
Implement CI/CD with Git and Jenkins
The guide details how you can create three basic Jenkins jobs to implement a Continuous Integration/Continuous Delivery (CI/CD) process. These jobs are as follows:
- For testing Git commits
- For releasing Business Process (BP) bundles to Nexus
- For publishing BP bundles to server Control Tower
Actually, you need to create a single configurable Jenkins job with three parameters allowing to execute it in the three modes:
- Build
- Release
- Deploy to CT
Required software
WorkFusion provides a CI/CD solution based on the technology stack:
- Git
- Maven
- Nexus
- Jenkins
- Azul Zulu OpenJDK 8.x
If you want to use a toolset different from the one recommended above, it is your call to wire them together to establish an automated CI/CD process. The particular OpenJDK version is required to provide the compatibility of the CI/CD pipeline with WorkFusion-based development projects.
Recommended integration server details
note
The current guide is created considering the usage of Ubuntu Linux as OS for the integration server where CI/CD tools are installed, configured, and executed. Hence, the commands below are for Ubuntu Linux. If you have any other Linux distribution, ask your system administrators to install the components.
The setup was tested on a simple server with 2 CPUs (3.1 GHz) and 4 GB of RAM.
Start with the following:
- Access the OS instance on the server via SSH using the terminal or a Putty SSH client.
- Download and install Azul Zulu OpenJDK 8.x.
tip
Mind that instances (servers) with installed Control Tower, Jenkins, and Nexus should be visible to each other (server IP addresses can be cross-"ping-ed").
Installing and configuring tools
Install Git
If you do not have an installed version control server to hold the project source code, you can set up Git version control on the same server as Jenkins.
You can install community versions of GitLab or a trial version of the Bitbucket server. This guide offers a simple Git-as-a-server installation.
Here's the easiest way of setting up a Git server. It is available via the Git protocol. The advantage of the method is that the protocol requires no authorization. Thus, if the server is public, the source is available to anyone who knows the URL.
To manually install Git as a service, follow the steps below:
Install Git.
sudo apt-get install git-coreConfirm the installation.
git --versionIn the response, you will see something similar to this, depending on the version of the installed package:
git version 2.17.1
Configure Git SSH access
Set up a home directory:
sudo useradd -r -m -U -d /home/git -s /bin/bash gitThe user home directory is set to
/home/git. All repositories are stored under this directory. No password is set for the"git"user. The login is available only using SSH keys.Switch to the
"git"user by executing thesucommand:sudo su - gitRun the following commands to create an SSH directory and set correct permissions:
mkdir -p ~/.ssh && chmod 0700 ~/.sshCreate a file named
~/.ssh/authorized_keysthat holds the authorized users' SSH keys:bash touch ~/.ssh/authorized_keys && chmod 0600 ~/.ssh/authorized_keys
The server setup is complete. You are now ready to create your first Git repository.
To initiate a new empty repository, run the following command under the "git" user:
git init --bare ~/projectname.git
Configure access to remote Git
To push local Git changes to the Git server, add the local user's SSH public key to the authorized_keys file of the remote "git" user.
If you already have an SSH key pair created in your local system, get a public key:
For Windows, find the
id_rsa.pubfile in youruser_directory/ssh/.For Linux, execute the following command:
cat ~/.ssh/id_rsa.pub
Generate SSH key pair in Linux
To generate an SSH key pair, Linux users should follow the steps below:
Open the terminal on your local computer and enter the following command:
ssh-keygen -t rsa -b 4096 -C "your_email@domain.com"Associating the key with your email address helps you to identify the key later. You'll see a response similar to this:
Generating a public/private rsa key pair. Enter file in which to save the key (/Users/username/.ssh/id_rsa):Press Enter to accept the default location and filename. If the
.sshdirectory doesn't exist, the system creates one for you.Enter and re-enter a passphrase when prompted. The whole interaction looks similar to this:
  Generating public/private rsa key pair.
    Enter file in which to save the key (/home/username/.ssh/id_rsa):
    Enter passphrase (empty for no passphrase):
    Enter same passphrase again:
    Your identification has been saved in /home/username/.ssh/id_rsa.
    Your public key has been saved in /home/username/.ssh/id_rsa.pub.
    The key fingerprint is:
    SHA256:Up6KjbnEV4Hgfo75YM393QdQsK3Z0aTNBz0DoirrW+c username@klar
    The key\'s randomart image is:
    +---[RSA 2048]----+
    |    .      ..oo..|
    |   . . .  . .o.X.|
    |    . . o.  ..+ B|
    |   .   o.o  .+ ..|
    |    ..o.S   o..  |
    |   . %o=      .  |
    |    @.B...     . |
    |   o.=. o. . .  .|
    |    .oo  E. . .. |
    +----[SHA256]-----+
Generate SSH key pair in Windows
To generate an SSH key pair, Windows users should follow the steps below:
Log in to your local computer as an Administrator.
In the command prompt, run:
ssh-keygen -t rsa -C "your_email@example.com"Associating the key with your email address helps you to identify the key later.
Note that the
ssh-keygencommand is only available if you have already installed Git (with Git Bash). You'll see a response similar to this:Generating public/private rsa key pair. Enter file in which to save the key (c/Users/ASUS/.ssh/id_rsa):Press Enter to accept the default location and filename. If the
.sshdirectory doesn't exist, the system creates one for you.Enter and re-enter a passphrase when prompted. The whole interaction looks similar to this.
Generating public/private rsa key pair.
Enter file in which to save the key (/c/Users/ASUS/.ssh/id_rsa): /c/Users/ASUS/.ssh/
Enter passphrase (empty for no passphrase):
Enter same passphrase again:
Your identification has been saved in /c/Users/ASUS/.ssh/
Your public key has been saved in /c/Users/ASUS/.ssh/
The key fingerprint is:
SHA256:jieniOIn20935n0awtn04n002HqEIOnTIOnevHzaI5nak ASUS@periwinkle
The key\'s randomart image is:

    +---[RSA 2048]----+
    |*= =+.           |
    |O*=.B            |
    |+*o* +           |
    |o +o.  .         |
    | ooo  + S        |
    | .o.ooo* o       |
    |  .+o+*oo .      |
    |   .=+..         |
    |   Eo            |
    +----[SHA256]-----+
Copy the output from the
catcommand above and go back to the Git server console.On the server, open your text editor and paste the public key you copied from your local machine into the
~/.ssh/authorized_keysfile:sudo nano /home/git/.ssh/authorized_keysnote
If running a command using a
gituser can require a password, you should run it with your login user with thesudopermissions. The entire public key text should be on a single line.The instruction assumes that the Git package is already installed on your local machine. If not, install it in the same way as explained in the previous sections.
If you have an existing unversioned project, navigate to the project directory. If you are starting from scratch, create a project directory, navigate to it, and initialize a Git repository.
cd /path/to/local/project
git init .
Add the git remote to your local repository.
git remote add origin git@git_server_ip:projectname.git
Get external IP
To find out the external IP of an instance, use any of these commands if you have Internet access:
curl ifconfig.me
curl icanhazip.com
curl ipecho.net/plain
curl ifconfig.co
Otherwise, ask your system administrator about your internal server IP.
Now, you can create any file in this directory, commit it, and push to the remote repo using your favorite tool or terminal commands.
touch test_file
git add .
git commit -m "descriptive message"
git push -u origin master
Install GitLab and Bitbucket
As a Git server alternative, you can also install community versions of GitLab or a trial version of the Bitbucket server.
Create repositories for CI pipeline
For correct implementation of a CI pipeline, create two repositories:
- For Jenkins pipeline libraries
- For your Digital Worker implementation
Creating repo for Jenkins pipeline libraries
Go to the server that hosts Git and create a remote repo:
sudo su - git git init --bare ~/common-build-library.gitOn your local machine, create the same repo:
mkdir common-build-library
cd common-build-library/
git init .
git remote add origin git@git_server_ip:common-build-library.git
Extract the contents of
jenkins-common-libraries.zipto the newly created repo directory.Commit and push to the remote Git:
git add .
git commit -m "commit message"
git push -u origin master
Creating repo for Digital Worker implementation
Go to the server that hosts Git and then create a remote repo:
sudo su - git
git init --bare ~/usecase-project.git
On your local machine, create the same repo:
mkdir usecase-project
cd usecase-project/
git init .
git remote add origin git@git_server_ip:usecase-project.git
Create a project from an Archetype.
Commit and push to remote Git.
git add .
git commit -m "commit message"
git push -u origin master
Install and configure Jenkins
To install Jenkins, follow the steps below:
Download the Jenkins installation package from https://jenkins.io/download/ and install it manually:
curl -# -o jenkins_2.190.2_all.deb https://prodjenkinsreleases.blob.core.windows.net/debian-stable/jenkins_2.190.2_all.deb
sudo apt install -f jenkins_2.190.2_all.deb
Alternatively, use a repository:
wget -q -O - https://pkg.jenkins.io/debian-stable/jenkins.io.key | sudo apt-key add - sudo sh -c 'echo deb http://pkg.jenkins.io/debian-stable binary/ > /etc/apt/sources.list.d/jenkins.list' deb https://pkg.jenkins.io/debian-stable binary/ sudo apt-get update sudo apt-get install jenkinsChange the default port by editing
/etc/default/jenkins:nano /etc/default/jenkinsChange the
HTTP_PORTproperty. As a result, the file should contain the following:HTTP_PORT=$SELECTED_PORT_VALUESave the file by pressing Ctrl+O and exit the file by pressing Ctrl+X.
Start Jenkins
Run the command to start Jenkins.
sudo systemctl start jenkins
sudo systemctl status jenkins
If everything goes well, the beginning of the output shows that the service is active and configured to start at boot.
● jenkins.service - LSB: Start Jenkins at boot time
       Loaded: loaded (/etc/init.d/jenkins; generated)
       Active: active (exited) since Mon 2018-07-09 17:22:08 UTC; 6min ago
         Docs: man:systemd-sysv-generator(8)
        Tasks: 0 (limit: 1153)
       CGroup: /system.slice/jenkins.service
Optional: open the firewall, if required. By default, Jenkins runs on the
8080port, so it's necessary to open the port using theufwcommand.sudo ufw allow 8080 sudo ufw statusIf
ufwis inactive, the following commands allow OpenSSH and enable the firewall.sudo ufw allow 22 sudo ufw allow OpenSSH sudo ufw enable
Configure Jenkins
To set up your installation, open Jenkins on its default port,
8080, using your server domain name or IP address:http://your_server_ip_or_domain:8080.To find the external instance IP, use any of these commands if you have Internet access:
curl ifconfig.me
curl icanhazip.com
curl ipecho.net/plain
curl ifconfig.co
Otherwise, ask your system administrator about your internal server IP.
You should see the Unlock Jenkins screen that displays the location of the initial password.
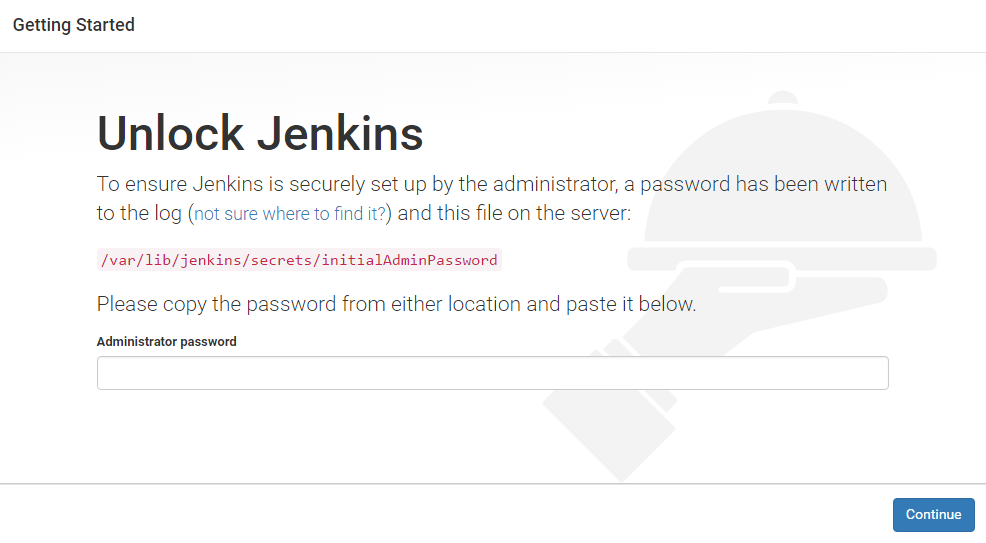
In the terminal window, use the
catcommand to display the password.sudo cat /var/lib/jenkins/secrets/initialAdminPasswordCopy the 32-character alphanumeric password from the terminal, paste it into the Administrator password field, and click Continue.
On the Customize Jenkins screen, click Install suggested plugins, which immediately begins the installation process.
When the installation is complete, you are prompted to set up the first administrative user. It’s possible to skip the step and continue as admin using the initial password used above, but our recommendation is to take a moment and create the user as described below:
important
The default Jenkins server is NOT encrypted, so the data submitted with this form is not protected. When you’re ready to use the installation, refer to How to Configure Jenkins with SSL Using an Nginx Reverse Proxy on Ubuntu 18.04. This protects the user credentials and the build information transmitted via the web interface.
In the Create First Admin User window, enter the Username and Password for your user. Click Save and Continue.
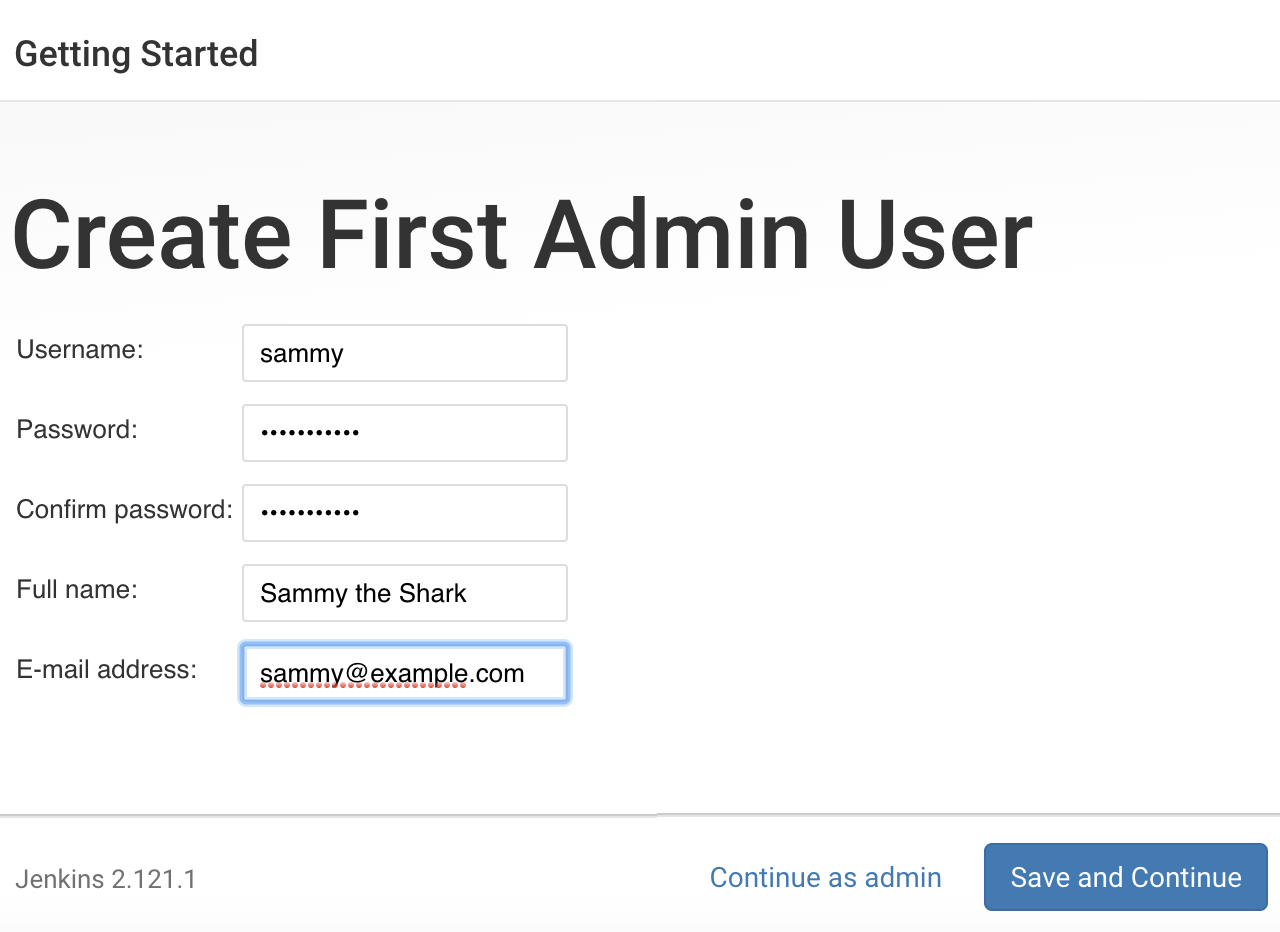
In the Instance Configuration window, enter the preferred Jenkins URL for your Jenkins instance. Confirm either the domain name for your server or your server’s IP address. For example, http://jenkins.example.com or http://203.0.113.0:8080.
Click Save and Finish. You will see a confirmation page stating "Jenkins is Ready!".
Click Start using Jenkins to open the Jenkins dashboard.
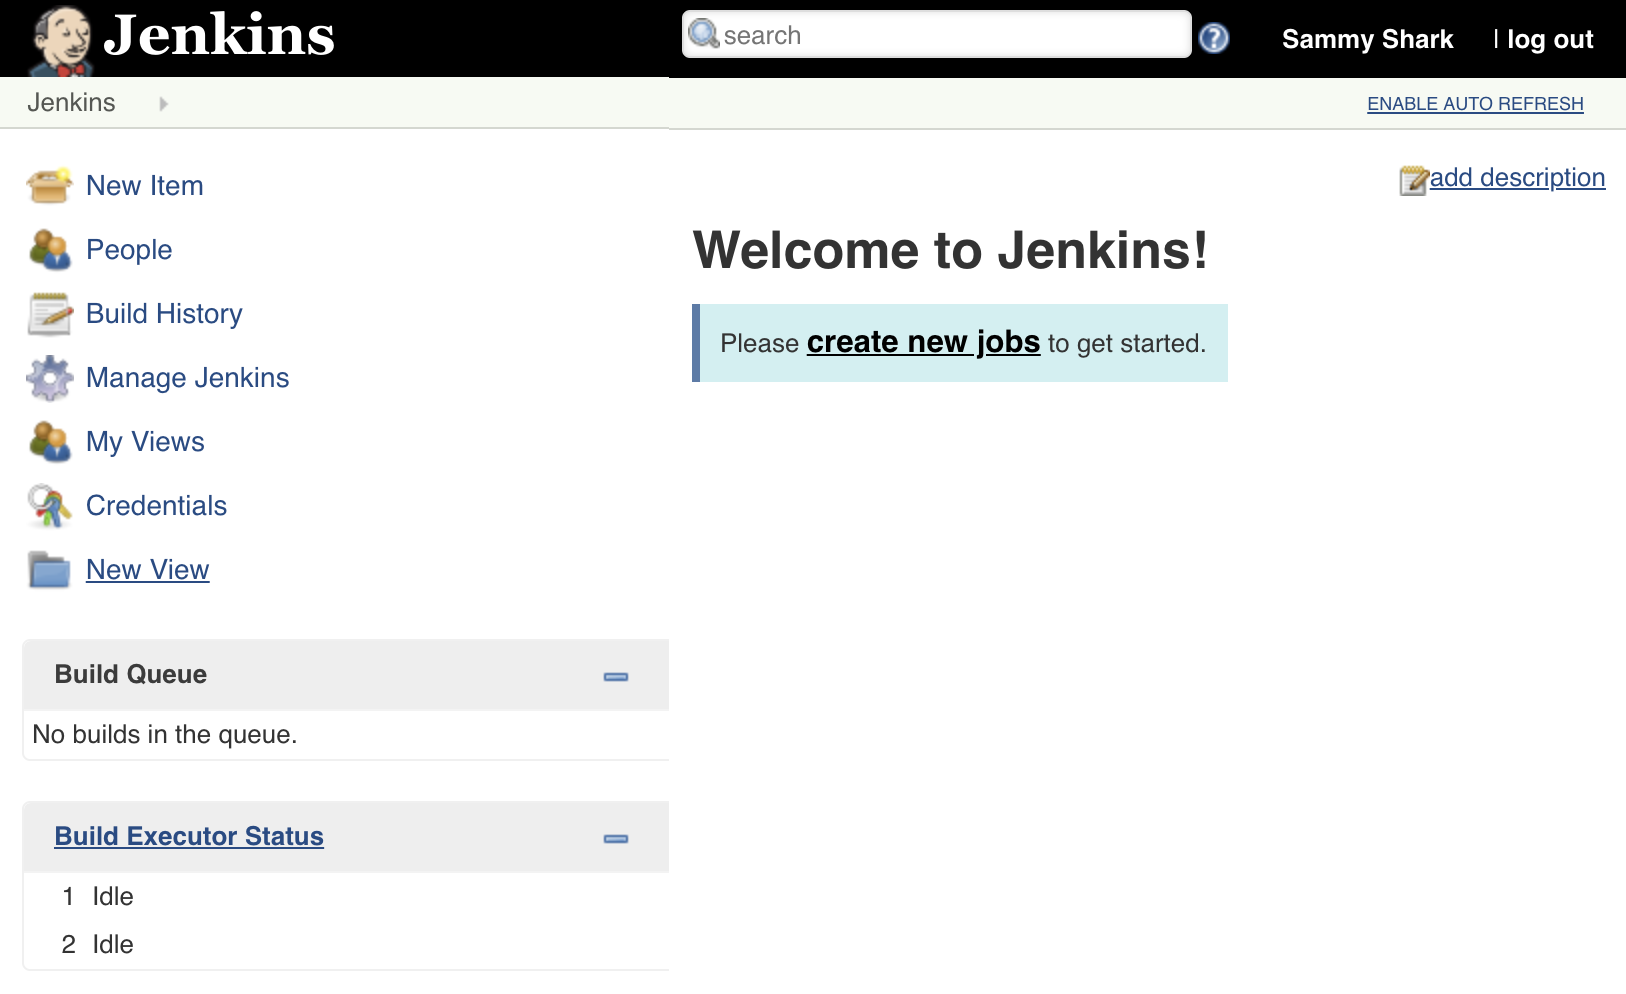
If you see an empty page after login, try restarting the Jenkins service with the following command:
sudo systemctl restart jenkins
Install Jenkins plugins
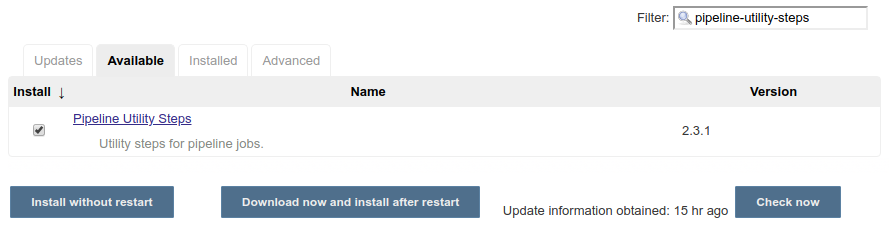
- In the left-side menu of the Jenkins main page, click Manage Jenkins > Manage Plugins.
- On the Available tab, find the following plugins using the search bar and select respective checkboxes:
Config File Provider plugin.
Rebuilder allows rebuilding a job using the same parameters.
Pipeline Utility Steps for extra capabilities in pipelines.
Badge plugin to improve error messaging (search query: "add badges").
Slack Notification plugin if you're planning to use Slack notifications.
Configure Maven and JDK in Jenkins
On the Jenkins main screen, click Manage Jenkins > Global Tool Configuration.
In the JDK section, specify the existing Maven installation and deselect Install Automatically. Set up JDK8 as Name.
note
JAVA_HOMEshould be set according to the system setup.In the Maven section, click Add Maven. By default, Maven is installed from the Apache site. Insert
Maven3.6.3as Name.Select Install automatically.
In the Version dropdown, select
3.6.3.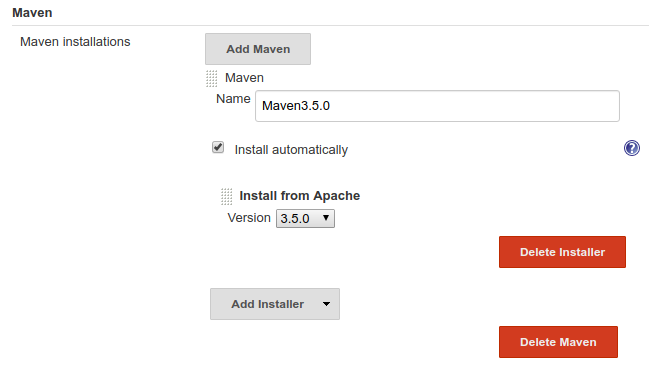
Click Save.
Create build job
Add build script to your codebase
If you are starting a new project, use the Archetypes from the https://repository.workfusion.com/content/repositories/archetypes projects created from the latest versions of these Archetypes that already contain the
build.groovyfile with a pipeline.If you already have a codebase, add the build script manually:
See code snippet
    @Library('common-build-library') _
    pipeline {

        agent any

        tools {
            jdk 'JDK8'
            maven 'Maven3.6.3'
        }

        parameters {
            booleanParam(name: 'DEPLOY_TO_CT', defaultValue: false, description: 'Deploy to Control Tower. False by default.')
            booleanParam(name: 'RELEASE', defaultValue: false, description: 'Release bundle and deploy it to nexus. Bundle will be deployed to nexus. False by default.')
            string(name: 'SLACK_CHANNEL', defaultValue: '', description: 'Slack channel for sending notifications about build status. IF empty - no slack notifications will be sent')
            string(name: 'EMAILS', defaultValue: '', description: 'Comma separated list of emails for sending notifications about build status. IF empty - no slack notifications will be sent')
        }

        options {
            buildDiscarder(logRotator(numToKeepStr: '10', daysToKeepStr: '60'))
        }

        stages {

            stage('Notify started') {
                steps {
                    notifySlack("started (${buildCause()})", 'lightskyblue', this)
                    notifyEmail("started (${buildCause()})", this)
                }
            }

            stage('Build') {
                when {
                    expression { return !params.RELEASE }
                }
                steps {
                    failWhen condition: readMavenPom(file: 'pom.xml').with {
                        it.version?.trim()
                    }, message: 'Root pom.xml file should contains version. Fix inconsistency in pom.xml.'

                    buildWithMaven configId: 'maven-settings', goals: ['clean', 'install'], jvmParameters: [skipObfuscation: 'true']
                }
            }

            stage('deploy to CT') {
                when {
                    expression { return params.DEPLOY_TO_CT }
                }
                steps {
                    failWhen condition: readMavenPom(file: 'pom.xml').with {
                        it.version?.trim()
                    }, message: 'Root pom.xml file should contains version. Fix inconsistency in pom.xml.'

                    failWhen condition: mavenVersion().endsWith('-SNAPSHOT'), message: 'Cannot deploy snapshot artifact. Fix project version in pom.xml.'

                    // Place your bundle sub-module name here
                    dir('package-folder-name') {
                        buildWithMaven configId: 'maven-settings', clean: false, goals: ['bundle:import']
                    }
                }
            }

            stage('Release') {
                when {
                    expression { return params.RELEASE }
                }
                stages {
                    stage('Build and Deploy release') {
                        steps {
                            failWhen condition: readMavenPom(file: 'pom.xml').with {
                                it.version?.trim()
                            }, message: 'Root pom.xml file should contains version. Fix inconsistency in pom.xml.'

                            failWhen condition: mavenVersion().endsWith('-SNAPSHOT'), message: 'Cannot deploy snapshot artifact. Fix project version in pom.xml.'

                            // Place your bundle sub-module name here
                            dir('rpa-bundle-quickstart-test-package') {
                                buildWithMaven configId: 'maven-settings', goals: ['clean', 'deploy']
                            }
                        }
                    }

                    stage('Make a tag and push') {
                        steps {
                            shellScript "git tag ${mavenVersion()}"
                            shellScript 'git push --tags'
                        }
                    }
                }
            }

        }

        post {
            success {
                notifySlack('is successful', 'forestgreen', this)
                notifyEmail('is successful', this)
            }
            unstable {
                notifySlack('is unstable', 'red', this)
                notifyEmail('is unstable', this)
            }
            failure {
                notifySlack('failed', 'red', this)
                notifyEmail('failed', this)
            }
            aborted {
                notifySlack('was aborted', 'red', this)
                notifyEmail('was aborted', this)
            }
        }
    }

    def notifySlack(String buildMessage, String color, def script) {
        final String slackChannel = script.params.SLACK_CHANNEL
        if (slackChannel.isEmpty()) {
            return
        }
        withCredentials([string(credentialsId: 'slack_auth', variable: 'SLACK_AUTH_PSW')]) {
            script.slackMessage(buildMessage: buildMessage, color: color, token: SLACK_AUTH_PSW, channel: slackChannel)
        }
    }

    def notifyEmail(String buildMessage, def script) {
        final def env = script.env
        if (emails.isEmpty()) {
            return
        }
        script.emailext(
                subject: "'${env.JOB_NAME} [${env.BUILD_NUMBER}]' ${buildMessage} ",
                to: params.EMAILS,
                body: """
    '${env.JOB_NAME} [${env.BUILD_NUMBER}]' ${buildMessage} :
    Check console output at "${env.JOB_NAME} [${env.BUILD_NUMBER}]"

    """
        )

    }
Add your bundle sub-module name in lines 54 and 75. Then, add the
build.groovyfile with the content to the root folder of your project, commit, and push it to the Git repository.
Configure credentials
- On the main Jenkins page, in the left menu, click Credentials.
- In the Stores scoped to Jenkins section, click Global Credentials.
- In the right-hand menu, click Add Credentials.
- If you are using a Git server with HTTPS access:
- In the Kind drop-down box, select Username with password.
- Type in your username and password for the Git account and credentials ID to have access to the credentials while configuring a build job. Then, click OK.
- If you are using a Git server with SSH access:
Generate an SSH key pair for using it as Jenkins credentials.
Create a directory for keeping the SSH RSA Keys file and navigate to the newly-created directory.
mkdir -p ~/ssh-rsa-keys && cd ~/ssh-rsa-keysCreate SSH RSA Keys in the PEM file format inside the newly created directory.
ssh-keygen -t rsa -b 4096 -C "git ssh keys" -f gitcreds.pemEnter a passphrase if asked or leave it blank.
Upon completion, the command creates two files: private key and public key. The one that has the PUB file extension refers to the public key file whereas the other is the private key file. Get the public key and copy it.
cat gitcreds.pem.pubPaste to the
authorized_keyslist.sudo su - git nano .ssh/authorized_keysGo to the private key and copy the value.
cat gitcreds.pemSelect configuring access via SSH, use the username, private key, and passphrase generated during Git setup. Use the
gitcreds.pemcontent as a private key from the previous item.
Create new directory for handling Jenkins common libraries
- On the main Jenkins page, click New Item.
- Enter the folder name and select Folder.
- Click OK.
Add jenkins-common-libraries to created directory
Go to the newly created folder.
Click Configure.
In the Pipeline Libraries section, click Add.
Insert
common-build-libraryas the name andmasteras the default version.In the Retrieval method section, select Modern SCM.
In the Source Code Management section, select Git.
Enter the
common-build-library.gitrepo URL (created earlier) and select git credentials from the list.tip
If Git and Jenkins are hosted on the same system, use 127.0.0.1 as the Git server IP.
Click Save.
Create config file for using in Maven build
Let's create all the necessary credentials to be used in a build:
In the created folder, click Credentials in the left menu.
Click Global > Add Credentials.
Add the Control Tower deploy credentials:
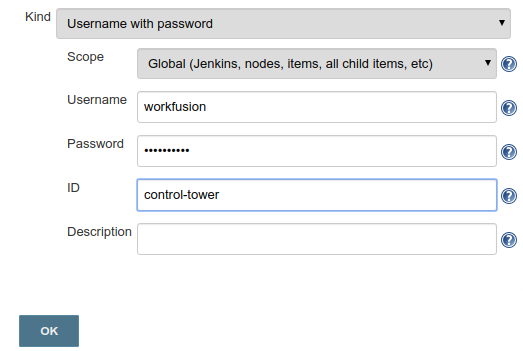
Select the Username with password credentials kind and insert your login and password to the Control Tower instance.
Use
control-toweras credentials ID.Click OK.
Add Nexus repository credentials:
Select Username with password credentials kind and insert your login and password to the Nexus Repository instance.
Use
nexus-repositoryas credentials ID.Click OK.
Optional: add Slack credentials if Slack notifications are available and required. Select the Secret text credentials type and insert your Slack authentication token. Use
slack_authas credentials id. Click OK.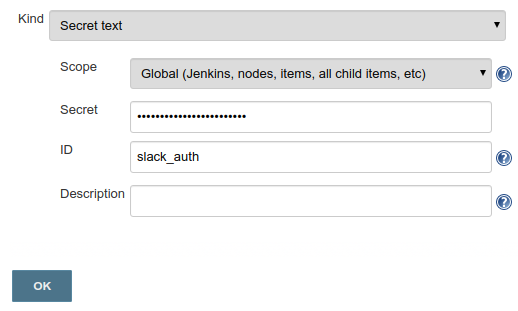
Add the Maven config file:
- Go to the created build folder and click Config Files.
- Click the Add a new Config link.
- Select
Maven settings.xml. - Enter
maven-settingsas ID and click Submit. - In the Edit Configuration File window > Configuration, click Add for the Server Credentials item.
- Insert
bcb-repositoryServerId, selectdeploycredentials, and click Add. - Insert
wf-dependenciesServerId, selectdeploycredentials, and click Add. - Insert
control-towerServerId, selectdeploycredentials, and click Add. - Click Submit.
Create and run build job
In the
business-process-buildfolder, click Create new jobs.Enter a job name, select Multibranch Pipeline, and click OK.
Enter Display Name for the job, for example, Build business process bundle.
In the Branch Sources section, select Git.
Add a link to the Git repository with your BP bundle and select git credentials.
tip
If Git and Jenkins are hosted on the same system, use 127.0.0.1 as the Git server IP.
Insert build.groovy as Script Path.
In the Scan Multibranch Pipeline Triggers, configure build scheduling. The interval should be according to your project requirements.
On the first script launch, you get an error with the following stack trace:
Error message
java org.jenkinsci.plugins.scriptsecurity.sandbox.RejectedAccessException: Scripts not permitted to use method hudson.model.Cause getShortDescription at org.jenkinsci.plugins.scriptsecurity.sandbox.whitelists.StaticWhitelist.rejectMethod(StaticWhitelist.java:262) at org.jenkinsci.plugins.scriptsecurity.sandbox.groovy.SandboxInterceptor.onMethodCall(SandboxInterceptor.java:161) at org.kohsuke.groovy.sandbox.impl.Checker$1.call(Checker.java:158) at org.kohsuke.groovy.sandbox.impl.Checker.checkedCall(Checker.java:161. at org.kohsuke.groovy.sandbox.impl.Checker$checkedCall$1.callStatic(Unknown Source) at org.codehaus.groovy.runtime.callsite.CallSiteArray.defaultCallStatic(CallSiteArray.java:56) at org.codehaus.groovy.runtime.callsite.AbstractCallSite.callStatic(AbstractCallSite.java:194) at buildCause$_getBuildUser_closure1.doCall(buildCause.groovy:7) at sun.reflect.NativeMethodAccessorImpl.invoke0(Native Method) at sun.reflect.NativeMethodAccessorImpl.invoke(NativeMethodAccessorImpl.java:62) at sun.reflect.DelegatingMethodAccessorImpl.invoke(DelegatingMethodAccessorImpl.java:43) at java.lang.reflect.Method.invoke(Method.java:491. at org.codehaus.groovy.reflection.CachedMethod.invoke(CachedMethod.java:93) at groovy.lang.MetaMethod.doMethodInvoke(MetaMethod.java:321. at org.codehaus.groovy.runtime.metaclass.ClosureMetaClass.invokeMethod(ClosureMetaClass.java:294) at groovy.lang.MetaClassImpl.invokeMethod(MetaClassImpl.java:1022) at groovy.lang.Closure.call(Closure.java:414) at groovy.lang.Closure.call(Closure.java:430) at org.codehaus.groovy.runtime.DefaultGroovyMethods.collect(DefaultGroovyMethods.java:3202) at org.codehaus.groovy.runtime.DefaultGroovyMethods.collect(DefaultGroovyMethods.java:3172) at com.cloudbees.groovy.cps.CpsDefaultGroovyMethods.collect(CpsDefaultGroovyMethods.java:399) at sun.reflect.NativeMethodAccessorImpl.invoke0(Native Method) at sun.reflect.NativeMethodAccessorImpl.invoke(NativeMethodAccessorImpl.java:62) at sun.reflect.DelegatingMethodAccessorImpl.invoke(DelegatingMethodAccessorImpl.java:43) at java.lang.reflect.Method.invoke(Method.java:491. at org.codehaus.groovy.runtime.metaclass.ReflectionMetaMethod.invoke(ReflectionMetaMethod.java:54) at org.codehaus.groovy.runtime.metaclass.NewInstanceMetaMethod.invoke(NewInstanceMetaMethod.java:56) at groovy.lang.MetaMethod.doMethodInvoke(MetaMethod.java:325) at groovy.lang.MetaClassImpl.invokeMethod(MetaClassImpl.java:1213) at groovy.lang.MetaClassImpl.invokeMethod(MetaClassImpl.java:1022) at org.codehaus.groovy.runtime.callsite.PojoMetaClassSite.call(PojoMetaClassSite.java:47) at org.codehaus.groovy.runtime.callsite.CallSiteArray.defaultCall(CallSiteArray.java:48) at org.codehaus.groovy.runtime.callsite.AbstractCallSite.call(AbstractCallSite.java:113) at org.kohsuke.groovy.sandbox.impl.Checker$1.call(Checker.java:160) at org.kohsuke.groovy.sandbox.GroovyInterceptor.onMethodCall(GroovyInterceptor.java:23) at org.jenkinsci.plugins.scriptsecurity.sandbox.groovy.SandboxInterceptor.onMethodCall(SandboxInterceptor.java:107) at org.kohsuke.groovy.sandbox.impl.Checker$1.call(Checker.java:158) at org.kohsuke.groovy.sandbox.impl.Checker.checkedCall(Checker.java:161. at org.kohsuke.groovy.sandbox.impl.Checker$checkedCall$1.callStatic(Unknown Source) at org.codehaus.groovy.runtime.callsite.CallSiteArray.defaultCallStatic(CallSiteArray.java:56) at org.codehaus.groovy.runtime.callsite.AbstractCallSite.callStatic(AbstractCallSite.java:194) at buildCause.getBuildUser(buildCause.groovy:7) at sun.reflect.NativeMethodAccessorImpl.invoke0(Native Method) at sun.reflect.NativeMethodAccessorImpl.invoke(NativeMethodAccessorImpl.java:62) at sun.reflect.DelegatingMethodAccessorImpl.invoke(DelegatingMethodAccessorImpl.java:43) at java.lang.reflect.Method.invoke(Method.java:491. at org.codehaus.groovy.reflection.CachedMethod.invoke(CachedMethod.java:93) at groovy.lang.MetaMethod.doMethodInvoke(MetaMethod.java:321. at groovy.lang.MetaClassImpl.invokeMethod(MetaClassImpl.java:1213) at groovy.lang.MetaClassImpl.invokeMethod(MetaClassImpl.java:1022) at org.codehaus.groovy.runtime.callsite.PogoMetaClassSite.call(PogoMetaClassSite.java:42) at org.codehaus.groovy.runtime.callsite.CallSiteArray.defaultCall(CallSiteArray.java:48) at org.codehaus.groovy.runtime.callsite.AbstractCallSite.call(AbstractCallSite.java:113) at org.kohsuke.groovy.sandbox.impl.Checker$1.call(Checker.java:160) at org.kohsuke.groovy.sandbox.GroovyInterceptor.onMethodCall(GroovyInterceptor.java:23) at org.jenkinsci.plugins.scriptsecurity.sandbox.groovy.SandboxInterceptor.onMethodCall(SandboxInterceptor.java:157) at org.kohsuke.groovy.sandbox.impl.Checker$1.call(Checker.java:158) at org.kohsuke.groovy.sandbox.impl.Checker.checkedCall(Checker.java:161. at com.cloudbees.groovy.cps.sandbox.SandboxInvoker.methodCall(SandboxInvoker.java:17) at buildCause.call(buildCause.groovy:2) at WorkflowScript.run(WorkflowScript:26) at org.jenkinsci.plugins.pipeline.modeldefinition.ModelInterpreter.delegateAndExecute(ModelInterpreter.groovy:140) at org.jenkinsci.plugins.pipeline.modeldefinition.ModelInterpreter.executeSingleStage(ModelInterpreter.groovy:663) at org.jenkinsci.plugins.pipeline.modeldefinition.ModelInterpreter.catchRequiredContextForNode(ModelInterpreter.groovy:398) at org.jenkinsci.plugins.pipeline.modeldefinition.ModelInterpreter.catchRequiredContextForNode(ModelInterpreter.groovy:396) at org.jenkinsci.plugins.pipeline.modeldefinition.ModelInterpreter.executeSingleStage(ModelInterpreter.groovy:662) at org.jenkinsci.plugins.pipeline.modeldefinition.ModelInterpreter.evaluateStage(ModelInterpreter.groovy:291) at org.jenkinsci.plugins.pipeline.modeldefinition.ModelInterpreter.toolsBlock(ModelInterpreter.groovy:542) at ___cps.transform___(Native Method) at com.cloudbees.groovy.cps.impl.ContinuationGroup.methodCall(ContinuationGroup.java:86) at com.cloudbees.groovy.cps.impl.FunctionCallBlock$ContinuationImpl.dispatchOrArg(FunctionCallBlock.java:113) at com.cloudbees.groovy.cps.impl.FunctionCallBlock$ContinuationImpl.fixArg(FunctionCallBlock.java:83) at sun.reflect.GeneratedMethodAccessor495.invoke(Unknown Source) at sun.reflect.DelegatingMethodAccessorImpl.invoke(DelegatingMethodAccessorImpl.java:43) at java.lang.reflect.Method.invoke(Method.java:491. at com.cloudbees.groovy.cps.impl.ContinuationPtr$ContinuationImpl.receive(ContinuationPtr.java:72) at com.cloudbees.groovy.cps.impl.PropertyishBlock$ContinuationImpl.get(PropertyishBlock.java:76) at com.cloudbees.groovy.cps.LValueBlock$GetAdapter.receive(LValueBlock.java:30) at com.cloudbees.groovy.cps.impl.PropertyishBlock$ContinuationImpl.fixName(PropertyishBlock.java:66) at sun.reflect.GeneratedMethodAccessor501.invoke(Unknown Source) at sun.reflect.DelegatingMethodAccessorImpl.invoke(DelegatingMethodAccessorImpl.java:43) at java.lang.reflect.Method.invoke(Method.java:491. at com.cloudbees.groovy.cps.impl.ContinuationPtr$ContinuationImpl.receive(ContinuationPtr.java:72) at com.cloudbees.groovy.cps.impl.ConstantBlock.eval(ConstantBlock.java:21) at com.cloudbees.groovy.cps.Next.step(Next.java:83) at com.cloudbees.groovy.cps.Continuable$1.call(Continuable.java:174) at com.cloudbees.groovy.cps.Continuable$1.call(Continuable.java:163) at org.codehaus.groovy.runtime.GroovyCategorySupport$ThreadCategoryInfo.use(GroovyCategorySupport.java:129) at org.codehaus.groovy.runtime.GroovyCategorySupport.use(GroovyCategorySupport.java:268) at com.cloudbees.groovy.cps.Continuable.run0(Continuable.java:163) at org.jenkinsci.plugins.workflow.cps.SandboxContinuable.access$001(SandboxContinuable.java:18) at org.jenkinsci.plugins.workflow.cps.SandboxContinuable.run0(SandboxContinuable.java:51) at org.jenkinsci.plugins.workflow.cps.CpsThread.runNextChunk(CpsThread.java:186) at org.jenkinsci.plugins.workflow.cps.CpsThreadGroup.run(CpsThreadGroup.java:370) at org.jenkinsci.plugins.workflow.cps.CpsThreadGroup.access$200(CpsThreadGroup.java:93) at org.jenkinsci.plugins.workflow.cps.CpsThreadGroup$2.call(CpsThreadGroup.java:282) at org.jenkinsci.plugins.workflow.cps.CpsThreadGroup$2.call(CpsThreadGroup.java:270) at org.jenkinsci.plugins.workflow.cps.CpsVmExecutorService$2.call(CpsVmExecutorService.java:67) at java.util.concurrent.FutureTask.run(FutureTask.java:266) at hudson.remoting.SingleLaneExecutorService$1.run(SingleLaneExecutorService.java:131) at jenkins.util.ContextResettingExecutorService$1.run(ContextResettingExecutorService.java:28) at jenkins.security.ImpersonatingExecutorService$1.run(ImpersonatingExecutorService.java:59) at java.util.concurrent.Executors$RunnableAdapter.call(Executors.java:511) at java.util.concurrent.FutureTask.run(FutureTask.java:266) at java.util.concurrent.ThreadPoolExecutor.runWorker(ThreadPoolExecutor.java:1149) at java.util.concurrent.ThreadPoolExecutor$Worker.run(ThreadPoolExecutor.java:624) at java.lang.Thread.run(Thread.java:748)To solve the error, keep doing the following actions until the build successfully passes. The build script contains several Groovy calls that are now allowed by default.
- To allow it, go to the Jenkins main page and, in the left menu, select Manage Jenkins.
- In the Manage Jenkins menu, click In-process Script Approval.
- Click Approve for any existing approval requests.
After all the required signatures are approved, the list should contain the following lines:
java field hudson.model.Run project method hudson.model.Cause getShortDescription method hudson.model.Run getCauses method org.apache.maven.model.Model getVersion method org.jenkinsci.plugins.workflow.support.steps.build.RunWrapper getRawBuild staticMethod org.codehaus.groovy.runtime.DefaultGroovyMethods grep java.util.List
Notes and possible issues
- Check if the connections between the Jenkins instance and Control Tower are established. Otherwise, the publish to CT build step fails.
- Check if the connections between the Jenkins instance and Nexus are established. Otherwise, the release build step fails.
- If you are using a setup with Git and Jenkins on a single machine or using a simple Git setup with only SSH authorization, the release step can fail.
Error message
        @@@@@@@@@@@@@@@@@@@@@@@@@@@@@@@@@@@@@@@@@@@@@@@@@@@@@@@@@@@
        @    WARNING: REMOTE HOST IDENTIFICATION HAS CHANGED!     @
        @@@@@@@@@@@@@@@@@@@@@@@@@@@@@@@@@@@@@@@@@@@@@@@@@@@@@@@@@@@
        IT IS POSSIBLE THAT SOMEONE IS DOING SOMETHING NASTY!
        Someone could be eavesdropping on you right now (man-in-the-middle attack)!
        It is also possible that a host key has just been changed.
        The fingerprint for the ECDSA key sent by the remote host is
        SHA256:VwutoGKAXnaG1/RQ8HXhOY3RcaDV4WZepmQzxmj1Kws.
         contact your system administrator.
        Add correct host key in /var/lib/jenkins/.ssh/known_hosts to get rid of this message.
        Offending ECDSA key in /var/lib/jenkins/.ssh/known_hosts:1
          remove with:
          ssh-keygen -f "/var/lib/jenkins/.ssh/known_hosts" -R "127.0.0.1"
        ECDSA host key for 127.0.0.1 has changed and you have requested strict checking.
        Host key verification failed.
This means that Jenkins cannot be authorized via SSH and push a tag. To solve this, run the following command on an instance (you can find this command in an error message).
ssh-keygen -f "/var/lib/jenkins/.ssh/known_hosts" -R "127.0.0.1"
The IP can be changed depending on the Git server deploy point.