
BI Server installation
important
Run the WorkFusion Analytics Server installation as Windows Administrator.
Pre-installation requirements
Port configuration
Configure open ports on BI Server:
| App | Port |
|---|---|
| WorkFusion Analytics Server (installation with SSL) | 443 |
| WorkFusion Analytics Server (installation without SSL) | 8080 |
WorkFusion Analytics Server must have access to DB Server (DB_HOSTNAME) for the following applications:
| App | Default port |
|---|---|
| MySQL database | 3306 |
| PostgreSQL database (for Control Tower and WorkSpace) | 5432 |
Installation package download
Download the installation package (the URL is provided by the WorkFusion team): WorkFusionAnalyticsInstaller.zip containing two folders: WorkfusionAnalyticsServer and WorkfusionAnalyticsDesktop.
License keys
Get License keys for WorkFusion Analytics Server and Desktop from the WorkFusion team.
WorkFusion Analytics Server installation
The installation process can take about 15-20 minutes.
Download
WorkFusionAnalitycsInstaller.zip(the URL is provided by the WorkFusion team) and unpack the archive.Start the Command Prompt (cmd) and go to the WorkfusionAnalyticsServer folder in the unpacked installation package from the previous step.
Launch the installation Batch file (
install_server.bat) with the following parameters:INSTALL_DIRandAPP_HOSTNAME:install_server.bat ${INSTALL_DIR} ${APP_HOSTNAME}Example:
install_server.bat D:\WorkFusionServer wf.exapmle.comOpen Manager Product Keys and enter the license key: Start > All Programs > Manage Product Keys.
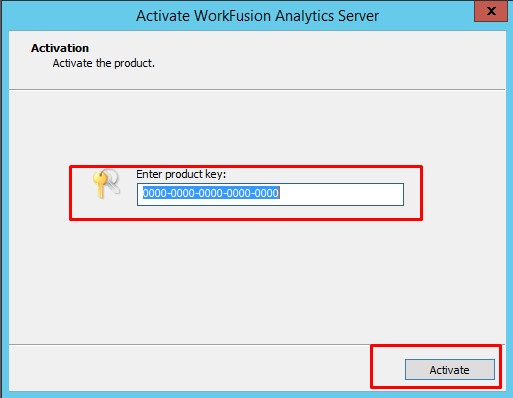
For more details on activation, refer to WorkFusion Analytics license.
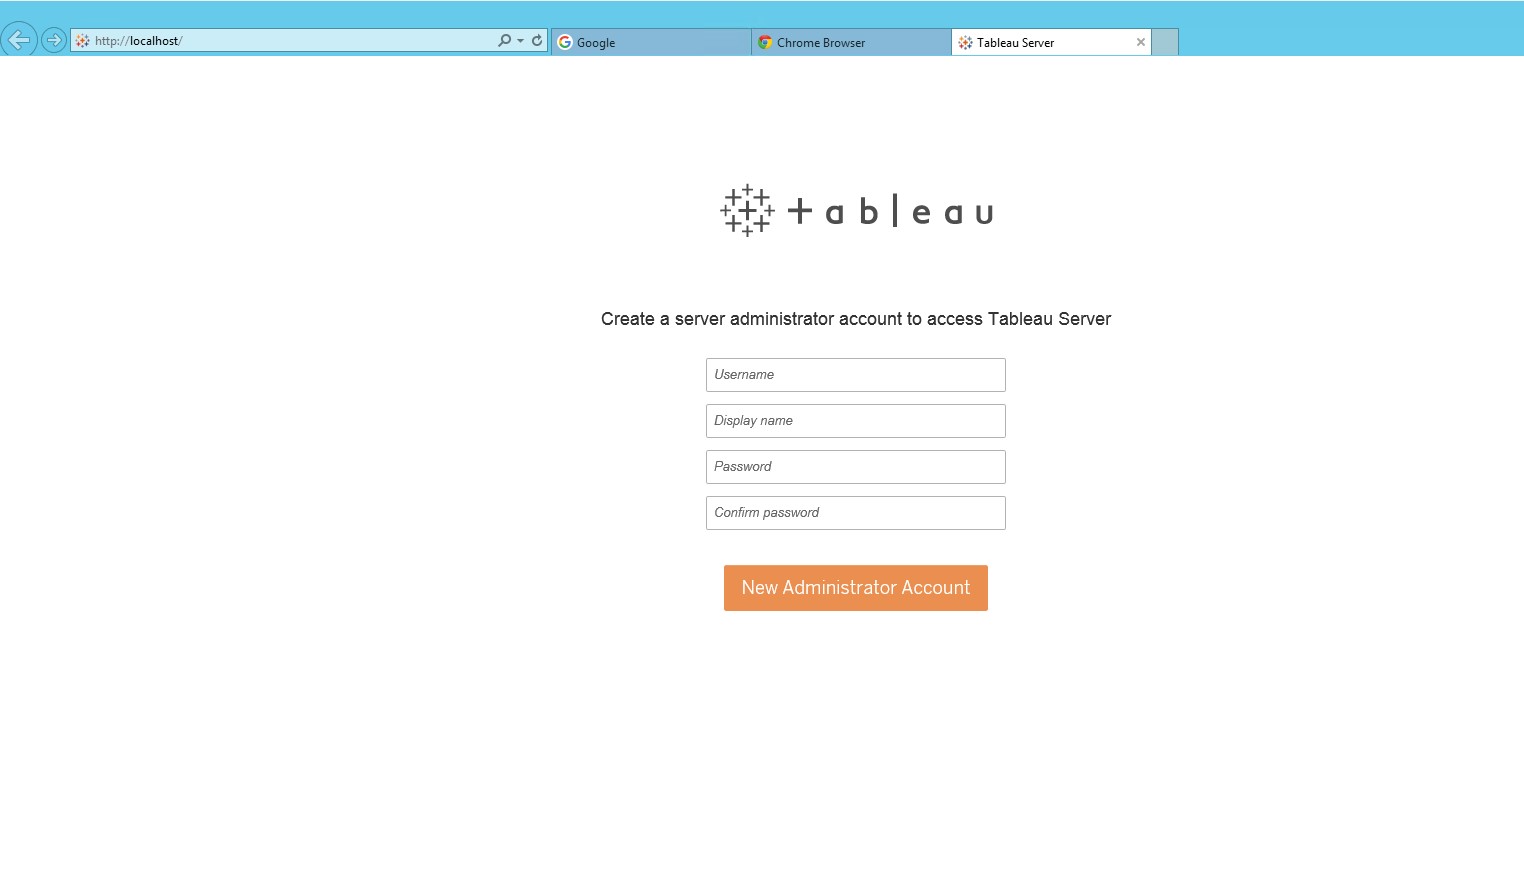
Open http://localhost in the browser on BI Server. Create a server administrator account.
caution
Do not use %, &, ^, or = characters and other special symbols in the password (the $ symbol is allowed).
WorkFusion Analytics Desktop installation
Download
WorkFusionAnalitycsInstaller.zip(the URL is provided by the WorkFusion team) and unpack the archive.Start the Command Prompt (cmd) and go to the
WorkfusionAnalyticsDesktopfolder in the unpacked installation package from the previous step.Launch the installation Batch file (
install_desktop.bat) with theinstallation directoryparameter:install_desktop.bat ${INSTALL_DIR}Example:
install_desktop.bat D:\WorkFusionDesktopStart WorkFusion Analytics Desktop using the Desktop shortcut and enter your license key.
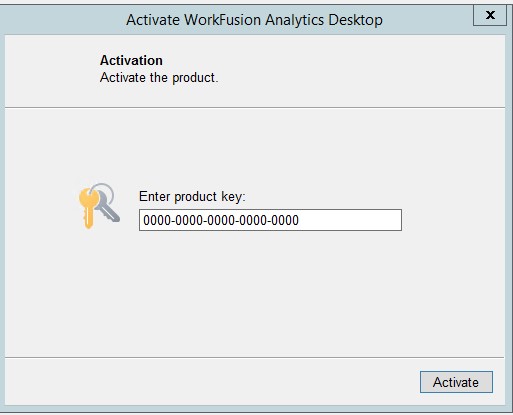
For more details on activation, refer to WorkFusion Analytics license.
SSL WorkFusion Analytics Server configuration
note
The step is optional.
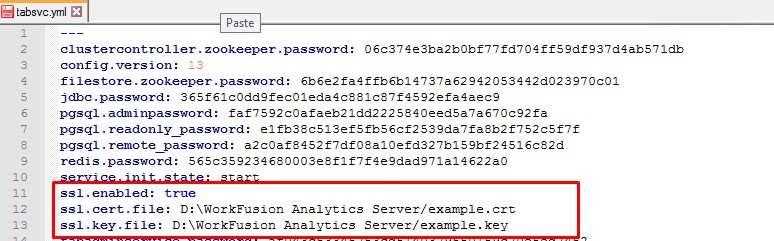
Add
INSTALL_DIR_WorkFusion Analytics Server/conf/tabsvc.ymlto the Tableau config on BI Server.ssl.enabled: true ssl.cert.file: < path to the certificate> ssl.key.file: < path to the key>Example:
Restart WorkFusion Analytics Server.
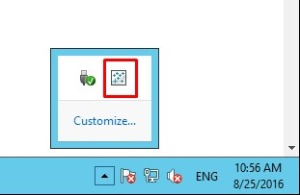
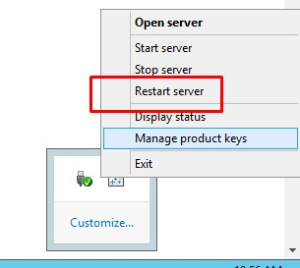
Deploy workbooks to WorkFusion Analytics Server
The section describes deployment of Tableau workbooks to Tableau 10 Server OEM (WorkFusion Analytics Machine).
Pre-deployment requirements
- Install Microsoft Server 2008 R2 or newer.
- Install WorkFusion Analytics Server 10.1 OEM or newer.
- Get installation packages from the WorkFusion team:
deploy_scripts.zip,dashboards.zip,wf_automation.zip.
Log in to the BI server using RDP where WorkFusion Analytics Server has been installed and follow the next steps:
Create folders for installation files
Create a folder
C:/tdeploy_home/install.Download the installation package
deploy_scripts.zip(provided by the WorkFusion team) and unpack intoC:/tdeploy_home/install.
Pre-installation directories after unpacking zip files:
c:\tdeploy_home
    \install    (file: install.cmd)
        \lib    (installation file pack)
Run installation
Open the Command Prompt and run the install.cmd command:
c:
cd \tdeploy_home\install
install.cmd c:\tdeploy_home
Created files and directories after install.cmd are as follows:
c:\tdeploy_home
    \deploy        (files: create_sitefolder.cmd, publish.cmd, manage_server.cmd)
        \config    (files: config._sample_.cmd, config._sample_WFA_.cmd, deploy_config.cmd, import_users.csv)
        \lib       (files: deploy_workbook.cmd, get_datetime.vbs, get_logfile.cmd, log_echo.cmd, replace_str.vbs)
        \to_deploy (empty)
        \deployed  (empty)
        \log       (empty)
The installation log file is created in C:\tdeploy_home\install\ named as install_YYYY-MMDD-HHMI.log.
Create folders for new site
c:
cd \tdeploy_home\deploy
create_sitefolder.cmd site_name
Where site_name is a part of the APP instance host. For example, if APP is hosted at https://wfapp.company.com/, the command parameter is wfapp. A site and a project with the same name are created on WorkFusion Analytics Server.
The command creates a new configuration files (copied from deploy/config/config._sample_.cmd and config._sample_WFA_.cmd) and a few new folders.
New files and directories after create_sitefloder.cmd are as follows:
c:\tdeploy_home
    \deploy
        \config
            config.site_name.cmd      (settings for the site "site_name")
            config.site_name_WFA.cmd  (settings for WF-Automation)
        \to_deploy
            \site_name                (widgets for deploying)
                 \automation          (WF-Automation widgets)
                 \dashboard           (generic widgets)
        \deployed
            \site_name                (already deployed widgets: are being moved from \to_deploy\site_name during deploy process)
                 \automation
                 \dashboard
The final directory structure is as follows:
c:\tdeploy_home
    \install
        \lib
    \deploy
        \config
        \lib
        \to_deploy
            \site_name
                 \automation
                 \dashboard
        \deployed
            \site_name
                 \automation
                 \dashboard
        \log
Edit configuration files
In
C:/tdeploy_home/deploy/configspecify appropriate values inconfig.site_name.cmdandconfig.site_name_WFA.cmd.Common config parameters:
REM DB options
SET DATABASE_SERVER_NAME=servername  (DB_HOSTNAME)
REM MySQL options
SET DATABASE_NAME_MYSQL=dbname
SET DATABASE_PORT_MYSQL=0000
SET DATABASE_USERNAME_MYSQL=dbuser
SET DATABASE_PASSWORD_MYSQL=dbpass
REM PostgreSQL options
SET DATABASE_NAME_PGSQL=dbname
SET DATABASE_PORT_PGSQL=0000
SET DATABASE_USERNAME_PGSQL=dbuser
SET DATABASE_PASSWORD_PGSQL=dbpass
REM WorkFusion Analytics (Tableau) Server options
SET TABLEAU_VERSION=10
SET TABLEAU_SERVER_URL="https://tableau.com"
SET TABLEAU_SERVER_BIN="C:\Program Files\Tableau\Tableau Server\<version>\bin"
SET TABLEAU_SITE=usersite     (site_name)
SET TABLEAU_PROJECT=usersite  (for config.site_name_WFA.cmd predefined value is 'WF-Automation')
SET TABLEAU_USERNAME=tabuser  (user role must be Server Administrator)
SET TABLEAU_PASSWORD=tabpass
A specific parameter for
config.site_name.cmd:REM CT options SET WF_INSTANCE_NAME=instanceurl.com (APP_HOSTNAME) REM Examples of IS_WF_PRIOR_82: t - if instance version < 8.2, f - if instance version >= 8.2 SET IS_WF_PRIOR_82=fA specific parameter for
config.site_name_WFA.cmd:SET SERVICE_WFBI_NAME=swfbiurl.com
| Config parameter | Values for Control Tower config.site_name.cmd |
Values for AutoML config.site_name_WFA.cmd |
Description |
|---|---|---|---|
|
DB_HOSTNAME |
DB_HOSTNAME |
DNS name of the database server |
|
wfdb |
not specified | data source's database name |
|
3306 |
not specified | default values:3306 for MySQL |
|
Use "{{ workfusion_db_user }}" Ansible variable defined earlier | not specified | workfusion_db_user from secrets.yml |
|
Use "{{ workfusion_db_pass }}" Ansible variable defined earlier | not specified | workfusion_db_pass from secrets.yml |
|
wf_datastore | wfml_automation |
data source's database name |
|
5432 |
5432 |
default values:5432 for PostgreSQL |
|
Use "{{ workfusion_datastore_user }}" Ansible variable defined earlier | Use "{{ wfbi_db_user }}" Ansible variable defined earlier | |
|
Use "{{ workfusion_datastore_pass }}" Ansible variable defined earlier | Use "{{ wfbi_db_pass }}" Ansible variable defined earlier | |
|
URL of the Tableau Server | ||
|
9 - Tableau Server v.9, 10 - if Tableau Server v.10 | ||
|
Full path to the \bin directory of Tableau Server |
||
|
site_name |
site_name |
part of the if APP is hosted at the value will be |
|
site_name |
WF-Automation |
should be equal to TABLEAU_SITE value in case of dashboards, not automation |
|
Tableau Server user name with "Server Administrator" rights | ||
|
"Server Administrator" user's password | ||
|
not specified | APP_HOSTNAME |
|
|
f | not specified |
|
|
not specified | Service WFBI name
if service-wfbi is hosted at the value will be |
- In
C:/tdeploy_home/deploy/configspecify appropriate values inimport_users.csv. Replace the existing value with credentials of a new user. This new user will be a user for Tableau configuration on the instance (a.propertiesfile).
import_users.csv:
NewUserName,NewUserPassword
caution
Do not use %, &, ^, or = characters and other special symbols in the password.
Create WorkFusion Analytics site, project and user
Run the manage_server.cmd command in the Command Prompt:
c:
cd \tdeploy_home\deploy
manage_server.cmd site_name
A site and a project are created on WorkFusion Analytics Server as site_name and WF-Automation respectively. A new user from the
file is added with the Site Administrator role.
Workbook publishing
Prepare new workbook files
Download the Workbook packages provided by the WorkFusion team.
Unpack
dashboards.zipto:\tdeploy_home\deploy\to_deploy\site_name\dashboardand
wf_automation.zipto:\tdeploy_home\deploy\to_deploy\site_name\automation
Publish new files
Run publish.cmd to consequently publish (add or replace) each file on WorkFusion Analytics Server.
c:
cd \tdeploy_home\deploy
publish.cmd site_name
The command also moves the published file to
\deploy\deployed\site_name\dashboard
and
\deploy\deployed\site_name\automation
respectively.
The log file is created in deploy/log.
As a result, new or updated workbooks should appear at the WorkFusion Dashboard or the Automation tab.
Do not use TWB or TWBX files located in the deploy/to_deploy or deploy/deployed directories repeatedly. Reload them from the delivery package each time.
Specify schedule to refresh extracts
A schedule should be configured by an administrator.
Log in to WorkFusion Analytics server.
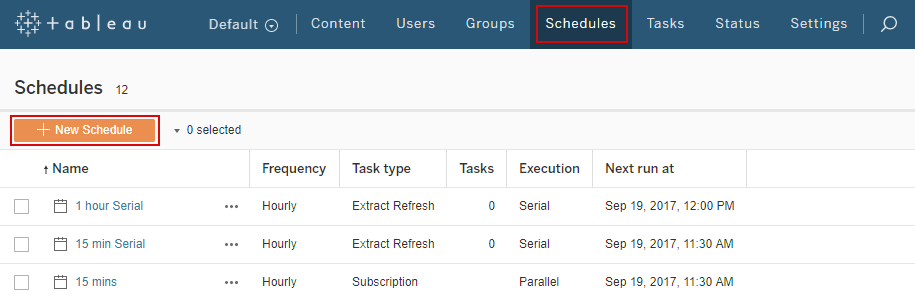
There are several pre-configered Schedules on the Server. New schedules can be added too.
Create schedule
Go to Schedules and click New schedule.
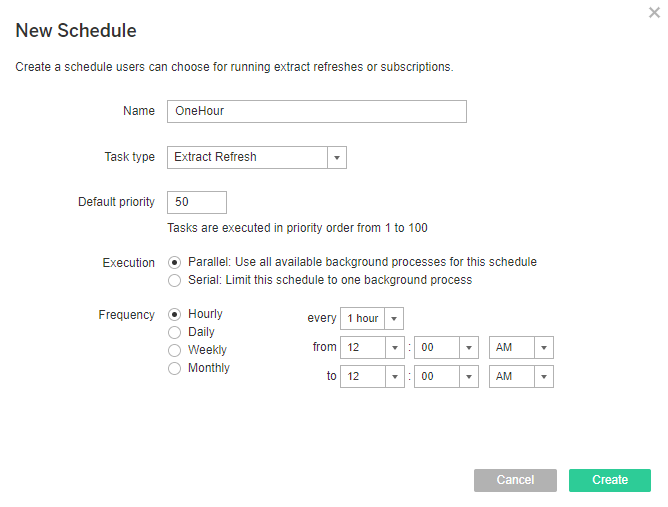
Enter a name and choose appropriate values.
Assign schedule to workbook
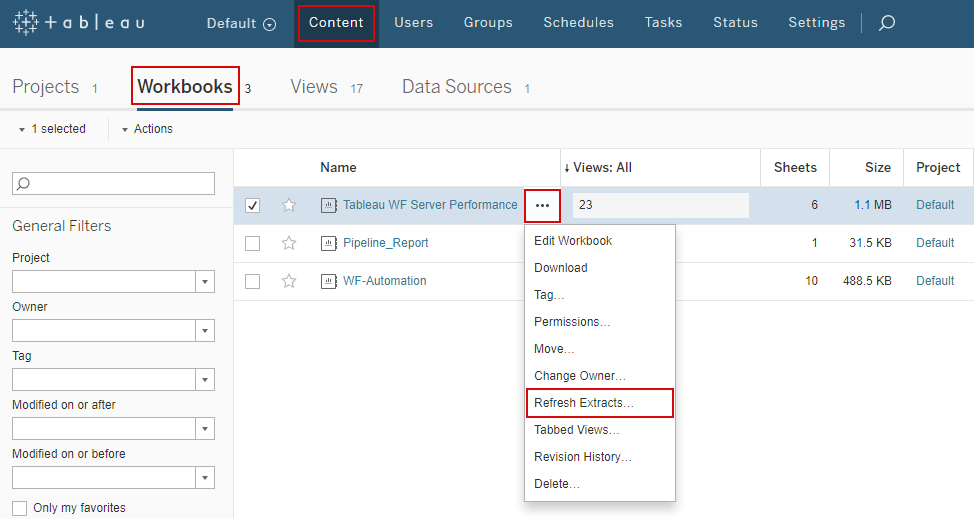
Go back to Content > Workbooks, click ... to expand the options of the required Workbook, then click Refresh Extracts.... Schedules should be assigned to "..._source" workbooks.
Choose Schedule a Refresh, select the required refresh time, and click Schedule Refreshes.
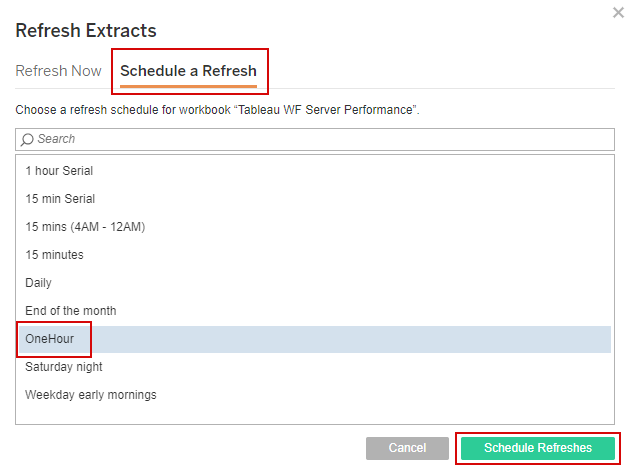
A Schedule is created for the selected workbook.
Repeat steps 1-3 for each Generic "..._source" and WF-Automation workbook on the site.
Enable WorkFusion Analytics Dashboard in Control Tower
To enable BI Analytics Server:
Install WorkFusion Analytics server as described in WorkFusion Analytics Server Installation.
Deploy workbooks to WorkFusion Analytics server as described in Deploy workbooks to WorkFusion Analytics Server.
Enable WorkFusion Analytics server in the WorkFusion platform:
Connect to APP server via SSH.
Edit properties in the
workfusion.propertiesfile under the following path/tomcat/conf/workfusion.properties. For Ansible installation, check/workfusion/conf/workfusion.properties.
<!-- Set the following variables in True value --> tableau.dashboard.enabled=true tableau.automation.enabled=true <!-- Set Tableau server version --> tableau.version=9- Check if a proper tail is set (it is automatically set by Ansible):
<!-- Set the value of the APP server tail -->
tableau.server.instance.tail=.example.com
Property Name Example Value Description Required for tableau.dashboard.enabledtrueWorkFusion Analytics Dashboard and report charts initialization: true - Tableau widgets will be displayed on Dashboard page; false - Java widgets will be displayed on Dashboard page. WorkFusion Analytics Dashboard tableau.automation.enabledtruetrue - Tableau automation charts will be displayed on the Automation tab; false - Java automation charts will be displayed on the Automation tab. WorkFusion Analytics charts tableau.server.instance.tailIf APP server DNS =
wfapp.subdomain.example.comthen<div class="sourceCode" id="cb2" data-syntaxhighlighter-params="brush: java; gutter: false; theme: Confluence" data-theme="Confluence" style="brush: java; gutter: false; theme: Confluence"><pre class="sourceCode java"><code class="sourceCode java"><span id="cb2-1"><a href="#cb2-1" aria-hidden="true" tabindex="-1"></a><span class="op">.</span><span class="fu">subdomain</span><span class="op">.</span><span class="fu">example</span><span class="op">.</span><span class="fu">com</span></span></code></pre></div> </div> </div> </div></td> <td class="confluenceTd">Server domain name for APP Server</td> <td class="confluenceTd">Automation/ML</td> </tr> <tr class="even"> <td class="confluenceTd"><pre><code>tableau.version</code></pre></td> <td class="confluenceTd"><code>9</code></td> <td class="confluenceTd"><div class="content-wrapper"> <p>WorkFusion Analytics Server version for Rest API configuration.</p> <div> <div> <p>For all WorkFusion Analytics Servers 9 or higher the value should be <strong>9</strong></p> </div> </div> </div></td> <td class="confluenceTd">WorkFusion Analytics UI</td> </tr> </tbody> </table> </div>Check and configure the secure properties file (Vault) on the DB server.
<!-- Set DNS name of BI server -->
tableau.dashboard.host=https://bi.example.com
tableau.automation.host=https://bi.example.com

<!-- Set login and password for connection to BI server -->
tableau.dashboard.username=tableau_user
tableau.dashboard.password=tableau_pass
tableau.automation.username=tableau_user
tableau.automation.password=tableau_pass

<!-- Set site and workbooks name for Automation -->
tableau.automation.site=wfapp
tableau.automation.workbook=WF-Automation-r
tableau.new.automation.workbook=WF-Automation-j
Property Name
Example Value
Description
Required for
tableau.dashboard.hostWorkFusion Analytics Server website url for Dashboard WorkFusion Analytics Dashboard tableau.automation.hostWorkFusion Analytics Server website url WorkFusion Analytics UI tableau.dashboard.usernametableau_userWorkFusion Analytics Server website username for Dashboard WorkFusion Analytics Dashboard tableau.dashboard.passwordtableau_passWorkFusion Analytics Server website password for Dashboard WorkFusion Analytics Dashboard tableau.automation.usernametableau_userWorkFusion Analytics Server website username for WF-Automation WorkFusion Analytics UI tableau.automation.passwordtableau_passWorkFusion Analytics Server website password for WF-Automation WorkFusion Analytics UI tableau.automation.siteIf APP server DNS=
wfapp.example.comthen
<div class="sourceCode" id="cb8" data-syntaxhighlighter-params="brush: java; gutter: false; theme: Confluence" data-theme="Confluence" style="brush: java; gutter: false; theme: Confluence"><pre class="sourceCode java"><code class="sourceCode java"><span id="cb8-1"><a href="#cb8-1" aria-hidden="true" tabindex="-1"></a>wfapp</span></code></pre></div>
</div>
</div>
</div></td>
<td class="confluenceTd">WorkFusion Analytics Server site name</td>
<td class="confluenceTd">WorkFusion Analytics Dashboard</td>
</tr>
<tr class="even">
<td class="confluenceTd"><pre><code>tableau.automation.workbook</code></pre></td>
<td class="confluenceTd"><p><code>WF-Automation-r</code></p></td>
<td class="confluenceTd">WorkFusion Analytics workbook for automation data (should always contain the value from example)</td>
<td class="confluenceTd">WorkFusion Analytics Dashboard</td>
</tr>
<tr class="odd">
<td class="confluenceTd"><pre><code>tableau.new.automation.workbook</code></pre></td>
<td class="confluenceTd"><p><code>WF-Automation-j</code></p></td>
<td class="confluenceTd">Additional WorkFusion Analytics workbook for automation data (should always contain the value from example)</td>
<td class="confluenceTd">WorkFusion Analytics Dashboard</td>
</tr>
</tbody>
</table>
Restart Tomcat:
sudo su - wfuser; wfmanager restart workfusionWait for about 1 minute and check errors (if any) in the Control Tower application logs:
sudo su - wfuser; tailf -n 50 /opt/workfusion/supervisord/log/workfusion.out.log
For an additional configuration step for installation with SSL, refer to Add third-party services' certificates to Truststore.
Check results
Open the following URL:
https://<hostname>/to go to the APP instance. The following menu appears: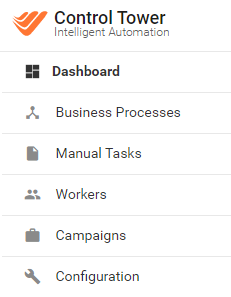
Go to Dashboard section in the main menu to see widgets.
Verify that WorkFusion Analytics Dashboard displays BI widgets:
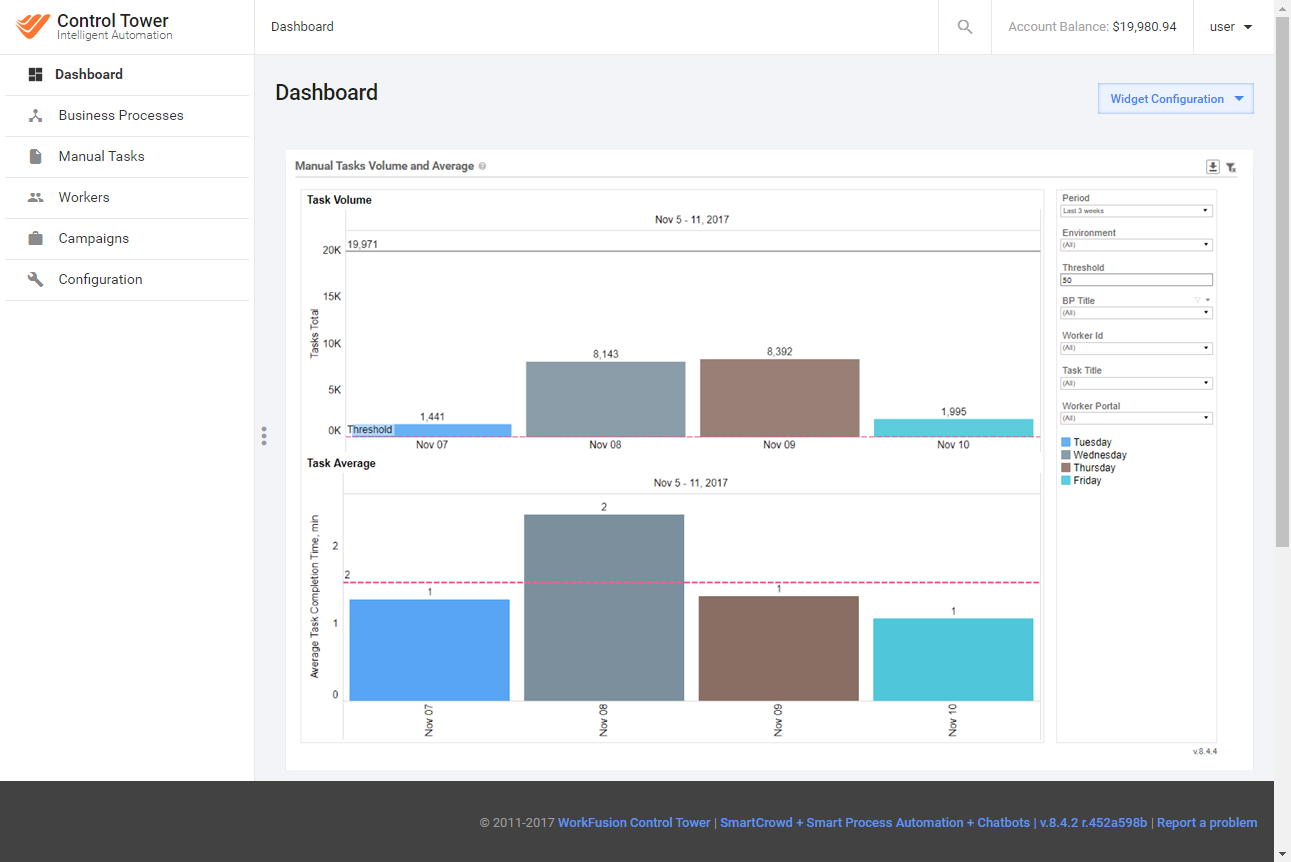
Go to Manual Tasks > View All Manual Tasks and click the Automation available label to see the Automation report.
caution
Do not use
%,&,^, or=characters and other special symbols in the password ($is allowed).