
Upgrade from 10.1.4 to 10.1.6.x
The guide describes the upgrade from 10.1.4 to 10.1.6.x version of WorkFusion Intelligent Automation Cloud Enterprise. Note that this operation uses the full installer, so the procedure is similar to the installation.
note
During the upgrade from the previous version, use the same number of servers that you have initially deployed to install 10.1.4. If you want to change the number of servers, perform the clean install.
This requirement is valid for all servers, except BEP Agent and RPA that can be scaled to any extent.
Prerequisites
Before upgrading IA Cloud Enterprise, make sure that your environment meets the following requirements. Failing to do so results in an extended time of the upgrade and may cause errors.
The environment meets all the requirements that are listed in the System requirements section:
-
Make sure that all ports listed on the page are open.
-
Make sure that the required Bot Master and Bot Unit users are present on the RPA server.
-
Also make sure that your database has a user with the enabled db_owner role.
-
Also, make sure that installation users on the Analytics and RPA server have either WinRM or the RDP access.
-
Starting from product version 10.1.6.1, the ca.crt requirements have been changed. It must include all intermediate certificates if they exist and a Root CA certificate. Thus for the upgrade from the previous 10.1.x versions you need to copy intermediate certificates from server.crt to ca.crt: both files – server.crt and ca.crt – must include intermediate ones if they exist.
Only for the high-availability setup. The settings and ports of the external load balancer are configured, as described in Configure Load Balancer.
You have WorkFusion Intelligent Automation Cloud 10.1.4 up and running.
No Business Processes are running.
You have prepared fleets for migration.
You have backed up the following components:
- Directories /opt/workfusion/workfusion and /opt/workfusion/wokspace.
- Vault properties for all components.
- Zookeeper settings that were changed since the last installation.
- Any system files that were changed since the last installation.
SSH access to Linux hosts is enabled.
If SSO or LDAP authentication are enabled on the existing environment, verify that they are working before the upgrade of each coresponding component.
Before you start
Verify the prerequisites automatically
After you prepare the environment for the upgrade, you can use the dedicated checking script for verification. For more information, see check readiness step.
Save fleet names for Bot Units
> This is needed only for customer fleets. Shared is the default fleet and does not need to be saved
To save currently used fleet names for Bot Units, do the following:
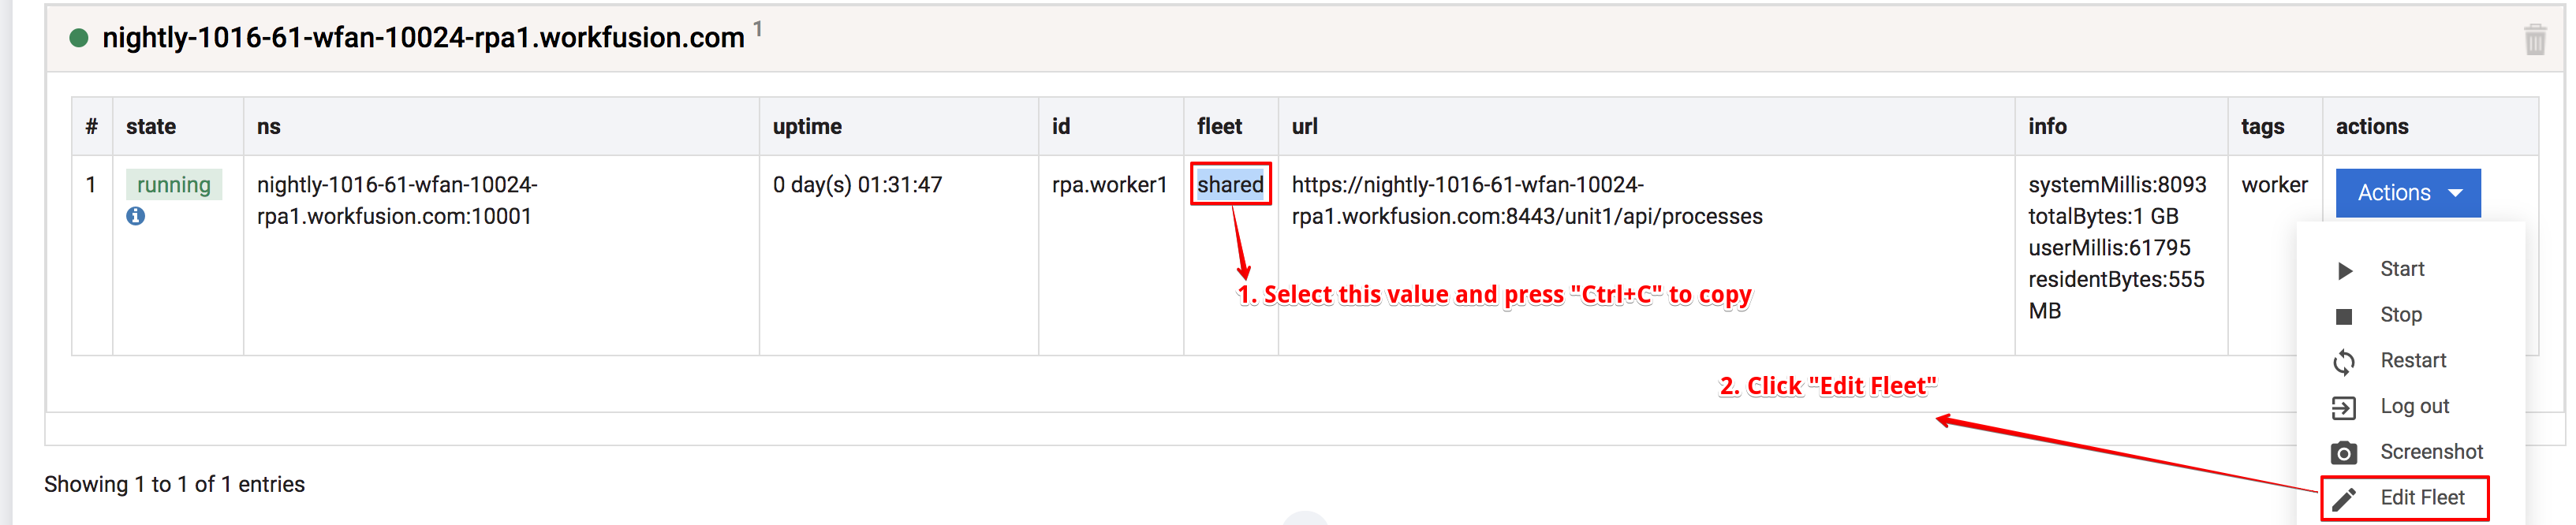
Log in to Control Tower, and click Bot Manager.
In the Bot Manager UI window, click on your RPA server to expand the fleets.
Copy the value into the fleet column → Actions → Edit Fleet.
In the window that opens, click Create new, and paste the previously copied value.
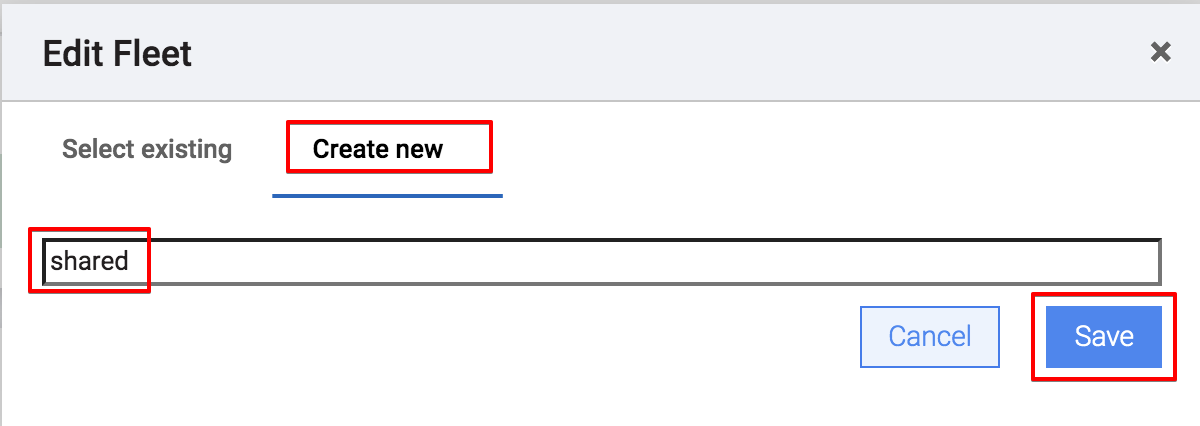
Repeat these steps for all fleets.
Stop IA Cloud Enterprise services
Connect to the server with the previous installation package via SSH and run the following commands as <linux_installation_user>:
$ cd PACKAGE_DIR
$ export ANSIBLE_PRIVATE_KEY_FILE="<path_to_ssh_key>"   # Path to SSH key for connection to all Linux servers as <wf_user>.
$ export ANSIBLE_REMOTE_USER="<linux_installation_user>" # <linux_installation_user> provided in config.yml.
$ export ANSIBLE_VAULT_PASS="<ansible_vault_password>"   # Password for decryption of config.yml.
$ ./install.sh stop_services full
Connect to all Linux servers via SSH and run the following command as <wf_user> on each of them:
$ wfmanager stop all
Prepare application user
Previous versions of IA Cloud Enterprise required two Linux users: installation and application ones. Version 10.1.6.x features only one application user (here, wf_user) both for installing and for running the Product.
To perfrorm the upgrade, provide the following permissions to the application user.
Grant the
sudopermissions.Provide the SSH access via the SSH-key to all Linux servers from the with the installation package.
If you upgrade the system in the multi-point way, skip this step.
Provide the application user with the owner permissions for
PACKAGE_DIR(where the installer was extracted during the initial installation of 10.1.4, for example: /opt/workfusion/wf_installer).$ sudo chown -R <wf_user> PACKAGE_DIR
Download and extract installer
To download and extract installer, connect to the server with the installation package from the previous version via SSH and run the following commands as <wf_user>:
Go to
INSTALL_DIR(where the installer directory was created during the initial installation of 10.1.4, for example: /opt/workfusion):$ cd INSTALL_DIRCreate a backup directory (here, BACKUP_DIR) for the previous version of the installer. Ensure that the backup directory is writable for <wf_user>:
$ mkdir BACKUP_DIRMove the contents of your
PACKAGE_DIRto the backup directory. As a result, directoryPACKAGE_DIRmust be empty before proceeding with the upgrade:$ cd PACKAGE_DIR $ mv * ../BACKUP_DIR $ mv .agreement ../BACKUP_DIRDownload the installer v.10.1.6.x to
PACKAGE_DIR:$ curl -o '<10.1.6.x-installer-archive>' '<link-to-installer-10.1.6.x>'If the Internet access is not available on the server, download the package to the
PACKAGE_DIRdirectory with any convenient method.Extract the installer:
$ tar xzf <10.1.6.x-installer-archive> --strip 1Copy configuration files for the current environment from
BACKUP_DIRtoPACKAGE_DIR:$ cp -r BACKUP_DIR/{license.properties,certificates,.agreement} PACKAGE_DIR/Generate new configuration files from existing ones:
$ export ANSIBLE_VAULT_PASS="<ansible_vault_password>"   # Password for decryption of config.yml.

$ cd PACKAGE_DIR
$ ./install.sh hosts_yml  generate -e @../BACKUP_DIR/hosts.yml
$ ./install.sh config_yml generate -e @../BACKUP_DIR/config.yml
$ ./install.sh rpa_yml    generate -e @../BACKUP_DIR/config.yml
$ ./install.sh ports_yml  generate -e @../BACKUP_DIR/config.yml
Encrypt config.yml:
$ ./install.sh encrypt configGenerate required internal certificates:
$ ./install.sh certs generate
note
If you're using multi-point upgrade:
- Connect to each Linux server via SSH and run commands above as <wf_user> on each of them.
- Ensure that config.yml, rpa.yml, ports and hosts.yml are identical on all hosts.
Check users' passwords
Ensure that users' passwords are valid in config.yml. In most cases, you don't need to change anything in the file. You may proceed further and skip this step. If you encounter issues, for example, an error message with invalid credentials, then:
Open config.yml for editing.
./install.sh edit_config int
# you'll be prompted for decryption password
Update it with valid passwords.
nexus_admin_pass

mssql_dba_pass
mssql_ct_pass
mssql_ws_pass
mssql_sqc_pass
mssql_rpa_pass
mssql_pm_pass
mssql_dm_pass
mssql_ocr_pass
mssql_automl_mms_pass
Re-run the installation script. The script is idempotent, it is safe to run it again.
For example, after the initial 10.1.4 installation, Nexus, or MSSQL passwords may be changed manually in the environment for some purpose. In this case, actualize them in config.yml, because the installer will use them during the execution for updating DB schemas and Nexus artifacts).
Upgrade components on servers
Upgrade the components, depending on your installation approach:
Remember to run the following command on the server with the installation package as <wf_user>.
Go to the
PACKAGE_DIR:$ cd PACKAGE_DIRRun the following command to set up the application user.
$ export ANSIBLE_REMOTE_USER="<wf_user>" # <wf_user> provided in config.yml.Run the following command to remove outdated components of the previous installation:
$ ./install.sh cleanup rudimentsPrepare the MS SQL server:
$ ./install.sh precheck mssql   # Checks that MSSQL credentials are set correctly in config.yml, Database exists, wf_dba_user exists and has db_owner role
$ ./install.sh configure mssql  # Creates all required schemas in Workfusion DB, creates and maps DB users to provided MSSQL logins, and assigns correct user permissions per schemas
Run the upgrade commands:
$ ./install.sh preinstall full -e skip_bi=true -e skip_rpa=true -e skip_ocrwin=true
$ ./install.sh install full -e skip_bi=true -e skip_rpa=true -e skip_ocrwin=true
$ ./install.sh check full -e skip_bi=true -e skip_rpa=true -e skip_ocrwin=true
Before updating the RPA server, uninstall current RPA and perform a clean installation of new RPA:
$ ./install.sh uninstall rpa
$ ./install.sh install rpa
$ ./install.sh check rpa
Upgrade the OCR Win server, if you use it instead of Linux OCR:
$ ./install.sh uninstall ocrwin
$ ./install.sh install wf-sec-storage
$ ./install.sh install ocrwin
$ ./install.sh check ocrwin
$ rm -rf ../wf-sec-storage
Cleanup RabbitMQ queues:
On the server with the installation packages, run the command:
$ ./install.sh stop_services full # stop all servicesOn the servers with RabbitMQ (all INT servers for the HA environment; or the APP server for the non-HA one), run the commands:
$ wfmanager start rabbitmq
$ rabbitmq-diagnostics ping -q # repeat untill Ping succeeded (echo $? == 0)
On any server with RabbitMQ (any INT for the HA environment; or APP for non-HA), run the command:
$ rabbitmqctl --silent list_queues --vhost bep | awk '{ print $1 }' | xargs -r -L1 rabbitmqctl delete_queue --vhost bepOn the server with the installation package, run the command:
$ ./install.sh start_services full # start all services
The upgrade is complete. It may require Control Tower for about 5 minutes to start. So, if you see error 503 in a browser right now, wait a bit.
If your current topology comprises six servers, run the following commands on each Linux server, as <wf_user>:
On each Linux server, stop all IA Cloud services:
$ wfmanager stop allTo verify the status on services, use the command
wfmanager status.On each Linux servers, in the
PACKAGE_DIR, run the following command to remove outdated components of the previous installation:$ ./install.sh cleanup rudiments -c local --limit=<current_server_dns_name>Run the following commands once on any Linux server:
$ ./install.sh precheck mssql   # Checks that MSSQL credentials are set correctly in config.yml, Database exists, wf_dba_user exists and has db_owner role
$ ./install.sh configure mssql  # Creates all required schemas in Workfusion DB, creates and maps DB users to provided MSSQL logins, and assigns correct user permissions per schemas
Install IA Cloud Enterprise components on all Linux servers by following the corresponding guide.
Log in to the RPA server and uninstall RPA components: Control Panel → Programs and Features → RPA (Uninstall).
Install RPA by following the instructions in the section Install RPA package.
Cleanup the RabbitMQ queues to ensure that old workers do not spawn queues:
$ wfmanager stop all        # Run on each Linux server
$ wfmanager start rabbitmq  # Run on all INT servers
$ rabbitmqctl --silent list_queues --vhost bep | awk '{ print $1 }' | xargs -r -L1 rabbitmqctl delete_queue --vhost bep      # Run on first INT server
$ wfmanager start all      # Run on each Linux server
After installing the Linux components, upgrade the OCR Win server (if it exists):
- Uninstall Win OCR components: Control Panel → Programs and Features → Workfusion OCR (Uninstall).
- Install Win OCR by following the instructions in section Install OCR Windows server.
If your current topology comprises eight servers, run the following commands on each Linux server, as <wf_user>:
On each Linux server, stop all IA Cloud services:
$ wfmanager stop allTo verify the status on services, use the command
wfmanager status.On each Linux servers, in the
PACKAGE_DIR, run the following command to remove outdated components of the previous installation:$ ./install.sh cleanup rudiments -c local --limit=<current_server_dns_name>Run the following commands once on any Linux server:
$ ./install.sh precheck mssql   # Checks that MSSQL credentials are set correctly in config.yml, Database exists, wf_dba_user exists and has db_owner role
$ ./install.sh configure mssql  # Creates all required schemas in Workfusion DB, creates and maps DB users to provided MSSQL logins, and assigns correct user permissions per schemas
Internal HAProxy
To upgrade HAProxy:
On the APP server, prepare the setup of the component:
$ ./install.sh preinstall lb -c localUpgrade the component:
$ export ANSIBLE_VAULT_PASS="<ansible_vault_password>"   # Password for decryption of config.yml.
$ cd PACKAGE_DIR

$ ./install.sh install lb -c local
INT Server
To upgrade the component, on the Integration Server:
Run the following commands as the
rootuser:$ ./install.sh preinstall int -c localRun the following commands as <wf_user>:
$ export ANSIBLE_VAULT_PASS="<ansible_vault_password>"   # Password for decryption of config.yml.
$ cd PACKAGE_DIR

$ ./install.sh install int -c local
$ ./install.sh check int -c local
BEP Master Server
To upgrade the component, on the BEP Master server:
Run the following commands as the
rootuser:$ ./install.sh preinstall bep-master -c localRun the following commands as <wf_user>:
$ export ANSIBLE_VAULT_PASS="<ansible_vault_password>"   # Password for decryption of config.yml.
$ cd PACKAGE_DIR

$ ./install.sh install bep-master -c local
$ ./install.sh check bep-master -c local
BEP Agent Server
To upgrade the component, on the BEP Agent server:
Run the following commands as the
rootuser:$ ./install.sh preinstall bep-agent -c localRun the following commands as <wf_user>:
$ export ANSIBLE_VAULT_PASS="<ansible_vault_password>"   # Password for decryption of config.yml.
$ cd PACKAGE_DIR

$ ./install.sh install bep-agent -c local
$ ./install.sh check bep-agent -c local
To upgrade multiple BEP Agent servers, on each BEP Agent server:
Run the following commands as the
rootuser:$ ./install.sh preinstall bep-agent --limit bep-agent1.example.comRun the following commands as <wf_user>:
$ export ANSIBLE_VAULT_PASS="<ansible_vault_password>"   # Password for decryption of config.yml.
$ cd PACKAGE_DIR

$ ./install.sh install bep-agent -c local --limit bep-agent1.example.com
$ ./install.sh check bep-agent  -c local --limit bep-agent1.example.com
APP Server
To upgrade the component, on the APP server:
Run the following commands as the
rootuser:$ ./install.sh preinstall app -c localRun the following commands as <wf_user>:
$ export ANSIBLE_VAULT_PASS="<ansible_vault_password>"   # Password for decryption of config.yml.
$ cd PACKAGE_DIR

$ ./install.sh install app -c local
$ ./install.sh check app -c local
OCR Server (Linux)
To upgrade the component, on the OCR Linux server:
Run the following commands as the
rootuser:$ ./install.sh preinstall ocr -c localRun the following commands as <wf_user>:
$ export ANSIBLE_VAULT_PASS="<ansible_vault_password>"   # Password for decryption of config.yml.
$ cd PACKAGE_DIR

$ ./install.sh install ocr -c local
$ ./install.sh check ocr -c local
RPA server
To upgrade the component, on the RPA server:
- Log in to the RPA server and uninstall RPA components: Control Panel → Programs and Features → RPA (Uninstall).
- Install RPA by following the instructions in the section Install RPA package.
Clean RabbitMQ queues
Clean up the RabbitMQ queues to ensure that old workers do not spawn queues:
$ wfmanager stop all        # Run on each Linux server
$ wfmanager start rabbitmq  # Run on all INT servers
$ rabbitmqctl --silent list_queues --vhost bep | awk '{ print $1 }' | xargs -r -L1 rabbitmqctl delete_queue --vhost bep      # Run on first INT server
$ wfmanager start all      # Run on each Linux server
Upgrade OCR Win (optional)
After installing the Linux components, upgrade the OCR Win server (if it exists):
- Uninstall Win OCR components: Control Panel → Programs and Features → Workfusion OCR (Uninstall).
- Install Win OCR by following the instructions in section Install OCR Windows server.
note
Before starting installation, ensure that config.yml, ports.yml, rpa.yml, hosts.yml and the /certificates directory are the same on all hosts.
To upgrade components, run the following command on the server with the installation package as <wf_user>:
On all Linux servers, prepare the environment variables:
$ export ANSIBLE_VAULT_PASS="<ansible_vault_password>" # Run on each Linux server to disable password prompt (not mandatory, just for convenience)On all Linux servers, enter the
PACKAGE_DIRdirectory and run the following command to remove outdated components of the previous installation:$ cd /opt/workfusion/wf_installer
$ ./install.sh cleanup rudiments -c localOn the first INT server, run the following commands to prepare MS SQL:
$ ./install.sh precheck mssql   # Checks that MSSQL credentials are set correctly in config.yml, Database exists, wf_dba_user exists and has db_owner role
$ ./install.sh configure mssql  # Creates all required schemas in Workfusion DB, creates and maps DB users to provided MSSQL logins, and assigns correct user permissions per schemas
Install the IA Cloud Enterprise components on all Linux servers by following the corresponding guide.
After installing the Linux components, log in to the RPA server and uninstall RPA components: Control Panel → Programs and Features → RPA (Uninstall).
Install RPA by following the instructions in the section Install RPA package.
Clean up the RabbitMQ queues to ensure that old workers do not spawn queues:
$ wfmanager stop all        # Run on each Linux server
$ wfmanager start rabbitmq  # Run on all INT servers
$ rabbitmqctl --silent list_queues --vhost bep | awk '{ print $1 }' | xargs -r -L1 rabbitmqctl delete_queue --vhost bep      # Run on first INT server
$ wfmanager start all      # Run on each Linux server
Upgrade Analytics server
Apply database migrations
To apply database migrations for Analytics server, on the APP server, go to the <package_dir> directory, and execute the following command:
./install.sh migrate bi
You can also migrate the databases after the installation. In this case, run the above command and restart the Analytics server to apply the changes.
Update filebeat and metricbeat
Connect to the BI server via RDP as a Windows Administrator user, download the new Analytics Server installer and unpack it to %USERPROFILE%\Downloads directory. The installer is located in the sources directory of the package.
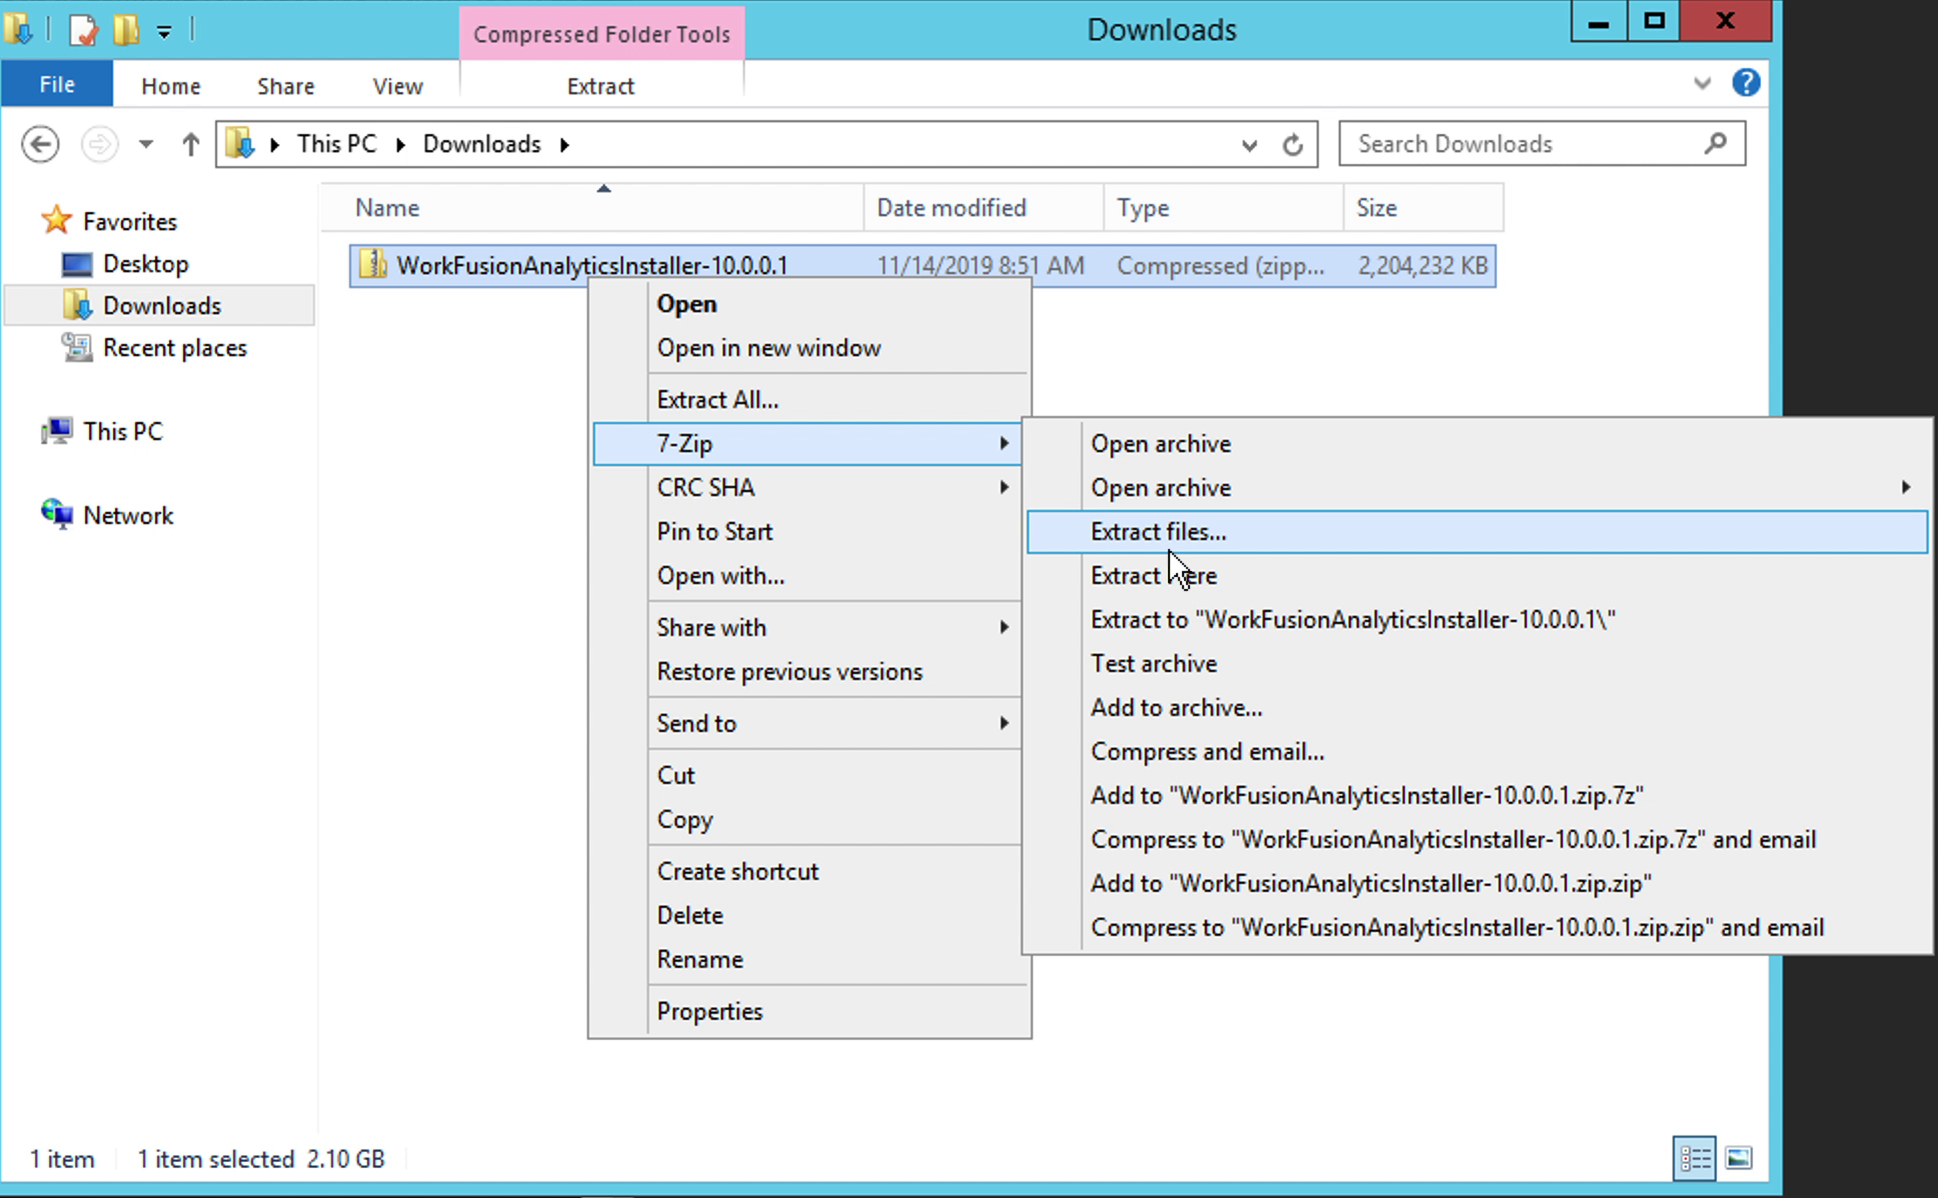
To install Filebeat:
On the Analytics server, start the Command Prompt (not PowerShell) and go to the Filebeat directory in the unpacked installation package.
To enable log gathering, run the install_filebeat.bat installation file with the specified parameters. Specify
INSTALL_DIRas a directory on Workfusion Analytics Server.$ install_filebeat.bat <FILEBEAT_DIR> INSTALL_DIR <BI_HOSTNAME> <LOGSTASH_HOSTNAME>:<PORT> # For 6-server topology LOGSTASH_HOSTNAME is APP_HOSTNAME, for 8-server -- INT_HOSTNAME # Example: install_filebeat.bat C:\workfusion\filebeat C:\workfusion\WorkFusionAnalyticsServer bi.example.com int.example.com:4567Start the
filebeatservice:sc start filebeat
note
If Filebeat starts with the error "setting ‘filebeat.registry_file’ has been removed", in filebeat.yml, remove the line: registry_file: registry_in.
To install Metricbeat:
On the Analytics server, start the Command Prompt (not PowerShell) and go to the metricbeat directory in the unpacked installation package.
To enable metrics gathering, run the install_metricbeat.bat installation file with the specified parameters. Specify
INSTALL_DIRas a directory on WorkfusionAnalyticsServer.install_metricbeat.bat <METRICBEAT_DIR> INSTALL_DIR <BI_HOSTNAME> <LOGSTASH_HOSTNAME>:<PORT> # For 6-server topology LOGSTASH_HOSTNAME is APP_HOSTNAME, for 8-server -- INT_HOSTNAME # Example: install_metricbeat.bat C:\workfusion\metricbeat C:\workfusion\WorkFusionAnalyticsServer bi.example.com INT.example.com:4569Start the
metricbeatservice:sc start metricbeat
Backup and clean up current site configuration
On your Analytics server, save all your custom workbooks and datasources to a predefined location on a local disk.
note
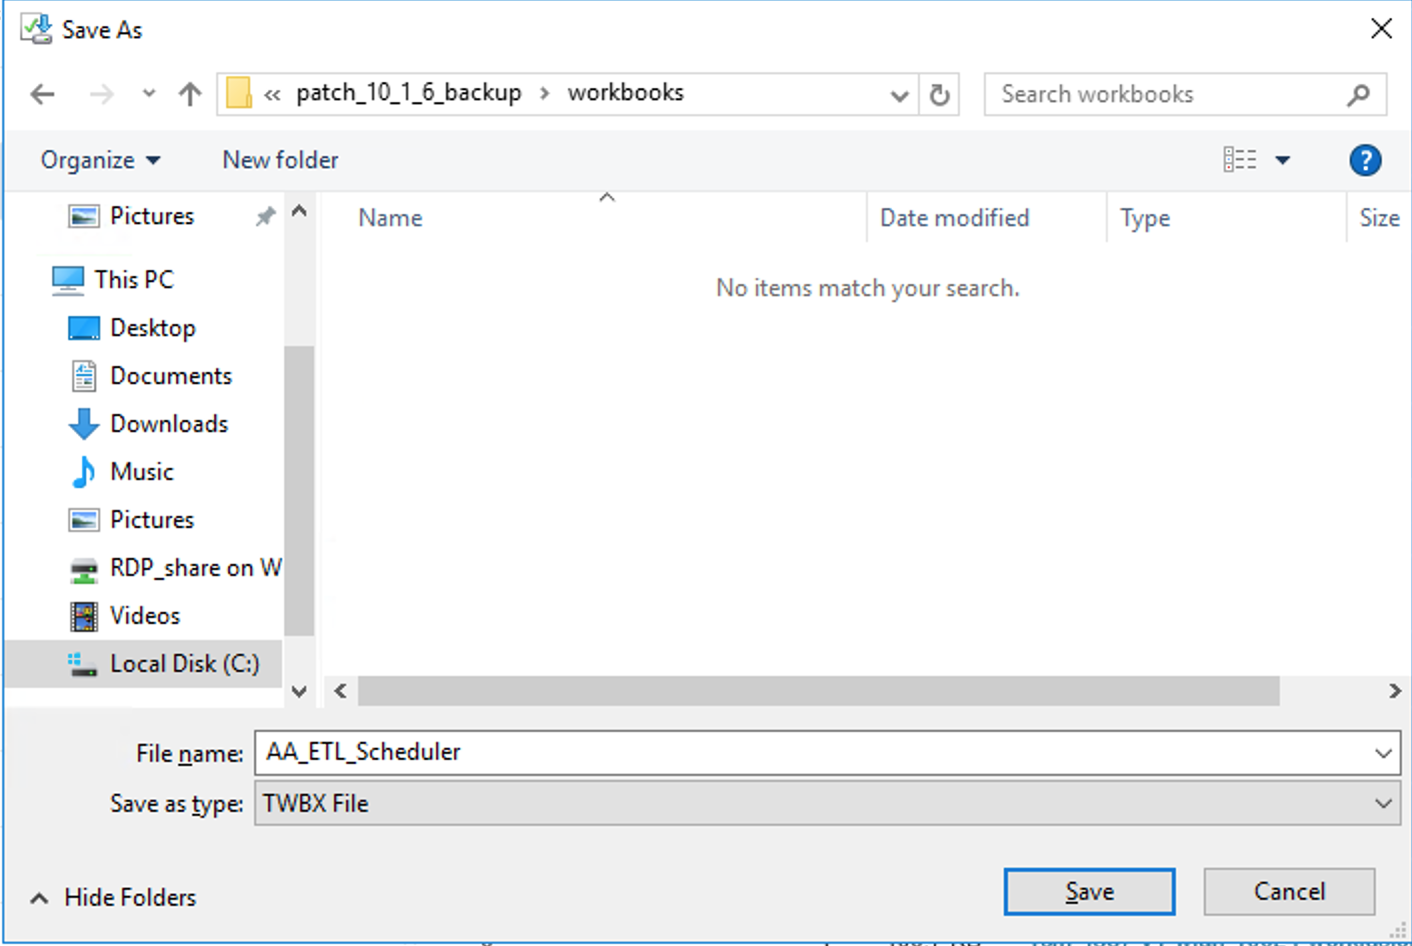
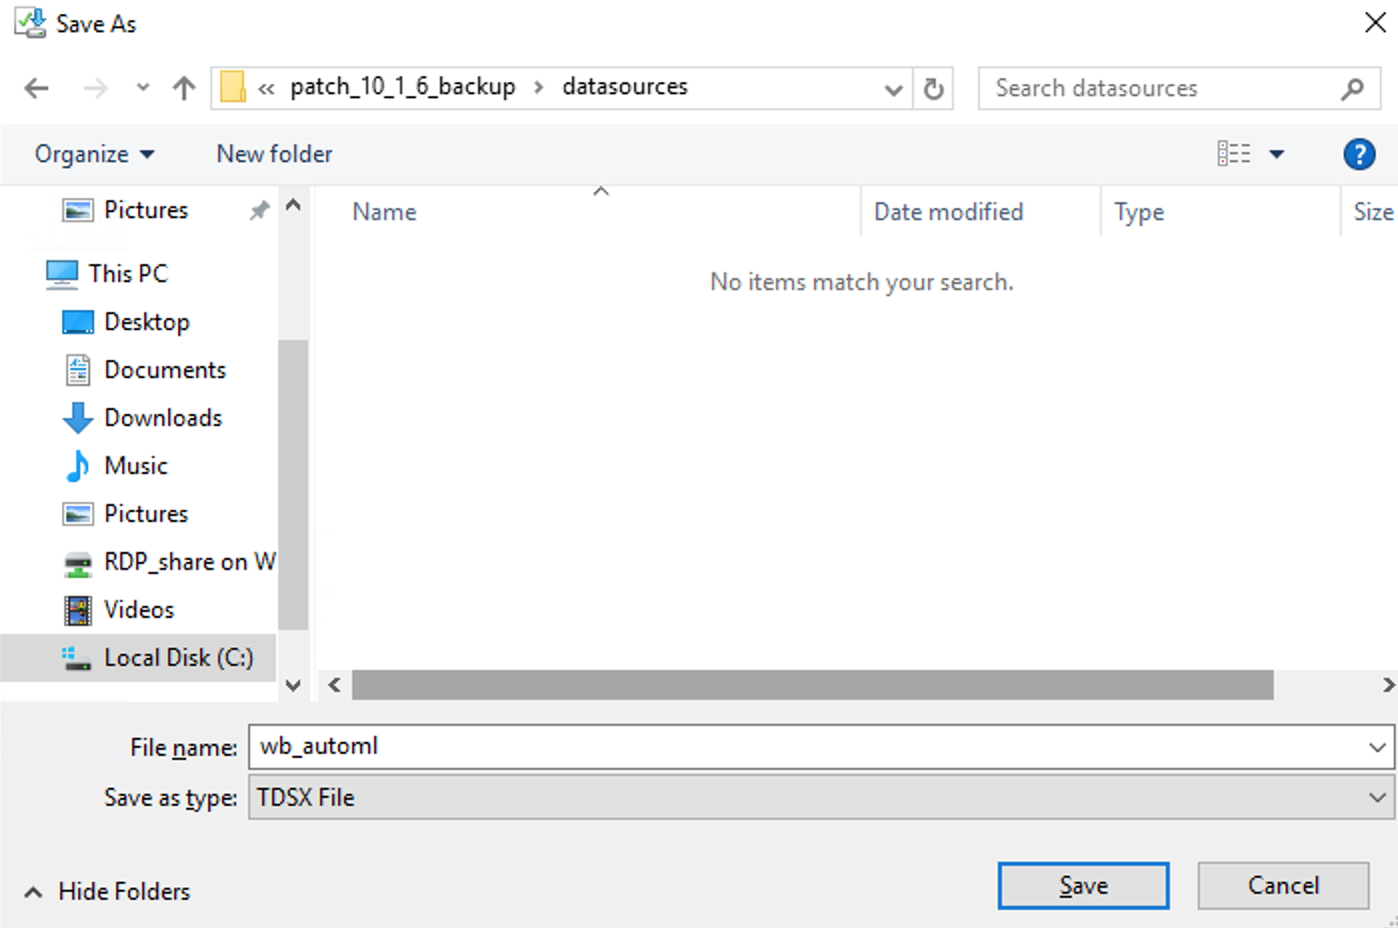
Download custom workbooks and datasources to separate directories. For example, c:\workfusion\patch_10_1_6_backup\workbooks\ and c:\workfusion\patch_10_1_6_backup\datasources\.
To download the custom workbooks from the Analytics server UI:
- Go to a particular site, and, on the Content tab, click Workbooks. To indentify custom workbooks, look for the _custom postfix in their names.
- In the right corner of the Name column, click More (...), then click Download, and save the file as a Tableau workbook.
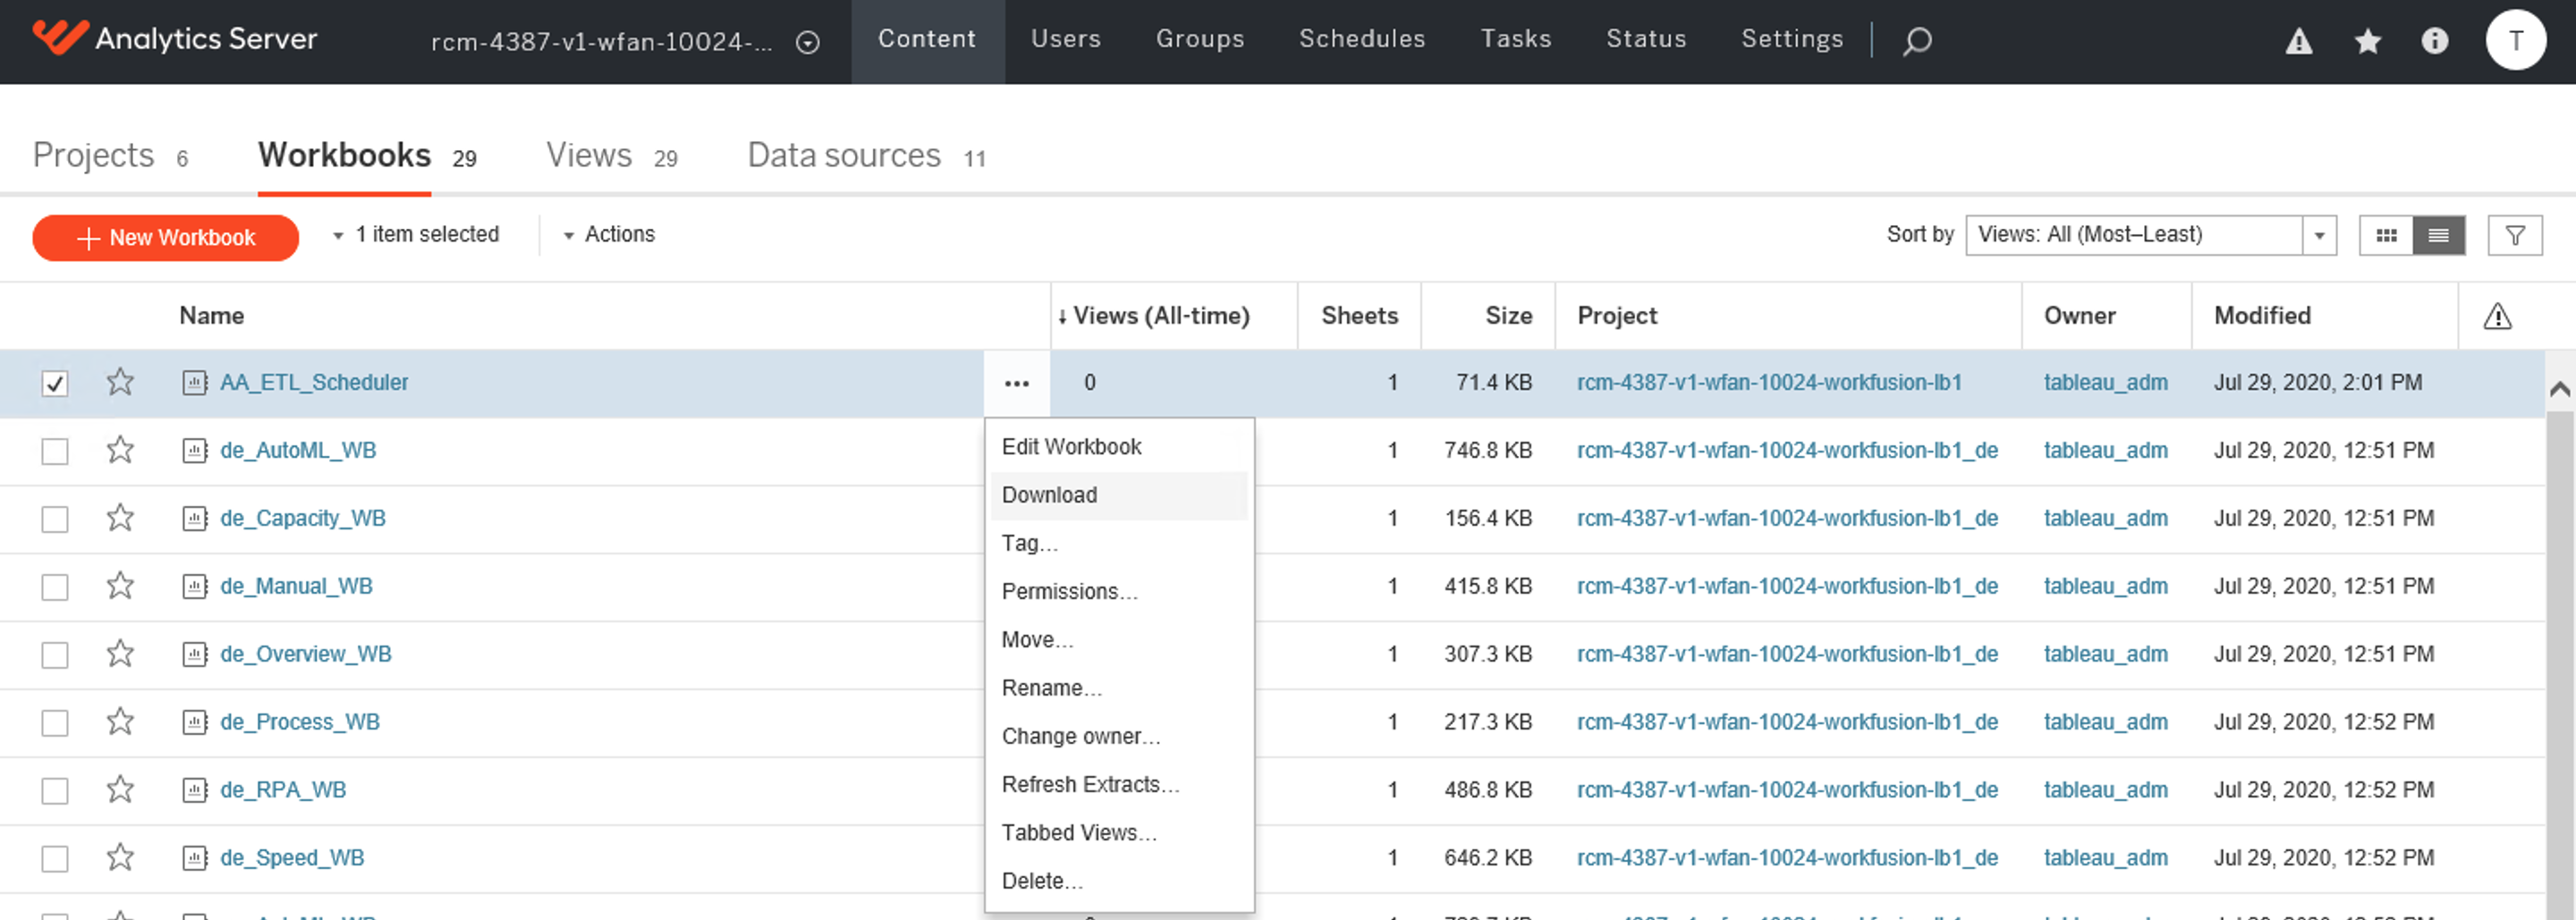
To download the custom datasources from the Analytics server UI:
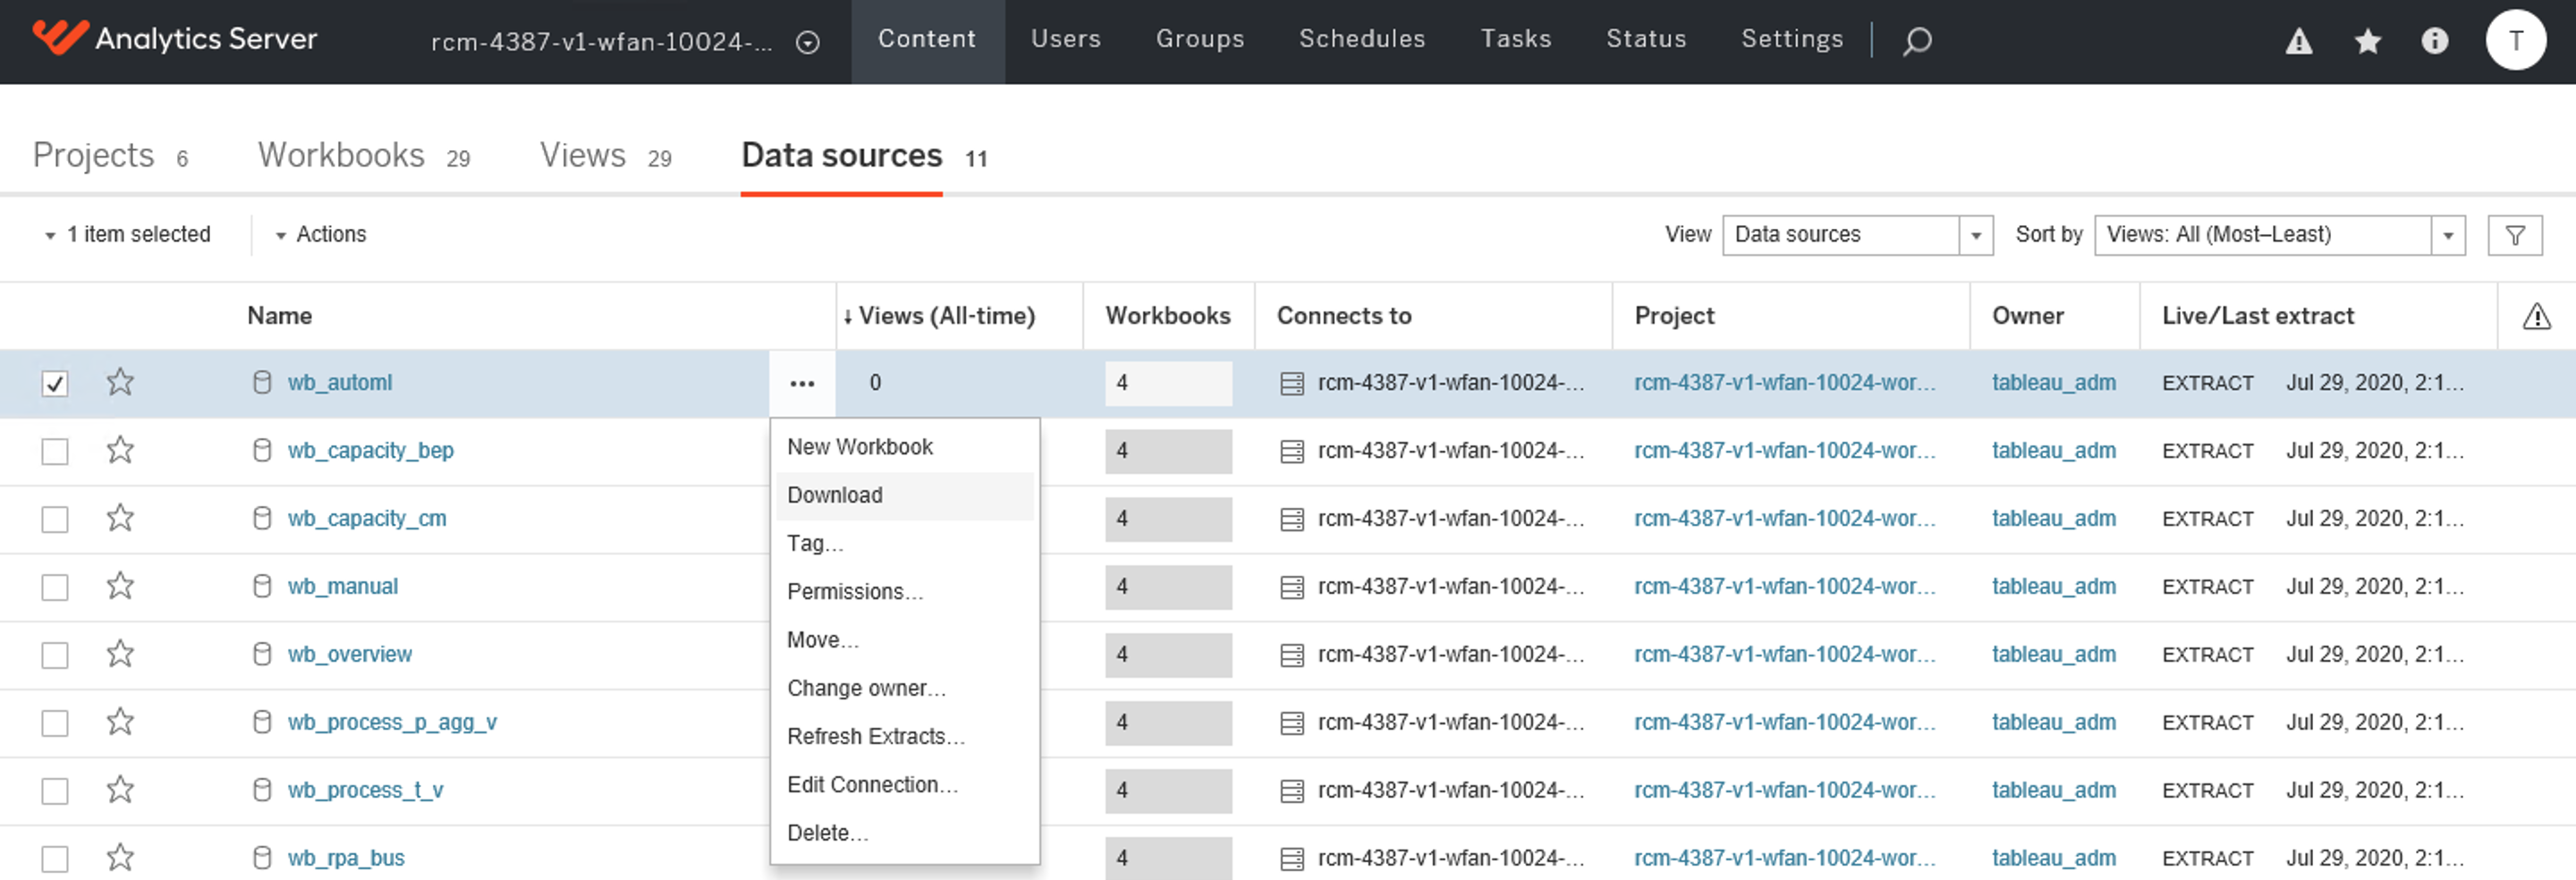
- Go to a particular site, and, on the Content tab, click Datasources.
- In the right corner of the Name column, click More (...), then click Download, and save the file as a Tableau datasource.
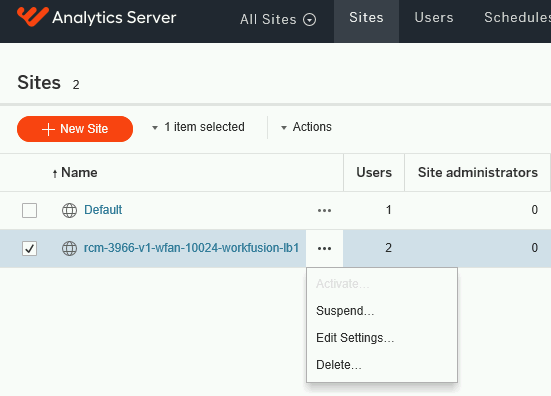
To clean the current site configuration, on Web UI, on the All sites tab, delete the site itself.
Update workbooks on Analytics server
To update workbooks on the Analytics server:
On the server with downloaded installation package, execute the following commands:
$ cd /opt/workfusion/wf_installer # your PACKAGE_DIR $ ./install.sh generate_conf bi $ python -m SimpleHTTPServer 9999Note: the 9999 port is used as an example. It can be any free port on the server, which is accessible from the BI server(s). The BI Installer is now temporarily downloadable from the server over HTTP. You can stop the HTTP server after copying.
On the BI server launch Powershell ISE as Administrator and execute the following script.
Before the execution, remember to modify the lines in the section between
# FILL IN THE PARAMETERS BELOWand# =========================================according to your configuration.# FILL IN THE PARAMETERS BELOW $download_from = "<server with installer hostname>:9999" $current_host = "<CURRENT BI SERVER HOSTNAME>" $current_site = "<SITE NAME>" # The first octet of workfusion_lb_hostname from hosts.yml # if workfusion_lb_hostname is "example-workfusion-lb1.workfusion.com", then $current_site = "example-workfusion-lb1" $install_dir = "c:\workfusion" # The value of "bi_install_dir" which you've set in config.yml during Linux servers installation. $workbooks_installer = "WorkFusionAnalyticsWorkbooks-<version>.zip" # Specify manually. Find the name of the installer in INSTALL_DIR/sources. For example, opt/workfusion/sources/WorkFusionAnalyticsWorkbooks-10.1.6.zip $custom_workbooks_location = "" # location of the downloaded custom workbooks from the step "Backup and then Clean up current site configuration on Analytics server", leave empty if you don't have custom workbooks $custom_datasources_location = "" # location of the downloaded custom datasources from the step "Backup and then Clean up current site configuration on Analytics server", leave empty if you don't have custom datasources # ===================================== $tdeploy_home = "${install_dir}\tdeploy_home" $workbooks_config = "${tdeploy_home}\deploy\config" if($(Test-Path -Path $tdeploy_home)) { Write-Host "Backing up old tdeploy_home" $current_time = Get-Date -Format FileDateTimeUniversal Rename-Item $tdeploy_home "${tdeploy_home}_${current_time}" } Write-Host "Creating tdeploy_home" New-Item -ItemType directory -Path $tdeploy_home -Force Write-Host "Downloading workbooks installer" $wc = New-Object net.webclient $wc.Downloadfile("http://${download_from}/sources/${workbooks_installer}", "${install_dir}\${workbooks_installer}") Write-Host "Unpacking Workbooks installer" Add-Type -assembly "system.io.compression.filesystem" [System.IO.Compression.ZipFile]::ExtractToDirectory("${install_dir}\${workbooks_installer}", "${install_dir}\WorkbooksInstaller") New-Item -ItemType directory -Path "${tdeploy_home}\install\" -Force Copy-Item "${install_dir}\WorkbooksInstaller\deploy-tools\*" -Destination "${tdeploy_home}\install\" -Recurse Write-Host "Executing install.cmd" cd "${tdeploy_home}\install" cmd.exe /c "install.cmd ${tdeploy_home}" Write-Host "Executing create_sitefolder.cmd" cd "${tdeploy_home}\deploy" cmd.exe /c "create_sitefolder.cmd ${current_site}" Write-Host "Downloading workbooks configs" $wc.Downloadfile("http://${download_from}/win_confs/bi_configs/${current_host}/config.${current_site}.cmd", "${workbooks_config}\config.${current_site}.cmd") $wc.Downloadfile("http://${download_from}/win_confs/bi_configs/${current_host}/import_users.csv", "${workbooks_config}\import_users.csv") Write-Host "Executing manage_server.cmd" cd "${tdeploy_home}\deploy" cmd.exe /c "manage_server.cmd ${current_site}" Write-Host "Copying dashboards and datasources" Copy-Item "${install_dir}\WorkbooksInstaller\dashboards\workbook\*" -Destination "${tdeploy_home}\deploy\to_deploy\${current_site}\dashboard\" -Recurse Copy-Item "${install_dir}\WorkbooksInstaller\dashboards\datasources\*" -Destination "${tdeploy_home}\deploy\to_deploy\${current_site}\datasource\" -Recurse if($(Test-Path -Path $custom_workbooks_location)) { Write-Host "${custom_workbooks_location} directory exists, proceeding to copying custom workbooks" Copy-Item "${custom_workbooks_location}\*" -Destination "${tdeploy_home}\deploy\to_deploy\${current_site}\dashboard\" -Recurse } if($(Test-Path -Path $custom_datasources_location)) { Write-Host "${custom_datasources_location} directory exists, proceeding to copying custom datasources" Copy-Item "${custom_datasources_location}\*" -Destination "${tdeploy_home}\deploy\to_deploy\${current_site}\datasource\" -Recurse } Write-Host "Executing publish.cmd" cd "${tdeploy_home}\deploy" cmd.exe /c "publish.cmd ${current_site}"
Configure schedule
To configure shedules:
On the Analytics (BI) server, launch the New PowerShell ISE.
Copy and execute the following script in PowerShell ISE:
See the script...
Before the execution, remember to modify the lines in the section between
# TO FILL IN BY CUSTOMERand# =========================================according to your configuration.Clear-Host [Net.ServicePointManager]::SecurityProtocol = [Net.SecurityProtocolType]::Tls12 # TO FILL IN BY CUSTOMER $bi_lb_hostname = "" # bi_lb_hostname from hosts.yml $tableau_admin_user = "" # tableau_admin_user from config.yml $tableau_admin_pass = "" # tableau_admin_pass from config.yml $current_site = "" # The first octet of workfusion_lb_hostname from hosts.yml # ===================================== $tableau_api_version = "2.8" $signin_address = "https://${bi_lb_hostname}/api/${tableau_api_version}/auth/signin" $schedules_address = "https://${bi_lb_hostname}/api/${tableau_api_version}/schedules" $sites_address = "https://${bi_lb_hostname}/api/${tableau_api_version}/sites" $signin_body = @" <tsRequest> <credentials name="${tableau_admin_user}" password="${tableau_admin_pass}" > <site contentUrl="${current_site}" /> </credentials> </tsRequest> "@ $fifteen_min_schedule = @" <tsRequest> <schedule name="15min-schedule" priority="50" type="Extract" frequency="Hourly" executionOrder="Serial"> <frequencyDetails start="12:00:00" end="12:00:00"> <intervals> <interval minutes="15" /> </intervals> </frequencyDetails> </schedule> </tsRequest> "@ $aa_etl_fifteen_min_schedule = @" <tsRequest> <schedule name="aa-etl-15min-schedule" priority="10" type="Extract" frequency="Hourly" executionOrder="Serial"> <frequencyDetails start="12:00:00" end="12:00:00"> <intervals> <interval minutes="15" /> </intervals> </frequencyDetails> </schedule> </tsRequest> "@ $workbook_raw = @" <tsRequest> <task> <extractRefresh> <workbook id="{0}" /> </extractRefresh> </task> </tsRequest> "@ $datasource_raw = @" <tsRequest> <task> <extractRefresh> <datasource id="{0}" /> </extractRefresh> </task> </tsRequest> "@ Write-Host "Simulating TASK [bi_workbooks : Login into Tableau via api: POST ${signin_address}] ***" $signin_response = Invoke-WebRequest $signin_address -Body $signin_body -Method 'POST' -Headers @{'Accept' = 'application/json'} Write-Host "Simulating TASK [bi_workbooks : Save Tableau Access Token and Site id] ********************" $tableau_token = ($signin_response | ConvertFrom-Json).credentials.token $site_id = ($signin_response | ConvertFrom-Json).credentials.site.id Write-Host "Simulating TASK [bi_workbooks : List schedules: GET ${schedules_address}] ***" $list_schedules_response = Invoke-WebRequest $schedules_address ` -Method 'GET' ` -Headers @{'X-Tableau-Auth' = $tableau_token; 'Accept' = 'application/json'} Write-Host "Simulating TASK [bi_workbooks : Check if '15min-schedule' created] ************************" $schedule_exists = (($list_schedules_response | ConvertFrom-Json).schedules.schedule | where { $_.name -eq "15min-schedule" }) -ne $null Write-Host "Simulating TASK [bi_workbooks : Check if 'aa-etl-15min-schedule' created] ************************" $aa_etl_schedule_exists = (($list_schedules_response | ConvertFrom-Json).schedules.schedule | where { $_.name -eq "aa-etl-15min-schedule" }) -ne $null if(!$schedule_exists) { Write-Host "Simulating TASK [bi_workbooks : Create 15min Schedule named '15min-schedule': POST ${schedules_address}] ***" $create_schedule_response = Invoke-WebRequest $schedules_address ` -Body $fifteen_min_schedule ` -Method 'POST' ` -Headers @{'X-Tableau-Auth' = $tableau_token; 'Accept' = 'application/json'} } if(!$aa_etl_schedule_exists) { Write-Host "Simulating TASK [bi_workbooks : Create 15min Schedule named 'aa-etl-15min-schedule': POST ${schedules_address}] ***" $create_schedule_response = Invoke-WebRequest $schedules_address ` -Body $aa_etl_fifteen_min_schedule ` -Method 'POST' ` -Headers @{'X-Tableau-Auth' = $tableau_token; 'Accept' = 'application/json'} } Write-Host "Simulating List schedules: GET ${schedules_address}] ***" $list_schedules_response = Invoke-WebRequest $schedules_address ` -Method 'GET' ` -Headers @{'X-Tableau-Auth' = $tableau_token; 'Accept' = 'application/json'} Write-Host "Simulating TASK [bi_workbooks : set_fact: save '15min-schedule' schedule Id] **************" $schedule_id = (($list_schedules_response | ConvertFrom-Json).schedules.schedule | where { $_.name -eq "15min-schedule" }).id Write-Host "Simulating TASK [bi_workbooks : set_fact: save 'aa-etl-15min-schedule' schedule Id] **************" $aa_etl_schedule_id = (($list_schedules_response | ConvertFrom-Json).schedules.schedule | where { $_.name -eq "aa-etl-15min-schedule" }).id Write-Host "Simulating TASK [bi_workbooks : Query workbooks: GET ${sites_address}/${site_id}/workbooks] ***" $list_workbooks_response = Invoke-WebRequest "${sites_address}/${site_id}/workbooks" ` -Method 'GET' ` -Headers @{'X-Tableau-Auth' = $tableau_token; 'Accept' = 'application/json'} Write-Host "Simulating TASK [bi_workbooks : Assign 'aa-etl-15min-schedule' to workbooks: PUT ${sites_address}/${site_id}/schedules/${aa_etl_schedule_id}/workbooks] ***" ($list_workbooks_response | ConvertFrom-Json).workbooks.workbook | ForEach-Object -Process { if($_.project.name -eq $current_site) { $assign_schedule_response = Invoke-WebRequest "${sites_address}/${site_id}/schedules/${aa_etl_schedule_id}/workbooks" ` -Body ($workbook_raw -f $_.id) ` -Method 'PUT' ` -Headers @{'X-Tableau-Auth' = $tableau_token; 'Accept' = 'application/json'} } } Write-Host "Simulating TASK [bi_workbooks : Query datasources: GET ${sites_address}/${site_id}/datasources] ***" $list_datasources_response = Invoke-WebRequest "${sites_address}/${site_id}/datasources" ` -Method 'GET' ` -Headers @{'X-Tableau-Auth' = $tableau_token; 'Accept' = 'application/json'} Write-Host "Simulating TASK [bi_workbooks : Assign '15min-schedule' to datasources: PUT ${sites_address}/${site_id}/schedules/${schedule_id}/datasources] ***" ($list_datasources_response | ConvertFrom-Json).datasources.datasource | ForEach-Object -Process { if($_.project.name -eq $current_site) { $assign_schedule_response = Invoke-WebRequest "${sites_address}/${site_id}/schedules/${schedule_id}/datasources" ` -Body ($datasource_raw -f $_.id) ` -Method 'PUT' ` -Headers @{'X-Tableau-Auth' = $tableau_token; 'Accept' = 'application/json'} } }
In case you upgraded the product, which you have earlier installed in the high-availability mode, repeat all Analytics installation and initialization steps on the second server. Remember that the services must have the following status:
- Running on the primary BI server.
- Stopped on the secondary server.
To check the status of services, run the command:
tsm status -v --username .\<your-bi-user> --password <your-bi-user-password>
important
Do not use TWB / TWBX files located in \deploy\to_deploy or \deploy\deployed directories repeatedly. Reload them from the delivery package each time.
The Analytics server is now upgraded to the latest version.
Restore custom parameters from previous versions
Custom workers
If you have changed workers' settings in IA Cloud 10.1.4, you can migrate the changes after the upgrade.
For that, after upgrading to IA Cloud 10.1.6.x, on the BEP Master server, open the file with workers' settings for Control Tower (for
example, /opt/workfusion/vds-data/workers/app/com.workfusion.spa.ct/worker-app/10.1.0.6/worker.yml), and enter the previous corresponding settings, such as memory, CPU, etc. Note that the structure of the new file differs from the previous one.
File worker.yml for 10.1.4
#cat /opt/workfusion/vds-data/workers/app/com.workfusion.spa.ct/worker-app/10.1.0.10/worker.yml

command: ${java} -XX:CICompilerCount=2 -XX:+UseSerialGC -XX:MaxMetaspaceSize=${metaspace}M -Xmx${heap}M -XX:+ExitOnOutOfMemoryError -Dgroovy.use.classvalue=true -Dgroovy.target.indy=true -Dfile.encoding=UTF8 -Dexecution.task.queue.input=${tasks.queue} -Dlogging.path=${log.dir} -Dlogging.file=${log.file} -Djava.io.tmpdir=${temp.dir} -Dwebharvest.machine.config.bundle.dir=${working.dir}/bcb -jar ${worker.jar} ${config.server.parameters}
cpu: 0.25
memory:
  heap: 1024
  metaspace: 128
File worker.yml for 10.1.6.x:
# cat /opt/workfusion/vds-data/workers/app/com.workfusion.spa.ct/worker-app/10.1.0.32//worker.yml

command: ${java} -XX:CICompilerCount=2 -XX:+UseSerialGC -XX:MaxMetaspaceSize=${metaspace}M -Xmx${heap}M -XX:+ExitOnOutOfMemoryError -Dgroovy.use.classvalue=true -Dgroovy.target.indy=true -Dfile.encoding=UTF8 -Dexecution.task.queue.input=${tasks.queue} -Dlogging.path=${log.dir} -Dlogging.file=${log.file} -Djava.io.tmpdir=${temp.dir} -Dwebharvest.machine.config.bundle.dir=${temp.dir}/bcb -jar ${worker.jar} ${config.server.parameters}
cpu: 0.4
memory:
  heap: 1024
  metaspace: 512
health-checks:
  - protocol: MESOS_HTTP
    path: /actuator/health
    grace-period-sec: 180
    interval-sec: 60
    timeout-sec: 10
    max-failures: 3
Check the upgrade
Once the upgrade is completed, check WorkFusion Platform with Business Process (BP) and Manual Task. The OCR must be activated. For more information on the post-installation checks, see Install components.