Reconciliation
Example overview
Problem statement
Reconciliation is an accounting practice used to ensure that two sets of records are in agreement. It confirms that money leaving an account matches the money that was spent. This is generally something done by the finance department during a month-end closing and can be a very time-consuming process that requires lots of manual effort, depending on the volume of transactions that don't match.
Existing manual process
Today, the existing manual process takes a lot of time. People have to copy transaction information from some file into an Excel document and manually check all the transactions for errors. This process transfers all the information to an Excel file and checks for errors, and then people need only to correct these errors.
Automation solution
The bot uses Adobe Reader to convert PDF files to TXT, because for machine processing, you have to use a format that you can read and extract information from for further work. The next big step is data processing and its transfer to an Excel file. In this step, copy all the necessary information into the appropriate columns in the template and set the status for the current transaction.
Reusable components
In this example, there are five reusable components:
- Create a temporary folder.
- Create a folder with the predefined name or use the current data.
- Convert PDF to a TXT file.
- Use the Custom Actions to download the file by a direct link to the folder.
- Generate a report.
Preconditions
Before you start working, ensure all the requirements are met:
- Install:
- Work.AI Developer
- Adobe Reader (English version)
- Download the example.
ManualReconciliationInput: the input folder inside theManualReconciliation v1.2.zipfolder, the standard path for the input folder:C:/(do not forget to extract before work).
Getting started
To get started, perform the following actions:
Extract the folder and drop it into your Recorder's workspace:
C:/Users/%USERNAME%/workfusion-workspace/rpae_project.cautionIf the template does not load at runtime, you can download
ManualTask.xlsxfrom the example folder to any file exchange and change the default value in thestr_link_to_filevariable to your direct link.Select the PDF files to process and save them in one folder.
Open the example in Recorder.
Set the default values for the following variables:
str_input_folder_path: the path to the folder with the PDF files, for example,C:/ManualReconciliationInput.str_result_path: the path to the folder or drive where you want to create a folder with the results, for example,C:/ManualReconciliationResultorC:/.str_result_folder_name: the result folder name, for example,ManualReconciliationResult.
Click Play recording.
Script overview
On a high level, the script consists of the following actions.
- Input data and create necessary folders.
- Convert PDFs to TXT files.
- Process data and save results.
- Generate final results using output data.
Let's explore these steps in detail.
Script workflow
Create necessary folders
Description: The group contains three options: create a temporary folder, create a result folder and create a folder with the same name as the current date.
- Create a temporary folder. Create a folder with a random name that can be useful when creating or saving several intermediate files and deleting the files after processing the program. In this case, use a random name, as you must make sure that the folder does not exist, and you will not delete any other files.
- Create a result folder. The option creates a folder with a preselected name and the path to save. You can use this option when you need to create a folder or check whether the folder exists, and if the folder does not exist, create it. This can be useful if your project first runs on another computer and you are not sure if the folder exists.
- Create a folder with the name as the current date. The option can be useful if you use your sample every day or several times a week because the processing results are saved in a folder with the date corresponding to the due date for you to find the necessary data easily.
Create folder – Temp (reusable)
In this part of the sample, a folder with a random name is created. For work, two variables are used:
str_temp_folder_path: the path to the directory to create a temporary folder.str_temp_folder_name: a variable to store a random name.
This is just an example. You can use any variable names you like.
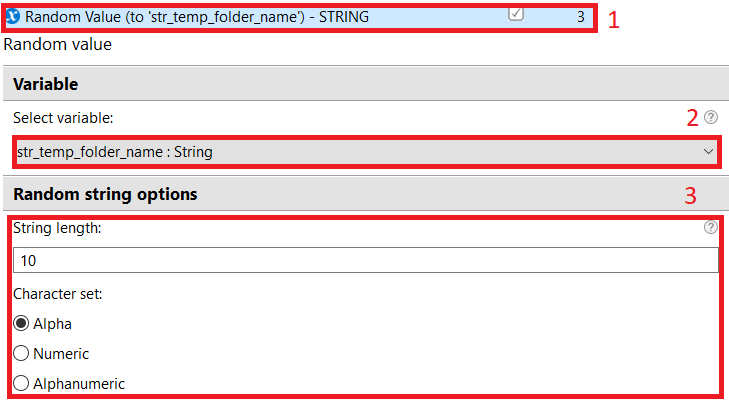
- Action 3 generates a random value for use as a folder name.
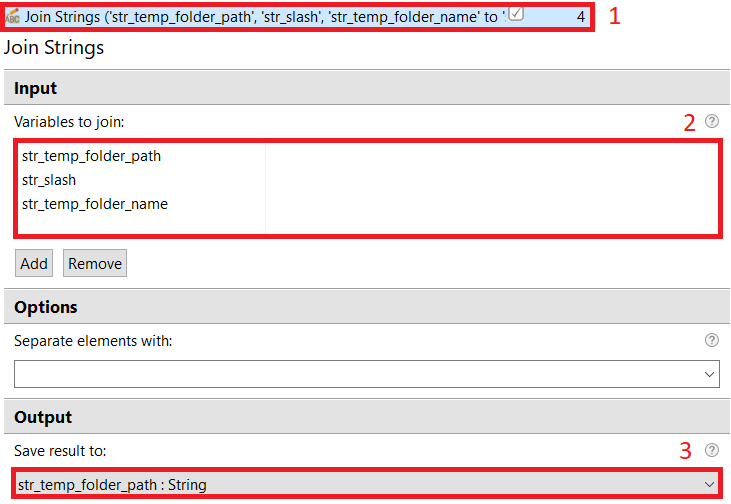
- Action 4 creates the path to a temporary folder, namely, appends the path to the directory to create the folder, the slash character, and the temporary folder name from the variable.
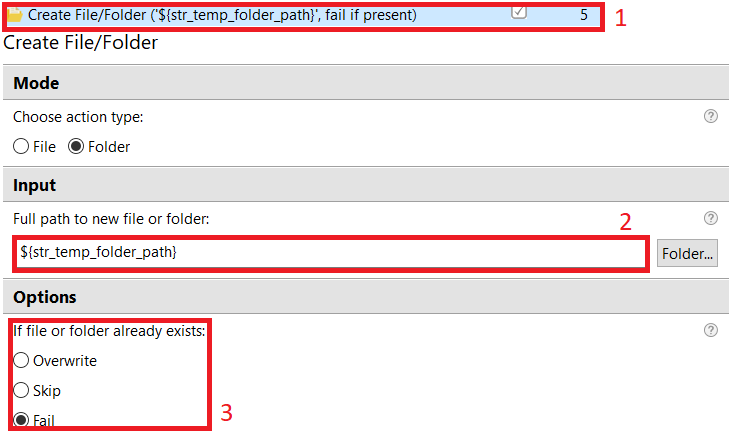
- Action 5 creates a temporary folder.
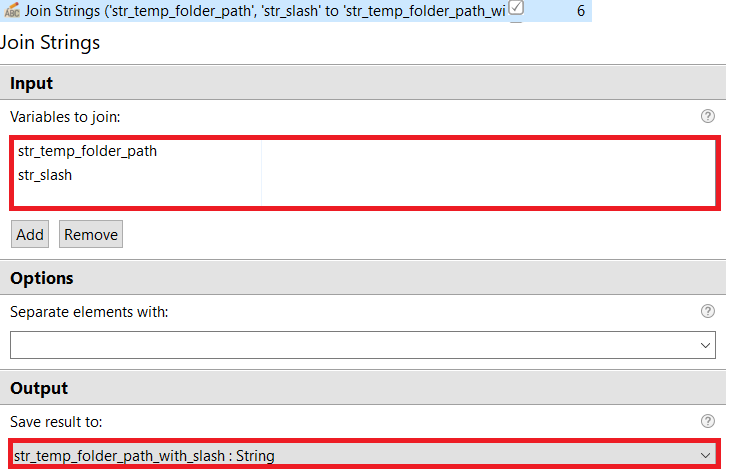
- Action 6 (Optional) creates a new variable with the path to the temporary folder and a slash at the end.

The Random Value action generates a random String value and stores it in a variable that you select in the drop-down menu (number 2 in the screenshot).
- The action is in the Variables group in Actions library. It can generate String, Boolean, and Number values.
- The field contains all the variables from the Recorder Variables tab. On selecting the
DateTimevariable, the action generates a simple string value. - On the Random String tab, you can choose the length of the string and the characters the string will consist of:
- Alpha: only letters
- Numeric: only numbers
- Alphanumeric: letters and numbers
The Join Strings action combines string variables into one. In this case, create the path to the temporary folder, namely, append the path to the directory to create the folder, the slash character, and the generated folder name from the previous step.
- Select the action in the Text group in Actions library.
- Add string variables for the union. These variables are combined, starting with the first one and adding the next line to the end of the previous one from the list.
- Select a string variable to save the action result. Save the result to the variable that contained the path to the directory to create the folder.
noteIt is a normal practice to save the result of concatenating strings into the variable used in the action, if it is no longer needed since you don't have to create an additional variable.
The Create File/Folder action creates a folder or a file. In this use case, apply this action to create a folder.
- Select the action in the Files and Folders group in Actions library.
- Specify the full path to the folder you want to create. If you create the Result folder in the
C:/Userdirectory, the path for this field isC:/User/Result. - Select the action to perform if the folder is not created. In this case, use the Fail option, as if the temporary folder is not created, all the following steps cannot work correctly.
(Optional) The Join String action is not needed, because you create a new variable that contains the path to the temporary folder and a slash symbol. The variable is used for the following actions when you save files to the temporary folder.
- Join a variable with the path to the temporary folder and a slash variable.
- Save the result in a new variable.
Create folder – Result (reusable).
In this part of the sample, create a folder with a preselected name and a path to save. For work, two variables are used:
str_result_path: the path to the directory where you want to create a folder to save the result.str_result_folder_name: a variable with the result folder name. This is just an example. You can use any variable names you like.
Take a closer look at how it works.
Action 8 works like action 4, creates the path to the result folder, namely, appends the path to the directory to create the folder, the slash character, and the result folder name from the variable.
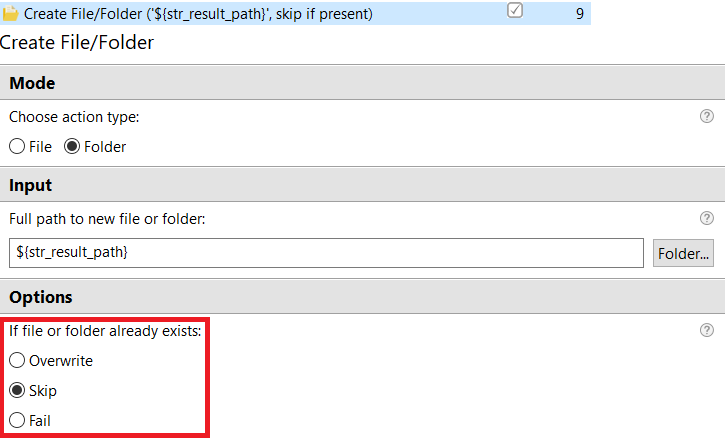
Action 9 creates a folder in the directory.

The same action (Create File/Folder) is performed as in action 5. Skip creating the folder if it already exists.
Create folder with name as the current date (reusable)
Create a folder with the name as the current date. For work, several variables are used:
str_result_path: the path to the results directory where the folder will be created.date_current: a variable of theDateTimetype.str_current_date: a variable to store a line with the current date.
This is just an example. You can use any variable names you like. Take a closer look at how it works:
Action 11 writes the current date to the
date_currentvariable.Action 12 sets the correct date format and converts the
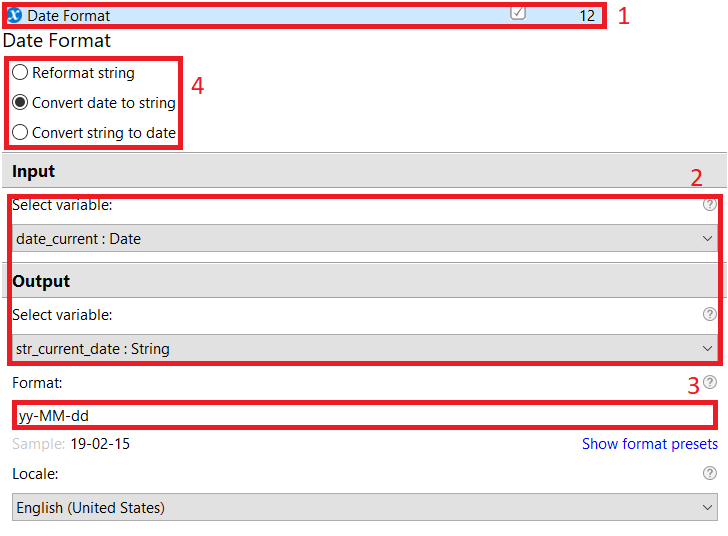
DateTimevariable to String.Action 13 works like action 4, creates the path to the current folder for saving results, namely, appends the path to the result directory, the slash character, and the line with the current date.
Action 9 works like action 9, but creates a result folder.

The Constant Value action sets the current date to a variable of the DateTime type needed to get the String variable with the current date.
Select Constant Value in the Variables group in Actions library. You can either set the current date or set the date manually.
Choose the value to set. In this case, use the Current Date checkbox.
Select the variable of the
DateTimetype on the Recorder Variables tab.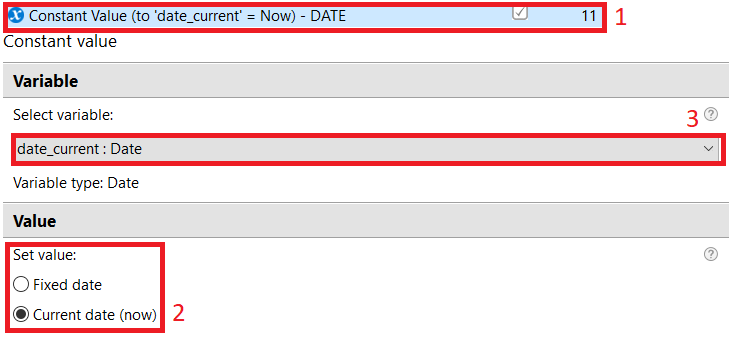
The Date Format action converts the variable of the DateTime type to the String variable and sets the specific format.
Select Date Format in the Variables group in Actions library. It can set the specific format for the DateTime and String variables, convert from DateTime to String and back.
Select input and output variables, if you want to convert DateTime to String. Then, set DateTime as input and String as output and check Convert date to string (number 4 on the screenshot).
Specify the format of the result in the output variable. Click Show format presets to see examples.
These flags are responsible for the action to be performed.
Convert PDF to text
Description: The group can be very useful for your project if you need to process information from a PDF file (PDF files must be in readable format), because in this case you get all the PDF files from the folder and convert them to TXT files. It is recommended to use Adobe Reader, as this application retains the original data format after conversion.
Reusable element: Convert a file from PDF to TXT. The element converts one file.
The Check Existence action verifies that the folder exists. This is a very important step for code reliability. When you move any files from folder to folder or save the file to a new directory, you need to be sure that the folder has been created.
There is also an alternative that is the Exception Handling action. The action skips the steps, if something is wrong, but if 100-200 actions are included inside the "try" part, and you try to save the file in a nonexistent folder, all work is skipped and you spend a lot of time. It would be more correct to use the Check Existence action. Before processing any files, you can check the existence of the folder and, if this folder does not exist, create a folder and continue processing the data.
- Select the action is in the Files and Folders group in Actions library.
- Specify the path to the file or folder that you want to check.
- In the drop-down menu, select a Boolean variable to save the test result.
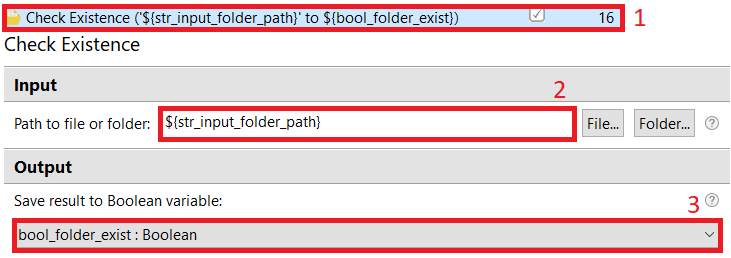
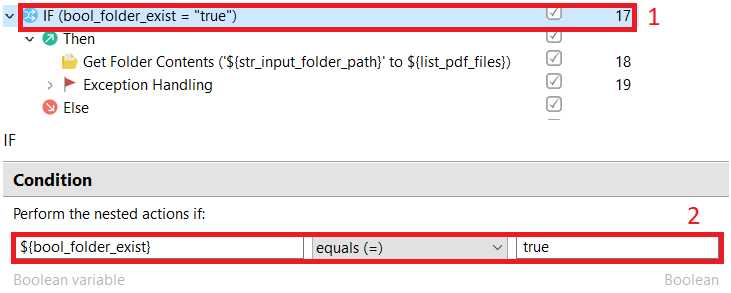
The IF condition action helps implement simple logic. If the expression in the main part returns
true, make one group of actions. If it returnsfalse, make another group of actions. In this case, check for the presence of a folder with input data, and if this folder was not created, skip the part of the processing. The input folder may be empty, but it must exist.- Select the action in the Conditions group in Actions library.
- Set the field required to create an expression.
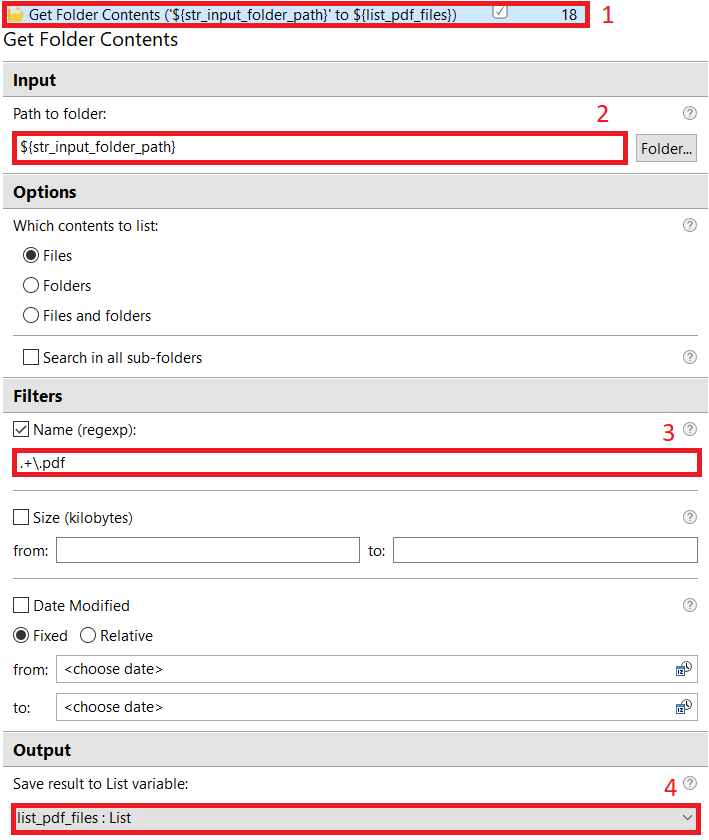
The Get Folder Contents action allows getting the path to all PDF files in a folder and saving these paths in the list.
- Select the action in the Files and Folders group in Actions library.
- Specify the path to the folder where you want to get the file paths.
- If you are going to use this action again, set the format of the files for which you want to get the paths.
- In this field, set a List variable to save the result of this action.
The Exception Handling block of exceptions closes Adobe Reader if something happens to the application. This allows your program shutting down without errors.
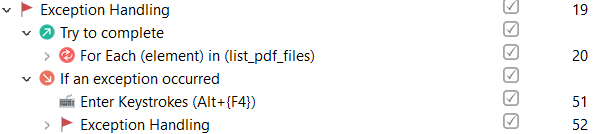
For Each is a loop performing all the actions inside it for all the items in the list. If we talk about your use case, process all the files using the file paths from the list.
- Specify the list with the file paths.
- Select a variable that contains the current item in the list.
- Use the For Each block with actions performed for each item in the list.

Convert file from PDF to TXT (reusable)
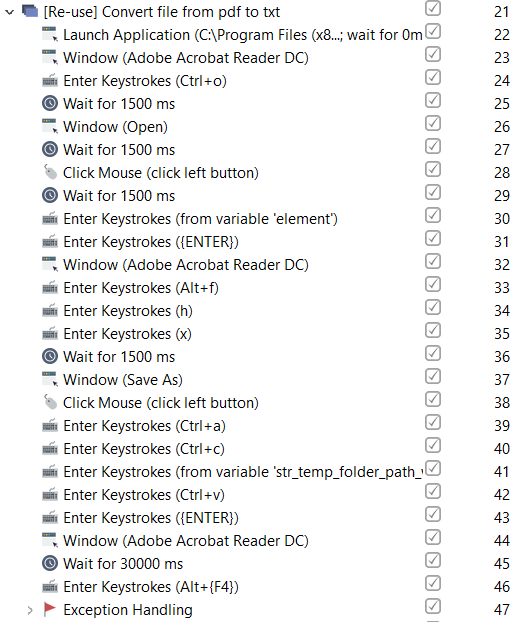
In this part of the sample, convert a file from PDF to TXT. For work, two variables are used:
element: the path to the input PDF file.str_temp_folder_path_with_slash: the path to the temporary directory to save the result of the conversion to.
This is just an example. You can use any variable names you prefer. Take a closer look at how it works:
Actions 22-23 open Adobe Reader and switch to the application window.
Actions 24-27 open the Open dialog box and switch to it.
Actions 28-31 click the text box to enter the path, enter the path to the PDF file, and press Enter.
Actions 32-35 return to the Adobe Reader window, open the File tab, select Save as Other and Text.
Actions 36-38 switch to the Save As window and click the text box to enter the path to save the result.
Actions 39-43 copy the current filename to the clipboard, enter the path to the temporary folder and add the filename to the end, press the Enter key.
Actions 44-47 return to the Adobe Reader window, wait for the end of the conversion process, and close the application.
The Launch Application action simply launches the application to which you have specified the path.
Select the action in the Application group in Actions library.
In this field, specify the path to the EXE file for the application, or use the cmd command to start the application with certain parameters.

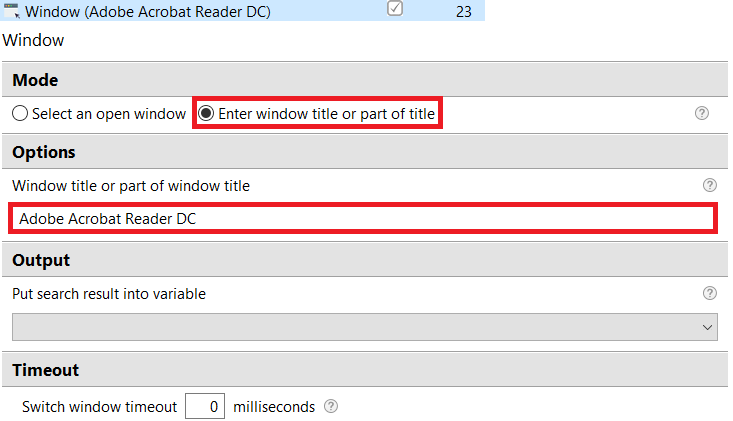
The Window action can switch to an open window using a selector or text contained in the window title.
Open the Open dialog box and switch to it.
The step includes the Enter Keystrokes, Wait, and Window actions.
Enter Keystrokes. Press the hotkey combination to open the Open dialog box.

Wait. Use the action after pressing hotkeys and switching. If your computer has low technical parameters, it may not have time to open the window, and the bot proceeds to the next action.

Window. The action performs the same action as action 23, but switches to the Open dialog box.
Click the text box to enter the path, enter the path to the PDF file, and press Enter.
These actions click the fields to enter the path to the input file and enter this path, on finishing, press Enter.
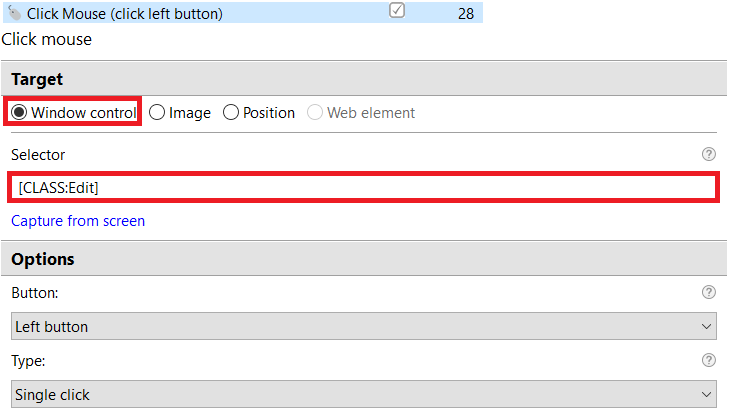
Mouse Click. In this action, use the selector to search for the field on the window and make one click with the left mouse button.
Enter Keystrokes. Enter text from a variable with the path to the input file.

Enter Keystrokes. Press Enter.

Return to the Adobe Reader window.
Open the File tab, select Save As and Text.
This part of the reused group returns to the Adobe Reader window and goes to File > Save As Other > Text.
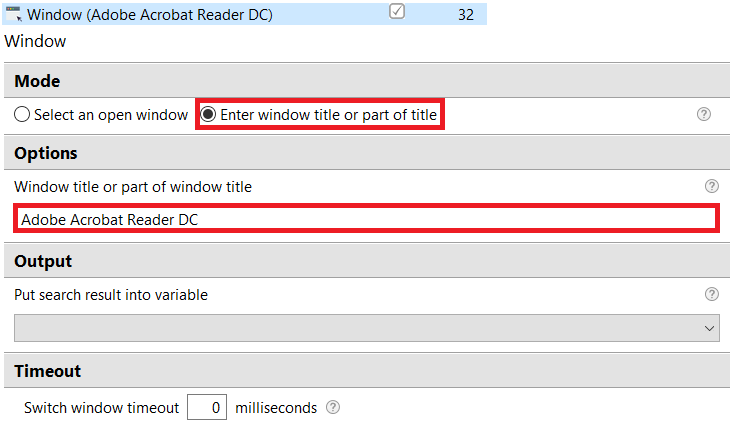
Window. Go back to Adobe Reader using part of the window title.
Enter Keystrokes. Press
Alt+fto open the File tab, then presshto go to the Save as option on the File tab. Then, pressxto set the Text option.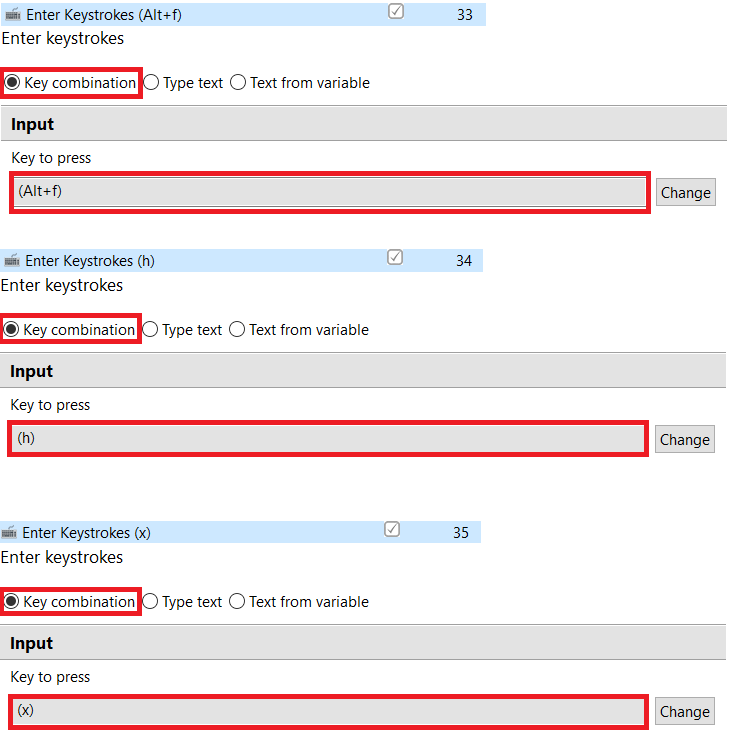
Switch to the Save As window and click the text box to enter the path to save the result.
In the beginning, wait for the Save As dialog box to open, switch to it, and click the field to enter the path.
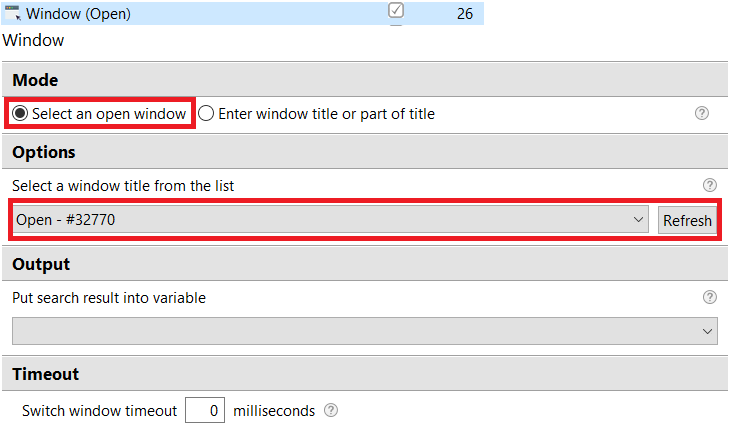
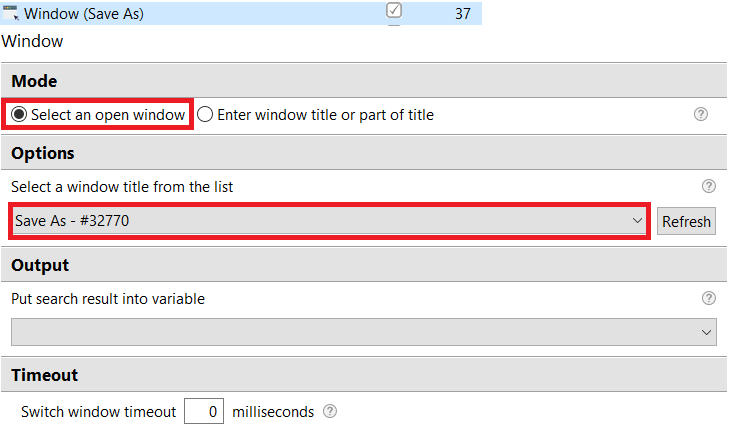
Window. Go to the Save As window using Select an open window and select this window on the Parameters tab.
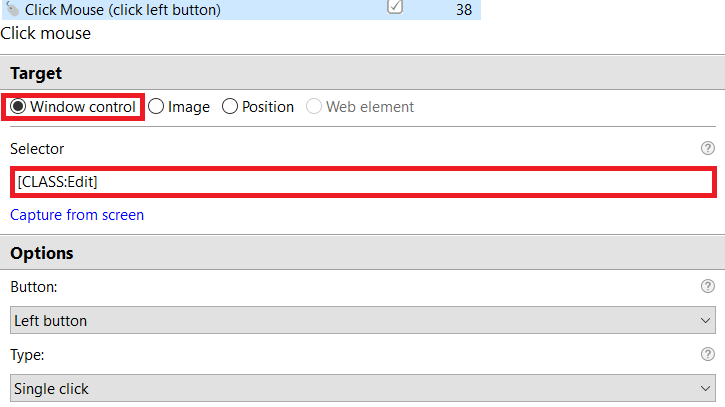
Mouse Click. The same action as action 28, since the selectors for these fields in the Open and Save As windows are the same.
Copy the current filename to the clipboard, enter the path to the temporary folder, and add the filename to the end, press Enter.
When you open the Save As dialog box, the path field contains the filename. Select all the text from this field and save it to the clipboard. After copying, enter the path to the temporary folder with the slash symbol at the end, and using Ctrl+v paste the filename. As a result, you have a path to save the TXT file with the original name to a temporary folder. Then press Enter.
Enter Keystrokes. At the beginning, press the
Ctrl+acombination for the selected text, after you save this text (filename) in the clipboard and, when all the text is selected, enter the path to the temporary folder instead of the filename, and add the filename to the end of the clipboard.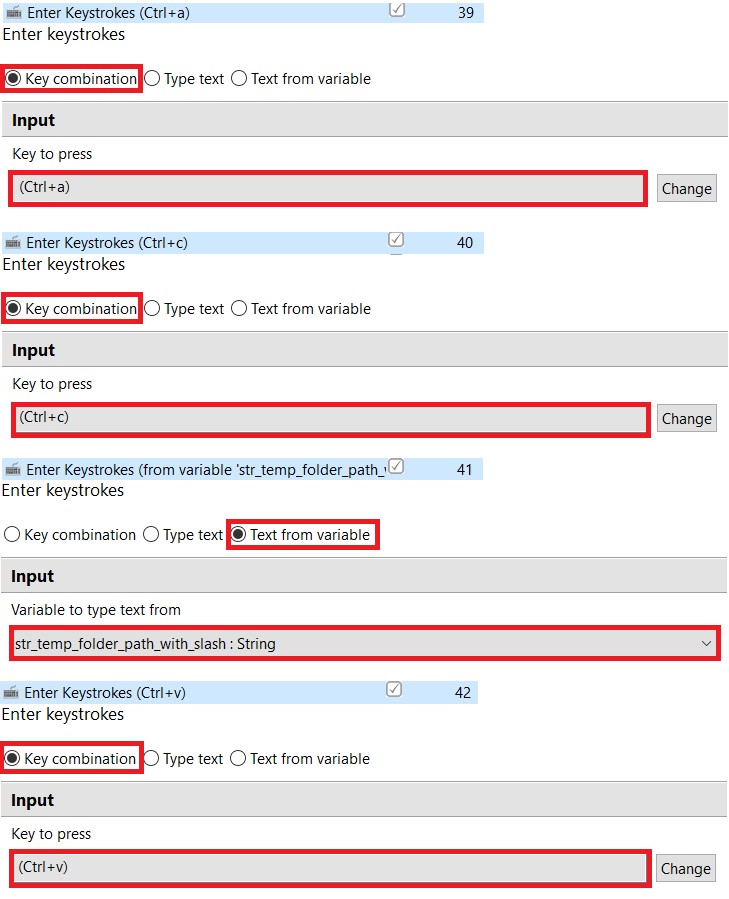
Enter Keystrokes. Press the Enter key to start the conversion and save the result.

Return to the Adobe Reader window, wait for the end of the conversion process, and close the application
Return to Adobe Reader, wait for the end of the process, and close the application.
Window. Go back to Adobe Reader using a part of the window title.
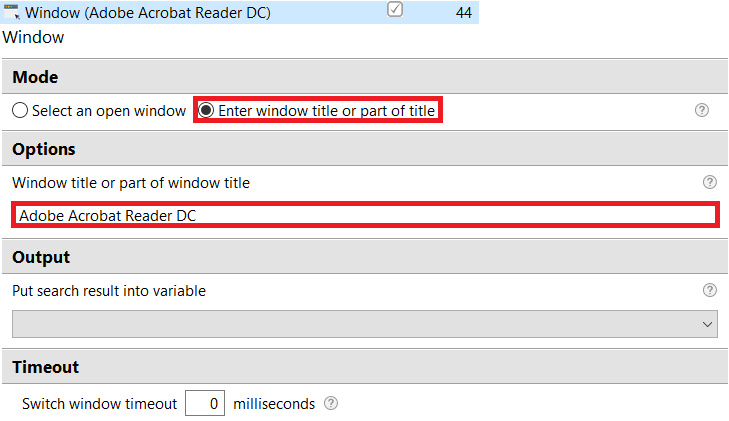
Wait. Wait for the conversion process to end. If you have a weak computer, set up more time to process.

Enter Keystrokes. Press the
Alt+F4combination to close the current application window.
Process data and save results
Description: The group processes the converted PDF files to XLSX. The input to this part is the TXT files from the temporary folder, and output are XLSX files stored in a temporary folder. The case is not universal, it can only process files in one format, so this part is individual for each format.
Reusable element: The Custom action downloads the file by a direct link to the folder. This is very useful if you store your files on external storage and have links to them. This action allows saving your file in any directory and with any name.
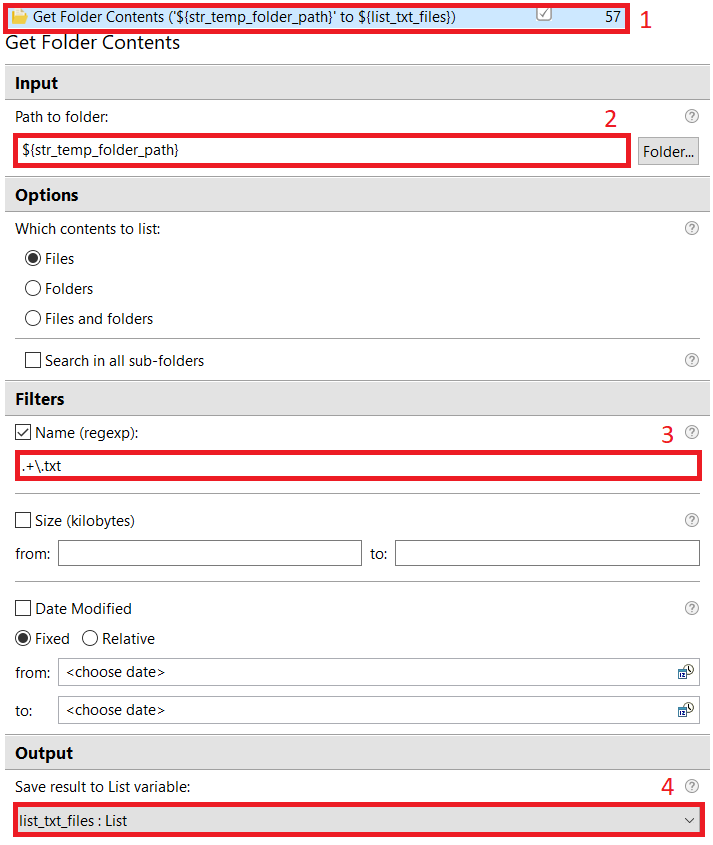
The Get Folder Contents action allows getting the path to all TXT files in a folder and saving these paths in the list.
- Select the action in the Files and Folders group in Actions library.
- Specify the path to the folder to get the file paths.
- If you are going to use this action again, set the format of the files for which you want to get the paths.
- Set a List variable to save the result of the action.
The Exception Handling block intercepts all exceptions during processing. If something is caught, skip the processing step and proceed to generate the result.

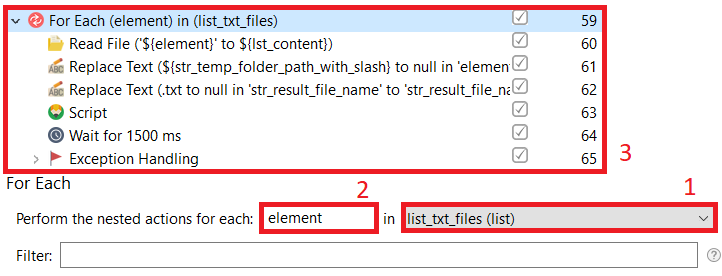
For Each is a loop performing all the actions inside it for all the items in the list. For your use case, process all the files using the file paths from the list.
- Specify the list with file paths.
- Set a variable that contains the current item in the list.
- Use the For Each block with actions to be performed for each item in the list.
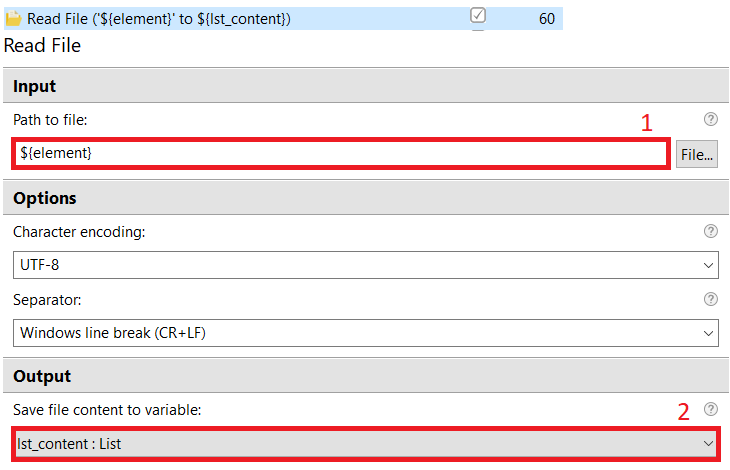
The Read File action reads information from a TXT file and saves the result to a list or string variable.
noteIf you save the result in a List variable, each line from the file is saved in the list separately. If you save in a String variable, all the information is saved as one line.
- Specify the path to the file. We use the
elementvariable, since it contains the path to one of the TXT files from the temporary folder. - In this field, select a variable to save the result.
- Specify the path to the file. We use the
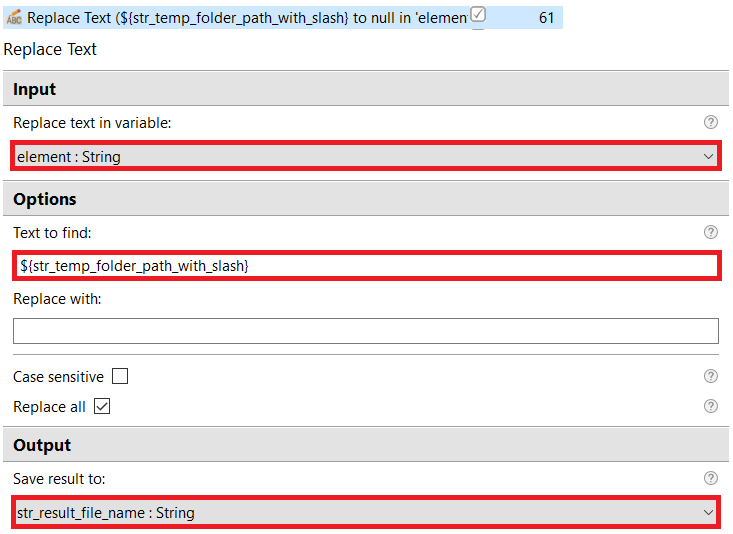
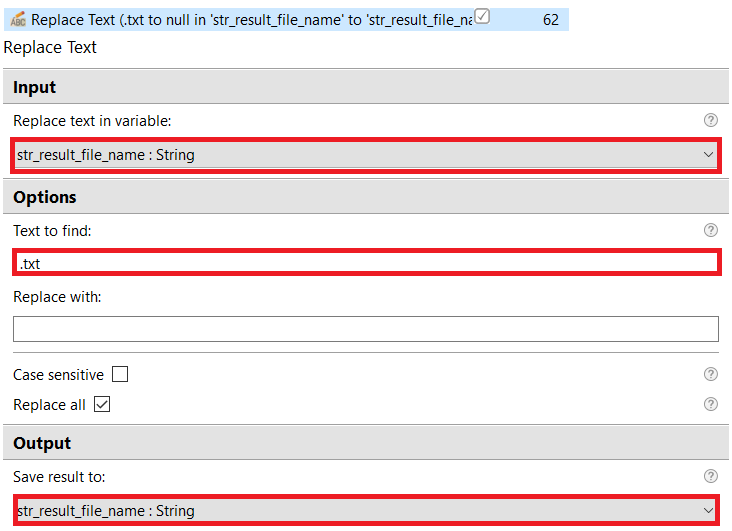
Get the filename from the file path. Replace the path (Replace Text) to the temporary folder and the format TXT to null. As a result, you get only the filename.
- The action replaces the path to the temporary folder to null.
- The action replaces the file format TXT to null.
Download the file by direct link to the folder (reusable)
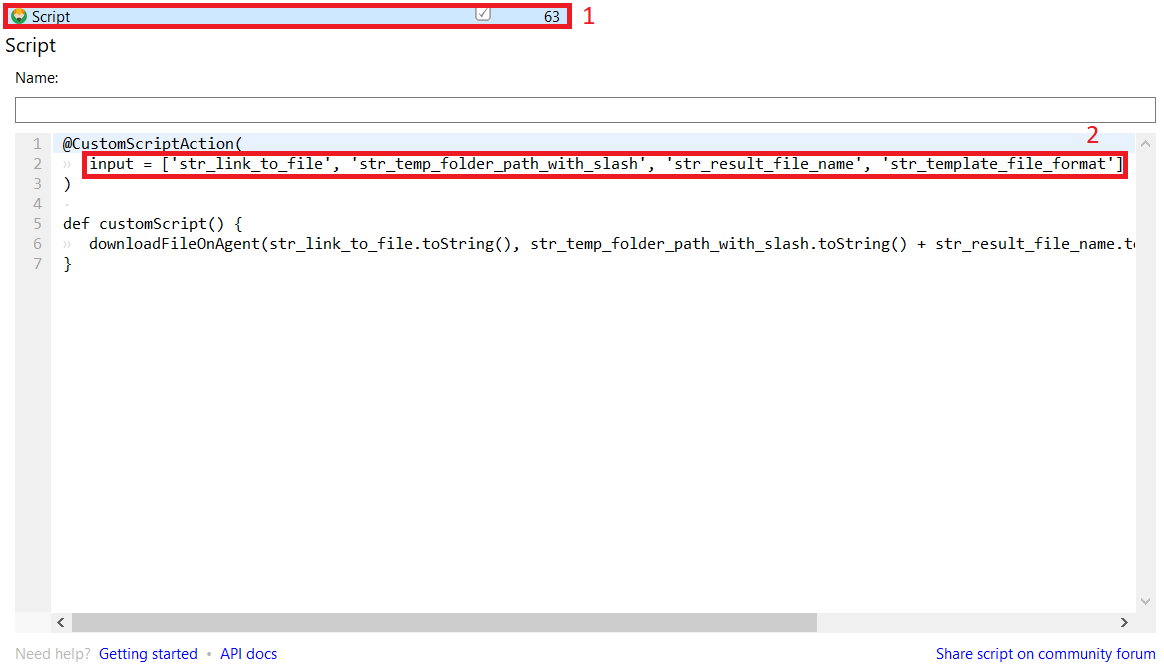
It is a custom action for downloading a file using a direct link to the folder. With this action, upload a file from the network and assign a name that is more convenient for you.
- The action replaces 15-20 standard actions with the browser and desktop and does not depend on the browser.
For work several variables are used:
str_link_to_file: a direct link to a template or other file on the network.str_temp_folder_path_with_slash: the path to the folder to download the file.str_result_file_name: the filename it will have after downloading.str_template_file_format: the variable should contain the file format, for example, XLSX, or you can add the file format to a variable with the filename and leave the variable empty.
This is just an example. You can use any variable names you prefer. Take a closer look at how it works.
The action uses the program command to download. Inside it, a path is created to save the file of input variables, and using this path and a link to the file, it downloads it.
All input variables must be created; otherwise, the action will not work.
The Exception Handling action is necessary to trap errors when handling an Excel file. If it intercepts anything, it deletes the XLSX file and goes to the next one.

The Open Spreadsheet action opens the Excel file in the background and allows working with it. In this case, open the template that you downloaded in action 63.
- Select the action in the Excel group in Actions library.
- Specify the path to the pattern. Form it from the
str_temp_folder_path_with_slash,str_result_file_nameandstr_template_file_formatvariables. - Select the checkbox to save the file after completing work with this file.
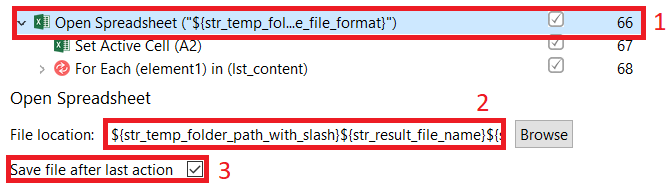
Set the active cell to A2, because A1 is the standard starting cell, but the first row of the template is used for headers.

The For Each cycle is needed for processing each line from the input file.
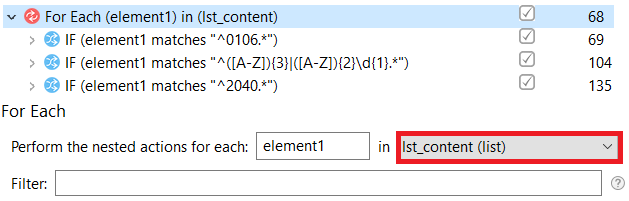
Business logic implementation: This part of the group implements business logic and contains three actions with a regular expression.
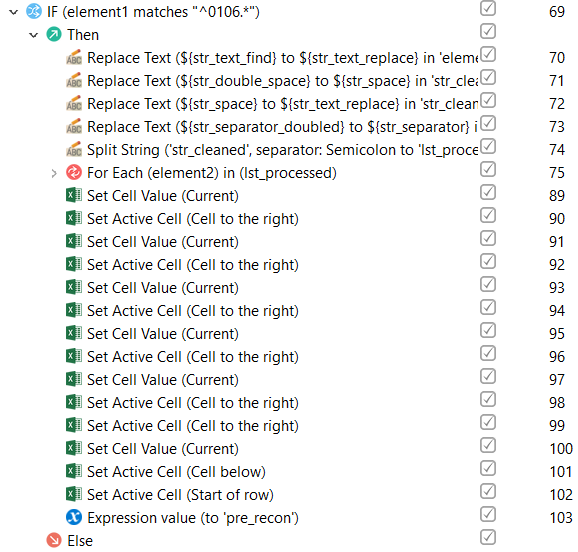
- The action processes all the transactions with the code 0106, enters this data into the Excel file, and sets the status.
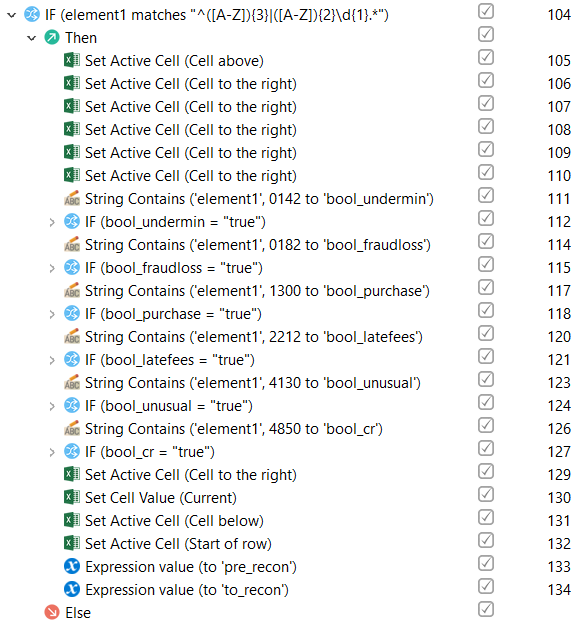
- The action returns to the previous line if the current line starts with an operator code, not a transaction code, and adds additional information about the transaction.
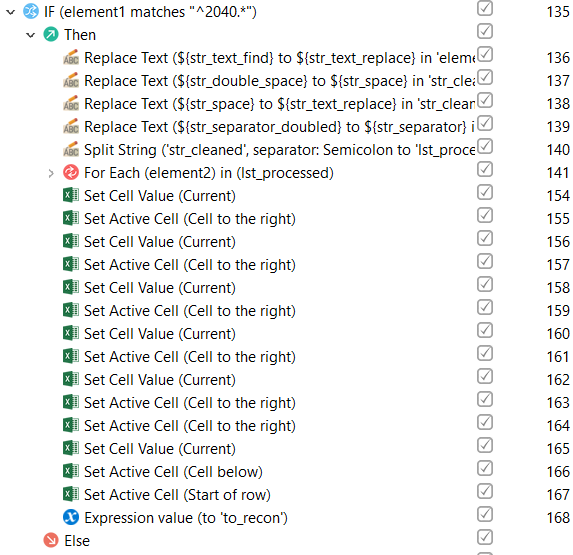
- The action processes all the transactions with the code 2040, enters this data into the Excel file, and sets the status.
Generate report
Description: This reusable group gets all the files with the selected format from a temporary folder and saves them to the results folder. You can use it not only for generating reports, but also for copying files of one format from folder to folder.
It would be more correct to use this group with reusable groups from the first part:
- Create a temporary folder.
- Create a result folder.
- Create a folder with a name as the current date.
The result generation reusable group gets all the files with the selected format from a temporary folder and saves them to the results folder.
For work, two variables are used:
str_temp_folder_path: the path to the temporary directory from which you move files.str_result_path: the path to the resulting directory where you move the files.
This is just an example. You can use any variable names you like. Below we take a closer look at how it works:
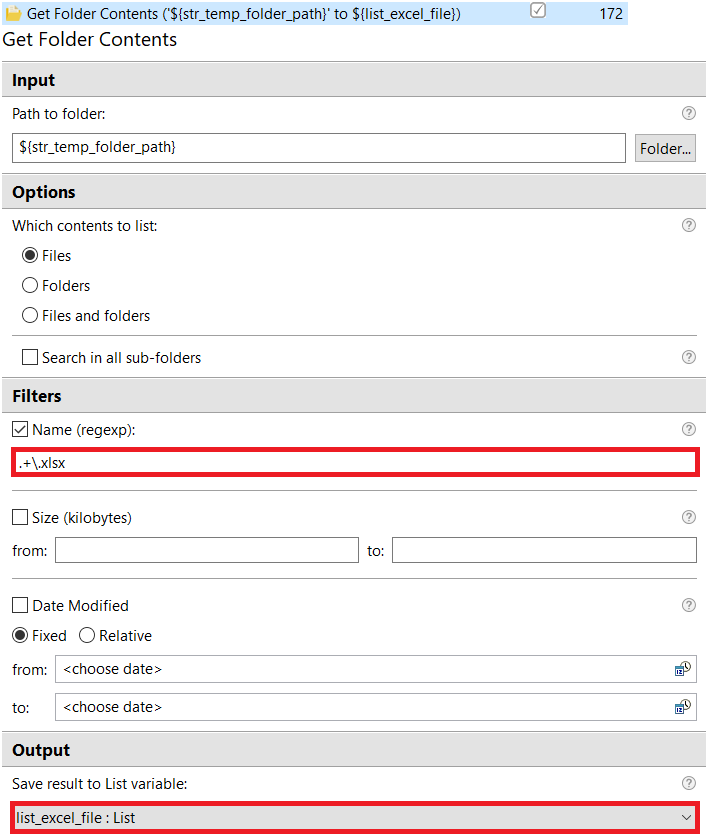
- Action 172 gets the paths to all XLSX files in a temporary folder.
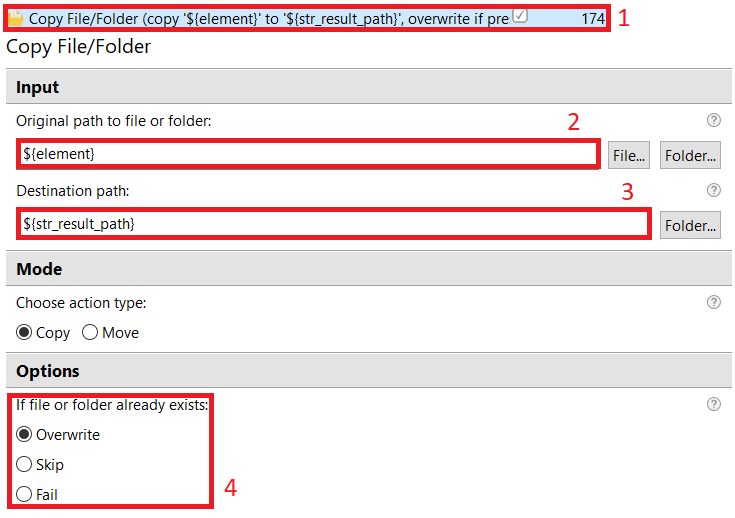
- Actions 173-174 copy files from the temporary folder to the results folder.
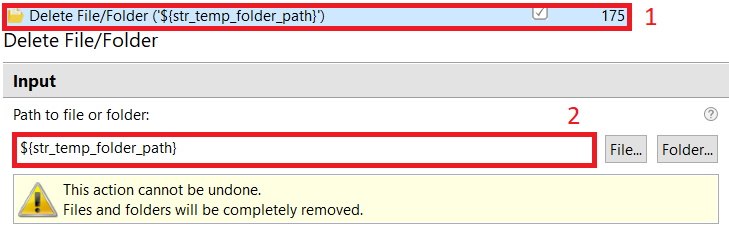
- Action 175 deletes the temporary folder.

The Get Folder Contents action works like action 18, but you get the paths to the XLSX files, not the PDF files. The result is a list of the paths to the XLSX files in the temporary folder.
The For Each cycle is required to move all the files from the list from the previous step.

The Copy File/Folder action can copy or move files, in which case you copy the file from the temporary folder to the results folder. If a file with that name exists, it overwrites this file and replaces it with a newer version.
- Select the action in the Files and Folders group in Actions library.
- The
elementvariable was created in the For each action in the previous step and contains the path to the XLSX file in the temporary folder. - Set the destination path to the folder with the results. This variable was received in the Create a folder with name as a current date group.
- On the tab, choose what to do if a file with the same name exists in the folder where you are trying to copy or move the file.
The Delete File/Folder action simply deletes the temporary folder. After completing the sample, you have only one new folder, that is the folder with the results, without intermediate files and folders.