Benefit of pre-packaged components
For Tutorial source code, see Source code access.
Definition
Before you create your first project based on ODF, we highly recommend to study all the details of the tutorial Invoices sample. With such example implementation, it's easier and faster to grasp lots of ODF concepts altogether.
Introduction
Solution Business Process was created with both pre-packaged components (bottom row in Figure 1) and custom-created steps (top row in Figure 1).
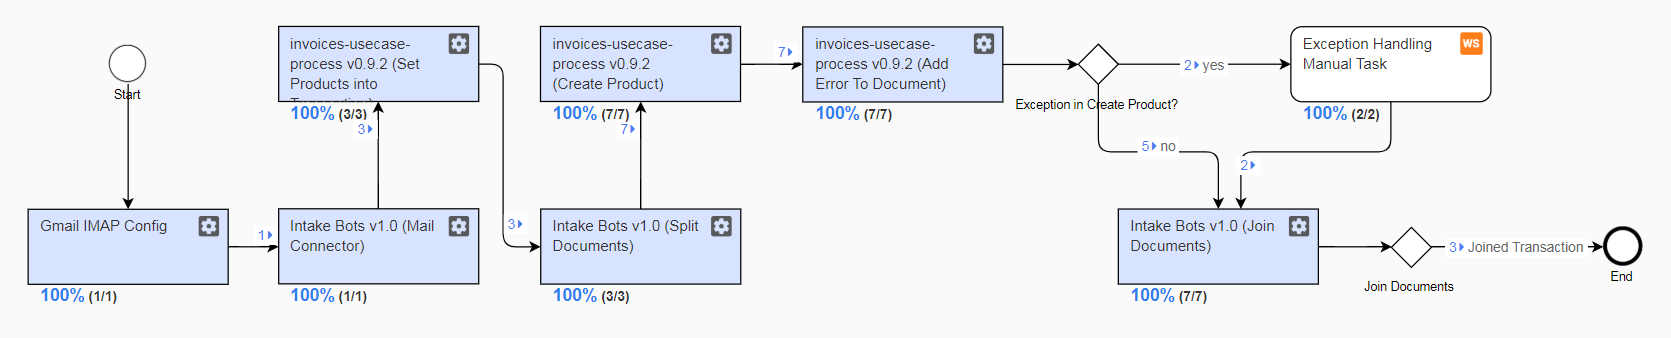
In this tutorial implementation, we will design a solution of the Robotic RPA sample, which uses some pre-packaged ODF components. Scope of automation includes reading new emails from Gmail, parsing attached Excel files to extract Products and enter into the InvoicePlane web application. Proper business exception handling using Manual Task is in scope.
Implement the applications communication sequence in the following way:
Mail Connector: Configure the Gmail IMAP folder to be a source of email messages. Processed messages should be marked and skipped during the next execution.
InvoicePlane: Log in to the InvoicePlane web application, navigate to the Create Product page and enter a new Product. If a Product form cannot be saved, an exception must be captured in a user-friendly manner, so that the user should understand the cause of the issue.
Transactions data: Results of Excel parsing as well as the status of Products entering should accumulate for all executions and be available in the Transactions Data Store
Excel: Attached XLSX contains a single sheet with the following columns:
family sku name description price tax
Design requirements
- Use the local Control Tower integration with remote Nexus to test the developed solution.
- All dependencies must be taken from the ODF Nexus REPOSITORY: https://repository.workfusion.com/content/repositories/wf-dependencies.
- Design RPA code by the following RPA guides.
- Use the Split-Join pre-packaged component: Documents Split-Join.
- Store apps credentials in Secrets Vault: Utilities | Work with Secrets Vault.
- From the performance perspective, it does make sense to parallel execution of the Product Creation bot.
Shared components
Use a separate Git repository for the system automated. The idea is that other teams within your company may reuse the RPA code you create to automate the InvoicePlane application.
- URL:
https://train-invoiceplane.workfusion.com/ - Login:
wf-robot@mail.com - Password:
BotsRock4ever!
Gmail account to use
Create one for your exercise. Make sure to configure additional permissions in your Google account to let an external service access the created mailbox.
- Go to your Google Account.
- On the left navigation panel, click Security.
- Click Turn on access on the Less secure app access panel at the bottom of the page.
Results
Result Data Store should contain an Email processed with data:
- List of Products with data for each product: family, sku, name, description, price, tax
- Any exceptions occurred while entering Products into the InvoicePlane application
- ID of the Business Process each Product executed
Solution
Go ahead and check out the source code of Invoices sample from ODF GitHub. Get it working both in your Eclipse and local Control Tower with the Work.AI license configured. It is important that you deeply review and understand each Bot Task and Java class implementation to grasp the following concepts.
- Design and test each Bot Task (XML) individually in Eclipse. Bot Task will call your Java classes.
- Simulate Input Data by bringing in Result Data of the previous Bot Task executed in Control Tower.
- Simulate as Data Store, containing Transactions (
wfs_data/datastore/_intake_transactions_v04.csv). - Use Secrets Vault and Global Variables for testing purposes to keep Bot Task unchanged in Eclipse and Control Tower.
- Design your custom
TransactionSupplier,TransactionProcessor, andDocumentProcessor. - Use out-of-the-box split and join Transactions by Documents.
- Use out-of-the-box mail IMAP connector.
- Handle exceptions using try-catch mechanisms in both Java and Bot Task. Handle failed records in Manual Task.
Get Tutorial project sources in Source code access | ODF tutorial sample project sources.
Process flow explained
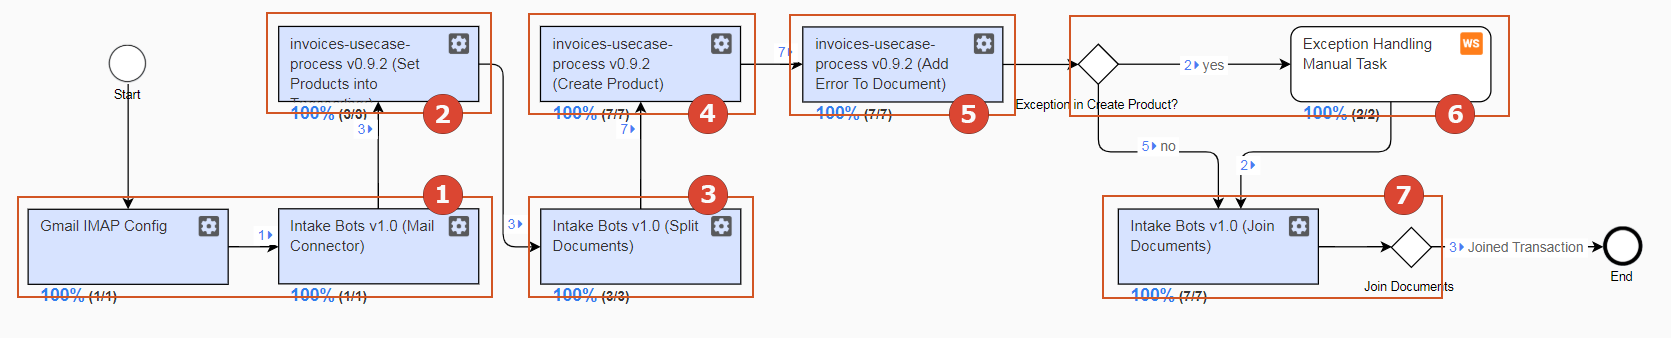
According to the process logic, a flow can be represented as 7 groups. Grouping is shown in Figure 2. Use tabs below to learn in detail each group design. Make sure you test each Bot Task in your Eclipse and assemble/run the whole process on your Control Tower.
Start from fetching emails
In order to provide input data for this process, we should choose the IMAP folder (can be usual Inbox) and have mailbox credentials ready to provision.
So, our process will start with "No Data" and by its own retrieve input data. All new emails fetched will be treated as "Transactions", for example, 1 Email = 1 Transaction.
So, Bot Tasks Gmail IMAP Config (IMAP Mail Connector Settings v10.1) and Intake Bots v1.0 (Mail Convertor) fetch emails, parse them, and put all email data (email attributes and attached documents) into a Transaction object.
To assemble those steps, you go into reusable components in Workflow designer (the Bot tab), find those two bots, drag them into your process canvas, and connect with transition arrows. Then, double-click the bot step, select ETL > IMAP Mail Connector Settings v10.1, and specify parameters in the Bot step configuration form.
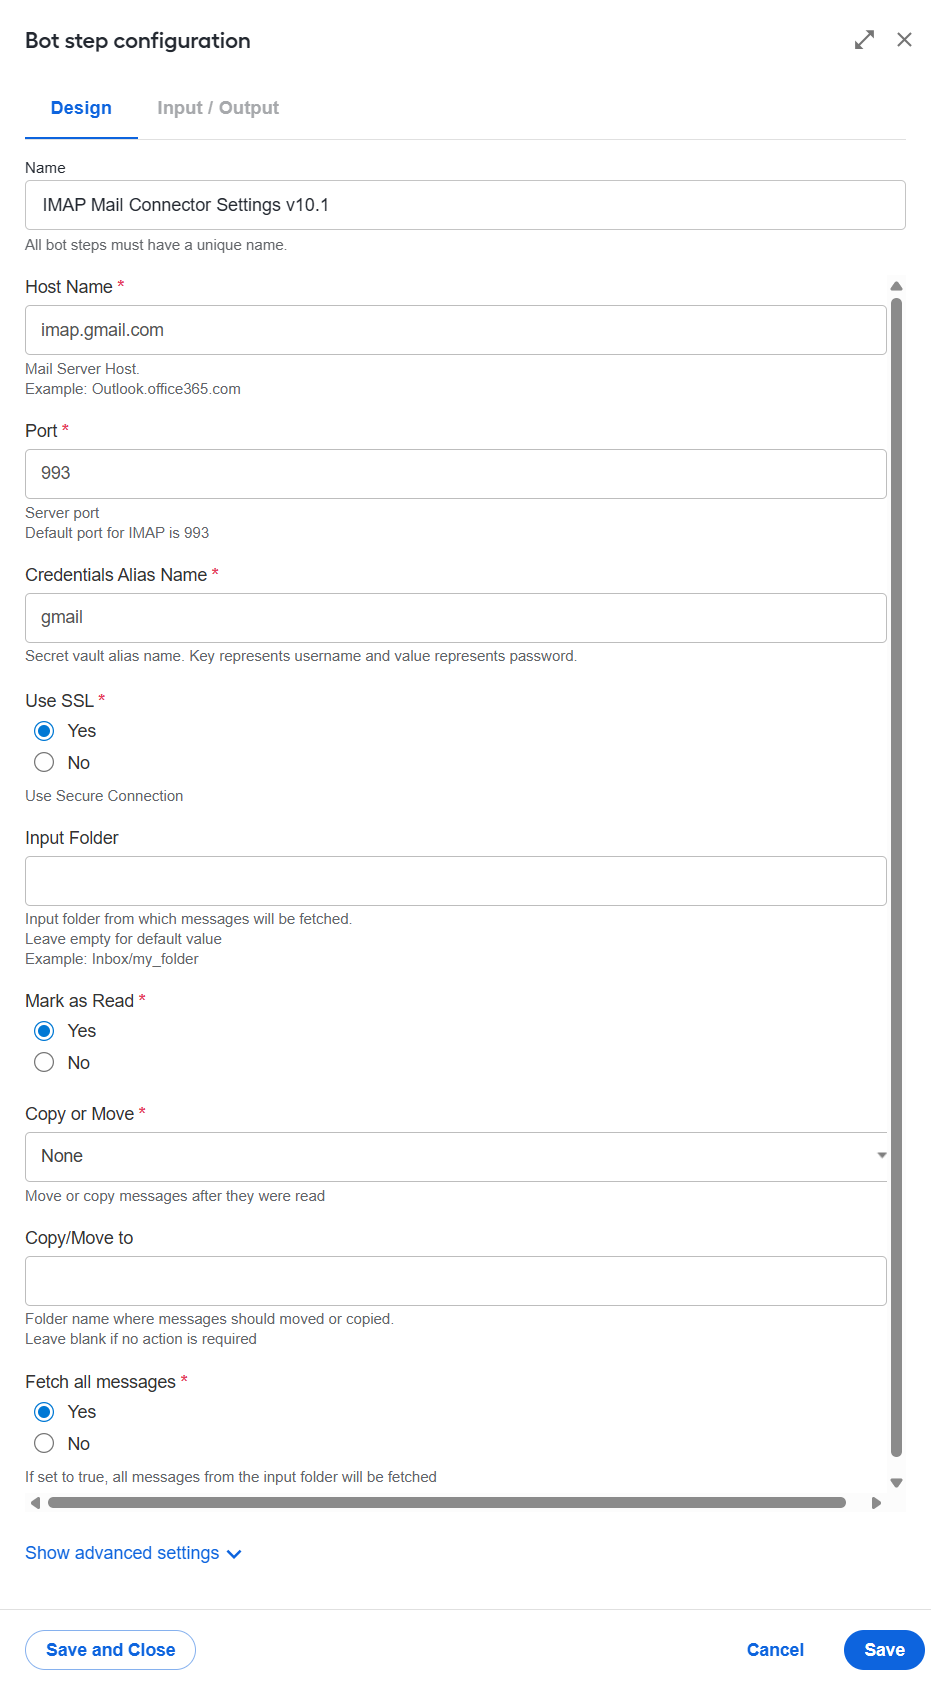
You should put the Secrets Vault credentials alias as one of parameters. Make sure you have such alias with the Gmail account username and password configured both in your Eclipse (where you test your Bot Tasks and Java code) and Control Tower (where you test your process end-to-end).
Intake Bots v1.0 (Mail Convertor) is not modified or configured – it comes 100% out of the box.
See how the serialized Transaction will look like as of the first step result
{
  "meta" : { },
  "id" : "c7b8d2d7-4a1d-4cdc-a753-6e0479ccb6b0",
  "docs" : [ {
    "meta" : {
      "cc" : "",
      "subject" : "Email One",
      "from" : "John Doe <john.doe@gmail.com>",
      "to" : "lecter.hannibal.rpa@gmail.com"
    },
    "id" : "ce696247-95ba-4659-87f2-a0c04e7549bf",
    "name" : "Email One",
    "type" : "Message",
    "textLink" : "http://localhost:15110/doc-upload/89ebf189-de31-4f0a-b551-8577ba9a6523.html",
    "taggedTextLink" : null,
    "originalDocumentLink" : null,
    "extractedFields" : { },
    "origin" : null,
    "merged" : false
  }, {
    "meta" : { },
    "id" : "a61d005c-9401-4ea0-a139-92da3b0a769b",
    "name" : "odf-input-1.xlsx",
    "type" : "Attachment",
    "textLink" : null,
    "taggedTextLink" : null,
    "originalDocumentLink" : "http://localhost:15110/doc-upload/591fbd06-ebeb-4e40-bef2-bf3d869d8c6c.xlsx",
    "extractedFields" : { },
    "origin" : null,
    "merged" : false
  } ]
}
Continue to product parsing
At this point, we need to parse the attached Excel files to extract Products. After that, we are adding Products data (we set extractedFields Map of Document object) into each Transaction object.
We are doing it in EmailMessageProcessor that implements TransactionProcessor
package com.ibank.automation.invoicesusecase.processor;

import com.workfusion.intake.api.domain.Document;
import com.workfusion.intake.api.domain.Field;
import com.workfusion.intake.api.domain.Transaction;
import com.workfusion.intake.processor.TransactionProcessor;
import com.ibank.automation.invoicesusecase.service.ExcelService;
import com.ibank.automation.system.invoiceplane.to.ProductTO;
import com.workfusion.rpa.core.storage.S3Manager;
import javax.inject.Inject;
import java.util.ArrayList;
import java.util.List;
import java.util.UUID;

public class EmailMessageProcessor implements TransactionProcessor {

    private S3Manager s3Manager;

    private final String EXPECTED_FILE_EXTENSION = "xlsx";

    @Inject
    public EmailMessageProcessor(final S3Manager s3Manager) {
        this.s3Manager = s3Manager;
    }

    @Override
    public Transaction transform(final Transaction transaction) {
        if (!transaction.getDocs().isEmpty()) {
            for (Document doc : transaction.getDocs()) {
                if (doc!=null && doc.getOriginalDocumentLink()!=null && doc.getOriginalDocumentLink().contains(EXPECTED_FILE_EXTENSION)) {

                    byte[] content = s3Manager.getContent(doc.getOriginalDocumentLink());

                    try {
                        List<ProductTO> products = ExcelService.parseProducts(content);
                        List<Document> newProductDocs = new ArrayList<Document>();
                        for(ProductTO product : products) {
                            Document newDoc = mapProductToDocument(product);
                            newProductDocs.add(newDoc);
                        }

                        transaction.setDocs(newProductDocs);
                        return transaction;

                    } catch (Exception e) {
                        e.printStackTrace();
                    }

                }
            }
        }
        return transaction;
    }

    private Document mapProductToDocument(ProductTO productTO){
        Document document = new Document();
        document.setId(uuid());
        document.setName(productTO.getProductName());
        document.getExtractedFields().put("family", Field.of(productTO.getFamily()) );
        document.getExtractedFields().put("price", Field.of(productTO.getPrice()) );
        document.getExtractedFields().put("description", Field.of(productTO.getProductDescription()) );
        document.getExtractedFields().put("product_name", Field.of(productTO.getProductName()) );
        document.getExtractedFields().put("sku", Field.of(productTO.getSku()) );
        document.getExtractedFields().put("tax_rate", Field.of(productTO.getTaxRate()) );
        document.setType(ProductTO.class.getName());
        return document;
    }

    private String uuid() {
        return UUID.randomUUID().toString();
    }

}
After this step, `Transaction` will look like as follows
{
  "meta" : { },
  "id" : "5255c503-7dae-48a0-83b0-ee5a43509e80",
  "docs" : [ {
    "meta" : { },
    "id" : "3ccdc4af-0c0f-4da6-81de-696a3e927725",
    "name" : "iPhone X",
    "type" : "com.ibank.automation.system.invoiceplane.to.ProductTO",
    "textLink" : null,
    "taggedTextLink" : null,
    "originalDocumentLink" : null,
    "extractedFields" : {
      "price" : {
        "singleValue" : "1500.0"
      },
      "description" : {
        "singleValue" : "hipsters dream"
      },
      "family" : {
        "singleValue" : "Phones"
      },
      "sku" : {
        "singleValue" : "220120.0"
      },
      "product_name" : {
        "singleValue" : "iPhone X"
      },
      "tax_rate" : {
        "singleValue" : "None"
      }
    },
    "origin" : null,
    "merged" : false
  }, {
    "meta" : { },
    "id" : "a41413b0-e4b3-4e1c-851f-d2e880657143",
    "name" : "Google Nexus",
    "type" : "com.ibank.automation.system.invoiceplane.to.ProductTO",
    "textLink" : null,
    "taggedTextLink" : null,
    "originalDocumentLink" : null,
    "extractedFields" : {
      "price" : {
        "singleValue" : "800.0"
      },
      "description" : {
        "singleValue" : ""
      },
      "family" : {
        "singleValue" : "Phones"
      },
      "sku" : {
        "singleValue" : "221121.0"
      },
      "product_name" : {
        "singleValue" : "Google Nexus"
      },
      "tax_rate" : {
        "singleValue" : "None"
      }
    },
    "origin" : null,
    "merged" : false
  } ]
}
Split transactions by documents
This is 100% out-of-the-box step. We need just to drag-and-drop Intake Bots v1.0 (Split Documents) bot from reusable components and connect it with transition arrows.
This bot will lead to duplication of transactions to multiple items with a unique document ID in each.
Create product with RPA
Now, it's time to add Bot Task containing <robotics-flow><robot>...</robot></robotics-flow> and call RPA Java code inside. We will implement CreateProductProcessor, which extends DocumentProcessor and overrides the processDocument(Document document) method.
@Override
protected Document processDocument(Document document) {
    ProductTO product = mapDocumentToProduct(document);
    new InvoicePlaneBusinessRobot(securityUtils, logger, params).addProduct(product);
    return document;
}
The InvoicePlaneBusinessRobot class encapsulates all the RPA business logic of our sample
package com.ibank.automation.invoicesusecase.rpa;

import com.workfusion.bot.service.SecureEntryDTO;
import com.workfusion.intake.api.domain.Document;
import com.workfusion.intake.api.domain.Field;
import com.ibank.automation.system.invoiceplane.InvoicePlaneClient;
import com.ibank.automation.system.invoiceplane.page.CreateProductPage;
import com.ibank.automation.system.invoiceplane.page.LoginPage;
import com.ibank.automation.system.invoiceplane.page.MainPage;
import com.ibank.automation.system.invoiceplane.page.MenuNavigationBar;
import com.ibank.automation.system.invoiceplane.page.ProductsPage;
import com.ibank.automation.system.invoiceplane.to.ProductTO;
import com.workfusion.rpa.core.security.SecurityUtils;
import org.slf4j.Logger;
import java.util.ArrayList;
import java.util.List;
import java.util.Map;
import java.util.UUID;
import java.util.concurrent.ConcurrentHashMap;
import java.util.function.Function;
import java.util.function.Predicate;
import java.util.stream.Collectors;

public class InvoicePlaneBusinessRobot {

    public static final String INVOICEPLANE_CREDENTIALS_ALIAS = "invoiceplane_credentials_alias";

    private final SecurityUtils securityUtils;

    private final Logger logger;

    private static final int EXPECTED_PRODUCTS_COUNT = 20;

    private Map<String, String> params;

    private MenuNavigationBar menuNavigationBar;

    public InvoicePlaneBusinessRobot(final SecurityUtils securityUtils, final Logger logger, Map<String, String> params) {
        this.logger = logger;
        this.securityUtils = securityUtils;
        this.params = params;
    }

    public ProductsPage addProduct(ProductTO product) {
        initRobot();
        final CreateProductPage createProductPage = menuNavigationBar.openCreateProduct();
        ProductsPage productsPage = createProductPage.addProduct(product);
        logger.debug("Adding product: " + product.getProductName());
        finiliseRobot();
        return productsPage;
    }

    public List<Document> parseProductsToDocuments() {
        initRobot();
        final List<ProductTO> products = parseProducts();
        logger.debug("Extracted products count: " + products.size());
        finiliseRobot();
        return products.stream().map(this::mapProductToDocument).limit(EXPECTED_PRODUCTS_COUNT)
                .collect(Collectors.toList());
    }

    private MainPage initRobot() {
        final InvoicePlaneClient client = new InvoicePlaneClient(logger, params);
        final LoginPage loginPage = client.getLoginPage();

        final SecureEntryDTO loginCreds = getLoginCreds();
        final MainPage mainPage = loginPage.login(loginCreds);

        this.menuNavigationBar = new MenuNavigationBar(logger);

        return mainPage;
    }

    private SecureEntryDTO getLoginCreds() {
        final SecureEntryDTO secureEntry = securityUtils.getSecureEntry(INVOICEPLANE_CREDENTIALS_ALIAS);

        if (secureEntry == null) {
            throw new IllegalStateException(
                    "Could not get credentials from Secret Vault.  set 'admin@workfusion.com' as key, 'o66Lc1Jn6Z' as value for '"
                            + INVOICEPLANE_CREDENTIALS_ALIAS + "' alias in your Secret Vault");
        }
        return secureEntry;
    }

    private List<ProductTO> parseProducts() {
        final ProductsPage productsPage = menuNavigationBar.openProducts();
        final List<ProductTO> products = new ArrayList<ProductTO>();

        while (needMoreProductsAndHasSmthToParse(productsPage, products)) {
            products.addAll(productsPage.getProducts().stream()
                    .filter(distinctByKey(p -> p.getProductName().toLowerCase())).collect(Collectors.toList()));
        }

        return products;
    }

    private String uuid() {
        return UUID.randomUUID().toString();
    }

    private void finiliseRobot() {
        if (menuNavigationBar != null) {
            menuNavigationBar.logout();
            menuNavigationBar = null;
        }
    }

    private <T> Predicate<T> distinctByKey(Function<? super T, Object> keyExtractor) {
        Map<Object, Boolean> map = new ConcurrentHashMap<>();
        return t -> map.putIfAbsent(keyExtractor.apply(t), Boolean.TRUE) == null;
    }

    private boolean needMoreProductsAndHasSmthToParse(ProductsPage productsPage, List<ProductTO> products) {
        return !(products.size() > EXPECTED_PRODUCTS_COUNT || !productsPage.nextPage());
    }

    private Document mapProductToDocument(ProductTO productTO) {
        Document document = new Document();
        document.setId(uuid());
        document.setName(productTO.getProductName());
        document.getExtractedFields().put("family", Field.of(productTO.getFamily()));
        document.getExtractedFields().put("price", Field.of(productTO.getPrice()));
        document.getExtractedFields().put("description", Field.of(productTO.getProductDescription()));
        document.getExtractedFields().put("product_name", Field.of(productTO.getProductName()));
        document.getExtractedFields().put("sku", Field.of(productTO.getSku()));
        document.getExtractedFields().put("tax_rate", Field.of(productTO.getTaxRate()));
        document.getExtractedFields().put("index", Field.of(Long.toString(productTO.getIndex())));
        return document;
    }

}
Mind that actual RPA commands against a certain page are implemented in a separate Maven module: system-invoiceplane. This module contains Selenium PageObjects, one per an application page. For our needs, we call ProductsPage productsPage = createProductPage.addProduct(product);.
Here is the CreateProductPage class
package com.ibank.automation.system.invoiceplane.page;

import org.openqa.selenium.By;
import org.openqa.selenium.TimeoutException;
import org.openqa.selenium.WebElement;
import org.openqa.selenium.support.FindBy;
import org.slf4j.Logger;
import com.ibank.automation.system.invoiceplane.RobotDriverWrapper;
import com.ibank.automation.system.invoiceplane.to.ProductTO;
import java.util.List;

public class CreateProductPage extends RobotDriverWrapper {

    @FindBy(id = "family_id")
    private WebElement family;

    @FindBy(id = "product_sku")
    private WebElement sku;

    @FindBy(id = "product_name")
    private WebElement productName;

    @FindBy(id = "product_description")
    private WebElement productDescription;

    @FindBy(id = "product_price")
    private WebElement productPrice;

    @FindBy(id = "tax_rate_id")
    private WebElement taxRate;

    @FindBy(xpath = "//button[@id='btn-submit']")
    private WebElement submit;

    @FindBy(xpath = "//div[@class='alert alert-danger']")
    private List<WebElement> addProductFailed;

    public CreateProductPage(Logger logger) {
        super(logger);
    }

    public ProductsPage addProduct(ProductTO product) {
        family.click();
        family.findElement(By.xpath("//option[contains(.,'" + product.getFamily() + "')]")).click();

        sku.click();
        sku.clear();
        sku.sendKeys(product.getSku());

        productName.click();
        productName.clear();
        productName.sendKeys(product.getProductName());

        productDescription.click();
        productDescription.clear();
        productDescription.sendKeys(product.getProductDescription());

        productPrice.click();
        productPrice.clear();
        productPrice.sendKeys(product.getPrice());

        taxRate.click();
        taxRate.findElement(By.xpath("//option[contains(.,'" + product.getFamily() + "')]")).click();

        submit.click();

        try {
            if (addProductFailed.size() > 0) {
                logger.debug(String.valueOf(addProductFailed.size()));
                throw new RuntimeException(addProductFailed.get(0).getText() + "\n" + "Product: " + product.getProductName());
            }
        } catch (TimeoutException e) {
            logger.debug("Unkown error during creation of Invoice Plane product");
            throw new RuntimeException();
        }

        return new ProductsPage(logger);
    }

}
It is important to understand how a business exception is handled in this PageObject. According to the InvoicePlane logic, there are three required fields in the form. If input data lacks any of those, the page won't save, and the application shows validation errors. Mind that after submit.click() we have a block of code that expects error messages (Selenium implicitlyWait, which we set in InvoicePlaneClient helps us to wait up to the maximum time we have configured).
If a validation error happens or if an application timeout occurs, our PageObject throws a Java exception with a user-friendly message.
In the Bot Task, we catch all exceptions and can route process execution to human-in-the-loop processing
<?xml version="1.0" encoding="UTF-8"?>
<config xmlns="http://web-harvest.sourceforge.net/schema/1.0/config" scriptlang="groovy">

    <!--
    #1 Secret Vault credentials to configure
    alias: invoiceplane_credentials_alias
    key: wf-robot@mail.com
    value: BotsRock4ever!

    #2 Global Variable to configure
    name: invoiceplane_url
    value: https://train-invoiceplane.workfusion.com
    -->

    <var-def name="invoiceplane_url">
        <var-global name="invoiceplane_url"/>
    </var-def>

    <script><![CDATA[
        status = "success";
        errormessage = "";
    ]]></script>

    <try>
        <body>
            <robotics-flow>
                <robot driver="chrome" close-on-completion="true" >
                    <script><![CDATA[
                            import com.ibank.automation.invoicesusecase.app.AppInvoicePlane
                            import com.ibank.automation.invoicesusecase.processor.CreateProductProcessor

                            String docId = _sys_doc_id.toString();
                            String transactionId = _sys_transaction_id.toString();

                            def app = AppInvoicePlane.init(binding).params([
                                    '_sys_doc_id': docId,
                                    'invoiceplane_url' : invoiceplane_url.getWrappedObject().get(0).toString()
                                ]).get();
                            def processedTransaction = app.processTransaction(CreateProductProcessor.class, transactionId);
                    ]]></script>
                </robot>
            </robotics-flow>
        </body>
        <catch>
            <script><![CDATA[
                errormessage = _exception_stacktrace.getWrappedObject();
                log.error(errormessage);
                status = "failure";
            ]]></script>
        </catch>
    </try>

    <export include-original-data="true">
        <single-column name="status" value="${status}"/>
        <single-column name="errormessage" value="${errormessage}"/>
    </export>
</config>
Add document status and error to transaction
In this step, we are going to add two attributes to each Document:
- status of Product creation. Possible values: success, failure
- error message (if no error occurs, the value is empty). The error will contain a custom meaningful message we explicitly throw in
PageObjectas well as Java exception stack-trace.
A simple DocumentProcessor extension will do the job
package com.ibank.automation.invoicesusecase.processor;

import com.workfusion.intake.api.domain.Document;
import com.workfusion.intake.api.domain.Field;
import com.workfusion.intake.processor.DocumentProcessor;
import com.workfusion.rpa.core.security.SecurityUtils;
import groovy.lang.Binding;
import javax.inject.Inject;
import javax.inject.Named;
import org.slf4j.Logger;
import java.util.Map;

public class CreateProductProcessorSetError extends DocumentProcessor {

    private static final String ERROR_PARAM_NAME = "error";

    private static final String STATUS_PARAM_NAME = "status";

    @Inject
    public CreateProductProcessorSetError(SecurityUtils securityUtils, Logger logger, Binding binding, @Named("botConfigParams") Map<String, String> params) {
        super(binding, params);
    }

    @Override
    protected Document processDocument(Document document) {
        document.getExtractedFields().put(ERROR_PARAM_NAME, Field.of(params.get(ERROR_PARAM_NAME)));
        document.getExtractedFields().put(STATUS_PARAM_NAME, Field.of(params.get(STATUS_PARAM_NAME)));
        return document;
    }

}
This CreateProductProcessorSetError will be used in our custom Bot Task:
<?xml version="1.0" encoding="UTF-8"?>
<config xmlns="http://web-harvest.sourceforge.net/schema/1.0/config" scriptlang="groovy">

    <script><![CDATA[
        import com.ibank.automation.invoices_usecase.app.AppInvoicePlane
        import com.ibank.automation.invoices_usecase.processor.CreateProductProcessorSetError

        String docId = _sys_doc_id.toString();
        String transactionId = _sys_transaction_id.toString();
        String error = errormessage.toString();
        String status = status.toString();

        def app = AppInvoicePlane.init(binding).params([
                '_sys_doc_id': docId,
                'error' : error,
                'status' : status
            ]).get();
        def processedTransaction = app.processTransaction(CreateProductProcessorSetError.class, transactionId);
    ]]></script>

    <export include-original-data="true">
    </export>
</config>
After this step, Transaction will look as follows
{
  "meta" : { },
  "id" : "f4755dd9-0382-441d-86ab-7bd5ea7ca280",
  "docs" : [ {
    "meta" : { },
    "id" : "a659ccde-df63-43c1-880c-4acf3086e6db",
    "name" : "Dodge Viper",
    "type" : "com.ibank.automation.system.invoiceplane.to.ProductTO",
    "textLink" : null,
    "taggedTextLink" : null,
    "originalDocumentLink" : null,
    "extractedFields" : {
      "price" : {
        "singleValue" : "74000.0"
      },
      "description" : {
        "singleValue" : "britva"
      },
      "family" : {
        "singleValue" : "Cars"
      },
      "sku" : {
        "singleValue" : "121121.0"
      },
      "product_name" : {
        "singleValue" : "Dodge Viper"
      },
      "tax_rate" : {
        "singleValue" : "None"
      },
      "error" : {
        "singleValue" : ""
      },
      "status" : {
        "singleValue" : "success"
      }
    },
    "origin" : null,
    "merged" : true
  }, {
    "meta" : { },
    "id" : "44eb2216-417a-484a-a7a9-10f1cc97f170",
    "name" : "Chvy Camarro",
    "type" : "com.ibank.automation.system.invoiceplane.to.ProductTO",
    "textLink" : null,
    "taggedTextLink" : null,
    "originalDocumentLink" : null,
    "extractedFields" : {
      "price" : {
        "singleValue" : ""
      },
      "description" : {
        "singleValue" : "yellow beast"
      },
      "family" : {
        "singleValue" : "Cars"
      },
      "sku" : {
        "singleValue" : "120120.0"
      },
      "product_name" : {
        "singleValue" : "Chvy Camarro"
      },
      "tax_rate" : {
        "singleValue" : "None"
      },
      "error" : {
        "singleValue" : "org.webharvest.exception.PluginException: [urn:uuid:3711FFCFAE868B2A2C155643570101174] robotics-flow executePlugin exception: [nodeId=http://127.0.0.1:15410] org.webharvest.exception.ScriptException: \nConfig line 28: script block\njava.lang.RuntimeException: The Price field is required.\nProduct: Chvy Camarro\r\n\tat com.freedomoss.crowdcontrol.webharvest.plugin.selenium.RoboticsFlowPlugin.executePlugin(RoboticsFlowPlugin.java:121)\r\n\tat org.webharvest.runtime.processors.WebHarvestPlugin.execute(WebHarvestPlugin.java:125)\r\n\tat org.webharvest.runtime.processors.BaseProcessor.run(BaseProcessor.java:127)\r\n\tat org.webharvest.runtime.processors.BodyProcessor.execute(BodyProcessor.java:27)\r\n\tat org.webharvest.runtime.processors.BaseProcessor.run(BaseProcessor.java:127)\r\n\tat org.webharvest.runtime.processors.TryProcessor.execute(TryProcessor.java:64)\r\n\tat org.webharvest.runtime.processors.BaseProcessor.run(BaseProcessor.java:127)\r\n\tat
      },
      "status" : {
        "singleValue" : "failure"
      }
    },
    "origin" : null,
    "merged" : true
  } ]
}
Route for manual exception handling
The outcome with Manual Task will be taken if the status variable = failure. Just add new Rule into the process canvas and configure two outcomes in its configuration popup. In Manual Task (also created from scratch), we are showing an error message to an Operations person and provide a single text field to type in the problem resolution (we may ask to provide a report on how the transaction has been handled manually). Also, it will be a good practice to list suggestions of how the Operations person should react to different exceptions the process may have. Use Manual Task instructions collapsible area as a guide.
Join back to transactions
Finally, we merge back all the records with Documents related to the same Transaction into one record. The out-of-the-box ODF bot component Join Documents paired by the out-of-the-box Join Documents rule component allows us to do this job. Drag and drop both from reusable components Bot and Rule tabs and connect with the transition arrows.