Explore ODF 2 Simple Archetype project structure
The article dwells on the structure of a project created from the ODF 2 Simple Archetype. For more details on creating a new project, see Start Maven project.
The new class-loading approach enables the isolation between BCB classes and application ones. If BCB classes use a library packaged together with the BCB, the BCB class loader loads the library classes from the BCB even if the Worker app contains the library. For ODF 2, the new class loader is enabled by default. To start an ODF 2 project, use a Simple Archetype that applies the new class-loading approach.
How Java sources match Business Processes
Bot Task names in a Business Process are generated automatically in two stages:
During the Maven build, a Bot Task XML is generated. The Bot Task Java class name is reworked into a lower case split by
-, withTaskignored. For example,InvoiceSubmissionTaskturns intoinvoice-submission.xml. Alternatively, a Bot Task can be explicitly named by a developer. To create a Bot Task, refer to Create Bot Task | @BotTask annotation.During the BCB deployment, Bot Task names are generated using the
<name>property from the BCB modulepom.xmland the AI Agent version from the rootpom.xml. For example,invoice-submission.xmlfrom<name>odf2-bcb</name>of v1.0.0 is named asodf2-bcb v1.0.0 (invoice-submission)in Control Tower.
Project structure
The ODF 2 project created from the Simple Archetype is a normal Maven multi-module project with the following structure:
- example-project-bcb
- example-project-package
- example-project-test
build.groovypom.xml
When opened in IntelliJ IDEA, the project looks as follows:

Besides a couple of Maven sub-modules, the project contains two files:
build.groovy: Jenkins Pipeline script that helps to create a proper CI/CD process. For more details, see Basic continuous integration.pom.xml: root configuration of the Maven project. Each Maven module and sub-module has itspom.xmlfile. The root file contains a primary configuration like repository settings, dependency management, profiles and modules specification. Also, the rootpom.xmlfile is the place where the AI Agent and ODF 2 versions are configured:<properties>
<usecase.name>uc-name</usecase.name>
<usecase.code>uc-code</usecase.code>
<usecase.version>${project.version}</usecase.version>
...
<odf2.version>X.X.X.X</odf2.version>
</properties>
The framework version depends on your platform version. For the appropriate version of ODF 2, refer to the compatibility matrix page.
BCB module
The BCB module is the main module of the project to store your Bot Tasks and related Java code.
By default, the BCB module looks as follows:
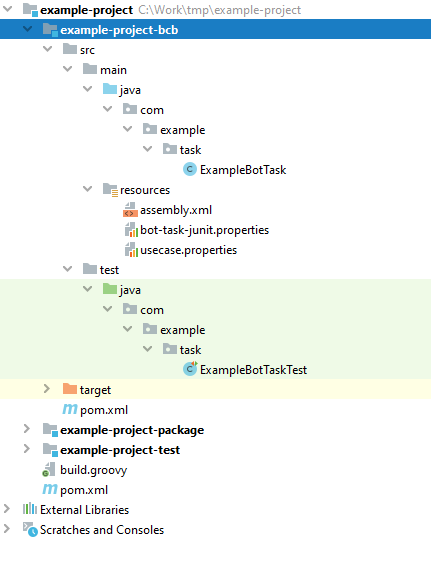
It comes with several pre-generated files:
ExampleBotTask.java: simple implementation of anAdHocTask.ExampleBotTaskTest.java: corresponding Bot Task test implemented using thebot-task-junitlibrary.bot-task-junit.properties: settings for thebot-task-junitlibrary to be used during the test execution.assembly.xml: assembly description that determines how exactly your BCB is converted into a final JAR file compatible with the Control Tower environment. Usually, you don't have to change this file.usecase.properties: actual AI Agent settings for the current project. The file is populated during a project build for the ODF 2 framework to read at runtime. This is especially crucial for Data Stores since a Data Store name consists of AI Agent code and version.
Package module
The package module or the Asset Bundle module comprises a Business Process and its supporting resources, such as AutoML models, Bot Configs, Data Stores, templates, and others.
In this case, the package module already contains a Business Process example, which is Example_BP.zip. Also, there is package.xml inside the assembly folder. This file is a descriptor for copying dynamic resources.
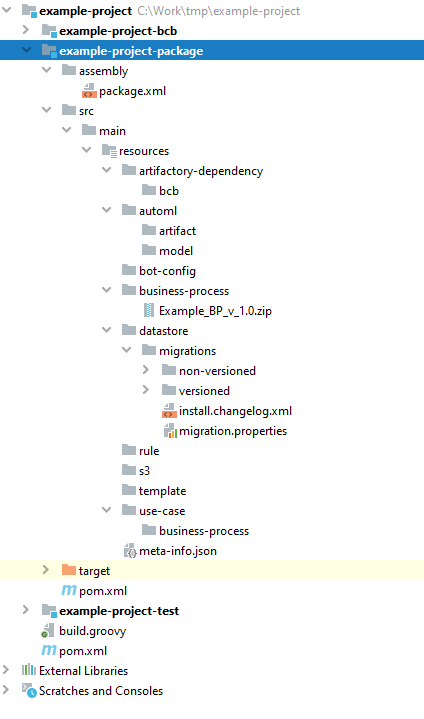
Let's describe each folder inside the package module.
/artifactory-dependency
The directory is required if a Bot Config Bundle (BCB) is used. Otherwise, it is optional. The directory's content maps to zero, one, or multiple BCBs.
There is no need to add assets to the artifactory-dependency directory in most cases. After you run mvn clean package, BCB files from the BCB modules of the same project are deployed automatically to the target/artifactory-dependency folder.
/automl
The directory maps to zero, one, or multiple AutoML models (trained or not). Each trained model is a sub-directory of the model directory. Each model artifact (not trained yet) is a sub-directory of the artifact directory. When there is no such directory in an Asset Bundle, all Manual Tasks have the No Automation AutoML setting.
/bot-config
The directory contains bot steps (XML) that appear in Control Tower and are essential for designing Business Processes. It is intended to store all the bot steps the BCB module doesn't include.
Packing this directory is optional unless you have legacy Bot Configurations not in BCBs, for example, those created before the transition to the ODF 2 framework.
Do not copy XML data from a BCB to the bot-config directory. Once the BCB import is over, all the necessary bot steps reappear in Control Tower automatically.
/business-process
Pack the directory with Business Process packages created as zip files in the local or server Control Tower in the development environment.
To add a new Business Process, do as follows:
- Create a Business Process in the server or local Control Tower in your development environment.
- Export the Business Process from Control Tower.
- Put the exported Business Process into the
resources/business-processfolder.
Apply a similar workflow when you need to update a Business Process to incorporate BCB code changes.
Be aware that the system automatically creates a Business Process draft for every imported Business Process package in Control Tower.
/datastore
The datastore directory serves as a storage for any content essential for creating and maintaining Business Processes. It is also the most convenient way to share temporary data across bot steps.
Pack the directory with CSV files to be used for creating Data Stores. One CSV file corresponds to one Data Store. The names of CSV files map to the names of Data Stores.
The data format in the files must be the same as if you uploaded data to a Data Store via Control Tower. Each file must contain headers and at least one record.
Mind that Data Stores based on the files contain a single data type, which is NVarchar(max).
The datastore folder created from the ODF 2 Simple Archetype already contains a Standardized Data Store schema. For details, refer to Manage Data Model.
/s3
Pack the directory with static resources if you need those for your AI Agent. Each top-level sub-directory in the s3 directory corresponds to an S3 bucket. Therefore, the names of these top-level sub-directories in the s3 directory must map to the names of S3 buckets.
/template
The directory contains zero, one, or multiple XML files, each representing a Template. An XML file name maps to a Template name.
A macro sub-directory can reside inside the template directory, representing Macro Templates used for advanced Manual Task customizations.
When simple Task Designer manipulations or Answer configurations are not enough to achieve the desired behavior or interface in a Manual Task, Macro Templates are created in Control Tower with custom HTML, CSS, or JavaScript code. Subsequently, the Macro Templates can be re-used via the <include> tag in a base Manual Task template.
/use-case
If you have a fully developed Business Process, packing the /use-case directory is optional.
You can include XML files representing Operations in the directory if you need them to develop a Business Process. In this case, you put the files into the directory for initial Asset Bundle deployment without a Business Process package. See the Package assets into an Asset Bundle for deployment | /business-process for packing the business-process directory.
meta-info.json
The file is required and must be a valid JSON file. The NAME and WF_VERSION parameter pairs are required.
The USE_CASE_CODE and USE_CASE_VERSION parameters are optional but recommended since they allow viewing AI Agent versions on the Digital Workers list. They define the AI Agent version where the imported bundle is applied. All AI Agent assets are to be tracked within the version. If the parameters are used, they must be used together.
The following restrictions apply to the parameters:
USE_CASE_CODEcan contain letters in uppercase, dashes (-), underlines (_), and digits.USE_CASE_VERSIONmust contain a semantic version of an AI Agent, for example, 1.0.2, 2.3.5-SNAPSHOT. For details, see Semantic Versioning.
If an Asset Bundle is structured correctly, it contains all components needed for Business Processes to run in a target (production) environment. However, any component from the structure above is optional, except for meta-info.json.
Test module
The Test module is intended to store integration and acceptance tests. When created, it looks as follows:
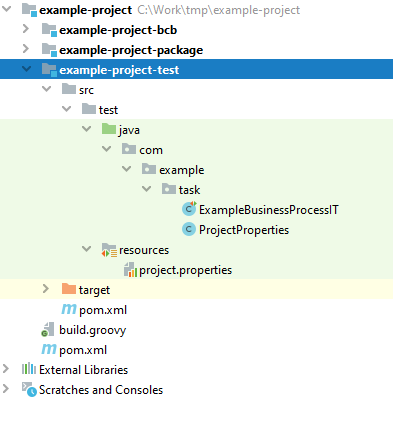
The module comes with several pre-generated files:
ExampleBusinessProcessIT.java: Spoke test example for theExample_BP.zipBusiness Process from the package module.ProjectProperties.java: helper class to read data from theproject.propertiesfile.project.properties: project-related settings to ease Spoke tests creation and usage.
If you are not aware of the Spoke library and how Business processes are tested, follow the Spoke tutorial and read the Business Process integration testing guide.
Here is a quick overview of what ExampleBusinessProcessIT does on execution:
- Uploads the project bundle from the package module to a Control Tower instance.
- Runs the
Example_BP.zipBusiness Process. - Waits until the Business Process is completed successfully.
- Asserts that the output data contains a required
completed_successfullyentry.
By default, all Spoke tests from the Test module are tied to the Maven verify phase and activated by run-spoke-tests profile. To run the tests during a Maven build, use the following command:
mvn clean verify -Prun-spoke-tests
Before running a Spoke test, make sure to prepare the spoke.configuration or spoke-it.properties file with the target Control Tower settings.
Follow the Spoke guide to get more information about Spoke Configuration.