Handle web elements via XPath
The topic is a brief introduction to XPath to present a quick overview of the main techniques you can use in your recordings to handle elements on a web page, for example, to click a link or an object, get or set value from/to fields or menus. The tutorial explains the basics of XPath with suitable examples.
What is XPath?
XPath is a query language that is used for traversing through an XML (or HTML) document identifying different parts of documents by indicating nodes by position, relative position, type, content, etc.
In other words, XPath is a quick way to reference an element on a web page and search the page top to bottom looking for elements that match the criteria defined in the expression.
XPath nodes
Commonly, XPath is used to search for particular elements or attributes with matching patterns. The patterns are defined with expressions to identify an element on a web page that does not have an easy, unique identifier.
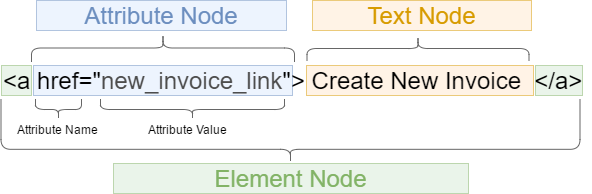
Similar to the Document Object Model, XPath allows us to pick nodes and sets of nodes out of the HTML tree. There are four main node types XPath has access to in HTML, including:
- Root Node
- Element Nodes
- Attribute Nodes
- Text Nodes
For example, the path to our element (link) is as follows.
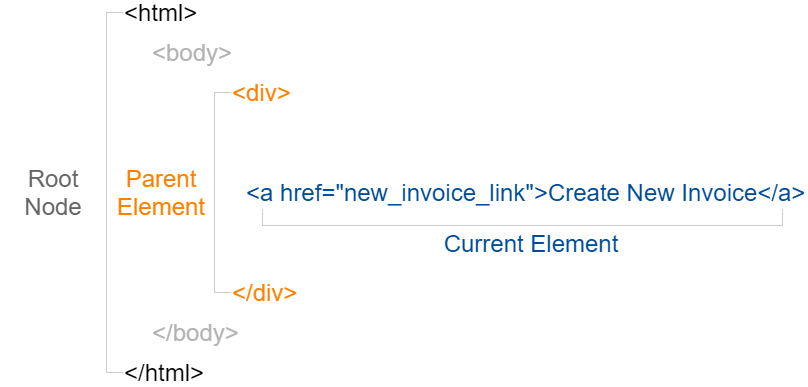
Thus, we can locate the element by the full or absolute path adhering to the following order used on the screenshot above: Root Node/Parent Element/Current Element, for example, /html/body/div/a.
Within the element node, attribute and text nodes are differentiated to locate the element by:
- Attribute:
//*[@href='new_invoice_link'], or - Text:
//a[contains(text(),'Create New Invoice')]
XPath types
XPath can use location paths, attribute location steps, and compound location paths to very quickly and efficiently retrieve nodes from an XML/HTML document. First, let's have a look at basic location paths in the example below.
- Open https://pub_demo.s3.amazonaws.com/invoiceplane-2/InvoicePlaneDemo.html in a browser, for example, Google Chrome.
- Press F12 or select the Inspect option in your browser to view DevTools.
- Analyze the input field to enter the email.
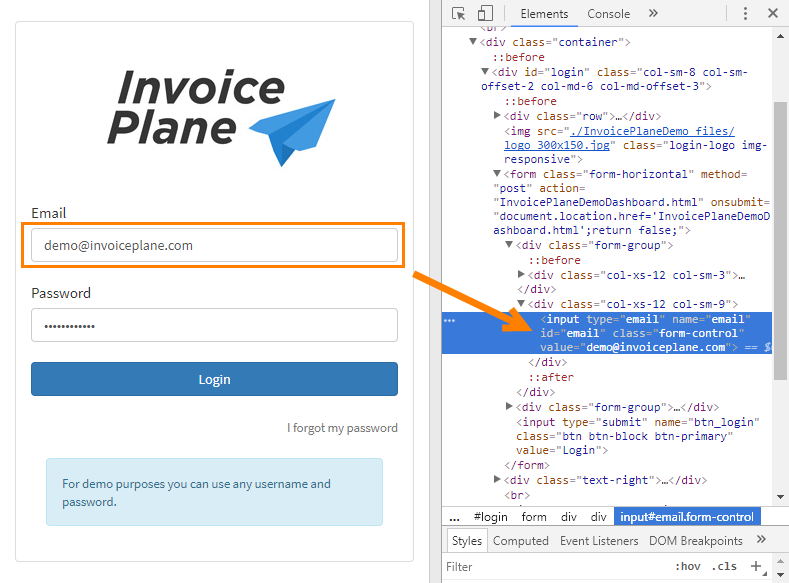
There are several location paths to that field. These are as follows.
/html/body/div/div/form/div/div[2]/inputor an absolute XPath//input[@id='email'], or a relative XPath//input[contains(@id,'email')], or a partial XPath
All the paths are correct and all can be used to search for the element in the document.
Thus, following XPath types are differentiated.
Absolute XPath
The absolute XPath is the direct way to find the element looking for it through the HTML tree top to bottom. A single slash (/) at the start instructs the XPath engine to search for the element starting from the root node and then proceed to the nested elements following the order of precedence.
The absolute path for the email input field in the previous example is as follows:
/html/body/div/div/form/div/div[2]/input
The absolute location path always refers to the root node and calls for each of those nested relationships to be present 100% of the time, or the Xpath will not function. That is why this type of XPaths is not considered to be a reliable one.
Relative XPath
As the absolute XPath is too lengthy, there is a possibility of getting a shorter XPath. A double slash (//) at the start instructs the XPath engine to search for the matching element in any place in the document. That means that the relative XPath searches through the entire web page to find the locator specified, while the absolute XPath goes strictly along the path defined from the root node.
There is a good chance that such XPath will work in case the web page is changed. It is always better to choose a relative XPath, as it helps us to reduce the chance of the Element not found exception.
The easiest way to build a relative XPath is to using the id attribute. Let's have a look on the HTML code of the input field from the example above.
<input id="email" class="form-control" type="email" value=" demo@invoiceplane.com " name="email" />
Let's take the id class to build an XPath for this element. In the brackets [], we specify the id attribute with the @ symbol. We can chain as many of these together as we need. The attribute value is taken into a single quote sign (\'), though Chrome DevTool generate XPaths with double quote sign (\").
//input[@id='email']
The operand can replace input thus searching for elements regarding of the type.
//*[@id='email']
Partial XPath (Contains)
Quite often, we can face issues when the element's properties are dynamically generated or changed by web developers as the time passes. In this case, we can search for an element using the contains predicate.
With contains, we can create the following XPath expression to find the input field for the email:
//input[contains(@id,'email')]
XPath axes
An axis represents a relationship to the context node, and is used to locate nodes relative to that node on the tree. The XPath axes methods are used to find dynamic elements, which otherwise not possible to find by normal XPath method.
You use an axis by using its name, along with a node test, and optionally, one or more predicates. The axis and node test are separated by ::, and the predicates are enclosed in [].
Axis syntax example:
axisname::nodetest[predicate]
| Axis | Description | Example |
|---|---|---|
ancestor | Contains the ancestors of the context node beginning with the parent node and traveling through to the root node | //*[text()='XPath Syntax']//ancestor::div |
ancestor-or-self | Contains the context node and the ancestors of the context node; thus, the ancestor axis will always include the root node | |
attribute | Contains the attributes of the context node, only elements have attributes | |
child | Contains the children of the context node | //*[@type='submit']/child::li |
descendant | Contains the descendants of the context node, i.e. all of the children of the context node, and all of their children, and so forth | //*[@id='feature']//descendant::a |
descendant-or-self | Сontains the context node and the descendants of the context node | |
following | Contains all the nodes that appear after the context node, except any descendant, attribute, and namespace nodes | |
following-sibling | Contains all the nodes that have the same parent as the context node and appear after the context node in the source document | //*[@type='submit']//following-sibling::input |
namespace | Contains all the nodes that are in scope for the context node; in this case, the context node must be an element node | |
parent | Contains the single node that is the parent of the context node | //*[@id='feature']//parent::div |
preceding | Contains all the nodes that precede the context node in the document except any ancestor, attribute and namespace nodes | //*[@type='submit']//preceding::input |
preceding-sibling | Contains all the nodes that have the same parent as the context node and appear before the context node in the source document | - |
self | Contains the context node itself | //*[@type='password']//self::input |
XPath syntax
XPath contains the path of the element situated at the web page. A simple example of syntax for creating XPath is as follows.
//nodename[@attribute='value']
Where the following elements are defined:
//: current node to selectnodename: name of the particular node@: attributeattribute: attribute name of the nodevalue: value of the attribute
Basic expressions
XPath uses path expressions to select nodes in an XML document. The node is selected by following a path or steps. The most common XPath expressions are listed in the table below.
| Expression | Description | Example |
|---|---|---|
/ | Defines an absolute XPath and searches all child elements from the root node only | /html/body/div/div/form/div/div[2]/input |
// | Defines a relative XPath and searches all descendant elements from the current node in any place in the document | //input[@id='email'] |
* | Searches elements regardless of the type | //*[@id='email'] |
@ | Specifies an element attribute | @id='email' |
[] | Specifies information about the element you are looking for, for example, an order number or an attribute | div/div[2]/input |
text() | Searches for the text of the element | //*[text()='Text to find'] |
contains() | Searches for a specific value in an attribute or the element text in case a full string match cannot be done | //*[contains(@id,'email')] //*[contains(text(),'Text to find')] |
or | Means any one condition should be true to find the element | //*[@type='submit' OR @name='Reset'] |
and | Means both conditions should be true to find the element; it fails to find the element if any one condition is false | //input[@type='submit' AND @name='Login'] |
Predicates
Predicates are used to find a specific node or a node that contains a specific value. Predicates are always embedded in square brackets.
Special cases
IFrames
Use case: Work with elements in IFrame
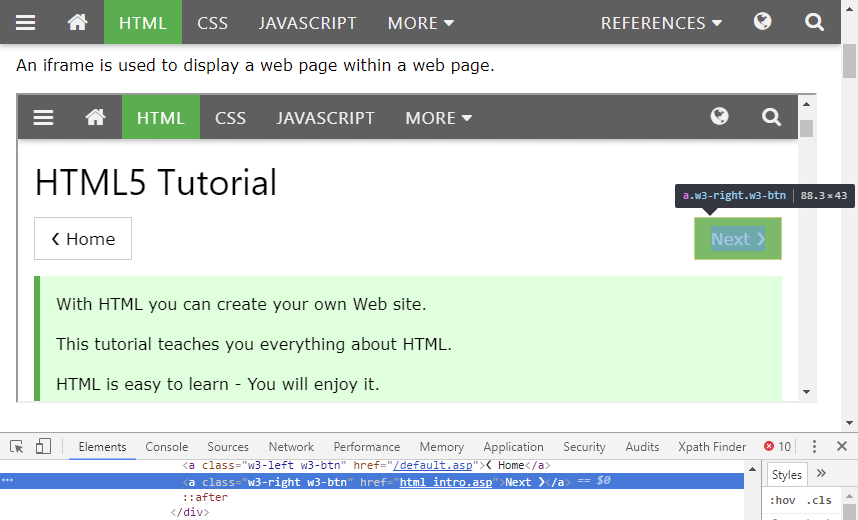
Let's take an example from w3schools.com. We will open the web page and click the Next element located in an IFrame to open the next topic of the embedded page.
Open URL https://www.w3schools.com/html/html_iframe.asp in Google Chrome.
Open DevTools and get XPaths for the following elements:
- IFrame (XPath to IFrame with the embedded document):
//iframe[contains(@height, '310px')]
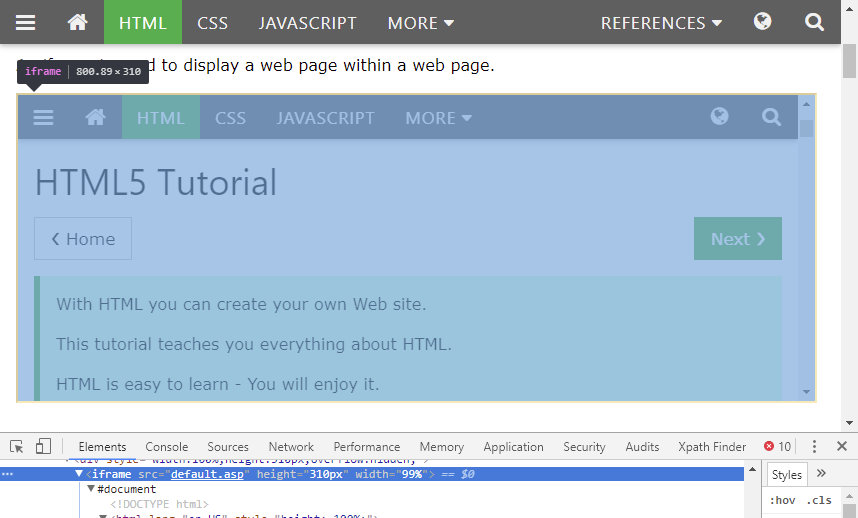
- Next button:
//*[@id="main"]/div[2]/a[2]
- IFrame (XPath to IFrame with the embedded document):
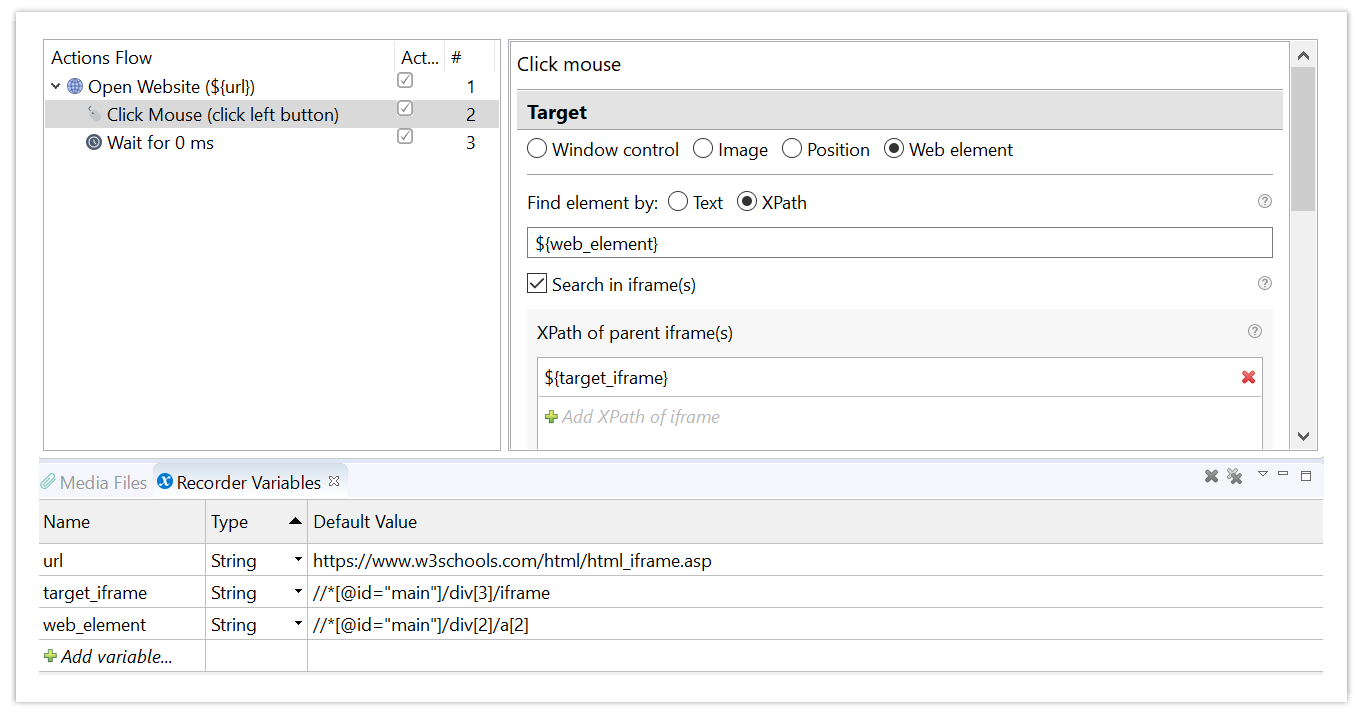
Create three String variables in Recorder.
url:https://www.w3schools.com/html/html_iframe.asptarget_iframe://*[@id="main"]/div[3]/iframeweb_element://*[@id="main"]/div[2]/a[2]
Use the Open website action to work with an IFrame.
- Site URL
- Value:
${url}
Use the Click Mouse action to click Next on the web page embedded in the IFrame.
- Locator > Web element > Xpath
- Mouse options: Left button, Single click
- XPath of the target element:
${web_element} - Select the Search in iframe(-s) option
- XPath of parent iframe(-s):
${target_iframe}
Play the recording to make sure that it works correctly, for example, the next topic is displayed in the IFrame.
You can download the recording for further tests.
Lists of elements
In some cases, XPath expression can return more than one element.
HTML structure:
<html>
<head>
  <title>Document</title>
</head>
<body>
  <div>
    <p class="new">1st paragraph</p>
  </div>

  <p class="new">2nd paragraph</p>

  <p class="old">wrong paragraph</p>

  <section>
    <div class="parent">
      <p class="new">3rd paragraph</p>
    </div>
  </section>
</body>
</html>
XPath expression: //p[@class='new']
Result:
<p class="new">1st paragraph</p>
<p class="new">2nd  paragraph</p>
<p class="new">3rd paragraph</p>
To pick a certain element from the list, you can use the following pattern: (expression)[index] where index starts from 1.
| XPath expression | Result |
|---|---|
(//p[@class='new'])[1] | <p class="new">1st paragraph</p> |
(//p[@class='new'])[2] | <p class="new">2nd paragraph</p> |
(//p[@class='new'])[3] | <p class="new">3rd paragraph</p> |
${link_list} = Web Element - Get (//p[@class='new'])
${list_size} = Expression - Get Length ${link_list}
${counter} = 1
While ${counter} < ${list_size}
  Web Element - Get Attribute "href" (//p[@class='new'])[${counter}]
  Expression ${counter} = ${counter} + 1
Tools to find XPath
There are a lot of plugins that can be very helpful for finding and building XPaths, though here we will cover using native browser solutions.
- Google Сhrome Developer Tools
- Firefox Developer Tools
- Fire IE Selenium Tool for Internet Explorer
Google Chrome
Chrome Developer Tools (DevTools for short) are a set of web authoring and debugging tools built into Google Chrome. The DevTools provide web developers with deep access into the internals of the browser and their web application.
The Elements panel lets you see everything in one DOM tree and allows inspection and on-the-fly editing of DOM elements.
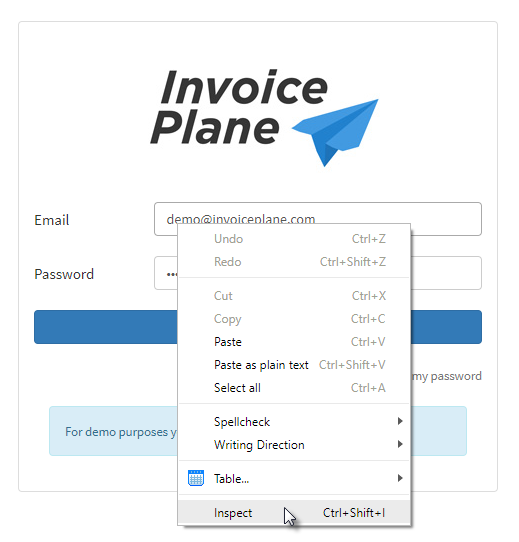
Open a web page in Google Chrome and do the following steps to get the XPath of a web page element.
Right-click the target element and choose Inspect.
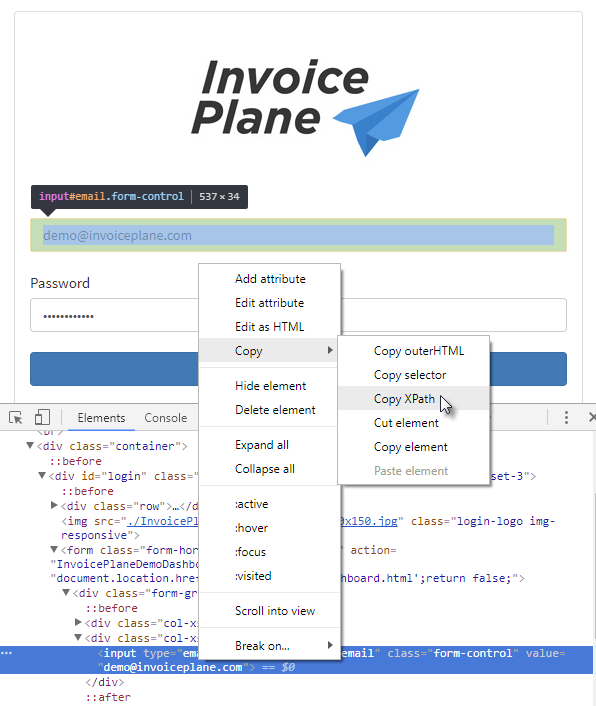
Right-click the selected element in the tree.
Choose Copy > Copy XPath from the context menu. The XPath to the selected element is copied to Clipboard.
XPath Helper plugin
The XPath Helper plugin for the Chrome browser helps dynamically write and apply XPath to a current page. Very useful to test XPath which aimed to get multiple results, for example, required set of links from HTML
Installation
Go to the page.
Click Add to Chrome.
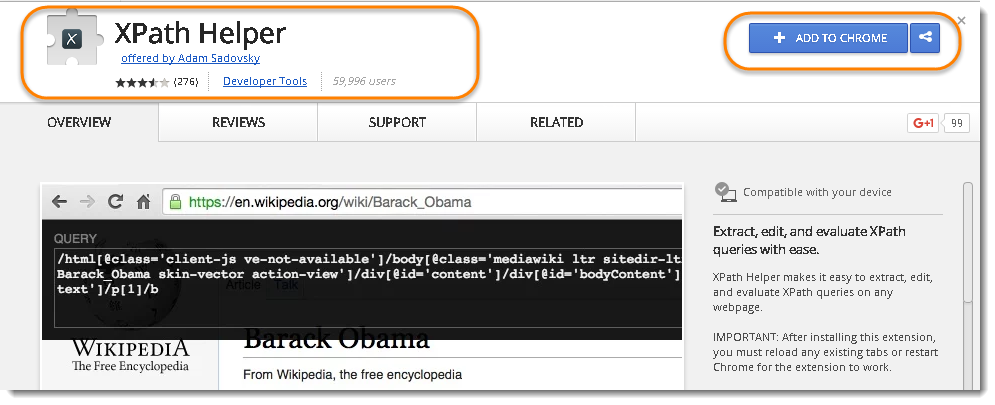
If you open the URL in any other browser, you will see the option Available in Chrome instead of Add to Chrome.
Click the Add button.
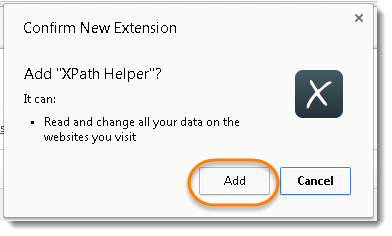
Once it is installed, it will display a popup message for successful installation. After installing this extension, you must reload any existing tabs or restart Chrome for the extension to work.
Now the icon for XPath Helper will appear on the top right most side of the Chrome browser. Click on it to open the helper.

Usage
- Open a new tab and navigate to any webpage.
- Hit Ctrl-Shift-X (or Command-Shift-X on OS X), or click the XPath Helper button in the toolbar, to open the XPath Helper console.
- Hold down Shift as you mouse over elements on the page. The query box will continuously update to show the XPath query for the element below the mouse pointer, and the results box will show the results for the current query.
- If desired, edit the XPath query directly in the console. The results box will immediately reflect your changes.
- Repeat step (2) to close the console.
If the console gets in your way, hold down Shift and then move your mouse over it; it will move to the opposite side of the page.
When rendering HTML tables, Chrome inserts artificial \<tbody> tags into the DOM, which will consequently show up in queries extracted by this extension.
Building your own XPath
For Registration Link on the page, try your own XPath: //li[@id=’menu-item-374′]
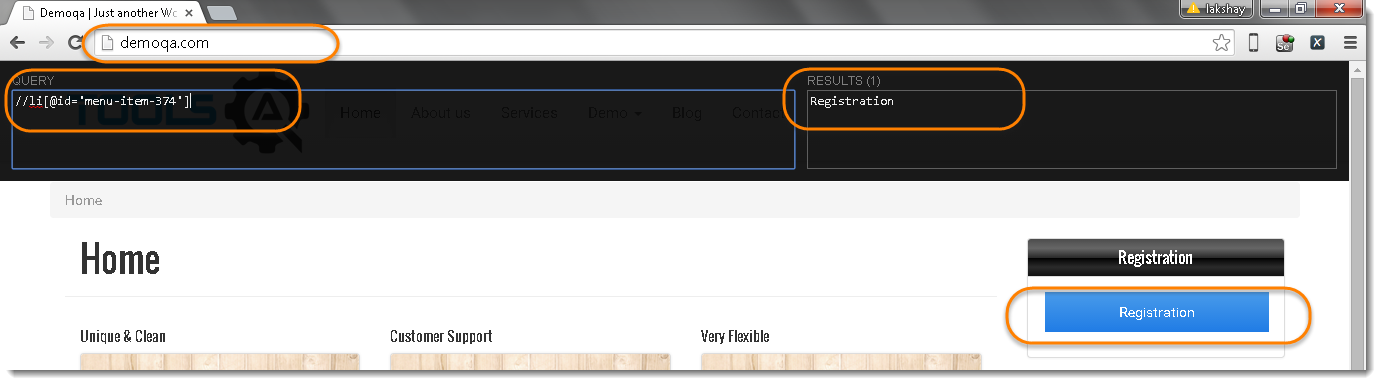
In case of invalid XPath, the result side will display error but if the XPath syntax is correct and no matches found then it will say NULL.
Try another XPath for the same element: //li[@id=’menu-item-374′]
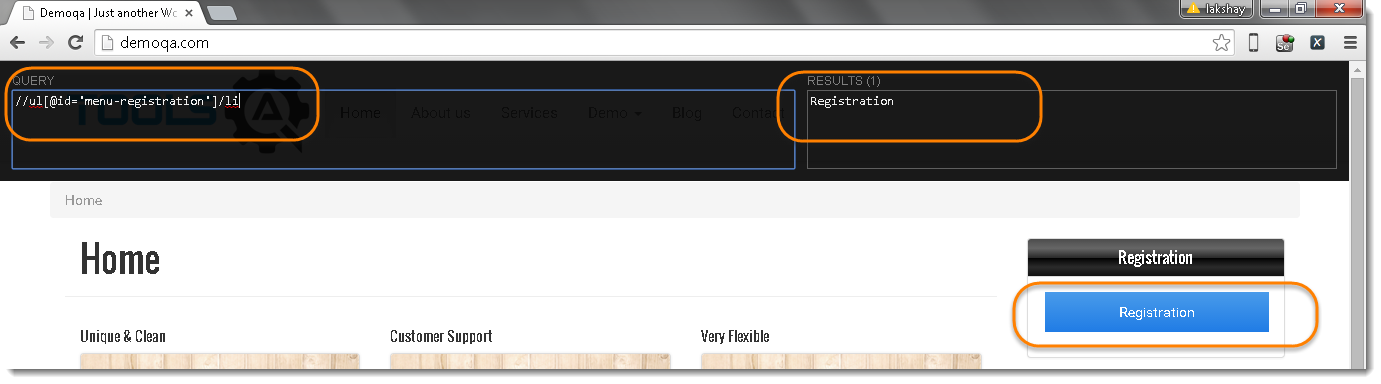
Firefox
Working with Firefox Developer Tools is almost identical to working with Google Chrome.
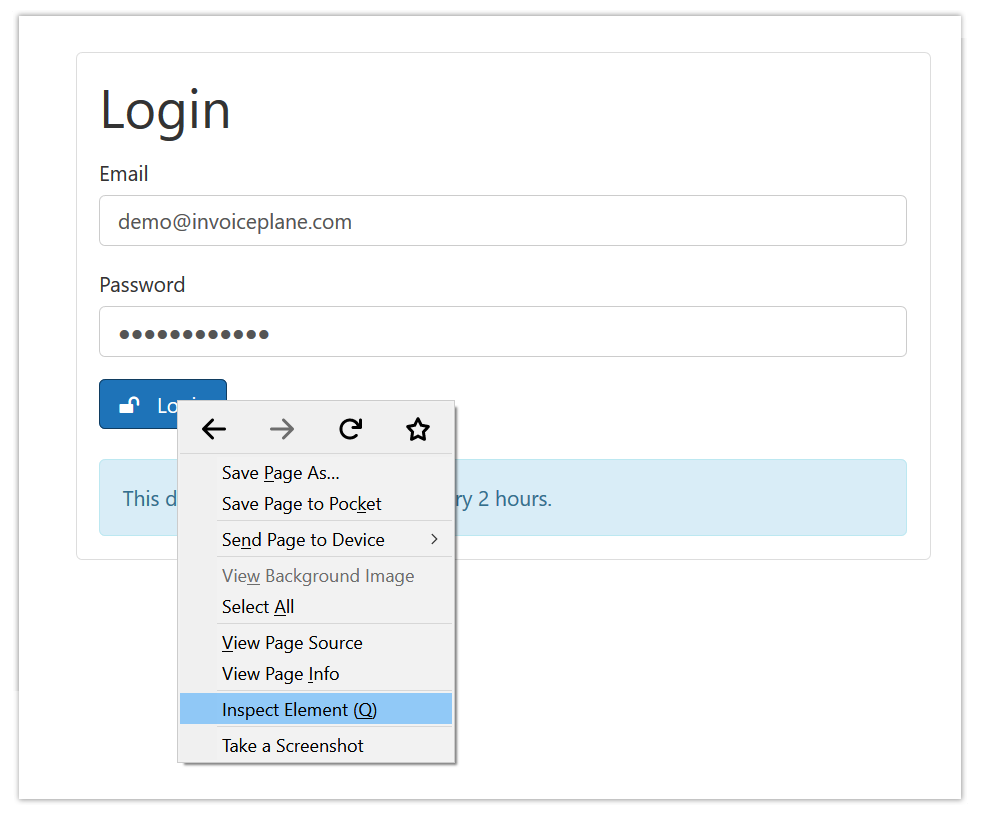
In order to copy the XPath in Firefox, open the web page and perform the following actions.
Right-click the required element and select Inspect Element (or press Q).
Right-click the selected element in the tree.
Click Copy > XPath.
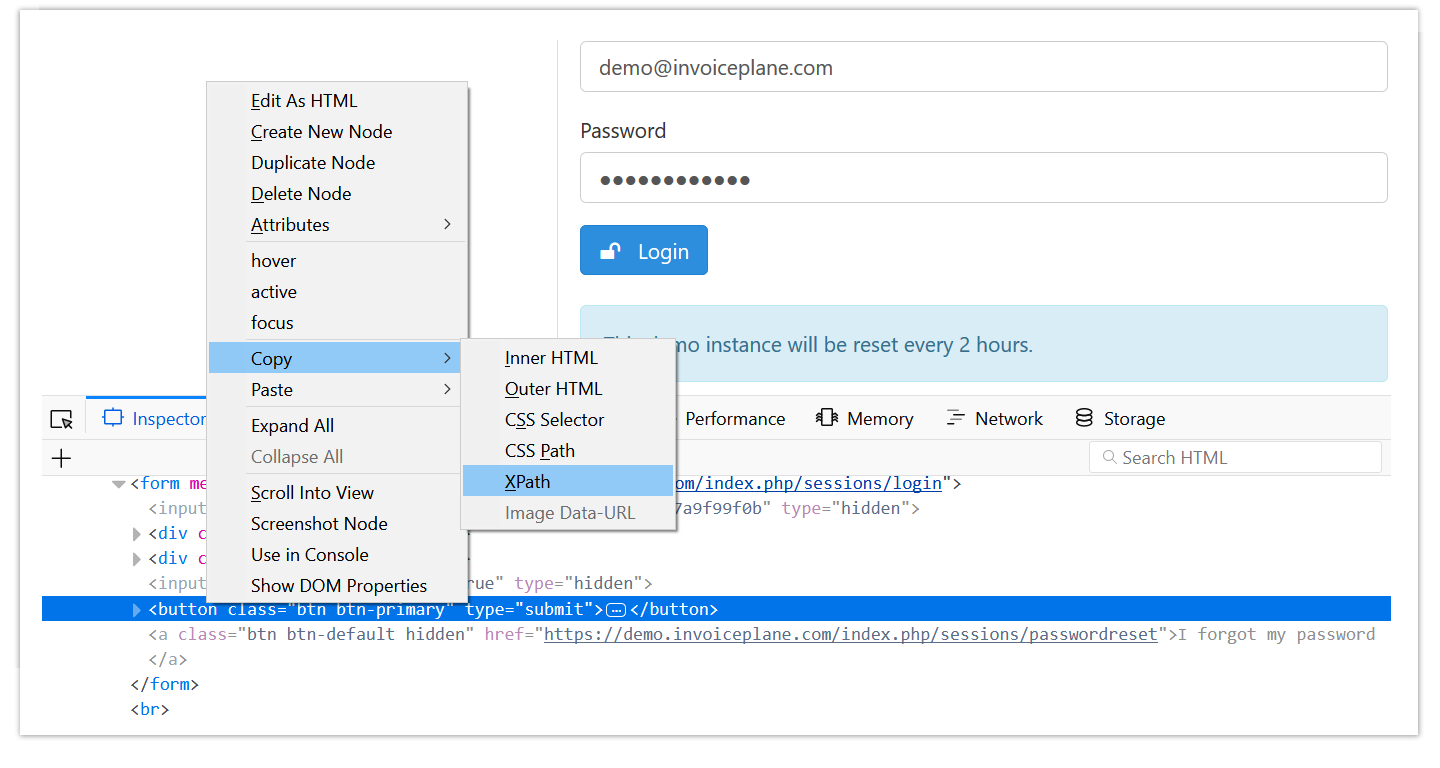
Depending on the complexity of the XPath, DevTools will create either an absolute or a relative XPath.
Internet Explorer
XPaths copied from Google Chrome or Firefox, as a rule, work in Internet Explorer too.
However, if you need to use an XPath on a web page or application that can only be opened in Internet Explorer, you can do it using IE Inspector or Fire IE Selenium Tool. As IE Inspector has a limited functionality to view the elements in the tree, it is better to use Fire IE Selenium Tool. The tool uses Excel based WebBrowser Control.
Download Fire IE Selenium Tool from the Fire IE Selenium download page. The tool is an Excel macro-enabled workbook. To view how to use it, see instructions on this web site.
XPath verification
If you need to verify that your XPath expression is correct and unique, use Chrome DevTools.
Open the web page in Chrome.
Press F12 to open DevTools.
Switch to the Elements panel.
Press Ctrl+F to open the Search field.
Enter or paste the XPath in the field.
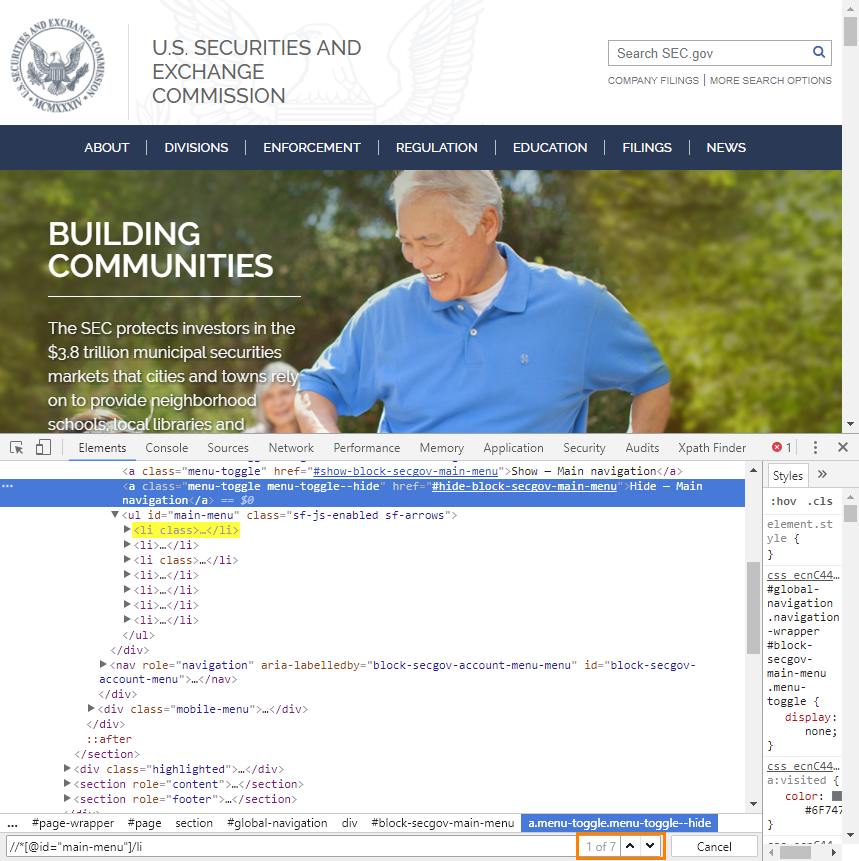
- If the XPath expression has at least one match, the respective element is highlighted in the tree with yellow color.
- If there is a number of elements matching the criteria defined in the expression, you will see the count of such elements to the right of the search filed with the following indication.
It is correct, if you are going to iterate through these elements. A set of elements, which can be accessed with the same XPath, is called Collection. Each single element from a collection can be accessed by index.
For example, an HTML page contains a collection of elements with the same class that is sample_class. The XPath to access the collection is //*[@class='sample_class'].
You can access the first element in the collection via the XPath: //*[@class='sample_class'][1] the second one via XPath: //*[@class='sample_class'][2] and so on.
In the recording, you can iterate through the collection with the following XPath to get each single element:
//*[@class='sample_class'][${recorder_var}]
Where recorder_var is a Recorder variable of Number type.
If you need just a single element, you should edit the criteria for more accurate matching.
Examples
The samples explain how you can use XPath in your recordings to automate interactions with a web application.
To get XPath, we will use Google Chrome DevTools.
XPaths of the elements in the examples below can be provided using Recorder variables of String type.
Example 1. Log into a web application
Steps to log into web application
In this example, we will use Recorder to log into a web application (Invoice Plane).
Open URL https://pub_demo.s3.amazonaws.com/invoiceplane-2/InvoicePlaneDemo.html in Google Chrome.
Open DevTools and get XPaths for the following elements:
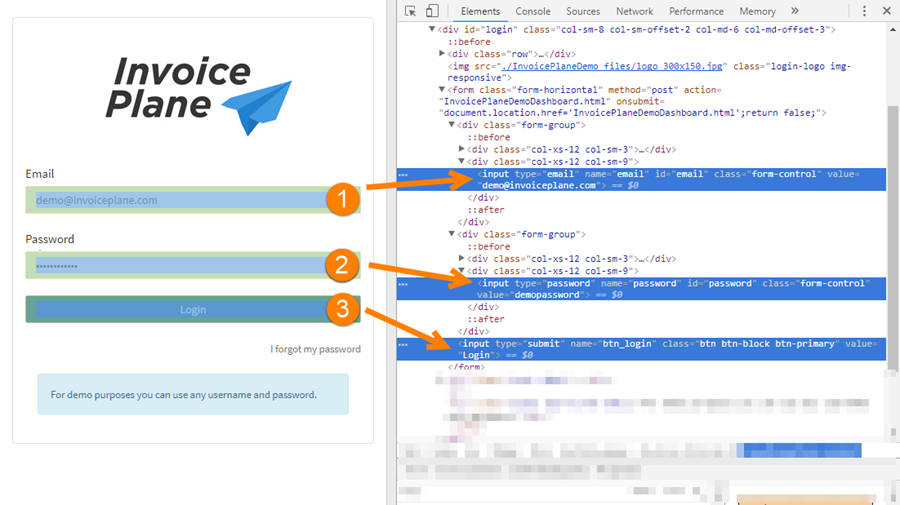
- Email input field:
//*[@id="email"] - Password input field:
//*[@id="password"] - Login button:
//*[@id="login"]/form/input
- Email input field:
Create Recorder variables for email and password to log in.
- Login:
- Name: email
- Type: String
- Value: any email, as the web application operates in the test mode
- Password:
- Name: password
- Type: String
- Value: any text, as the web application operates in the test mode
- Login:
Open the website to enter email and password and log into the application (the Open Website action).
Site URL > Value: <https://pub_demo.s3.amazonaws.com/invoiceplane-2/InvoicePlaneDemo.html>
Use the Web Element action to enter the email.
- Mode: Set value
- Input:
email - Options > XPath of the element:
//*[@id="email"]
Use the Web Element action to enter the email.
- Mode: Set value
- Input:
password - Options > XPath of the element:
//*[@id="password"]
Using the **Click Mouse** action, click the **Login** button to log into the application with the email and password provided.- Locator > Web element > Xpath
- Mouse options: Left button, Single click
- XPath of the target element:
//*[@id="login"]/form/input
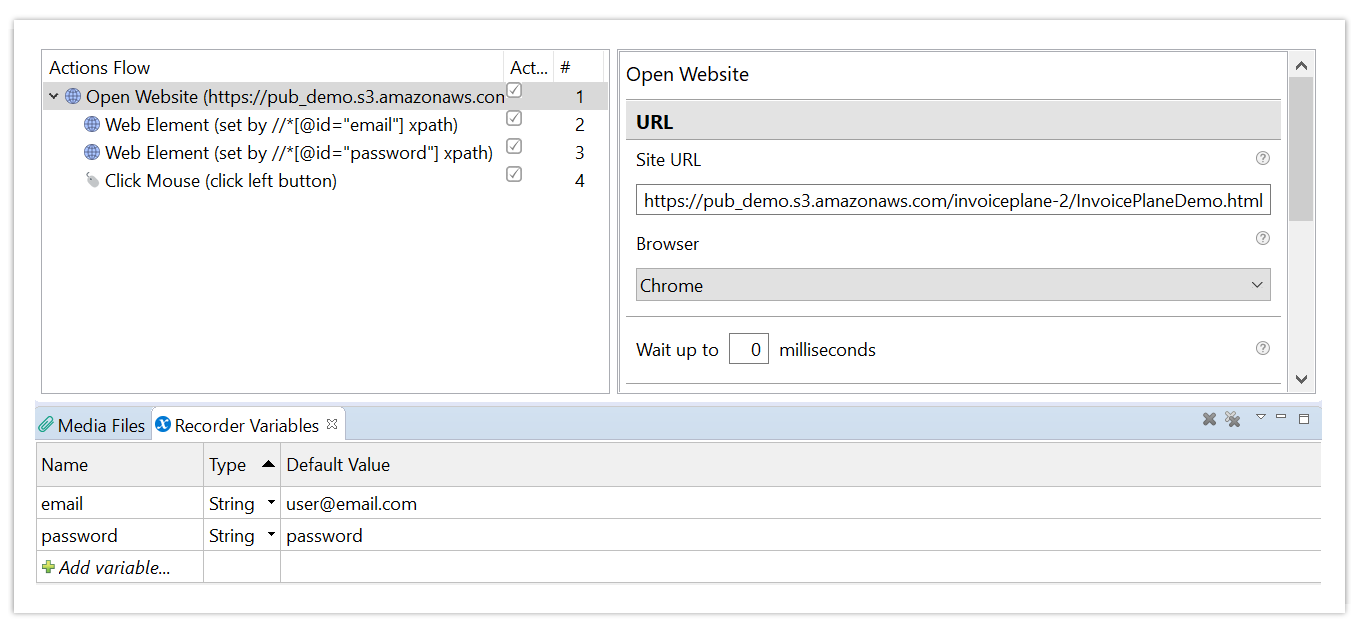
Play the recording to make sure that the data is entered correctly, the Login button is clicked and the login process is executed.
::: note You can download the recording for further tests. :::
Example 2. Create invoice
Steps to create invoice
In this example, we will use Recorder to click the Create Invoice button in Invoice Plane. The step in the example is an extension to Example 1, as it is performed after log into Invoice Plane.
Open URL https://pub_demo.s3.amazonaws.com/invoiceplane-2/InvoicePlaneDemoDashboard.html in Google Chrome.
Open DevTools and get the XPath of the following element: Create Invoice button on the Quick Actions panel -
//*[@id="panel-quick-actions"]/div[2]/a[3]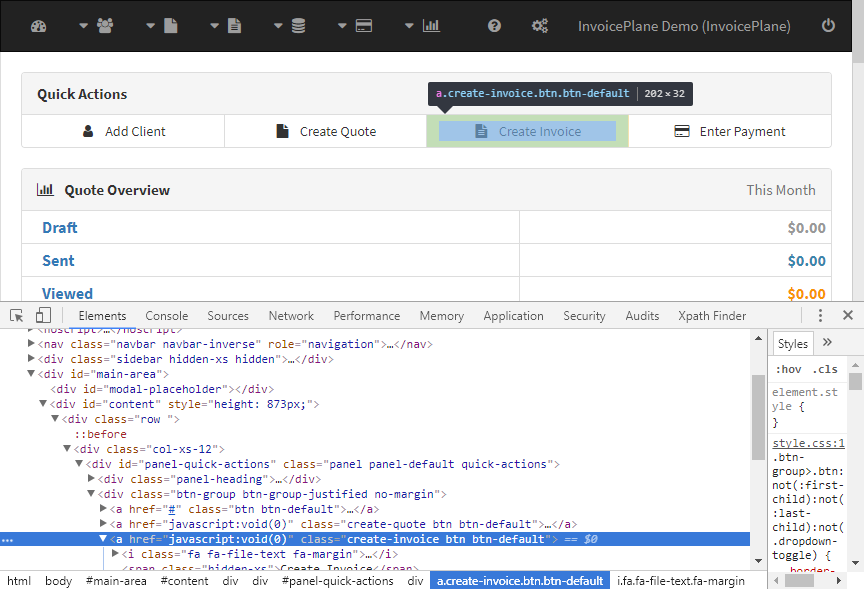
Alternatively, you can use the main menu Invoices dropdown > Create Invoice. The XPath of the Create Invoice menu item will be as follows:
//*[@id="ip-navbar-collapse"]/ul[1]/li[4]/ul/li[1]/aor://a[@class='create-invoice'].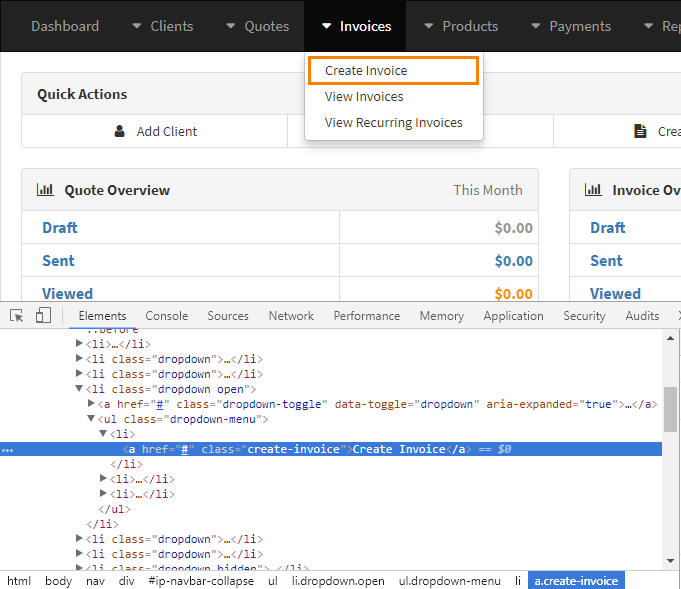
You can find the locator is using the following expression to search for a text in the link:
//a[contains(text(), 'Create Invoice')]or, if the text is known and unique://a[text()='Create Invoice'].Add the following step to the previous recording.
Using the Click Mouse action, click Create Invoice to open the input mask to create a new invoice. Mind that as Invoice Plane is used for tests, the input mask does not open.
- Locator > Web element > Xpath
- Mouse options: left button, Single click
- XPath of the target element:
//*[@id="panel-quick-actions"]/div[2]/a[3]. Alternatively, you can use://*[@id="ip-navbar-collapse"]/ul[1]/li[4]/ul/li[1]/aor://a[@class='create-invoice'].
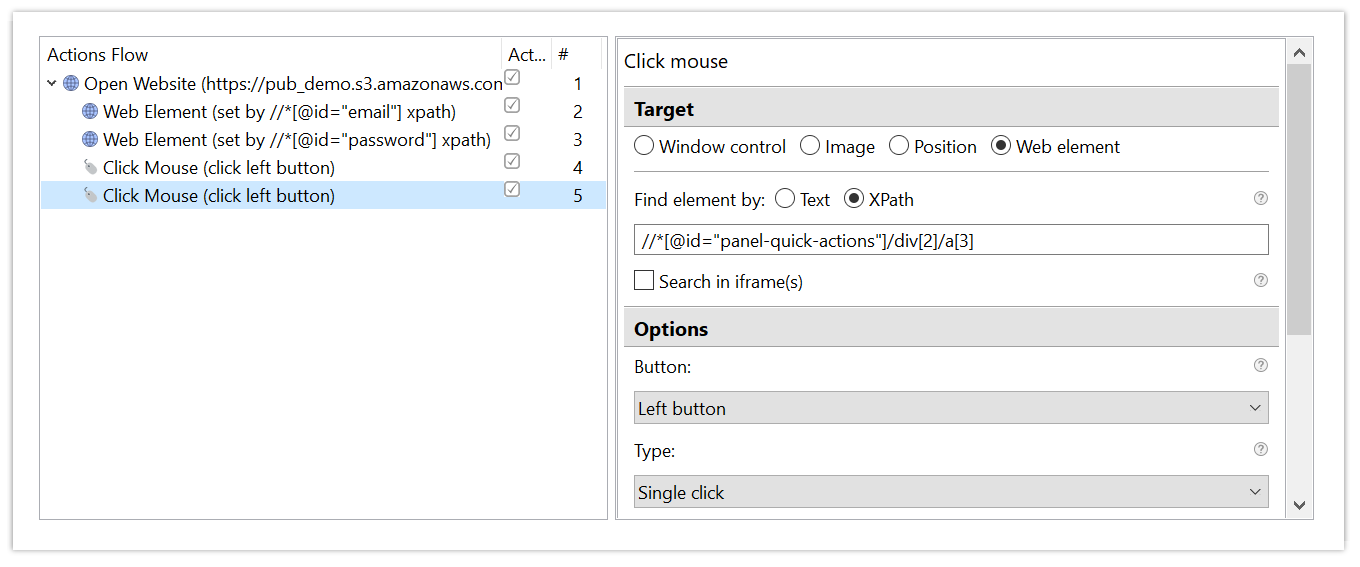
Play the recording to make sure that Create Invoice is clicked.
You can download the recording for further tests.
Example 3. Download invoice
Steps to download invoice
In this example, we will use Recorder to click a link pointing to an invoice in the image format to download the image. The step is an extension to Example 1, as it is performed after we log into Invoice Plane.
Open URL https://pub_demo.s3.amazonaws.com/invoiceplane-2/InvoicePlaneDemoDashboard.html in Google Chrome.
Open DevTools and get XPath for the following element.
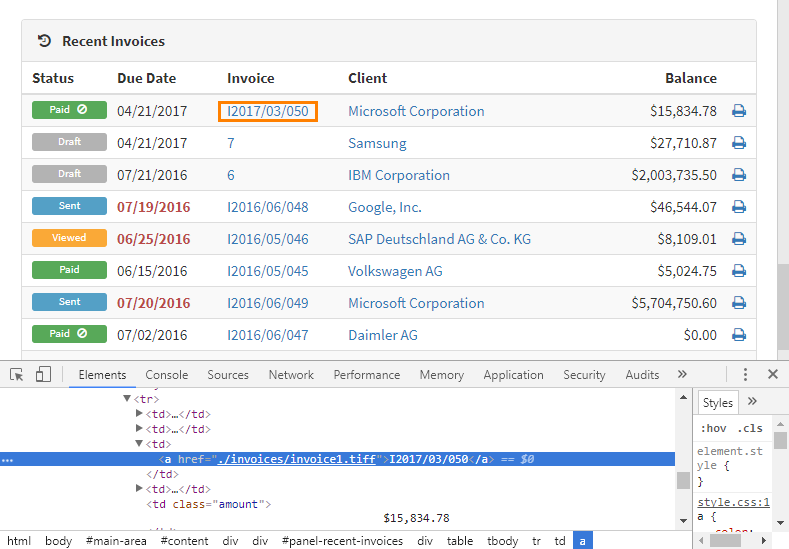
The XPath to the first element is as follows:
//*[@id="panel-recent-invoices"]/div[2]/table/tbody/tr[1]/td[3]/aAs we want to iterate through all the available invoices in the anel, we need an XPath to get the links from all table rows. It looks like this:
//*[@id="panel-recent-invoices"]/div[2]/table/tbody/tr/td[3]/aTo get each link, we create a counter in Recorder variables (for example,
counterwith type Number) and use it in the XPath://*[@id="panel-recent-invoices"]/div[2]/table/tbody/tr[${counter}]/td[3]/aOpen the web site (the Open Website action) to download invoices.
Create and use a List variable to save all links to invoices (the Web Element action).
- Mode: Get value
- Options > XPath of the element:
//*[@id="panel-recent-invoices"]/div[2]/table/tbody/tr/td[3]/a - Input:
links_list(Recorder variable)
Create a loop to iterate through all elements in the
links_listlist (the For Each Loop action). Perform the nested action for each element inlinks_list.Increment Counter (initially defined as 0): Variables > Expression Value.
- Select variable:
counter - Expression:
${counter}+1
- Select variable:
Right-click (the Click Mouse action) a link to download an invoice in the image format from Recent Invoices.
- Locator: Web element, Xpath
- Mouse options: Right button, Single click
- XPath of the target element:
//*[@id="panel-recent-invoices"]/div[2]/table/tbody/tr[${counter}]/td[3]/a
Click Save Link As... (the Click Mouse action) in the context menu and capture it.
- Locator: Click on image
- Mouse options: Left button, Single click
- Target location: set Anchor region and Click position in the captured image, so that the bot clicks the Save Link As... item in the context menu.
Click Save (the Click Mouse action) in the Save As window and capture it.
- Locator: click on image
- Mouse options: left button, Single click
- Target location: set Anchor region and Click position in the captured image, so that the bot clicks the Save button in the Save dialog.
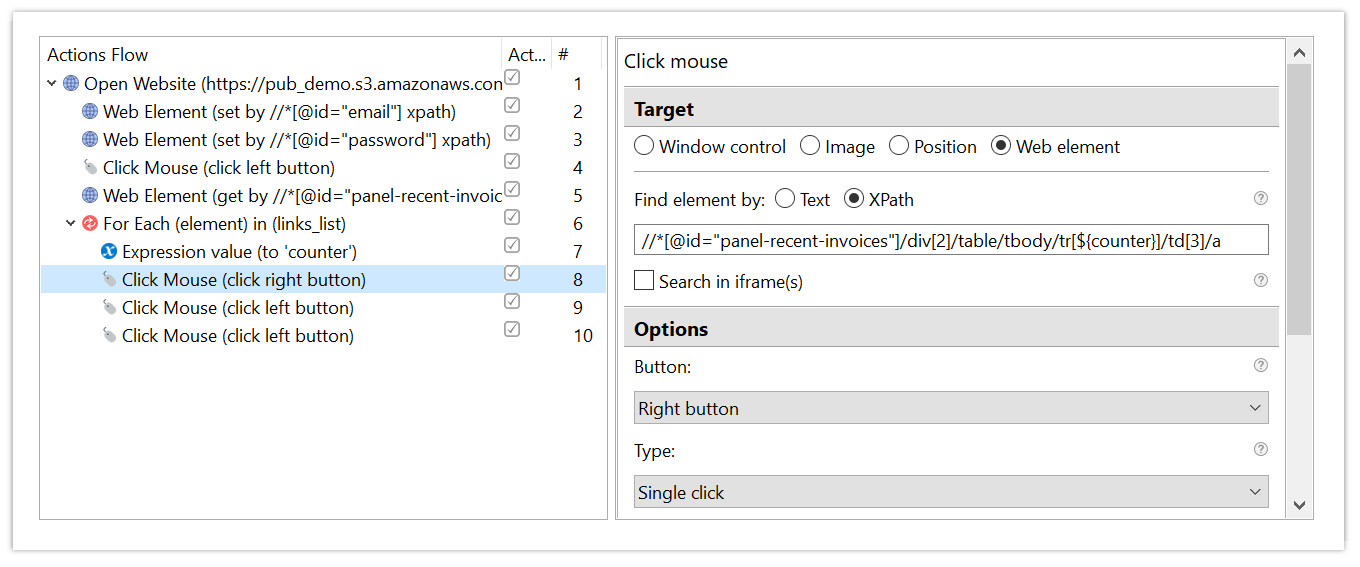
Play the recording to make sure that all invoices are downloaded.
You can download the recording for further tests.