Set up disaster recovery
Disaster recovery (DR) is the ability to continue services' operation in case of major outages, often with reduced capabilities or performance. Disaster recovery solutions typically involve manual activities. DR is aimed at minimal data loss, including up to 15 seconds for database loss, up to 15 minutes for file system data loss, and up to 4 hours of server downtime.
The DR architecture implies having two sites: primary and DR one. The primary set hosts the complete set of servers (either in the HA mode or without it) with running components. The DR site is the exact copy of the primary one, including the servers' DNS and topology. All the servers on the DR site are running while the components on them are stopped.
The replication of data between the sites is performed every 30 minutes. If the primary site fails, the system is switched to the DR site with minimum data loss.
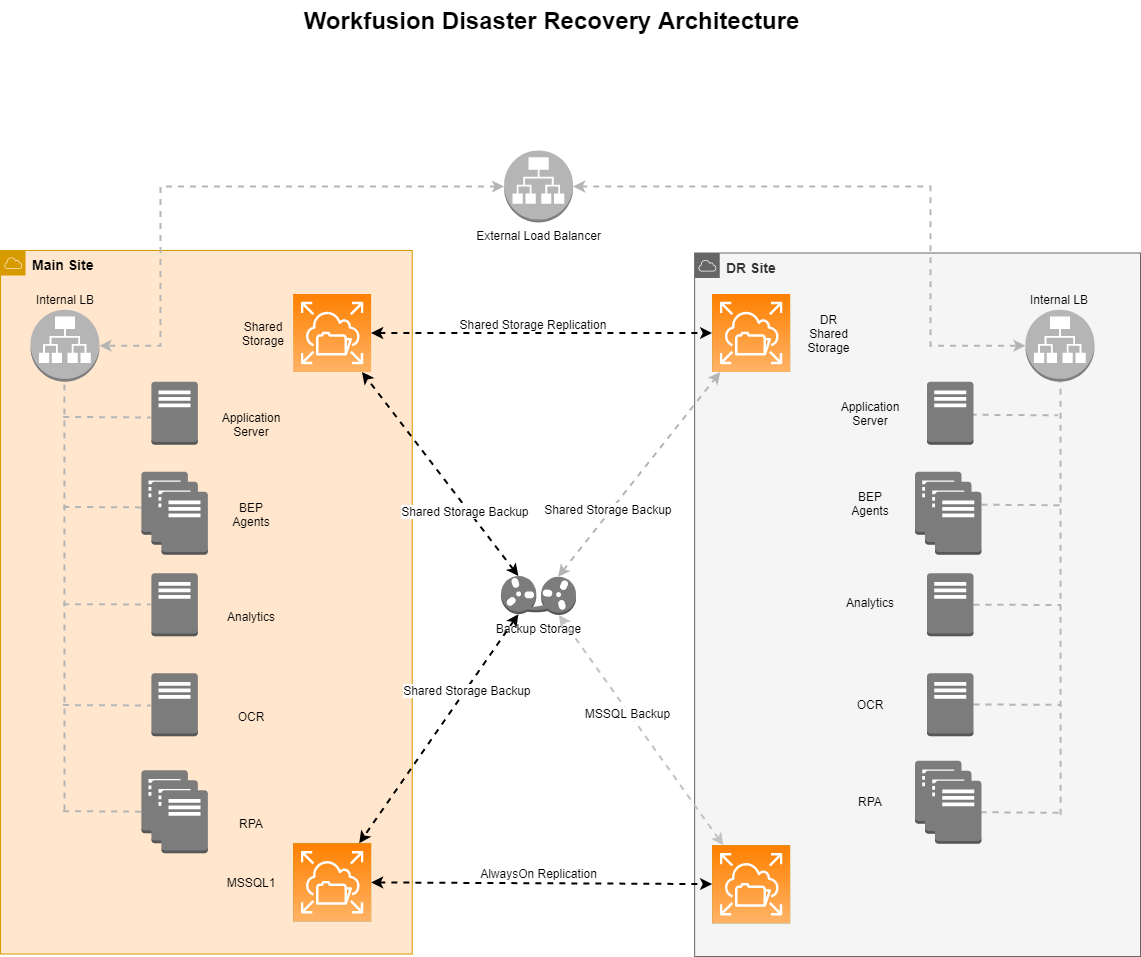
Requirements
- The
INSTALL_DIR/sharedshared directory must be mounted to the Master servers both on the primary and the DR sites. - The shared NFS directory must be replicated between the primary and the DR sites.
- MS SQL must support the Log Shipment and the Asynchronous Replication methods.
- The client must configure the Global DNS server or Route 53 to enable site failover.
- The DR site must mirror the following objects of the primary site:
- Servers' topology
- DNS records
- Credentials for services
- All the Work.AI components must be stopped on the DR site.
Deploy DR environment
Prerequisites
- The primary environment is deployed as usual and stopped.
- NFS directories from the primary site are replicated to the DR site's NFS.
- MSSQL is replicated from the primary site to the DR one.
- DNS records point to the DR environment.
Deployment
To deploy the Disaster Recovery environment, do the following:
Copy
INSTALLER_DIR(for example,/opt/workfusion/wf_installer) from the primary site (the MASTER1 server) to the DR one.noteIf you transfer the installer directory with
rsync, make sure to add the-l, --links copy symlinks as symlinksoption.Install the Product to the DR environment as usual while skipping the RPA setup:
$ cd $INSTALLER_DIR
$ ./install.sh install full -e skip_rpa=true
Stop all services.
- Standard setup
- Multipoint setup
For the Standard installation, run the commands:
$ cd ${INSTALLER_DIR}
$ ./install.sh stop_services full -e skip_rpa=true
For the Multipoint installation:
On each Master server, run the commands:
# this line could be executed only once
$ wfmanager stop marathon-apps
$ wfmanager stop all
On each Agent server, run the command:
$ wfmanager stop all
Copy
${INSTALL_DIR}/vds-data/ssl/marathon.jksfrom primary environment to the DR environment, replacing the existing oneRestore vault, etcd, ZooKeeper, and Elasticsearch data.
These Data Stores must be restored in a specific order. The vault must be restored before etcd because it requires a running, unsealed vault and a valid
root_tokenin the current (still DR-local) etcd. After etcd is restored, vault-unseal must be restarted so it picks up the keys produced by the primary site.Start the minimal stack required for the vault restore. On each Master server, run:
$ wfmanager start etcd haproxy vault vault-proxy vault-unsealRestore the vault. Run on MASTER1 only:
$ vault-restore.sh ${install_dir}/shared/vault/backups/vault-backup-<...>.snap
# Path to the correct backup file produced by the primary environmentnoteRemember to specify the path to the backup file.
Otherwise, the restoration script does not run. Unlike
etcd-restore.shandzookeeper-restore.sh,vault-restore.shdoes not have an implicit "latest backup" fallback by design to avoid accidentally accepting a snapshot from a wrong environment.The script reads the matching
root_tokenfrometcd, invokesbao operator raft snapshot restore -force, and then restarts the local vault server so that the new seal/barrier state is loaded from the restored storage.noteIn HA mode, the
bao operator raft snapshot restorecall propagates the snapshot to all raft followers, but only MASTER1's vault server is restarted automatically. You must also restart vault on the remaining Master servers so that they reload their in-memory state:# on MASTER2 and MASTER3
$ wfmanager restart vaultAfter this step, the vault is sealed with the seal configuration from the snapshot. The local
etcdstill holds the DR-local keys (that do not match the new seal configuration), sovault-unsealwill loop with thecipher: message authentication failederror, which is expected and is resolved by the next two steps.To restore etcd on each Master server, run the command:
$ etcd-restore.sh ${install_dir}/shared/etcd/backups/etcd_snapshot_<...>.db
# Path to correct backup file, produced by primary environment
$ wfmanager start etcdnoteRemember to specify the path to the backup file.
Otherwise, the restoration script automatically uses the latest backup in the
/backupsdirectory. Thus, it can accidentally use the file produced by the cron backup script in an incorrect environment.After this step, etcd contains the
vault-init-keysfrom the primary site. The keys match the seal configuration that the vault is currently sealed with.Restart
vault-unsealon each Master server so that it re-reads the now-restoredvault-init-keysfrom etcd:$ wfmanager restart vault-unsealnotevault-unsealreadsvault-init-keysfrometcdonce at process startup and caches them in memory for the lifetime of the process. Without this restart, it would keep sending the previously cached DR-local keys to vault, and the unseal would keep failing withcipher: message authentication failed. The restart forces it to pick up the keys from the restored etcd.Verify that the vault has unsealed with the new keys by looking at
vault-unseal.login thelogsdirectoryTo restore ZooKeeper on each Master server, run the command:
$ zookeeper-restore.sh ${install_dir}/shared/zookeeper/backups/zk-backup-<...>.zip
# Path to correct backup file, produced by primary environmentnoteRemember to specify the path to the backup file.
Otherwise, the restoration script automatically uses the latest backup in the
/backupsdirectory. Thus, it can accidentally use the file produced by the cron backup script in an incorrect environment.To restore Elasticsearch:
Start the Elasticsearch cluster by running the following command on each ELK server (according to
elk_hostsvalue in hosts.yml):$ wfmanager start elasticsearchRestore Elasticsearch security indices by running the following command once on any Master server:
$ elasticsearch-restore.sh
Start all services.
- Standard setup
- Multipoint setup
For the Standard installation, run the commands:
$ cd ${INSTALLER_DIR}
$ ./install.sh start_services full -e skip_rpa=true -e skip_bi=true
For the Multipoint installation:
On each Master server, run the commands:
$ wfmanager start all
# the following line can be executed only once
$ wfmanager start marathon-apps
On each Agent server, run the commands:
$ wfmanager start all
Install RPA:
$ ./install.sh install rpaVerify that the deployed environment is working:
$ ./install.sh check full -e test_ml=true -e test_ocr=true -e test_rpa=true -e test_desktop=true -e test_ie=trueAfter setting the DR site, remember to disable the autostart of its processes. For that, on the DR site, perform the following operations:
On all Linux servers, run the following command to stop the processes. The processes on other servers must be stopped manually.
$ wfmanager stop marathon-apps
$ wfmanager stop all
On each server, run the following command to rename the directory with the startup scripts:
$ mv ${INSTALL_DIR}/supervisord/apps ${INSTALL_DIR}/supervisord/apps_disabled
$ wfmanager update
Switch the DNS records to point back to the primary site.
Configure DR failover
Switch from Primary site to DR
Failover is switching from a primary site to the DR one.
To switch to the DR site, do the following:
Stop all processes (for example, CT, workfusion, and so on) on the primary site.
It is recommended to shut down all servers with running processes. Alternatively, you can use the command
wfmanager stop marathon-apps && wfmanager stop allto halt the processes on the Linux servers. The processes on other servers, including MS SQL, must be stopped manually.Switch the DNS records and IP addresses from the primary site to the DR one.
Perform the failover procedure for MS SQL according to your standard process.
On each Linux server, restore supervisord configuration:
$ mv ${INSTALL_DIR}/supervisord/apps_disabled ${INSTALL_DIR}/supervisord/apps
$ wfmanager update
$ wfmanager stop all
Restore vault, etcd, and ZooKeeper data. Follow the procedure in step 5 of the Deployment section, keeping the order: vault → etcd → restart vault-unseal → ZooKeeper. The full sequence (run on MASTER1 unless noted otherwise):
# 1. Start the minimal stack on each MASTER
$ wfmanager start etcd haproxy vault vault-proxy vault-unseal

# 2. On MASTER1 only — restore vault (auto-restarts the local vault).
#    In HA mode, also run `wfmanager restart vault` on MASTER2 and MASTER3.
$ vault-restore.sh ${install_dir}/shared/vault/backups/vault-backup-<...>.snap

# 3. On each MASTER — restore etcd
$ etcd-restore.sh ${install_dir}/shared/etcd/backups/etcd_snapshot_<...>.db
$ wfmanager start etcd

# 4. On each MASTER — restart vault-unseal to pick up the new keys
$ wfmanager restart vault-unseal

# 5. On each MASTER — restore ZooKeeper
$ zookeeper-restore.sh ${install_dir}/shared/zookeeper/backups/zk-backup-<...>.zip
See the Deployment step 5 notes for an explanation of why vault must be restored before
etcdand whyvault-unsealmust be restarted afterwards.Start all services:
On the DR site, on each Linux server, start all processes:
$ wfmanager start allOn the DR site on any Master server, run the command:
$ wfmanager start marathon-appsThe processes on the Windows servers, including MS SQL, are to be started via the user interface or with specific initiation commands.
After the replication, S3 and Nexus are immediately updated to the latest state as they both are installed in a shared directory.
Switch from DR to primary site
Once an incident is resolved, you may want to switch from the DR site back to the primary one or to a new environment.
On the DR site
To switch from the DR site to the primary one, on the Disaster Recovery site, perform the following operations:
On each Master server, run the etcd backup procedure:
$ etcd-backup.shOn each Master server, run the ZooKeeper backup procedure:
$ zookeeper-backup.shOn MASTER1, run the vault backup procedure to produce a fresh snapshot of the DR-site vault state:
$ vault-backup.shnoteIn HA mode, run
vault-backup.shon each Master server. The script internally checks whether the local node is the current raft leader and is a no-op on followers. As a result, only one snapshot per invocation is produced from whichever Master is the leader at that moment.Stop the processes on the Linux servers:
$ wfmanager stop marathon-apps
$ wfmanager stop all
The processes on other servers, including MS SQL, must be stopped manually.
On Linux servers, disable services autostart by renaming the directory with startup scripts:
$ mv ${INSTALL_DIR}/supervisord/apps ${INSTALL_DIR}/supervisord/apps_disabled
$ wfmanager updateOptional. Stop all DR servers.
Switch the DNS records and IP addresses from the DR site to the primary one.
Perform the failover procedure for MS SQL.
On the primary site
Continue the procedure and, on the primary site, perform the following operations:
Replicate common_nfs_share from the DR site.
Start all Master servers.
Stop all services on Master servers.
$ wfmanager stop marathon-apps
$ wfmanager stop all
Restore the vault, etcd, and ZooKeeper data on the primary site in the following order: vault → etcd → restart vault-unseal → ZooKeeper. The order, the rationale, and the per-step notes are identical to step 5 of the Deployment section. The only differences are the source of the backup files (the DR site this time, not the primary one) and the fact that the primary site already has fully installed services from before, so no
install fullis required.Start the minimal stack required for the vault restore. On each Master server, run:
$ wfmanager start etcd haproxy vault vault-proxy vault-unsealTo restore the vault on MASTER1, run the command:
$ vault-restore.sh ${install_dir}/shared/vault/backups/vault-backup-<...>.snap
# Path to correct backup file, produced by dr environmentnoteIn HA mode, additionally restart the vault on MASTER2 and MASTER3:
$ wfmanager restart vaultTo restore etcd on each Master server, run the command:
$ etcd-restore.sh ${install_dir}/shared/etcd/backups/etcd_snapshot_<...>.db
# Path to correct backup file produced by dr environment
$ wfmanager start etcdnoteRemember to specify the path to the backup file.
Otherwise, the restoration script automatically uses the latest backup in the
/backupsdirectory. Thus, it can accidentally use the file produced by the cron backup script in an incorrect environment.Restart
vault-unsealon each Master server so that it picks up the now-restoredvault-init-keysfrom etcd:$ wfmanager restart vault-unsealVerify that the vault has unsealed with the new keys by looking at
vault-unseal.login thelogsdirectory.To restore ZooKeeper, on each Master server, run the command:
$ zookeeper-restore.sh ${install_dir}/shared/zookeeper/backups/zk-backup-<...>.zip
# Path to correct backup file produced by dr environmentnoteRemember to specify the path to the backup file.
Otherwise, the restoration script automatically uses the latest backup in the
/backupsdirectory. Thus, it can accidentally use the file produced by the cron backup script in an incorrect environment.
Start all processes on Master servers.
$ wfmanager start all
$ wfmanager start marathon-apps
Start other Linux and Windows servers.
The processes on the Windows servers, including MS SQL, are to be started via the user interface or with specific initiation commands.
Run a health check Business Process to verify that the system is restored correctly.
Recover OCR tasks
You can recover OCR tasks that might not be processed in case of a disaster on the entire platform.
You can start the recovery process on one OCR server (node) at a time.
Start recovery
The /api/v2/recovery REST endpoint allows starting recovery immediately and gives a chance to restore tasks stuck in the IN_PROGRESS or QUEUED status.
There are two ways to initiate the recovery:
- Restart the OCR REST process manually. Recovery is started automatically once the application is up.
- Send the POST request to the
/api/v2/recoveryOCR API endpoint. Recovery is started on one of the OCR servers in a cluster.
API messages
| Message | Recovery state |
|---|---|
| Recovery is in progress | Recovery has started successfully |
| No tasks for recovery | Recovery process hasn't found any task for recovery |
| Recovery start was skipped because it had been started by another service | User tries to start recovery when the recovery is already in progress. Recovery request is skipped. |
| Recovery start is failed | Recovery cannot be started for some reason (for example, problems with connection to ZooKeeper) |
Recovery process
recovery_status was introduced for a task as a database column to implement the recovery procedure. It is returned with general task info in the /getTaskStatus API.
Once the recovery process is started, OCR looks in the database to gather information about tasks with the InProgress, Queued, Submitted status.
| Task state before recovery | Task state after recovery |
|---|---|
| Submitted | Submitted tasks cannot be recovered. OCR recovery marks their status as ProcessingFailed and sets RecoveryStatus to Skipped. |
| Queued and InProgress | For Queued and InProgress tasks, the recovery process checks task data for consistency to ensure that recovery is meaningful for this particular task. Data consistency is checked between MSSQL and S3. If inconsistent task data (image files or pattern) is missing in S3 or MSSQL, a task is marked with the ProcessingFailed status, and the recovery status is set to Skipped.If data is consistent between S3 and MSSQL, the recovery process sends the task to processing, so the task is pushed to RabbitMQ and waits for its turn for processing. The recovery status is set to |
Sync S3 content from primary to DR site
Log in via SSH to the MASTER1 VM in the DR environment.
Extract the
rclonebinary. It's available in the installer'ssources/directory.$ mkdir -pv ${install_dir}/rclone
$ unzip ${install_dir}/wf_installer/sources/rclone-v1.71.1-linux-amd64.zip -d ${install_dir}/rclone/Navigate to the
rclone-v1.71.1-linux-amd64directory. You'll find therclonebinary inside.$ cd /opt/workfusion/rclone/rclone-v1.71.1-linux-amd64
$ ls -laCreate the
rclone.conffile here with the following content:
[ceph-primary]
type = s3
provider = Ceph
access_key_id = XXXXXXXXXXXX
secret_access_key = XXXXXXXXXXXXXXXXXXXX
endpoint = https://primary_s3_lb_hostname

[ceph-dr]
type = s3
provider = Ceph
access_key_id = XXXXXXXXXXXX
secret_access_key = XXXXXXXXXXXXXXXXXXXX
endpoint = http://127.0.0.1:7480
Make sure to replace the primary_s3_lb_hostname variable placeholder with an actual value. Also, fill the correct values for the access_key_id and secret_access_key variables for the primary and DR environments. They can be taken from config.yml and hosts.yml.
In this case, for ceph-dr, we use the local http://127.0.0.1:7480 rados-gateway endpoint so that we don't have to pass the requests to the local Ceph via the Load Balancer -> HAProxy -> Nginx route. We'll use direct API for faster write operations. 7480 is a local port where the Ceph rados-gateway is listening on the Master server.
Synchronize the entire S3 content from the primary environment to DR.
$ ./rclone sync ceph-primary: ceph-dr: --progress --stats=30s --create-empty-src-dirs
The synchronization will make the DR S3 content IDENTICAL to the primary environment. It means that if any files were present on the DR site but absent on the primary one, they will be removed from the DR site. In other words, it will make the Ceph content on the DR site an EXACT copy of the primary one.
- Repeat the
rclonecommand from the previous step periodically (for example, daily or once in several hours). It will synchronize the delta between the previous and current executions. To run it automatically in the desired time at desired intervals, use a supervisor-based cron or a standard Linux cron job.