Create no-code schema-based Business Process
The guide describes two automation use cases leveraging no-code Work.AI features and contract-based data schemas:
Simple case: invoice handling
Advanced case: account creation
Based on the above use cases, you can learn how to use the no-code features in Control Tower to do the following:
Configure input and output contracts to set a data flow across steps
Create a model dataset, train a model, and integrate it into your automations
Set up optical character recognition (OCR)
Integrate a human-in-the-loop component into your automations
Apply rules and transformations to process data
Set up connectors to integrate with third-party systems
Integrate sub-processes and run them synchronously or asynchronously
Build simple invoice handling flow
The general sequence to design a simple automation workflow for invoice processing is as follows:
In Control Tower, prepare a model for invoice processing.
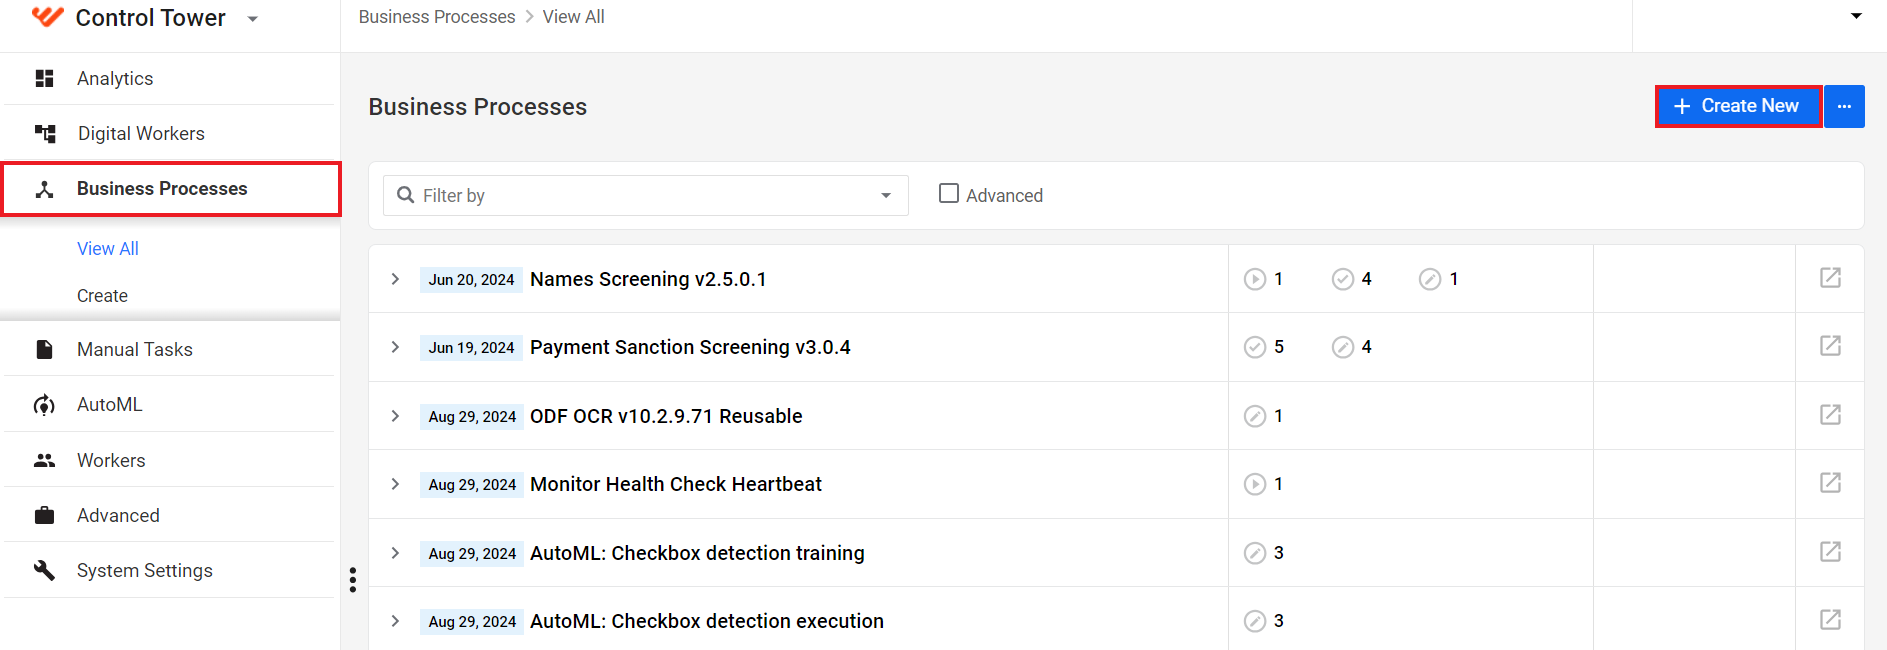
In the main menu, select Business Processes and, in the top right corner, click Create New.
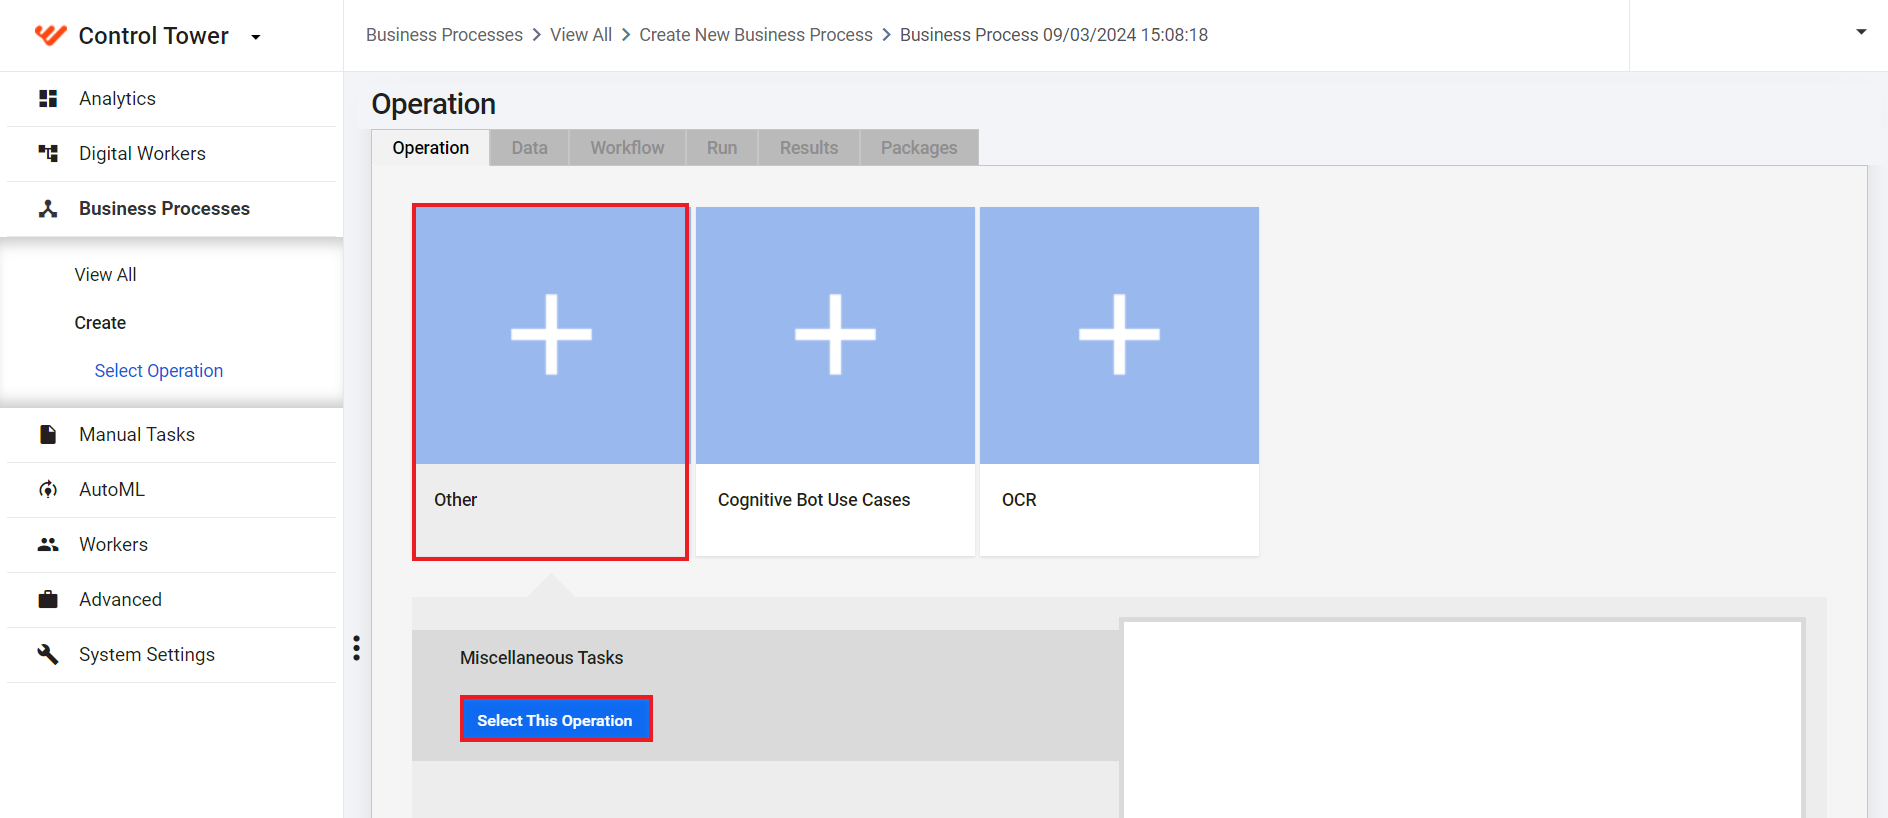
On the Operation tab, choose Other > Miscellaneous Tasks and click Select This Operation.
On the Data tab, select the No data checkbox. The Business Process gets input at the OCR step.

On the Workflow tab, click the pencil icon and set the Business Process (BP) name to Invoice handling.
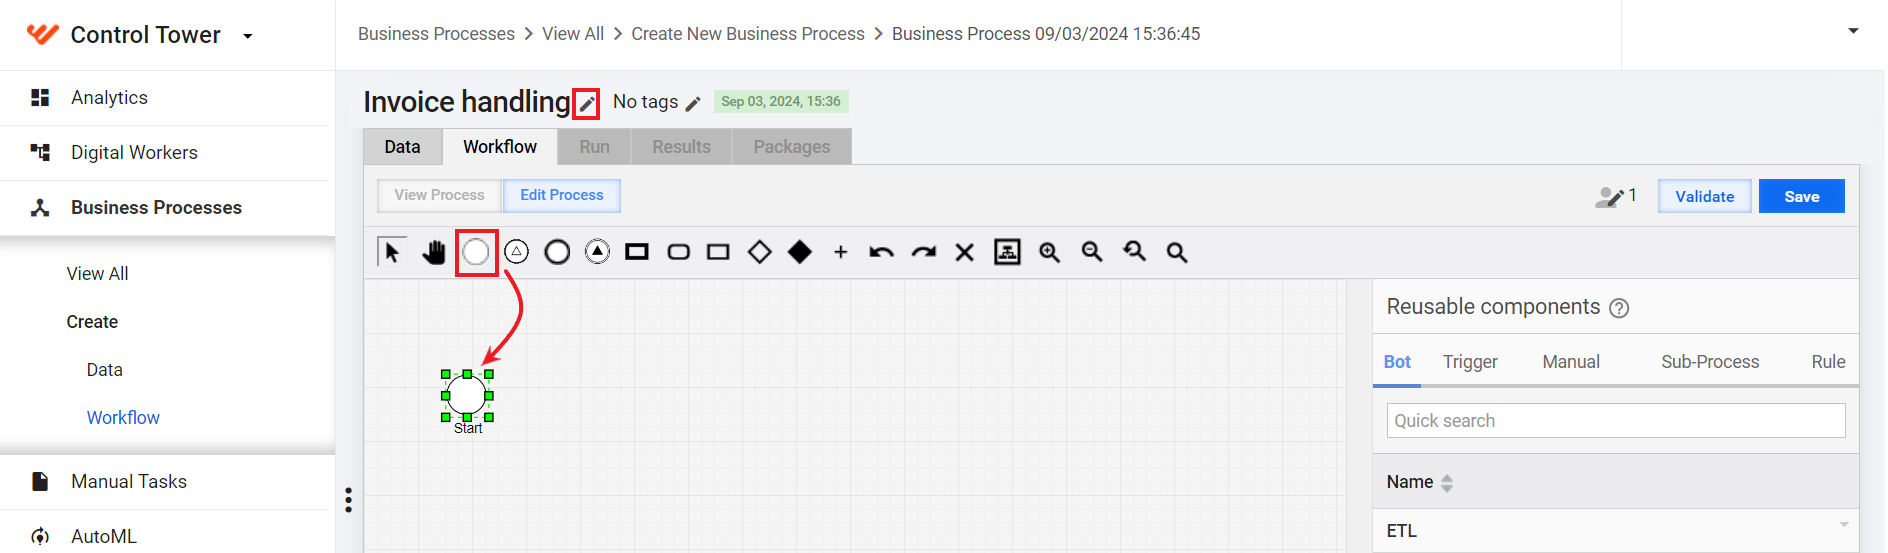
Drag a Start element to the canvas from the toolbar.
Add, configure, and connect the following steps to form an automation flow:
Add an End element by dragging it to the canvas from the toolbar and connect it to the rest of the flow.
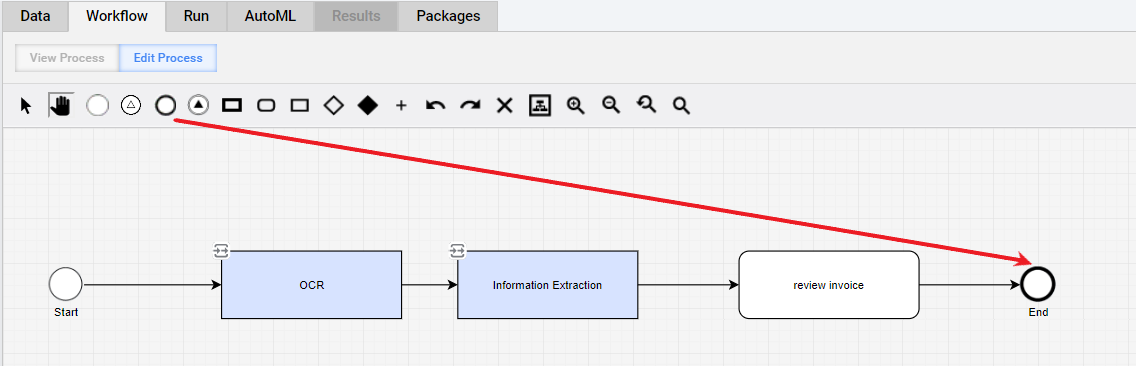
Click Save to save the resulting flow.
Prepare information extraction model
To prepare an information extraction (IE) model for the invoice handling BP, follow the instructions below.
Create and label dataset
Start with creating and labeling a dataset for training the IE model:
Navigate to AutoML > Datasets and create a Document type dataset as described in the guide.
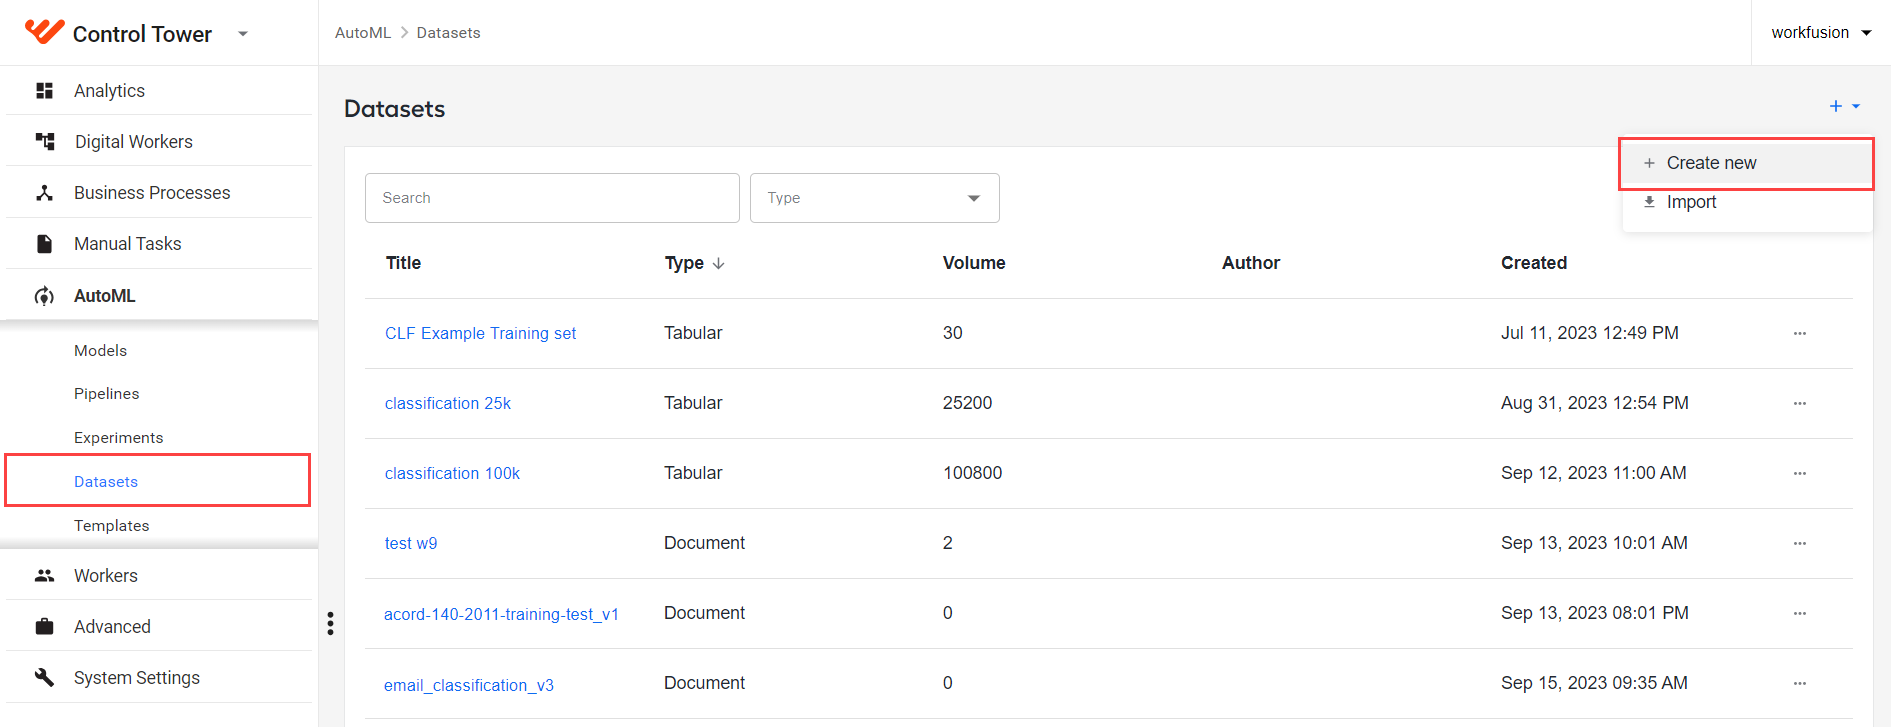
To create the dataset type, you will need a set of documents. You can download the sample batch or use any of your own valid for your use case. In any case, the set must include at least 10 documents, which is the minimum requirement for a dataset to be valid for model training.
As soon as the document set is uploaded, navigate to the Labels tab and set up labels for the invoice datapoints (form fields) you expect as input for your model. For detailed instructions on setting labels, read Manage datasets | Set up labels.
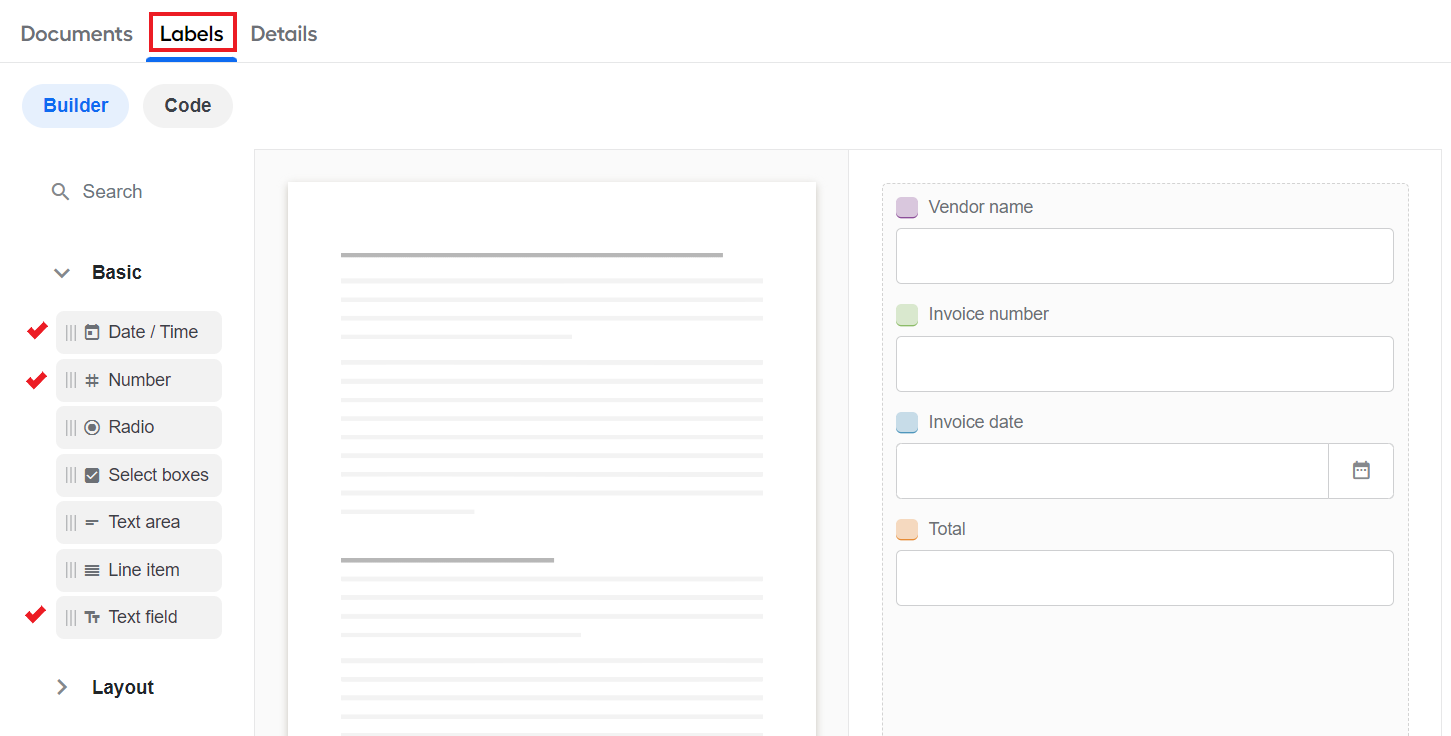
For the sample set, the datapoints are as follows: Vendor name (Text field component), Invoice number and Total (Number component), and Invoice date (Date / Time component).
Select the documents you want to label, click Label, and choose Label with AI.
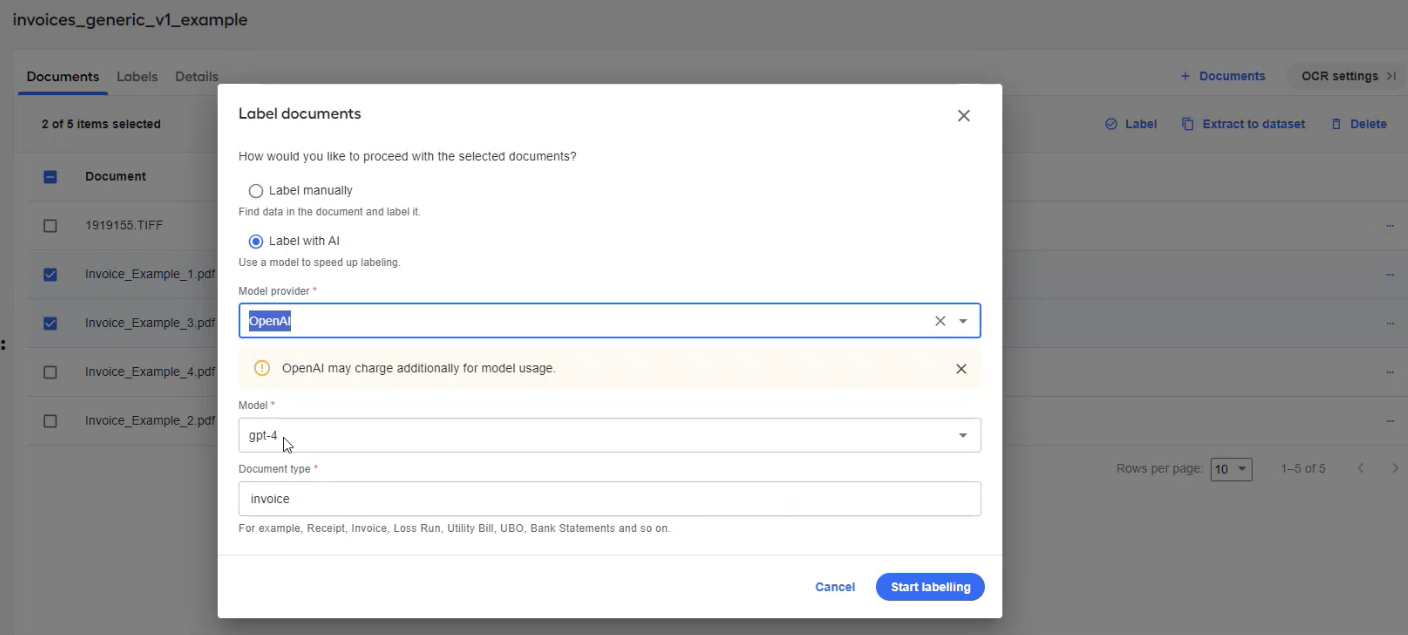
In the Model provider drop-down box, select OpenAI. In the Model field, select gpt-4. Click Start labelling.
The OpenAI model will label the documents for you. You can double-check each labeled document and correct the results as needed. After that, the dataset is ready for model training.
Alternatively, you can label your dataset manually or with a WorkFusion model. For details on available document labeling methods, read the guide.
Train model
To train an information extraction model with the created dataset, follow the steps below:
Navigate to the AutoML menu > Models and click Train new.
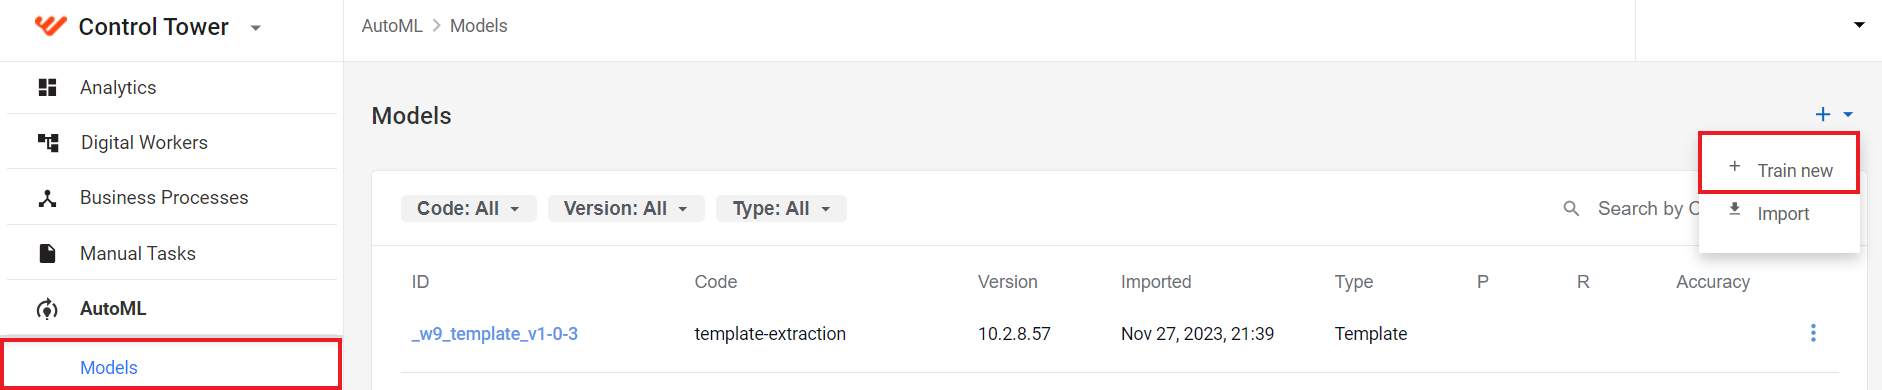
On the displayed screen, choose Train.
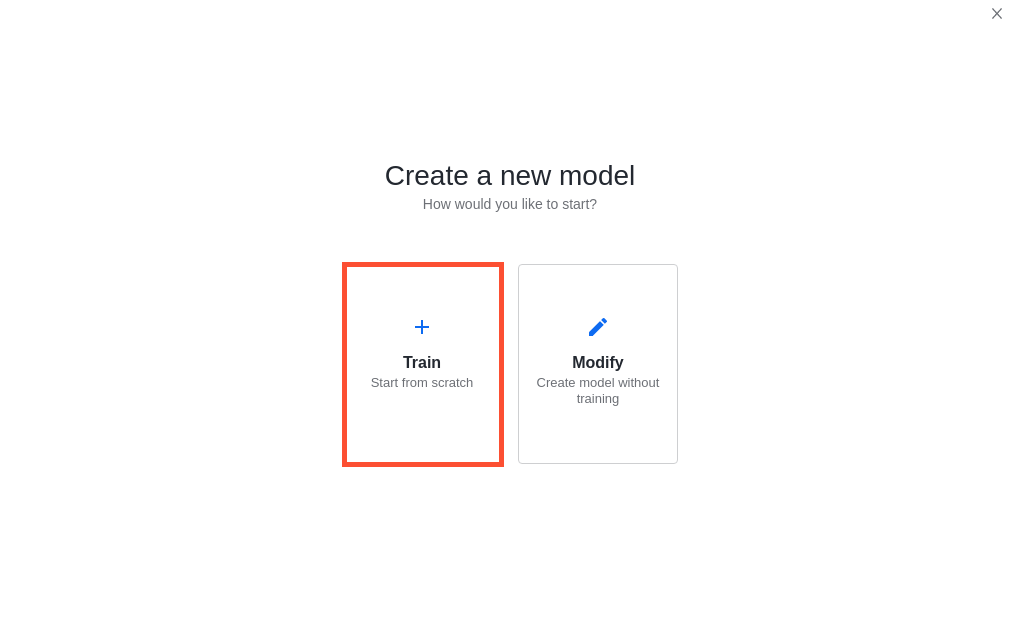
Configure the model training settings:
Set a unique name for the new model.
Choose an out-of-the-box pipeline available for extraction.
In the Training set drop-down box, select the dataset you created. If there are multiple versions of the dataset, choose one.
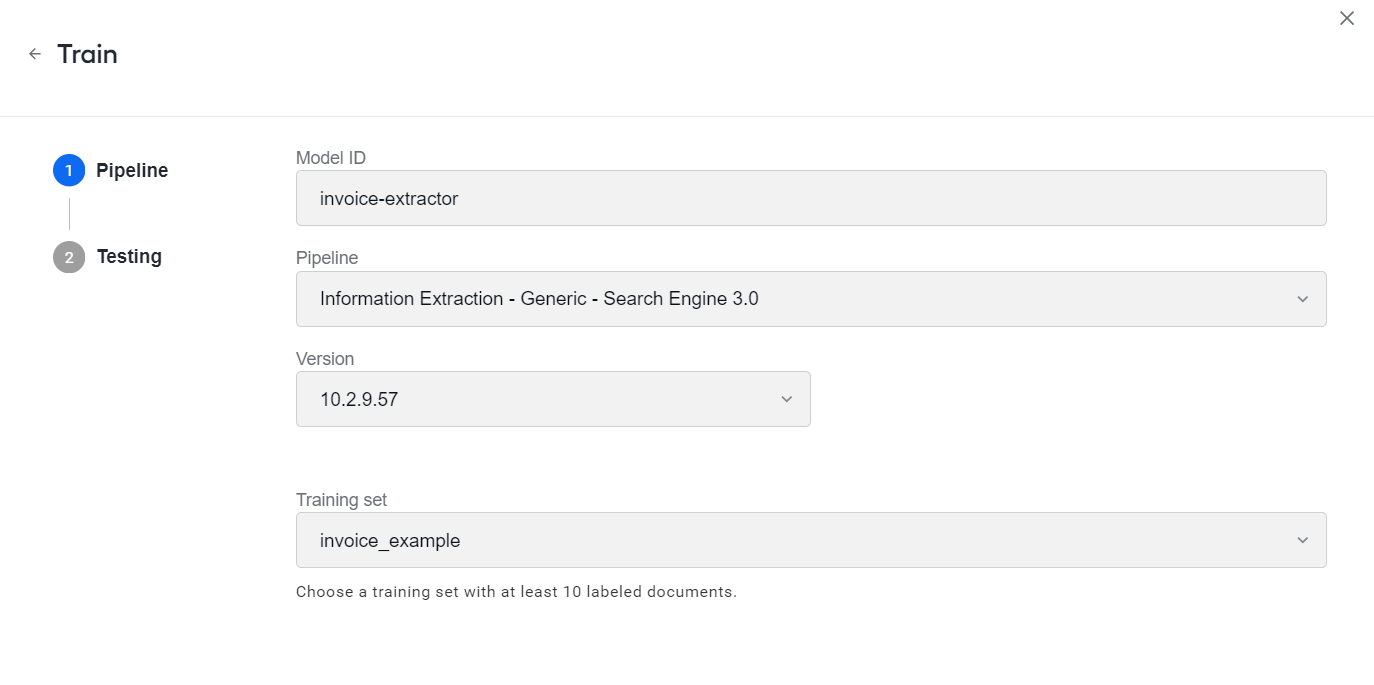
- Complete the rest of the model configuration steps as described in the guide. Essentially, you can leave the default settings.
Once the configuration is completed and you click Start, the training run becomes available on the Experiments page. As soon as the training is completed, you can click the corresponding model name in the Models list and see the results.
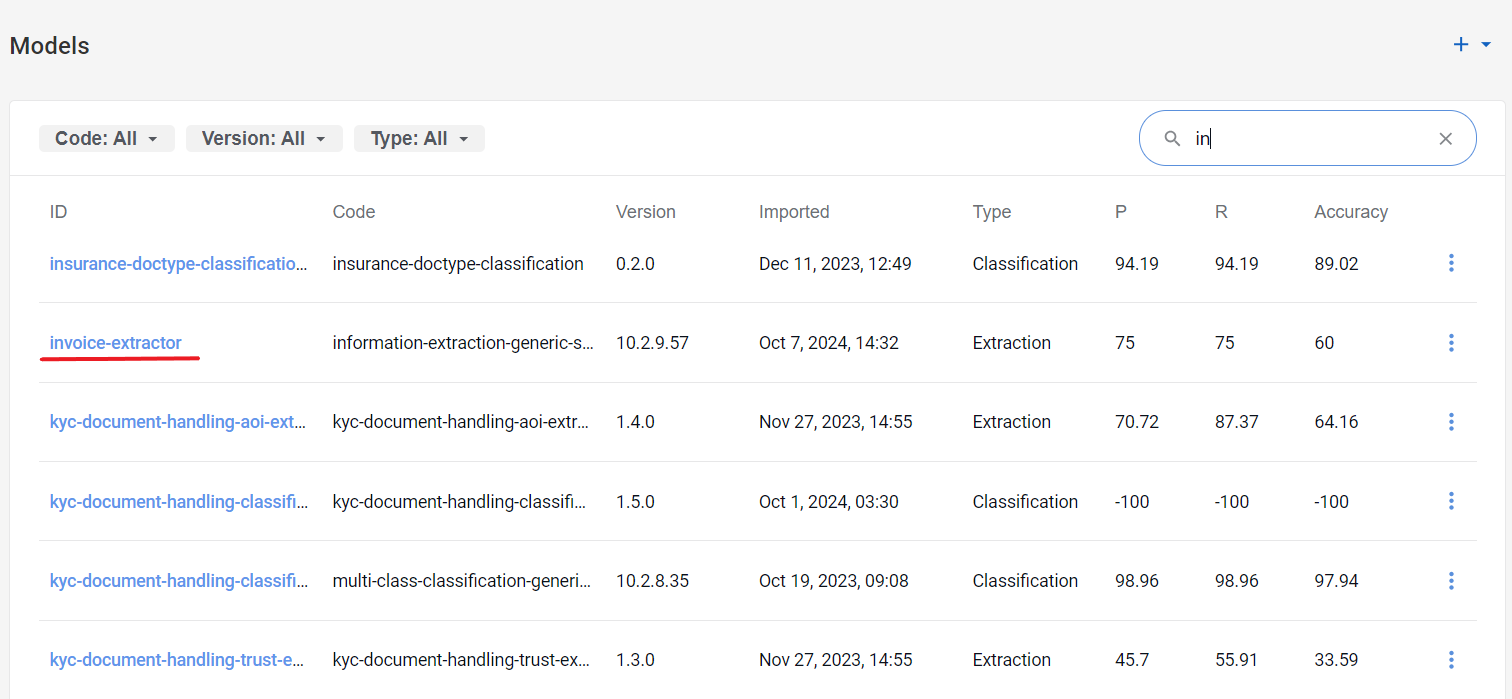
If the results are fine for you, you can proceed to use the model to build the simple invoice handling flow. To improve the results, if needed, retrain the same model with another pipeline or dataset.
Configure OCR
Once you added the Start element to the BP flow, add the OCR step:
On the Reusable components panel, open the Models tab, drag the OCR step to the canvas, and connect the Start element to it.
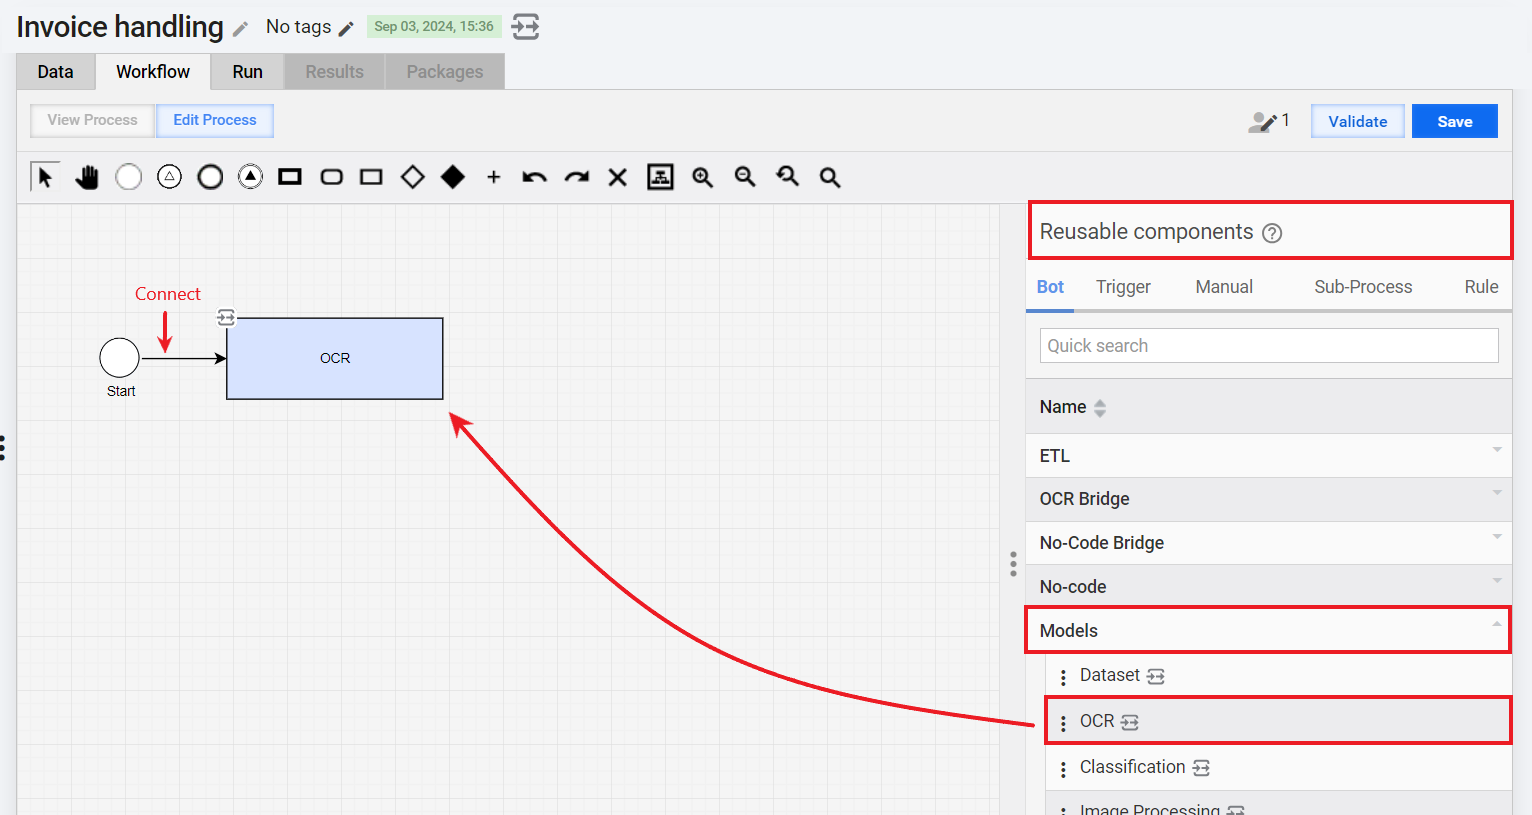
Double-click the step to open its configuration and, on the Design tab, make the following change:
In the Document URL field, specify the URL to a document uploaded to S3. This is how the BP will get its input data.
In the OCR engine field, choose the OCR engine you are using.
You can leave the default values for the rest of the fields or change them as needed. For more details, read Configure OCR step and OCR providers.
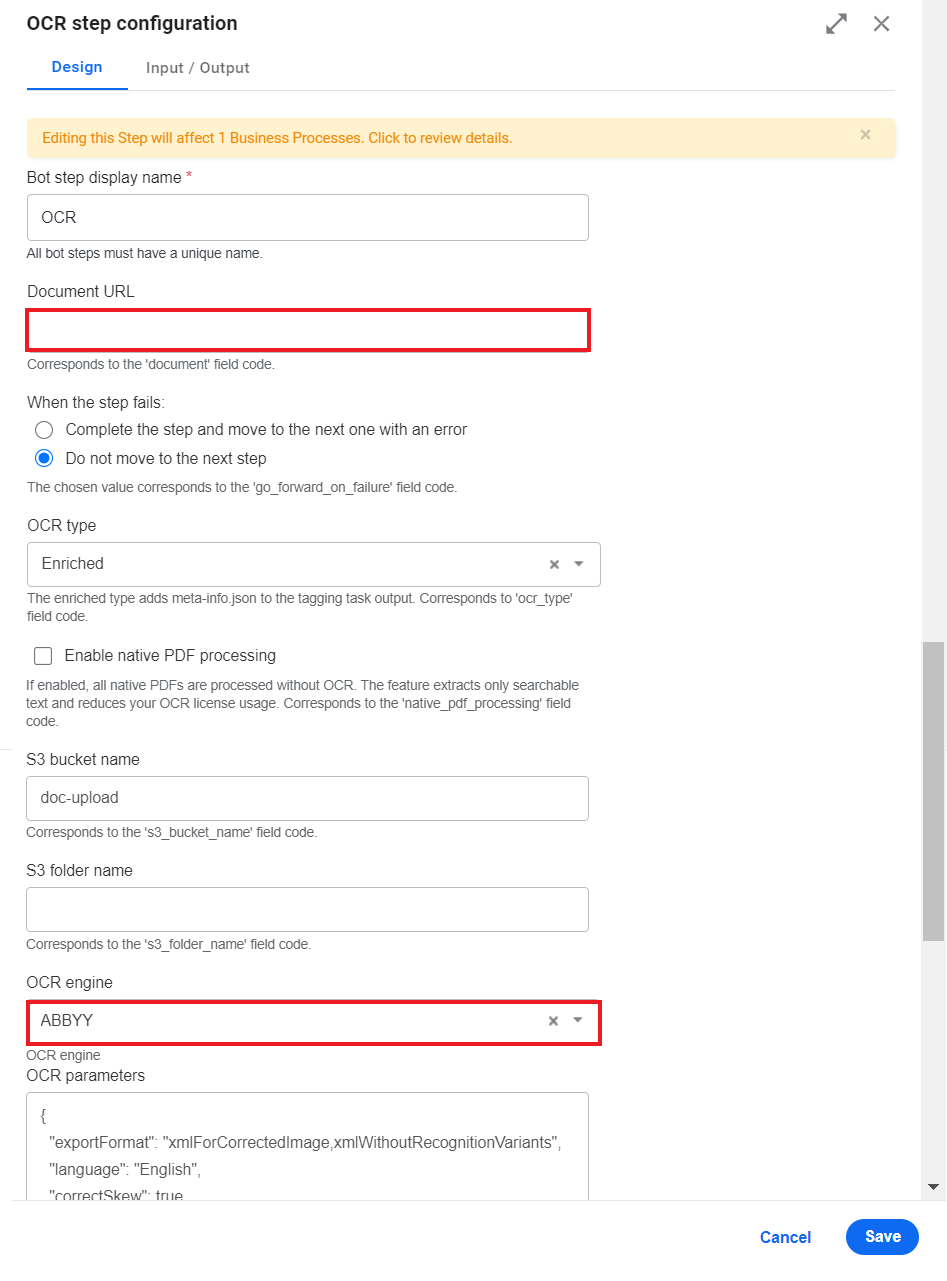
Click Save to finish the configuration.
The input and output contracts for the step on the Input / Output tab are autogenerated based on the settings on the Design tab.
Integrate information extraction model into flow
To add the model you trained to the invoice handling flow, do as follows:
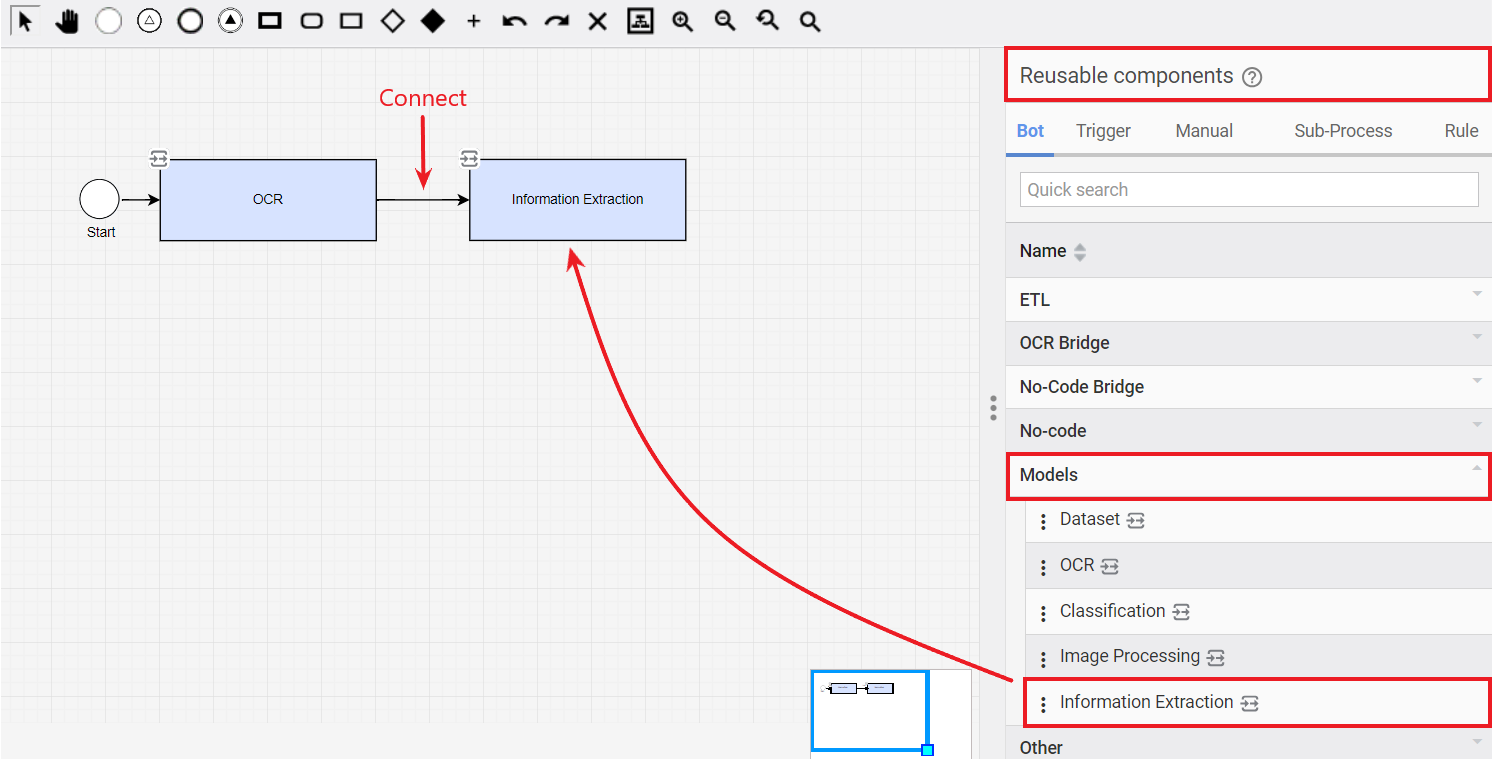
On the Reusable components panel, open the Models tab, drag the Information extraction step to the canvas, and connect the OCR element to it.
Double-click the step to open its configuration and, in the Model ID field, choose the ID of the model you prepared.
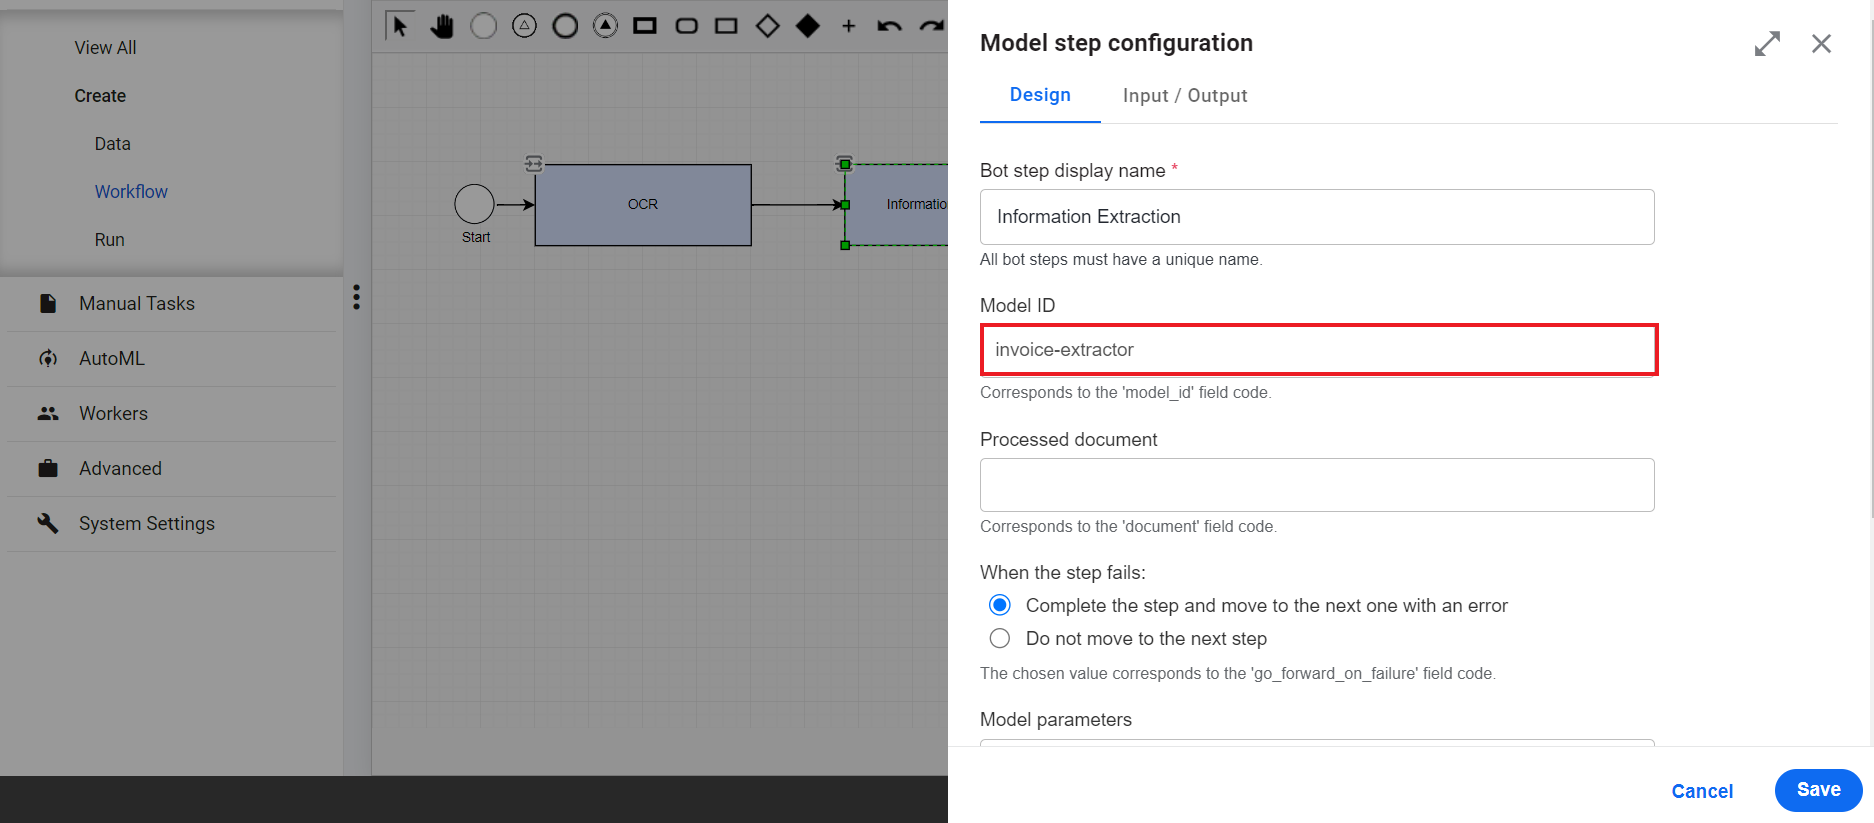
Click the Save button to finish the configuration.
The input and output contracts for the step on the Input / Output tab are autogenerated based on the settings on the Design tab.
Configure human-in-the-loop
To add a human-in-the-loop component to review the extraction results, do as follows:
Drag the Manual Task element to the canvas from the toolbar and connect it to the preceding Information Extraction step.
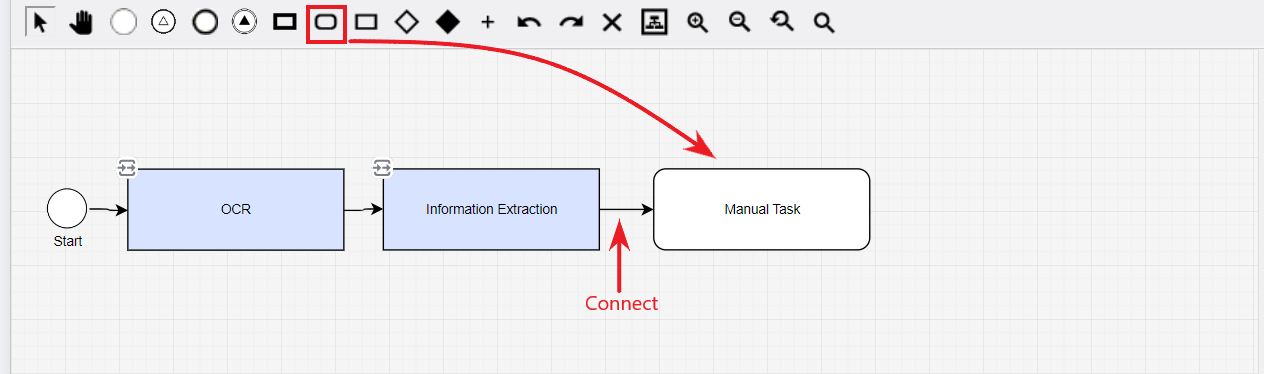
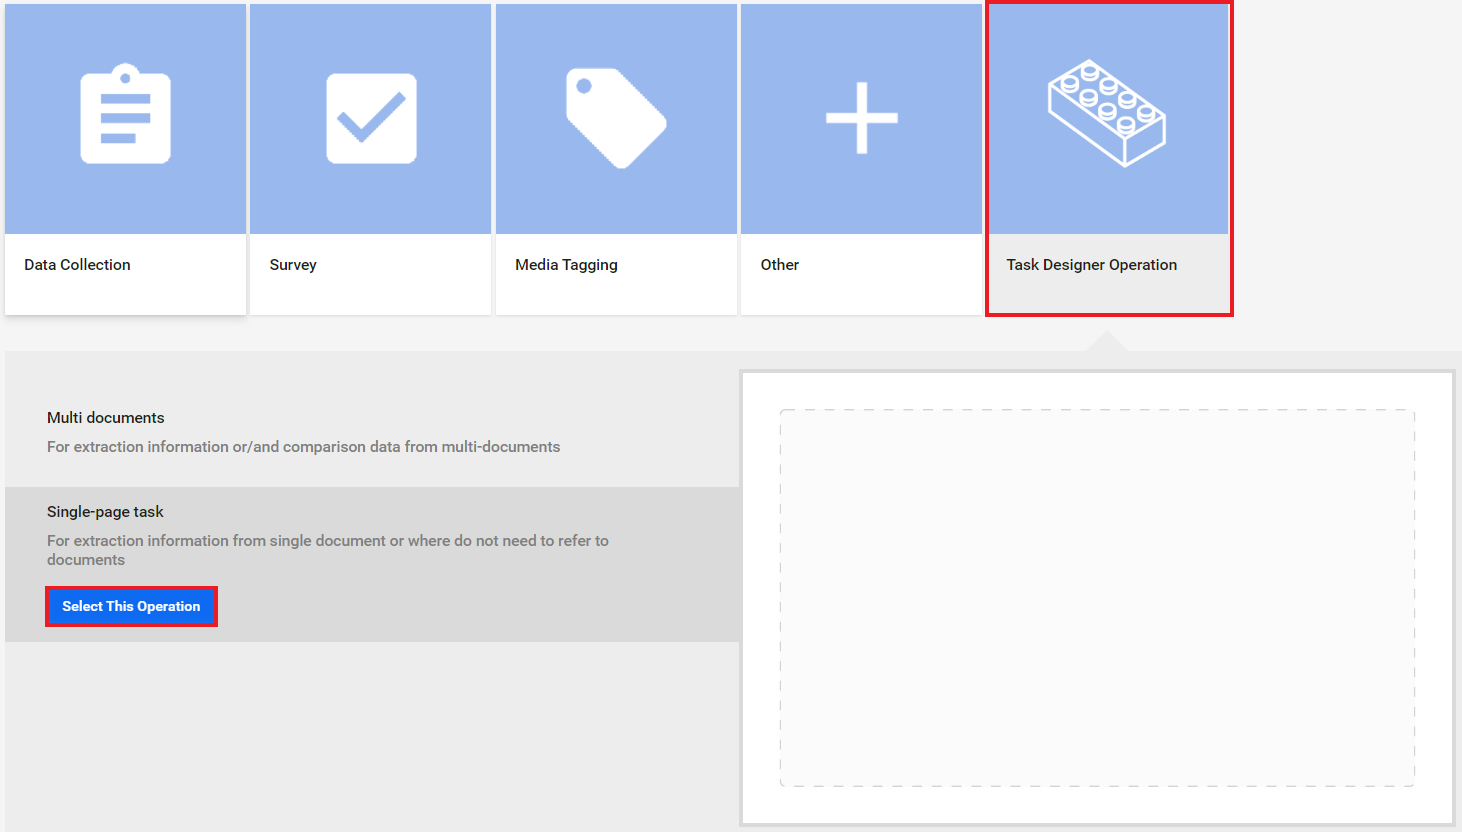
Double-click the step and choose a template for creating a task form: select Task Designer Operation > Single-page task and click Select This Operation.
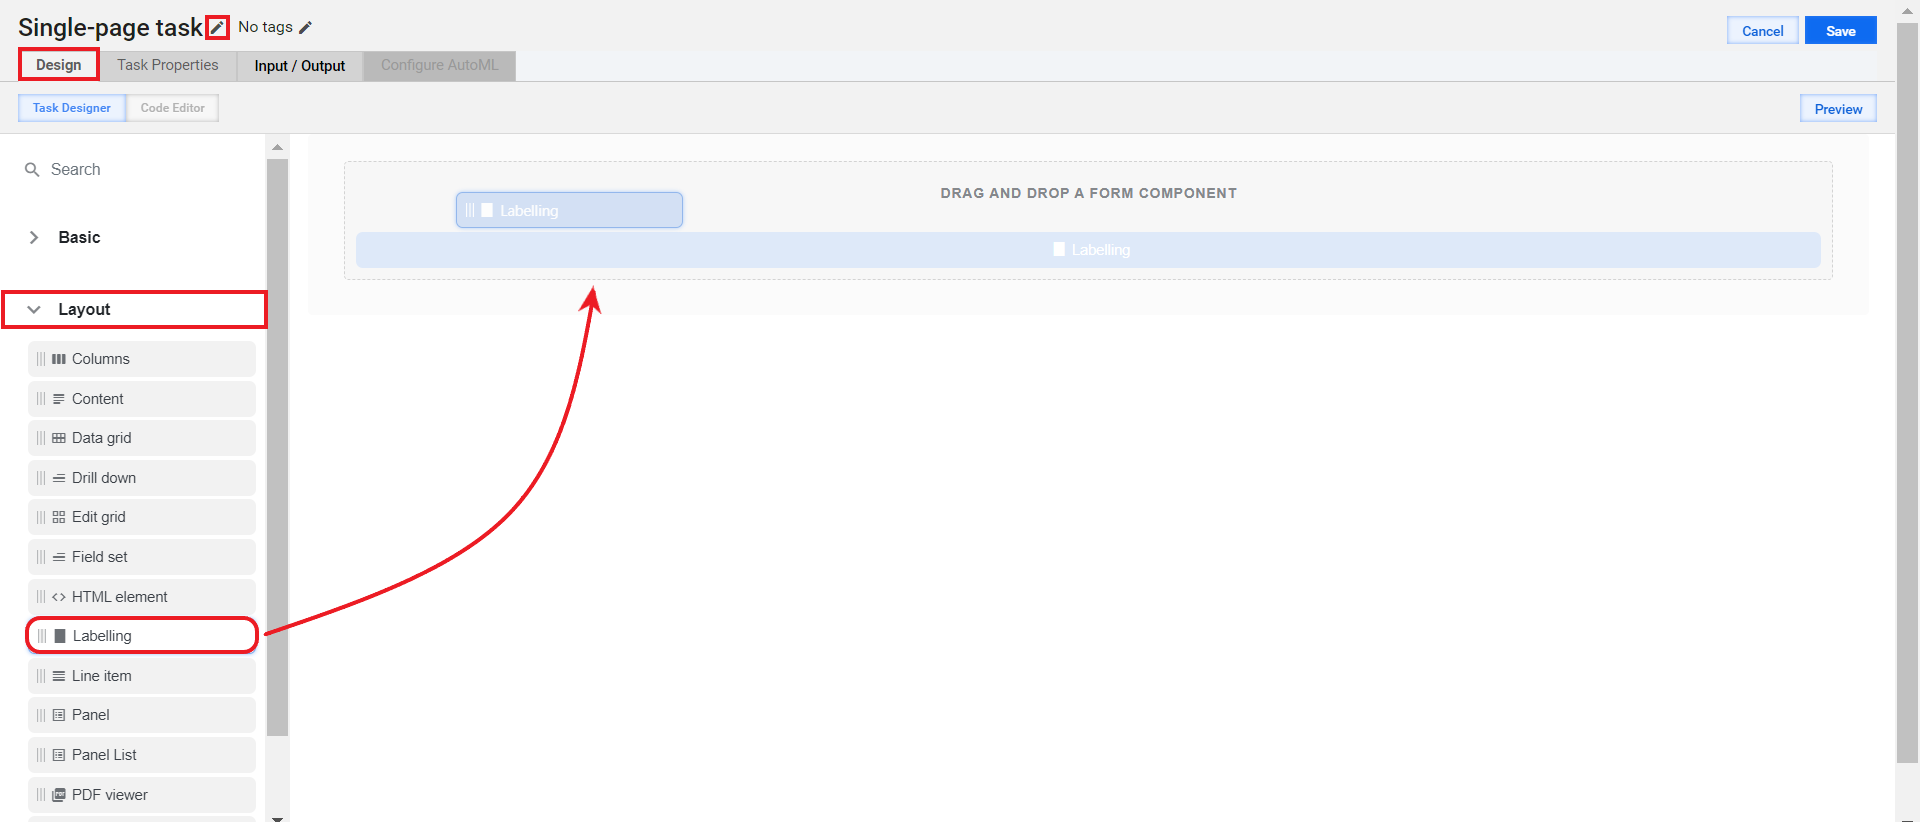
On the Design tab, rename the task to review invoice by clicking the pencil icon next to the task template name. Then, open the Layout menu and drag the Labelling component to the canvas.
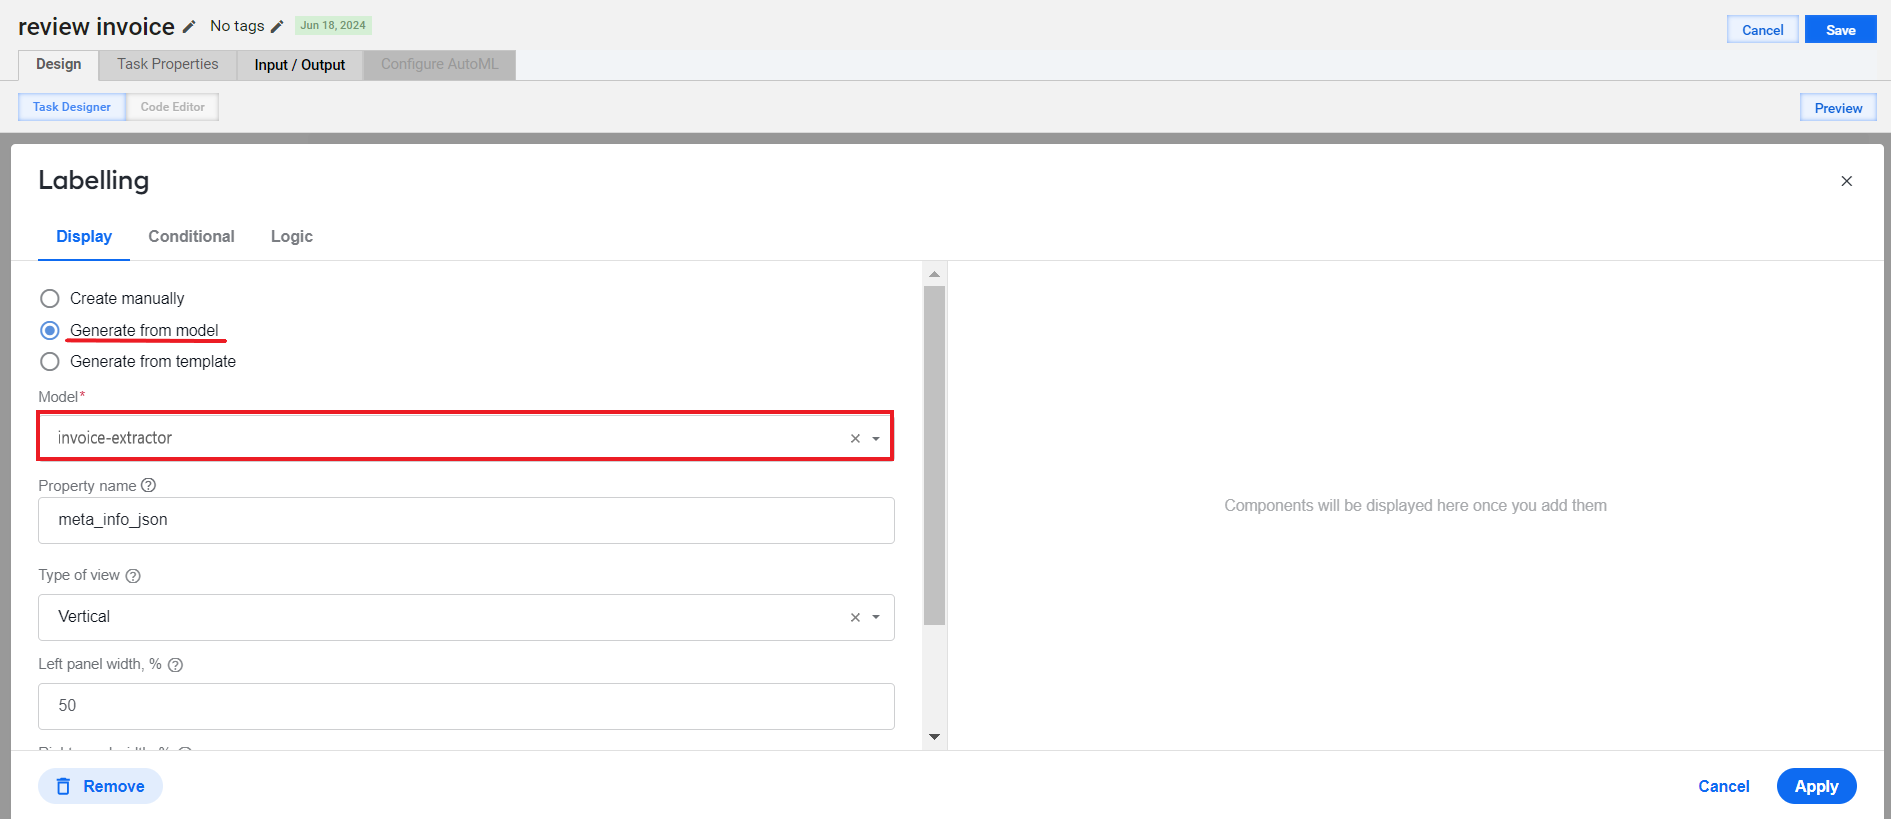
To create a form configuration automatically from the trained model data, choose Generate from model and, in the Model field, select the information extraction model you trained (in this use case example, invoice-extractor).
Alternatively, you can create the input fields for the task form manually. For details, read Design Manual Tasks via Task Designer Operation.
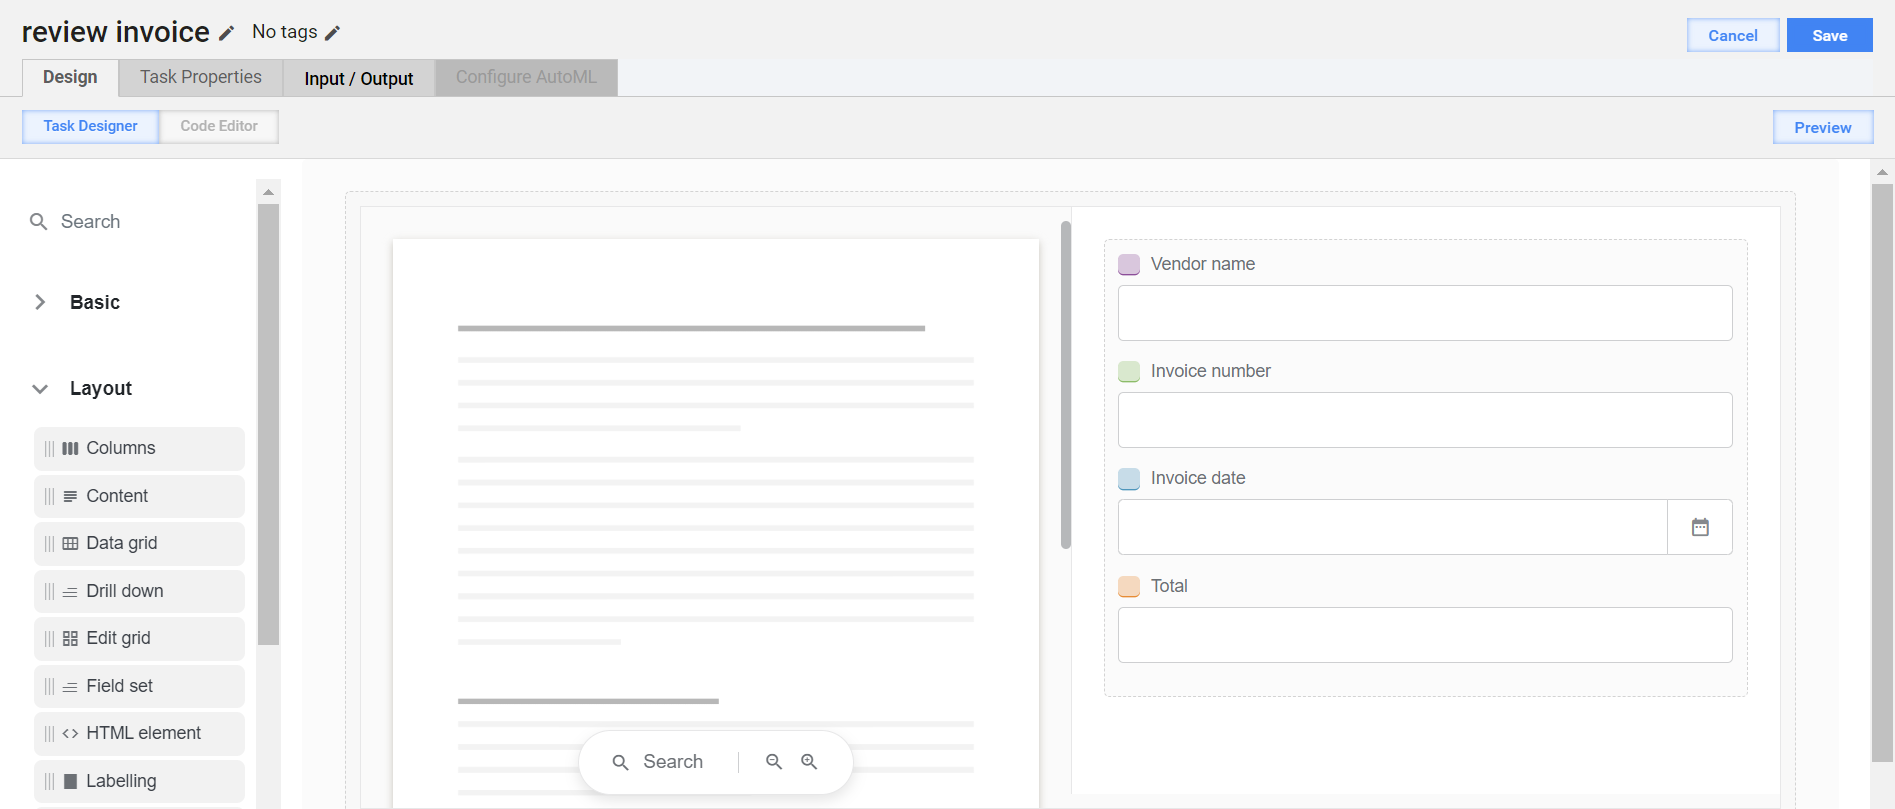
Click Apply, and you are redirected to the Design tab where you will see the task form with the input fields retrieved from the selected model's output. If needed, you can edit the fields as required.
Navigate to the Input / Output tab and configure the following:
Switch the Enable Input/ Output connection toggle.
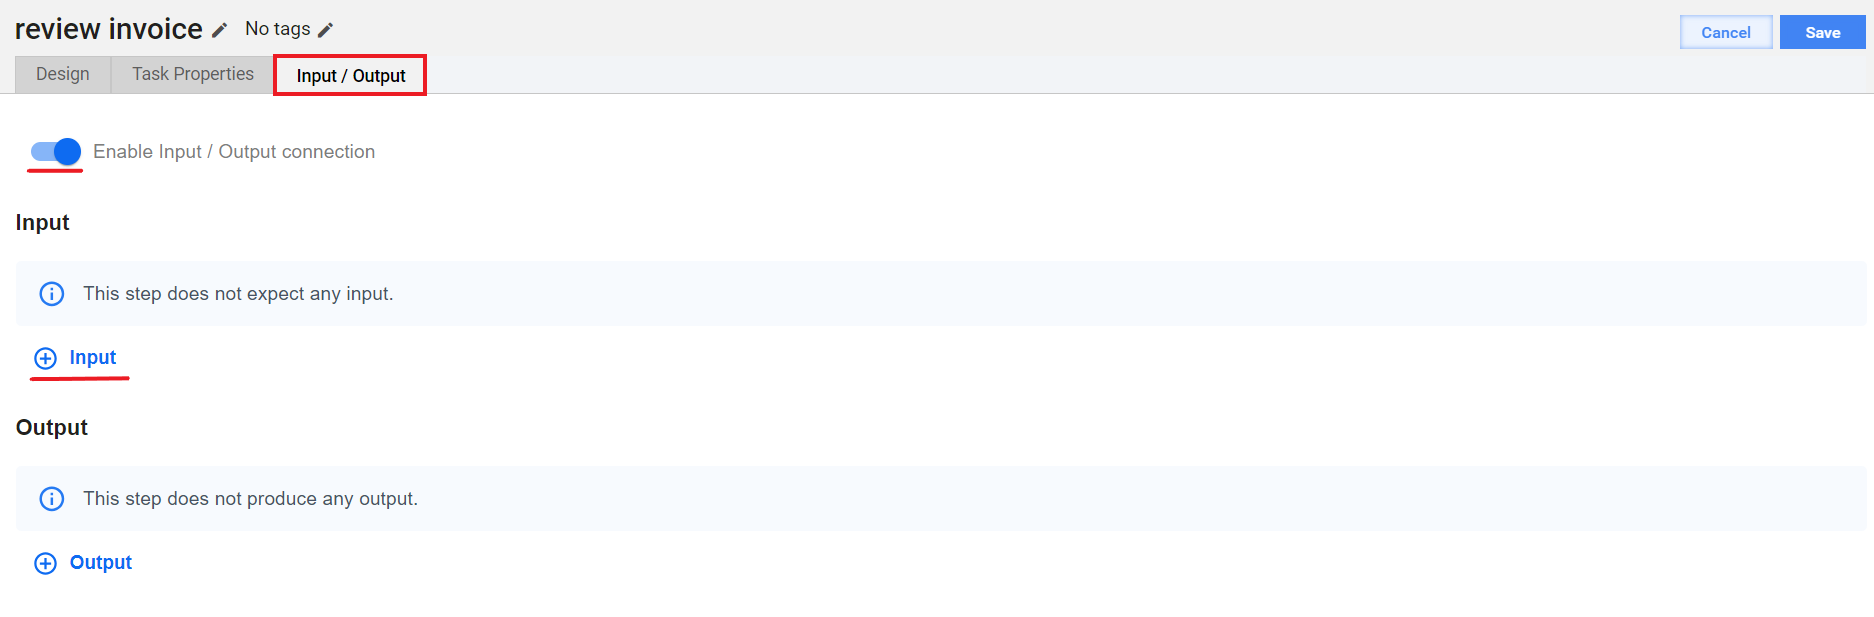
In the Input section, click Input and, in the Step variable, select
model_result. The Type field corresponding to the variable is filled in automatically.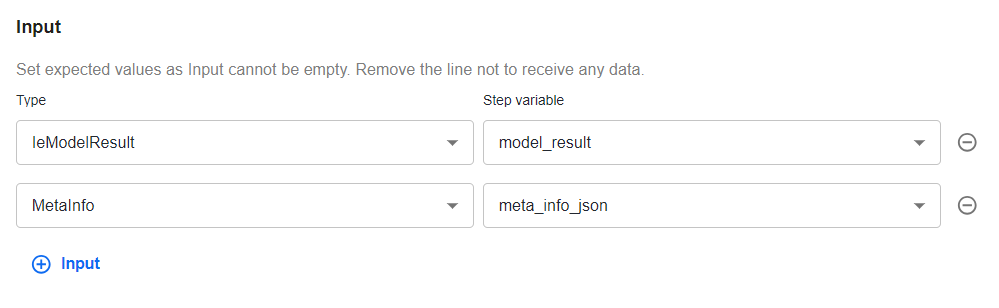
Click Input once more and, in the Step variable, select
meta_info_json.Leave the Output section empty and click Save to finish the Manual Task setup.
Build advanced flow for account creation
The section details how to design the advanced automation workflow to review account data as shown below.
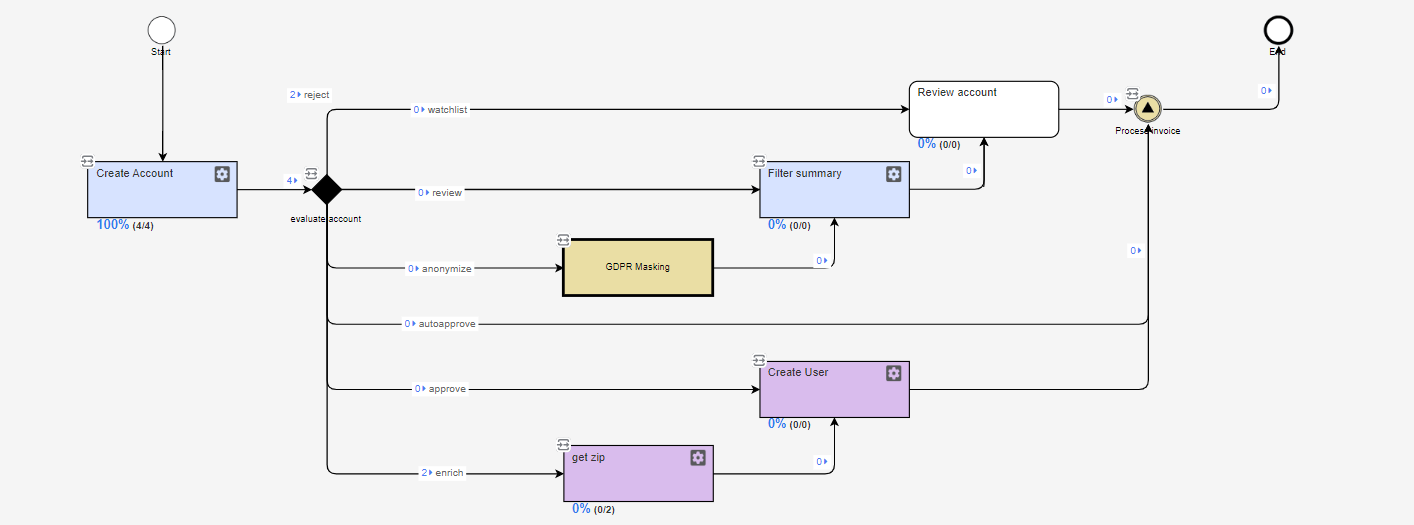
For large BPs, the recommended practice is building step by step: connect a step to the Start and End elements and click the Save button. This not only protects your settings against accidental loss but also makes it possible to adjust each step until it works as expected.
The general high-level sequence to build the flow is as follows:
In Control Tower, go to Business Processes and, in the top right corner, click Create New.
On the Operation tab, choose Other > Miscellaneous Tasks and Select This Operation.
On the Data tab, click Upload Data and upload an input CSV file with the links to the prepared source documents. You can download and use the sample input file.
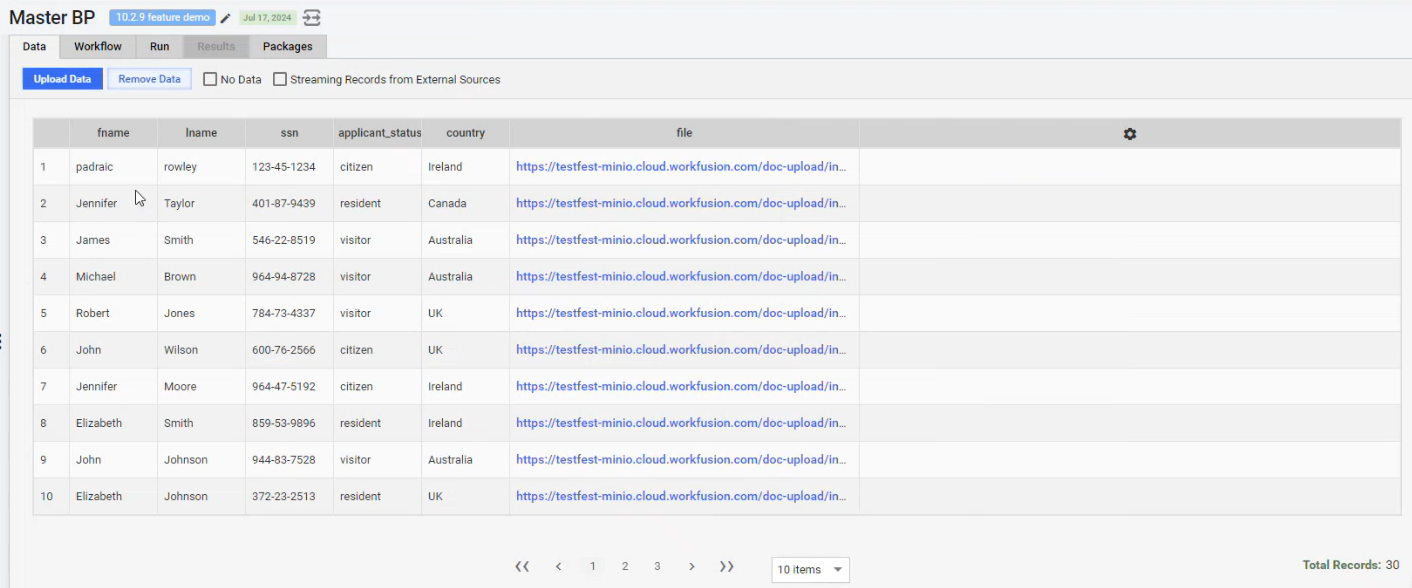
Navigate to the Workflow tab and rename the Business Process as needed by clicking the pencil button next to its placeholder name.
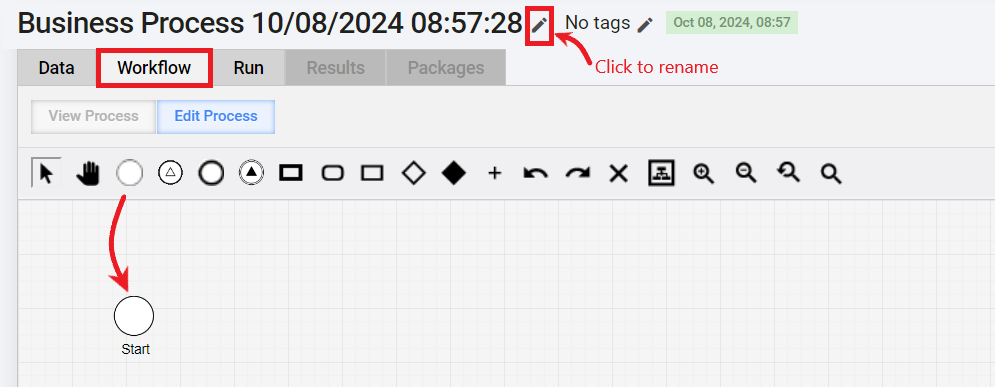
Add a Start element by dragging it to the canvas from the toolbar.
Add, configure, and connect the following elements:
Add an End element by dragging it to the canvas from the toolbar and click Save to finish the Business Process setup.
Prepare source documents
To prepare the documents to be handled in sample BPs, follow the steps below:
Log in to the MinIO Console. To access it, request the URL, login, and password from your system administrator.
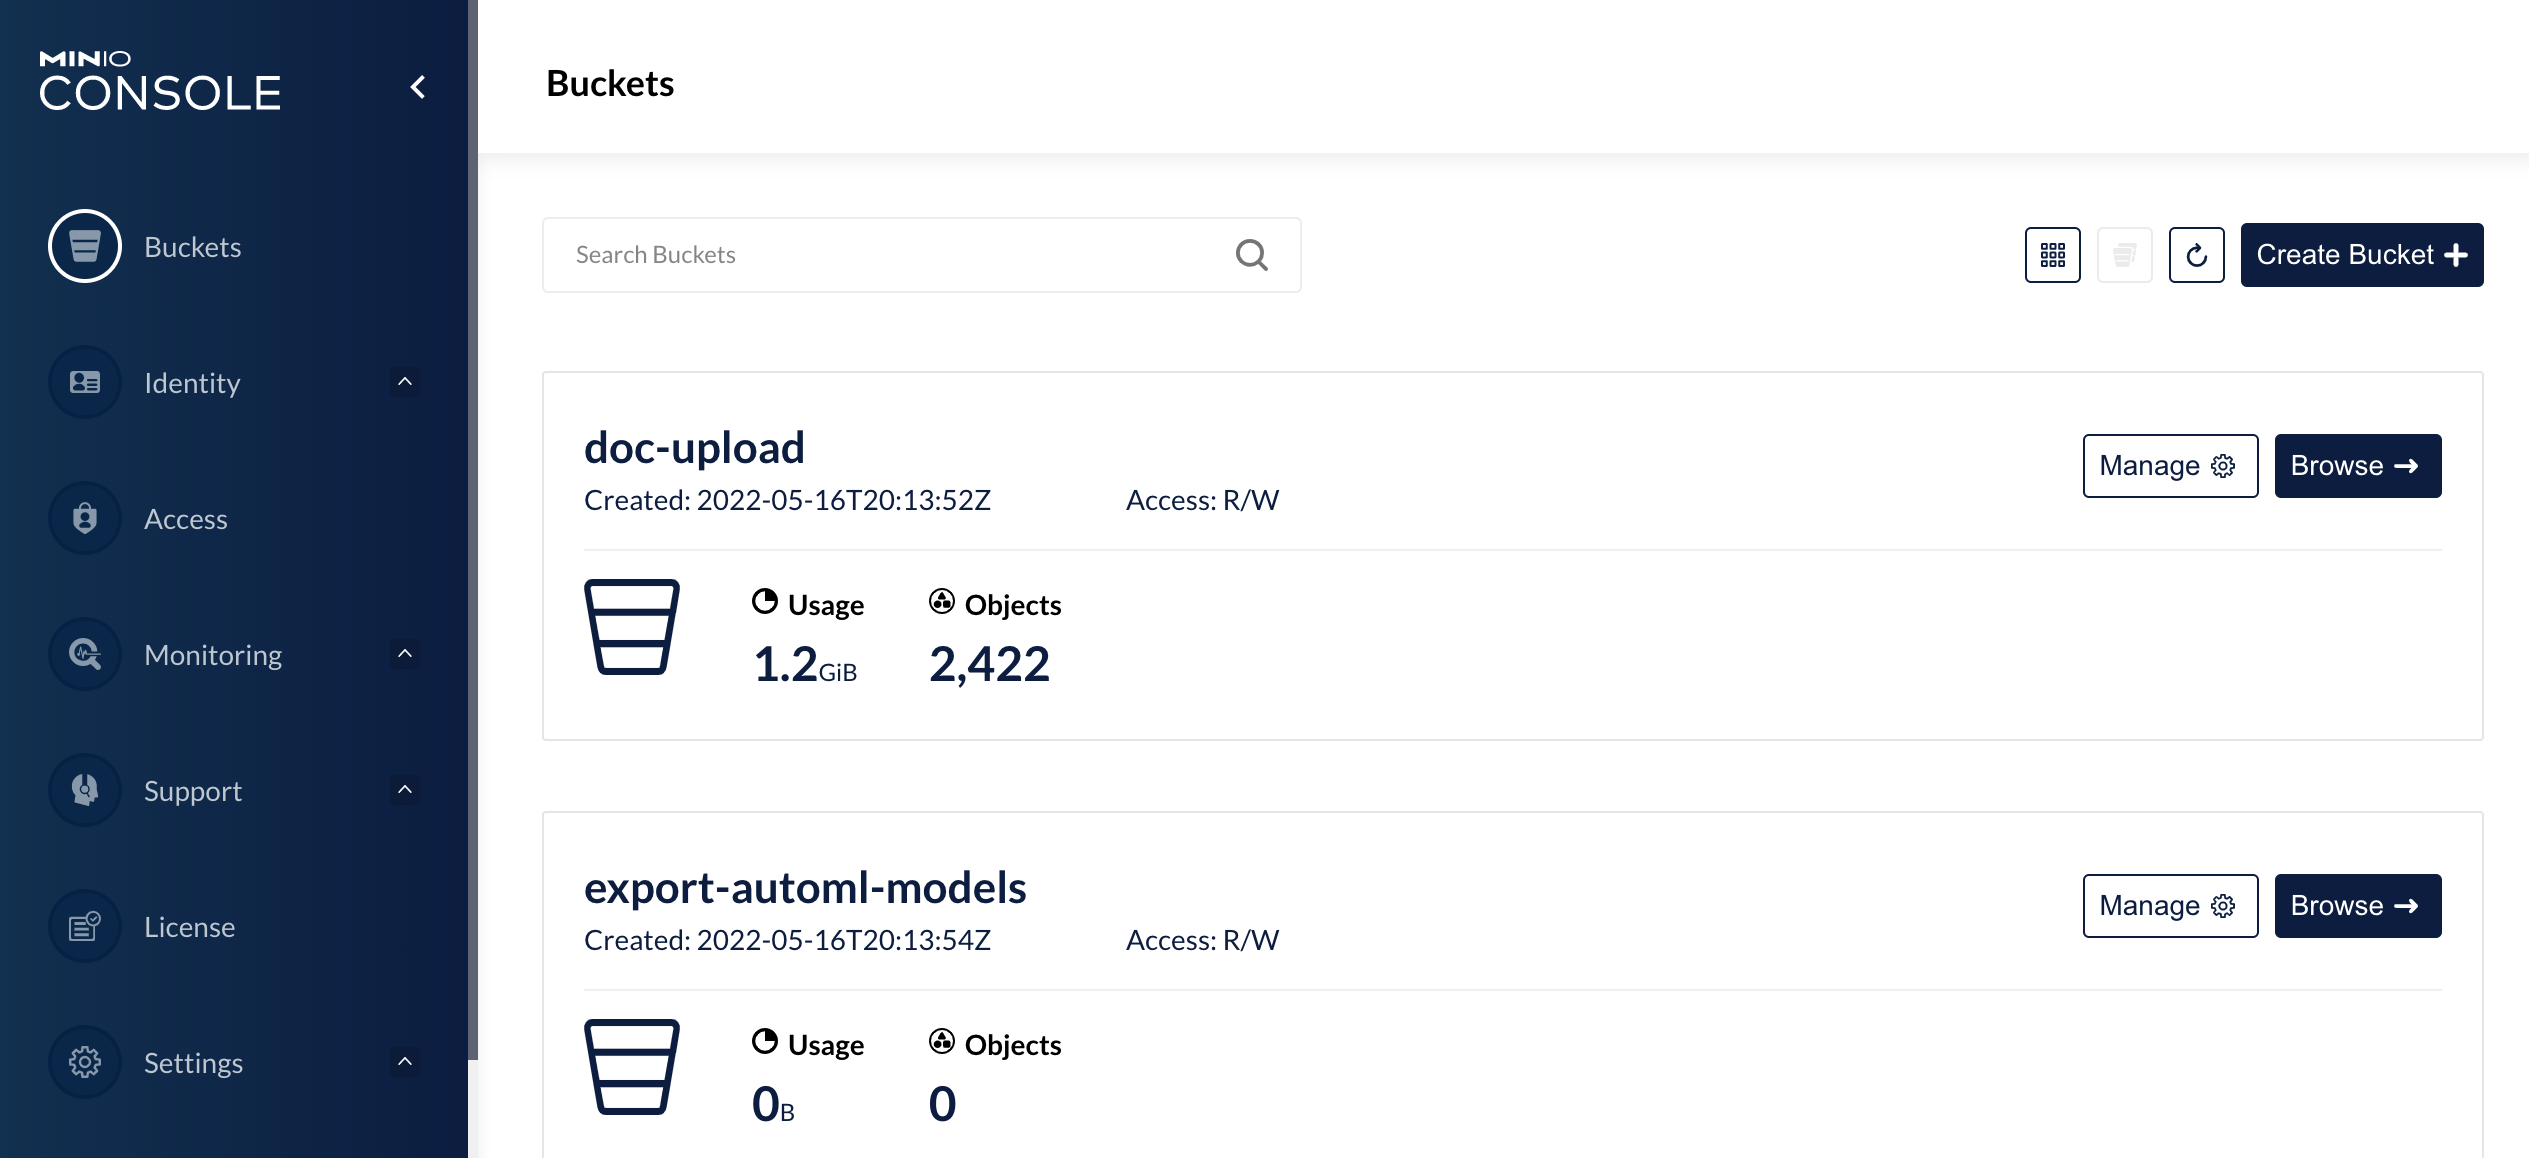
Go to Buckets, find the doc-upload bucket, and click Browse next to it.
Inside the bucket, create a new folder, go to it, and click Upload to add your documents.
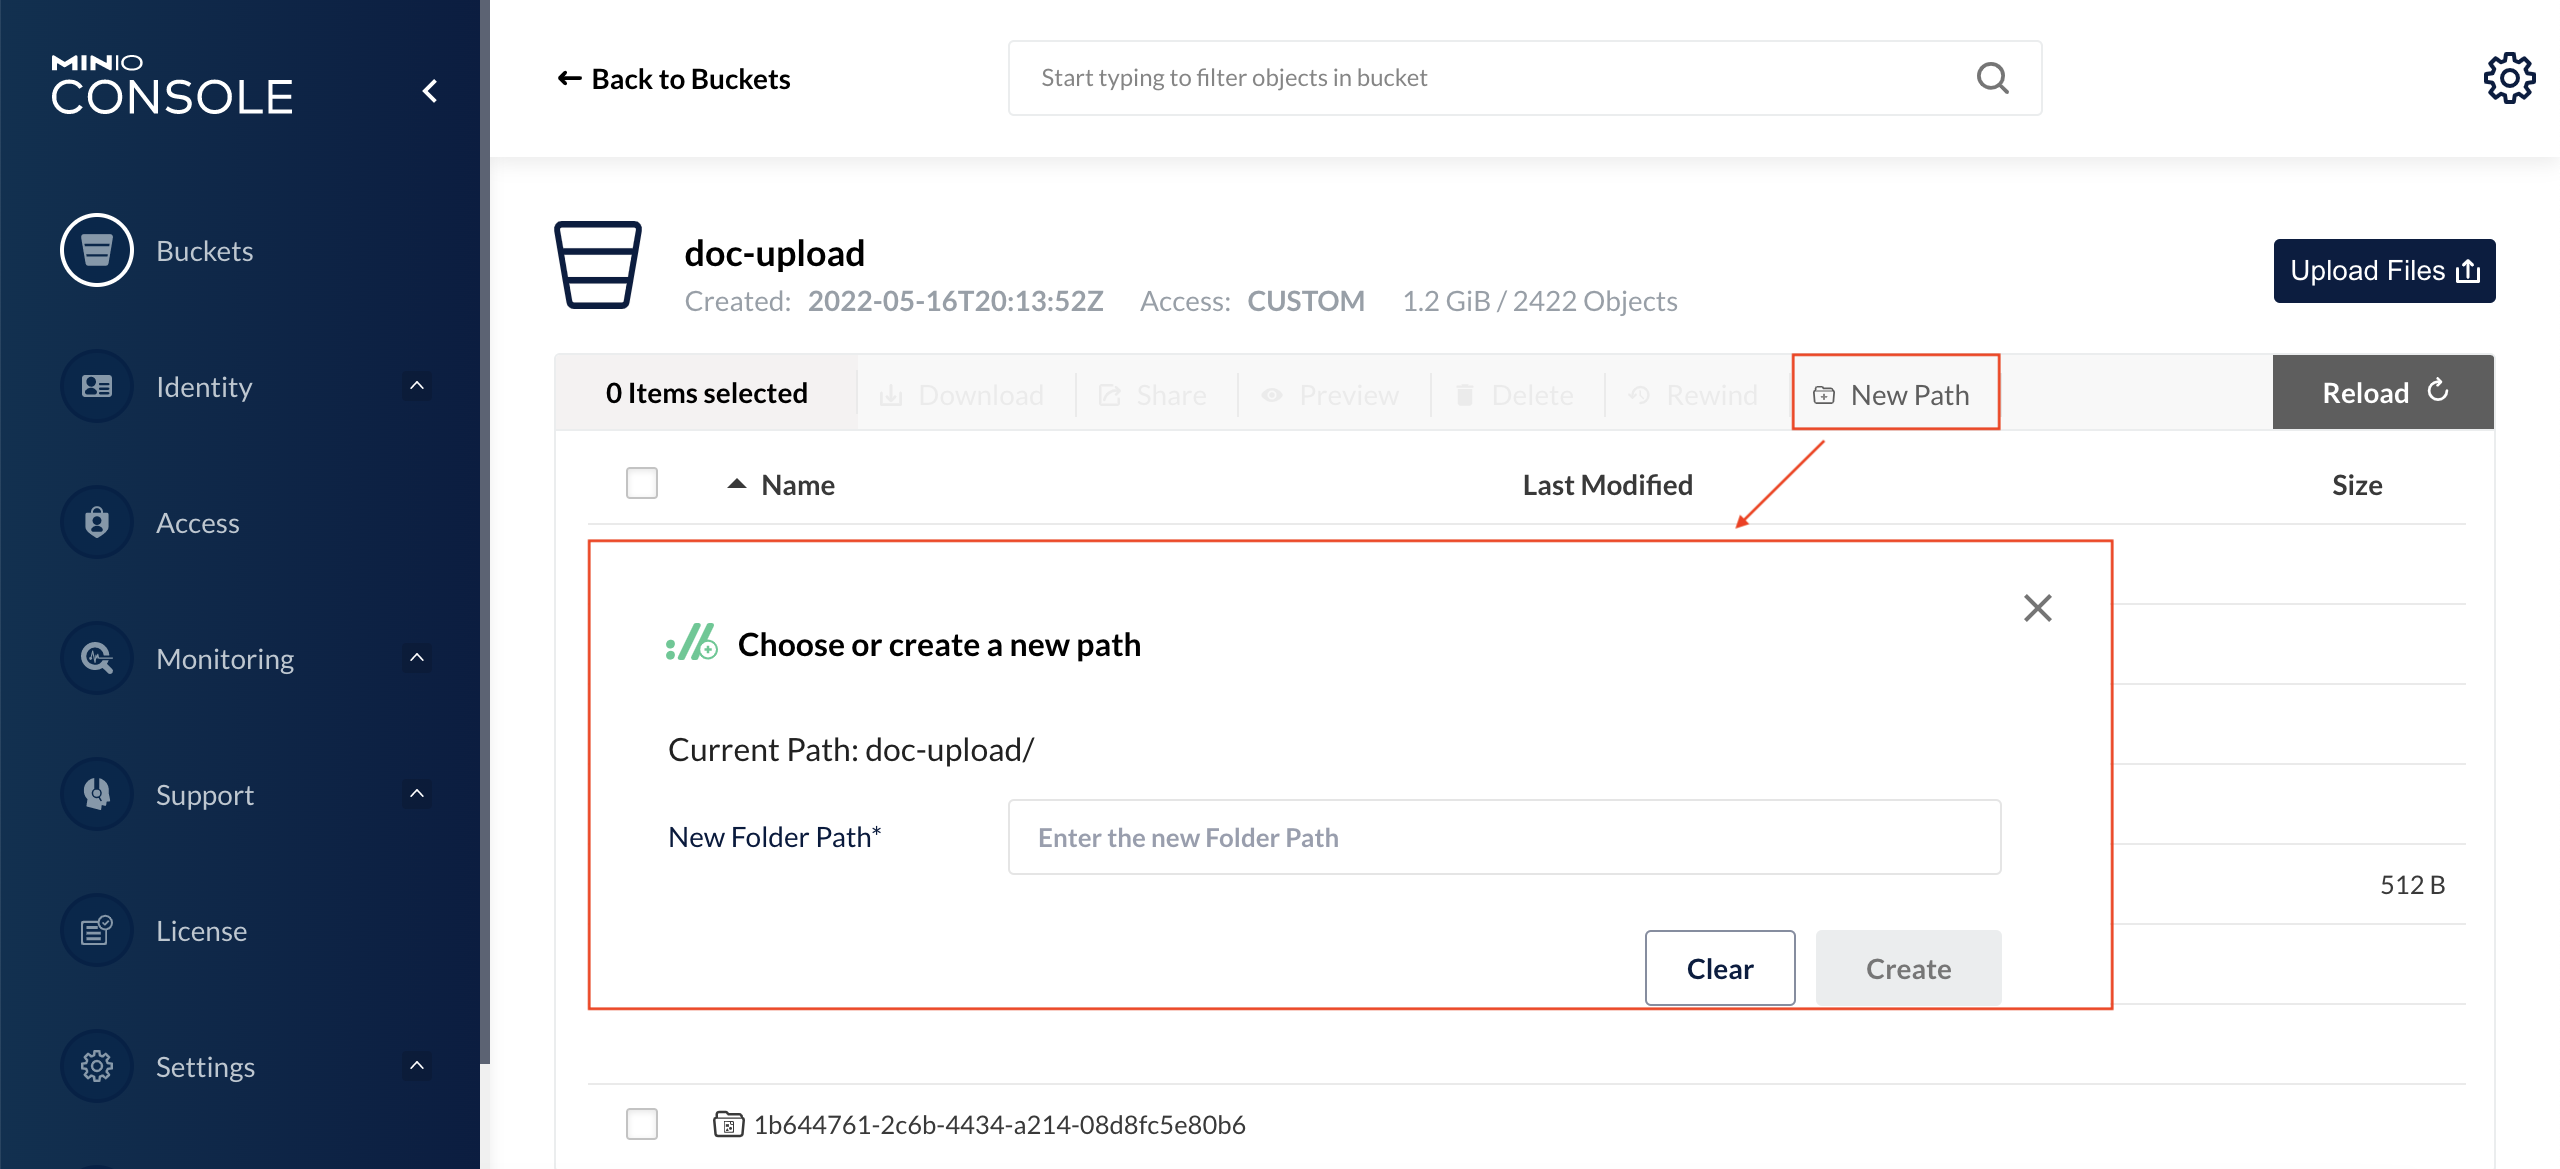
To prepare an input CSV file, follow the steps below:
Open the folder where you uploaded the documents and select one of them.
In the Selected Objects menu, click Share.
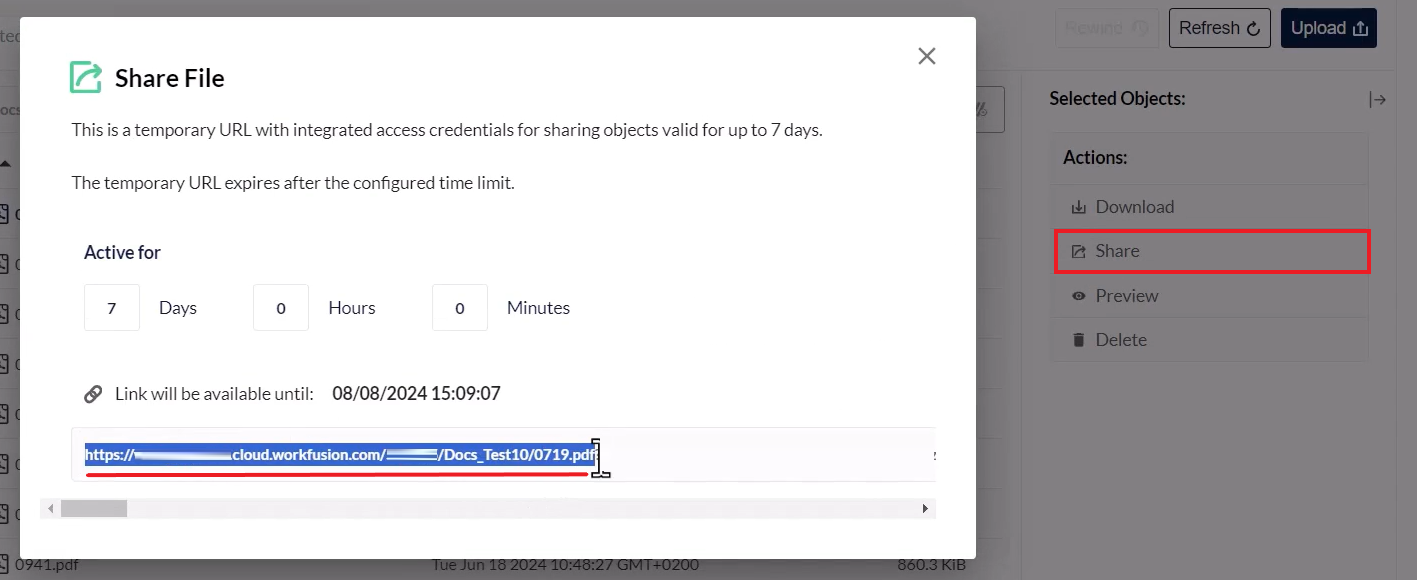
From the Share File screen, copy the link to the file and paste it in your input file.
Repeat steps 1 to 3 for the rest of the documents you want to be included in the input file.
You can now close the MinIO Console and go back to Control Tower.
Add bot step to ingest input data
The step takes the columns of the input file uploaded on the Data tab and maps them to the custom account object. The latter is a JSON structure processed at runtime and comprising such data elements as the account name, SSN, applicant's status, and country. The output of the step is the same account custom object that you can use as input in the subsequent BP steps.
To add the bot step, follow the instructions below:
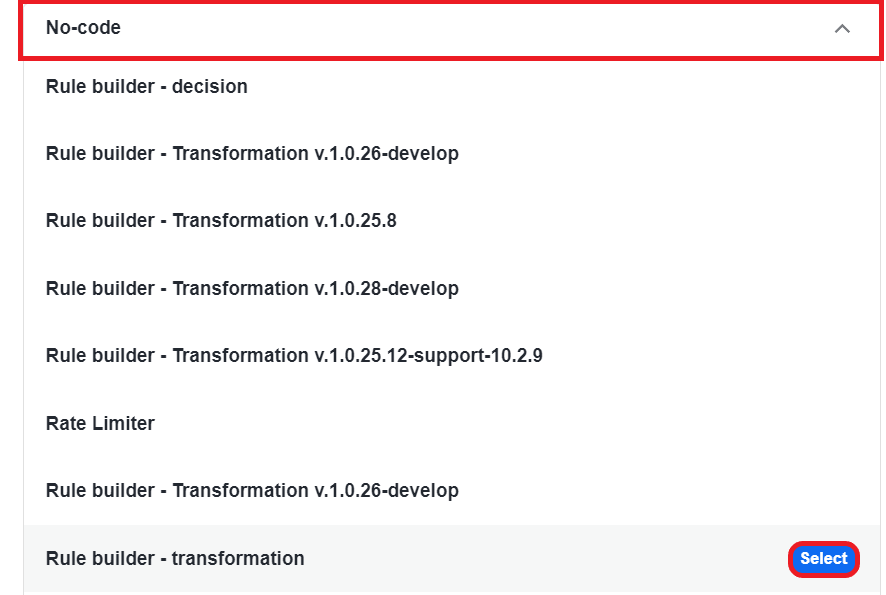
Drag a Bot Task step to the canvas and connect the Start element to it. Then, double-click the step to start the configuration and select No code > Rule builder - transformation Operation.
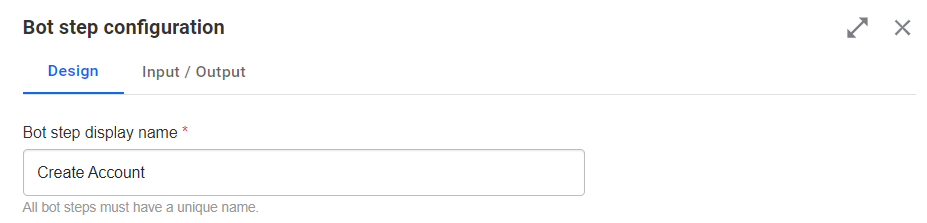
On the Design tab, set the step's name, for example, to Create Account.
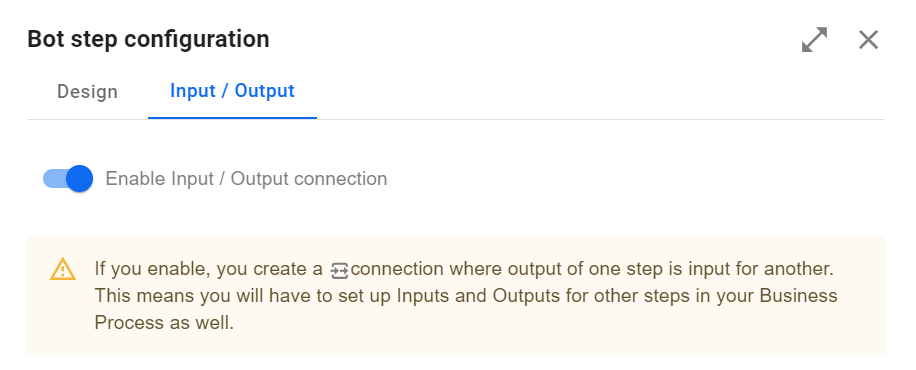
Navigate to the Input / Output tab and switch the Enable Input / Output connection toggle to allow adding step contracts.
In the Input section, click Input and set the input contracts for the step:
In the Type drop-down box, click New Object and set up the custom
Accountdata object with the following nested variables of thestringtype:name,ssn,status,country. Then, click Save.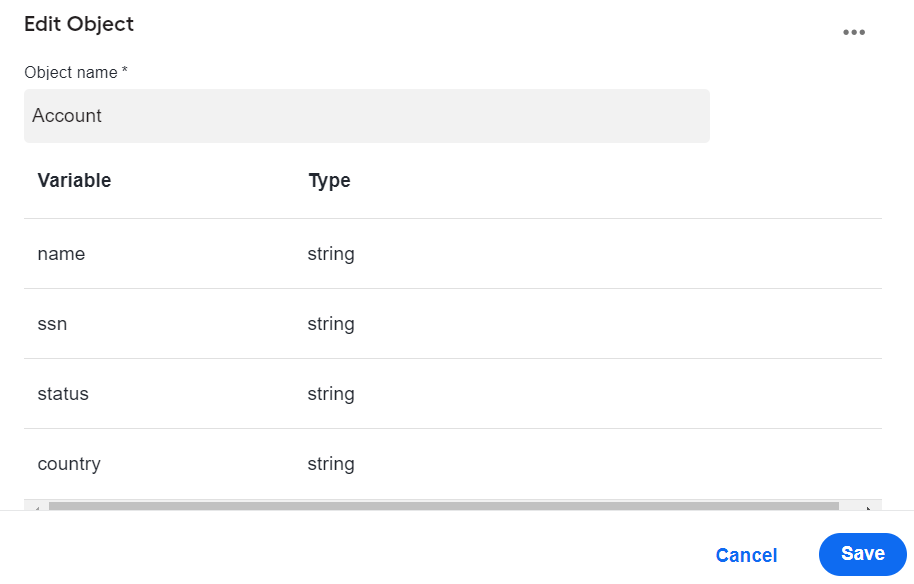
In the Type drop-down, select the newly created
Accountobject. Click the Step variable field, choose Custom variable, and type inaccount.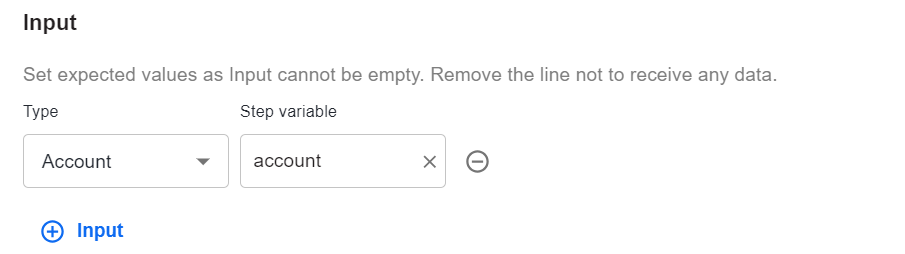
Map the
Accountobject nested variables to the column names in the input file:Move the mouse pointer to the right of the Step variable box and click Show mapping. You will see how the nested variables in Step variable are mapped to those in Source by default.
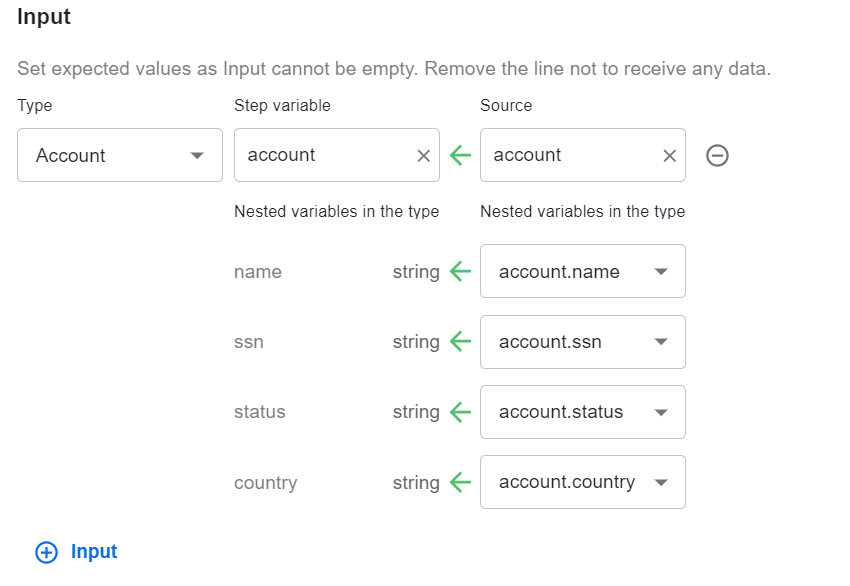
Leave the
namenested variable as it is but change the mapping forssn,status,country. To do that, click a variable field, choose Custom variable, and type in the names of the input file columns as shown in the figure below.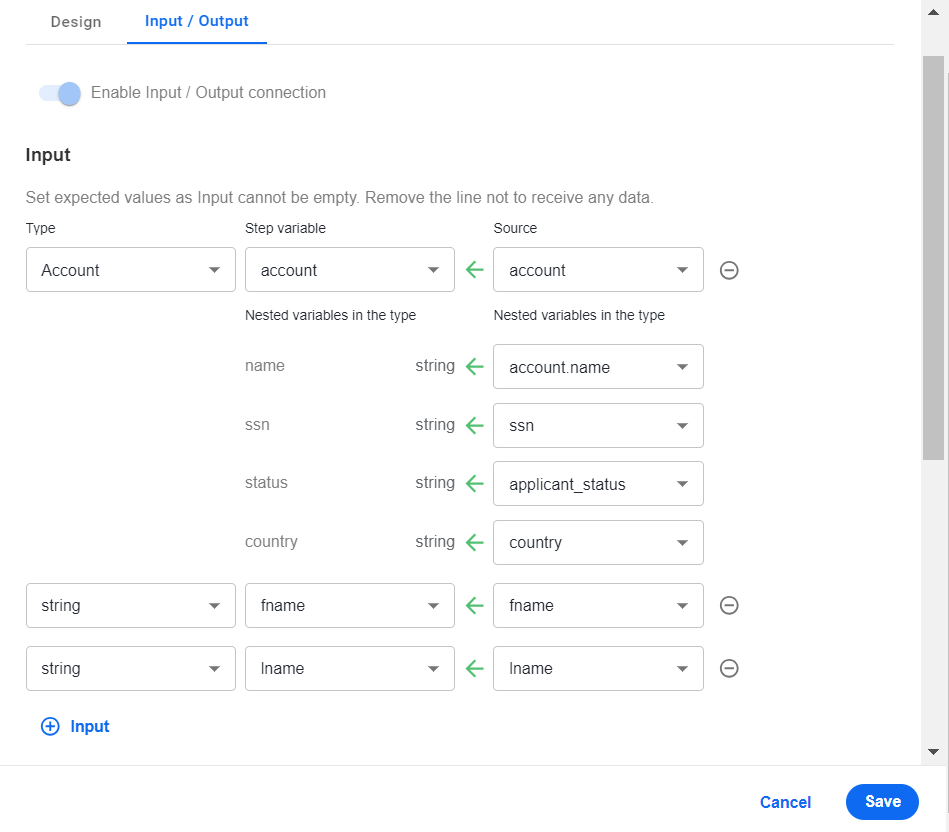
Add two more custom Input objects corresponding to the
fname(first name) andlname(last name) columns in the input file:In the Type field, choose
stringfor both objects.Click the Step variable field, choose Custom variable, and type in
fnameandlnameaccordingly.
In the Output section, click Output and add a data object expected as the step's output. To do that, in the Type and Step variable fields, select the previously created custom
Accountobject andaccountvariable. No mapping is needed here.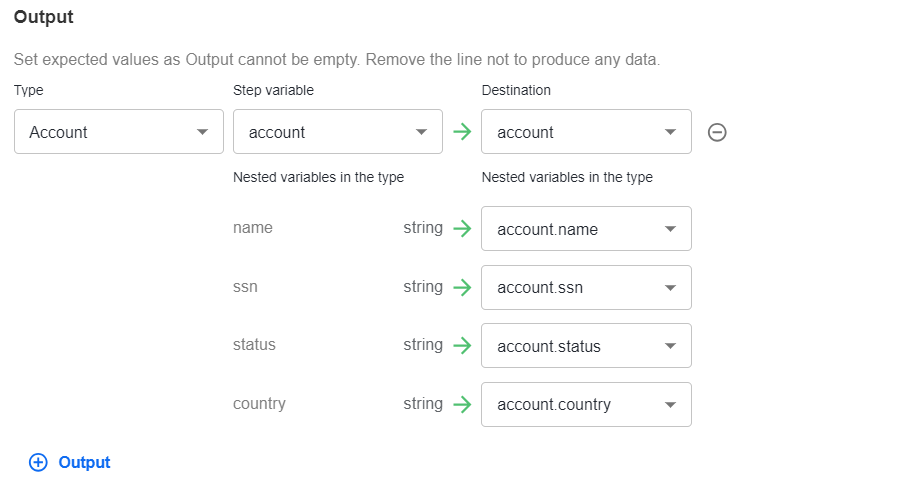
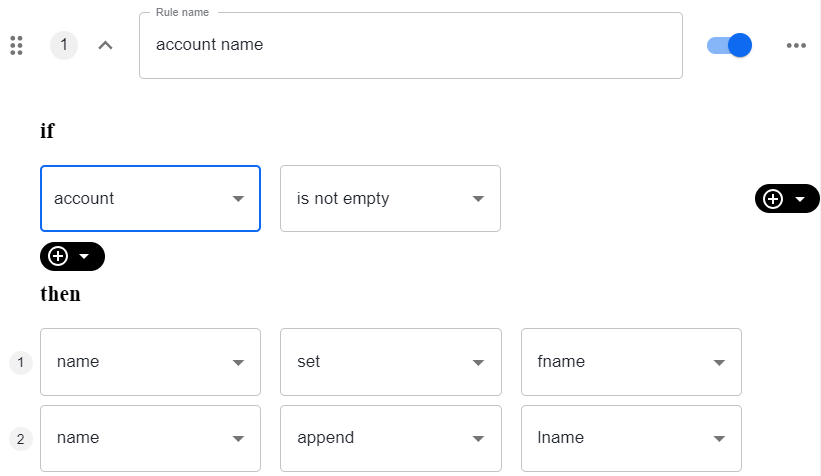
Go back to the Design tab and set a transformation rule to join the data from the
lnameandfnameinput columns into a singleaccount.nameobject:Condition (if): choose the
accountobject and theis not emptyoperator.Outcome (then): choose the
account.nameobject and thesetoperator. To set the value for the chosen object, click the value field, select Custom > Expression, and type in:${fname}+${lname}.
Alternatively, instead of the custom expression, you can set the following two outcomes:
account nameobject,setoperator,fnamevalueaccount nameobject,appendoperator,lnamevalue
Click Save to save the step configuration.
For detailed instructions on setting inputs, outputs, and mappings, read Implement schema-based Business Process | Add contract.
Add decision rule to evaluate accounts
The step takes the account output data object from the previous step and evaluates what to do next with it. For the sample use case, we set the rules for each of the following decisions:
Autoapprove
Reject
Enrich
Anonymize
Check against the watchlist
Review
To add and configure the step, do as follows:
Drag the No code rule element to the canvas from the toolbar and connect the preceding transformation step to it.
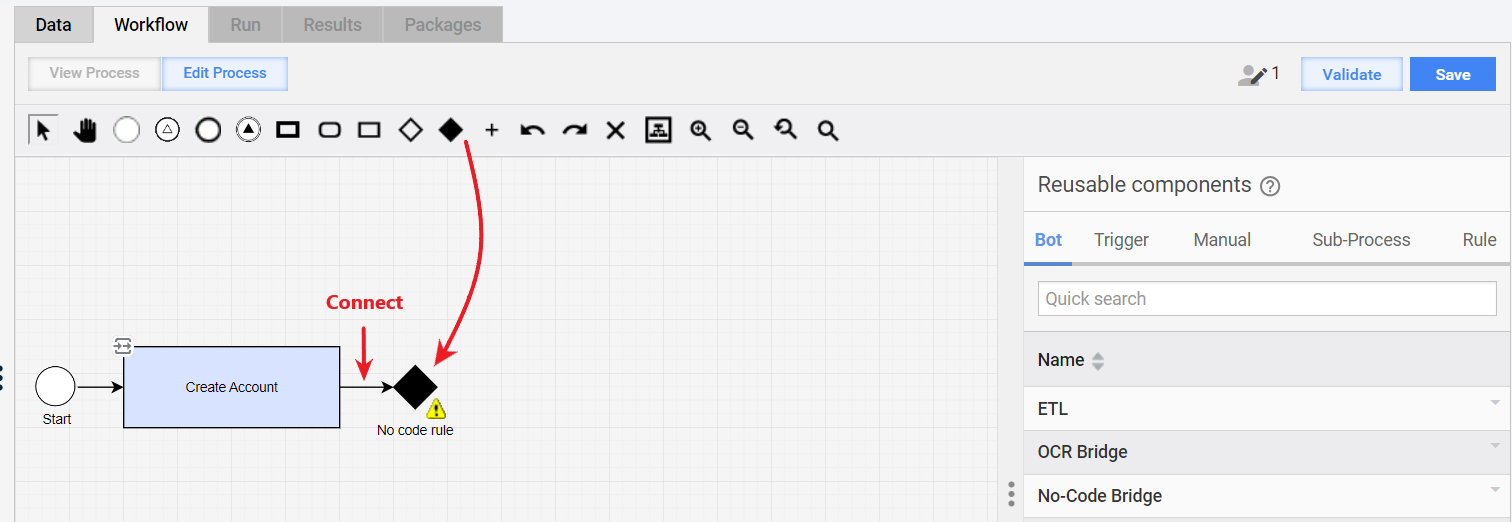
Double-click the No code rule to open the configuration page and rename the step to evaluate account.
Navigate to the Input / Output tab, make sure the Enable Input/ Output connection toggle is on, and set the input contracts as shown below:
In the Type field, choose the custom
Accountobject. Set Step variable toaccount. Leave the mapping as is.Set another Input object type to
string, click the Step variable field, choose Custom variable, and type inblacklisted.Move the pointer to the right of the
blacklistedobject and click Show mapping. Click the Source field, choose Custom value, set the type tostring, and enter a blacklisted person's name (in this example,John Doe).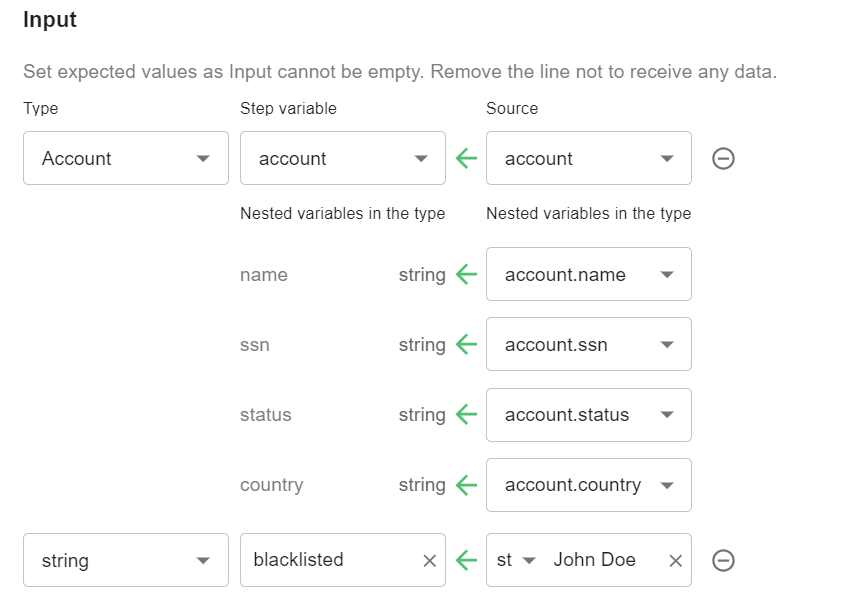
In the Output section on the same tab, set the decision step output:
Click Output and then the Type drop-down box. Choose New Object and create the three custom objects in the order listed below:
Rule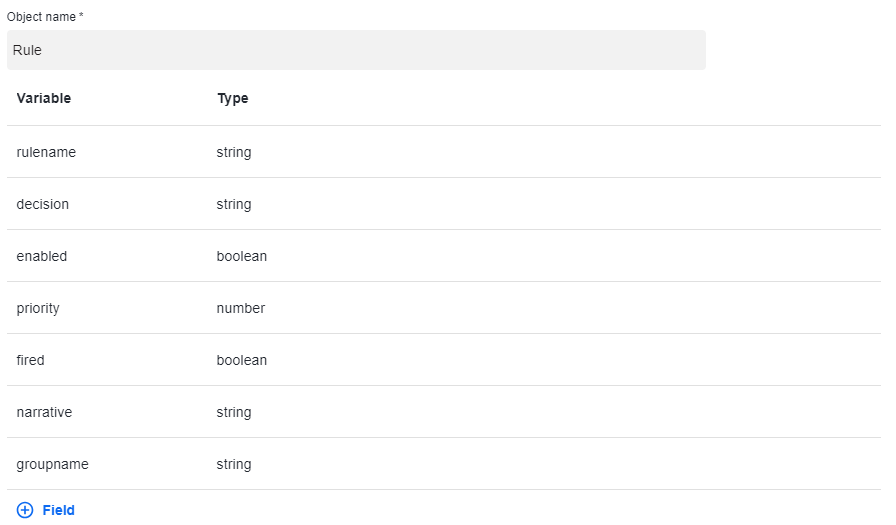
ruleDetails
decision
In the Type drop-down box, choose the created custom
decisionobject. Then, click the Step variable field, choose Custom variable, and type indecision. Leave the default mappings.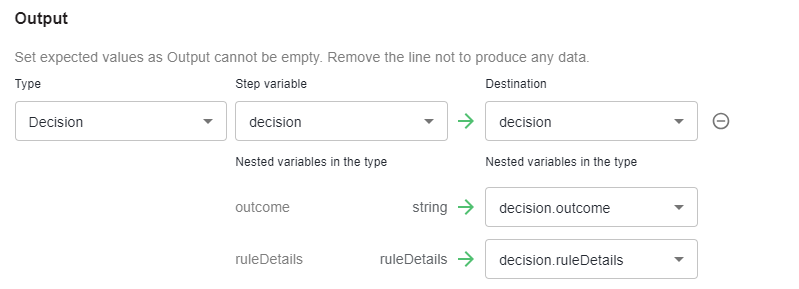
Go back to the Design tab and set required decision rules manually or generate them with AI. For detailed instructions, read Configure no-code Decision rule step.
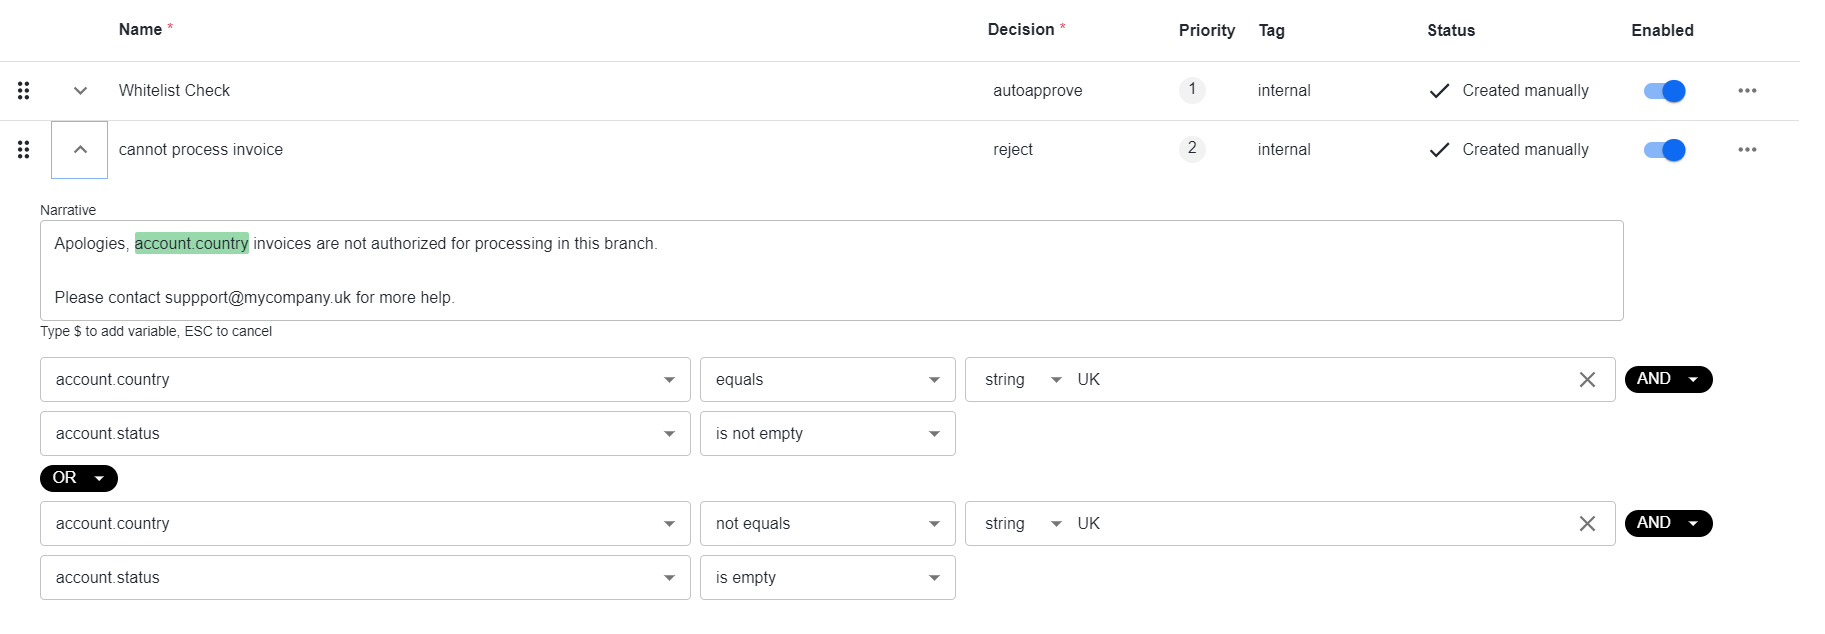
Below is a sample setup for the described use case:
See detailed sample rules
Rule name Decision Variable and operator settings Narrative Whitelist check autoapprove account.namecontainsaccount.nameis a VIP subject to special treatment and requires autoapproval.Cannot process invoice reject account.countryequalsaccount.statusis not empty
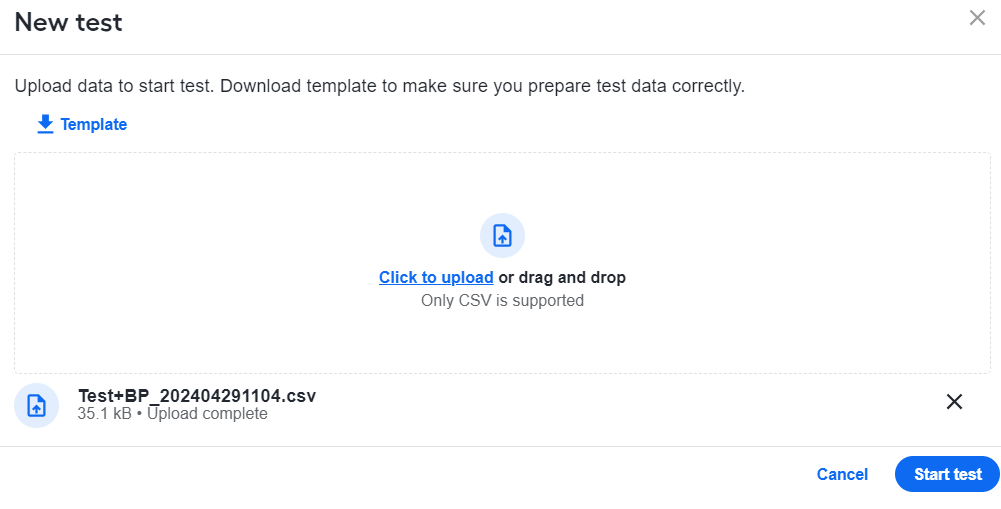
account.countryinvoices are not authorized for processing in this branch. Contact the support service.Insufficient address information enrich account.countryequalsApplicants from account.countryrequire more address verification details for approval.Watchlist check watchlist account.namecontainsaccount.nameis a partial match tovariable_valueand is on a known watchlist. Please, perform a further investigation.Subject to GDPR anonymize account.countryequalsaccount.countryrequires GDPR compliance, and the user must be anonymized.Blacklist check review account.namecontainsaccount.nameis a partial match tovariable_valueand should be reviewed.Citizenship check approve account.statusequalscitizenaccount.nameis a citizen ofaccount.countryand is eligible for review.Visitor check review account.statusequalsvisitoraccount.nameis not a citizen ofaccount.countryand is eligible for review.Resident check review account.statusequalsresidentaccount.nameis a resident ofaccount.countryand is eligible for review.Known SSN approve account.ssncontainsssn numberaccount.nameprofile andaccount.ssnare already listed in the system and can be approved.Otherwise review - - To check the decision-making results, click the Test button, upload a test CSV with input data, and click Start test. You can download and use the sample test file.
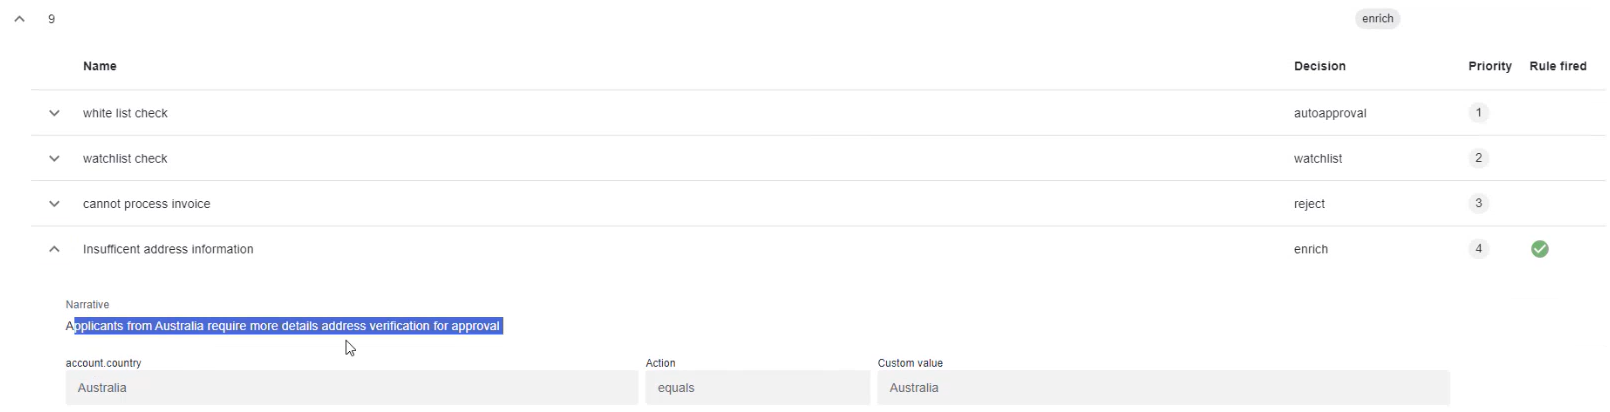
If you expand the decisions resulting from the test, you can see why a specific decision was taken:
Click Save, and the decisions for the rules you added appear on the workflow canvas as outgoing connections of the No code rule element.
Add transformation to filter fired rules
The step takes the output intended for review from the No code rule step and filters out those rules that fired, leaving out the rest. To set the filtering step, follow the instructions below:
Drag a Bot Task step to the canvas and connect it to the outgoing connection for the review decision.
Double-click the Bot Task step to start the configuration and choose the Rule builder - transformation Operation.
On the Design tab, set the step name to Filter summary.
Navigate to the Input / Output tab, switch the Enable Input / Output toggle, and set Type and Step variable to
decisionfor both the Input and Output contracts: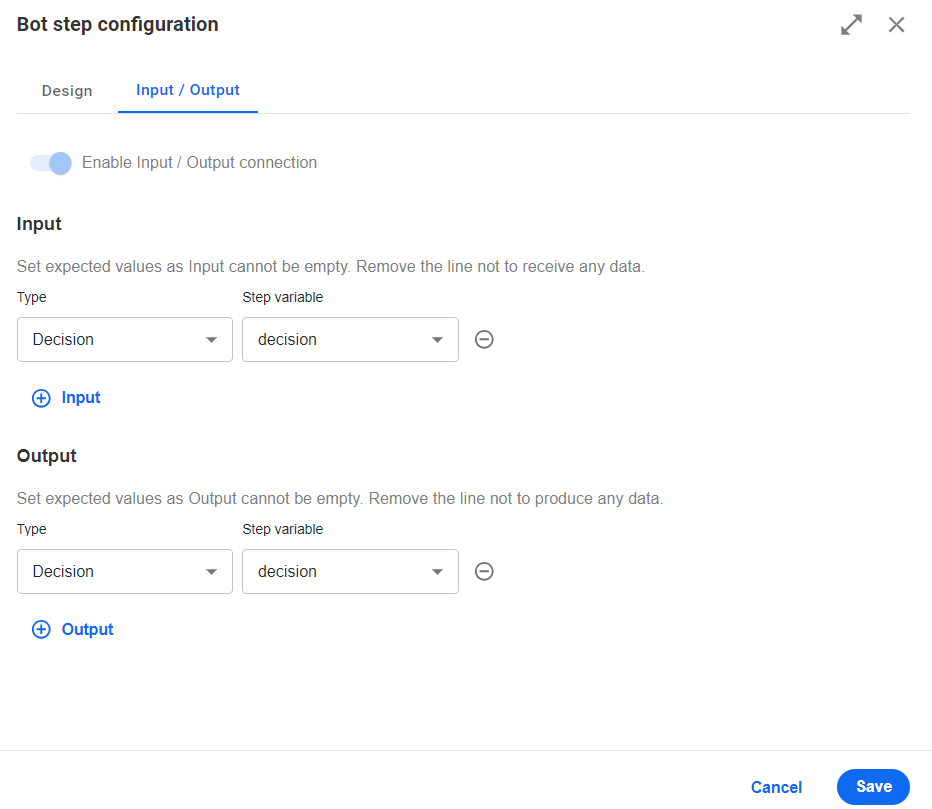
Go back to the Design tab and create the remove unfired rules rule:
Condition (if): choose the
decision.ruleDetails.ruleList.firedparameter, theequalsoperator, and the Booleanfalsevalue.Outcome (then): choose the
decision.ruleDetails.ruleListparameter and theremoveaction.
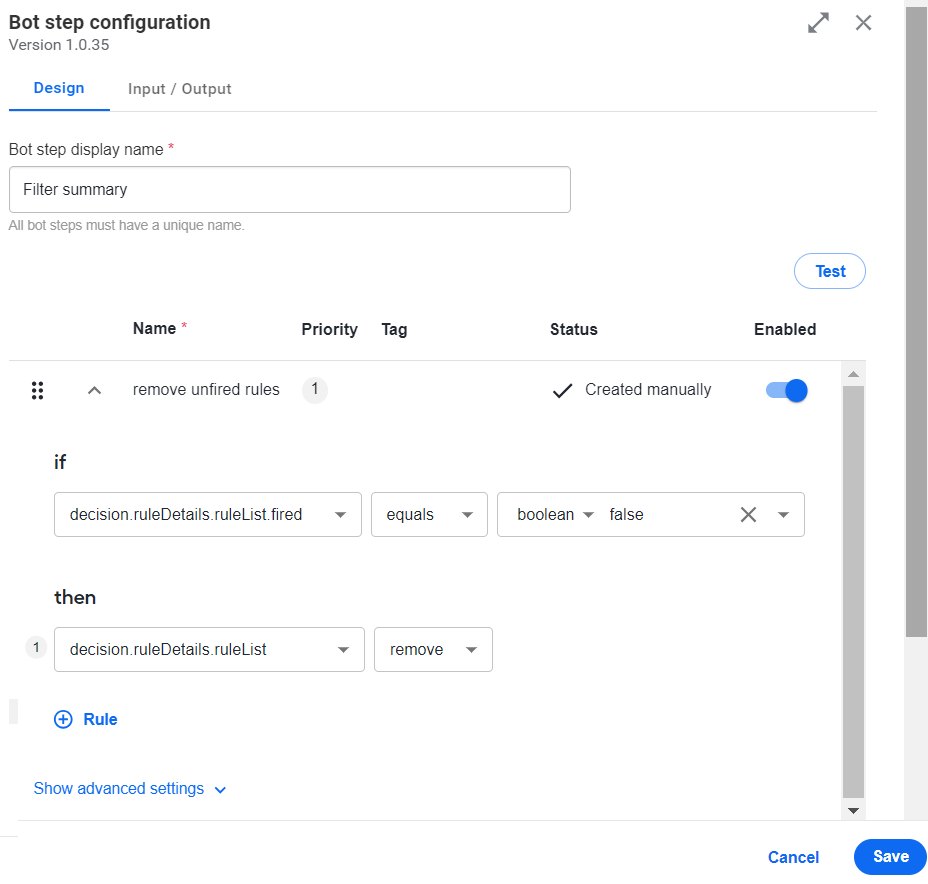
Click Save to save the step configuration.
Add Manual Task
The Manual Task enables you to review the output of the previous steps requiring further investigation or review. To add the manual review step to the flow, follow the instructions below:
Drag the Manual Task element from the toolbar to the canvas and connect it to the outgoing connection of the No code rule step for the watchlist decision and that of the Filter summary step.
Double-click the Manual Task element and choose a template to create a form for the task: select Task Designer Operation > Single-page task and click Select This Operation.
Navigate to the Input / Output tab, switch the Enable Input / Output connection toggle and, in the Input section, add two input data objects:
AccountandDecision. In the Output section, the data object is fetched automatically from previous steps based on the MT design.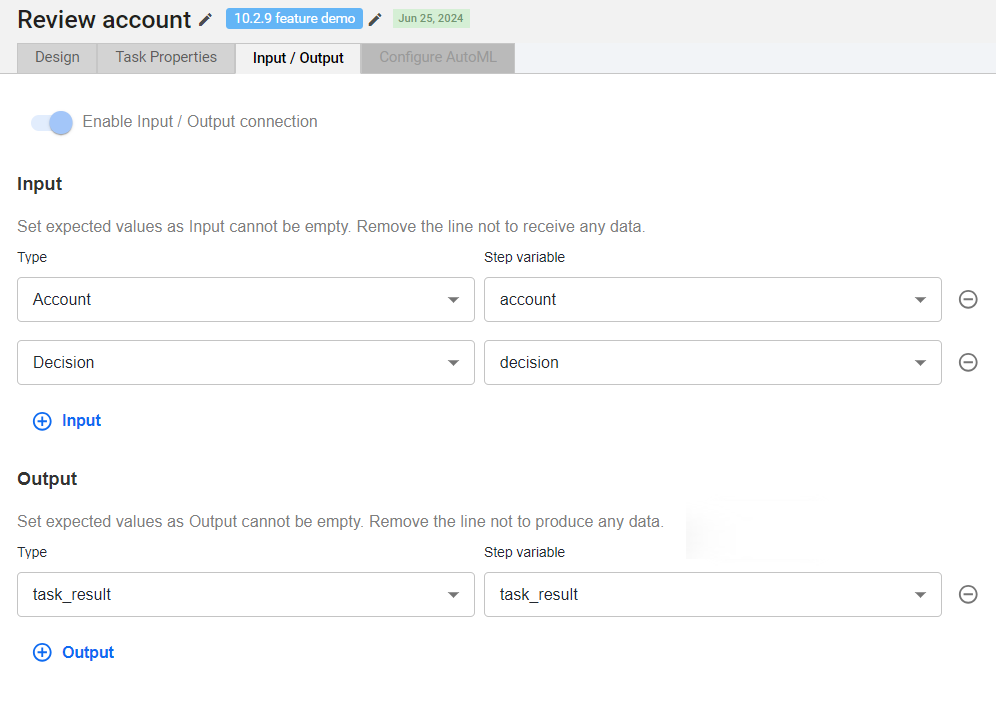
On the Design tab, set the step name to Review account by clicking the pencil button.
In the Task Designer mode, set up a task form manually. For that, follow the instructions to design a single-page Manual Task form using appropriate Basic or Layout components.
When configuring the components expecting dynamic input, set the Property name value on the API tab to the corresponding variable from the
accountordecisioncustom objects. The figure below illustrates how to set the Property name value for a form field receiving account name data: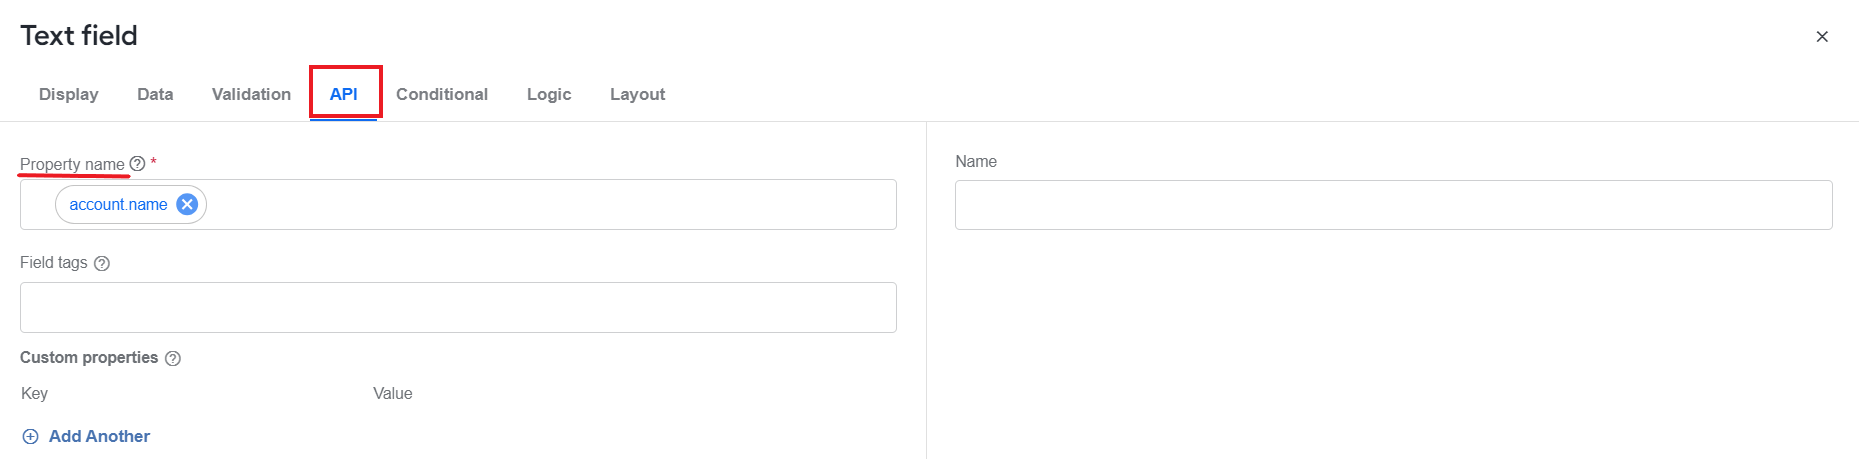
Alternatively, you can switch to the Code Editor mode and insert the sample code below to set up a task form.

Manual Task code
<#include "task-designer.ftl" parse=true/>

<@hit>
    <#-- This line is needed for task content validation. It must contains title.  -->
    <@instructions title="<h2>Review account</h2>">
        <@editable id="__INSTRUCTIONS__">To create tasks where do not need to refer to documents</@editable>
    </@instructions>

    <#assign taskDesignerContextPath = contextPath?replace('/workfusion$', '/task-designer', 'r')/>
    <#if (!__PREVIEW__??)>
        <script src="${taskDesignerContextPath}/renderer/static/js/main.js"></script>
        <link href="${taskDesignerContextPath}/renderer/static/css/main.css" rel="stylesheet">
    <#else>
        <script src="${taskDesignerContextPath}/builder/static/js/main.js"></script>
        <link href="${taskDesignerContextPath}/builder/static/css/main.css" rel="stylesheet">
    </#if>

      <@taskDesignerScript />

      <@editable id="task_designer_config"><input id='task_designer_config' type='hidden' name='config' value='{
  "display": "form",
  "components": [
    {
      "label": "Single-page task",
      "key": "emptyState",
      "type": "well",
      "input": false,
      "tableView": false,
      "components": [
        {
          "label": "HTML",
          "attrs": [
            {
              "attr": "",
              "value": ""
            }
          ],
          "content": "<h2><span style=\"background-color:hsl(0,0%,100%);\">Customer Application Summary</span></h2><p><span style=\"background-color:hsl(0,0%,100%);\">Please review all provided information before either accepting the decision, or making a modification in the “Decision” field at the bottom of the page.</span></p>",
          "refreshOnChange": false,
          "key": "html1",
          "type": "htmlelement",
          "input": false,
          "tableView": false
        },
        {
          "html": "<h3> </h3><h3>Customer Information</h3>",
          "label": "Content",
          "refreshOnChange": false,
          "key": "content1",
          "type": "content",
          "input": false,
          "tableView": false
        },
        {
          "label": "Decision Table",
          "columns": [
            {
              "components": [
                {
                  "label": "Name",
                  "allowTagging": true,
                  "tableView": true,
                  "answerType": "TEXT",
                  "key": "{{account.name}}",
                  "type": "textfield",
                  "input": true
                },
                {
                  "label": "SSN",
                  "allowTagging": true,
                  "tableView": true,
                  "answerType": "TEXT",
                  "key": "{{account.ssn}}",
                  "type": "textfield",
                  "input": true
                }
              ],
              "width": 6,
              "offset": 0,
              "size": "md",
              "push": 0,
              "pull": 0,
              "currentWidth": 6
            },
            {
              "components": [
                {
                  "label": "Country",
                  "allowTagging": true,
                  "tableView": true,
                  "answerType": "TEXT",
                  "key": "{{account.country}}",
                  "type": "textfield",
                  "input": true
                },
                {
                  "label": "Status",
                  "allowTagging": true,
                  "tableView": true,
                  "answerType": "TEXT",
                  "key": "{{account.status}}",
                  "type": "textfield",
                  "input": true
                }
              ],
              "width": 6,
              "offset": 0,
              "size": "md",
              "push": 0,
              "pull": 0,
              "currentWidth": 6
            }
          ],
          "key": "decision_table",
          "type": "columns",
          "input": false,
          "tableView": false
        },
        {
          "html": "<h3> </h3><h3>Automated Decisions</h3>",
          "label": "Content",
          "refreshOnChange": false,
          "key": "content",
          "type": "content",
          "input": false,
          "tableView": false
        },
        {
          "label": "Final recomendation",
          "autofocus": true,
          "disabled": true,
          "tableView": false,
          "answerType": "TEXT",
          "key": "{{decision.outcome}}",
          "type": "tags",
          "input": true
        },
        {
          "label": "Decision",
          "disableAddingRemovingRows": true,
          "clickable": true,
          "reorder": false,
          "addAnotherPosition": "bottom",
          "layoutFixed": false,
          "enableRowGroups": false,
          "initEmpty": false,
          "tableView": false,
          "key": "decision.ruleDetails.ruleList",
          "type": "datagrid",
          "rowGroups": [
            {
              "label": ""
            }
          ],
          "input": true,
          "components": [
            {
              "label": "Rule",
              "allowTagging": true,
              "disabled": true,
              "tableView": true,
              "answerType": "TEXT",
              "key": "rulename",
              "type": "textfield",
              "input": true
            },
            {
              "label": "Narrative",
              "allowTagging": true,
              "disabled": true,
              "tableView": true,
              "answerType": "TEXT",
              "key": "narrative",
              "type": "textfield",
              "input": true
            },
            {
              "label": "Tag",
              "allowTagging": true,
              "disabled": true,
              "tableView": true,
              "answerType": "TEXT",
              "key": "groupName",
              "type": "textfield",
              "input": true
            },
            {
              "label": "Recommendation",
              "disabled": true,
              "tableView": false,
              "answerType": "TEXT",
              "key": "decision",
              "type": "tags",
              "input": true
            },
            {
              "label": "Fired",
              "allowTagging": true,
              "disabled": true,
              "tableView": true,
              "answerType": "TEXT",
              "key": "fired",
              "type": "textfield",
              "input": true
            }
          ]
        },
        {
          "html": "<h3> </h3><h3>Analst Evaluation</h3>",
          "label": "Content",
          "refreshOnChange": false,
          "key": "content2",
          "type": "content",
          "input": false,
          "tableView": false
        },
        {
          "label": "Columns",
          "columns": [
            {
              "components": [
                {
                  "label": "Decision Summary",
                  "allowTagging": true,
                  "autoExpand": false,
                  "autofocus": true,
                  "tableView": true,
                  "answerType": "TEXT",
                  "key": "{{decision.ruleDetails.ruleList.narrative}}",
                  "type": "textarea",
                  "input": true
                }
              ],
              "offset": 0,
              "size": "md",
              "push": 0,
              "pull": 0,
              "currentWidth": "8",
              "width": "8"
            },
            {
              "components": [
                {
                  "label": "Decision",
                  "allowTagging": true,
                  "inline": false,
                  "tableView": false,
                  "values": [
                    {
                      "label": "Accept",
                      "value": "accept",
                      "description": ""
                    },
                    {
                      "label": "Escalate",
                      "value": "escalate",
                      "description": ""
                    },
                    {
                      "label": "Reject",
                      "value": "reject",
                      "description": ""
                    }
                  ],
                  "answerType": "TEXT",
                  "key": "decision1",
                  "type": "radio",
                  "input": true,
                  "defaultValue": "accept"
                }
              ],
              "offset": 0,
              "size": "md",
              "push": 0,
              "pull": 0,
              "currentWidth": "3",
              "width": "3"
            }
          ],
          "key": "columns1",
          "type": "columns",
          "input": false,
          "tableView": false
        }
      ]
    }
  ]
}'/></@editable>
</@hit>
In the top right corner, click the Save button to save the configured task.
Build and include sub-process for anonimyzing
To make sure account-associated data is anonimyzed according to GDP regulations, we will build a separate flow and include it as a sub-process into the advanced BP.
Build GDPR handling BP
To create the GDPR handling BP, follow the same sequence as for the other BP described above: Business Processes > Create new > Other > Miscellaneous tasks.
Once the BP is created, follow the instructions to design its flow:
On the Data tab, select the Streaming Records from External Sources checkbox.
Navigate to the Workflow tab and rename the BP to GDPR handling by clicking the pencil button next to the placeholder name.
Drag the Start element from the toolbar to the canvas.
Drag the Bot Task step to the canvas and connect the Start element to it. Then, double-click the step on the canvas, choose No-code > Rule builder-transformation, and click Select.
On the Design tab, set the step name to Anonymize. Then, go to the Input / Output tab, switch the Enable Input / Output connection toggle, and create the custom
accountdata object and step variable as described in the Add bot step to ingest input data.Set both the Input and Output of the step to use the created custom
accountobject. In the Step variable fields, create the customaccountvariables.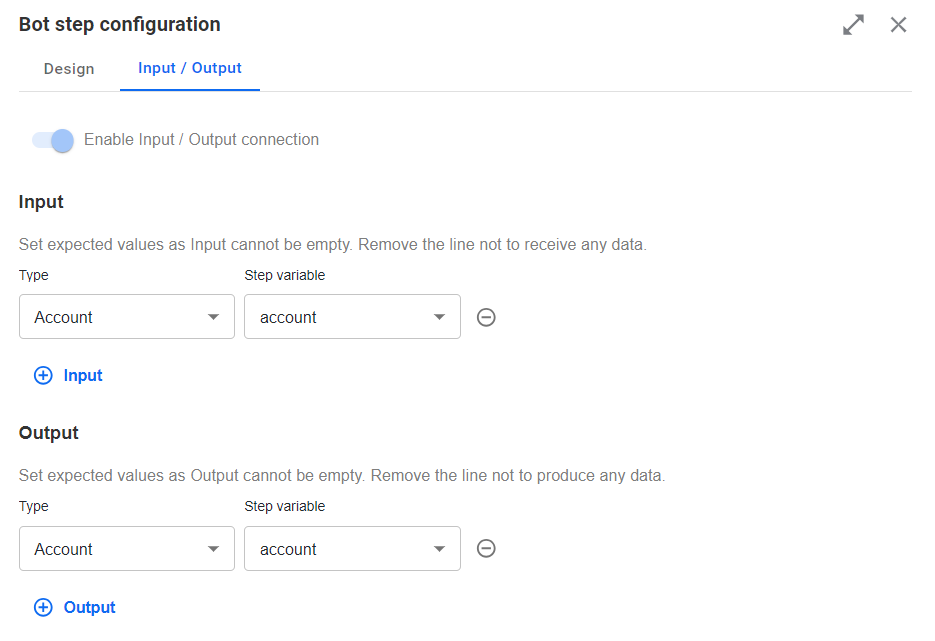
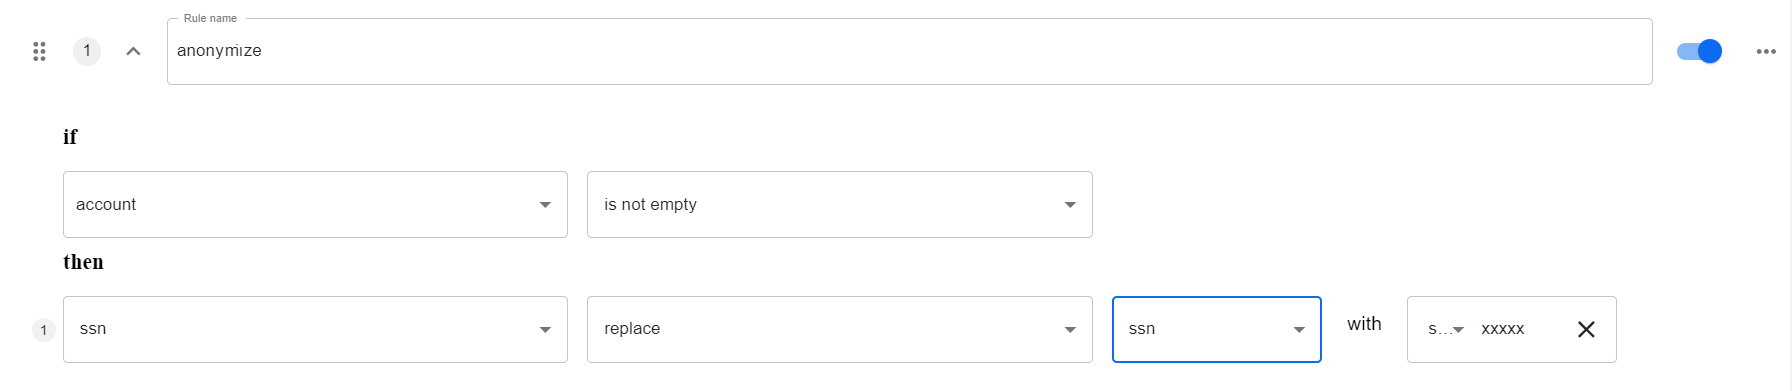
Go back to the Design tab and set the transformation rule for anonymizing specific input data:
Condition (if): choose the
accountobject and theis not emptyoperator.Outcome (then): choose the
account.ssnobject and thesetoperator. To set the value for the chosen object, click the value field, select Custom > Expression, enter the@sign and type in a mask expression:MASK(ssn, 3) = XXX-XXX-X123. Using the expression lets you leave some of the SSN number digits visible.Alternatively, you can set the SSN number to be fully anonymized:
Condition (if): choose the
accountobject and theis not emptyoperator.Outcome (then): choose the
account.ssnobject and thereplaceoperator. To set the value for the chosen object, selectssnand set it to be replaced with thexxxxxstring.
Repeat step 4 to add another Bot Task for passing the anonymized data to the core flow. On the Design tab, set the step name to pass data, click Show advanced settings, and add the following XML code in the bottom box:
    <?xml version="1.0" encoding="UTF-8"?>
<config charset="UTF-8">
  <var-def name="account" overwrite="false">{{account}}</var-def>
    <export include-original-data= "false" send-to-external-connector="true">
      <single-column name="account" value="${account}"/>
    </export>
</config>
On the Input / Output tab, switch the Enable Input / Output connection, set the Input and Output contracts to
accountthe same way as for step 6, and click Save.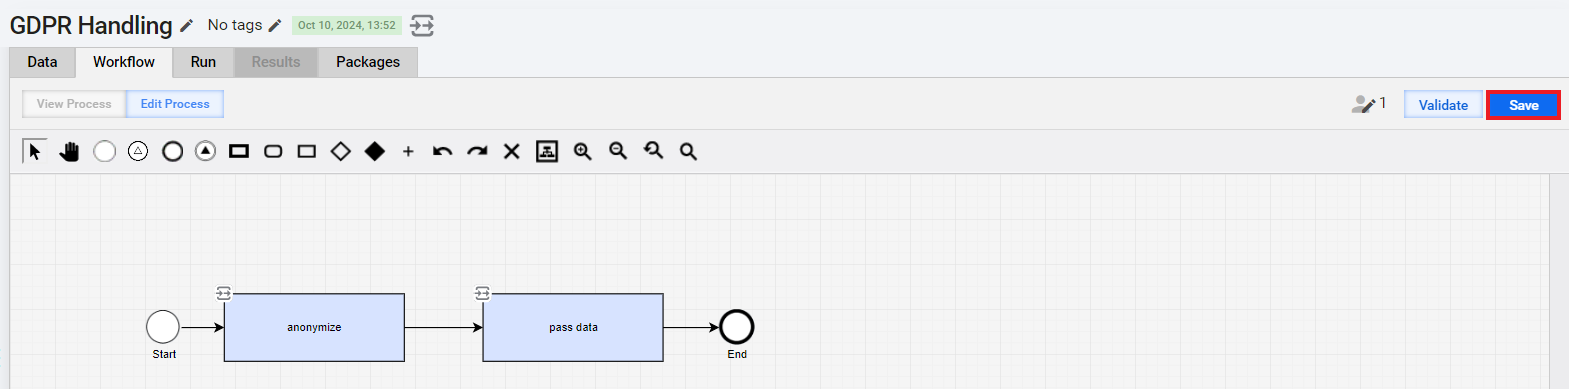
Drag the End element to the canvas and connect it to the pass data step. Click Save to save the entire sub-process.
Include GDPR handling BP as sub-process
To add the created GDPR handling BP to the core flow, follow the instructions below:
Drag the Synchronous Sub-process Execution step to the canvas and connect it to the outgoing connection of the No code rule step for the anonymize decision. Adding the flow as a synchronous sub-process means that the steps after this one will not be executed unless the execution of the sub-process finishes.
Double-click the step and, on the Design tab, choose the created GDPR handling BP from the drop-down list.
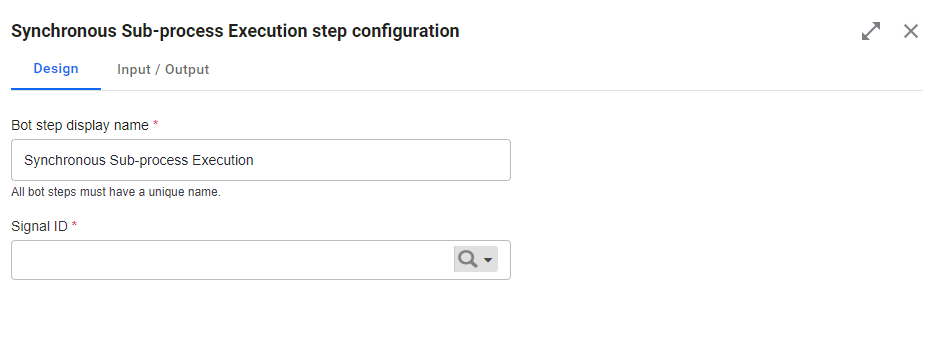
Navigate to the Input / Output tab, switch the Enable Input / Output connection toggle, and add the
accountcustom data object as both the Input and Output contracts.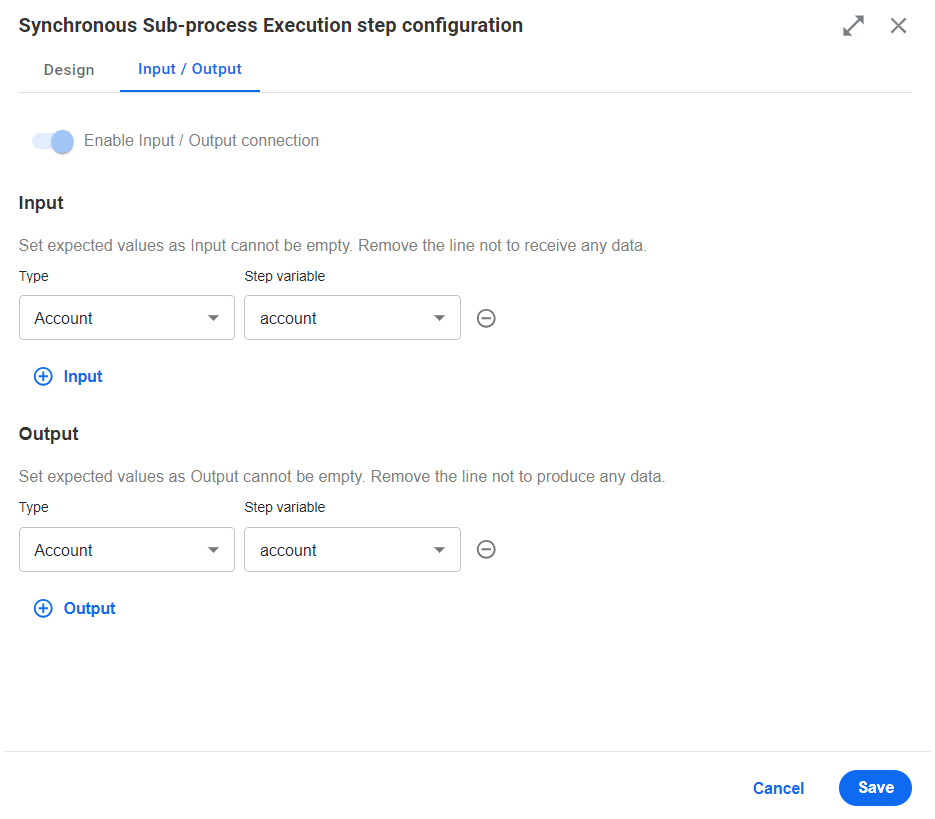
- Click the Save button to save the sub-process step configuration.
Add connectors
Connector steps allow you to integrate with third-party or internal systems for sourcing from or transmitting data to them.
Configure enrichment data ingestion
The step retrieves data from the specified information source via API and passes down the workflow. To add the step, follow the instructions below:
Drag a Bot Task to the canvas and connect it to the outgoing enrich connection of the No code rule step.
Double-click the Bot Task to initiate the configuration process and, in the displayed Operations list, select Connectors > Generic connector and click Select.
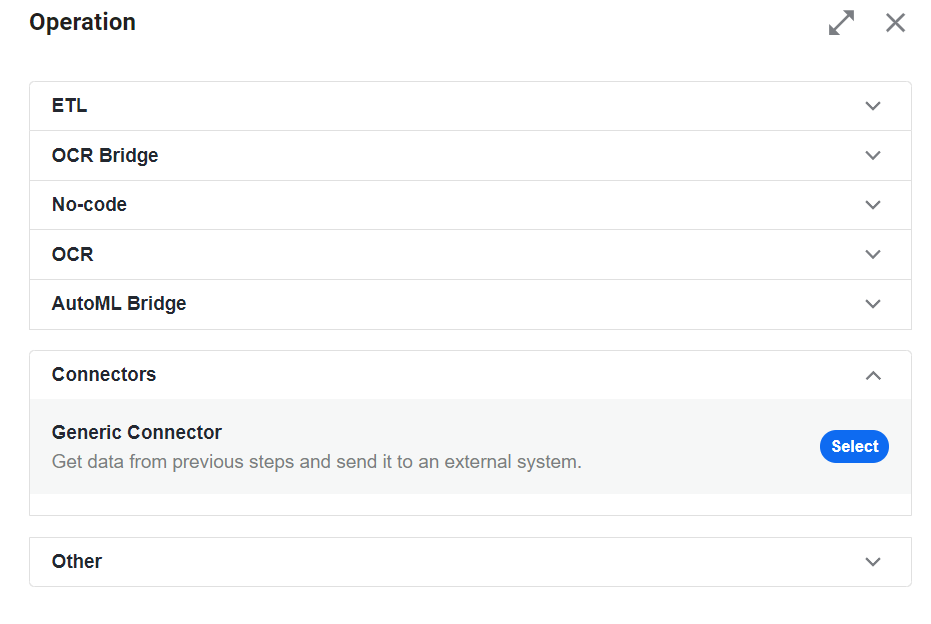
On the Design tab, set Bot step display name to get zip and set the configuration of the step to get zip files with enrichment information:
In the Connector field, choose Rest Client.
As Configuration method, select From existing API.
In the API URL field, specify the API URL. In the example, we use the
https://petstore.swagger.io/v2/swagger.yamllink.In the API endpoint field, choose an API endpoint for your purpose (for instance,
GET /pet/{petId}).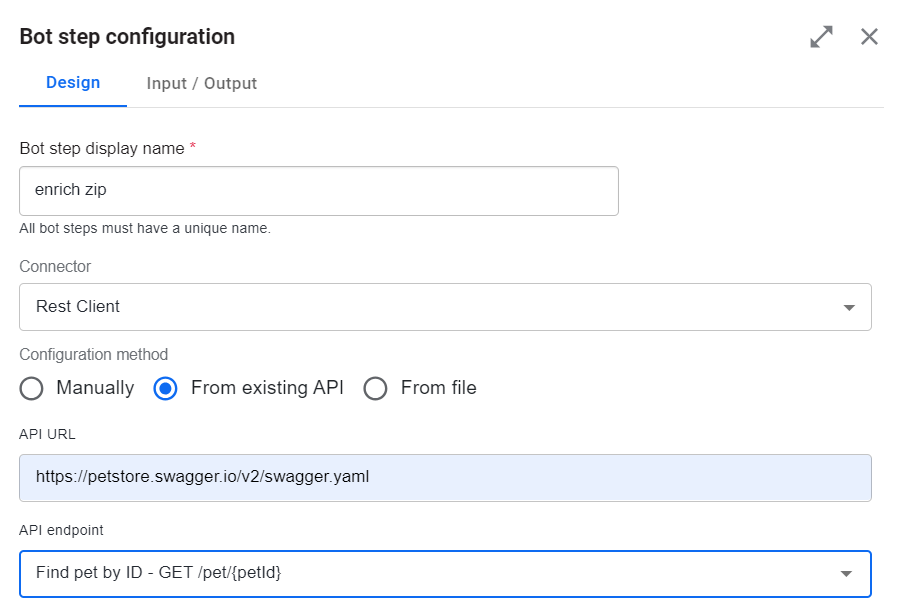
On the Input/ Output tab, the input and output contracts are created dynamically based on the API specification. Edit the autogenerated contracts as needed:
In the Input section, move the pointer over to the right of the
requestBodyobject and click Show mapping.In the Source fields corresponding to the step variables, specify values as if you were sending a request via API.
Below is an example of how to set a value for a
GET /pet/{petId}request: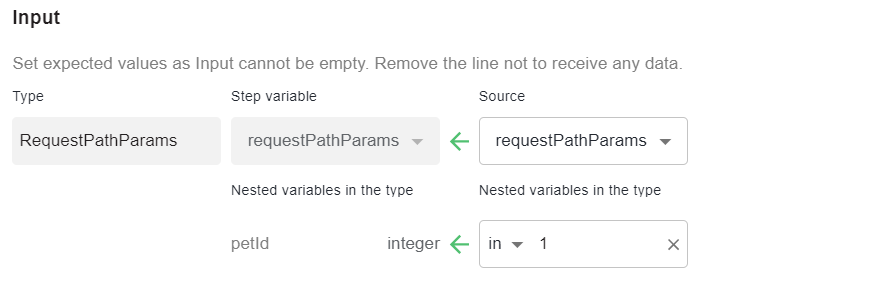
Click Save to finish the configuration.
Create user
The step manipulates the user data coming from the previous steps in the JSON format to get comprehensive user account information. To add the connector, follow the instructions below:
Drag a Bot Task to the canvas. Then, connect it to the outgoing approve connection of the No code rule step and the outgoing connection of the get zip connector step.
Double-click the step on the canvas and, in the displayed Operations list, click Connectors > Generic connector and then click Select.
On the Design tab, set the step name to Create user and configure the following:
In the Connector field, choose Rest Client.
As Configuration method, select From existing API.
In the API URL field, specify the required URL.
In the API endpoint field, choose an API endpoint to post or update data in an external system.
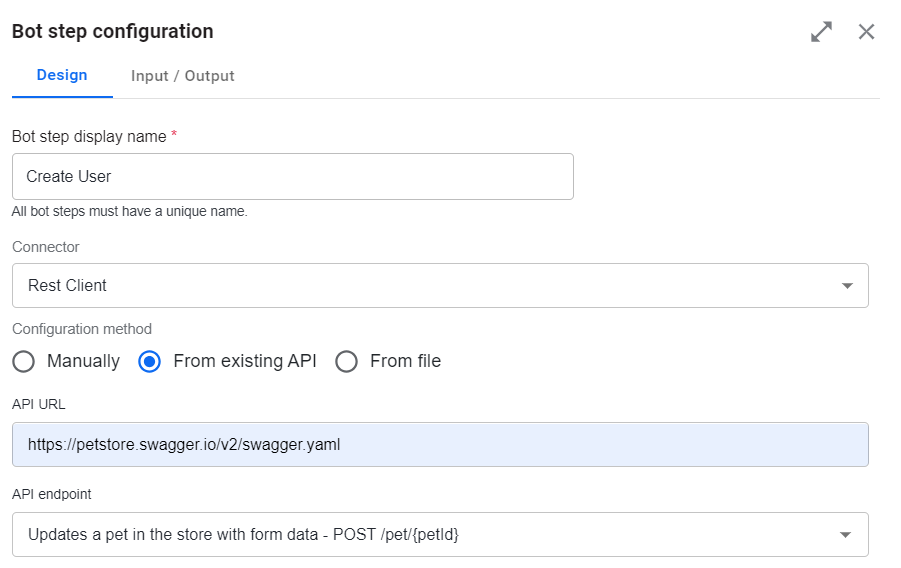
On the Input/ Output tab, the input and output contracts are created dynamically based on the API specification. Edit the autogenerated contracts as needed:
In the Input section, move the pointer over to the right of the
requestBodyobject and click Show mapping.In the Source fields corresponding to step variables, specify values as if you were sending a request via API.
Click Save.
Implement asynchronous sub-process execution
To enable the asynchronous execution of invoice handling as part of the advanced automation case, use the Asynchronous Sub-process Execution step:
Drag the step to the canvas. Then, connect it to the outgoing autoapprove connection of the No code rule step and the outgoing connections of the Create User and review account steps.
Double-click the Asynchronous Sub-process Execution on the canvas to open the configuration page.
Set the step name to Process invoice.
In the Signal ID field, select the simple invoice handling BP.
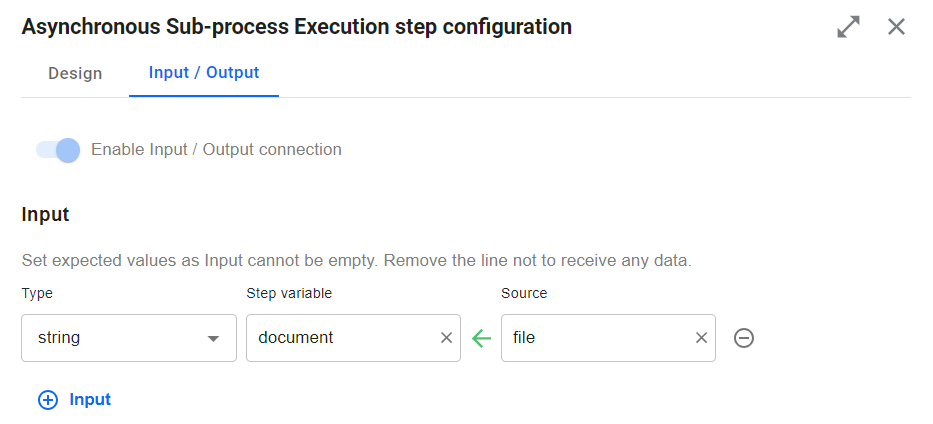
Go to the Input / Output tab, make sure the Enable Input / Output connection toggle is on, click Input, and set the input contract and mapping. For the described use case, those are as follows:
In the Type field, choose
string.Click the Step variable field, then click Custom variable, and specify
document. This is the name of the variable coming from the Invoice handling BP.Move the pointer to the side of the Step variable field and click Show mapping. Then, click inside the Source field, choose Custom variable, and type in
file. This is the name of the column in the input CSV file of the core flow where the BP should look for required data.
In case a Business Process becomes non-operational or its performance degrades, look for troubleshooting tips in the following support guides:
When you have trouble creating a BP, read the following guide: