Configure bot steps in UI
The custom bot step configuration user interface is used to simplify the specification of configuration parameters for bot steps. The feature enables the creation of complex forms using frameworks like FormIO or React and is supported for Java Native Workers (JNWs), Triggers, Bot Config Bundles (BCBs), and WebHarvest tasks.
To create a custom bot step configuration form, add a corresponding tag in the step XML and design a configuration panel. Under the hood, the mechanism is similar to the ETL bot step configuration but with the following difference:
You can specify a custom template instead of using the default one.
If a custom template is used, it is fully responsible for rendering, obtaining, and storing data. The platform only provides saved values and stores new ones.
The custom bot step configuration form is a recommended approach to specify configuration parameters for bot steps starting from Work.AI v10.2.8. Still, it inherits some limitations from ETL steps, for example:
To store any content, you require encoding, for example, for binary data.
While an AI Agent level configuration is used only as a snapshot of values when a Business Process (BP) starts, you can modify the step-level configuration at any time, and the values will apply immediately.
Write step XML
In the bot step content, specify the <configuration> tag:
<configuration template="<template_name>">{{configuration_payload_name}}</configuration>
where:
templateis the name of a template, for example,groupid_artifact_version/processor_name.ftl. Templates can be delivered by importing macro templates.The content of the
<configuration>tag is passed to the step for execution. Specify the parameter name, for example,configuration_payload_name, which corresponds to data provided by the configuration page (groupid_artifact_version/step_name.ftl).The parameters in the Bot Configuration should be wrapped with
{{ ... }}, for example,{{configuration_payload_name}}. They can be placed anywhere in the configuration, for instance, within the<configuration>or<profile>tags. Valid symbols are alphanumeric characters and underscores.
After a value is passed to the parameter, it replaces the parameter. For example, given the following XML:
<?xml version="1.0" encoding="UTF-8"?>
<config type="java">
    <worker>g:a:v</worker>
    <processor>processor</processor>
    <configuration template="template.ftl">
        {{configuration_payload}}
    </configuration>
</config>
Passing the 1234 value as configuration_payload results in the following configuration:
<?xml version="1.0" encoding="UTF-8"?>
<config type="java">
    <worker>g:a:v</worker>
    <processor>processor</processor>
    <configuration template="template.ftl">
        1234
    </configuration>
</config>
- You must include the
<configuration>tag and at least one parameter to make a bot step step configuration form available. - If multiple
<configuration>tags are present, only the last occurrence is used.
Symbols outside the following ranges are removed (in the HEX format):
- 0x9
- 0xA
- 0xD
- 0x20-0xD7FF
- 0xE000-0xFFFD
- 0x10000-0x10FFFF
Symbols in the following ranges are escaped (in the HEX format):
- 0x7F-0x84
- 0x86-0x9F
View sample code
See examples of valid step XMLs below.
JNW
See the example with a single stored parameter:
<?xml version="1.0" encoding="UTF-8"?>
<config type="java">
    <worker>com.workfusion.webtests.jnw.configuration:configuration-verifier-jnw:1.0.2-dev</worker>
    <processor>configuration-exposer</processor>
    <configuration template="conf/com.workfusion.webtests.jnw.configuration/configuration-verifier-jnw.ftl">
        {{configuration_payload}}
    </configuration>
</config>
Let's assume the configuration_payload value is 1234. Then, the configuration is as follows:
@TaskProcessor(id = "configuration-exposer")
public class ConfigurationExposerProcessor implements ITaskProcessor {

    // ... required fields, constructor, and so on

    @Override
    public TaskOutputData process(TaskInputData input) {
        // '\n\t\t1234\n' will be here
        String configurationValue = input.getConfiguration();
        // ... other business logic here
    }

}
Trigger
See the example with multiple parameters:
<?xml version="1.0" encoding="UTF-8"?>
<config type="trigger">
    <worker>com.workfusion.webtests.jnw.configuration:configuration-verifier-trigger:1.0.2-dev</worker>
    <processor>trigger-config-{{processor_id}}</processor>
    <configuration template="conf/com.workfusion.webtests.jnw.configuration/configuration-verifier-trigger.ftl">
        {{payload}}
    </configuration>
</config>
Let's assume the payload value is 1234 and processor_id is change. Then, the configuration is as follows:
@PipelineProcessor(id = "trigger-config-change")
public class SamplePipelineProcessor implements IPipelineProcessor {

    // ... required fields, constructor, and so on

    @Override
    public void startPipeline(PipelineContext pipelineContext) {
        String configuration = pipelineContext.getPipeline().getPipelineConfig();
        // .. other business logic here
    }

    // .. other required methods and business logic

}
BCB
<?xml version="1.0" encoding="UTF-8"?>
<config xmlns="http://web-harvest.sourceforge.net/schema/1.0/config" scriptlang="groovy">

    <configuration template="conf/com.workfusion.webtests.jnw.configuration/configuration-verifier-bcb.ftl">{{configuration_payload}}</configuration>

    <script><![CDATA[
        // some business logic here, for example ODF
        ]]></script>

    <export include-original-data="true">
        <single-column name="bcb_config_body" value="${task_configuration}" />
    </export>
</config>
Configuration with escaping
<?xml version="1.0" encoding="UTF-8"?>
<config type="java">
    <worker>com.workfusion.webtests.jnw.configuration:configuration-verifier-jnw:1.0.2-dev</worker>
    <processor>configuration-exposer</processor>
    <configuration template="conf/com.workfusion.spa.java.native.worker/configuration-verifier-jnw/v1/ReactExample.ftl">
        {{configuration_payload}}
    </configuration>
</config>
If the passed configuration_payload value is &asd<, the configuration is as follows:
<?xml version="1.0" encoding="UTF-8"?>
<config type="java">
<worker>com.workfusion.webtests.jnw.configuration:configuration-verifier-jnw:1.0.2-dev</worker>
<processor>configuration-exposer</processor>
<configuration template="conf/com.workfusion.spa.java.native.worker/configuration-verifier-jnw/v1/ReactExample.ftl">
&asd<
</configuration>
</config>
Design configuration panel
The configuration page template is based on the FreeMarker framework, for example:
<#include "/step_configuration_panel_base.ftl" parse=true/> <!-- this is part of platform -->
<@stepConfigurationPanel>
    <!--
        Your custom implementation starts inside @stepConfigurationPanel tag
     -->
</@stepConfigurationPanel>
The entire custom implementation must be designed inside the <@stepConfigurationPanel> tag. Here, you can add your JS, CSS, HTML tags, and so on. The content in <@stepConfigurationPanel> is then wrapped with HTML tags, CSS rules, and JS libraries required to render the configuration page and handle interactions.
View available functions
The <@stepConfigurationPanel> tag produces HTML containing the window.stepConfigurationUtils utility object. This object includes the following utility methods and fields that simplify data restoration and propagation:
parameterscontains a mapping of parameter names to input IDs in the HTML DOM. Each parameter name corresponds to the name in the step XML, converted to uppercase. Returns an input name.For example, you have the following step XML:
<?xml version="1.0" encoding="UTF-8"?>
<config type="trigger">
   <worker>com.workfusion.webtests.jnw.configuration:configuration-verifier-trigger:1.0.2-dev</worker>
   <processor>trigger-config-{{processor_id}}</processor>
   <configuration template="conf/com.workfusion.webtests.jnw.configuration/configuration-verifier-trigger.ftl">
   {{custom_payload}}
   </configuration>
</config>
Then, the following parameters are available:
window.stepConfigurationUtils.parameters.CUSTOM_PAYLOAD
window.stepConfigurationUtils.parameters.PROCESSOR_IDobtainDatafetches the ID of the input and returns the data stored in it. If the input is missing or unexpected (not described in the step XML), an error is thrown. It is recommended to read a value to restore the state of the configuration form.Parameters include:
id(string): the ID of the input to get a value from. Returns a string value of the parameter.window.stepConfigurationUtils.obtainData(window.stepConfigurationUtils.parameters.CONFIGURATION_PAYLOAD)
setDatasaves the passed data into input. The value is passed to the step XML. If the input is missing or unexpected (not described in the step XML), an error is thrown. If the value is an object or array, it is transformed to JSON; otherwise, it is stored as is. Call this method each time the value in the form is updated.Parameters include:
id(string): the ID of the input to set a value to.value(any except null and undefined): the value to be stored. If the value is an object or array, it is transformed into JSON. Otherwise, the value is stored as is.window.stepConfigurationUtils.setData(window.stepConfigurationUtils.parameters.CONFIGURATION_PAYLOAD, data)
raiseValidationStatusupdates the form validation status and notifies Control Tower if the current form is invalid, disabling saving of such a form in the Workflow Designer or on the AI Agent aggregated view. The intermediate save (Save and continue later) is still available.Parameters include:
isValid(boolean):trueif the form is valid; otherwise,false.window.stepConfigurationUtil.raiseValidationStatus(changed && changed.isValid)
showLoaderdisplays the loader animation. Use it before your application loads. The animation remains until your application preparation is finished.<script>
window.stepConfigurationUtils.showLoader()
</script>
<!-- any JS, CSS, HTML here which may need some time for initialization-->
<script>
window.stepConfigurationUtils.hideLoader()
</script>hideLoaderhides the loader animation. Use it after your application finishes loading.getStepInputContractreads the step input schema data. Returns an object or null.window.stepConfigurationUtils.getStepInputContract()getStepOutputContractreads step output schema data. Returns an object or null.window.stepConfigurationUtils.getStepOutputContract()getObjectSchemareads the object schema data. Returns an object or null.window.stepConfigurationUtils.getObjectSchema()onSharedDataUpdateupdates payload in the AI Agent configuration screen. The function is declared instep_configuration_panel_base.ftl. You should override it in your custom template file. As the configuration differs for each AI Agent, you should implement the function depending on each specific AI Agent. If the function is not implemented, an error is thrown.Parameters include:
id: the ID of the attribute to be updated.value(any except null and undefined): the payload to be updated. If the value is an object or array, it is stored as JSON. Otherwise, the value is stored as is.window.stepConfigurationUtils.onSharedDataUpdate = function (id, data) {
let emailPayload = readPayload(UTILS.parameters.EMAIL_PAYLOAD)
let payload = {
data: {
email: emailPayload,
},
metadata: {}
}
form.setSubmission(payload)
}
Configure escaping
In some cases, you might need to use minified JavaScript that includes constructions used by FTL, such as ${content_here}. These constructions can be invalid in the context of an FTL template. For such cases, two solutions are available:
Using the
noparsedirective that allows you to mark parts of your current FTL file as content that should not be processed as an FTL template. For example, you have the following FTL:<#include "/step_configuration_panel_base.ftl" parse=true/>
<@stepConfigurationPanel>
<!-- some content here -->
<div><#noparse>${invalid-ftl-parameter-name}</#noparse></div>
<!-- continue other content here -->
</@stepConfigurationPanel>It will be translated to the following HTML:
<html>
<!-- generated HTML content -->
<div>${invalid-ftl-parameter-name}</div>
<!-- continue other HTML content -->
</html>
Using the
includedirective with thenoparseattribute set totrue. For this approach, create multiple files—the current (root) template and included templates:root.ftl<#include "/step_configuration_panel_base.ftl" parse=true/>
<@stepConfigurationPanel>
<div id="root"></div>
<style>
<#include "/bundle.css" parse=false/>
</style>
<script>
<#include "/bundle.js" parse=false/>
</script>
</@stepConfigurationPanel>bundle.js// any JS code that allows to initialize your applicationbundle.css.any-css-needed-by-your-FE {}
See configuration form example
Let's assume the step requires two parameters: configuration_payload and processor_id:
<#include "/step_configuration_panel_base.ftl" parse=true/>
<@stepConfigurationPanel>
    <script>
        // show loader animation until whole application will be loaded
        window.stepConfigurationUtils.showLoader()
    </script>
    <!-- Include FormIO library which embedded into platform -->
    <@load library="FormIO"/>
    <div id="formio_container"/>
    <script>
        FORMIO_FORM = {
            "display": "form",
            "components": [
                {
                    "label": "Some Text Input",
                    "applyMaskOn": "change",
                    "tableView": true,
                    "validate": {
                        "required": true,
                        "minLength": 2
                    },
                    "key": "some_text_input1",
                    "type": "textfield",
                    "allowTagging": true,
                    "answerType": "TEXT",
                    "input": true
                },
                {
                    "label": "ProcessorId",
                    "widget": "choicesjs",
                    "tableView": true,
                    "data": {
                        "values": [
                            {
                                "label": "validate",
                                "value": "validate"
                            },
                            {
                                "label": "persist",
                                "value": "persist"
                            }
                        ]
                    },
                    "key": "processor_id",
                    "type": "select",
                    "input": true,
                    "defaultValue": "validate"
                }
            ]
        }
    </script>
    <script>
        let UTILS = window.stepConfigurationUtils;
        $(window).on('load', function () {
            Formio.createForm(document.getElementById("formio_container"), FORMIO_FORM)
                .then(form => {
                    let payloadStr = UTILS.obtainData(UTILS.parameters.CONFIGURATION_PAYLOAD)
                    try {
                        let payloadObject = payloadStr ? JSON.parse(payloadStr) : null;
                        if (payloadObject) {
                            let payload = {
                                data: payloadObject,
                                metadata: {}
                            }
                            form.setSubmission(payload)
                        }
                    } catch (e) {
                        console.log(e)
                    }
                    UTILS.raiseValidationStatus(form.checkValidity(null, false, null, true))
                    form.on('change', changed => {
                        UTILS.setData(UTILS.parameters.CONFIGURATION_PAYLOAD, form.submission.data)
                        UTILS.setData(UTILS.parameters.PROCESSOR_ID, form.submission.data.processor_id)
                        UTILS.raiseValidationStatus(changed && changed.isValid);
                    })
                    UTILS.hideLoader()
                })
        })
    </script>
</@stepConfigurationPanel>
Configure data sharing
Step configuration data sharing is available only for JNW, Triggers, BCB, and WebHarvest bot steps.
To share configuration values between two bot step configurations, do as follows:
In the Bot step configuration menu, on the Design tab, click Show advanced settings to expand the options. In the Step Configuration Sharing Namespace field, specify the configuration sharing namespace identifier. The ID is used to identify all Bot Configurations within the AI Agent and update their configuration form values upon saving the BP.
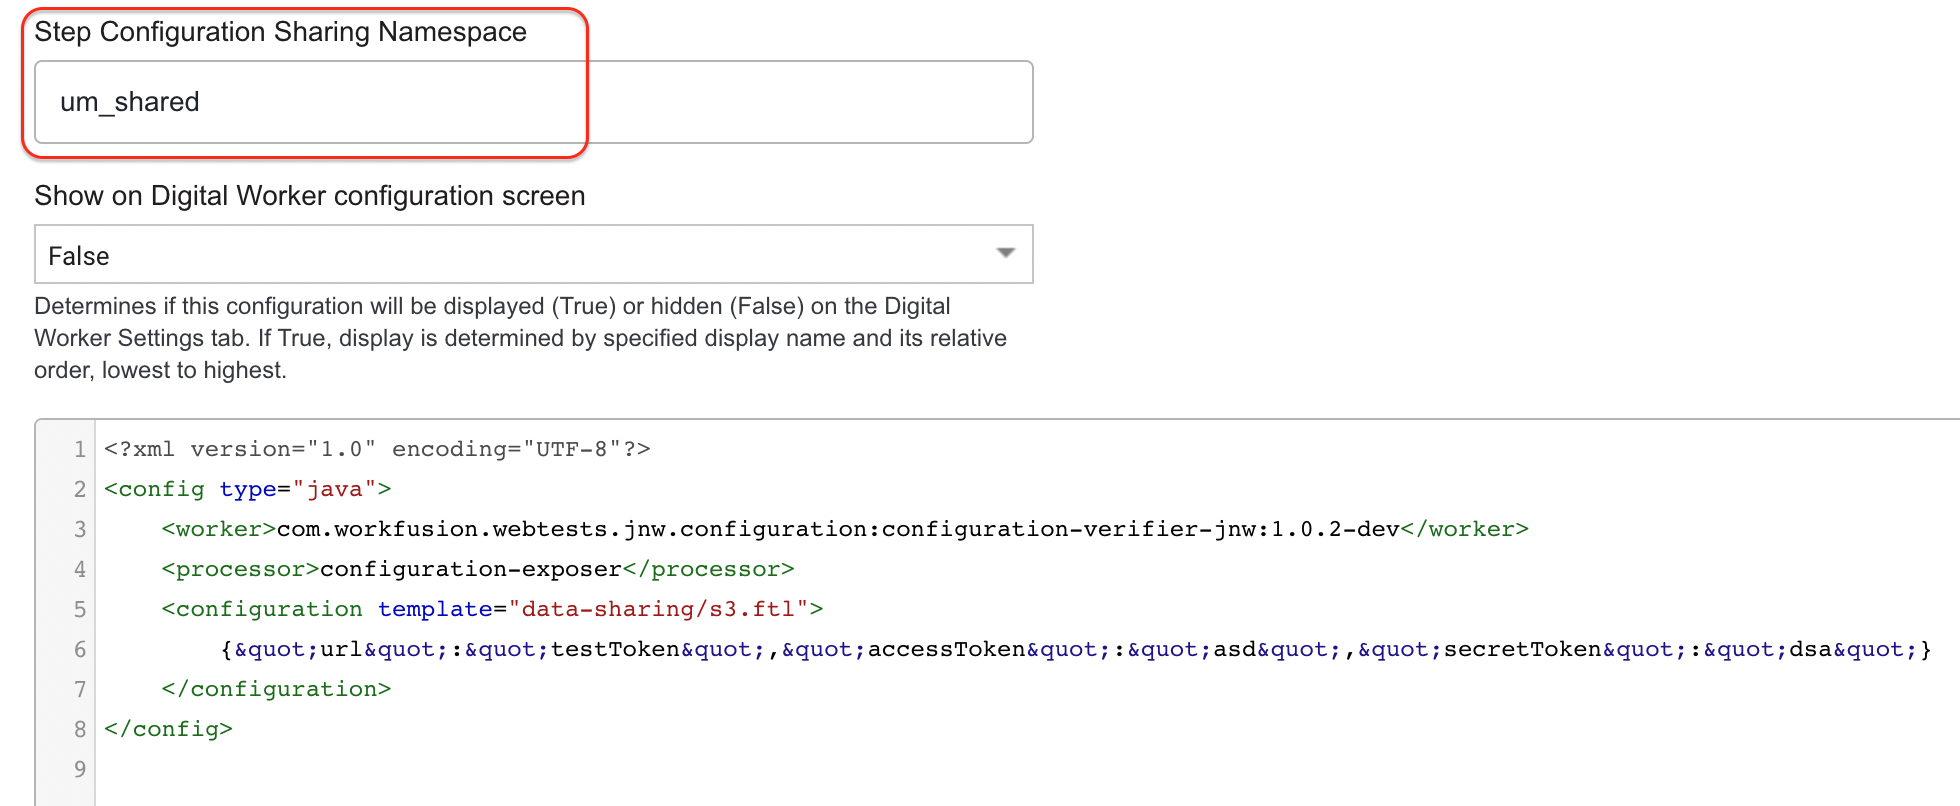
In the AI Agent configuration screen, edit the configuration payload of the current step.
If the step configuration sharing namespace is missing, the configuration form values relate only to the current step.
If the step configuration sharing namespace is present, the configuration form values are updated for each step of of the current BP or AI Agent with the same namespace, using the
onSharedDataUpdatefunction.
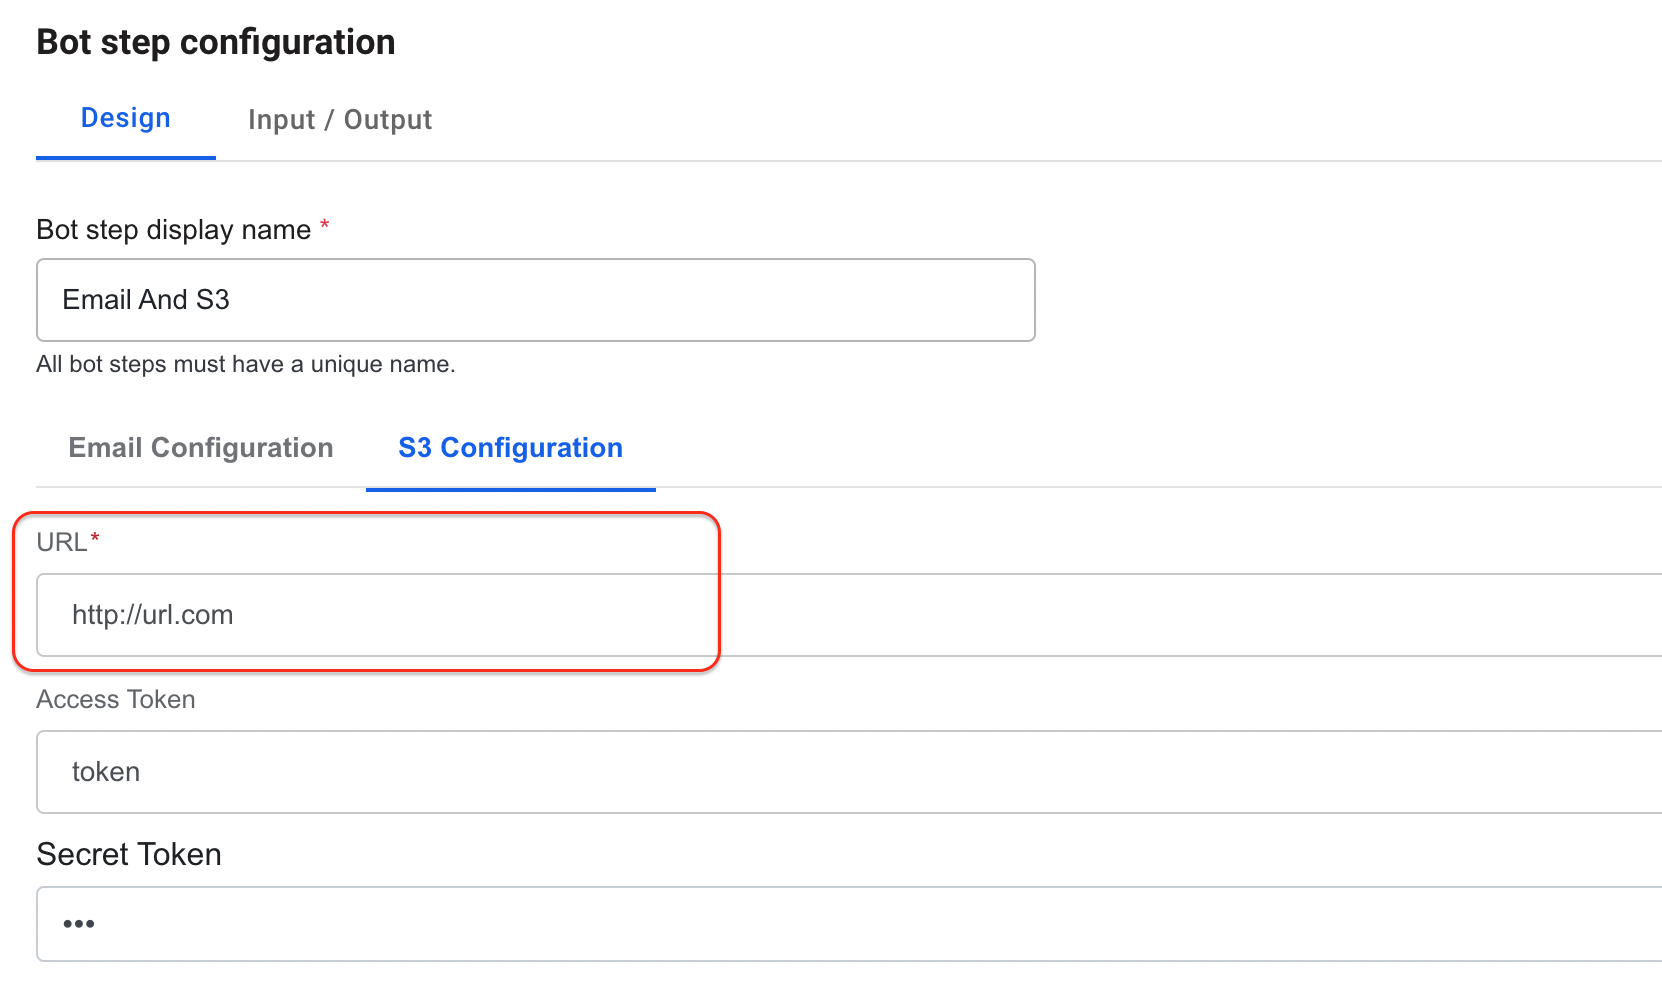
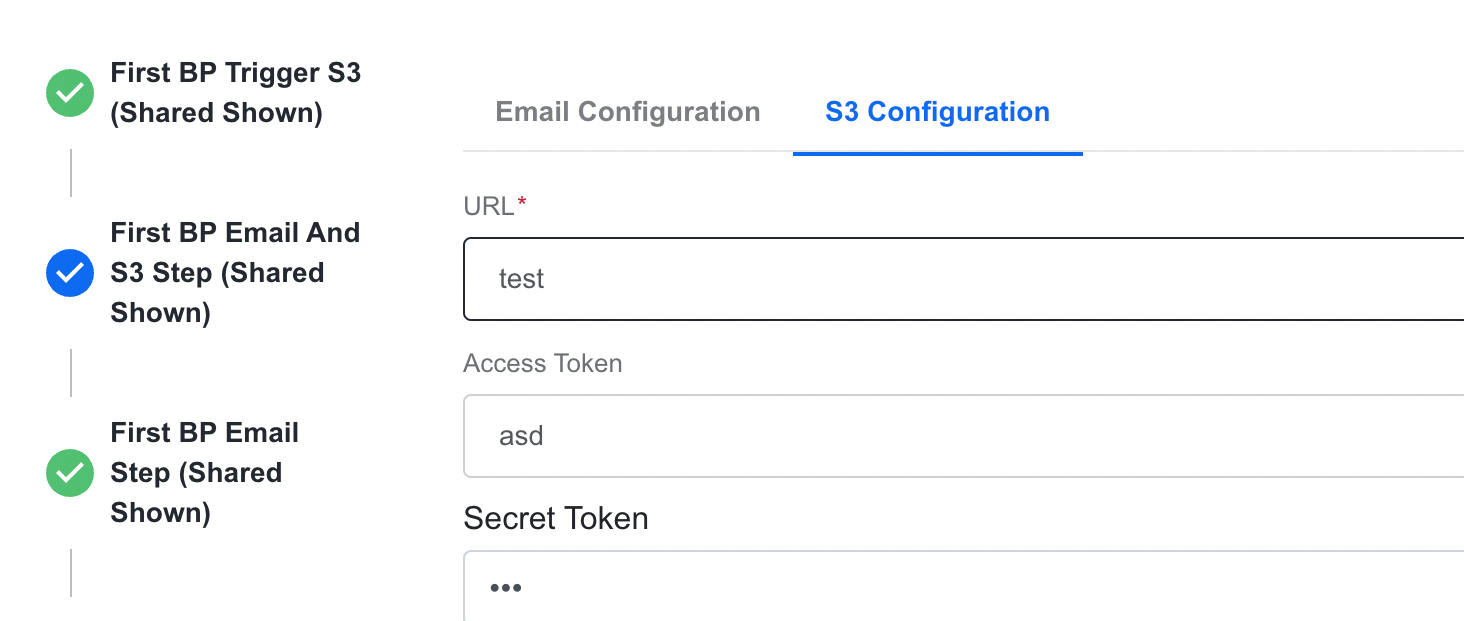
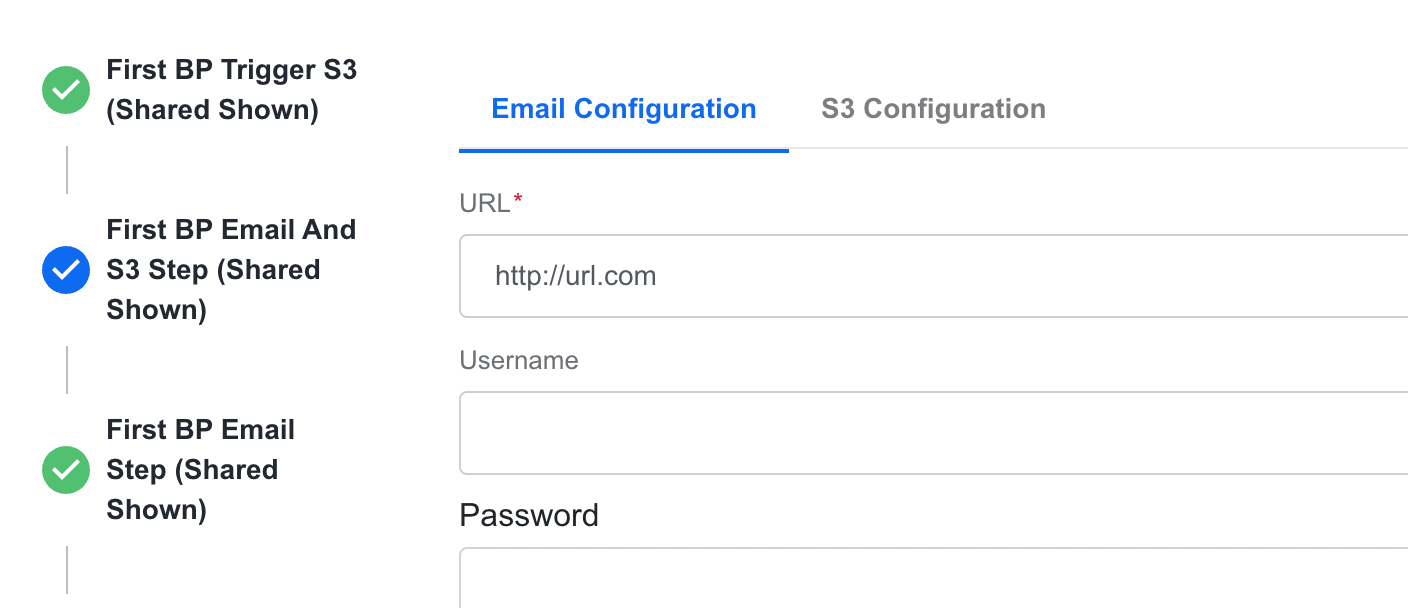
For example, in a BP below, the S3 and Email and S3 bots have a configuration payload. Upon updating the S3 bot, the latest payload is reflected in the Email and S3 bot step.

The S3 bot step uses um_shared as the data sharing identifier.
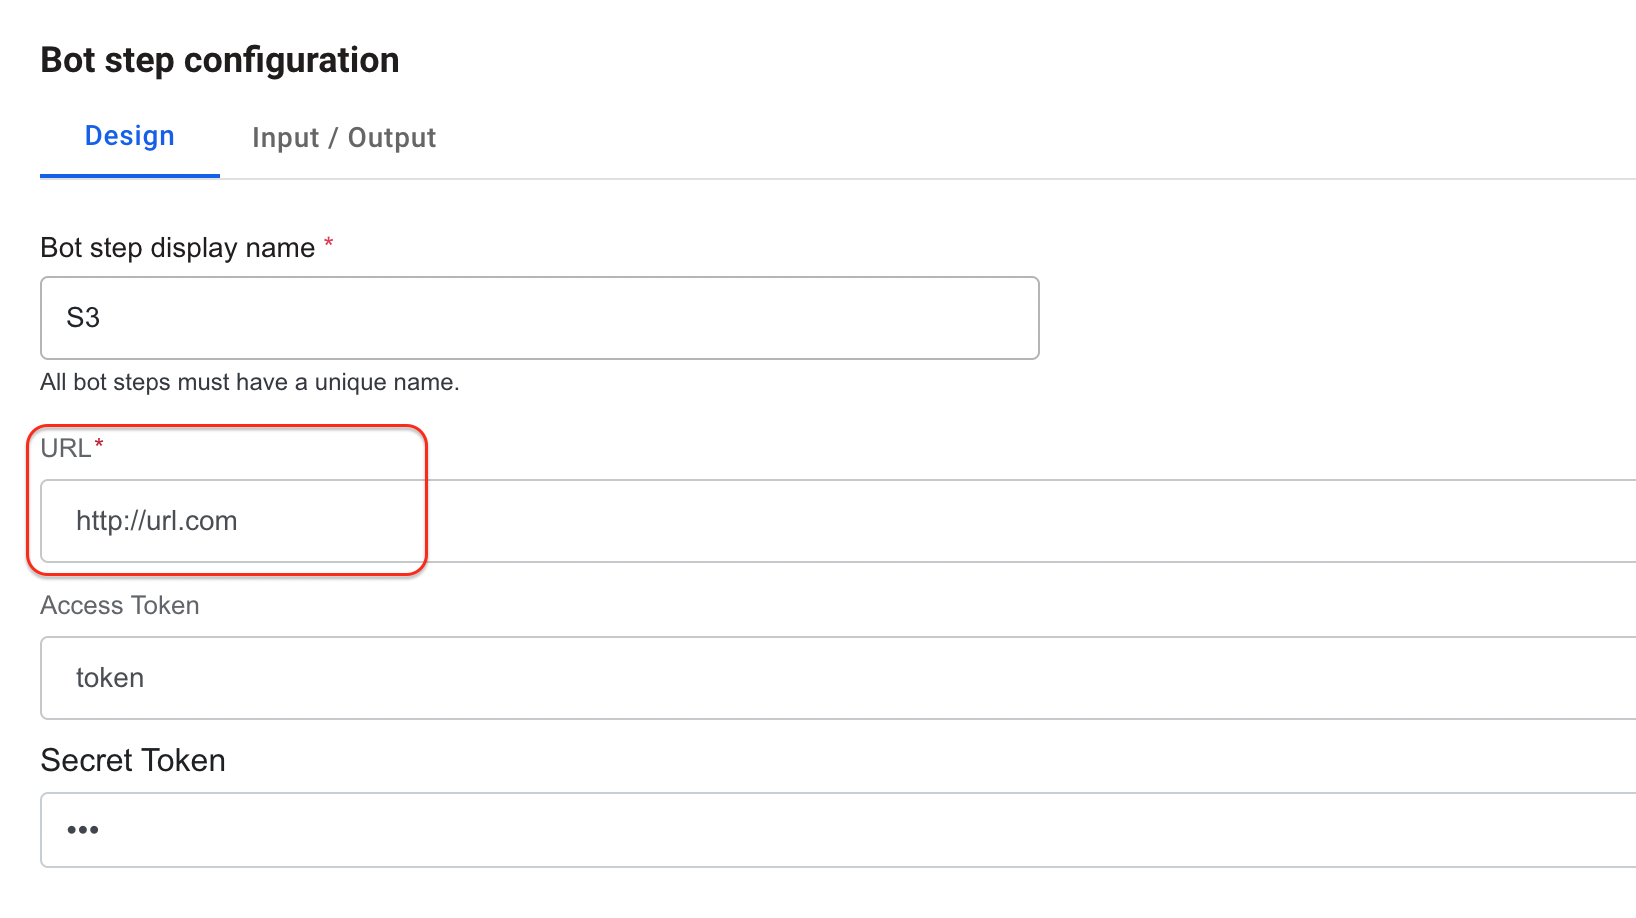
The configurations of S3 and Email and S3 bot steps are shared. Consequently, updates to attributes of the first bot result in updated values for the Email and S3 bot step.
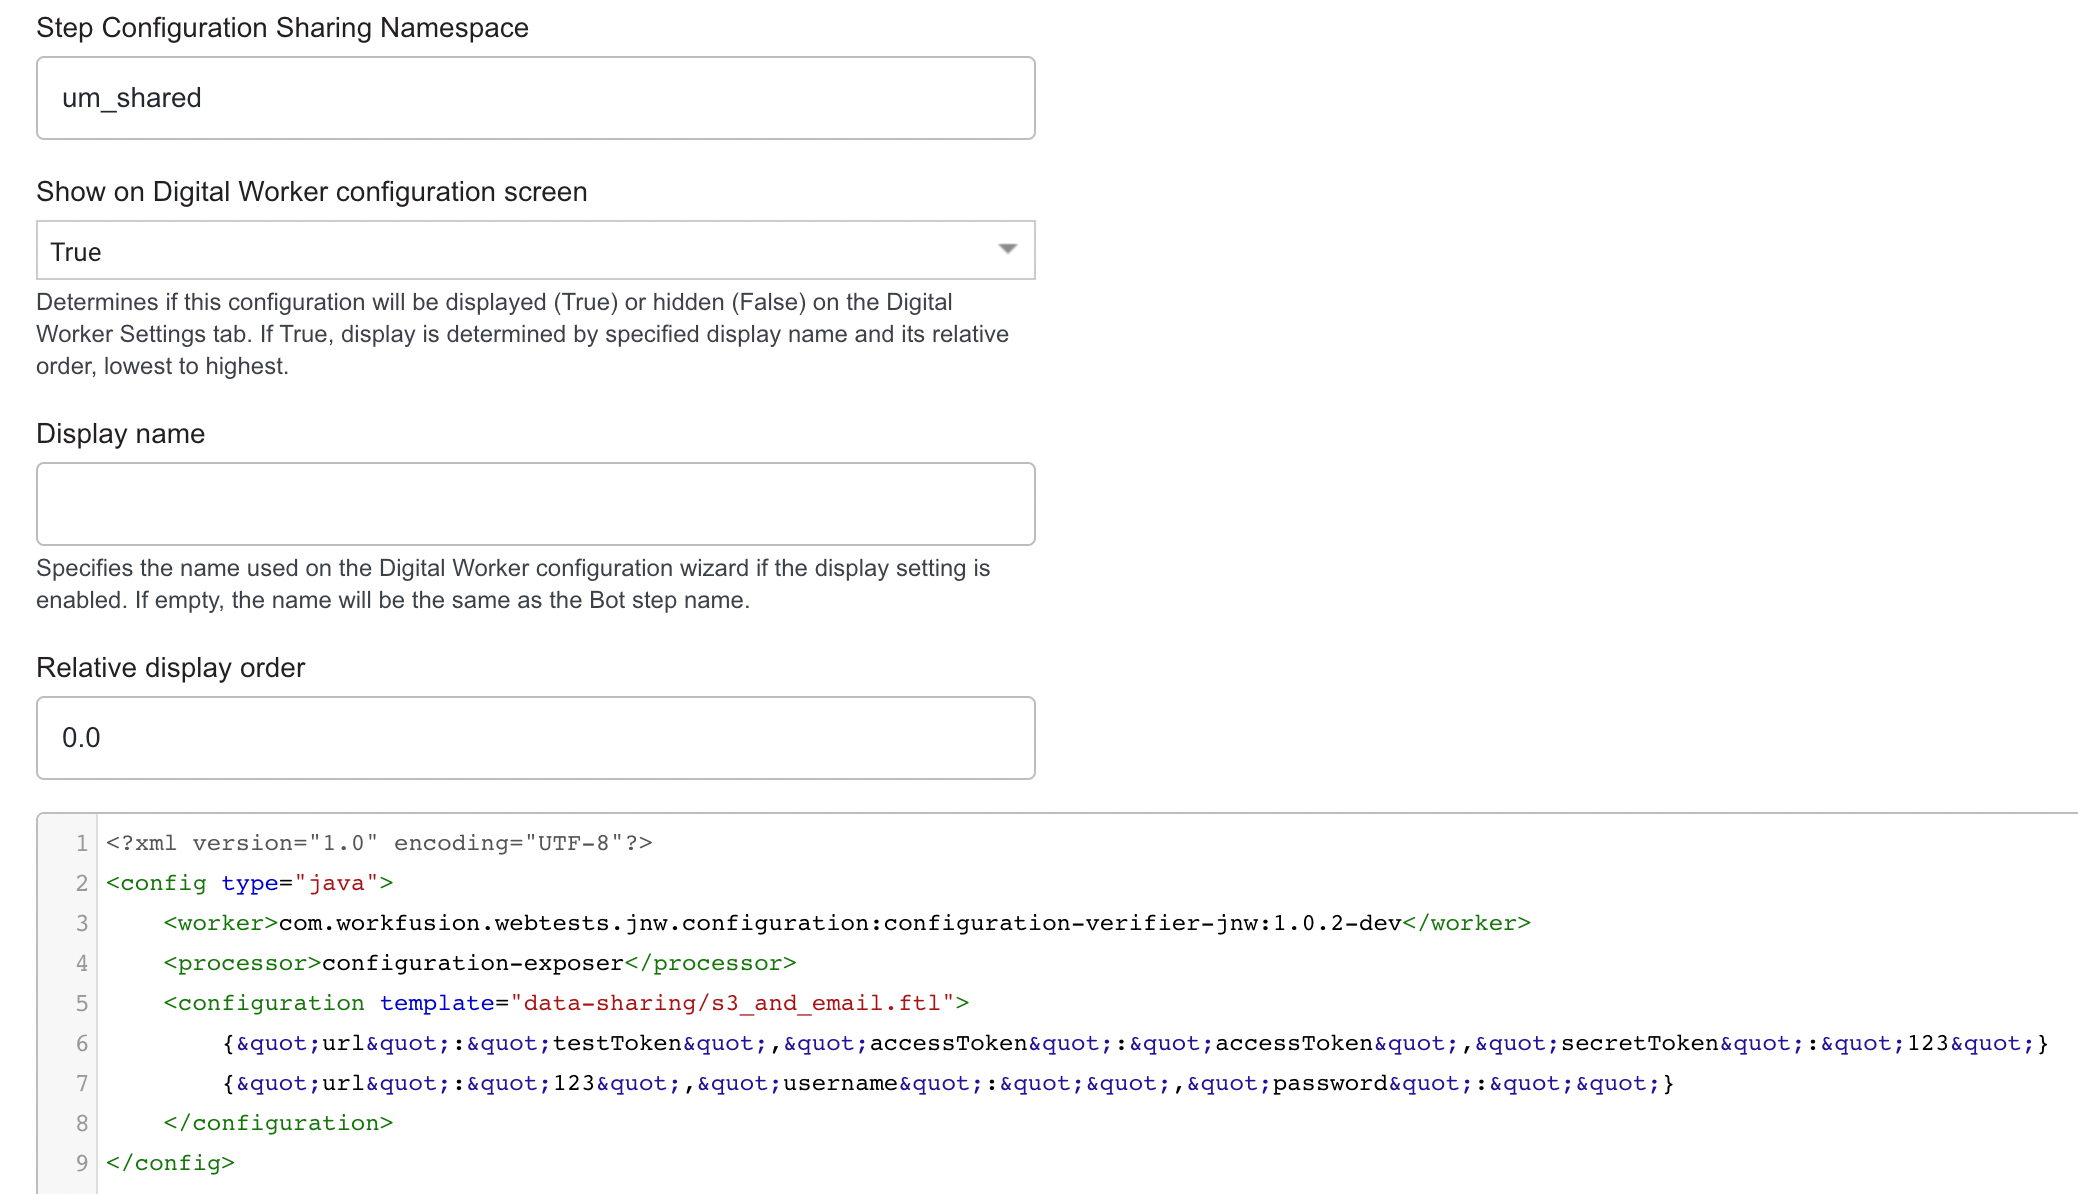
In the AI Agent configuration screen, the onSharedDataUpdate function updates the attributes of bot steps with the same data sharing identifier. Thus, the configuration of First BP Email Step is shared with that of First BP Email And S3 Step.
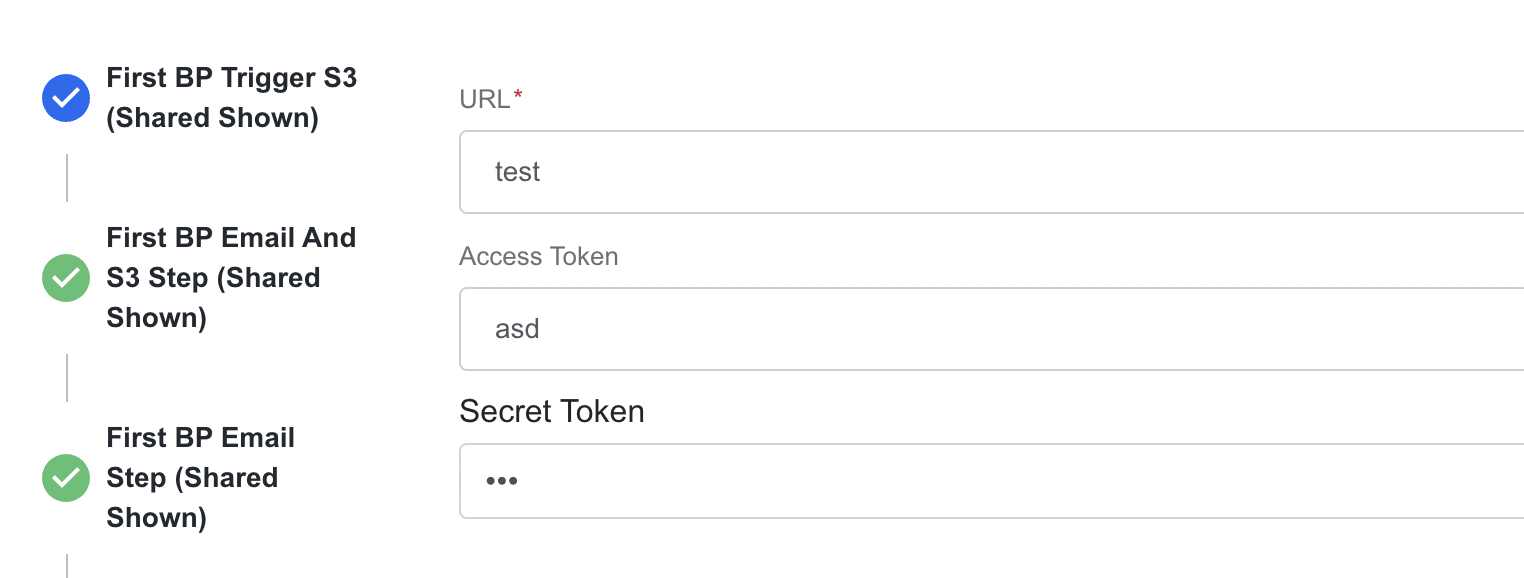
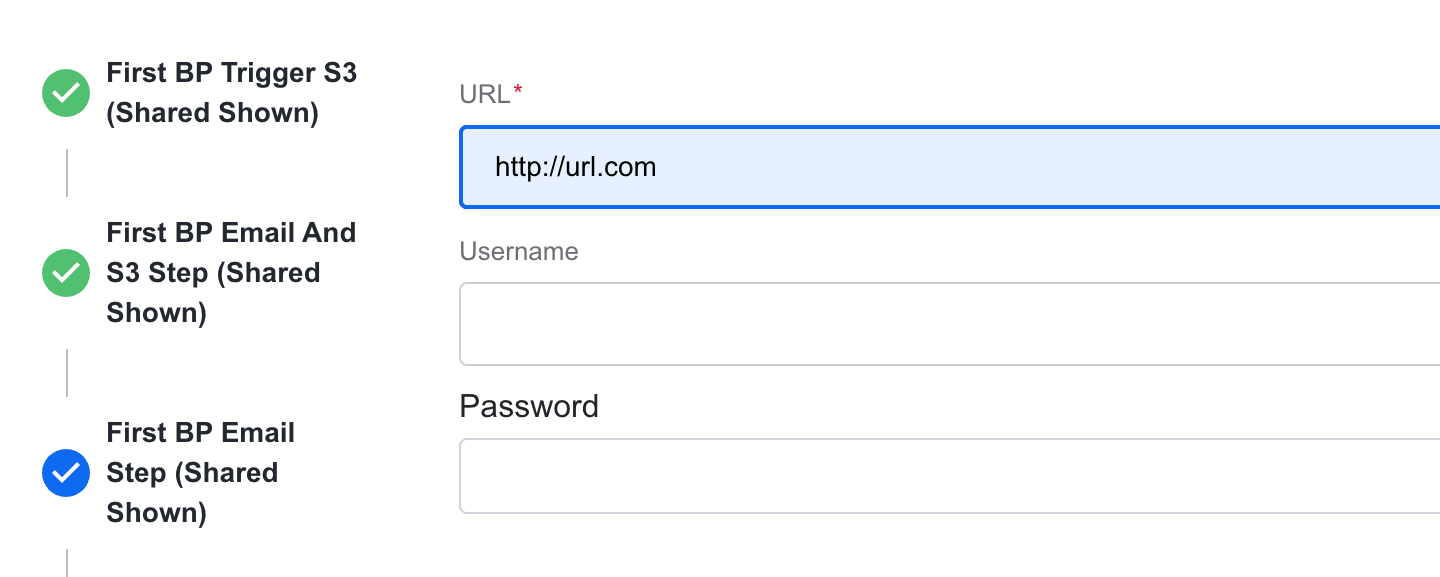
The properties of First BP Email and S3 Step are updated whenever changes are made to First BP Trigger S3 and First BP Email Step.
Configure step for AI Agent configuration screen
You can configure how a bot step configuration form is displayed on the AI Agent configuration screen. Go to the Bot step configuration menu > the Design tab and click Show advanced settings. The display options include:
Show on Digital Worker Configuration screen. Select True to display the bot step configuration form on the AI Agent configuration screen. By default, newly added steps are hidden on the AI Agent configuration screen (False).
Display name. Specify the name of the bot step configuration form as it appears on the AI Agent configuration screen. If left blank, the step name is used by default.
Relative display order. Define the order of panels on the AI Agent configuration screen. The ascending order is used by default. The default value is 0.0.
Best practices
Use unique prefix for templates
The template mechanism does not allow differentiation between templates belonging to specific steps or AI Agents. If two different steps use different configuration form templates with the same identifier (for example, template.ftl), only the latest imported template is accessed by both steps.
To avoid name collisions, use unique prefixes for your templates. For example, you can use the GAV structure (groupId:artifactId:version), where:
- G: group ID of the corresponding artifact
- A: artifact ID of the corresponding artifact
- V: version of the template
See a sample structure of an Asset Bundle that has a unique identifier for the template that is resolved to conf/com.workfusion.webtests.jnw.configuration/configuration-verifier-jnw/v1/FormIOExample.ftl:
|-template
      |-macro
          |-conf
              |-com.workfusion.webtests.jnw.configuration
                        |-configuration-verifier-jnw
                                    |-v1
                                      |-FormIOExample.ftl
Encode binary content
If your configuration contains binary data that must be stored without modification, complete the following steps:
Encode your payload, for example, using Base64 encoding.
Call
window.stepConfigurationUtils.setData(window.stepConfigurationUtils.<YOUR_NAME_HERE>, encodedValue).On the step logic side, decode the value before parsing.
For troubleshooting tips, refer to the following support guides: