Generate pure Python project
To simplify Python development, an integration was enabled with pure Python projects. You can use the projects to develop custom Python models instead of the mixed Java-Python approach described in the preceding articles of the section.
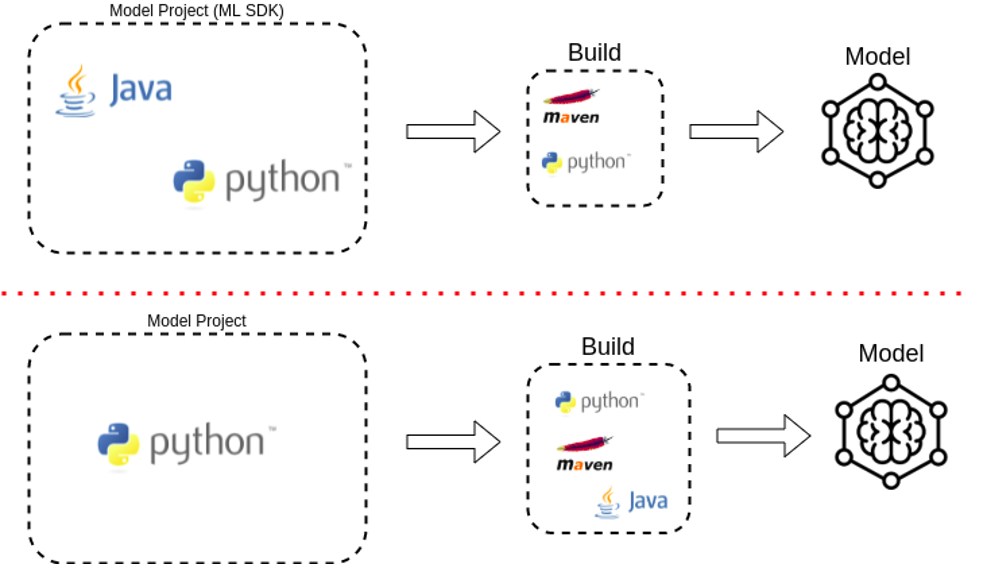
Using the ml-python-classification-archetype-v2 or ml-python-ie-archetype-v2 Archetypes, you can generate custom models based on pure Python projects to be operated by Workers in Work.AI.
To create such a model, follow the steps:
Generate a project from a template using the
ml-python-classification-archetype-v2Archetype.At this stage, a project structure is created. It includes a stub for integrating a custom Python model with Python Bridge used to execute the model from a Java Worker and building a script and its structure.
Create a custom Python model and integrate it with SDK.
Prerequisites
To create the project from a template using the ml-python-classification-archetype-v2, you need the following components:
Java and Maven configured for Nexus containing WorkFusion artifacts.
This is also required for any environment (local, Jenkins, or other) and for building the final Java-wrapped AutoML Worker.
For model building, Python 3.x must be installed with standard libraries only. Also, you need PyYAML, which is included in the
requirements/requirements-py37.txtrequirements file for a standard environment to execute models on production.For model development, Python 3.7 is needed.
Development guide
Set Python environment
After creating a project from the Maven archetype, configure the environment for it:
Prepare your virtual environment. It is advised to use a dedicated Python virtual environment for this project. To create it, use the following command:
python -m virtualenv [PATH_WHERE_YOUR_VIRTUALENV_WILL_BE_CREATED]If you have several versions of Python installed, you may want to specify the version to be used for creating the virtual environment. For that, add the
-pparameter to the command earlier. Refer to Python's venv documentation for details.For example, to create a virtual environment with Python 3.7 inside your project, execute the following command in the root directory of your project:
python -m virtualenv venv_custom_model -p python3.7Activate your environment and install libraries by running the command:
- On Windows:
venv_custom_model\Scripts\activate.bat - On Linux or Mac:
source venv_custom_model/bin/activate
To install the libraries, use the
requirements/requirements-py37.txtrequirements file. The files include libraries installed in Python environments and used by AutoML Workers.To use one of the libraries in your project, you don't need to do anything. To add more dependencies, compile them as WHL files and put them in the project's
deps/wheelsdirectory before building Java Workers.- On Windows:
The WHL files must be prepared for the same operating system as used by the Workers on production.
Integrate your code
Put your Python code in the project's /src directory to use it. You can create your modules there or extend the one made from the template ("YOUR_MODEL_PACKAGE_NAME").
This initially generated code includes two files:
pipeline.pyis used for integrating your model with Python Bridge, which is the Python part of AutoML Workers.Extend
_fit,_predict, and other methods there so that they pass the input provided by the AutoML Worker to your model and return the output converted to the types expected by the AutoML Worker. You can rearrange the input there to fit the desired input type of your model.Your Python model is built from the
/srcdirectory as a WHL file. You can also use this file with a model prepared in other projects. In such a case, you can include it in your dependencies (as WHL), import inpipeline.py, and delegate_fit,_predict, and other requests to the imported model. In such a case,pipeline.pyacts solely as an adapter to your model.app.pyis used as your custom model's entry point to be executed by the AutoML Worker (python -m YOUR_MODEL_PACKAGE_NAME.app).It is generated from the template by default and does not need to be changed. This entry point imports the AutoML Python library and creates a model server to serve your model. By default, this application serves your model defined in
pipeline.py:app.set_model(YourModelClassName()).AutoML Workers need to know the Python entry point path that the Worker executes. The path is set in
model.ymlasCustomPipeline.entrypointPath. By default, it is set toYOUR_MODEL_PACKAGE_NAME.appwhen the project is generated from the template.
If you change the entry point path, for example, rename the file or package, you also need to update model.yml.
Customize setup.py
The AutoML Worker building script uses setup.py to pack Python code into the WHL distribution file from the current project. When the project is generated from the template, it has reasonable defaults for building the WHL file. setup.py dynamically receives some properties from model.yml, which is the primary data source. Other values supported by setup.py can be extended in the setup.py itself. For more information, refer to the official Python documentation.
Customize model.yml
The model.yml file is the single source of truth describing the custom model for AutoML Workers. For example, it contains data for AutoML Workers about what entry point must be executed, the title, description and version of the model, and so on.
Add dependencies
If your model uses dependencies other than the ones specified in the requirements/requirements-py37.txt requirements file for your Python version, you must include them as WHL files in this project.
To do that, add them to the deps/wheels directory before building the project. Note that the operating system (OS) in which AutoML Workers are executed may differ from the OS where the wheels were prepared, and wheel files can be OS-specific. For some libraries, you can get the WHL files directly from https://pypi.org. For others, prepare them with the pip command: python -m pip wheel [YOUR_LIBRARY]. Refer to the official documentation for details.
Write tests
Optional
Tests are not required for building AutoML Workers, wrapping this custom model, but it is advised to write them. If available, the tests can be executed before the build procedure locally or on the CI/CD server.
Create CI/CD pipelines
Optional
You can build the final Java Worker using your model's code locally. But it is also recommended to create a CI/CD pipeline for mature projects to build the Worker on the CI/CD server and use it in your system. In this case, the Worker is built in the same way as locally, with the build.py script. See the Prerequisites section.
Test project
The project generated from the template (archetype) has the run directory. It contains several scripts that can help with debugging and testing the integration:
run_fit.pyandrun_predict.pyrequire defining variablesINPUT_DIR,OUTPUT_DIR,TRAINED_MODEL_DIRthat point to your dataset and output directories. After that, they let you run your model as a single process with a debugger. This simulates how a Java Worker executes your model. Note that not all Java Worker features are implemented.start_server.pyandexample_config.pylet you run the entry point module itself as a subprocess of the primary process. It doesn't allow for training or executing the model but verifies that the entry point starts the model server correctly.
Build project
The project generated from the template contains the build.py script that is used for wrapping the custom model from the project into the Java Worker.
To run the build, execute the command:
python build.py
To build AutoML Java Worker, the script performs the following actions:
- Creates a temporary project from a Java archetype for an AutoML Worker.
- Creates a wheel file from the Python code in the current project.
- Packs this project's dependencies.
- Puts the dependencies correctly in the temporary project and builds it.
- The temporary project's artifact is then copied to
/deployin the current project's root directory. It contains the AutoML Worker files: executable JAR and YML files with Worker execution configuration. By default, the temporary project is deleted after creating the artifact.
The building procedure can be used in CI/CD pipelines for generating artifacts (Workers).