
Integrate LDAP and AD
Prepare for configuration
note
All users that are going to log in to Control Tower or Workspace using LDAP/AD, must:
- be added to the specific group.
- have the email address defined.
Configure Control Tower
To configure LDAP and AD for Control Tower:
Log in to Control Tower Web UI.
Go to System Settings > User Group Management.
Create a new group with the following settings:
- Group Name: any meaningful name to be displayed on CT UI.
- External Group Name: the exact name of the LDAP group, as it is configured on the LDAP server.
- User Role: for example, Administrator.
Click Save.
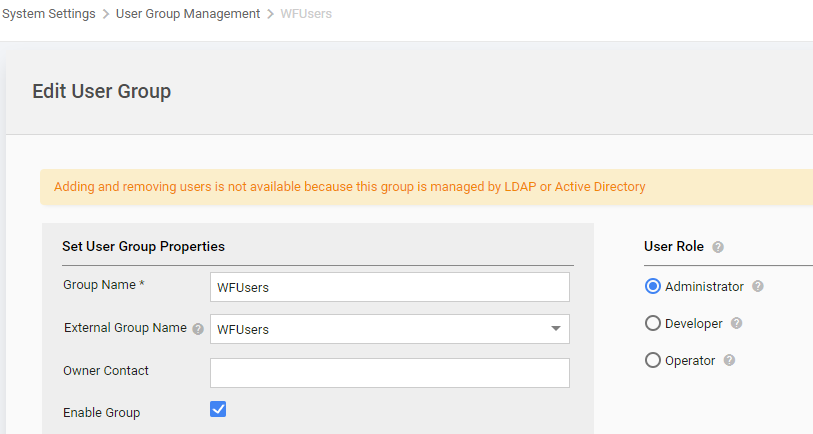
Log in to the APP server(s) Linux console as
WFUSER.Change the properties in INSTALL_DIR/workfusion/conf/workfusion.properties
# ldap
# True or False. If false, all other ldap-related properties will be ignored
ldap.enabled=True

# If true, LDAP with WF roles will be used. No groups from LDAP will be used.
# If true, ldap.group.base and ldap.group.filter will be ignored
ldap.internal.authorization.enabled=False

# Container of corporate user database used for authentication
# Supports several base directories pipe separated <baseDN1>|<baseDN2>|...
ldap.user.base=CN=Users,DC=example,DC=com

# Container of corporate groups used for authorization
# Supports several base directories pipe separated <baseDN1>|<baseDN2>|...
ldap.group.base=CN=WFUsers,CN=Users,DC=example,DC=com

# User filter for search, optional, alternative = (uid={0})
ldap.user.filter=(sAMAccountName={0})

# Group filter for search, optional, alternative = (memberUid={1})
ldap.group.filter=(member={0})
Go to INSTALL_DIR/wf-sec-storage/, and create a temporary file (for example, new.properties) with the following parameters:
ldap.server.url=ldaps://{ domain_controller_hostname.example.com}:{ port }
ldap.bind.dn=CN=ldap_search_user,CN=Users,DC=example,DC=com
ldap.bind.password=ldap_search_user_password
Upload the new parameters to Vault Workfusion case:
loader.sh workfusion new.propertiesTo check the result, enter the command below:
loader.sh workfusion review | grep -i ldapTo apply the changes, restart the workspace services:
wfmanager restart workfusion
Now you can log in to Control Tower Web UI as an LDAP user. The user will be automatically created or updated in Control Tower UI after successful authentication with the data fetched from LDAP.
note
For high-availability and disaster recovery installation:
Remember to make these changes on all instances, where Control Tower is installed, for example, ct1 and ct2.
Configure WorkSpace
note
To enable LDAP for Workspace, you need to have one or several groups of users created on your LDAP server.
Members of these groups will be allowed to log in to Workspace UI.
Log in to the APP server(s) Linux console as
WFUSER.Change the properties in INSTALL_DIR/workspace/conf/workspace.properties.
# ldap
ldap.enabled=True

# Activate internal authorization if swithed to true with ldap.enabled
ldap.internal.authorization.enabled=False

# Comma-separated group names from LDAP for mapping to worker users
ldap.worker.groups=WFUsers

# Comma-separated group of roles from LDAP which are mapped to the WorkSpace Requester role
ldap.requester.groups=WSReq

# Name of a license that is set to the requester if the new requester is created
ldap.requester.license=license_name

# Container of corporate user database used for authentication
# Support several base directories pipe separated <baseDN1>|<baseDN2>|...
ldap.user.base=CN=Users,DC=example,DC=com

# Container of corporate user groups used for authorization
# Support several base directories pipe separated <baseDN1>|<baseDN2>|...
ldap.group.base=CN=WFUsers,CN=Users,DC=example,DC=com|CN=WSReq,CN=Users,DC=example,DC=com

# User filter for search, optional, alternative= (uid={0})
# ldap.user.filter=(sAMAccountName={0})
ldap.user.filter=(UserPrincipalName={0})

# Group filter for search, optional, alternative = (memberUid={1})
ldap.group.filter=(member={0})

# Optional ldap settings
ldap.user.attribute.email=mail
ldap.user.attribute.firstName=givenname
ldap.user.attribute.lastName=sn
ldap.user.attribute.country=country
Go to INSTALL_DIR/wf-sec-storage/ and create a temporary file (for example, new.properties) with the following parameters:
ws.secure.ldap.server.url=ldaps://{ domain_controller_hostname.example.com}:{ port }
ws.secure.ldap.bind.dn=CN=ldap_search_user,CN=Users,DC=example,DC=com
ws.secure.ldap.bind.password=ldap_search_user_password
Upload the new parameters to Vault Workfusion case:
loader.sh workspace new.propertiesTo check the result, enter the command below:
loader.sh workspace review | grep -i ldapTo apply the changes, restart the workspace services.
wfmanager restart workspace
Now you can log in to Workspace UI as an LDAP user.
note
For high-availability and disaster recovery installation:
Remember to make these changes on all instances where Workspace is installed, for example, ct1 and ct2.
Configure Elastic stack
note
To integrate LDAP for the Elastic stack in the HA environment, the changes mentioned below must be applied for all the servers/roles, for example, for two APP and three INT servers.
Active Directory
To configure AD, log in to the INT server via SSH and do the following:
Create the LDAP realm by adding the following lines to the elasticsearch.yml configuration file located in the <elasticsearch_home>/config directory.
xpack.security.authc.realms.active_directory.<name_of_realm>:         # name of AD realm
    order: <order>                                                    # unique order of AD realm
    domain_name: <ldap_domain_name>                                   # domain name of AD
    url: <ldap_url>                                                   # URL of AD
    bind_dn: <bind_dn>                                                # User by which all requests to AD will be executed
    ssl:
        certificate_authorities: [ "<ca_sert_path>" ]                 # Path to CA certificate (should be PEM encoded)

# Certificate is provided by Active Directory maintainers.

# Example:
xpack.security.authc.realms.active_directory.ad:
    order: 0
    domain_name: example.com
    url: ldaps://ad.example.com:636/
    bind_dn: "cn=Administrator,cn=Users,dc=example,dc=com"
    ssl:
        certificate_authorities: [ "/opt/workfusion/elasticsearch/certs/cacert.pem" ]
Configure password of the bind_dn user by executing the following:
$ cd <elasticsearch_home> # directory where elasticsearch was installed.

$ bin\elasticsearch-keystore add xpack.security.authc.realms.active_directory.<name_of_realm>.secure_bind_password
# name of AD realm configured in elasticsearch.yml file.

# Example for name of realm 'ad':
$ bin\elasticsearch-keystore add xpack.security.authc.realms.active_directory.ad.secure_bind_password
Configure role mappings of external users and / or groups by adding the following lines to role_mapping.yml file located in <elasticsearch_home>/config directory.
<role>:                   # role. Description of built-in roles will be provided below.
    - "<user_dn>"         # The Active Directory distinguished name (DN) of user
    - "<group_dn>"        # The Active Directory distinguished name (DN) of group

# Example:
kibana_user:
    - "cn=Mark,cn=users,dc=example,dc=com"      # The Active Directory distinguished name (DN) of user 'Mark'
    - "cn=admins,dc=example,dc=com"             # The Active Directory distinguished name (DN) of group 'admins'
For the description of a built-in user, see the documentation.
LDAP
To configure LDAP:
Create the LDAP realm by adding the following lines to the elasticsearch.yml configuration file located in the <elasticsearch_home>/config directory.
xpack.security.authc.realms.ldap.<name_of_realm>:         # name of LDAP realm
    order: <order>                                        # unique order of LDAP realm
    url: <ldap_url>                                       # URL of LDAP
    bind_dn: <bind_dn>                                    # User by which all requests to LDAP will be executed
    user_search:
        base_dn: "ou=users,dc=example,dc=com"               # The LDAP distinguished name (DN) in which users will be searched
        filter: "(cn={0})"                                  # The attribute which will be used to search user by provided username
    group_search:
        base_dn: "ou=groups,dc=example,dc=com"              # The LDAP distinguished name (DN) in which groups will be searched
    ssl:
        certificate_authorities: [ "<ca_sert_path> " ]    # Path to CA certificate (should be PEM encoded)

# Certificate is provided by Active Directory maintainers.

# Example:
xpack.security.authc.realms.ldap.openldap:
    order: 0
    url: "ldaps://ldap.example.com:636"
    bind_dn: "cn=admin,dc=example,dc=com"
    user_search:
        base_dn: "ou=users,dc=example,dc=com"
        filter: "(cn={0})"
    group_search:
        base_dn: "ou=groups,dc=example,dc=com"
    ssl:
        certificate_authorities: [ "/opt/workfusion/elasticsearch/certs/cacert.pem" ]
Configure the password for the bind_dn user by executing the following commands:
$ cd <elasticsearch_home> # directory where elasticsearch was installed.

$ bin\elasticsearch-keystore add xpack.security.authc.realms.ldap.<name_of_realm>.secure_bind_password
# name of LDAP realm configured in elasticsearch.yml file.

# Example for name of realm 'openldap':
$ bin\elasticsearch-keystore add xpack.security.authc.realms.ldap.openldap.secure_bind_password
Configure role mappings of external users and / or groups by adding the following lines to role_mapping.yml file located in <elasticsearch_home>/config directory.
<role>:                   # role. Description of built-in roles will be provided below.
    - "<user_dn>"         # The LDAP distinguished name (DN) of user
    - "<group_dn>"        # The LDAP distinguished name (DN) of group

# Example:
kibana_user:
    - "cn=Mark,ou=users,dc=example,dc=com"      # The LDAP distinguished name (DN) of user 'Mark'
    - "ou=admins,dc=example,dc=com"             # The LDAP distinguished name (DN) of group 'admins'
For the description of a built-in user, see the documentation.