
Update passwords
This guide describes the update of passwords for the installed Workfusion Intelligent Automation Cloud Enterprise v10.2.
The guide may be helpful in the following cases:
- Workfusion Intelligent Automation Cloud Enterprise was initially installed with weak passwords, and you want to update some or all of them.
- In your organization, you have a password rotation policy, which requires regular passwords update.
The passwords-update procedure comprises of the following stages:
- Stop all running Business Processes in Control Tower.
- Stop all Product-related services.
- Destroy workers and cleanup rabbitmq queues.
- On the MASTER server, update
config.ymlandrpa.ymlwith new passwords. - On the MASTER server, re-encrypt
config.ymlandrpa.yml. - Generate new Vault and Logstash certificates.
- Copy new
config.ymland certificates from MASTER to all other Linux servers. - On the RPA server, update user credentials.
- On the Analytics (BI) server, update user credentials.
- Update MS SQL logins credentials.
- Apply the new configuration.
- Run environment health-check.
important
Once you start to update passwords, make sure to finish it on all servers. Otherwise, your product may not be operational.
Prepare environment
To prepare the environment:
- In your browser, log in to Control Tower, and stop any running business processes.
- Stop all product services (except BI):
On the MASTER server, adjust variables for your environment and execute the commands as
WFUSER:$ export PACKAGE_DIR=/opt/workfusion/wf_installer
$ export ANSIBLE_PRIVATE_KEY_FILE='/path/to/ssh-private-key'
$ export ANSIBLE_VAULT_PASS='your-ansible-vault-pass'
$ cd $PACKAGE_DIR
$ ./install.sh stop_services full -e skip_bi=true
On each Linux server (in the following order: AGENT -> MASTER), run the following command as
WFUSER:$ wfmanager stop all
To destroy workers, on each AGENT server, run the following commands as
WFUSER:$ pkill -f worker.jar # check that there are no running worker processes: $ ps aux | grep 'worker.jar'To clean the rabbitmq queues up, on the MASTER server, run the following command as
WFUSER:$ wfmanager start rabbitmq $ rabbitmqctl list_queues --vhost bep | awk '{ print $1 }' | xargs -L1 rabbitmqctl delete_queue --vhost bep $ wfmanager stop rabbitmq
For the high-availability mode,
- On each MASTER server, start rabbitmq.
- Execute the
rabbitmqctlcommand for cleanup. - Stop rabbitmq.
Update passwords
Note that simple changing passwords in the configuration files config.yml or rpa.yml does not update the passwords used by the Product components on different environment servers. These files are the aggregated configurations you usually fill before product installation. They are used only by the installer to read the provided desired settings and save them during deployment to various destinations, where the configuration is stored while the product is running.
To update passwords in config.yml:
On the MASTER server, backup your current
config.yml:$ cd PACKAGE_DIR $ cp config.yml config_yml_bakEdit
config.ymland change the required passwords:$ ./install.sh edit_config masterYou will be prompted to enter your current
ansible_vault_password.Below is the complete list of passwords that you might want to update. Update the desired settings and save the file.
ansible_vault_password

wf_password

keycloak_admin_pass
keycloak_wildfly_mgmt_password

s3_access_key
s3_secret_key
java_cacerts_truststore_pass
marathon_web_pass
mesos_web_pass
rabbitmq_ocr_pass
rabbitmq_bep_pass
rabbitmq_admin_pass
nexus_admin_pass
tableau_dashboard_pass
tableau_admin_pass
ocr_sec_pass
ocr_jwt_secret
workspace_root_requester_pass
bot_manager_jwt_secret
rpa_bot_manager_pass

vault_admin_cert_pass
vault_client_cert_pass
elk_logstash_certificate_pass

bi_user
bi_pass

rpa_user
rpa_pass

mssql_dba_user
mssql_dba_pass
mssql_ct_user
mssql_ct_pass
mssql_ws_user
mssql_ws_pass
mssql_sqc_user
mssql_sqc_pass
mssql_ds_user
mssql_ds_pass
mssql_rpa_user
mssql_rpa_pass
mssql_pm_user
mssql_pm_pass
mssql_dm_user
mssql_dm_pass
mssql_rapi_user
mssql_rapi_pass
mssql_ocr_user
mssql_ocr_pass
mssql_automl_mms_user
mssql_automl_mms_pass

mssql_keycloak_user
mssql_keycloak_pass

mssql_ml_lab_user
mssql_ml_lab_pass
To change Keycloak related users' passwords after the initial installation, first modify them in the Keycloak Web Interface (Manage account -> Password), then edit the following parameters in
config.yml.keycloak_admin_pass: YOUR_PASSWORD wf_password: YOUR_PASSWORD
To update passwords in rpa.yml:
On the MASTER server, backup your current
rpa.yml:$ cd PACKAGE_DIR $ cp rpa.yml rpa_yml_bakEdit
rpa.ymland change the required passwords:$ ./install.sh edit_rpa_config masterYou will be prompted to enter your current
ansible_vault_password.Below is the complete list of passwords that you might want to update. Update the desired settings and save the file.
# for each unit
username
password
On the MASTER server, re-encrypt
config.ymlandrpa.yml:Perform this step only if you have updated
ansible_vault_passwordinconfig.yml.To re-encrypt
config.ymlandrpa.ymlwith new password, run the following command:$ ./install.sh rekey configYou will be prompted to enter your old ansible vault password. After command execution,
config.ymlandrpa.ymlbecome encrypted with a new password that you specified during editing.
Generate new Vault and Logstash certificates
important
Perform this step only if you have updated one of the following settings in config.yml:
vault_admin_cert_pass
vault_client_cert_pass
elk_logstash_certificate_pass
To generate new Vault and Logstash certificates, on the MASTER server, execute the following commands as WFUSER:
$ rm -rf ./certificates/_auth_internal/vault*
$ rm -rf ./certificates/_auth_internal/logstash*
$ ./install.sh certs generate
After execution, the new vault and logstash certificates are generated, and their private keys are protected by your new passwords:
./certificates/_auth_internal/logstash.crt
./certificates/_auth_internal/logstash.key
./certificates/_auth_internal/logstash.p12
./certificates/_auth_internal/vault_admin.crt
./certificates/_auth_internal/vault_admin.p12
./certificates/_auth_internal/vault_workfusion.crt
./certificates/_auth_internal/vault_workfusion.p12
Update RPA credentials
important
Perform this step only if you changed any of the RPA users' credentials in config.yml or rpa.yml.
If you have changed any of the following settings in config.yml, update the respective RPA Windows credentials on the RPA servers:
rpa_user:
rpa_pass:

bot_master_user_name:
bot_master_user_pass:
bot_unit_base_name:
bot_unit_pass:
The preparation of Windows users is a part of the installation prerequisites, so it is up to you to update them now. You can use both Active directory users or local Windows ones. If you use local Windows users and decide to change only passwords, on the RPA server, go to Computer Management > Local Users and Groups > Users > right-click a user > Set Password and change the passwords.
For the multi-point installation, rpa_user and rpa_pass are not used. They are used only by the installer in a single-point installation to connect to the RPA server and execute commands remotely.
For a multi-point installation, rpa_user represents the user you use to log in to the RPA machine via RDP. Thus
Only bot_master_user and bot_unit users take part in the product execution.
Update Analytics credentials
important
Do this step only if you're updating BI-related passwords:
bi_user:
bi_pass:

tableau_dashboard_pass:
tableau_admin_pass:
The Analytics user is a regular Windows account used only by the Ansible installer to connect to the BI server via RDP and execute commands remotely. It doesn't take part in the product execution after installation is finished.
Update bi_user on the BI server only for the single-point installation.
If you have earlier changed tableau_dashboard_pass or tableau_admin_pass, to update the BI credentials:
- In your browser, log in to Tableau as a current Tableau administrator.
- Go to the Users tab, click the desired user, then go to the Settings tab > Change Password.
To update the BI credentials in the HA setup:
- Start your standby BI server, and log in to it with a browser (using direct
bi_hostnameof standby BI server). - Repeat steps 1-2 of the instruction earlier.
Update MS SQL credentials
important
Do this step only if you are updating any of MS SQL users:
mssql_dba_user
mssql_dba_pass
mssql_ct_user
mssql_ct_pass
mssql_ws_user
mssql_ws_pass
mssql_sqc_user
mssql_sqc_pass
mssql_ds_user
mssql_ds_pass
mssql_rpa_user
mssql_rpa_pass
mssql_pm_user
mssql_pm_pass
mssql_dm_user
mssql_dm_pass
mssql_rapi_user
mssql_rapi_pass
mssql_ocr_user
mssql_ocr_pass
mssql_automl_mms_user
mssql_automl_mms_pass
mssql_keycloak_user
mssql_keycloak_pass
mssql_ml_lab_user
mssql_ml_lab_pass
To update MS SQL passwords:
- Connect to your MS SQL server with MS SQL Management Studio as the administrator user with the "securityadmin" server role at a bare minimum.
- Update passwords for MS SQL logins.
If you updated both passwords and usernames, you can create new MS SQL logins and remove old ones on the MS SQL server.
Distribute updated configuration and certificates
important
Perform this step only for the multi-point installation type.
To copy config.yml and certificates from the MASTER server to other Linux servers, use any convenient file transferring method.
The following example demonstrates file sharing from the MASTER server over HTTP.
To distribute updated configuration and certificates across servers:
On the MASTER server, go to
PACKAGE_DIRwhere the installer is extracted, and execute the following commands:$ cd PACKAGE_DIR $ python -m SimpleHTTPServer 8443As a result, a similar line appears:
# Output:
Serving HTTP on 0.0.0.0 port 8443 ...
This command makes files in
PACKAGE_DIRon the MASTER server downloadable from other servers. Ensure that the port you have chosen is not blocked by a firewall and is accessible on the MASTER server from other Linux servers.On all other Linux hosts (AGENT, OCR), change the
PACKAGE_DIRandMASTER_HOSTNMAMEvariables, and run the commands asWFUSER:$ export PACKAGE_DIR=/opt/workfusion/wf_installer $ export MASTER_HOSTNAME=master.example.com $ cd $PACKAGE_DIR $ curl -o 'config.yml' http://$MASTER_HOSTNAME:8443/config.yml $ curl -o './certificates/_auth_internal/vault_admin.crt' http://$MASTER_HOSTNAME:8443/certificates/_auth_internal/vault_admin.crt $ curl -o './certificates/_auth_internal/vault_admin.p12' http://$MASTER_HOSTNAME:8443/certificates/_auth_internal/vault_admin.p12 $ curl -o './certificates/_auth_internal/vault_workfusion.crt' http://$MASTER_HOSTNAME:8443/certificates/_auth_internal/vault_workfusion.crt $ curl -o './certificates/_auth_internal/vault_workfusion.p12' http://$MASTER_HOSTNAME:8443/certificates/_auth_internal/vault_workfusion.p12 $ curl -o './certificates/_auth_internal/logstash.crt' http://$MASTER_HOSTNAME:8443/certificates/_auth_internal/logstash.crt $ curl -o './certificates/_auth_internal/logstash.key' http://$MASTER_HOSTNAME:8443/certificates/_auth_internal/logstash.key $ curl -o './certificates/_auth_internal/logstash.p12' http://$MASTER_HOSTNAME:8443/certificates/_auth_internal/logstash.p12Copy the
vault_workfusion.p12certificate from the MASTER to the RPA server. For that run Powershell as Administrator, and execute the following commands:$rpa_install_dir = 'C:\RPA' # RPA Installation Directory on this server $download_from = "master.example.com:8443" # Hostname of MASTER server and port on which files are shared # Downloading vault_workfusion.p12 from MASTER server and saving it as workfusion.p12 file in ${rpa_install_dir}\bot-agent\ssl\ directory $wc = New-Object net.webclient $wc.Downloadfile("http://${download_from}/certificates/_auth_internal/vault_workfusion.p12", "${rpa_install_dir}\bot-agent\ssl\workfusion.p12") $wc.Downloadfile("http://${download_from}/certificates/_auth_internal/vault_workfusion.p12", "${rpa_install_dir}\worker\ssl\workfusion.p12")On the MASTER server, stop file-sharing by pressing
Control+C(orCommand+Con Mac).
Apply configuration
To apply configuration:
On the MASTER server, run the following commands:
$ export PACKAGE_DIR=/opt/workfusion/wf_installer
$ export ANSIBLE_PRIVATE_KEY_FILE='/path/to/ssh-private-key'
$ export ANSIBLE_VAULT_PASS='your-ansible-vault-pass'

$ cd $PACKAGE_DIR
$ ./install.sh precheck mssql
$ ./install.sh configure mssql
$ ./install.sh configure full
Perform the following steps only if you're updating the password for the Vault client's certificate:
vault_client_cert_passUpdate Vault p12 certificates on the RPA servers:
On the MASTER server, go to
PACKAGE_DIR(directory where installer is extracted), and execute:$ cd PACKAGE_DIR
$ python -m SimpleHTTPServer 8443
# Output:
Serving HTTP on 0.0.0.0 port 8443 ...This will make files in PACKAGE_DIR on the MASTER server downloadable from other servers. Ensure that the port you have chosen is accessible on the MASTER server (not blocked by firewalls) from other Linux servers.
on the RPA server, run Powershell as Administrator, and execute the following commands:
 ```bash
 $rpa_install_dir  = 'C:\RPA'  # RPA Installation Directory on this server
 $download_from = "master.example.com:8443"  # Hostname of the MASTER server and port on which files are shared

 # Downloading vault_workfusion.p12 from MASTER server and saving it as workfusion.p12 file in ${rpa_install_dir}\bot-agent\ssl\ directory
 $wc = New-Object net.webclient
 $wc.Downloadfile("http://${download_from}/certificates/_auth_internal/vault_workfusion.p12", "${rpa_install_dir}\bot-agent\ssl\workfusion.p12")
 $wc.Downloadfile("http://${download_from}/certificates/_auth_internal/vault_workfusion.p12", "${rpa_install_dir}\worker\ssl\workfusion.p12")
 ```
Reboot the RPA server
To apply configuration:
On the MASTER server, run the following commands:
$ export PACKAGE_DIR=/opt/workfusion/wf_installer
$ export ANSIBLE_VAULT_PASS='your-ansible-vault-pass'

$ cd $PACKAGE_DIR
$ ./install.sh precheck mssql -c local
$ ./install.sh configure mssql -c local
$ ./install.sh configure master -e skip_common=true -c local --limit <current_hostnmame>
On the AGENT server, run the following commands:
$ export PACKAGE_DIR=/opt/workfusion/wf_installer
$ export ANSIBLE_VAULT_PASS='your-ansible-vault-pass'

$ cd $PACKAGE_DIR
$ ./install.sh configure agent -c local --limit <current_hostnmame>
On the OCR server, run the following commands:
$ export PACKAGE_DIR=/opt/workfusion/wf_installer
$ export ANSIBLE_VAULT_PASS='your-ansible-vault-pass'

$ cd $PACKAGE_DIR
$ ./install.sh configure ocr -c local --limit <current_hostnmame>
To push OCRWin configs to Zookeeper and Vault, on the MASTER server, run the commands (only if Windows OCR is used):
$ export PACKAGE_DIR=/opt/workfusion/wf_installer
$ export ANSIBLE_VAULT_PASS='your-ansible-vault-pass'

$ cd $PACKAGE_DIR
$ ./install.sh configure ocrwin -c local --limit <current_hostnmame>
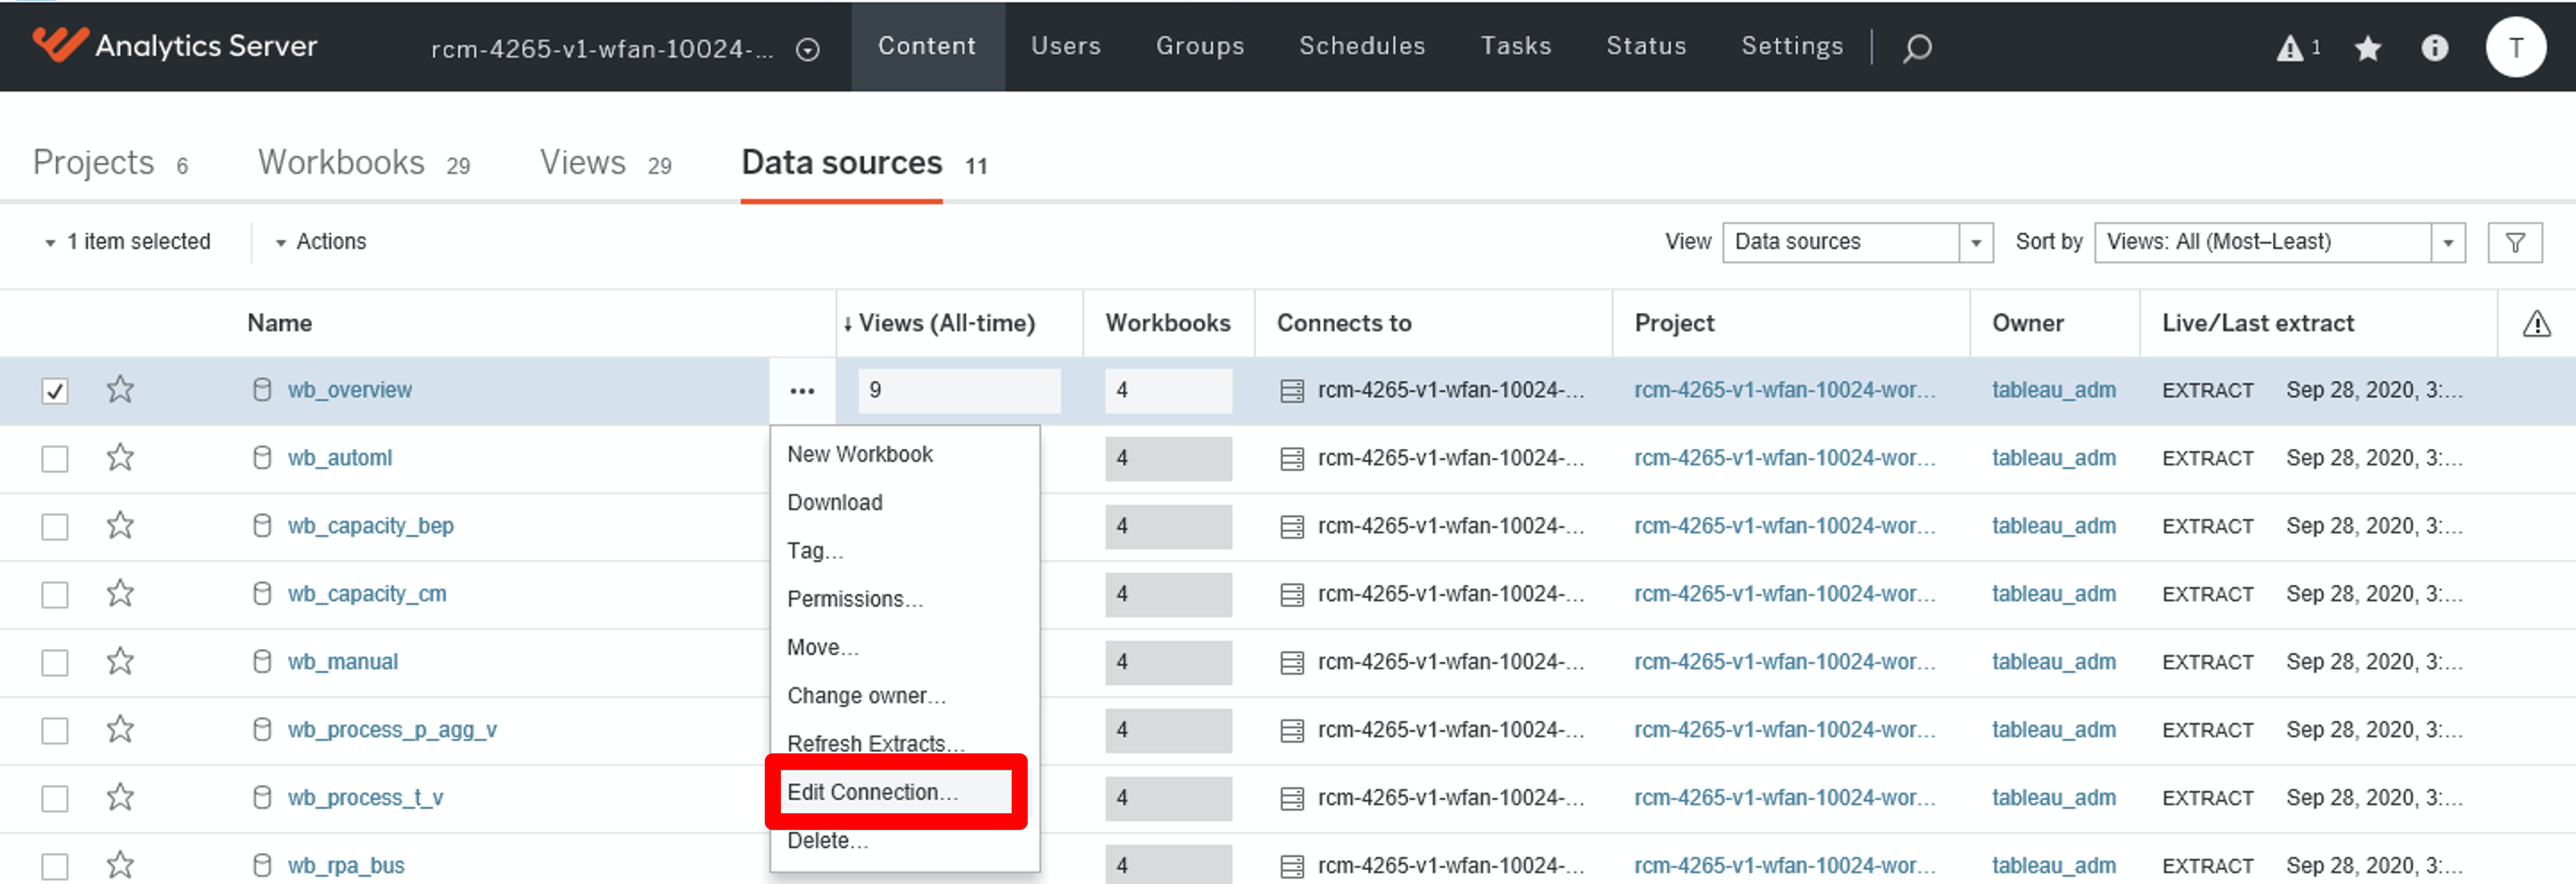
Update Tableau data sources connection string
important
Do this step only if you're updating MSSQL BI-related passwords:
mssql_dm_user
mssql_dm_pass
- Log in to Tableau as administrator.
- Go to Datasouces, click More (•••) next to a required datasource, and then click Connection.
- Change Username and Password.
- Click <<Test Connection>>.
- Click Save.
Check environment
To check the environment:
Wait for the environment to stabilize after the startup of services for about 5-7 minutes.
On the MASTER server, run the command:
$ ./install.sh check master -c local --limit <current_hostnmame> -e test_ml=true -e test_rpa=true -e test_ie=true -e test_desktop=true -e test_ocr=true