Apply surface-based Robotics driver
Overview
To automate console and core applications where there is no way to get a window or element locator, you can use WorkFusion's image-based (or surface-based) driver for automating desktop and web applications.
For faster image capturing and defining offsets, you can use the RPA Recorder for:
- Making screenshots
- Media file panel
- Exporting code
Surface selector byImage()
The Robotics API has been extended with a byImage(String imageUrl, int offsetX, int offsetY) selector enabling you to locate interface elements by their screenshots.
The bot performs clicks, hovers, or other actions directly at the geometrical center of the screenshot (with an offset in pixels, if defined):
- offset X coordinate is positive from the center to the right
- offset Y coordinate is positive from the center to bottom
| Center click | Click with offset |
|---|---|
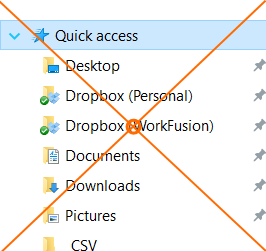 | 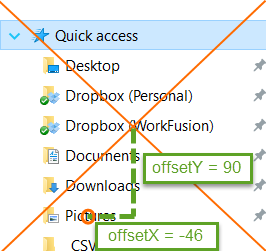 |
Robotics API example:
$(byImage("https://server-name/1478701332260-click.png")).doubleClick();
Images should be uploaded to a server and accessible through HTTP.
Non-Latin symbols are not allowed when providing the image file path in the byImage selector.
Surface capability imageSimilarityThreshold
For surface-based automation, it is possible to set the image similarity threshold capability to address complicated cases where images should strictly match (alternatively, be 60% alike).
The imageSimilarityThreshold capability can take double values from 0.0 to 1.0.
imageSimilarityThreshold syntax:
<robotics-flow>
        <robot name="driver" driver="universal">

            <capability name="imageSimilarityThreshold" value="0.6"/>

            <script><![CDATA[
                ...
The setImageMatchingOptions method allows you to define the templateSimilarity value. You can use this method multiple times to override the parameter.
setImageMatchingOptions([
    templateSimilarity: 0.7
])
Typing without Window switching
When using the surface-based approach, add the following method to type into any currently active window without explicitly switching to it:
- In the
<script>section, add theenableTypeOnScreen()method. - To disable the behavior, use the
disableTypeOnScreen()method.
Enabling this typing option is not stable because random popup windows can appear during bot execution.It is recommended to use the window() method for each new window.
Typing on screen example
    import com.workfusion.odf2.compiler.BotTask;
    import com.workfusion.odf2.core.task.AdHocTask;
    import com.workfusion.odf2.core.task.TaskInput;
    import com.workfusion.odf2.core.task.output.TaskRunnerOutput;
    import com.workfusion.odf2.core.webharvest.rpa.RpaDriver;
    import com.workfusion.odf2.core.webharvest.rpa.RpaFactory;
    import com.workfusion.odf2.core.webharvest.rpa.RpaRunner;
    import com.workfusion.rpa.driver.Driver;
    import com.workfusion.rpa.helpers.RPA;
    import com.workfusion.rpa.helpers.UiElement;
    import com.workfusion.rpa.helpers.UiElementCollection;
    import org.openqa.selenium.By;
    import org.openqa.selenium.Dimension;
    import org.openqa.selenium.Point;
    import org.slf4j.Logger;
    import javax.inject.Inject;
    import static com.workfusion.rpa.helpers.RPA.$;
    import static com.workfusion.rpa.helpers.RPA.$$;
    import static com.workfusion.rpa.helpers.UiSelectors.byImage;

    @BotTask(requireRpa = true)
    public class ApplySurfacebasedRoboticsDriver implements AdHocTask {
        private final RpaRunner rpaRunner;
        private final Logger logger;

        @Inject
        public ApplySurfacebasedRoboticsDriver(RpaFactory rpaFactory, Logger logger){
            this.rpaRunner = rpaFactory
                    .builder(RpaDriver.UNIVERSAL)
                    .closeOnCompletion(true)
                    .build();
            this.logger = logger;
        }

        @Override
        public TaskRunnerOutput run(TaskInput taskInput) {

            rpaRunner.execute(driver->{
                this.typingWithoutWindowSwitching(driver);
                this.win10CalculatorSample(driver);
                RPA.sleep(2000);
                this.getLocationAndSizes(driver);
            });

            return taskInput.asResult()
                    .withColumn("example_bot_task_output", "completed_successfully");
        }

        private void typingWithoutWindowSwitching(Driver driver){
            RPA.enableTypeOnScreen();

            RPA.open("notepad.exe");
            RPA.switchTo().window("[CLASS:Notepad]");
            RPA.sendKeys("What is RPA?");
            RPA.pressEnter();


            RPA.openFirefox("https://www.wikipedia.org/");
            $(By.xpath("//input[@id='searchInput']")).val("Robotic process automation").pressEnter();
            RPA.sleep(2000);
            String wiki_text = driver.findElement(By.xpath("//div[@id='bodyContent']//p")).getText();

            // explicitly switch to window before typing
            RPA.disableTypeOnScreen();

            RPA.switchTo().window("[CLASS:Notepad]");
            RPA.sendKeys(wiki_text);
            RPA.pressEnter();
            RPA.pressEnter();
            RPA.pressCtrlA();
            RPA.pressBackSpace();
        }
    }
Multiple image search
$$(byImage) returns a collection of similar images.
Multiple image search
import com.workfusion.odf2.compiler.BotTask;
import com.workfusion.odf2.core.task.AdHocTask;
import com.workfusion.odf2.core.task.TaskInput;
import com.workfusion.odf2.core.task.output.TaskRunnerOutput;
import com.workfusion.odf2.core.webharvest.rpa.RpaDriver;
import com.workfusion.odf2.core.webharvest.rpa.RpaFactory;
import com.workfusion.odf2.core.webharvest.rpa.RpaRunner;
import com.workfusion.rpa.driver.Driver;
import com.workfusion.rpa.helpers.RPA;
import com.workfusion.rpa.helpers.UiElement;
import com.workfusion.rpa.helpers.UiElementCollection;
import org.openqa.selenium.By;
import org.openqa.selenium.Dimension;
import org.openqa.selenium.Point;
import org.slf4j.Logger;

import javax.inject.Inject;

import static com.workfusion.rpa.helpers.RPA.$;
import static com.workfusion.rpa.helpers.RPA.$$;
import static com.workfusion.rpa.helpers.UiSelectors.byImage;


@BotTask(requireRpa = true)
public class ApplySurfacebasedRoboticsDriver implements AdHocTask {
    private final RpaRunner rpaRunner;
    private final Logger logger;
    private static final String s3Path = "https://aa-materials.s3.us-east-1.amazonaws.com/Materials/Surface_based_examples/";
    private static final String pagePath = s3Path + "index.html";
    private static final String image_1 = s3Path + "test_rodger.png";
    private static final String image_2 = s3Path + "test_ship.png";

    @Inject
    public ApplySurfacebasedRoboticsDriver(RpaFactory rpaFactory, Logger logger){
        this.rpaRunner = rpaFactory
                .builder(RpaDriver.UNIVERSAL)
                .capability("imageSimilarityThreshold","0.52")
                .closeOnCompletion(true)
                .build();
        this.logger = logger;
    }

    @Override
    public TaskRunnerOutput run(TaskInput taskInput) {

        rpaRunner.execute(driver->{
            this.multipleImageSearch(driver);
        });

        return taskInput.asResult()
                .withColumn("example_bot_task_output", "completed_successfully");
    }

    public void multipleImageSearch(Driver driver){
        String expectedResult = "clicked";

        RPA.openChrome(pagePath);
        int objectCollection = $$(By.xpath("/html/body/div[2]/p/img")).size();
        logger.debug("Object Collection Size - " + objectCollection);


        int imageCollection = $$(byImage(image_1,0,0)).size();
        logger.debug(" image collection " + imageCollection );
        if(imageCollection == objectCollection ){
            logger.debug("Multi Image Search is working");
        }

        UiElementCollection imageElements = $$(byImage(image_1));
        for(UiElement element:imageElements){
            element.click();
            RPA.sleep(2000);
        }

        UiElement select = $(By.xpath("//select"));
        RPA.actions().moveToElement(select).click().build().perform();

        RPA.sleep(5000);

        int imageCollection2 = $$(byImage(image_2)).size();
        logger.debug(" pirate ship count " + imageCollection2);
        if(imageCollection2 == objectCollection){
            logger.debug("Multi Image Search is working");
        }

    }

}
Examples
Here, you can find several examples on how to use the surface-based robotics driver.
Clicking Win10 calculator
The example below shows clicking the Win10 calculator. The following images are used:
https://rpa-grid.s3.amazonaws.com/integration-test/images-win-10/calculator/calculator2.png
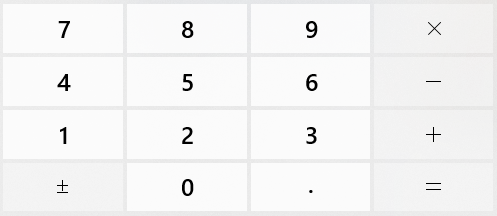
https://rpa-grid.s3.amazonaws.com/integration-test/images-win-10/calculator/menu.png

Win10 calculator sample
import com.workfusion.odf2.compiler.BotTask;
import com.workfusion.odf2.core.task.AdHocTask;
import com.workfusion.odf2.core.task.TaskInput;
import com.workfusion.odf2.core.task.output.TaskRunnerOutput;
import com.workfusion.odf2.core.webharvest.rpa.RpaDriver;
import com.workfusion.odf2.core.webharvest.rpa.RpaFactory;
import com.workfusion.odf2.core.webharvest.rpa.RpaRunner;
import com.workfusion.rpa.driver.Driver;
import com.workfusion.rpa.helpers.RPA;
import com.workfusion.rpa.helpers.UiElement;
import com.workfusion.rpa.helpers.UiElementCollection;
import org.openqa.selenium.By;
import org.openqa.selenium.Dimension;
import org.openqa.selenium.Point;
import org.slf4j.Logger;
import javax.inject.Inject;
import static com.workfusion.rpa.helpers.RPA.$;
import static com.workfusion.rpa.helpers.RPA.$$;
import static com.workfusion.rpa.helpers.UiSelectors.byImage;


@BotTask(requireRpa = true)
public class ApplySurfacebasedRoboticsDriver implements AdHocTask {
    private final RpaRunner rpaRunner;
    private final Logger logger;

    @Inject
    public ApplySurfacebasedRoboticsDriver(RpaFactory rpaFactory, Logger logger){
        this.rpaRunner = rpaFactory
                .builder(RpaDriver.UNIVERSAL)
                .closeOnCompletion(true)
                .build();
        this.logger = logger;
    }

    @Override
    public TaskRunnerOutput run(TaskInput taskInput) {

        rpaRunner.execute(driver->{
            this.win10CalculatorSample(driver);
        });

        return taskInput.asResult()
                .withColumn("example_bot_task_output", "completed_successfully");
    }

    private void win10CalculatorSample(Driver driver){
        //Create your own screenshot of calculator if needed. Accordingly adjust the offset to make your example work.
        String imagePath = "C:\\Users\\sshukla\\Desktop\\New folder\\";

        RPA.open("calc.exe");
        RPA.setOption("typeOnScreen", true);
        $(byImage(imagePath + "calwin10.PNG", -50, 105)).click(); // 2
        $(byImage(imagePath + "calwin10.PNG",  145, -35)).click(); // *
        $(byImage(imagePath + "calwin10.PNG", -50, 25)).click(); // 5
        $(byImage(imagePath + "calwin10.PNG",  145, 155)).click(); // =


        // copy result
        String calculationResult= RPA.selectAllTextAndCopy();
        logger.debug(" Calculator Result " + calculationResult);

        $(byImage(imagePath+"calwin10menu.png")).click(); // show menu

        // close
        RPA.pressAltF4();
    }
}
Getting location and size
There is also an ability to get the size of the rectangle found on screen by robot and its location:
getSize()getLocation()getRect()getWidth()getHeight()getPoint()getX()getY()GetDimension()
Getting location and size
import com.workfusion.odf2.compiler.BotTask;
import com.workfusion.odf2.core.task.AdHocTask;
import com.workfusion.odf2.core.task.TaskInput;
import com.workfusion.odf2.core.task.output.TaskRunnerOutput;
import com.workfusion.odf2.core.webharvest.rpa.RpaDriver;
import com.workfusion.odf2.core.webharvest.rpa.RpaFactory;
import com.workfusion.odf2.core.webharvest.rpa.RpaRunner;
import com.workfusion.rpa.driver.Driver;
import com.workfusion.rpa.helpers.RPA;
import com.workfusion.rpa.helpers.UiElement;
import com.workfusion.rpa.helpers.UiElementCollection;
import org.openqa.selenium.By;
import org.openqa.selenium.Dimension;
import org.openqa.selenium.Point;
import org.slf4j.Logger;
import javax.inject.Inject;
import static com.workfusion.rpa.helpers.RPA.$;
import static com.workfusion.rpa.helpers.RPA.$$;
import static com.workfusion.rpa.helpers.UiSelectors.byImage;


@BotTask(requireRpa = true)
public class ApplySurfacebasedRoboticsDriver implements AdHocTask {
    private final RpaRunner rpaRunner;
    private final Logger logger;

    @Inject
    public ApplySurfacebasedRoboticsDriver(RpaFactory rpaFactory, Logger logger){
        this.rpaRunner = rpaFactory
                .builder(RpaDriver.UNIVERSAL)
                .closeOnCompletion(true)
                .build();
        this.logger = logger;
    }

    @Override
    public TaskRunnerOutput run(TaskInput taskInput) {

        rpaRunner.execute(driver->{
            this.getLocationAndSizes(driver);
        });

        return taskInput.asResult()
                .withColumn("example_bot_task_output", "completed_successfully");
    }

    private void getLocationAndSizes(Driver driver){
        //Create your own image if provided image not giving result. Replace the image path with your path.
        String imagePath = "C:\\Users\\sshukla\\Desktop\\New folder\\";

        RPA.open("calc.exe");
        RPA.setOption("typeOnScreen", true);

        // execute coordinate-based methods
        int rectangle_width = $(byImage(imagePath + "calwin10.PNG")).getRect().getWidth();
        Point location= $(byImage(imagePath + "calwin10.PNG")).getLocation();
        Dimension size= $(byImage(imagePath + "calwin10.PNG")).getSize();

        logger.debug(" rectangle_width - " + rectangle_width);
        logger.debug(" location - " + location);
        logger.debug(" size - " + size);

        // close
        RPA.pressAltF4();
    }
}
Using image-based selectors in RPA API
See some samples on how to use image-based selectors in RPA API.
Image-based RPA examples
String imagePath = "https://your-server/some-folder/";

$(byImage("${imagePath}/image1.png")).click();
$(byImage("${imagePath}/image1.png"), 40, -60).doubleClick();
$(byImage("${imagePath}/image1.png")).tripleClick();
$(byImage("${imagePath}/image1.png")).click(n);
$(byImage("${imagePath}/image1.png")).contextClick();

$(byImage("${imagePath}/image2.png")).hover();

$(byImage("${imagePath}/image3.png")).isExists();
$(byImage("${imagePath}/image4.png"), -25, 77).getLocation();
$(byImage("${imagePath}/image5.png"), 10, 77).getCoordinates();

actions()
   .dragAndDrop(
       $(byImage("${imagePath}/source-folder.png")),
       $(byImage("${imagePath}/target-folder.png")))
   .build().perform();

actions().dragAndDrop($(byImage("${imagePath}/source.png")), xOffset, yOffset).build().perform();
actions().clickAndHold($(byImage("${imagePath}/image.png"))).build().perform();
actions().release($(byImage("${imagePath}/image.png"))).build().perform();

actions().moveToElement($(byImage("${imagePath}/image.png"))).build().perform();