Process transactions with REST connector
The REST (HTTP) connector is an external connector that listens to incoming HTTP requests and sends records to Control Tower (CT). Optionally, for sync requests only, it can also return transaction results as an HTTP response.
The REST connector allows you to run separate records, or transactions, using REST API calls. Within the context, a transaction is understood as a single piece of work defined by the input data and going through Business Process (BP) steps. Usually, one transaction represents processing a single document, email, or another business-specific data item.
The request timeout is configured to 300s by default in the internal HAProxy load balancer. Such configuration may conflict with the AWS load balancer, where the timeout is hardcoded to 350s. As a result, when viewing all Business Processes in Control Tower, you may encounter a 500 Internal Server Error and the find the application unavailable.
Depending on your instance configuration, it is strongly recommended to do the following:
If you don't have AWS LB in your installation and use the SYNC communication with REST connector, you can set HAProxy timeouts to higher values if necessary, for example, if the SYNC calls fail upon timeouts.
/opt/workfusion/haproxy/conf/haproxy.conftimeout client 300s -> timeout client 500s
timeout server 300s -> timeout server 500sIf you use AWS LB, switch your communication with the REST connector to the ASYNC mode only to guarantee no long-living requests.
Communication patterns
The REST connector supports the following communication patterns:
Synchronous: the connector sends a record to execute and waits for the execution results. The pattern is better suited for fast BPs.
Asynchronous: the connector sends a record to execute and gets the result if it is completed. Optionally, you can also get the execution status—completed, in progress, failed. The following options are possible:
async-fire-and-forget: the connector sends a record and does not check the result. Use it when you are not interested in the result or when the BP already contains the logic required to post the results to a system.
async-send-and-check-for-results: the connector sends a record and periodically checks its results until the record is completed. When the record is completed, the check-for-result response also contains the results.
Input formats
The REST connector works with the input formats listed in the table below:
| Format | Format defined by | Supported input type | Supported output type |
|---|---|---|---|
| RAW request | External system | Any textual format: JSON, XML, plain text, or any other.Input requests are not parsed by the connector or CT. They are passed “as is” to the BP and should be parsed by the corresponding step. | For the sync mode and check status operations: any textual format, such as JSON, XML, plain text, or any other. An actual response is built inside the BP as part of the step logic. For the async mode: the response is provided in the JSON format, including the info about the submitted record. |
| JSON-encoded input or output record | Work.AI platform | A JSON single-level object. Also, it can be considered as the <String, String> Map. | A JSON single-level object. Also, it can be considered as the <String, String> Map. |
REST API endpoints
When a Business Process is created, the signal_id parameter can be generated for it automatically. This UID is unique for each BP definition, and you can rename it at your discretion. This parameter is passed with a BP package during import and export operations.
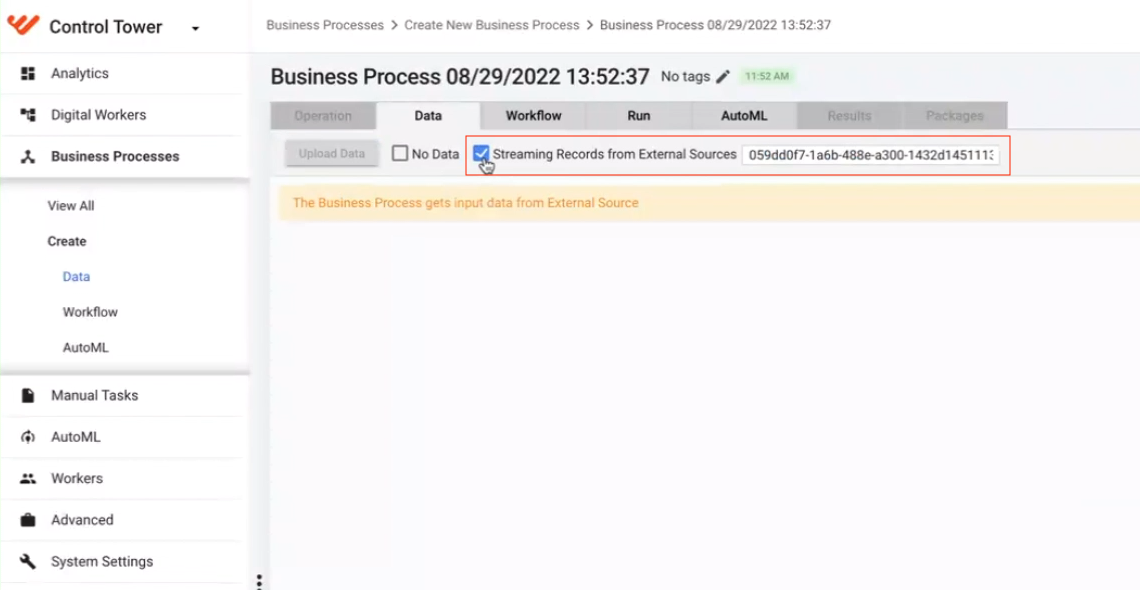
POST /execute-record-raw/{signal-id}
Executes synchronously a record with a raw format request (any textual format).
Path parameter:
The signal-id parameter identifies the signal ID for the BP where the record is to be sent. Defaults to null. The parameter type is string.
Request:
Any textual format (JSON, XML, plain text, or any other). The format is defined by an external system.
Response:
Any textual format (JSON, XML, plain text, or any other). The response is built.
POST /execute-record-json/{signal-id}
Executes synchronously a record with a JSON format request.
Path parameter:
The signal-id parameter identifies the signal ID for the BP where the record is to be sent. Defaults to null. The parameter type is string.
Request:
A JSON-encoded input record: single-level object, same as the <String, String> Map.
Response:
JSON-encoded result step output: single-level object, same as the <String, String> Map.
POST /start-record-raw/{signal-id}
Starts an asynchronous record process with a raw format request used as input.
Path parameter:
The signal-id parameter identifies the signal ID for the BP where the record is to be sent. Defaults to null. The parameter type is string.
Request:
Any textual format (JSON, XML, plain text, or any other). The format is defined by an external system.
Response:
The response is sent immediately after the record is submitted to a BP. It is JSON representing the record submission status, including the following optional parameters:
requestId(optional): unique identifier generated for each record request.status(optional): current record status—completed, in progress, failed, and so on.statusDetail(optional): contains error messages for failed statuses.
POST /start-record-json/{signal-id}
Starts an asynchronous record with a JSON format request used as input.
Path parameter:
The signal-id parameter identifies the signal ID for the BP where the record is to be sent. Defaults to null. The parameter type is string.
Request:
A JSON-encoded input record: single-level object, same as the <String, String> Map.
Response:
The response is sent immediately after the record is submitted to a BP. It is JSON representing the record submission status, including the following parameters:
requestId(optional): unique identifier generated for each record request.status(optional): current record status—completed, in progress, failed, and so on.statusDetail(optional): contains error messages for failed statuses.
GET /check-record-status/{request-id}
Checks an asynchronous record status based on the specified request-id.
Path parameter:
The request-id parameter stands for the request ID returned in the response to the corresponding API call to start a record. Defaults to null.
Request:
An empty body. The request ID is represented by the path variable.
Response:
It is JSON representing the record processing status, including the following parameters:
requestId(optional): unique identifier generated for each record request.status(optional): current record status—completed, in progress, failed, and so on.statusDetail(optional): contains error messages for failed statuses.Output data for JSON; only when the record is completed.
GET /get-record-result/{request-id}
Gets you the results for asynchronous JSON or raw records based on the specified request ID.
Path parameter:
The request-id path parameter stands for the request ID returned in the response to the corresponding API call to start a record. Defaults to null.
Request:
An empty body. The request ID is represented by the path variable.
Response:
If a record is complete, returns the result in the expected format. If the record is in progress, returns an empty response with the 204 (No Content) status.
For sample requests and responses in various formats, see Usage examples.
The table below features examples of how different request types are executed, accounting for communication patterns and formats:
In the figures below, the bold arrows indicate the initial request and final response.
| Type | Raw | JSON-encoded record |
|---|---|---|
| Synchronous | 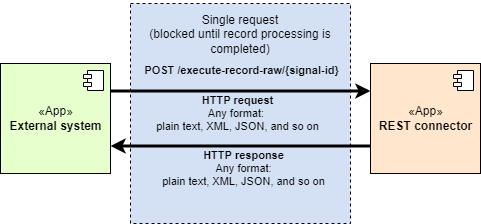 | 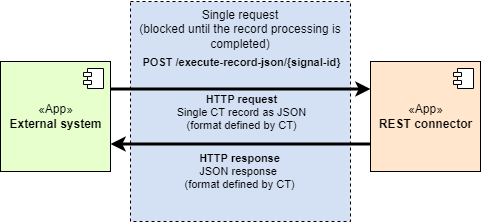 |
| Asynchronous | 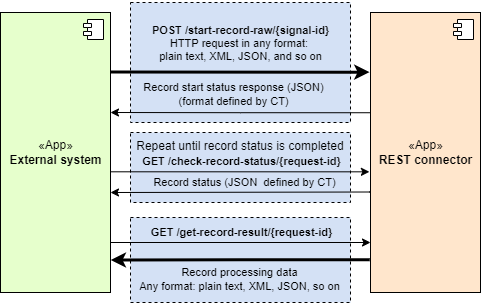 | 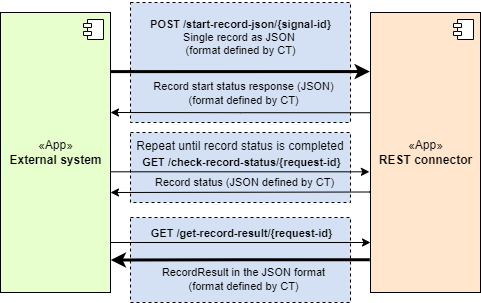 |
Bold errors signify the initial request and final response.
Processing input data
JSON format
In the JSON format, you don't need to add any code. You can access the fields from the input request as if they were part of the CSV line for conventional records.
For example, you have the following input request:
{
   "column_a": "value_a",
   "column_b": "value_b",
}
To access the fields from the input request, you can use the code below:
<script language="groovy"><![CDATA[
   String valueA = column_a.toString();
   String valueA = column_b.toString();
]]></script>
RAW format
For the RAW format, read the string value from the rest_request input field and use JSON deserialization into the RestRequest class from the com.workfusion.connector:input-connector-rest-api dependency:
<script language="groovy"><![CDATA[
   import com.workfusion.connector.rest.model.RestRequest;
   import com.google.gson.Gson;

   RestRequest request = Gson.fromJson(rest_request.toString(), RestRequest);
   String body = request.getBody();
   Map<String, List<String>> headers = request.getHeaders();
   // process body and headers
]]></script>
The com.workfusion.connector:input-connector-rest-api dependency is available as part of the wf-dependencies repository. To use the artifact for the above deserialization, do the following:
Make sure your project's
pom.xmlhas the<dependencies>section.Add the
input-connector-rest-apiartifact as a dependency:<dependency>
<groupId>com.workfusion.connector</groupId>
<artifactId>input-connector-rest-api</artifactId>
<version>1.0.12</version>
</dependency>
Alternatively, instead of the RestRequest object, you can use the simple map:
<script language="groovy"><![CDATA[
   import com.google.gson.Gson;

   Map request = Gson.fromJson(rest_request.toString(), Map.class);
   String body = (String)request.get("body");
   Map<String, List<String>> headers = (Map<String, List<String>>)request.get("headers");
   // process body and headers
]]></script>
Sending results back to connector
To send the results back to the connector, a BP must have a bot step set up for the purpose.
Set up bot step for legacy WebHarvest Worker
For a legacy WebHarvest Worker, a BP must have a step with the export plugin attribute send-to-external-connector="true". The entire output of the step is sent back to the connector and processed based on the request type:
JSON: the record is returned as a JSON object. No additional logic is required.
RAW: the connector expects the
rest_responsefield to be in the output. This field should contain a JSON-encoded object (map) with the following fields:body(required): a response body.status(optional): a response status; if none, 200 is used.headers(optional): an encoded map string–a list (string) of additional headers to add to the response.
In the case of Java code, for building the response in the RAW format, use the RestResponse class. Create and fill the object, then serialize it as JSON, and add it to the output:
    <script language="groovy"><![CDATA[
       import com.workfusion.connector.rest.model.RestResponse;
       import com.google.gson.Gson;

       String body = "<example>xml</example>";
       int status = 200;
       Map<String, List<String>> headers = new HashMap<String, List<String>>();
       headers.put("Content-type", Arrays.asList("text/xml"));
       RestResponse restReponse = new RestResponse(body, status, headers);
       restResponseJson = new Gson().toJson(restResponse)
    ]]></script>

    <export include-original-data="true">
        <single-column name="rest_response" value="${restResponseJson}"/>
    </export>
In the case of the Groovy script, instead of using the RestResponse object, you can create a map and deserialize it to JSON:
<script language="groovy"><![CDATA[
   import com.google.gson.Gson;
   def restReponse= [body: "<example>xml</example>", status: 200, headers: ["Content-type": ["text/xml"]]]
   restResponseJson = new Gson().toJson(restResponse)
]]><script>
Set up bot step for Java Native Worker
Currently, a Java native task in BP is an ordinary Bot Task represented by XML. The task has a <config> root element with the attribute type="java" distinguishing it from WebHarvest tasks. The tags inside the configuration contain metadata related to the task: the Worker (GAV) that should execute the task, the target processor class inside the Worker, and so on.
This XML for the task type does not contain any imperative commands, only metadata.
See the Java native task example below:
<?xml version="1.0" encoding="UTF-8"/>
<config type="java">
    <worker>my-company:worker:1.0.0</worker>
    <processor>my-custom-task</processor>
    <splitData>force</splitData>
    <sendResultToCaller>true</sendResultToCaller>
</config>
A Java native task has the following parameters:
worker(required): GAV (groupId:artifactId:version) of the Java Native Worker's artifactprocessor(required): task processor ID. This code is used to locate the processor class and route the task to it.splitData(optional): define the data split behavior. Possible values are:auto(default): automatically detect split behavior:If the result contains a single record, do not split data.
If the result contains two or more records, split data.
force: always split data. The parameter is suitable, for example, for the monitoring loop flow.
sendResultToCaller(optional): defines if the result should be sent to an external connector (REST connector) or a caller BP. The parameter implements the same logic as thesend-to-external-connectorattribute in the export plugin. It can have the following values:false(default): do not send the results from this step.true: send the results from the step to the external connector or caller BP.If the
sendResultToCallerparameter is not defined or missing, the results are not sent.
Security
To run records in a BP instance, ensure the following:
Authentication: the source of the record event is “trusted”, meaning it is associated with a valid user and provides necessary credentials.
Authorization: the user associated with the record request has access to the given BP.
For incoming REST API calls outside the platform, requests must be authenticated and authorized as they came from external sources unknown to the WokrFusion platform. In this case, token-based authentication and authorization are used:
External systems must add an authentication token to each REST requests. You can implement the token in one of the following ways:
Short-living token: the external system is configured to obtain and refresh access tokens from Keycloak automatically. See Secure token generation.
Long-living token: when generating the secure token, you need to add the
scopekey with theoffline_accessvalue to the request body. Also, make sure the API users have the realm-level offline_access role assigned, and offline_access is among available client scopes.
The connector verifies the token and extracts the user principal form token.
If the token verification fails, an error is returned.
If the token verification succeeds, the user info is included in the request metadata.
The connector does not perform any authorization, such as checking the user access to the target BP, because this involves the CT business logic: finding the BP, checking the user access with respect to assigned filters, and so on. This operation is delegated to the trigger component inside CT.
The trigger component finds the target BP instance and performs the authorization by checking the permissions of a given user to access the target BP, including filters and so on.
If the user has no access, the trigger sends an error result back to the queue. Once the connector receives the result, it generates an error response to the external system.
If the user has the required access, the trigger starts the BP. If the request is asynchronous, it sends the success results to the corresponding queue. On receiving the result, the connector returns a successful response (
“Transaction started”) to the external system.
For sample tokens, see Usage examples.
Connector failure
As the HTTP protocol is not well suited for transactional processing, when the connection is broken, the customer can't know whether the request processing was started or not. For guaranteed execution, provide a retry mechanism.
On the WorkFusion side, the ultimate goal is to guarantee “at-least-once” execution. This means that, with each request, a new record is submitted so that you do not have to guess whether it is the first request or a retry. For this kind of assumption, every request should include a unique identifier, allowing you to build a correlation between the original request and retry. However, the input data format is defined by the external system, and it can be very different, thus it is impossible to infer it atomically.
Usage examples
Secure token generation
To obtain a secure token, execute a POST request to the user management service (Keycloak):
curl --location --request POST 'https://auth-server-url/auth/realms/WorkfusionRealm/protocol/openid-connect/token' \
--header 'Content-Type: application/x-www-form-urlencoded' \
--data-urlencode 'grant_type=password' \
--data-urlencode 'client_id=wf-control-tower' \
--data-urlencode 'client_secret={client_secret}' \
--data-urlencode 'username={ct_user_name}' \
--data-urlencode 'password={ct_password}'
If the request is successful, you get a response with the access token you can use for further requests:
{
    "access_token": "eyJhbGciOiJSUzI1NiIsInR5cCIgOiAiSldUIiwia2lkIiA6ICJLcHB4VGhSVDFOWExKVUlETjA1cXpWczdNMnBHaW5kU0lMb3lOSGhNVDlrIn0.eyJleHAiOjE2NTM5NTE2ODEsImlhdCI6MTY1MzkxNTY4MSwianRpIjoiOWMxYWFhODYtMzQ5My00ZDA0LThjMDktZjczZjg0YmUwZTRmIiwiaXNzIjoiaHR0cHM6Ly92c29rb2xvdnNraS1kZXZlbG9wLXdmYXctMTAwNjEtYXV0aC1sYjEud2ZsYWIuaW8vYXV0aC9yZWFsbXMvV29ya2Z1c2lvblJlYWxtIiwiYXVkIjpbIndmLWNvbnRyb2wtdG93ZXIiLCJyZWFsbS1tYW5hZ2VtZW50Iiwid2Yta2liYW5hIiwid2Ytd29ya3NwYWNlIiwiYWNjb3VudCJdLCJzdWIiOiIwYWQxODRmNC0zNDRmLTRmNDUtODgyOS1iZDk2ZjBhMzBlNzMiLCJ0eXAiOiJCZWFyZXIiLCJhenAiOiJ3Zi1jb250cm9sLXRvd2VyIiwic2Vzc2lvbl9zdGF0ZSI6IjNmNjYxNzBkLWEzZDktNDY3MS04MWQ4LTExYTNkNWQwYTlmOSIsImFjciI6IjEiLCJyZWFsbV9hY2Nlc3MiOnsicm9sZXMiOlsib2ZmbGluZV9hY2Nlc3MiLCJ1bWFfYXV0aG9yaXphdGlvbiJdfSwicmVzb3VyY2VfYWNjZXNzIjp7InJlYWxtLW1hbmFnZW1lbnQiOnsicm9sZXMiOlsidmlldy1pZGVudGl0eS1wcm92aWRlcnMiLCJtYW5hZ2UtaWRlbnRpdHktcHJvdmlkZXJzIiwibWFuYWdlLXVzZXJzIiwidmlldy11c2VycyIsInZpZXctY2xpZW50cyIsInF1ZXJ5LWNsaWVudHMiLCJtYW5hZ2UtY2xpZW50cyIsInF1ZXJ5LWdyb3VwcyIsInF1ZXJ5LXVzZXJzIl19LCJ3Zi1raWJhbmEiOnsicm9sZXMiOlsiQWRtaW4iXX0sIndmLXdvcmtzcGFjZSI6eyJyb2xlcyI6WyJXb3JrZXIiXX0sIndmLWNvbnRyb2wtdG93ZXIiOnsicm9sZXMiOlsiQWRtaW5pc3RyYXRvciJdfSwiYWNjb3VudCI6eyJyb2xlcyI6WyJtYW5hZ2UtYWNjb3VudCIsIm1hbmFnZS1hY2NvdW50LWxpbmtzIiwidmlldy1wcm9maWxlIl19fSwic2NvcGUiOiJlbWFpbCBwcm9maWxlIiwiZW1haWxfdmVyaWZpZWQiOmZhbHNlLCJuYW1lIjoiYXV0b3Rlc3QwMV9maXJzdG5hbWUgYXV0b3Rlc3QwMV9sYXN0bmFtZSIsInByZWZlcnJlZF91c2VybmFtZSI6ImF1dG90ZXN0MSIsImdpdmVuX25hbWUiOiJhdXRvdGVzdDAxX2ZpcnN0bmFtZSIsImZhbWlseV9uYW1lIjoiYXV0b3Rlc3QwMV9sYXN0bmFtZSIsImVtYWlsIjoiYXV0b3Rlc3QwMUB3b3JrZnVzaW9uLmNvbSJ9.ED_O6OFb6xfSbd3tfJrZXTyAJmEYZFwvJ1GeYvk0EGfCB8liTQp8wYC67TnvD2rpBW3UNL7JklWbzbFM3lfUYZBUBnWL4uIxsVFq77zBSoYjlvxCA5qRQViYBTEdsQ9tRnl_X4QuR0OG7chlA83ZbYcDijvaU--sGl3VL1-oEQUfBUDnBwFAt7LxlpXF78lDnSmTYXJ9_AzYFy7dTKrdWWVT6ArJC5FMpNem2qOZ-nonEjNwvzOFSjTffxHISILuLz24SOz1XJzsTFmoya81kU6UC1eS7KJn-IgoaxGvTF-9CgsGahwcejEY5MrFv-SDeUPykNmsJC5QNtsPgsZl3g",
    "expires_in": 36000,
    "refresh_expires_in": 2400,
    "refresh_token": "eyJhbGciOiJIUzI1NiIsInR5cCIgOiAiSldUIiwia2lkIiA6ICI3YjllN2RjYy0xYTRlLTRlODktODczMy1iY2IwMGY0Mzg0NzYifQ.eyJleHAiOjE2NTM5MTgwODEsImlhdCI6MTY1MzkxNTY4MSwianRpIjoiZGFiMzcwMmUtOWNhMy00YzI4LWE3ZTItMzYyMzlkYzAzMDU0IiwiaXNzIjoiaHR0cHM6Ly92c29rb2xvdnNraS1kZXZlbG9wLXdmYXctMTAwNjEtYXV0aC1sYjEud2ZsYWIuaW8vYXV0aC9yZWFsbXMvV29ya2Z1c2lvblJlYWxtIiwiYXVkIjoiaHR0cHM6Ly92c29rb2xvdnNraS1kZXZlbG9wLXdmYXctMTAwNjEtYXV0aC1sYjEud2ZsYWIuaW8vYXV0aC9yZWFsbXMvV29ya2Z1c2lvblJlYWxtIiwic3ViIjoiMGFkMTg0ZjQtMzQ0Zi00ZjQ1LTg4MjktYmQ5NmYwYTMwZTczIiwidHlwIjoiUmVmcmVzaCIsImF6cCI6IndmLWNvbnRyb2wtdG93ZXIiLCJzZXNzaW9uX3N0YXRlIjoiM2Y2NjE3MGQtYTNkOS00NjcxLTgxZDgtMTFhM2Q1ZDBhOWY5Iiwic2NvcGUiOiJlbWFpbCBwcm9maWxlIn0.m3hWYgrwl-kDUuQhmKOzzk9Pfw7yAgviBBvDuBQdxCs",
    "token_type": "bearer",
    "not-before-policy": 0,
    "session_state": "3f66170d-a3d9-4671-81d8-11a3d5d0a9f9",
    "scope": "email profile"
}
In the examples, {username} and {password} are the user’s Control Tower credentials to log in to the application UI.
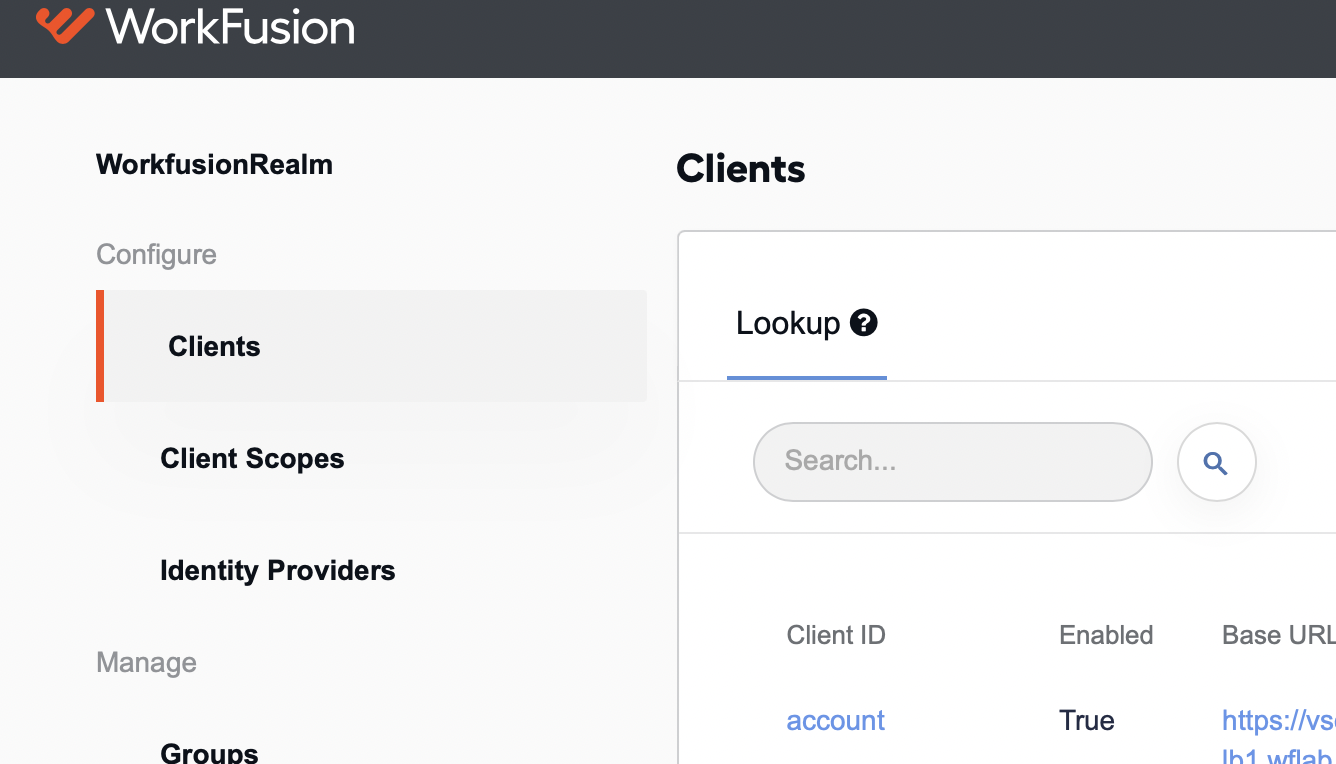
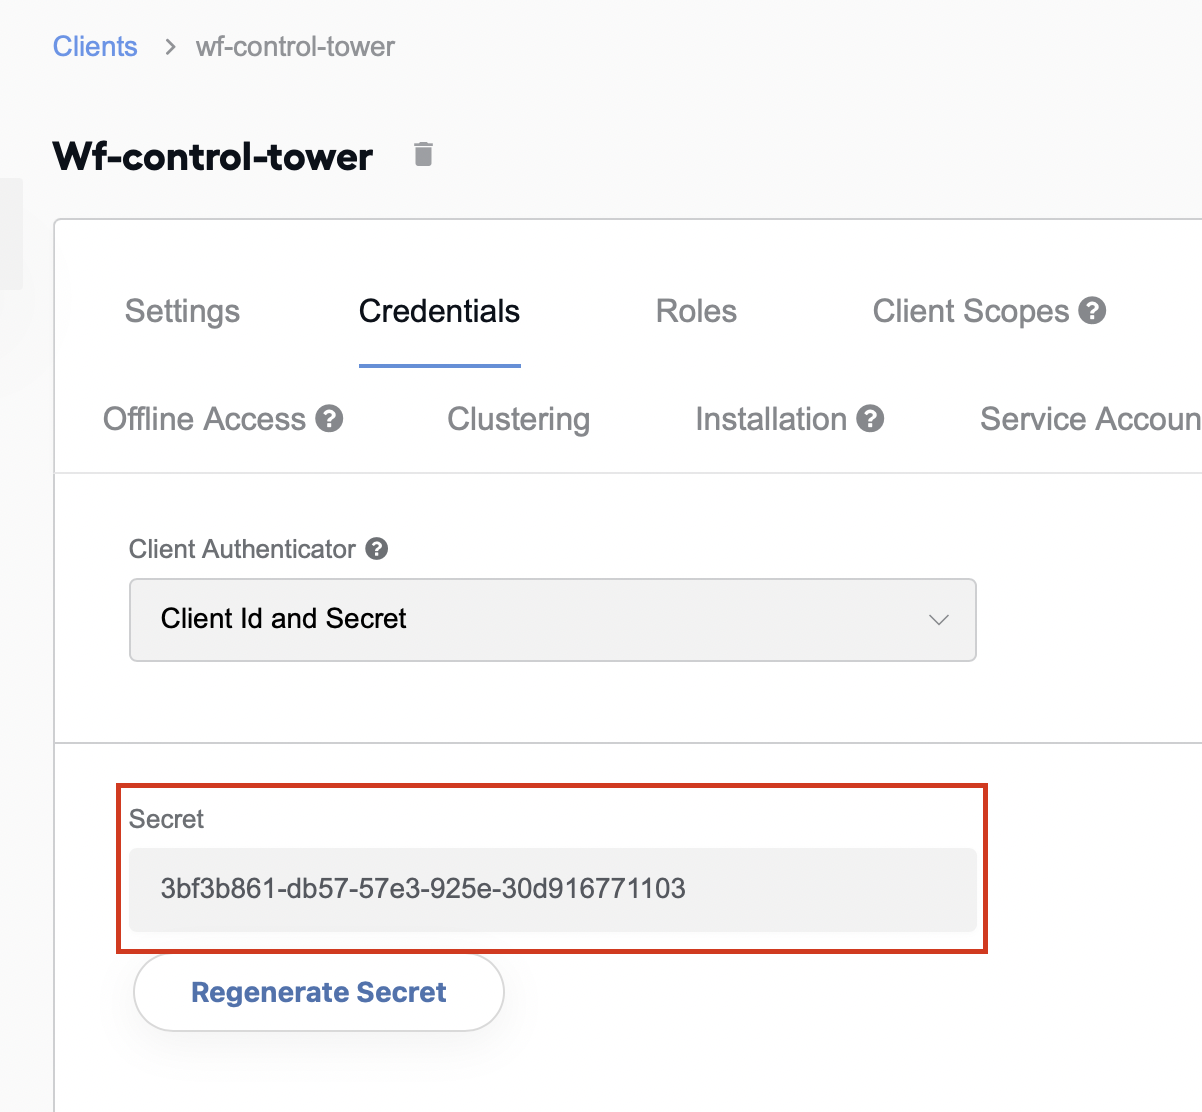
To obtain the {client_secret}, log in to Keycloak and act as below:
Go to Clients:
Find the wf-control-tower client and open its configuration. The Secret field contains what you need.
In all requests, include the access token within the Authorization header. Replace XXXXX with the actual access token from Keycloak:
Authorization: Bearer XXXXX
JSON format, synchronous execution
In the sample request below, the BP signal ID is my-bp-singal-id. Change it to your BP signal ID before calling.
The input data is provided as JSON in --data-raw. Change it to your input data.
Request example:
curl --location --request POST 'https://workfusion.mycompany.com/input-connector-rest/execute-record-json/my-bp-singal-id' \
--header 'Authorization: Bearer TOKEN-FROM-KEYKLOACK'
--header 'Content-Type: application/json' \
--data-raw '{
    "col1": "aaaa",
    "col2": "bbbb",
    "col3": "cccc"
}'
Response example:
{
    "_sys_ext_record_id": "20017",
    "result_col1": "xxxx",
    "result_col2": "yyyy",
    "result_col3": "zzzz"
}
JSON format, asynchronous execution
The workflow below illustrates how to start a record, check its status, and get the record results for an asynchronous execution in the JSON format:
Start a record.
Request:
curl --location --request POST 'https://workfusion.mycompany.com/input-connector-rest/start-record-json/my-bp-singal-id' \
--header 'Authorization: Bearer TOKEN-FROM-KEYKLOACK'
--header 'Content-Type: application/json' \
--data-raw '{
    "col1": "aaaa",
    "col2": "bbbb",
    "col3": "cccc"
}'
Response:
{
    "requestId": "bc21e4d8-33",
    "status": "IN_PROGRESS",
    "statusDetails": "Record Processing Started"
}
Check the record status.
Request:
Replace
bc21e4d8-19with actualrequestIdfrom the response to the previous request.curl --location --request GET 'https://workfusion.mycompany.com/input-connector-rest/check-record-status/bc21e4d8-19' \
--header 'Authorization: Bearer TOKEN-FROM-KEYKLOACK'The following responses are possible:
When the status is in progress
 {
  "requestId": "bc21e4d8-19",
  "status": "IN_PROGRESS",
  "statusDetails": "In progress"
 }
When the status is completed
 {
     "requestId": "bc21e4d8-19",
     "status": "COMPLETED",
     "format": "JSON"
 }
Get results.
Request:
curl --location --request GET 'https://workfusion.mycompany.com/input-connector-rest/get-record-result/bc21e4d8-33' \
--header 'Authorization: Bearer TOKEN-FROM-KEYKLOACK'
Response:
{
    "_sys_ext_record_id": "20017",
    "result_col1": "xxxx",
    "result_col2": "yyyy",
    "result_col3": "zzzz"
}
RAW format, synchronous execution
Request:
curl --location --request POST 'https://workfusion.mycompany.com/input-connector-rest/execute-record-raw/test-raw' \
--header 'Authorization: Bearer TOKEN-FROM-KEYKLOACK'
--header 'Content-Type: application/xml' \
--header 'My-custom-header: some-value' \
--data-raw '<some>
  <input>xml is here</input>
</some>'
Response:
<this>
    <is>xml response</is>
</this>
RAW format, asynchronous execution
The workflow below illustrates how to start a record, check its status, and get the record results for an asynchronous execution in the RAW format:
Start a record.
Request:
curl --location --request POST 'https://workfusion.mycompany.com/input-connector-rest/start-record-raw/my-bp-singal-id' \
--header 'Authorization: Bearer TOKEN-FROM-KEYKLOACK'
--header 'Content-Type: application/xml' \
--header 'My-custom-header: some-value' \
--data-raw '<some>
<input>xml is here</input>
</some>'
Response:
{
    "requestId": "bc21e4d8-43",
    "status": "IN_PROGRESS",
    "statusDetails": "Record Processing Started"
}
Check the record status.
In the example below, replace
bc21e4d8-19with actualrequestIdfrom the response to the previous request.curl --location --request GET 'https://workfusion.mycompany.com/input-connector-rest/check-record-status/bc21e4d8-19'The following responses are possible:
When the status is in progress:
 {
     "requestId": "bc21e4d8-19",
     "status": "IN_PROGRESS",
     "statusDetails": "In progress"
 }
When the status is completed:
 {
     "requestId": "bc21e4d8-19",
     "status": "COMPLETED",
     "format": "JSON"
 }
Get results.
Request:
curl --location --request GET 'https://workfusion.mycompany.com/input-connector-rest/get-record-result/bc21e4d8-33' \
--header 'Authorization: Bearer TOKEN-FROM-KEYKLOACK'
Response:
<this>
    <is>xml response</is>
</this>