Write Bot Task JUnit tests
Bot Task JUnit is a JUnit 5 API for running and testing Bot Tasks. You can use it for running Tasks locally from an IDE of choice during development and/or for executing tests in a CI/CD pipeline.
Starting with Work.AI v10.3, ODF 1 is no longer supported. For information about using Bot Task JUnit in the ODF context, refer to the Work.AI v10.2.9 documentation.
Add Bot Task JUnit dependencies to existing project
To start working with Bot Task JUnit, add the following dependencies to your project:
bot-task-junit: the library that contains API required for writing JUnit tests for Bot Tasks.bot-execution-engine: the engine responsible for running Bot Tasks, compatible with the current ODF 2 version.odf2-junit: the library that contains functionality for supporting ODF 2 features in bot-task-junit.
The libraries are published on repository.workfusion.com. Usually, the repository is already a part of each project. You don't have to configure anything additionally.
Add bot-task-junit and bot-execution-engine as test dependencies to a BCB module that contains Bot Tasks to be tested:
<dependencies>
    <dependency>
        <groupId>com.workfusion.odf</groupId>
        <artifactId>bot-task-junit</artifactId>
        <scope>test</scope>
    </dependency>
    <dependency>
        <groupId>com.workfusion.studio</groupId>
        <artifactId>bot-execution-engine</artifactId>
        <scope>test</scope>
    </dependency>
    <!-- ODF2 helper module -->
    <dependency>
        <groupId>com.workfusion.odf2</groupId>
        <artifactId>odf2-junit</artifactId>
    </dependency>
</dependencies>
Library versions are managed by the BOM file, eliminating the need for explicit specification.
We propose using AssertJ, which is the library with a rich set of assertions. Basically, you can use any assertions library you are used to, but mind that all the examples below are written with the help of AssertJ.
Bot Task JUnit test in a nutshell
The first thing to do is write a simple test that helps to launch a Bot Task:
import org.junit.jupiter.api.DisplayName;
import org.junit.jupiter.api.Test;

import com.workfusion.odf.test.junit.WorkerJUnitConfig;
import com.workfusion.odf.test.launch.BotTaskUnit;
import com.workfusion.odf.test.launch.OutputData;
import com.workfusion.odf2.junit.BotTaskFactory;

import static org.assertj.core.api.Assertions.assertThat;

@WorkerJUnitConfig
class GenericTaskExampleTest {

    @Test
    @DisplayName("should run bot task")
    void shouldRunBotTask(BotTaskFactory botTaskFactory) {

        // given
        BotTaskUnit botTaskUnit = botTaskFactory.fromClass(GenericTaskExample.class);

        // when
        OutputData outputData = botTaskUnit.buildAndRun();

        // then
        assertThat(outputData.getRecords()).hasSize(1);
    }

}
The @WorkerJUnitConfig annotation is mandatory. It tells JUnit to ensure that all related environments (Worker, in-memory database, S3 mock server, and others) are started before test execution. Here, you can see that the BotTaskFactory and BotTaskXmlFactory classes are used as test parameters. JUnit makes sure these parameters are populated with valid objects from the @WorkerJUnitConfig context.
BotTaskUnit
In the context of ODF 2 framework, it is advisable to utilize the BotTaskFactory class for generating a BotTaskUnit object directly from a Java class associated with a Bot Task.
The BotTaskUnit class representing a single isolated Bot Task independently configured and executed on the local or remote worker. The BotTaskUnit methods behave in a builder-pattern manner and don't perform any operations until the buildAndRun() method is called:
import java.time.Duration;

import org.junit.jupiter.api.DisplayName;
import org.junit.jupiter.api.Test;

import com.workfusion.odf.test.junit.WorkerJUnitConfig;
import com.workfusion.odf.test.launch.InputData;
import com.workfusion.odf.test.launch.OutputData;
import com.workfusion.odf2.junit.BotTaskFactory;

import static org.assertj.core.api.Assertions.assertThat;

@WorkerJUnitConfig
class GenericTaskExampleTest {

    @Test
    @DisplayName("should run bot task")
    void shouldRunBotTask(BotTaskFactory botTaskFactory) {
        // when
        OutputData outputData = botTaskFactory.fromClass(GenericTaskExample.class)
                .withInputData(InputData.of("header", "value_1", "value_2"))
                .withS3(cfg -> cfg.withEndpointUrl("localhost:3040"))
                .withOcr(cfg -> cfg.withApiBaseUrl("localhost:3041"))
                .withSecureEntries(cfg -> cfg.withEntry("alias", "key", "value"))
                .withRunId("run-id")
                .withTimeout(Duration.ofSeconds(45))
                .withCustomAttribute("key", "value")
                .withDigitalWorkerConfigurationId(123L)
                .withDigitalWorkerConfigurationJson("{\"components\": []}")
                .withCustomSettings(cfg -> cfg.getProxySettings().setUsername("username"))
                .buildAndRun();

        // then
        assertThat(outputData.getRecords()).hasSize(1);
    }

}
BotTaskUnit provides the following builder-methods:
withS3specifies custom S3 settings to be used during Bot Task execution.withOcrspecifies custom OCR settings to be used during Bot Task execution.withSecureEntriesspecifies secure entries to be available during Bot Task execution.withInputDataspecifies the Bot Task's input data as theInputDataobject.withRunIdspecifies the run ID of the Business Process for Bot Task execution.withTimeoutspecifies the maximum amount of time to wait until the Bot Task execution is completed. If the timeout is elapsed before a Bot Task is completed, execution is interrupted and exception is thrown. The default timeout is equal to 1 minute.withCustomAttributeadds a custom attribute to a Bot Task context.withDigitalWorkerConfigurationIdspecifies the AI Agent configuration ID to be used during Bot Task execution.withDigitalWorkerConfigurationJsonspecifies the AI Agent configuration JSON to be used during Bot Task execution.
For specific non-standard cases, you can provide the settings that don't exist in BotTaskUnit using the withCustomSettings method of a builder:
@WorkerJUnitConfig
class GenericTaskExampleTest {

    @Test
    @DisplayName("should run bot task with custom settings")
    void shouldRunBotTaskWithCustomSettings(BotTaskFactory botTaskFactory) {
        botTaskFactory.fromClass(GenericTaskExample.class)
                .withCustomSettings(settings -> {
                    ProxySettings proxySettings = settings.getProxySettings();
                    proxySettings.setEnabled(true);
                    proxySettings.setServer("https://proxy.server.url");
                })
                .buildAndRun();
    }

}
Running multiple Bot Tasks
In the ODF 2 framework, it's possible to run multiple Bot Tasks in a single test. This can be achieved by employing the fromClasses method or the multipleTasks factory method.
The Bot Tasks you supply to these methods are executed sequentially, one by one. The output data generated by a preceding Bot Task is utilized as the input for the subsequent task.
@WorkerJUnitConfig
class MultipleBotTasksTest {

    @Test
    @DisplayName("should run multiple bot tasks in a single test")
    void shouldRunMultipleBotTasksInSingleTest(BotTaskFactory botTaskFactory) {
        botTaskFactory
                .fromClasses(
                        FirstBotTask.class,
                        SecondBotTask.class,
                        ThirdBotTask.class)
                .buildAndRun();
    }

}
@WorkerJUnitConfig
class MultipleBotTasksTest {

    @Test
    @DisplayName("should run multiple bot tasks in a single test")
    void shouldRunMultipleBotTasksInSingleTest(BotTaskFactory botTaskFactory) {
        botTaskFactory.multipleTasks()
                .nextTask(task -> task.fromClass(FirstBotTask.class))
                .nextTask(task -> task.fromClass(SecondBotTask.class))
                .nextTask(task -> task.fromClass(ThirdBotTask.class))
                .configure()
                .buildAndRun();
    }

}
AI Agent configuration
With regard to an AI Agent, the Bot Task JUnit allows you to set an AI Agent configuration for a Bot Task test context.
@WorkerJUnitConfig
class GenericTaskExampleTest {
    @Test
    @DisplayName("should run bot task with DW config")
    void shouldRunBotTaskWithDwConfig(BotTaskFactory botTaskFactory) {
        botTaskFactory.fromClass(GenericTaskExample.class)
                .withDigitalWorkerConfigurationId(123L)
                .withDigitalWorkerConfigurationJson("{\"components\": []}")
                .buildAndRun();
    }
}
withDigitalWorkerConfigurationIdspecifies the AI Agent configuration ID to be used during Bot Task execution.withDigitalWorkerConfigurationJsonspecifies the AI Agent configuration JSON to be used during Bot Task execution.
Moreover, withDigitalWorkerConfigurationJson has an overridden version that facilitates the modification of the JSON payload via ConfigurationJsonBuilder. This builder makes it possible to set the configuration JSON from a file or a string and then to enact changes to the JSON payload via the withValue or withTransformation methods.
The withValue method sets a value in an AI Agent configuration at a designated JSON path. The withTransformation method accepts Consumer<DocumentContext> that operates on the DocumentContext object encapsulating the JSON payload.
The DocumentContext class originates from the JsonPath library and allows for JSON manipulation akin to XPath expressions. Any adjustments made to the DocumentContext are serialized into JSON and are subsequently passed through other defined transformations, ultimately influencing the Bot Task's test context.
@WorkerJUnitConfig
class GenericTaskExampleTest {
    @Test
    @DisplayName("should run bot task with DW config")
    void shouldRunBotTaskWithDwConfig(BotTaskFactory botTaskFactory) {
        botTaskFactory.fromClass(GenericTaskExample.class)
                .withDigitalWorkerConfigurationJson(cfg -> cfg
                        .withJson(Paths.get("path-to-config-file.json"))
                        .withValue("property.name", "value")
                        .withTransformation(json -> json
                                .set("$.nested.key", "new value")
                                .set("$.other.nested.key", json.read("$.nested.key"))))
                .buildAndRun();
    }
}
For further details on JSONPath expressions, refer to the JsonPath documentation.
Advanced configuration
In the context of the ODF 2 framework, you have the option to generate a BotTaskUnit object using the BotTaskUnitBuilder class. You can acquire the builder by employing either the singleTask method or the multipleTasks method.
@WorkerJUnitConfig
class AdvancedBotTaskTest {

    @Test
    @DisplayName("should run single task")
    void shouldRunSingleTask(BotTaskFactory botTaskFactory) {
        botTaskFactory.singleTask()
                .fromClass(FirstBotTask.class)
                .addModule(TestModule.class)
                .configure()
                .buildAndRun();
    }

    @Test
    @DisplayName("should run multiple tasks")
    void shouldRunMultipleTasks(BotTaskFactory botTaskFactory) {
        botTaskFactory.multipleTasks()
                .nextTask(task -> task
                        .fromClass(FirstBotTask.class)
                        .addModule(TestModule.class))
                .nextTask(task -> task
                        .fromClass(SecondBotTask.class)
                        .addModule(TestModule.class))
                .configure()
                .buildAndRun();
    }

}
The BotTaskUnitBuilder provides the capability to incorporate or override ODF 2 modules (classes implementing the OdfModule interface) within a testing context. This can be particularly valuable when you need to mock a Feather object that communicates with an external system.
For instance, consider a scenario where you have a Bot Task responsible for transmitting billing information through BillingService:
@BotTask
public class BillingServiceBotTask implements AdHocTask {

    private final BillingService billingService;

    @Inject
    public BillingServiceBotTask(BillingService billingService) {
        this.billingService = billingService;
    }

    @Override
    public TaskRunnerOutput run(TaskInput taskInput) {
        String jsonInfo = taskInput.getRequiredVariable("billing_json_info");
        boolean result = billingService.sendInfo(jsonInfo);
        return taskInput.asResult().withColumn("billing_service_result", String.valueOf(result));
    }

}
Creating a test for the Bot Task can be complex due to the interaction with external BillingService that might not be accessible during testing. To address this, you can mock the BillingService object by creating a module to override its behavior:
public class BillingServiceMockModule implements OdfModule {

    @Singleton
    @Provides(override = true)
    public BillingService billingServiceMock() {
        return jsonInfo -> true;
    }

}
Then, you can include this module into a Bot Task test as demonstrated below:
@WorkerJUnitConfig
class BillingServiceBotTaskTest {

    @Test
    @DisplayName("should send billing info")
    void shouldSendBillingInfo(BotTaskFactory botTaskFactory) {
        // when
        Map<String, String> actualResult = botTaskFactory.singleTask()
                .fromClass(BillingServiceBotTask.class)
                .addModule(BillingServiceMockModule.class)
                .configure()
                .withInputData(InputData.of("billing_json_info", "{billing:test_data}"))
                .buildAndRun()
                .getFirstRecord();

        // then
        assertThat(actualResult).containsEntry("billing_service_result", "true");
    }

}
In ODF 2, tests are executed as PF4J bundles by default, leading to isolation of the bundle's classpath from the test classpath. Thus, to use the BillingServiceMockModule class, place it within the project's source folder (src/main/java) rather than the test folder (src/test/java).
Alternatively, you can disable PF4J isolation, which grants the bundle access to the entire test classpath.
@WorkerJUnitConfig
class BillingServiceBotTaskTest {

    @Test
    @DisplayName("should send billing info")
    void shouldSendBillingInfo(BotTaskFactory botTaskFactory) {
        // when
        Map<String, String> actualResult = botTaskFactory.singleTask()
                .fromClass(BillingServiceBotTask.class)
                .addModule(BillingServiceMockModule.class)
                .configure()
                .withCustomSettings(settings -> settings.getClassloaderSettings().setPf4jEnabled(false)) // switch off PF4J isolation
                .withInputData(InputData.of("billing_json_info", "{billing:test_data}"))
                .buildAndRun()
                .getFirstRecord();

        // then
        assertThat(actualResult).containsEntry("billing_service_result", "true");
    }

    public static class BillingServiceMockModule implements OdfModule {

        @Singleton
        @Provides(override = true)
        public BillingService billingServiceMock() {
            return jsonInfo -> true;
        }

    }

}
Input data provisioning
Input data is configured using the com.workfusion.odf.test.launch.InputData object. Let's take a look at the factory methods of this class:
public class InputData {

    /**
     * Creates {@link InputData} from the provided CSV file path, relative to `src/test/resources` or the current project.
     */
    public static InputData fromResource(String inputFilePath);

    /**
     * Creates {@link InputData} from the provided CSV file path, relative to `src/test/resources` or the current project.<p/>
     * Start and end indexes specify the record range to be processed from the provided CSV file.
     */
    public static InputData fromResource(String inputFilePath, int startIndex, int endIndex);

    /**
     * Creates the temporary single column {@link InputData} from the provided content.
     */
    public static InputData of(String header, String... values);

    /**
     * Creates the temporary multiple columns {@link InputData} from the provided content.
     */
    public static InputData of(List<String> headers, List<String>... rows);

}
Basically, you can create input data from a CSV file or String directly before test execution. The first approach might be useful when you have a huge input and want to keep it away from a test or reuse it for multiple tests. In this case, you put a CSV file with prepared input data under src/test/resources and specify its path in a test:
@WorkerJUnitConfig
class InputDataTest {

    @Test
    void someTest(BotTaskFactory botTaskFactory) {
        BotTaskUnit genericTask = botTaskFactory
                .fromClass(GenericTaskExample.class)
                .withInputData(InputData.fromResource("input-data.csv"));
    }

}
The second approach is useful when you have just a couple of columns or want to pass a runtime value as input data:
@WorkerJUnitConfig
class InputDataTest {

    @Test
    void testWithSingleColumn(BotTaskFactory botTaskFactory) {
        botTaskFactory.fromClass(GenericTaskExample.class)
                .withInputData(InputData.of("header", "value-1", "value-2", "value_3"))
                .buildAndRun();
    }

    @Test
    void testWithMultipleColumns(BotTaskFactory botTaskFactory) {
        botTaskFactory.fromClass(GenericTaskExample.class)
                .withInputData(InputData.of(
                        Arrays.asList("column_1", "column_2", "column_3"),
                        Arrays.asList("value_1", "value_2", "value_3")))
                .buildAndRun();
    }

}
In the ODF 2 framework, it is the com.workfusion.odf2.junit.InputDataBuilder class that helps to build InputData directly from the Transaction object. It automatically populates fields like TRANSACTION_ID, TRANSACTION_STATUS, ERROR_STATUS, and so on based on the passed Transaction object.
@WorkerJUnitConfig
class InputDataTest {

    @Test
    void testWithInputDataBuilder(BotTaskFactory botTaskFactory, OrmSupport ormSupport) {
        Transaction transaction = ormSupport.getTransactionRepository().startNewTransaction("NEW");

        InputData inputData = InputDataBuilder.from(transaction)
                .add("header1", "value1")
                .add("header2", "value2")
                .build();

        botTaskFactory.fromClass(GenericTaskExample.class)
                .withInputData(inputData)
                .buildAndRun();
    }

}
Data Store state provisioning
If you have ORMLite and an object data model, you can create Data Store tables for test execution using the com.j256.ormlite.table.TableUtils#createTable(ConnectionSource, Class) method.
ORMLite has built-in utility classes for creating, updating, and deleting tables using entity classes. ODF 2 provides functionality for operating with standard entity types. To use the functionality, add the odf2-junit module to your test scope.
The module contains the com.workfusion.odf2.junit.OrmSupport implementation, which allows you to manage tables using entity classes and provide ready-to-use repository classes for operating with built-in entities:
Use
OrmSupport#createTablesto create tables before starting a Bot Task:ormSupport.createTables(Transaction.class, CustomEntity1.class, CustomEntity2.class);Use
OrmSupport#clearTablesorOrmSupport#clearAllCreatedTablesto clear table content between test executions:ormSupport.clearTables(Transaction.class, CustomEntity1.class, CustomEntity2.class);Use
OrmSupport#dropTablesorOrmSupport#dropAllCreatedTablesto drop tables after test execution:ormSupport.dropTables(Transaction.class, CustomEntity1.class, CustomEntity2.class);Use repository classes to perform operations with entities. You can create simple CRUD repositories using
OrmSupport:OrmLiteRepository<CustomEntity> repository = ormSupport.getRepository(CustomEntity.class);OrmSupportcontains getters for standard repositories and functionality for generating a repository for entity classes:@BeforeAll
public void setUp(OrmSupport ormSupport) {
TransactionRepository transactionRepository = ormSupport.getTransactionRepository();
MonitorRepository monitorRepository = ormSupport.getMonitorRepository();
OrmLiteRepository<CustomEntity> customEntityRepository = ormSupport.getRepository(CustomEntity.class);
}
Data Store scopes
Any approach of working with a Data Store object that you are using can have one of the three scopes that define the lifecycle of configured tables:
CLASS: tables defined in the@BeforeAllmethods are kept until all tests are finished. It means that the changes made in one test are visible to others, depending on the order of execution.EACH_TEST: tables defined in@BeforeEachmethods are dropped and re-created across test methods. It means that all tests see the data the way you define it, without interference between tests.TEST: tables defined in the@Testmethod itself are dropped right after the method is finished. It means the data is invisible to other tests.
@WorkerJUnitConfig
class DatastoresTest {

    @BeforeAll
    public static void configureGlobalData(OrmSupport ormSupport) {
        ormSupport.createTables(GlobalEntity.class);
    }

    @BeforeEach
    public static void configureDataForEachTest(OrmSupport ormSupport) {
        ormSupport.createTables(EachTestEntity.class);
    }

    @Test
    void someTest(OrmSupport ormSupport) {
        ormSupport.createTables(Entity.class);

        // GlobalEntity.class is visible, and all changes made will last until all tests in this class are finished
        // EachTestEntity.class table is visible, but any change to it will be lost across tests
        // Entity.class table is visible, but will be deleted right after the test
        // OtherEntity.class table from another test does not exist at the moment
    }

    @Test
    void someOtherTest(OrmSupport ormSupport) {
        ormSupport.createTables(OtherEntity.class);

        // GlobalEntity.class is visible, and all changes made will last until all tests in this class are finished
        // EachTestEntity.class table is visible, but any change to it will be lost across tests
        // Entity.class table is visible, but will be deleted right after the test
        // OtherEntity.class table from another test does not exist at the moment
    }

}
- Data Store names are sanitized according to a simple rule: any symbol that is not a Latin letter, a digit, or an underscore, is replaced with an underscore; for example, "my-table-01.csv" turns into "my_table_01".
- Unlike in Work.AI Developer, changes made in Data Stores are not saved to working copies of CSV files but lost after tests are finished. To access the contents of Data Stores, use the
Datastores.read()method that returns aDatastoreTableobject.
Reading data from Data Stores
To read data from a specific Data Store, use the Datastores.read() method. It returns the com.workfusion.odf.test.datastore.table.DatastoreTable object with data from the Data Store.
While working with ORM and a data model, use repositories provided by OrmSupport.
@Test
public void testTransaction(OrmSupport ormSupport) {
    Optional<Transaction> transaction = ormSupport.getTransactionRepository().findById(transactionUuid);
    assertThat(transaction).isPresent()
            .map(Transaction::getStatus)
            .contains(TransactionStatus.PROCESSING_COMPLETED.toString());
}
Also, you can print DatastoreTable in a user-friendly format:
@WorkerJUnitConfig
class DatastoresTest {

    @Test
    void shouldPrintDatastoreRecords(Datastores datastores) {
        DatastoreTable datastoreTable = datastores.read("datastore_name");

        // Print full table
        System.out.println(datastoreTable);

        // Return 'TablePrinter' object
        TablePrinter tablePrinter = datastoreTable.getTablePrinter();

        // Print exact rows
        System.out.println(tablePrinter.printTable(0, 0));

        // Print exact columns
        System.out.println(tablePrinter.printTable("column1"));

        // Print exact rows and columns
        System.out.println(tablePrinter.printTable(0, 0, "column1"));
    }

}
OCR mocking
For each test run, there is an underlying in-memory service that can mock real OCR behavior. To interact with this service, inject the com.workfusion.odf.test.ocr.OcrMock object into any test class method annotated as @Test, @BeforeAll, @BeforeEach, @AfterEach, and @AfterAll. OcrMock helps to respond with any desired text for any desired image.
@WorkerJUnitConfig
class OcrTest {

    @Test
    void shouldRunOcrTask(OcrMock ocrMock) {
        ocrMock.shouldReturn("Lorem ipsum dolor sit amet").forImage("/img/ocr-test-image.png");
    }

}
In this example, ocrMock is configured to respond with "Lorem ipsum dolor sit amet" when an image at "/img/ocr-test-image.png" is submitted. This is called an expectation. A test author can define any number of expectations for different images. There is also an option to create a default expectation that results in the same text for any submitted image unless this image is covered with a more specific expectation.
In the following example, OcrMock returns "Default result" for any submitted image, except hypothetical "a.png" for which "Specific result" is returned.
@WorkerJUnitConfig
class OcrTest {

    @Test
    void shouldRunOcrTask(OcrMock ocrMock) {
        ocrMock.shouldReturn("Default result").forAnyImage();
        ocrMock.shouldReturn("Specific result").forImage("a.png");
    }

}
OCR scopes
OcrMock can have one of the three scopes that define the lifecycle of expectations:
- Expectations created in the
@BeforeAllmethods are kept until all tests are finished. - Expectations created in the
@BeforeEachmethods are deleted and re-created between test methods. It means that OCR tasks created from those expectations are invisible to other tests. - Expectations created in the
@Testmethod itself are deleted right after the method is finished. It means these expectations and corresponding tasks are invisible to other tests.
@WorkerJUnitConfig
@TestMethodOrder(MethodOrderer.OrderAnnotation.class)
class OcrServiceTest {

    private static final String BUCKET_NAME = "doc-upload";
    private static final String IMAGE_KEY = "lorem-ipsum.png";
    private static final String MOCK_RESULT = "Lorem ipsum dolor sit amet";

    private static Path imagePath;

    private static Transaction transaction;
    private static String taskId;
    private static String cacheKey;
    private static String ocrType;
    private static String ocrExportType;

    @BeforeAll
    static void beforeAll(OrmSupport ormSupport, OcrMock ocrMock) throws URISyntaxException, SQLException {
        ormSupport.createTables(Transaction.class, ConfigEntity.class, ErrorEntity.class, JoinEntity.class, OcrCacheEntity.class);

        ormSupport.getConfigRepository().create(new ConfigEntity(OdfConfigurationItem.OCR_S3_BUCKET.getPropertyName(), BUCKET_NAME));
        transaction = ormSupport.getTransactionRepository().startNewTransaction(TransactionStatus.INTAKE_IN_PROGRESS.toString());

        imagePath = getResource(IMAGE_KEY).toAbsolutePath();

        ocrMock.shouldReturn(
                MOCK_RESULT,
                "<document><page height='7' width='13'><charParams content='X', t='T', r='R', b='B', l='L' /></page></document>",
                "Lorem ipsum dolor sit amet")
                .withPages("page")
                .forImage(imagePath.toString());
    }

    @Test
    @Order(1)
    @DisplayName("should submit image to OCR")
    void shouldSubmitImageToOCR(S3MockClient s3Client, BotTaskFactory botTaskFactory) {
        // given
        s3Client.createBucket(BUCKET_NAME);
        s3Client.putObject(BUCKET_NAME, IMAGE_KEY, imagePath.toFile());

        final InputData inputData = InputDataBuilder.from(transaction)
                .add("document-url", s3Client.getUrl(BUCKET_NAME, IMAGE_KEY).toString())
                .build();

        // when
        final Map<String, String> result = botTaskFactory.fromClass(TestSubmitToOcrTask.class)
                .withInputData(inputData)
                .buildAndRun()
                .getFirstRecord();

        // then
        assertThat(result)
                .containsKey(TaskVariable.OCR_TASK_ID.toString())
                .containsKey(TaskVariable.OCR_CACHE_KEY.toString())
                .containsEntry(TaskVariable.OCR_TYPE.toString(), OcrType.TOD.toString())
                .containsEntry(TaskVariable.OCR_EXPORT_TYPE.toString(), OcrConfiguration.DEFAULT_EXPORT_FORMAT.toString());

        taskId = result.get(TaskVariable.OCR_TASK_ID.toString());
        cacheKey = result.get(TaskVariable.OCR_CACHE_KEY.toString());
        ocrType = result.get(TaskVariable.OCR_TYPE.toString());
        ocrExportType = result.get(TaskVariable.OCR_EXPORT_TYPE.toString());
    }

    @Test
    @Order(2)
    @DisplayName("should retrieve OCR result")
    void shouldRetrieveOcrResult(S3MockClient s3Client, BotTaskFactory botTaskFactory) {
        // given
        s3Client.createBucket(BUCKET_NAME);

        final InputData inputData = InputDataBuilder.from(transaction)
                .add(TaskVariable.OCR_TASK_ID, taskId)
                .add(TaskVariable.OCR_CACHE_KEY, cacheKey)
                .add(TaskVariable.OCR_TYPE, ocrType)
                .add(TaskVariable.OCR_EXPORT_TYPE, ocrExportType)
                .build();

        // when
        final Map<String, String> result = botTaskFactory.fromClass(TestRetrieveOcrResultTask.class)
                .withInputData(inputData)
                .buildAndRun()
                .getFirstRecord();

        // then
        assertThat(result).containsKey("ocr-xml");

        final String mockResult = s3Client.getObjectAsString(BUCKET_NAME,
                StringUtils.substringAfter(result.get("ocr-xml"), BUCKET_NAME + "/"));

        assertThat(mockResult).isEqualTo(MOCK_RESULT);
    }

    private static Path getResource(String name) throws URISyntaxException {
        URL resource = OcrServiceTest.class.getClassLoader().getResource(name);
        Objects.requireNonNull(resource, String.format("Unable to find resource '%s' on classpath", name));
        return Paths.get(resource.toURI());
    }

}
As OCR in ODF 2 works asynchronously, the procedures of sending a request and receiving a response are split into two tasks going in a special order.
S3 mocking
For each test run, there is an underlying in-memory S3 server ready to handle user requests. To interact with this server, inject the com.workfusion.odf.test.s3.S3MockClient object into any test class method annotated as @Test, @BeforeAll, @BeforeEach, @AfterEach, and @AfterAll.
@WorkerJUnitConfig
class S3Test {

    @BeforeEach
    void setUpS3(S3MockClient s3Client) {
        s3Client.putObject("test-bucket", "test-file.txt", "test file content");
    }

}
The mock client works the same way as a real Amazon S3 client and has most of its methods. For example, you can create a bucket before test execution and populate it with objects from test resources or receive a test object as a String for assertion after Bot Task execution.
Explore the S3MockClient interface to see all methods and their descriptions.
@WorkerJUnitConfig
class S3Test {

    @Test
    void shouldRunBotTask(BotTaskFactory botTaskFactory, S3MockClient s3Client) {
        // given
        s3Client.createBucket("test-bucket");

        // when
        botTaskFactory.fromClass(PutToS3Task.class).buildAndRun();

        // then
        assertThat(s3Client.getObjectAsString("BUCKET_NAME", "created-file.txt")).isNotEmpty();
    }

}
S3 scopes
S3MockClient can have one of three scopes that define the lifecycle of uploaded buckets and objects:
- Buckets and objects created in the
@BeforeAllmethods are kept until all tests are finished. It means that changes made in one test are visible to others, depending on the order of execution. - Buckets and objects created in the
@BeforeEachmethods are deleted and re-created across test methods. It means that all tests see the data the way you define it without interference between tests. - Buckets and objects created in the
@Testmethod itself are deleted right after the method is finished. It means this data is invisible to other tests.
Secrets Vault provisioning and mocking
There are two ways of working with Secrets Vault entries in Bot Task JUnit:
- Set up a Bot Task test with mock secret entries
- Connect to the external Secrets Vault server, for example, HashiCorp
It is recommended to use mock entries in all possible scenarios because it usually helps to eliminate dependencies on external services, which is a good idea for a test.
Here is an example of how you can mock Secrets Vault entries before running a Bot Task:
@WorkerJUnitConfig
class SecretVaultTest {

    @Test
    void shouldRunBotTaskWithSecretEntries(BotTaskFactory botTaskFactory) {
        Map<String, String> actualRecord = botTaskFactory.fromClass(SecretsVaultTask.class)
                .withSecureEntries(cfg -> cfg
                        .withEntry("alias-1", "key-1", "value-1")
                        .withEntry("alias-2", "key-2", "value-2"))
                .buildAndRun()
                .getFirstRecord();
    }

}
There might be circumstances when mocking Secrets Vault entries is not sufficient. For example, you have to connect to an external service and use real credentials. Exposing credentials inside the test code poses formidable security risks. That is why for these scenarios, the external Secrets Vault server, for example, HashiCorp, must be used.
Basically, you have to provide the connection settings to the Secrets Vault server using the @TestPropertySource annotation:
@WorkerJUnitConfig
@TestPropertySource("classpath:secret-vault-settings.properties")
class SecretVaultTest {

    @Test
    void shouldRunBotTaskWithSecretEntries(BotTaskFactory botTaskFactory) {
        // when
        final BotTaskUnit task = botTaskFactory.fromClass(SecretsVaultTask.class);

        // then
        assertThatCode(task::buildAndRun).doesNotThrowAnyException();
    }

}
Here is an example of the secret-vault-settings.properties file. Mind to put it in the src/test/resources folder:
secure.storage.type=VAULT
secure.storage.safe.internal=safe_internal
secure.storage.platformId=platform_id
secure.storage.serverApi=https://localhost:8200
secure.storage.client.certificate=/path/to/certificate
secure.storage.client.keyPass=key_pass
secure.storage.applicationId=application_id
If secret-vault-settings.properties contains any sensitive information, do not commit it directly to the source code repository. Instead, make sure this file appears during the test runtime only, for example, during a CI/CD build.
Assertions
Output data
The com.workfusion.odf.test.launch.OutputData object helps to manipulate output data, for example, the CSV data created by the export WebHarvest plugin. You can obtain it from BotTaskResult after the Bot Task execution is completed. The following example shows how to assert the output data:
@WorkerJUnitConfig
class OutputDataTest {

    @Test
    void shouldAssertOutputData(BotTaskFactory botTaskFactory) {
        final OutputData outputData = botTaskFactory
                .fromClass(OutputDataTaskExample.class)
                .buildAndRun();

        // assert that a file with output data is created
        assertThat(outputData.getFile()).exists();

        // assert that the file with output data contains the exact content
        assertThat(outputData.getFile()).hasContent("expected content");

        // assert that the output data contains only the two columns with the exact names
        assertThat(outputData.getHeaders()).containsExactly("column-1", "column-2");

        // assert that the output data contains the exact values in the specific column
        assertThat(outputData.getColumnValues("column-1")).containsExactly("value 1", "value 2");

        // assert that the output data contains the exact values in the specific column
        assertThat(outputData.getColumnValues("column-1", Integer::valueOf)).containsExactly(1, 2, 3);

        // assert that the output data contains the exact value in th specific cell
        assertThat(outputData.getValue("column-1", 1)).isEqualTo("value 2");
    }

}
Data Stores
In ODF 2, Data Stores are used for persisting the data model state in the AI Agent implementation. To access this data, you must use repositories. The OrmSupport class provides an easy way to create a repository for a given entity.
@WorkerJUnitConfig
public class DataStoresTest {

    TransactionRepository transactionRepository;
    OrmLiteRepository<Email> emailRepository;

    @BeforeAll
    public void setUp(OrmSupport ormSupport) {
        transactionRepository = ormSupport.getTransactionRepository();
        emailRepository = ormSupport.getRepository(Email.class);
    }

    @Test
    @DisplayName("should get entities from datastores")
    public void shouldGetEntitiesFromDatastores() {
        // get all existing transactions and check for its statuses
        assertThat(transactionRepository.findAll())
                .hasSize(5)
                .extracting(Transaction::getStatus)
                .containsOnly(TransactionStatus.INTAKE_IN_PROGRESS.toString());

        // get email by ID and check subject
        assertThat(emailRepository.findById("emailId"))
                .isNotEmpty()
                .map(Email::getSubject)
                .isEqualTo("subject");
    }

}
RPA tasks
If you require to run an RPA task from a JUnit test, Work.AI Developer is mandatory. Make sure to install it in your local environment. You may check a compatible version from the Compatibility matrix article.
A JUnit test for the RPA task looks completely the same as a regular Bot Task JUnit test. The only thing that changes is that you have to replace the @WorkerJUnitConfig annotation in favor of @IacDeveloperJUnitConfig. The following listing shows an RPA test example:
@IacDeveloperJUnitConfig
class RpaIntegrationTest {

    @Test
    void shouldRunRPABotTask(BotTaskFactory botTaskFactory) {
        // given
        BotTaskUnit rpaTask = botTaskFactory.fromClass(RpaBotTask.class);

        // then
        assertThatCode(rpaTask::buildAndRun).doesNotThrowAnyException();
    }

}
Work.AI Developer integration
Changing just one annotation might sound like a small transformation, but in reality, it completely changes the test lifecycle. Instead of setting up an in-memory environment (queues, Workers, and others), @IacDeveloperJUnitConfig does the following:
- Searches for the Work.AI Developer installation.
- Connects to the Secrets Vault to obtain required settings and credentials.
- Establishes a connection with RabbitMQ.
- Puts a task to the RabbitMQ and waits until the Worker from Work.AI Developer completes the task.
Install and launch Work.AI Developer before running an RPA test. In the example below, the RPA Worker Java21 group is started. It already contains Secrets Vault, RabbitMQ, and RPA Worker Java21.
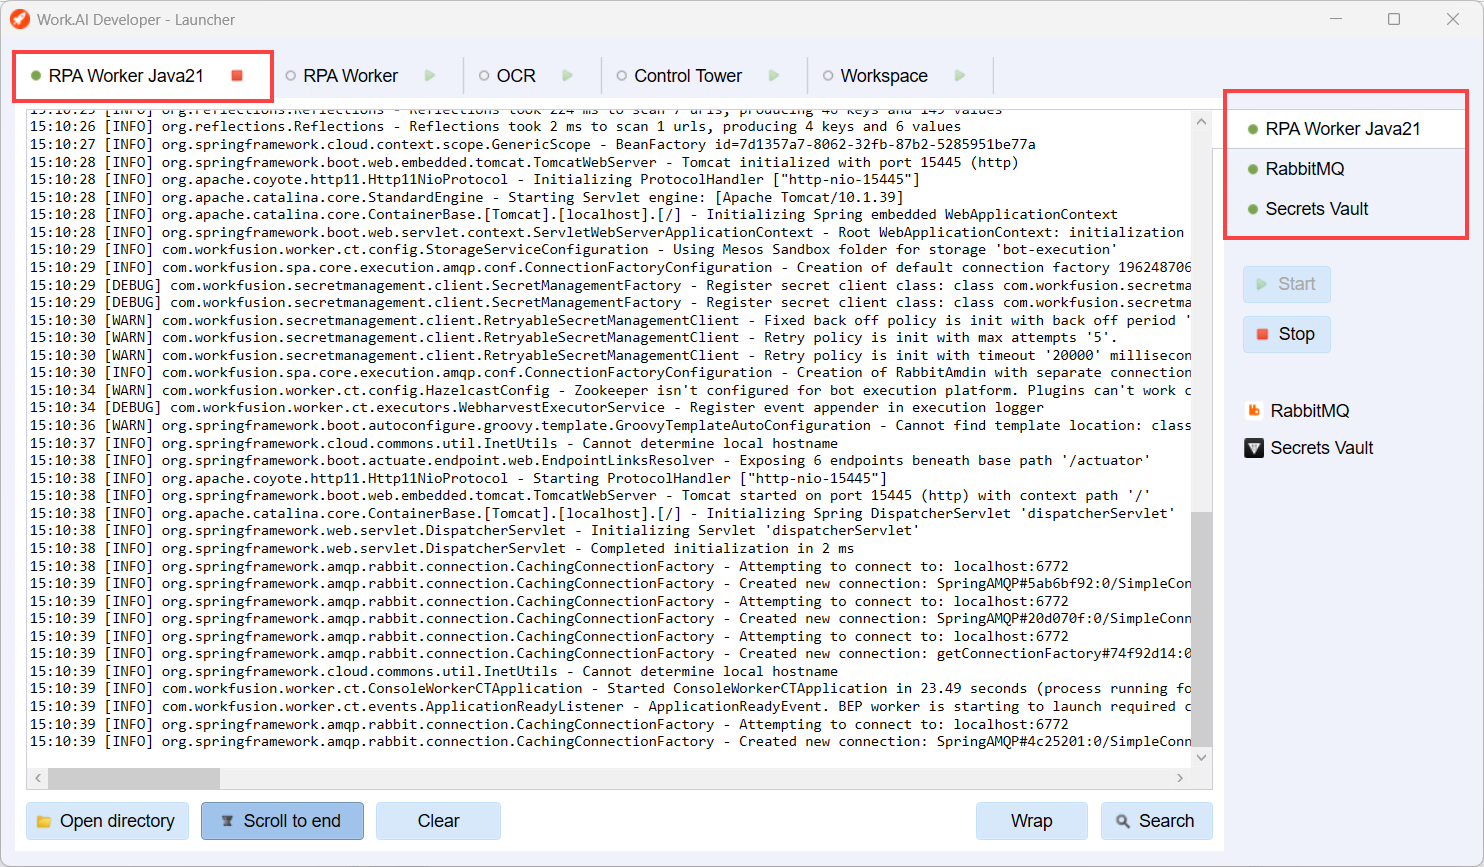
If Work.AI Developer is unavailable, the test fails with ConnectException: Connection refused: connect.
It is important to highlight that the test tries to use all services directly from Work.AI Developer, including File Storage, OCR, and Secrets Vault. Mind to put your test files directly to File Storage or save credentials to Secrets Vault if required. You should start the related services before running the test.
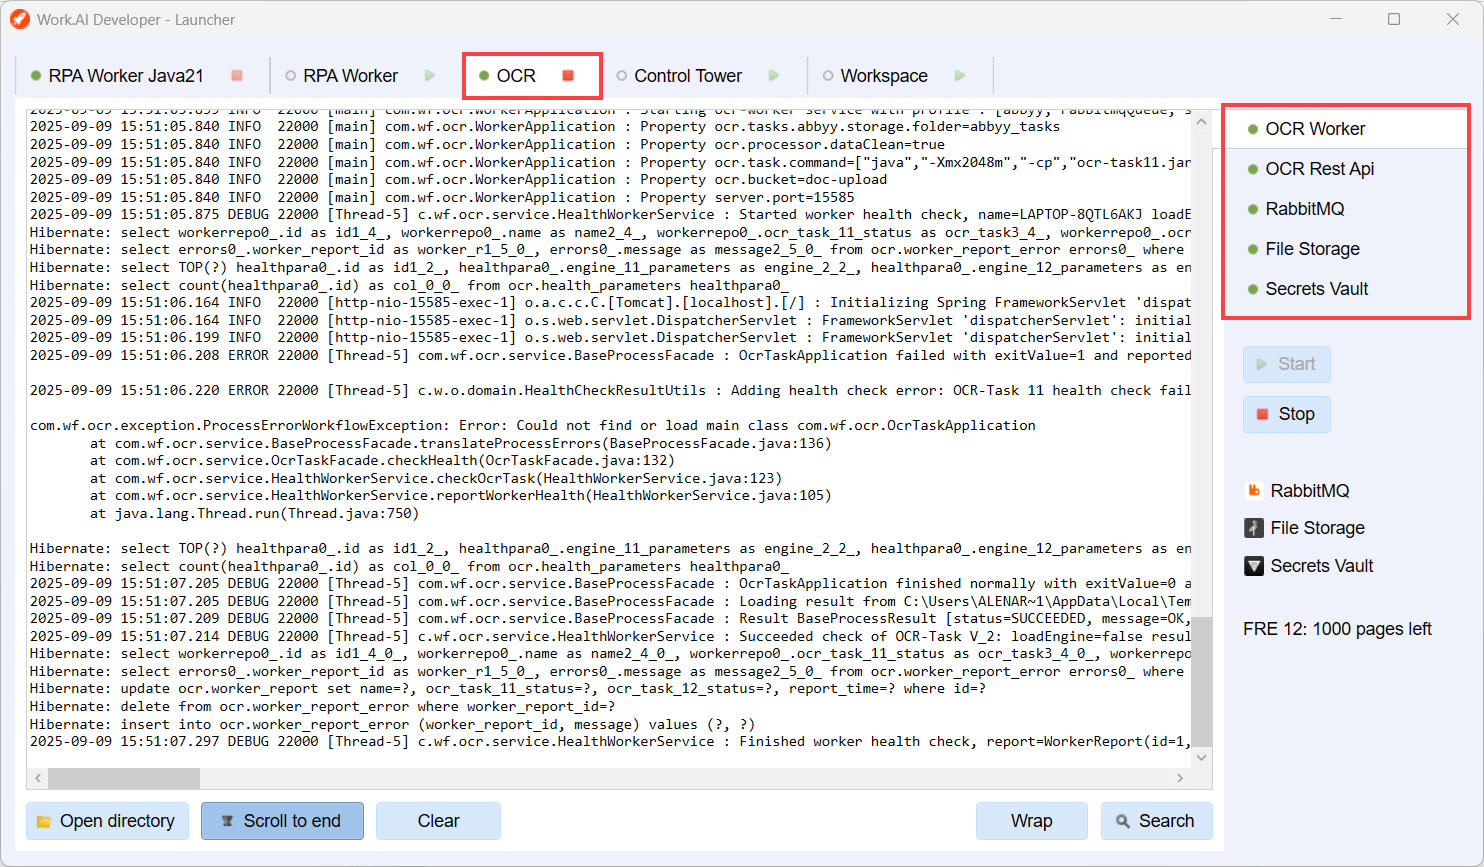
The rest of the components located in the OCR group include:
- OCR Worker
- OCR Rest API
- RabbitMQ
- File Storage
- Secrets Vault
Using mocks together with Work.AI Developer
At some point, you may find that you want to use, for example, real OCR from the Work.AI Developer installation and, at the same time, mock S3 behavior instead of using real File Storage. By default, @IacDeveloperJUnitConfig tries to use ALL services from the Work.AI Developer installation (both OCR and File
Storage in this case). You can change this behavior if needed. Here is an example of how to do it:
@IacDeveloperJUnitConfig
class RpaIntegrationTest {

    @Test
    void shouldRunRPAWithMockedS3BotTask(BotTaskFactory botTaskFactory, S3MockClient s3Client) {
        // given
        s3Client.createBucket("doc-upload");

        BotTaskUnit rpaTask = botTaskFactory.fromClass(RpaBotTask.class)
                .withS3(cfg -> cfg.withEndpointUrl(s3Client.getServerEndpoint()));

        // then
        assertThatCode(rpaTask::buildAndRun).doesNotThrowAnyException();
    }

}
AutoML tasks
Bot Task JUnit does not work with AutoML tasks.
Known issues
Error running '%fileName%': Command line is too long. Shorten command line for %fileName% or also for JUnit default configuration
Symptoms
When running a Bot Task JUnit test from Intellij IDEA for the first time, you might see the following error:
Error running '%fileName%': Command line is too long. Shorten command line for %fileName% or also for JUnit default configuration.
Solution
In the Run/Debug Configuration dialog, navigate to the Shorten command line field and choose JAR manifest from the drop-down list.
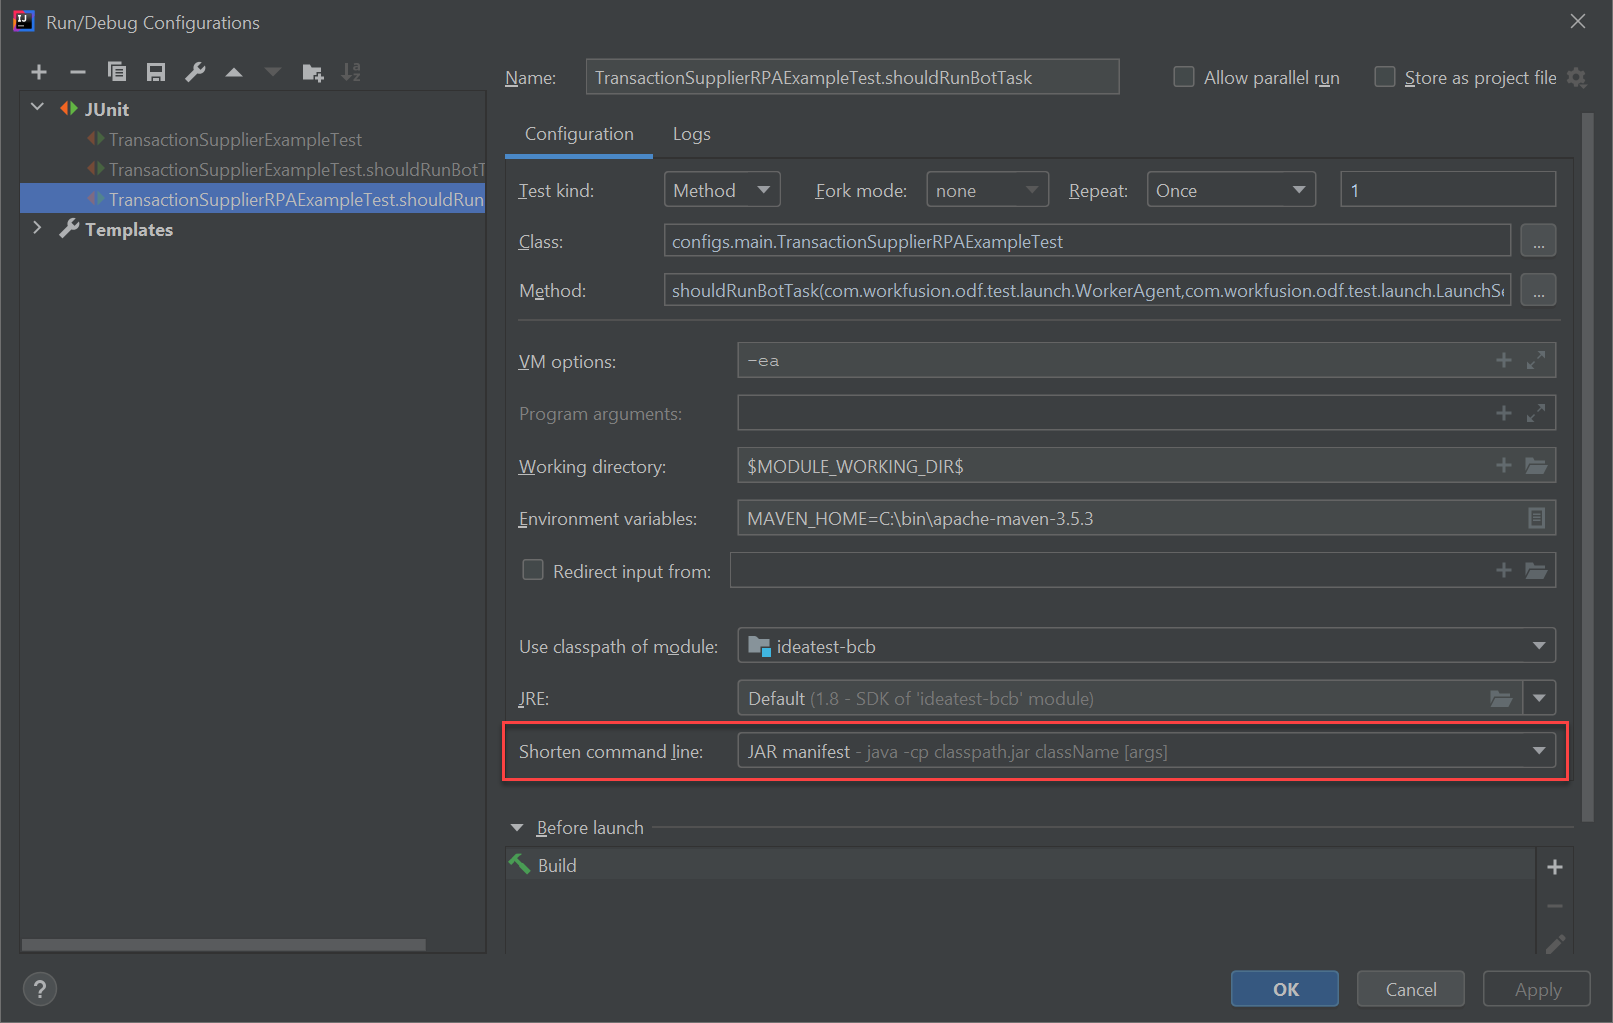
For more details, refer to the blog post from JetBrains.
Exception opening port (port may be in use)
Symptoms
When running a test on the Windows OS, you may experience the following exception saying that the port is already in use:
Exception opening port "port_number" (port may be in use), cause: "java.net.BindException: Address already in use: JVM_Bind" [90061-200]
The exception occurs quite rarely. Usually, it means that, during the test configuration, the operating system returned a free port, but at runtime, the port had already been taken by some other process. bot-task-junit cannot re-configure
itself at this stage and fails with an error.
Solution
Restart the failed test.