Install RPA Windows server
To learn more about deployment, see Deploy RPA. For the general deployment architecture, refer to Installation overview | Deployment diagram.
Prerequisites
Before you start the installation process, mind the following conditions:
- Your hardware meets the minimum system requirements and RPA server requirements.
- The Master server of your Work.AI platform is installed.
- On the Master server, the
rpa.ymlfile is filled in correctly. - RPA Windows users are created in advance and logged in at least once.
- The RPA Windows users listed in
rpa.ymlexist on RPA server(s), the passwords are correct, and all users are members of the Remote Desktop Users group. To check this, log in via RDP as a user of each type. - VDI installation is possible on Microsoft Windows 10, 11.
If rpa.yml contains wrong credentials or hostnames, correct them:
On the Master server, open
rpa.ymlfor editing, and specify correct values:./install.sh edit_rpa_config masterPush the provided configuration from
rpa.ymlto Secrets Vault. In the database, initialize the machines table with correct data:./install.sh configure bot-manager -c local
For more prerequisites, see also the System requirements | RPA server article.
Upload RPA installer
The product installer workfusion-full-package-<version>.tar.gz contains the RPA installer RPAInstaller-<version>.zip file.
To copy the RPA installer from the Master server to all existing RPA servers:
On the Master server, replace
/opt/workfusion/wf_installerwith correctPACKAGE_DIRfor your environment.Generate configuration files for the RPA installer and make the installer and configs downloadable from the Master server over HTTP by running the following commands:
$ cd /opt/workfusion/wf_installer
$ ./install.sh generate_conf rpa
$ python -m http.server 9999noteThe 9999 port is used as an example. You can use any free port on the Master server accessible from the RPA servers and stop the HTTP server after copying.
Connect to the RPA server via RDP and download the RPA installer and configuration files from the Master server:
On the RPA server, launch PowerShell ISE as Administrator.
Copy the script below and execute it in PowerShell on the RPA servers. Before the execution, remember to modify the first four lines according to your configuration:
current_host,download_from,rpa_installer, andinstall_dir.$current_host = "host-rpa.example.com" # DNS name of this RPA server—the one you're logged in to
$download_from = "host-master.example.com:9999" # DNS name of Master server and port from which to download RPAInstaller
$rpa_installer = "RPAInstaller-<version>.zip" # RPA Installer file name on the Master server (check it in sources/ directory on Master server)
$install_dir = "C:\RPA" # RPA Installation Directory on this server (it will be created if it doesn't exist)
$package_dir = "${install_dir}\RPAInstaller" # RPA Installer package Directory on this server
# Delete previous version of package directory if exists
If (Test-Path $package_dir){
Get-ChildItem -Path $package_dir -Recurse | Remove-Item -force -recurse
Remove-Item $package_dir -Force
}
# Creating install_dir
New-Item -ItemType directory -Path ${install_dir} -Force
# Downloading RPA installer and configs
$wc = New-Object net.webclient
$wc.Downloadfile("http://${download_from}/sources/${rpa_installer}", "${install_dir}\RPAInstaller.zip")
$wc.Downloadfile("http://${download_from}/win_confs/rpa_configs/${current_host}/rpa_installer_conf.zip", "${install_dir}\rpa_installer_conf.zip")
# Unpacking RPA installer and configs
Add-Type -assembly "system.io.compression.filesystem"
[System.IO.Compression.ZipFile]::ExtractToDirectory("${install_dir}\RPAInstaller.zip", "${install_dir}\RPAInstaller")
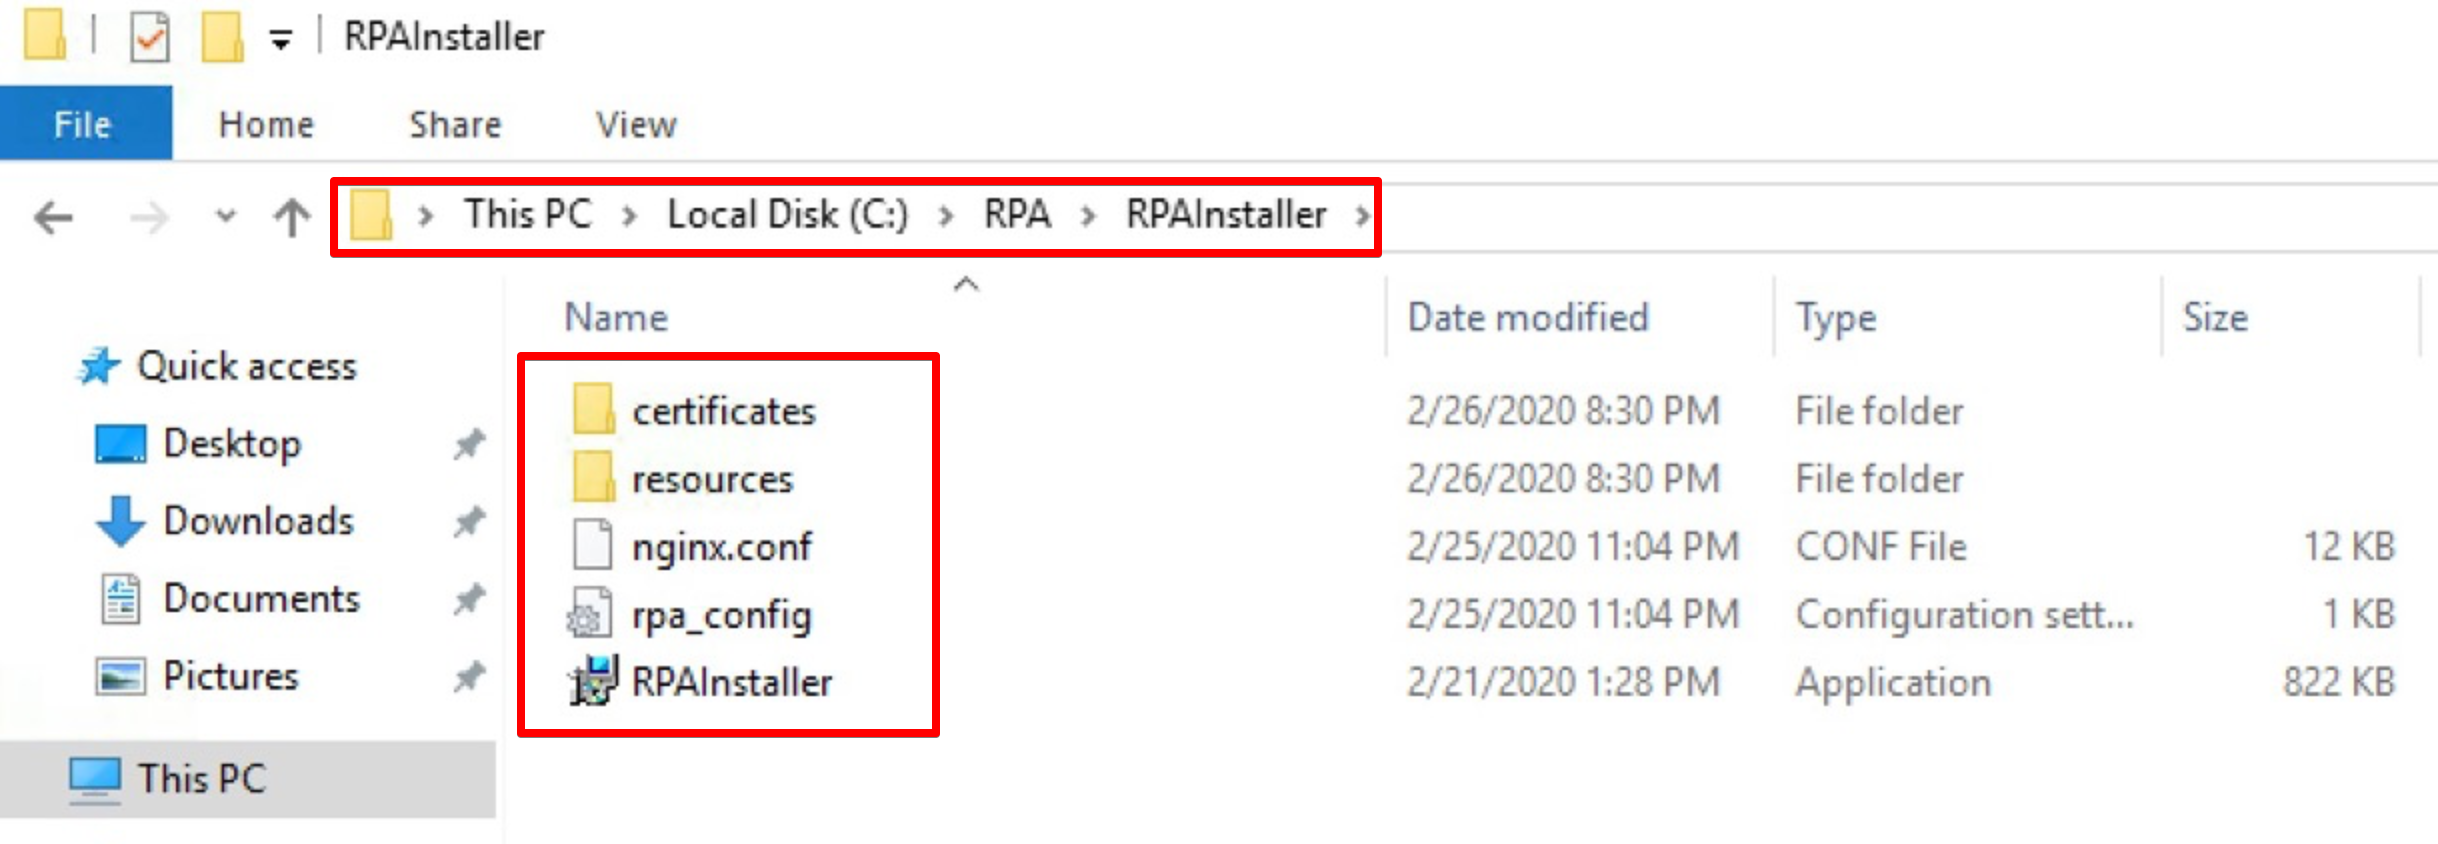
[System.IO.Compression.ZipFile]::ExtractToDirectory("${install_dir}\rpa_installer_conf.zip", "${install_dir}\RPAInstaller")The script runs for about 10 seconds. After execution, you see the following files:
On the Master server, press
Ctrl+Cto stop sharing files.
Configure deployment type
To set the deployment type for RPA installation, define the rpa_deployment_mode property in the installer. Possible values are as follows:
unified_setup: the unified installation is suitable for both server and client Windows versions and does not require a console session.server: the legacy server installation that uses a console session.vdi: the legacy VDI installation that uses a console session.
Install RPA server
To install the RPA components, complete the following steps:
Right-click
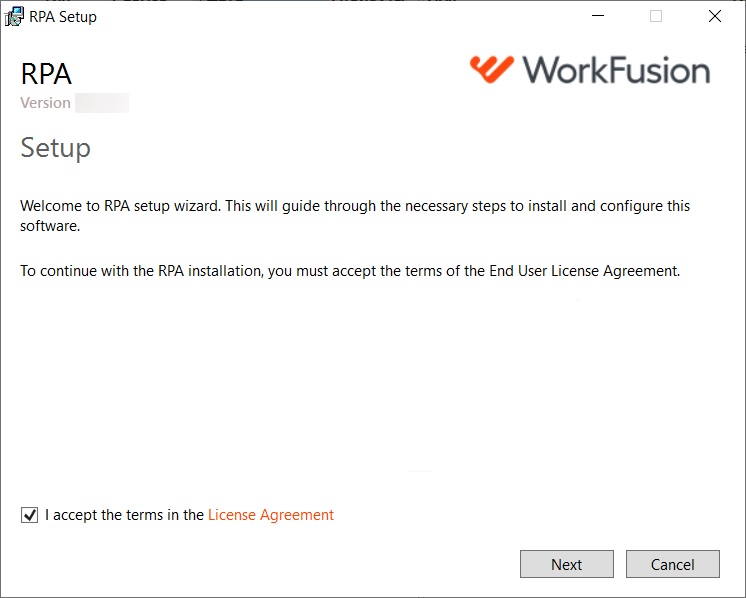
RPAInstaller.exeand select Run as administrator. The RPA Setup Wizard appears.Accept the License Agreement and click Next.
Specify the RPA installation directory. Use the same value as in the script earlier. In this example, it is
C:/RPA: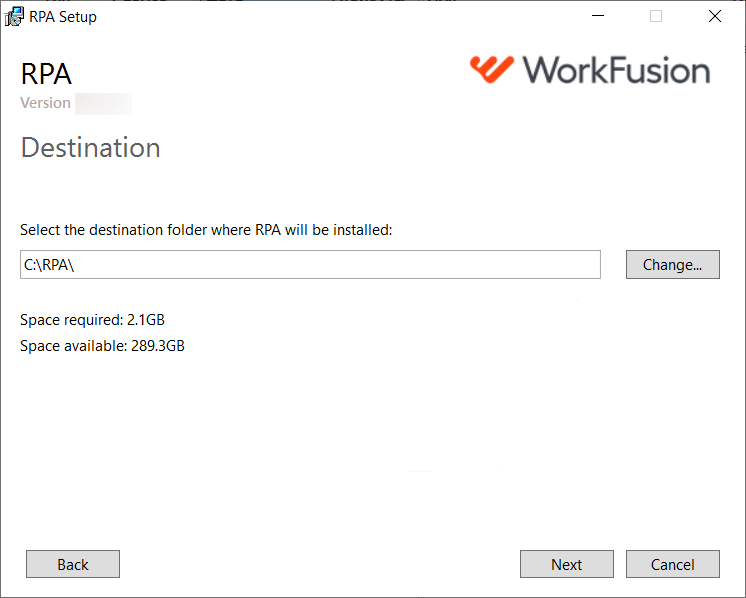
You can install RPA in the Program Files (x86) folder. The installation procedure remains the same.
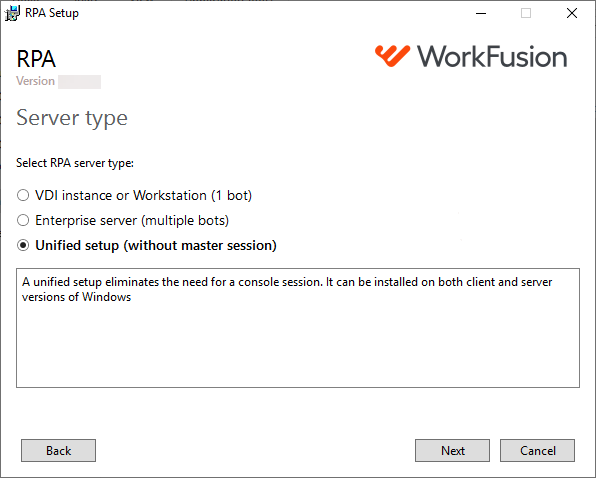
Select an RPA server type, depending on the RPA infrastructure deployment:
VDI instance or Workstation (1 bot)
Enterprise Server (multiple bots)
Unified setup (without master session)
For more details, refer to the Deploy RPA topic.
Specify the path to the folder with certificates, for example,
<rpa_install_dir>/RPAInstaller/certificates.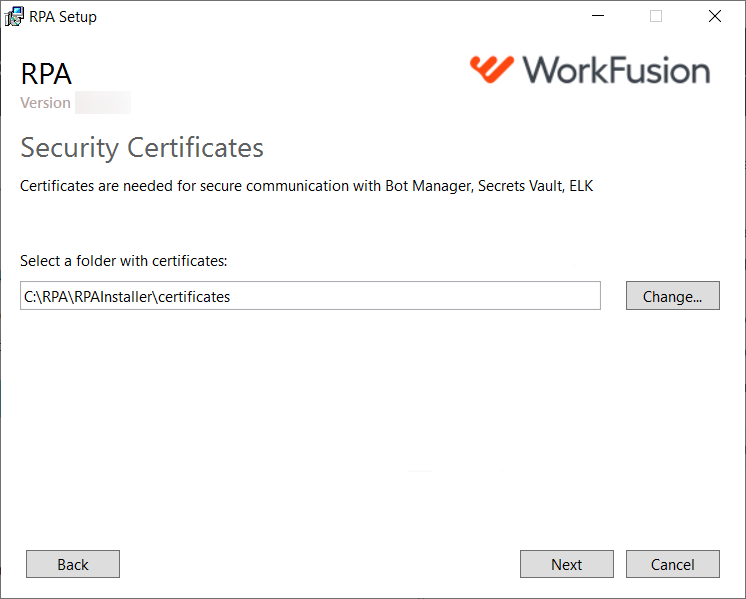
Set up the network configuration:
Select the Nginx config file location:
<rpa_install_dir>/RPAInstaller/nginx.conf.Specify My Machine DNS name—the DNS name of the current RPA server.
In the ZooKeeper field, use the value of the
master_hostnamessetting (seehosts.ymlon the Master server). The default ZooKeeper port is 2181 unless you haven't modified it inports.yml.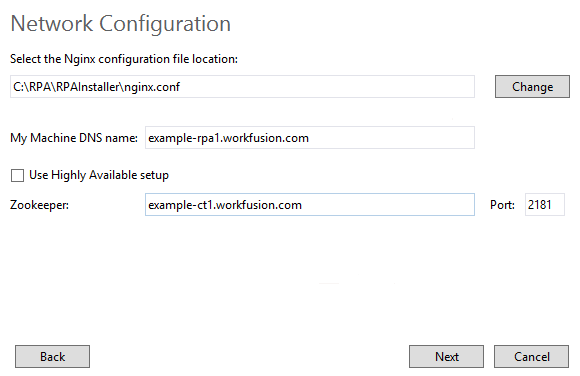
Choose the RPA Windows users on behalf of which the RPA Units will act. If the users exist on the RPA server and credentials are set correctly in
rpa.yml(refer to RPA requirements), the drop-down list contains all the Windows users mentioned in therpa.ymlfile for this RPA server.VDI instance or Workstation (1 RPA Unit): specify only one RPA Unit.
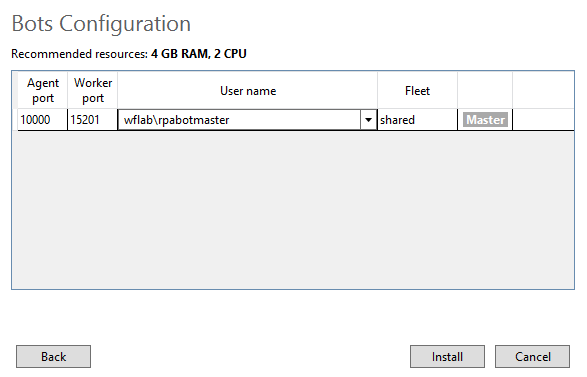
Enterprise Server (multiple RPA Units):
To add an RPA Unit, click Add Bot and select an RPA Unit user from the drop-down list. If the needed user is missing in the list, you can create a Windows user or log in as the Active Directory user during this step and reopen the drop-down list afterward.
To delete an RPA Unit, click the Close button next to it.
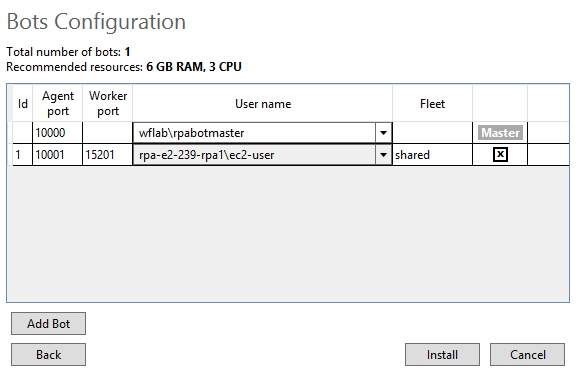
Specify the preferred Java version for the RPA server:
- Java 21 (recommended)
- Java 8
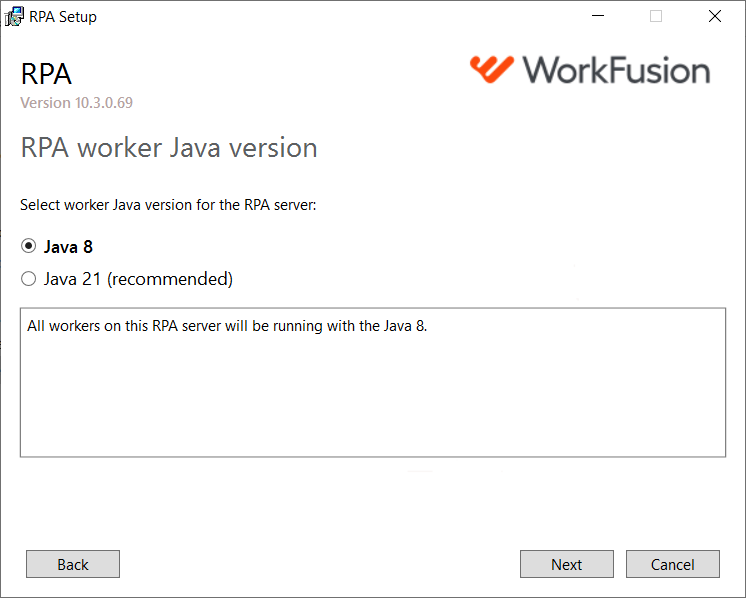
Regardless of which Java version you select, the Bot Agent and video recorder will always run with Java 21. Also, see Configure Java version manually.
Specify the path to the RPA configuration file.
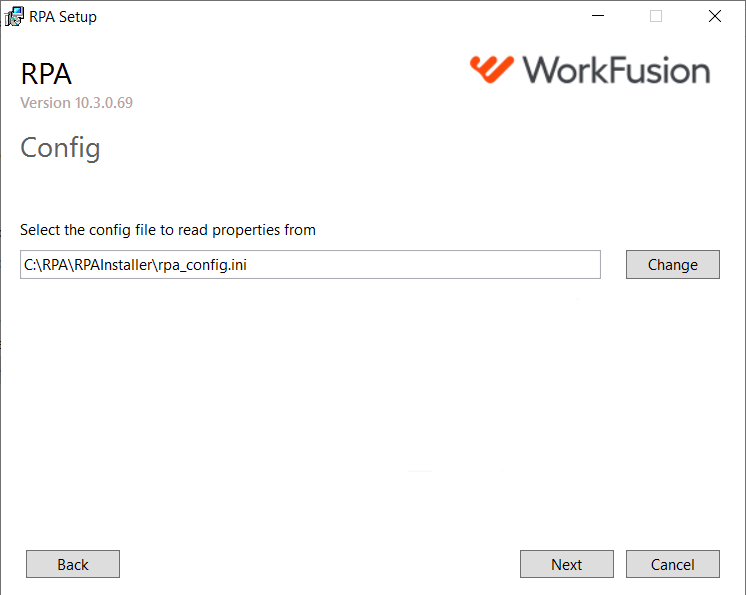
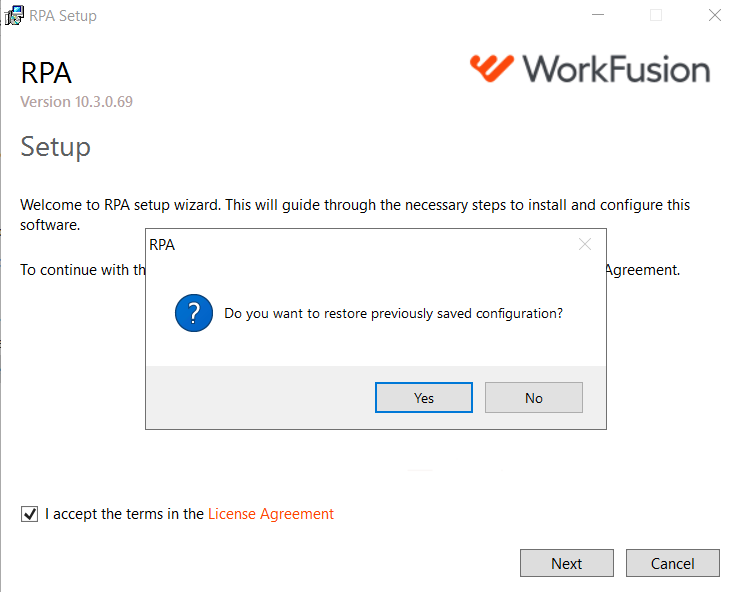
The step is skipped if you restore a previously saved configuration in step 1.
 tip
tipYou can also specify the path to the RPA configuration file during installation using the command line. Add the
CONFIGflag, for example:RPAInstaller.exe /s /norestart CONFIG="C:\config\rpa_config.ini"Click Install and wait for the installation process to complete.
Click Finish and reboot the server.
At this point, the RPA installation is complete. Repeat the above steps on each RPA server in your environment if you have several RPA servers.
You can install an RPA server on a VDI host managed by the Citrix Virtual App and Desktop environment. In this case, the installation process does not differ from the standard RPA Windows server installation.
Configure Java version manually
You can specify the corresponding Java version in the Ansible overrides when running the WorkFusion installer by setting the rpa_java_version flag. Available options are Java8 or Java21. If no version is specified, the default option is Java8.
In case of the manual installation, you can specify the Java version in one of the following ways:
Using the command line, set the Java version with the
JAVA_VERSIONflag. Available options areJava8orJava21:RPAInstaller.exe /install /quiet /norestart /log log.txt CONFIG="rpa_config.ini" JAVA_VERSION="Java21"Using the
rpa_config.inifile, specify thejava_versionflag. Available options areJava8orJava21, for example:[general]
install_dir=C:\RPA
installation_type=Prod
java_version=Java8
install_service=true
hide_rdp_control=False
nginx_config_path=C:\RPA\RPAInstaller\nginx.conf
certs_path=C:\RPA\RPAInstaller\certificates
rpa_hostname=<RPA_HOSTNAME>
highly_available_setup=False
zookeeper_url=<ZOOKEEPER_URL>
server_type=Server
bot_master=10000;;BotMaster;
bot_unit_1=10001;15201;BotUnit1;shared
bot_unit_2=10002;15202;BotUnit2;shared
If the Java version is specified both via the command line and in the rpa_config.ini file, rpa_config.ini takes precedence.
In case of the installation with Java 21, the following configurations apply:
The Worker startup script uses
RPA/worker/worker-java21.bat, which launchesworker-app-java21.jar.WorkFusionDesktopUI.dllandWLUICusto.dllfor Java 21 located inRPA/lib/java21.jvm-connector.jarandrpa-agent.jarfor Java 8 and Java 21 are moved to theRPA/rpa-grid-dependency/java8andRPA/rpa-grid/dependency/java21folders, respectively.RPA/bot-agent/conf/bot-agent-unit-java21.ymlandRPA/bot-agent/conf/bot-agent-nordp-java21.ymlare created as a part of the Bot Agent configuration to start the Worker with Java 21.
By default, all Workers inside a single RPA server are configured to use one selected Java version—either Java 8 or Java 21. However, it is possible to configure specific units to run with a different Java version.
To do this, manually update RPA/bot-agent/bin/bot-agent-unit<UNIT_ID>.bat. In line 6, change conf/bot-agent-unit.yml to conf/bot-agent-unit-java21.yml (or conf/bot-agent-unit-java21.yml to conf/bot-agent-unit.yml) and restart WFSvc.
Configure RPA users in Secrets Vault manually
The step is optional.
If you filled in rpa.yml correctly during the Master server installation, all the settings from rpa.yml are automatically pushed to Secrets Vault. Remember to fill in rpa.yml during the preparation for the Master server installation.
If for any reason, the configuration from rpa.yml wasn't pushed to Secrets Vault or was pushed with wrong values, you can update it in one of the following ways:
Automatically. Fill in
rpa.ymlcorrectly on the Master server and run the command:./install.sh configure bot-managerManually. In case of the VDI Server installation, configure only the Master user.
Log in to Control Tower, and on the main page, go to System Settings > Secrets Vault.
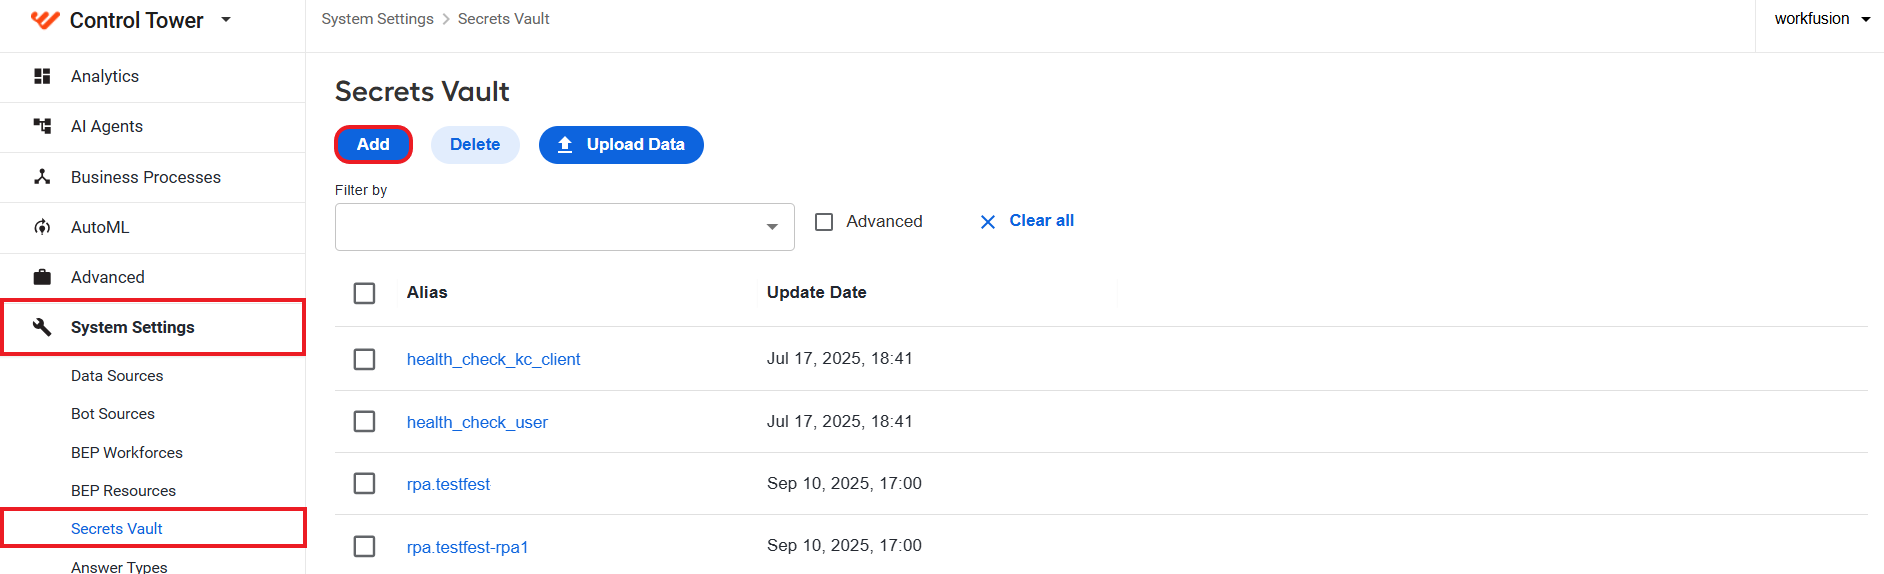
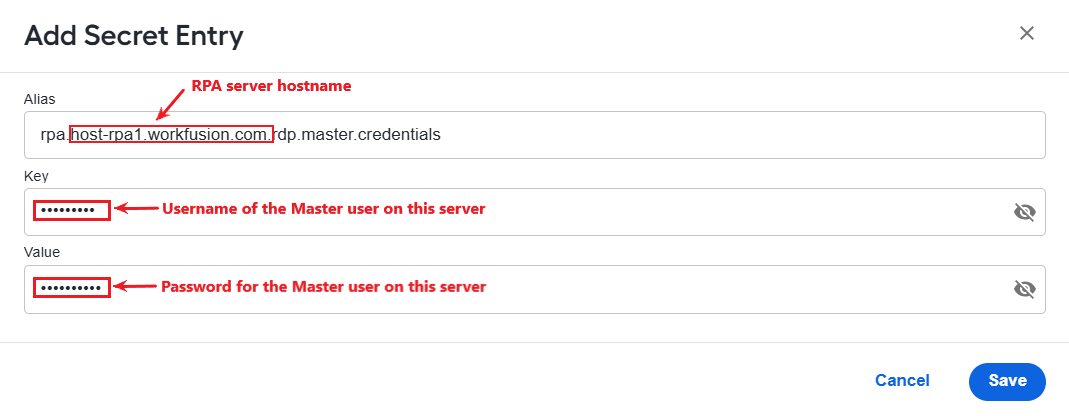
To add a record for a Master user, click Add on the Secrets Vault page and fill in the fields as in the example below.
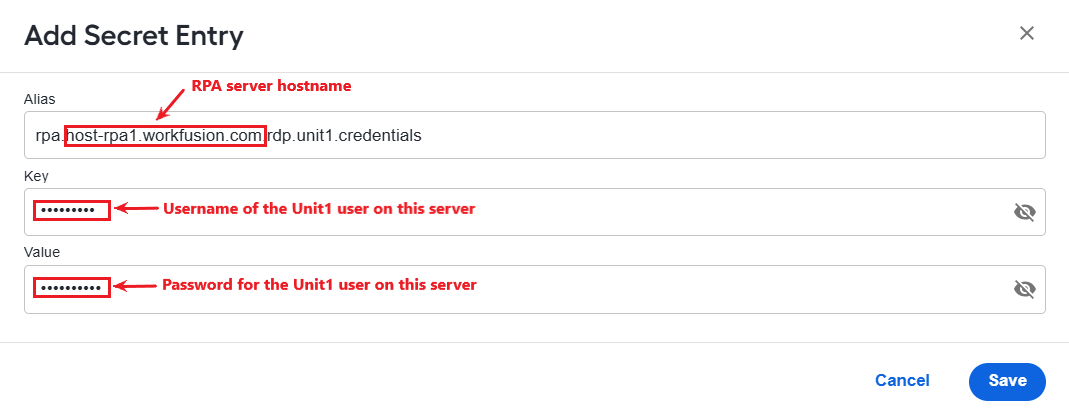
Add a record for the Unit user(s). Click Add on the Secrets Vault page and fill in the fields as in the example.
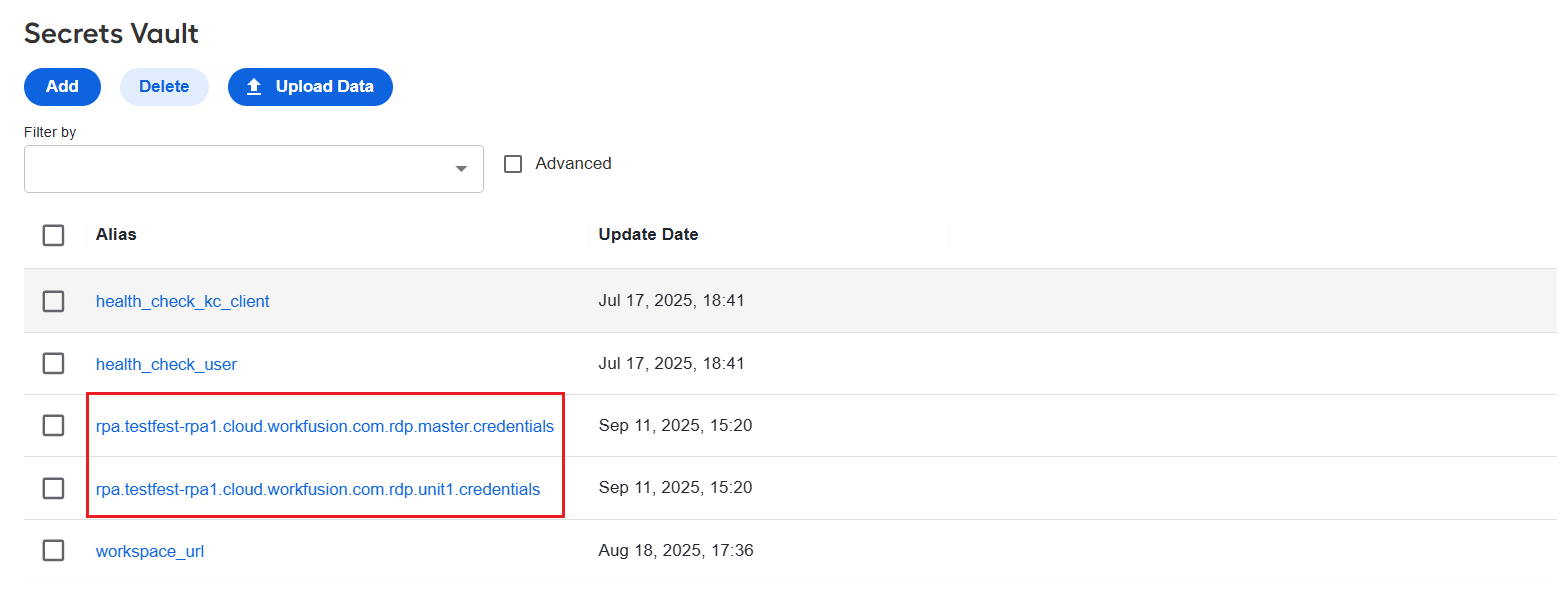
Create similar records for all users on all RPA servers. On each RPA server, only one Master user but multiple RPA Unit users can exist.
The following example shows a case when one RPA server is used, with one Master user and one RPA Unit user:
If you add RPA Unit domain users to Secrets Vault, the username should contain the Down-Level Logon Name, for example, DOMAIN/UserName, where the domain is the NetBIOS domain name.
Typically, the NetBIOS domain name is the subdomain of the DNS domain name. For example, if the DNS domain name is contoso.com, the NetBIOS domain name is contoso. If the DNS domain name is corp.contoso.com, the NetBIOS domain name is corp.
Verify Internet Explorer settings
The step is optional.
You have to verify the Internet Explorer settings only if you use it. Check the settings for each added user. For more details, go to Configuring Internet Explorer.
Change RPA Units resolution
The step is optional.
By default, the WFRDP Client has a resolution of 1270*700. To change the resolution, refer to Change RPA Unit resolution.
Check RPA installation
To check the status of installed RPA server components, follow the steps below:
Reboot your RPA server after the installation is finished.
If you don't have an RDS license for this RPA server and you are using an RDP connection to your RPA server, disconnect RDP to release the connection needed for RPA processes.
To check the RPA Worker, open the following link in your browser as any user on the RPA machine:
http://localhost:1520{unit_id}/health. You will get the following response:[
{
"status": "UP",
"details": {
"rabbit": {
"status": "UP",
"details": {
"version": "3.7.14"
}
},
"diskSpace": {
"status": "UP",
"details": {
"total": 53317988352,
"free": 25653489664,
"threshold": 10485760
}
},
"refreshScope": {
"status": "UP"
},
"zookeeper": {
"status": "UP",
"details": {
"connectionString": "hostname.workfusion.com:port",
"state": "STARTED"
}
}
}
}
]Open Bot Manager and make sure your RPA Windows server hostname is available and you can send commands to the RPA Worker.
Run any RPA task and view logs in Kibana.