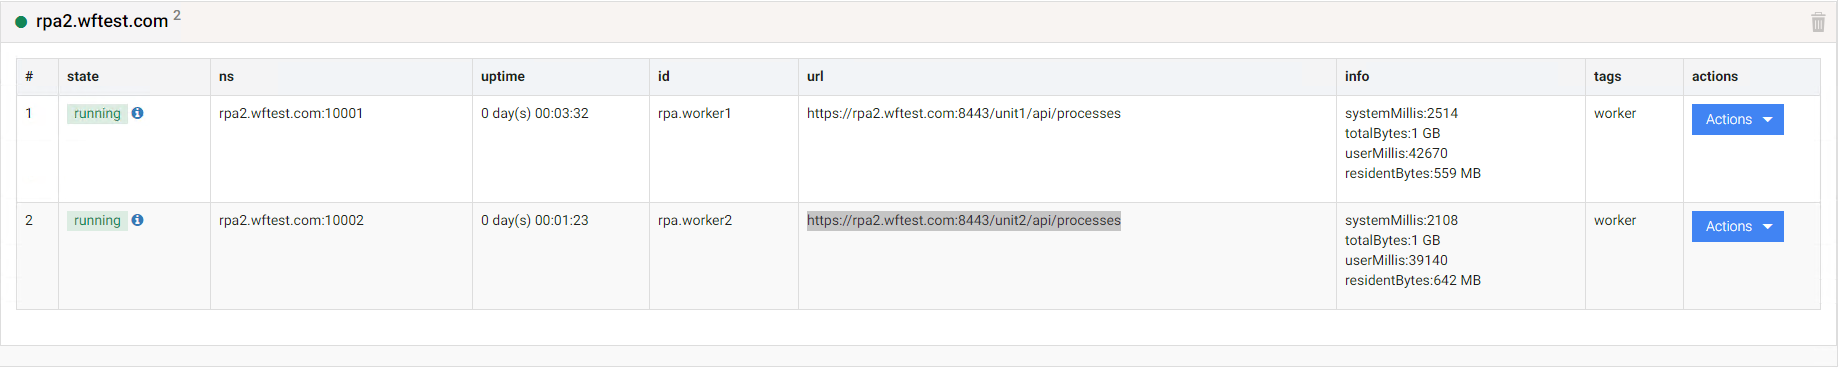
Add RPA unit to RPA server
The instruction describes how to improve the RPA server performance by increasing the number of running bots.
You can add RPA units to the RPA server only in case of the Enterprise RPA server installation. You cannot apply this approach to the VDI RPA Server installation type.
The RPA server hardware must meet system requirements, considering the increased number of RPA Units and the number of resources needed to run the software that needs to be automated.
Make sure that you have activated an RDS license on your RPA server, which allows you to run multiple RDP sessions by bot users on a single server.
Add new Windows users to RPA server
To add new Windows users, follow the steps below:
- Go to the RPA server and create additional RPA unit user(s).
- Add the created users to the Remote Desktop Users group.
Register new Bot Units in Secrets Vault
Option 1. Update rpa.yml
To add RPA units to the desired RPA server, update the rpa.yml file with the credentials of new RPA unit users. The data will be pushed to Secrets Vault automatically. For that, do the following:
On the Master server, open the
rpa.ymlfile.$ vi rpa.ymlThe file has the following structure:
rpa_machines:
rpa1.example.com:
    -
    unit: 'master'
    username: 'USERNAME'
    password: 'PASSWORD'
    -
    unit: 'unit_1'
    username: 'USERNAME'
    password: 'PASSWORD'
    -
    unit: 'unit_2'
    username: 'USERNAME'
    password: 'PASSWORD'
rpa2.example.com:
    -
    unit: 'master'
    username: 'USERNAME'
    password: 'PASSWORD'
    -
    unit: 'unit_1'
    username: 'USERNAME'
    password: 'PASSWORD'
    -
    unit: 'unit_2'
    username: 'USERNAME'
    password: 'PASSWORD'
To add other RPA Units (for example, the three ones) to the
rpa1.example.comsection, insert them asunit_3,unit_4,unit_5, and saverpa.yml. The file will have the following structure:rpa_machines:
rpa1.example.com:
-
unit: 'master'
username: 'USERNAME'
password: 'PASSWORD'
-
unit: 'unit_1'
username: 'USERNAME'
password: 'PASSWORD'
-
unit: 'unit_2'
username: 'USERNAME'
password: 'PASSWORD'
-
unit: 'unit_3'
username: 'USERNAME'
password: 'PASSWORD'
-
unit: 'unit_4'
username: 'USERNAME'
password: 'PASSWORD'
-
unit: 'unit_5'
username: 'USERNAME'
password: 'PASSWORD'
rpa2.example.com:
-
unit: 'master'
username: 'USERNAME'
password: 'PASSWORD'
-
unit: 'unit_1'
username: 'USERNAME'
password: 'PASSWORD'
-
unit: 'unit_2'
username: 'USERNAME'
password: 'PASSWORD'noteWhile editing
rpa.yml, avoid adding extra indentation before lines and use the existing file structure.On the Master server, execute the following command:
./install.sh configure bot-manager
After this step, a new configuration is pushed to Secrets Vault automatically. Alternatively, you may update Secrets Vault manually.
Option 2. Update Secrets Vault manually
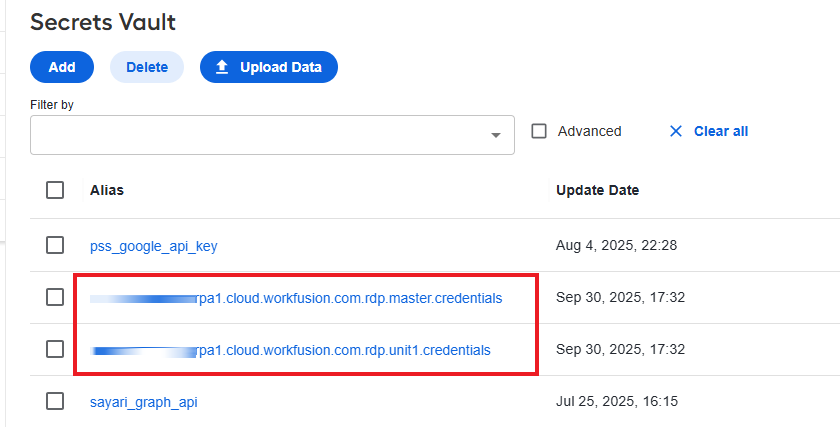
Log in to Control Tower and, on the main page, go to System Settings > Secrets Vault.
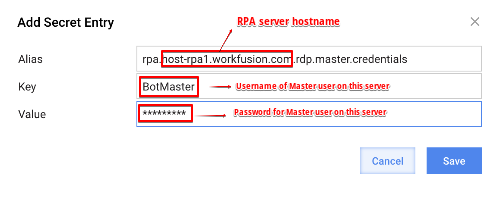
Add a record for the Master user: click Add and fill in the fields as in the example.
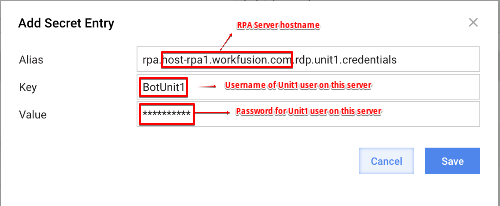
Add a record for the Unit user(s): click Add and fill in the fields as in the example.
Create similar records for all users on all RPA servers (if you have more than one). On each RPA server, only one Master user but several Unit users can exist. The example below illustrates a case when one RPA server is used, with one Master user and one Unit user.
Work.AI versions up to v10.2.9 Work.AI 10.3+ 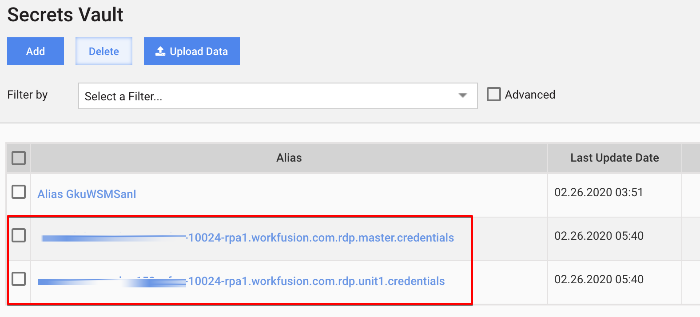
Log in to the RPA server as the Bot Master user or Administrator. Note that local group policies might restrict managing privileges for Bot Master. In this case, you need Administrator access to the RPA server.
Provide the full privileges for the RPA installation folder to the newly created Bot Unit user(s). To do so, either right-click the directory and provide access to a Unit user or execute the following PowerShell command:
$user = 'USER'
$install_dir = 'C:\RPA'

$acl = (Get-Item "${install_dir}").GetAccessControl('Access')
$AccessRule = New-Object System.Security.AccessControl.FileSystemAccessRule("${user}", "FullControl", "ContainerInherit,ObjectInherit", "None", "Allow")
$acl.SetAccessRule($AccessRule)
Set-Acl -AclObject $acl -Path ${install_dir}
In the following steps, the example is for ID=2.
Register new RPA Units on RPA server
Log in to the RPA server as Bot Master user or Administrator. Note that local group policies can restrict managing privileges for Bot Master. In this case, you will need the Administrator access to the RPA server.
Go to
C:\RPA\bot-agent\confand edit thebot-agent-master.ymlfile. In theprocessessection, add the following block for a new RPA Unit user:- id: unit_2
address: "127.0.0.2"
expression: "cmd /c start /wait mstsc unit.rdp /v:127.0.0.2"
directory: rdp
tag: "rdp"- In the
idparameter, change the number. - In the
addressparameter, change the localhost address.
- In the
In the
C:\RPA\bot-agent\conf\unitsdirectory, create the newunit<ID>.ymlfile with the following content:unit_id: 2
fleet: shared
server.port: 1000${unit_id}
logging.folder: logs/unit${unit_id}
worker_port: 1520${unit_id}
bot.agent.context.path: "/unit${unit_id}"
environment.agent.ns: "${environment.agent.hostname}:${server.port}"
bot.agent.master.port: 10000In the
C:\RPA\bot-agent\conf\unitsdirectory, create therecordings.ymlfile with the following content:unit1.recording.enabled: false
unit1.recording.length: 3600
unit2.recording.enabled: false
unit2.recording.length: 3600
video:
    recording.enabled: "${recording.${environment.agent.hostname}.unit${unit_id}:${unit${unit_id}.recording.enabled}}"
    recording.length: "${unit${unit_id}.recording.length}"
```
In the
C:\RPA\nginx\conf\bot-unitsdirectory, create thenew unit<ID>.conffile with the following content:location /unit_2/ {
proxy_pass http://127.0.0.1:10002/;
}The
unit_idparameter must be identical to the ID in the filename.In the
C:\RPA\bot-agent\bindirectory, create the newbot-agent-unit<ID>.batfile with the following content:@ECHO OFF
set unit_id=2
cd %~dp0
set config=conf\bootstrap.yml,conf\environment.yml,conf\units\unit%unit_id%.yml,conf\bot-agent-unit.yml,conf\units\recordings.yml
call bot-agent.cmd run Unit%unit_id% "%config%"The
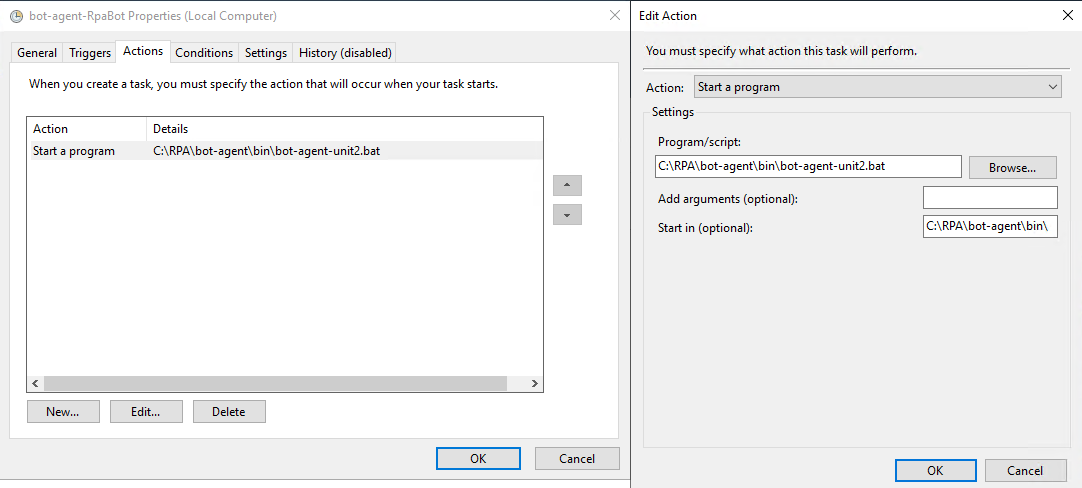
unit_idparameter must be identical to the ID in the filename.To add triggers and actions on logon, go to Task Scheduler and click Create Task to add a new task similar to the existing one for the RPA Unit. To set up the task, follow the steps below:
On the General tab, enter the task name and description. Specify an RPA Unit that will execute the task within the Change User or Group settings.
On the Triggers tab, define how often you want your task to be executed.
On the Actions tab, set the action that this task will perform. The difference is the path to the bat file on the Actions tab.
Modify Conditions and Settings, if needed.
Click OK to save the task.
Reboot the RPA server.
A new RPA Unit appears in the Bot Manager console, and an RDP connection opens automatically on the new host with the changed configuration files.