Configure Octopus Deploy
The Octopus Server is the deployment automation server that orchestrates releases, deploys software, and manages deployment processes and runbooks.
This documentation provides an overview of Octopus Deploy concepts and links to the relevant documentation that explores the ideas further and guides you through implementing them with your own self-hosted Octopus Server installation prerequisites for new Octopus infrastructure installation:
Infrastructure
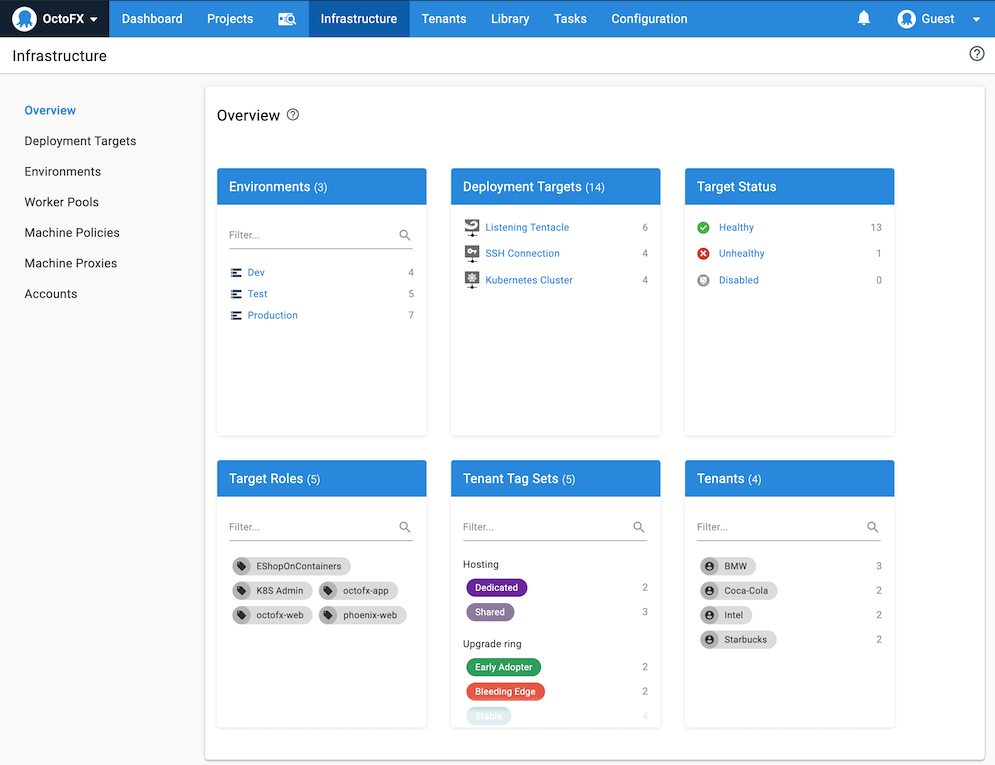
With Octopus Deploy, the machines and services you deploy your software to are managed on the Infrastructure tab of the Octopus web portal:
Environments
Before adding your Deployment Targets to Octopus, configure your environments. The environments represent the different stages of your deployment pipeline and ensure that the deployed software remains in the same state. It moves through those stages from Development to Test and finally to Production.
Typical environments include:
- Development
- Test
- Production
You can add any amount of environments to your deployment pipeline and as many deployment targets to each environment as you need.
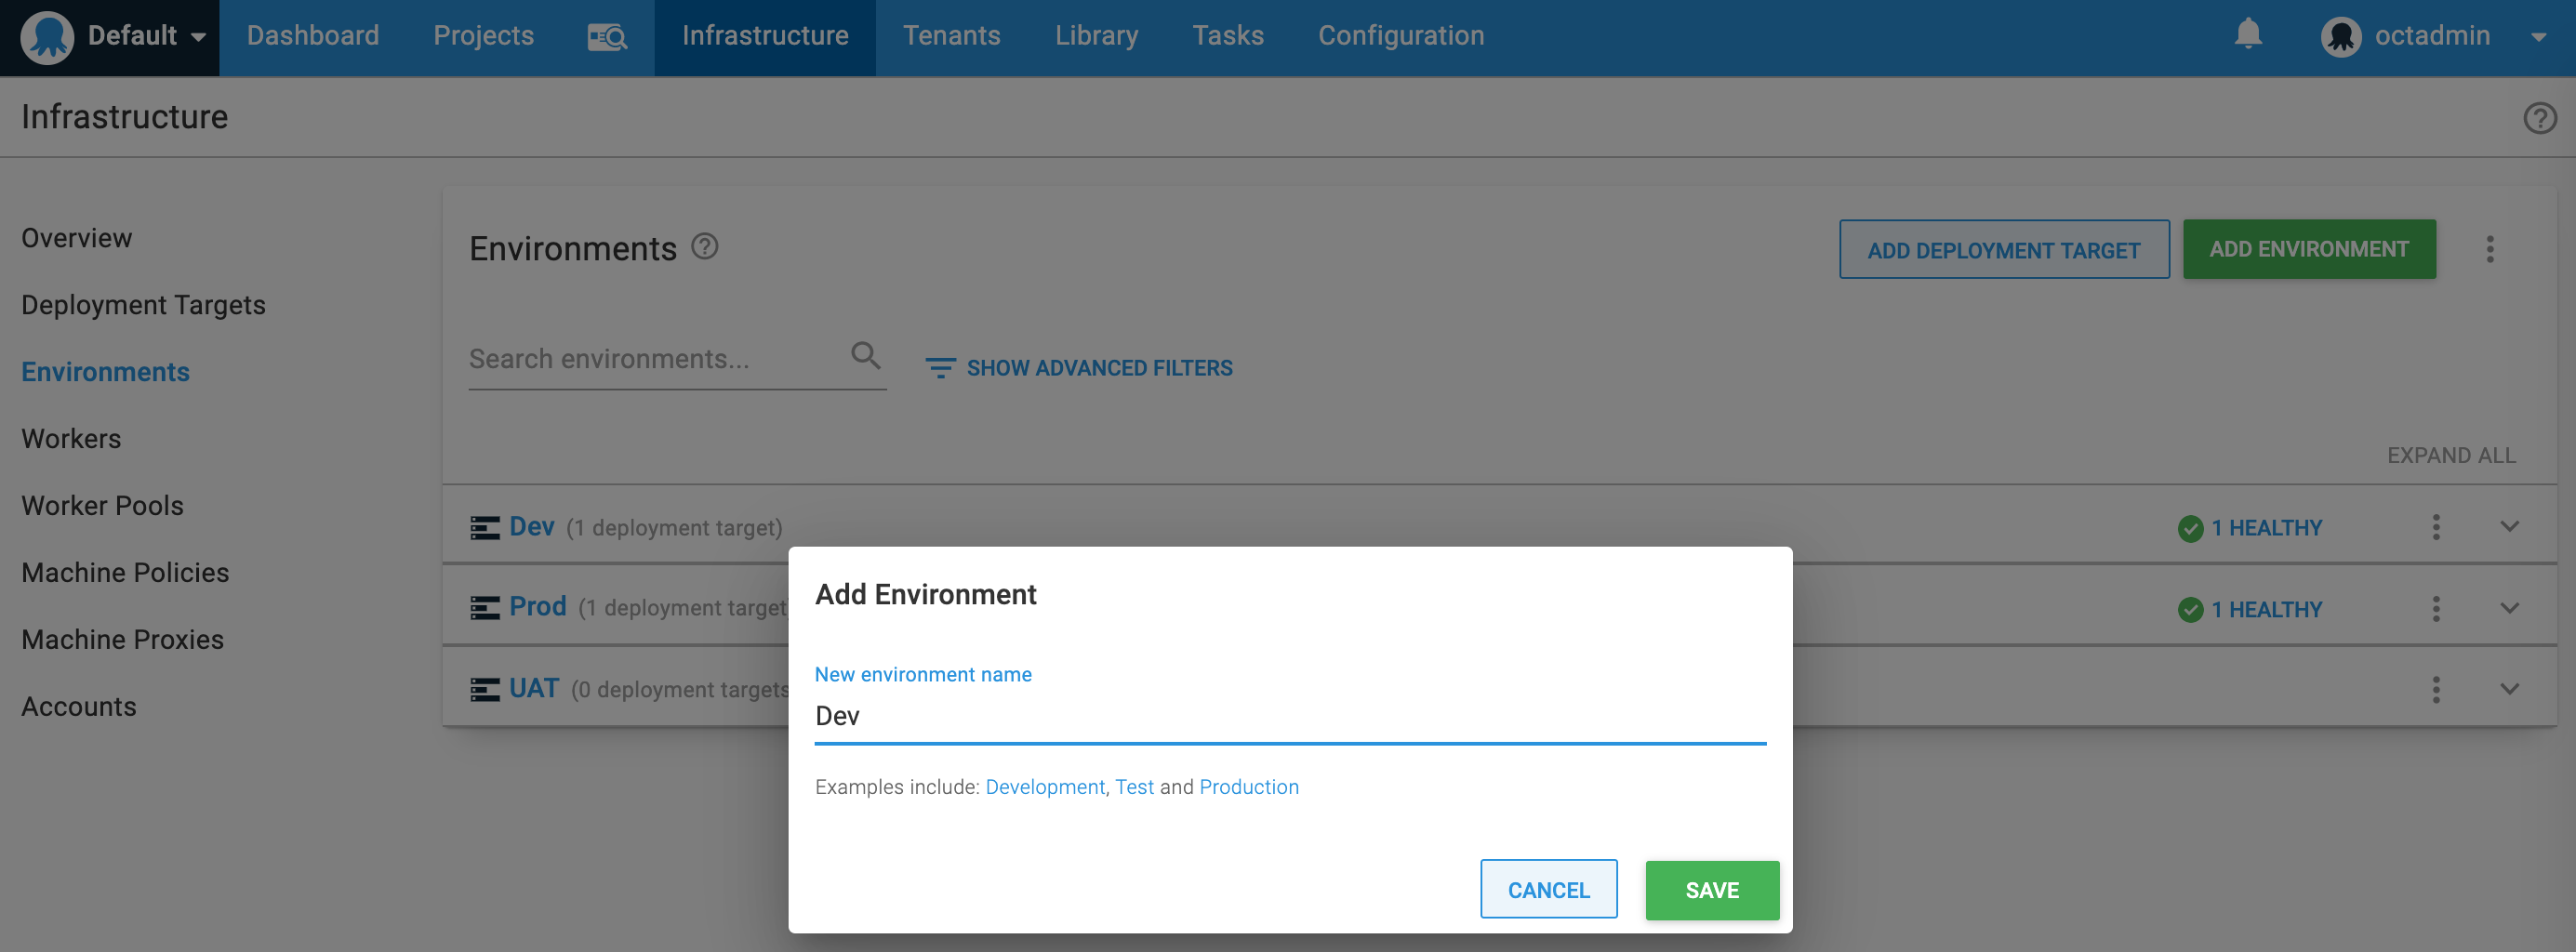
To do this, go to Environments and click Add Environment.
For more information on environments, see the guide.
Add accounts
To add accounts for connection to servers, follow the steps below:
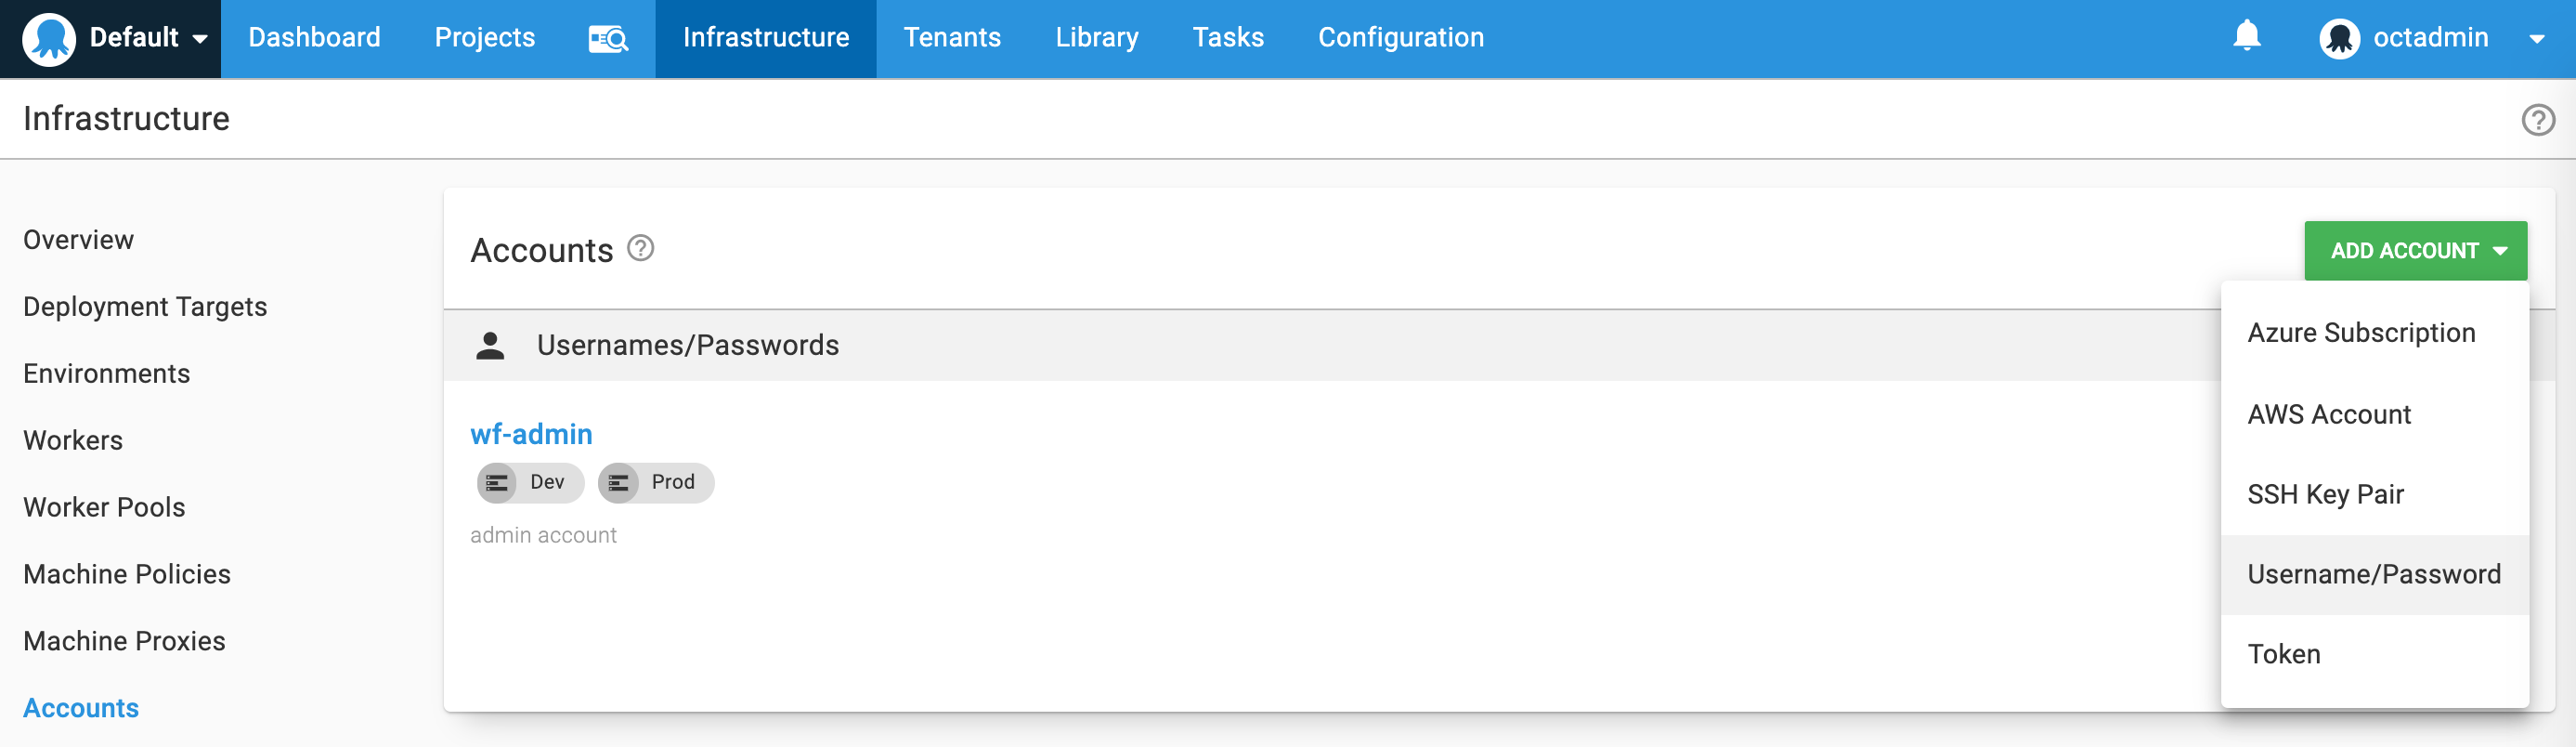
Go to Accounts and click Add Account > Username/Password.
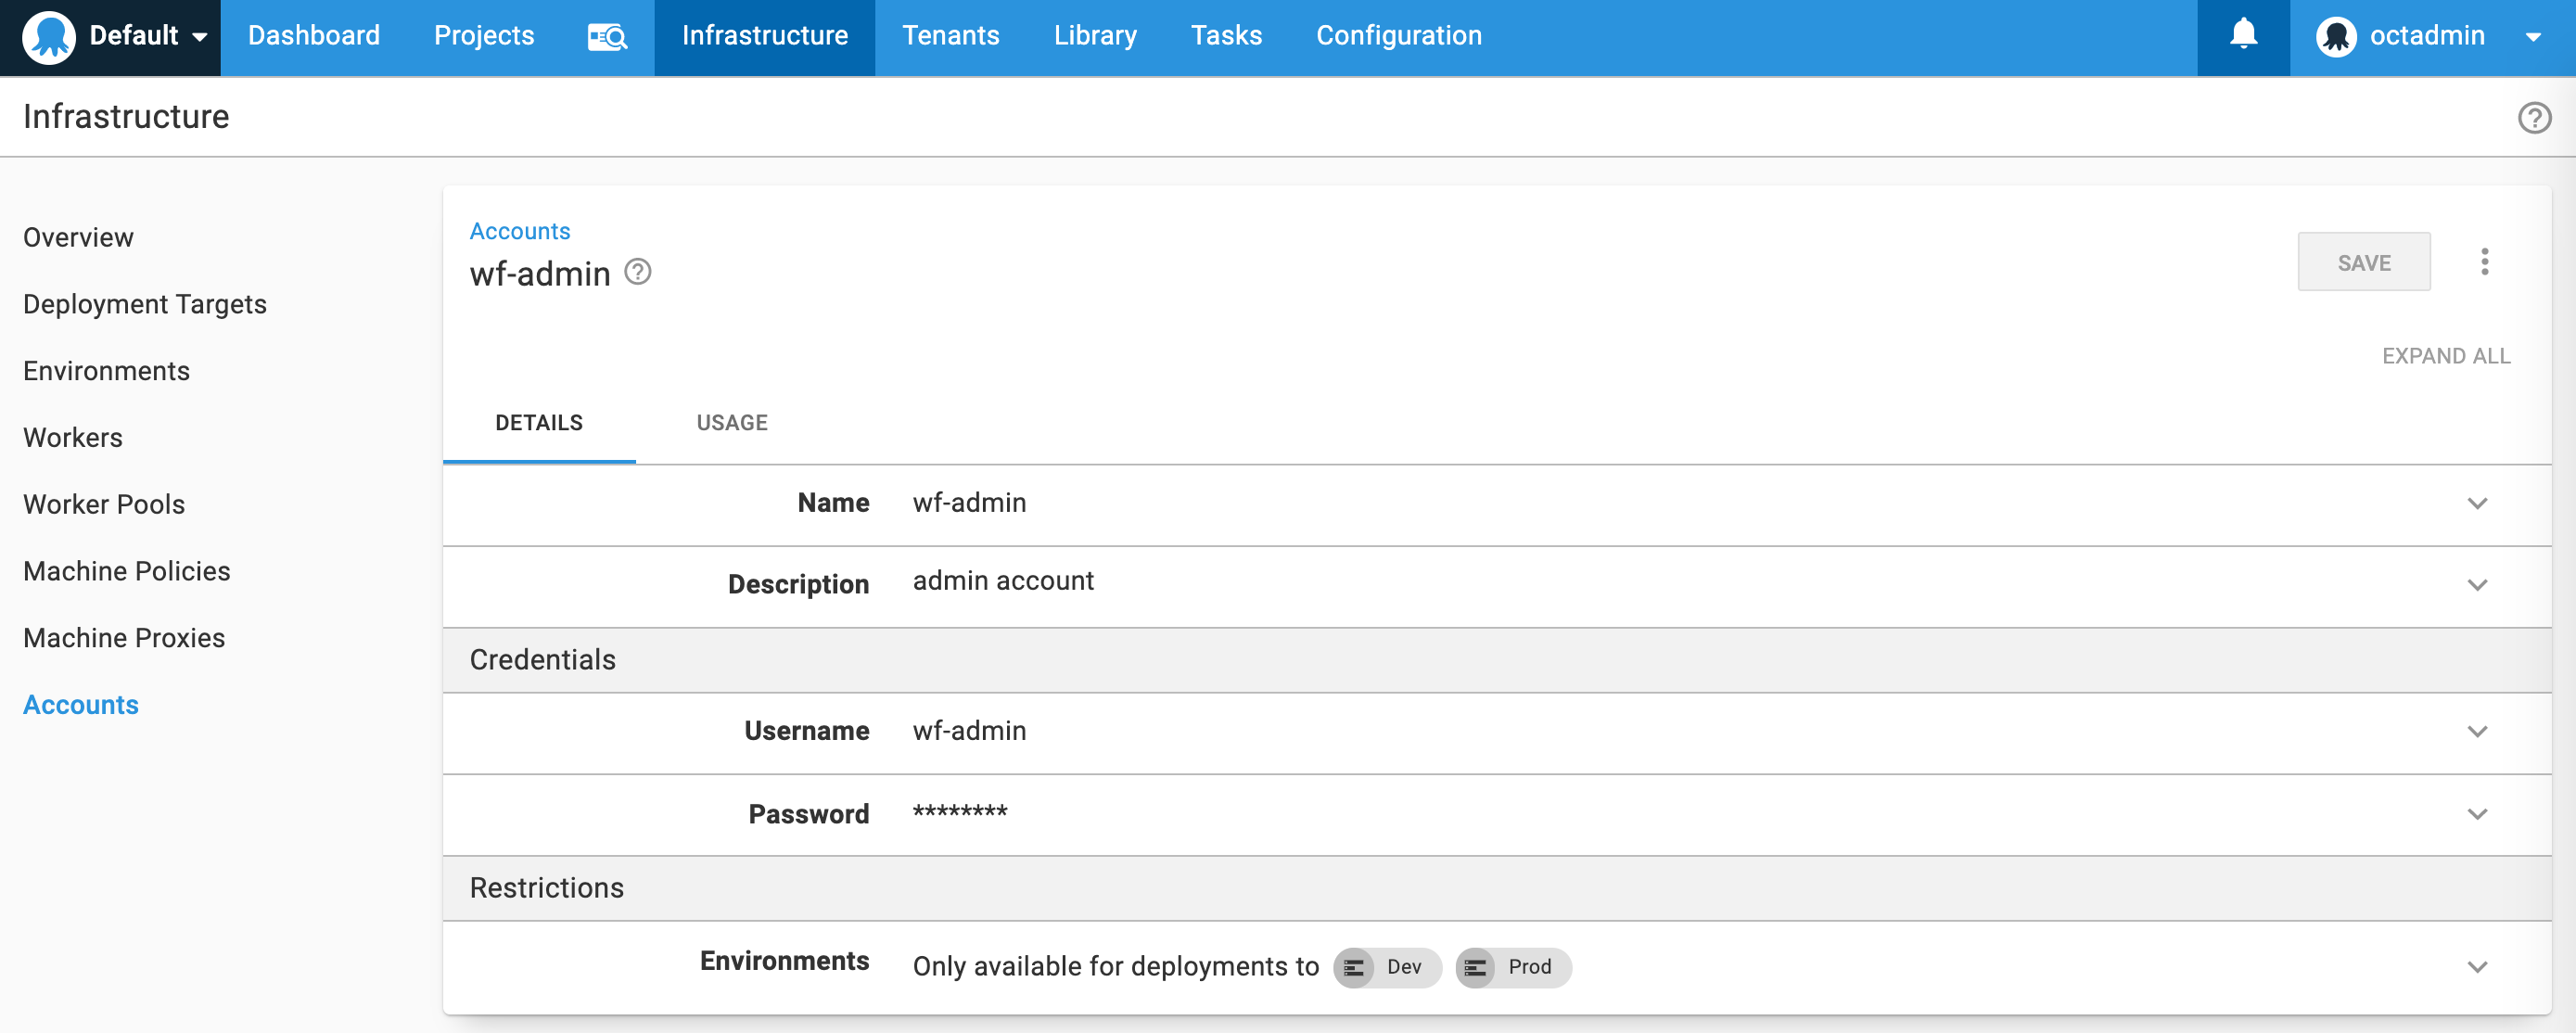
Enter the credentials and select the environments that are allowed to use the account.
Manage Deployment Targets
With Octopus Deploy, you can deploy software to Windows or Linux servers, Microsoft Azure, AWS, Kubernetes clusters, cloud regions, or an offline package drop. Regardless of where you're deploying your software, these machines and services act as your Deployment Targets.
To manage your deployment targets, follow the steps below:
On the Octopus web portal, go to Infrastructure ➜ Deployment Targets:
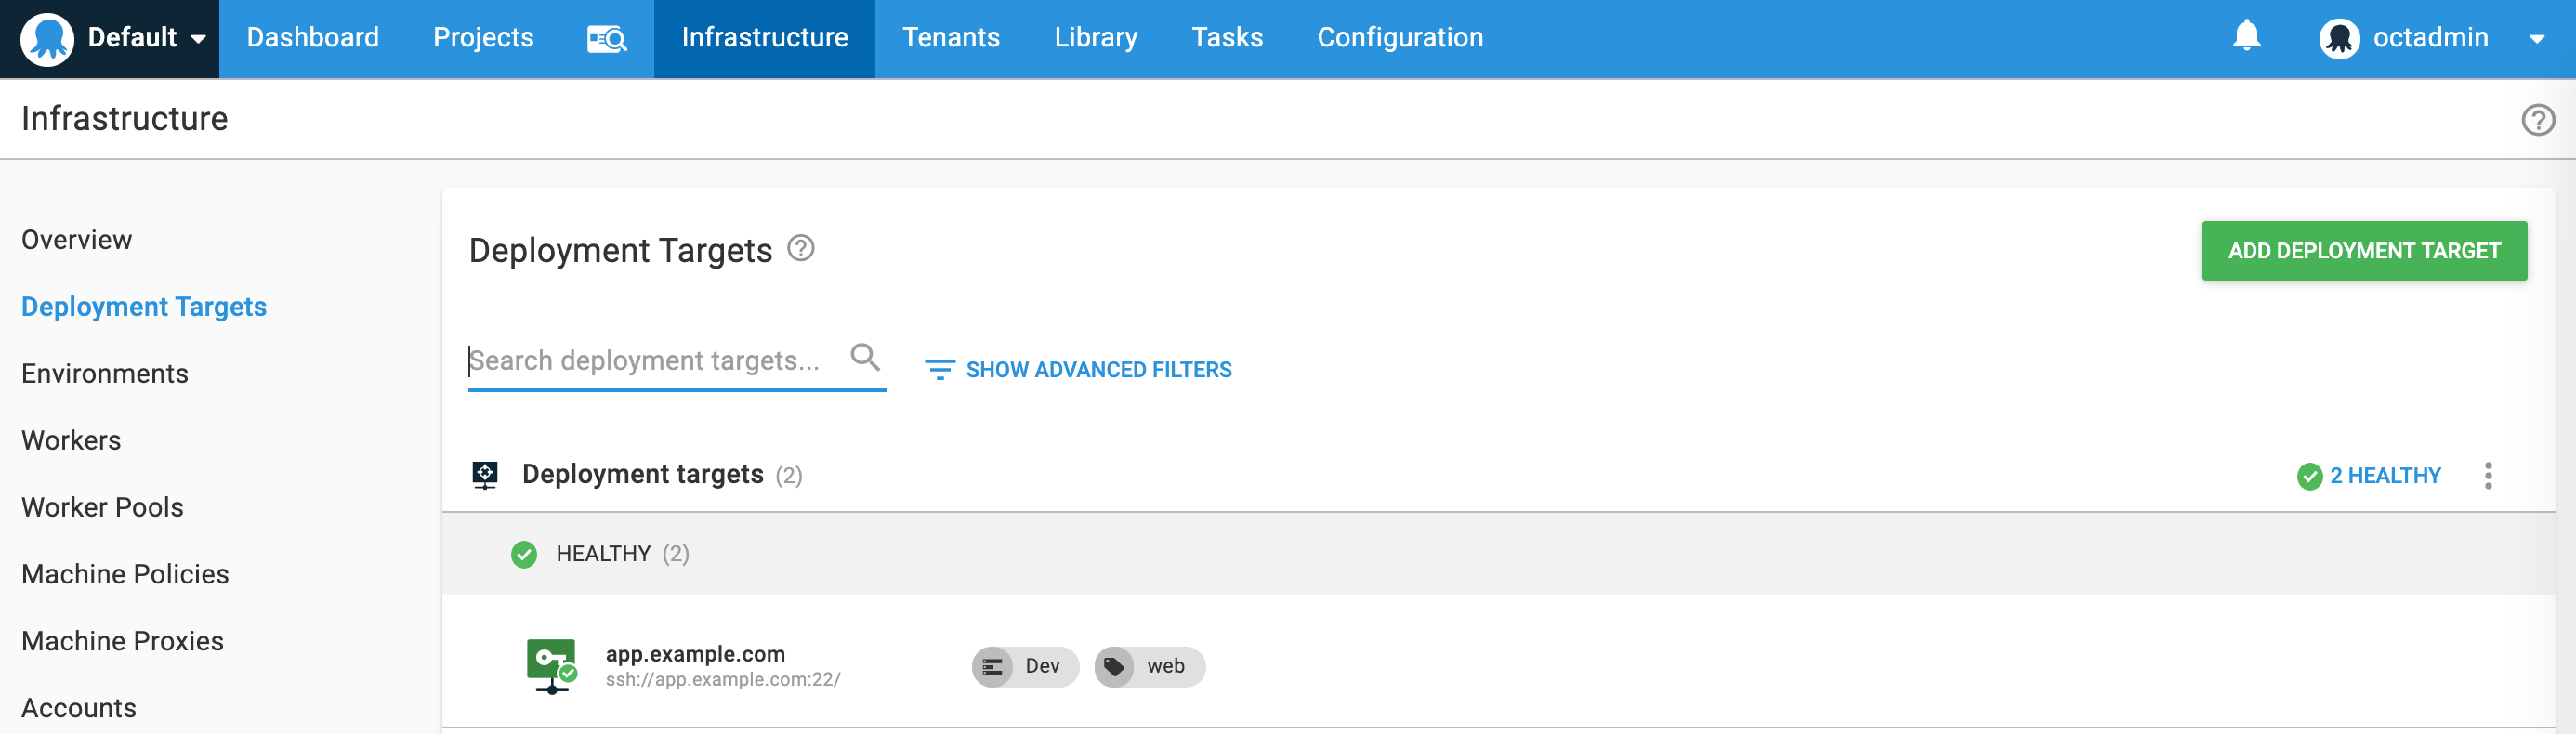
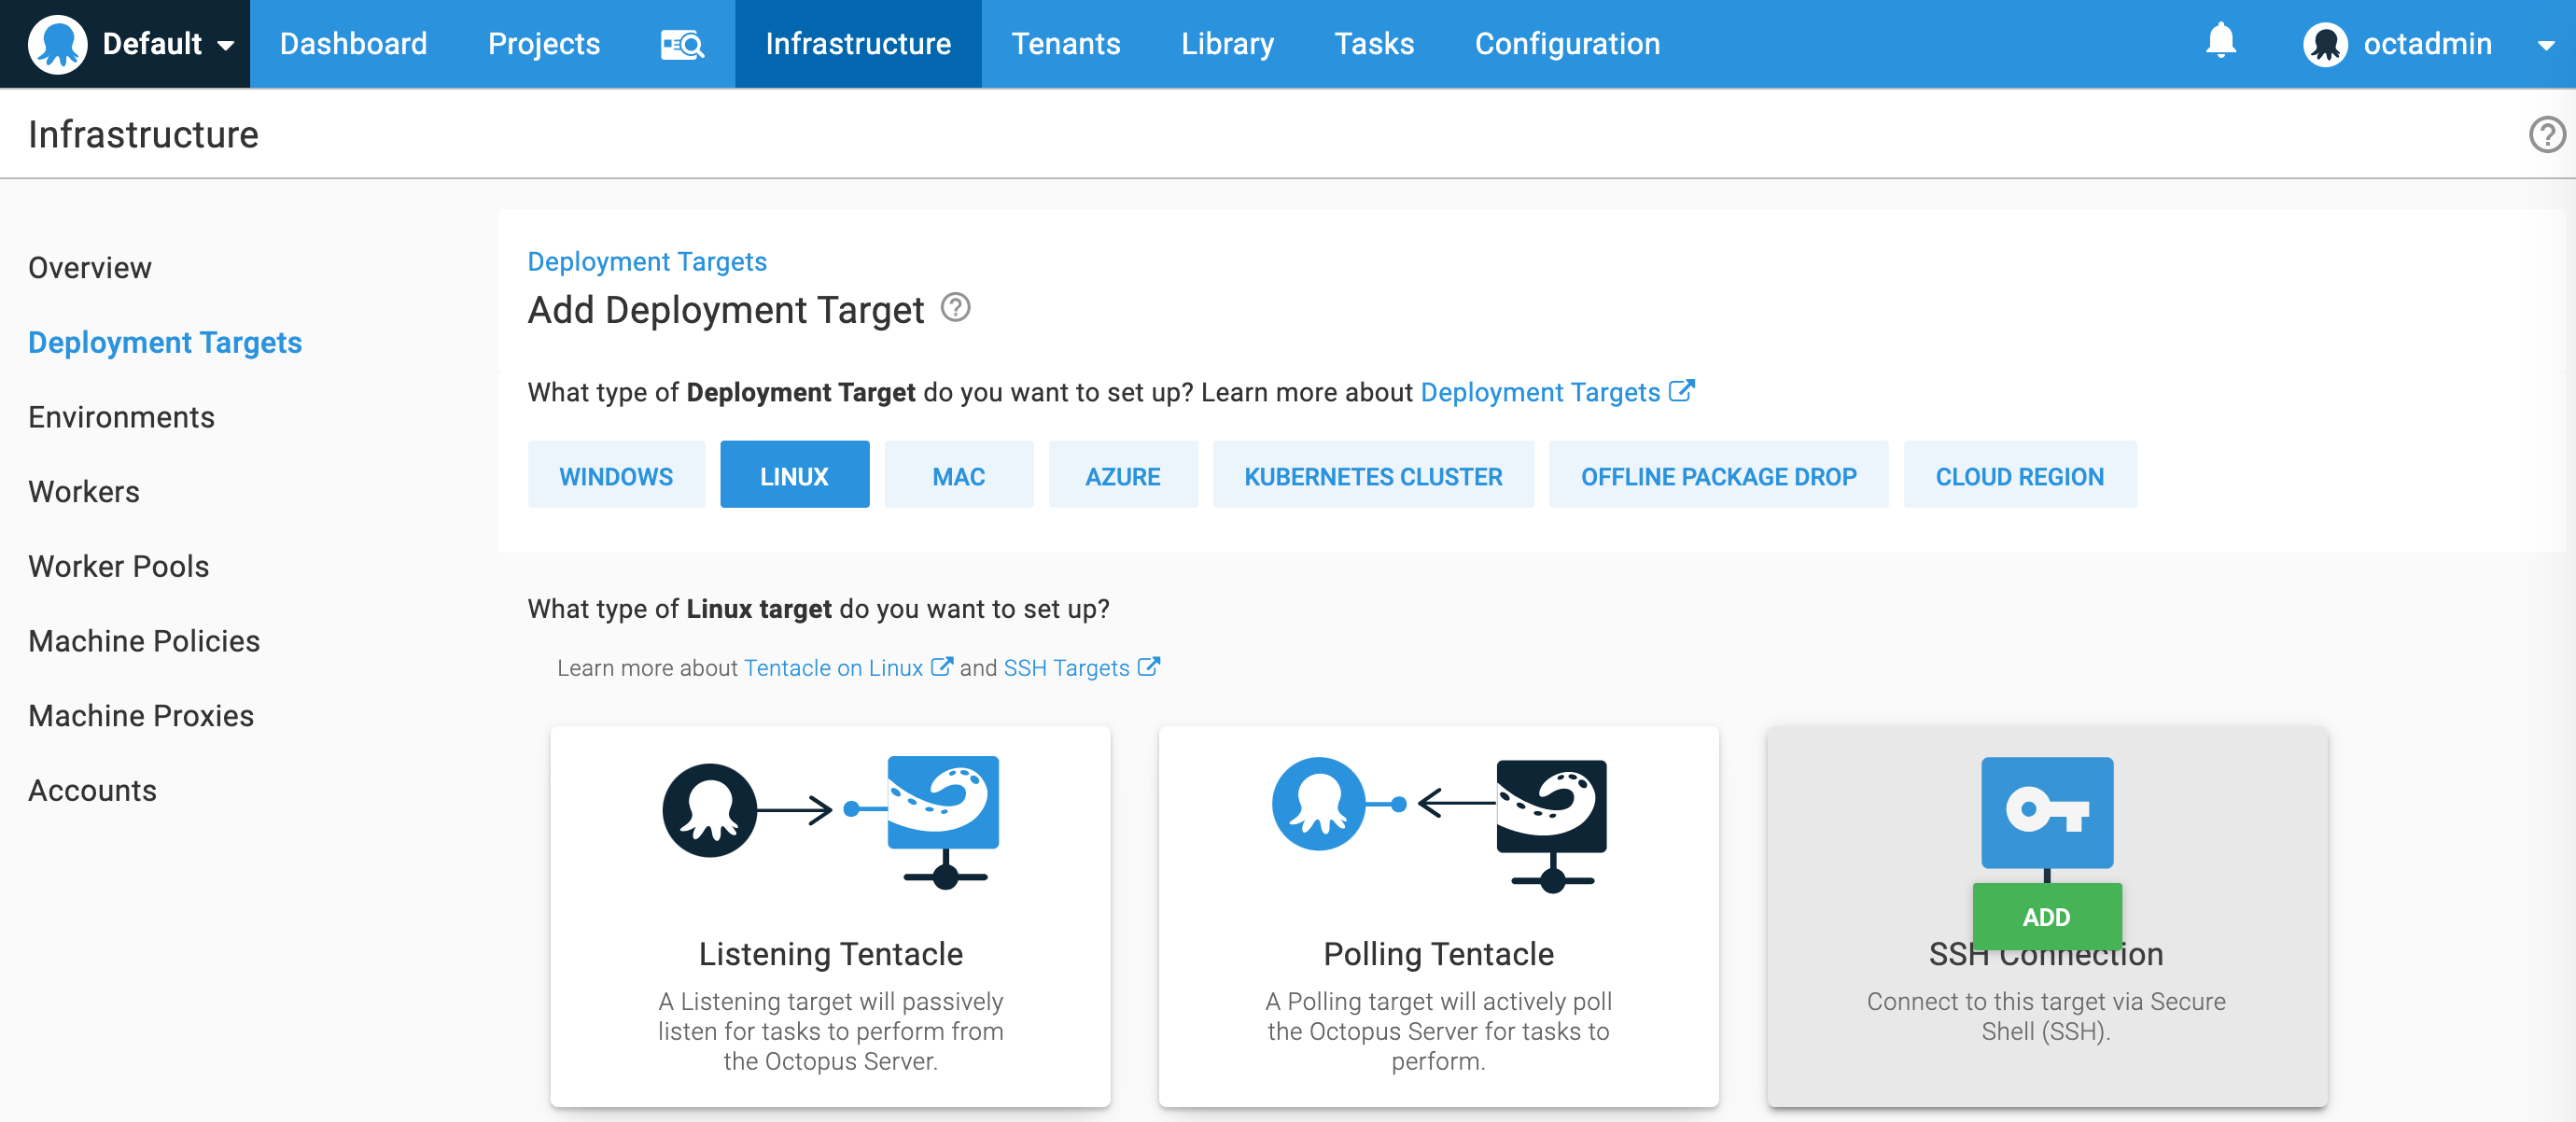
Add Deployment Targets before creating the Deploy Flow. For that, go to Deployment Targets and click Add deployment target.
Select Linux OS and add SSH Connection.
Enter host, port, select Environments, Target roles (type the name, for example, "web"), select Account, Platform > linux-x64.
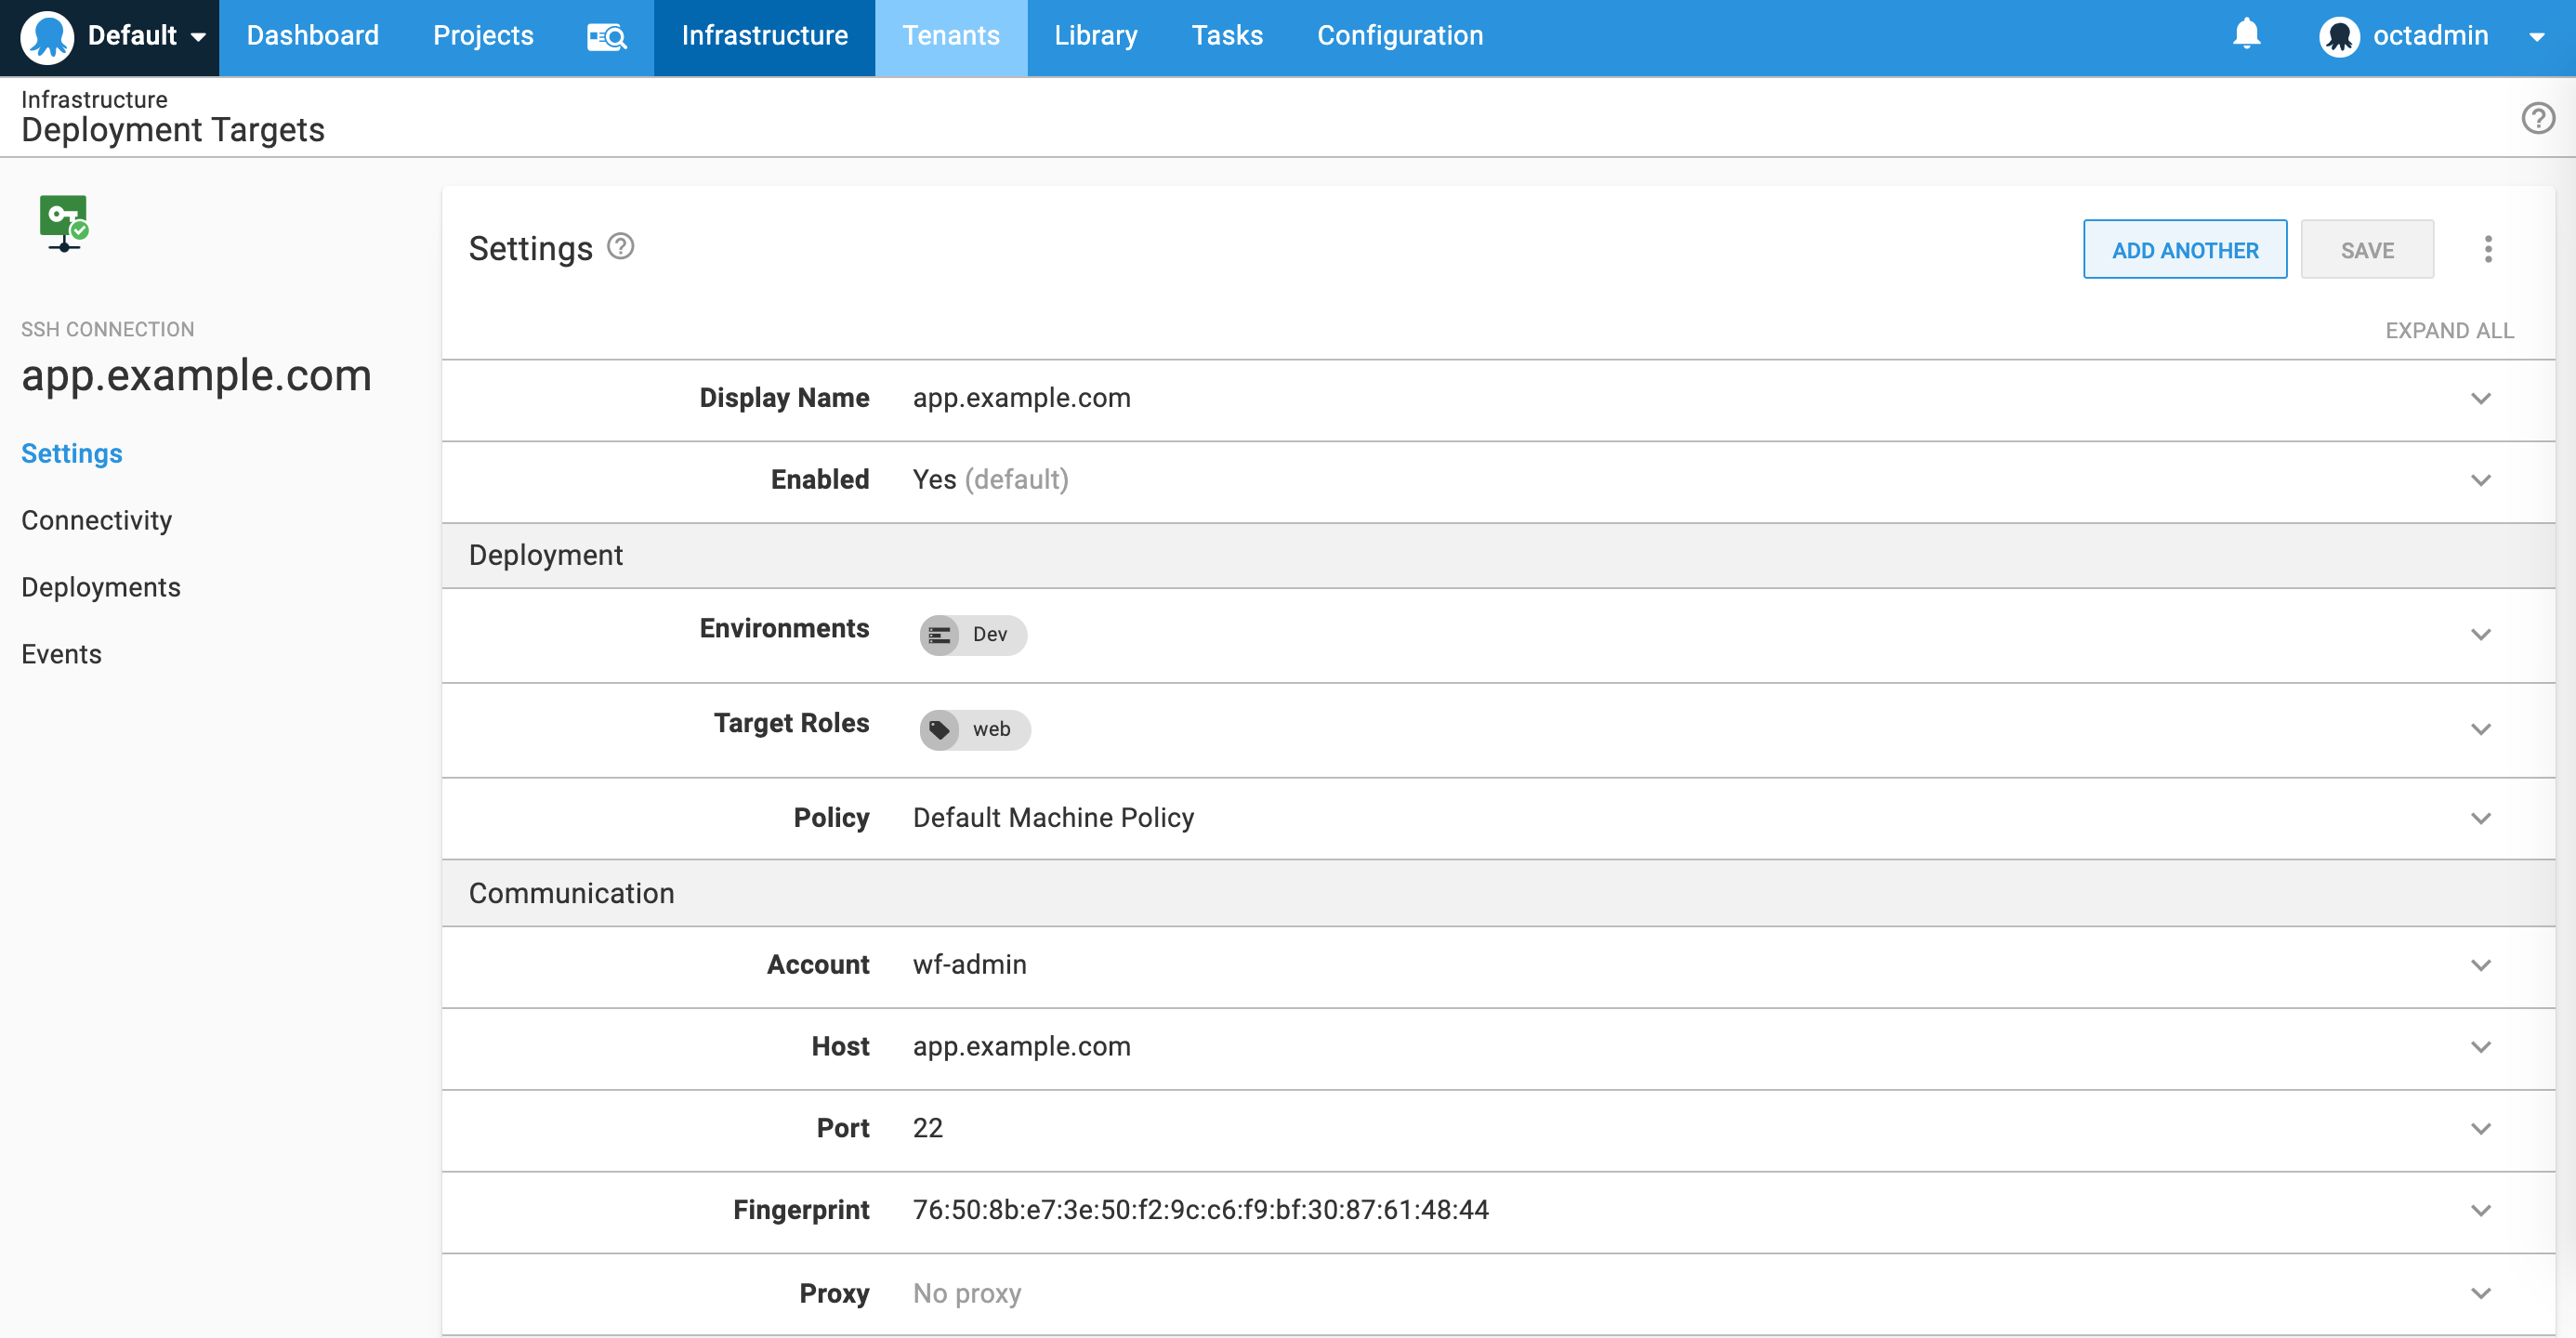
The SSH connection is established if there are no issues. If there are any, check the firewall configurations.
For more information, see the Deployment targets guide.
Projects
With Projects, you can create and manage your deployment processes, releases, and runbooks from the Octopus REST API and Octopus web portal.
For each project, you can define a deployment process, runbooks to manage your infrastructure, variables, the environments where the software is deployed, and releases of your software.
To manage your projects, on the Octopus web portal, go to the Projects tab:
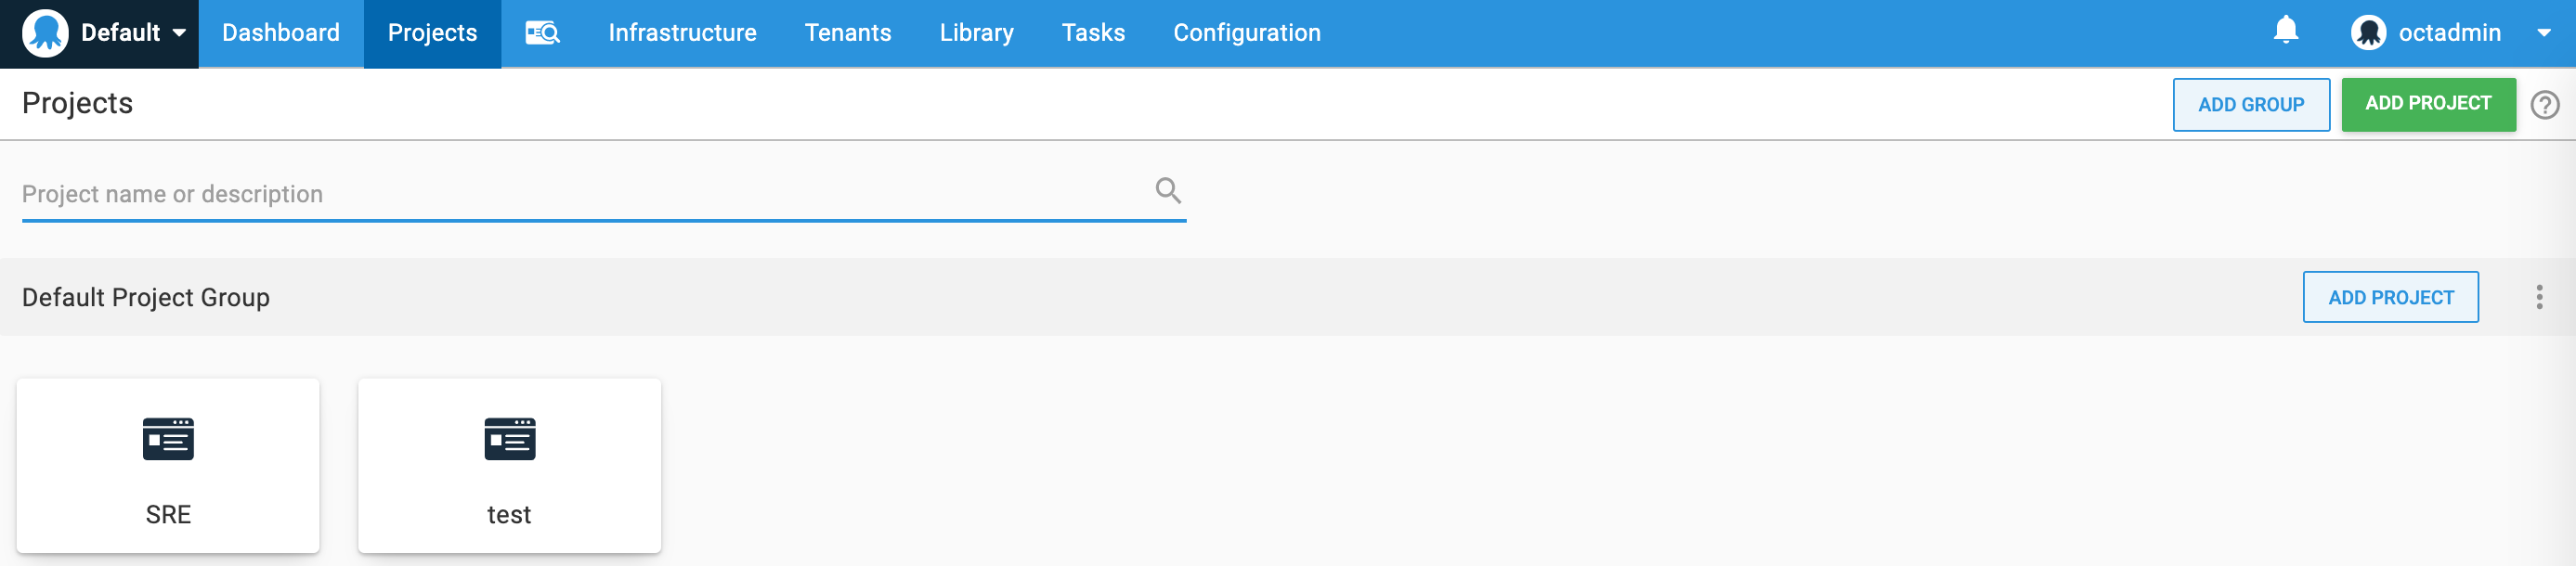
Add project
Before defining your deployment processes or runbooks, create a project:
- On the main navigation menu, select Projects and click Add project.
- Specify the name of the new project.
- Click Show advanced and add a description for the project.
- To change the Project group, select an existing project group from the drop-down menu.
- To change the Lifecycle, select an existing lifecycle from the drop-down menu.
- To open a visual representation of the chosen lifecycle, click Show lifecycle.
- Click Save. The created project's overview page appears.
Now, you can define your deployment process or runbooks.
Define deployment process
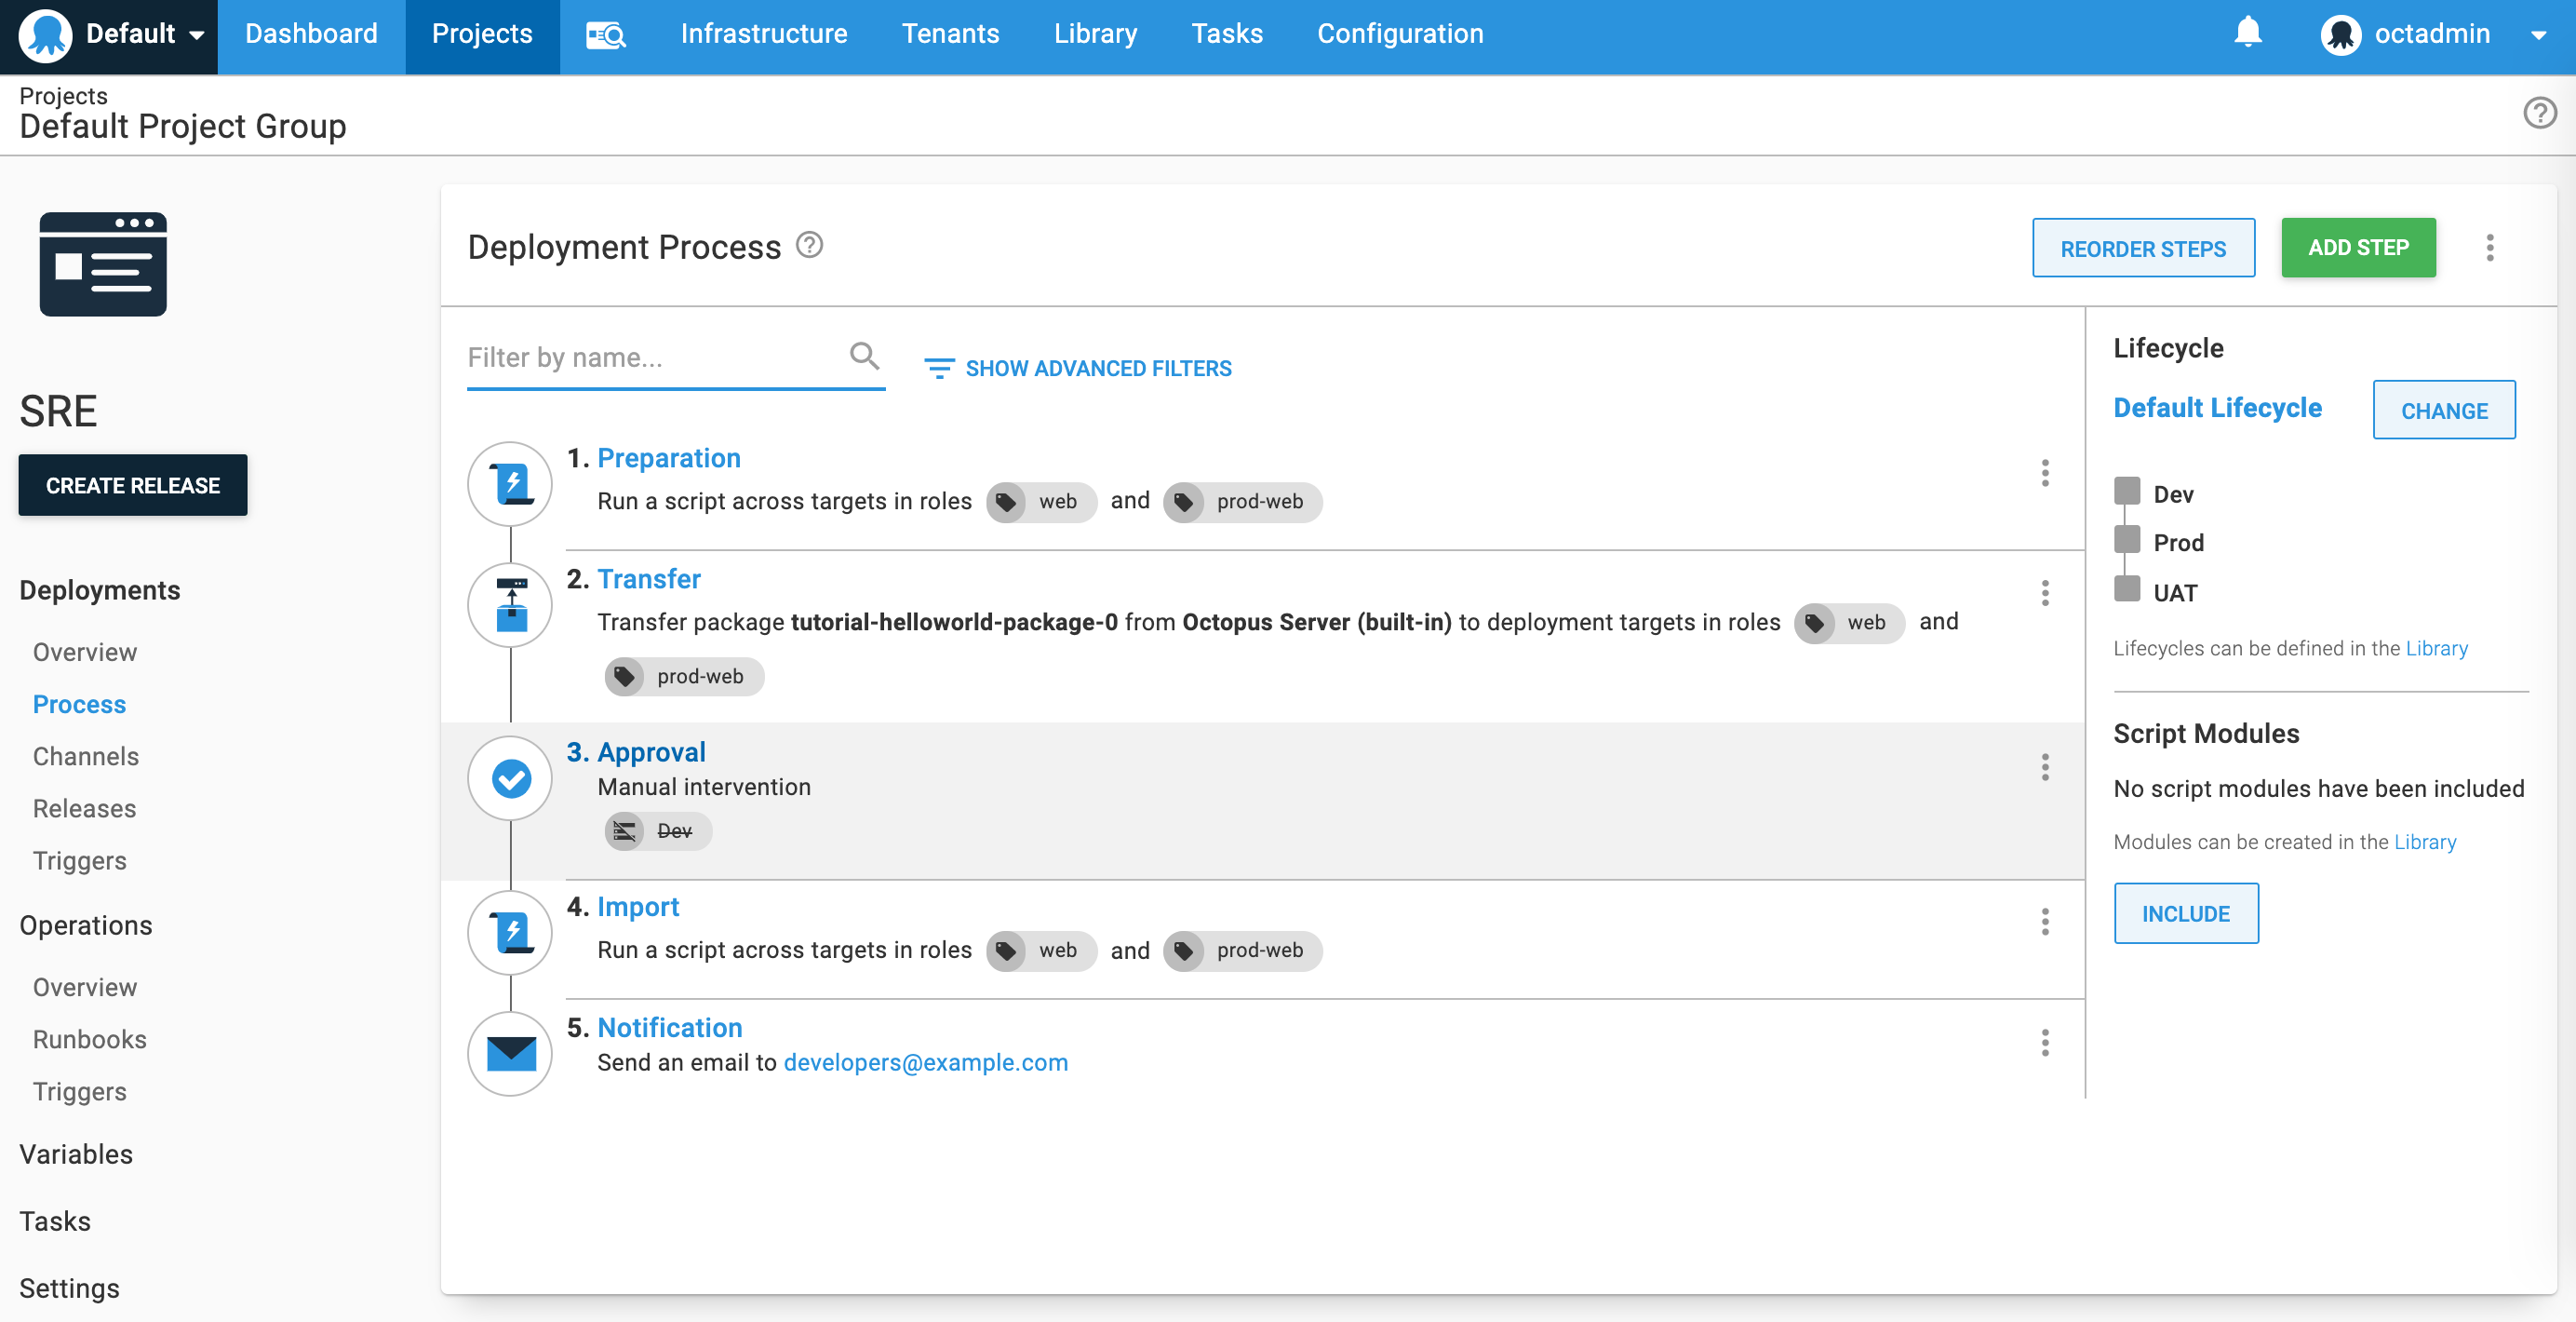
To create a new step in your process, go to Projects > Deployments > Process and click Add step.
The final setup should look as follows:
Create preparation step
To create a preparation step, follow the instruction below:
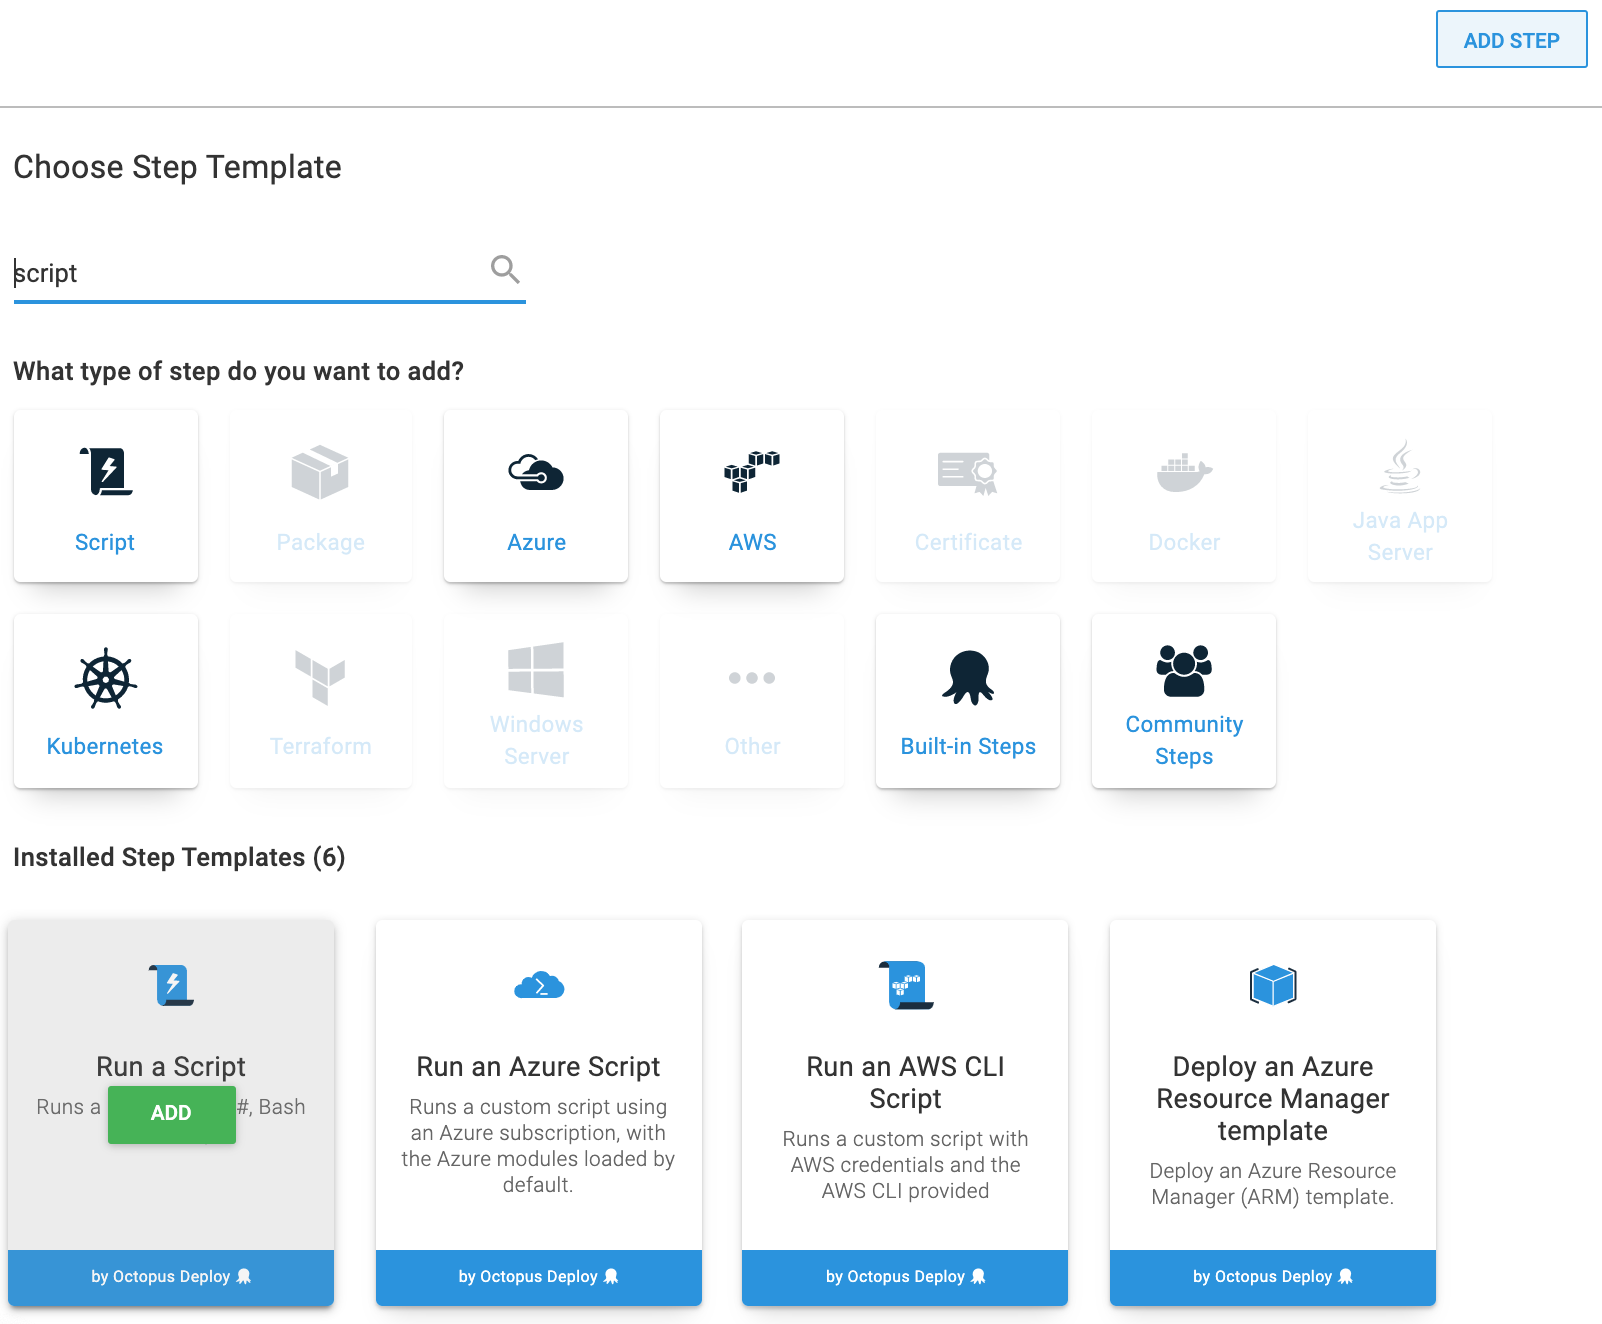
Select the Run a Script template:
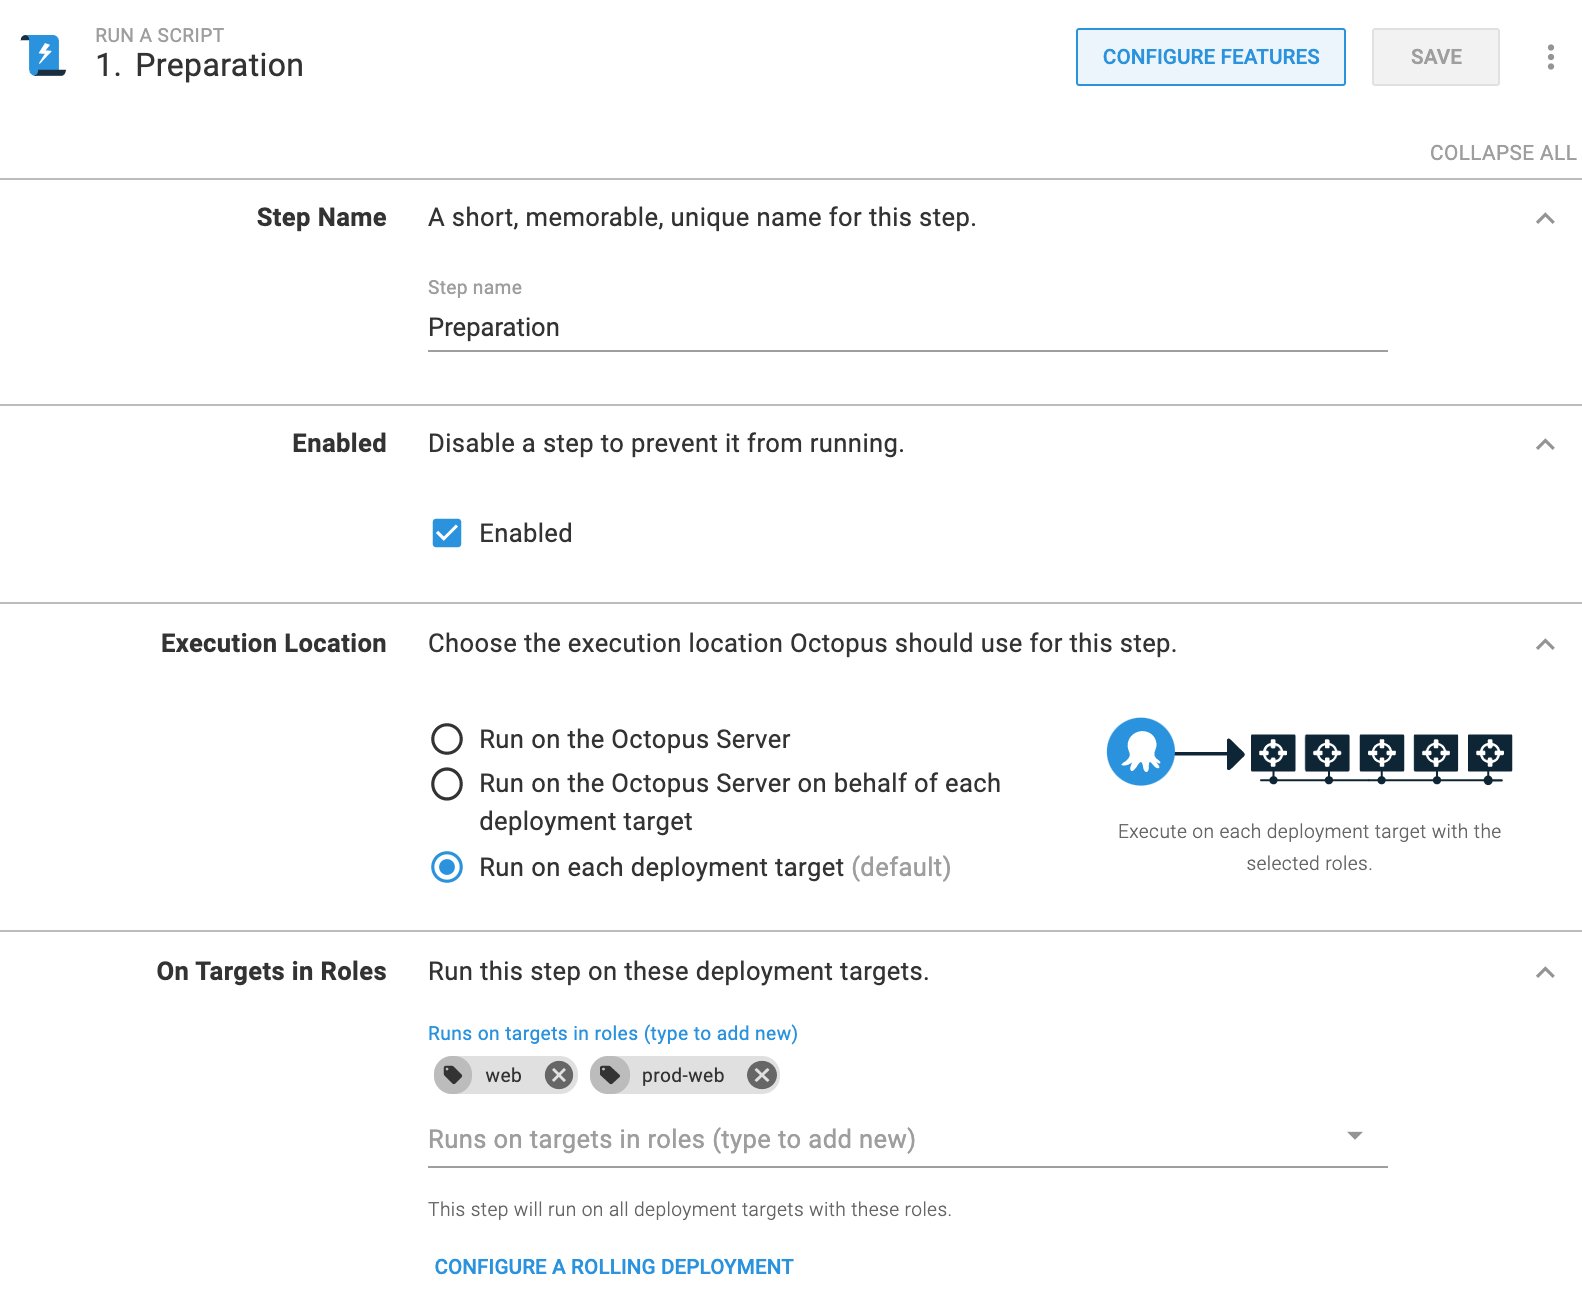
Enter the Step Name and select Targets in Roles. You have already defined them on the Deployment Targets step.
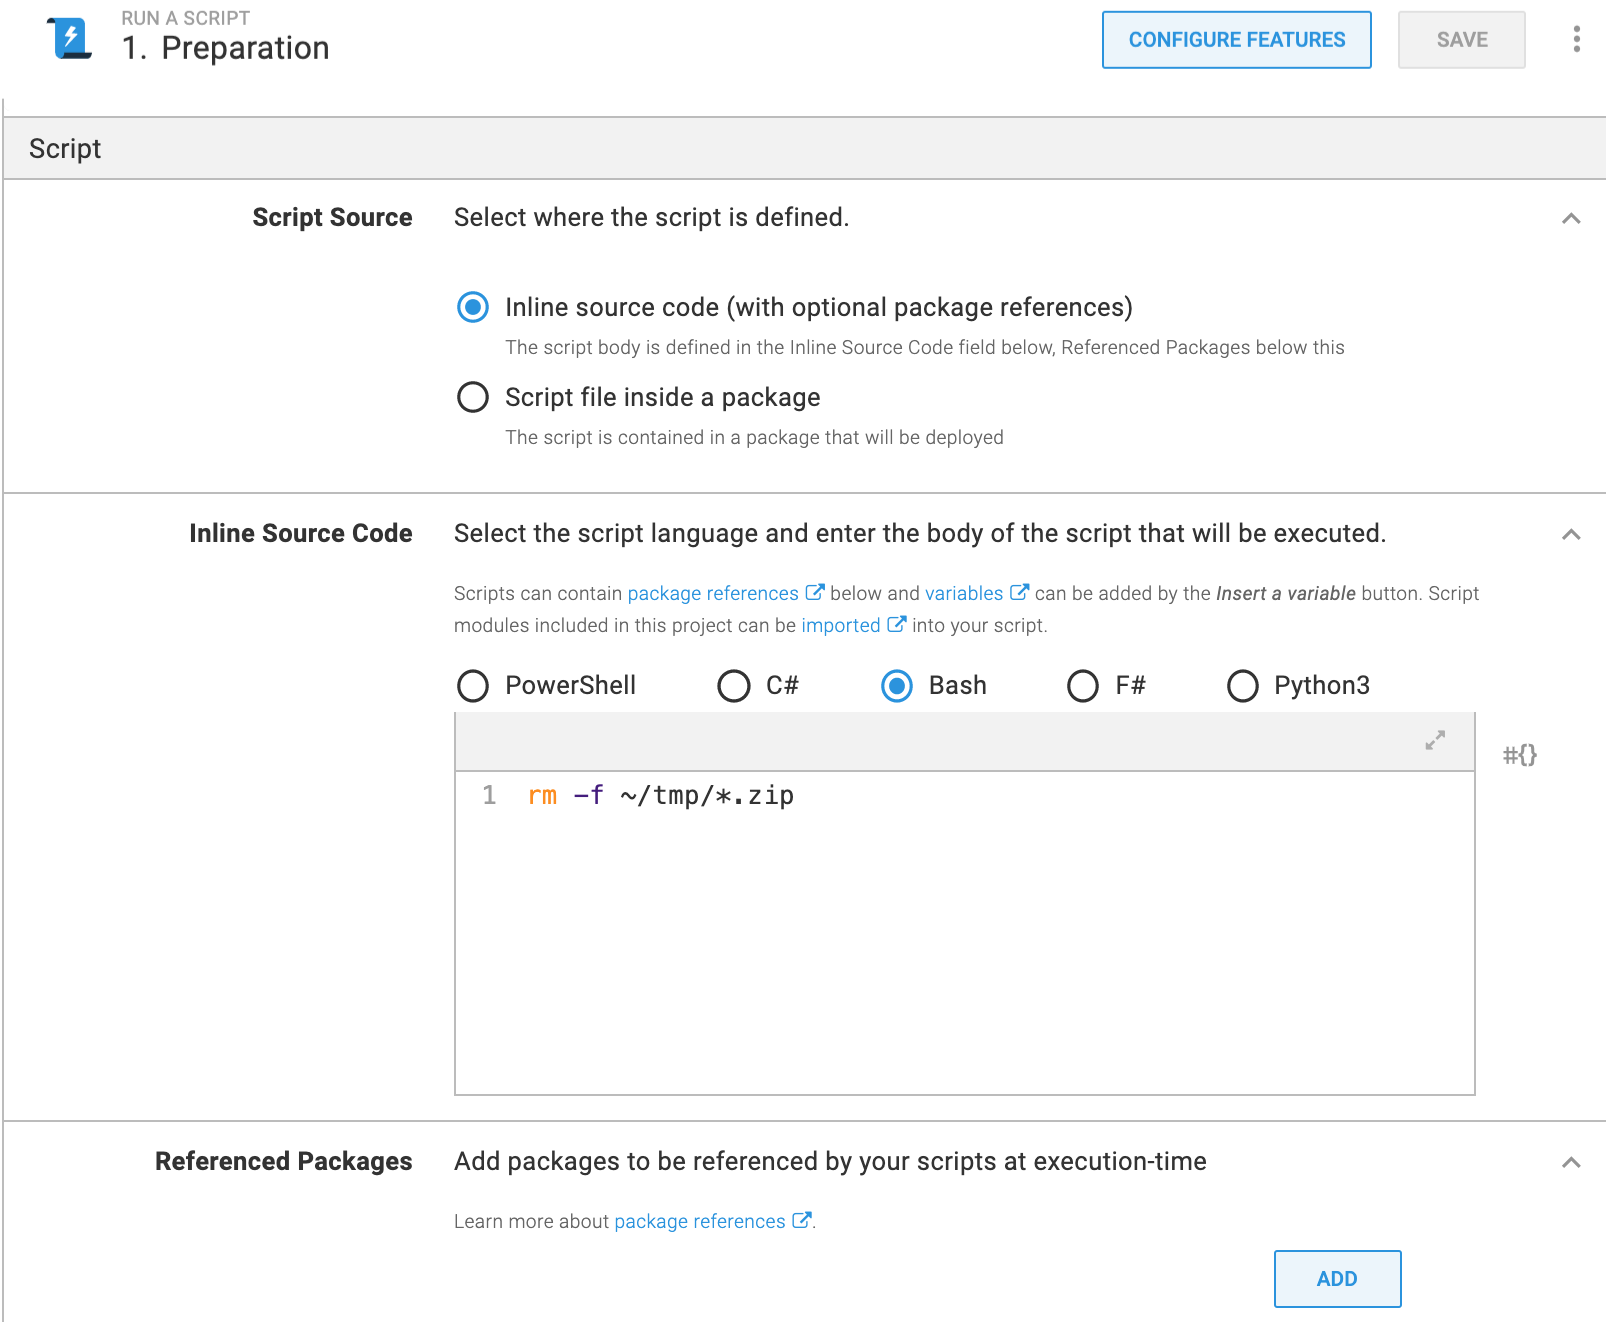
In the Inline source code group, select Bash and enter the following command.
rm -f ~/tmp/*.zipYou use only one build, and it is cached. So, old changes can be applied to Production.
Save the changes.
Create Transfer package step
To create the Transfer package step, follow the steps below:
Select the Transfer a Package template.
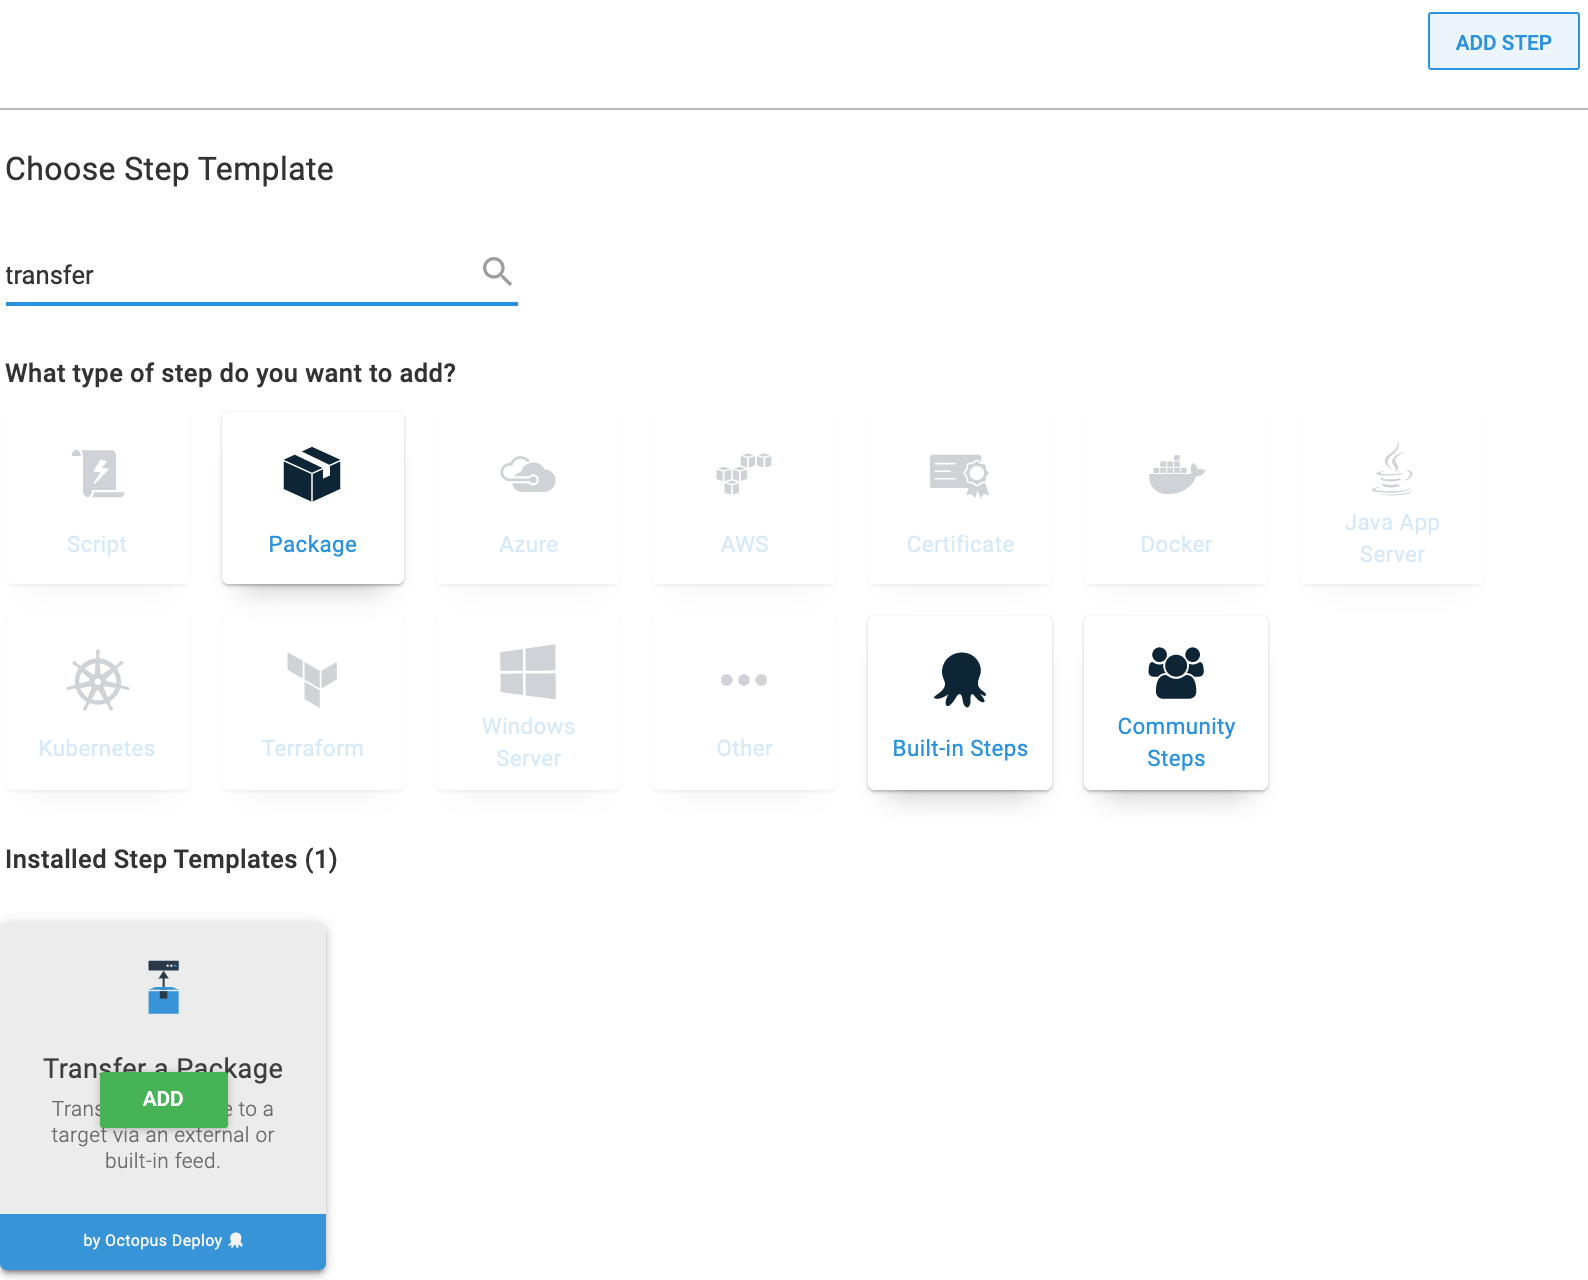
Specify Step Name and select Targets in Roles. You have already defined them on the Deployment Targets step.
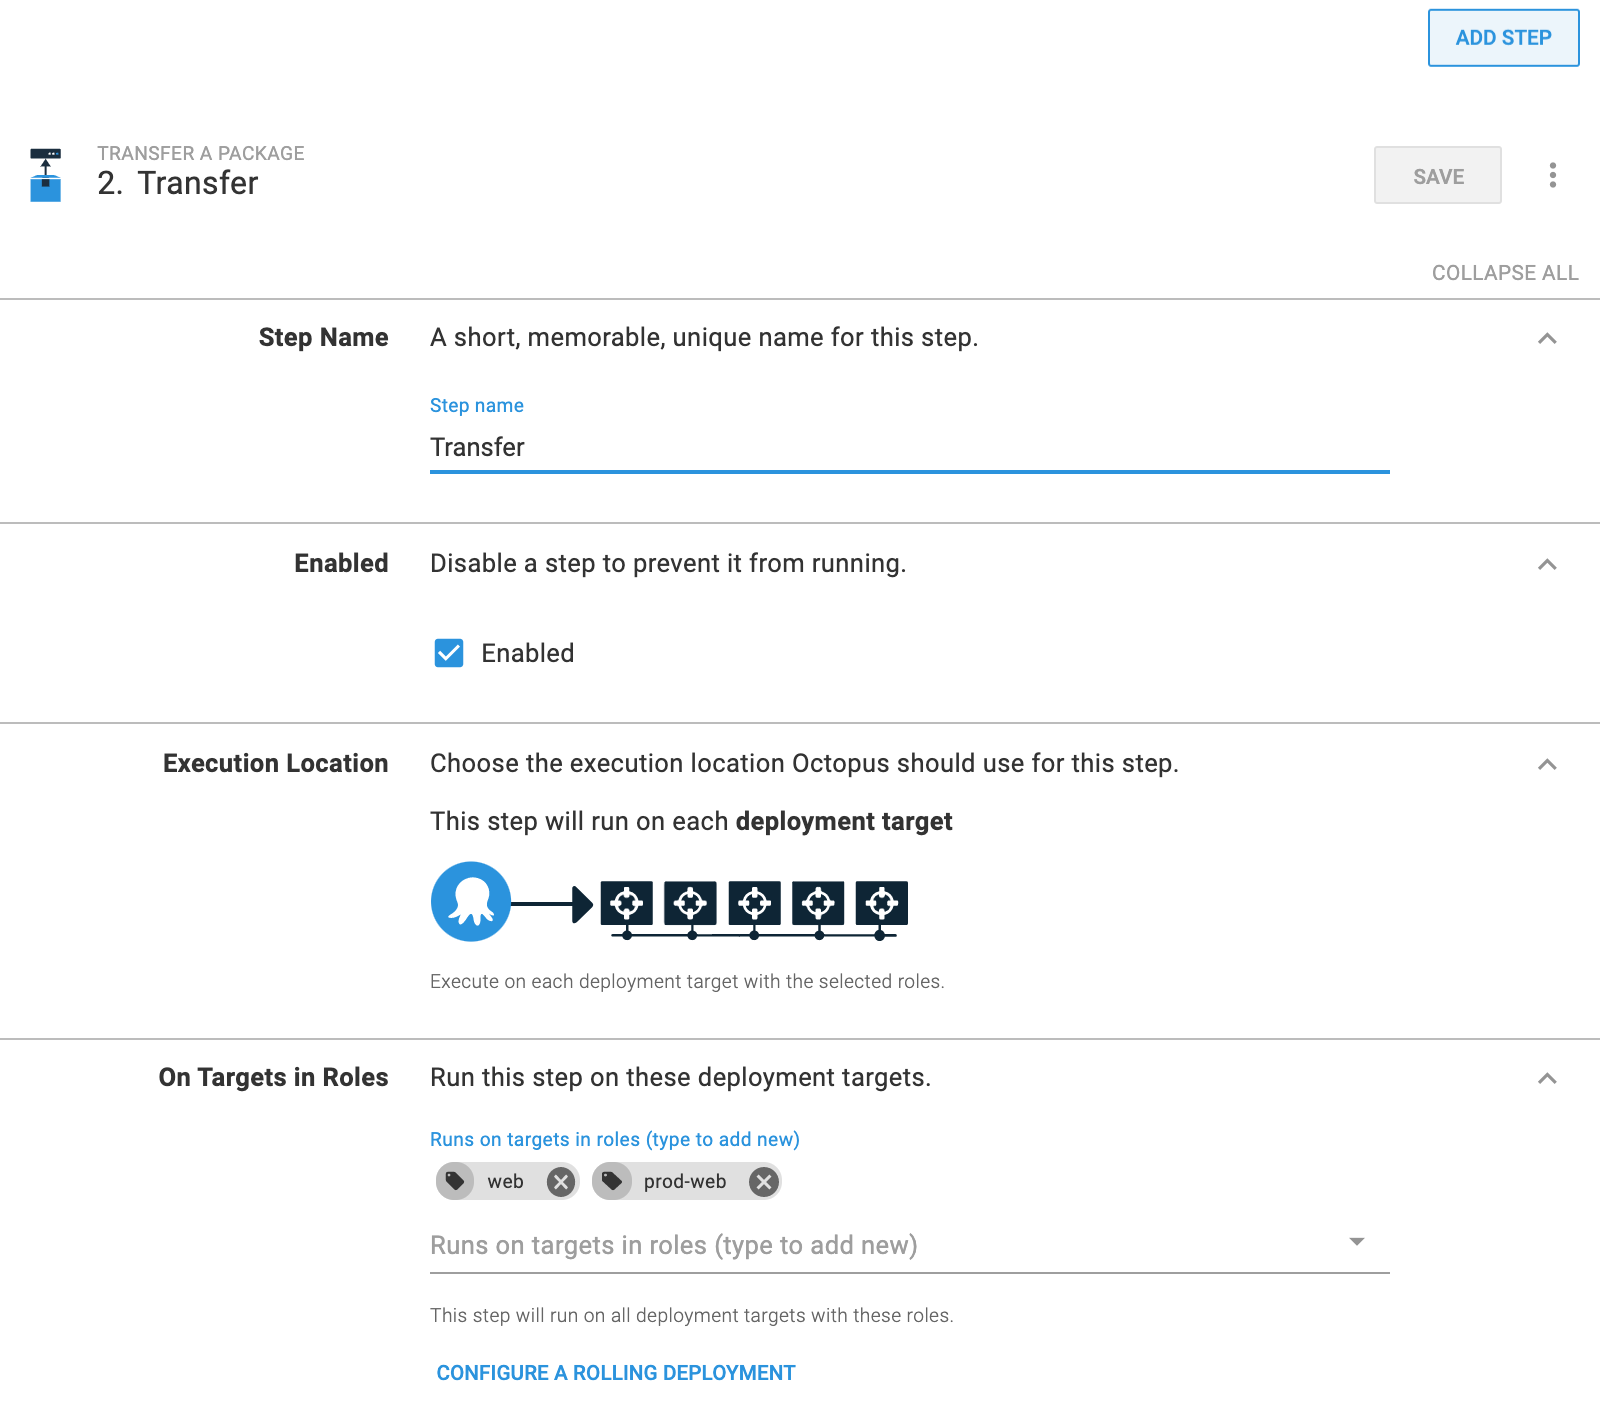
In Package Details, in the Package Feed box, select Octopus Server", specify Package ID, and a transfer path on the server to temporarily store the package. Save it and create the next step.
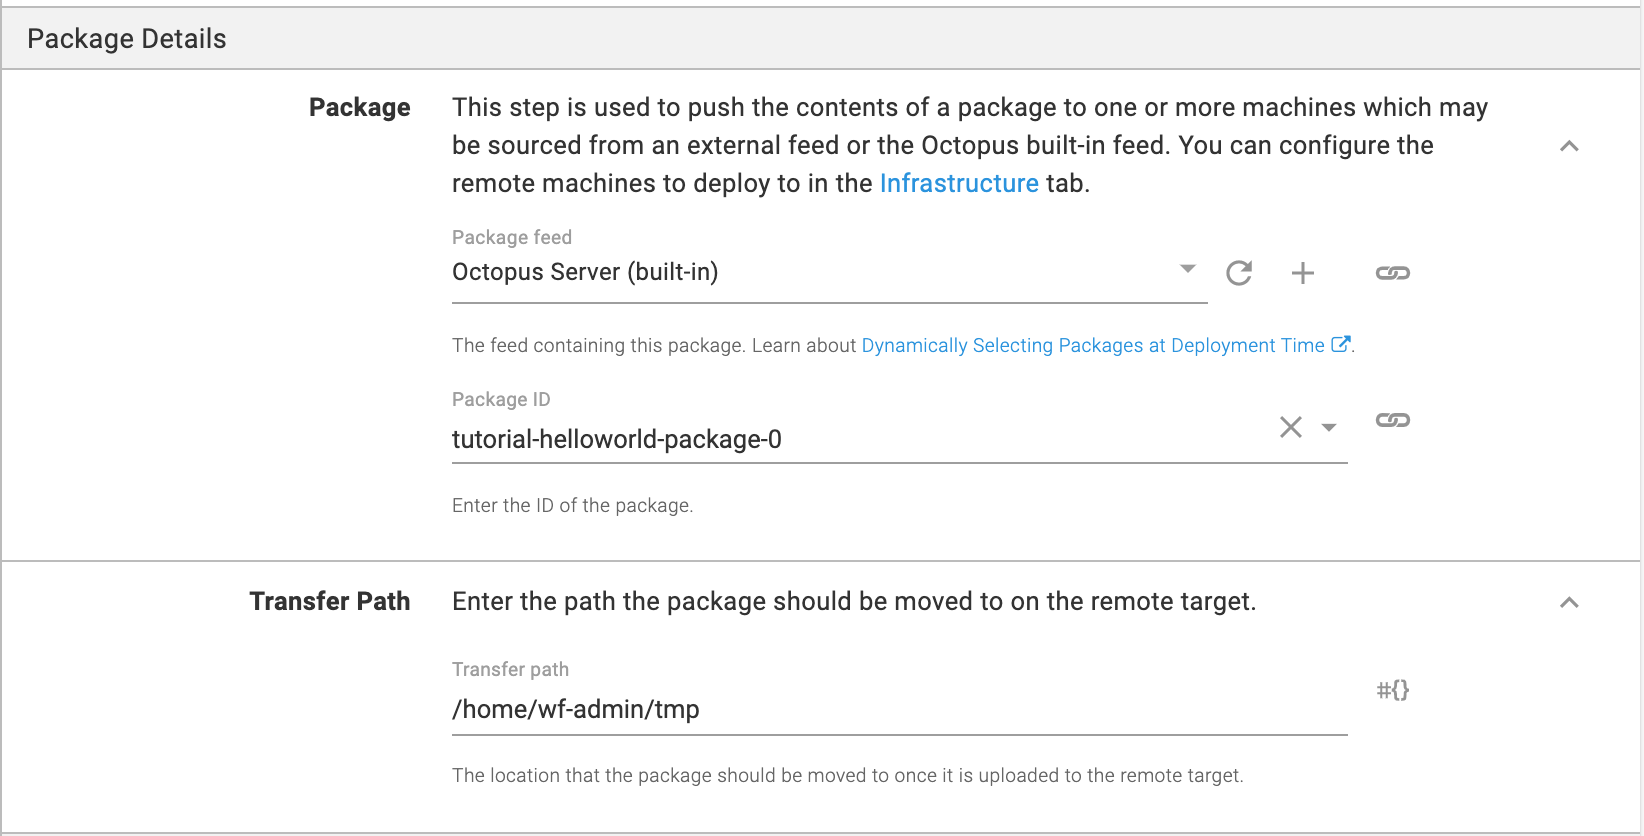
The Package is sent to Octopus Feed from CI. The TeamCity pipeline has a dedicated step to send the package to Octopus Library.
Set approval
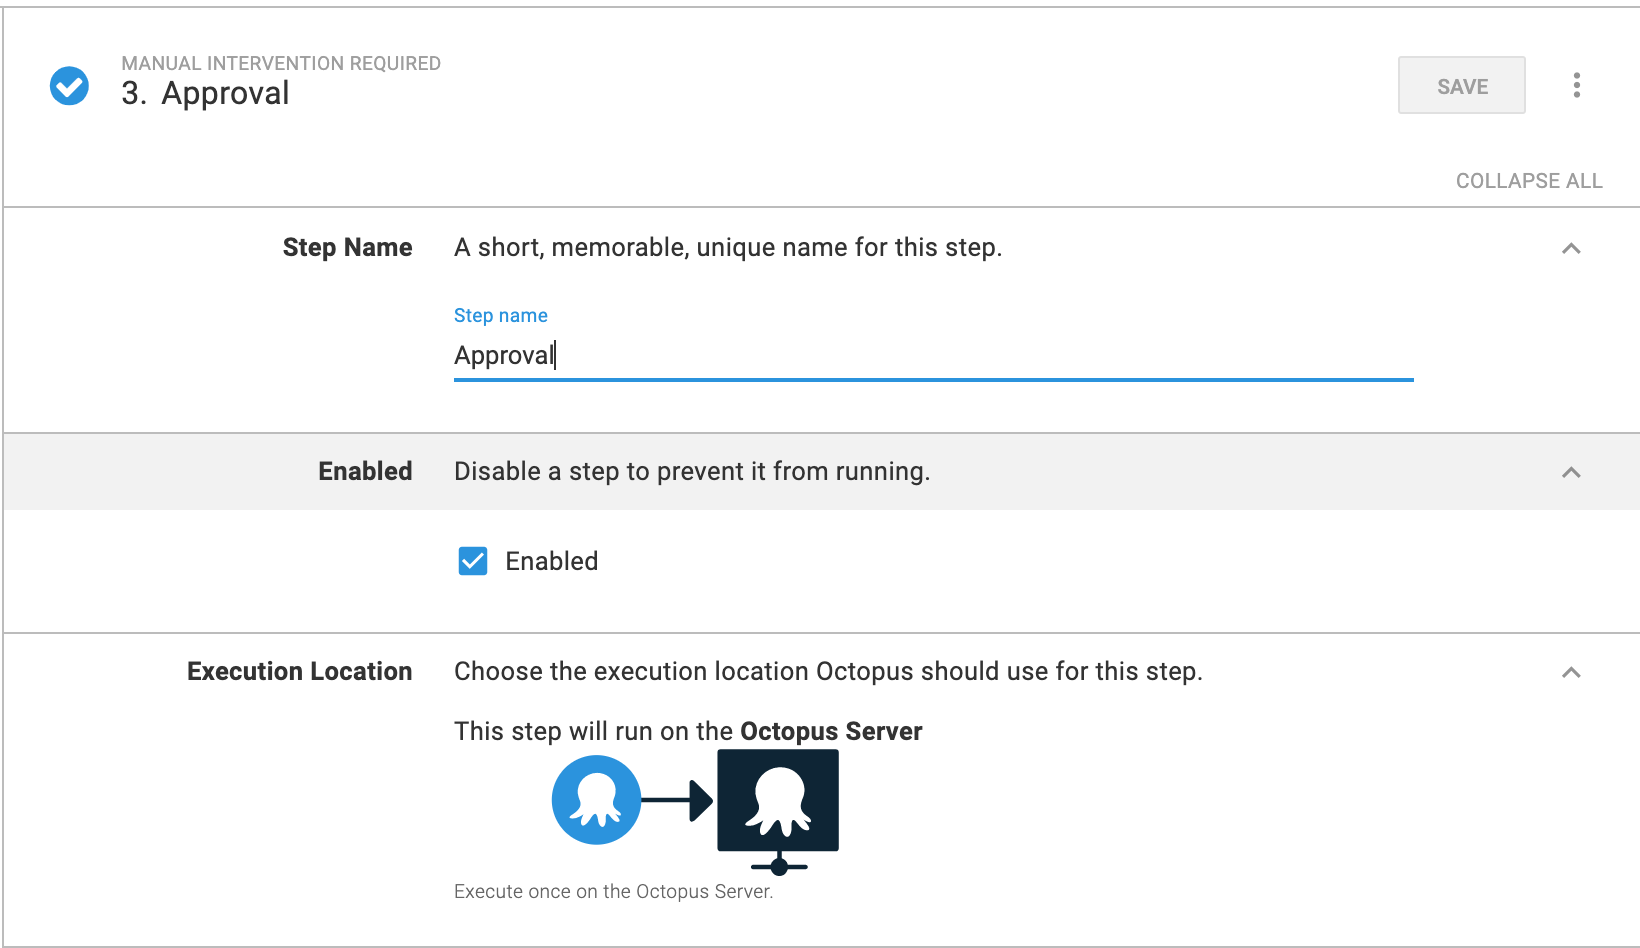
Select the Manual Intervention template.
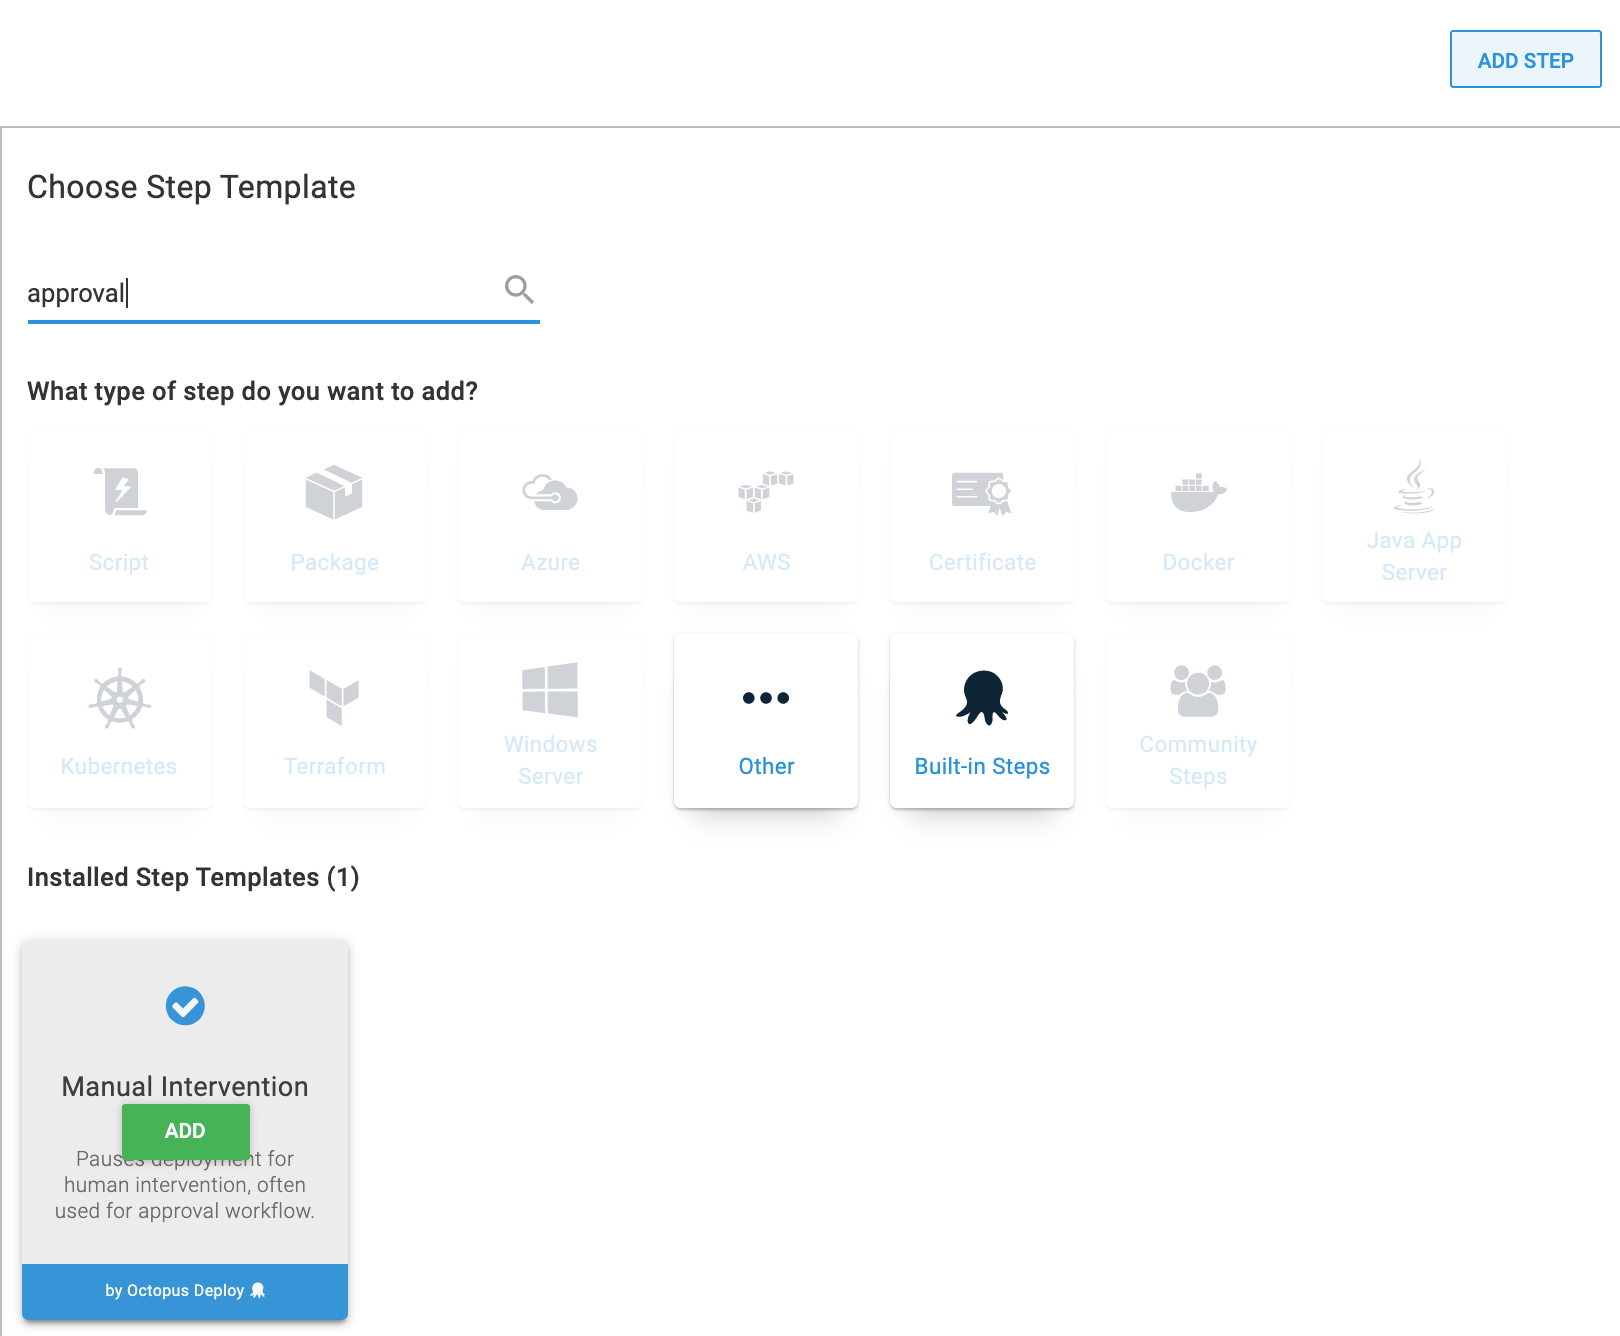
Specify Step Name.
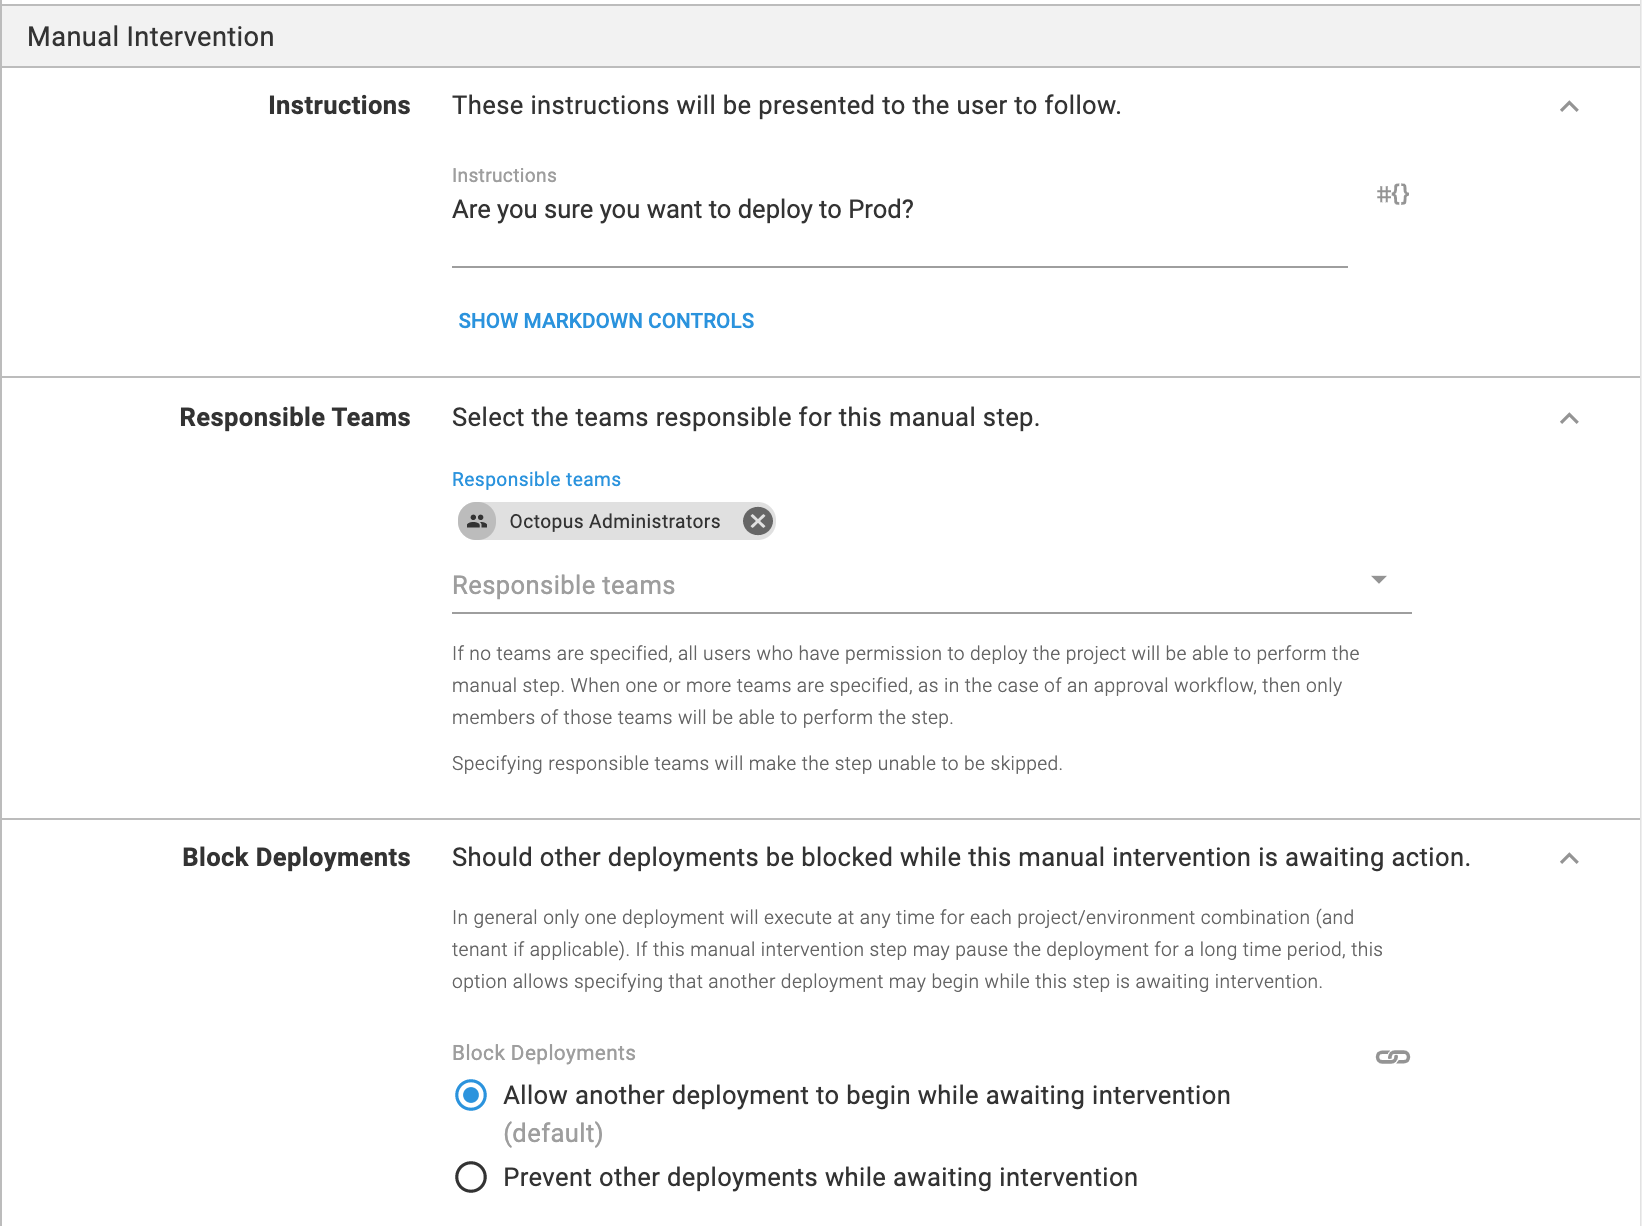
Enter the instruction and define Responsible Teams.
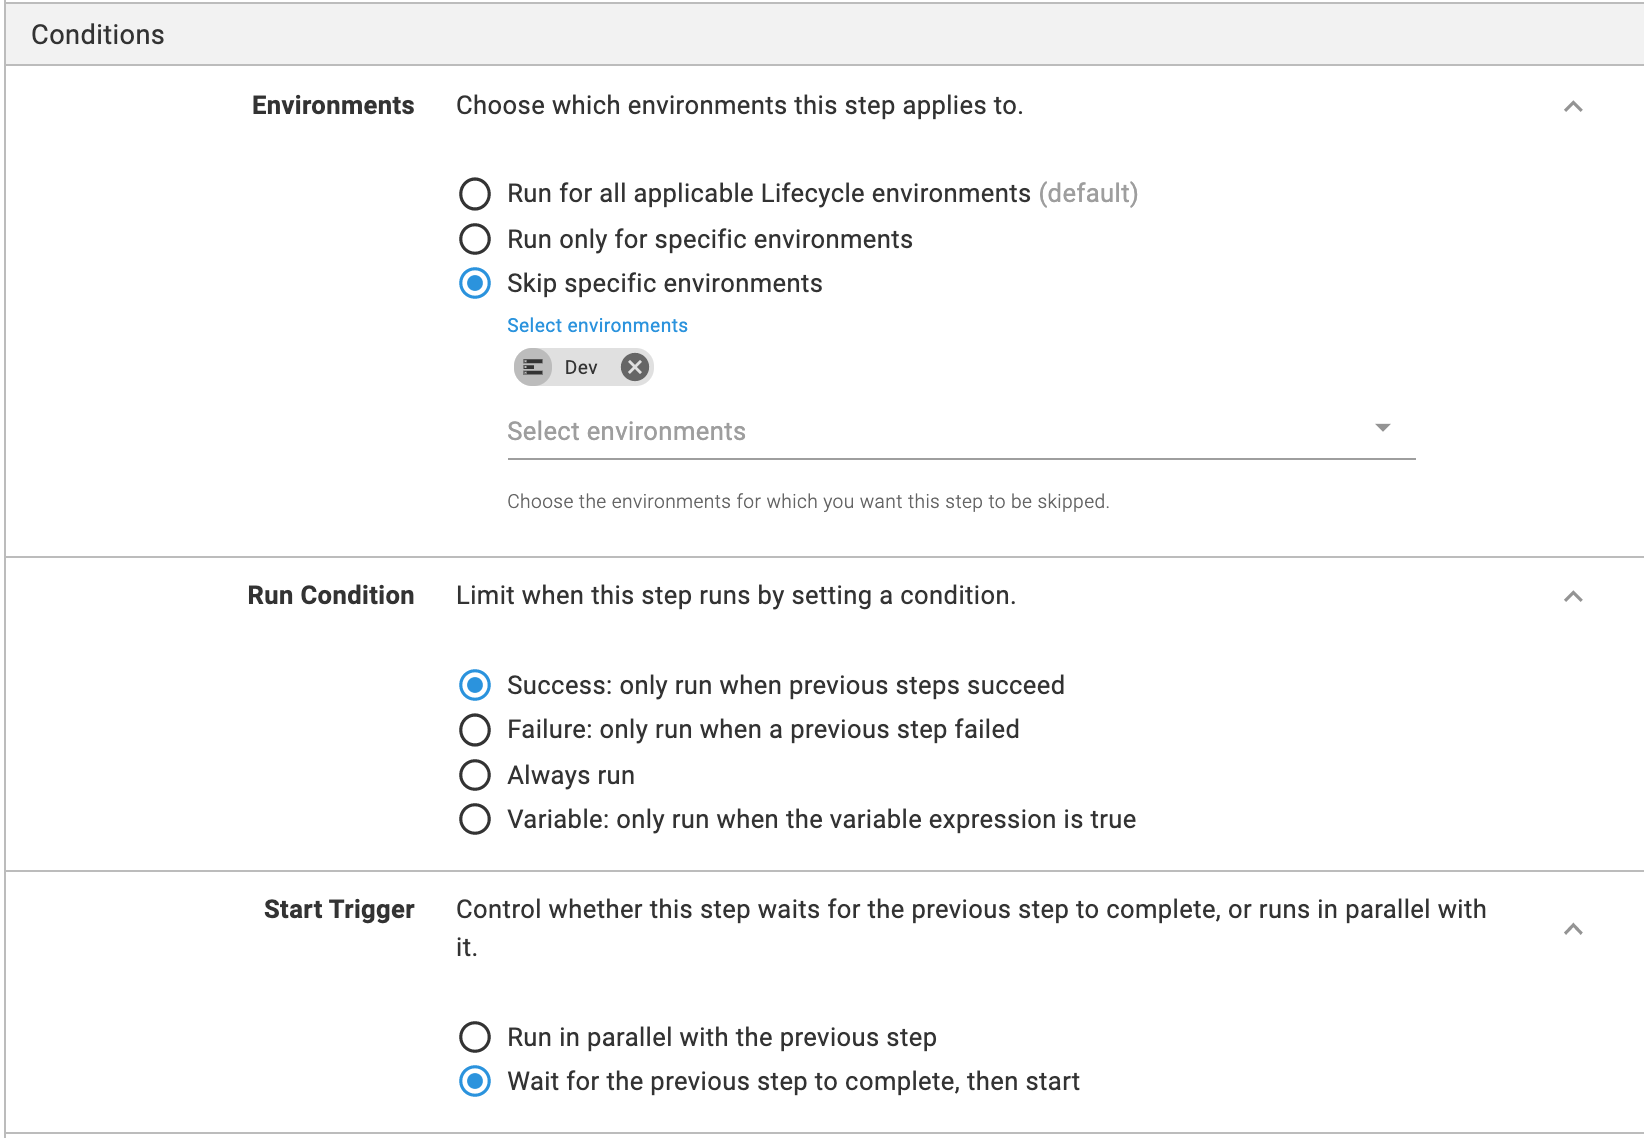
Select Conditions, Skip environment, and Dev. This step is applied to Production only.
Add another transfer step
To add another Transfer step, follow the instructions below:
Select the Run a Script template.
Specify Step Name and select Targets in Roles. You have already defined them on the Deployment Targets step.
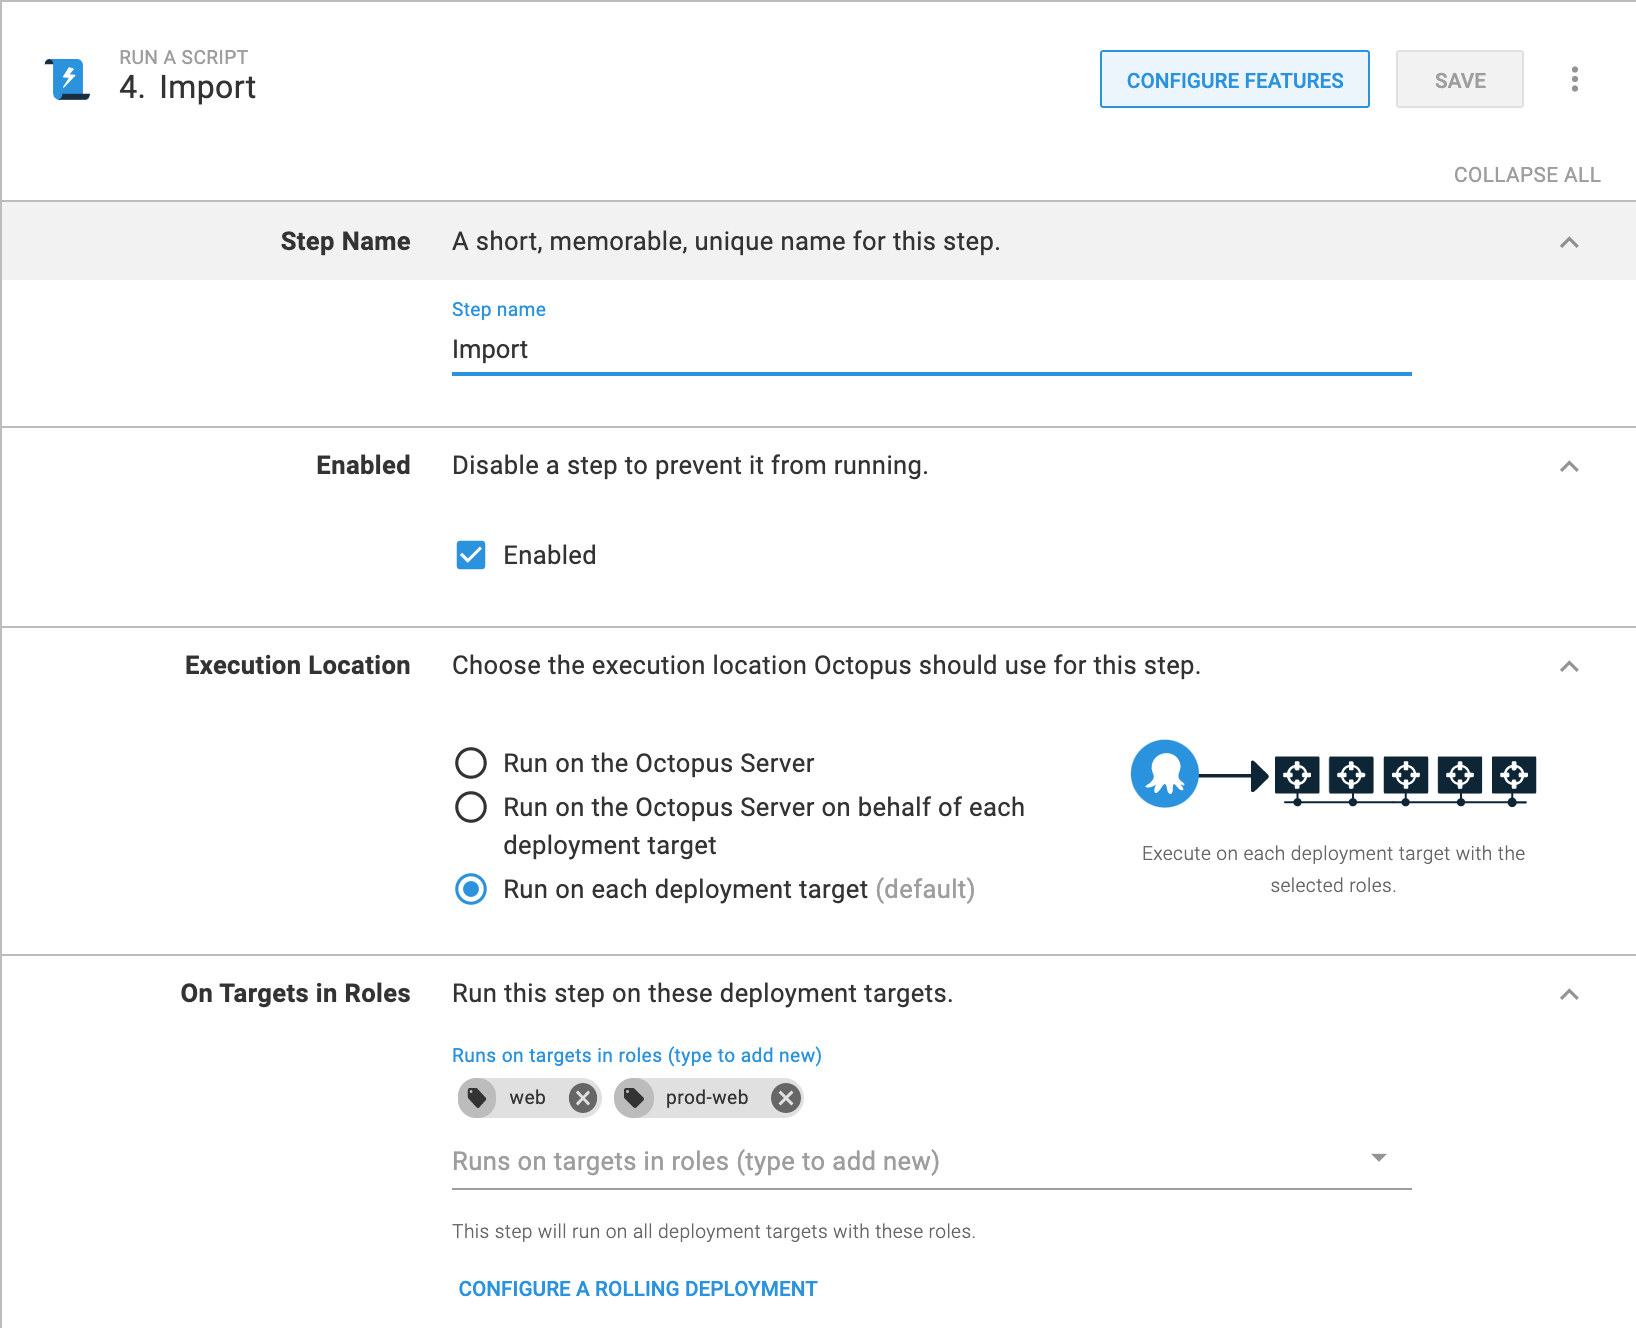
In the Inline source code group, select Bash and enter the following command.
You use only one build, and it is cached. So, old changes can be applied to Production.
Note: the
hostname,username, andpasswordvalues are taken from Variables.Click to see script for importing package to Control Tower
bundleFile="#{Octopus.Action[Transfer].Output.Package.FilePath}"
resolutionStrategy=REPLACE
statusAttemptLimit=300
#delay is in seconds
statusDelay=1
hostname=`get_octopusvariable "hostname"`
username=`get_octopusvariable "username"`
password=`get_octopusvariable "password"`
timestamp() {
  date +%Y-%m-%d_%H-%M-%S-%3N
}
writeOutputToFile() {
  echo $1 >bundle-import-$2.json
}
if [[ -z "$bundleFile" ]]; then
  echo 'Please pass path to bundle as first parameter'
  exit 1
fi
if [[ -z "$hostname" ]]; then
  echo 'Please pass hostname as second parameter'
  exit 1
fi
if [[ -z "$username" ]]; then
  echo 'Please pass username as third parameter'
  exit 1
fi
if [[ -z "$password" ]]; then
  echo 'Please pass password as fourth parameter'
  exit 1
fi
if [ ! -f "$bundleFile" ]; then
  echo 'The given bundle file does not seem to exist (possible typo?)'
  exit 1
fi
#calculate checksum
checksum=$(md5sum "$bundleFile" | cut -d ' ' -f1)
#if absolute path with escaping (\\) is passed, need to cut '\'
if [[ $checksum == \\* ]]; then
  checksum="${checksum:1}"
fi
cookie_file=$(mktemp --suffix=_bunle_import_cookie)
#login
loginResponse=$(
  curl -s --request POST \
    --url $hostname/workfusion/api/dologin \
    --header 'Accept: */*' \
    --header 'Cache-Control: no-cache' \
    --header 'Connection: keep-alive' \
    --header 'Content-Type: application/x-www-form-urlencoded' \
    --header 'accept-encoding: gzip, deflate' \
    --data "j_username=$username&j_password=$password" \
    --cookie-jar $cookie_file \
    --insecure
)
#extract token
token=$(echo $loginResponse | grep -Po '"csrfToken":.*?[^\\]",' | grep -Po ':".*"' | sed 's/:"//g' | sed 's/"//g')
if [[ -z "$token" ]]; then
  echo "Login failed"
  writeOutputToFile "$loginResponse" "$(timestamp)"
  exit 1
fi
echo 'Login successful'
#call bundle import
importResponse=$(
  curl --request POST \
    --url $hostname/workfusion/api/v1/bundle-import/ \
    --header 'Accept: */*' \
    --header 'Cache-Control: no-cache' \
    --header 'Connection: keep-alive' \
    --header "X-CSRF-TOKEN: $token" \
    --header 'accept-encoding: gzip, deflate' \
    --header 'cache-control: no-cache' \
    --form "bundleFile=@$bundleFile" \
    --form "checksum=$checksum;type=text/plain" \
    --form "conflictResolutions={\"conflictResolutionStrategy\": \"$resolutionStrategy\"};type=application/json" \
    --cookie $cookie_file \
    --insecure
)
#if verification failed, script is stopped
uuid=$(echo $importResponse | grep -Po '"uuid":.*?[^\\]",' | grep -Po ':".*"' | sed 's/:"//g' | sed 's/"//g')
validationStatus=$(echo $importResponse | grep -Po '"importStatus":.*?[^\\]",' | grep -Po ':".*"' | sed 's/:"//g' | sed 's/"//g')
if [[ (-z "$uuid") || ("$validationStatus" != 'ACCEPTED') ]]; then
  currTimestamp=$(timestamp)
  echo "Import failed, see bundle-import-$currTimestamp.json for details"
  writeOutputToFile "$importResponse" "$currTimestamp"
  exit 1
fi
echo 'Asset Package accepted'
#checking status in a cycle
isFinished=0
attempt=1
while [ $isFinished -eq 0 ]; do
  #stop script if number of retries exceeded
  if [[ $attempt -ge $statusAttemptLimit ]]; then
    echo "Attempt limit ($statusAttemptLimit) is exceeded"
    writeOutputToFile "Attempt limit ($statusAttemptLimit) is exceeded" "$(timestamp)"
    exit 1
  fi
  sleep $statusDelay
  statusResponse=$(
    curl -s --request GET \
      --url $hostname/workfusion/api/v1/bundle-import/$uuid \
      --header 'Accept: */*' \
      --header 'Cache-Control: no-cache' \
      --header 'Connection: keep-alive' \
      --header "X-CSRF-TOKEN: $token" \
      --header 'accept-encoding: gzip, deflate' \
      --header 'cache-control: no-cache' \
      --cookie $cookie_file \
      --insecure
  )
  status=$(echo $statusResponse | grep -Po -m1 '{"status":.*?[^\\]",' | head -1 | grep -Po ':".*"' | sed 's/:"//g' | sed 's/"//g')
  if [ -z "$status" ]; then
    currTimestamp=$(timestamp)
    echo "Import failed, see bundle-import-$currTimestamp.json for details"
    writeOutputToFile "$status" "$currTimestamp"
    exit 1
  fi
  echo "Import in progress, attempt $attempt"
  ((attempt++))
  if [[ "$status" == 'SUCCEEDED' ]]; then
    isFinished=1
    echo "Import succeeded"
  fi
  if [[ "$status" == 'FAILED' ]]; then
    isFinished=1
    currTimestamp=$(timestamp)
    echo "Import failed, see bundle-import-$currTimestamp.json for details"
    writeOutputToFile "$statusResponse" "$currTimestamp"
  fi
done
exit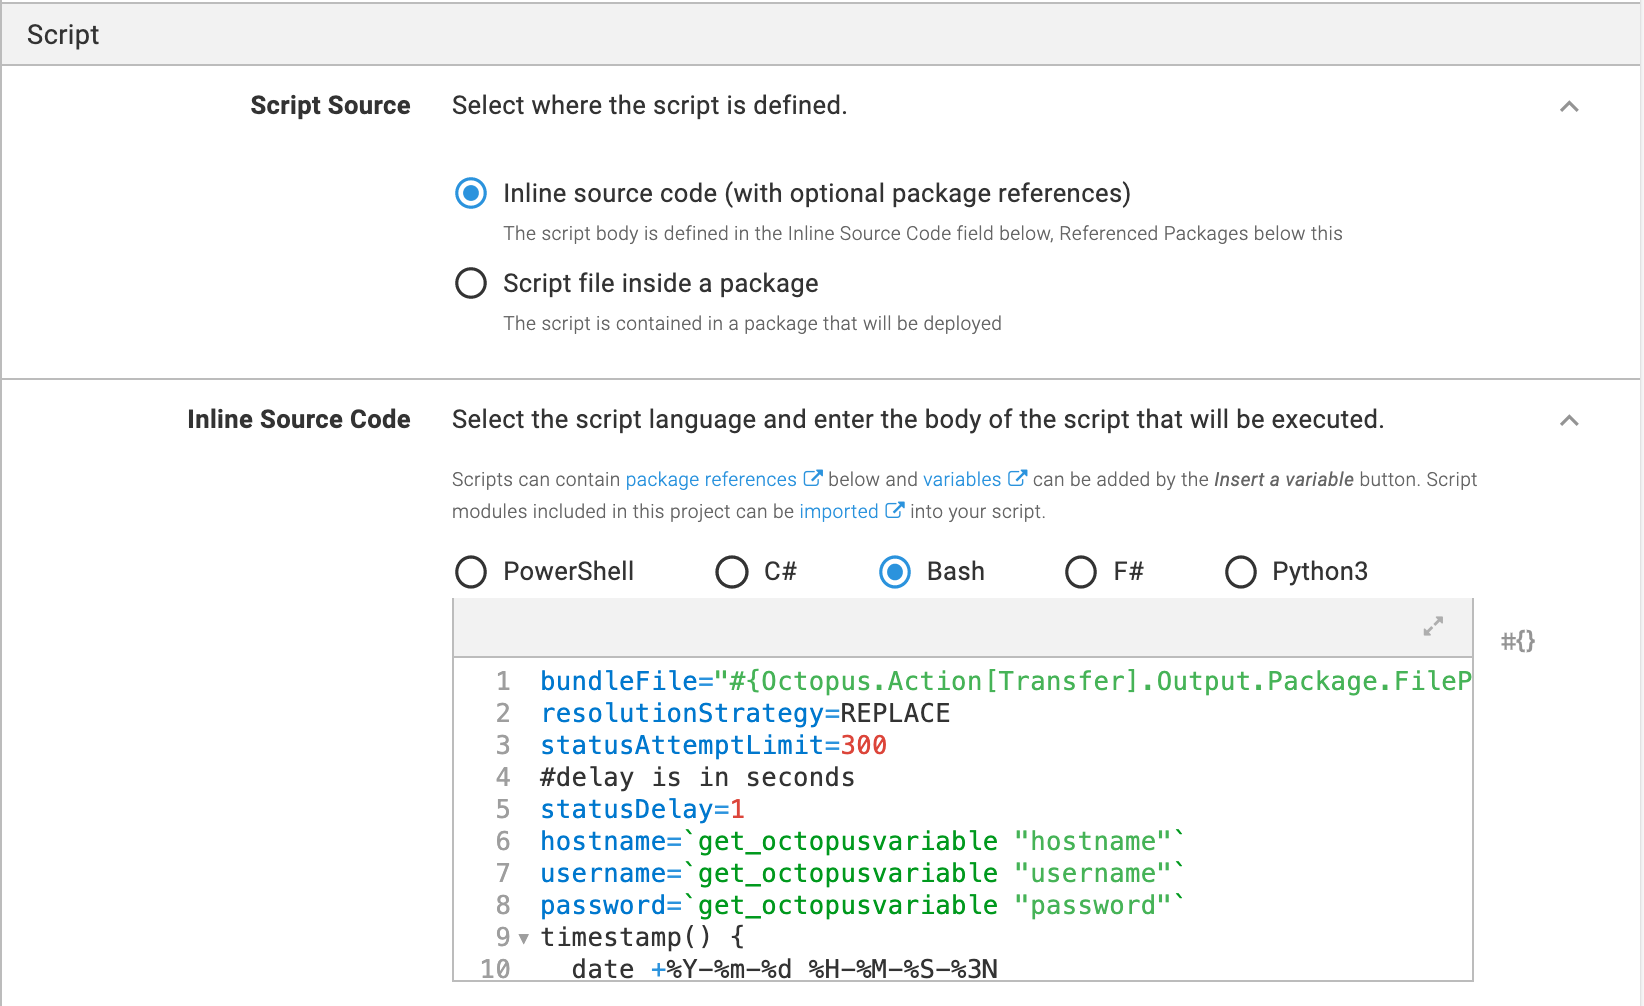
Save the changes.
Add notification
You must set up SMTP Configuration before adding the Notification step to Projects:
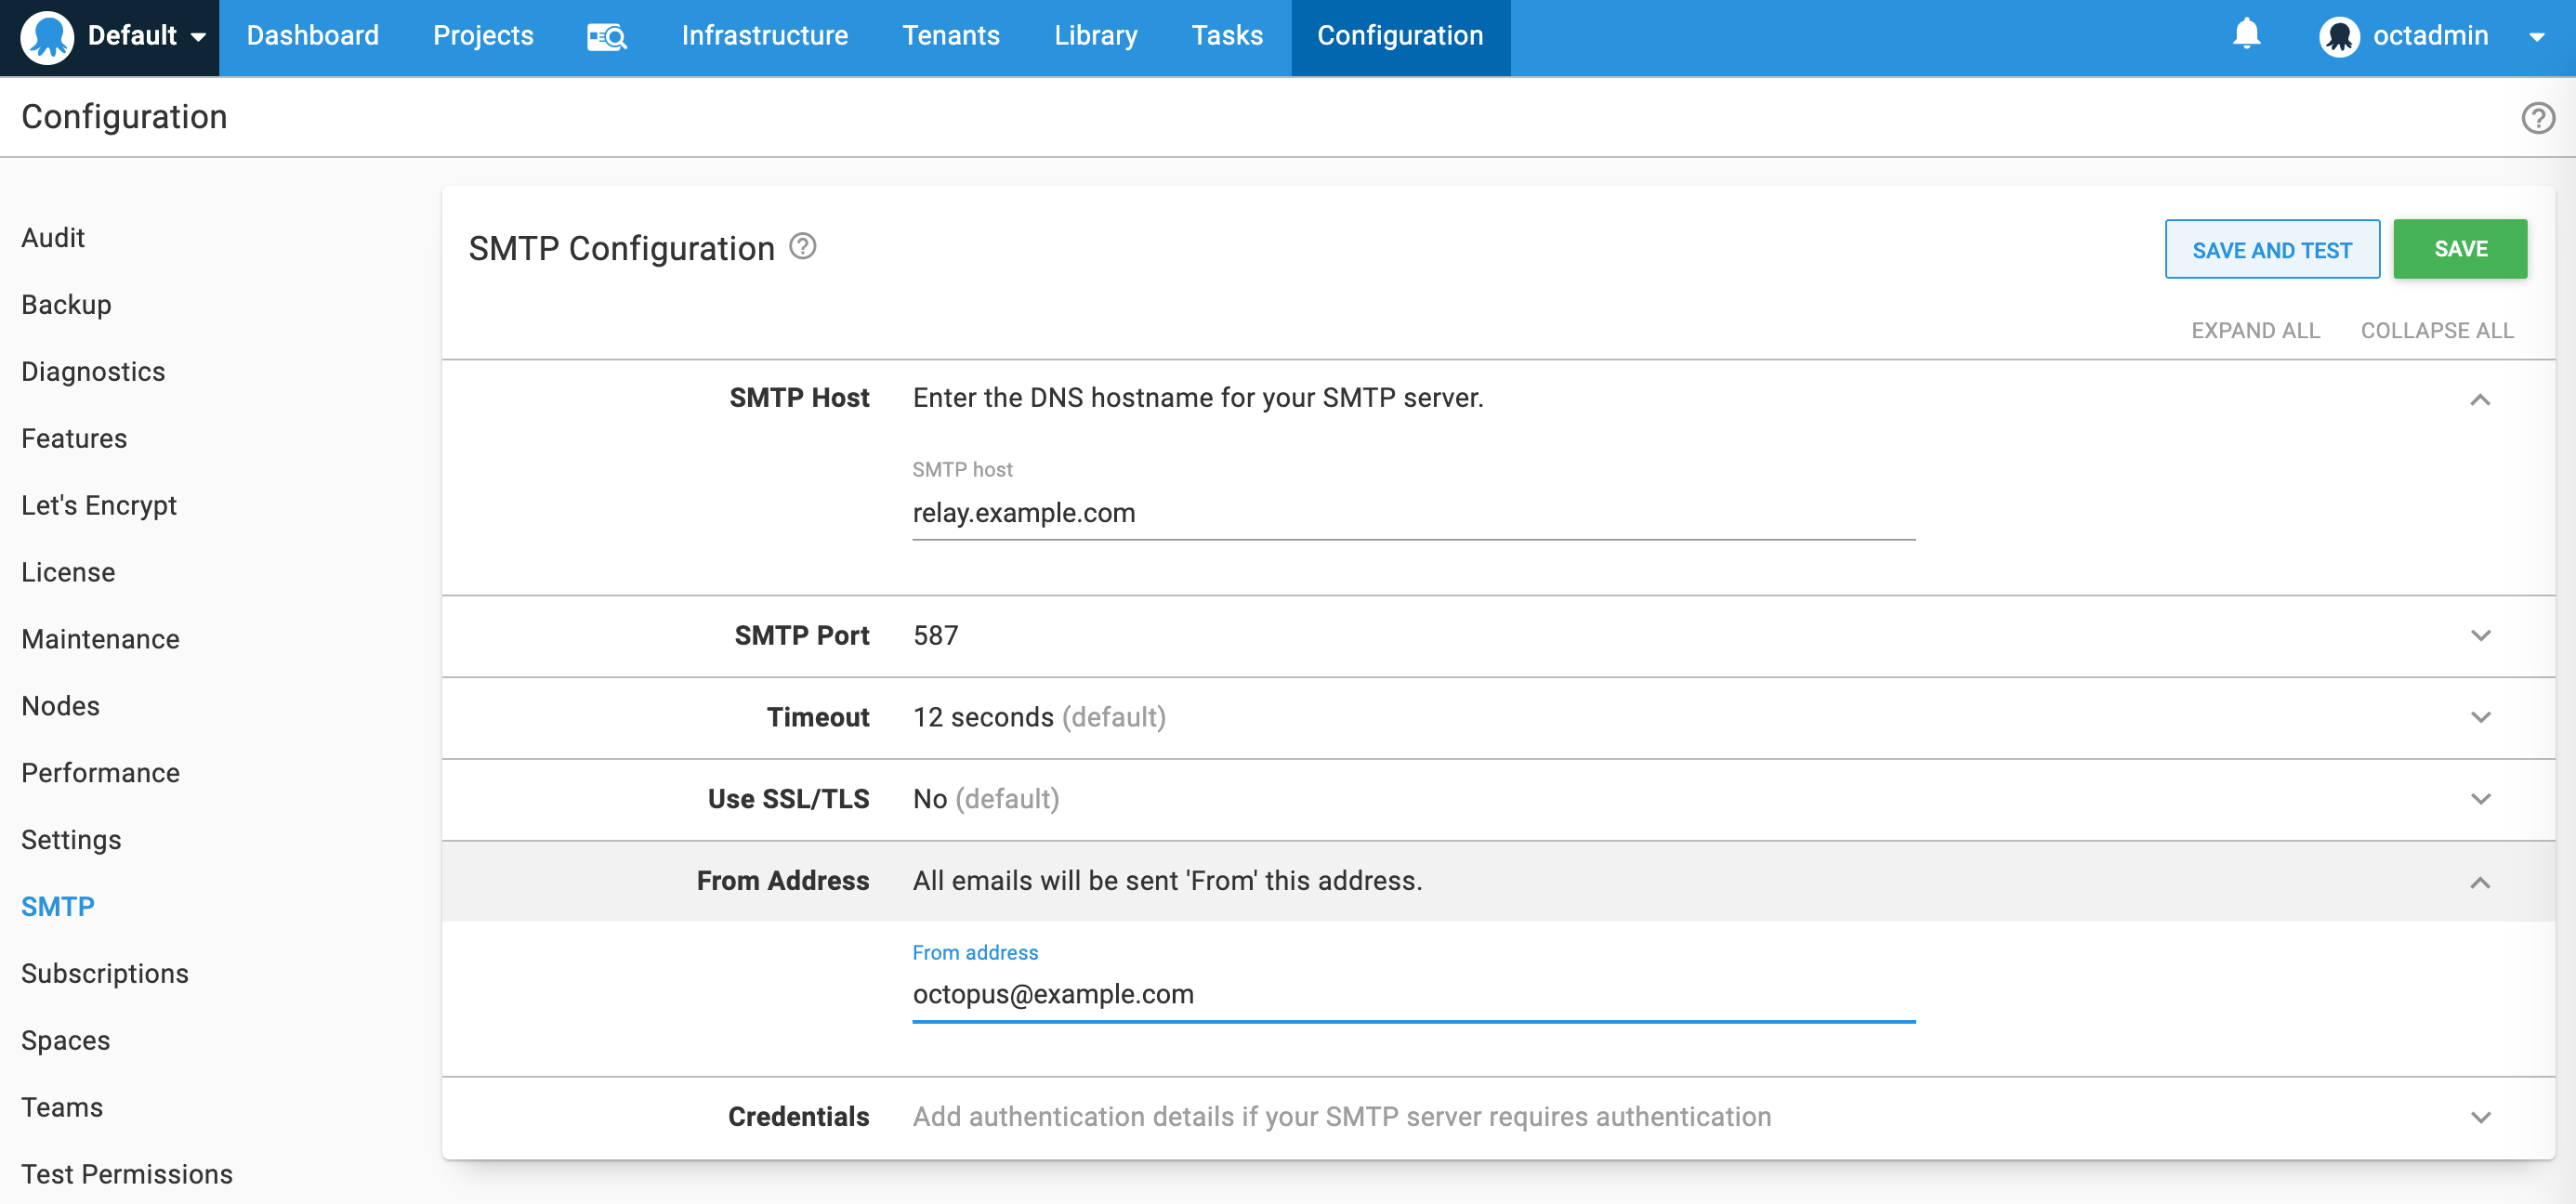
For that, follow the steps below:
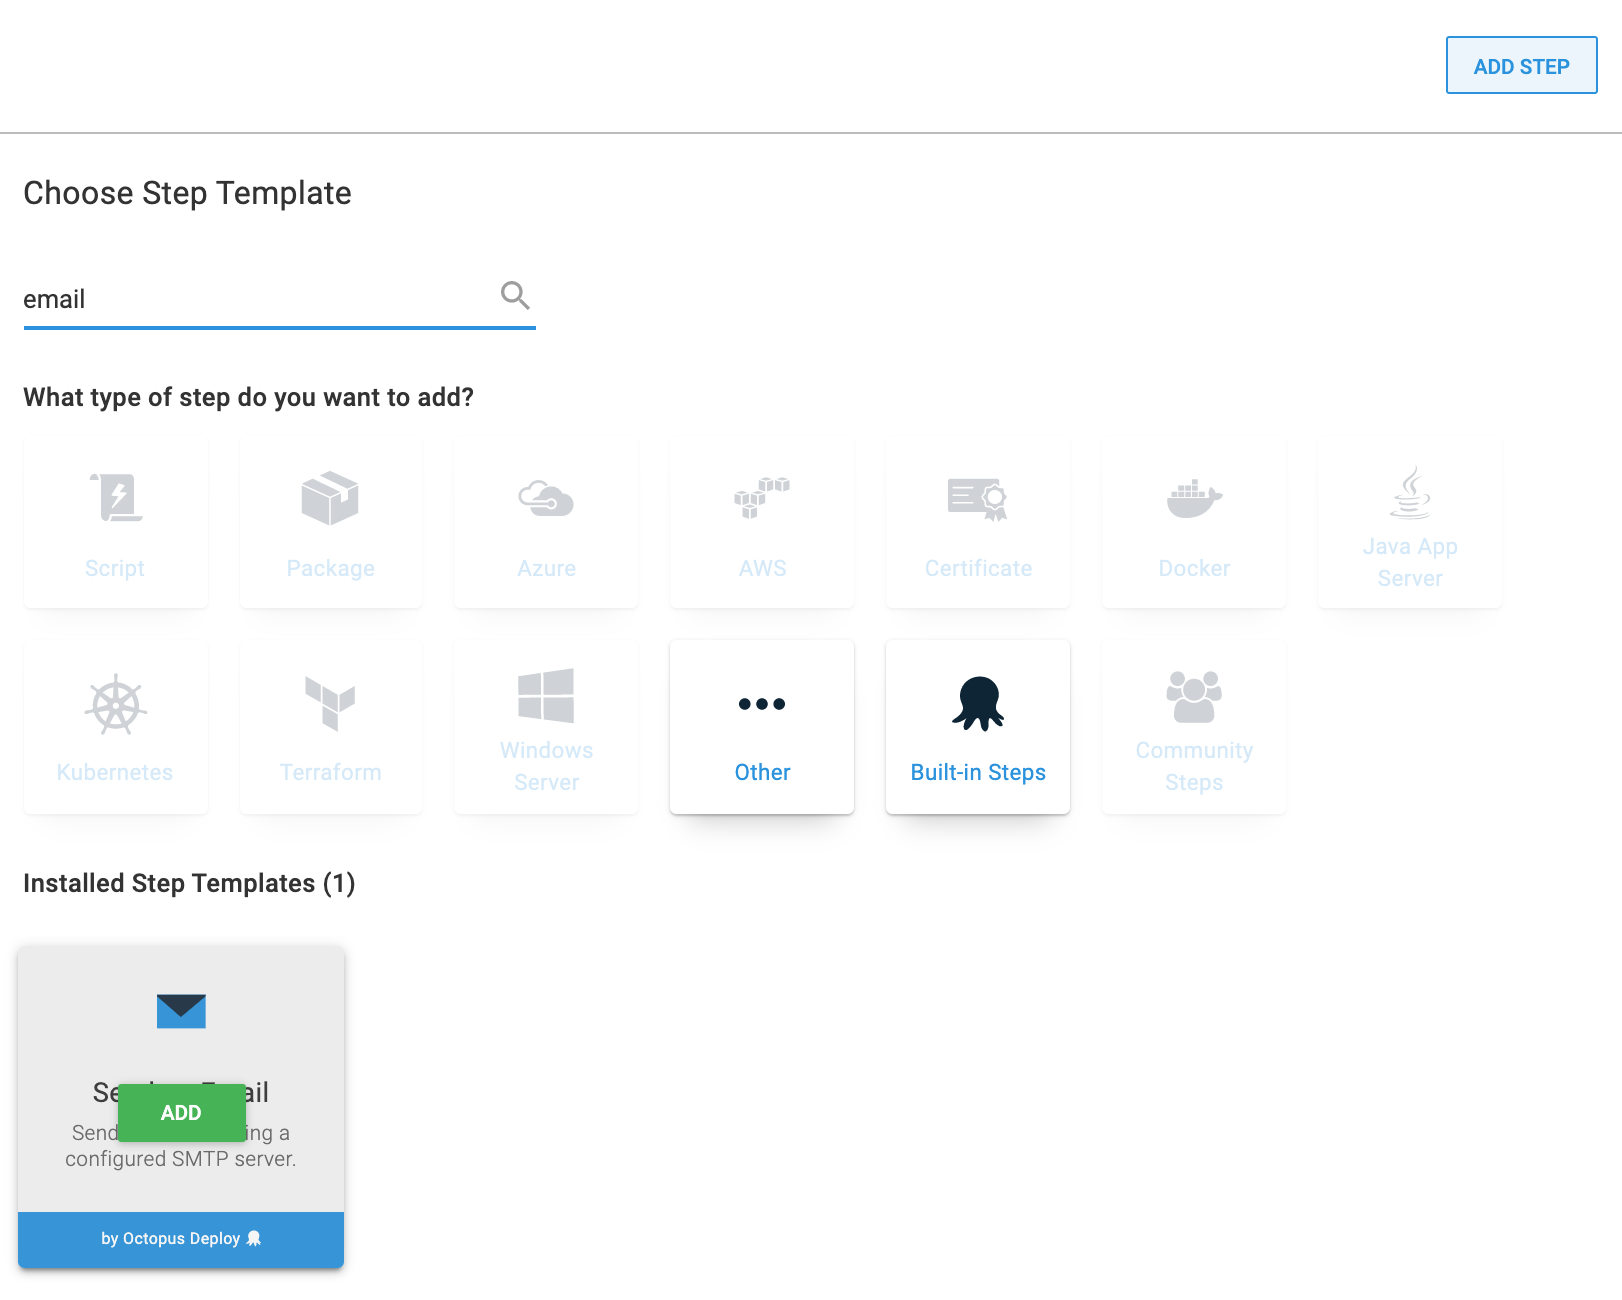
Select the Send an Email template.
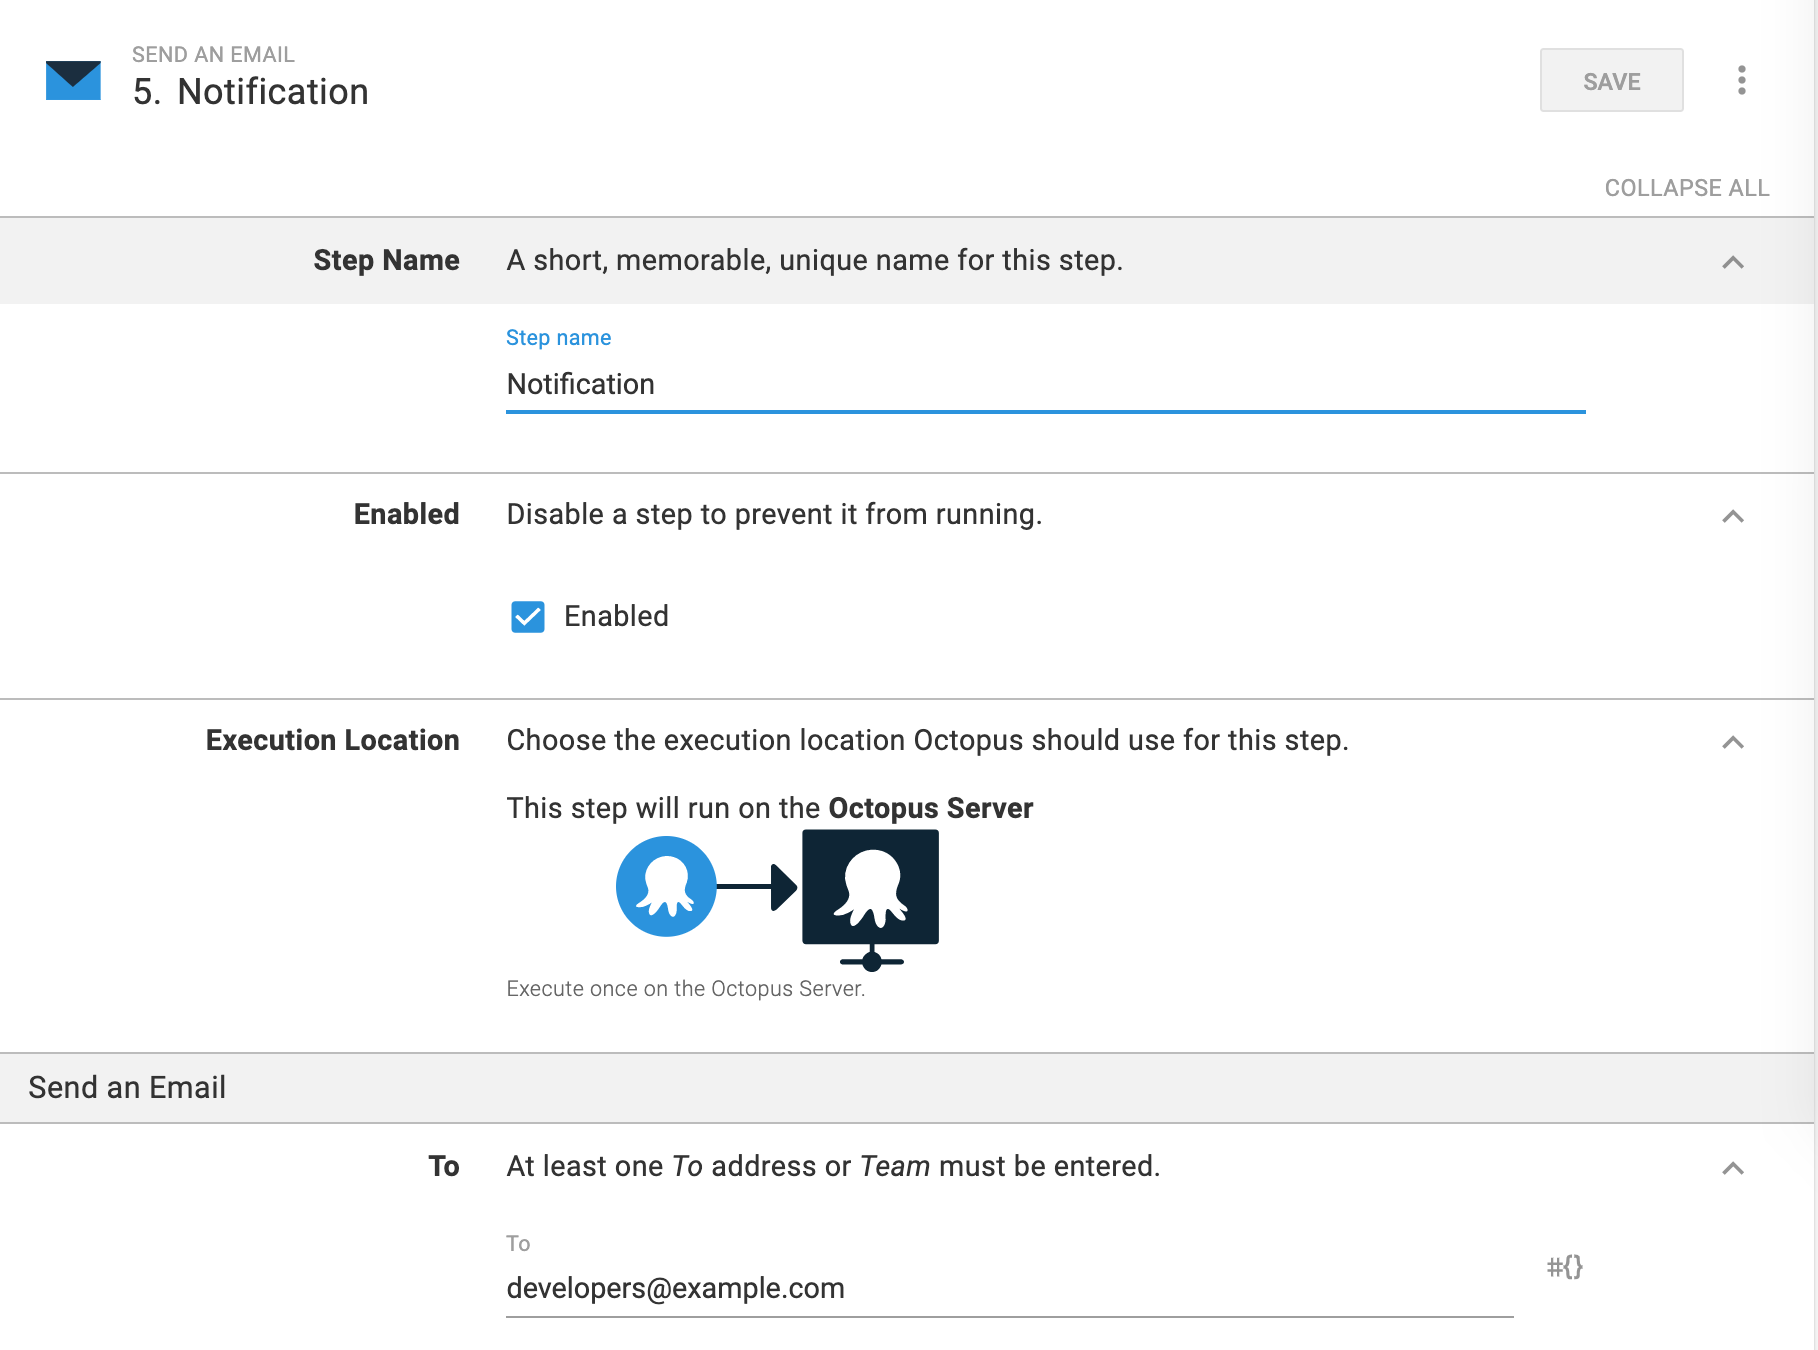
Specify Step Name and, in the Send an Email section, add the addresses for sending emails.
Add Subject and Body of the email. Use HTML as the
bodyformat.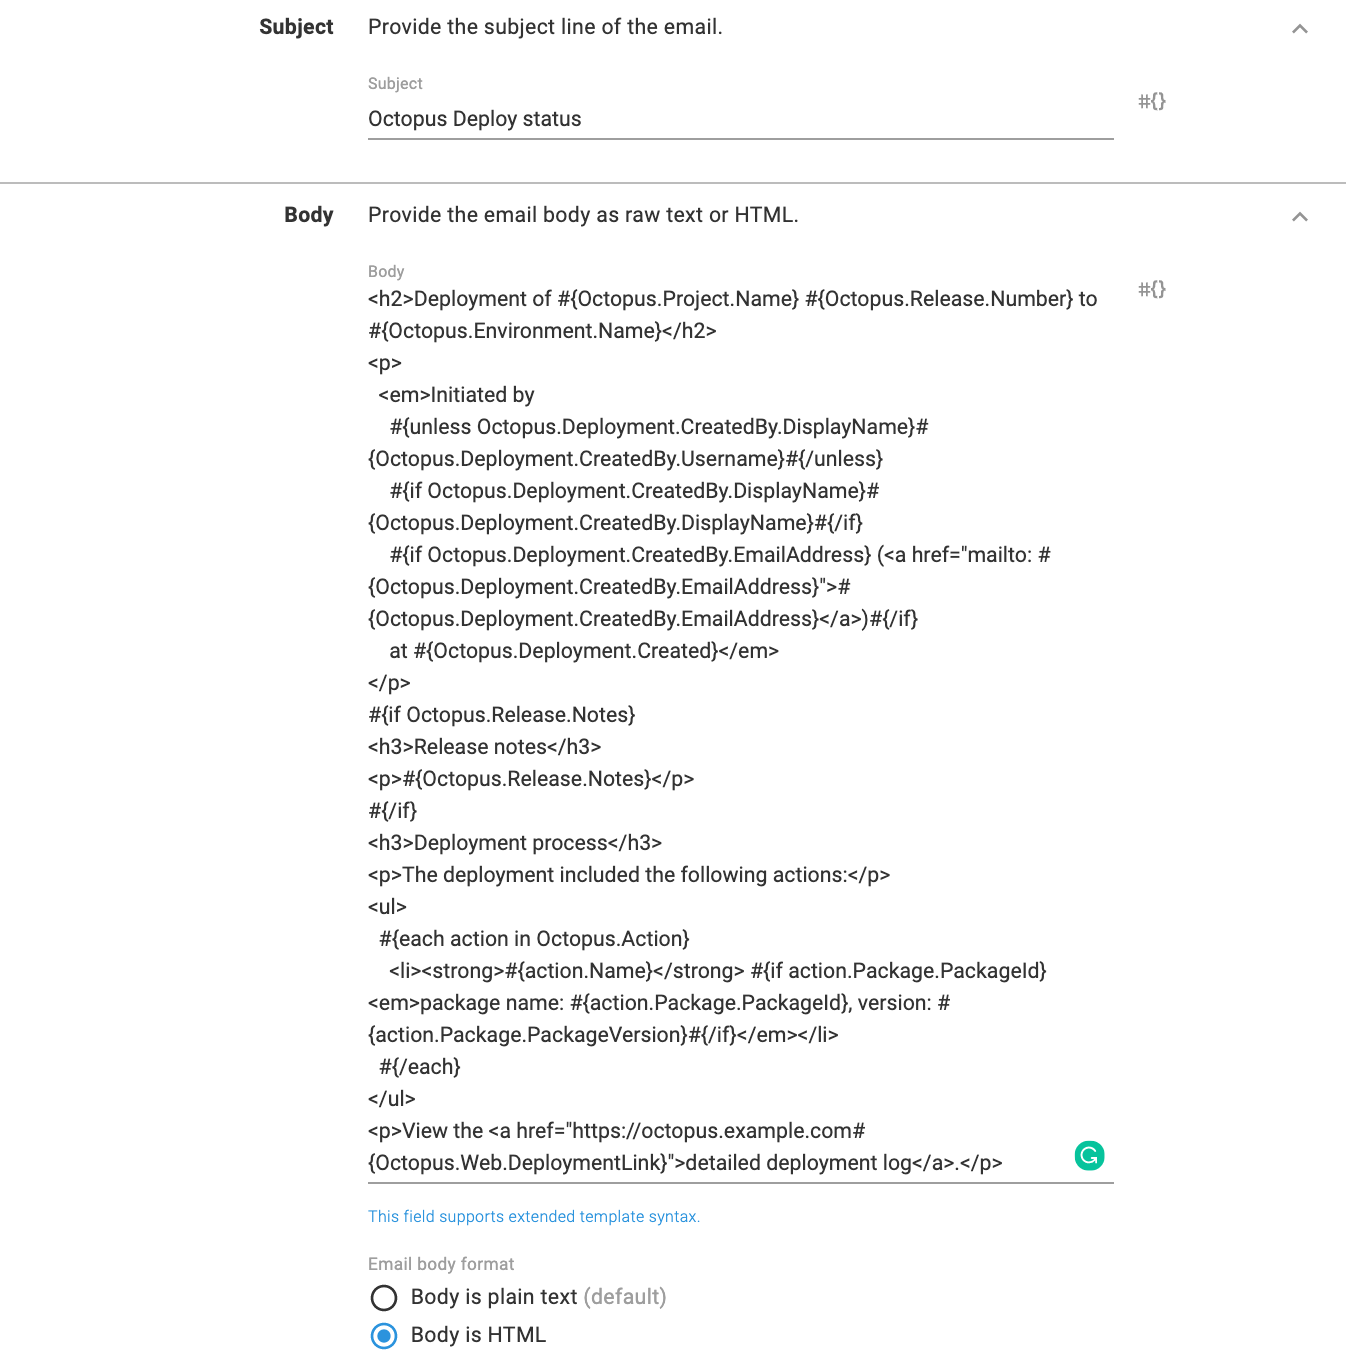
Click to view Email Body sample
<h2>Deployment of #{Octopus.Project.Name} #{Octopus.Release.Number} to #{Octopus.Environment.Name}</h2>
<p>
  <em>Initiated by
    #{unless Octopus.Deployment.CreatedBy.DisplayName}#{Octopus.Deployment.CreatedBy.Username}#{/unless}
    #{if Octopus.Deployment.CreatedBy.DisplayName}#{Octopus.Deployment.CreatedBy.DisplayName}#{/if}
    #{if Octopus.Deployment.CreatedBy.EmailAddress} (<a href="mailto: #{Octopus.Deployment.CreatedBy.EmailAddress}">#{Octopus.Deployment.CreatedBy.EmailAddress}</a>)#{/if}
    at #{Octopus.Deployment.Created}</em>
</p>
#{if Octopus.Release.Notes}
<h3>Release notes</h3>
<p>#{Octopus.Release.Notes}</p>
#{/if}
<h3>Deployment process</h3>
<p>The deployment included the following actions:</p>
<ul>
  #{each action in Octopus.Action}
    <li><strong>#{action.Name}</strong> #{if action.Package.PackageId} <em>package name: #{action.Package.PackageId}, version: #{action.Package.PackageVersion}#{/if}</em></li>
  #{/each}
</ul>
<p>View the <a href="https://octopus.example.com#{Octopus.Web.DeploymentLink}">detailed deployment log</a>.</p>
The project flow is now designed. You can create a release and deploy the process.
Variables
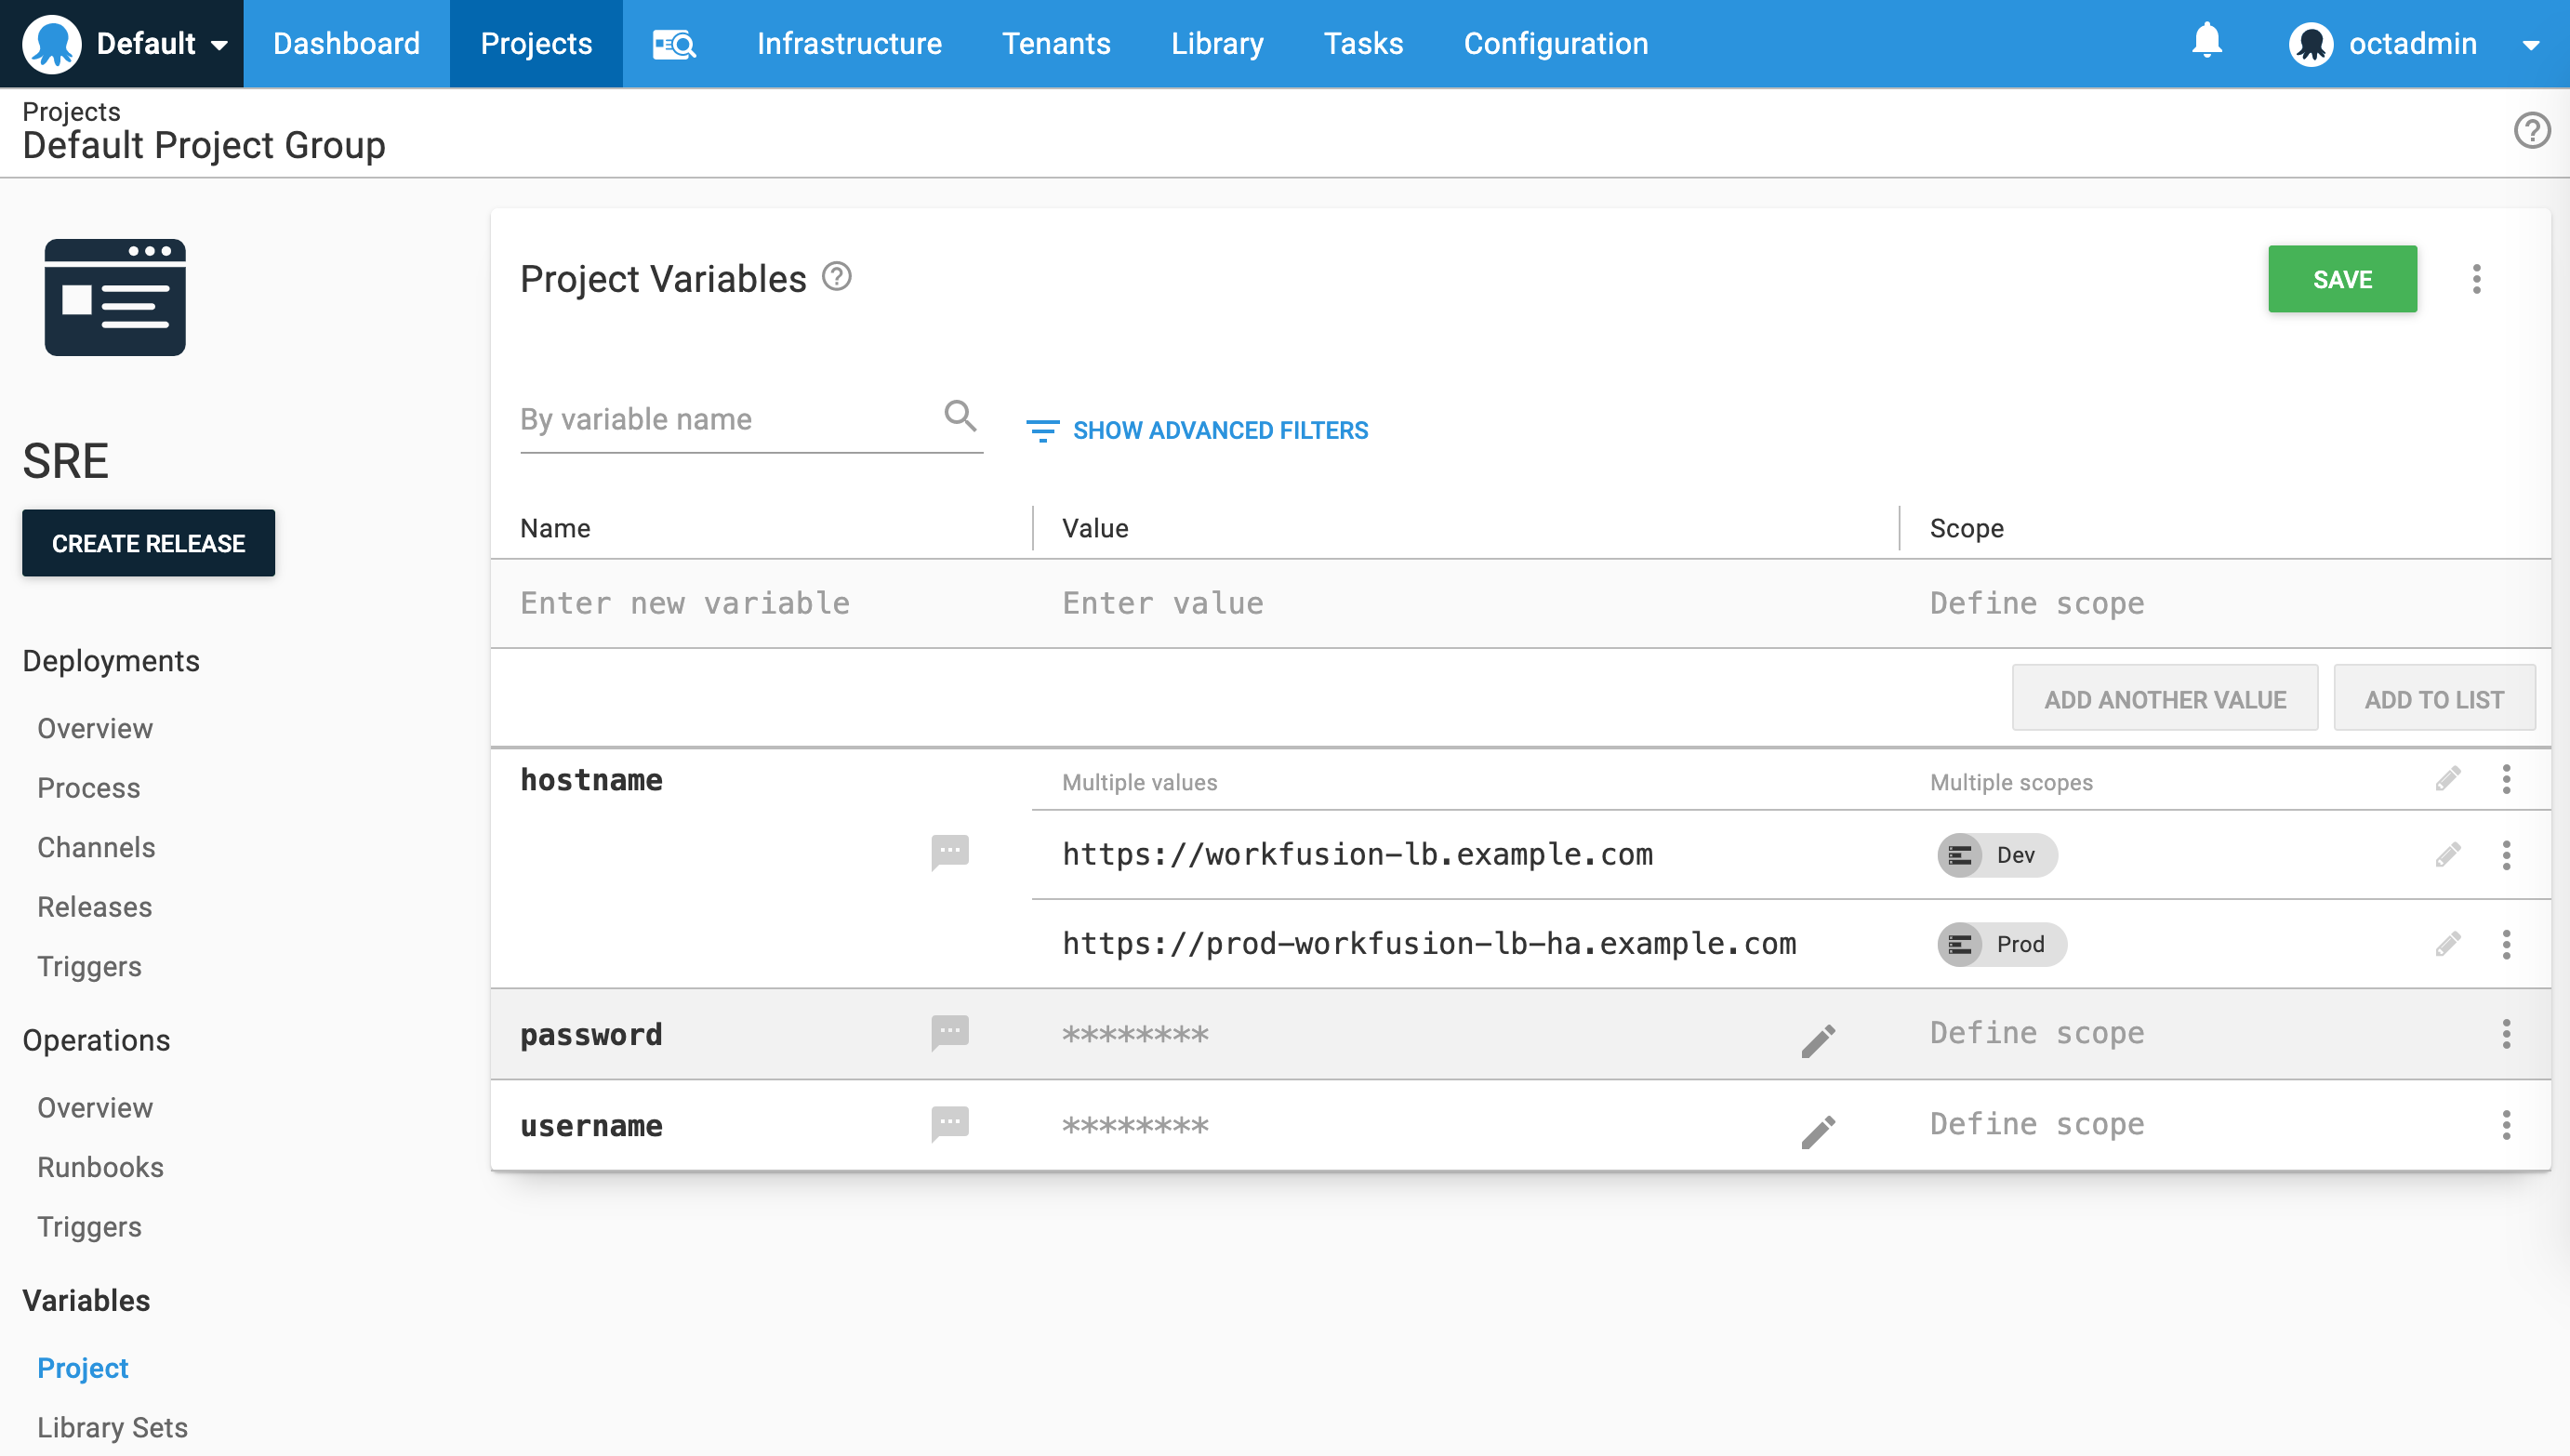
Octopus supports variables so that you can parameterize your deployment processes and operation runbooks. This allows your processes to work across your infrastructure without having to hard-code or manually update configuration settings that differ across environments, deployment targets, channels, or tenants.
For example, when you deploy software to your Development environment, you may need to provide the development CT URL. When you promote the release to production, you need to deliver the production CT URL. You can define the scopes like Development or Production. The username and password can be specified as sensitive values so you cannot see them.
To manage the variables for your projects, go to your project on the Octopus web portal. On the Project tab, select Variables.
Release management
A release is a snapshot of the deployment process and associated assets (packages, scripts, variables) as they existed when the release was created. The release has a version number, and you can deploy that release as many times as you need to, even if parts of the deployment process have changed since the release was created (those changes will be included in future releases).
When you deploy a release, you execute the deployment process with all the associated details as they existed when the release was created.
You can deploy a release as many times as you want to.
Create release
To create a release after you define the deployment process, follow the steps below:
On the Project's Overview page, click Create release.
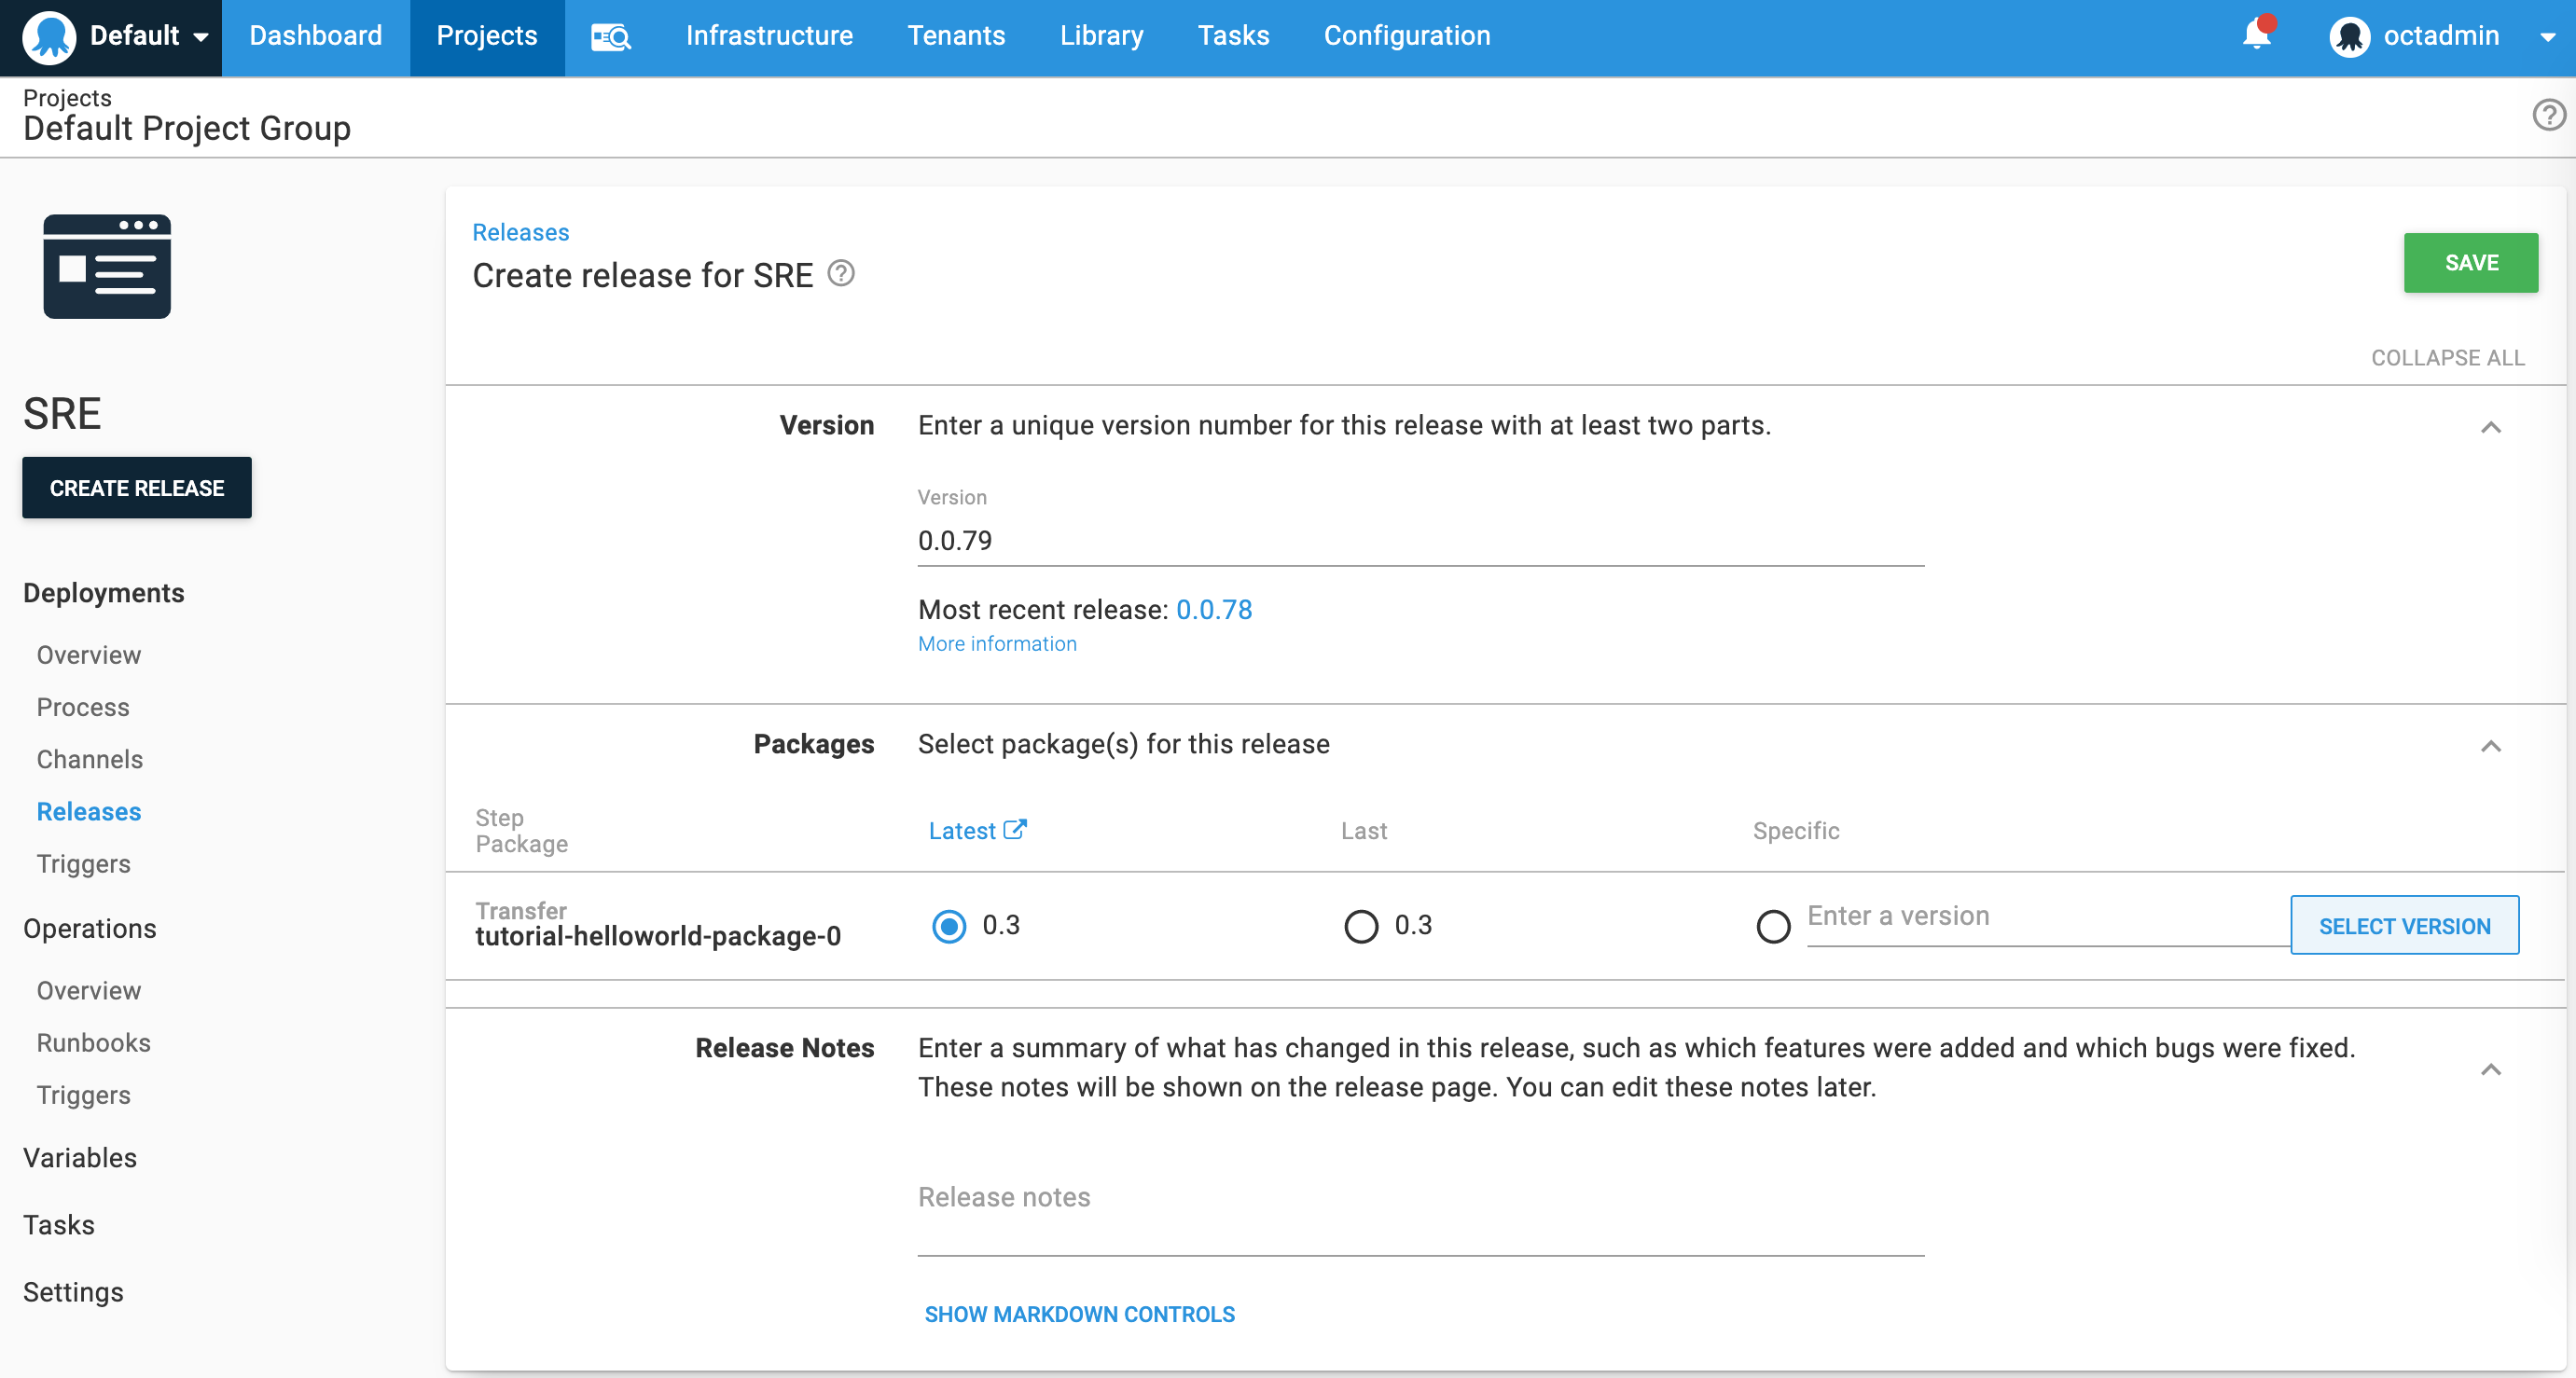
Depending on the type of steps you configured in the deployment process, there could be additional options available. For instance, if you're using a step to deploy a package, there is a package section where you can specify which version of the package to use in the release.
Give the release a version number, add any release notes you'd like to include and click Save.
View releases
To see all the releases that have been created for the project, go to the project's overview page and select Releases. To deploy a release or schedule a deployment, click the release.
Deploy releases
After creating the release, if the lifecycle associated with the project is configured to deploy automatically to its first environment, the deployment of the release starts as soon as the release is created.
If the release is not deployed automatically, click Deploy to <\environment>, where <\environment> is the first environment in the project's lifecycle. Alternatively, you can click Deploy to... to select a specific environment for deployment.
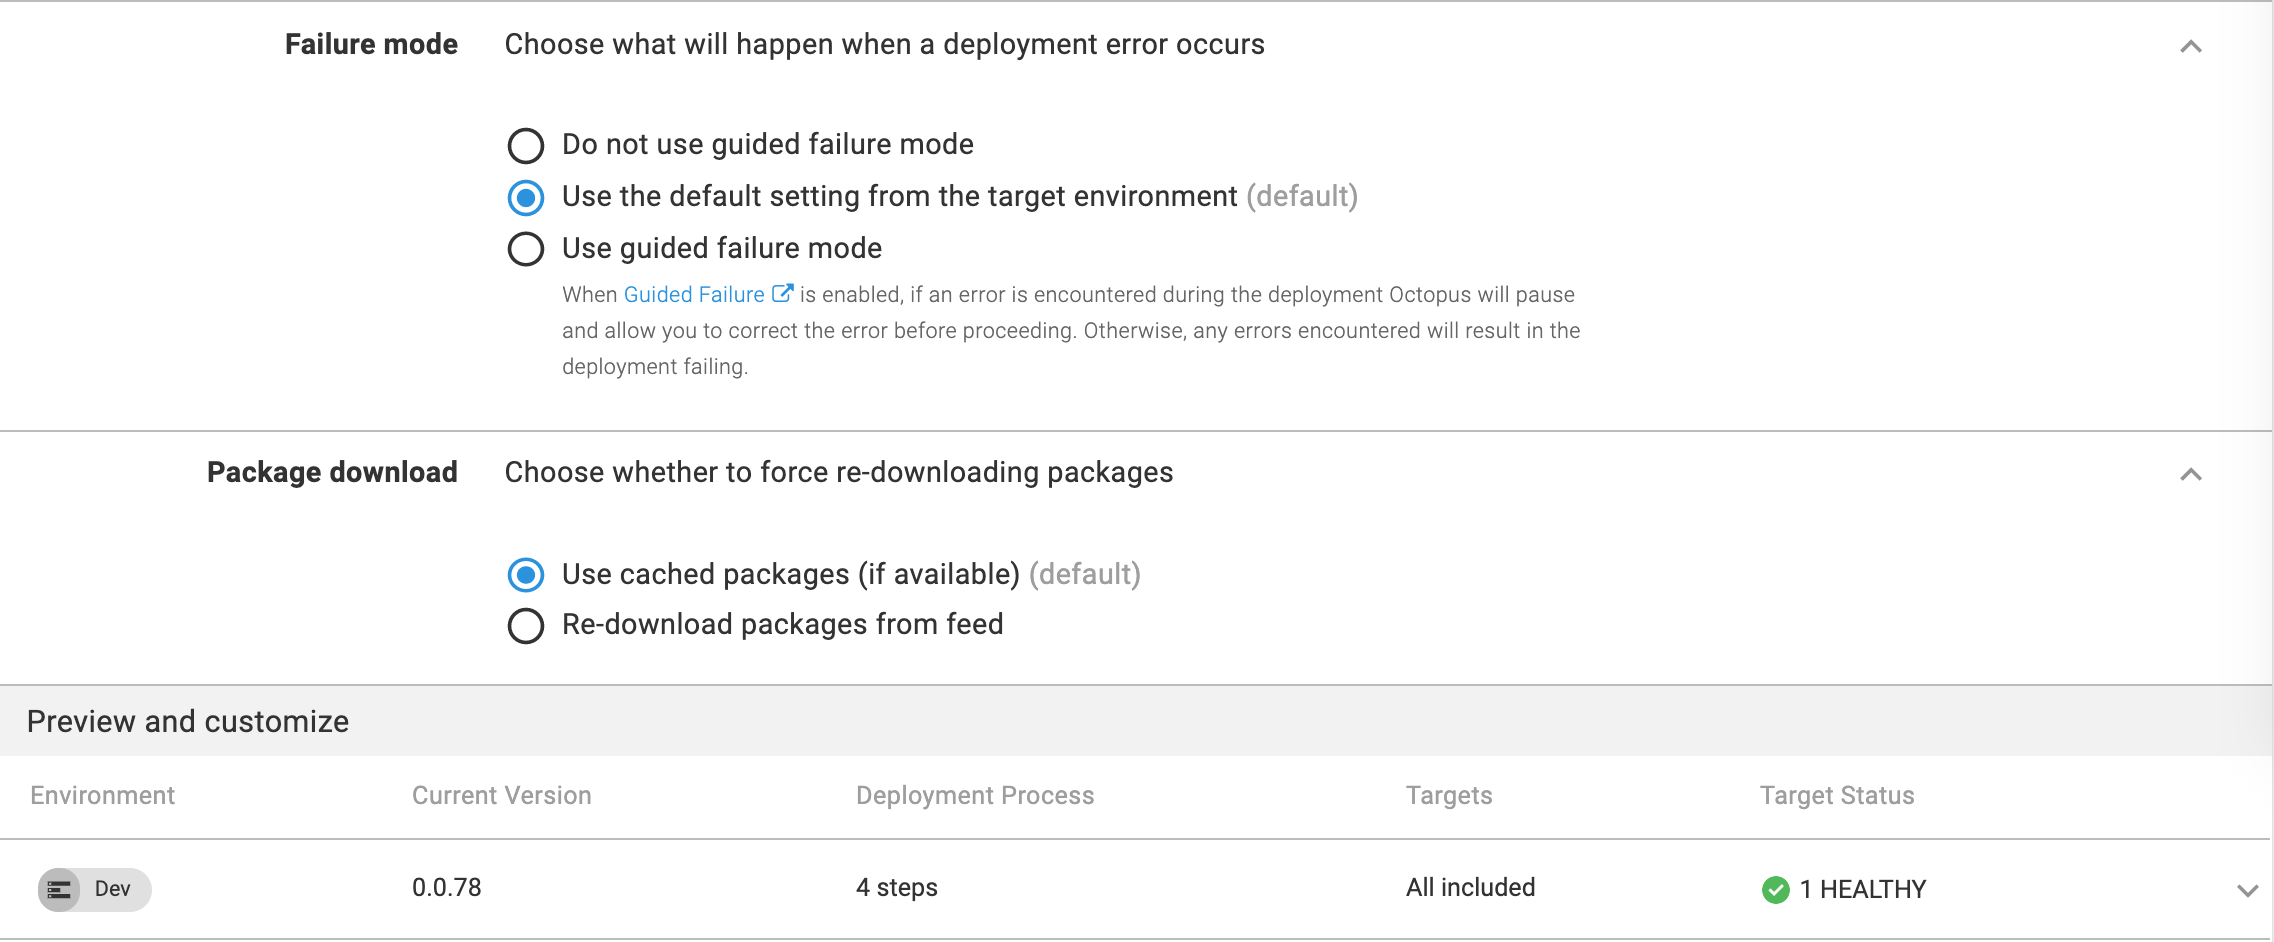
After you click Deploy to..., you can select the Environment, specify the time when it should be deployed, and exclude steps, if needed:
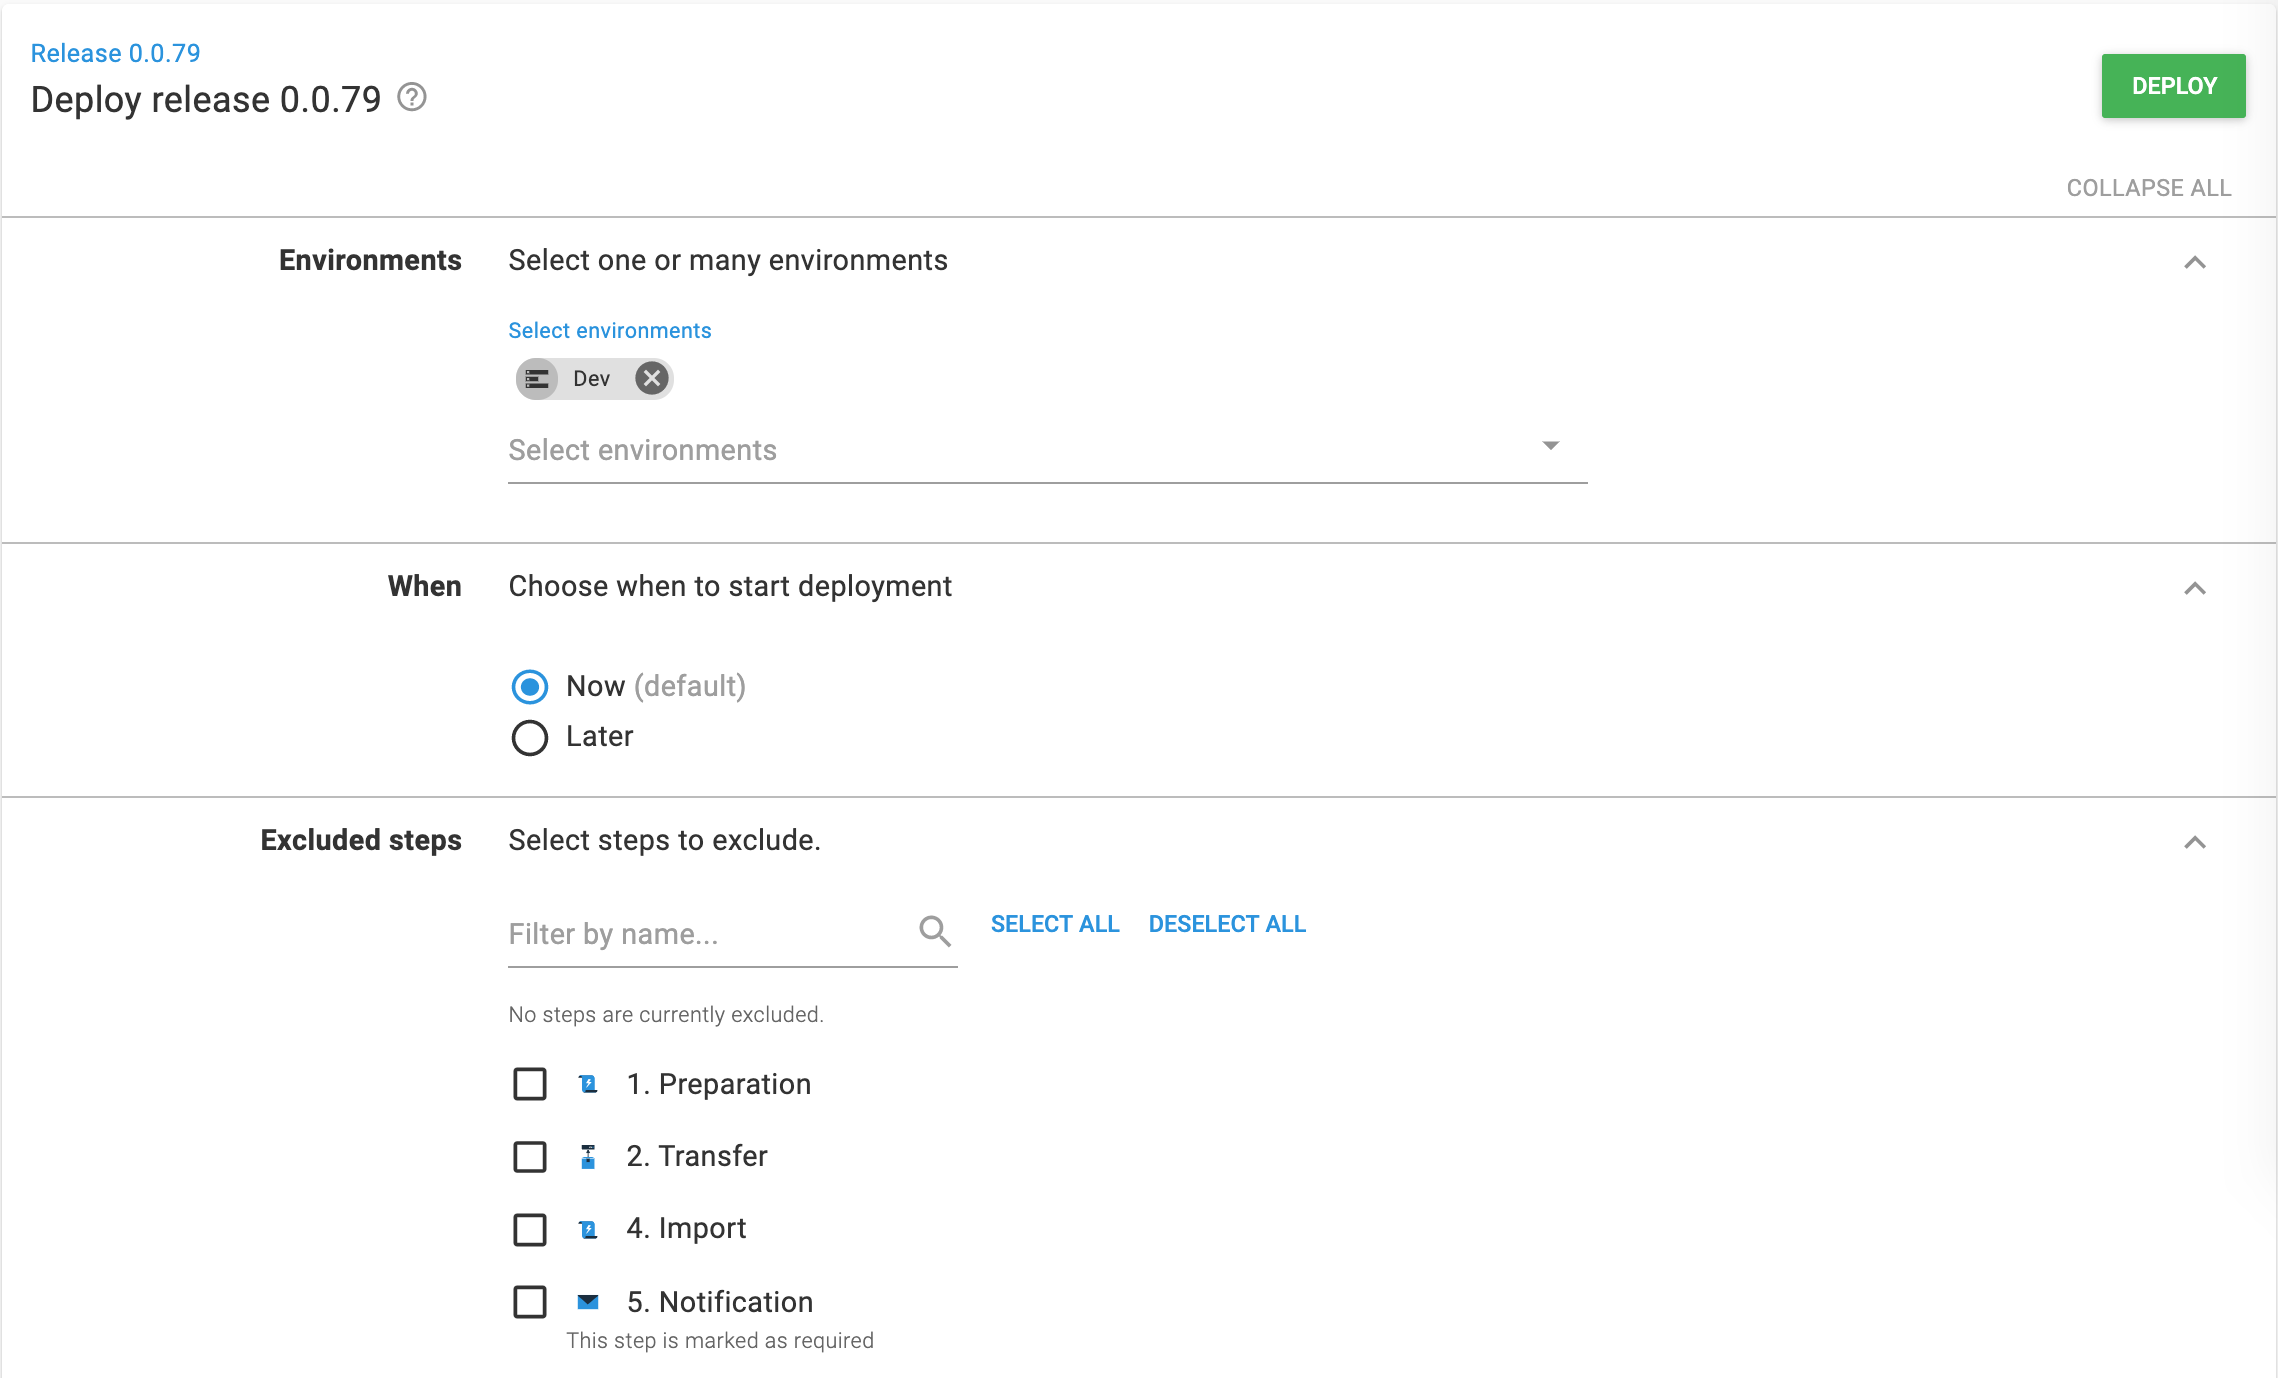
Select Failure mode and define which package to use (cached or redeploy).
If a deployment to Development is successful, you can promote the deployment to Production.