Add Tenant
The guide describes configuring a new Tenant to pass data via DW REST API.
Create Tenant
Work.AI supports multiple Tenants used to store users of different customers separately. To create a Tenant, do as follows:
Connect to the Master server via SSH, for example,
node-installer-wfaw-10081-master.wflab.io.Open the installer folder, for example,
/opt/workfusion/wf_installer.In the
config_overrides.ymlfile, add the following line:tenants: 'dbcustd.wflab.io'cautionThe
tenantsfield contains a comma-separated list of all known Tenants' resolvable FQDNs. The Tenant ID (in the above example,dbcustd) can contain only alphanumeric characters and dashes. The ID must start with an alphanumeric character and end with a character or a digit. Do not delete values if you don't mean to remove the Tenants.To check if a FQDN of your Tenant name is resolvable or not, use, for example:
getent ahostsv4 'dbcustd.wflab.io | head -1 | awk '{print $1}'Pre-conditions before the Tenants' installation add internal IPs and Tenants' names to
/etc/hosts. Without that, expect a failed FQDN validation. The example data in/etc/hosts:10.100.39.163 dbcustd.wflab.ioRun the commands:
cd /opt/workfusion/wf_installer
export ANSIBLE_PRIVATE_KEY_FILE="id_rsa" && export ANSIBLE_VAULT_PASS='SuchSecure!'
./install.sh install tenants -e @config_overrides.yml
Wait until the task is completed.
Configure realm
After you add a new Tenant, proceed to its configuration.
Configure Keycloak
When adding a new Tenant, a new realm appears in Keycloak with the same name as the added Tenant, for example, dbcustd.
To configure Keycloak for a new Tenant, do as follows:
Log in to Keycloak as the super admin (the admin user from the Master realm).
Configure LDAP and IDP if you require them for the newly created realm.
To access Control Tower, new users must have roles from the wf-control-tower client of a new realm.
To allow authentication via REST API for IDP, log in to Keycloak via the UI at least once and set up a user password in Keycloak.
Create additional Keycloak client for DW REST API
Default clients have low time-to-live (TTL) access or refresh tokens. In some cases, you have to allow using long-lived tokens.
To allow the configuration of long-lived tokens, perform the following steps:
- Create a new OIDC client
wf-dw-rest-api-client. - Configure valid redirect URI as "*".
- Verify that the Direct Access Grant is enabled.
- To configure the client as confidential instead of public, pass a client secret during the REST API login request.
- Go to the client configuration > Advanced Settings and set the needed value of lifespans, for example, 10 hours.
- Perform all login actions for DW REST API using this client.
Configure Control Tower
Create Business Process related to Tenant
To create a Business Process related to a new Tenant, perform the following steps:
- Log in to Control Tower as Admin from WorkfusionRealm.
- Create or import Business Processes related to a Tenant. If different Tenants use the same definition of a Business Process, create a separate copy of the Business Process for each Tenant. Make sure this copy is not deep.
- Specify
singnalIdfor Business Processes, for example,dbcustd-bp-1. For details on how to getsignalId, see the instruction. - Configure a unique Tenant marker for this Business Process, for example, a tag or a title prefix.
- Launch the Business Process.
Create filter
A filter is needed to exclude cases when, for some reason, users of tenant1 try to submit data into a Business Process related to tenant2. To avoid such cases, add a unique tag or a specific title for each Tenant for this Business Process.
You can also assign the filter to a user or a group.
Assign permissions to newly created roles
You require only the View Business Processes permission for DW REST API. For more details, refer to Manage Control Tower roles and permissions.
Configure Workspace
For details, see Configure multi-tenancy for Workspace.
Send payload
To send the payload to DW REST API, do as follows:
In Control Tower, open the required Business Process, go to the Run tab, open the API popup, and copy the required URL.
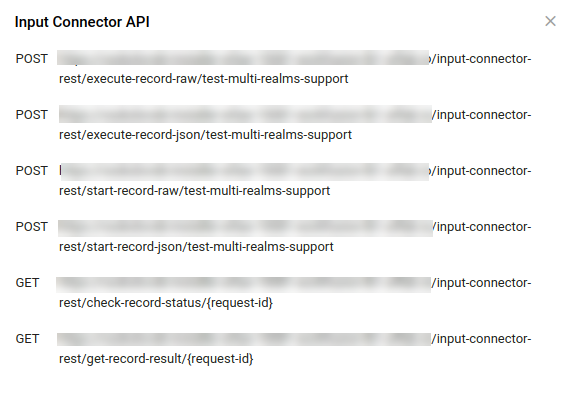
Modify the DW REST API URL for a new Tenant. The URL will be used by customers to submit data. Change the URL value from
HOST/input-connector-rest/PATH/SIGNAL-IDtoHOST/TENANT_ID/input-connector-rest/PATH/SIGNAL_ID, for example:Before:
https://custom-name.workfusion.com/input-connector-rest/execute-record-raw/test-multi-realms-supportAfter:
https://custom-name.workfusion.com/dbcustd/input-connector-rest/execute-record-raw/test-multi-realms-support
Send a request to Keycloak to get an access token. For this purpose, use one of the following clients:
- admin-cli
- wf-control-tower
- A newly created client, for example, dw-rest-api-client
Now, you can send a request to Keycloak to get an access token and submit data for processing to the customer's endpoint.
For example, the curl command for obtaining the access token can look
as follows:
curl --location --request POST 'https://CUSTOM-NAME.workfusion.com/auth/realms/dbcustd/protocol/openid-connect/token' \
--header 'Content-Type: application/x-www-form-urlencoded' \
--data-urlencode 'grant_type=password' \
--data-urlencode 'client_id=CLIENT-NAME' \
--data-urlencode 'username=USERNAME' \
--data-urlencode 'password=USER-PASSWORD' \
--data-urlencode 'client_secret=CLIENT_SECRET_IF_CONFIDENTIAL_CLIENT_IS_USED'
As a result, you obtain the following JSON:
{
  "access_token": "eyJhbGciOiJSUzI1NiIsInR5cCIgOiAiSldUIiwia2lkIiA6ICIzUmJ5LXRSaFBCSmZJU3VCaXBsOC1jSVdNZGR1ckpIbEFmU3ZwR1pBQ2I4In0.eyJleHAiOjE2NjM5Mzc1NTIsImlhdCI6MTY2MzkzNzQ5MiwianRpIjoiNmRhNWY2NTItZmFiMy00MDNiLTlkZDAtZjMyYTAzNjBiYWRkIiwiaXNzIjoiaHR0cHM6Ly92c29rb2xvdnNraS1pbnN0YWxsZXItd2Zhdy0xMDA4MS1hdXRoLWxiMS53ZmxhYi5pby9hdXRoL3JlYWxtcy9kYmN1c3RkIiwic3ViIjoiNWI5ZjBkYTEtMzRjOC00OTcwLWJjM2YtOTk5MTEwYmZjYTUzIiwidHlwIjoiQmVhcmVyIiwiYXpwIjoiYWRtaW4tY2xpIiwic2Vzc2lvbl9zdGF0ZSI6Ijk1MDgzZGRiLTZhYzgtNDliZS04NWM1LTFlMTA4ZTNkNjkyMSIsImFjciI6IjEiLCJzY29wZSI6IiJ9.OYa96Wz-sroTcyN8vbaSDNvGEd9E55VP9aG3DWDuz5TkxdQneRzVjAFkbWOgokDPEUQdleOgU6ZXqijnEAQw7ErvICu-Cam3VLH0XMGpOAmHC85GFh4t3kKRLbHTafuqqlFUSNmpenfulmQ4o4gndU7BiBpxZWa73N9w_4vp9NVXMg3-r-rlok9GgFD0xO8JRpyRfC0jTvhIP79q4e8E4h5BbTy_EAPKXITvidsWBwFTX1rnReorrtjWG99-OYA-p1kguPe7X5MD4E4IwvSHAc6maSjstEXvGdUcTcIBQ6_YT9ngUdpkakqDDZyfQJ89zXunlCf2V2SuaThF6gd-IQ",
  "expires_in": 60,
  "refresh_expires_in": 2400,
  "refresh_token": "eyJhbGciOiJIUzI1NiIsInR5cCIgOiAiSldUIiwia2lkIiA6ICJkZTc4MjQwNi0wODk2LTQzNmUtOGFhNS02MDZmMzNjNWEyZGYifQ.eyJleHAiOjE2NjM5Mzk4OTIsImlhdCI6MTY2MzkzNzQ5MiwianRpIjoiOTU1YWZkNDgtMjBkZi00ZWExLTg0YjEtNTM0YjdhYTYwYTExIiwiaXNzIjoiaHR0cHM6Ly92c29rb2xvdnNraS1pbnN0YWxsZXItd2Zhdy0xMDA4MS1hdXRoLWxiMS53ZmxhYi5pby9hdXRoL3JlYWxtcy9kYmN1c3RkIiwiYXVkIjoiaHR0cHM6Ly92c29rb2xvdnNraS1pbnN0YWxsZXItd2Zhdy0xMDA4MS1hdXRoLWxiMS53ZmxhYi5pby9hdXRoL3JlYWxtcy9kYmN1c3RkIiwic3ViIjoiNWI5ZjBkYTEtMzRjOC00OTcwLWJjM2YtOTk5MTEwYmZjYTUzIiwidHlwIjoiUmVmcmVzaCIsImF6cCI6ImFkbWluLWNsaSIsInNlc3Npb25fc3RhdGUiOiI5NTA4M2RkYi02YWM4LTQ5YmUtODVjNS0xZTEwOGUzZDY5MjEiLCJzY29wZSI6IiJ9.5M1cYzGwBZDFD8zTxnabv405598BIjeqZV_wYuH3Lis",
  "token_type": "bearer",
  "not-before-policy": 0,
  "session_state": "95083ddb-6ac8-49be-85c5-1e108e3d6921",
  "scope": ""
}
Pay attention to the access_token field. You must use this token in your requests to DW REST API.
curl --location --request POST 'https://https://CUSTOM-NAME.workfusion.com/dbcustd/input-connector-rest/execute-record-raw/test-multi-realms-support' \
--header 'Authorization: Bearer eyJhbGciOiJSUzI1NiIsInR5cCIgOiAiSldUIiwia2lkIiA6ICIzUmJ5LXRSaFBCSmZJU3VCaXBsOC1jSVdNZGR1ckpIbEFmU3ZwR1pBQ2I4In0.eyJleHAiOjE2NjM5Mzc1NTIsImlhdCI6MTY2MzkzNzQ5MiwianRpIjoiNmRhNWY2NTItZmFiMy00MDNiLTlkZDAtZjMyYTAzNjBiYWRkIiwiaXNzIjoiaHR0cHM6Ly92c29rb2xvdnNraS1pbnN0YWxsZXItd2Zhdy0xMDA4MS1hdXRoLWxiMS53ZmxhYi5pby9hdXRoL3JlYWxtcy9kYmN1c3RkIiwic3ViIjoiNWI5ZjBkYTEtMzRjOC00OTcwLWJjM2YtOTk5MTEwYmZjYTUzIiwidHlwIjoiQmVhcmVyIiwiYXpwIjoiYWRtaW4tY2xpIiwic2Vzc2lvbl9zdGF0ZSI6Ijk1MDgzZGRiLTZhYzgtNDliZS04NWM1LTFlMTA4ZTNkNjkyMSIsImFjciI6IjEiLCJzY29wZSI6IiJ9.OYa96Wz-sroTcyN8vbaSDNvGEd9E55VP9aG3DWDuz5TkxdQneRzVjAFkbWOgokDPEUQdleOgU6ZXqijnEAQw7ErvICu-Cam3VLH0XMGpOAmHC85GFh4t3kKRLbHTafuqqlFUSNmpenfulmQ4o4gndU7BiBpxZWa73N9w_4vp9NVXMg3-r-rlok9GgFD0xO8JRpyRfC0jTvhIP79q4e8E4h5BbTy_EAPKXITvidsWBwFTX1rnReorrtjWG99-OYA-p1kguPe7X5MD4E4IwvSHAc6maSjstEXvGdUcTcIBQ6_YT9ngUdpkakqDDZyfQJ89zXunlCf2V2SuaThF6gd-IQ' \
--header 'Content-Type: application/json' \
--data-raw '{"a":"1","b":"2"}'
The command returns the data generated by the Business Process.