
Interfaces and modules basics
Download sample project
Download helloworld_10.1.0.4.zip.
Learn HelloWorld sample project structure
note
To make it easier to understand the important classes and interfaces, we recommend to download and import this example project into your WorkFusion Studio and refer to it as you read this guide.
The downloaded project must have the file structure as below.
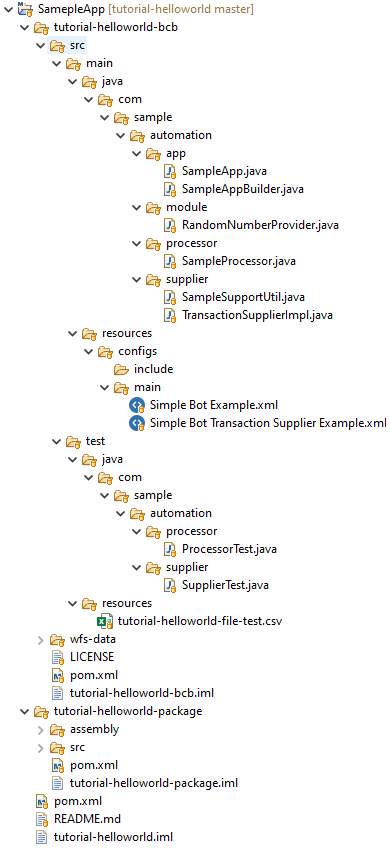
As soon as you have downloaded the project, perform the following actions.
Run
mvn clean installon parent pom.xml.Make sure you set all the needed data about Control Tower and Nexus users.
- The user specified in settings.xml under server ID bcb-repository exists in Nexus:
<server> <id>wf-dependencies</id> <username>odf-user</username> <password>********</password> </server>- The Nexus user should have a deployment privilege on the wf-machine-config-bundle repository.
- In parent pom.xml, you have set the specified Nexus repository where your JARs will be installed. Make sure to point it to your Nexus, for example:
<workfusion.nexus.host.url>http://localhost:8081/</workfusion.nexus.host.url>- Add the following code with the Control Tower user credentials to the settings.xml file:
<server> <id>control-tower</id> <username>CT_username</username> <password>CT_password</password> </server>- In parent pom.xml, you have set the Control Tower host where your bundle will be published.
<workfusion.controltower.url>https://yourinstance.workfusion.com/</workfusion.controltower.url>
Now, you can deploy your bots to Nexus or publish a bundle with BP to Control Tower.
Deploy to Nexus
- Run
mvn deployon parent pom.xml. This deployment depends on your Nexus repository configuration. - Once the build is reflected in Nexus, upload the bots into the local Control Tower. Go to Bot Configurations > Import from repository. You can build your business process by selecting a bot task from the list.
Publish to Control Tower
- Run
mvn bundle:importon tutorial-helloworld-package/pom.xml. This command calls the import plugin. - Open your Control Tower and find BP named "tutorial helloworld v0.0.3".
note
This BP works with input data only. You can find the input file for testing in the following path: tutorial-helloworld-bcb/src/test/resources/tutorial-helloworld-file-test.csv
Learn TransactionSupplier
An ODF project flow generally starts with TransactionSupplier. Two parts drive TransactionSupplier in our projects:
src > main > resources > Simple Bot Transaction Supplier Example.xmlsrc > main > java > com.sample.automation.supplier > TransactionSupplierImpl.java
What is TransactionSupplier
When working with any form of intake, each row or record is treated as a transaction.
A transaction in ODF and Control Tower context is also called a "record" or "task" and:
- represents a single execution unit
- typically contains a number of variables or data properties
- in most cases, contains a number of documents as links to files stored in File Storage
- originates either:
- from a single row of input data
- from a split data export of a bot task
- goes step by step, according to a business process design schema
- differs from a traditional database "transaction" with regards to the rollback feature — it is not possible to roll back ODF Transactions
TransactionSupplier is responsible for creating these transactions and providing them to the next bot task step, for example, in Transaction Supplier Example.xml.
def app = AddressUCApp.init(binding).get();def transactions = app.loadTransactions(TransactionSupplierExample.class);

// Exporting only transaction ids to the next steps.
result = [];
transactions.each {
    result << ['transaction_id': it.id];
}
The ID of each result is then sent as a transaction (in the form of transaction_id) to the next step by using:
<multi-column list="\${result}" split-results="true">
    <put-to-column-getter name="_sys_transaction_id" property="transaction_id"/>
</multi-column
How are transactions created?
Let us begin with understanding what Transaction supplier example.xml does. In the application class (in our case AddressUCApp.java), after initiating the binding, transactions can be fetched from the loadTransaction() method:
def transactions = app.loadTransactions(TransactionSupplierExample.class);
The superclass for all ODF applications can be found in com.workfusion.intake.core.APP.java. Here is how loadTransaction() in App.java generates individual transactions. Each transaction object looks like this:
public class Transaction extends Entity {
    private String id;
    private List<Document> docs;

    public Transaction() {
    }
    // getters and setters
}
When the App superclass calls loadTransaction(), dbTransactionService() saves each record into the data store as a transaction and returns Collection<Transaction>. This collection is returned in Groovy into "transactions", and all the transaction.id values are stored into a result array that is passed as a multi-column to the next bot tasks. Refer to a code snippet for better understanding.
Collection<Transaction> transactions = ((TransactionSupplier)this.getInstance(connectorClass)).get();
TransactionService transactionService = (TransactionService)this.getInstance(TransactionService.class);
DBTransactionService dbTransactionService = (DBTransactionService)this.getInstance(DBTransactionService.class);

try {
    dbTransactionService.startTransaction();
    transactions.stream().forEach(transactionService::save);
    dbTransactionService.commitTransaction();
    return transactions;
} catch (Exception var6) {
    this.log.error("Transactional update failed", var6);
    dbTransactionService.rollbackTransaction();
    throw new RuntimeException("Cannot save transactions", var6);
}
note
Mind that the code above reads a number of records and stores them in the data store only — it does not read data of each record. That is done by the TransactionSupplierExample.java class discussed next.
Closer look into TransactionSupplier
Collection<Transaction> transactions = ((TransactionSupplier)this.getInstance(connectorClass)).get();
In the loadTransaction() function, the get() method from the TransactionSupplierExample.java class is called. In this method, you define how the data is loaded into the transaction and supplied further.
HitSubmissionDataItemDto submissionDataItemDto = (HitSubmissionDataItemDto) BindingUtils.getWrappedObjFromContext(binding, WebHarvestConstants.HIT_SUBMISSION_DATA_ITEM);
for (Map.Entry<String, String> entry : submissionDataItemDto.getItemValueMap().entrySet()) {
    transaction.putAttribute(entry.getKey(), entry.getValue());
}
In the get() method, the transaction object is initialized with randomly generated UUID. To add input data from the Control Tower Upload data step, use the above code. The values of input records exist in the binding. You need to get these values from the binding and provide them in the transaction. Let's look into the essential parts of this code:
HitSubmissionDataItemDto– the object that is returned from binding and the values for input are stored asList<Map< tableHeader, value >>
You iterate over the map to extract values and put them into the transaction.
for (Map.Entry<String, String> entry : submissionDataItemDto.getItemValueMap().entrySet()) {
  transaction.putAttribute(entry.getKey(), entry.getValue());
}
Once the transaction has the values, you can process these in TransactionProcessor discussed below.
As an alternative to using HitSubmissionDataItemDto to access variables from the previous bot task step, you can use particular pass variables from groovy XML using the params object:
<script><![CDATA[
        import com.ibank.automation.invoicesusecase.app.AppInvoicePlane
        import com.ibank.automation.invoicesusecase.processor.CreateProductProcessor

        String docId = _sys_doc_id.toString();
        String transactionId = _sys_transaction_id.toString();

        def app = AppInvoicePlane.init(binding).params([
                '_sys_doc_id': docId,
                'invoiceplane_url' : invoiceplane_url.getWrappedObject().get(0).toString()
            ]).get();
        def processedTransaction = app.processTransaction(CreateProductProcessor.class, transactionId);
]]></script>
Learn TransactionProcessor
Something to keep in mind is that each bot supplied with a transaction from the supplier should have its unique TransactionProcessor. Let's discuss this flow in the example project. Two parts drive TransactionProcessor in our project:
src > main > resources > Simple Bot Example.xmlsrc > main > java > com.ibank.automation.processor > SampleProcessor.java
What is the purpose of TransactionProcessor?
TransactionProcessor is an interface implemented by processors. Processors in ODF are classes where data transformation is done. Processors perform modifications in Transaction Intake-data (transaction data from TransactionSupplier) and Transaction Documents (list documents OCRed in a transaction). In our example, TransactionProcessor.java is invoked in the Simple bot example.xml bot task.
def processedTransaction = app.processTransaction(TransactionProcessor.class, transactionId)
The processTransaction(<TransactionProcessor class>, transaction_id) function is present in App.java which is extended by your application app class, i.e., SampleApp.java.
When transaction_id is provided to this function, it checks for this entry in the odf_transactions data store, and provides transaction_data to the processor.
Closer look into TransactionProcessor
The function processTransaction() is a part of App superclass. ProcessTransaction internally calls dbTransactionService() to peek into the odf_transactions data store to fetch transaction data. Because of this, a single record of data input to transactionSuppler is available to transactionProcessor per transaction.
public final Transaction processTransaction(Class<? extends TransactionProcessor> processorClass, String transactionId) {
        TransactionService transactionService = (TransactionService)this.getInstance(TransactionService.class);
        Transaction transaction = transactionService.byId(transactionId);
        if (transaction != null) {
            Transaction processedTransaction = ((TransactionProcessor)this.getInstance(processorClass)).transform(transaction);
            transactionService.update(processedTransaction);
            return processedTransaction;
        } else {
            return null;
        }
}
The processTransaction() function takes two parameters, i.e., the transactionProcessor class and transaction_id. Transactions can be transformed in the transactionSupplier.transform() method in the class that is supplied to processTransaction().
Here is an example in our project:
@Override
public Transaction transform(Transaction transaction) {
    logger.debug("Processor works");

    // transform transaction
    logger.debug("Current transaction contains {}", transaction.getAttributes().toArray().toString());
    return transaction;
}
What are Modules?
Modules in ODF are resource providers. For instance, if you want ODF to access data stores or File Storage, or simply create a resource supplier class, then ODF provides a mechanism to achieve this by using modules.
Modules can be used for defining custom components/business logic to process each transaction. If you are familiar with Spring Framework, classes annotated with the @Component annotation have methods annotated with @Bean to provide beans. Similarly, ODF modules provide resources by annotation methods with the @Provides and @Named annotation.
Defining and implementing Module
The code below is not included in the example project but can be easily incorporated. Consider a case where TransactionSupplier has to create a transaction for each random number (between 1 to 100) generated by the script. The script can provide a list of random numbers.
Thus, you can create a class which implements the com.workfusion.intake.core.Module class with a method with the return type of List<Integer>:
public class RandomNumberProvider implements Module {

    @Provides
    @Named("random_numbers")
    public List<Integer> generateRandomNumber () {
        List<Integer> randomIntList = new ArrayList<>();
        Random random = new Random();

        for(int i = 0; i < 15; i++) {
            int randomInt = random.nextInt(100);
            randomIntList.add(randomInt);
        }
        return randomIntList;
    }
}
In order to use the module defined above, initialize the module and add it to the list of additionalModules in your AppBuilder class get() method.
public class RandomNumberAppBuilder {
    private Binding context;
    private Map<String, String> params = new HashMap<>();
    private List<Module> overrideModules;
    private Object injectContext;

    public RandomNumberApp get() {
        Module randomNumberProvider =  new RandomNumberProvider();
        List<Module> modules = Arrays.asList(randomNumberProvider);
        return new RandomNumberApp(context, modules, overrideModules, injectContext);
    }
}
This will be passed to your App class constructor as additionalModules.
public class RandomNumberApp extends App {

    protected RandomNumberApp(Binding context, List<Module> additionalModules, List<Module> overrideModules, Object injectContext) {
        super(context, additionalModules, overrideModules, injectContext);
    }

    public static RandomNumberAppBuilder init(Binding binding) {
        return new RandomNumberAppBuilder(binding);
    }
}