
AppDynamics agents configuration
AppDynamics graph and applications
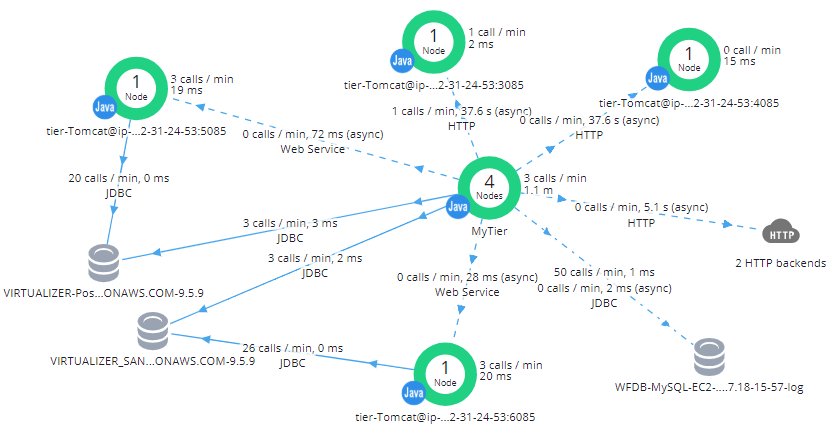
| Server | Application | AppD Agent type |
|---|---|---|
| APP | Control Tower | Java agent |
| WorkSpace | Java agent | |
| Sandbox | Java agent | |
| WFBI | Java agent | |
| SQC | Java agent | |
| RPA Manager | Java agent | |
| WFAgent | Java agent | |
| DB | MySQL | DB agent |
| PostreSQL | DB agent | |
| MongoDB | DB agent | |
| Nexus | Java agent | |
| WFAgent | Java agent | |
| OCR | OCR2Rest | Java agent |
| OCR2Worker | Java agent | |
| WFAgent | Java agent | |
| AutoML Master | Marathon | Java agent |
| VDS Gateway service | Java agent | |
| VDS Mesos adepter | Java agent | |
| VDS scaling service | Java agent | |
| ZooKeeper | Java agent | |
| WFAgent | Java agent | |
| AutoML Agent | WFAgent | Java agent |
| APM | Logstash | Java agent |
| WFAgent | Java agent |
Prepare Agents
APP Agent
The APP Agent must be configured for all servers to be monitored.
To use the AppDynamics Java Agent, you need the following:
- An AppDynamics account on a running Controller version 4.2+.
- Access to the machine where the application runs. Verify that you have a user account with privileges to install the agent software and restart the application.
- The machine where your application runs can access the Controller.
To configure the APP Agent, follow the steps below:
Configure the connection details for Controller by specifying the hostname and the port in the Controller web user interface (UI).
Download the Agent Installer from the Controller.
Install the APP Agent. For that, unarchive the Java Agent, for example:
$ mkdir -p /apps/workfusion/appagent
$ unzip AppServerAgent-4.5.7.zip -d /apps/workfusion/appagent
DB Agent
The Database (DB) Agent must be configured for a database server on which the DB services are running.
Prerequisites for the database:
When creating the Collector, a specified user must have required permissions.
The machine running the Database Agent requires 1 GB of heap space and 256 MB per Collector.
Examples:- Monitoring five database instances requires (5 x 256 MB = 1,280 MB) + 1,024 MB = 2,304 MB.
- Monitoring 20 database instances requires (20 x 256 = 5,120 MB) + 1,024 MB = 6,144 MB.
- Monitoring 100 database instances requires ( 100 x 256 = 25,600 MB) + 1,024 MB = 26,624 MB.
The maximum heap size is 50 MB per collector.
The Database Agent requires a Java virtual machine. JVMs versions 1.7 and 1.8 are supported.
The machine where the Agent is run can connect to the Controller and to the databases to be monitored.
The Controller event service is started.
To configure a DB Agent, follow the steps below:
Configure the connection details for the Controller by specifying the hostname and port in the Controller Web UI.
Download the Agent Installer from the Controller.
Unarchive the Database Agent on the machine from which you can connect to the Controller and to the databases to be monitored:
$ mkdir -p /apps/workfusion/dbagent
$ unzip db-agent.zip -d /apps/workfusion/dbagent
In the
/apps/workfusion/supervisord/apps/directory, create a service file, for example,dbagent.ini, with the following content:[program:dbagent] command = bash -c ' source /apps/workfusion/environment.sh java -jar /apps/workfusion/dbagent/db-agent.jar ' autostart = true stopasgroup = true stdout_logfile = /apps/workfusion/supervisord/log/%(program_name)s.out.log stderr_logfile = /apps/workfusion/supervisord/log/%(program_name)s.err.logUpdate the
wfmanagerconfiguration.wfmanager updateIn the Controller Web UI, configure the connection to DBs.
Machine Agent
Pre-installation
Java requirements:
- JRE 1.8 is required.
- In 4.2, JRE 1.8 is bundled with the OS-specific Machine Agent installation downloads.
- The Standalone Machine Agent (Machine Agent) starts within its own JVM.
- You can also use an existing JRE previously installed in your environment.
To configure the Machine Agent, follow the steps:
- Install the agent as the same user who owns the Machine Agent files or as an administrator on the host machine. If you want to monitor networks or disks available only to the root user, run the Machine Agent with root privileges.
- All files in the
<machine-agent-home>installation directory must be readable by the Machine Agent. - The user who runs the Machine Agent must have write privileges for the
confandlogsdirectories in the<machine_agent_home>directory.
Installation
Configure the connection details for the Controller by specifying the hostname and the port in the Controller Web UI.
Download the Agent zip bundle from the Controller.
Install the Machine Agent. Extract files from the zip archive in the directory where you want to install the Machine Agent. See the command example below:
$ mkdir -p /apps/workfusion/machineagent
$ unzip ./machineagent-bundle-64bit-linux-<version>.zip -d /opt/workfusion/machineagent
In the directory, open the
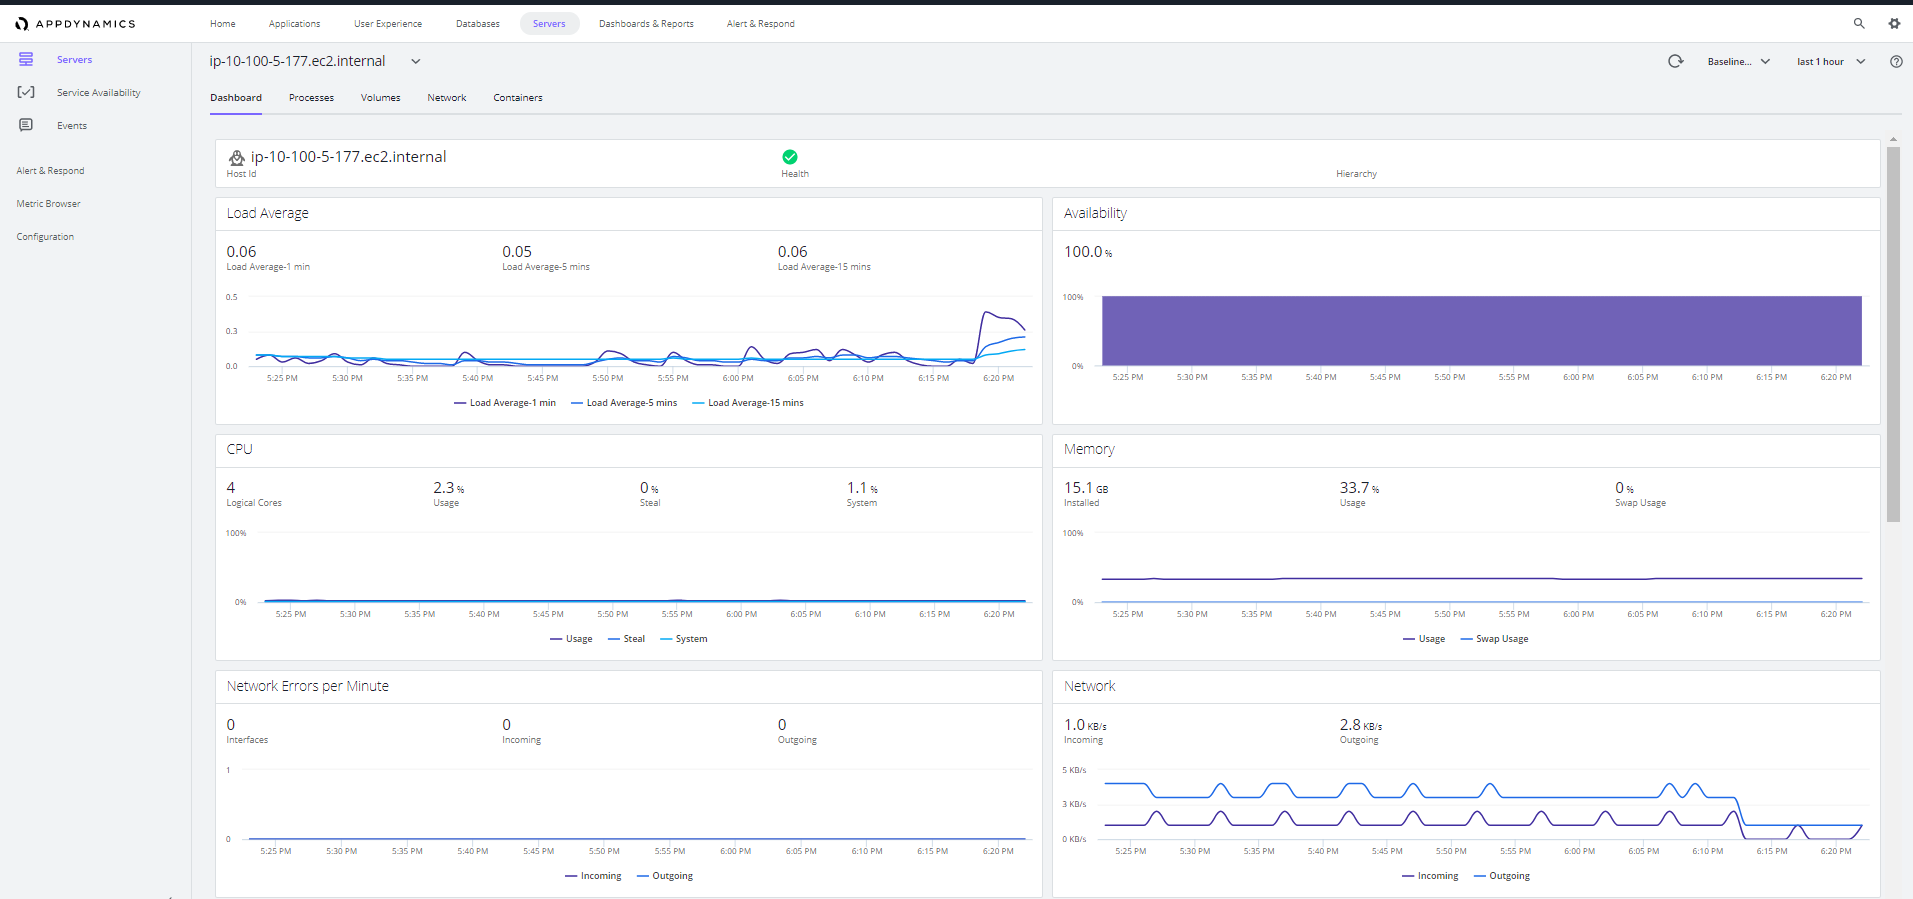
bindirectory and start the Machine Agent as a daemon using the command below:$ cd /opt/workfusion/machineagent/bin $ ./machine-agent -p pid_file -dAs a result, you get the statistics in the Controller as shown in the picture:
Preparation Machine Agent
Additional services can be monitored as extensions of the Appdynamics Machine Agent. AppDynamics Monitoring Extensions require a Server Infrastructure and Monitoring (SIM) agent or Standalone Machine Agent (MA) to report metrics to the AppDynamics Controller.
note
Multiple MA and SIM instances on a single physical host are not supported for extension installation.
SIM
In this mode, it is imperative to purchase the Server Visibility license and provide the SIM-enabled flag for an Agent. It can be provided as a JVM argument to the MA or can be specified in controller-info.xml. For more details, refer to the official Appdynamics documentation.
Standalone Machine Agent
In this mode, there are two installation scenarios:
Under the APM MA installation scenario, no application name, tier name, or node name must be provided to the MA as it will piggyback on the APM Agents running on the same server. In this case, APP Agent must be already configured on the server to be monitored. The Agent’s metrics are reported under the Metric Browser of all APM apps. Check that, in
controller-info.xml, the SIM-enabled property is set tofalse.Under the Independent MA installation scenario, a Server Visibility License (SIM License) is mandatory. Refer to the SIM section. Once the Agent is set up, it must be started, and the hardware metrics reported by the Agent must be verified in the Controller.
AppDynamics Extensions must be installed on the Agent only after verifying whether the Agent’s hardware metrics are reported.
APP server services
Control Tower
Add the
-javaagentparameter to the startup command, for example,/apps/workfusion/workfusion/bin/setenv.sh.In the
-javaagentparameter, specify the path to the Java Agent JAR file, for example:$ -javaagent:/apps/workfusion/appagent/javaagent.jar \The result can look as follows:
JAVA_OPTS=" \
  -Xms512G \
  -Xmx8G \
  -Djava.awt.headless=true \
  -Dfile.encoding=UTF-8 \
  -javaagent:/apps/workfusion/appagent/javaagent.jar \
  -server \
  -XX:+DisableExplicitGC \
  -XX:+UseG1GC \
  -XX:MaxMetaspaceSize=2048m \
  -Xloggc://apps/workfusion/workfusion/logs/gc.log \
  -XX:-PrintGCDetails \
  -verbose:gc \
  -XX:+PrintGCDateStamps \
  -Duser.timezone=UTC \
  -Dspring.profiles.active=\"default,soapEnable\" \
  -Dorg.apache.el.parser.SKIP_IDENTIFIER_CHECK=true \
  -Dgroovy.use.classvalue=true \
  -Dgroovy.target.indy=true \
 \
"
JAVA_HOME=/apps/workfusion/java
Add the
custom-excludeparameter to the/apps/workfusion/appagent.\<version>/conf/app-agent-config.xmlXML file in thebci-processing-excludestag.$ <custom-exclude filter-type="STARTSWITH" filter-value="com/workfusion/concurrency/stripes/StripedObject"/>The result can look as follows:
<bci-processing-excludes>
                    <!-- override-system-exclude is used to whitelist classes (e.g. 'com.sun.jersey') for instrumentation despite a blacklist ('com.sun.*') -->
                    <!-- override-system-exclude filter-type="equals" filter-value="foo"/-->
                    <custom-exclude filter-type="CONTAINS" filter-value="$JaxbAccessor"/>
                    <custom-exclude filter-type="CONTAINS" filter-value="$$FastClassByCGLIB"/>
                    <custom-exclude filter-type="STARTSWITH" filter-value="$Proxy"/>
                    <custom-exclude filter-type="STARTSWITH" filter-value="org/mozilla/javascript/gen/"/>
                    <custom-exclude filter-type="STARTSWITH" filter-value="atg/dms/"/>
                    <custom-exclude filter-type="CONTAINS" filter-value="$$EnhancerByCGLIB$$"/>
                    <custom-exclude filter-type="EQUALS" filter-value="org.jboss.resource.adapter.jms.JmsMessageConsumer"/>
                    <custom-exclude filter-type="EQUALS" filter-value="com.ibm.ejs.jms.JMSMessageConsumerHandle"/>
                    <custom-exclude filter-type="EQUALS" filter-value="io/netty/util/concurrent/DefaultThreadFactory$DefaultRunnableDecorator"/>
                    <custom-exclude filter-type="STARTSWITH" filter-value="io/netty/util/concurrent/SingleThreadEventExecutor"/>
                    <custom-exclude filter-type="STARTSWITH" filter-value="io/reactivex/netty/client/ConnectionPoolImpl"/>
                    <custom-exclude filter-type="STARTSWITH" filter-value="com/workfusion/concurrency/stripes/StripedObject"/>
                    <!--- to disable lambda classes instrumentation, use the following line
                        <custom-exclude filter-type="CONTAINS" filter-value="$$Lambda$"/>
                    -->
</bci-processing-excludes>
Restart the workfusion service.
wfmanager restart workfusion
WorkSpace
Add the
-javaagentparameter to the startup command, for example,/apps/workfusion/workspace_production/bin/setenv.sh.In the
-javaagentparameter, specify the path to the Java Agent JAR file, for example:$ -javaagent:/apps/workfusion/appagent/javaagent.jar \The result can look as follows:
JAVA_OPTS=" \
  -Xms512M \
  -Xmx1G \
  -Djava.awt.headless=true \
  -Dfile.encoding=UTF-8 \
  -javaagent:/apps/workfusion/appagent/javaagent.jar \
  -server \
  -XX:+DisableExplicitGC \
  -XX:+UseG1GC \
  -XX:MaxMetaspaceSize=2048m \
  -Xloggc://apps/workfusion/workspace_production/logs/gc.log \
  -XX:-PrintGCDetails \
  -verbose:gc \
  -XX:+PrintGCDateStamps \
  -Duser.timezone=UTC \
  -Dspring.profiles.active=\"default,soapEnable\" \
  -Dorg.apache.el.parser.SKIP_IDENTIFIER_CHECK=true \
  -Dgroovy.use.classvalue=true \
  -Dgroovy.target.indy=true \
 \
"
JAVA_HOME=/apps/workfusion/java
Restart the workspace service.
$ wfmanager restart workspace_production
Sandbox
Add the
-javaagentparameter to the startup command, for example,/apps/workfusion/workspace_sandbox/bin/setenv.sh.In the
-javaagentparameter, specify the path to the Java Agent JAR file, for example:$ -javaagent:/apps/workfusion/appagent/javaagent.jar \The result can look as follows:
JAVA_OPTS=" \
  -Xms512M \
  -Xmx1G \
  -Djava.awt.headless=true \
  -Dfile.encoding=UTF-8 \
  -javaagent:/apps/workfusion/appagent/javaagent.jar \
  -server \
  -XX:+DisableExplicitGC \
  -XX:+UseG1GC \
  -XX:MaxMetaspaceSize=2048m \
  -Xloggc://apps/workfusion/workspace_sandbox/logs/gc.log \
  -XX:-PrintGCDetails \
  -verbose:gc \
  -XX:+PrintGCDateStamps \
  -Duser.timezone=UTC \
  -Dspring.profiles.active=\"default,soapEnable\" \
  -Dorg.apache.el.parser.SKIP_IDENTIFIER_CHECK=true \
  -Dgroovy.use.classvalue=true \
  -Dgroovy.target.indy=true \
 \
"
JAVA_HOME=/apps/workfusion/java
Restart the sandbox service.
$ wfmanager restart workspace_sandbox
WFBI
Add the
-javaagentparameter to the startup command, for example,/apps/workfusion/wfbi/bin/setenv.sh.In the
-javaagentparameter, specify the path to the Java Agent JAR file, for example:$ -javaagent:/apps/workfusion/appagent/javaagent.jar \The result can look as follows:
JAVA_OPTS=" \
  -Xms512M \
  -Xmx1G \
  -Djava.awt.headless=true \
  -Dfile.encoding=UTF-8 \
  -javaagent:/apps/workfusion/appagent/javaagent.jar \
  -server \
  -XX:+DisableExplicitGC \
  -XX:+UseG1GC \
  -XX:MaxMetaspaceSize=2048m \
  -Xloggc://apps/workfusion/wfbi/logs/gc.log \
  -XX:-PrintGCDetails \
  -verbose:gc \
  -XX:+PrintGCDateStamps \
  -Duser.timezone=UTC \
  -Dspring.profiles.active=\"default,soapEnable\" \
  -Dorg.apache.el.parser.SKIP_IDENTIFIER_CHECK=true \
  -Dgroovy.use.classvalue=true \
  -Dgroovy.target.indy=true \
-Dsecurity.server.login=11Wuser_name -Dsecurity.server.password=iIkT9g42YF4eg@ -Dlog4j.configuration=/apps/workfusion/wfbi/conf/log4j.xml \
"
JAVA_HOME=/apps/workfusion/java
Restart the wfbi service:
wfmanager restart wfbi
SQC
Add the
-javaagentparameter to the startup command, for example,/apps/workfusion/sqc/bin/setenv.sh.In the
-javaagentparameter, specify the path to the Java Agent JAR file, for example:$ -javaagent:/apps/workfusion/appagent/javaagent.jar \The result can look as follows:
JAVA_OPTS=" \
  -Xms256M \
  -Xmx512M \
  -Djava.awt.headless=true \
  -Dfile.encoding=UTF-8 \
  -javaagent:/apps/workfusion/appagent/javaagent.jar \
  -server \
  -XX:+DisableExplicitGC \
  -XX:+UseG1GC \
  -XX:MaxMetaspaceSize=2048m \
  -Xloggc://apps/workfusion/sqc/logs/gc.log \
  -XX:-PrintGCDetails \
  -verbose:gc \
  -XX:+PrintGCDateStamps \
  -Duser.timezone=UTC \
  -Dspring.profiles.active=\"default,soapEnable\" \
  -Dorg.apache.el.parser.SKIP_IDENTIFIER_CHECK=true \
  -Dgroovy.use.classvalue=true \
  -Dgroovy.target.indy=true \
 \
"
JAVA_HOME=/apps/workfusion/java
Restart the sqc service:
$ wfmanager restart sqc
RPA Manager
Add the
-javaagentparameter to the startup command, for example,/apps/workfusion/rpa-manager/run-rpa-manager.sh.In the
-javaagentparameter, specify the path to the Java Agent JAR file, for example:-javaagent:/apps/workfusion/appagent/javaagent.jar \The result can look as follows:
#!/bin/bash -e
# Ansible managed

source /apps/workfusion/environment.sh

$ rm -rf /tmp/jetty-*.dir

$ cd /apps/workfusion/rpa-manager
$ JAVA_OPTS='-XX:+UseParNewGC -XX:+UseConcMarkSweepGC -XX:+CMSParallelRemarkEnabled -XX:MaxPermSize=512m -Xms512m -Xmx2048m -javaagent:/apps/workfusion/appagent/javaagent.jar -Djava.net.preferIPv6Addresses=false -Djava.net.preferIPv4Stack=true'
$ exec ${JAVA_HOME}/bin/java $JAVA_OPTS \
-Dlog4j.configuration=file:./grid-router/log4j.properties -jar ./jetty-runner.jar \
--classes ./grid-router --host localhost --port 5555 --config ./grid-router/jetty.xml ./rpa-manager-server.war
Restart the rpa-manager service:
$ wfmanager restart rpa-manager
WFAgent
Add the
-javaagentparameter to the startup command, for example,/apps/workfusion/wfagent/.wfagent.In the
-javaagentparameter, specify the path to the Java Agent JAR file, for example:$ -javaagent:/apps/workfusion/appagent/javaagent.jarThe result can look as follows:
#!/bin/bash -e
# Ansible managed

echo "Init WF Agent"
source /apps/workfusion/environment.sh
cd /apps/workfusion/wfagent

JAVA_DEFAULT_OPTS="-Dfile.encoding=UTF-8 -Dloader.path=./lib -Djava.io.tmpdir=./run"
JAVA_OPTS="${JAVA_DEFAULT_OPTS} -Xmx384M  -javaagent:/apps/workfusion/appagent/javaagent.jar"
PID_FOLDER=run
LOG_FOLDER=logs


CONF=`find settings -name \*.yml -print |sort | tr '\n' ','`
CONF="${CONF}custom.yml"

export MODE=${MODE:-service}
echo "Starting with configs: ${CONF}"

exec ${JAVA_HOME}/bin/java $JAVA_OPTS \
-jar /apps/workfusion/wfagent/status-agent-9.2.0.0.jar \
 --spring.config.location=${CONF}
Restart the wfagent service:
$ wfmanager restart wfagent
Nginx
This section describes the case of the installation scenario with a Standalone Machine Agent:
You need an APP Agent configured on the server. For more details, refer to the APP Agent section.
Install a Machine agent. Refer to the Machine Agent section.
Run Nginx with
ngx_http_stub_status_moduleenabled. Add thebasic_statusparameter to the Nginx configuration file on the following/apps/workfusion/nginx/sites.d/app.confpath. See the example below:# Ansible managed server { server_name app.workfusion.com; listen 80; location / { rewrite ^(.*)$ https://$host:443$1 permanent; } } server { server_name app.workfusion.com; listen 443 ssl; include snippets/ssl_params; include snippets/proxy_params; ssl_certificate ssl/app.crt; ssl_certificate_key ssl/app.key; error_page 497 https://$host:$server_port$request_uri; if ($request_method !~ ^(GET|HEAD|POST|OPTIONS|PUT|DELETE)$ ){ return 444; } error_page 404 401 /404.html; location = /404.html { root /opt/workfusion/nginx/var/www; } location = /ca.crt { root /opt/workfusion/nginx/ssl/; } location = /basic_status { stub_status; } include app_apps.d/*.conf; }Download the Appdynamics Nginx Monitoring Extension from the official site. Unzip the Nginx monitoring extension archive to the
MachineAgent_Dir>/monitorsdirectory. See the command example below:$ wget https://www.appdynamics.com/media/uploaded-files/1550056110/nginx-monitoring-extension-2.0.0.zip $ unzip nginx-monitoring-extension-2.0.0.zip -d /opt/workfusion/machineagent/monitors/Configure the extension by editing the
config.ymlfile in<MACHINE_AGENT_HOME>/monitors/NginxMonitor/. You need to customize the Metric Prefix. Theconfig.ymlfiles contain twometricPrefixsections:metricPrefix:Custom Metrics |RedismetricPrefix:Server |Component:<COMPONENT_ID> |Custom Metrics |RedisThe first metric prefix is recommended when SIM is enabled. The second metric prefix is recommended when one or more app agents coexist on the same host with the MA. This metric prefix points to one specific component. You can get
COMPONENT_IDas described below:Go to your Controller.
Select the Application associated with your Machine Agent.
Select Tiers and Nodes and select the exact tier corresponding to your Machine Agent.
Once you select the Tier, click the Details button to open the Dashboard.
In the Dashboard URL, find the word component and the value corresponding to it. This value is your tier ID or component ID that you need to update as your
Component_IDvalue in the configuration.Note that the component ID or component name specified in the metric prefix of the extension should match the corresponding tier of the Machine Agent. The extension cannot report to a tier other than its Machine Agent's tier.
Restart the Machine Agent.
Check that a custom metric appears in the Controller. For more details, refer to the Check custom metrics section.
DB server services
Nexus
In the Additional JVM parameters field, add the
-javaagentparameter to the JSW configuration file, for example,/apps/workfusion/nexus/bin/jsw/conf/wrapper.conf.In the
-javaagentparameter, specify the path to the Java Agent JAR file, for example:$ wrapper.java.additional.<number>=-javaagent:/apps/workfusion/appagent/javaagent.jarThe result can look as follows:
# Additional JVM parameters (tune if needed, but match the sequence of numbers!)
wrapper.java.additional.1=-XX:MaxPermSize=192m
wrapper.java.additional.2=-Djava.io.tmpdir=./tmp
wrapper.java.additional.3=-Djava.net.preferIPv4Stack=true
wrapper.java.additional.4=-Dcom.sun.jndi.ldap.connect.pool.protocol="plain ssl"
wrapper.java.additional.4.stripquotes=TRUE
wrapper.java.additional.5=-javaagent:/apps/workfusion/appagent/javaagent.jar
#wrapper.java.additional.5=-Xdebug
#wrapper.java.additional.6=-Xnoagent
#wrapper.java.additional.7=-Djava.compiler=NONE
#wrapper.java.additional.8=-Xrunjdwp:transport=dt_socket,server=y,suspend=y,address=8000
#wrapper.java.additional.9=-XX:+HeapDumpOnOutOfMemoryError
Update the wfmanager configuration:
wfmanager update
WFAgent
Add the
-javaagentparameter to the startup command, for example,/apps/workfusion/wfagent/.wfagent.In the
-javaagentparameter, specify the path to the Java Agent JAR file, for example:$ -javaagent:/apps/workfusion/appagent/javaagent.jarThe result can look as follows:
#!/bin/bash -e
# Ansible managed

echo "Init WF Agent"
source /apps/workfusion/environment.sh
cd /apps/workfusion/wfagent

JAVA_DEFAULT_OPTS="-Dfile.encoding=UTF-8 -Dloader.path=./lib -Djava.io.tmpdir=./run"
JAVA_OPTS="${JAVA_DEFAULT_OPTS} -javaagent:/apps/workfusion/appagent/javaagent.jar -Xmx384M"
PID_FOLDER=run
LOG_FOLDER=logs

CONF=`find settings -name \*.yml -print |sort | tr '\n' ','`
CONF="${CONF}custom.yml"

export MODE=${MODE:-service}
echo "Starting with configs: ${CONF}"

exec ${JAVA_HOME}/bin/java $JAVA_OPTS \
-jar /apps/workfusion/wfagent/status-agent-9.2.0.5.jar \
 --spring.config.location=${CONF}
Restart the wfagent service:
$ wfmanager restart wfagent
Nginx
The following guide describes the installation scenario with a Standalone Machine Agent:
You need an APP Agent configured on the server. For more details, refer to the APP Agent section.
Install a Machine Agent. Refer to the Machine Agent section.
Run Nginx with
ngx_http_stub_status_moduleenabled. Add thebasic_statusparameter to the Nginx configuration file on the following path:/apps/workfusion/nginx/sites.d/db.conf. See the example below:# Ansible managed server { server_name db.workfusion.com; listen 80; location / { rewrite ^(.*)$ https://$host:443$1 permanent; } } server { server_name db.workfusion.com; listen 443 ssl; include snippets/ssl_params; include snippets/proxy_params; ssl_certificate ssl/db.crt; ssl_certificate_key ssl/db.key; error_page 497 https://$host:$server_port$request_uri; if ($request_method !~ ^(GET|HEAD|POST|OPTIONS|PUT|DELETE)$ ){ return 444; } error_page 404 401 /404.html; location = /404.html { root /opt/workfusion/nginx/var/www; } location = /ca.crt { root /opt/workfusion/nginx/ssl/; } location = /basic_status { stub_status; } include db_apps.d/*.conf; }Download the Appdynamics Nginx Monitoring Extension from the official site. Unzip the Nginx monitoring extension archive to the
MachineAgent_Dir/monitorsdirectory. See the command example below:$ wget https://www.appdynamics.com/media/uploaded-files/1550056110/nginx-monitoring-extension-2.0.0.zip $ unzip nginx-monitoring-extension-2.0.0.zip -d /opt/workfusion/machineagent/monitors/Configure the extension by editing the
config.ymlfile in<MACHINE_AGENT_HOME>/monitors/NginxMonitor/. Customize the metric prefix. Theconfig.ymlfiles contain twometricPrefixsections:metricPrefix:Custom Metrics|RedismetricPrefix:Server|Component:<COMPONENT_ID>|Custom Metrics|Redis
The first metric prefix is recommended when SIM is enabled. The second metric prefix is recommended when one or more APP Agents coexist on the same host with the MA. This metric prefix points to one specific component. You can find the
COMPONENT_IDas described below:Go to your Controller.
Select the Application associated with your Machine Agent.
Select Tiers and Nodes and the exact tier corresponding to your Machine Agent.
Once you select the Tier, click the Details button to open the Dashboard.
In the Dashboard URL, find the word component and the value corresponding to it. This value is your tier ID or the component ID you need to update as your
Component_IDvalue in the configuration.Note that the component ID or component name specified in the metric prefix of the extension must match the corresponding tier of the Machine Agent. The extension cannot report to a tier different from its Machine Agent's tier.
Restart the Machine Agent.
Check that custom metric appears in the Controller. For more details, refer to the Check custom metrics section.
OCR server services
OCR2Rest
Add the
-javaagentparameter to the startup command, for example,/apps/workfusion/supervisord/apps/ocr2-rest.ini.In the
-javaagentparameter, specify the path to the Java Agent JAR file, for example:$ -javaagent:/apps/workfusion/appagent/javaagent.jarThe result can look as follows:
# Ansible managed

[program:ocr2rest]
directory = /apps/workfusion/ocr
environment =
    PATH="$PATH:/usr/local/sbin:/sbin:/bin:/usr/sbin:/usr/bin:/root/bin",
    JAVA="/apps/workfusion/java/bin/java -Djava.io.tmpdir=/apps/workfusion/ocr/tmp",
    JAVA_OPTS="-Dfile.encoding=UTF-8 -javaagent:/apps/workfusion/appagent/javaagent.jar -Dspring.config.location=./etc/ocr-rest.yml",
    LD_LIBRARY_PATH="$LD_LIBRARY_PATH:/apps/workfusion/ABBYY_FRE11/Bin"

command = bash -c '
    source /apps/workfusion/environment.sh
    exec $JAVA $JAVA_OPTS -jar ocr-rest-9.3.0.0.jar $APP_OPTS
    '
autostart = false
stopasgroup = true
startinorder = true
priority = 860

stdout_logfile = /apps/workfusion/supervisord/log/%(program_name)s.out.log
stderr_logfile = /apps/workfusion/supervisord/log/%(program_name)s.err.log
Update the wfmanager configuration:
$ wfmanager update
OCR2Worker
Add the
-javaagentparameter to the startup script, for example,/apps/workfusion/supervisord/apps/ocr2-worker.ini.In the
-javaagentparameter, specify the path to the Java Agent JAR file, for example:$ -javaagent:/apps/workfusion/appagent/javaagent.jarThe result can look as follows:
# Ansible managed

[program:ocr2worker]
directory = /apps/workfusion/ocr
environment =
    PATH="$PATH:/usr/local/sbin:/sbin:/bin:/usr/sbin:/usr/bin:/root/bin",
    JAVA="/apps/workfusion/java/bin/java -Djava.io.tmpdir=/apps/workfusion/ocr/tmp",
    JAVA_OPTS="-Dfile.encoding=UTF-8 -javaagent:/apps/workfusion/appagent/javaagent.jar -Dspring.config.location=./etc/ocr-worker.yml",
    LD_LIBRARY_PATH="$LD_LIBRARY_PATH:/apps/workfusion/ABBYY_FRE11/Bin"

command = bash -c '
    source /apps/workfusion/environment.sh
    exec $JAVA $JAVA_OPTS -jar ocr-worker-9.3.0.0.jar $APP_OPTS
    '
autostart = false
stopasgroup = true
startinorder = true
priority = 850

stdout_logfile = /apps/workfusion/supervisord/log/%(program_name)s.out.log
stderr_logfile = /apps/workfusion/supervisord/log/%(program_name)s.err.log
Update the wfmanager configuration:
$ wfmanager updateStart the ocr2worker service:
$ wfmanager start ocr2worker
WFAgent
Add the
-javaagentparameter to the startup command, for example,/apps/workfusion/wfagent/.wfagent.In the
-javaagentparameter, specify the path to the Java Agent JAR file, for example:$ -javaagent:/apps/workfusion/appagent/javaagent.jarThe result can look as follows:
#!/bin/bash -e
# Ansible managed

echo "Init WF Agent"
source /apps/workfusion/environment.sh
cd /apps/workfusion/wfagent

JAVA_DEFAULT_OPTS="-Dfile.encoding=UTF-8 -Dloader.path=./lib -Djava.io.tmpdir=./run"
JAVA_OPTS="${JAVA_DEFAULT_OPTS} -javaagent:/apps/workfusion/appagent/javaagent.jar -Xmx256M"
PID_FOLDER=run
LOG_FOLDER=logs


CONF=`find settings -name \*.yml -print |sort | tr '\n' ','`
CONF="${CONF}custom.yml"

export MODE=${MODE:-service}
echo "Starting with configs: ${CONF}"

exec ${JAVA_HOME}/bin/java $JAVA_OPTS \
-jar /apps/workfusion/wfagent/status-agent-9.2.0.5.jar \
 --spring.config.location=${CONF}
Restart the wfagent service:
$ wfmanager restart wfagent
Nginx
The instruction describes the installation scenario with a Standalone Machine Agent:
You need an APP Agent configured on the server. For more details, refer to the APP Agent section.
Install a Machine Agent. Refer to the Machine Agent section.
Run Nginx with
ngx_http_stub_status_moduleenabled. Add thebasic_statusparameter to the Nginx configuration file on the following path:/apps/workfusion/nginx/sites.d/ocr.conf. See the example below:# Ansible managed server { server_name ocr.workfusion.com; listen 80; location / { rewrite ^(.*)$ https://$host:443$1 permanent; } } server { server_name ocr.workfusion.com; listen 443 ssl; include snippets/ssl_params; include snippets/proxy_params; ssl_certificate ssl/ocr.crt; ssl_certificate_key ssl/ocr.key; error_page 497 https://$host:$server_port$request_uri; if ($request_method !~ ^(GET|HEAD|POST|OPTIONS|PUT|DELETE)$ ){ return 444; } error_page 404 401 /404.html; location = /404.html { root /opt/workfusion/nginx/var/www; } location = /ca.crt { root /opt/workfusion/nginx/ssl/; } include ocr_apps.d/*.conf; }Download the Appdynamics Nginx Monitoring Extension from the official site. Unzip the Nginx monitoring extension archive to the
<MachineAgent_Dir>/monitorsdirectory. See the command example below:$ wget https://www.appdynamics.com/media/uploaded-files/1550056110/nginx-monitoring-extension-2.0.0.zip $ unzip nginx-monitoring-extension-2.0.0.zip -d /opt/workfusion/machineagent/monitors/Configure the extension by editing the
config.ymlfile in<MACHINE_AGENT_HOME>/monitors/NginxMonitor/. Customize the metric prefix. Theconfig.ymlfiles contain twometricPrefixsections:metricPrefix:Custom Metrics|RedismetricPrefix:Server|Component:<COMPONENT_ID>|Custom Metrics|RedisThe first metric prefix is recommended when SIM is enabled. The second metric prefix is recommended when one or more APP Agents coexist on the same host with the MA. This metric prefix points to one specific component. You can find
COMPONENT_IDas described below:
Go to your Controller.
Select the Application associated with your Machine Agent.
Select Tiers and Nodes and the exact tier corresponding to your Machine Agent.
Once you select the Tier, click the Details button to open the Dashboard.
In the Dashboard URL, find the word component and the value corresponding to it. This value is your tier ID or component ID you need to update as your
Component_IDvalue in the configuration.Note that the component ID or component name specified in the metric prefix of the extension should match the corresponding tier of the Machine Agent. The extension cannot report to a tier different than its Machine Agent's tier.
Restart the Machine Agent.
Check that a custom metric appears in the Controller. For more details, refer to the Check custom metrics section.
AutoML Master server services
Marathon
Add the
-javaagentparameter to the startup command, for example,/apps/workfusion/supervisord/apps/marathon.ini.In the
-javaagentparameter, specify the path to the Java Agent JAR file, for example:$ -javaagent:/apps/workfusion/appagent/javaagent.jarThe result can look as follows:
# Ansible managed

[program:marathon]
environment =
    LD_LIBRARY_PATH="/apps/workfusion/mesos/usr/lib/:/apps/workfusion/mesos/usr/lib64/:$LD_LIBRARY_PATH",
    MESOS_NATIVE_JAVA_LIBRARY="/apps/workfusion/mesos/usr/lib/libmesos.so",
    LIBPROCESS_SSL_ENABLED=true,
    LIBPROCESS_SSL_KEY_FILE=/apps/workfusion/mesos/ssl/vds_master.key,
    LIBPROCESS_SSL_CERT_FILE=/apps/workfusion/mesos/ssl/vds_master.crt,
    LIBPROCESS_PORT=15000,
    JAVA_OPTS="-Xmx16G -javaagent:/apps/workfusion/appagent/javaagent.jar"

command = bash -c '
    source /apps/workfusion/environment.sh
    exec /apps/workfusion/marathon/bin/start \
      --zk     zk://bi-inst-automlmaster1.workfusion.com:2181/marathon \
      --master zk://bi-inst-automlmaster1.workfusion.com:2181/mesos \
      --http_address 127.0.0.1 \
      --http_port 8080 \
      --mesos_leader_ui_url "https://bi-inst-automlmaster1.workfusion.com:5050" \
      --disable_ha
    '

autostart = false
autorestart = true
startinorder = true
stopasgroup = true
priority = 880


stdout_logfile = /apps/workfusion/supervisord/log/%(program_name)s.out.log
stderr_logfile = /apps/workfusion/supervisord/log/%(program_name)s.err.log
Update the wfmanager configuration:
$ wfmanager updateStart the Marathon service:
$ wfmanager start marathon
VDS Gateway service
Add the
-javaagentparameter to the startup command, for example,/apps/workfusion/supervisord/apps/vds-gateway-service.ini.In the
-javaagentparameter, specify the path to the Java Agent JAR file, for example:$ -javaagent:/apps/workfusion/appagent/javaagent.jarThe result can look as follows:
# Ansible managed

[program:vds-gateway-service]
directory = /apps/workfusion/vds-gateway-service
environment = JAVA_OPTS="-Xmx1G"
command = bash -c '
 source /apps/workfusion/environment.sh
 java -javaagent:/apps/workfusion/appagent/javaagent.jar -jar wfml2-gateway-service-9.3.0.3.jar --spring.config.location=/apps/workfusion/vds-gateway-service/vds-gateway-service.properties
 '

autostart = true
stopasgroup = true

stdout_logfile = /apps/workfusion/supervisord/log/%(program_name)s.out.log
stderr_logfile = /apps/workfusion/supervisord/log/%(program_name)s.err.log
Update the wfmanager configuration:
$ wfmanager update
VDS Mesos adapter
Add the
-javaagentparameter to the startup command, for example,/apps/workfusion/supervisord/apps/vds-mesos-adapter.ini.In the
-javaagentparameter, specify the path to the Java Agent JAR file, for example:$ -javaagent:/apps/workfusion/appagent/javaagent.jarThe result can look as follows:
# Ansible managed

[program:vds-mesos-adapter]
directory = /apps/workfusion/vds-mesos-adapter
environment = JAVA_OPTS="-Xmx2G"
command = bash -c '
    source /apps/workfusion/environment.sh
    java -javaagent:/apps/workfusion/appagent/javaagent.jar -jar vds-mesos-adapter-9.3.0.3.jar --spring.config.location=/apps/workfusion/vds-mesos-adapter/vds-mesos-adapter.properties
    '

autostart = false
startinorder = true
priority = 883
stopasgroup = true

stdout_logfile = /apps/workfusion/supervisord/log/%(program_name)s.out.log
stderr_logfile = /apps/workfusion/supervisord/log/%(program_name)s.err.log
Update the wfmanager configuration:
$ wfmanager update
VDS scaling service
Add the
-javaagentparameter to the startup command, for example,/apps/workfusion/supervisord/apps/vds-scaling-service.ini.In the
-javaagentparameter, specify the path to the Java Agent JAR file, for example:$ -javaagent:/apps/workfusion/appagent/javaagent.jarThe result can look as follows:
# Ansible managed

[program:vds-scaling-service]
directory = /apps/workfusion/vds-scaling-service
environment = JAVA_OPTS="-Xmx1G"
command = bash -c '
    source /apps/workfusion/environment.sh
    java -javaagent:/apps/workfusion/appagent/javaagent.jar -jar wfml2-meta-model-scaling-service-9.3.0.3.jar --spring.config.location=/apps/workfusion/vds-scaling-service/vds-scaling-service.properties
    '

autostart = false
startinorder = true
priority = 885
stopasgroup = true

stdout_logfile = /apps/workfusion/supervisord/log/%(program_name)s.out.log
stderr_logfile = /apps/workfusion/supervisord/log/%(program_name)s.err.log
Update the wfmanager configuration:
$ wfmanager update
ZooKeeper
In the
start-foregroundoption, add the-javaagentparameter to the startup script, for example,/apps/workfusion/zookeeper/bin/zkServer.sh.In the
-javaagentparameter, specify the path to the Java Agent JAR file, for example:$ -javaagent:/apps/workfusion/appagent/javaagent.jarThe result can look as follows:
start-foreground)
    ZOO_CMD=(exec "$JAVA")
    if [ "${ZOO_NOEXEC}" != "" ]; then
      ZOO_CMD=("$JAVA")
    fi
    "${ZOO_CMD[@]}" "-Dzookeeper.log.dir=${ZOO_LOG_DIR}" "-javaagent:/apps/workfusion/appagent/javaagent.jar" "-Dzookeeper.root.logger=${ZOO_LOG4J_PROP}" \
    -cp "$CLASSPATH" $JVMFLAGS $ZOOMAIN "$ZOOCFG"
    ;;
print-cmd)
    echo "\"$JAVA\" -Dzookeeper.log.dir=\"${ZOO_LOG_DIR}\" -Dzookeeper.root.logger=\"${ZOO_LOG4J_PROP}\" -cp \"$CLASSPATH\" $JVMFLAGS $ZOOMAIN \"$ZOOCFG\" > \"$_ZOO_DAEMON_OUT\" 2>&1 < /dev/null"
    ;;
stop)
    echo -n "Stopping zookeeper ... "
    if [ ! -f "$ZOOPIDFILE" ]
    then
      echo "no zookeeper to stop (could not find file $ZOOPIDFILE)"
    else
      $KILL -9 $(cat "$ZOOPIDFILE")
      rm "$ZOOPIDFILE"
      echo STOPPED
    fi
    exit 0
    ;;
Update the wfmanager configuration:
$ wfmanager update
WFAgent
Add the
-javaagentparameter to the startup command, for example,/apps/workfusion/wfagent/.wfagent.In the
-javaagentparameter, specify the path to the Java Agent JAR file, for example:$ -javaagent:/apps/workfusion/appagent/javaagent.jarThe result can look as follows:
#!/bin/bash -e
# Ansible managed

echo "Init WF Agent"
source /apps/workfusion/environment.sh
cd /apps/workfusion/wfagent

JAVA_DEFAULT_OPTS="-Dfile.encoding=UTF-8 -Dloader.path=./lib -Djava.io.tmpdir=./run"
JAVA_OPTS="${JAVA_DEFAULT_OPTS} -javaagent:/apps/workfusion/appagent/javaagent.jar -Xmx384M"
PID_FOLDER=run
LOG_FOLDER=logs


CONF=`find settings -name \*.yml -print |sort | tr '\n' ','`
CONF="${CONF}custom.yml"

export MODE=${MODE:-service}
echo "Starting with configs: ${CONF}"

exec ${JAVA_HOME}/bin/java $JAVA_OPTS \
-jar /apps/workfusion/wfagent/status-agent-9.2.0.5.jar \
 --spring.config.location=${CONF}
Restart the wfagent service:
$ wfmanager restart wfagent
RabbitMQ
note
The extension must be able to connect to RabbitMQ to collect and send metrics. To do this, you will have to either establish a remote connection between the extension and the product or have an Agent on the same machine running the product for the extension to collect and send the metrics.
The section describes the installation scenario with a Standalone Machine Agent:
You need an APP Agent configured on the server. For more details, refer to the APP Agent section.
Install a Machine Agent. Refer to the Machine Agent section.
The RabbitMQ Management Plugin must be enabled. Check this using the command below:
$ rabbitmq-plugins listYou get the output with the
rabbitmq_managementstatus:Configured: E = explicitly enabled; e = implicitly enabled | Status: [failed to contact rabbit@ip-10-100-5-177 - status not shown] |/ [e ] amqp_client 3.6.1 [ ] cowboy 1.0.3 [ ] cowlib 1.0.1 [e ] mochiweb 2.13.0 [ ] rabbitmq_amqp1_0 3.6.1 [ ] rabbitmq_auth_backend_ldap 3.6.1 [ ] rabbitmq_auth_mechanism_ssl 3.6.1 [ ] rabbitmq_consistent_hash_exchange 3.6.1 [ ] rabbitmq_event_exchange 3.6.1 [ ] rabbitmq_federation 3.6.1 [ ] rabbitmq_federation_management 3.6.1 [E ] rabbitmq_management 3.6.1 [e ] rabbitmq_management_agent 3.6.1 [ ] rabbitmq_management_visualiser 3.6.1 [ ] rabbitmq_mqtt 3.6.1 [ ] rabbitmq_recent_history_exchange 1.2.1 [ ] rabbitmq_sharding 0.1.0 [ ] rabbitmq_shovel 3.6.1 [ ] rabbitmq_shovel_management 3.6.1 [ ] rabbitmq_stomp 3.6.1 [ ] rabbitmq_tracing 3.6.1 [e ] rabbitmq_web_dispatch 3.6.1 [ ] rabbitmq_web_stomp 3.6.1 [ ] rabbitmq_web_stomp_examples 3.6.1 [ ] sockjs 0.3.4 [e ] webmachine 1.10.3Otherwise, you can enable the RabbitMQ Management Plugin using the following command:
$ rabbitmq-plugins enable rabbitmq_managementDownload the Appdynamics RabbitMQ Monitoring Extension from the official site. Unzip
RabbitMQMonitor.zipto the<MachineAgent_Dir>monitorsdirectory. See the command example below:$ wget https://www.appdynamics.com/media/uploaded-files/1540293018/rabbitmqmonitor-2.0.1.zip $ unzip ./rabbitmqmonitor-2.0.1.zip -d /opt/workfusion/machineagent/monitors/Configure the extension by editing the
config.ymlfile in<MACHINE_AGENT_HOME>/monitors/RabbitMQMonitor/. Customize the metric prefix. Theconfig.ymlfile contains twometricPrefixsections:metricPrefix:Custom Metrics|RedismetricPrefix:Server|Component:<COMPONENT_ID>|Custom Metrics|RedisThe first metric prefix is recommended when SIM is enabled. The second metric prefix is recommended when one or more APP Agents coexist on the same host with the MA. This metric prefix points to one specific component. You can find
COMPONENT_IDas described below:Go to your Controller.
Select the Application associated with your Machine Agent.
Select Tiers and Nodes and the exact tier corresponding to your Machine Agent.
Once you select the Tier, click the Details button to open the Dashboard.
In the Dashboard URL, find the word component and the value corresponding to it. This value is your tier ID or component ID you need to update as the
Component_IDvalue in the configuration.Note that the component ID or component name specified in the metric prefix of the extension should match the corresponding tier of the Machine Agent. The extension cannot report to a tier different from its Machine Agent's tier.
Then, define the server parameters. The main option list includes the following:
host,port,useSSL,username,password. Below is a sampleconfig.ymlfile:servers: - host: "localhost" port: 15672 useSSL: false username: "vds_rabbitmq_user" password: "vds_rabbitmq_password" encryptedPassword: "" displayName : "RabbitMQ" connection: socketTimeout: 10000 connectTimeout: 10000 ############ ## Queue Group Configuration. The queue stats will be grouped by the 'groupName' ## if the 'queueNameRegex' matches the name of the Queue. ## groupName The stats from Queues matched by the 'queueNameRegex' will be reported under this name ## queueNameRegex A Regex to match the Queue Name ## showIndividualStats If set to false then the Individual Queue stats will not be reported. ## This will help if there are several short lived queues and an explosion of metrics ## in the controller can be avoided ############ # Uncomment the following lines for configuration queueGroups: - groupName: group1 queueNameRegex: queue.+ showIndividualStats: false # Queue Group Configuration #- groupName: group2 # queueNameRegex: temp.+ # showIndividualStats: false filter: nodes: includes: [".*"] queues: includes: [".*"] endpointFlags: federationPlugin: "false" overview: "true" encryptionKey: "myKey" # number of concurrent tasks numberOfThreads: 15 #This will create this metric in all the tiers, under this path #metricPrefix: Custom Metrics|RabbitMQ| #This will create it in specific Tier/Component. Make sure to replace <COMPONENT_ID> with the appropriate one from your environment. #To find the <COMPONENT_ID> in your environment, please follow the screenshot https://docs.appdynamics.com/display/PRO42/Build+a+Monitoring+Extension+Using+Java metricPrefix: Server|Component:33011499|Custom Metrics|RabbitMQ
Change the entries from
metrics.xml. Comment the string as shown below:<!-- <stat url="/api/federation-links" alias="FederationLinks"> </stat> -->Restart the Machine Agent
Check tha the custom metric appears in the Controller. For more details, refer to the Check custom metrics section.
Nginx
The section describes the installation scenario with a Standalone Machine Agent:
You need an APP Agent configured on the server. For more details, refer to the APP Agent section above.
You need to install a Machine Agent. Refer to the Machine Agent section above.
Run Nginx with
ngx_http_stub_status_moduleenabled. Add thebasic_statusparameter to the Nginx configuration file on the following path:/apps/workfusion/nginx/sites.d/vds_master.conf. See the example below:# Ansible managed server { server_name vds_master.workfusion.com; listen 8000 ssl; include snippets/ssl_params; include snippets/proxy_params; ssl_certificate ssl/vds_master.crt; ssl_certificate_key ssl/vds_master.key; error_page 497 https://$host:$server_port$request_uri; if ($request_method !~ ^(GET|HEAD|POST|OPTIONS|PUT|DELETE)$ ){ return 444; } error_page 404 401 /404.html; location = /404.html { root /opt/workfusion/nginx/var/www; } location = /ca.crt { root /opt/workfusion/nginx/ssl/; } include vds_master_apps.d/*.conf; }Download the Appdynamics Nginx Monitoring Extension from the official site. Unzip the Nginx monitoring extension archive to the
<MachineAgent_Dir>/monitorsdirectory. See the example below:$ wget https://www.appdynamics.com/media/uploaded-files/1550056110/nginx-monitoring-extension-2.0.0.zip $ unzip nginx-monitoring-extension-2.0.0.zip -d /opt/workfusion/machineagent/monitors/Configure the extension by editing the
config.ymlfile in<MACHINE_AGENT_HOME>/monitors/NginxMonitor/. Customize the metric prefix. Theconfig.ymlfile contains twometricPrefixsections:metricPrefix:Custom Metrics|RedismetricPrefix:Server|Component:<COMPONENT_ID>|Custom Metrics|RedisThe first metric prefix is recommended when SIM is enabled. The second metric prefix is recommended when one or more APP Agents coexist on the same host with the MA. This metric prefix points to one specific component. You can find
COMPONENT_IDas described below:Go to your Controller.
Select the application associated with your Machine Agent.
Select Tiers and Nodes and the exact tier corresponding to your Machine Agent.
Once you select the Tier, click the Details button to open the Dashboard.
In the Dashboard URL, find the component word and the value corresponding to it. This value is your tier ID or component ID you need to update as the
Component_IDvalue in the configuration.Note that the component ID or component name specified in the metric prefix of the extension should match the corresponding tier of the Machine Agent. The extension cannot report to a tier different than its Machine Agent's tier.
Restart the Machine Agent.
Check that the custom metric appears in the Controller. For more details, refer to the Check custom metrics section.
AutoML slave server services
WFAgent
/apps/workfusion/wfagent/.wfagent
Restart the wfagent service
wfmanager restart wfagent
APM server services
Logstash
In the JVM configuration file, for example,
/apps/workfusion/logstash/config/jvm.options, in theGC configurationfield, add the-javaagentparameter.In the
-javaagentparameter, specify the path to the Java Agent JAR file, for example:$ -javaagent:/apps/workfusion/appagent/javaagent.jarThe result can look as follows:
## GC configuration
-XX:+UseParNewGC
-XX:+UseConcMarkSweepGC
-XX:CMSInitiatingOccupancyFraction=75
-XX:+UseCMSInitiatingOccupancyOnly
-javaagent:/apps/workfusion/appagent/javaagent.jar
Restart the logstash service:
$ wfmanager restart logstash
WFAgent
Add the
-javaagentparameter to the startup command, for example,/apps/workfusion/wfagent/.wfagent.In the
-javaagentparameter, specify the path to the Java Agent JAR file, for example:$ -javaagent:/apps/workfusion/appagent/javaagent.jarThe result can look as follows:
#!/bin/bash -e
# Ansible managed

echo "Init WF Agent"
source /apps/workfusion/environment.sh
cd /apps/workfusion/wfagent

JAVA_DEFAULT_OPTS="-Dfile.encoding=UTF-8 -Dloader.path=./lib -Djava.io.tmpdir=./run"
JAVA_OPTS="${JAVA_DEFAULT_OPTS} -Xmx1024M -javaagent:/apps/workfusion/appServerAgent/javaagent.jar"
PID_FOLDER=run
LOG_FOLDER=logs


CONF=`find settings -name \*.yml -print |sort | tr '\n' ','`
CONF="${CONF}custom.yml"

export MODE=${MODE:-service}
echo "Starting with configs: ${CONF}"

exec ${JAVA_HOME}/bin/java $JAVA_OPTS \
-jar /apps/workfusion/wfagent/status-agent-9.2.0.5.jar \
 --spring.config.location=${CONF}
Restart the wfagent service:
$ wfmanager restart wfagent
Nginx
The section describes the installation scenario with a Standalone Machine Agent:
You need an APP Agent configured on the server. For more details, refer to the APP Agent section.
Install a Machine Agent. Refer to the Machine Agent section.
Run Nginx with
ngx_http_stub_status_moduleenabled. Add thebasic_statusparameter to the Nginx configuration file on the following path:/apps/workfusion/nginx/sites.d/apm.conf. See the example below:# Ansible managed server { server_name apm.workfusion.com; listen 80; location / { rewrite ^(.*)$ https://$host:443$1 permanent; } } server { server_name apm.workfusion.com; listen 443 ssl; include snippets/ssl_params; include snippets/proxy_params; ssl_certificate ssl/apm.crt; ssl_certificate_key ssl/apm.key; error_page 497 https://$host:$server_port$request_uri; if ($request_method !~ ^(GET|HEAD|POST|OPTIONS|PUT|DELETE)$ ){ return 444; } error_page 404 401 /404.html; location = /404.html { root /opt/workfusion/nginx/var/www; } location = /ca.crt { root /opt/workfusion/nginx/ssl/; } include apm_apps.d/*.conf; }Download the Appdynamics Nginx Monitoring Extension from the official site. Unzip the Nginx monitoring extension archive to the
<MachineAgent_Dir>/monitorsdirectory. See the command example below:$ wget https://www.appdynamics.com/media/uploaded-files/1550056110/nginx-monitoring-extension-2.0.0.zip $ unzip nginx-monitoring-extension-2.0.0.zip -d /opt/workfusion/machineagent/monitors/Configure the extension by editing the
config.ymlfile in<MACHINE_AGENT_HOME>/monitors/NginxMonitor/. Customize the metric prefix. Theconfig.ymlfile contains twometricPrefixsections:metricPrefix:Custom Metrics|RedismetricPrefix:Server|Component:<COMPONENT_ID>|Custom Metrics|RedisThe first metric prefix is recommended when SIM is enabled. The second metric prefix is recommended when one or more APP Agents coexist on the same host with the MA. This metric prefix points to one specific component. You can find
COMPONENT_IDas described below:Go to your Controller.
Select the Application associated with your Machine Agent.
Select Tiers and Nodes and the exact tier corresponding to your Machine Agent.
Once you select the Tier, click the Details button to open the Dashboard.
In the Dashboard URL, find the component word and the value corresponding to it. The value is your tier ID or component ID you need to update as your
Component_IDvalue in the configuration.Note that the component ID or component name specified in the metric prefix of the extension should match the corresponding tier of the Machine Agent. The extension cannot report to a tier different from its Machine Agent's tier.
Restart the Machine Agent.
Check that the custom metric appears in the Controller. For more details, refer to the Check custom metrics section.
RPA server services
WFAgent
Add the
-javaagentparameter to the startup command, for example,C:\\RPA\wfagent\bin\wfagent.cmd.In the
-javaagentparameter, specify the path to the Java Agent JAR file, for example:$ -javaagent:"C:\AppServerAgent\javaagent.jar"The result can look as follows:
:start
    set version=9.2.0.5
    set jarfile=status-agent-%version%.jar
    IF [%version%]==[9.2.0.5] (
      for /f "delims=" %%a in ('dir %~dp0\..\status-agent-*.jar /b') do (
            call set jarfile=%%concat%%%%a
      )
    )
    echo %jarfile%
    set java_opts=-Dfile.encoding=UTF-8 -Xmx300m -javaagent:"C:\AppServerAgent\javaagent.jar"

    cd %~dp0\..\
    if exist ..\java\bin\java.exe (
      set java_executable=..\java\bin\java
    ) else (
      set java_executable=java
    )
    echo "Configs: %2"
    echo "Overrides: %3"
    %java_executable% %java_opts%  -jar %jarfile% --spring.config.location=%2 %3
    pause
goto:eof
Run
bat-scriptto restart the wfagent service:C:\RPA\wfagent\bin\wfagent-hub-node-nordp.bat
Check custom metrics
- Find the Application associated with the Machine Agent under the Applications tab in the main menu bar.
- Click Metric Browser in the left bottom corner. A new window should open.
- Select Application Infrastructure Performance and look for the tier associated with the Machine Agent.
- Under this tier, look for Custom Metrics. Metrics from the configured extensions should show up here, in respective directories.
- The data in the previous point is a tier-level value, an aggregation of data represented by each node under this tier. To get metrics pertaining to a specific node, use the Individual Nodes section.