Configure Identity Providers
You can set up WorkFusion User Management (Keycloak) to authenticate users based on identities from external providers.
The WF User Management supports integration with identity providers (IdP) using either of the protocols:
SAML v2.0
OpenID Connect v1.0
Integrate IdP based on SAML v2.0
To integrate with an IdP using the SAML protocol, follow the steps below:
- Prepare the IdP client for integration with the WF User Management.
- Create and configure a SAML IdP provider in WF User Management.
- Authenticate in Control Tower with IdP credentials.
- Map client roles to IdP users.
Configure IdP client
The configuration flow is as follows:
Import the WF User Management IdP settings (the IdP entity descriptor) using either of the two methods:
Paste the following URL in your browser address line: https://{{keycloak_dns}}/auth/realms/{{workfusion_realm}}/protocol/saml/descriptor, where:
keycloak_dns is the DNS address of your User Management instance.
workfusion_realm is the name of the realm where you manage clients, roles, groups, users, and so on. Typically, it is WorkfusionRealm.
Go to Realm Settings > General > Endpoints > SAML 2.0 Identity Provider Metadata.
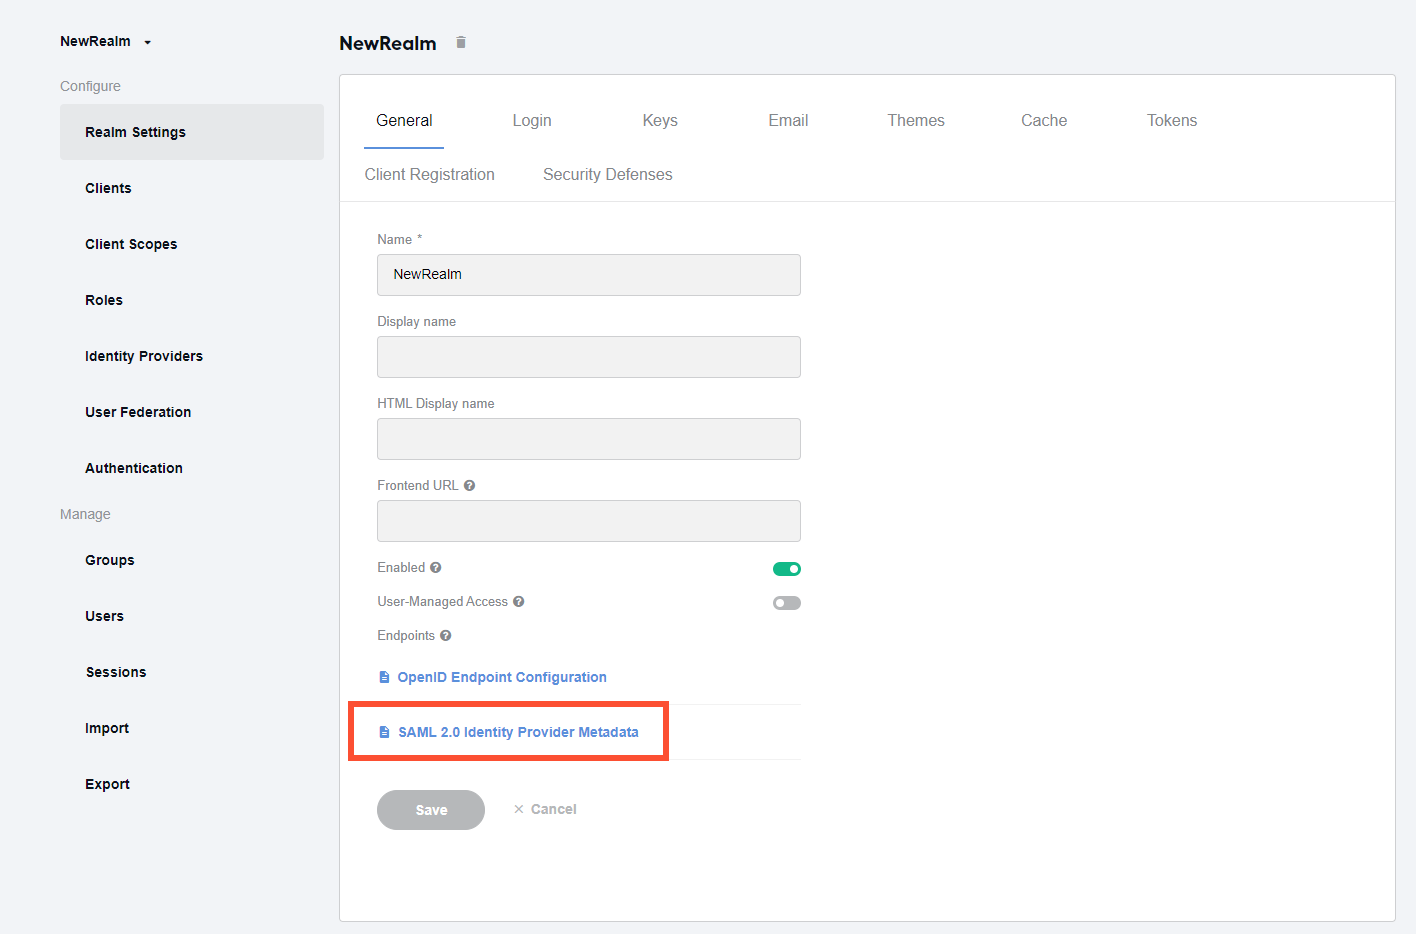
Whichever method you use, this brings you to XML containing the IdP metadata, including the certificates.
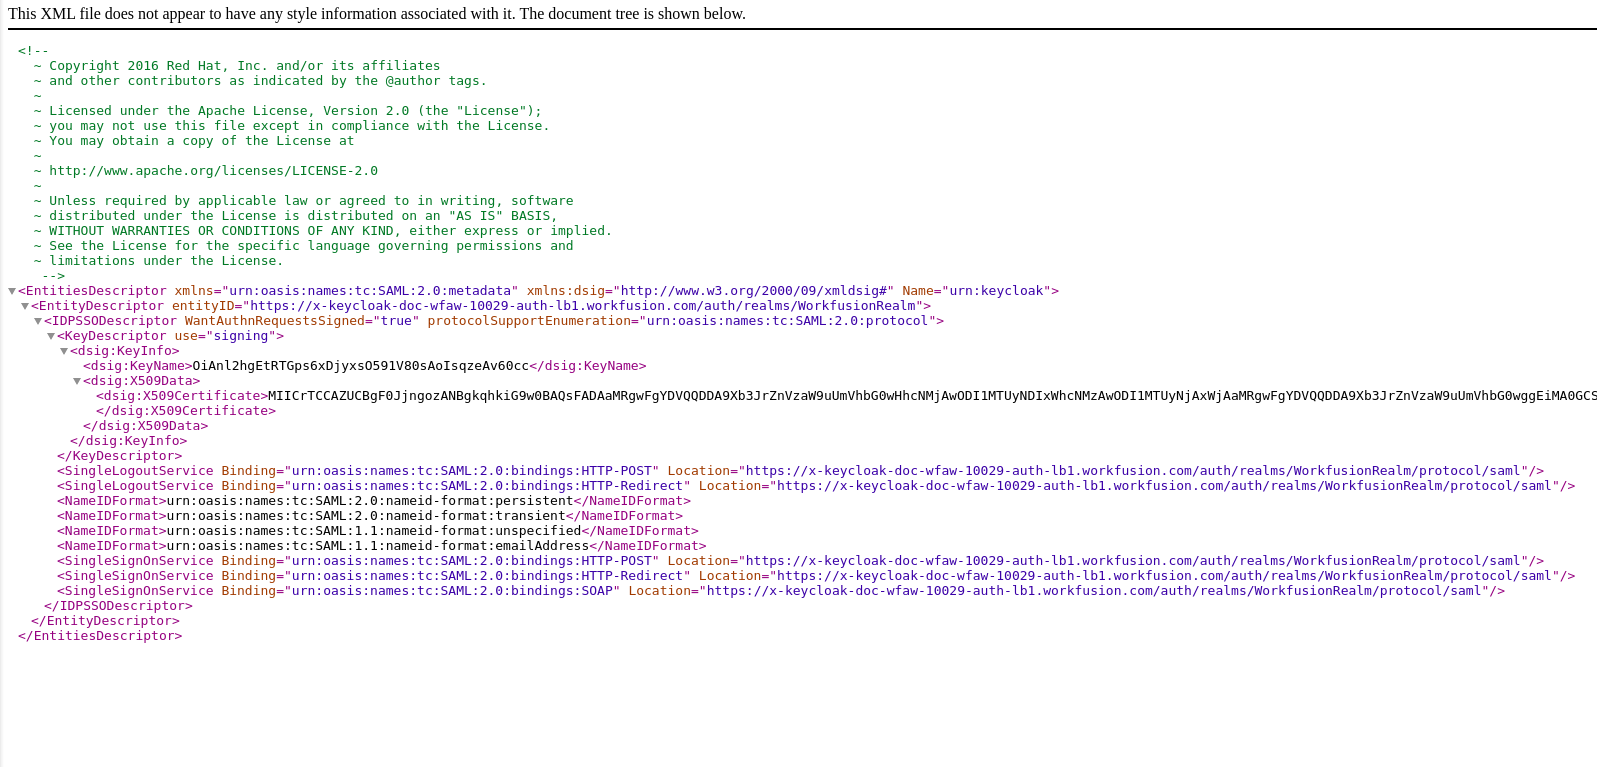
Use the IdP settings from Step 1 to configure the IdP client for integration with the WF User Management.
Get the entity descriptor for your IdP client. Retrieve the IdP client data (Single Sign-On Service URL, Single Logout Service URL, certificates, and so on) essential for further configuration of the SAML IdP in the WF User Management.
Create SAML IdP
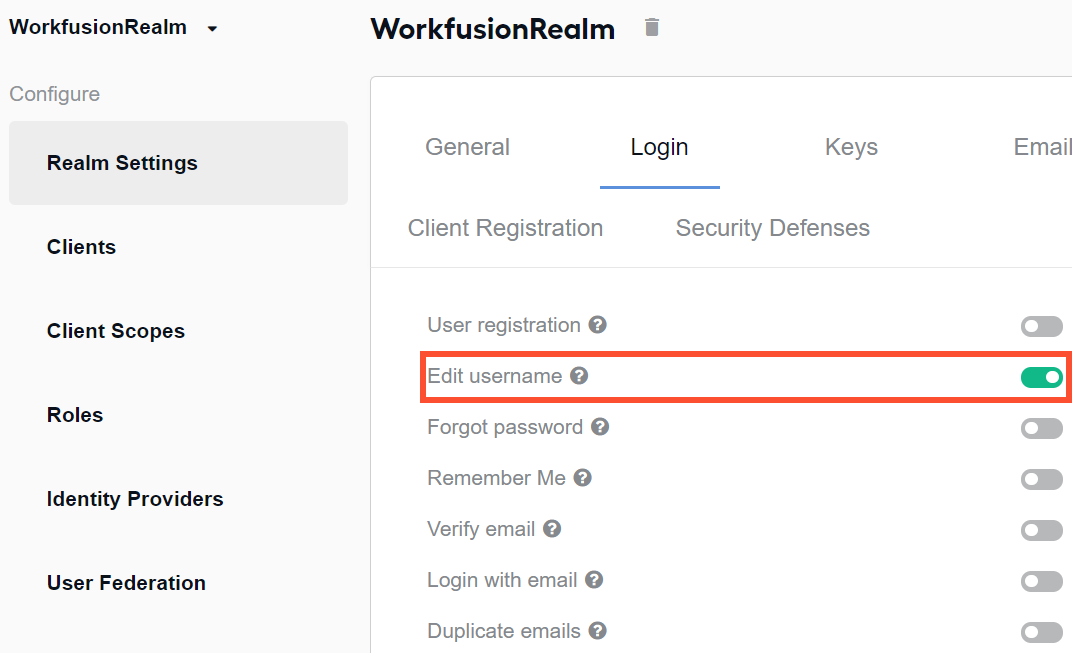
Before creating a SAML IdP, enable username editing:
Select Realm settings.
Go to the Login tab.
Make sure the Edit username toggle is on. If it is off, turn it on.
Then, create a SAML IdP as instructed below:
On the left menu, select Identity Providers.
On the right, click the drop-down box and select SAML v2.0.
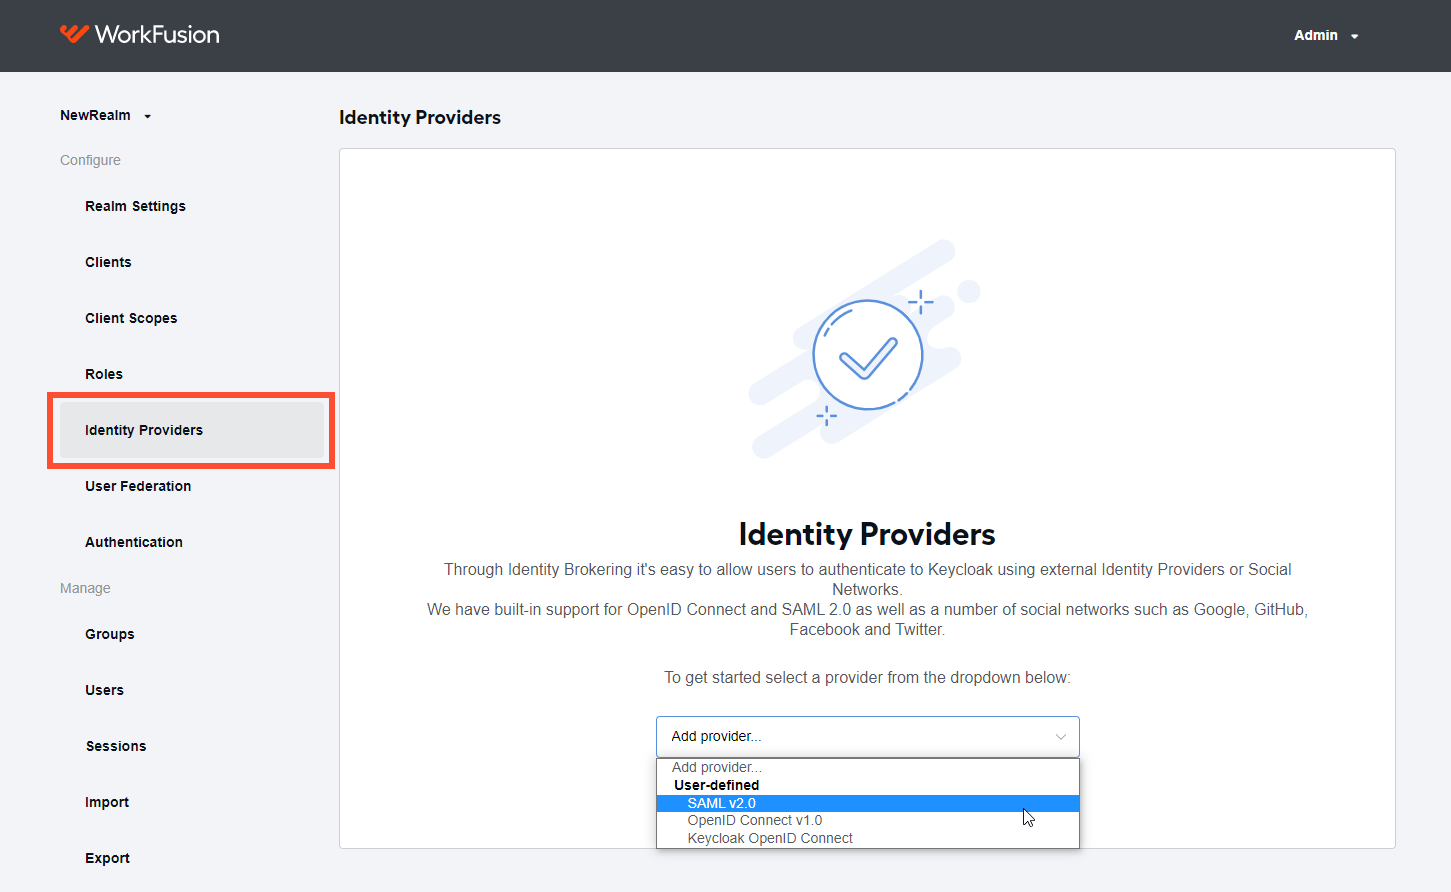
The action brings you to the screen where you need to configure the IdP settings.
Configure SAML IdP
To configure the SAML IdP you created in the previous step, follow the instructions below:
Fill in the fields and switch toggles on or off as shown in the screenshot below:
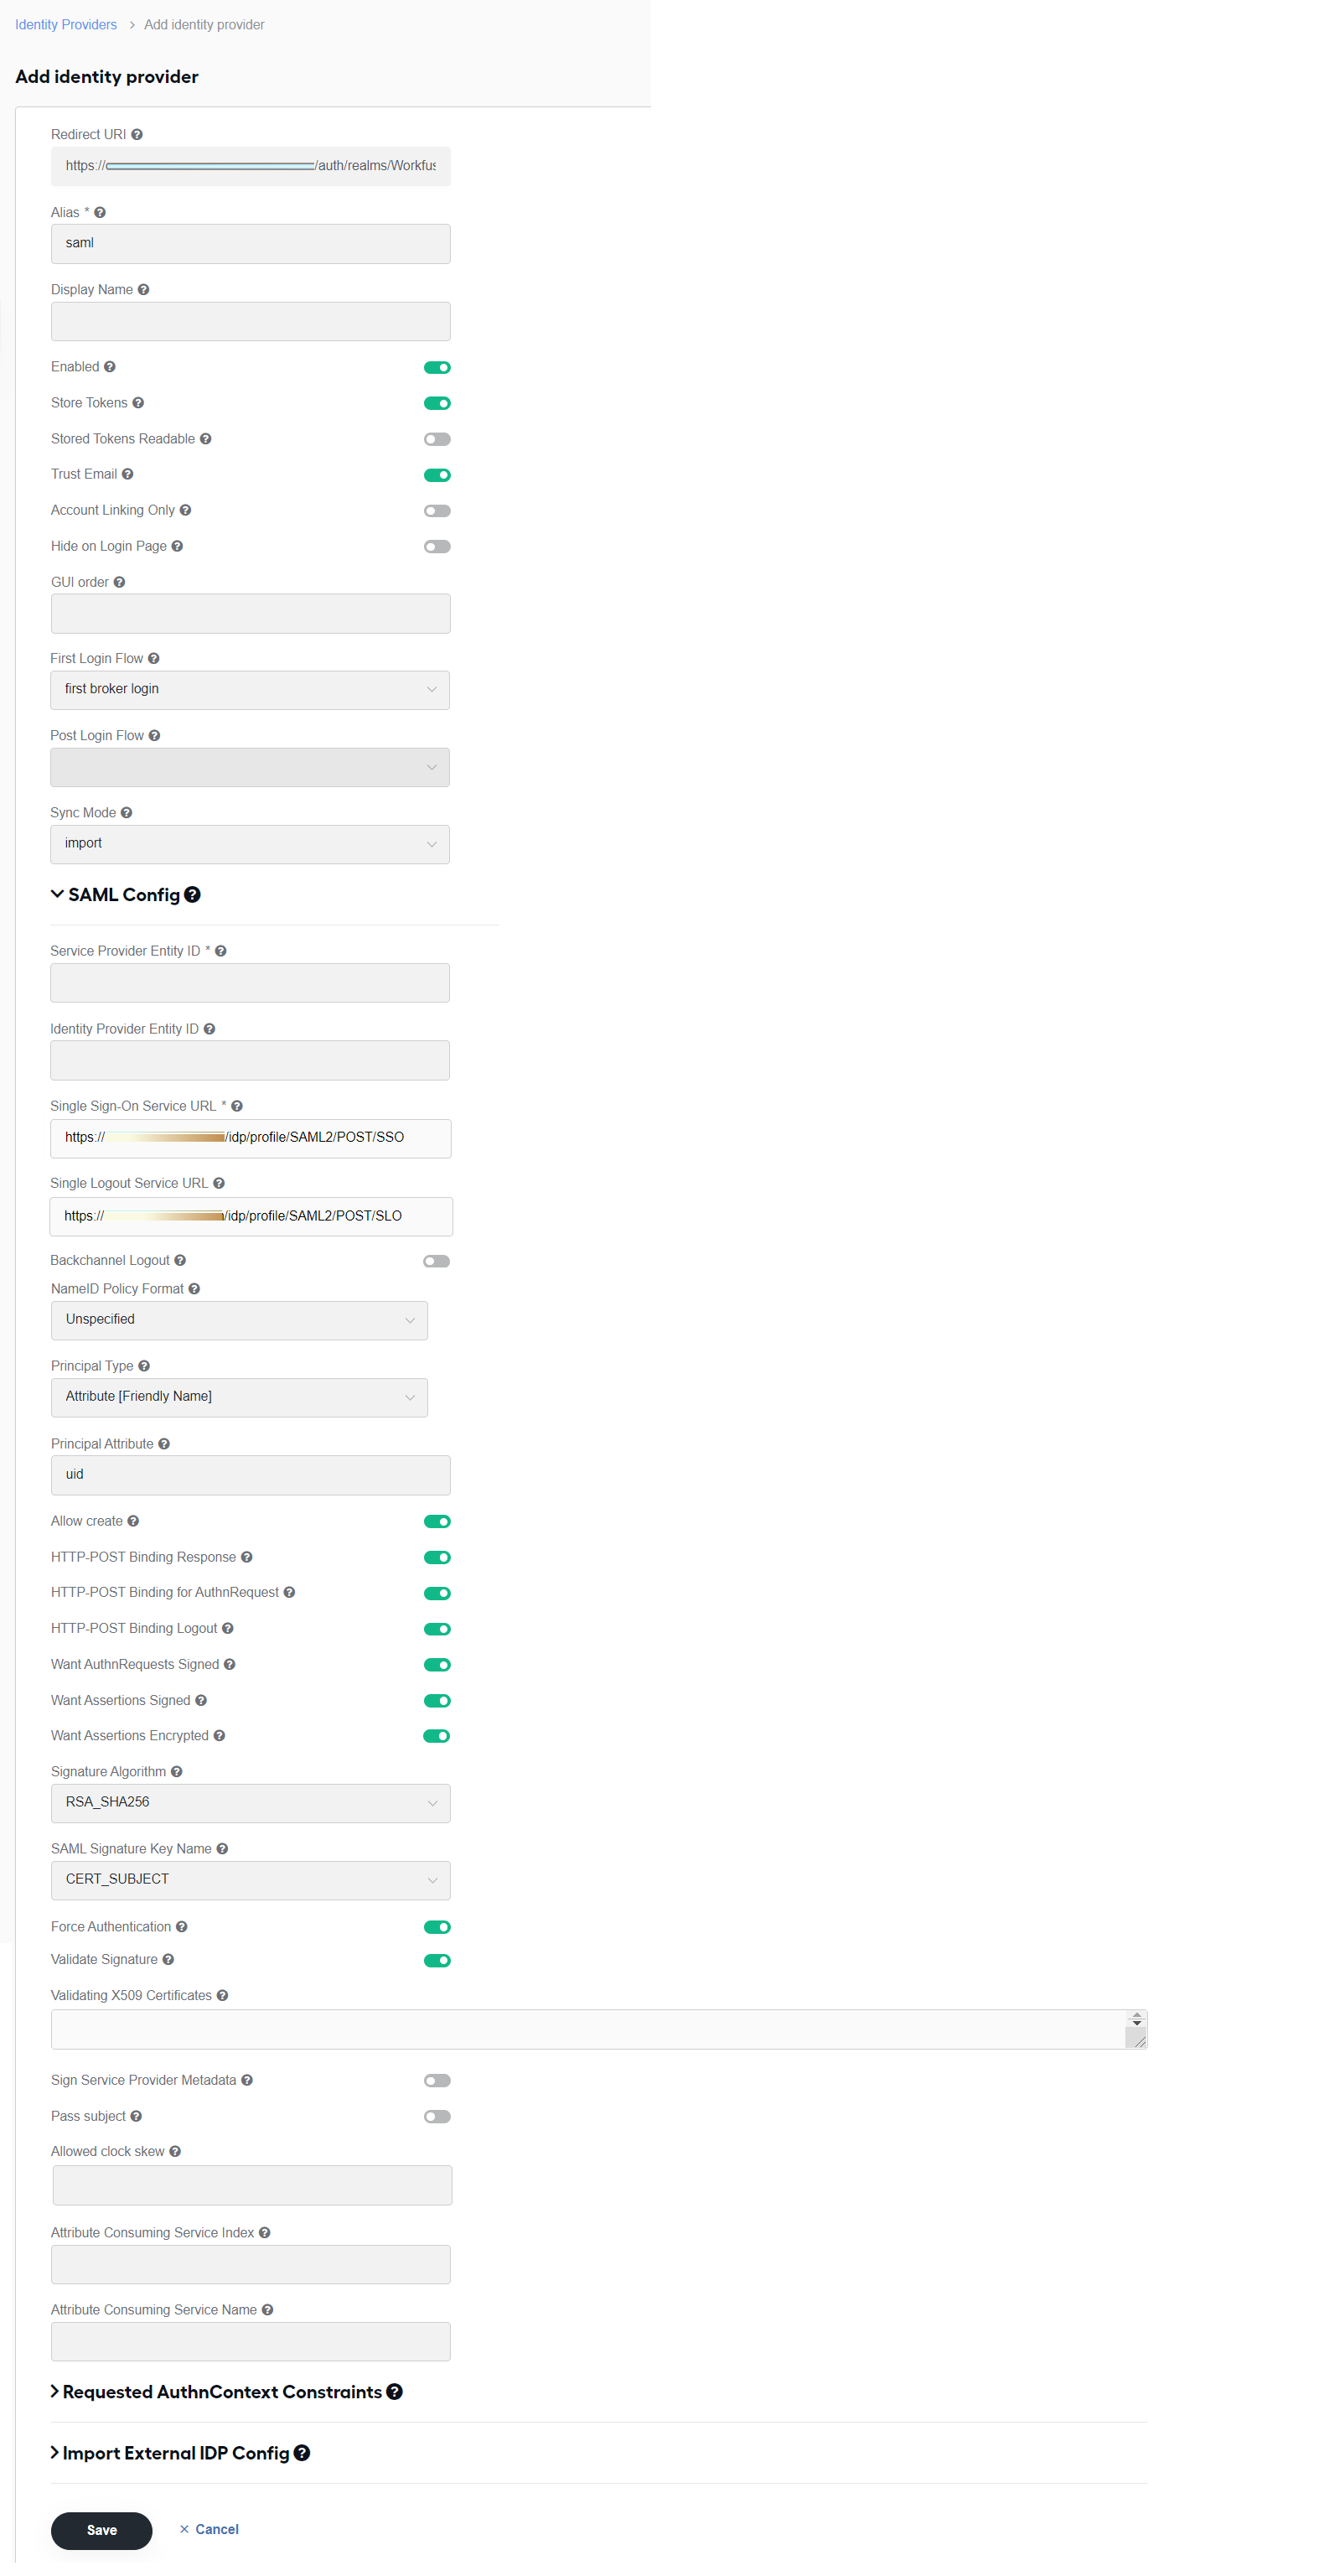
Pay attention to the following recommendations:
Service Provider Entity ID: the field is required, the specified ID is used for unique identification of the service provider.
Identity Provider Entity ID: the field is optional, the specified ID is used to validate the issuer if received SAML assertions.
Single Sign-On Service URL: the field is required, specifies the SAML endpoint to start the authentication process.
Single Logout Service URL: the field is optional, specifies the SAML logout endpoint.
Validating X509 Certificate: contains the public certificate to validate the signatures of SAML requests and responses from the configured IdP.
Principal Type: the setting must match the Identity Provider configuration. If you are unsure which parameter is sent, you can use SAML troubleshooting tools for investigation, for example, SAML Chrome Panel.
noteThe values for the configuration fields above are specified in the IdP entity descriptor mentioned in Configure IdP client.
Click Save and proceed to setting the authentification flow.
Set authentication flow
To set an authentication flow for the configured IdP, follow the steps below:
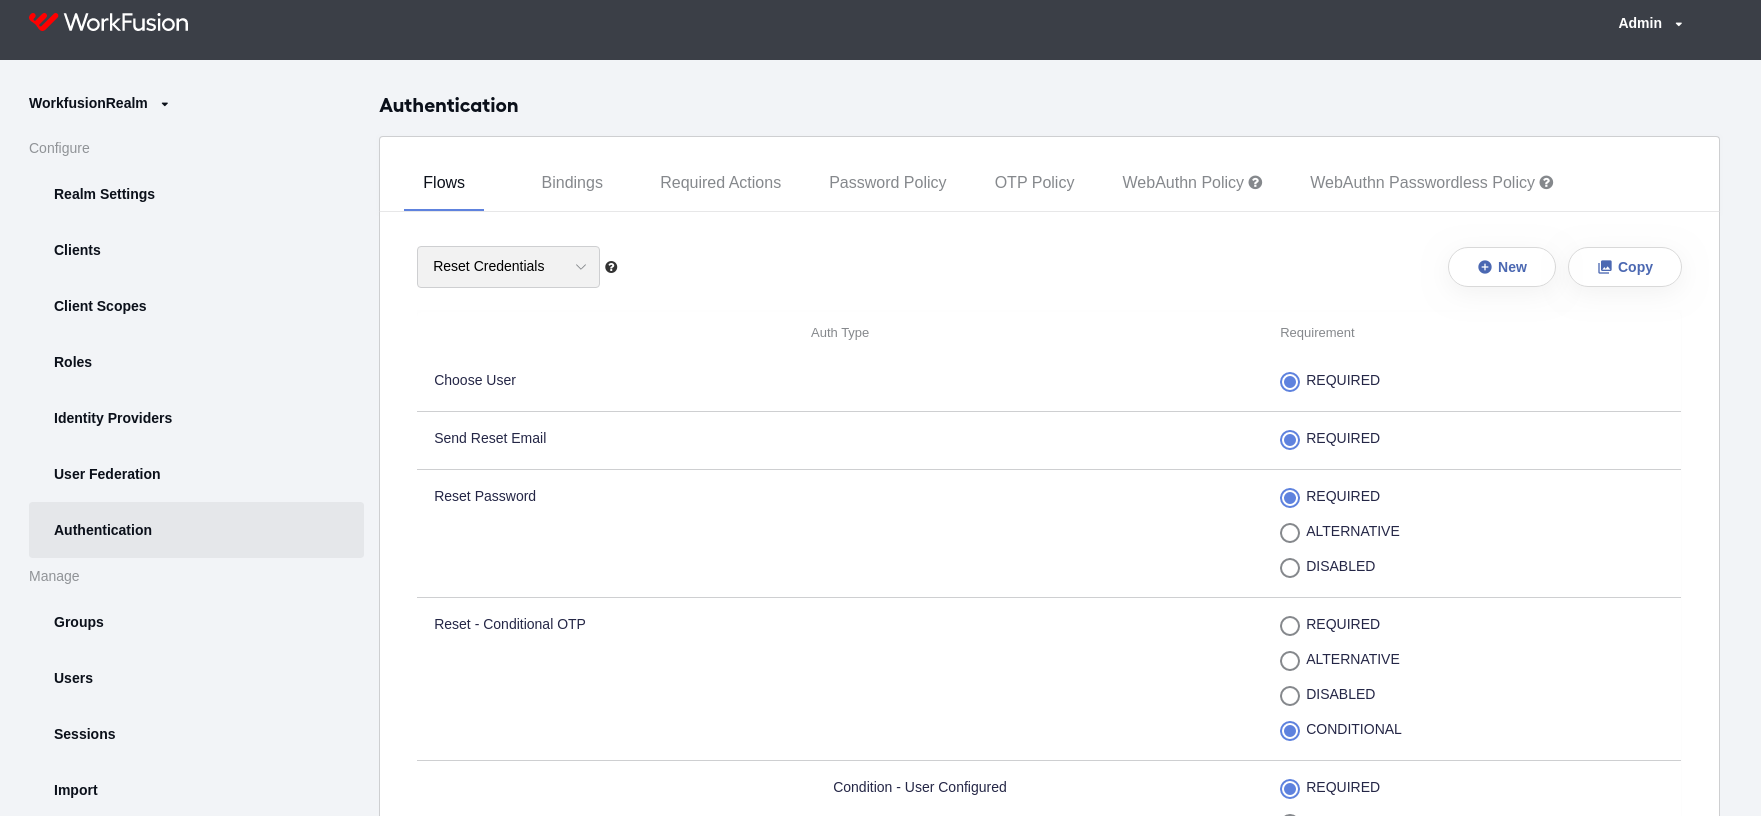
On the left menu, select Authentication.
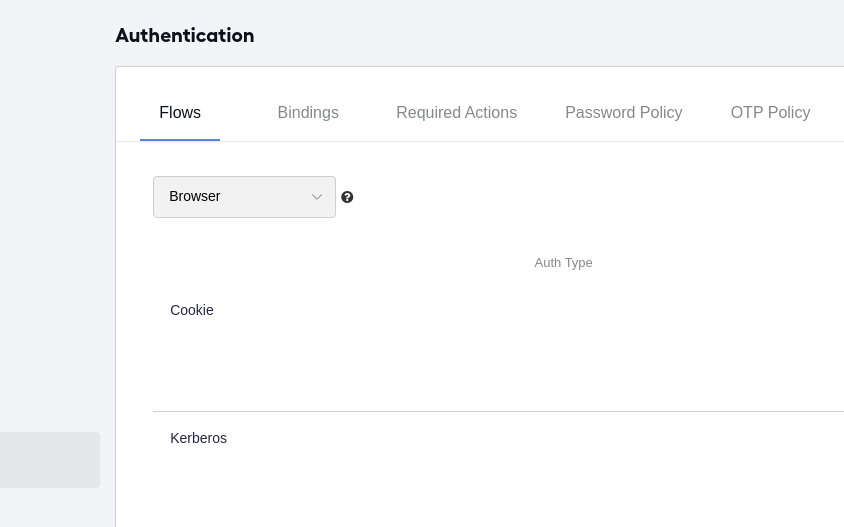
In the drop-down box on top of the Flows tab, select Browser.
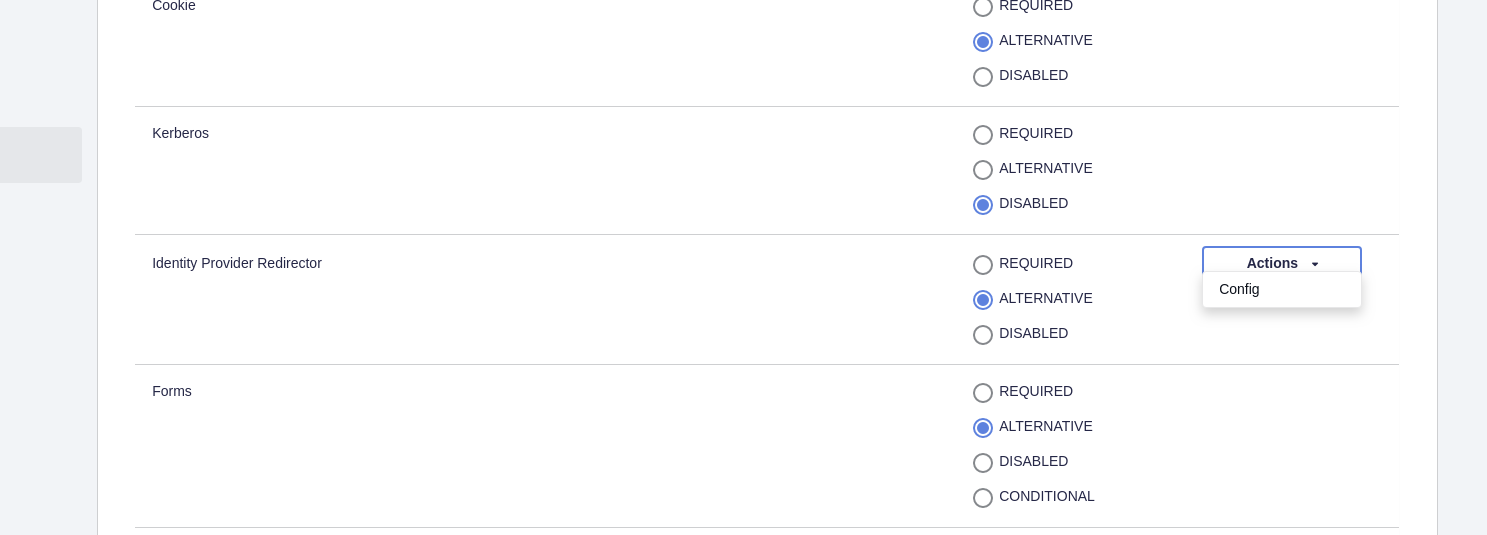
On the same tab, go to the Identity Provider Redirector line > Actions and select Config.
Specify the SAML alias for the IdP you are matching to the authentication flow.
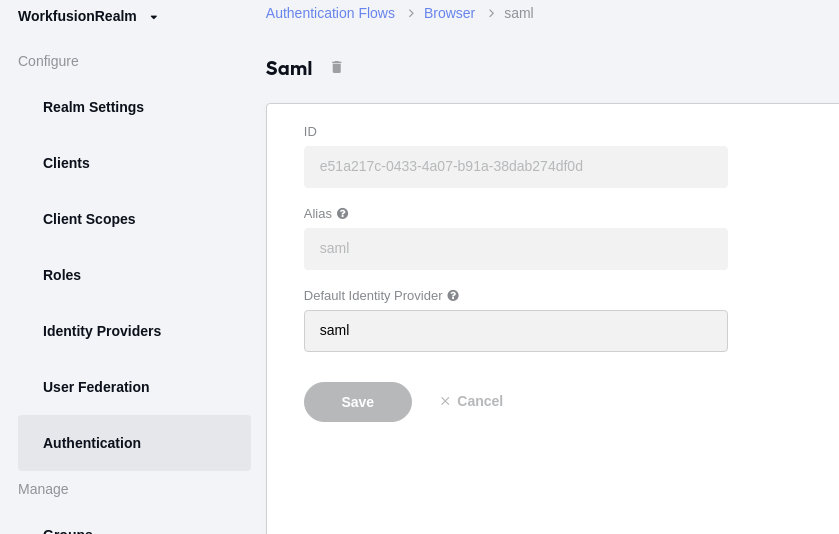
If you want to have the possibility to configure multiple IDPs, do not specify the Default Identity Provider parameter.
After you complete the authentication flow setup, user authentication in all clients (Control Tower, WorkSpace, Kibana) is based on the credentials stored in the IdP. Your next step is to sign in to Control Tower with the IdP credentials.
Authenticate in Control Tower
The authentication is essential for IdP users to appear as WF User Management entities. Follow the steps below:
Go to the Control Tower URL. From the URL, you are redirected to the following IdP login form.
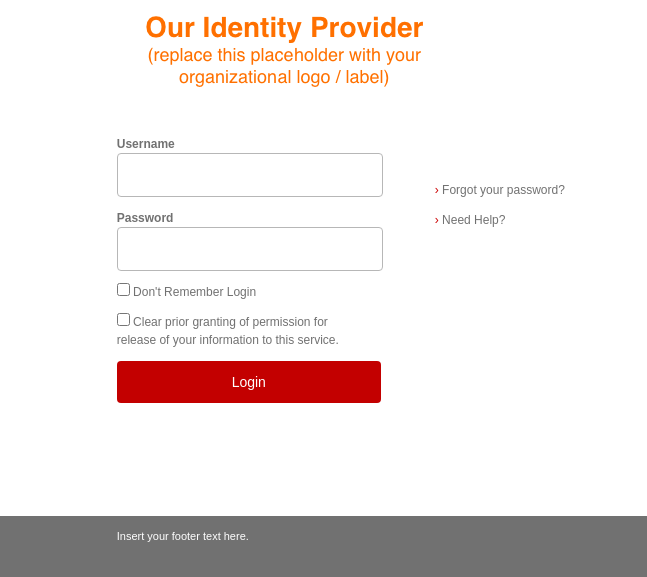
To log in, enter the credentials for a valid IdP user. The following form appears on the screen:
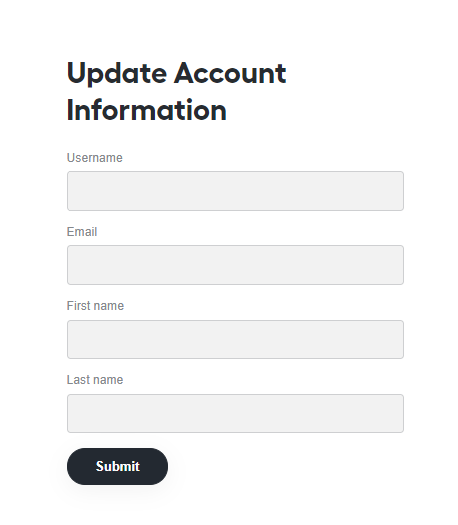
You can set the form to update automatically using an Identity Provider mapper. For instructions and a sample project, see the Create IdP mapper section.
Fill in the Username, Email, First name, and Last name fields (all fields are mandatory) and submit.
Two authentication outcomes are possible:
If the username of the IdP user does not exist in the WF User Management, it is created. However, the Control Tower authentication attempt fails. To make the authentication a success, configure a Control Tower role for the created user as described in the Map roles to IdP users section.
If the username of the IdP user already exists in the WF User Management, you see the following screen:
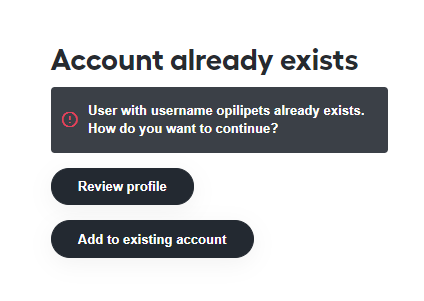
Clicking Review profile brings you back to the login page where you need to change the value in the Username field.
Clicking Add to existing account brings you to the below email verification page. The verification is essential for you to add the IdP credentials to an existing WF User Management user.
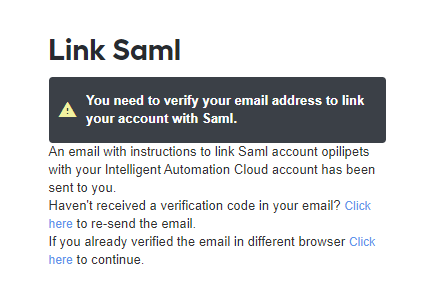
To verify, sign in to the email assigned to the respective WF User Management user and click the email verification link.
If an existing WF User Management user doesn't have a wf-control-tower client role, you get an authentication error message. To proceed, configure Control Tower roles. For the configuration details, refer to the Map roles to IdP users section.
Create IdP mapper
To create an IdP mapper, go to Identity Providers > SAML > Identity Provider Mapper and click Create. In the form that follows, select Mapper Type and fill in other fields.
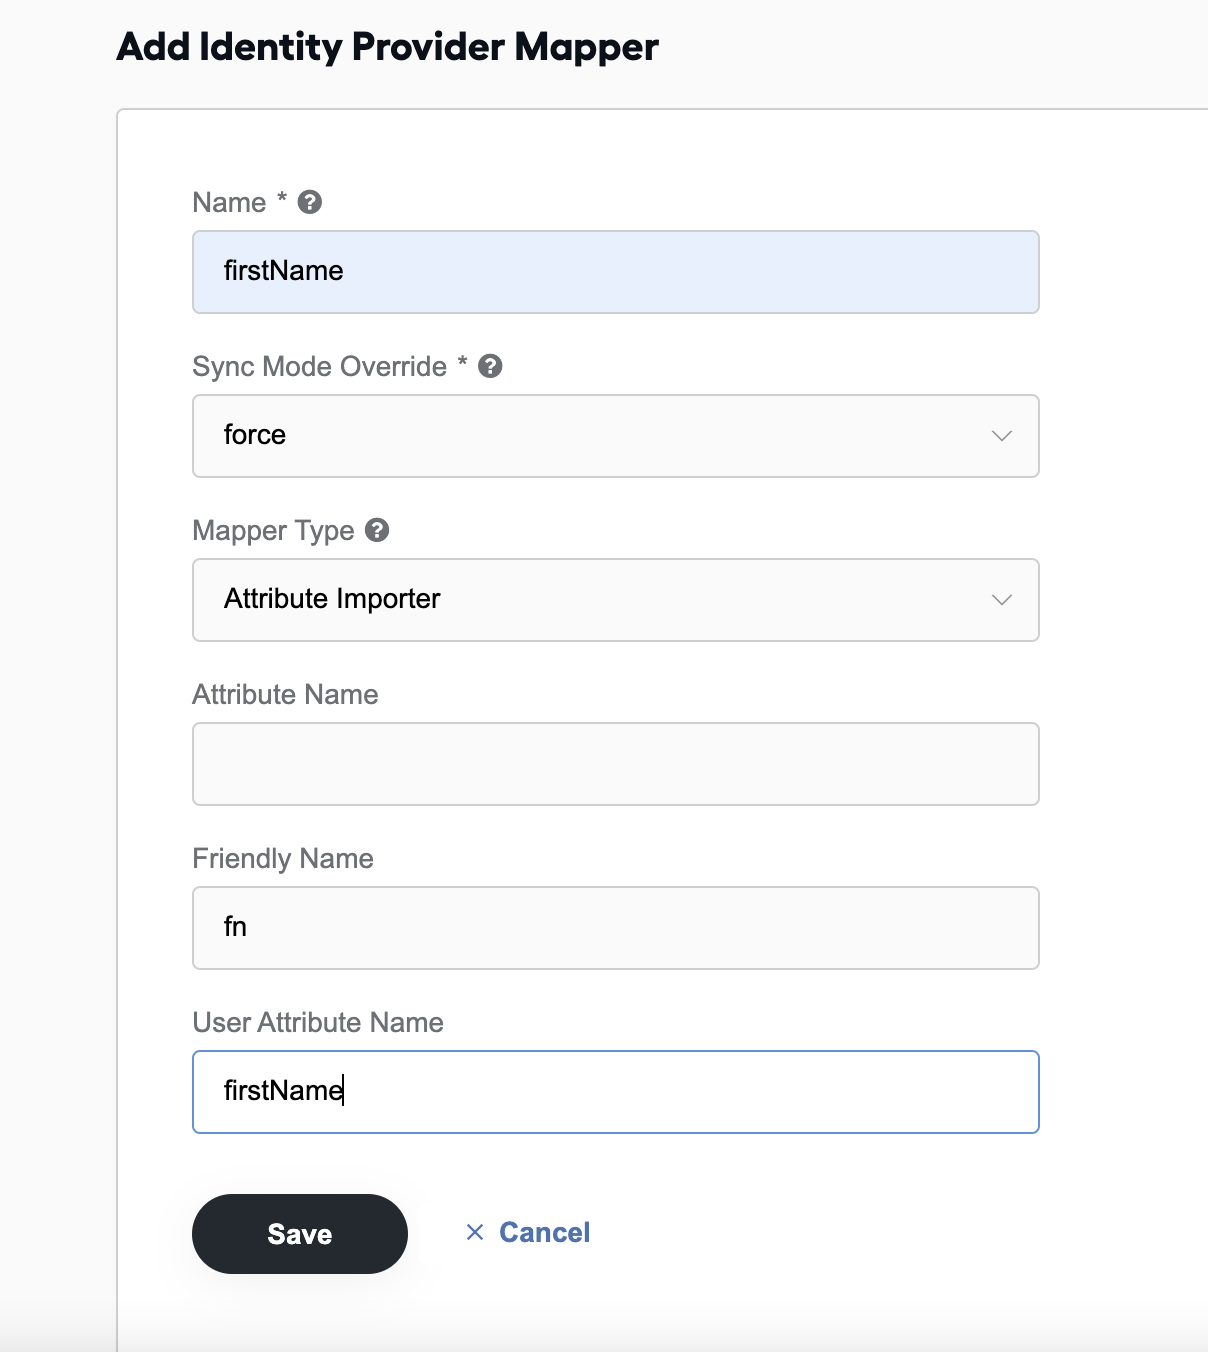
Below is a sample of how you can create an IDP mapper:
Specify any name for the mapper.
Specify the sync mode override. Possible values include:
- legacy to keep the behavior as it was before you selected the option.
- import to only import the user once at their first login with the IdP credentials.
- force to constantly update the user after every login under the identity provider.
- inherit to use the sync mode defined in the identity provider for this mapper.
Select a mapper type based on the table below:
Mapper type Description Advanced Attribute to Role If the set of attributes exists and can be matched, grant the user the specified realm- or client-level role. Username Template Importer Format the username to import. Hardcoded User Session Attribute When a user is imported from an IdP, hardcode the mapper value to a specific user session attribute. Attribute Importer Import the declared SAML attribute, if it exists in the assertion, to a specified user property or attribute. Hardcoded Role When a user is imported from an IdP, hardcode a role mapping for the user. Hardcoded Attribute When a user is imported from an IdP, hardcode the mapper value to a specific user attribute. SAML Attribute to Role If an attribute exists, grant the user the specified realm or application role. The rest of the parameters are specific to the mapper type you’ve chosen.
For more information, refer to the Keycloak documentation.
Map roles to IdP users
The user-to-role mapping is essential for users to access User Management clients—Control Tower, WorkSpace, and Kibana. You have two mapping alternatives:
Automatic role mapping
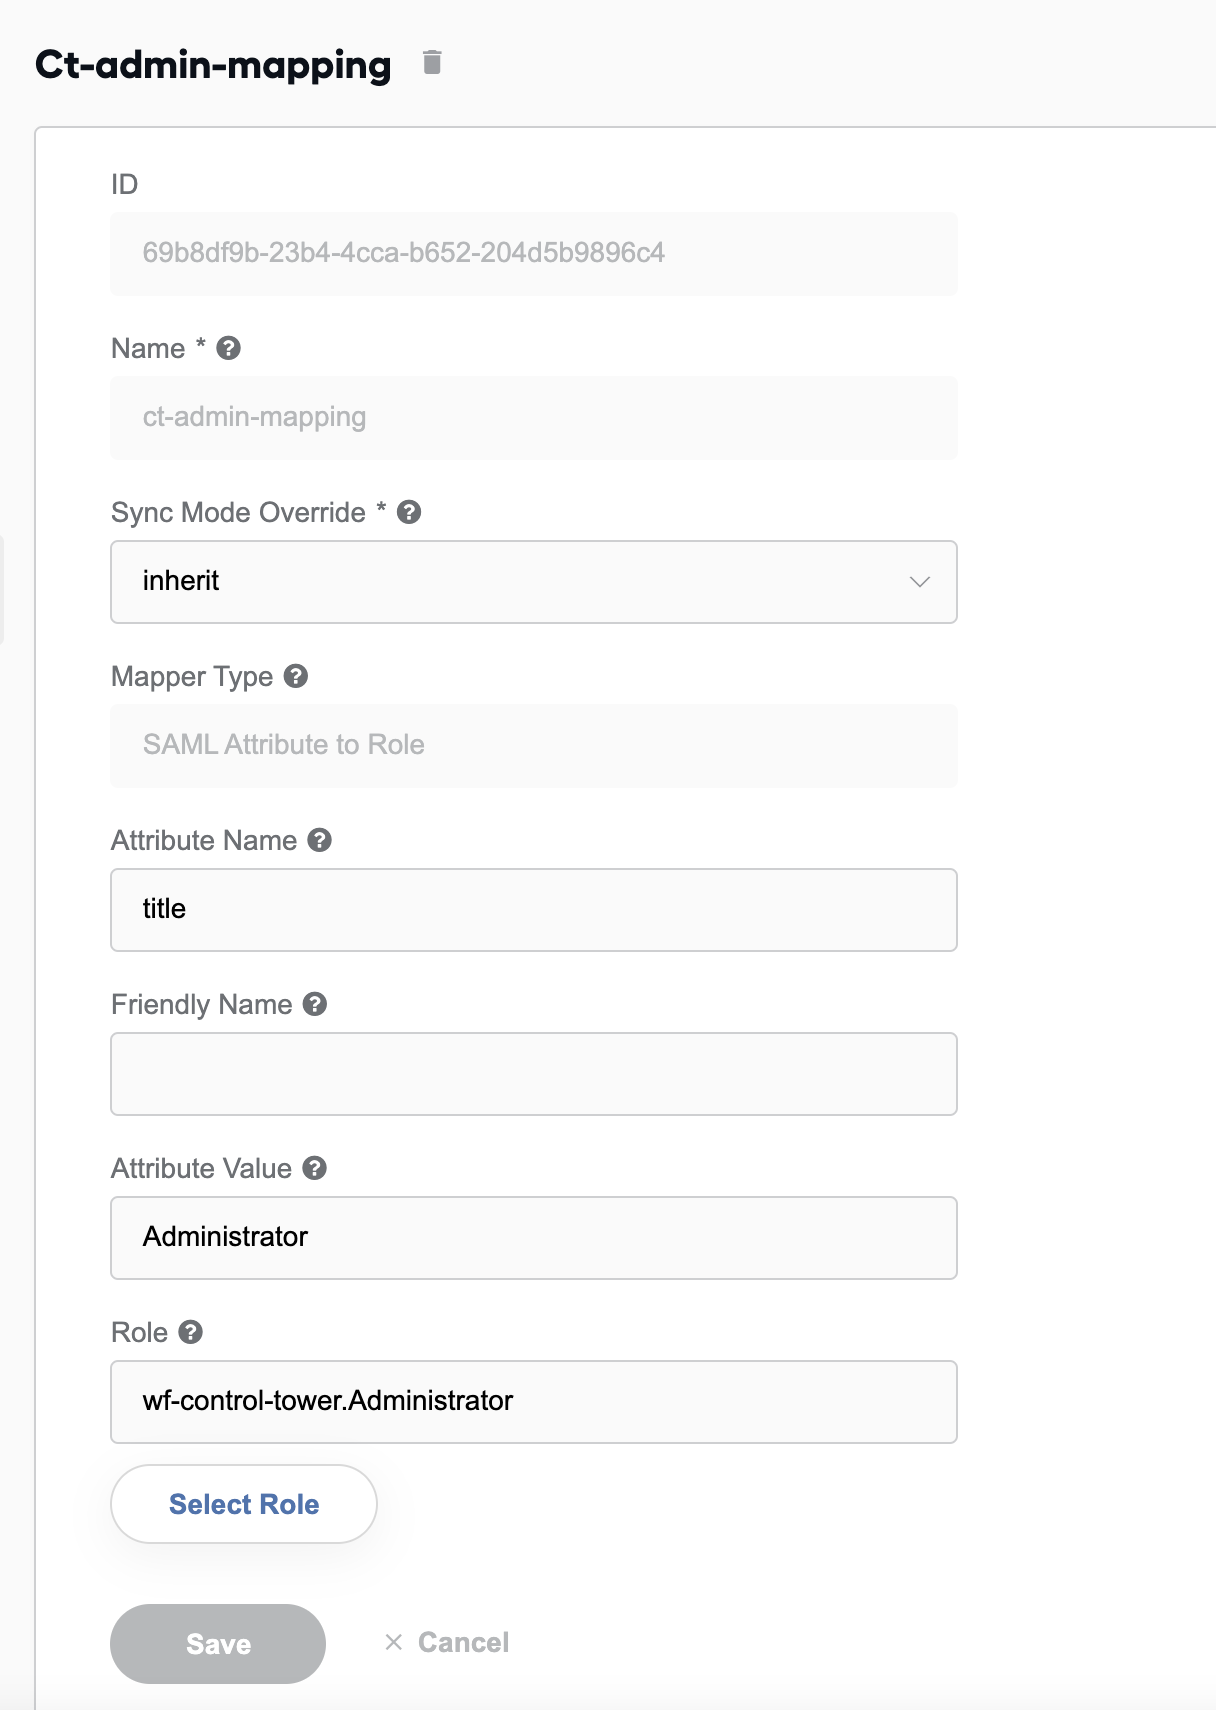
If the underlying organizational structure allows, you can configure an IdP provider to send user attributes in SAML assertions and the WF User Management to map new users to specific roles based on those. For instance, the IdP can send the Department, Organization Unit, Job Title attributes, and the WF User Management maps users to specific client roles based on their values.
Below is an example of how a job title is mapped to the Control Tower Administrator role:
Alternatively, if you store users in LDAP and can't use the attribute-to-role mapping or if you need more fine-grained management of groups or roles, configure User Federation with your LDAP and then set group and role mappings. For details, refer to Configure LDAP.
Manual role mapping for IdP users
Manual role mapping becomes possible after IdP users are already on the Users list in the WF User Management system. To map manually, follow the steps below:
On the left menu, select Users.
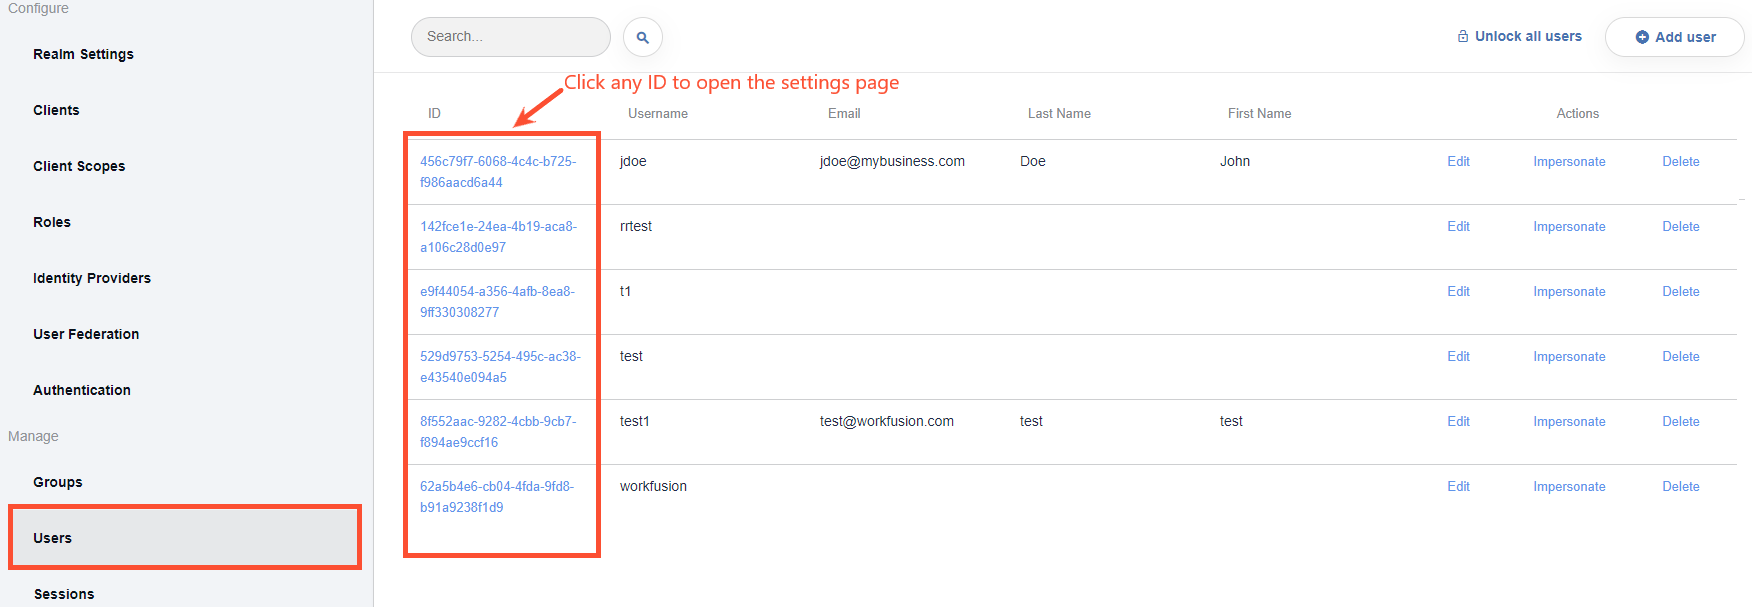
In the list of users on the right, select a user and click its ID.
On the user settings page, go to the Role Mappings tab.
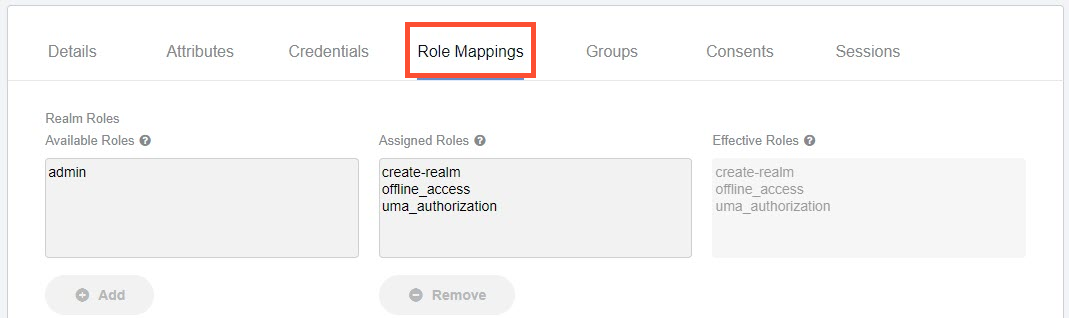
In the Client Roles box, enter the WorkFusion client to which you want the user to have access—wf-control-tower, wf-kibana.
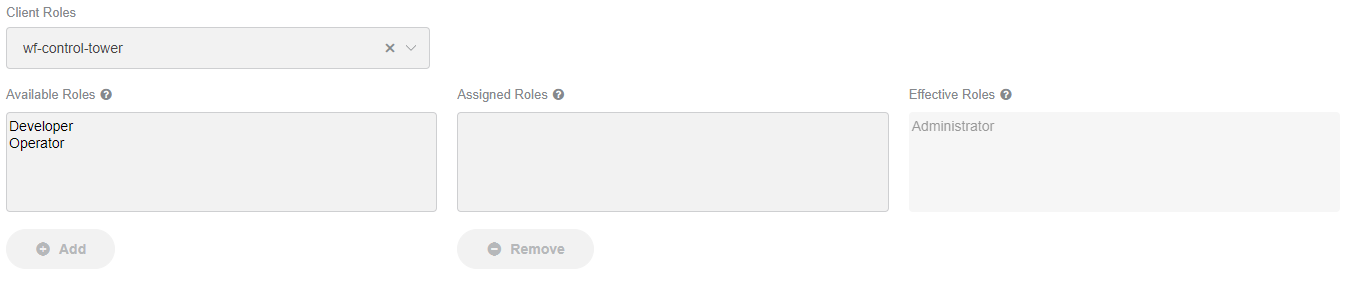
In the Available roles field, select required roles and click Add to assign them to the user. When assigned successfully, the roles appear in the Assigned Roles and Effective Roles fields.
In about 10 minutes (max), the new setup is synced with Control Tower or another client. This means users can log in to Control Tower or another client with their IdP credentials.
Sign and encrypt certificates
To generate certificates for signing and encrypting SAML assertions, complete the following steps:
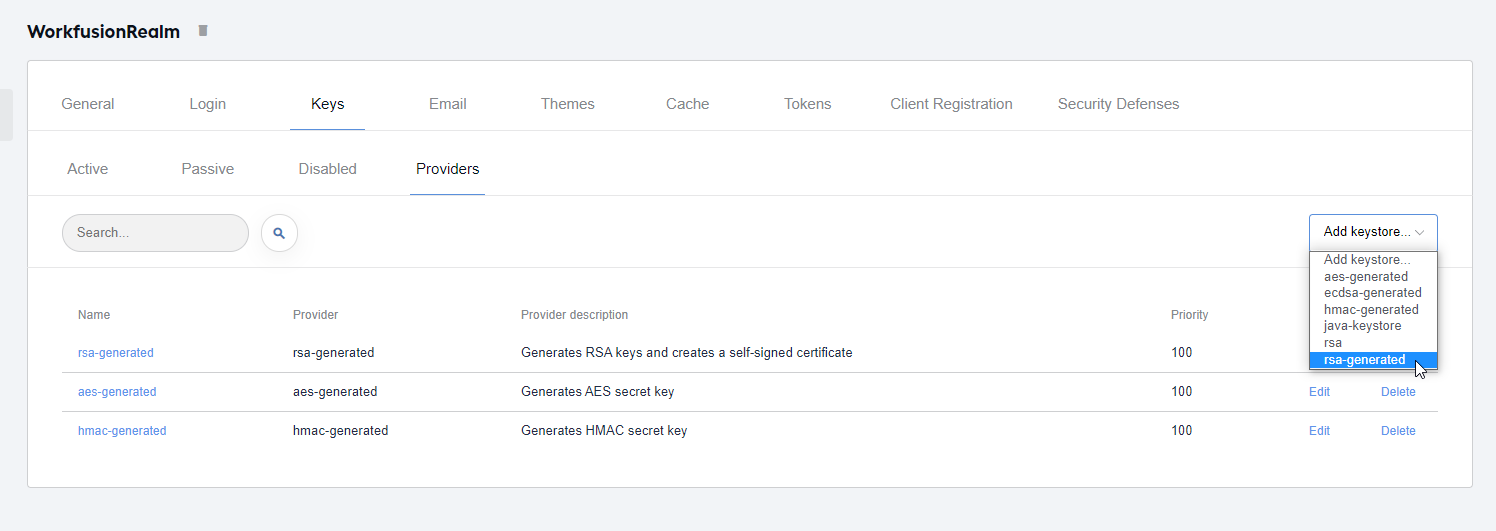
In the WorkFusion realm, select Realm Settings > Keys > Providers.
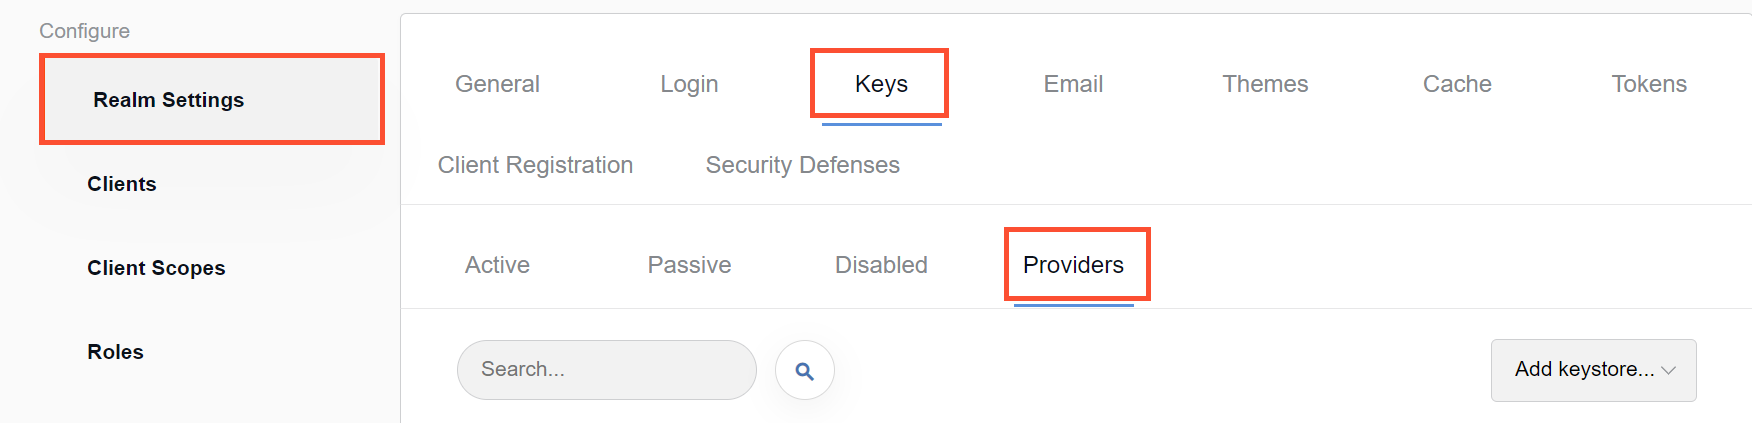
To add a provider, click the Add keystore drop-down box and select rsa-generated.
Fill in the following form with the desired keystore priority, length, and so on.
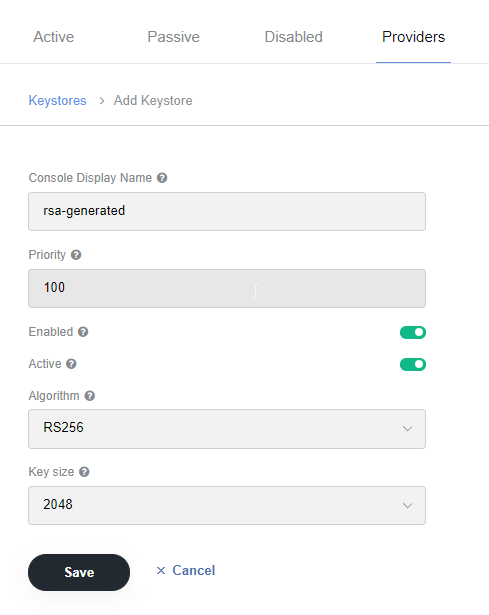
Changing the priority for a provider does not cause the keys to be re-generated. If you want to change the Key size, you can edit the provider, which entails generating new keys.
Save the provider. The generated certificates appear in the WF User Management SAML entity descriptor mentioned in Configure IdP client.
It is also possible to use existing keypair and certificates. For details, visit the Keycloak official documentation.
Migrate users with link-trusted-provider flow
The link-trusted-provider flow is designed to enable user migration from version to version. The flow is for migration purposes only and is applied at first login. It is allowed for users with a trusted provider only—the same provider as you used before migration to WF User Management.
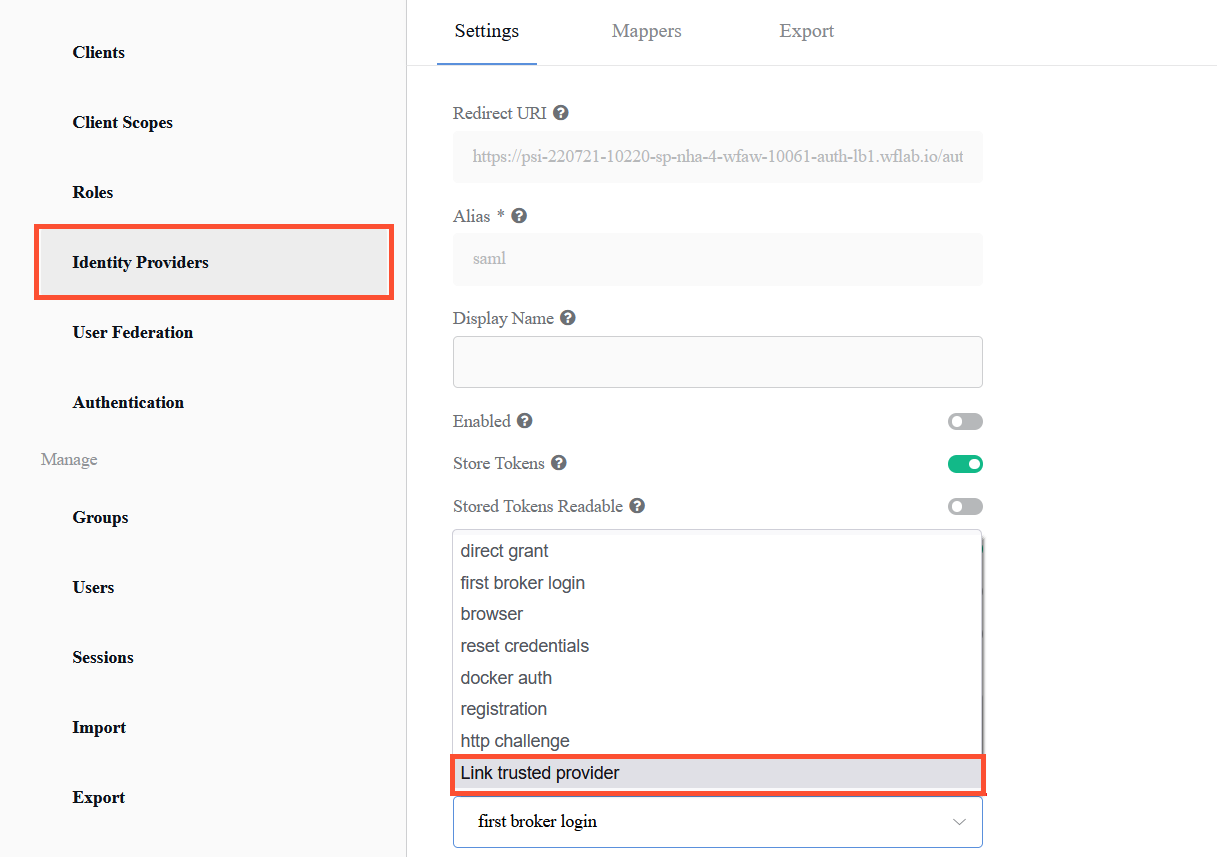
The flow has significant differences as compared to the default first broker login one:
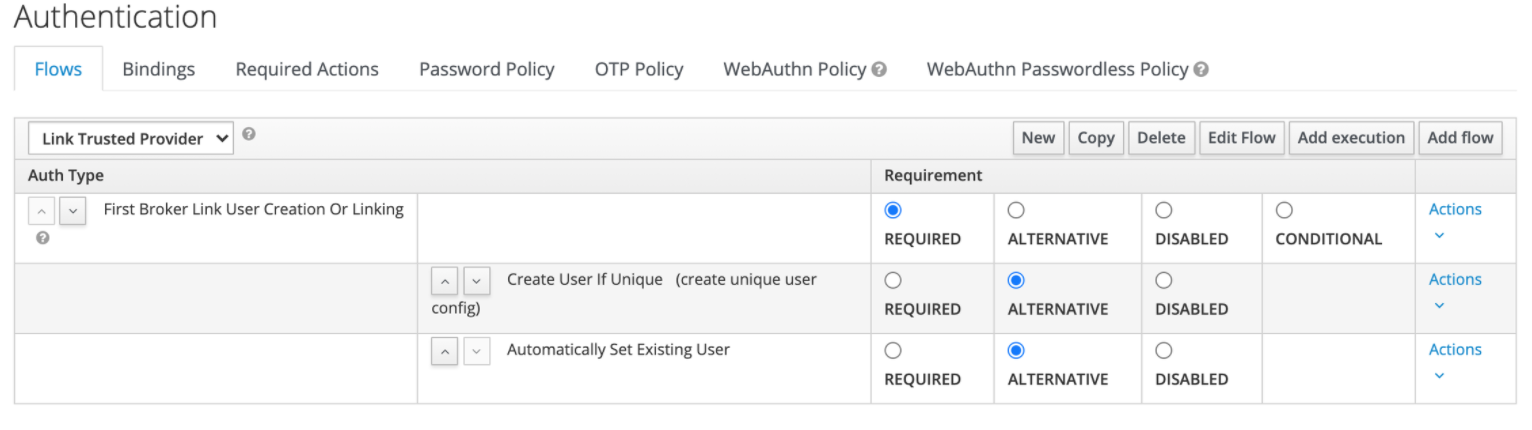
The first broker login flow requires the verification of external users against a local user in the WF User Management in case of a collision. To verify, the following checks are essential:
- Email check, which is not always possible in customer environments.
- Asking users to prompt a local password or sign in as an admin and specify an OTP for a user, which adds manual work, especially when the number of users to be migrated is significant.
The link-trusted-provider migration flow is designed to simplify the first login by performing the following sequence of actions:
- It creates a user if it doesn't exist in the WF User Management.
- It links a migrated user to that in the WF User Management if the latter exists with the same username.
- It does not allow users to update mapped attributes (username, email) from Identity Providers.
Integrate multiple identity providers
The WF User Management allows setting up multiple Identity Providers for user authentification. The feature can be useful when an organization has several departments that need separate authentication flows.
If there are multiple IdPs configured, when users try to log in, they see sign-in options. For example, if there are two IDPs configured, the following screen is displayed:
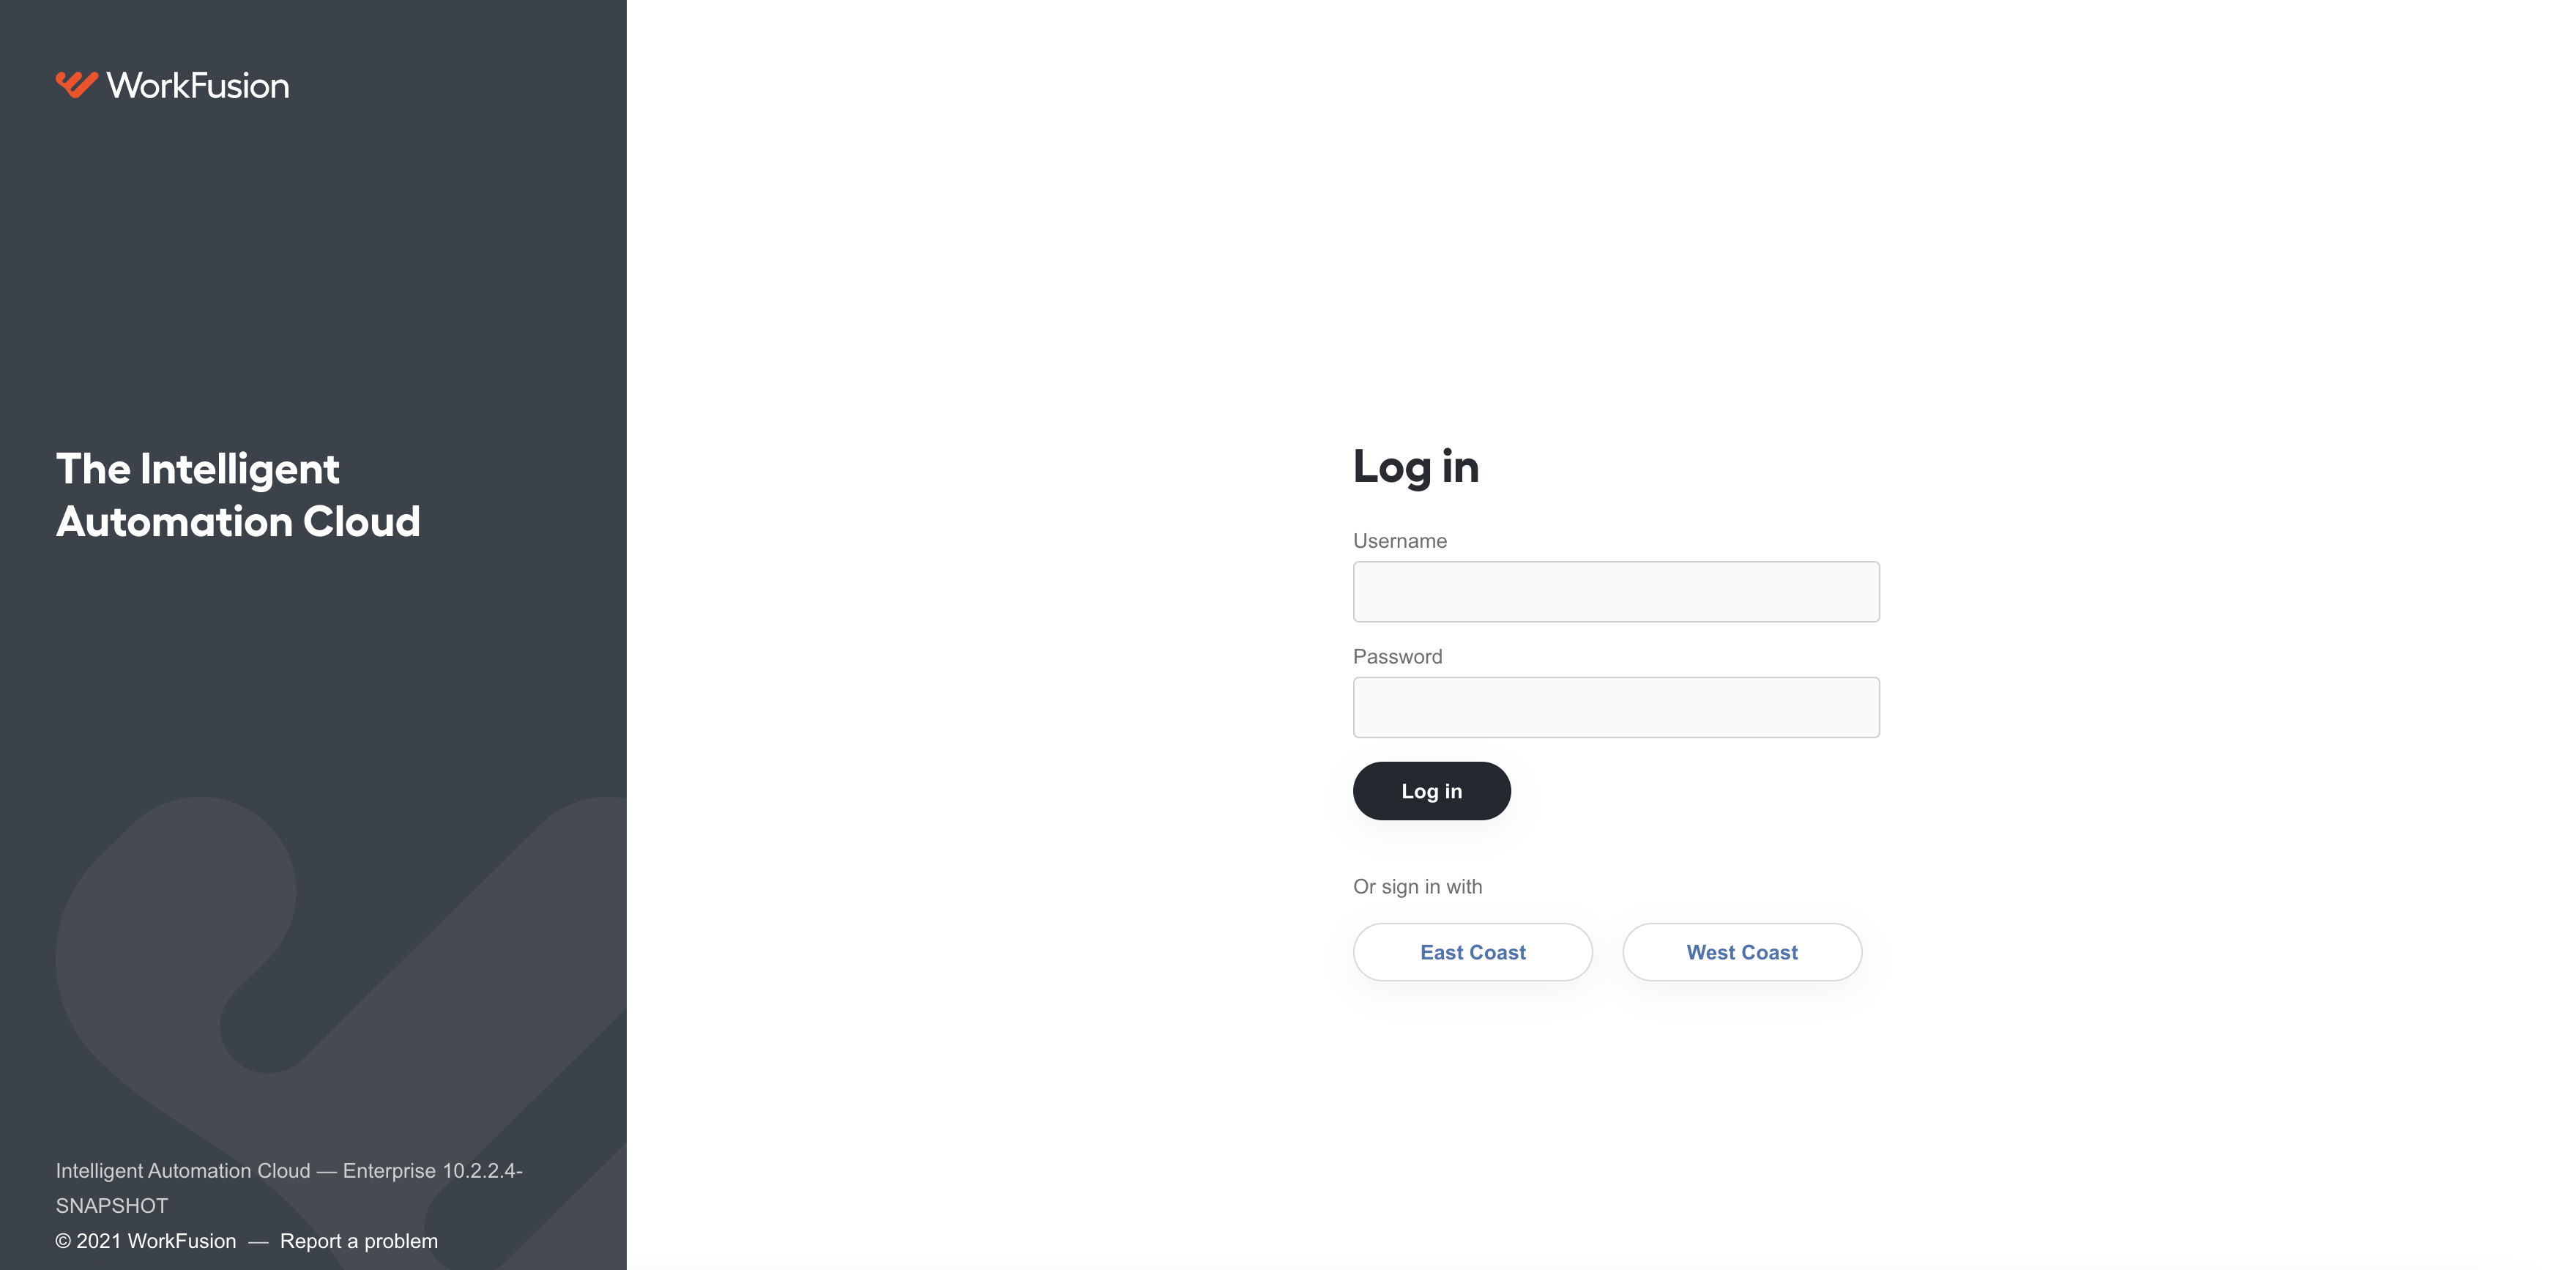
To add more IdPs, follow the steps below:
Go to Identity Providers.
In the Add provider drop-down list, choose the required provider.
Configure an additional provider:
For SAML IdPs, use the guide. When configuring, consider the following recommendations:
Specify a user-friendly Display Name. Make it concise and clear as the names longer than 14 symbols are truncated by an ellipsis. In this way, users can easily identify IdPs on the login page.
To change the order of the IdP login buttons on the login page, assign a value to the GUI order parameter of each IdP. When you move the pointer over the question mark next to the field, you can see a tooltip saying Number defining order of the provider in GUI (on login page). For instance, if you have two IdPs, assign 1 and 2 as GUI order.
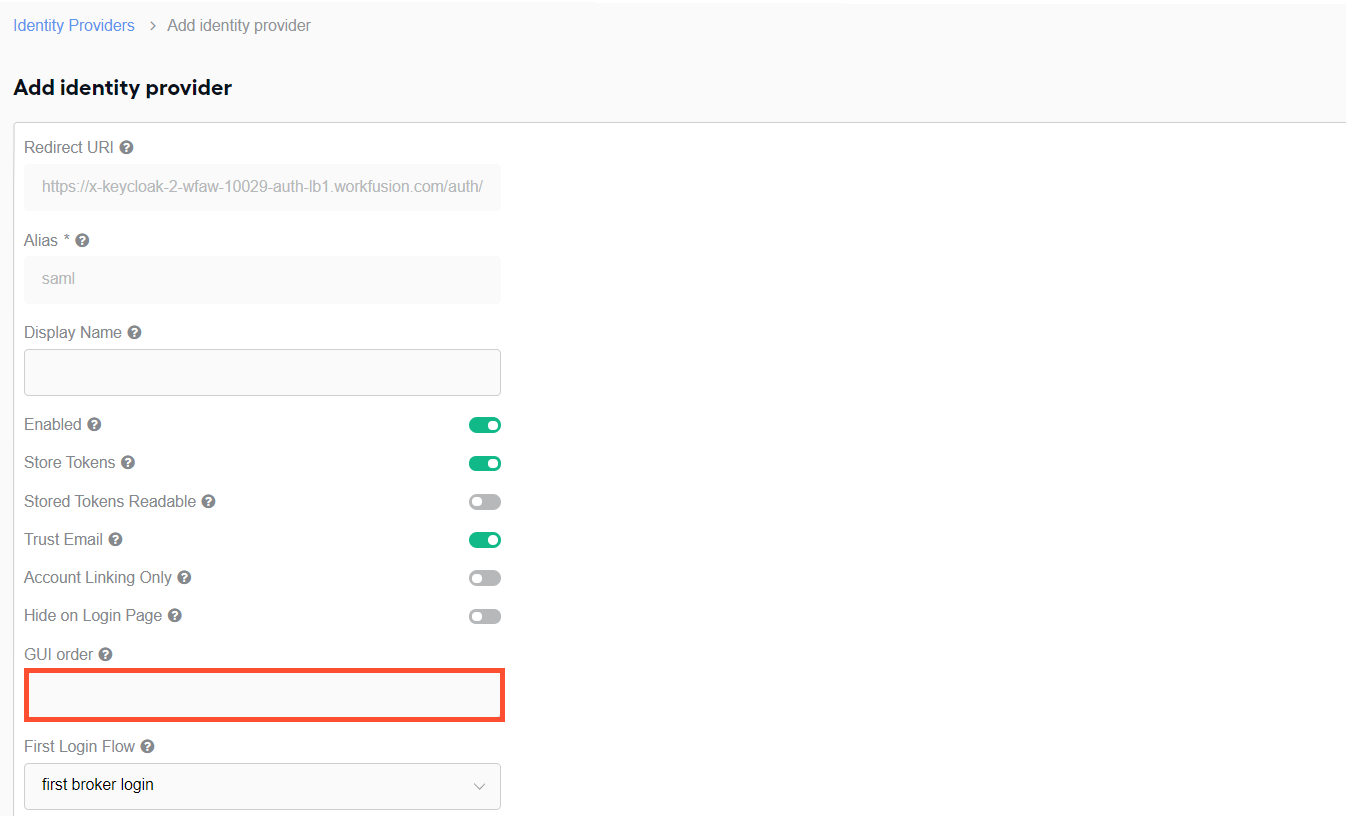
For OpenID providers, refer to the official Keycloak documentation.
If you want to have the possibility to configure multiple IDPs, do not specify the Default Identity Provider when setting the Browser authentication flow.
Disable automated user creation
By default, when a user authenticates using IdP credentials and there is no record for them in the internal WF User Management database, such a record is created. This saves you the trouble of creating users but may not be suitable for specific setups.
For instance, if you cannot completely trust an IdP, you may want to pre-create users in the WF User Management and disable the automated user creation to provide an additional authentication layer with a separate set of credentials. In this case, even if the credentials you specified on the login screen pass the IdP's authentication, you will not sign in successfully to Work.AI.
Disabling the automated user creation is only possible after you complete the SSO configuration.
To disable the automated user creation, follow the steps below:
To create an authentication flow, click Authentication > Flows > New.
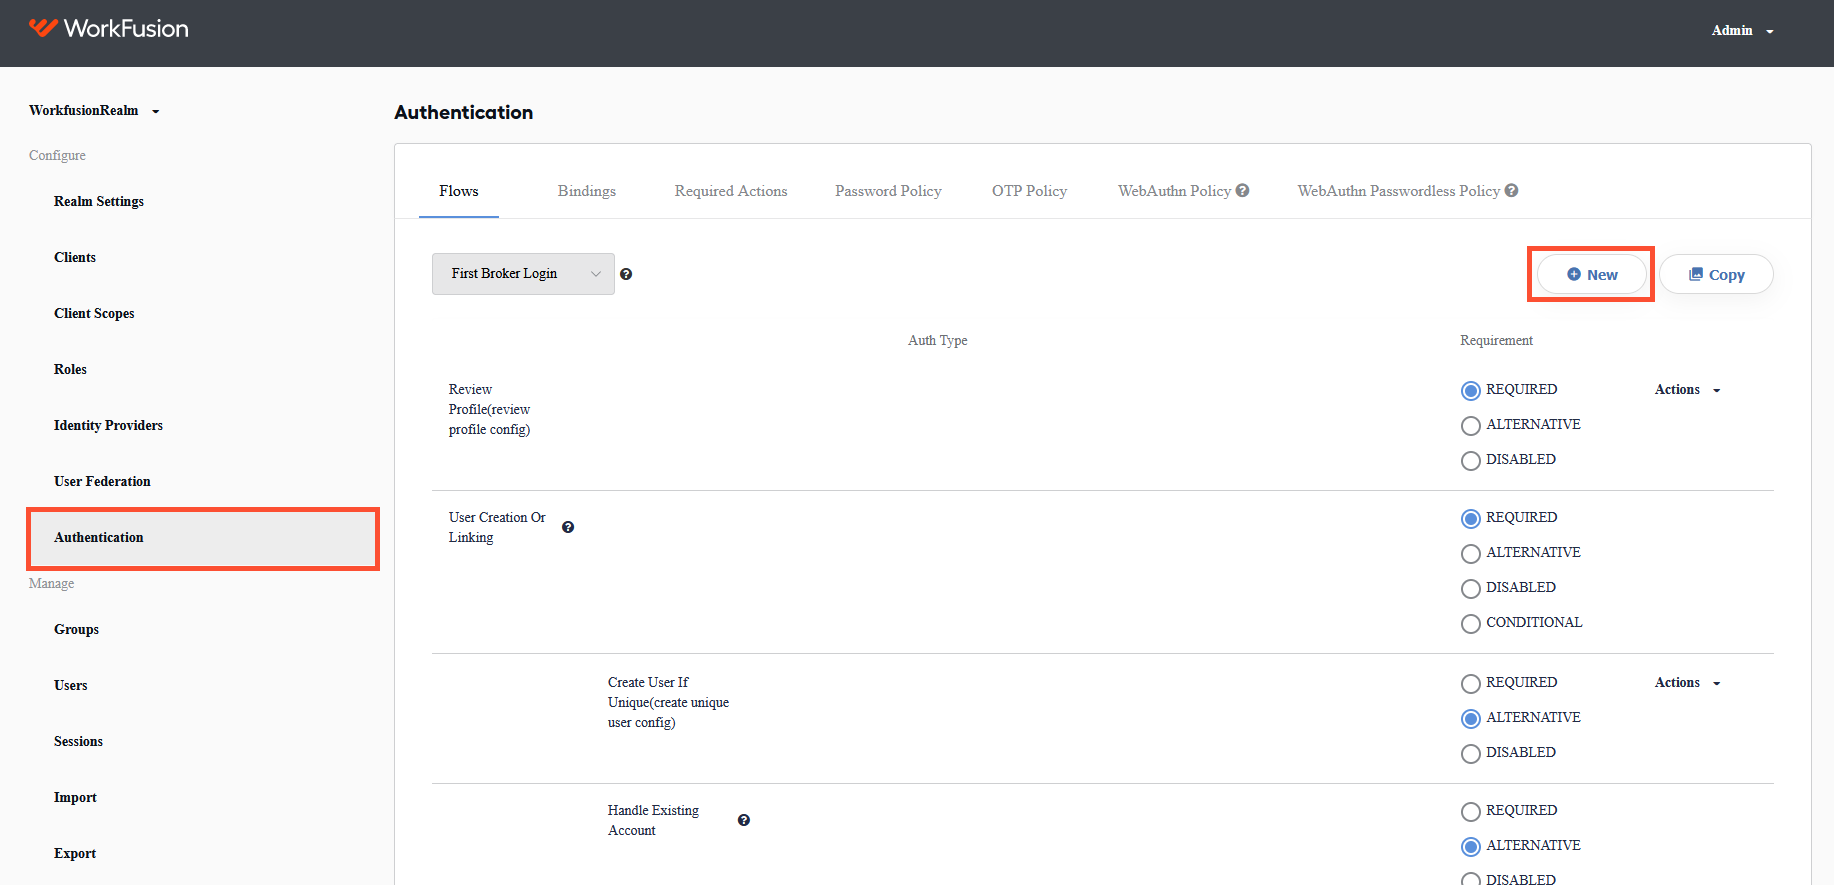
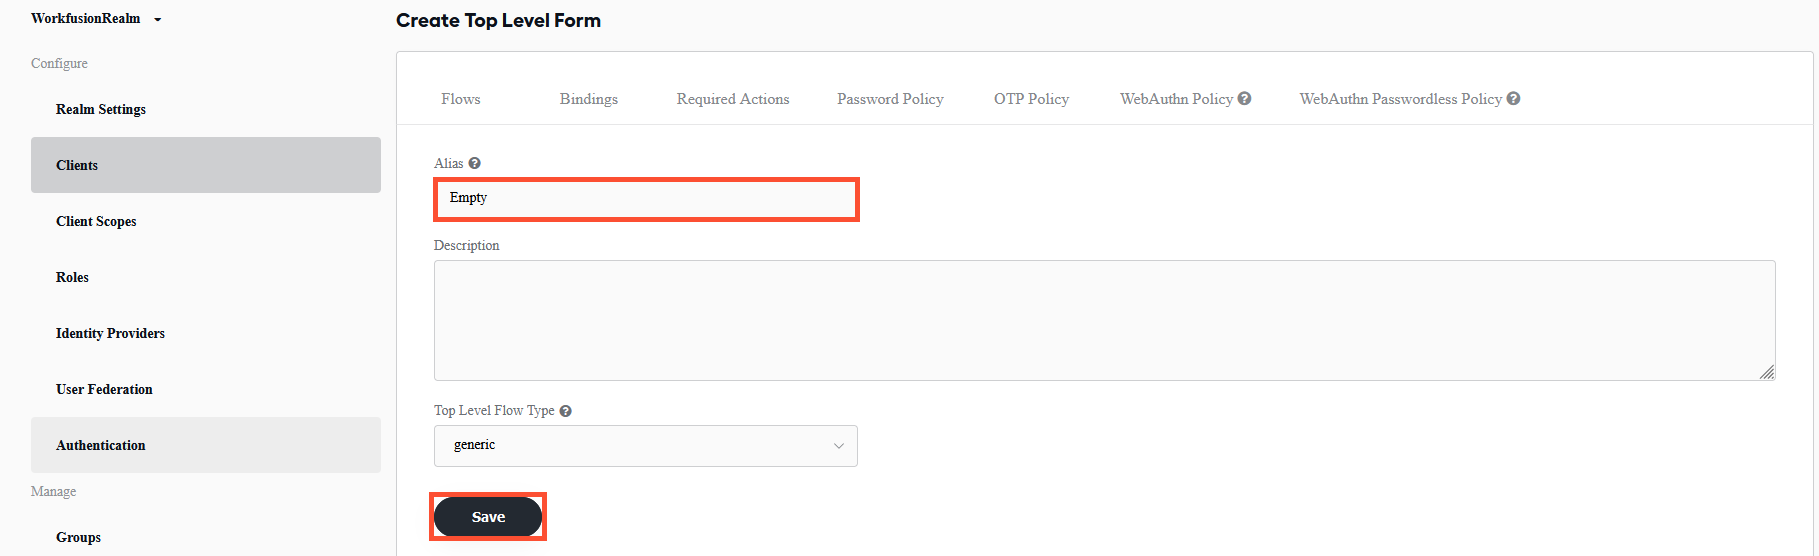
Set any alias name for further usage and click Save.
On the Identity Providers page, choose the configured IdP and click Edit.
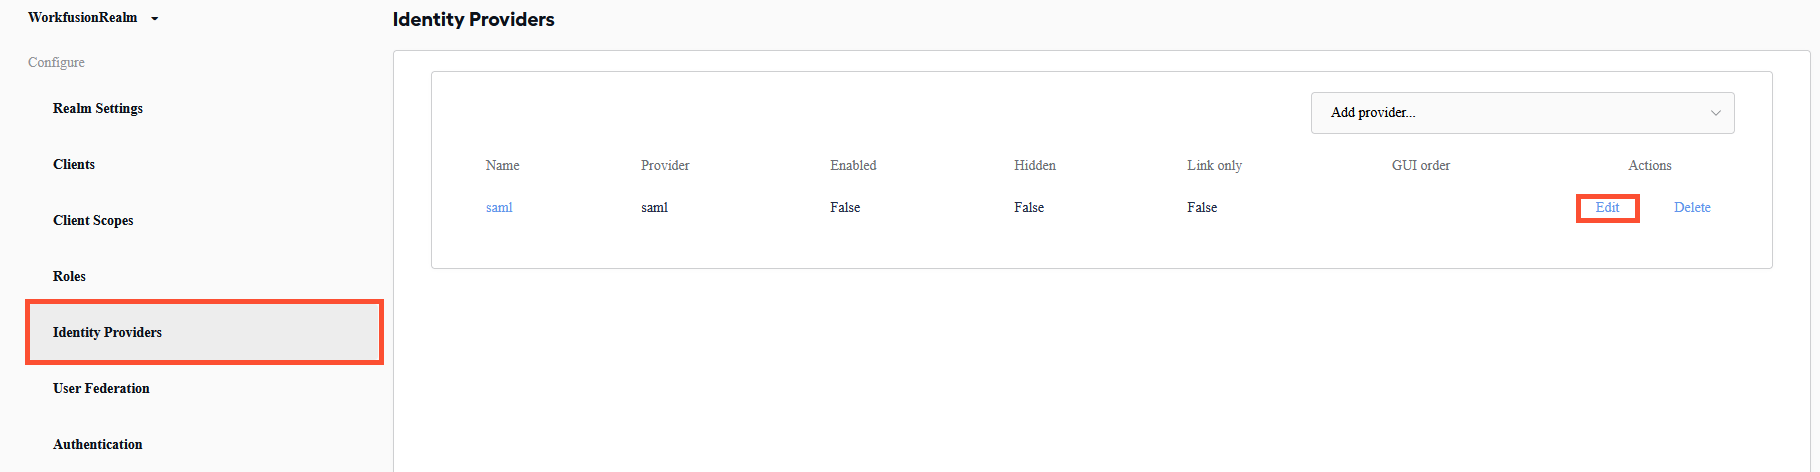
To modify the existing authentication, in the First Login flow drop-down box, select the Empty flow created in Step 2.
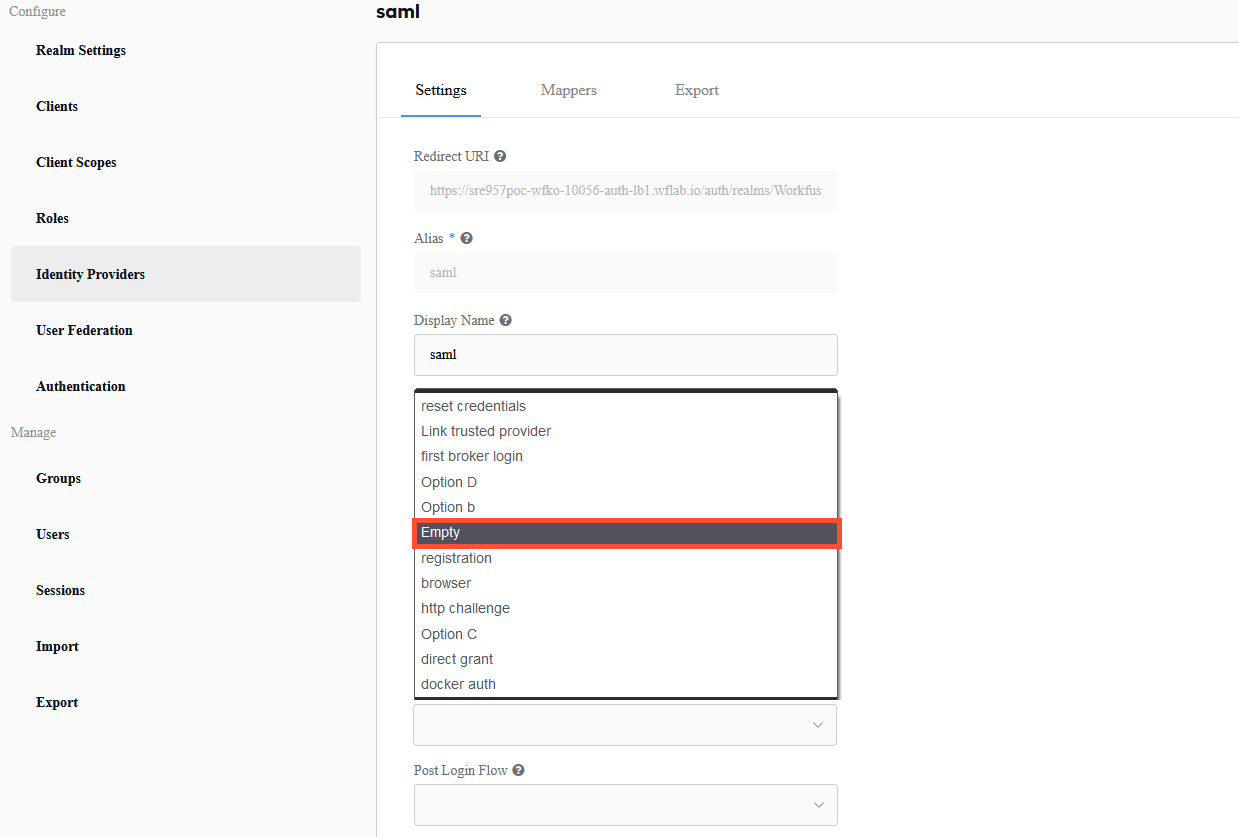
At the bottom of the Settings page, click Save.
Go to the Users page and click the user you want to link to the IdP.
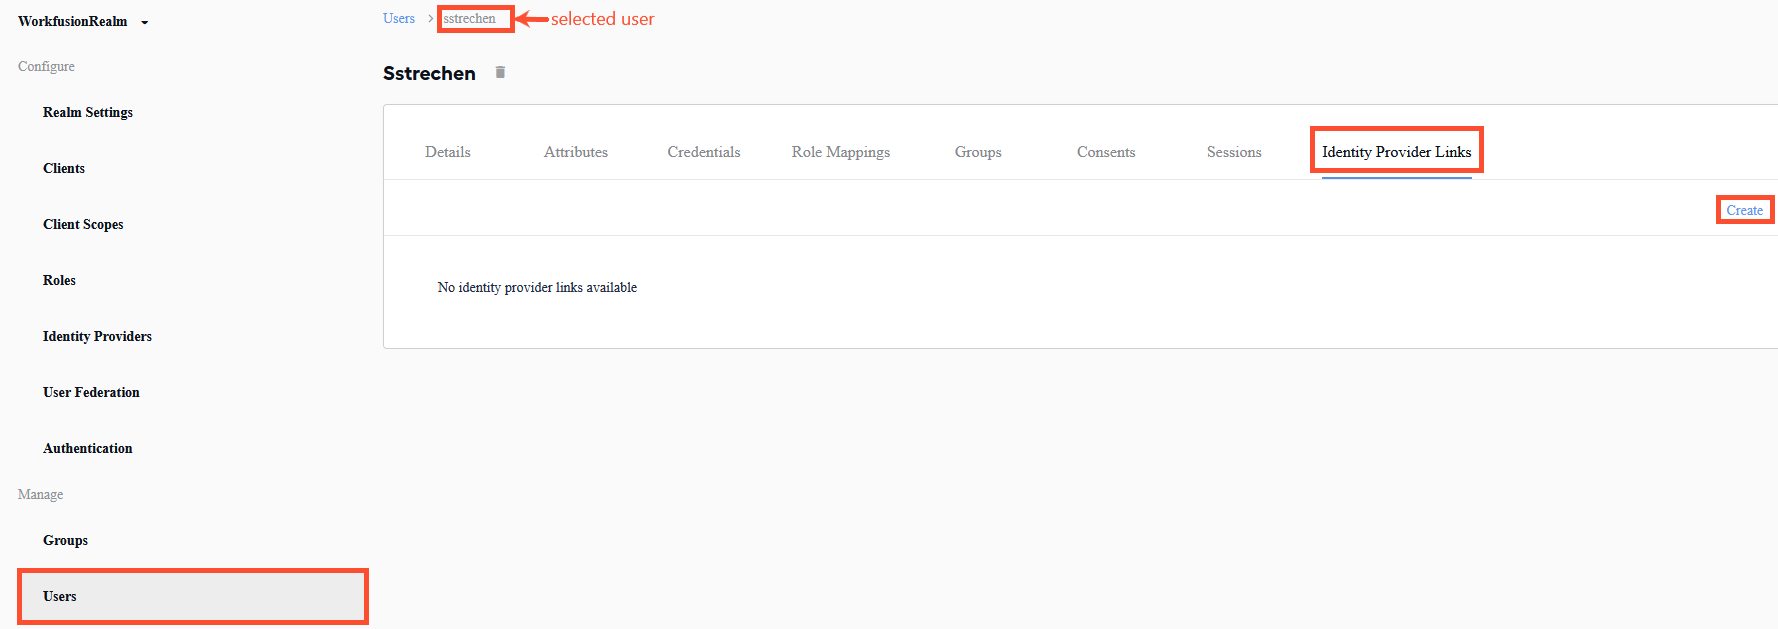
Go to the Identity Provider Links tab and click Create.
On the displayed page, fill in the fields as described below:
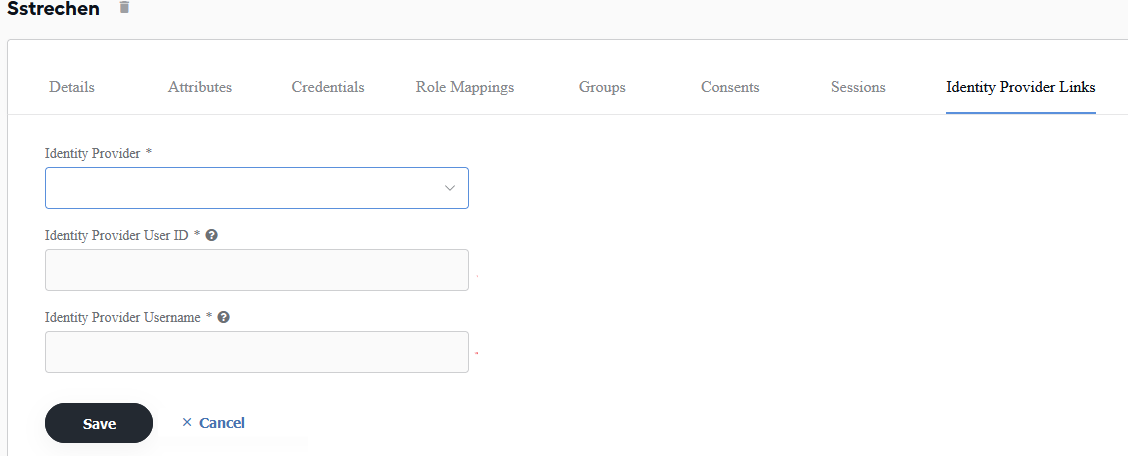
Identity Provider: choose an alias of the enabled and configured IdP.
Identity Provider User ID: specify SAM-Account-Name from the IdP.
Provider Username: type in the IdP username from the WF User Management in lower case.
Click the Save button.
Integrate based on OpenID Connect v1.0
For the instructions to create and configure an OIDC IdP, refer to the Keycloak official documentation.