Configure LDAP
User Federation
If you have a user federation provider connected to Keycloak, be aware that Keycloak sends multiple requests to the provider to find users. To avoid slowdowns, pick the base root as close to the actual users you want to sync as you can and consider the performance of LDAP queries.
The general recommendation is to apply the user federation feature only when you need it. In some cases, IDP is a better option. For example, for role mapping, you can use the IDP auth response.
Keycloak enables retrieving user data for identification and authentication (credentials, passwords, and so on) from external storage. By default, it supports LDAP/Active Directory.
The working principle of the feature is as follows:
- As a user attempts to log in to a realm, Keycloak searches for the user in its internal storage.
- When no match is found, Keycloak searches for the user in every external user storage configured for the realm until it finally finds the right match.
- Data from the appropriate storage is mapped into a standard user model used by Keycloak.
To enable the feature for a particular storage provider, select a realm in the top left corner of the Keycloak console. On the left menu, click User Federation.
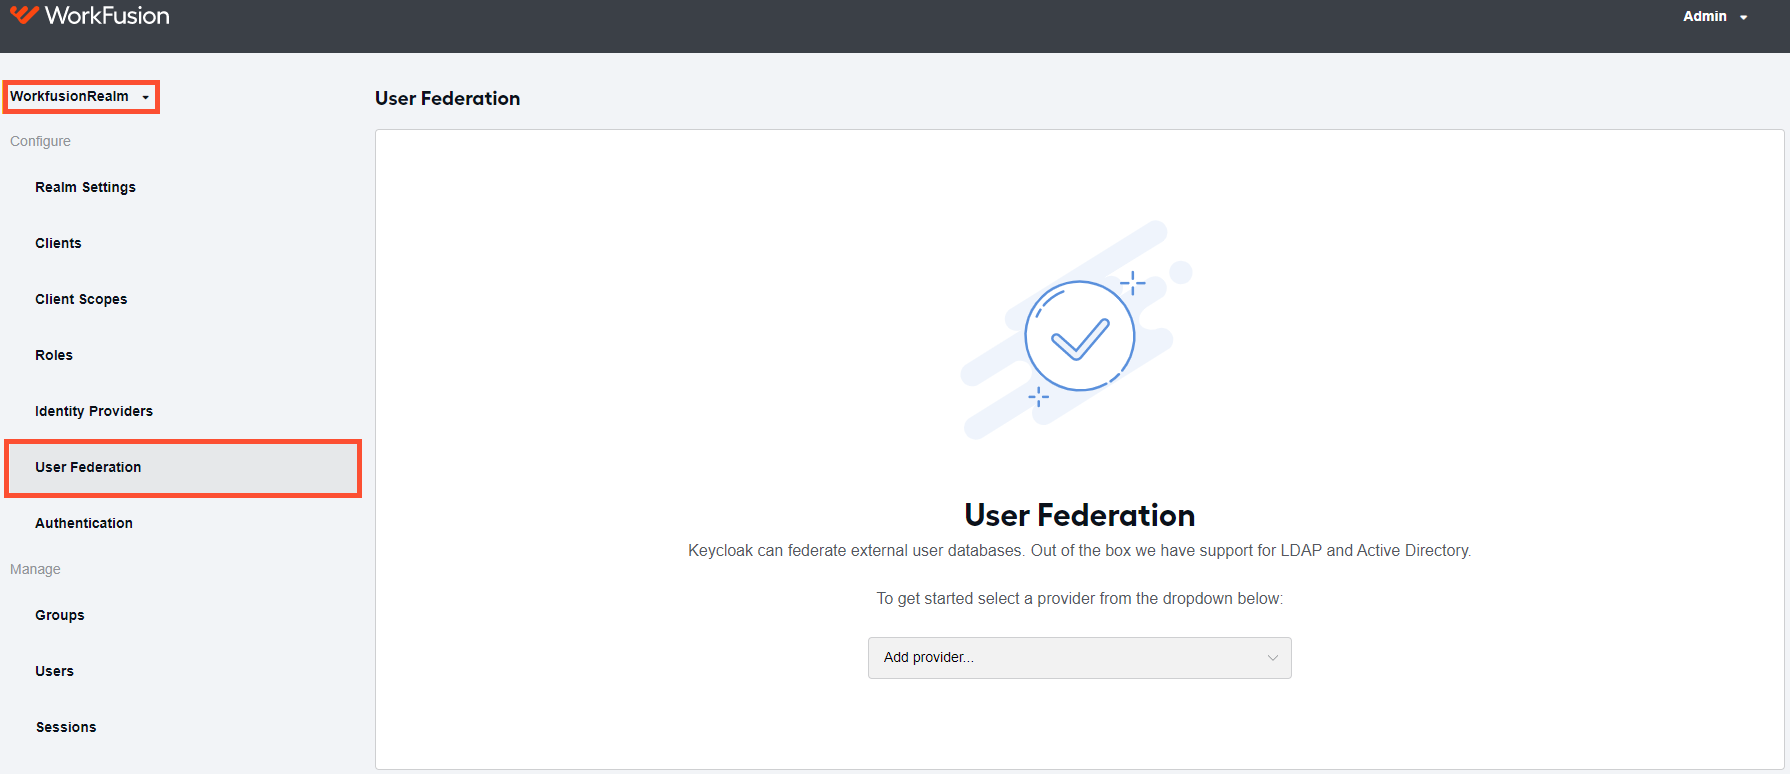
On the right, you can see a page for adding storage providers.
Add and configure LDAP
To add LDAP as an external storage provider, click the Add provider... drop-down box and select ldap.
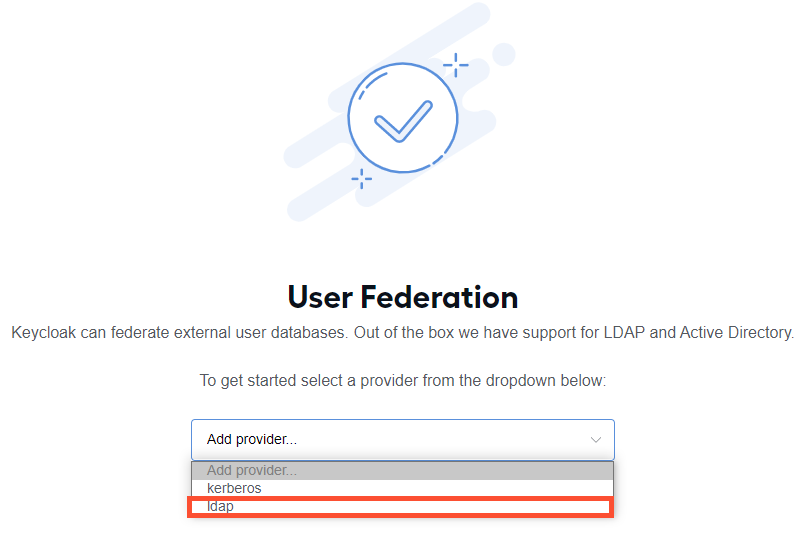
To set up the provider, go to the Required settings page and follow the steps below.
Step 1. Configure general settings
Enable the LDAP storage provider by turning on the Enable toggle.
In the Console Display Name field, type in a custom name for the provider to be displayed on the admin console. For instance, it can be AD for Active Directory.
Set the Priority field to 0. The setting indicates the priority of the LDAP provider for user search. The lowest value is first.
Enable importing LDAP users to the local Keycloak database by turning on the Import Users toggle. Imported users are then synced based on the configured synchronization policy.
Note that the Import Users toggle should always be on.
In the Edit mode drop-down box, select UNSYNCED. User data is only imported from LDAP to Keycloak but not synced back to LDAP when the option is selected. Other available options are as follows:
READONLY: any attributes mapped into Keycloak from LDAP (for example, email, username, first name) are not available for editing. If you attempt to modify the data, Keycloak returns an error. The policy also disables password updates.
WRITABLE: all attributes mapped into Keycloak from LDAP (for example, username, passwords) are editable and synchronized with the LDAP storage either automatically or on-demand, based on the configured synchronization policy.
When creating the LDAP provider, avoid updating the Import users or Edit mode toggles after enabling or disabling them. The updates can mess up with the mapping configuration.
In the Vendor field, select one of the following options:
- Active Directory, if you are going to connect to Active Directory. This automatically presets several properties on the Required Settings page so that you can skip Step 7 and the first three items in Step 8.
- Other, if you are going to connect to another LDAP (non-AD) provider. This automatically presets several properties on the Required Settings as well.
In the Username LDAP attribute field, the default value is set to cn. It stands for the name of the LDAP attribute mapped as the Keycloak username.
Adjust the username mapping accordingly if you need to use a different LDAP parameter in the Username LDAP attribute field, for example, sAMAccountName for Microsoft AD. To do that, go to the Mappers tab in your LDAP configuration, select username, and change the LDAP attribute setting.
Set other parameter values as shown in the sample configurations below.
Sample configuration for AD
RDN LDAP attribute field: cn
UUID LDAP attribute field: objectGUID
User Object Classes field: person, organizationalPerson, user, divided by a comma
Users DN field: full DN of the LDAP tree where your users are, for example CN=Users,DC=wflab,DC=io
Bind Type field: simple
Bind DN field: DN of the LDAP admin for accessing the LDAP server in the username@wflab.io format
Search Scope field: Subtree, which enables search across the entire tree under configured Users DN
Sample configuration for another LDAP (non-AD) provider
Username LDAP attribute field: uid
RDN LDAP attribute field: uid
UUID LDAP attribute field: entryUUID
Pay attention to the following considerations:
- Choose Users DN (Distinguishing Name of the LDAP catalog where users are stored) carefully as the number of records in the DN determines the performance of specific actions. For instance, you can experience significant performance degradation of Control Tower pages if your DN points to a catalog that contains more than 1,500 records. This is due to the fact that when Control Tower queries data for a given user and LDAP starts processing the query, the more users are in the catalog, the slower the processing speed is. To maintain proper performance, make sure the user DN points to a catalog with as few users as possible. For example, if the Users catalog specified as CN=Users,DC=wflab,DC=io contains 3,000 users, but there is a CN=Internal,CN=Users,DC=wflab,DC=io sub-catalog with only 300 users and only internal users are to use the platform, this is the way to go.
- If there are a number of different sub-catalogs, consider configuring multiple User Federations pointing to the same LDAP that are different just in the Users DN attribute. For example, instead of one User Federation with Users DN specified as CN=Users,DC=wflab,DC=io, create two User Federations with Users DN set as CN=Internal,CN=Users,DC=wflab,DC=io and CN=Authorized_partner,CN=Partners,CN=Users,DC=wflab,DC=io respectively.
cautionFor correct mapping on the Keycloak side, all users to be mapped with the LDAP configuration should have the RDN LDAP attribute field completed.
In the Connection URL field, specify the URL to your LDAP server (for example, ldaps://dc1.wflab.io:636). Use LDAPS: //LDAP_HOST:636 for a secure connection or LDAP: //LDAP_HOST:389.
Check whether the connection you set is working by clicking Test connection. In case the setting is ok, you see a success message. Otherwise, you get an error message, in which case check the URL is correct and read the Keycloak error logs for more information.
In the Bind Credential field, specify the password for the LDAP admin configured in the Bind DN field. The field can obtain its value from the vault. Use ${vault.ID}.
Check whether the credential you set is working by clicking Test authentication. In case the authentication is ok, you see a success message. Otherwise, you get an error message, in which case check the credential is correct and read the Keycloak error logs for more information.
Step 2. Set custom filter
In the Custom User LDAP Filter field, specify the LDAP filter string to filter the user list in Users DN to only those you need to import to the Keycloak DB.
You can set the option to filter based on groups or anything else. For instance:
- Use a filter like (mail=*) to include only users with an email address (excludes service account users).
- Use a filter like (memberOf=CN=WFUsers,CN=Users,DC=wflab,DC=io) to include only the members of the LDAPs WFUsers group.
- Use a filter like (memberOf:1.2.840.113556.1.4.1941:=CN=common_group,DC=wflab,DC=io) in a scenario when you have a common parent group to which you dynamically add other groups where members need to be imported to Keycloak.
Step 3. Set synchronization policy and save configuration
In the Sync Settings section, make the following changes:
Turn on the Periodic Full Sync toggle. This enables full periodic synchronization of LDAP users to Keycloak.
Changes made to a user in LDAP are also applied to the user in Keycloak, for instance:
- If a user is added to Active Directory, they are added to Keycloak.
- If a user is enabled or disabled in Active Directory, they are enabled or disabled in Keycloak.
- If a user is removed from Active Directory, they are removed from Keycloak.
Set the Full Sync Period to 18000.
To save the configuration, click Save. You will see the following buttons appear on the screen.

If you choose to disable Periodic Full Sync, your next step is to synchronize users by clicking Synchronize changed users or Synchronize all users. For the first-time synchronization, use Synchronize all users.
If you enable Periodic Full Sync, the synchronization automatically runs every Full Sync Period.
Step 4. Grant access to Keycloak clients
To grant access to Keycloak clients—Control Tower and Kibana—map the clients' roles to imported users. You can skip the step if you import AD users and their AD groups, provided you can map the AD groups exactly to Keycloak client roles. For details, see the Group mappers and the Configure AD group access to Keycloak clients sections.
To grant access, follow the instruction:
On the left menu, select Users.
On the right, select a user from the displayed list.
Go to Role Mappings.
In the Client Roles drop-down box, type in the client to which you need to grant access—wf-control-tower or wf-kibana.
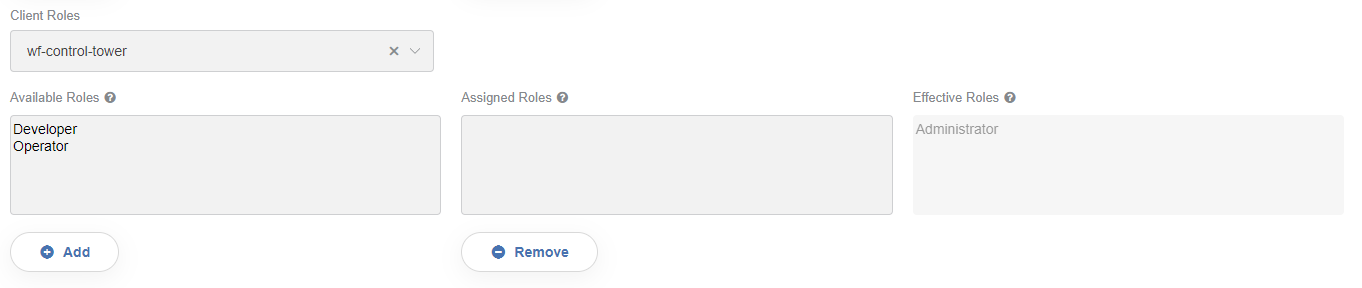
In the Available Roles field, select one or several roles and click Add to assign them to the user. If the roles are assigned successfully, you see an appropriate message, and the roles appear in the Effective Roles field.
In 10 minutes (max), users from Keycloak are synced with Control Tower or another client. This means the users can log into Control Tower or another client with their credentials from Active Directory.
Attribute mappers
After successful LDAP configuration, Keycloak maps user attributes from LDAP into a standard user model. By default, the mapping covers the following attributes:
| LDAP attribute | Mapped to |
|---|---|
| cn | username |
| last name | lastName |
| first name | firstName |
| whenChanged | modifyTimestamp |
| whenCreated | createTimestamp |
To view the existing attribute mappings, open the left menu, select User Federation, and go to the Mappers tab.
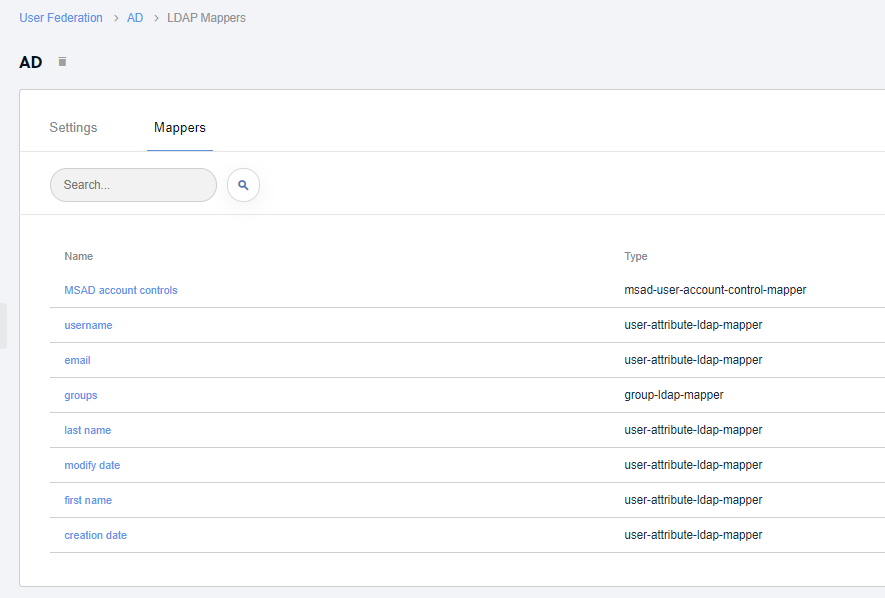
You can also click any mapper on the list to view its configuration page.
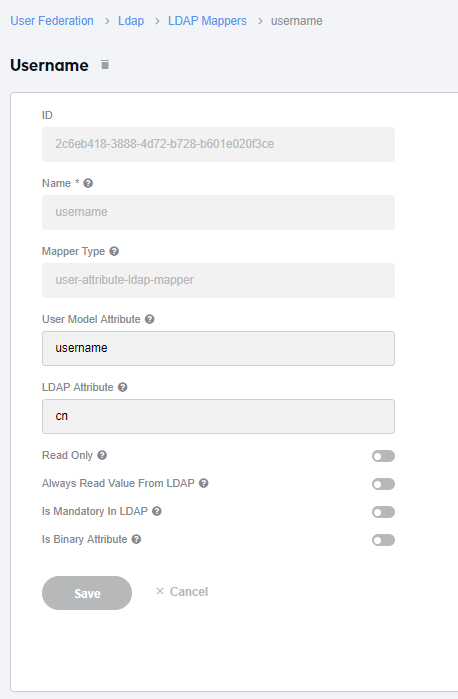
Keycloak allows creating custom attribute mappers. For more information about LDAP mappers, refer to the official Keycloak documentation.
Group mappers
Group mappers enable importing AD groups to Keycloak. Below is an example of how you can configure a group mapper:
On the Mappers tab, click Create.
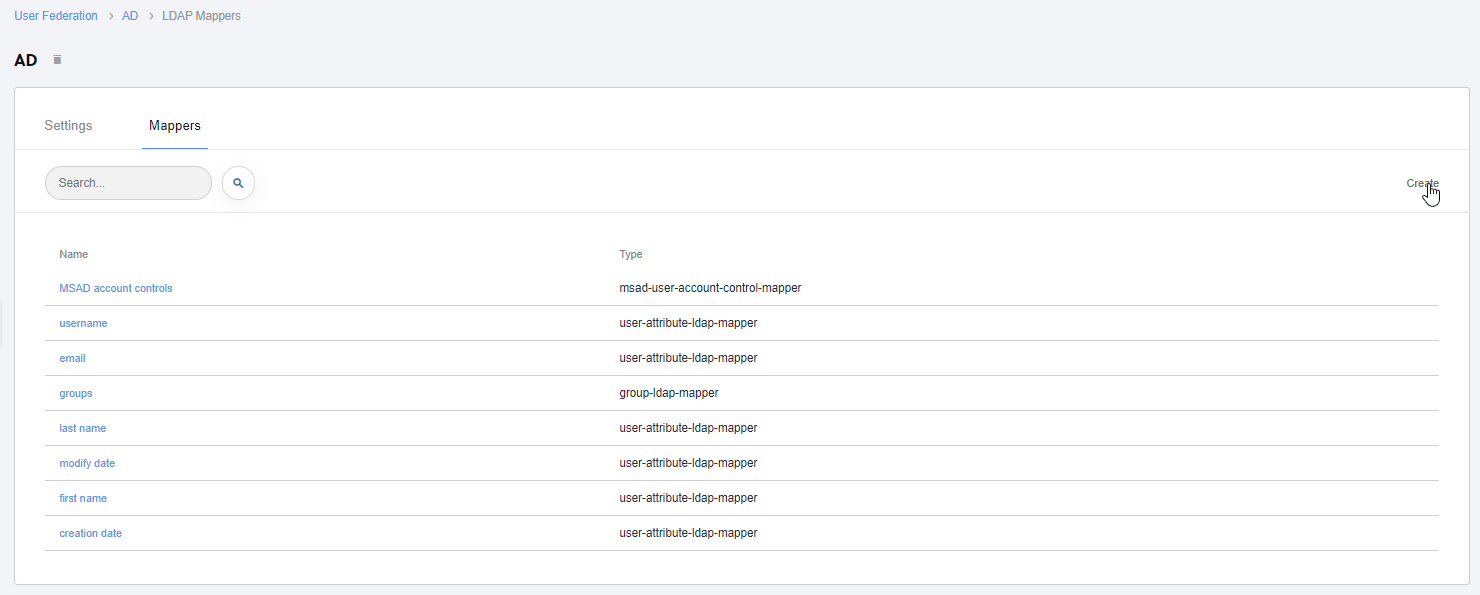
In the Name field, specify a name for the created mapper.
In the Mapper Type drop-down box, select group-ldap-mapper.
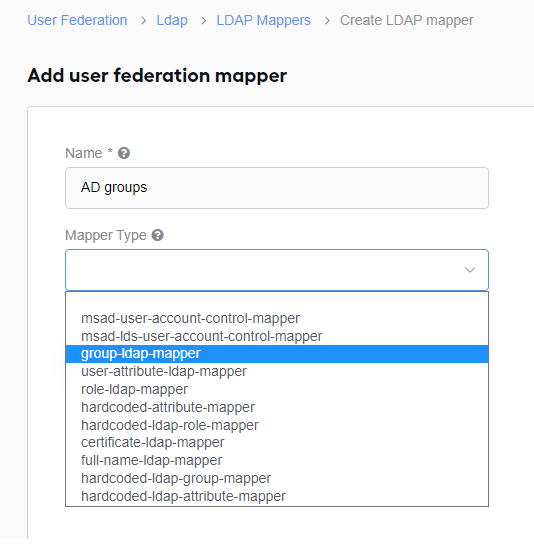
In the LDAP Groups DN field, specify the full DN of the LDAP tree where your groups are, for example, CN=Users,DC=wflab,DC=io.
In the LDAP Filter field, specify the LDAP filter string to filter the group list in LDAP Groups DN to only those you need to import to the Keycloak DB.
You can set the option to filter based on group names or anything else. For instance:
- Use a filter like (CN=WorkFusion_Group_*) to include all groups with names starting with WorkFusion_Group_.
- Use a filter like (|(CN=WorkFusion_Group_DEV)(CN=WorkFusion_Group_ADM)) to include only groups with specified names.
- Use a filter like (memberOf:1.2.840.113556.1.4.1941:=CN=common_group,dc=wflab,dc=io) in a scenario when you have a common parent group to which you dynamically add other groups to be imported to Keycloak.
Click Save to save the group mapper configuration.
After the configuration is saved, the following buttons become available.

If users are already imported from AD to Keycloak, clicking Sync LDAP Groups To Keycloak imports all groups from AD to Keycloak as Keycloak groups and associates them with respective users.
If users are not imported from AD to Keycloak yet, their groups with associations can be imported automatically while users are imported.
Configure AD group access to Keycloak clients
After AD groups are imported to Keycloak, associate them with clients—Control Tower and Kibana. In this way, you enable access to the clients for all users in an imported AD group.
On the left menu, select Groups.
From the list of the groups on the right, select an AD group by clicking its name (in this example,
WFUsers) and click Edit.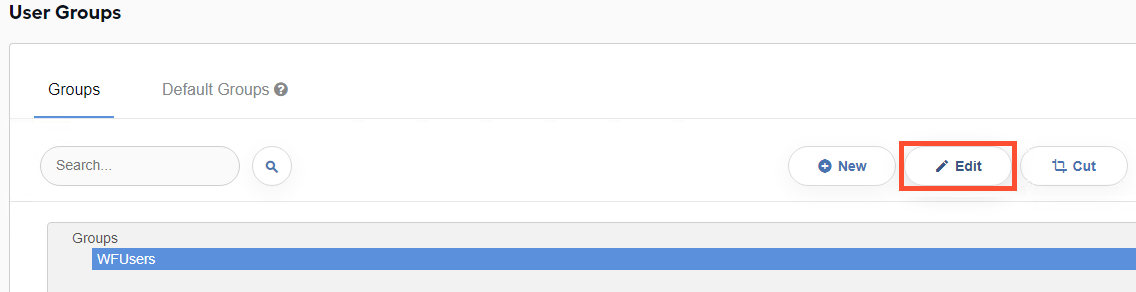
Select the Role Mappings tab.
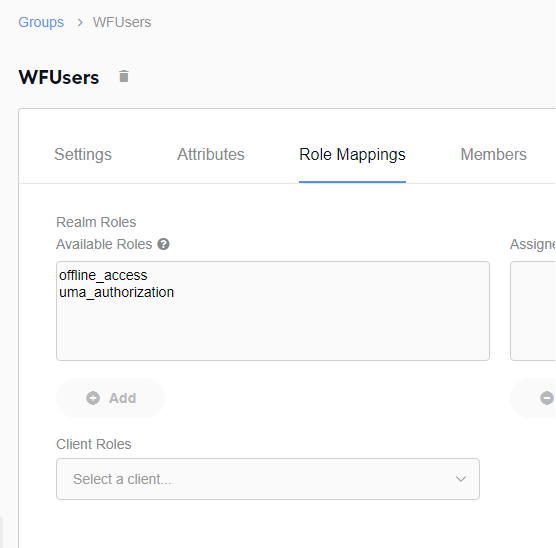
In the Client Roles drop-down box, specify the client you want users from the group to access (for example, wf-control-tower).
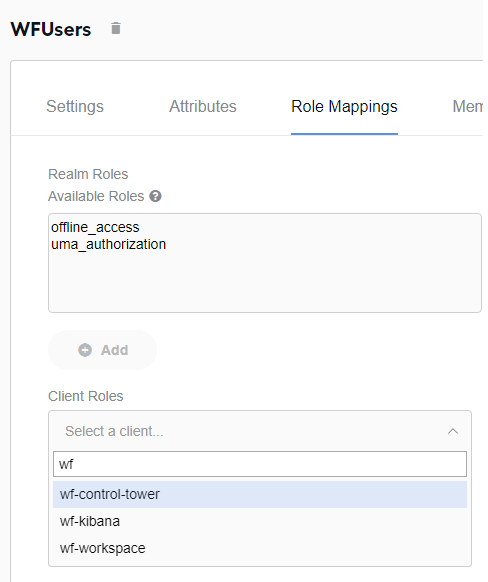
In the Available Roles field for the Client Roles sub-section, select the roles to be associated with the group, click Add.
You can configure how often the Keycloak users are synced with Control Tower. That means all users within the selected group (in the example, WFUSER) can log into Control Tower with their credentials from Active Directory in the scheduled period.
By default, the frequency is set to one hour. To change the default value, In Control Tower, open ${catalina.home}/conf/workfusion.properties, and add the keycloak.schedule.period property with a proper cron expression.
If the property already exists, override the current value. For example, a configuration that sets the sync frequency to "once an hour" looks as follows:
keycloak.schedule.period=0 0 * ? * *
However, it's not recommended to set the frequency to less than one hour as the sync's performance depends entirely on the users' fetching performance, which can be affected if underlying providers, such as ldap, are slow.
ldap-with-local-users-override provider
The ldap-with-local-users-override provider enables automatic user migration from version to version. It would allow mapping local Keycloak users with LDAP if LDAP was enabled after user migration under a standard provider.
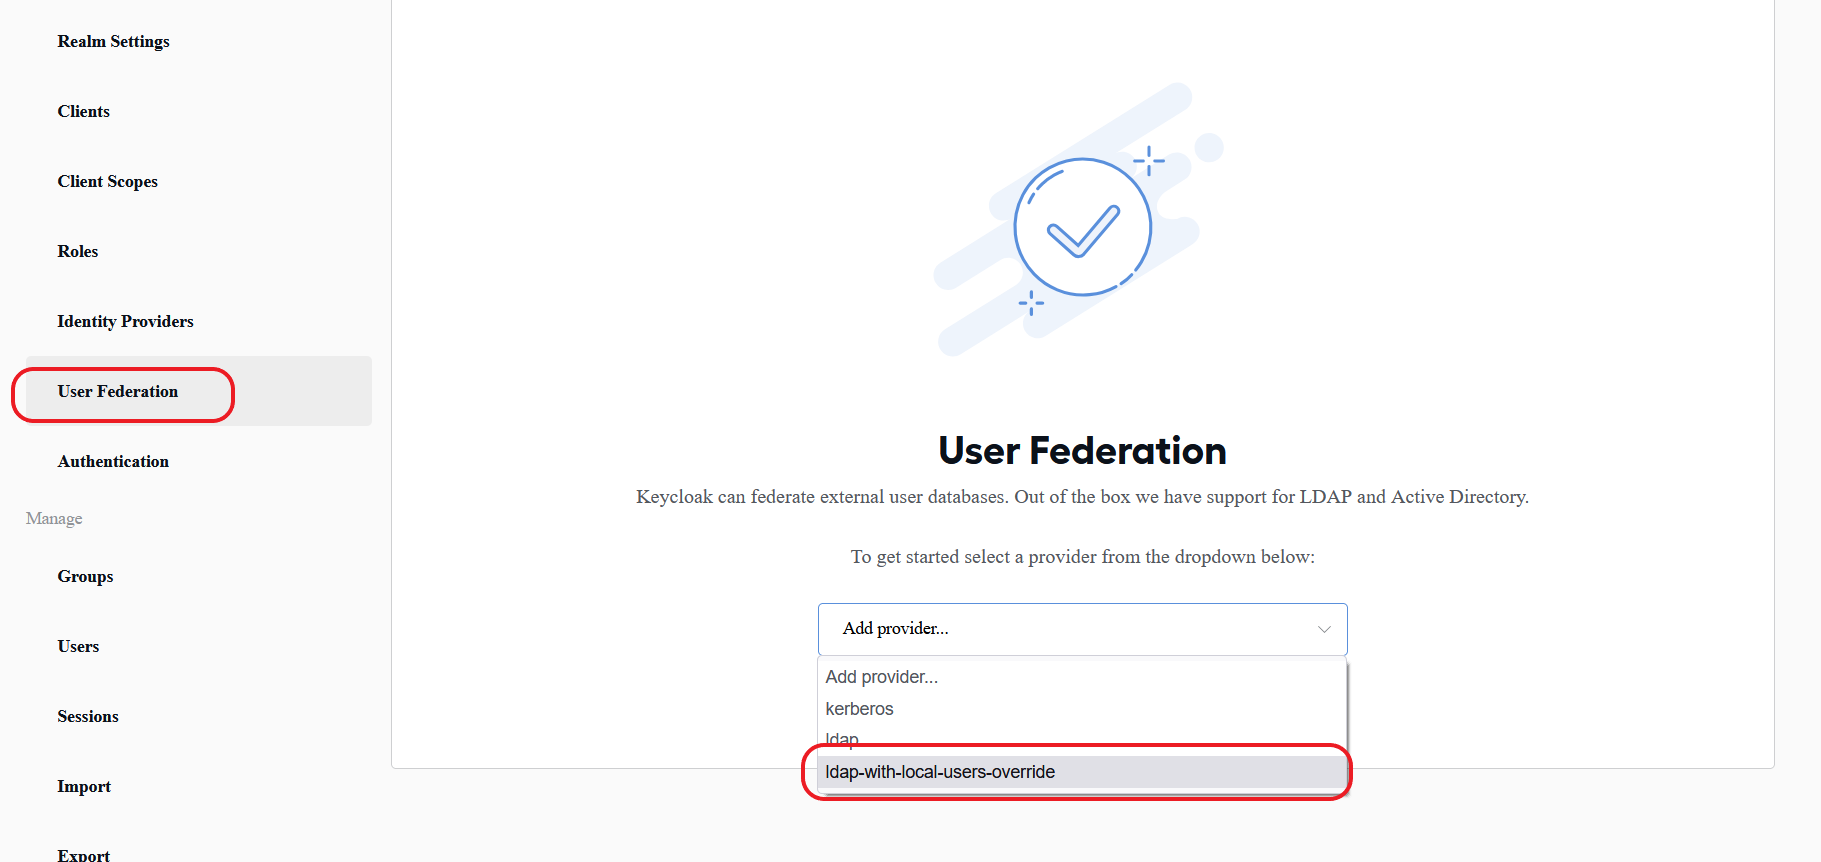
The ldap-with-local-users-override provider merges LDAP users with Keycloak local ones having the same username, mapping associated LDAP attributes. The actions are essential because users from previous platform versions migrate to a new version as local Keycloak users, and it is necessary to connect them with their LDAP representations.
The ldap-with-local-users-override configuration is available only for the workfusion theme.