Install ODF 2 dependencies on-premises
View difference between ODF 2 and ODF in terms of installation
ODF components are available on the Work.AI platform environment before the first deployment of the project that uses them. The deployment is completed automatically by the platform installer.
ODF 2 is different in this aspect. There is no need to pre-install it because ODF 2 core libraries are part of any ODF 2-based project deployment.
Install ODF 2 dependencies to on-premises Nexus
ODF 2 is not included into the Work.AI platform installer out of the box. To run automation projects in isolated corporate environments without access to the WorkFusion public Nexus, complete the preparations described in the guide.
You can always use the WorkFusion public Nexus unless your company's policies prohibit it or you cannot access it.
By default, ODF 2 Archetypes generate Maven projects that point to the WorkFusion public Nexus. If you need to switch to your company's Nexus, follow the instructions below based on your Nexus version.
As a prerequisite, download the archived WorkFusion dependencies.
Nexus 3
To upload the archived dependencies to a Nexus 3 repository, do as follows:
- Verify that your company's Nexus has the
wf-dependenciesrepository. If the repository does not exist, create it. - Extract the
odf-aggregated-dependenciesarchive to a folder of your choice. - Create a shell script with the following content, modifying the variables to match your environment:
Linux
set -e
DEPENDENCIES_PATH='change me' # Path to the folder with the unpacked contents of odf-dependencies-10.2.9.76.zip
USERNAME='change me' # Nexus username
PASSWORD='change me' # Nexus user password
NEXUS_URL='change me' # Nexus URL (e.g. https://my-environment-nexus.com/nexus)
REPO='wf-dependencies' # Nexus repository where dependencies will be uploaded. Use 'wf-dependencies' unless you have a specific reason to use a different one.

find $DEPENDENCIES_PATH/ -type f -iname '*.jar' > filelist.txt
while IFS= read -r file
do
    curl -ks --http1.1 -u "$USERNAME:$PASSWORD" -X PUT -T "$file" "$NEXUS_URL/repository/$REPO/${file#$DEPENDENCIES_PATH/}"
done < filelist.txt
Windows
@echo off
REM === CONFIGURATION SECTION ===
REM Path to the folder with the unpacked contents of odf-dependencies-10.2.9.76.zip (without trailing slash)
set "DEPENDENCIES_PATH=change me"
REM Nexus username
set "USERNAME=change me"
REM Nexus user password
set "PASSWORD=change me"
REM Nexus URL (e.g. https://my-environment-nexus.com/nexus)
set "NEXUS_URL=change me"
REM Nexus repository name
set "REPO=wf-dependencies"

REM === LOGIC SECTION ===
REM Recursively find all .jar files, then upload
for /r "%DEPENDENCIES_PATH%" %%F in (*.jar) do (
    set "FULLPATH=%%F"
    setlocal enabledelayedexpansion
    REM Remove DEPENDENCIES_PATH prefix (including trailing backslash) from FULLPATH to get the subpath and reverse backslash
    set "SUBPATH=!FULLPATH:%DEPENDENCIES_PATH%\=!"
    set "SUBPATH=!SUBPATH:\=/!"
    REM Construct the full URL and upload with curl
    curl --http1.1 --user "%USERNAME%:%PASSWORD%" -X PUT --upload-file "%%F" "%NEXUS_URL%/repository/%REPO%/!SUBPATH!"
    echo Dependency uploaded: !NEXUS_URL!/repository/!REPO!/!SUBPATH!
    endlocal
)
pause
- Execute the script from the folder where it is located.
Nexus 2
To upload the archived dependencies to a Nexus 2 repository, complete the following steps:
Verify that your company's Nexus has the
wf-dependenciesrepository. If the repository does not exist, create it with the following configuration: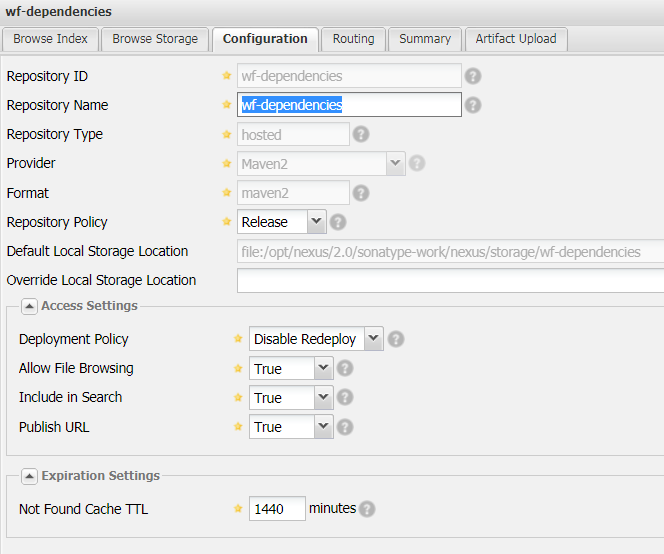
As a result, you get a repository with the following folder path on the database server (that hosts Nexus):
/opt/nexus/2.0/sonatype-work/nexus/storage/wf-dependencies.Upload
wf-dependencies.odf-X.X.X.X.zipto the server and unzip the archive into/opt/nexus/2.0/sonatype-work/nexus/storage/wf-dependencies. For the current version of ODF 2, refer to the Compatibility matrix page.To add dependencies manually, enable SSH access to the database server and root permissions:
Click to see helpful shell commands
Upload to the Nexus server.
scp -i id_rsa wf-dependencies-X.X.X.X.zip username@dbserver.company.com:/home/username
Copyid_rsais your public security key for SSH access. Request your company IT for proper commands if needed.Find the zip file in
/home/username/on the server.Enable an SSH connection to the Nexus server.
ssh -i id_rsa username@dbserver.company.com
Copy
Unzip the directory.
unzip -r /home/username/dependencies-X.X.X.X.zip /opt/nexus/2.0/sonatype-work/nexus/storage/wf-dependencies
Copy
The default server directory where Nexus stores JARs for repositories is
/opt/nexus/2.0/sonatype-work/nexus/storage. If needed, confirm that with your company IT.Copy to the repository directory.
cp -a /home/username/wf-dependencies/. /opt/nexus/2.0/sonatype-work/nexus/storage/wf-dependencies
Copy
Change all dependency permissions. For Nexus, to have full control over JARs copied manually, change the group and owner to
nexusfor all copied files.cd /opt/nexus/2.0/sonatype-work/nexus/storage/wf-dependencies
sudo chgrp -R nexus *
sudo chown -R nexus *
Copy
Perform the same manipulations with the dependencies archive on the on-premises Nexus to update the dependencies after a newer version of ODF 2 is released.
Configure Maven and project settings
The configuration includes the following two steps:
To generate an ODF 2 project, configure a repository used to get Simple Archetype. In the case of on-premises and a single
dependencies/repository containing an Archetype (that is different from the public Nexus where Archetypes are placed in the separatearchetypes/repository), you have the same repository URL for both<id>wf-dependencies</id>and<id>wf-archetypes</id>repository settings in your Maven settings.After the configuration is done, run a generation process from the command line on your workstation. For more details, refer to Create project.
Having generated the ODF 2 project from Simple Archetype, configure a remote profile in the root
pom.xmlfile. Specify the Control Tower user credentials to be used. For that, modify the Maven settings in theUSER_HOME/.m2/settings.xmlfile.For more details, refer to Deploy Asset Bundle | Configure access to Control Tower.
Build environment requirements
Local builds and CI/CD pipelines require using Azul Zulu OpenJDK 21.x. For details, refer to the guide.
To start exploring the ODF 2 capabilities for creating automation projects, refer to the guides listed below:
- If you work with Eclipse IDE:
- If you work with IDEA IDE: