Manage and assign realm and client roles
WorkFusion User Management features two levels of roles:
Realm-level in a global namespace shared by all clients.
Client-level in a namespace dedicated to a specific client (for example, wf-control-tower, wf-kibana).
You should also differentiate between the two role types:
Composite: have one or more additional roles associated with them.
Default: assigned by default to every new user registered within a realm.
Client-level roles
Client roles are applicable to a particular client. They are essential for accessing the resources of specific WorkFusion applications.
The WorkFusion User Management UI features preconfigured roles for its default clients:
realm-management
The roles for the realm-management client in the table below define user permissions to modify the settings of the WorkFusion User Management UI.
| Role | Description |
|---|---|
| view-clients | Allows viewing the list of existing clients and their configurations. To use the view-clients permissions, users must also be assigned the manage-clients role. |
| manage-clients | Allows creating and modifying client configurations. |
| query-clients | Allows viewing the list of clients, but not any particular client. |
| wf-manage-client-roles-only | Allows creating, modifying, and deleting client-level roles. It doesn’t allow any operations with clients directly. Likewise, it doesn’t provide permission to modify or delete the client roles a grantee may have. To modify an own client role, the grantee also needs to have the manage-clients or manage-realm roles. |
| view-identity-providers | Allows viewing the list of identity providers and their configurations. To see the list of identity providers, users must also be assigned the query-realm or view-realm roles. To see identity provider configurations, users must also be assigned the view-realm or query-realm and query-client roles. |
| manage-identity-providers | Allows creating or updating identity provider configurations. To use the manage-identity-providers permissions, users must also be assigned the view-realm role. |
| query-groups | Allows viewing the list of groups, but not any particular group. |
| wf-manage-groups-only | Allows creating, renaming, moving, and deleting groups. With the role only, grantees can't manage users and modify or delete the groups to which they belong. To modify their own groups, the grantees also need to have the manage-users or manage-realm roles. |
| view-users | Allows viewing the list of users and groups, as well as particular users and groups. With the permission, you can also edit groups. |
| manage-users | Allows creating and modifying users and groups. To exercise the manage-users permissions, users must be also assigned the view-users role. |
| query-users | Allows viewing the list of users, but not any particular user. |
| view-realm | Allows viewing realm configurations, realm-level roles, as well as the list of User Federations and sessions. To see the content of a realm-level role, users must also be assigned the view-users role. To see the content of a session, users must also be assigned the view-clients role. |
| manage-realm | Allows editing realm configurations, realm-level roles, User Federations, and the session list, but not the content of any particular session. To edit the realm-level role content, users must also be assigned the manage-users role. To edit the content of a session, users must also be assigned the manage-clients role. |
| wf-manage-realm-roles-only | Allows creating, modifying, and deleting realm roles. Unlike manage-realm, the role alone is not enough to let grantees modify or delete their own roles. |
wf-control-tower
Roles for the wf-control-tower client define user permissions to access both the Control Tower functionality and specific User Management settings. For the client, there are three preconfigured roles in the WorkFusion User Management UI: Administrator, Developer, and Operator.
Users with the Administrator role have access to the entire Control Tower functionality and can have the following permissions to modify User Management settings:
- realm-management/view-users
- realm-management/manage-identity-providers
- realm-management/query-clients
- realm-management/query-users
- realm-management/manage-clients
- realm-management/manage-users
- realm-management/query-groups
- realm-management/view-identity-providers
- realm-management/view-clients
For detailed descriptions of the above permissions, see realm-management.
Users assigned the Developer or the Operator roles have access only to particular Control Tower functions as described in Manage Control Tower roles and permissions.
For instructions on assigning user roles for the wf-control-tower client, refer to Configure users | Assign role to user.
wf-workspace
Workspace supports three default roles:
- Administrator
- Manager
- Worker
The roles work in combination with the permissions you set via the Workspace user interface. For detailed information, refer to Manage Workspace roles and permissions.
wf-kibana
For the wf-kibana client, there is only one preconfigured role—Admin. Users with the role can create, read, update, or delete permissions related to Kibana.
For instructions on assigning user roles, refer to Configure users | Assign role to user.
wf-marathon
The Marathon application supports the following default roles:
view for viewing the Marathon content
manage for managing the Marathon content
wf-bot-manager
The Bot Manager application supports the following default roles:
BM_VIEW_UI allows you to access the Bot Manager application interface only.
BM_EXECUTE_ACTIONS allows you to access both the Bot Manager application interface and API and start or stop processes using the interface tools.
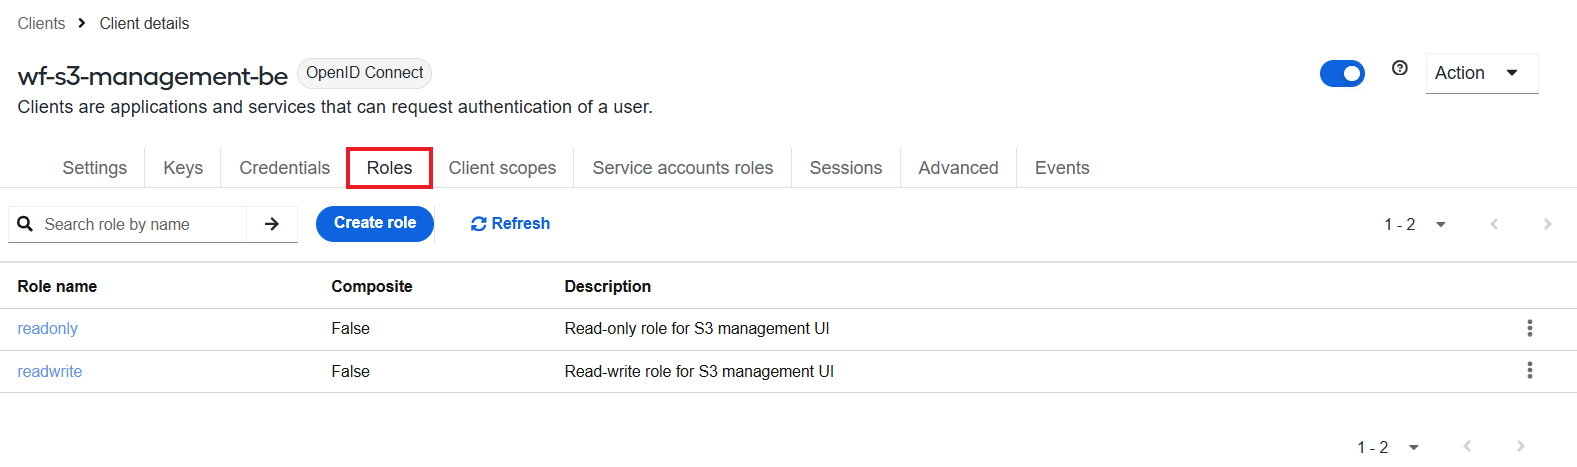
wf-s3-management-be
The S3 Manager application features the following default roles:
readwrite gives full access to all actions on all S3 buckets.
readonly allows you to only view all S3 buckets.
View client roles
To view the roles preconfigured for a particular client, follow the steps below:
In the top left corner of the User Management UI screen, select a realm.
On the left menu, click Clients, and select a client from the list on the right.
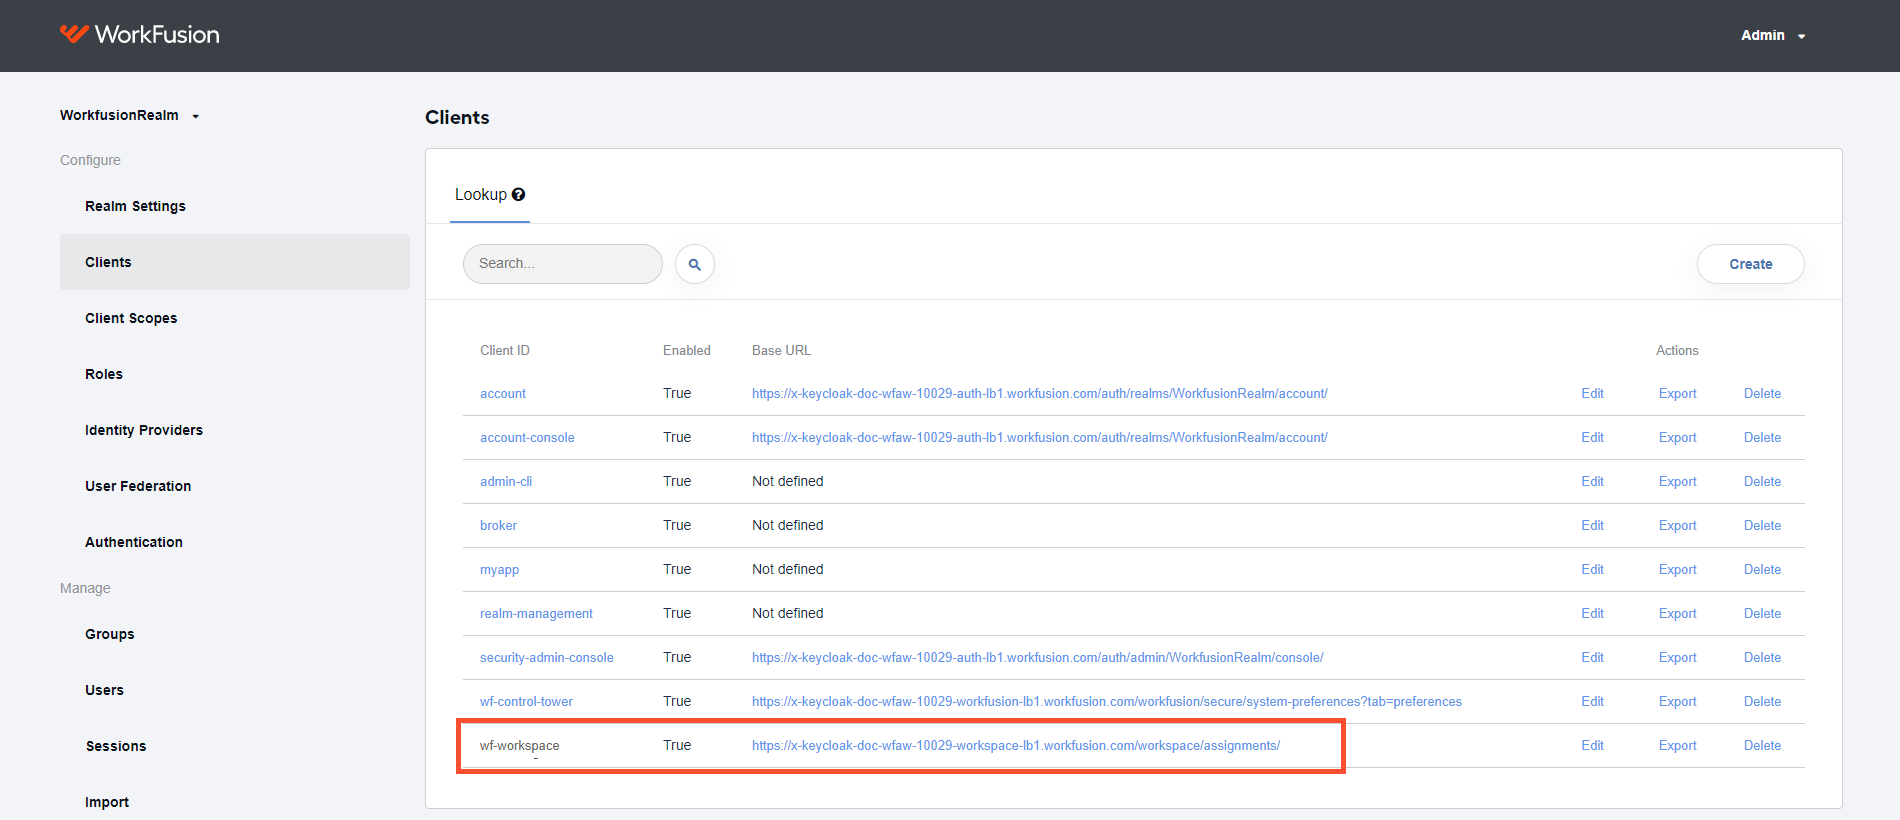
Go to the Roles tab to see the client's preconfigured roles.
Add client roles
To add a client role, follow the instructions:
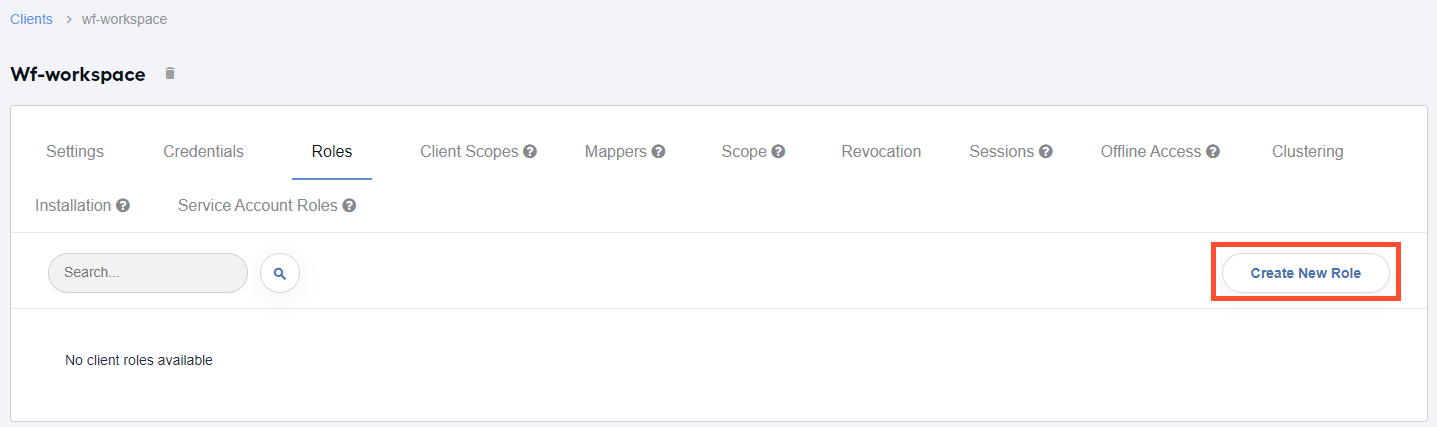
On the Roles tab, click the Create New Role button.
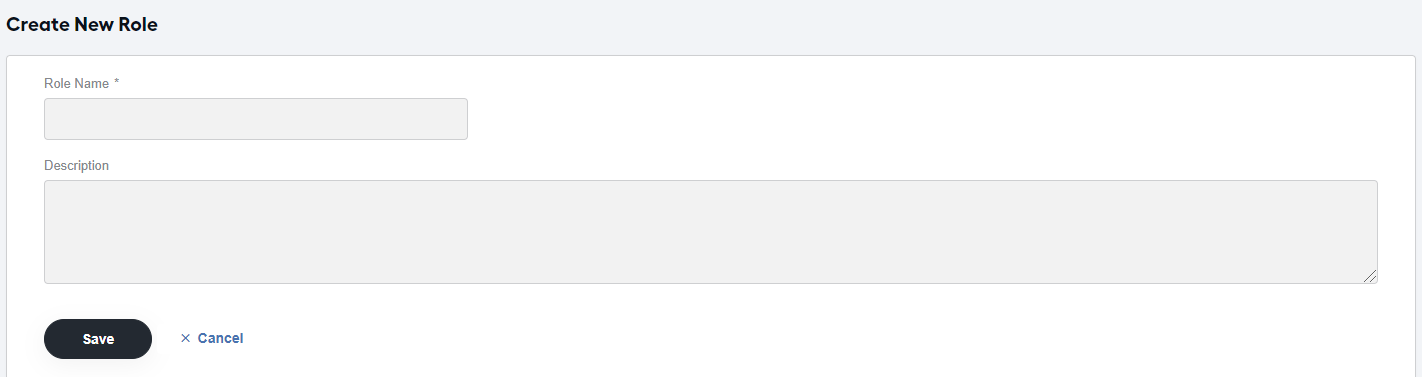
On the Create New Role page, enter the role name and description, and click Save.
As a User Management client, Control Tower can use only the roles preconfigured in Control Tower. Moreover, to access the Control Tower functionality mapped to a particular role, users must first configure role permissions in Control Tower.
To configure the permissions in Control Tower, select System settings > Role Management and choose a role for which you want to set permissions. In the role editing window, check required permissions. For details, refer to Manage Control Tower roles and permissions.
View mapped users
To view users assigned a specific client role, follow the instructions:
In the top left corner of the User Management UI screen, select a realm.
On the left menu, select Clients and then a client from the list.
Go to the Roles tab and select a client role.
Go to the Users In Role tab. Here, you can see a list of users to whom the client role is assigned.
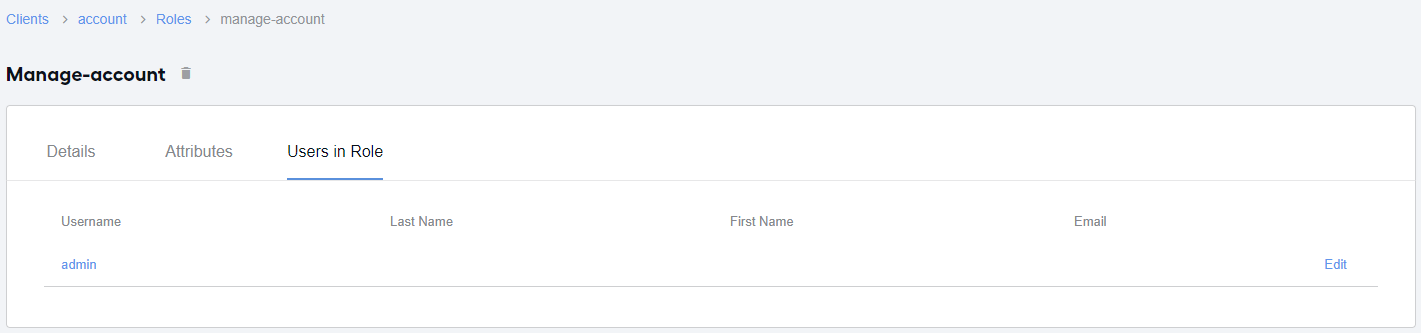
By clicking the username on the list or Edit next to it, you can also access the user settings or role mappings. For details, refer to the Manage users topic.
Realm-level roles
Realm-level roles are applicable to all clients of a particular realm. The WorkFusion User Management UI features preconfigured realm roles, including default ones.
You can also use realm-level roles for aggregation via composite roles though it is advisable to use groups for this purpose.
For the master realm, preconfigured roles include the following:
- admin grants administrator rights to manage the settings across realms.
- offline_access permits the realm users to get tokens for offline access.
- uma_authorization enables access to the user management functionality.
- create_realm allows creating realms.
The offline_access and uma_authorization roles are also set as default roles for the master realm.
For the WorkFusionRealm, preconfigured roles are as follows:
- offline_access
- uma_authorization
The same roles are also set as default ones for WorkFusionRealm.
View realm roles
To view available realm roles, follow the steps below:
In the top left corner of the User Management UI screen, select a realm.
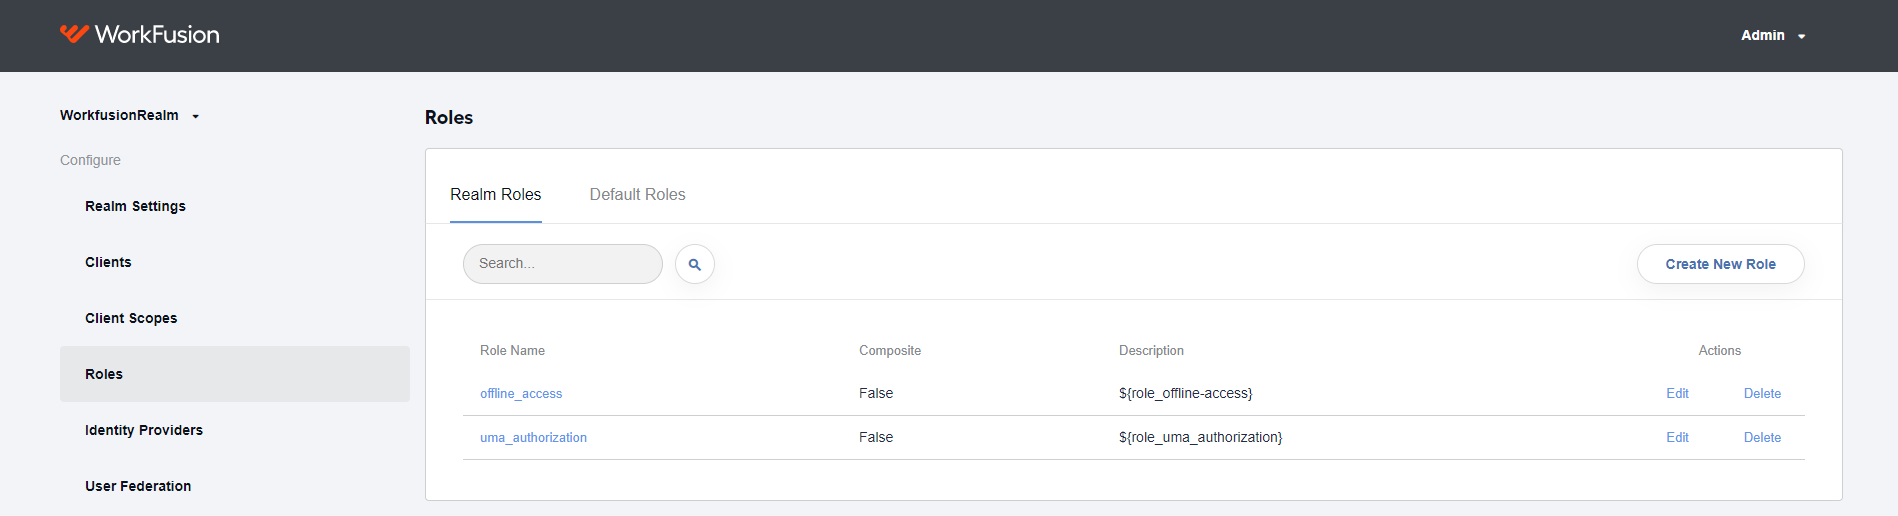
On the left menu, select Roles.
Go to the Realm Roles tab to see the list of roles preconfigured for the realm.
Create realm roles
The available preconfigured roles are enough to work with WorkFusion applications. However, if you need to create a realm-level role, follow the steps below:
In the top left corner of the User Management UI screen, select a realm.
On the left menu, select Roles.
Go to the Realm roles tab and click Create New Role.
Enter a role name and its description.
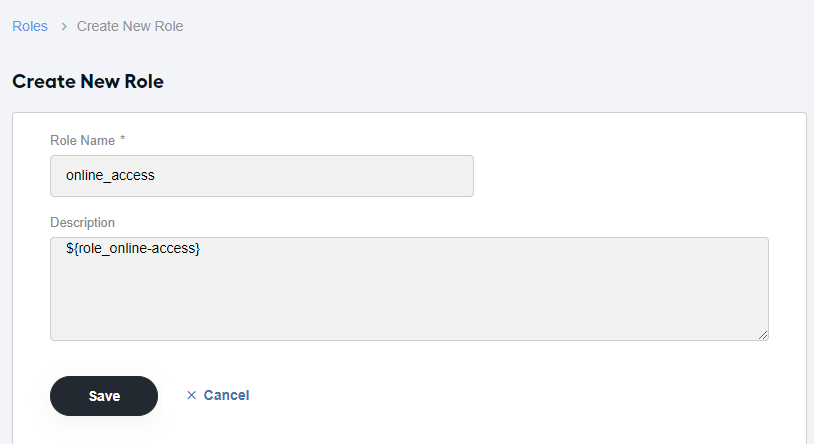
Click Save.
Composite roles
The WorkFusion User Management UI also permits creating composite roles—that's when a regular realm or a client role is associated with one or more additional roles.
When a composite role is assigned to a user, the user gains all the roles of the composite components. The inheritance is recursive, so any composite of the composites also gets inherited.
To turn a regular role into a composite one, follow the instruction below:
In the top left corner of the User Management UI screen, select a realm.
On the left menu, select Clients and then a particular client from the list.
Go to the Roles tab and select a role you want to make a composite.
On the Details tab, make sure the Composite Roles toggle is on.
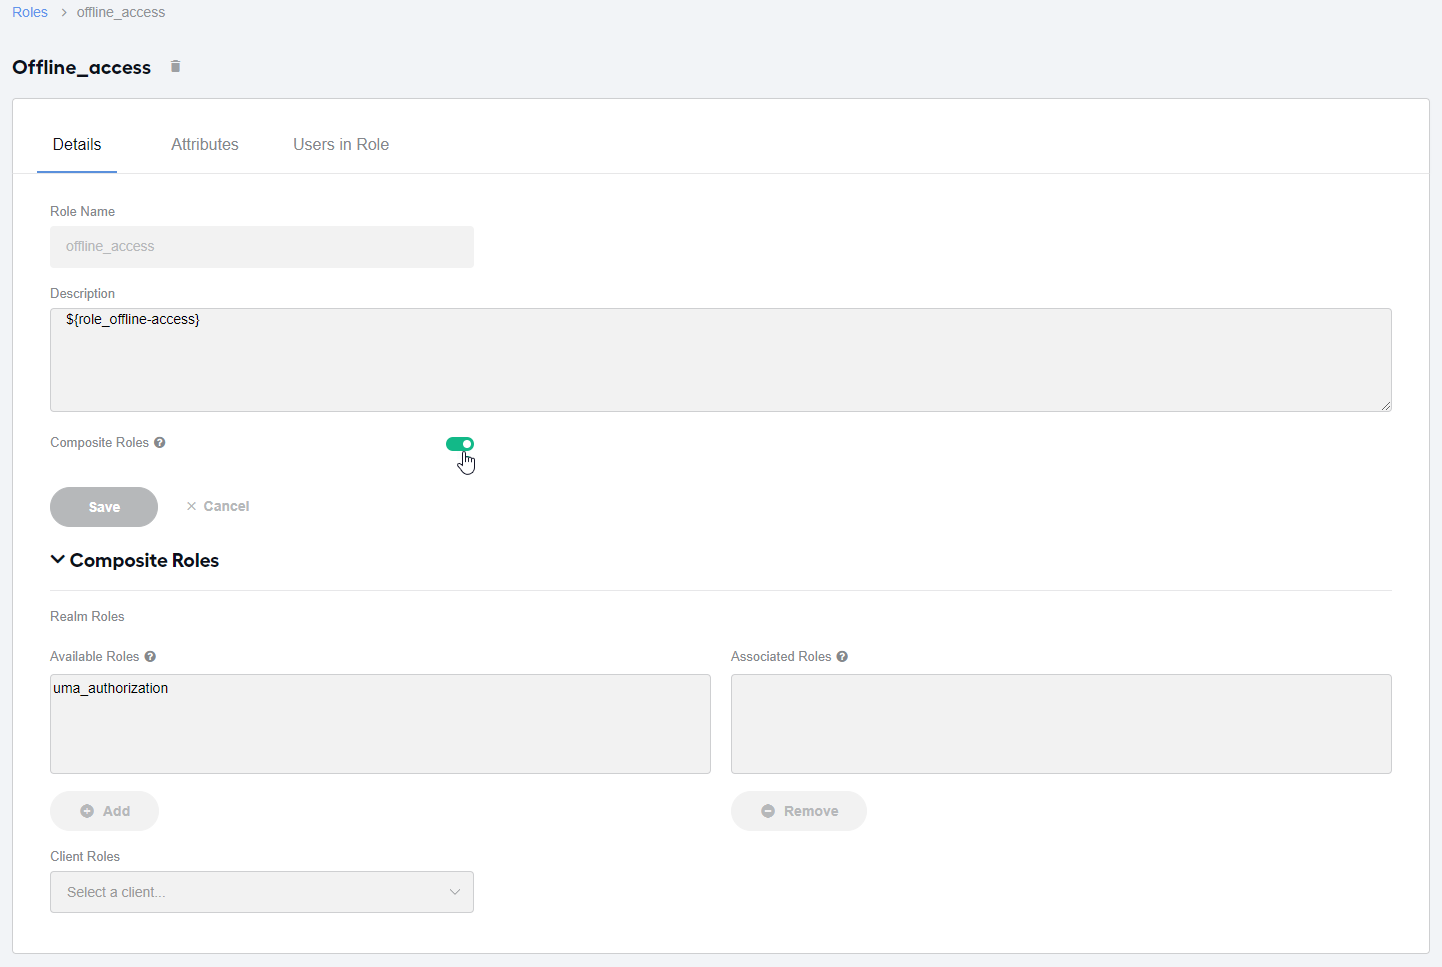
In the Composite Roles section, add the required realm and client roles to the composite you are creating.
To add a realm role, follow the steps:
Go to the Realm Roles block.
In the Available options field, select an option.
Click the Add button. The role appears in the Associated roles field of the same block, and you see a message about successfully adding it to the composite.
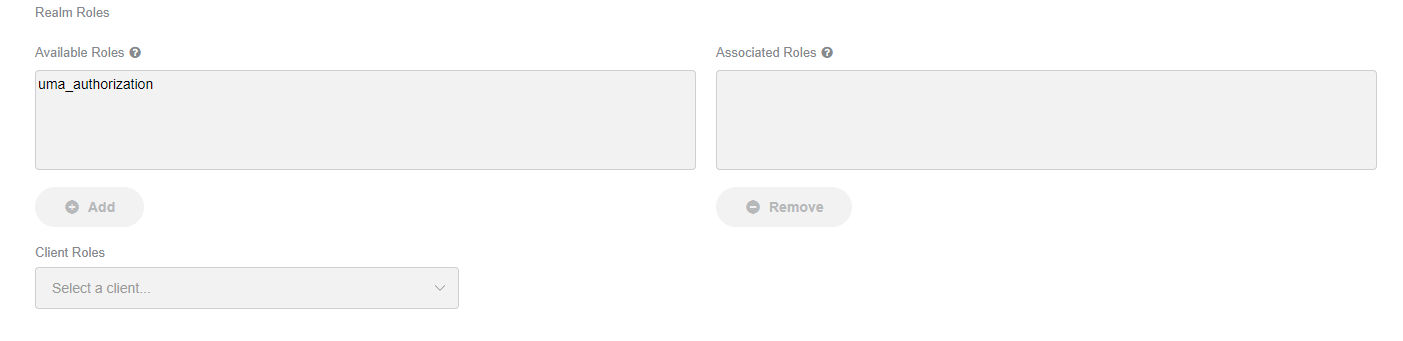
To associate a client role with the current one, follow the steps:
Click the Select a client box.
Enter the name of a client (for example, wf-control-tower).
In the Available options field, select an option, and click Add. The role appears in the Associated roles field, and you see a message about successfully adding it to the composite.
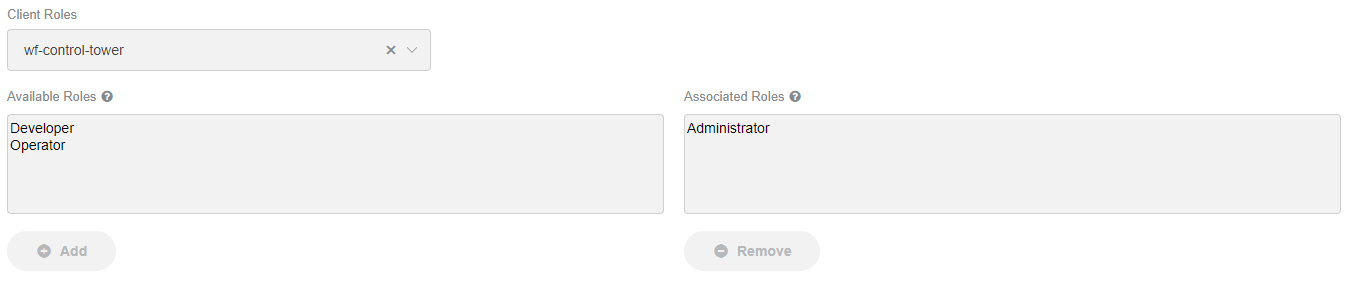
Click Save to apply the changes.
Default roles
To view default realm roles, follow the steps below:
In the top left corner of the User Management UI screen, select a realm.
On the left menu, select Roles.
Go to the Default roles tab. You can see the realm's default roles in the Realm Default Roles field.
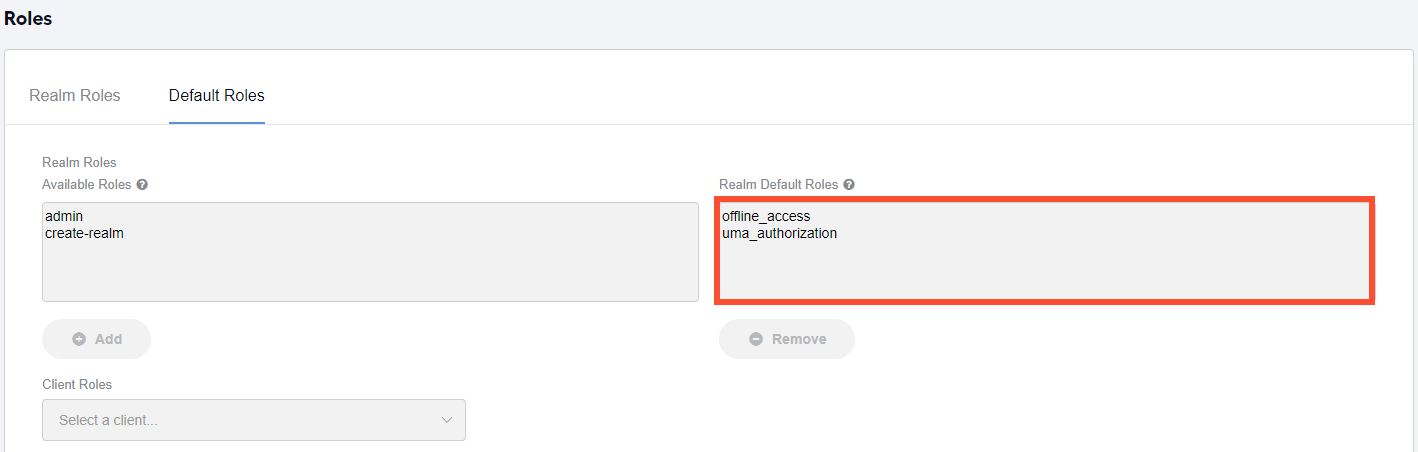
To add a default role for a particular realm, follow the instructions:
In the top left corner of the User Management UI screen, select a realm.
On the left menu, select Roles and go to the Default roles tab.
In the Available Roles field of the Realm Roles section, select a role, and click the Add button. The new role appears in the Realm Default Roles field.

In the Realm Default Roles field, you can also see preconfigured default roles applicable to the realm users.
To set a default client-level role in a specific realm, proceed as follows:
In the top left corner of the Keycloak console, select a realm.
On the left menu, select Roles and go to the Default roles tab.
In the Client Roles box, enter the client's name (for example, wf-control-tower).

In the Available Roles field of the Client Roles section, select a role, and click Add. The new role appears in the Client Default Roles field.
Whereas default roles are assigned to all users in the realm automatically, non-default roles are mapped to individual users manually. Refer to the Role mapping section.
Role mapping
Role mapping means assigning roles to an individual user or a group of users to act for user management purposes across clients and realms in accordance with the role permissions.
Map roles to individual users
To assign a role to an individual user, complete the following steps:
Make sure you are in the correct realm.
On the left menu, select Users and choose a user from the list.
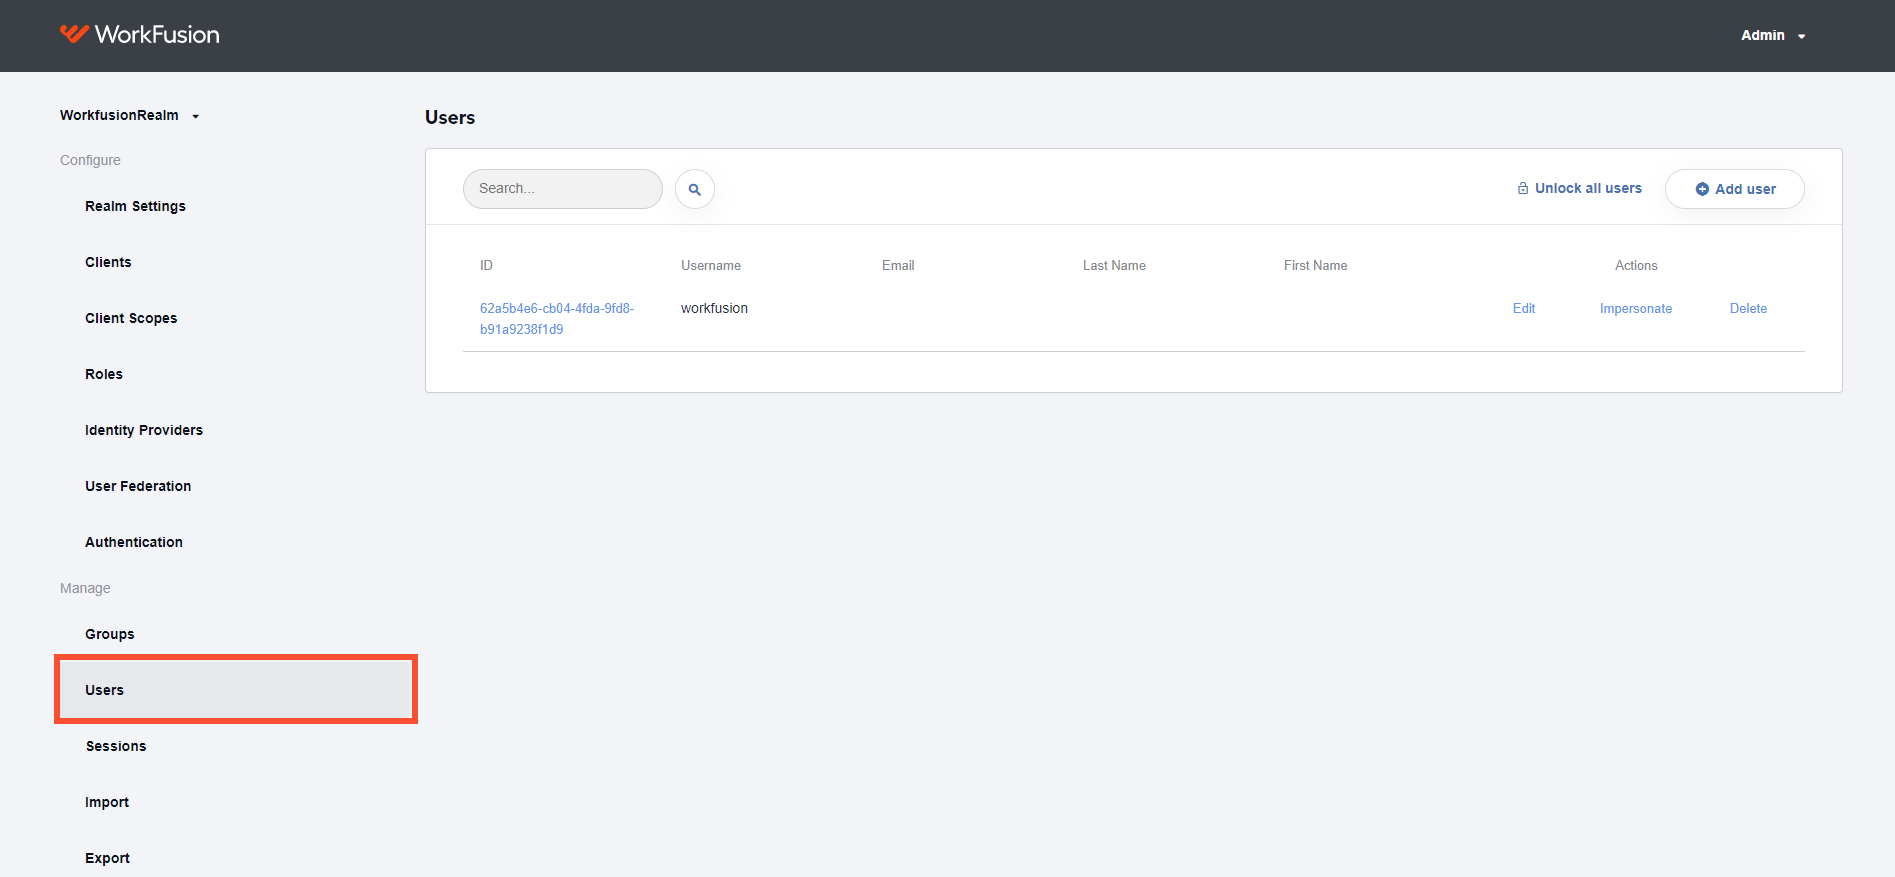
Go to the Role mappings tab to assign a realm or a client role to the user as described in the following subsections.
Assign realm role
To assign a realm role to an individual user, follow the steps:
Go to the Realm Roles block.
In the Available Roles field, select an option.
Click Add. The role appears in both the Assigned Roles and the Effective Roles fields of the same block. You can also see a message about its successful assignment to the user.
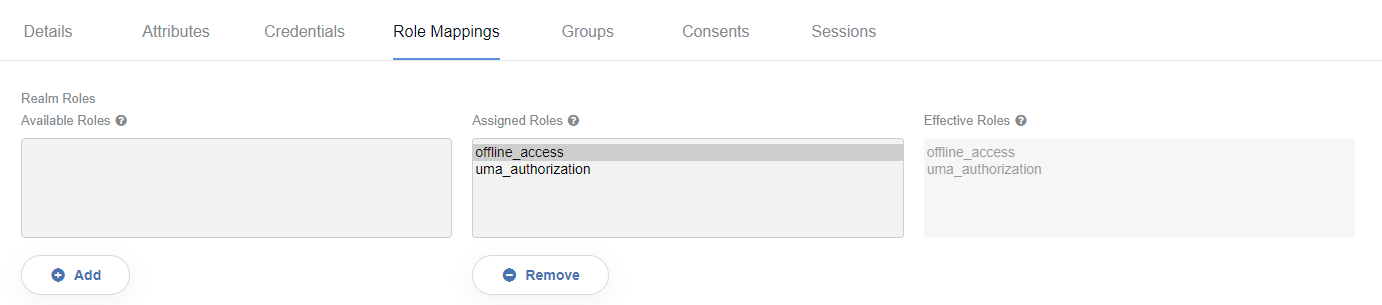
In the Assigned Roles and the Effective Roles fields, you can also see any realm or client roles that are already assigned to the user by default or otherwise.
In the Effective roles field, apart from the assigned role, you can see any other roles associated with it as part of a composite. See the Composite roles section.
For details on available realm roles, read the Realm-level roles section.
Assign client role
To assign a client role to an individual user, proceed as below:
Go to the Client Roles section. In the Client Roles box, enter the name of an existing client (for example, wf-control-tower).
In the Available Roles field, select one of the following options, depending on the client:
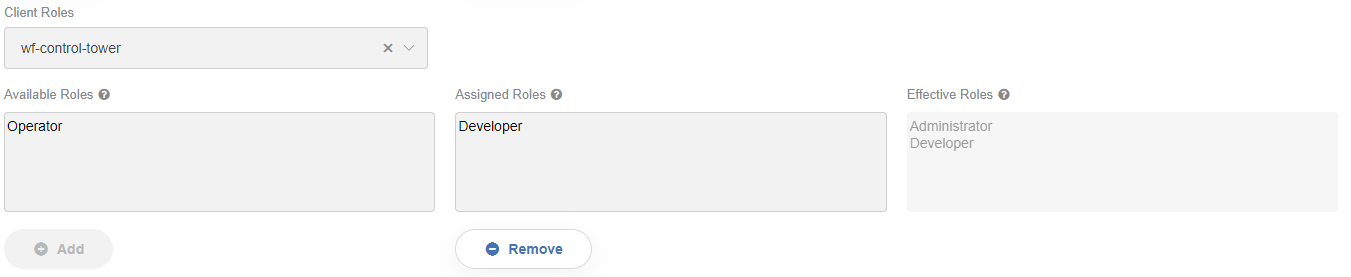
For Control Tower, choose any of the preconfigured roles—Administrator, Developer, or Operator. For details, read wf-control-tower.
For Kibana, you can set up the Admin role only. For details, refer to wf-kibana.
For Workspace, choose one of the three default roles—Administrator, Manager, Worker. For details, refer to wf-workspace.
For Marathon, choose the view or manage role. For details, refer to wf-marathon.
For Bot Manager, specify BM_VIEW_UI or BM_EXECUTE_ACTIONS. For details, refer to wf-bot-manager.
For S3 Manager, specify readonly or readwrite. For details, refer to wf-s3-management-be.
For a list of available roles for the realm-management client, read the realm-management subsection.
Click Add. The role you choose appears in both the Assigned roles and the Effective roles fields. Also, you can see a message about successfully assigning it to the user.
After you complete the steps above, the role and associated permissions are assigned to the selected user only, irrespective of its group membership or any roles assigned to the user under it.
Map roles to groups of users
To assign a role to a group of users within a realm, follow the steps:
Make sure you are in the correct realm.
On the left menu, select Groups.
From the list on the right, select a group, and click the Edit button.
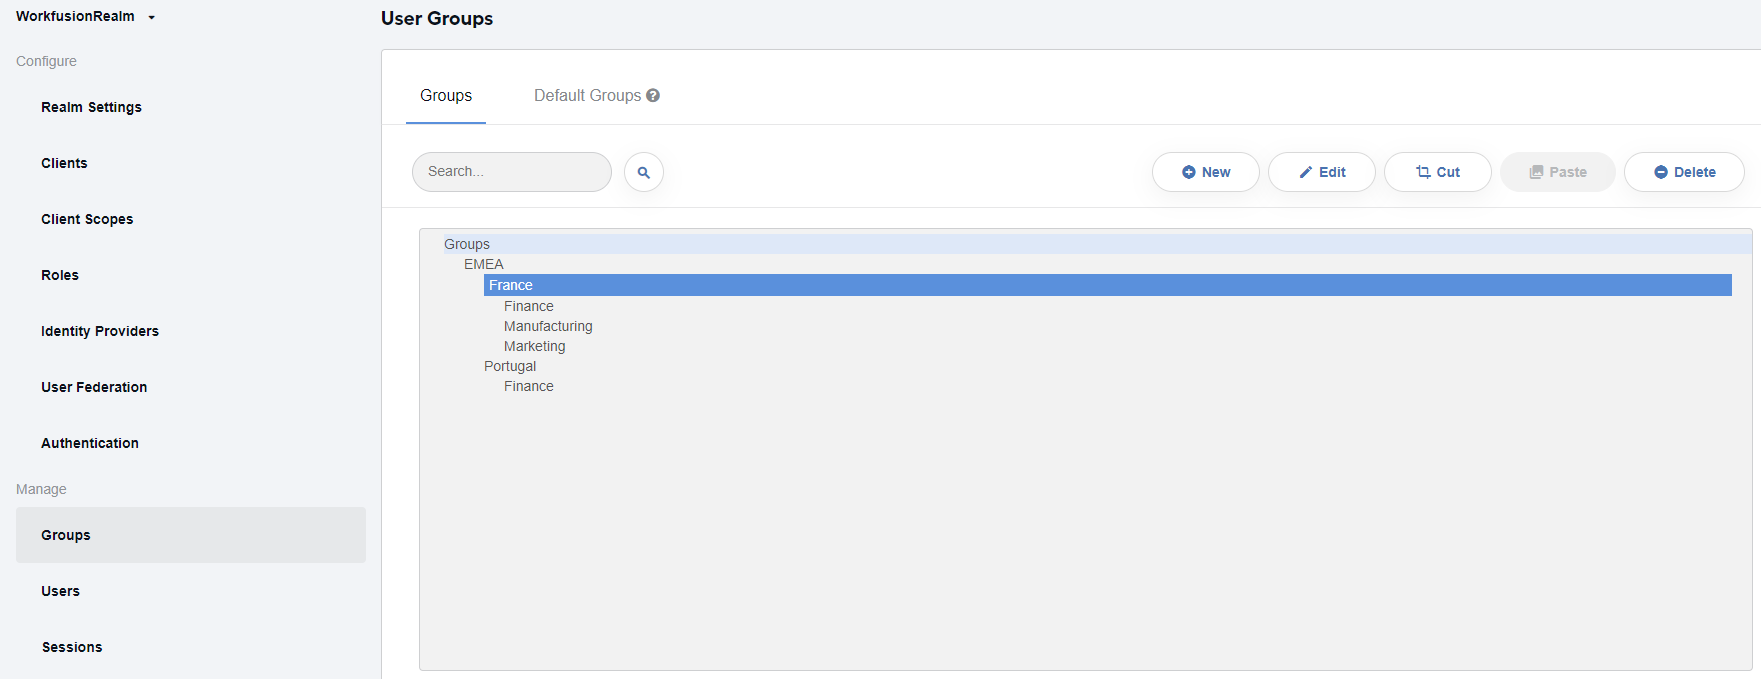
Go to the Role Mappings tab and assign a realm or a client role to the particular group as detailed in the respective subsection below.
Assign realm role
To assign a realm role to a group of users, proceed as follows:
Go to the Realm Roles block.
In the Available Roles field, select an option.
Click Add. The role appears in both the Assigned Roles and the Effective Roles fields of the same block. Also, you can see a message about successfully updating the role mappings of the group.
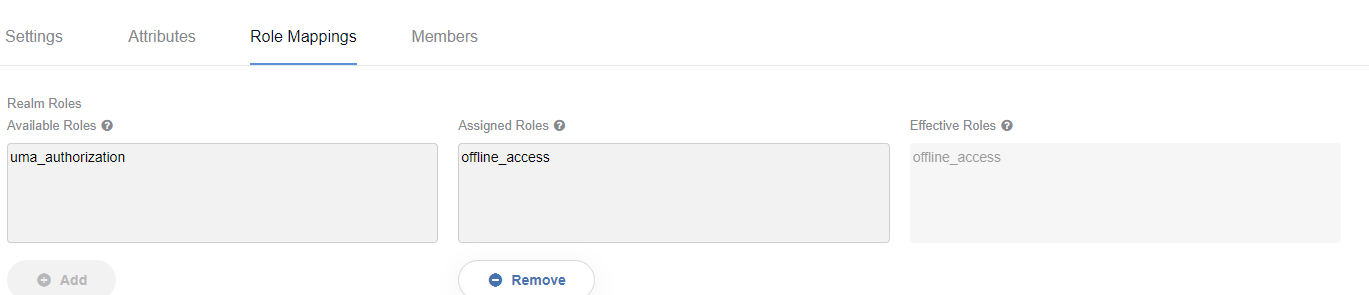
In the Assigned Roles and the Effective Roles fields, you can also see any realm or client roles assigned to the user by default or otherwise.
In the Effective Roles field, apart from the assigned role, you can see any other roles associated with it as part of a composite. See the Composite roles section above.
Assign client role
To assign a client role to a group of users, proceed as described below:
Go to the Client Roles block. In the Client Roles box, enter the name of an existing client (for example, wf-control-tower).
In the Available Roles field, select one of the following options, depending on the client:
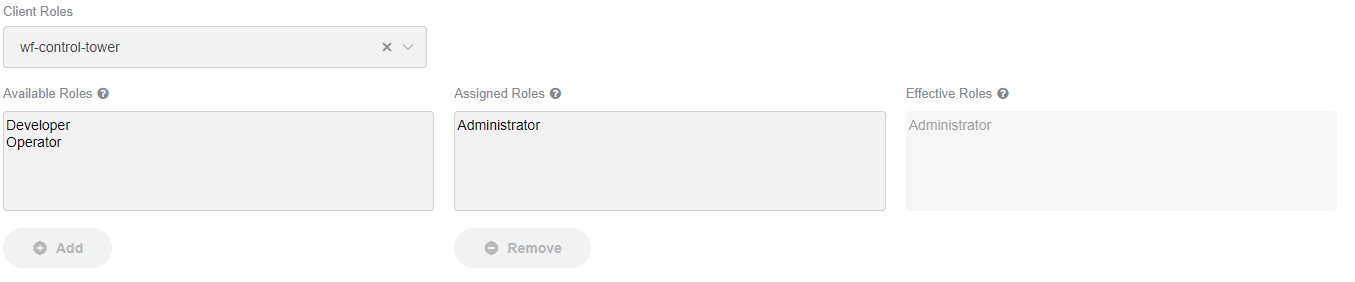
For Control Tower, choose any of the preconfigured roles—Administrator, Developer, or Operator. For details, read wf-control-tower.
For Kibana, you can set up the Admin role only. For details, refer to wf-kibana.
For Workspace, choose one of the three default roles—Administrator, Manager, Worker. For details, refer to wf-workspace.
For Marathon, choose the view or manage role. For details, refer to wf-marathon.
For Bot Manager, specify BM_VIEW_UI or BM_EXECUTE_ACTIONS. For details, refer to wf-bot-manager.
For S3 Manager, specify readonly or readwrite. For details, refer to wf-s3-management-be.
For a list of available roles for the realm-management client, read the realm-management subsection.
Сlick Add. The role appears in both the Assigned Roles and the Effective Roles fields. Also, you can see a message about successfully updating the group role mappings.
After you complete the steps above, the role and associated permissions are assigned to all users of the selected group.