Specify Recorder variables
Recorder variables are used to store initial or runtime values that a bot can:
- Enter from the keyboard.
- Copy to or from the clipboard.
- Set from a variable defined in Actions.
- Get as an operation result (image found or not:
trueorfalse). - Compare in conditions (if
${my_variable}> 5 ). - Get as the current list or table item in the For Each loop.
- Export as results and pass them to the next process steps on the server.
Define variables
All variables are defined in the Recorder Variables panel by clicking the plus(+) icon.
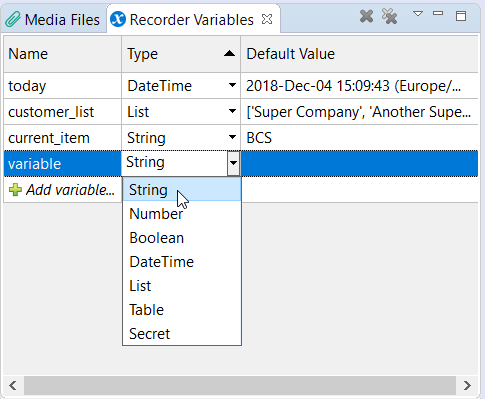
To add a variable, enter the following values:
Name: use only alphabetic characters in the lower case, numeric symbols, and the underscore. All other characters, such as letters in the upper case and special symbols, are not supported. As you type in unsupported characters, they are highlighted in red.
 tip
tipThere are specific words you cannot use as Recorder variables names. To view them, refer to the List of reserved words.
Type: define the value format for correct comparison (for example, in the If-Else action) and parsing (for example, to parse clipboard content to a table).
Default Value: set the variable value. Comparing and assigning values of different types can result in exceptions or false results. For example, comparing String with Number.
Simple types
Simple variable types consist of one value with a special format.
String
String should conform to the following patterns: string length, alpha, numeric, alpha-numeric. For example, John Doe.
Number
Number should conform to the following patterns: range, integer, decimal. For example, 100402.55.
Boolean
Selection is made in Default Value: true, false.
DateTime
The value is populated with the current date and time automatically, for example, 2019-Jan-09 02:34:57 (Europe/Minsk). To manually set up, click Default Value, select the date and time you need, and click OK.
The date and time formats for DateTime variables are defined in the regional settings of the operating system.
Secret
A variable of the Secret type is either selected from the list of Secret Entries previously added in Secrets Vault or created directly in the Default Value field via Add Secret Entry.
Complex types
Complex variable types consist of multiple values, each of the String type. These are List and Table.
Lists and tables are needed when you want to do the same set of actions for all their items (rows or columns), for example, send an email to each person in an email list, input an account number and amount for each transaction in a table, and so on.
List
List should conform to the following patterns: length, character set in the list content. For example, ['Hydrogen', 'Helium', 'Lithium'].
A List variable can have up to 2,147,483,647 elements.
Table
Table should conform to the following patterns: rows, columns, character set in the table content. For example, [['Afghanistan', 'Afghani', 'AFN'], ['Albania', 'Lek', 'ALL'], ['Algeria', 'Algerian Dinar', 'DZD']].
A Table variable can have any number of elements but is restricted to the memory that you allocate to Recorder.
List of reserved words
The following reserved words cannot be used as Recorder variable names, and thus turn red if entered into the Name field.
See reserved words
__botExecutionConfig____sys_execution_finish_listeners__applicationContextPathapplicationHostassignmentautomationAppUrlautomationPasswordapplicationResourceUrlautomationUserdataStorePropertiesexportResultformBasedAuthSessionTtlhit_submission_data_itemincludedConfigsitemmachineConfigTextmachineWorkerPrefixocrPropertiespluginsExecutionRecordspoolableObjectprevDatarecorder_recorder_.recorderImagesBucketreleaseDaterestFormAuthEnables3AccessKeys3EndpointUrls3KeyMaps3SecretKeys3SignerTypeseleniumServersysOcrApiUrlsourcetableauDbPasswordtableauDbUrltableauDbUsertitleTOWER_BOT_userInternalCredentialswfbiPasswordwfbiUrlwfbiUserworkfusionAccessKeyworkfusionSecretKey
The words below are Groovy language keywords that also cannot be used as names for Recorder variables. Even if you can define the Groovy keywords as names, your script will fail in case you publish it to Control Tower.
See Groovy language keywords
asassertauthorbreakcasecatchclassconstcontinuedefdefaultdoelseenumextendsfalsefinallyforgotoifimplementsimportininstanceofinterfacelognewnullpackagereturnstart_datesuperswitchthisthrowthrowstraittruetrywhile
Use variables
Set action parameters
After you've created and defined variables, you can use them in action parameters (Enter Keystrokes, Clipboard, If-Else, Launch Application, and others).
Start typing a variable name and select an appropriate item or press Enter.
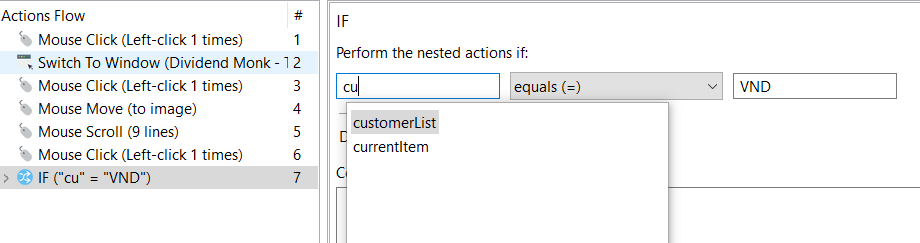
Recorder automatically wraps the variable name with the ${} symbols.

If you delete any of the wrapping symbols or modify the variable name to a non-existing one, the whole expression is treated as a string.
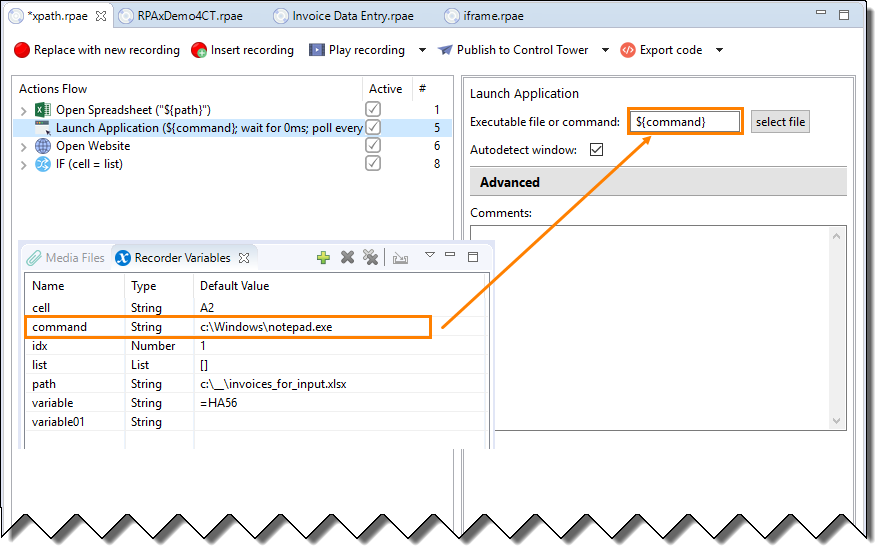
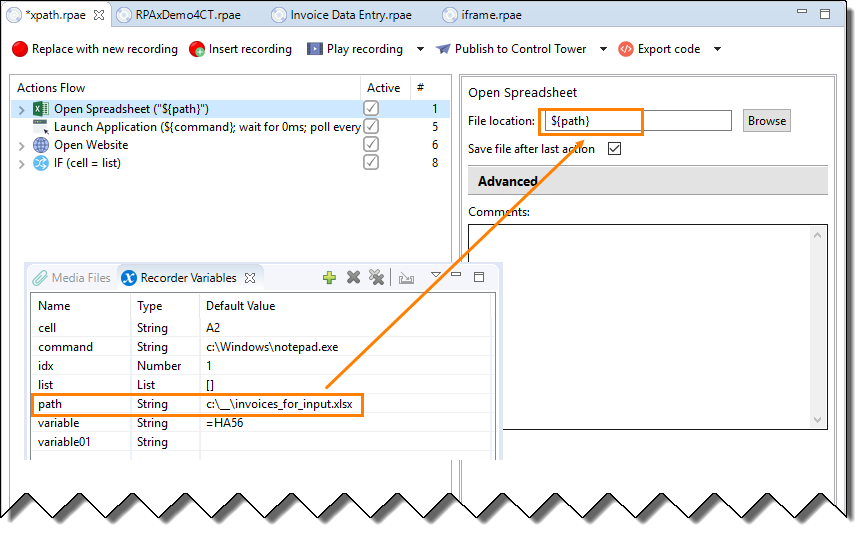
You can use the Recorder variables in the free text fields, such as:
Path to an application
Path to a file
Web element
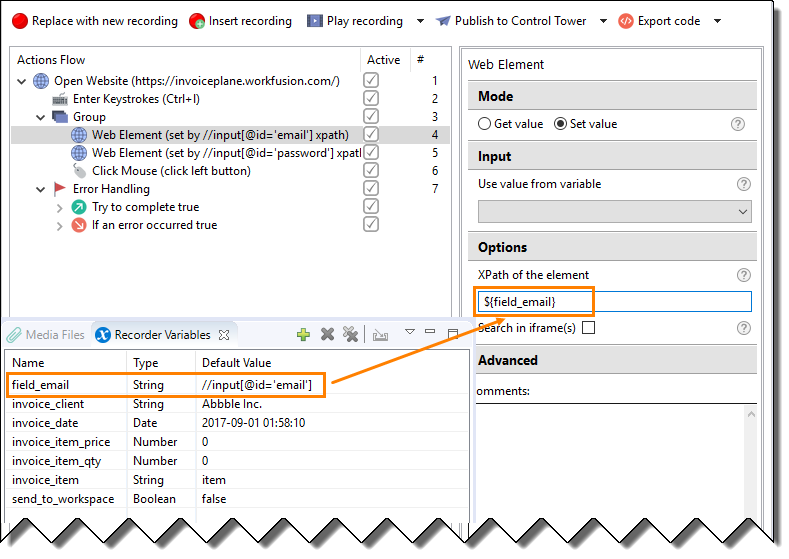
The autocomplete function is not available for free text fields. So, take care to enter the variable name correctly in the defined format. The variable syntax in action parameters looks as follows: ${variable_name}.
When running a recording, bots substitute all variables with their respective values and performs comparisons, calculations, parsing, and other operations defined in Actions Flow.
Parse lists and tables
When using variables in actions that require types conversion (for example, Clipboard from List or Table to String and vice versa), follow the instruction below:
Enter Row Separator.
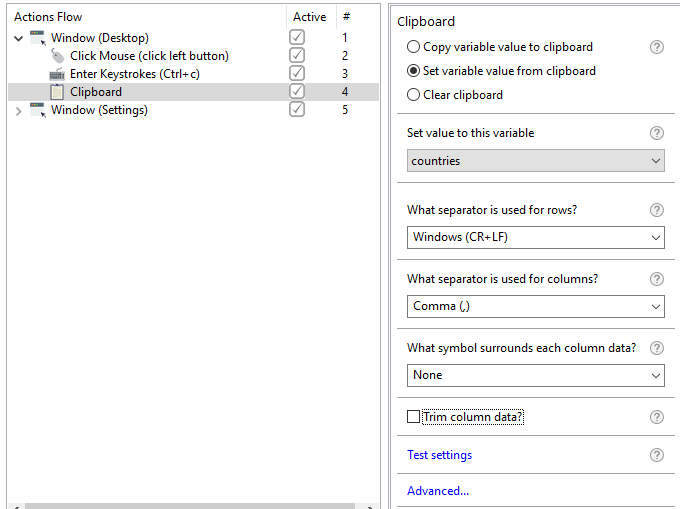
Enter Column Separator.
Enter Surrounding symbols for column data.
Enable or disable Trimming, which refers to removing leading and trailing spaces.
To test the conversion, click Test settings and paste your list or table content there.
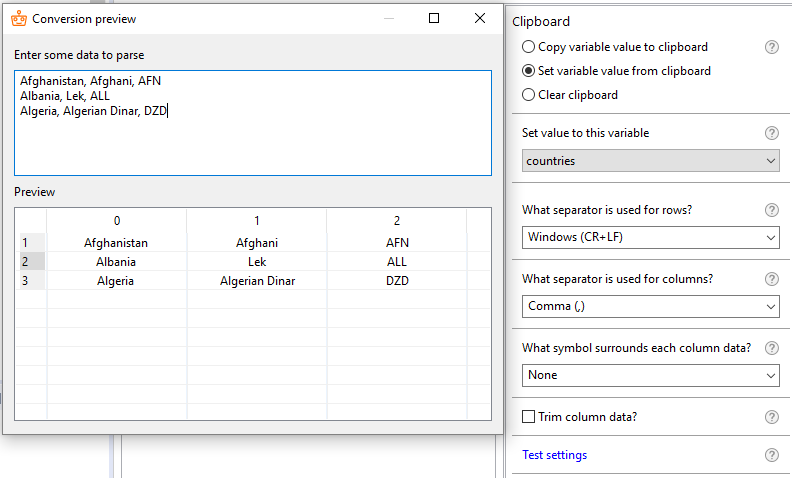
Enter other separators if needed.
Get value from lists and tables
A value of each list or table element can be retrieved using the element's index.
Define indices explicitly as an integer:
${list_variable[1]}${table_variable.get(1,2)}
Alternatively, declare the indices as a Recorder variable of the Number type:
${list_variable[index]}${table_variable.get(row_index,column_index)}, whereindex,row_indexandcolumn_indexare Recorder variables of the Number type.
- In List variables, numbering of elements starts with 1.
- In Table variables, numbering of rows and columns starts with 1.
Use indices with lists
Recorder variables are as follows:
product_listis a List variable.5is a numeric constant (5th element in the List).For example,
${product_list[5]}.my_listis a List variable.counteris a Number variable.For example,
${my_list[counter]}.list_inputis a List variable.iterationis a Number variable.For example,
${list_input[iteration as Integer]}.
Sample recording
The sample recording below demonstrates how to get values from the elements in a List variable. We will create a short recording to go through the entire list, get values from all elements, and populate them in Notepad (except the last one).
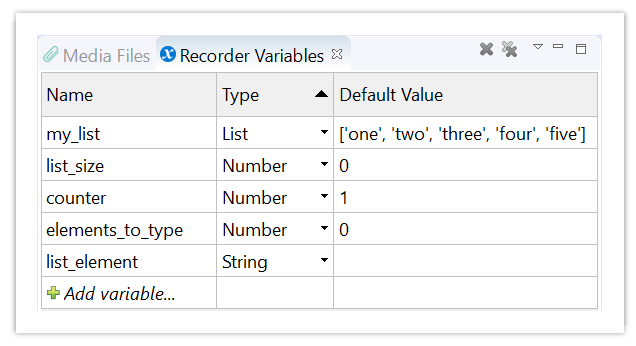
Create Recorder variables.
counter: a Number variable to iterate through the elements by indexesmy_list: a List variablelist_element: a String variable to receive the value from the List elementlist_size: a Number variable to receive the number of the elements from the listelements_to_type: a Number variable to receive the number of the list elements to populate in Notepad
Open Notepad with the Launch Application action to paste values from the list.
Use the Expression Value action to get the number of elements in the list.
- Select the List variable (
my_list) to get the number of elements. - Use the Get size option in the Expression.
- Select the Number variable (
list_size) to save the result.
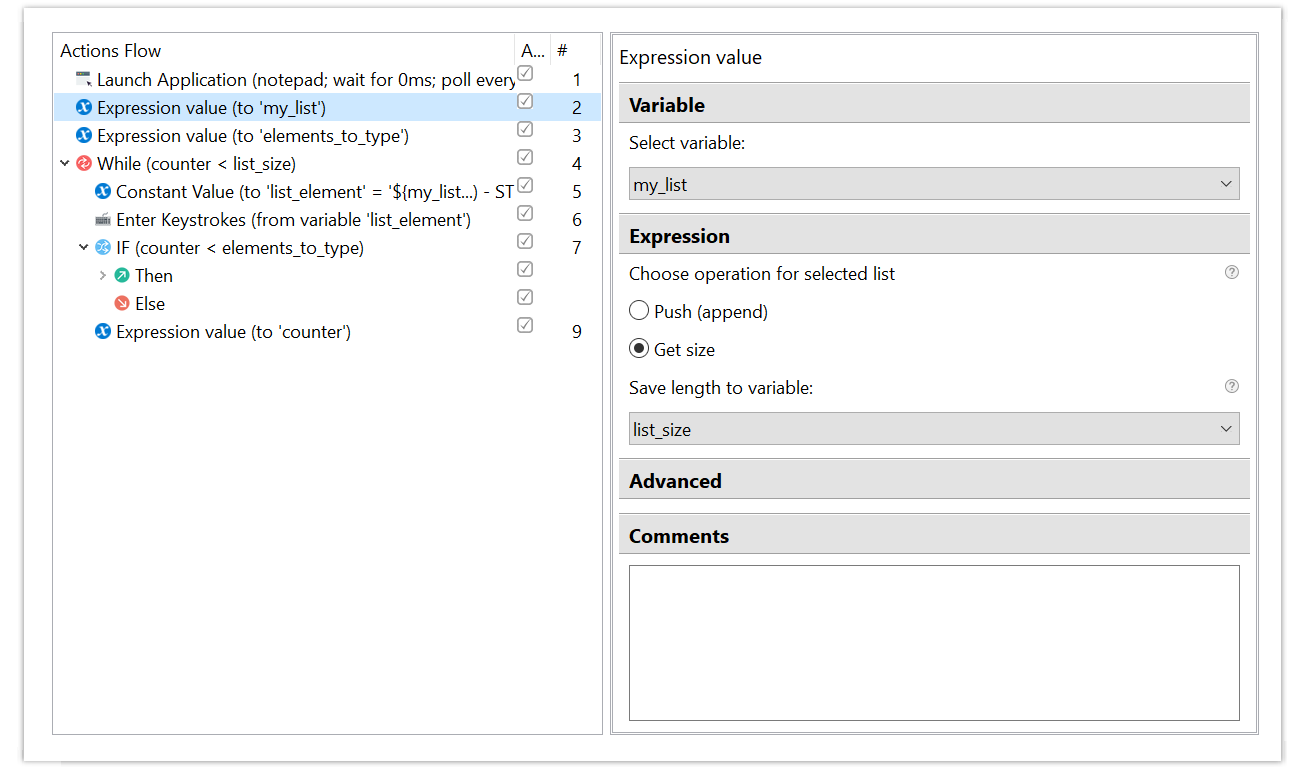
- Select the List variable (
In the Expression Value action, define the number of elements to be printed to Notepad: all elements minus 1.
- Define the expression as
${list_size}-1 to prevent printing the last element. - Select the Number variable (
elements_to_type) to save the result.
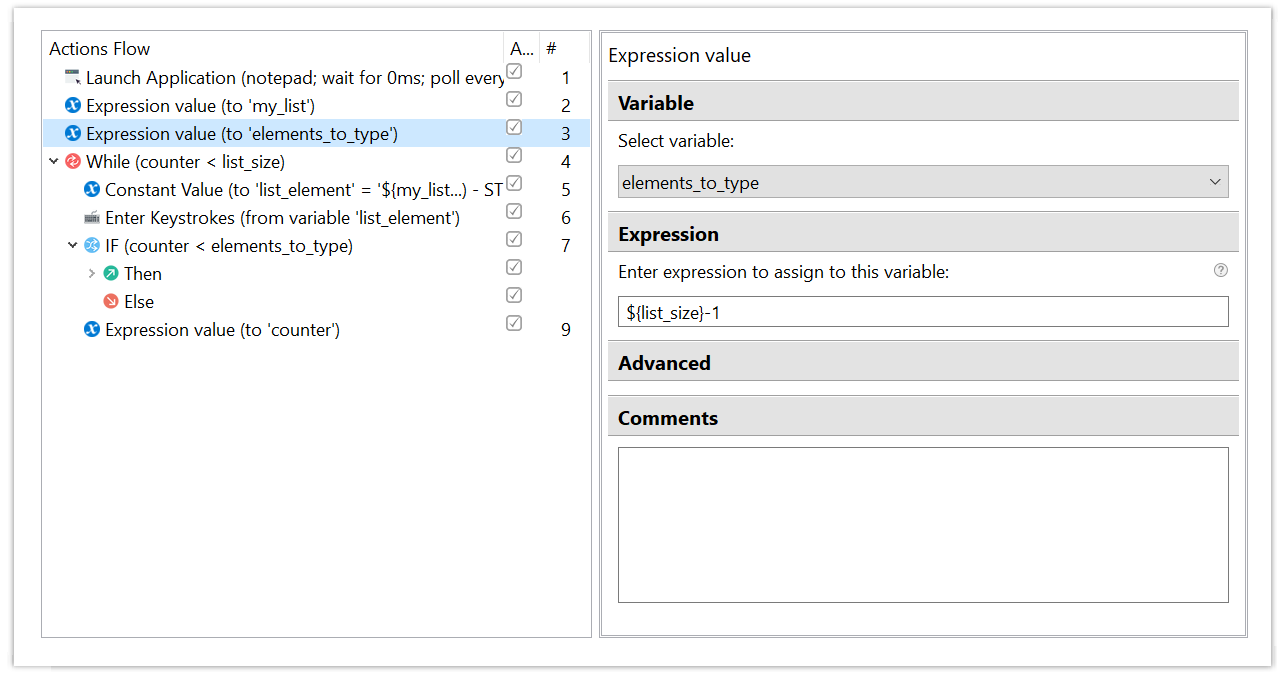
- Define the expression as
Create a loop to iterate through the list. Use the While loop until the counter is less than the size of the list:
${counter} < ${list_size}. Mind that iteration starts from 1, as for any other array.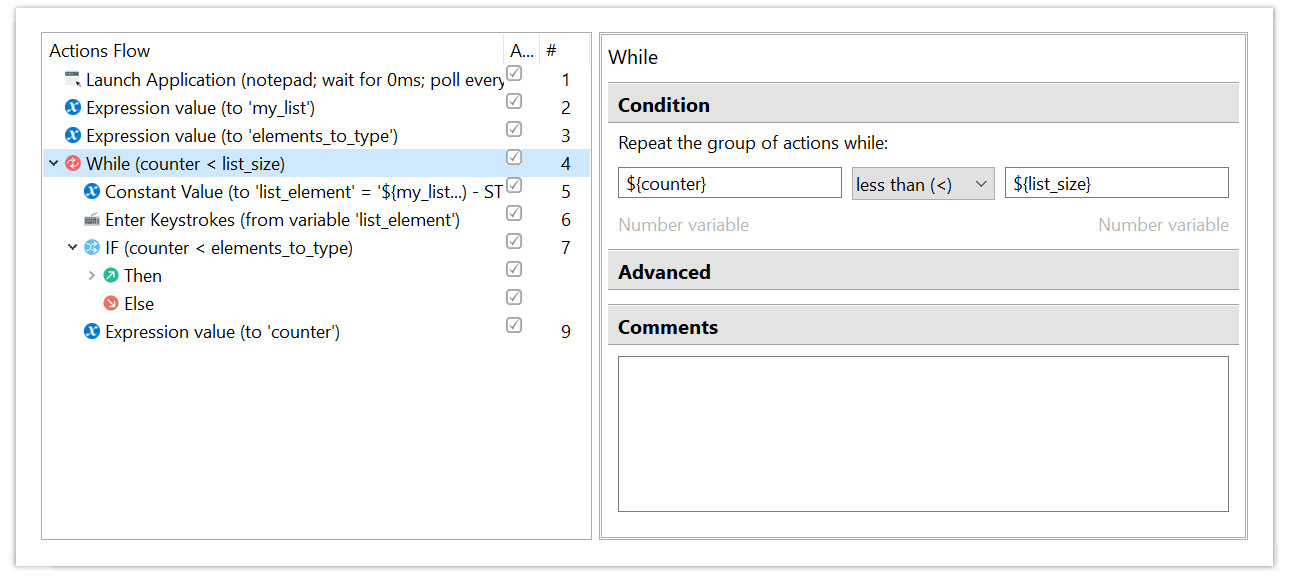
To get the element value, create a Constant Value action.
- Use the following construct to get the value from the List element:
${my_list[counter]}, wheremy_list[1]is an element from the list with index 1,counteris the Recorder variable defining the index of the element. - Select the String variable (
list_element) to save the result.
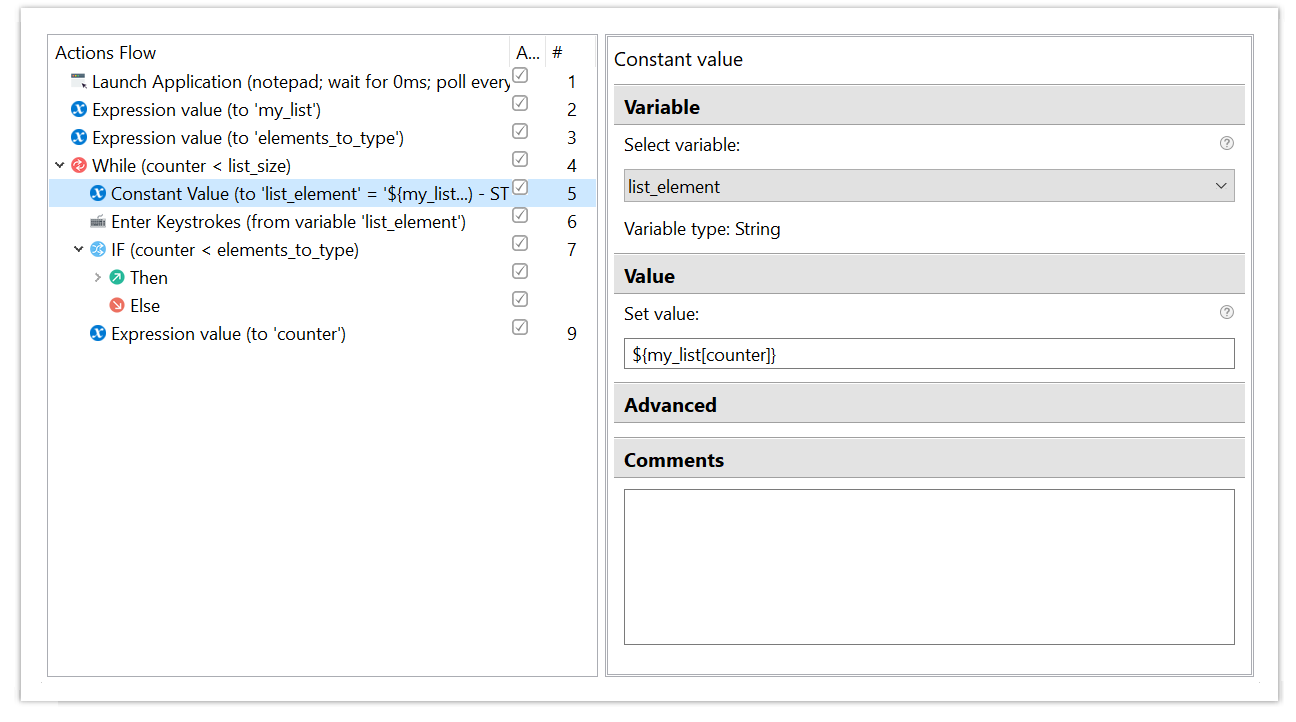
- Use the following construct to get the value from the List element:
Use the Enter Keystrokes action to paste the value from the String variable (
list_element_value) to Notepad.Condition to insert the linefeed character. Use the If-Else condition to perform the nested action.
Insert the linefeed character. If the condition is
true, insert the Enter character to Notepad with the Enter Keystrokes action.Use the Expression Value action to increment the counter to 1.
- Define the expression as
${counter}+1. - Select the Number variable (
counter) to save the incremented value.
- Define the expression as
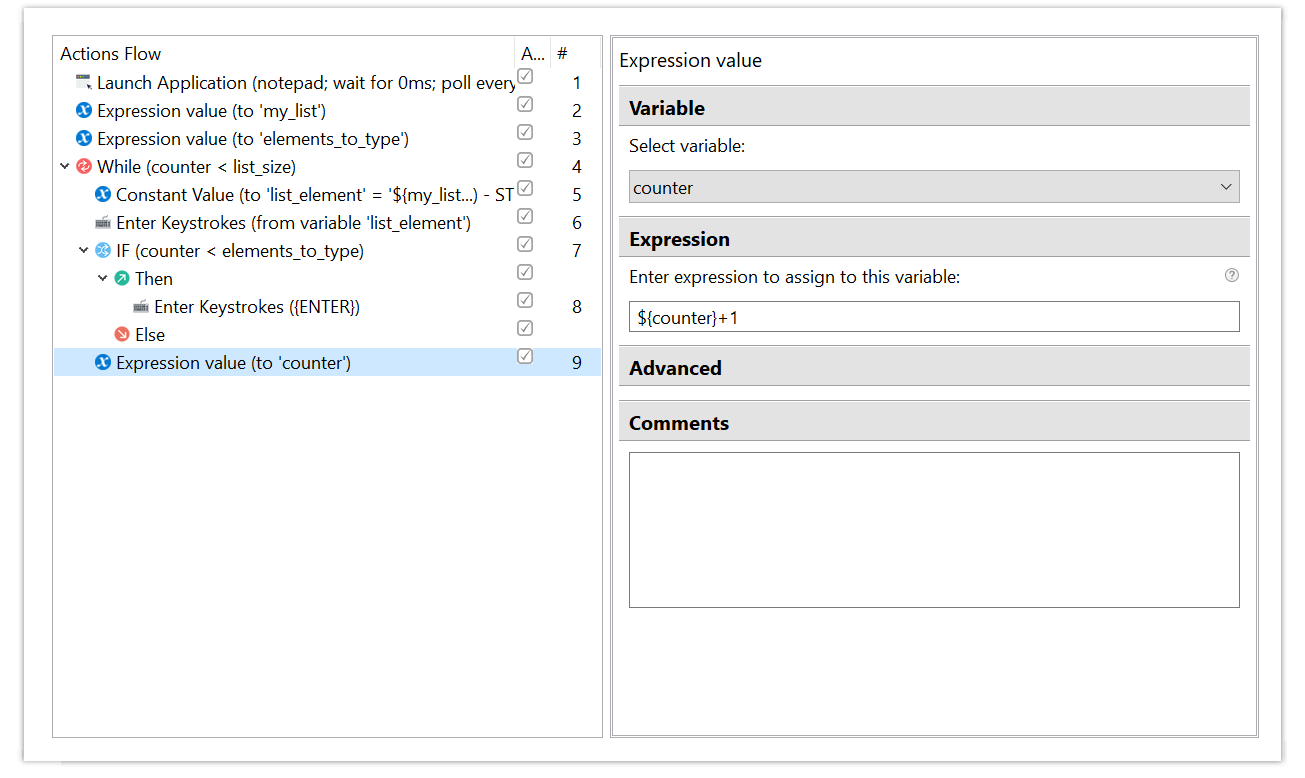
The recording was made with RPA Express 2.0.1. You can download the sample recording for further tests.
Use indices with tables
WorkFusion RPA API has several methods that allow retrieving values from rows, columns, and cells in a Table variable using indices.
It helps to avoid using multiple For Each Loop actions to iterate through the entire table. Users can access the values in the required elements in the table directly, thus making the script easier and faster.
Recorder variables are as follows:
product_tableis a Table variable.3,4are numeric constants (4th element in the 3rd row in the table).Example:
${product_table.get(3,4)}Output: String
my_tableis a Table variable.row_counter,column_counterare Number variables.Example:
${my_table.get(row_counter,column_counter)}Output: String
table_inputis a Table variable.row_numberis a Number variableExample:
${table_input.getRow(row_number)}Output: List
table_valuesis a Table variable.column_numberis a Number variable.Example:
${table_values.getColumn(column_number)}Output: List
Sample recording
A recording below shows how to get two values from a Table and type text with them in Notepad.
Create Recorder variables:
my_tableis a Table variable.row_index,column_indexare the Number variables used to define the coordinates of the value in the table.fruit,dayare String variables to receive the value from the table elements.

Open Notepad with the Launch Application action.
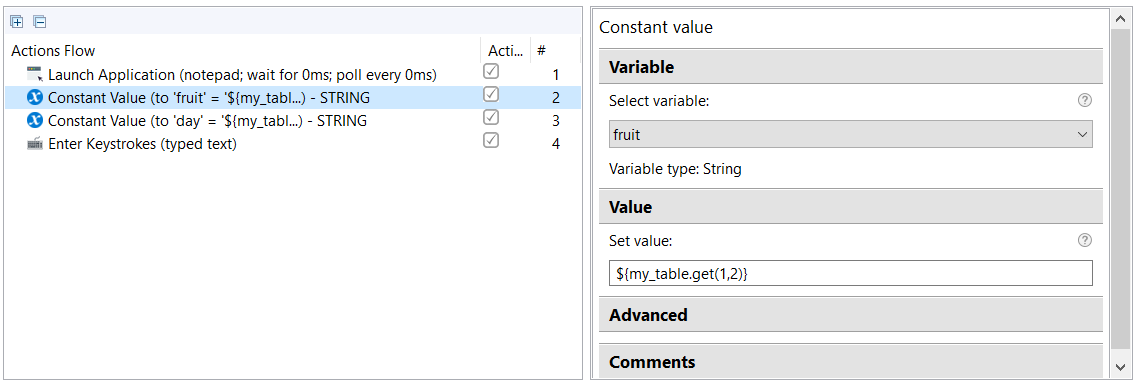
Use the Constant Value action to get the value of an element in the table.
- Select the String variable (
fruit) to save the value of the target element. - Use the
get()method to get the value of the element. - Define the row and column of the element using Integer values:
(1,2)–row 1, column 2. - Write the expression to get the element value in the Set value field:
${my_table(1,2)}.
- Select the String variable (
Use the Constant Value action to get the value of another element in the table.
Select the String variable (
day) to save the value of the target element.Use the
get()method to get the value of the element.Define the row and column of the element using the Recorder variables of the Number type (
row_index,column_index).Write the expression to get the element value in the Set value field:
${my_table(row_index,column_index)}.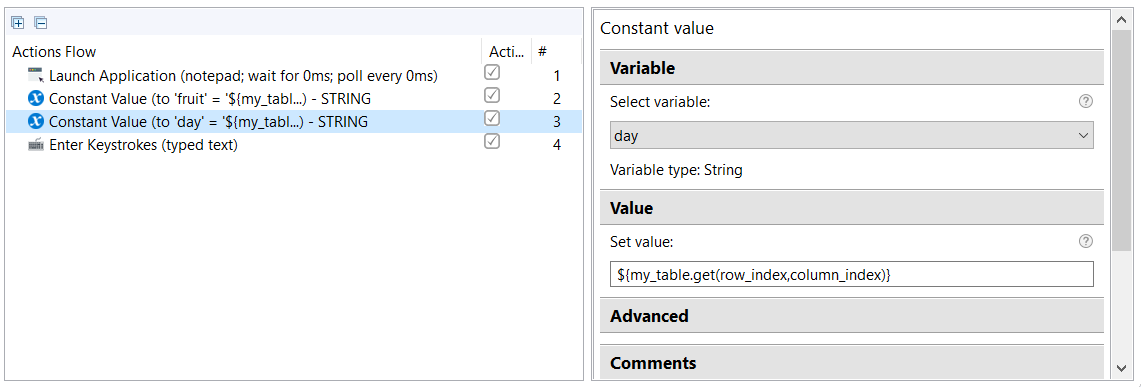
Use the Enter Keystrokes action to type a text containing the values in the
${fruit}and${day}variables to Notepad.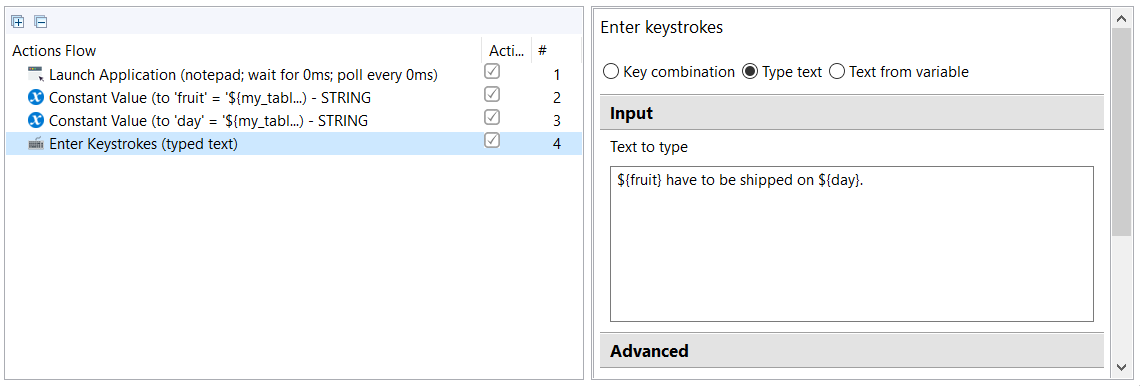
It is possible to use expressions directly in the Enter Keystrokes action.
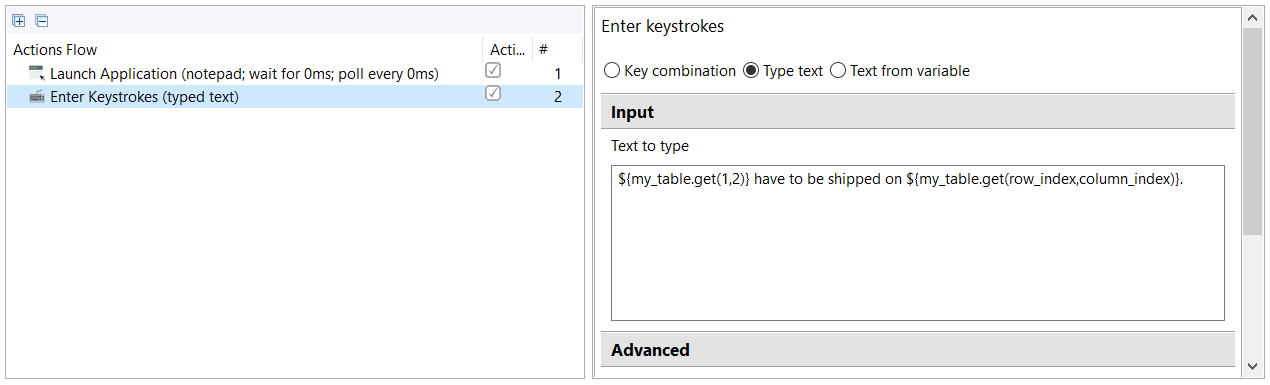
The recording was made with RPA Express 2.1.3. You can download the sample recording for further tests.
Variables log
Upon execution of a recording or several steps of the recording, a log file is created in the Recording folder.
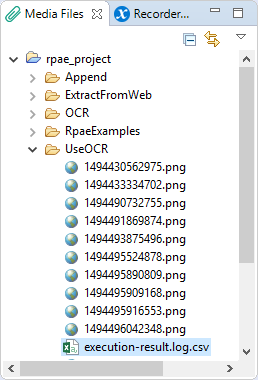
The log file contains the values of all Recorder variables after the last step.
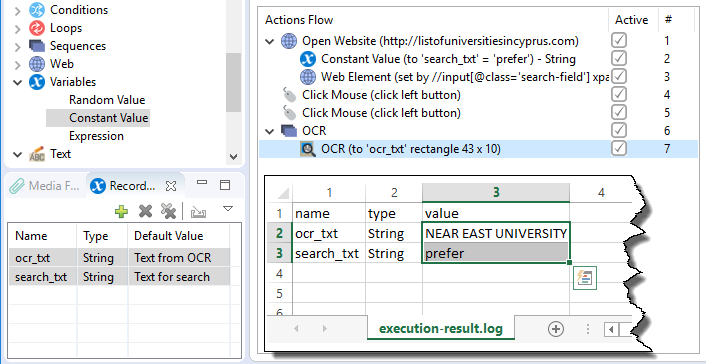
Import and export variables
When importing a bot step from a Business Process to Recorder, all its input data is accessible in the Recorder Variables view.
All Recorder variables are exported together with the recording and are available in the Control Tower Business Process.