Create Bot Task
Before getting into details, let's take a quick look at a simple Bot Task within the ODF 2 framework:
@BotTask
public class GenericTaskExample implements AdHocTask {

    private final Logger logger;

    @Inject
    public GenericTaskExample(Logger logger) {
        this.logger = logger;
    }

    @Override
    public TaskRunnerOutput run(TaskInput taskInput) {
        logger.info("Hello, World!");
        return taskInput.asResult();
    }

}
Here, you can see a pure Java class with two extra details:
com.workfusion.odf2.compiler.BotTaskannotationcom.workfusion.odf2.core.task.AdHocTaskinterface implementation
The @BotTask annotation tells the compiler that the current Java class is essentially an ODF 2 Bot Task and should be treated accordingly.
The AdHocTask interface, in its turn, explains the framework how exactly to execute the Bot Task.
In the above example, the framework calls the run method and prints the Hello, World! message into the logger.
The run method also receives the TaskInput object that represents the input data of a running Bot Task and returns TaskRunnerOutput—the output data.
In this particular example, TaskRunnerOutput is created from TaskInput without modifications. All data from the input is passed to the output.
@BotTask annotation
Considering that any Java class can be a Bot Task, you should somehow distinguish between ordinary Java classes and Bot Tasks. This is where the @BotTask annotation steps in. When you build your project, the Java compiler searches for the classes annotated with @BotTask. Then, it automatically creates an XML file inside the configs/main folder for each found class. The created XML is basically a WebHarvest Bot Config representing a single step in your Business Process.
Generally speaking, you never deal with these XML files directly because they're not a part of the ODF 2 project source code but rather a compilation result. Anyway, it's good to understand how a Business Process step is connected to the Java class annotated with @BotTask.
Let's take a look at the generated XML file:
<?xml version="1.0" encoding="UTF-8"?>
<config xmlns="http://web-harvest.sourceforge.net/schema/1.0/config" scriptlang="groovy">

    <script><![CDATA[
        import com.workfusion.odf2.core.Odf
        import com.workfusion.odf2.client.GenericTaskExample

        def odf = Odf.builder()
            .withInput(__taskInputMap.getWrappedObject())
            .withBinding(binding)
            .build()

        result = odf.runTask(GenericTaskExample)            // this line asks ODF to instantiate and run the Bot Task class

        rows = result.getRows()
        columns = result.getColumns()
    ]]></script>

    ...

</config>
Here, you can see a part of the generic-task-example.xml file generated by the compiler. It is a pretty simple Bot Config that initializes the ODF 2 framework and delegates a callback to the class annotated with @BotTask—GenericTaskExample.class.
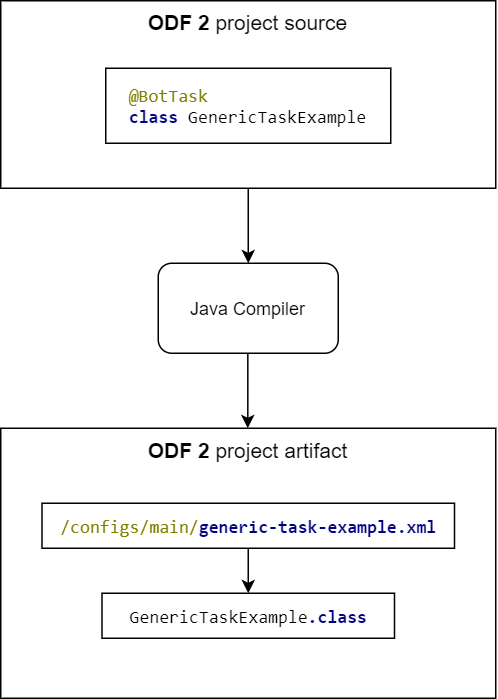
By default, the name of the XML file is generated according to the related class name. If, for some reason, you need a custom filename, specify the fileName attribute in the @BotTask annotation:
@BotTask(fileName = "custom-file-name.xml")
public class GenericTaskExample implements AdHocTask {...}
Task Runner
Now, when you understand how a Business Process step is connected to a Java class, let's explore how exactly the ODF 2 framework executes a Bot Task. As you saw in GenericTaskExample, there is the run method to execute. But where does this method come from? Can you declare other methods in your Bot Task?
At the bottom level, the ODF 2 framework works with the com.workfusion.odf2.core.task.OdfTask interface. AdHocTask is just a successor of OdfTask. Any Bot Task must implement this interface directly or through inheritance.
public interface OdfTask {

    Class<? extends OdfTaskRunner<?>> getRunnerClass();

    // other methods omitted for clarity

}
The main purpose of OdfTask is to specify a runner class—a special class that declares how exactly the framework should treat the task. Let's take a look, for example, at the runner implementation for AdHocTask:
class Runner implements OdfTaskRunner<AdHocTask> {

    private final TaskInput taskInput;

    @Inject
    public Runner(TaskInput taskInput) {
        this.taskInput = taskInput;
    }

    @Override
    public TaskRunnerOutput run(AdHocTask task) {
        return task.run(taskInput);
    }

}
As you can see, AdHocTask.Runner receives an instance of AdHocTask and then calls the run method. Also, the runner injects TaskInput through the constructor and provides it as a parameter when calling the run method.
A runner is an abstract concept and can basically do anything from simple method delegation, like in the example above, to very complex logic. In general, a task runner encapsulates common logic specific to a Bot Task of the current type. For example, it can obtain a variable from the input, extract the data associated with this variable from an external service, and delegate the extracted data directly to a Bot Task.
Custom Task Runner
ODF 2 comes with plenty of runners and corresponding Bot Task types. Besides, you can easily define your own task type with a custom task runner.
Let's imagine you need a special task with a fallback mechanism. First, define a task interface with all required methods. In our example, there are two methods—mainMethod and fallbackMethod—to be called only if mainMethod fails with an exception.
public interface FallbackTask extends OdfTask {

    @Override
    default Class<FallbackTaskRunner> getRunnerClass() {
        return FallbackTaskRunner.class;
    }

    void mainMethod();

    void fallbackMethod(Exception e);

}
Once you have a task interface, create corresponding FallbackTaskRunner.
public class FallbackTaskRunner implements OdfTaskRunner<FallbackTask> {

    private final TaskInput taskInput;

    @Inject
    public FallbackTaskRunner(TaskInput taskInput) {
        this.taskInput = taskInput;
    }

    @Override
    public TaskRunnerOutput run(FallbackTask task) {
        try {
            task.mainMethod();
        } catch (Exception e) {
            task.fallbackMethod(e);
        }

        return taskInput.asResult();
    }

}
The runner tries to call mainMethod. If it fails, it delegates execution to fallbackMethod. In this particular example, there is no specific output data, and the runner simply creates TaskRunnerOutput from TaskInput.
Now, you have FallbackTaskRunner and the FallbackTask interface. Let's create a new Bot Task from this interface:
@BotTask
public class FallbackTaskExample implements FallbackTask {

    private final Logger logger;

    @Inject
    public FallbackTaskExample(Logger logger) {
        this.logger = logger;
    }

    @Override
    public void mainMethod() {
        logger.info("Inside main method");
    }

    @Override
    public void fallbackMethod(Exception e) {
        logger.info("Inside fallback method. Error was: {}", e.getMessage());
    }

}
As you can see, the ODF 2 framework doesn't limit you in terms of how a Bot Task should look like. You can use predefined task types, such as AdHocTask, or create your own type and embed it into the framework.
Bot Tasks and Transactions
In ODF 2, all business data is kept in Data Stores or user database tables managed by Control Tower. The entire pool of data to be processed at a time is tied to a Transaction—a Data Store entity with a unique ID to address the data. A Control Tower record passes a Transaction ID and some more technical information between tasks.
Multiple examples on this page use the AdHocTask interface as a task type. This code is an example, not a template for production code.
AdHocTask is a task type that does nothing beyond what's written in the task class. It means no error handling, transaction status analysis, transaction pass-through, or other useful things that ODF 2 provides behind the scenes.
You can use it for demonstration purposes, writing tests, or solving some corner cases. For the absolute majority of implementations, using AdHocTask is not recommended.
To create a new Transaction object inside a Bot Task, inject TransactionRepository and call the startNewTransaction method. At this point, the framework creates a new entity inside the Data Store. To make the next steps in a Business process aware of the newly created Transaction, pass it to the output data by creating a new TransactionResult object.
@BotTask
@Requires(TransactionModule.class)
public class TransactionProviderTask implements AdHocTask {

    private final TransactionRepository transactionRepository;

    public TransactionProcessorTask(TransactionRepository transactionRepository) {
        this.transactionRepository = transactionRepository;
    }

    @Override
    public TaskRunnerOutput run(TaskInput taskInput) {
        Transaction transaction = transactionRepository.startNewTransaction("transaction_status");
        return new TransactionResult(taskInput, transaction);
    }

}
In practice, this way of producing Transactions is rarely used. Usually, Multi-process Ai Agent design | Monitor Tasks are applied.
After you create a Transaction, you can work with it in the next Bot Task through the com.workfusion.odf2.transaction.CurrentTransaction object. Using the object, you can check if an input record contains Transaction-specific data and access the corresponding Transaction entity. You can inject the object in the task constructor, but out-of-the-box transactional task types provide it as method arguments for the developer's convenience.
@BotTask
public class TransactionProcessorTask implements TransactionalTask {

    @Override
    public void run(CurrentTransaction transaction, TransactionResult result) {
        transaction.get().setStatus("SOME NEW STATUS");
    }
}
TransactionModule is required to get access to the Transaction-related helpers and services. Out-of-the-box transactional task interfaces are marked with @Requires(TransactionModule.class) annotation, so the developer need not worry about this. Make sure to specify the requirement for this module in the @Requires annotation, if you are not implementing one of those.
Bot Tasks with RPA
When it comes to an RPA task, there is a huge difference that distinguishes it from a regular task—an RPA bot requires a special environment with Windows OS and specific software installed. Consequently, the ODF 2 framework should somehow let the platform understand that this specific task contains RPA logic and should be executed in a specific environment. To address this, you have the requireRpa attribute in the @BotTask annotation.
@BotTask(requireRpa = true)
public class RpaTask implements SomeTaskType {...}
The requireRpa attribute guarantees that the current task is executed on the RPA node. It is done by the compiler that adds extra RPA-related settings to the generated XML file. There is also an optional roboticsFleet attribute specifying the RPA fleet to be used. Fleets stand for groups of bots that segregate tasks according to their business value or machines with specified software. If no fleet attribute is provided, a task is sent to the shared fleet.
@BotTask(requireRpa = true, roboticsFleet = "common-fleet")
public class RpaTask implements SomeTaskType {...}
Now let's put it all together and look at how a simple Bot Task with the RPA logic looks like in terms of the ODF 2 framework.
@BotTask(requireRpa = true, roboticsFleet = "common-fleet")
public class RpaTask implements TransactionalTask {

    private final RpaRunner rpaRunner;

    @Inject
    public RpaTask(RpaRunner rpaRunner) {
        this.rpaRunner = rpaRunner;
    }

    @Override
    public void run(CurrentTransaction transaction, TransactionResult result) {

        rpaRunner.execute(driver -> {
            driver.switchDriver("desktop");

            open("notepad");
            window(".Notepad[title='Untitled - Notepad']");
            $(".Edit").sendKeys("Hello, World!");
        });
    }
}
Task input and output
The Business Process key concept is the data flow between steps while processing big amounts of uniform data. Input data for Business Processes is divided into items with a defined structure called records. Each record comes to a Bot Task in the form of a com.workfusion.odf2.core.task.TaskInput object.
You can inject TaskInput through the constructor:
@BotTask
public class TransactionProcessorTask implements TransactionalTask {

    private final TaskInput taskInput;

    @Inject
    public FallbackTaskExample(TaskInput taskInput) {
        this.taskInput = taskInput;
    }

    @Override
    public void run(CurrentTransaction transaction, TransactionResult result) {
        Optional<String> variable = taskInput.getVariable("my_variable");
        String requiredVariable = taskInput.getRequiredVariable("my_required_variable");
        String transactionId = taskInput.getRequiredVariable(TaskVariable.TRANSACTION_ID); // the same as transaction.getId()
    }

}
TaskInput provides several methods you should be aware of:
Optional<String> getVariable(String name)returns a variable by the name orOptional.empty()if the variable doesn't exist in the input data.String getRequiredVariable(String name)returns a variable by the name or throws an exception if the variable doesn't exist in the input data.String getRequiredVariable(TaskVariable variable)returns a variable by the constant name defined in thecom.workfusion.odf2.core.webharvest.TaskVariableenum or throws an exception if the variable doesn't exist in the input data.SingleResult asResult()returns the current data asSingleResultthat can be used as the task output.
The task output is controlled by Task Runners that can return TaskRunnerOutput from their run method.
Depending on the design of a specific task implementation, a Bot Task can shape an output record in one way or another.
For example, in AdHocTask, the task implementation fully controls its output.
@BotTask
public class GenericTaskExample implements AdHocTask {

    @Override
    public TaskRunnerOutput run(TaskInput taskInput) {
        String data = taskInput.getRequiredVariable("some_column");
        return taskInput.asResult().withColumn("some_column", data + " modified");
    }

}
In TransactionalTask, output is out of the direct control of the implementation. It is populated with Transaction-related data received from the previous step and updated with changes done to the Transaction. The implementation code can modify it through the TransactionResult object but cannot interfere with Transaction-related fields.
@BotTask
public class TransactionProcessorTask implements TransactionalTask {

    @Override
    public void run(CurrentTransaction transaction, TransactionResult result) {
        // This being a TransactionalTask implementation, currentTransaction.get() will always return the Transaction object.
        // In the absence of transaction this method will not be called.

        transaction.get().setStatus("SOME NEW STATUS"); // This change will be automatically saved to DataStore and propagated to the task output.

        result.setColumn("additional_column", "some value"); // In this way you can add custom columns to the task output. All transaction-related columns will be dealt with by the framework.

        result.setColumn(TaskVariable.TRANSACTION_STATUS, "OTHER STATUS"); // Will be overwritten with "SOME NEW STATUS" from CurrentTransaction object.
    }
}
TaskRunnerOutput is an abstract class for which the framework provides three descendants for usage in different cases:
MultipleResultis used to return multiple records simultaneously.SingleResultrepresents a single record to be returned.TransactionResultis a special case ofSingleResultthat ensures that Transaction-specific columns are correctly populated and returned.
The TaskInput class has a convenience method that converts it to SingleResult containing the same data as an input record and can be further modified before returning.
In more complex scenarios, you may need to put multiple arrays or objects into the task output. This way, you can design "split data" so that the next step is executed multiple times in parallel. To do that, your Bot task must return the MultipleResult object:
@BotTask
public class GenericTaskExample implements AdHocTask {

    @Override
    public TaskRunnerOutput run(TaskInput taskInput) {
        return Stream.of(
                        new SingleResult().withColumn("some_column", "some_value"),
                        new SingleResult().withColumn("some_column", "some_other_value"))
                .collect(MultipleResults.toMultipleResults());
    }

}
taskInput.asResult() generates <export> within the XML source of the Bot Task used by Control Tower. Starting from version 10.2.4, <export> is generated with include-original-data=“true”, which means that all input variables are automatically added to the output. That helps to transit a portion of variables through a number of Bot Tasks down to the Bot Task where these variables are expected to be used. Before version 10.2.4, <export> was generated with include-original-data=“false”.
You can also use MultipleResult to generate output with multiple transactions. For an example, refer to Create and process user Transactions.
WebHarvest context
The section applies to Bot Tasks running on the traditional WebHarvest-based Worker only. Tasks running on the Java Native Worker cannot access the WebHarvest context. Working with the WebHarvest context directly is not recommended.
Since every Bot Task uses WebHarvest under the hood, sometimes it can be useful to work with the WebHarvest context directly. The ODF 2 framework provides the following objects to inject into your Bot Task to get access to the WebHarvest context:
groovy.lang.Bindingprovides access to the Groovy binding object associated with the current task.com.workfusion.odf2.core.webharvest.BindingReaderis a utility class that provides the ability to read from a Groovy binding in a handy manner.org.webharvest.runtime.Scraperis a WebHarvest scraper associated with the current Bot Task.org.webharvest.runtime.ScraperContextis the scraper context associated with the current Bot Task. To get this context, first, injectScraperitself and then call thegetContextmethod.
The code sample below shows how to get access to the DatabaseProperties object from the underlying WebHarvest context:
@BotTask
public class GenericTaskExample implements AdHocTask {

    private final BindingReader bindingReader;

    @Inject
    public GenericTaskExample(BindingReader bindingReader) {
        this.bindingReader = bindingReader;
    }

    @Override
    public TaskRunnerOutput run(TaskInput taskInput) {
        DatabaseProperties properties = bindingReader.getRequiredVariable("dataStoreProperties", DatabaseProperties.class);
        String connectionUrl = properties.getUrl();

        return taskInput.asResult().withColumn("connection_url", connectionUrl);
    }

}
For more details on the WebHarvest context and related variables, refer to Apply WebHarvest and WorkFusion context variables.
Reserved words
The following reserved words cannot be used as output variable names as they will override ODF 2 internal variables or WebHarvest variables.
You can also refer to the com.workfusion.odf2.core.webharvest.TaskVariable enum to check whether a word is reserved or not.
ODF 2 reserved words
_sys_transaction_id_sys_transaction_status_sys_error_status_sys_new_transaction_status_sys_parent_transaction_uuid_sys_ocr_task_id_sys_ocr_cache_key_sys_ocr_type_sys_ocr_export_type
WebHarvest reserved words
hit_submission_data_itemitemprevDataassignmentsourcedataStorePropertiesincludedConfigsapplicationHostapplicationContextPathapplicationResourceUrluserInternalCredentialsseleniumDriverseleniumServerseleniumLoggerseleniumDriverRegistryselenium_node_idselenium_parent_browser_capabilitiescapabilityNodeIdexportResultreleaseDates3EndpointUrls3AccessKeys3SecretKeys3KeyMapsecureStorePassword
Additional annotations for Bot Tasks
@SendToExternalConnector
You can put the com.workfusion.odf2.compiler.SendToExternalConnector annotation on a class already annotated as @BotTask. It instructs the ODF 2 compiler to add the send-to-external-connector="true" attribute to the <export> section of a generated XML file.