
Upgrade from 10.1.6.x to 10.2.1
The guide describes the upgrade to the 10.2.1 version of WorkFusion Intelligent Automation Cloud Enterprise. Note that this operation uses the installer, so the procedure is similar to the installation.
Before you start
The 10.2.1 non-HA topology requires only five servers:
- MASTER
- AGENT
- RPA
- BI
- DB
Note the following changes in server roles:
- The separate INT, APP, and BEP Master servers no longer exist. Instead, WorkFusion has introduced a single MASTER server. It contains all services, which were previously running on these three servers. In the case of the single-point installation, MASTER becomes the server to run the setup on.
- BEP Agent servers were renamed to the AGENT servers.
- OCR Linux now runs on one of the AGENT servers in the same way as other workers.
The upgrade starts with preparing the environment to bring the topology to the appropriate state.
Before the upgrade, ensure that:
- You created the additional DNS record for Keycloak (See DNS names).
- No Business Process or Manual Task is running.
- You prepared fleets for migration.
- You backed up the following components:
- Directories
/opt/workfusion/workfusionand/opt/workfusion/workspace. - Vault properties for all components.
- Zookeeper settings changed since the last installation.
- Any system files changed since the previous installation.
- Directories
- You enabled SSH access to all Linux hosts.
- You verified that the SSO or LDAP authentication you enabled on the existing environment is working.
Save fleet names for Bot Units
To save currently used fleet names for Bot Units, do the following:
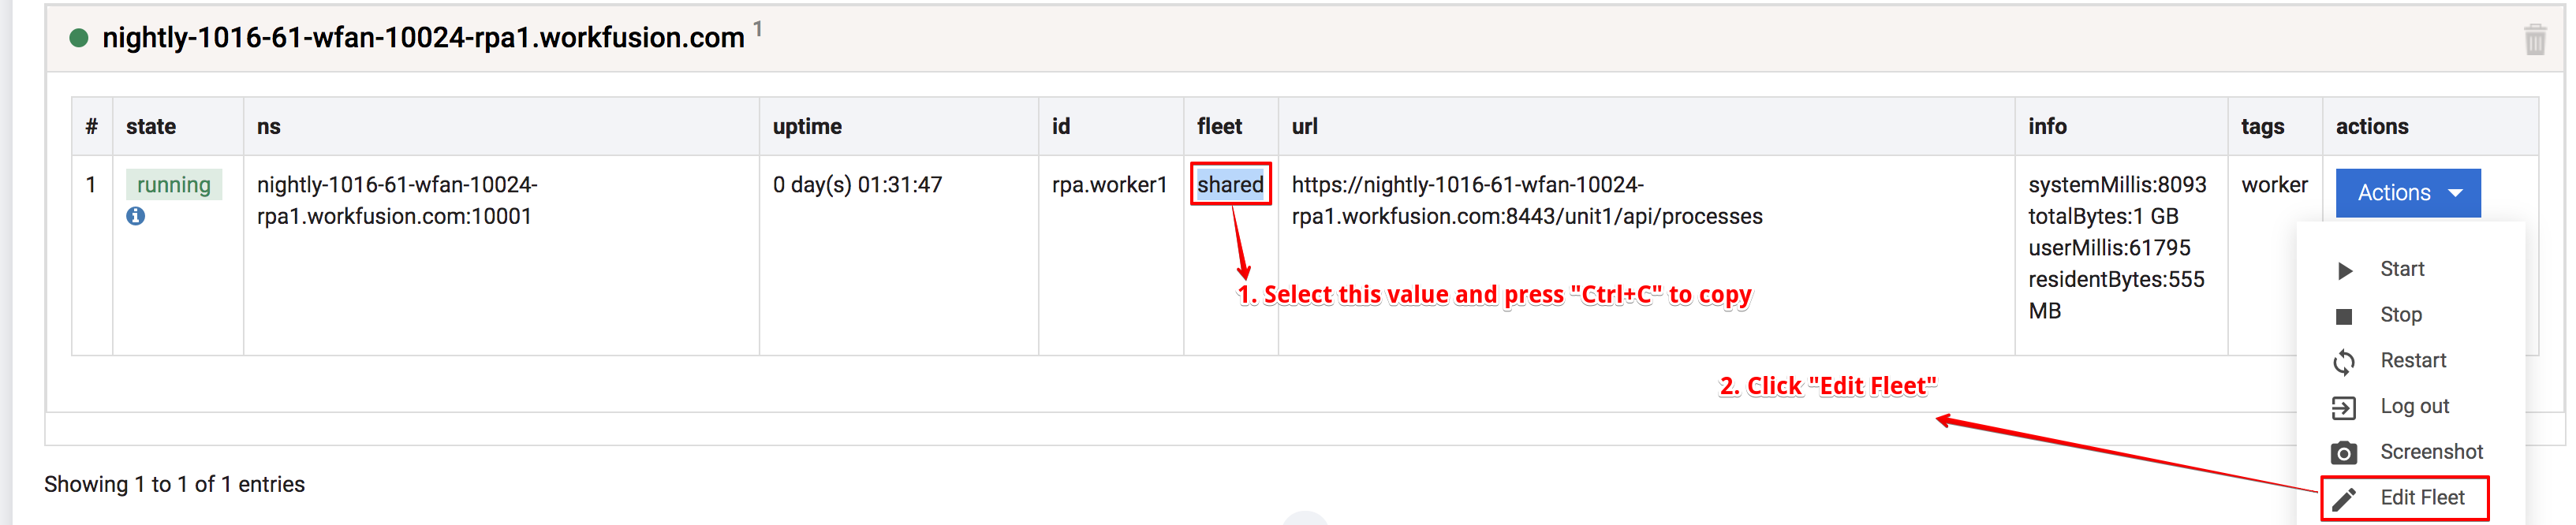
Log in to Control Tower, and click Bot Manager.
In the Bot Manager UI window, click on your RPA server to expand the fleets.
Copy the value into the fleet column → Actions → Edit Fleet.
In the Edit Fleet window, click Create new, and paste the values copied earlier.
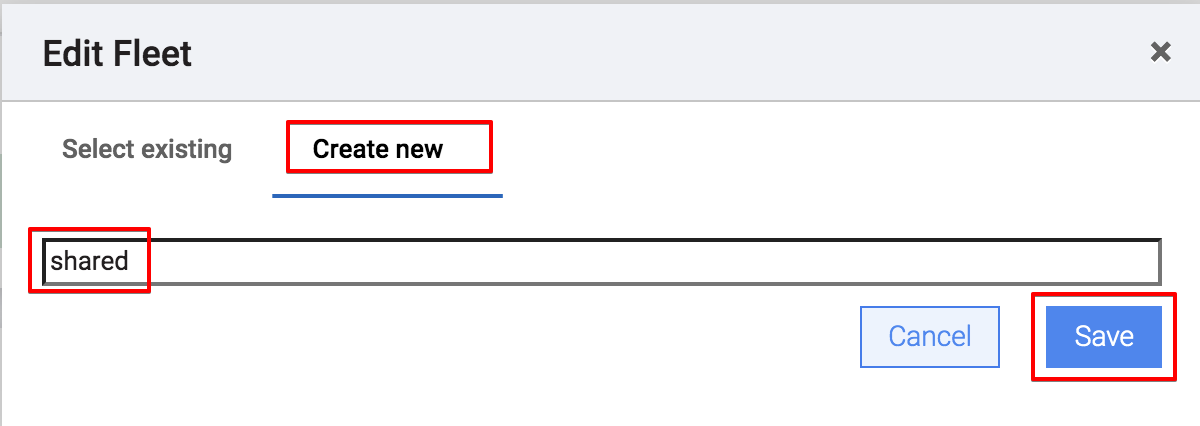
Repeat steps 3-4 for all fleets.
Check running business processes
Before the upgrade, check that no business processes are running:
Go to
INSTALL_DIR, which contains the installer directory created during the installation of 10.1.6.x, for example:/opt/workfusion:$ cd INSTALL_DIRCheck the output of the following command:
./zookeeper/bin/zkCli.sh ls /control-tower/execution/active-instances | egrep -qo '^\[[0-9a-f-]+' && echo 'There are running business processes. Please stop them first to continue upgrade.' || echo 'There are no running business processes. You are OK to continue update procedure.'
Continue the update procedure if the command displays the following message: "There are no running business processes. You are OK to continue update procedure." Otherwise, stop the running processes first.
Prepare ELK stack
Before the upgrade, check that Elasticsearch, Logstash, and Kibana are prepared and won't break during the upgrade.
Shards count
ELK cannot hit the active shard count limit to make the upgrade. To check the limit and amount of currently used shards, run the following commands:
```bash
$ cd INSTALL_DIR
$ ES_LB_NAME=<HOSTNAME_OF_INT1_MACHINE>

# Gets the current limit of shards per node
$ curl -sk --cert ../ssl/kibana.crt --key ../ssl/kibana.key https://${ES_LB_NAME}:9200/_cluster/settings?include_defaults=true | jq -r '.defaults.cluster.max_shards_per_node'

# Gets the amount of currently used shards for each host (int1/int2/int3)
$ for host in int1 int2 int3; do curl -sk --cert ../ssl/kibana.crt --key ../ssl/kibana.key https://${ES_LB_NAME}:9200/_cluster/stats/nodes/*${host}* | jq -r '.indices.shards.total'; done
```
Disk space
The Elasticsearch shared disk should have at least 10% of free disk space. To check the available disk size, run the command:
```bash
df -h <ELASTICSEARCH_DATA_DIR>
```
Elasticsearch license
The license for Elasticsearch has to be valid. To check the license, run the command:
```bash
$ cd INSTALL_DIR
$ ES_LB_NAME=<HOSTNAME_OF_INT1_MACHINE>

$ curl -sk --cert ../ssl/kibana.crt --key ../ssl/kibana.key https://${ES_LB_NAME}:9200/_license | jq -r '.license.expiry_date'
```
Elasticsearch indices
Remove the indices that are older than seven days and that don't start with a dot (to be sure not to remove an index with cluster-related data):
```bash
let "WEEK_AGO = 1000 * (`date +\"%s\"` - (3600 * 24 * 7))"
PASSWORD=<ES_ADMIN_PASSWORD>
ES_LB_NAME=<HOSTNAME_OF_INT1_MACHINE>
OLD_INDICES=`curl -sk -u "admin:${PASSWORD}" https://${ES_LB_NAME}:9200/_cat/indices?h=index,creation.date | awk -v week_ago="$WEEK_AGO" -e '$1 !~ /^\..*/ && $2 < week_ago { print $1 }' | tr '\n' ' '`
for index in $OLD_INDICES; do echo "curl -sk -u \"admin:${PASSWORD}\" https://${ES_LB_NAME}:9200/$index -X DELETE"; done
```
Stop services
To stop services:
Connect to the server with the previous installation package via SSH and run the following commands as <linux_installation_user>:
$ cd PACKAGE_DIR
$ export ANSIBLE_PRIVATE_KEY_FILE="<path_to_ssh_key>"   # Path to SSH key for connection to all Linux servers as WFUSER.
$ export ANSIBLE_VAULT_PASS="<ansible_vault_password>"   # Password for decryption of config.yml.
$ ./install.sh stop_services full
Connect to all Linux servers via SSH and run the following command as WFUSER on each of them:
$ wfmanager stop all
Prepare topology
Prerequisites
Before upgrading IA Cloud Enterprise, ensure that your environment meets the following requirements. Failing to do so results in an extended time of the upgrade and may cause errors:
The environment must meet all the requirements listed in the System requirements section:
-
Make sure that you have created all domain names listed on the page.
-
Make sure that all ports listed on the page are open.
-
Ensure that the required Bot Master and Bot Unit users are present on the RPA server.
-
Also, make sure that your database has a user with the enabled db_owner role.
-
Ensure that installation users on the Analytics and RPA server have either WinRM or RDP access.
Ensure that the environment has sufficient hardware resources.
If necessary, upgrade your server hardware before you use the existing INT server as MASTER. Note that the MASTER server uses more resources than INT. As you no longer need separate APP and BEP Master servers, you can use them as additional AGENT servers.
Ensure that shared folders are created and mounted correctly.
Skip this requirement if you use an external NFS server.
Shared folders, INSTALL_DIR/vds-data and INSTALL_DIR/shared, must be located on the MASTER server. For ensuring that:
- Move the preceding folders to the MASTER server with any convenient method.
- To share the folders via NFS and mount them to AGENT servers, either perform all root-related steps manually by following the guide or, if the
WFUSERhas thesudoprivileges, proceed with the guide.
Before upgrading IA Cloud Enterprise, ensure that your environment meets the following requirements. Failing to do so results in an extended time of the upgrade and may cause errors.
-
For 8-server installation only: ensure that all lb records (like marathon-lb.example.com) now point to the INT server's IP address.
Also, note that it's not mandatory to change the actual hostnames of servers. For example, if your current server has FQDN int1.example.com, you don't need to rename it to master1.example.com.
-
Ensure that all listed ports are open.
-
Ensure that the required Bot Master and Bot Unit users are present on the RPA server.
-
Make sure to create a new mssql_keycloak_user login in the database. Also, ensure that your database has a user with the enabled db_owner role.
-
Ensure that installation users on the Analytics and RPA server have either WinRM or RDP access.
Set the external load balancer's parameters and ports, as described in Configure Load Balancer. The load balancer must route all TCP traffic from the specified ports to the same ports on Master1, Master2, and Master3 servers (round-robin balancing between Master1, Master2, and Master3).
-
Prepare certificates
In 10.2.1, the server.crt certificate must mandatorily include the end and all intermediate certificates if they exist. Ensure that your certificates comply with the requirements.
Then, on the MASTER server, place prepared ca.crt, server.crt, and server.key to the PACKAGE_DIR/certificates/ directory.
Skip the step if you don't have them. In this case, self-signed certificates get generated automatically during the installation.
$ ls -la PACKAGE_DIR/certificates/
total 24
drwxr-xr-x.  3 ec2-user ec2-user   78 Sep 24 14:47 .
drwxr-xr-x. 12 ec2-user ec2-user 4096 Sep 27 17:20 ..
-rw-r--r--.  1 ec2-user ec2-user 2984 Sep 24 14:42 ca.crt
-rw-r--r--.  1 ec2-user ec2-user 4835 Sep 24 14:42 server.crt
-rw-r--r--.  1 ec2-user ec2-user 1674 Sep 24 14:42 server.key
Verify prerequisites
After you prepare the environment for the upgrade, you can use the dedicated checking script for verification. For more information, read the check readiness instruction.
Prepare installation directories
The preparation flow requires two folders on the MASTER server:
- package_dir, where a new installer package gets downloaded.
- backup_dir, which contains configuration files from the previous installation.
Because of the different initial topologies and file placement, the approach to the flow may slightly differ.
To download and extract the installer, connect to the server with the installation package from the previous version via SSH and run the following commands as WFUSER:
Go to
INSTALL_DIR, which contains the installer directory created during the installation of 10.1.6.x, for example:/opt/workfusion:$ cd INSTALL_DIRCreate a backup directory (here,
BACKUP_DIR) for the previous version of the installer. Ensure that the backup directory is writable forWFUSER:$ mkdir BACKUP_DIRMove the contents of your
PACKAGE_DIRto the backup directory. As a result, directoryPACKAGE_DIRmust be empty before proceeding with the upgrade:$ cd PACKAGE_DIR
$ mv * ../BACKUP_DIR
$ mv .agreement ../BACKUP_DIRStop the unnecessary OCR server, or prepare it for the AGENT role.
For IA Cloud v.10.2.1 in 6-servers topology, WorkFusion doesn't use OCR as dedicated servers. For more details see the Hardware and OS section. Instead, you can use the existing OCR server as the AGENT one. For this, back up all directories and files from
INSTALL_DIRand clean this directory after the backup.If you don't want to use OCR as an AGENT server, you can stop them.
To prepare the installer, connect to the MASTER server via SSH and execute the following actions as WFUSER:
Make sure that
PACKAGE_DIR(for example:/opt/workfusion/wf_installer) andINSTALL_DIRexist on the MASTER server and are owned byWFUSER:$ sudo mkdir INSTALL_DIR
$ sudo chown WFUSER:WFUSER INSTALL_DIR
$ sudo mkdir PACKAGE_DIR
$ sudo chown WFUSER:WFUSER PACKAGE_DIRGo to
INSTALL_DIRand create a backup directory (BACKUP_DIR in this case) for storing the previous version of configuration files. Ensure that the backup directory is writable forWFUSER::$ cd INSTALL_DIR
$ mkdir BACKUP_DIRMove the following configuration files from
PACKAGE_DIRon the previous installation server to the newly created backup directory (BACKUP_DIR) on the MASTER server, with any convenient method:license.properties
.agreement
rpa.yml
ports.yml
config.yml
hosts.ymlIf
PACKAGE_DIRon your MASTER server already contains the previous installation package, move the contents of the existingPACKAGE_DIRto the backup directory. As a result, directoryPACKAGE_DIRmust be empty before proceeding with the upgrade:$ cd PACKAGE_DIR
$ mv * ../BACKUP_DIR
$ mv .agreement ../BACKUP_DIRStop unnecessary servers, or prepare this for AGENT role:
For IAC v.10.2.1 in 8-servers or HA topologies, WorkFusion doesn't use CT, BEP Master, and OCR as dedicated servers. For more details see Hardware and OS section. You can use them as AGENT servers. For this, back up all directories and files in INSTALL_DIR and clean this directory.
Stop them if you don't want to use CT, BEP Master, and OCR as AGENT servers.
Download installer
To download and configure the installer v.10.2.1:
Download the installer to
PACKAGE_DIR:$ curl -o '<10.2.1-installer-archive>' '<link-to-installer-10.2.1>'If Internet access is unavailable on the server, download the package to the
PACKAGE_DIRdirectory with any convenient method.Extract the installer:
$ tar xzf <10.2.1-installer-archive> --strip 1Copy configuration files for the current environment from
BACKUP_DIRtoPACKAGE_DIR:$ cp -r ../BACKUP_DIR/{license.properties,.agreement} PACKAGE_DIR/Generate new configuration files from existing ones:
$ export ANSIBLE_VAULT_PASS="<ansible_vault_password>"   # Password for decryption of config.yml.

$ cd PACKAGE_DIR
$ ./install.sh hosts_yml  generate -e @../BACKUP_DIR/hosts.yml
After executing
./install.sh hosts_yml generate, inhosts.yml, specify the correct value forkeycloak_lb_hostname.$ ./install.sh config_yml generate -e @../BACKUP_DIR/config.yml $ ./install.sh ports_yml generate -e @../BACKUP_DIR/ports.yml $ test -f ../BACKUP_DIR/rpa.yml && cp -f ../BACKUP_DIR/rpa.yml rpa.yml || ./install.sh rpa_yml generatenote
To use optional servers (for example, OCR on the 6-servers environment and CT, BEP Master, OCR for 8-servers, or HA environment) as AGENT servers, add these servers to
hosts.ymlasagent_hostnames.note
The new
mssql_keycloak_userhas been introduced with the default password in config.yml. Change it to the password ofmssql_keycloak_user, which you have created on the 'prepare the database' step.note
In the 10.2.1 version, IA Cloud supports Active Directory logins. If you want to switch to MS SQL AD logins, in config.yml, change the corresponding
mssqllogins to the logins and password you have created when preparing the database.Encrypt config.yml:
$ ./install.sh encrypt configIn the 10.2.1 version, the server.crt certificate must mandatorily include the end and all intermediate certificates if they exist. If your certificates don't comply with the requirements, prepare new ones according to the requirements.
Generate required internal certificates:
$ ./install.sh certs generate
If you upgrade using the multi-point approach
- On the MASTER server, generate configuration files as described earlier.
- Ensure that
PACKAGE_DIR, including installer package, certificates folder, config.yml, rpa.yml, ports.yml, and hosts.yml, are synchronized across all Linux hosts.
Check users' passwords
Ensure that users' passwords are valid in config.yml. In most cases, you don't need to change anything in the file. You may proceed further and skip this step. If you encounter issues, for example, an error message with invalid credentials, then:
Open config.yml for editing.
./install.sh edit_config master
# you'll be prompted for the decryption password
Update it with valid passwords.
nexus_admin_pass

mssql_dba_pass
mssql_ct_pass
mssql_ws_pass
mssql_sqc_pass
mssql_rpa_pass
mssql_pm_pass
mssql_dm_pass
mssql_ocr_pass
mssql_automl_mms_pass
mssql_keycloak_pass
Re-run the installation script.
For example, after the initial 10.1.6.x installation, you may change the Nexus or MSSQL passwords manually in the environment. In this case, actualize them in config.yml because the installer uses them to update DB schemas and Nexus artifacts).
Upgrade components on servers
caution
Before uninstalling the RPA component, manually copy the log content to preserve the logs, as the corresponding folder and all of its content will get deleted.
Log locations:
- bot-agent logs: ..\RPA\bot-agent\logs
- worker logs: ..\RPA\logs
- nginx logs: ..\RPA\nginx\logs
- WFSvc logs: ..\RPA\tools\logs
Upgrade the components, depending on your installation approach:
Remember to run the following command on the MASTER server as WFUSER.
Run the following command to set up the application user.
$ export ANSIBLE_PRIVATE_KEY_FILE="<path_to_ssh_key>"   # Path to SSH key for connection to all Linux servers as WFUSER.
$ export ANSIBLE_VAULT_PASS="<ansible_vault_password>"   # Password for decryption of config.yml.
Run the following command to remove outdated components of the previous installation:
$ cd PACKAGE_DIR
$ ./install.sh cleanup rudiments
Run the following commands:
$ ./install.sh precheck mssql   # Checks that MSSQL credentials are set correctly in config.yml, Database exists, wf_dba_user exists and has db_owner role
$ ./install.sh configure mssql  # Creates all required schemas in Workfusion DB, creates and maps DB users to provided MSSQL logins, and assigns correct user permissions per schemas
Run the upgrade commands:
$ ./install.sh preinstall full -e skip_bi=true -e skip_rpa=true -e skip_ocrwin=true
$ ./install.sh install full -e skip_bi=true -e skip_rpa=true -e skip_ocrwin=true
$ ./install.sh check full -e skip_bi=true -e skip_rpa=true -e skip_ocrwin=true
Before updating the RPA server, uninstall the current RPA and perform a clean installation of the new RPA:
$ ./install.sh uninstall rpa
$ ./install.sh install rpa
$ ./install.sh check rpa
Cleanup RabbitMQ queues:
On the server with the installation packages, run the command:
$ ./install.sh stop_services full # stop all servicesOn the server with rabbitmq (first MASTER server in the HA mode, or the MASTER server), run the commands:
$ wfmanager start rabbitmq
$ rabbitmq-diagnostics ping -q # repeat untill Ping succeeded (echo $? == 0)
$ rabbitmqctl --silent list_queues --vhost bep | awk '{ print $1 }' | xargs -r -L1 rabbitmqctl delete_queue --vhost bep
On the server with the installation package, run the command:
$ ./install.sh start_services full # start all services
The upgrade is complete. It may require Control Tower for about 5 minutes to start. So, if you see error 503 in a browser right now, wait a bit.
Run the following commands on each Linux server, as WFUSER:
On each Linux server, stop all IA Cloud services:
$ wfmanager stop allTo verify the status of services, use the command
wfmanager status.On each Linux server, in the
PACKAGE_DIR, run the following command to remove outdated components of the previous installation:$ ./install.sh cleanup rudiments -c local --limit=<current_server_dns_name>Run the following commands once on any Linux server:
$ ./install.sh precheck mssql   # Checks that MSSQL credentials are set correctly in config.yml, Database exists, wf_dba_user exists and has db_owner role
$ ./install.sh configure mssql  # Creates all required schemas in Workfusion DB, creates and maps DB users to provided MSSQL logins, and assigns correct user permissions per schemas
Install IA Cloud Enterprise components on all Linux servers by following the corresponding guide.
Note the server changes:
- For a 6-server environment: your current APP server means MASTER, and BEP AGENT servers mean AGENT.
- For an 8-server environment: your current INT server means MASTER, and BEP AGENT servers mean AGENT.
Log in to the RPA server and uninstall RPA components: Control Panel → Programs and Features → RPA (Uninstall). After that, remove the RPA folder.
Install RPA by following the instructions in the section Install RPA package.
Cleanup the RabbitMQ queues to ensure that old workers don't spawn queues:
$ wfmanager stop all        # Run on each Linux server
$ wfmanager start rabbitmq  # Run on all MASTER servers
$ rabbitmqctl --silent list_queues --vhost bep | awk '{ print $1 }' | xargs -r -L1 rabbitmqctl delete_queue --vhost bep      # Run on first MASTER server
$ wfmanager start all      # Run on each Linux server
Before starting installation, ensure that config.yml, ports.yml, rpa.yml, hosts.yml and the /certificates directory are the same on all hosts.
To upgrade components, run the following command on the server with the installation package as WFUSER:
On all Linux servers, prepare the environment variables:
$ export ANSIBLE_VAULT_PASS="<ansible_vault_password>" # Run on each Linux server to disable password prompt (not mandatory, just for convenience)On all Linux servers, enter the
PACKAGE_DIRdirectory and run the following command to remove outdated components of the previous installation:$ cd /opt/workfusion/wf_installer
$ ./install.sh cleanup rudiments -c localRun the following commands once on any MASTER server:
$ ./install.sh precheck mssql   # Checks that MSSQL credentials are set correctly in config.yml, Database exists, wf_dba_user exists and has db_owner role
$ ./install.sh configure mssql  # Creates all required schemas in Workfusion DB, creates and maps DB users to provided MSSQL logins, and assigns correct user permissions per schemas
Install the IA Cloud Enterprise components on all Linux servers by following the corresponding guide.
Note the server changes:
- For a 6-server environment: your current APP server means MASTER, and BEP AGENT servers mean AGENT.
- For an 8-server environment: your current INT server means MASTER, and BEP AGENT servers mean AGENT.
After installing the Linux components, log in to the RPA server and uninstall RPA components: Control Panel → Programs and Features → RPA (Uninstall).
Install RPA by following the instructions in the section Install RPA package.
Clean up the RabbitMQ queues to ensure that old workers don't spawn queues:
$ wfmanager stop all        # Run on each Linux server
$ wfmanager start rabbitmq  # Run on all MASTER servers
$ rabbitmqctl --silent list_queues --vhost bep | awk '{ print $1 }' | xargs -r -L1 rabbitmqctl delete_queue --vhost bep # Run on first MASTER server
$ wfmanager start all      # Run on each Linux server
Upgrade Analytics server
Backup site configuration
Before upgrading the Analytics components, connect to the BI server via RDP as a Windows Administrator user and save all your custom workbooks and data sources to a predefined location on a local disk.
important
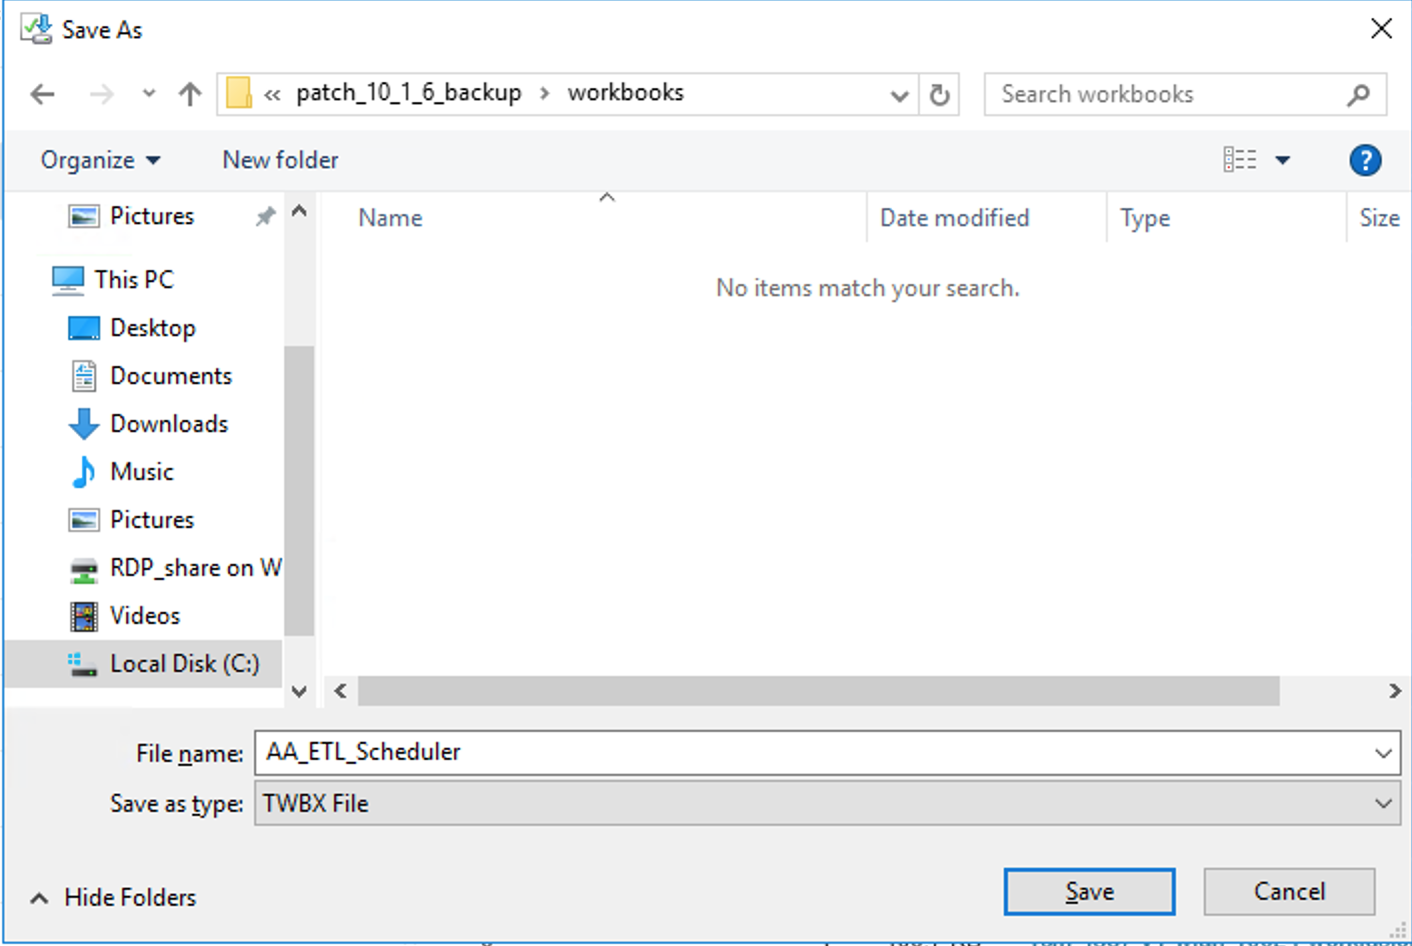
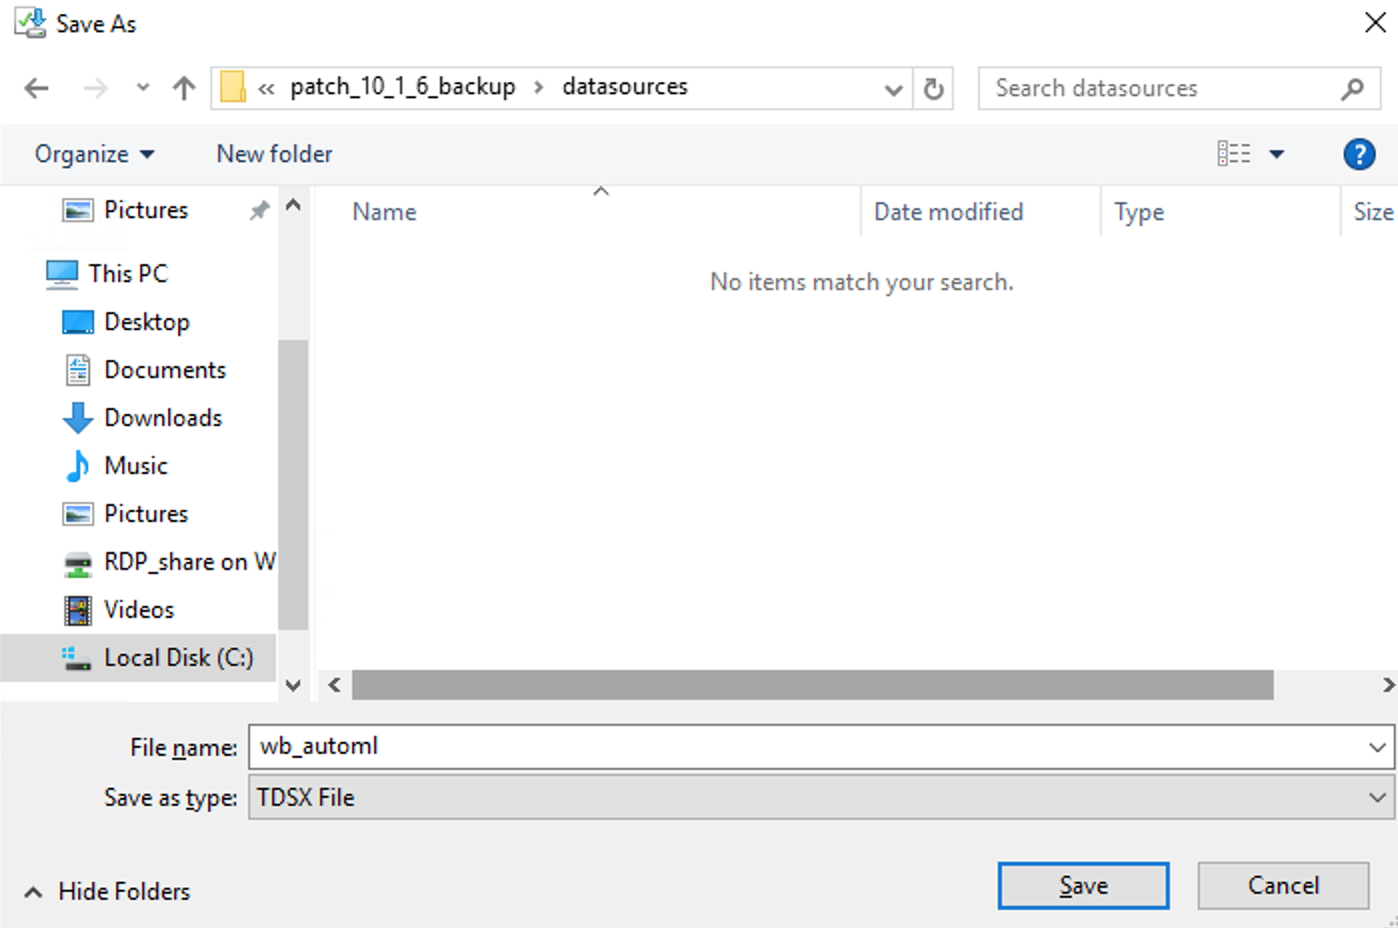
Download custom workbooks and datasources to separate directories. For example, c:\patch_10_1_6_backup\workbooks\ and c:\patch_10_1_6_backup\datasources\.
Don't save backup files in Analytics (BI) server installation directory, for example, c:\workfusion\ as it gets deleted during the upgrade.
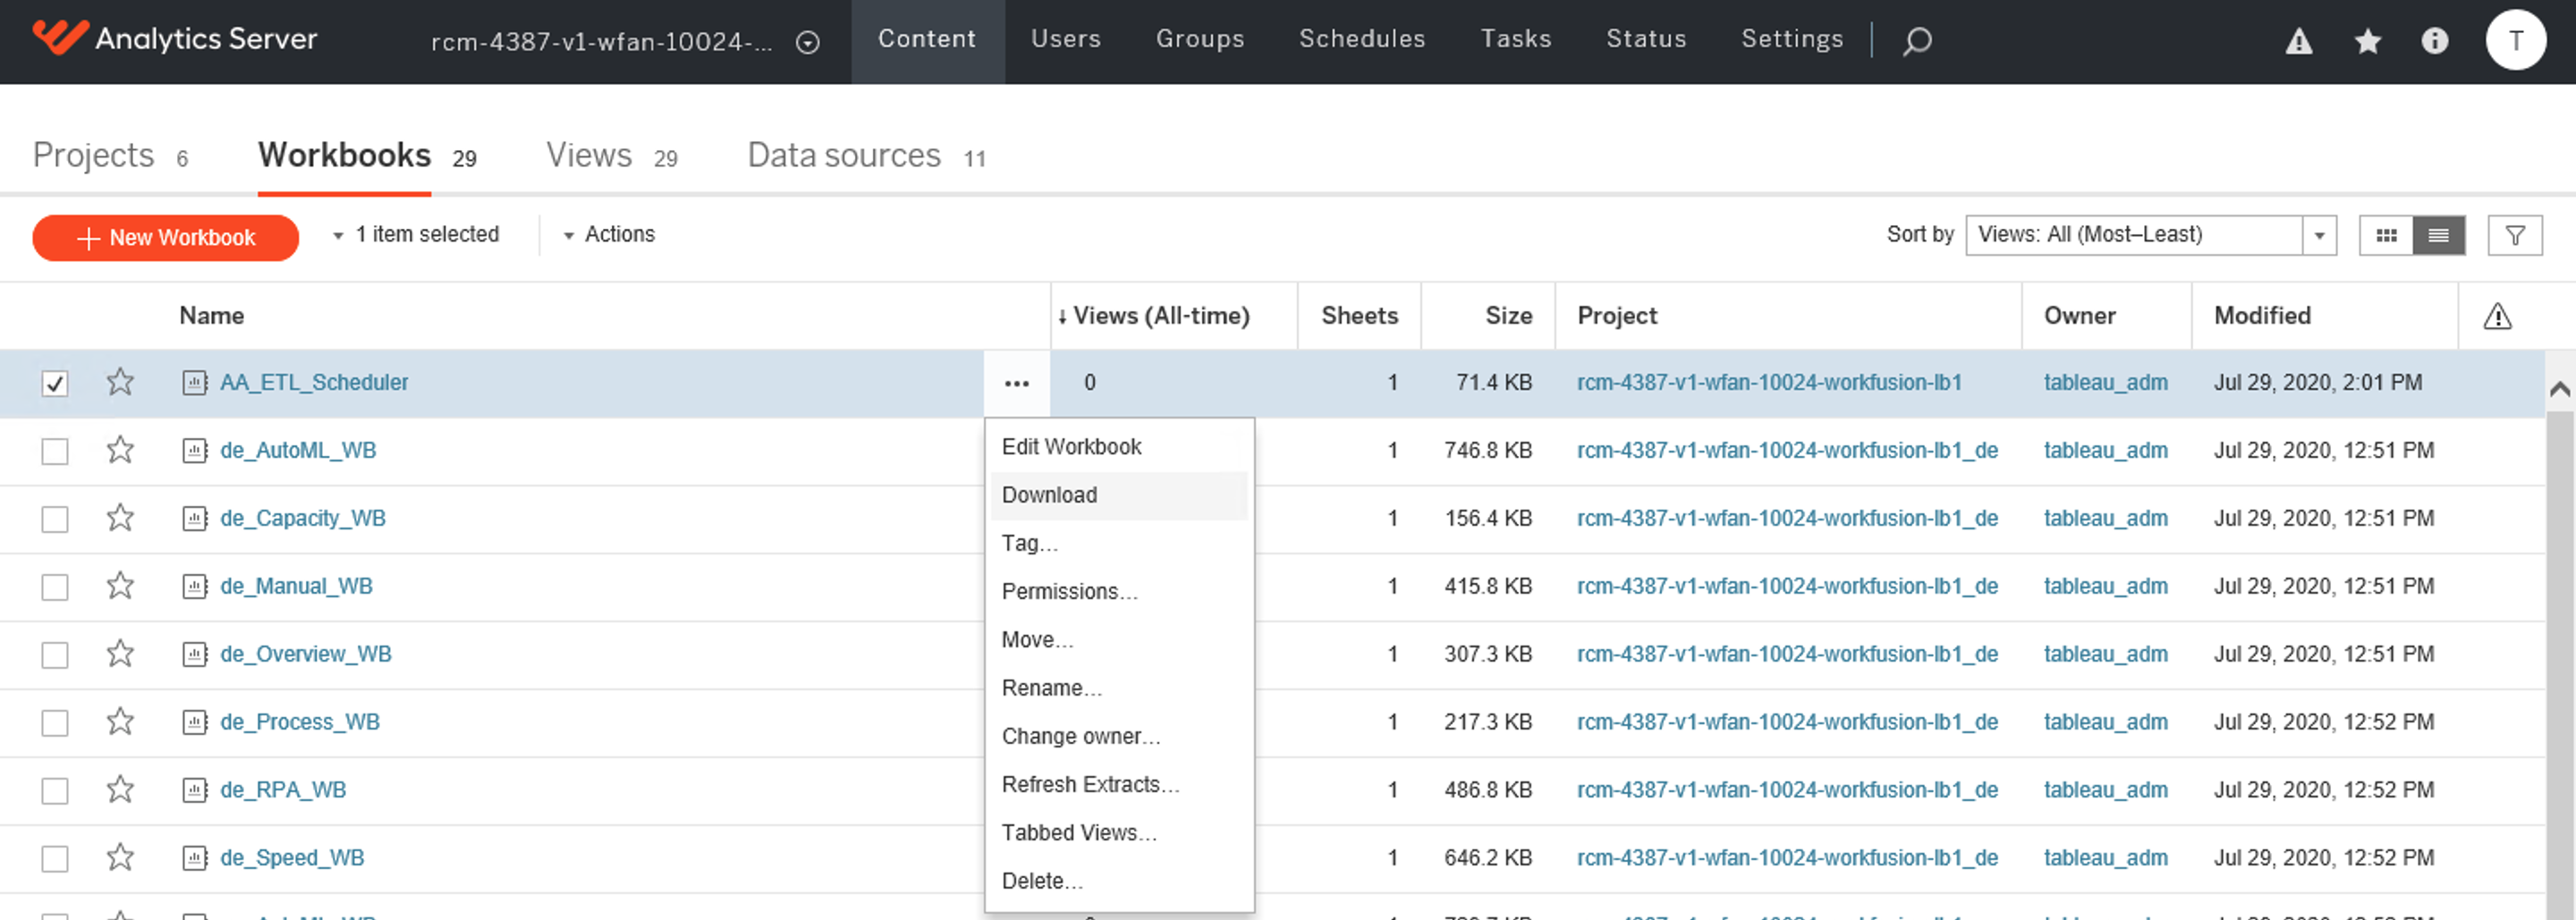
To download the custom workbooks from the Analytics server UI:
- Go to a particular site, and, on the Content tab, click Workbooks. Look for the
_custompostfix in their names to identify custom workbooks. - In the right corner of the Name column, click More (...), click Download, and save the file as a Tableau workbook.
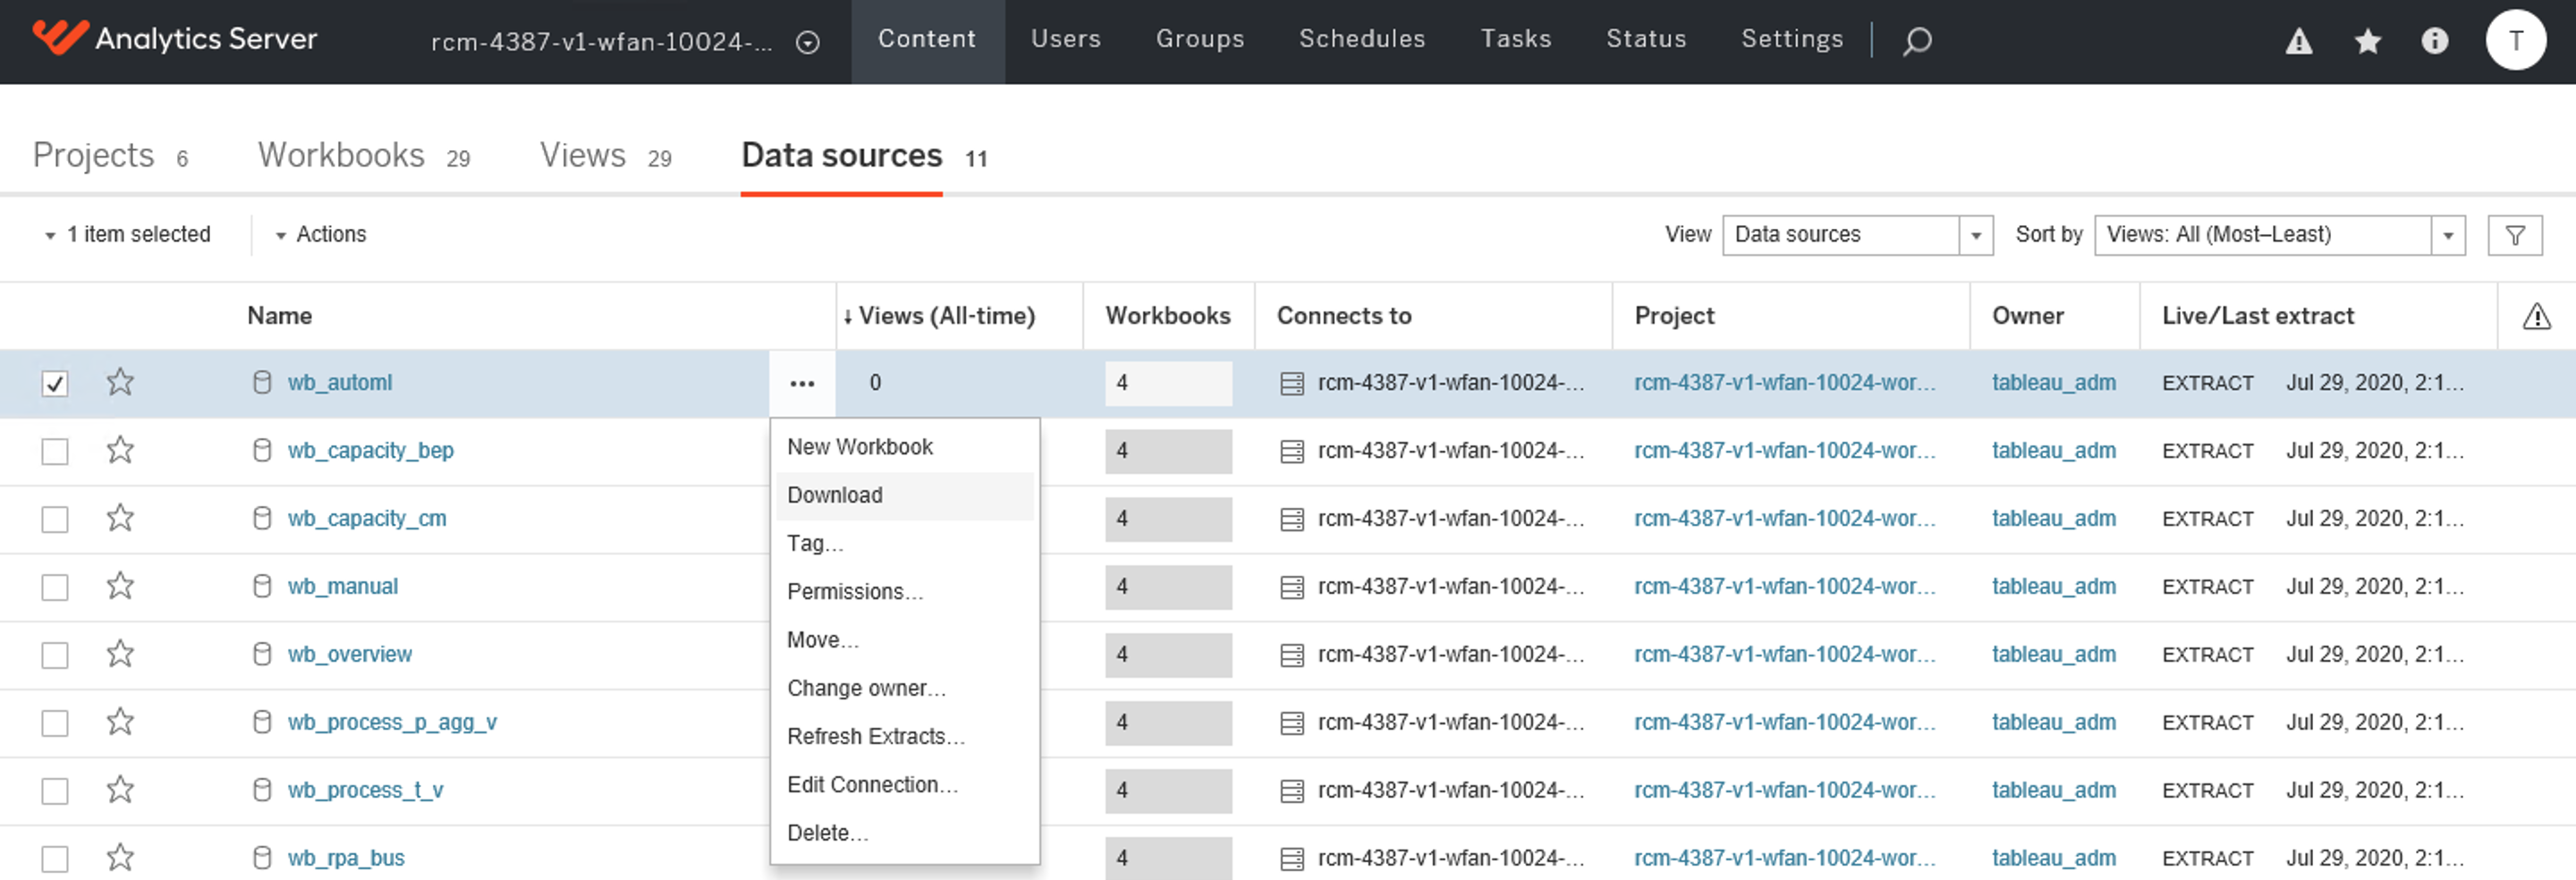
To download the custom data sources from the Analytics server UI:
Go to a particular site, and, on the Content tab, click Datasources.
In the right corner of the Name column, click More (...), click Download, and save the file as a Tableau datasource.
Remember to rename the custom dashboards by replacing all occurrences of the underscore character ("_") with a plus symbol ("+") in the titles, except for the first and last two underscores.
To restore custom dashboards, follow the instructions in the section Backup and restore custom Analytics dashboards.
Upgrade Analytics
To upgrade the Analytics Server:
On the MASTER server, run the following command:
$ cd /opt/workfusion/wf_installer
$ ./install.sh uninstall bi
Restart the Analytics server to apply changes.
On the MASTER server, run the following command:
$ ./install.sh preinstall bi
$ ./install.sh install bi
$ ./install.sh check bi
To upgrade the Analytics Server:
On the Analytics (BI) server, launch the New PowerShell ISE.
Launch PowerShell ISE as Administrator. Copy the following script and execute it in PowerShell on the relevant Analytics server.
# UNINSTALL TABLEAU SERVER
# FILL IN THE PARAMETERS BELOW
$install_dir   = "c:\workfusion" # The value of "install_dir" which you've set in config.yml during Linux servers installation.

$env:win_user="username" # The value of "bi_user" which you've set in config.yml during Linux servers installation.
$env:win_pass='"password"' # Leave single and double quotes in place. Replace only word password. The value of "bi_pass," which you've set in config.yml during Linux servers installation.
# =========================================
$package_dir   = "${install_dir}\WorkFusionAnalyticsServer"

Write-Host "Uninstalling filebeat"
$service = Get-WmiObject -Class Win32_Service -Filter "name='filebeat'"
    if ($service) {
    $service.StopService()
    Start-Sleep -s 1
    $service.delete()
    }

Write-Host "Uninstalling metricbeat"
$service = Get-WmiObject -Class Win32_Service -Filter "name='metricbeat'"
    if ($service) {
    $service.StopService()
    Start-Sleep -s 1
    $service.delete()
    }

Write-Host "Stop PostgreSQL process"
$proceses = "postgress"
        Get-Process | Where-Object {$proceses.Contains($_.Name)} | Stop-Process -Force

Write-Host "Uninstall WorkFusion Analytics Server"
$path = Get-ChildItem -Path $install_dir\WorkFusionAnalyticsServer\packages -Recurse tableau-server-obliterate.cmd
        if ($path) {
        &$path.FullName -y -y -y
        }

Write-Host "Uninstall PostgreSQL Server"
$app = Get-WmiObject -Class Win32_Product | Where-Object {$_.Name -match "psql"}
        if ($app) {$app.Uninstall()}

Write-Host "Remove installation directory"
If (Test-Path $install_dir){
Get-ChildItem -Path $install_dir -Recurse | Remove-Item -force -recurse
Remove-Item $install_dir -Force
}
Restart the Analytics server to apply changes.
Install Analytics (BI) server by following the instructions in the section Install Analytics Server.
Restore custom parameters from previous versions
note
When upgrading to v.10.2.1, you need to manually configure LDAP/AD and IDP/SSO in Keycloak.
- For LDAP/AD configuration instructions, refer to the Configure LDAP section.
- For IDP/SSO configuration instructions, refer to the Configure Identity Providers section.
Custom workers
Suppose you have changed workers' settings in IA Cloud 10.1.6.x, you can migrate them after the upgrade.
For that, after upgrading to IA Cloud 10.2.1, on the MASTER server, open the file with workers' settings for Control Tower (for
example, /opt/workfusion/vds-data/workers/app/com.workfusion.spa.ct/worker-app/10.1.0.32/worker.yml), and enter the previous corresponding settings, such as memory, CPU, etc. Note that the structure of the new file differs from the previous one.
File worker.yml for 10.1.6.x
#cat /opt/workfusion/vds-data/workers/app/com.workfusion.spa.ct/worker-app/10.1.0.10/worker.yml

command: ${java} -XX:CICompilerCount=2 -XX:+UseSerialGC -XX:MaxMetaspaceSize=${metaspace}M -Xmx${heap}M -XX:+ExitOnOutOfMemoryError -Dgroovy.use.classvalue=true -Dgroovy.target.indy=true -Dfile.encoding=UTF8 -Dexecution.task.queue.input=${tasks.queue} -Dlogging.path=${log.dir} -Dlogging.file=${log.file} -Djava.io.tmpdir=${temp.dir} -Dwebharvest.machine.config.bundle.dir=${working.dir}/bcb -jar ${worker.jar} ${config.server.parameters}
cpu: 0.25
memory:
  heap: 1024
  metaspace: 128
File worker.yml for 10.2.1
# cat /opt/workfusion/vds-data/workers/app/com.workfusion.spa.ct/worker-app/10.1.0.32//worker.yml

command: ${java} -XX:CICompilerCount=2 -XX:+UseSerialGC -XX:MaxMetaspaceSize=${metaspace}M -Xmx${heap}M -XX:+ExitOnOutOfMemoryError -Dgroovy.use.classvalue=true -Dgroovy.target.indy=true -Dfile.encoding=UTF8 -Dexecution.task.queue.input=${tasks.queue} -Dlogging.path=${log.dir} -Dlogging.file=${log.file} -Djava.io.tmpdir=${temp.dir} -Dwebharvest.machine.config.bundle.dir=${temp.dir}/bcb -jar ${worker.jar} ${config.server.parameters}
cpu: 0.4
memory:
  heap: 1024
  metaspace: 512
health-checks:
  - protocol: MESOS_HTTP
    path: /actuator/health
    grace-period-sec: 180
    interval-sec: 60
    timeout-sec: 10
    max-failures: 3
Upgrade Business Processes
Migrate your Business Processes with Manual Tasks that use qualifications. To do that, refer to the following guides:
Check upgrade
Once the upgrade is complete, check the WorkFusion Platform with Business Process (BP) and Manual Task. The OCR must be activated. For more information on the post-installation checks, see Install components.