Use XPath in JavaScript
XPath in JavaScript: introduction
What is XPath
XPath is used to identify different parts of XML documents by indicating nodes by position, relative position, type, content, etc.
Similar to the DOM, XPath allows to pick nodes and sets of nodes out of an XML tree. There are seven different node types XPath has access to (for most JavaScript purposes the first four node types will most likely be sufficient):
Root Node
Element Nodes
Text Nodes
Attribute Nodes
Comment Nodes
Processing Instruction Nodes
Namespace Nodes
How XPath traverses the tree
XPath can use location paths, attribute location steps, and compound location paths to very quickly and efficiently retrieve nodes from our document. You can use simple location paths to quickly retrieve nodes you want to work with. There are two basic simple location paths: the root location path (/) and child element location paths.
The forward slash (/) servers as the root location path…it selects the root node of the document. It is important to realize this is not going to retrieve the root element, but the entire document itself. The root location path is an absolute location path, no matter what the context node is, the root location path will always refer to the root node.
Child element location steps are simply using a single element name. For example, the XPath p refers to all p children of our context node.
One of the really handy things with XPath is we have quick access to all attributes as well by using the at sign @ followed by the attribute name we want to retrieve. So we can quickly retrieve all title attributes by using @title.
XPath in JavaScript
- You can execute the following JavaScript snippets on this page - https://www.w3.org/TR/WCAG20-TECHS/H33.html
- To use XPath in IE 11, you need to include the following library - https://github.com/google/wicked-good-xpath
The document.evaluate method looks like this:
var theResult = document.evaluate(expression, contextNode, namespaceResolver, resultType, result);
- The
expressionargument is simply a string containing the XPath expression we want evaluate. - The
contextNodeis the node we want the expression evaluated against. - The
namespaceResolvercan safely be set to null in most HTML applications. - The
resultTypeis a constant telling what type of result to return. Again, for most purposes, we can just use the XPathResult.ANY_TYPE constant which will return whatever the most natural result would be. - Finally, the
resultargument is where we could pass in an existing XPathResult to use to store the results in. If we don’t have an XPathResult to pass in, we just set this value to null and a new XPathResult will be created.
Here’s a very simple XPath expression that will return all elements in our document with a title attribute.
var titles = document.evaluate("//*[@title]", document, null, XPathResult.ANY_TYPE, null);
If you take a look at the XPath expression we passed in “//\*[@title]”, you will notice that we used the attribute location step followed by the attribute we want to find, title:
- The two forward slashes preceding the at sign is how we tell the browser to select from all descendants of the root node (the document).
- The asterisk sign says to grab any nodes regardless of the type.
- Then we use the square brackets in combination with our attribute selector to limit our results only to nodes with a title attribute.
The evaluate method in this case returns an UNORDERED_NODE_ITERATOR_TYPE, which we can now move through by using the iterateNext() method like so:
var titles = document.evaluate("//*[@title]", document, null, XPathResult.ANY_TYPE, null);
var theTitle = titles.iterateNext();

while (theTitle){
    alert(theTitle.textContent);
    theTitle = titles.iterateNext();
}
Since each item in the results is a node, we need to reference the text inside of it by using thetextContent property (line 3). You can only iterate to a node once, so if you want to use your results later, you could save each node off into an array with something like below:
var titles = document.evaluate("//*[@title]", document, null, XPathResult.ANY_TYPE, null);
var arrTitles = [];
var theTitle = titles.iterateNext();

while (theTitle){
    arrTitles.push(theTitle.textContent);
    theTitle = titles.iterateNext();
}
Now, arrTitles is filled with your results and you can use them however often you wish.
This is just the beginnin, as we continue to look at XPath expressions and introduce predicates and XPath functions, you will start to see just how truly robust XPath expressions are.
snapshotItem(int i)
With the resultType property, the type of the result can be retrieved. If the value of the resultType property is UNORDERED_NODE_SNAPSHOT_TYPE or ORDERED_NODE_SNAPSHOT_TYPE, then the result contains snapshots for all nodes that match the expression. In this case, the snapshotItem(i) method can be used to retrieve the matching nodes from the snapshots collection, by position. Use the snapshotLength property to get the length of the snapshots collection.
The snapshotItem method is similar to the iterateNext method. Both provide access to the matching nodes. The main difference is that the modification of the document invalidates the iteration, but does not invalidate the snapshots collection.
document.evaluate("//div[@class='spacer js-gps-track']/a", document, null, XPathResult.ORDERED_NODE_SNAPSHOT_TYPE, null).snapshotItem(1).innerText
Different ways of choosing XPaths
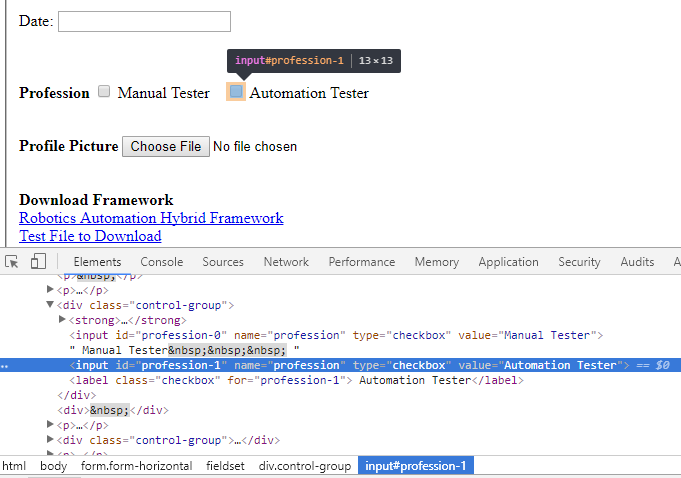
Let's take an example of the Automation Tester checkbox on the https://rpa-tutorial.s3.amazonaws.com/trainings/iframe/form.html form.
Absolute XPath
The easiest way of finding the xpath is to use the Browser Inspector tool to locate an element and get the XPath of it.
/html/body/form/fieldset/div[20]/input[2]
Relative XPath
At times XPath generated by Firebug or XPath Helper plugins are too lengthy and there is a possibility of getting a shorter XPath. Above XPath will technically work, but each of those nested relationships will need to be present 100% of the time, or the locator will not function. Above choosen XPath is known as Absolute XPath. It is always better to choose a Relative XPath, as it helps us to reduce the chance of element not found exception.
To choose the relative XPath, it is advisable to look for the recent Id attribute. Look below at the HTML code of the above screenshot.
Relative XPaths:
//input[@id='profession-1']
//div[@class='control-group'][5]/input[2]
Difference between single ‘/’ or double ‘//’
- A single slash at the start of Xpath instructs XPath engine to look for element starting from root node.
- A double slash at the start of Xpath instructs XPath engine to search look for matching element anywhere in the XML document.
Relative XPath with FirePath
There is an alternate way to get the relative XPath with help of the FirePath tool. Click on the drop down menu on the FirePath button and unselect Generate absolute XPath.

Now, click on the same element with the Inspector, the new XPath will look like this:
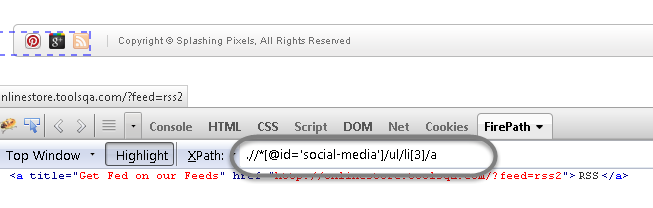
If something gets changed above the ID social-media, your XPath will still work.
Single ‘/’ and double ‘//’ in XPath
- A single slash ‘/’ anywhere in Xpath signifies to look for the element immediately inside its parent element.
- A double slash ‘//’ signifies to look for any child or any grand-child element inside the parent element.
Relative XPath with //
//form//input[@name='profession'][2]
Partial XPath: Contains Keyword
Most of the times users face issues when the locator’s properties are dynamically generating.
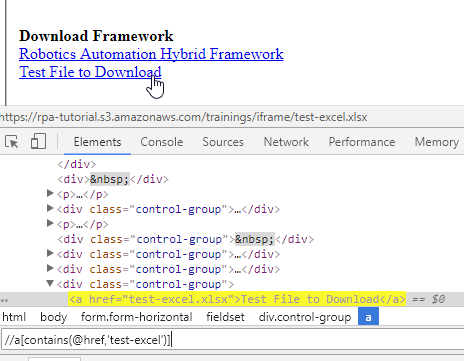
The only thing we are sure here is that the text ‘test-excel’ will always be included in the href of this link, so we can utilize this hint in our XPath like this:
//a[contains(@href,'test-excel')]
Partial XPath: starts-with keyword
Now let’s take another example and assume that the "value" attribute is dynamically generating.
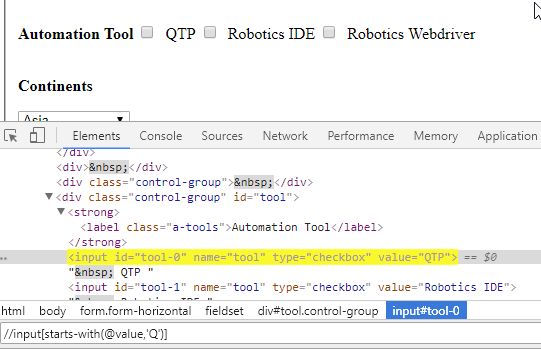
//input[starts-with(@value,'Q')]
Partial XPath: text keyword
You can also select an element by its inner text:
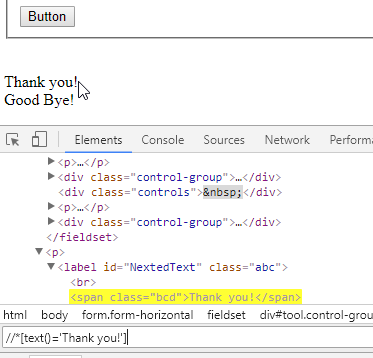
//*[text()='some text']
Combination of contains and text():
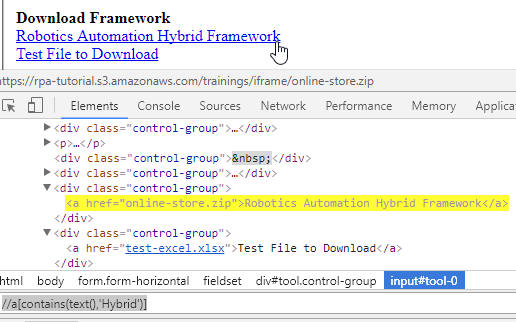
//a[contains(text(),'Hybrid')]