Configure no-code Generic Connector
Using the no-code Connector step, you can apply multiple configuration options to handle different connection scenarios and create custom connectors for the integration of external services into your automations.
Generic Connector types
There are several types of the no-code Generic Connector you can add to your Business Process (BP):
- Generic Connector: a standard Bot Task that receives data from an AI Agent and sends it to an external system (the producer connector).
- Generic Connector Trigger: a Trigger start element that retrieves data from an external system for processing by an AI Agent (the consumer connector).
Adding connector to Business Process workflow
To add the Generic Connector to your BP workflow, do as follows:
In the Business Processes list, open a needed BP instance or create a BP by clicking the Create New button.
Add a Generic Connector of the required type:
Once you added the needed connector to your BP workflow, you can proceed to its configuration.
Add Generic Connector
You can add the Generic Connector as a standard Bot Task to your BP flow in one of the ways described below.
Add from toolbar
To add a connector from the toolbar, follow the steps below:
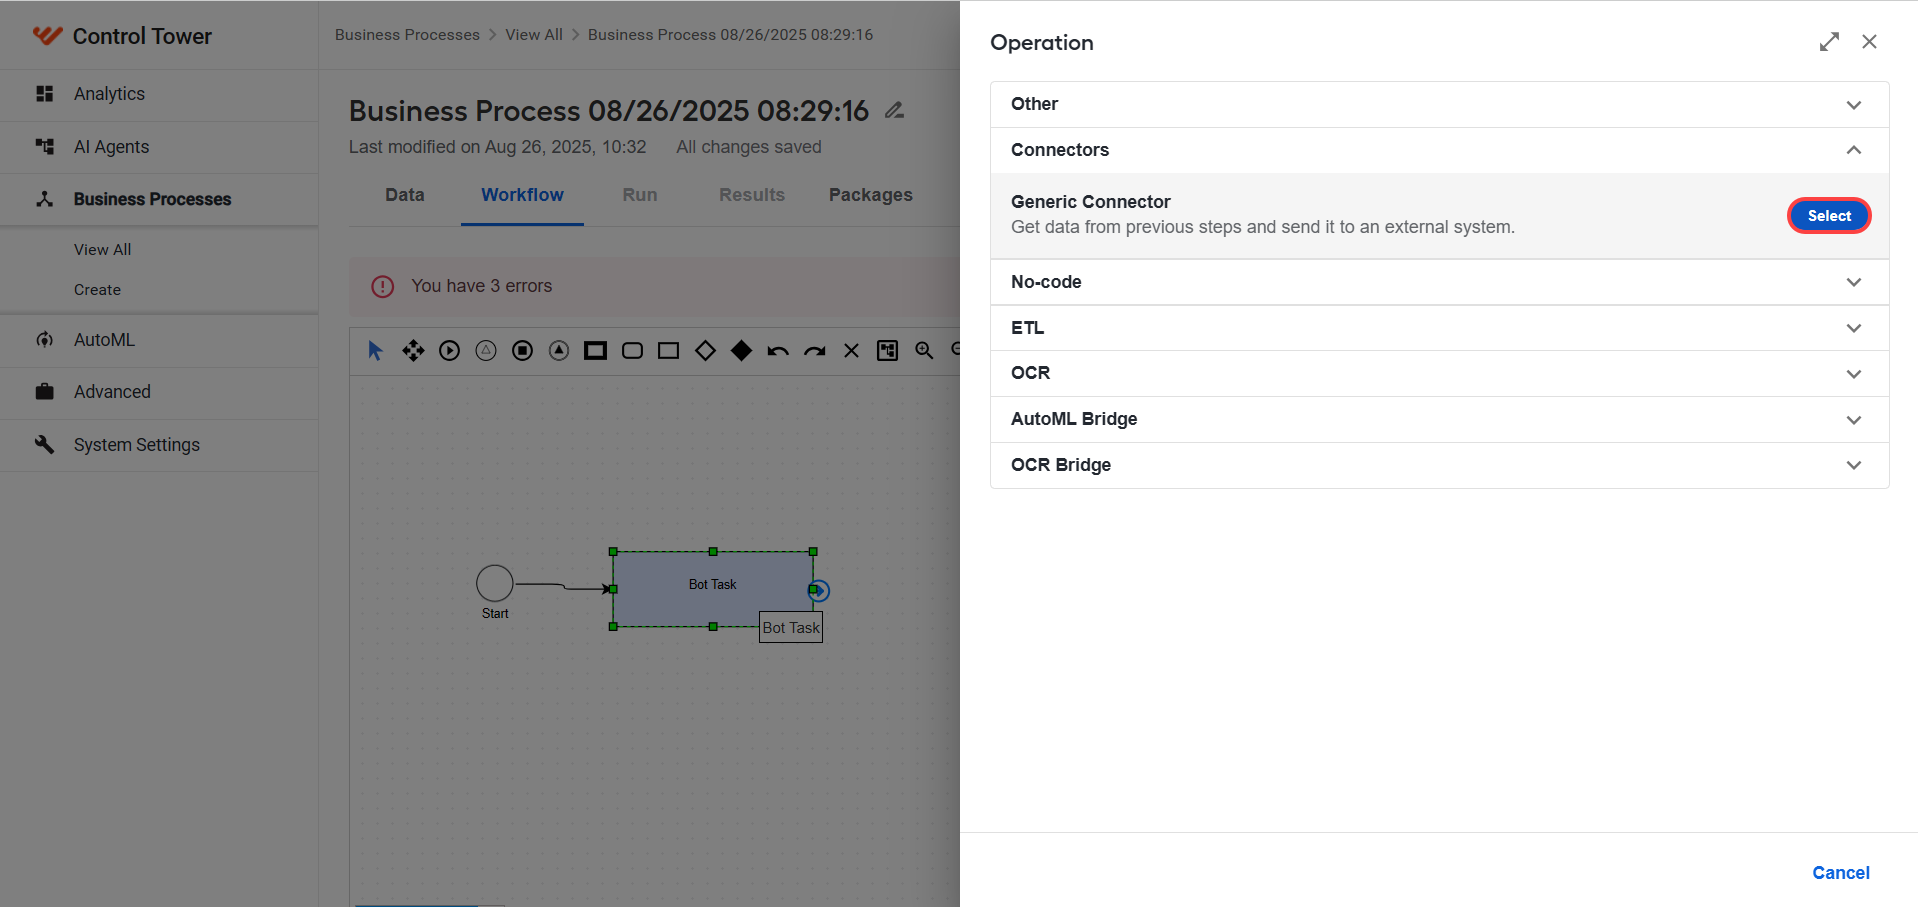
Navigate to the Workflow tab and drag the Bot Task element from the toolbar.
Double-click the element. In the Operation menu, choose Connectors > Generic Connector and click Select.
Add from reusable components
To add a connector from the Reusable components panel, follow the steps below:
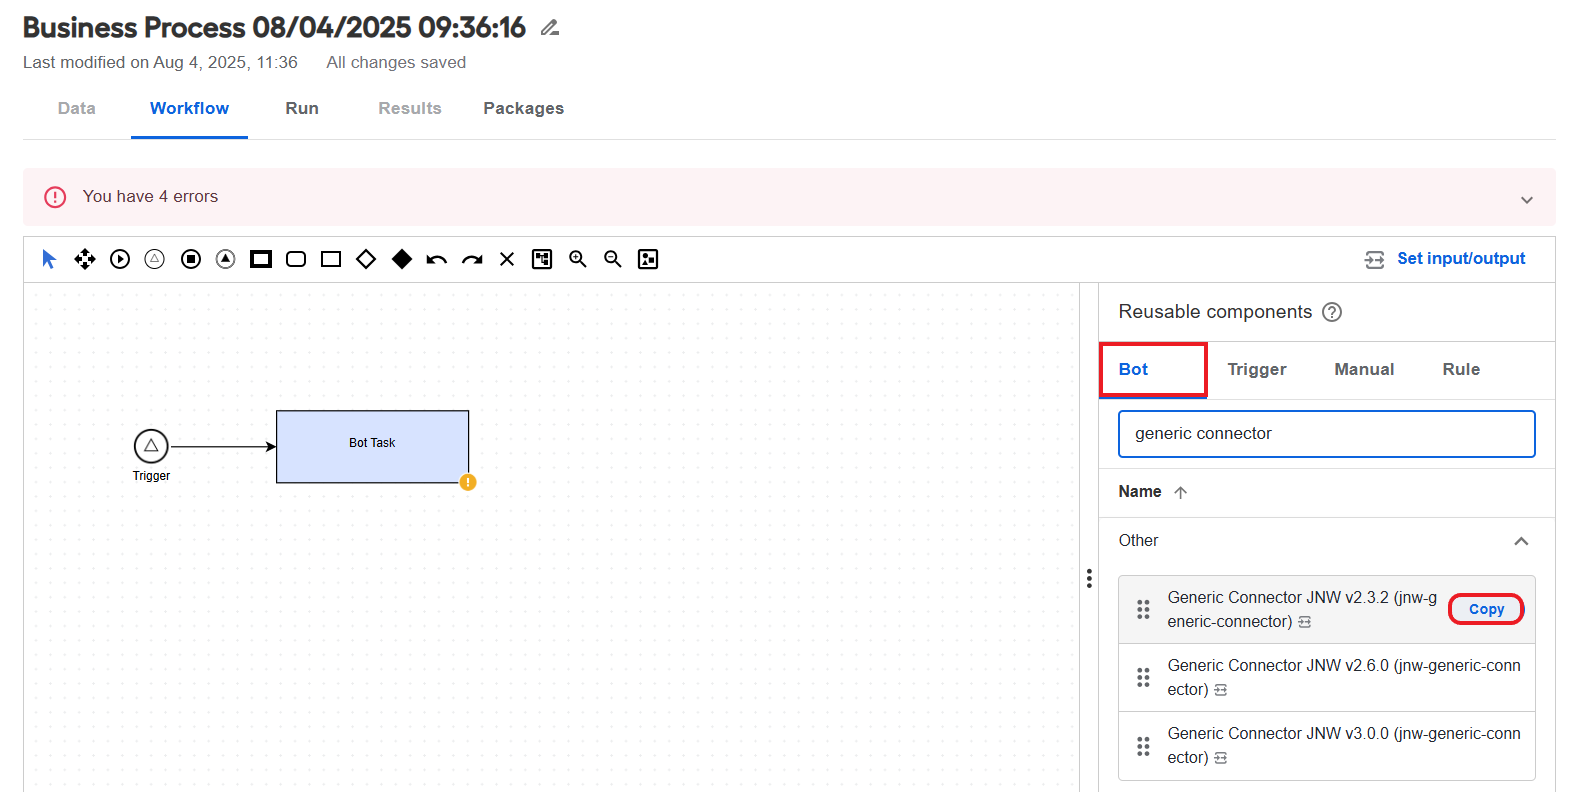
Navigate to the Workflow tab, go to the side panel, and select the Bot tab.
In the search field, enter Generic Connector as the desired connector.
Move the pointer over the Generic Connector bot step and click Copy.
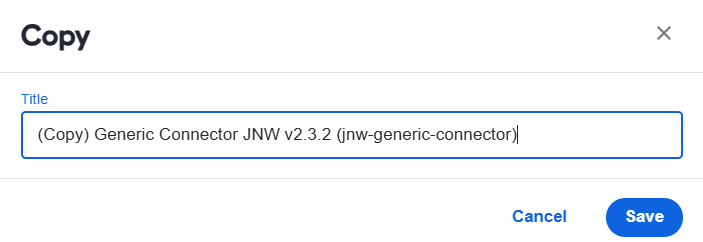
Specify a suitable name corresponding to the intended task and click Save.
 warning
You must make a duplicate copy. Do not modify the original template.
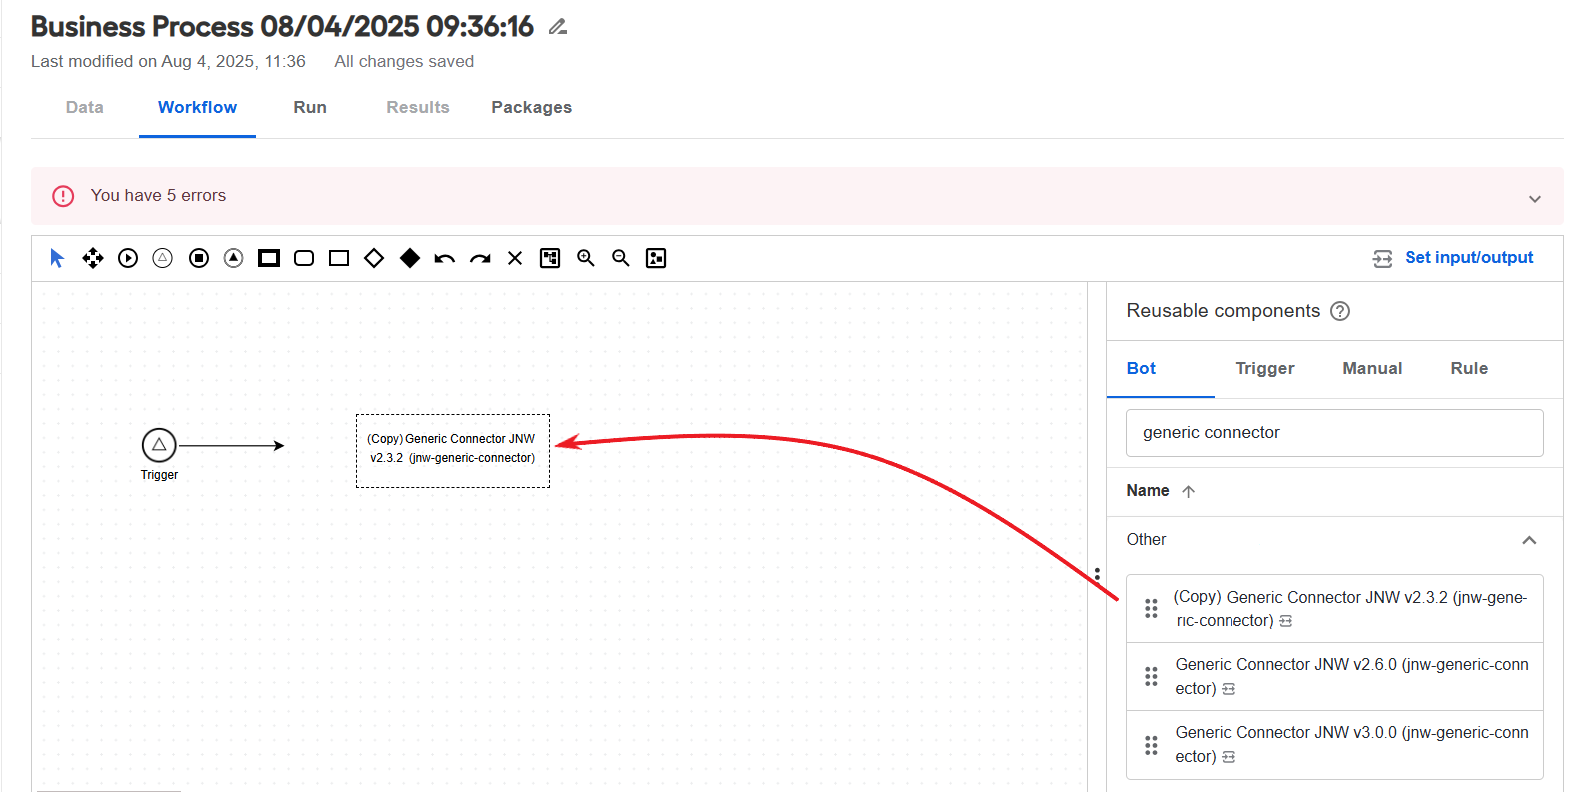
Drag the copied step to the canvas. As a result, you create an independent step instance: the changes you make in the copy are not synchronized with the source.
Add Generic Connector Trigger
The Generic Connector Trigger or a No-code Trigger step can only be the start element of your BP. You can add it in one of the ways described below.
Add from toolbar
To add a Generic Connector Trigger from the toolbar, follow the steps below:
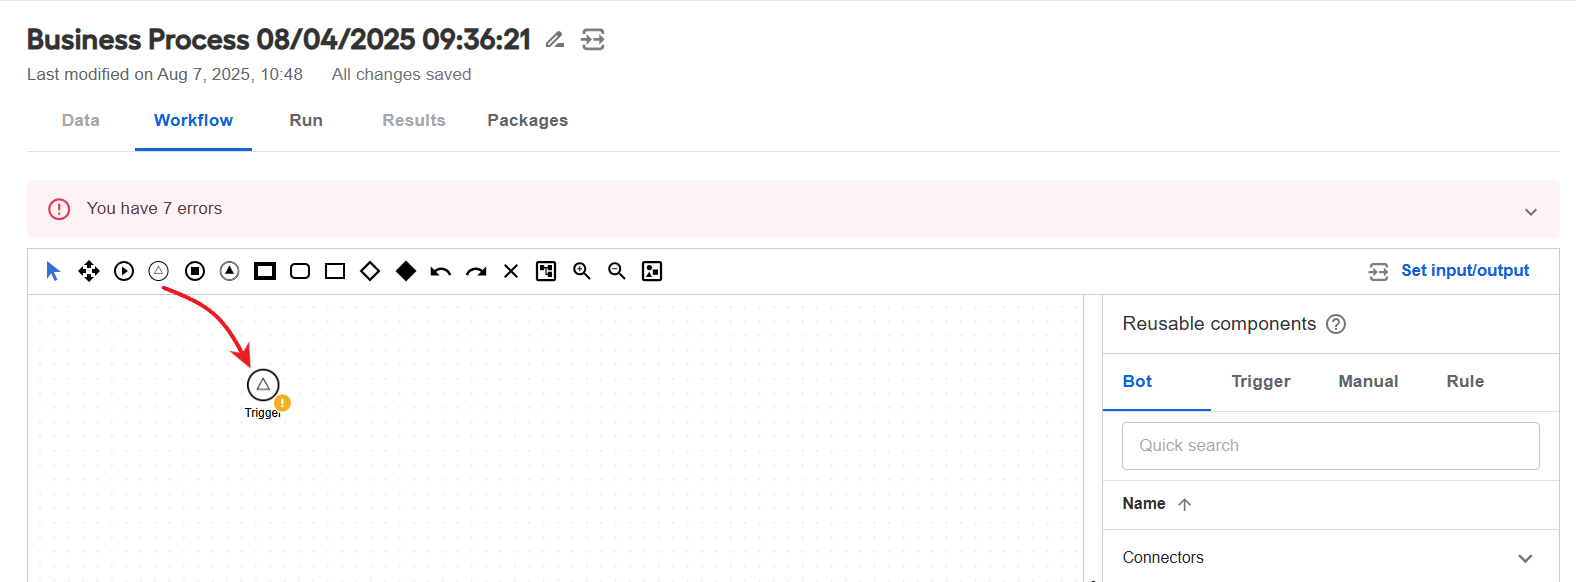
Navigate to the Workflow tab and drag the Trigger element from the toolbar to the canvas.
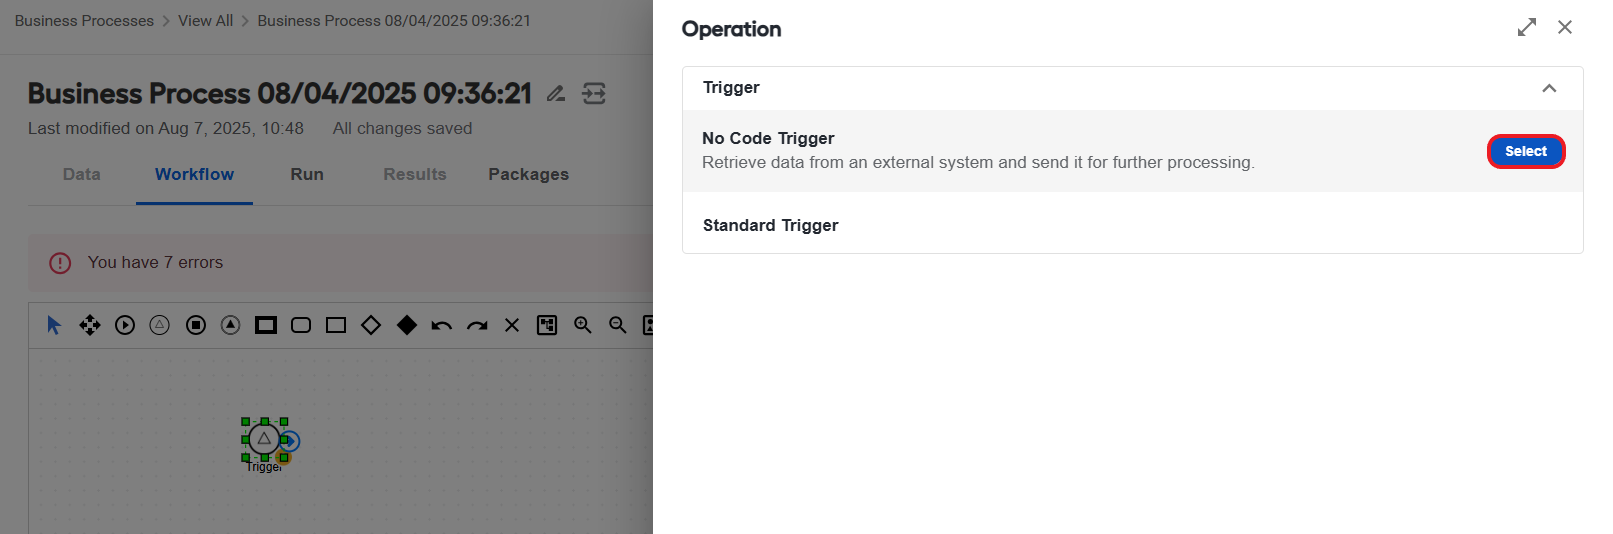
Double-click the element. In the Operation menu, choose Trigger > No Code Trigger and click Select.
Add from reusable components
To add a Generic Connector Trigger from the Reusable components panel, follow the steps below:
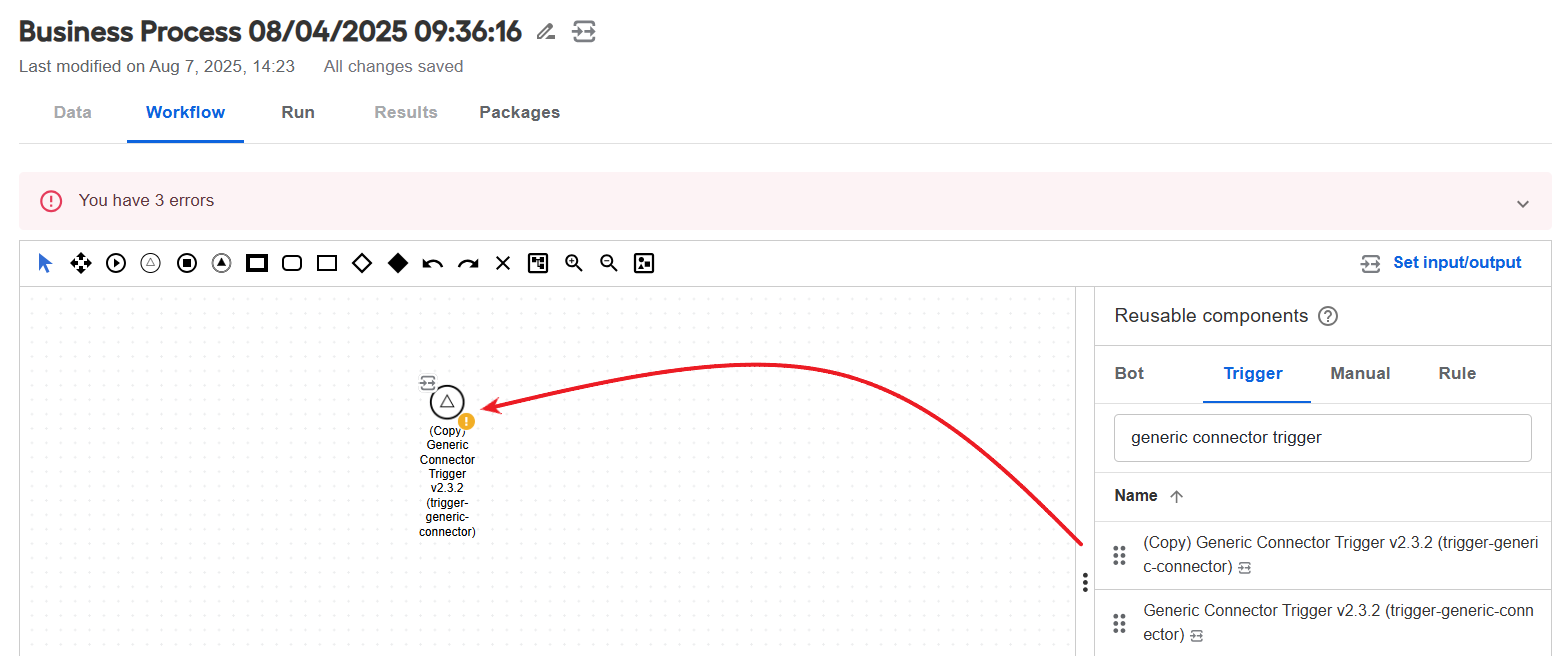
Navigate to the Workflow tab, go to the Reusable components panel, and select the Trigger tab.
In the search field, enter Generic Connector Trigger as the desired connector.
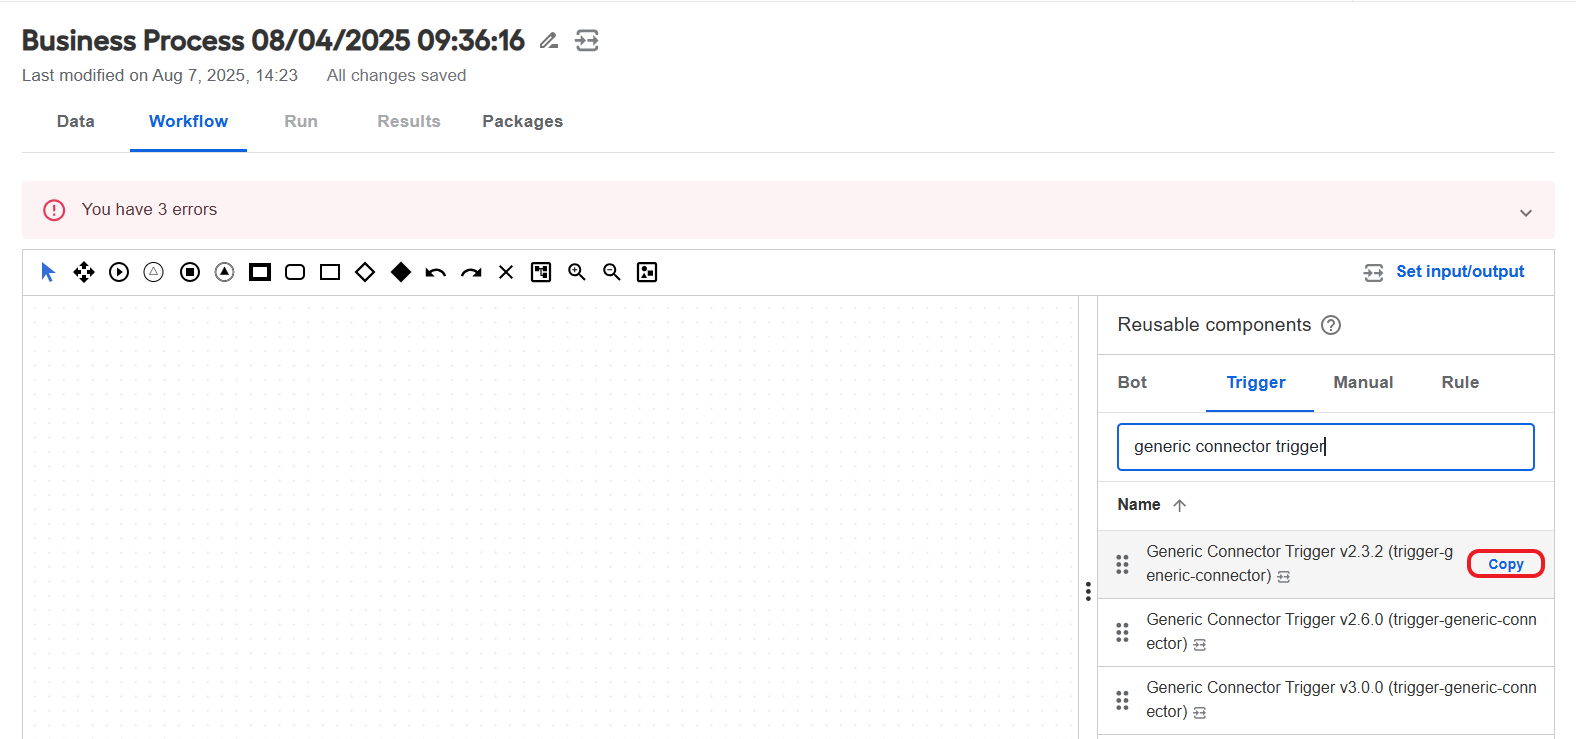
Move the pointer over a Generic Connector Trigger bot step and click Copy.
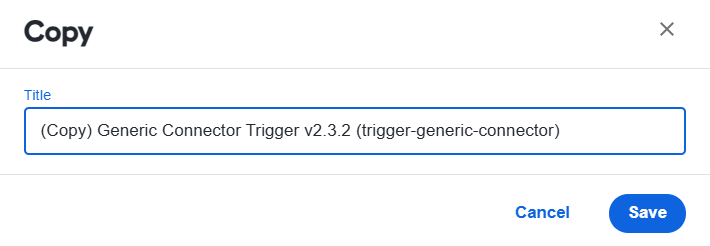
Specify a suitable name corresponding to the intended task and click Save.
Drag a copied step to the canvas. As a result, you create an independent step instance: the changes you make in the copy are not synchronized with the source.
You must make a duplicate copy. Do not modify the original template.
Configuration
When you add the Generic Connector to your BP workflow, configure its settings:
Double-click the Bot Task with the Generic Connector to open its configuration panel.
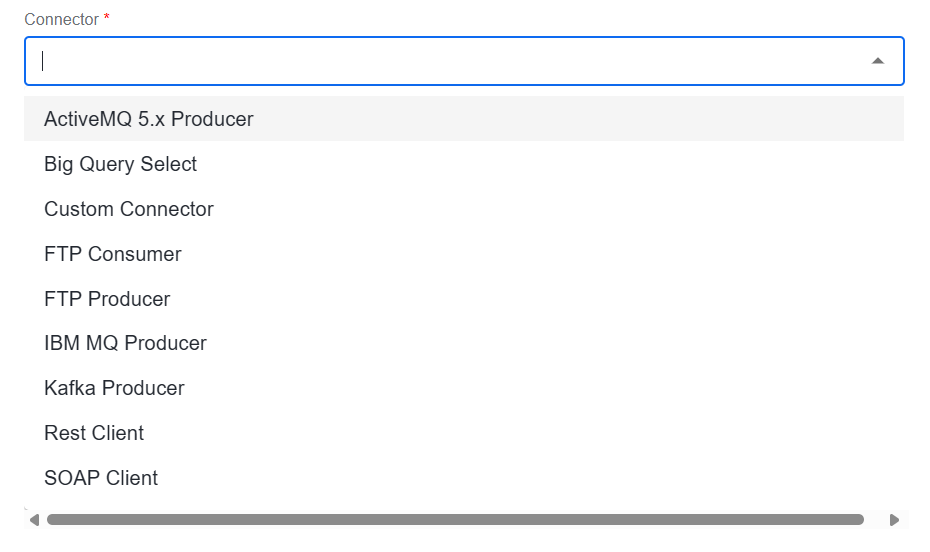
Go to the Design tab. In the Connector dropdown list, select a needed configuration. The list of available options is fetched from the Generic Connector metadata table via the Data Store REST API.
For a Bot Task, the Generic Connector out-of-the-box options are as follows:
- ActiveMQ Producer
- Big Query Select
- IBM MQ Producer
- FTP Producer
- FTP Consumer
- Kafka Producer
- Rest Client
- SOAP Client
For a Trigger step, the Generic Connector Trigger out-of-the-box options are as follows:
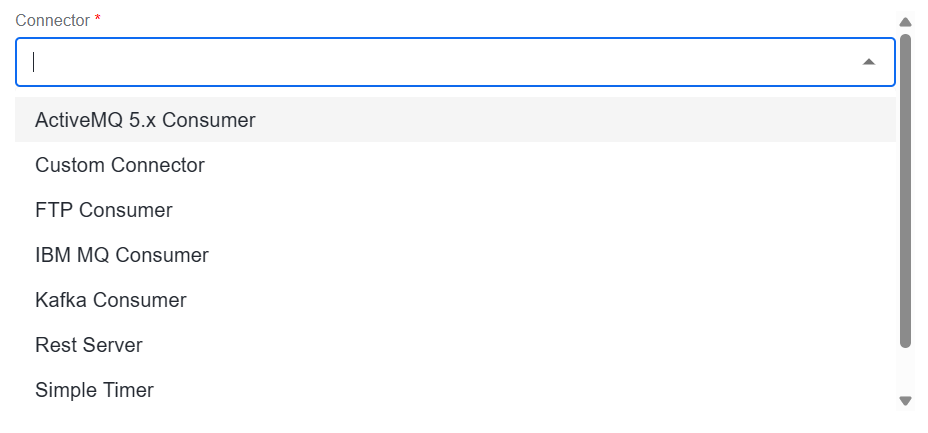
Fill in the needed fields and click Save. The configuration values, component dependencies, and the route template are injected into the Bot Task configuration to start the task execution.
You can add the Generic Connector functionality by entering the required metadata in the ds.ds_uc_genericconnector_component_v1 Data Store.
ActiveMQ Producer
Configuration settings
Select ActiveMQ Producer for the Bot Task to send messages to an active MQ queue. The step also passes the messages to the next step in the workflow.
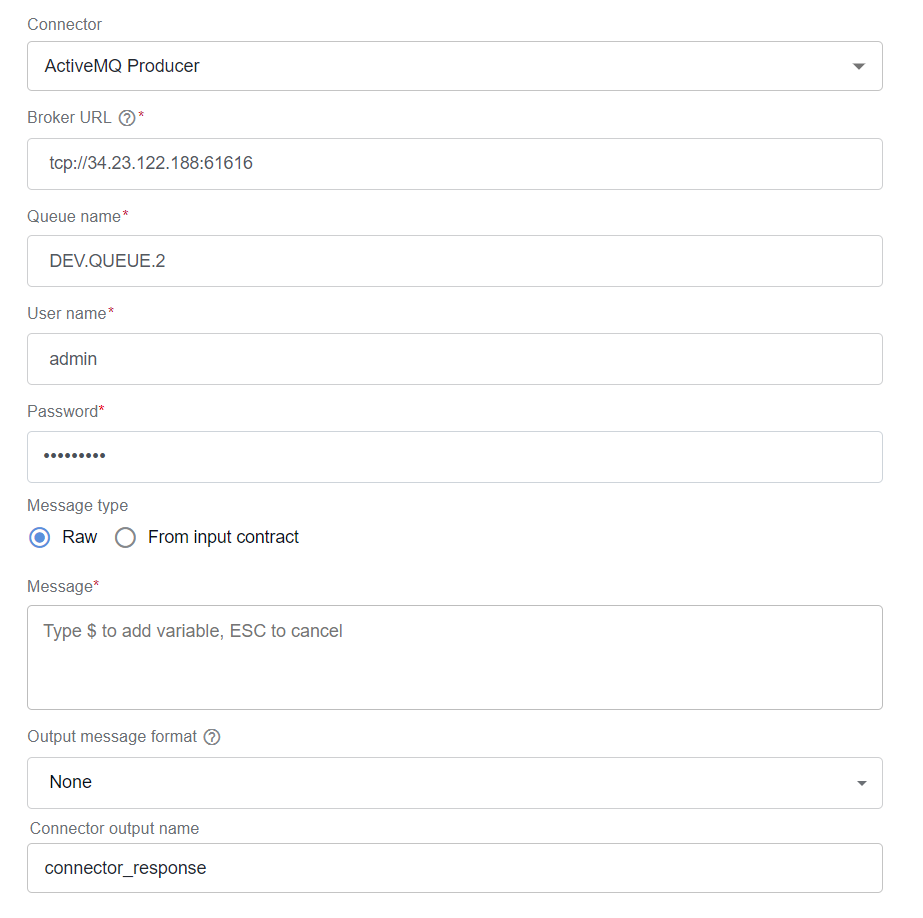
Fill in the following settings:
Broker URL. Establish a connection to the ActiveMQ message broker using a connection string or URI that specifies the broker's location and configuration details. This includes information such as the protocol (for example, TCP), hostname or IP address, and the port number where the ActiveMQ broker is running.
Queque name. Specify the name of a specific queue in the ActiveMQ broker. Queues are destinations for messages and follow the point-to-point messaging pattern, meaning messages sent to a queue are typically consumed by a single consumer. Queue names are used to identify where messages are sent and retrieved.
User name. Enter a username for authentication when connecting to the ActiveMQ broker. Typically, it is part of the authentication process to ensure that only authorized users or applications can access and interact with the broker. Depending on the configuration, it can be used with a password.
Password. Enter a secret or a password used in combination with the username to authenticate and establish a secure connection to the ActiveMQ broker. This ensures that only authorized users or applications can connect and perform operations on the broker.
noteIn the screenshot above, the password and message use parameter substitution to retrieve the data from Secrets Vault and the previous Bot Task.
Message type. Select the type of input from the previous step:
- Raw. In the Message field, specify raw data to be sent as a message. You can enter any value. For contracts, only JSON can be sent between steps.
A message is a data unit sent and received by applications through the message broker. ActiveMQ supports different message types, including text messages, binary messages, and more. Messages are published to topics or sent to queues and are consumed by consumers to facilitate communication and data exchange between applications.
- From input contract. Select the option to use the input contract from the Input / Output tab as the request body. Make sure the input contract name is
requestBody.
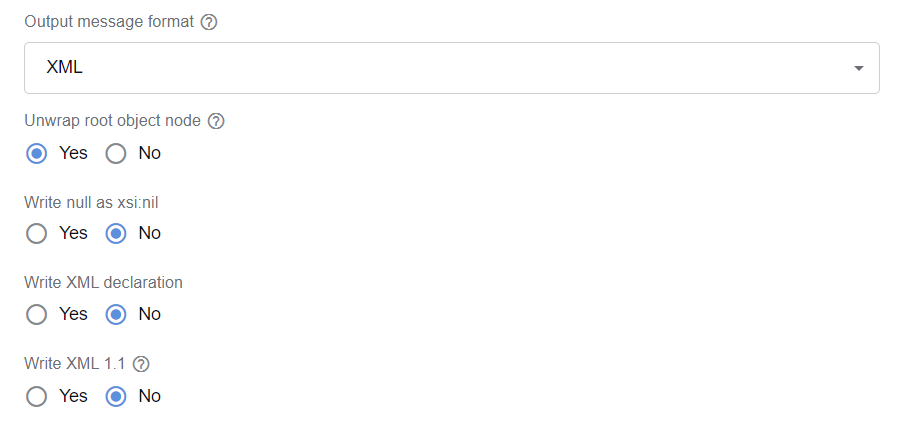
Output message format (optional). Select the option to convert the message to one of the listed message formats before sending it to a queue. Leave None (the default) if not applicable.
- XML
- CSV
- Fixed-Width
Unwrap root object node. Determines how root values of the
ObjectNodetype (theJsonNodesubtype that representsObjectcontent values) are written. IfObjectNodehas only one key-value entry, select Yes to use that key as the root element name. If the rootObjectNodehas more than one entry, select No to determine the root element name using the standard logic (explicitly configured or default).Write null as xsi:nil. Select Yes to represent a field with a null value an XML element with the
xsi:nilattribute set totrue. It means the element has a null value and is not equivalent to an empty or missing element.Write XML declaration. Select Yes to add the XML declaration at the beginning of the XML document.
Write XML 1.1. Select Yes to output XML in version 1.1. In this case, certain aspects can differ from the default 1.0 processing. For example, an XML declaration is automatically added (regardless of the Write XML declaration option) to indicate that XML 1.1 compliant handling is used. XML 1.1 allows quoted control characters (ASCII codes 0–31), additional line feeds, and more name characters.
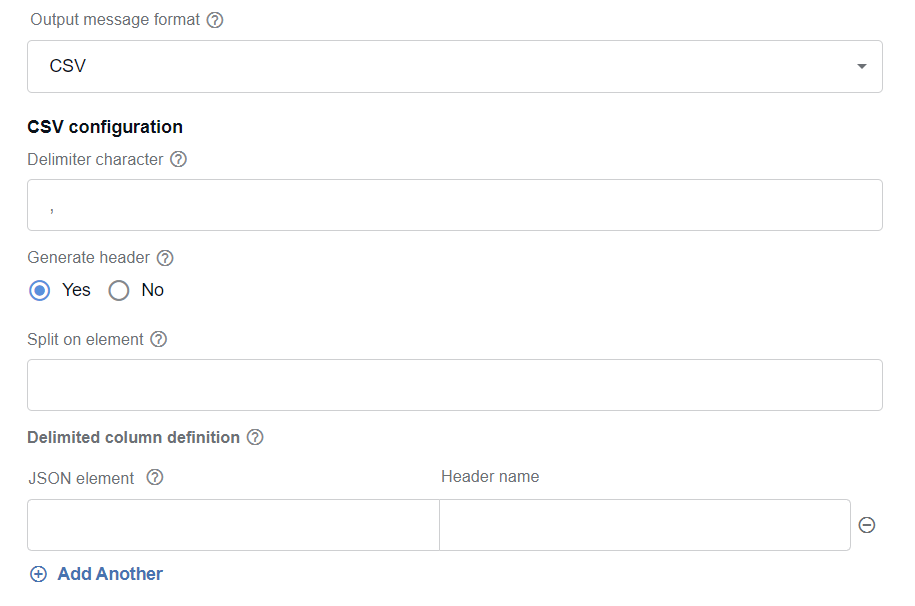
Delimiter character. Specify a character to be used as a delimiter between values in the output data (default is a comma).
Generate header. Select Yes to include a header in the output. In this case, the Delimited column definition grid contains the Header name column.
Split on element. Specify a JSON element in the data to split on.
Delimited column definition:
- JSON element. Specify a JSON element to be used as the source data for the column definition. You can define one or more JSON elements.
- Header name. Provide the header name for the column if you previously selected Yes for the Generate header option.
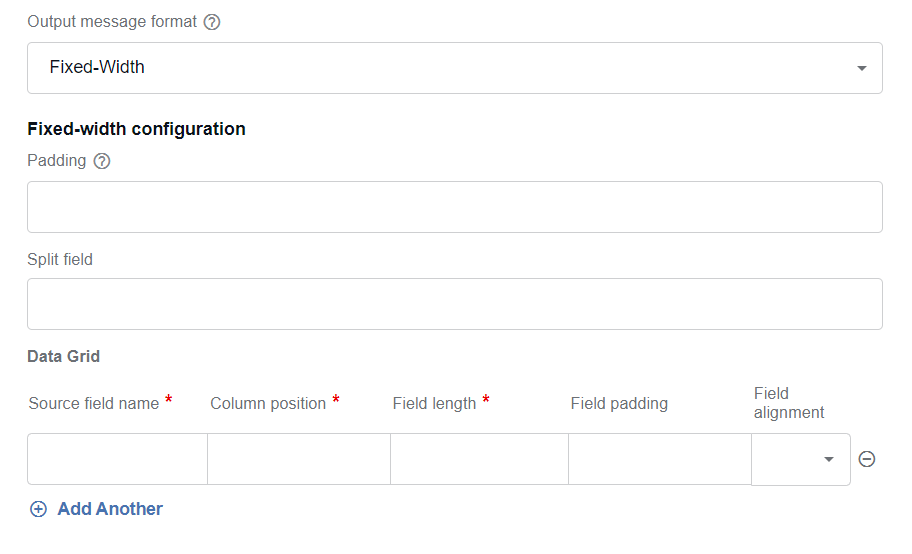
Padding. Specify a character to be used for padding values (default is a space).
Split field. Specify a JSON element to perform splitting on.
Data Grid:
Source field name. Specify a JSON element to be used as the source data for the field.
Column position. Specify the start position of the column.
Field length. Specify the size or length of the column.
Field padding (optional). Define the padding to apply.
Field alignment. Select how to align the column data: Left, Right, or Center.
Big Query Select
Configuration settings
Select Big Query Select for the Bot Task to execute a Big Query Select statement against BigQuery. The result is sent to the next step.
Specify the following required parameters:
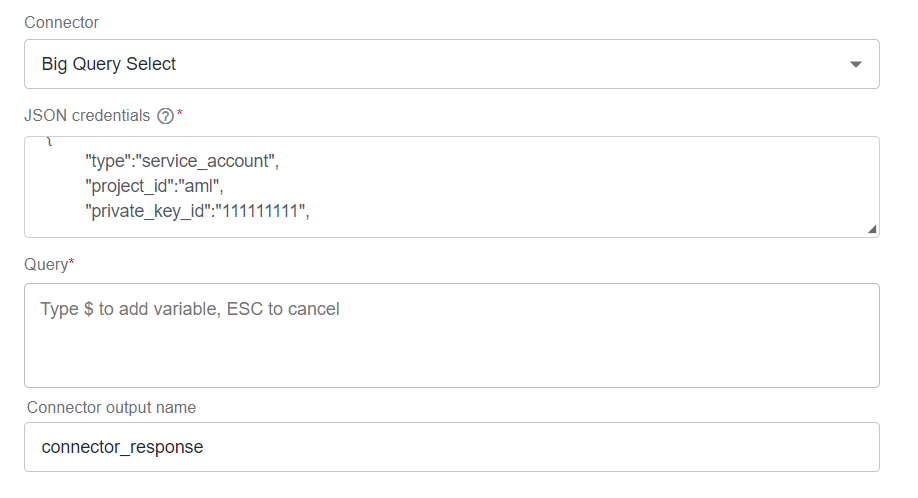
- JSON credentials. Enter your JSON credentials for authentication in BigQuery. In the example below, the credentials are associated with a service account. For more details, see Create and delete service account keys | IAM Documentation | Google Cloud.
- Query. A query in BigQuery is an SQL (Structured Query Language) statement used to interact with and analyze data stored in the BigQuery platform. It allows you to extract, transform, and analyze large datasets for various purposes, such as reporting, data exploration, and machine learning.
IBM MQ Producer
Configuration settings
Select IBM MQ Producer for the Bot Task to send messages to an IBM MQ queue. The step also passes the messages to the next step in the workflow.
Specify the following required parameters:
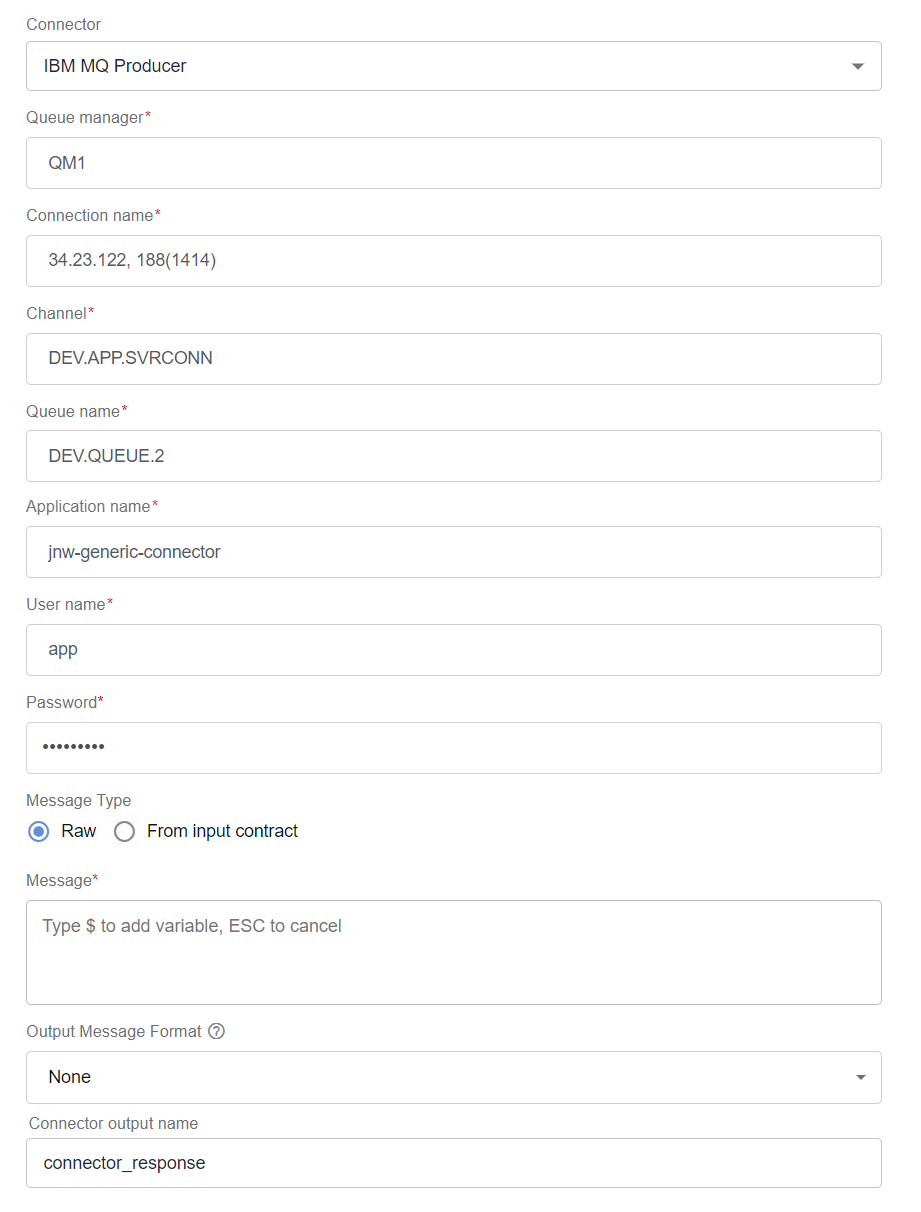
Queue manager. Specify the MQ queue manager name. The queue manager is a fundamental component in IBM MQ responsible for managing message queues. It controls the creation, administration, and routing of messages to and from various queues. Typically, each IBM MQ installation has one or more queue managers.
Connection name. Enter the network address or hostname and the port number used to establish a network connection between two queue managers through a communication channel. It specifies the destination queue manager to which messages are sent.
Channel. Enter a communication pathway that allows messages to flow between two queue managers, whether on the same system or connected over a network. Channels are configured to establish connections and transmit data between queue managers. There are different channel types, such as sender, receiver, server, and client channels, each serving a specific purpose.
Queue name. Enter the name of a specific queue within an IBM MQ queue manager. Applications can send messages to a queue or retrieve them from it using the queue name. Queue names are used to identify the destination of messages.
Application name. Enter a user-defined identifier for the application or program that connects to the IBM MQ queue manager. It can help identify and monitor the source of connections in the queue manager's logs and monitoring tools.
User name. Enter the identification used for authentication when connecting to an IBM MQ queue manager. It is often used with a password to ensure secure access to the message queuing system.
Password. Enter a secret or credentials required for authentication when connecting to an IBM MQ queue manager, especially if authentication and security measures are in place. It is used with a username to establish a secure connection.
Message type. Select the type of input from the previous step:
- Raw. In the Message field, specify raw data to be sent as a message. You can enter any value. For contracts, only JSON can be sent between steps.
A message is the fundamental data unit that contains the actual data that applications send and receive through the messaging system. Messages can have various attributes and data types, and they are typically placed in queues for processing or transmission between applications.
- From input contract. Select to use the input contract from the Input / Output tab as the request body. Make sure the input contract name is
requestBody.
Output message format (optional). Select the option to convert the message to one of the listed message formats before sending it to a queue:
- None (the default option)
- XML
- CSV
- Fixed-Width
For more details, see ActiveMQ Producer | Output message format.
FTP Producer
Configuration settings
Select FTP Producer for the bot step to upload a file to an FTP server. You can set it to retrieve uploaded files from sources like S3, a local shared file system (useful for steps requiring local storage for file manipulation), or data generated by the previous step. After saving the configuration, complete the required setup on the Input/Output tab.
Specify the following required parameters:
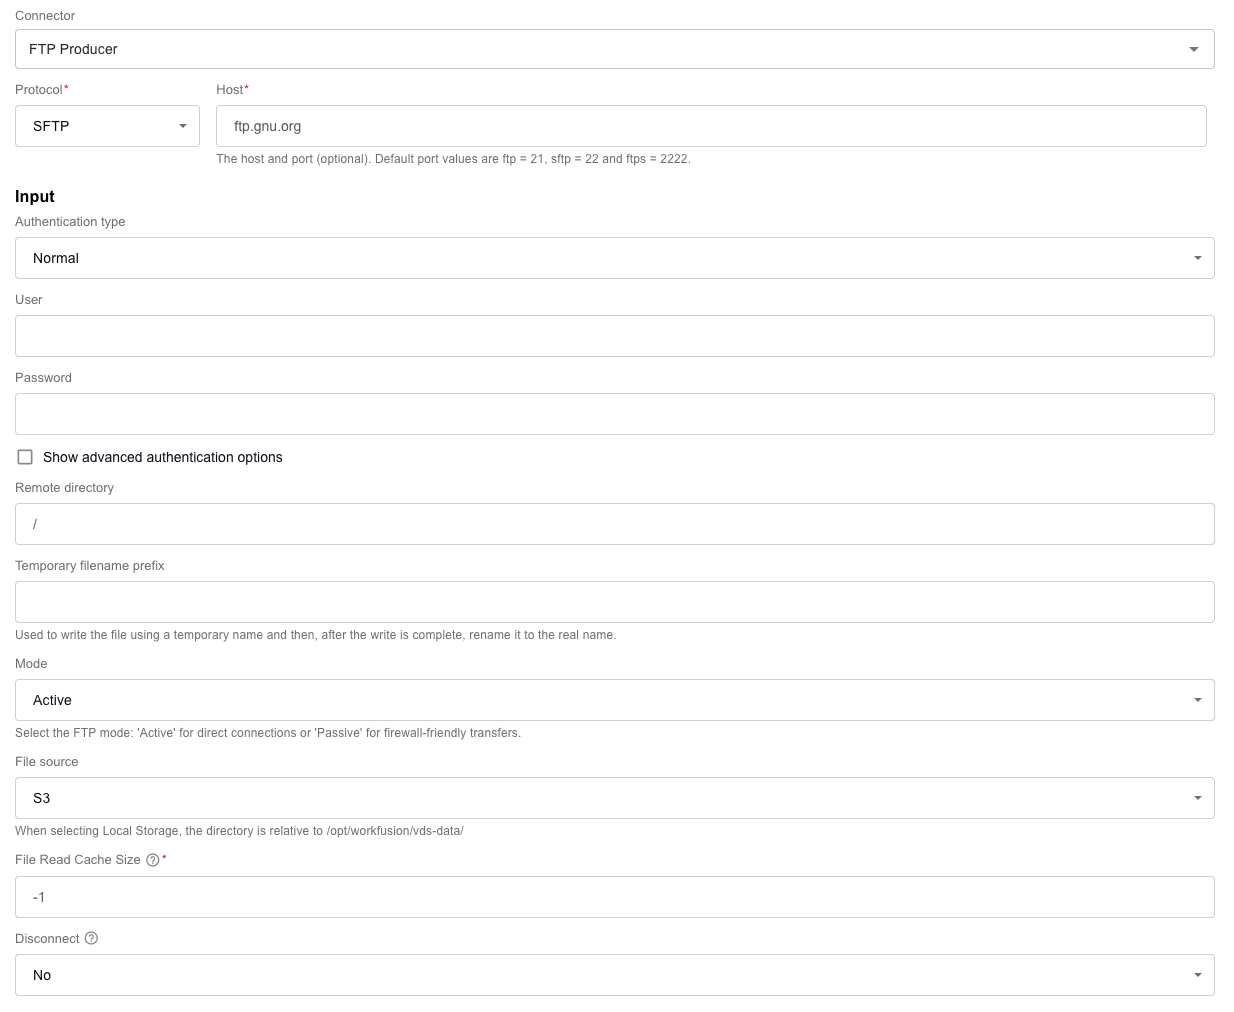
Protocol. Select the file transfer protocol, ensuring it meets security and configuration requirements:
FTP: Standard File Transfer Protocol (port 21).
FTPS: FTP with SSL/TLS encryption for secure transfers (port 2222).
SFTP: SSH File Transfer Protocol (port 22).
Host. Enter the FTP server's hostname and optional port. If not specified, the default port for the selected protocol is used:
FTP: 21
FTPS: 2222
SFTP: 22
Authentication type. Configure the authentication method for secure server access.
- None: no authentication is required (only for open servers).
- Normal: username and password authentication. Provide credentials in the User and Password fields.
- Private: private key authentication, mainly for SFTP connections. An optional passphrase may be added for extra security. Specify the following parameters:
- User. Enter the username required for authentication.
- Password. Enter the password associated with the specified username.
- Private key. Provide the private key for authentication.
- Private key passphrase. Set the passphrase for the private key verification.
Show advanced authentication options. For SFTP connections, additional security configurations are available. Customize algorithms and protocols for secure communication and server compatibility.
- Public key accepted algorithms. List public key algorithms, such as
ssh-rsaandecdsa-sha2-nistp256. - Server host keys. Specify algorithms supported for server host keys, such as
ssh-dssandecdsa-sha2-nistp384. - Key exchange protocols. Set preferred key exchange protocols, such as
diffie-hellman-group14-sha1andecdh-sha2-nistp521.
- Public key accepted algorithms. List public key algorithms, such as
Remote directory. Specify the target directory on the FTP server.
Temporary filename prefix. Define a prefix for temporary filenames. The prefix is applied during upload and replaced with the actual filename upon completion.
Mode. Select the FTP connection mode.
- Active establishes a direct connection to the client for data transfer.
- Passive enables a client-initiated connection to the server. Recommended for environments with firewall restrictions.
File source. Select where to source the files from:
Local Storage. Source files from a local directory relative to
/opt/workfusion/vds-data/.- Local Directory. Enter the path to the local storage.
- File Name. Define the filename to be transfered.
- Delete the file upon completion. Select Yes to delete the file after a successful transfer.
- Timeout. Set the access time limit (in milliseconds) to prevent indefinite blocking. Enter
-1to wait indefinitely or0to return immediately if the file is unavailable.
File content. Provide the filename and content directly for transfer.
S3. Access files from an Amazon S3 URL.
- S3 URL. Specify the S3 file URL.
File Read Cache Size. Define the number of files that can be checked simultaneously when searching for the file to transfer. Enter
-1for unlimited.Disconnect. Select whether to close the FTP/SFTP connection immediately after the transfer is completed.
Output. Configure how to handle service connection results:
Failed connection. Select the option for a failed connection:
- Throw exception triggers an exception and allows the step to retry in Control Tower. This retry mechanism is independent of the connector's retry configuration.
- Send failure response sends an exception response to the next step.
- Empty output sends an empty output to the next step.
Retry on failure. Select Yes to retry the connection within the step instead of at the Control Tower level.
Max attempts. Set the maximum number of retry attempts. Once all attempts fail, the option selected in Failed connection is applied.
Delay. Specify the delay (in milliseconds) between retries.
FTP Consumer
Configuration settings
The FTP Consumer allows a bot step to download a file from an FTP server.
Specify the following required parameters:
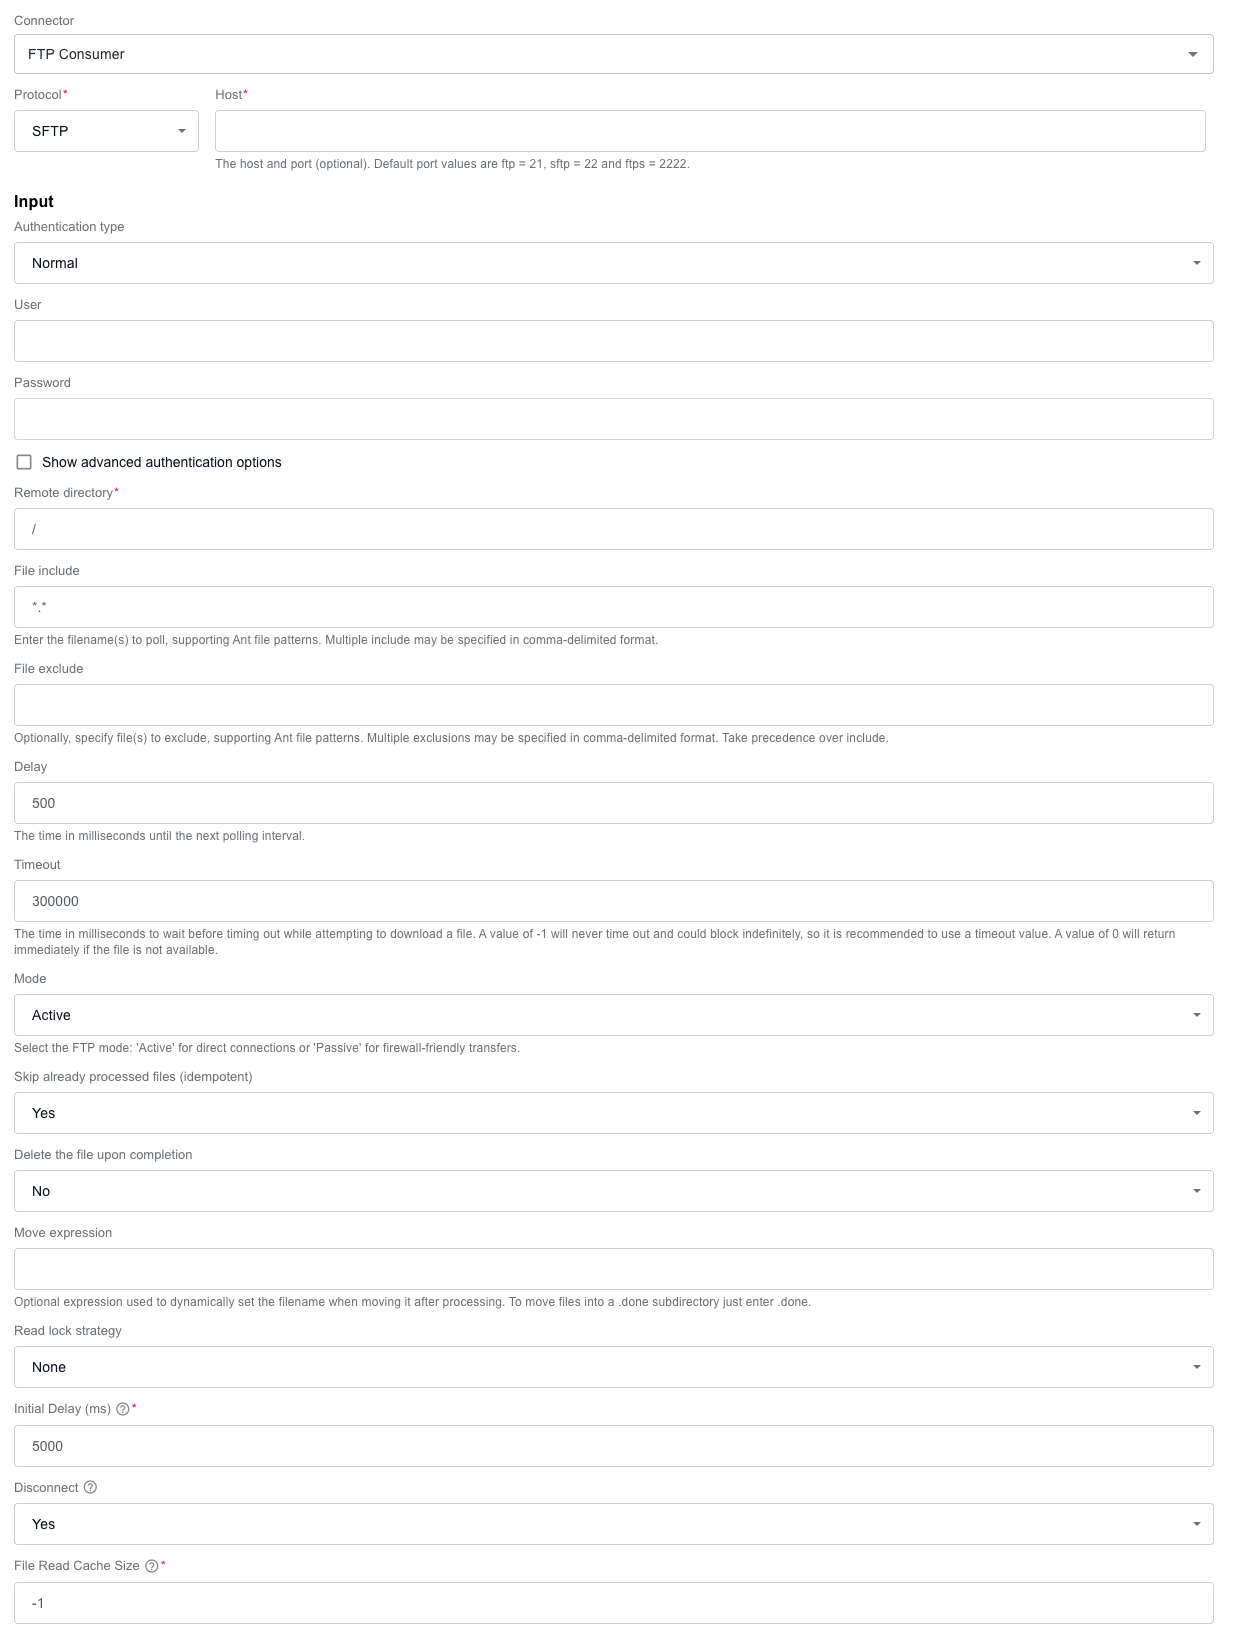
Protocol. Select the file transfer protocol, ensuring it meets security and configuration requirements:
FTP: Standard File Transfer Protocol (port 21).
FTPS: FTP with SSL/TLS encryption for secure transfers (port 2222).
SFTP: SSH File Transfer Protocol (port 22).
Host. Enter the FTP server's hostname and optional port. If not specified, the default port for the selected protocol is used:
FTP: 21
FTPS: 2222
SFTP: 22
Authentication type. Configure the authentication method for secure server access.
- None: no authentication is required (only for open servers).
- Normal: username and password authentication. Provide credentials in the User and Password fields.
- Private key: private key authentication, mainly for SFTP connections. An optional passphrase may be added for extra security. Specify the following parameters:
- User. Enter the username required for authentication.
- Password. Enter the password associated with the specified username.
- Private key. Provide the private key for authentication.
- Private key passphrase. Set the passphrase for the private key verification.
Show advanced authentication options. For SFTP connections, additional security configurations are available. Customize algorithms and protocols for secure communication and server compatibility.
- Public key accepted algorithms. List public key algorithms, such as
ssh-rsaandecdsa-sha2-nistp256. - Server host keys. Specify algorithms supported for server host keys, such as
ssh-dssandecdsa-sha2-nistp384. - Key exchange protocols. Set preferred key exchange protocols, such as
diffie-hellman-group-exchange-sha-256andecdh-sha2-nistp521.
- Public key accepted algorithms. List public key algorithms, such as
Remote directory. Set the target directory on the FTP server from which files will be retrieved.
File include. Specify files to poll using Ant file patterns, such as
*.txtfor text files. You can enter multiple includes in the comma-delimited format.File exclude. Define files to exclude using Ant patterns. You can enter multiple excludes in the comma-delimited format. Exclusions take precedence over inclusions.
Delay. Set the time (in milliseconds) until the next polling interval.
Timeout. Define the maximum time (in milliseconds) to wait for a file download to complete. Enter
-1to wait indefinitely or0to return immediately if a file is unavailable.Mode. Select the FTP connection mode.
- Active establishes a direct connection to the client for data transfer.
- Passive enables a client-initiated connection to the server. Recommended for environments with firewall restrictions.
Skip already processed files (idempotent). Select Yes to skip previously processed files and avoid duplicates.
Delete the file upon completion. Select Yes to delete the file after a successful transfer.
Move expression. Specify an expression to move files to a designated directory or location after processing, for example, a
.donesubdirectory.Read lock strategy. To prevent issues with incomplete or partially written files, define a read lock strategy.
- None. No read lock is applied.
- Changed monitors file changes before processing.
- Rename renames files to secure exclusive access.
The additional read lock options are as follows:
Read lock min length. Specify the minimum file size required before processing (applicable if the Changed option is selected).
Read lock min age. Define the minimum file age to wait before processing, for example,
300sfor files older than 5 minutes.Read lock check interval. Set the interval (in milliseconds) between attempts to acquire a read lock.
Read lock timeout. Define the maximum wait time to acquire a read lock. The timeout value must be higher than the Read lock check interval one.
Initial Delay. Set the interval (in milliseconds) before the first poll occurs.
Disconnect. Select whether to close the FTP/SFTP connection immediately after the transfer is completed.
File Read Cache Size. Define the number of files that can be checked simultaneously when searching for the file to transfer. Enter
-1for unlimited.Output. Configure how to handle service connection results.
- File destination:
- Local storage. Save files to a local directory relative to
/opt/workfusion/vds-data/.- Local Directory. Enter the path to the local storage.
- S3. Store files in an Amazon S3 bucket.
- Bucket. Specify the target S3 bucket.
- Key (optional). Define a key in S3. If not specified, the value defaults to the filename.
- Local storage. Save files to a local directory relative to
- File destination:
Kafka Producer
Configuration settings
Kafka Producer allows you to configure a bot step that handles records from a previous step, transforms the data format if needed, and sends it to a Kafka topic.
Specify the following settings:
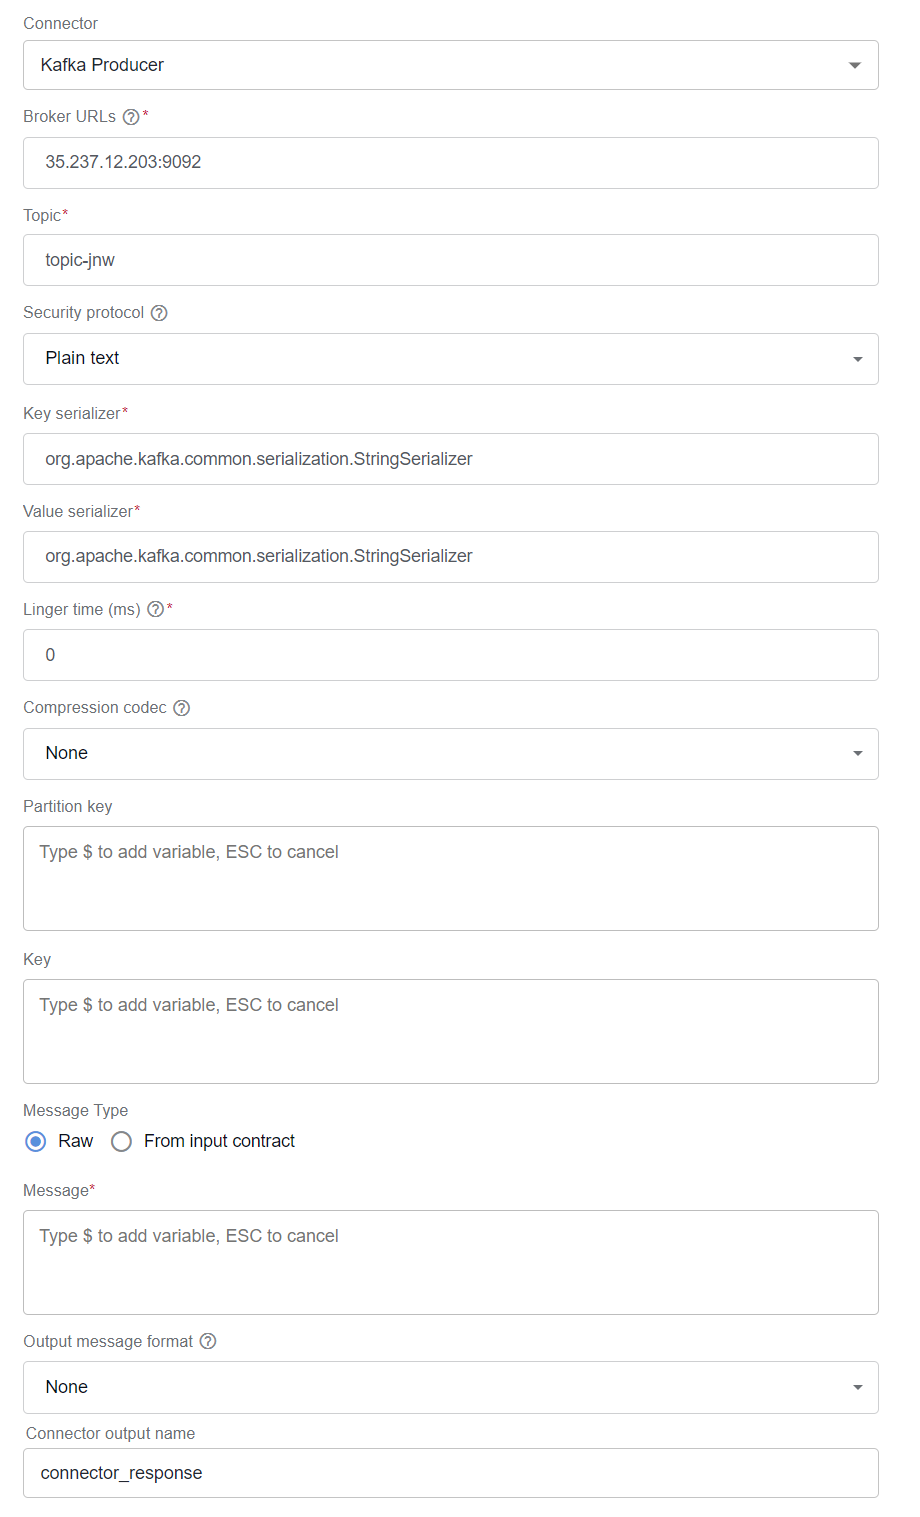
Broker URLs. Specify the addresses of the Kafka brokers to which the producer connects. Keep the following format:
host1:port,host2:port.Topic. Enter the name of the Kafka topic to which the producer sends messages.
Security protocol. Define the protocol for communicating with the Kafka brokers.
PLAINTEXT. Select for unencrypted connections.
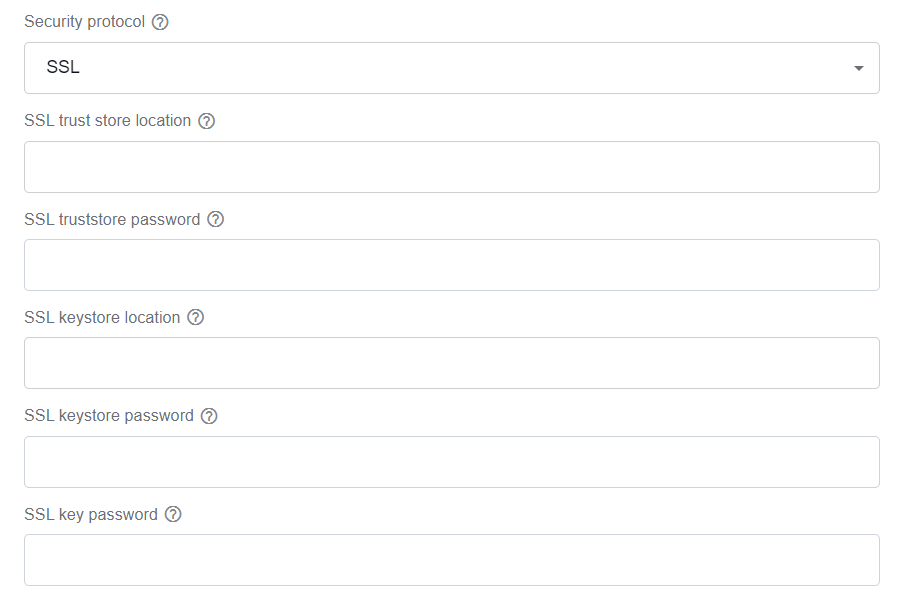
SSL. Select for encrypted connections and configure the following settings:
- SSL truststore location. Specify the location of the truststore file.
- SSL truststore password. Define the password for the truststore file. If a password is not set, the configured truststore file is still used, but the integrity check is disabled.
- SSL keystore location. Specify the filesystem path to the SSL keystore file.
- SSL keystore password. Define the store password for the keystore file.
- SSL key password. Define the password of the private key in the keystore file or the PEM key specified in
sslKeystoreKey.
Key serializer. Specify the class to serialize the key object into bytes. The default value is
org.apache.kafka.common.serialization.StringSerializer.Value serializer. Specify the class to serialize the value object into bytes. The default value is
org.apache.kafka.common.serialization.StringSerializer.Linger time. Define the period to delay sending messages till, for example, batching together similar messages to be sent to the same partition (in milliseconds). Note that a small amount of time can significantly reduce the number of requests sent, improving the client's and broker's performance.
Compression codec. Select the compression algorithm to compress message sets. Available options are as follows:
- None (the default option)
- Gzip
- Snappy
- LZ4
- ZSTD
Partition key. Determine a partition to send a particular message.
Key. Specify the key associated with the sent message. Keys are a mechanism to ensure that all messages for the same key are sent to the same partition in a topic.
Message type:
- Raw. In the Message field, specify raw data to be sent as a message. A message is a data record the producer sends to a Kafka topic.
- From input contract. Select the
connector_requestinput contract from the Input / Output tab as the request body. Make sure the input contract is defined.
Output message format (optional). Select the option to convert the message to one of the listed message formats before sending it to a queue:
- None (the default option)
- XML
- CSV
- Fixed-Width
For more details, see ActiveMQ Producer | Output message format.
Rest Client
Configuration settings
Rest Client allows you to configure a bot step to connect to any available REST API, retrieve the data, and make it available for the next step.
Specify the following settings:
Configuration method. Select the way to configure the connector.
Manually. Enter information about a REST endpoint manually.
Method. Specify an HTTP method.
URL. Specify the REST URL.
From existing API. Select the desired Swagger 2.0 or OpenAPI 3.0-compatible specification. For links to open-source APIs, see Integrate external services using connector library | OpenAPI connectors.
API URL. Provide the API URL to load an existing API specification.
API endpoint. Select the needed API endpoint from the list of imported endpoints.
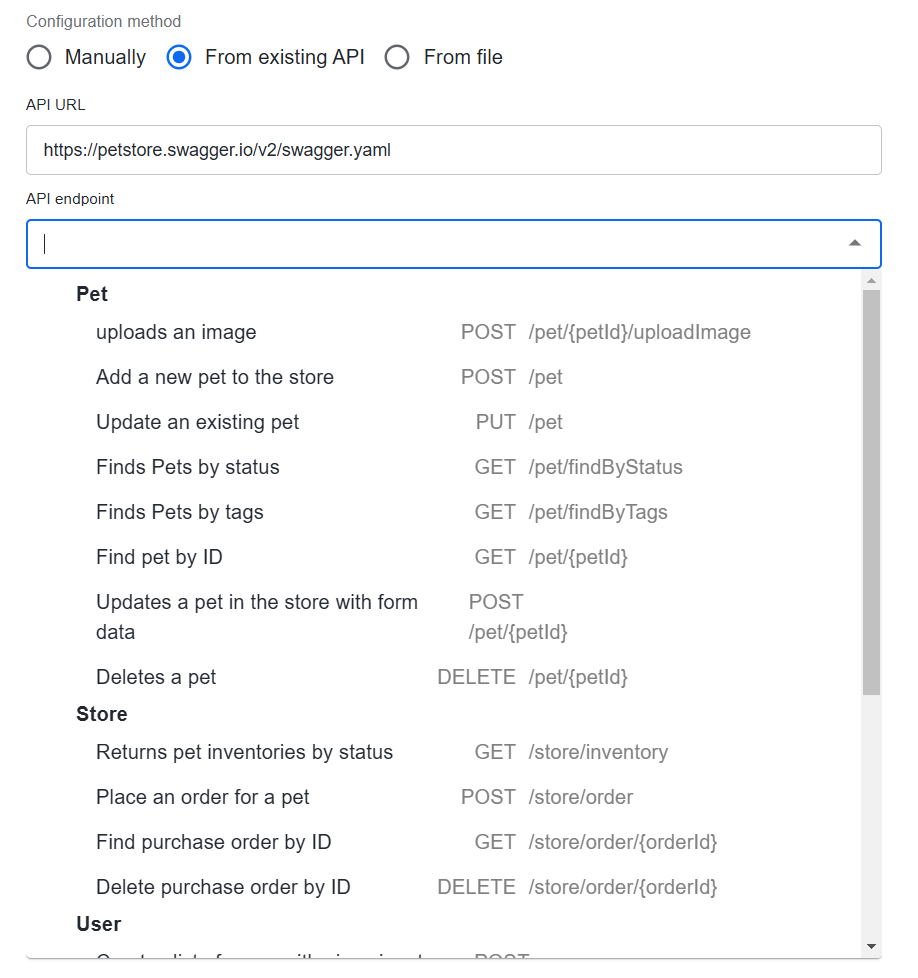
Method. For the From existing API configuration method, the field is filled in automatically depending on the selected API endpoint.
URL. For the From existing API configuration method, the URL is filled in automatically depending on the selected API endpoint.
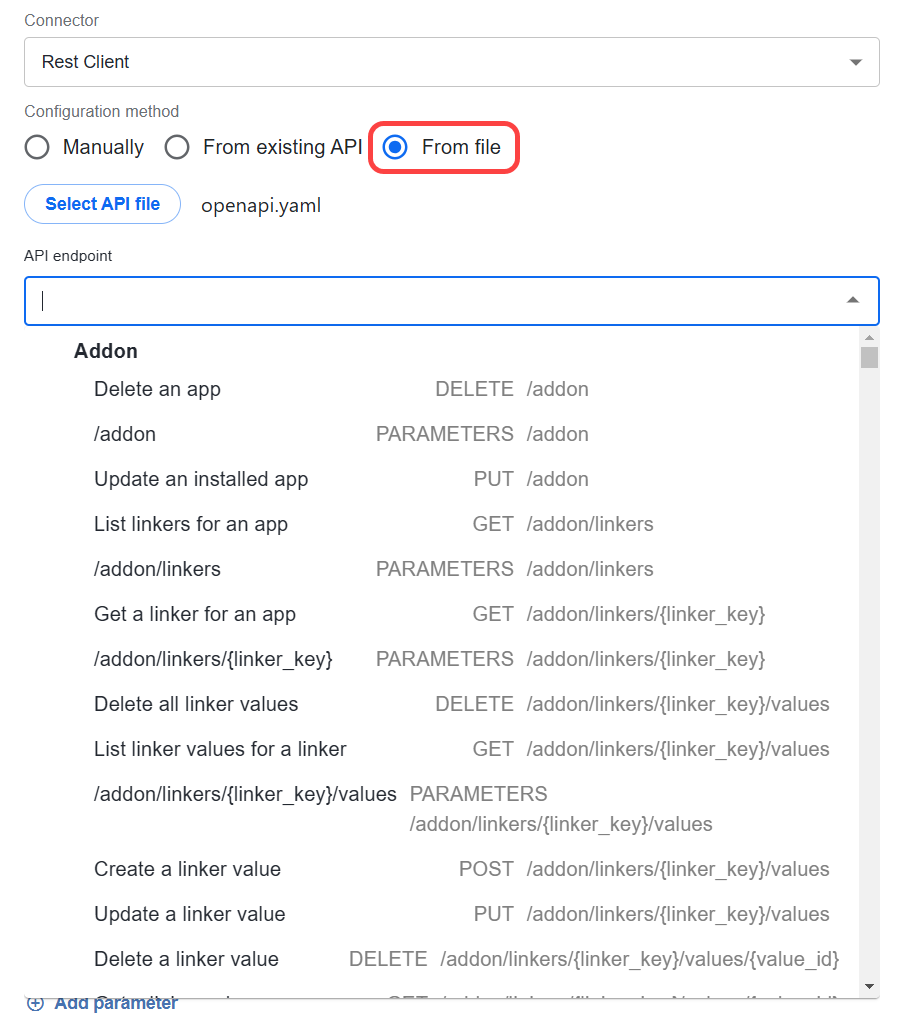
From file. Import a file with the needed API specification. To get YAML files with API specifications of various web services, refer to Integrate external services using connector library | OpenAPI connectors.
- Select API file. Click the button to upload the file of the API you intend to interact with.
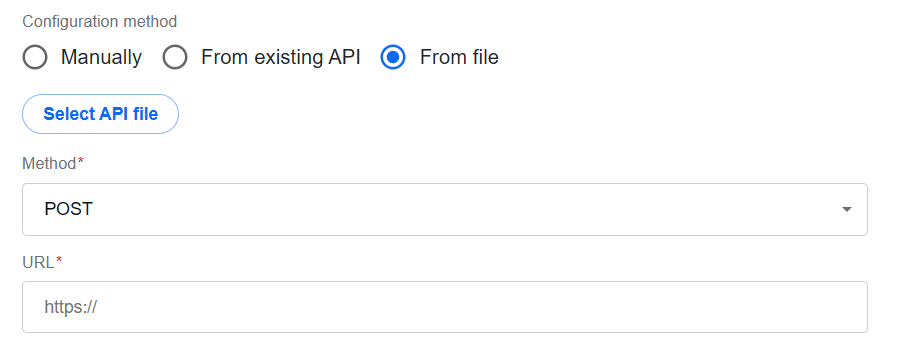
- API endpoint. Select the needed API endpoint from the list of imported endpoints.
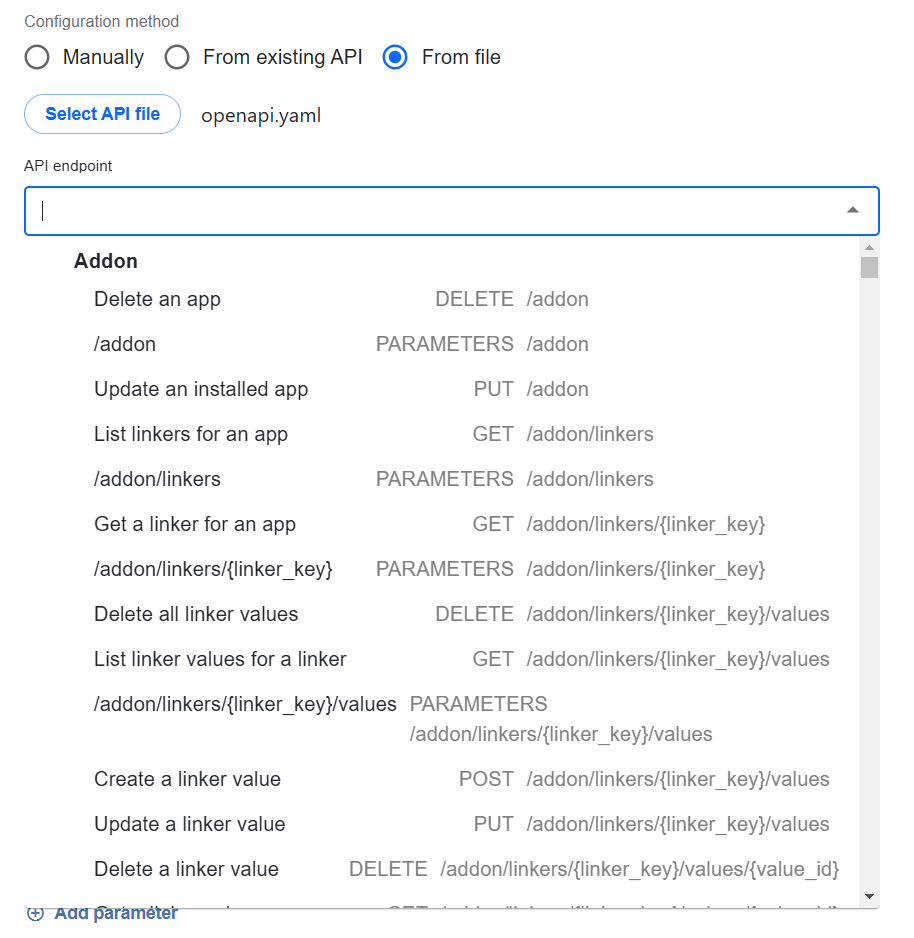
Method. For the From file configuration method, the field is filled in automatically depending on the selected API endpoint.
URL. For the From file configuration method, the URL is filled in automatically depending on the selected API endpoint.
Input. Specify the request parameters required to correctly communicate with the external service.
Authorization type. Set up the authorization type required to access the service. The supported types are as follows:
None (default). No authentication is required.
Basic authentication. Enter your credentials in the Login and Password fields.

Bearer token. Select to set a token directly in the header.

Header prefix. Specify a prefix to be added to the authorization header before the token.
Bearer token. Enter a security token that is a cryptic string generated by the server in response to a login request.
Bearer token URI. Select the option to retrieve the bearer token from a remote server via a specified URI. You can configure the authorization parameters to be sent in a URL-encoded body.
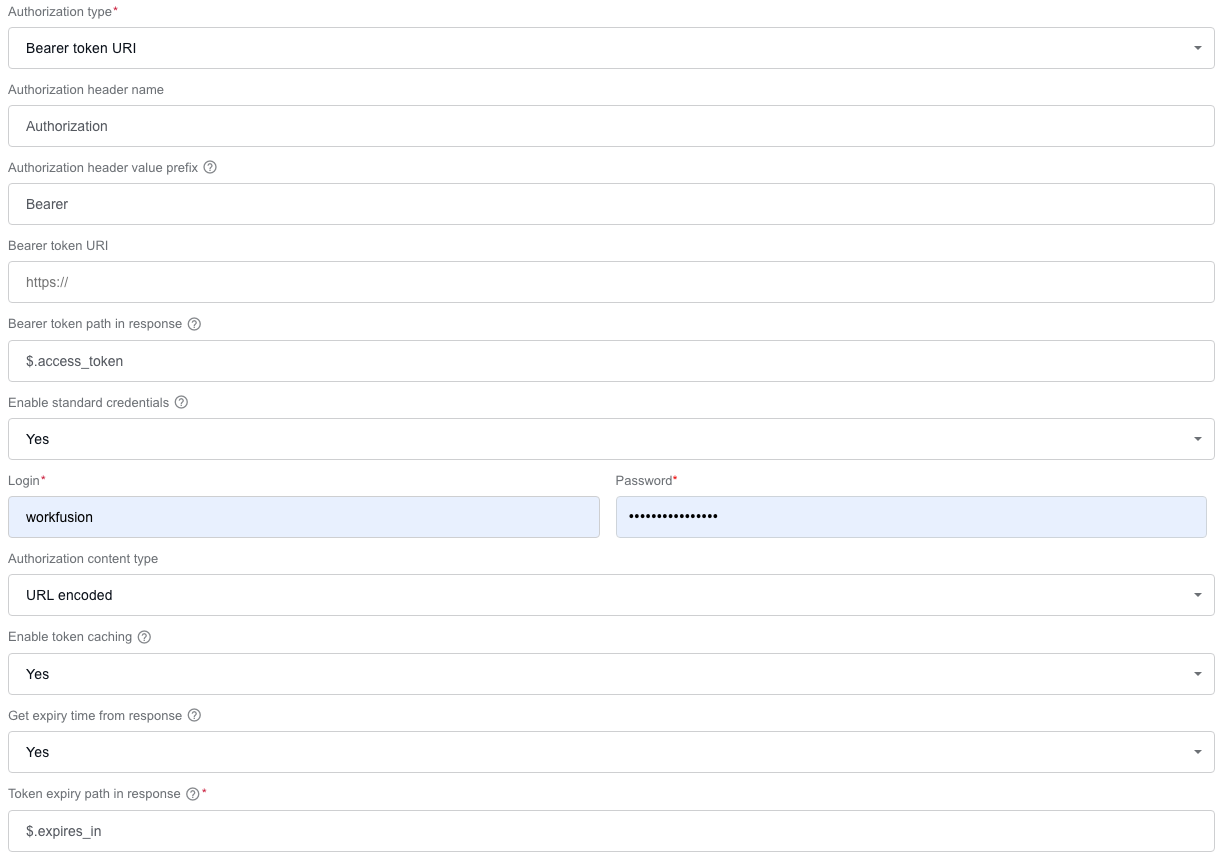
Authorization header name. Enter the name of the header where the authorization token should be included.
Authorization header value prefix. Specify a prefix to be added before the token value in the authorization header.
Bearer token URI. Provide the endpoint URL used to request the bearer token.
Bearer token path in response. Specify the path to the token in the JSON response, for example,
$.access_token.Enable standard credentials. Select Yes if the authentication request requires login credentials. If selected, provide needed values in the Login and Password fields. Select No if credentials are not required.
Authorization content type. Select the content type of the authentication request body.
Enable token caching. Select Yes to cache the token for reuse. Enabling the caching helps you to avoid repeated authentication requests.
Get expiry time from response. Select Yes to automatically extract the token's expiration time from the authentication response. Thus, the token is refreshed before it expires.
Token expiry path in response. Specify the JSON path to the expiration time in the response, for example,
$.expires_in.Authorization parameters. Specify parameters to be added as a part of the bearer URL request. Click Add authorization parameter and enter a key in the Key field. To set up values, go to the Input / Output tab and specify a value in the corresponding input object. The object is defined as the
BearerUrlEncodedParamstype with thebearerUrlEncodedParamsname.
Enable proxy configuration. Select Yes to enable the use of a proxy for both the API request and its authentication request when Bearer token URI is selected as the authorization type.
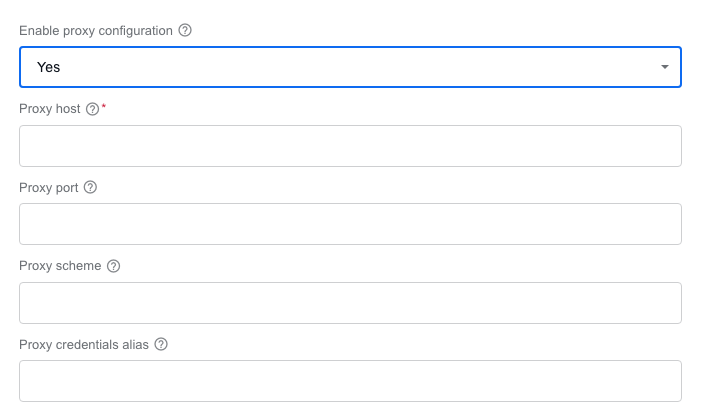
Proxy host. Enter the hostname or IP address of the proxy server.
Proxy port. Enter the port number used by the proxy server.
Proxy scheme. Select the communication protocol used by the proxy server.
Proxy credentials alias. Specify the alias referencing the credentials used to authenticate with the proxy server.
Headers. Set one or more headers if additional security checks are required to execute requests to the service. To add a header, click Add header and enter a key in the Key field.

To set up values, go to the Input / Output tab and specify a value in the corresponding input object. The object is defined as the
RequestHeaderstype with therequestHeadersvariable name.noteYou can set up a constant value, a reference to a secret entry in Secrets Vault, or a reference to an AI Agent configuration.
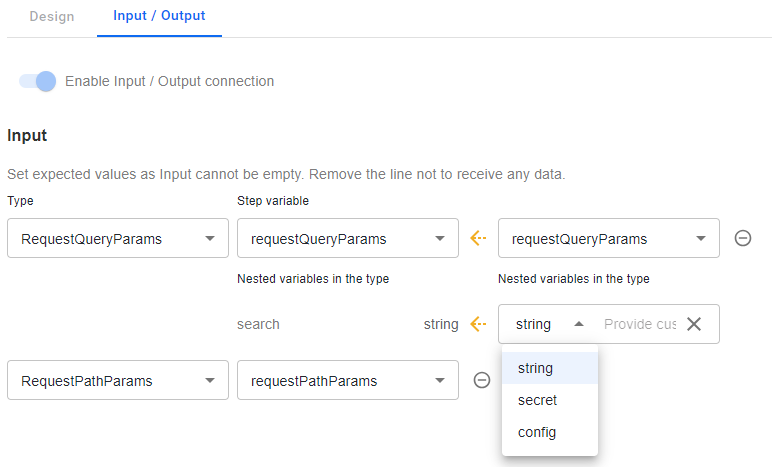
Query parameters are parameters located in the URL after the question mark. Specify one or more optional parameters to make your requests to the service more specific.
To add a query parameter, click Add parameter and enter a key in the Key field.

To set up values, go to the Input / Output tab and specify a value in the corresponding input object. The object is defined as the
RequestQueryParamstype with therequestQueryParamsname.noteYou can set up a constant value, a reference to a secret entry in Secrets Vault, or a reference to an AI Agent configuration (if applicable).
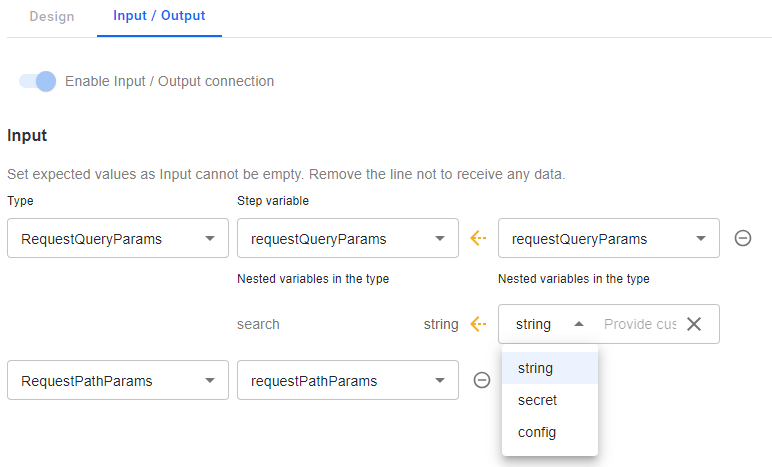
- Path parameters are parameters that are part of the URL path. Specify the exact entities to which you want to refer the request.
To add a path parameter, click Add parameter and enter a key in the Key field.

To set up values, go to the Input / Output tab and specify a value in the corresponding input object. The object is defined as the
RequestPathParamstype with therequestPathParamsname.Body. Specify the exact data content to be sent with the request to the connected service.
Body type. Select a body data type.
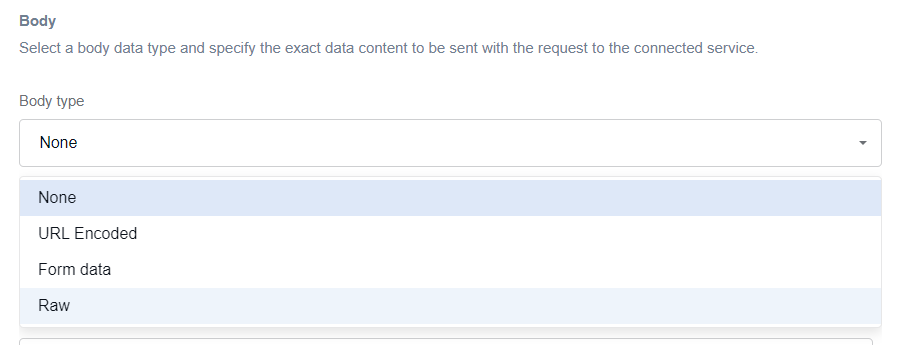
None (the default option). Select not to send a body with the request.
URL Encoded. Select to send a URL-encoded form string as a body. To add a key-value pair encoded using the same pattern as URL parameters, click Add parameter.
Form data. Select to upload a file to the REST service.
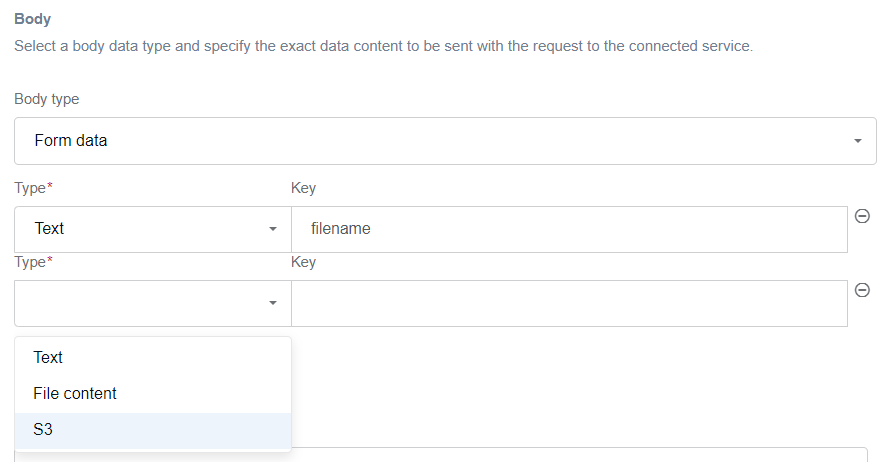
In Type and Key, specify the file content as a text string (Text), a Base64-encoded string (File content), or an S3 URL (S3).
- Raw. Use raw body data to send anything you can enter as text.
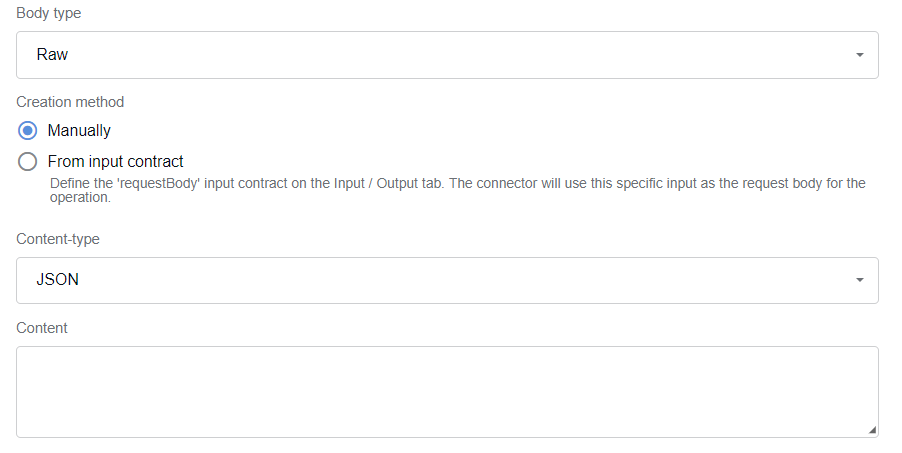
Manually:
Content-type. Specify the HTTP header content type, for example, application/json. Select one of the options: Text, Javascript, JSON, or XML.
Content. Enter a string representation of the body to be sent. It can also be a substitution parameter or contain substitution parameters.
From input contract. Select to use the
requestBodyinput contract from the Input / Output tab as the request body. Make sure the input contract is defined. The variable name must berequestBody.Content-type. Specify the HTTP header content type. The only content type available is JSON.
Content. Enter a string representation of the body to be sent. It can also be a substitution parameter or contain substitution parameters.
Request delay. Set the delay time (in milliseconds) before starting.
You can dynamically configure some fields directly from the previous step via the input data. The fields are as follows:
Parameter Description Example values uriURL for the API https://google.com/api httpMethodHTTP method in uppercase POST,GET,DELETE, and so onrequestQueryParamsString representation of a JSON object {"key1":"value1", "key2":"value2"}requestPathParamsString representation of a JSON object {"key1":"value1", "key2":"value2"}requestHeadersString representation of a JSON object {"key1":"value1", "key2":"value2"}requestBodyBody to send in a request bearerUrlEncodedParamsURL-encoded parameters when the Bearer Token URI authentication type is used {"key1":"value1", "key2":"value2"}Output. Choose how to handle the results of connecting to the service.
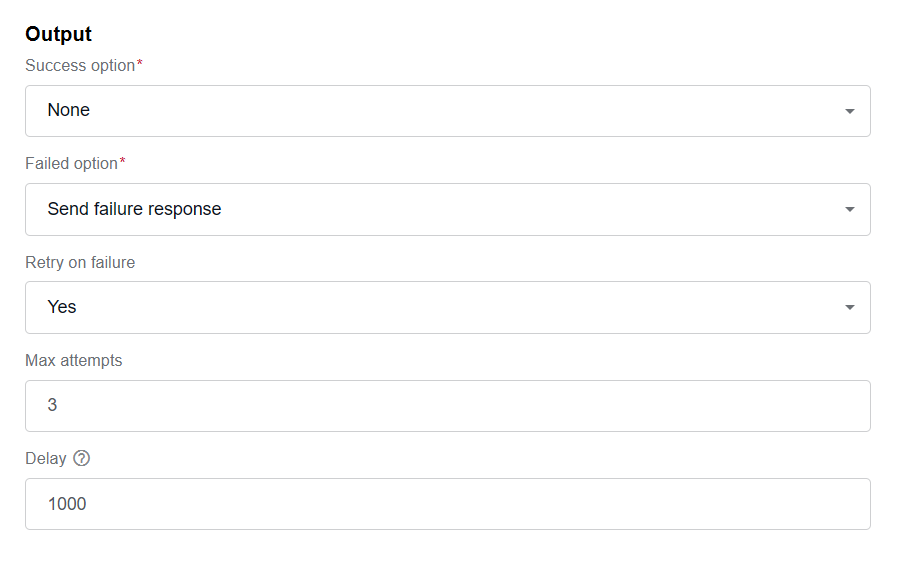
Success. Select how to handle the output for the next step in case of a successful connection:
None. Select to send a response as is.
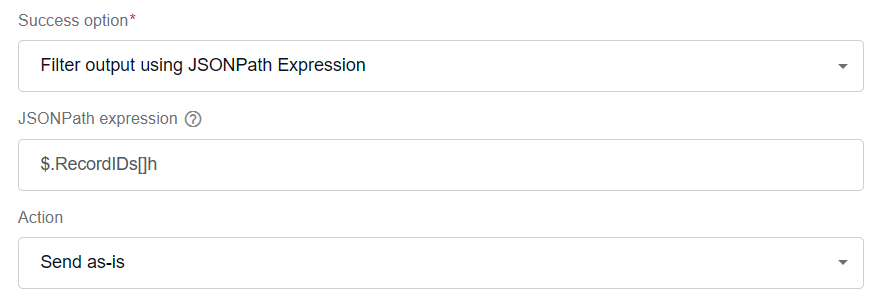
Filter output using JSONPath Expression. Apply a JSONPath expression to the response.
JSONPath expression. Enter a JSONPath expression to target the node in the response, for example,
$.store.book[0].title.Action. Select the action to perform:
- Send as-is
- Split list into individual items
Use previous connector's output. Select to forward the previous step's output as the output of the current step. Make sure the previous step's output is named
connector_response.
Failed connection. Select the option for a failed connection scenario:
Throw exception. Select to throw an exception. Mind that the step is retried on the Control Tower side.
Send failure response. Select to send an exception response to the next step.
Empty output. Select to send an empty output to the next step.
Retry on failure. Retry the connection within the step instead of at the Control Tower level.
Max attempts. Specify the maximum number of attempts to retry the connection. Once the final retry attempt is made (and it is not successful), the option selected in Failed connection is applied.
Delay. Specify the delay period between retries (in milliseconds).
OpenAPI specifications
You can integrate various web services into your Business Process by using a URL or a YAML file with the API specification for a selected web service.
When configuring the Rest Client connector, select From existing API > API URL and add a link to the needed API specification. In the table, see the links to the most popular open-source API definitions you can use.
| API | Description | API URL |
|---|---|---|
| Petstore API | Contains a simple API for a pet store. | https://petstore.swagger.io/v2/swagger.yaml |
| GitHub API | Allows the management of GitHub resources from your application. | https://api.github.com/spec.yaml |
| Stripe API | Enables the integration of payment processing into your applications. | https://stripe.com/docs/api.yaml |
| Twitter API | Provides access to Twitter data and functionalities. | https://developer.twitter.com/en/docs/twitter-api.yaml |
| Google Maps API | Allows embedding maps and location data into your applications. | https://developers.google.com/maps/documentation/openapi.yaml |
| Spotify API | Provides access to the Spotify music catalog and user data. | https://developer.spotify.com/documentation/web-api/openapi.yaml |
| Dropbox API | Enables the integration of the Dropbox file storage and sharing capabilities. | https://www.dropbox.com/developers/documentation/openapi.yaml |
| Slack API | Enables the integration of Slack messaging and collaboration features. | https://api.slack.com/specs/openapi.yaml |
| JIRA API | Provides access to JIRA's project management functionalities. | https://developer.atlassian.com/cloud/jira/platform/swagger-v3.v3.yaml |
| Zoom API | Enables the integration of Zoom video conferencing capabilities. | https://marketplace.zoom.us/docs/openapi.yaml |
| Reddit API | Provides access to Reddit data and functionalities. | https://www.reddit.com/dev/api.yaml |
| OpenWeatherMap API | Provides weather data and forecasts. | https://openweathermap.org/api.yaml |
| YouTube API | Provides access to YouTube data and functionalities. | https://developers.google.com/youtube/v3/docs/openapi.yaml |
| Microsoft Graph API | Provides access to Microsoft Сloud services. | https://docs.microsoft.com/graph/openapi.yaml |
| Amazon S3 API | Allows the management of Amazon S3 storage resources. | https://docs.aws.amazon.com/AmazonS3/latest/API/openapi.yaml |
| Salesforce API | Enables the integration of Salesforce CRM functionalities. | https://developer.salesforce.com/docs/atlas.en-us.api_rest.meta/api_rest/openapi.yaml |
| Zendesk API | Provides access to Zendesk customer service functionalities. | https://developer.zendesk.com/api-reference/ticketing/introduction/openapi.yaml |
| Shopify API | Enables the integration of the Shopify e-commerce platform. | https://shopify.dev/docs/admin-api/rest/reference/openapi.yaml |
| PayPal API | Enables payment processing and financial transactions. | https://developer.paypal.com/docs/api/openapi.yaml |
| Trello API | Provides access to Trello's project management features. | https://developer.atlassian.com/cloud/trello/guides/rest-api/api-introduction/openapi.yaml |
| Bitbucket API | Allows the management of Bitbucket repositories and resources. | https://developer.atlassian.com/bitbucket/api/2/reference/openapi.yaml |
| Contentful API | Enables the content management in Contentful CMS. | https://www.contentful.com/developers/docs/references/content-management-api/openapi.yaml |
| SendGrid API | Provides email delivery and tracking capabilities. | https://sendgrid.api-docs.io/v3.0/mail-send/openapi.yaml |
| Heroku API | Allows the management of Heroku app deployments and resources. | https://devcenter.heroku.com/articles/platform-api-reference/openapi.yaml |
| GitLab API | Enables the integration of GitLab CI/CD functionalities. | https://docs.gitlab.com/ee/api/openapi/openapi.yaml |
| LinkedIn API | Provides access to LinkedIn data and functionalities. | https://docs.microsoft.com/en-us/linkedin/shared/api-guide/openapi.yaml |
| Pinterest API | Provides access to Pinterest data and functionalities. | https://developers.pinterest.com/docs/api/v3/openapi.yaml |
| Facebook Graph API | Provides access to Facebook social graph data. | https://developers.facebook.com/docs/graph-api/openapi.yaml |
| Instagram Graph API | Provides access to Instagram data and functionalities. | https://developers.facebook.com/docs/instagram-api/reference/openapi.yaml |
| Flickr API | Provides access to Flickr photo-sharing functionalities. | https://www.flickr.com/services/api/openapi.yaml |
| Intercom API | Enables the integration of Intercom customer messaging. | https://developers.intercom.com/intercom-api-reference/reference/openapi.yaml |
| HubSpot API | Provides access to HubSpot marketing and sales data. | https://developers.hubspot.com/docs/api/overview/openapi.yaml |
| Mailchimp API | Enables email marketing automation and analytics. | https://mailchimp.com/developer/marketing/docs/fundamentals/openapi.yaml |
| Twitch API | Provides access to Twitch streaming data and functionalities. | https://dev.twitch.tv/docs/api/reference/openapi.yaml |
| WordPress API | Allows the management of WordPress content and resources. | https://developer.wordpress.org/rest-api/reference/openapi.yaml |
| Asana API | Provides access to Asana's project management functionalities. | https://developers.asana.com/docs/asana-api-reference/openapi.yaml |
| Algolia API | Enables search and discovery functionalities. | https://www.algolia.com/doc/rest-api/search/openapi.yaml |
| BambooHR API | Provides access to BambooHR data. | https://documentation.bamboohr.com/reference/openapi.yaml |
| Freshdesk API | Enables the integration with Freshdesk customer support. | https://developers.freshdesk.com/api/openapi.yaml |
| Typeform API | Allows the management and creation of Typeform surveys and forms. | https://developer.typeform.com/api-reference/reference/openapi.yaml |
| Salesforce API | For more details on the available APIs and their usage, refer to Salesforce REST API Developer Guide. |
You can also download YAML files from the OpenAPI repository on GitHub and then import them to your Business Process. To do that, perform the following steps:
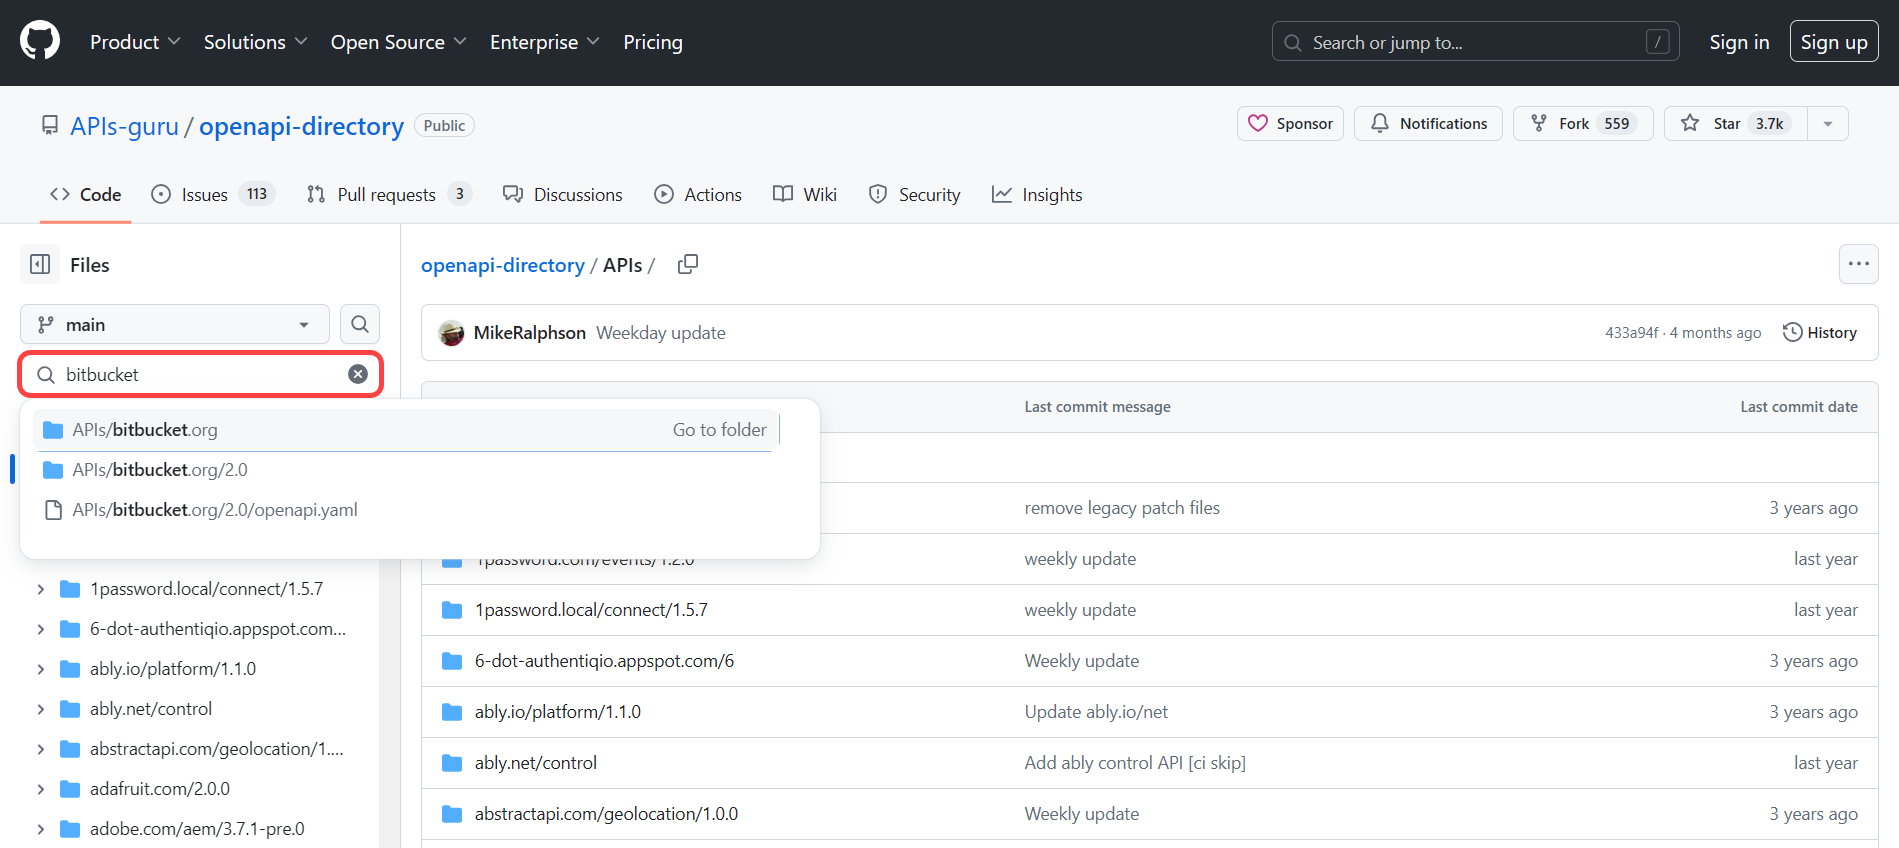
In the OpenAPI repository, use the search option or navigate through the directories to find the desired API. If applicable, identify a specific version of the API you intend to use.
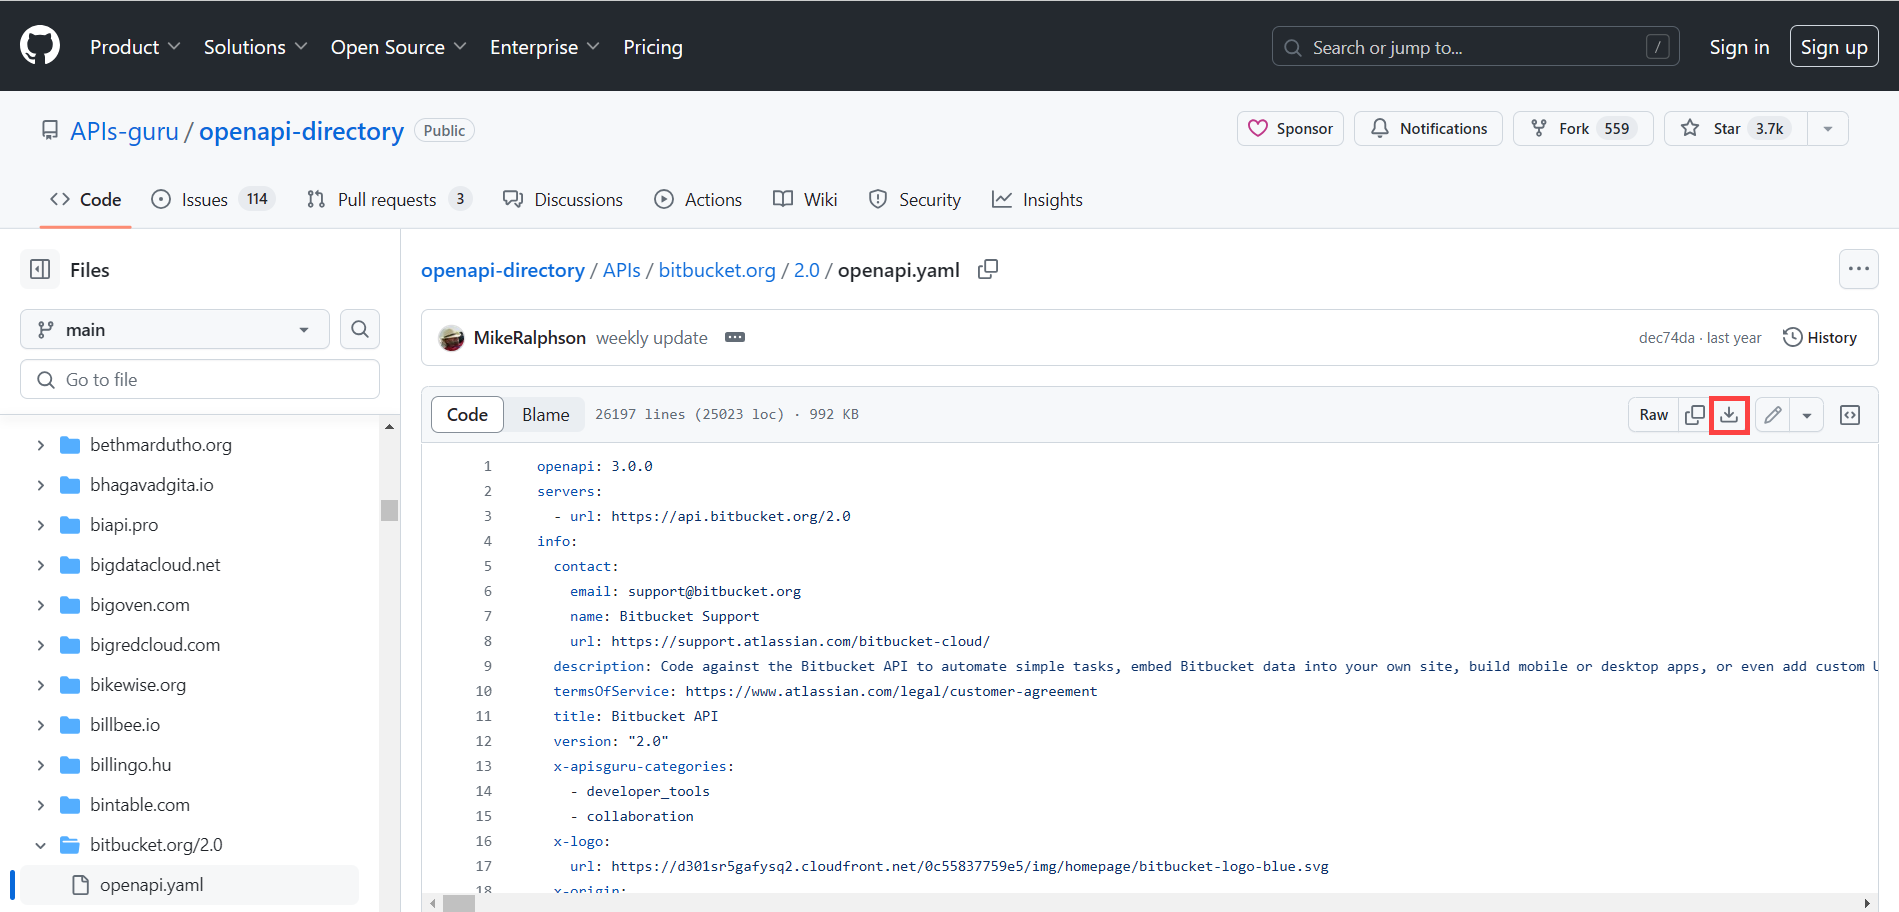
Open the file and click the Download raw file button.
Import the downloaded file using the From file option.
SOAP Client
Configuration settings
SOAP Client allows you to configure the bot step to connect to any available SOAP web service, retrieve the data, and make it available for the next step.
Specify the following settings:
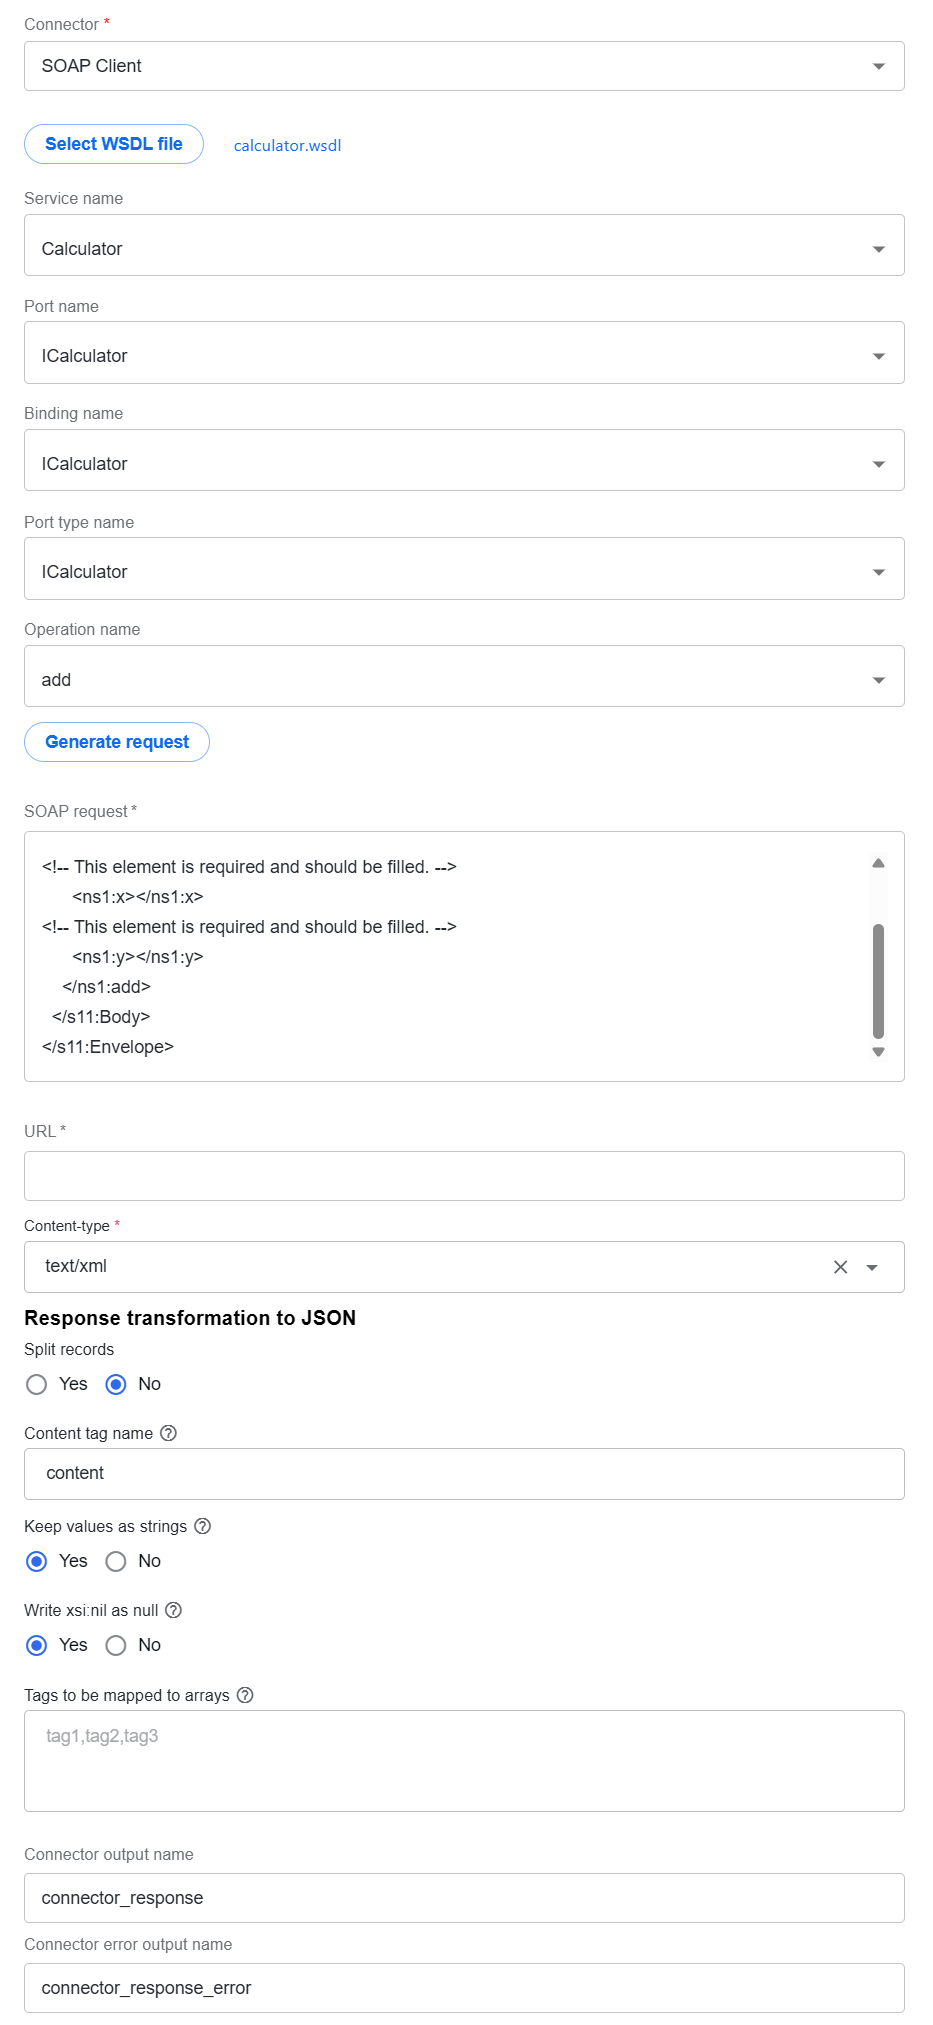
Select WSDL file. Click the button to upload a WSDL file of the web service you intend to interact with. The component parses the file to extract and display the available services, ports, bindings, port types, and operations. Once the service's file is uploaded, the fields below contain the related data you can choose from:
Service name. Select a service name from the list of services defined in the uploaded WSDL file.
Port name. Select a port from the list of available ports for the defined service.
Binding name. Specify a binding name for the selected port.
Port type. Specify a port type for the selected binding.
Port type name. Specify a port type name for the selected binding.
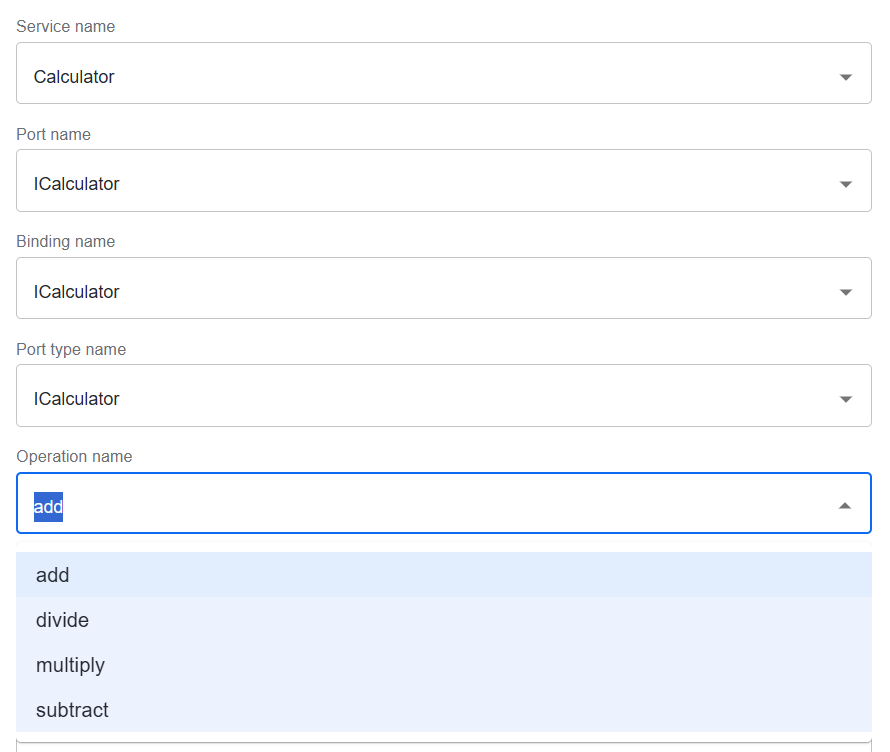
Operation name. Select the operation from the list of available operations available based on the specified port type.
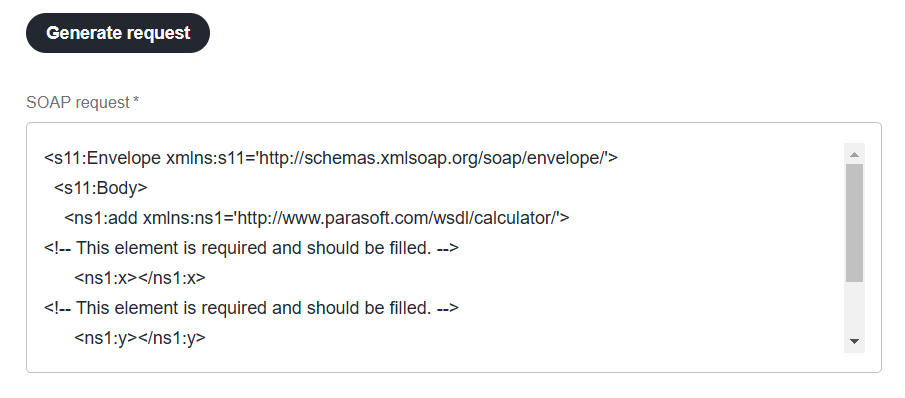
Generate request. Click the button to generate a sample SOAP request tailored to the selected service, port, binding, port type, and operation.
SOAP request. Use the generated sample SOAP request as a template for making actual SOAP calls to the web service.
URL. Specify the URL endpoint to send the SOAP request to.
Content type. Select the HTTP header content type: text/xml or application/soap+xml.
Response transformation to JSON.
Split records. Select Yes to split the data into multiple output records and fill in the Tag name to split field.
Content tag name. Specify a JSON element to be used as the content in XML.
Keep values as strings. Select Yes not to convert the values. In this case, they are retained as strings.
Write null as xsi:nil. Select Yes if you want the data field containing a null value to be represented in the resulting XML as an element with the
xsi:nilattribute set totrue. It means the element has a null value and is not equivalent to an empty or missing element.Tags mapped to arrays. Add XML tags that should be converted to JSON arrays.
SOAP responses are formatted in XML. To integrate an XML response with the contract on the Input / Output tab, convert it to a JSON Schema object in the Schema definition section.
ActiveMQ Consumer
Configuration settings
Select ActiveMQ Consumer for the Trigger step to retrieve messages from the configured ActiveMQ queue.
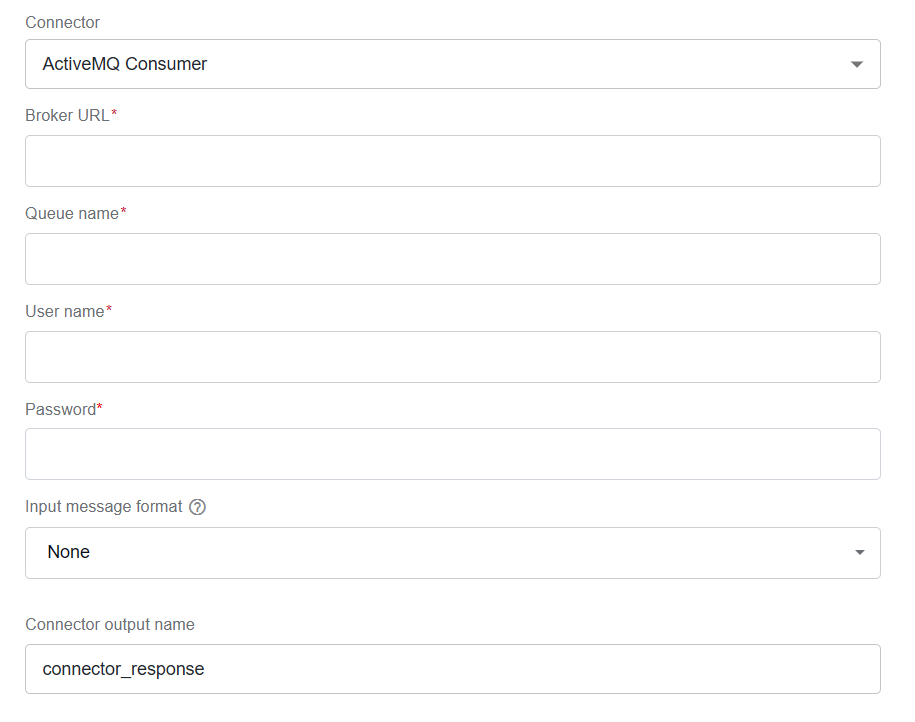
The configuration properties are the same as for ActiveMQ Producer, except for Input message format instead of Output message format:
Input message format (optional). Specify the format of messages read from the queue. Leave None (the default option) if not applicable.
- XML
- CSV
- Fixed-Width
Split records. Select Yes to split the input data into multiple output records and fill in the Tag name to split field.
Content tag name. Specify a JSON element to be used as the content in XML.
Keep values as strings. Select Yes not to convert the values. In this case, they are retained as strings.
Write null as xsi:nil. Select Yes if you want the data field containing a null value to be represented in the resulting XML as an element with the
xsi:nilattribute set totrue. It means the element has a null value and is not equivalent to an empty or missing element.Tags mapped to arrays. Add XML tags that should be converted to JSON arrays.
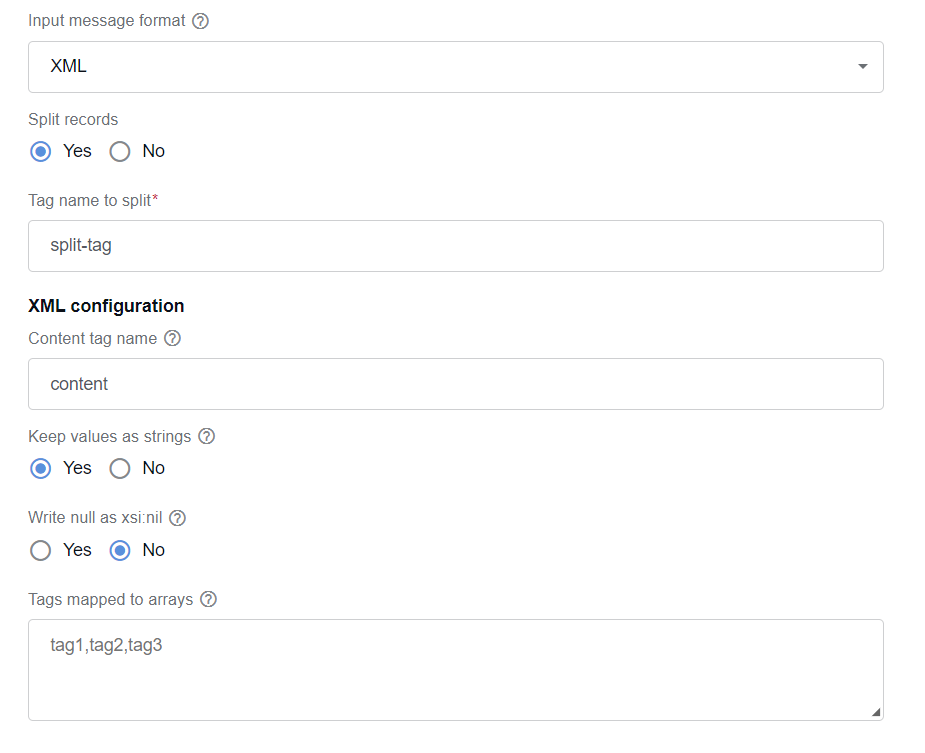
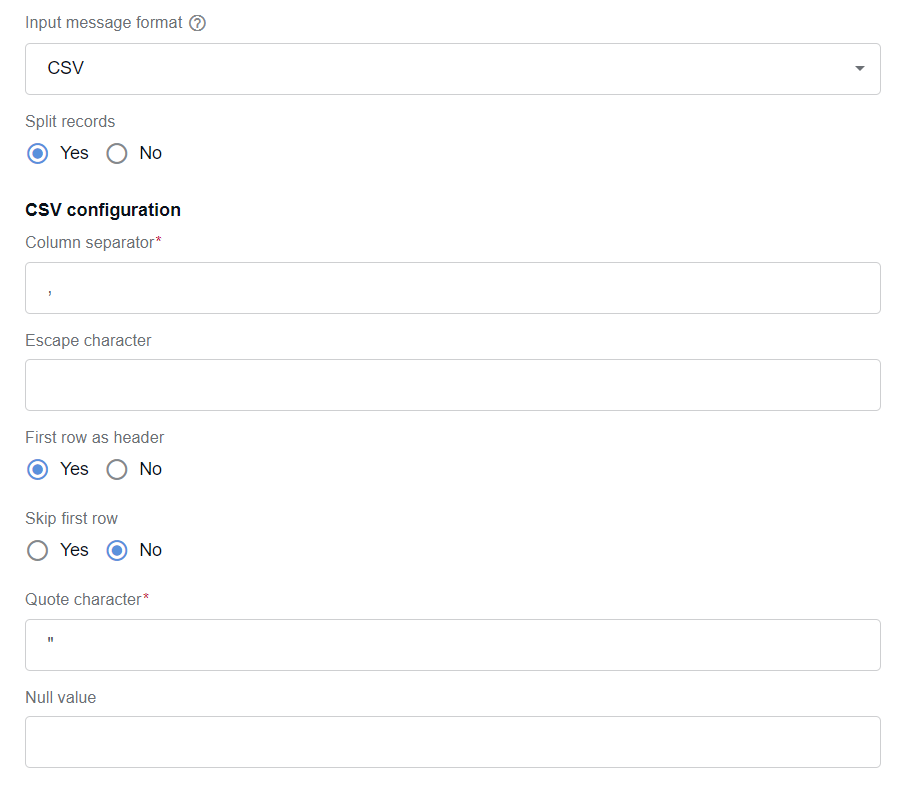
Split records. Select Yes to split the input data into multiple output records.
Column separator. Define a character to be used as a separator between columns.
Escape character. Specify the character that indicates that the character immediately following it should be treated as a literal character and not as a special character or delimiter.
First row as header. Select Yes to indicate if the first row in the input data should be considered as the header.
Skip the first row. Select Yes to skip the first row during processing.
Quote character. In CSV files, the quote character is the double quotation mark (
""). It is used to enclose text fields or values that might contain special characters, such as commas or line breaks. It allows the CSV parser to correctly interpret and distinguish the field content from the actual delimiters used in the file.Null value. Set a String representation of a null value (defaults to null).
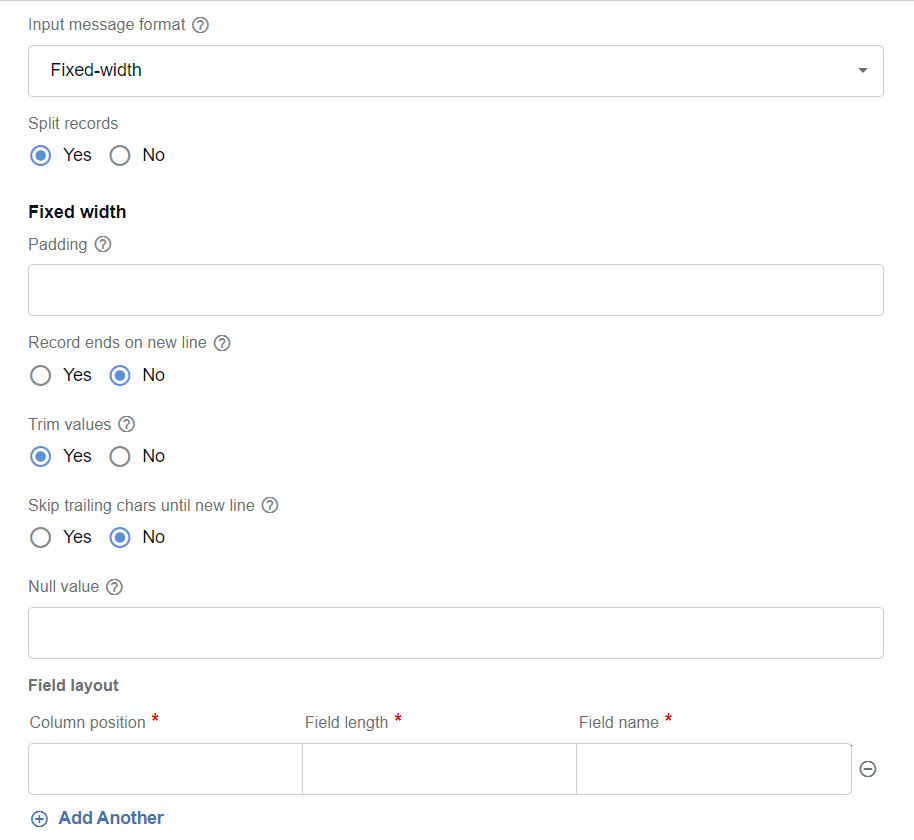
Split records. Select Yes to split the input data into multiple output records.
Padding. Define the padding character to be used to represent unwritten spaces (defaults to
' ').Record ends on a new line. Select Yes to consider a record parsed when a new line is reached.
Trim values. Select Yes to trim values of white spaces.
Skip trailing chars until new line. Select Yes to skip trailing characters beyond the record's length until a new line is reached (defaults to No).
Null value. Set a String representation of a null value (defaults to null).
Field layout:
Column position. Specify the start position of the field.
Field length. Specify the size of the field.
Field name. Specify the name of the field in the JSON output.
FTP Consumer Trigger
Configuration settings
The FTP Consumer (Trigger) component is a long-running poller that continuously monitors an FTP, FTPS, or SFTP server for new files and triggers actions when files are detected. The component is suitable for automated workflows requiring file polling.
For configuration instructions, refer to the FTP Consumer settings.
IBM MQ Consumer
Configuration settings
Select the IBM MQ Consumer for the Trigger step to retrieve messages from the configured IBM MQ queue.
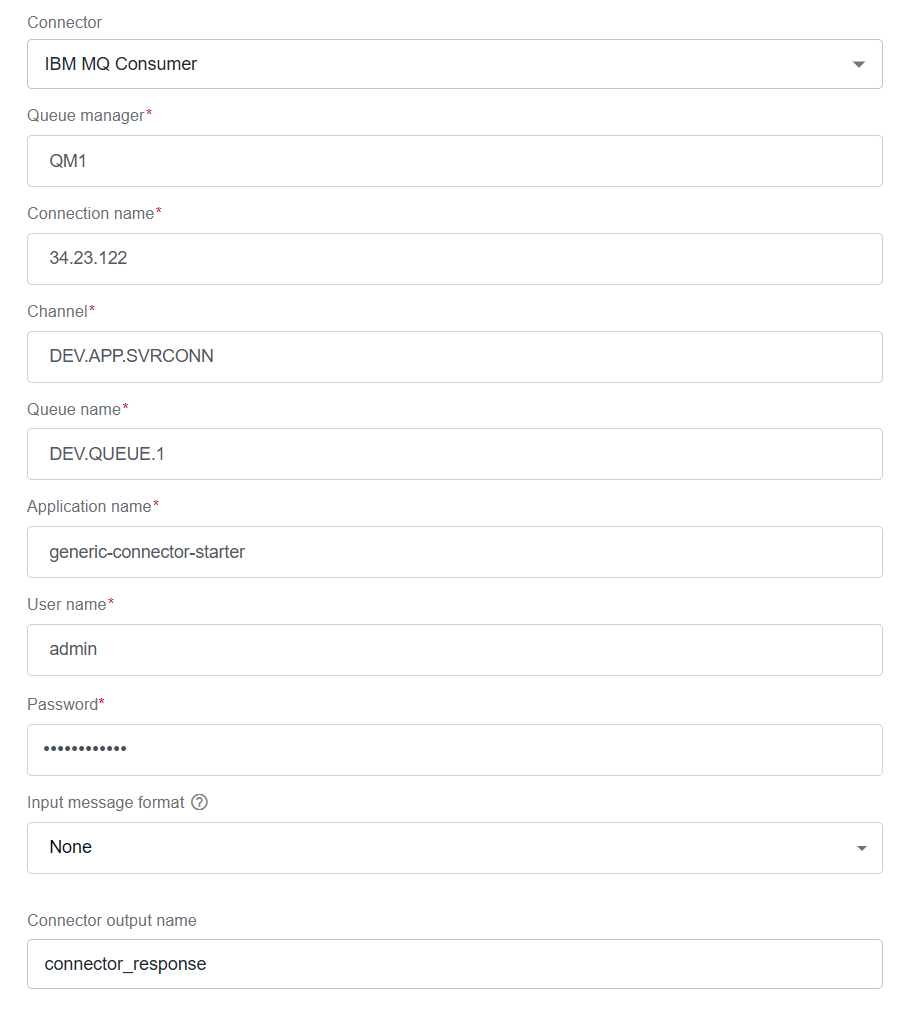
The configuration properties are the same as for IBM MQ Producer, except for Input message format instead of Output message format.
- Input message format (optional). Specify the format of messages read from the queue. For more details, see ActiveMQ Consumer | Input message format.
Kafka Consumer
Configuration settings
Kafka Consumer allows you to configure the bot step to consume records from Kafka topics, transform the record format to JSON (if needed), and make it available for the next step.
Specify the following settings:
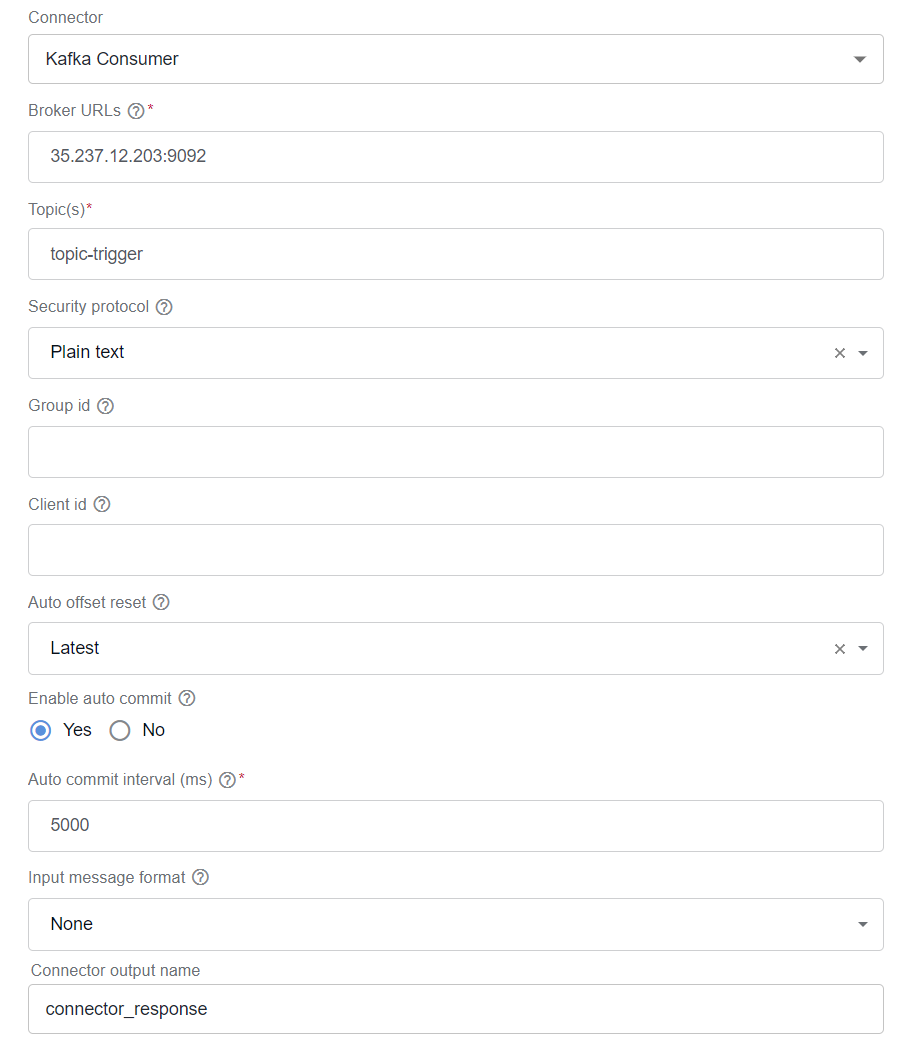
Broker URLs. Specify the addresses of the Kafka brokers that the consumer connects to. Keep the following format:
host1:port,host2:portTopic(s). Enter the names of the topics to which the consumer sends messages.
Security protocol. Define the protocol for communicating with the Kafka brokers.
PLAINTEXT. Select for unencrypted connections.
SSL. Select for encrypted connections. The setting must match the Kafka cluster's configuration.
SSL truststore location. Specify the location of the truststore file.
SSL truststore password. Specify the password for the truststore file. If a password is not set, the configured truststore file is still used, but the integrity check is disabled.
SSL keystore location. Specify the filesystem path to the SSL keystore file.
SSL keystore password. Define the store password for the keystore file.
SSL key password. Define the password of the private key in the keystore file or the PEM key specified in
sslKeystoreKey.
Group ID. Identify the group of consumers to be considered as a single group (sharing a logical subscription) when consuming messages from topics.
Client ID. Identify a client to pass to the server when making requests. The client ID is used to track the source of requests beyond the IP or port by allowing a logical application name to be included in Kafka logs and monitoring metrics.
Auto offset reset. Configure the auto offset reset function.
- None (the default option).
- Earliest. Select to reset the offset of messages to the earliest offset state automatically.
- Latest. Select to reset the offset of messages to the latest offset state automatically.
Enable auto commit. Select Yes to periodically commit the offset of messages already fetched by the consumer to ZooKeeper.
- Auto commit interval (ms). Determine the frequency to commit the consumer offsets (in milliseconds).
Input message format (optional). Specify the format of messages read from the queue. For more details, see ActiveMQ Consumer | Input message format.
Rest Server
Configuration settings
The Rest Server connector enables you to establish a REST API endpoint that listens for incoming requests, forwards them to the subsequent step, and sends a response back to the caller.
For a response to be sent to the caller, a BP must have a WebHarvest-based step with the send-to-external-connector export plugin attribute set to true or a JNW-based step with the sendResultToCaller Boolean parameter set to true.
- WebHarvest-based step example
- JNW-based step example
<?xml version="1.0" encoding="UTF-8"?>
<config charset="UTF-8">
    <export include-original-data="false" send-to-external-connector="true">
    </export>
</config>
<?xml version="1.0" encoding="UTF-8"?>
<config type="java">
    <worker>my-company:worker:1.0.0</worker>
    <processor>my-custom-task</processor>
    <sendResultToCaller>true</sendResultToCaller>
</config>
Specify the following settings:
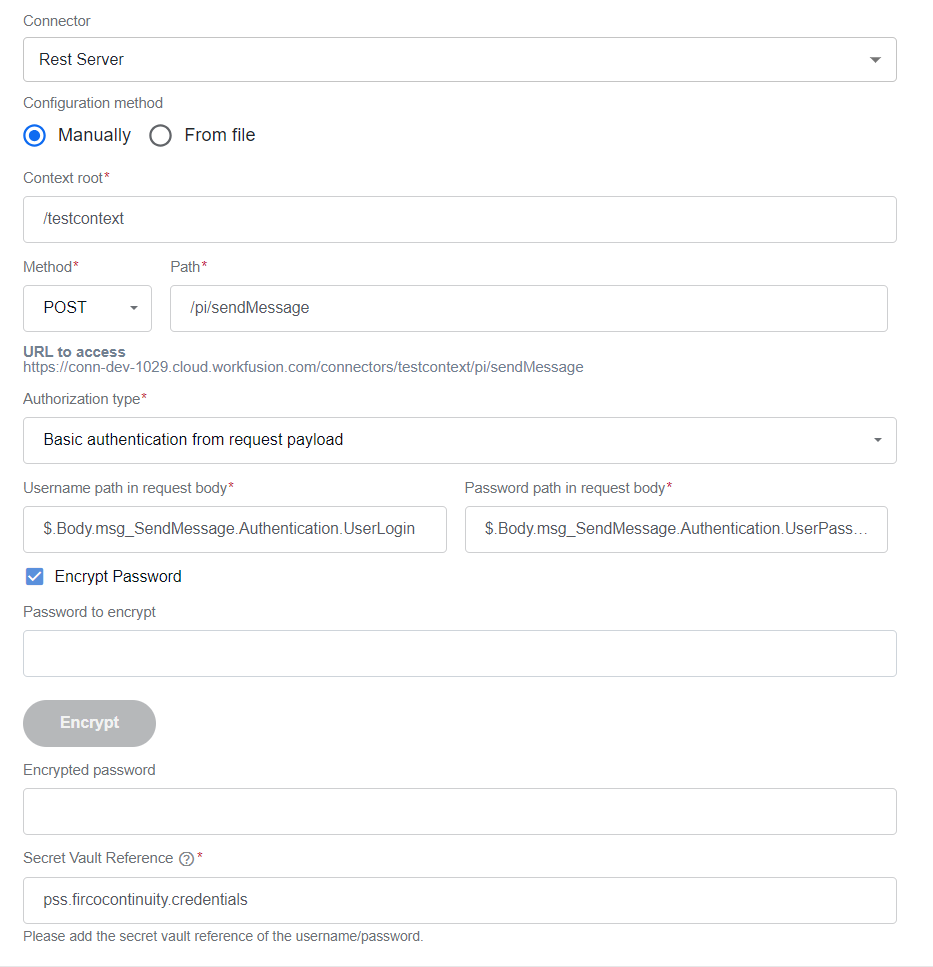
Configuration method. Specify the method to configure the connector:
- Manually. Enter information about a REST endpoint manually.
- From file. Select the desired Swagger API file.
Context root. Specify the path in the URL that identifies the connector service.
cautionYou cannot have the same context root shared by multiple Rest Server trigger steps across BPs. In case of a collision, an error occurs, and a message about the misconfigured BP appears.
Method. Define the HTTP method that the server will accept for the endpoint.
Path. Specify the path in the URL after the context root that identifies the endpoint.
URL to access. The field displays the full endpoint path constructed from the context root and path.
Authorization type. Define the type of authorization to be used to secure the endpoint:

None (the default option).
Basic authentication:
- Authorization header. Specify the header name for the authorization.
Basic authentication from request payload:
Username path in request body. Enter a JSONPath expression where to find the username in the JSON body.
Password path in request body. Enter a JSONPath expression where to find the password in the JSON body.
Encrypt password. Select to encrypt the incoming password.
Password to encrypt. Enter the password to be encrypted and click the Encrypt button to generate it.
Encrypted password. The field displays the encrypted version of the password from the Password to encrypt field.
Secret vault reference. Specify the Secrets Vault alias storing the password.
Bearer token authentication. Select to set a token directly in the header.
Bearer token header. Specify the request header that holds the bearer token. Typically, the header is
Authorization.Client Id. Enter the client unique identifier used to validate the bearer token header sent in the request.
Client Secret. Specify the client secret alias used to validate the bearer token header sent in the request.
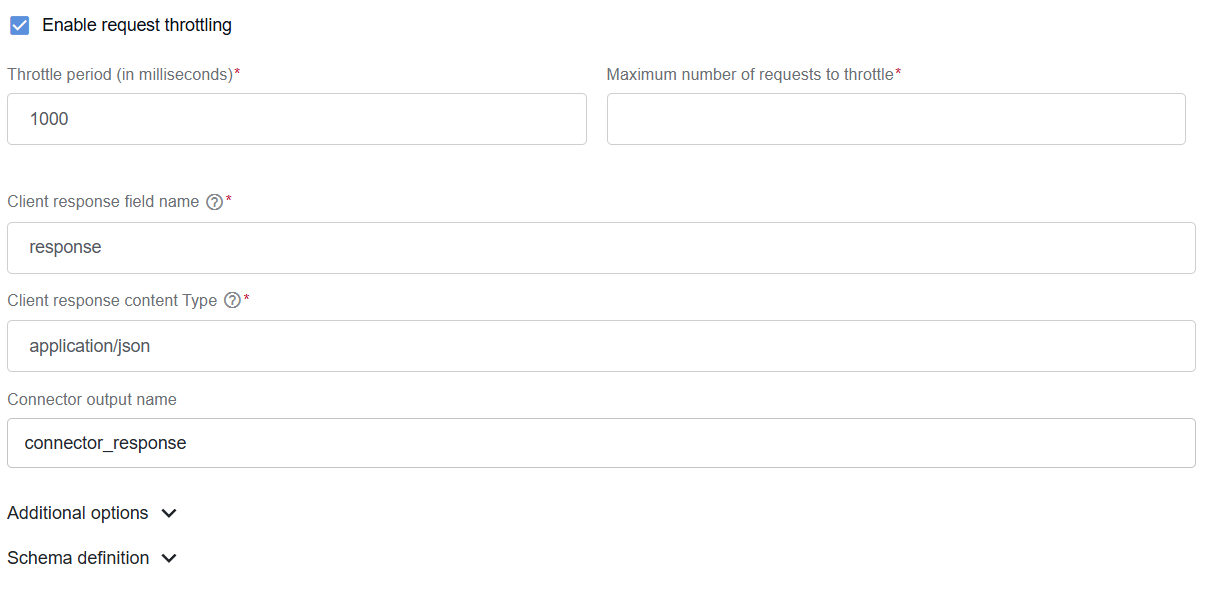
Enable request throttling. Select to enable the throttling of incoming requests.
Throttle period (in milliseconds). Specify the duration for which the requests should be throttled.
Maximum number of request to throttle. Define the highest number of requests to delay or limit within the defined throttle period.
Client response field name. Specify the output column from the step that sends back the result.
Client response content Type. Set the content type, also known as MIME type or Media type, of the client response.
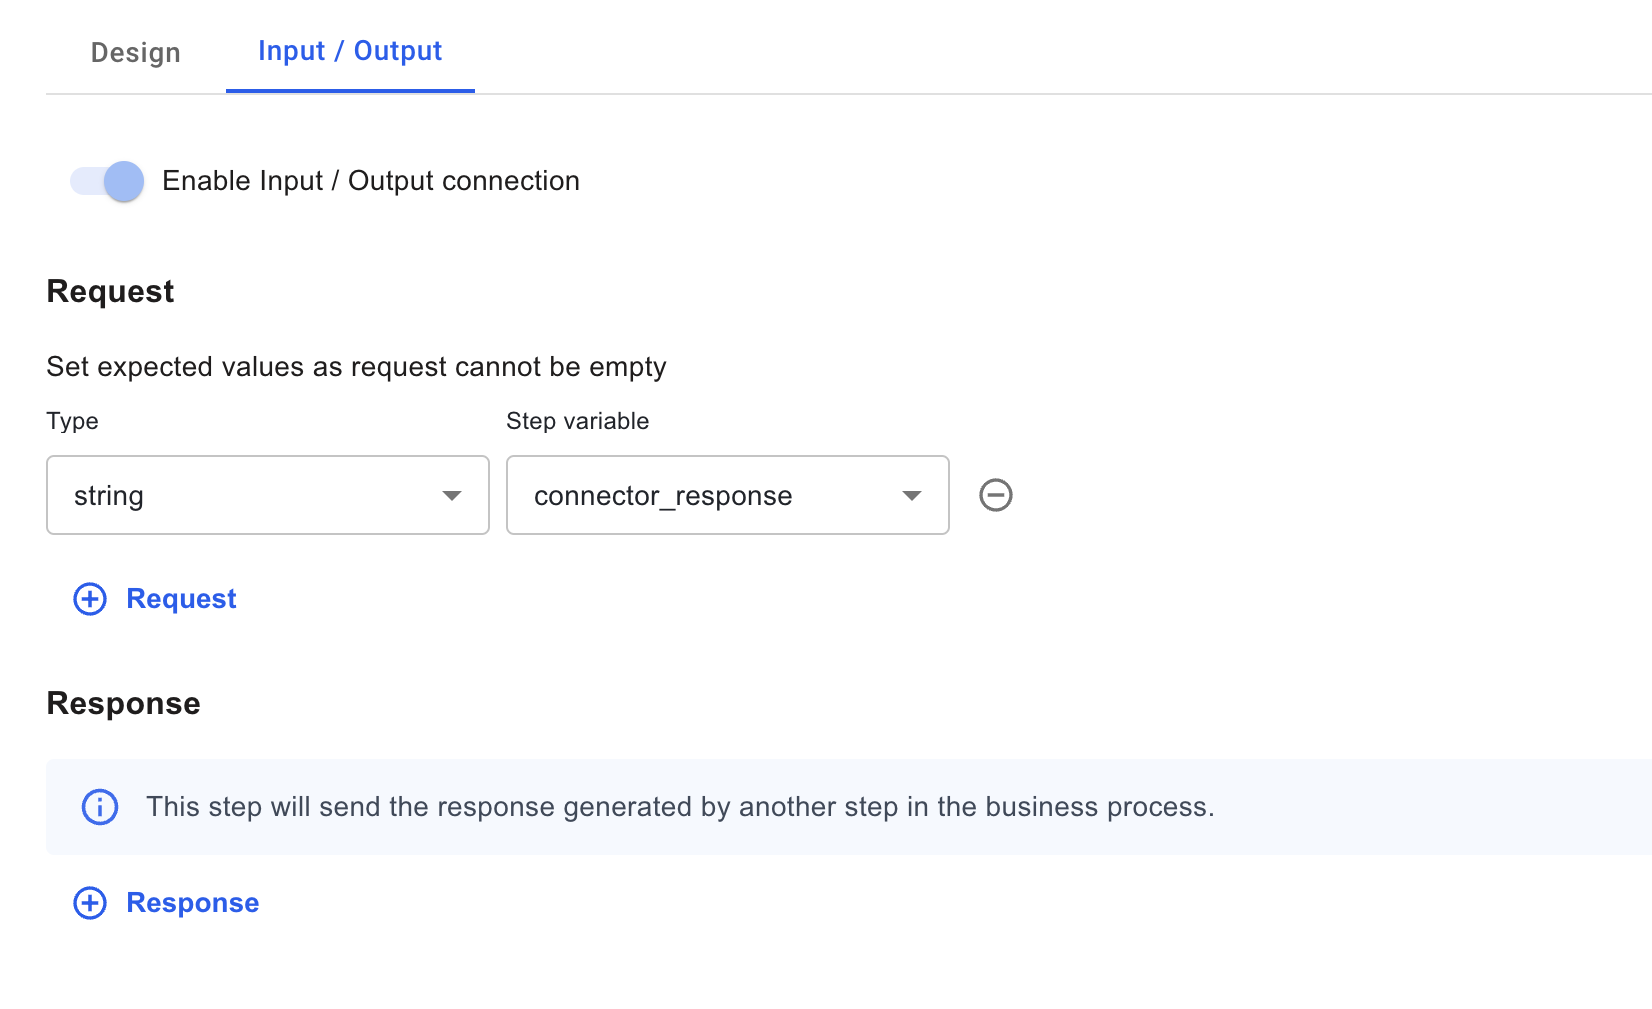
For the Rest Server Trigger step, on the Input / Output tab, the Input and Output labels are renamed into Response and Request, respectively. The output of the step is a REST request coming from an external source, while the input is a response that comes back from another BP step.
Simple Timer
Configuration settings
Simple Timer is based on the Camel simple timer. Specify the following settings:
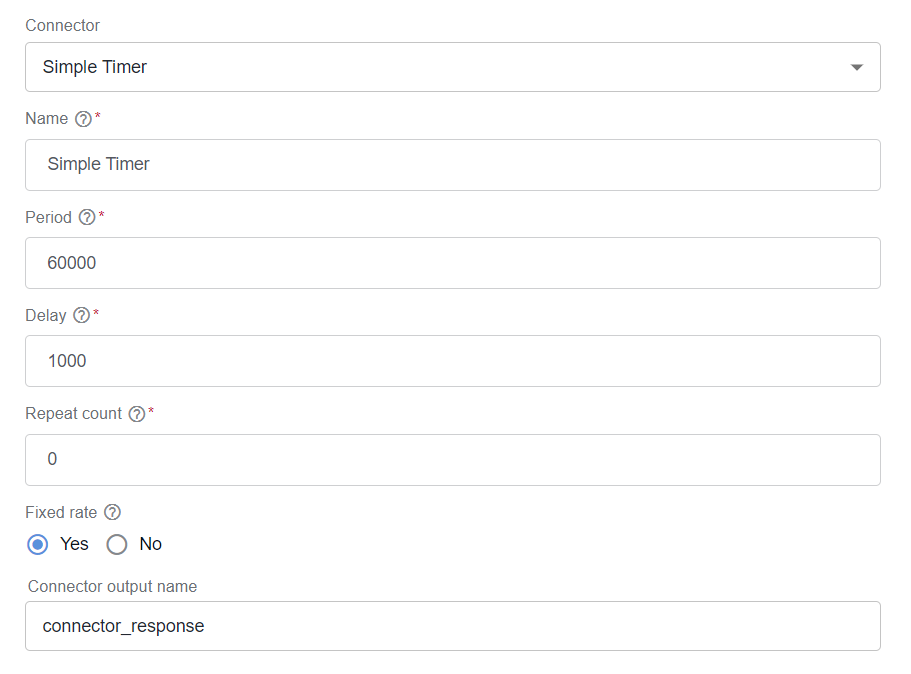
Name. Enter a user-defined identifier for the timer event. Give a meaningful name to the timer that you can use to manage and reference timers when defining the timer's behavior in your Camel routes.
Period. Specify the time interval the timer event should trigger (in milliseconds). It defines the gap between successive occurrences of the timer event. For example, if you set the period to 5,000 milliseconds, the timer triggers every 5 seconds.
Delay. Set up the time to wait before the first occurrence of the timer event (in milliseconds). It specifies the initial delay before the timer starts triggering events. If you set a delay of 1,000 milliseconds and a period of 5,000 milliseconds, the first timer event occurs 1 second after the timer is started, and subsequent events occur every 5 seconds.
Repeat count. Specify how many times the timer event should be triggered. If you set the repeat count to a specific number, the timer triggers that many times. If the repeat count is not set or set to a negative value, the timer triggers indefinitely until stopped.
Fixed rate.
- Select Yes for the timer to trigger events at a fixed rate based on the period, even if the processing of timer events takes longer than the specified period.
- Select No for the timer to maintain a fixed interval between the start times of each event, allowing events to overlap if processing takes longer.
Connector output
All data processed by the Connector step is placed in the Bot Task results and made available to the next step as connector_response. You can modify the Connector output using the following fields:

Connector output name. Define a name for the Connector output. The default value is
connector_response.Connector error output name. Define a name for the Connector error output that appears when you set Failed option to Send failure response.

The default value is
connector_response_error. You can change it if needed.
Advanced settings
Define schema
In the Schema definition section, you can convert the type of a response for further usage depending on your needs. For example, convert XML, JSON, or JSON Schema text to a JSON Schema object.
To create a schema definition, perform the following steps:
Click Schema definition to expand the available options.
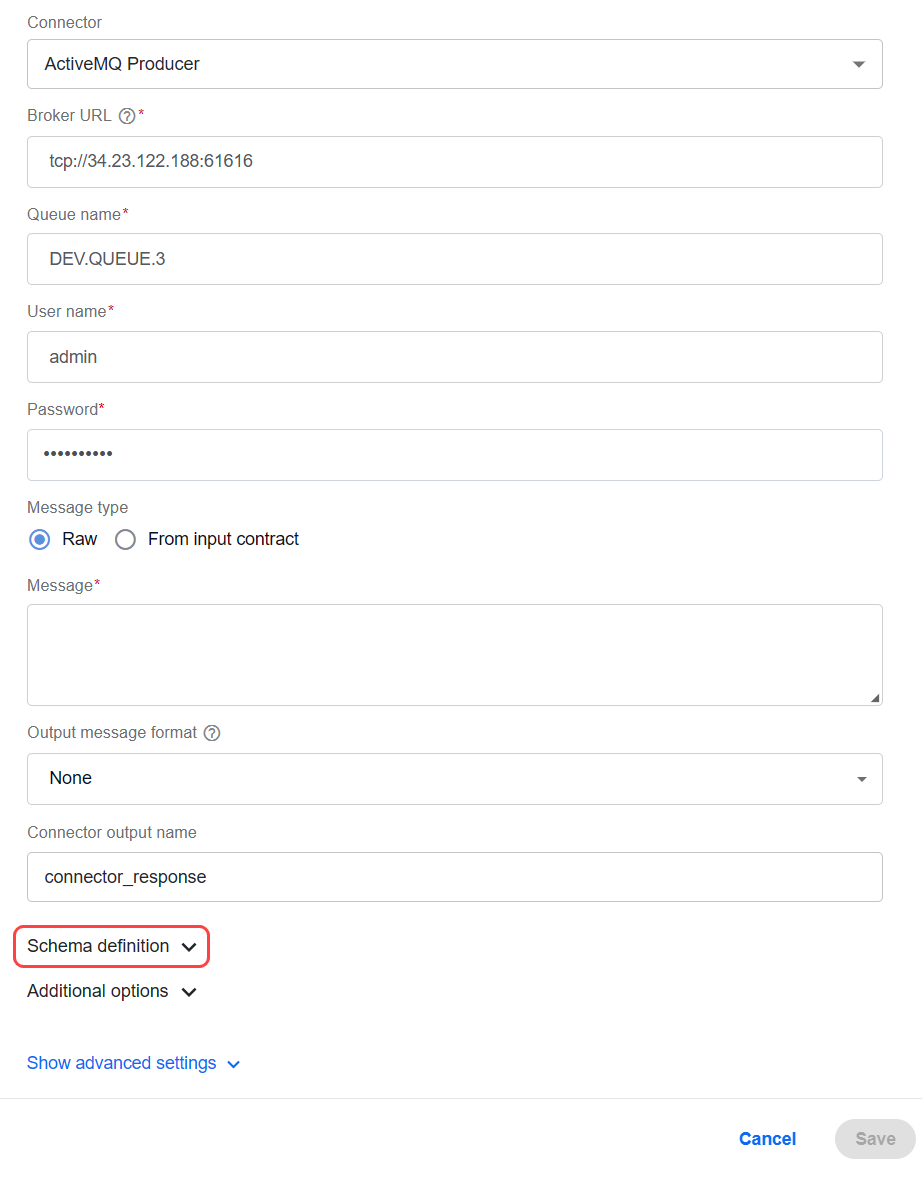
In the Schema display name field, provide a unique name for the schema.
In the Code text area, input a sample response.
Click Create to transform the sample to a JSON Schema object. A newly created schema definition is available in the repository of schema definitions for further use on the Input / Output tab.
You can set the resulting schema definition as input or output. To do this, select Create and set as input or Create and set as output respectively.
Set up routing
A dynamic component configuration system consists of a user interface (UI) and a backend processing system. The UI allows you to select components, configure parameters, and schedule recurring processing. The backend system generates Camel YAML routes based on your inputs, executes the routes, and returns responses.
The Route text area shows the Camel route executed by a Worker. If you are familiar with Camel routing, you can modify this route, for example, add additional logging for debugging purposes.
Expand the Additional options section in the configuration form.
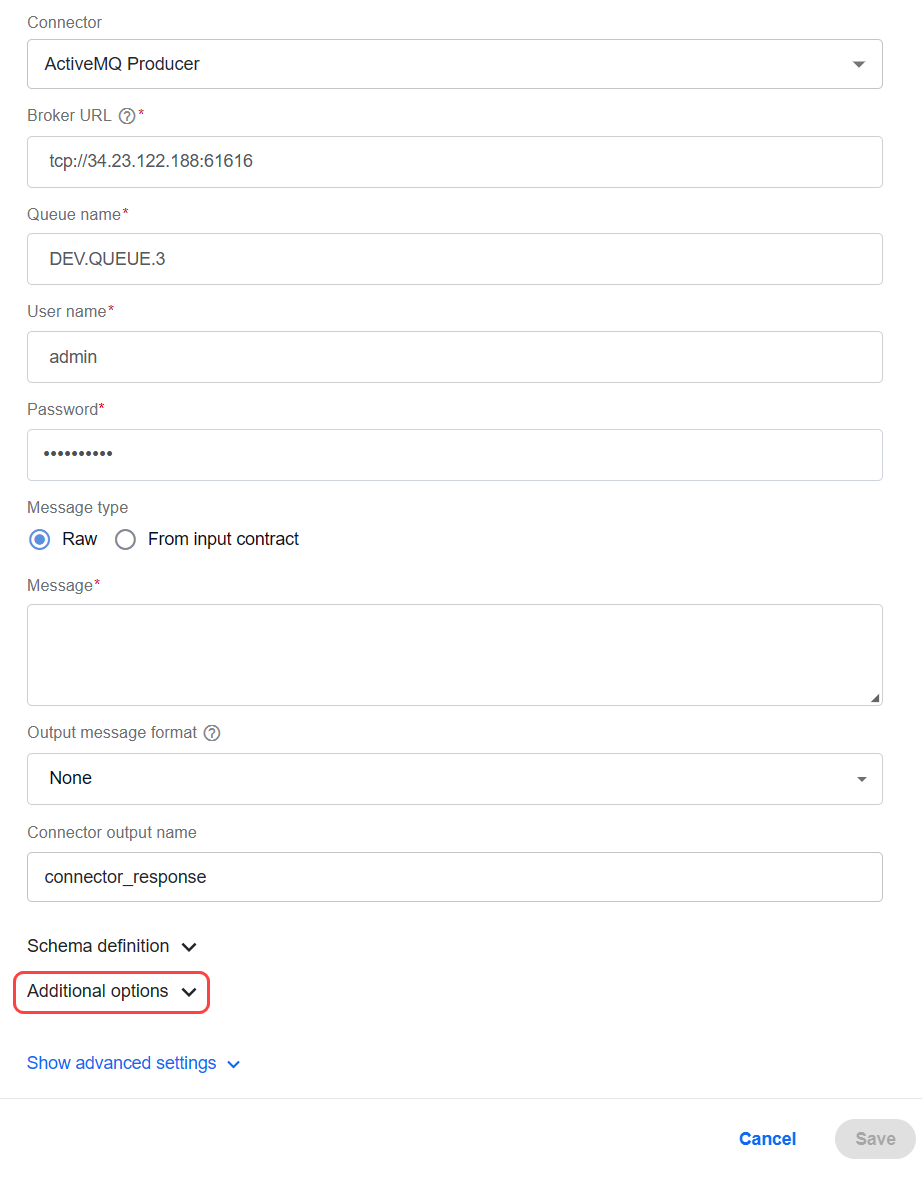
In the Route text area, add the required edits.
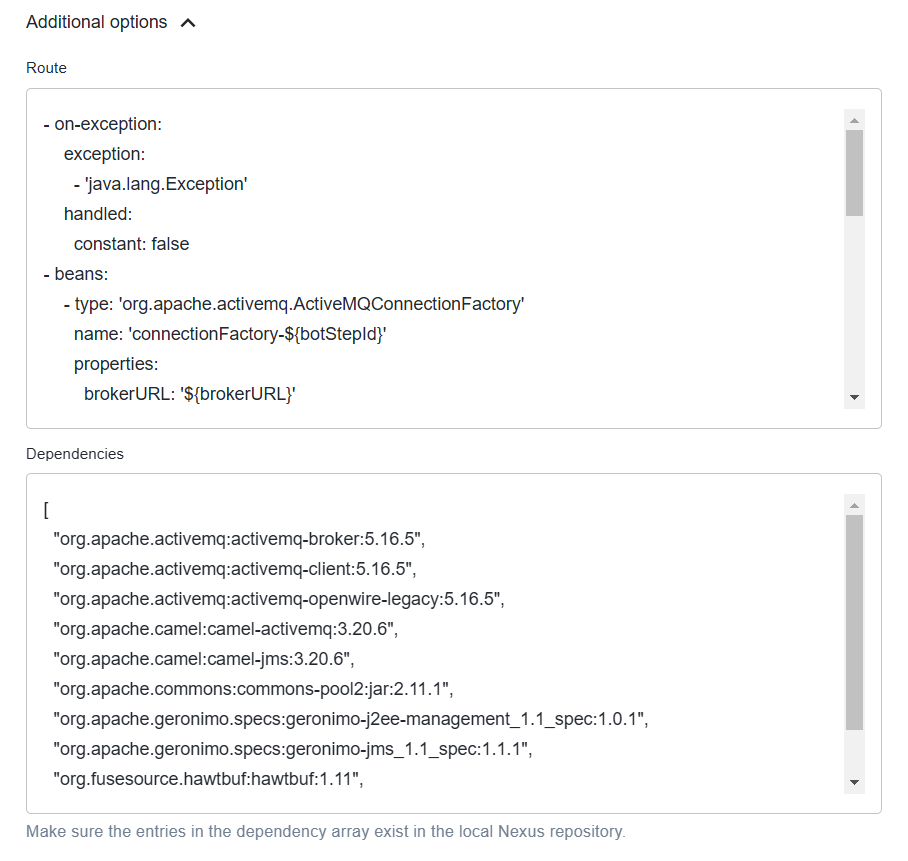
You can also specify your dependencies in the Dependencies section. Mind that the entries in the dependency array must exist in the local Nexus. For more details, also see Define runtime JAR dependencies.
Define runtime JAR dependencies
Before you add a new Generic Connector, identify the additional runtime dependencies required during the execution of your BP.
The Generic Connector already contains the following dependencies out of the box. You do not need to include them in the list.
Out-of-the-box runtime dependencies
[INFO] com.workfusion.connectors:common-generic-connector:jar:1.1.0-dev
[INFO] +- com.google.cloud:google-cloud-bigquery:jar:2.31.1:compile
[INFO] |  +- com.google.cloud:google-cloud-core:jar:2.22.0:compile
[INFO] |  +- com.google.protobuf:protobuf-java-util:jar:3.23.2:compile
[INFO] |  +- com.google.api.grpc:proto-google-common-protos:jar:2.23.0:compile
[INFO] |  +- com.google.api.grpc:proto-google-iam-v1:jar:1.18.0:compile
[INFO] |  +- com.google.auth:google-auth-library-credentials:jar:1.19.0:compile
[INFO] |  +- com.google.cloud:google-cloud-core-http:jar:2.22.0:compile
[INFO] |  +- com.google.api-client:google-api-client:jar:2.2.0:compile
[INFO] |  +- com.google.oauth-client:google-oauth-client:jar:1.34.1:compile
[INFO] |  +- com.google.http-client:google-http-client-apache-v2:jar:1.43.3:compile
[INFO] |  +- com.google.http-client:google-http-client-appengine:jar:1.43.3:compile
[INFO] |  +- com.google.api:gax-httpjson:jar:2.32.0:compile
[INFO] |  +- io.opencensus:opencensus-api:jar:0.31.1:compile
[INFO] |  +- io.opencensus:opencensus-contrib-http-util:jar:0.31.1:compile
[INFO] |  +- com.google.http-client:google-http-client-gson:jar:1.43.3:compile
[INFO] |  +- com.google.http-client:google-http-client:jar:1.43.3:compile
[INFO] |  +- org.apache.httpcomponents:httpclient:jar:4.5.14:compile
[INFO] |  +- org.apache.httpcomponents:httpcore:jar:4.4.15:compile
[INFO] |  +- com.google.j2objc:j2objc-annotations:jar:2.8:compile
[INFO] |  +- org.checkerframework:checker-compat-qual:jar:2.5.5:compile
[INFO] |  +- org.checkerframework:checker-qual:jar:3.33.0:compile
[INFO] |  +- com.google.auth:google-auth-library-oauth2-http:jar:1.19.0:compile
[INFO] |  +- com.google.code.findbugs:jsr305:jar:3.0.2:compile
[INFO] |  +- com.google.apis:google-api-services-bigquery:jar:v2-rev20230520-2.0.0:compile
[INFO] |  +- com.google.api:api-common:jar:2.15.0:compile
[INFO] |  +- javax.annotation:javax.annotation-api:jar:1.3.2:compile
[INFO] |  +- com.google.guava:guava:jar:31.1-jre:compile
[INFO] |  +- com.google.guava:failureaccess:jar:1.0.1:compile
[INFO] |  +- com.google.guava:listenablefuture:jar:9999.0-empty-to-avoid-conflict-with-guava:compile
[INFO] |  +- com.google.api:gax:jar:2.32.0:compile
[INFO] |  +- org.threeten:threetenbp:jar:1.6.8:compile
[INFO] |  +- com.google.code.gson:gson:jar:2.9.1:compile
[INFO] |  +- org.threeten:threeten-extra:jar:1.7.2:compile
[INFO] |  +- com.google.protobuf:protobuf-java:jar:3.23.2:compile
[INFO] |  +- com.google.cloud:google-cloud-bigquerystorage:jar:2.41.1:compile
[INFO] |  +- io.grpc:grpc-api:jar:1.56.1:compile
[INFO] |  +- io.grpc:grpc-context:jar:1.56.1:compile
[INFO] |  +- io.grpc:grpc-stub:jar:1.56.1:compile
[INFO] |  +- io.grpc:grpc-protobuf:jar:1.56.1:compile
[INFO] |  +- io.grpc:grpc-protobuf-lite:jar:1.56.1:compile
[INFO] |  +- com.google.auto.value:auto-value:jar:1.10.2:compile
[INFO] |  +- com.google.api.grpc:proto-google-cloud-bigquerystorage-v1beta1:jar:0.165.1:compile
[INFO] |  +- com.google.api.grpc:proto-google-cloud-bigquerystorage-v1beta2:jar:0.165.1:compile
[INFO] |  +- com.google.api:gax-grpc:jar:2.32.0:compile
[INFO] |  +- io.grpc:grpc-alts:jar:1.56.1:compile
[INFO] |  +- io.grpc:grpc-grpclb:jar:1.56.1:compile
[INFO] |  +- org.conscrypt:conscrypt-openjdk-uber:jar:2.5.2:compile
[INFO] |  +- io.grpc:grpc-auth:jar:1.56.1:compile
[INFO] |  +- io.grpc:grpc-netty-shaded:jar:1.56.1:compile
[INFO] |  +- io.grpc:grpc-googleapis:jar:1.56.1:runtime
[INFO] |  +- io.grpc:grpc-core:jar:1.56.1:compile
[INFO] |  +- com.google.android:annotations:jar:4.1.1.4:runtime
[INFO] |  +- org.codehaus.mojo:animal-sniffer-annotations:jar:1.23:runtime
[INFO] |  +- io.perfmark:perfmark-api:jar:0.26.0:runtime
[INFO] |  +- commons-logging:commons-logging:jar:1.2:compile
[INFO] |  +- commons-codec:commons-codec:jar:1.15:compile
[INFO] |  +- com.google.api.grpc:grpc-google-cloud-bigquerystorage-v1beta1:jar:0.165.1:compile
[INFO] |  +- com.google.api.grpc:grpc-google-cloud-bigquerystorage-v1beta2:jar:0.165.1:compile
[INFO] |  +- com.google.api.grpc:grpc-google-cloud-bigquerystorage-v1:jar:2.41.1:compile
[INFO] |  +- com.google.api.grpc:proto-google-cloud-bigquerystorage-v1:jar:2.41.1:compile
[INFO] |  +- org.apache.arrow:arrow-vector:jar:12.0.1:compile
[INFO] |  +- org.apache.arrow:arrow-format:jar:12.0.1:compile
[INFO] |  +- com.fasterxml.jackson.core:jackson-core:jar:2.14.3:compile
[INFO] |  +- com.fasterxml.jackson.core:jackson-annotations:jar:2.14.3:compile
[INFO] |  +- com.fasterxml.jackson.core:jackson-databind:jar:2.14.3:compile
[INFO] |  +- com.fasterxml.jackson.datatype:jackson-datatype-jsr310:jar:2.13.5:compile
[INFO] |  +- io.netty:netty-common:jar:4.1.92.Final:compile
[INFO] |  +- com.google.flatbuffers:flatbuffers-java:jar:1.12.0:compile
[INFO] |  +- org.slf4j:slf4j-api:jar:1.7.36:compile
[INFO] |  +- org.apache.arrow:arrow-memory-core:jar:12.0.1:compile
[INFO] |  +- org.apache.arrow:arrow-memory-netty:jar:12.0.1:runtime
[INFO] |  +- io.netty:netty-buffer:jar:4.1.92.Final:runtime
[INFO] |  \- com.google.errorprone:error_prone_annotations:jar:2.18.0:compile
[INFO] +- org.yaml:snakeyaml:jar:2.1:compile
[INFO] +- com.jayway.jsonpath:json-path:jar:2.8.0:compile
[INFO] |  \- net.minidev:json-smart:jar:2.4.11:runtime
[INFO] |     \- net.minidev:accessors-smart:jar:2.4.11:runtime
[INFO] |        \- org.ow2.asm:asm:jar:9.3:runtime
[INFO] +- commons-io:commons-io:jar:2.13.0:compile
[INFO] +- org.apache.commons:commons-text:jar:1.10.0:compile
[INFO] |  \- org.apache.commons:commons-lang3:jar:3.12.0:compile
[INFO] +- com.fasterxml.jackson.dataformat:jackson-dataformat-csv:jar:2.13.0:compile
[INFO] +- com.univocity:univocity-parsers:jar:2.9.1:compile
[INFO] +- org.json:json:jar:20230618:compile
[INFO] +- com.fasterxml.jackson.dataformat:jackson-dataformat-xml:jar:2.15.3:compile
[INFO] |  +- org.codehaus.woodstox:stax2-api:jar:4.2.1:compile
[INFO] |  \- com.fasterxml.woodstox:woodstox-core:jar:6.5.1:compile
[INFO] +- com.workfusion.connectors:connectors-core:jar:2.1.0:compile
[INFO] |  +- com.workfusion.connectors:connectors-core-parent:pom:2.1.0:compile
[INFO] |  +- com.workfusion.spa.java.native.worker:module-secrets:jar:1.0.0.28:compile
[INFO] |  +- commons-collections:commons-collections:jar:3.2.2:compile
[INFO] |  +- com.workfusion:nexus-client:jar:1.0.100:compile
[INFO] |  |  +- io.github.openfeign:feign-gson:jar:10.2.3:compile
[INFO] |  |  |  \- io.github.openfeign:feign-core:jar:10.2.3:compile
[INFO] |  |  +- io.github.openfeign:feign-slf4j:jar:10.2.3:compile
[INFO] |  |  \- io.github.openfeign.form:feign-form:jar:3.3.0:compile
[INFO] |  |     \- com.google.code.findbugs:annotations:jar:3.0.1:compile
[INFO] |  |        \- net.jcip:jcip-annotations:jar:1.0:compile
[INFO] |  +- org.springframework.retry:spring-retry:jar:1.3.4:compile
[INFO] |  +- javax.el:javax.el-api:jar:2.2.5:compile
[INFO] |  +- org.eclipse.aether:aether-connector-basic:jar:1.1.0:compile
[INFO] |  |  +- org.eclipse.aether:aether-api:jar:1.1.0:compile
[INFO] |  |  +- org.eclipse.aether:aether-spi:jar:1.1.0:compile
[INFO] |  |  \- org.eclipse.aether:aether-util:jar:1.1.0:compile
[INFO] |  +- org.eclipse.aether:aether-transport-http:jar:1.1.0:compile
[INFO] |  |  \- org.slf4j:jcl-over-slf4j:jar:1.7.36:compile
[INFO] |  +- org.apache.maven.resolver:maven-resolver-util:jar:1.9.13:compile
[INFO] |  |  \- org.apache.maven.resolver:maven-resolver-api:jar:1.9.13:compile
[INFO] |  +- org.apache.maven:maven-aether-provider:jar:3.3.9:compile
[INFO] |  |  +- org.apache.maven:maven-model:jar:3.3.9:compile
[INFO] |  |  +- org.apache.maven:maven-model-builder:jar:3.3.9:compile
[INFO] |  |  |  +- org.codehaus.plexus:plexus-interpolation:jar:1.21:compile
[INFO] |  |  |  +- org.apache.maven:maven-artifact:jar:3.3.9:compile
[INFO] |  |  |  \- org.apache.maven:maven-builder-support:jar:3.3.9:compile
[INFO] |  |  +- org.apache.maven:maven-repository-metadata:jar:3.3.9:compile
[INFO] |  |  +- org.eclipse.aether:aether-impl:jar:1.0.2.v20150114:compile
[INFO] |  |  +- org.codehaus.plexus:plexus-component-annotations:jar:1.6:compile
[INFO] |  |  \- org.codehaus.plexus:plexus-utils:jar:3.0.22:compile
[INFO] |  +- co.elastic.apm:apm-agent-attach:jar:1.33.0:compile
[INFO] |  |  +- net.java.dev.jna:jna:jar:5.3.1:compile
[INFO] |  |  \- net.java.dev.jna:jna-platform:jar:5.3.1:compile
[INFO] |  +- co.elastic.apm:apm-agent-api:jar:1.33.0:compile
[INFO] |  \- jakarta.validation:jakarta.validation-api:jar:2.0.2:compile
[INFO] +- org.projectlombok:lombok:jar:1.18.28:compile
[INFO] +- org.apache.camel.springboot:camel-spring-boot-starter:jar:3.20.6:compile
[INFO] |  +- org.apache.camel.springboot:camel-spring-boot:jar:3.20.6:compile
[INFO] |  |  +- org.apache.camel:camel-spring:jar:3.20.6:compile
[INFO] |  |  |  +- org.springframework:spring-aop:jar:5.3.27:compile
[INFO] |  |  |  +- org.springframework:spring-beans:jar:5.3.27:compile
[INFO] |  |  |  +- org.springframework:spring-expression:jar:5.3.27:compile
[INFO] |  |  |  \- org.springframework:spring-tx:jar:5.3.27:compile
[INFO] |  |  +- org.apache.camel:camel-spring-main:jar:3.20.6:compile
[INFO] |  |  |  \- org.apache.camel:camel-main:jar:3.20.6:compile
[INFO] |  |  |     \- org.apache.camel:camel-core-languages:jar:3.20.6:compile
[INFO] |  |  +- org.apache.camel:camel-util-json:jar:3.20.6:compile
[INFO] |  |  +- org.apache.camel:camel-xml-jaxb-dsl:jar:3.20.6:compile
[INFO] |  |  |  \- org.apache.camel:camel-xml-jaxb:jar:3.20.6:compile
[INFO] |  |  |     +- com.sun.xml.bind:jaxb-core:jar:2.3.0:compile
[INFO] |  |  |     \- com.sun.xml.bind:jaxb-impl:jar:2.3.3:compile
[INFO] |  |  |        \- com.sun.activation:jakarta.activation:jar:1.2.2:runtime
[INFO] |  |  +- org.apache.camel:camel-spring-xml:jar:3.20.6:compile
[INFO] |  |  |  \- org.apache.camel:camel-core-xml:jar:3.20.6:compile
[INFO] |  |  +- org.apache.camel:camel-cloud:jar:3.20.6:compile
[INFO] |  |  +- org.apache.camel:camel-cluster:jar:3.20.6:compile
[INFO] |  |  \- org.apache.camel:camel-health:jar:3.20.6:compile
[INFO] |  +- org.apache.camel.springboot:camel-core-starter:jar:3.20.6:compile
[INFO] |  +- org.apache.camel.springboot:camel-bean-starter:jar:3.20.6:compile
[INFO] |  +- org.apache.camel.springboot:camel-browse-starter:jar:3.20.6:compile
[INFO] |  |  \- org.apache.camel:camel-browse:jar:3.20.6:compile
[INFO] |  +- org.apache.camel.springboot:camel-controlbus-starter:jar:3.20.6:compile
[INFO] |  |  \- org.apache.camel:camel-controlbus:jar:3.20.6:compile
[INFO] |  +- org.apache.camel.springboot:camel-dataformat-starter:jar:3.20.6:compile
[INFO] |  |  \- org.apache.camel:camel-dataformat:jar:3.20.6:compile
[INFO] |  +- org.apache.camel.springboot:camel-dataset-starter:jar:3.20.6:compile
[INFO] |  |  \- org.apache.camel:camel-dataset:jar:3.20.6:compile
[INFO] |  +- org.apache.camel.springboot:camel-direct-starter:jar:3.20.6:compile
[INFO] |  |  \- org.apache.camel:camel-direct:jar:3.20.6:compile
[INFO] |  +- org.apache.camel.springboot:camel-directvm-starter:jar:3.20.6:compile
[INFO] |  |  \- org.apache.camel:camel-directvm:jar:3.20.6:compile
[INFO] |  +- org.apache.camel.springboot:camel-file-starter:jar:3.20.6:compile
[INFO] |  +- org.apache.camel.springboot:camel-language-starter:jar:3.20.6:compile
[INFO] |  |  \- org.apache.camel:camel-language:jar:3.20.6:compile
[INFO] |  +- org.apache.camel.springboot:camel-log-starter:jar:3.20.6:compile
[INFO] |  +- org.apache.camel.springboot:camel-mock-starter:jar:3.20.6:compile
[INFO] |  |  \- org.apache.camel:camel-mock:jar:3.20.6:compile
[INFO] |  +- org.apache.camel.springboot:camel-ref-starter:jar:3.20.6:compile
[INFO] |  |  \- org.apache.camel:camel-ref:jar:3.20.6:compile
[INFO] |  +- org.apache.camel.springboot:camel-rest-starter:jar:3.20.6:compile
[INFO] |  |  \- org.apache.camel:camel-rest:jar:3.20.6:compile
[INFO] |  |     \- org.apache.camel:camel-tooling-model:jar:3.20.6:compile
[INFO] |  +- org.apache.camel.springboot:camel-saga-starter:jar:3.20.6:compile
[INFO] |  |  \- org.apache.camel:camel-saga:jar:3.20.6:compile
[INFO] |  +- org.apache.camel.springboot:camel-scheduler-starter:jar:3.20.6:compile
[INFO] |  |  \- org.apache.camel:camel-scheduler:jar:3.20.6:compile
[INFO] |  +- org.apache.camel.springboot:camel-seda-starter:jar:3.20.6:compile
[INFO] |  |  \- org.apache.camel:camel-seda:jar:3.20.6:compile
[INFO] |  +- org.apache.camel.springboot:camel-stub-starter:jar:3.20.6:compile
[INFO] |  |  \- org.apache.camel:camel-stub:jar:3.20.6:compile
[INFO] |  +- org.apache.camel.springboot:camel-timer-starter:jar:3.20.6:compile
[INFO] |  +- org.apache.camel.springboot:camel-validator-starter:jar:3.20.6:compile
[INFO] |  |  \- org.apache.camel:camel-validator:jar:3.20.6:compile
[INFO] |  +- org.apache.camel.springboot:camel-vm-starter:jar:3.20.6:compile
[INFO] |  |  \- org.apache.camel:camel-vm:jar:3.20.6:compile
[INFO] |  +- org.apache.camel.springboot:camel-xpath-starter:jar:3.20.6:compile
[INFO] |  |  \- org.apache.camel:camel-xpath:jar:3.20.6:compile
[INFO] |  +- org.apache.camel.springboot:camel-xslt-starter:jar:3.20.6:compile
[INFO] |  |  \- org.apache.camel:camel-xslt:jar:3.20.6:compile
[INFO] |  \- org.apache.camel.springboot:camel-xml-jaxp-starter:jar:3.20.6:compile
[INFO] |     \- org.apache.camel:camel-xml-jaxp:jar:3.20.6:compile
[INFO] |        \- org.apache.camel:camel-xml-io-util:jar:3.20.6:compile
[INFO] +- org.apache.camel:camel-yaml-dsl:jar:3.20.6:compile
[INFO] |  +- org.apache.camel:camel-yaml-dsl-common:jar:3.20.6:compile
[INFO] |  |  \- org.snakeyaml:snakeyaml-engine:jar:2.3:compile
[INFO] |  +- org.apache.camel:camel-yaml-dsl-deserializers:jar:3.20.6:compile
[INFO] |  \- org.apache.camel:camel-dsl-support:jar:3.20.6:compile
[INFO] |     \- org.apache.camel:camel-core-model:jar:3.20.6:compile
[INFO] |        \- org.apache.camel:camel-core-processor:jar:3.20.6:compile
[INFO] +- org.apache.camel:camel-timer:jar:3.20.6:compile
[INFO] +- org.apache.camel:camel-bean:jar:3.20.6:compile
[INFO] +- org.apache.camel.springboot:camel-http-starter:jar:3.20.6:compile
[INFO] |  \- org.apache.camel:camel-http:jar:3.20.6:compile
[INFO] |     +- org.apache.camel:camel-http-common:jar:3.20.6:compile
[INFO] |     |  +- org.apache.camel:camel-http-base:jar:3.20.6:compile
[INFO] |     |  \- org.apache.camel:camel-attachments:jar:3.20.6:compile
[INFO] |     |     \- com.sun.activation:javax.activation:jar:1.2.0:compile
[INFO] |     \- javax.servlet:javax.servlet-api:jar:3.1.0:compile
[INFO] +- org.apache.camel:camel-jsonpath:jar:3.20.6:compile
[INFO] |  \- org.apache.camel:camel-file:jar:3.20.6:compile
[INFO] +- org.apache.camel:camel-log:jar:3.20.6:compile
[INFO] +- org.apache.camel:camel-jackson:jar:3.20.6:compile
[INFO] |  \- org.apache.camel:camel-core-engine:jar:3.20.6:compile
[INFO] |     +- org.apache.camel:camel-base-engine:jar:3.20.6:compile
[INFO] |     |  \- org.apache.camel:camel-base:jar:3.20.6:compile
[INFO] |     \- org.apache.camel:camel-core-reifier:jar:3.20.6:compile
[INFO] +- org.apache.camel:camel-fastjson:jar:3.20.6:compile
[INFO] |  \- com.alibaba:fastjson:jar:1.2.83:compile
[INFO] +- org.apache.camel.springboot:camel-fastjson-starter:jar:3.20.6:compile
[INFO] \- org.apache.camel:camel-support:jar:3.20.6:compile
[INFO]    +- org.apache.camel:camel-api:jar:3.20.6:compile
[INFO]    +- org.apache.camel:camel-management-api:jar:3.20.6:compile
[INFO]    \- org.apache.camel:camel-util:jar:3.20.6:compile
To identify additional runtime dependencies required during the BP execution, perform the following steps:
Create a Maven project with the following
pom.xmlfile:<project xmlns="http://maven.apache.org/POM/4.0.0" xmlns:xsi="http://www.w3.org/2001/XMLSchema-instance" xsi:schemaLocation="http://maven.apache.org/POM/4.0.0 https://maven.apache.org/xsd/maven-4.0.0.xsd">
<modelVersion>4.0.0</modelVersion>
<groupId>com.workfusion.test</groupId>
<artifactId>dependency</artifactId>
<version>0.0.1-SNAPSHOT</version>
<name>dependency</name>
<properties>
<camel.springboot.version>3.20.6</camel.springboot.version>
</properties>
<dependencies>
<dependency>
<groupId>org.apache.camel.springboot</groupId>
<artifactId>camel-spring-boot-starter</artifactId>
<version>${camel.springboot.version}</version>
</dependency>
<!-- Add dependencies after this -->
</dependencies>
</project>Execute the following Maven command to capture the existing dependency tree:
mvn dependency:tree -Dscope:runtimeAdd the required runtime dependencies for your new Generic Connector component, for example,
camel-kafkatopom.xml:<!-- Add dependencies after this -->
<dependency>
<groupId>org.apache.camel</groupId>
<artifactId>camel-kafka</artifactId>
<version>${camel.springboot.version}</version>
</dependency>Execute the Maven command from step 2 to capture the updated dependency tree.
Compare the output and identify the list of dependencies added to the project, ignoring any ordering changes in a particular JAR. Also, eliminate any dependencies that are already available through the out-of-box list of dependencies.
Expand the Additional options section in the configuration form. In the Dependencies text area, list the dependencies in the
group:artifact:versionformat, one per row.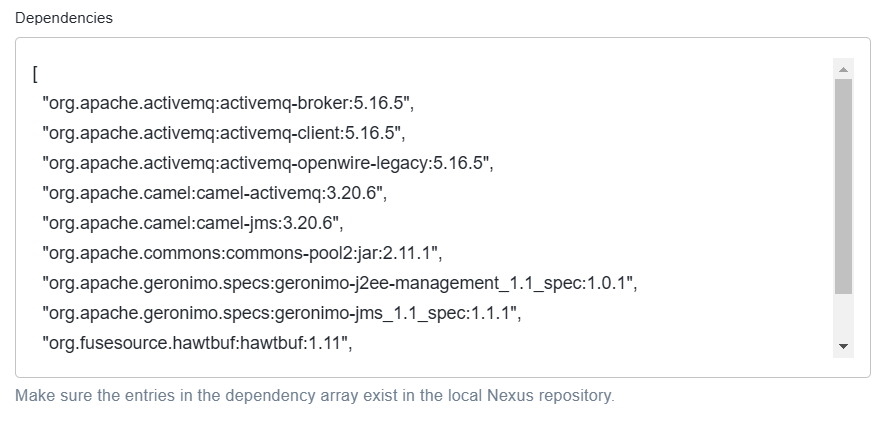
For Apache Kafka, the format resembles the following example:
"org.apache.camel:camel-kafka:3.20.6",
"org.apache.kafka:kafka-clients:3.3.2",
"com.github.luben:zstd-jni:1.5.2-1",
"org.lz4:lz4-java:1.8.0",
"org.xerial.snappy:snappy-java:1.1.8.4"
The above list is then referenced in the
task_configentry in the"dependencies"section. For more details, see Define Connector via metadata.
Add dependencies to Control Tower
After identifying the runtime JAR dependencies, make them available in your Control Tower instance. To create a dependency bundle, do as follows:
Create a zip file with the following structure. It should include all the previously described dependencies.
|____component-dependencies-bundle-1.1.0-SNAPSHOT.zip
| |____meta-info.json
| |____artifactory-dependency
| | |____wf-dependencies
| | | |____org
| | | | |____lz4
| | | | | |____lz4-java
| | | | | | |____1.8.0
| | | | | | | |____lz4-java-1.8.0.jar
| | | | |____xerial
| | | | | |____snappy
| | | | | | |____snappy-java
| | | | | | | |____1.1.8.4
| | | | | | | | |____snappy-java-1.1.8.4.jar
| | | | |____apache
| | | | | |____camel
| | | | | | |____camel-kafka
| | | | | | | |____3.20.6
| | | | | | | | |____camel-kafka-3.20.6.jar
| | | | | |____kafka
| | | | | | |____kafka-clients
| | | | | | | |____3.3.2
| | | | | | | | |____kafka-clients-3.3.2.jar
| | | |____com
| | | | |____github
| | | | | |____luben
| | | | | | |____zstd-jni
| | | | | | | |____1.5.2-1
| | | | | | | | |____zstd-jni-1.5.2-1.jar
The
meta-info.jsonfile should contain the following information:{
"WF_VERSION" : "X.X.X.X",
"TARGET_VERSION" : "X.X.X",
"DESCRIPTION" : "component-dependencies-bundle 1.1.0-SNAPSHOT",
"NAME" : "component-dependencies-bundle",
"USE_CASE_CODE" : "component-dependencies-bundle",
"USE_CASE_VERSION" : "1.1.0-SNAPSHOT",
"INSTANCE" : "your.instance.name",
"AUTHOR" : "author",
"PACKAGE_DATE" : "2024-03-15 11:38:54"
}In the example above, sample data is used.
Upload the created zip file to Control Tower > AI Agents > Upload new. You can upload multiple JARs using a single zip file, or you can create a zip file per each dependency.
Define Connector via metadata
The Generic Connector allows you to manually define new types of connectors and add them to the list of options. To do this, you should have a good understanding of the following concepts:
- Camel routes
- Form.io
- SQL
- YAML
To add a new row to the database, perform the following steps:
In Control Tower, go to Advanced > Data Stores and select the uc_genericconnector_component_v1 Data Store.
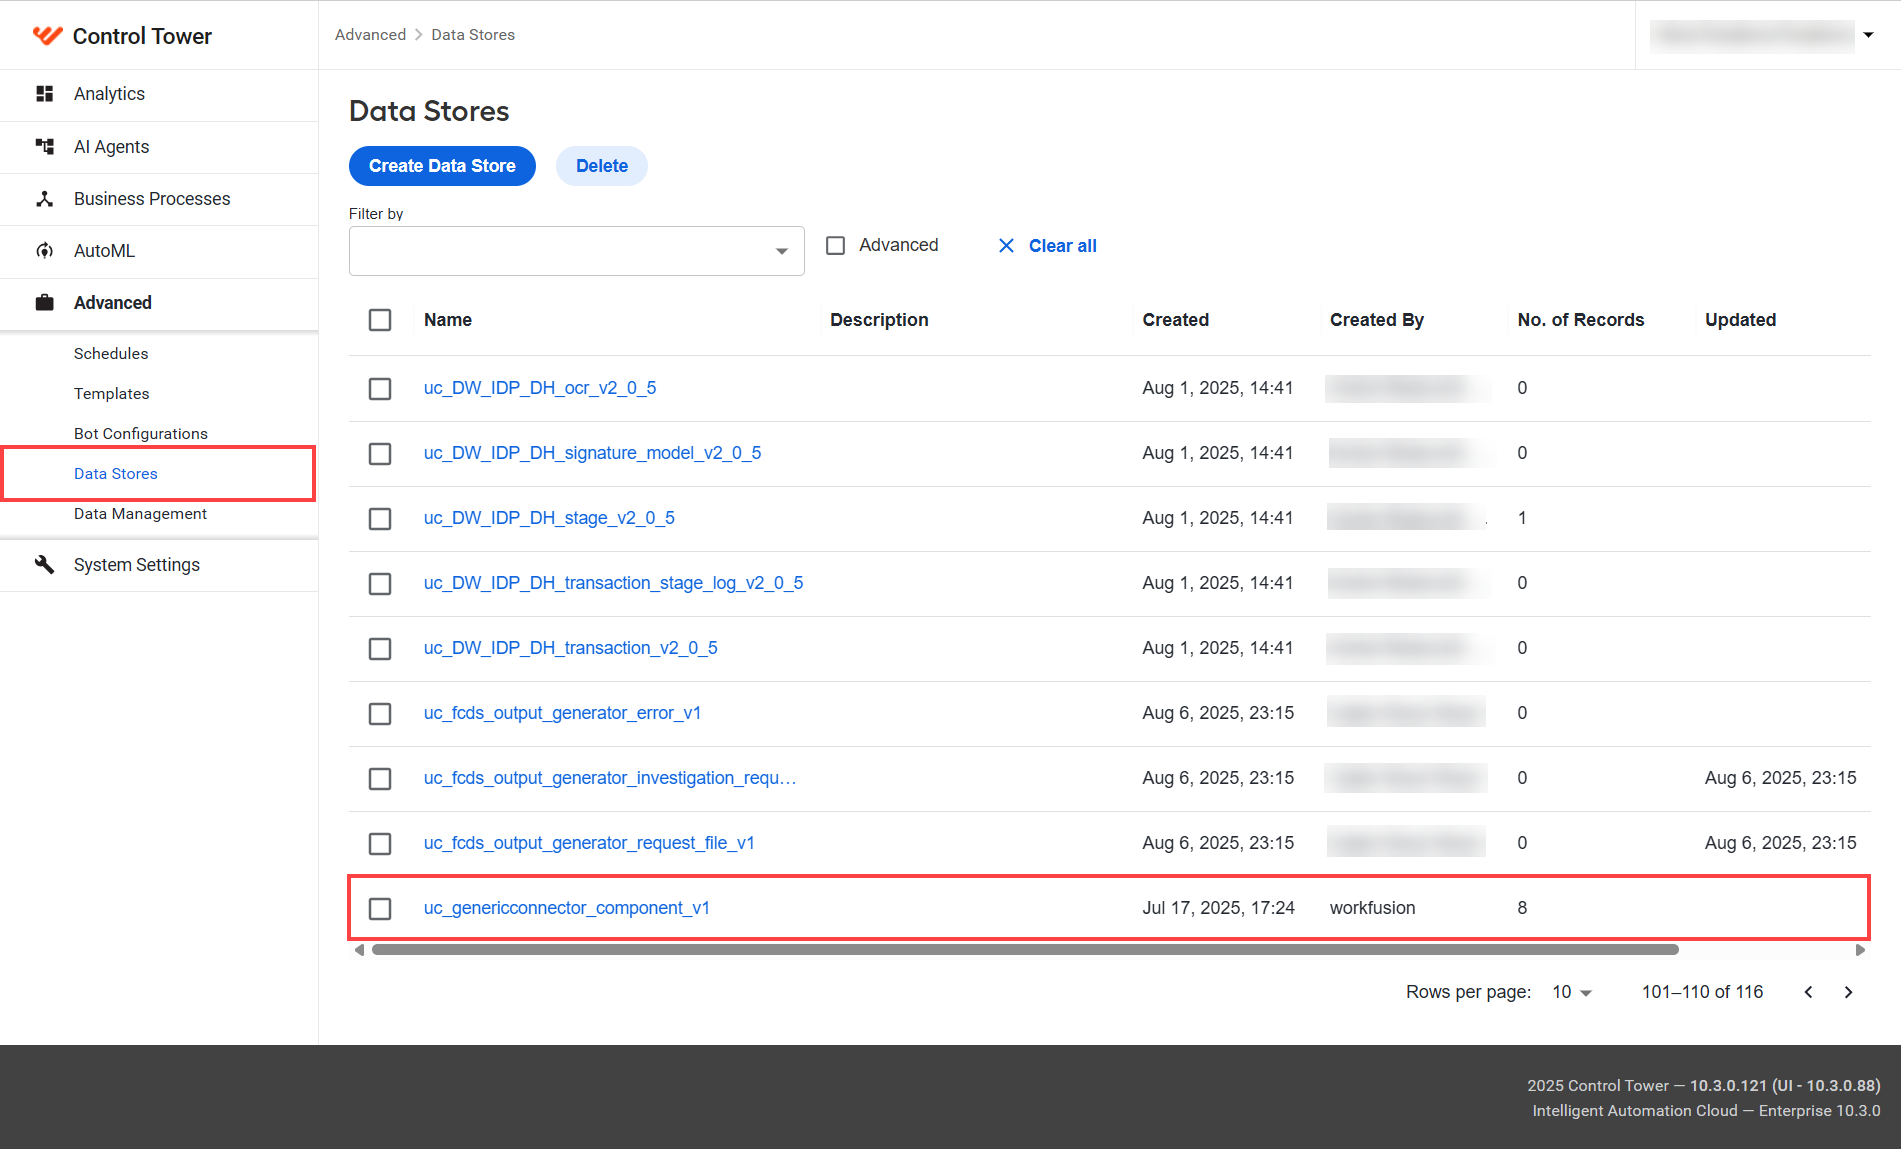
On the Data tab, click + Record**.
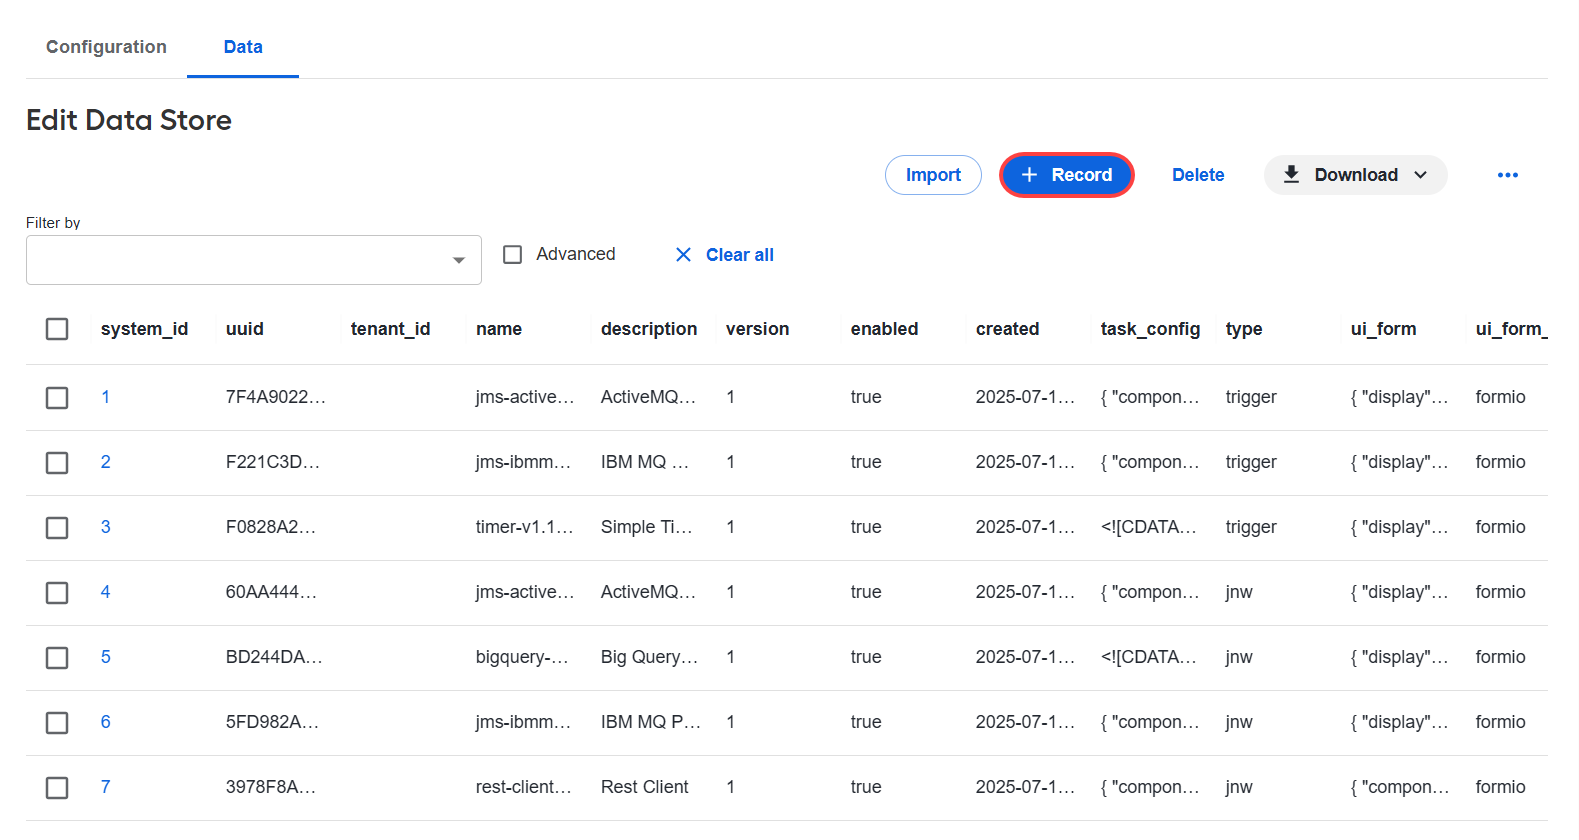
In the Record # window, fill in the following fields:
- uuid: a unique identifier.
- tenant_id: the tenant ID; can be left empty.
- name: the component name. The value must include only lowercase characters and no spaces. It is recommended that you add a suffix with a version separated by a dash, for example,
jms-ibmmq-v1.1. - description: the component description.
- version: the component version.
- enabled: enter
trueto enable the component. Otherwise, enterfalse. - created: the date when the component was created.
- task_config: a specially formatted JSON structure representation of the component's routes and dependencies to be executed by the execution engine.
See the example of task_config
<![CDATA[
{
  "component": "jms-activemq-v1.1",
  "config": {
    "queueName": "",
    "username": "",
    "password": "",
    "brokerURL": "",
    "requestBody": ""
  },
  "dependencies": [
    "org.apache.activemq:activemq-broker:5.16.5",
    "org.apache.activemq:activemq-client:5.16.5",
    "org.apache.activemq:activemq-openwire-legacy:5.16.5",
    "org.apache.camel:camel-activemq:3.20.6",
    "org.apache.camel:camel-jms:3.20.6",
    "org.apache.commons:commons-pool2:jar:2.11.1",
    "org.apache.geronimo.specs:geronimo-j2ee-management_1.1_spec:1.0.1",
    "org.apache.geronimo.specs:geronimo-jms_1.1_spec:1.1.1",
    "org.fusesource.hawtbuf:hawtbuf:1.11",
    "org.springframework:spring-jms:5.3.23"
  ],
  "route": "[{beans: [{type: org.apache.activemq.ActiveMQConnectionFactory, name: connectionFactory, properties: {brokerURL: '${brokerURL}', username: '${username}', password: '${password}'}}]}, {route: {id: generic-connector, from: {uri: 'direct:start', steps: [{to: {uri: 'jms:queue:${queueName}?connectionFactory=#connectionFactory'}}, {process: {ref: dataTypeTransformer}}]}}}]"
}
]]>
Where:
component: the component name; must be the same as the name in the Data Store table.config: parameters to be used by the component. You can leave the default values here.dependencies: dependencies required to run the component. The JARs must exist in the local Nexus. If they do not exist, add them.route: the Camel route to be executed; define the route using YAML DSL. In the example above, the parameters in theconfigsection are used as placeholders.
- type:
jnwfor Generic Connector ortriggerfor Generic Connector Trigger. - ui_form: the JSON representation of the form created with the help of Form Builder.
- ui_form_type: the type of the form library to be used to render the form. Currently, only
formiois supported.
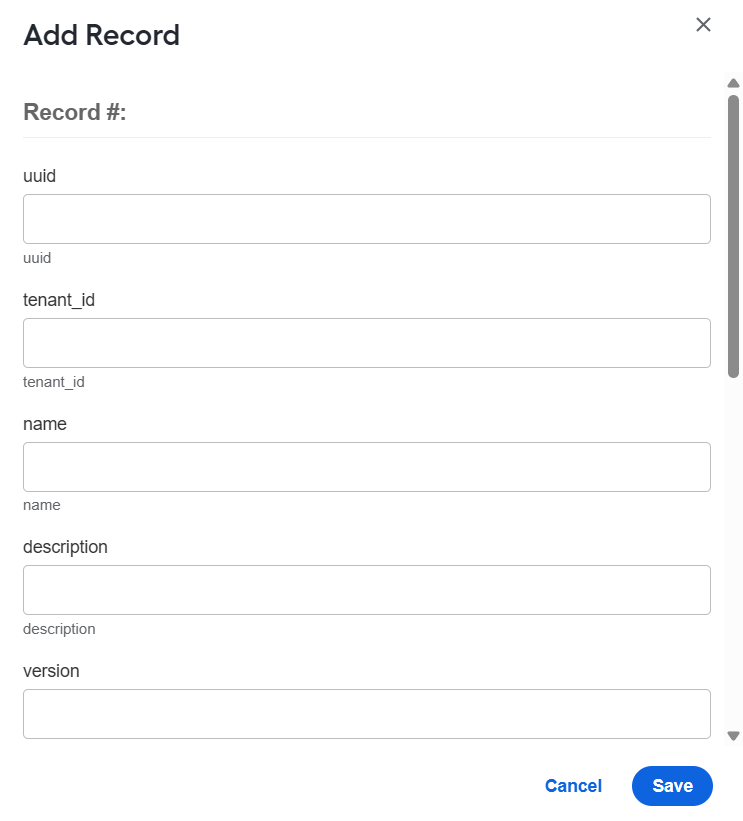
Click Save.
Substitute parameters
You can substitute parameters within any part of the configuration via the ${parameter_name} syntax. To look up the substitution value, do as follows:
Check the data of the previous steps and find a parameter with the matching name. If none is found, go to step 2.
Check Secrets Vault for an alias that matches the parameter name and get its value. If none is found, go to step 3.
Check the Generic Connector configuration or its parameter list for a matching parameter.
Check the AI Agent configuration (if any).