
Configuration on VM best practice
A lot of users use Intelligent Automation Cloud Business on their local machines, but sometimes it is not convenient to run business processes locally. In this article, you will find steps on how to configure Business Edition to work on a virtual machine (VM).
Preconditions
caution
Make sure you have appropriate Intelligent Automation Cloud Business license. If you don't have it, you cannot configure Intelligent Automation Cloud on a remote VM.
Install a VM on the selected remote computer. Make sure it is Windows Server 2012, 2012 R2, or 2016.
Install the latest Intelligent Automation Cloud version. Follow Installation best practice during the installation.
- Install Development Workstation and Server on the VM.
- Create the required users in Control Tower according to the User Management guide.
- Install Development Workstation on respective laptops using credentials for each user and be sure to reference the IPv4 of the server.
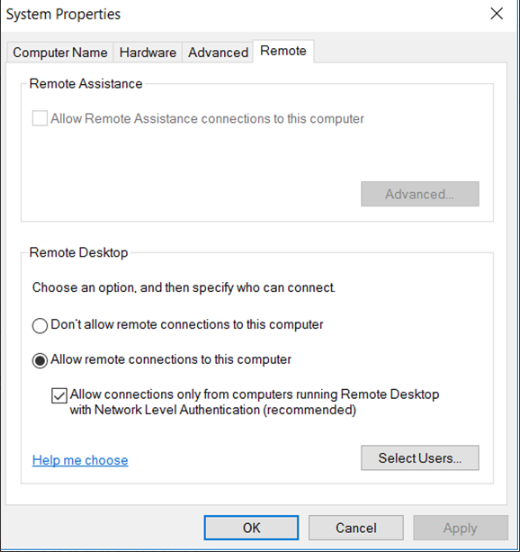
Configure all required network rules for users to be connected to Server on the VM through laptops according to your organization policy. For example, you should configure specific security groups with rules on the AWS virtual machine. See more information in Amazon VPC Security groups.
Virtual machine configuration
Follow the steps to configure your VM for running multiple bots.
- Check that WorkFusionRPA bots are added as users to enable Remote Desktop (Remote Desktop Users). If WorkfusionRPABot[X] is not showing in the list, click Add and add it manually.
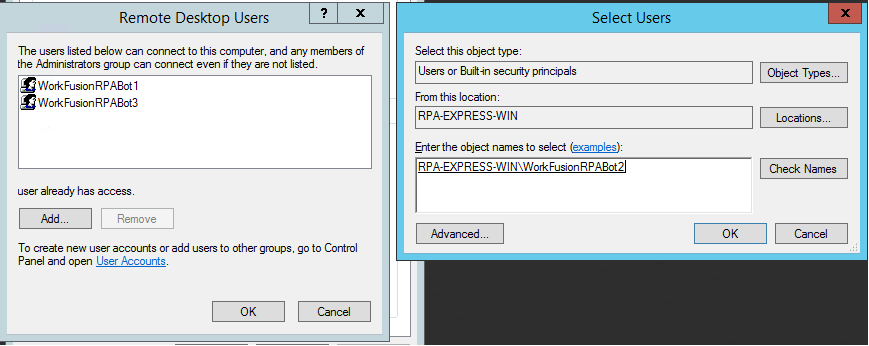
- Make sure that additional bots are started after running Intelligent Automation Cloud Business. You should see several RDP connection windows, the number should be the same you selected during installation - 1 bot for 1 RDP window.

- Make sure the bot users have security permissions to any network shared sources that they need to access to when running scripts.
- Go to the folder C:\IntelligentAutomationCloud\RPA\registry. Run the following files via Administrator permissions:
- machine-settings.reg
- run user-settings.reg
- settings-firewall.bat
- Configure the Group Policy Settings so that the VM will not shut down after an idle period.
- To launch GPO, go to Run >
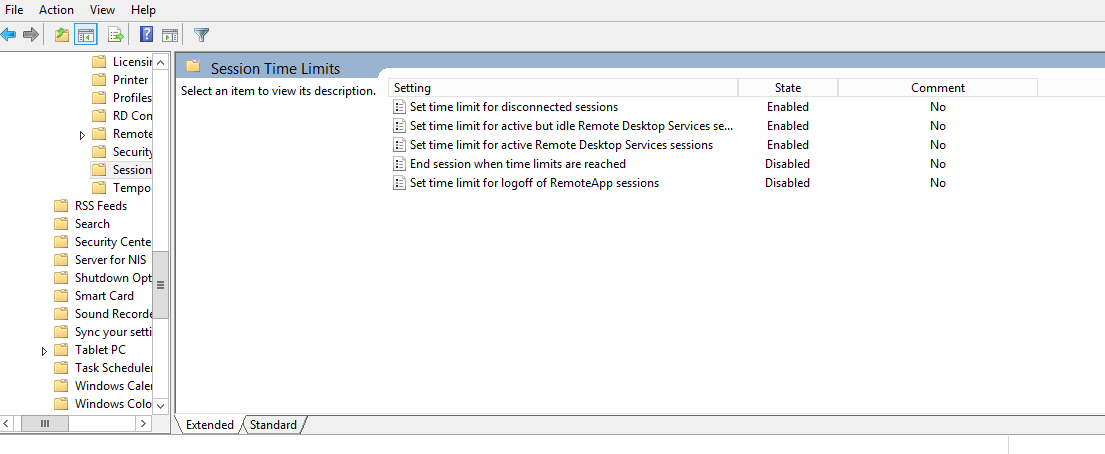
gpedit.msc. - Navigate to Computer Configuration > Policies > Administrative Templates > Windows Components > Remote Desktop Services > Remote Desktop Session Host > Session Time Limits.
- Set the policy. Set the time limit for disconnected sessions to Enabled and time to Never.
- Set up the other policies as on the image below.
- To launch GPO, go to Run >
- Double-check that the following Windows Registry is set up.
- Run
regedit. - Navigate to HKEY_LOCAL_MACHINE\Software\Microsoft\Terminal Server Client.
- Set RemoteDesktop_SuppressWhenMinimized to 2.
- Run