Contacts recognition and upload to Salesforce workflow
On the high level the script consists of the following actions.
- Open and recognize business cards from image files according to predefined templates.
- Collect all recognized contacts and non-recognized data into CSV files: out.csv and out_error.csv.
- Log in Salesforce and verify your Salesforce account via Outlook.
- Upload the .csv file with recognized contacts to Salesforce.
Let's explore these steps in detail.
caution
Make sure that OCR is up and running before script execution. You can enable it on the Components tab.
Environment
- Windows OS that meets System Requirements
- Any of these browsers: Google Chrome or FireFox
- MS Outlook (a version doesn't matter) with the email account linked to your Salesforce account to receive a Salesforce verification email
- Screen resolution should be one of these:
- 1920 x 1080
- 1900 x 600
- 1366 x 768
- 1280 x 1024
- 1024 x 768
Script variables
| Variable name | Type | Description | Default value |
|---|---|---|---|
| input_files | List | the list used to store the list of input files | |
| ocred | Boolean | the flag used to check whether input file was processed or not | false |
| contacts | Table | required to collect recognized contacts and then insert into file | |
| folder_path | String | the path to the folder with input files (images) | |
| login | Secret | Salesforce username (need to be set up before script running) | |
| password | Secret | Salesforce password (need to be set up before script running) | |
| contacts_error | Table | required to collect non-recognized contacts and insert into a separate file | |
| url_sf_login | String | Salesforce login page | https://login.salesforce.com/ |
| url_sf_contact | String | Salesforce Contacts page | https://ap5.lightning.force.com/one/one.app#/sObject/Contact/list?filterName=all |
| verification_code | String | required to store Salesforce verification code |
Script workflow
Process input files
Description: The group opens input files with images, recognizes business cards, and stores information into temporary Table variables. In case no template for a business card is found, the file information is added into a separate file.
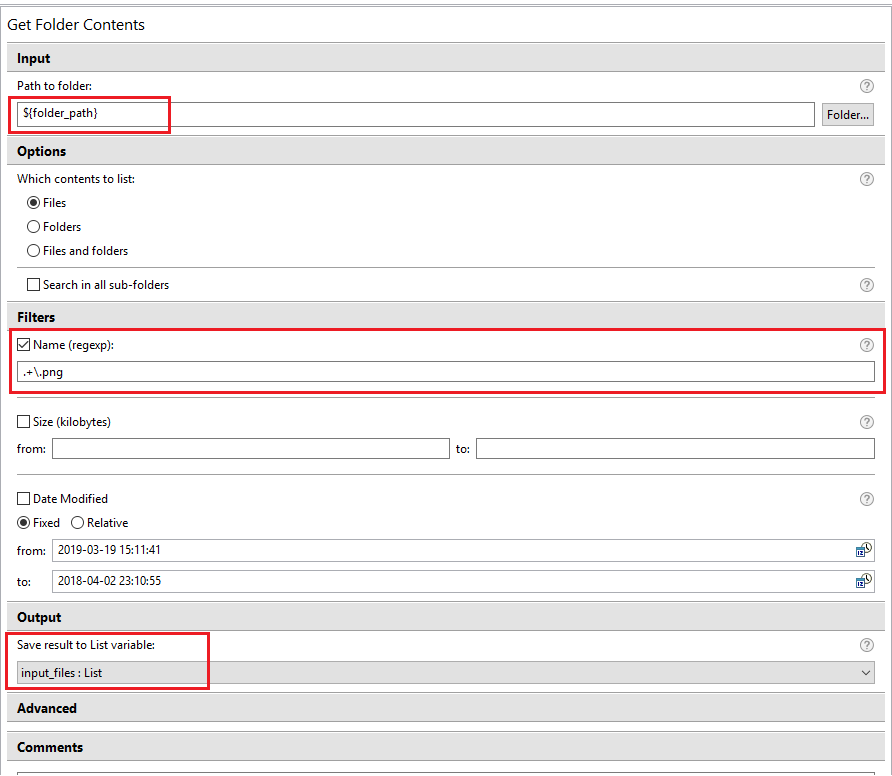
- In the Get Folder Contents action, bot gets the list of .png files from the folder mentioned in the
folder_pathvariable and saves the results into theinput_filesList variable.
- In the For Each loop, files from the list are checked according to the existing templates. Recognized information is stored into the
contactsTable variable, non-recognized – intocontacts_error.


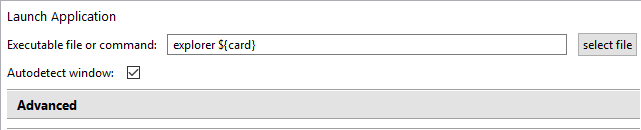
- The Launch Application and Wait steps are needed to open a .png file via the default viewer. The Wait action is required to give time to open the file and load the image.

- Before processing each image file, the
ocredflag and temporary variablecontactare cleaned up. (Constant Value)

- Bot checks which predefined template is used in the separate file.

- The template check group (IF-Else) starts with checking the
ocredflag. If the condition istrue, bot starts to process a specific file. In case it isfalse, it goes to the next template.

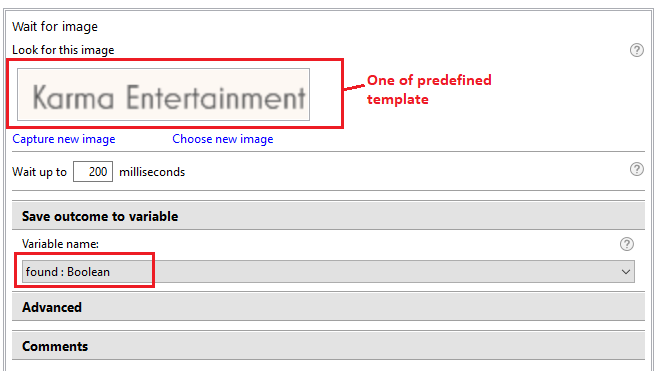
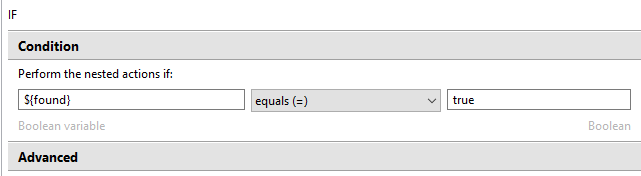
- Bot waits for the image (the Wait for Image action) that is specific for each predefined template. If the image is found on the screen, the result becomes
trueand is saved into thefoundvariable.
- If the template is found (IF-Else), bot processes with the contact recognition.
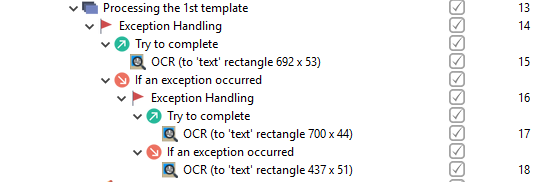
- When the template is found, bot can extract needed data using the OCR action. Exception Handling is added to process with different screen resolutions, as OCR functionality is sensitive to image quality.
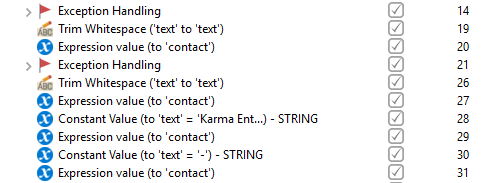
- The Exception Handling, OCR, Trim Whitespace and Expression Value actions are added to format recognized information and used to:
- remove unnecessary whitespaces
- add the value to the
contacttemporary variable - populate the company name and phone number for a specific template In this specific template, there is no phone number on the business card image, so the phone number will be reflected as a dash in the output.
- On processing the file successfully, the
ocredflag is set up astrueand the recognized information is added to thecontactsTable variable (Constant Value, Expression Value).

- If none of the predefined template is found, the file name is added to the list of non-recognized images and stored in the
contacts_errorTable variable (Constant Value, Expression Value).

- At the end of the input file processing, bot closes the opened file with the key combination Alt + F4 (Enter Keystrokes).

Export recognized contacts to .csv file
Description: The group exports successfully recognized contacts to the output .csv file.
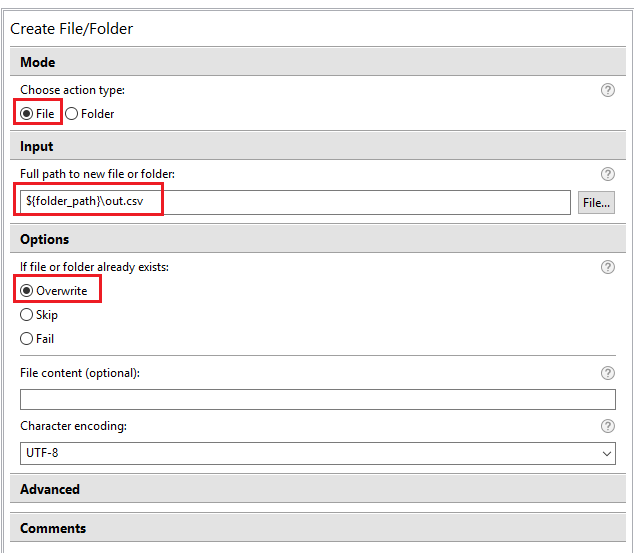
- Bot creates a file (Create File or Folder) named
out.csvin the path mentioned in thefolder_pathTable variable. If the file already exists, it will be overwritten.
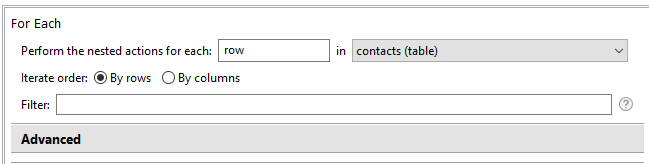
- In For Each loop, all the recognized contacts are processed from the
contactsrow by row:- each row reads to temp variable
text - square brackets are removed from the start and the end of row
- the formatted row is written to the
out.csvfile The For Each, Constant Value, Replace Text and Write to File actions are used.
- each row reads to temp variable


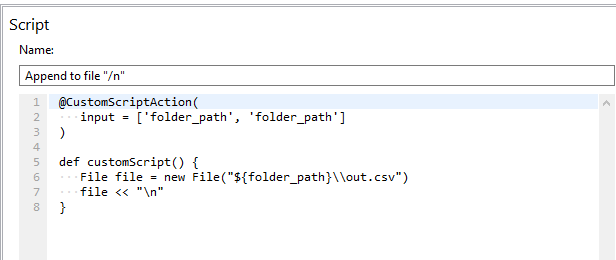
- The custom script helps to add the end-of-line character (
\n) at the end of each row (reusable).
tip
You can easily use this script in other projects. For this, you just need to change the file name (here, out.csv) to any convenient name.
Open and upload data to Salesforce
Description: The group allows to log into Salesforce account with two-factor authentication and upload the .csv file into Salesforce contacts. The whole block can be used in other projects, no specific changes are required.
tip
To reuse the group, make sure you have added the required Salesforce credentials in Secrets Vault in WorkFusion Studio. If you add another Secret Vault entry, change the following variables:
login– Salesforce username (Secrets Vault > Key)password– Salesforce password (Secrets Vault > Value)
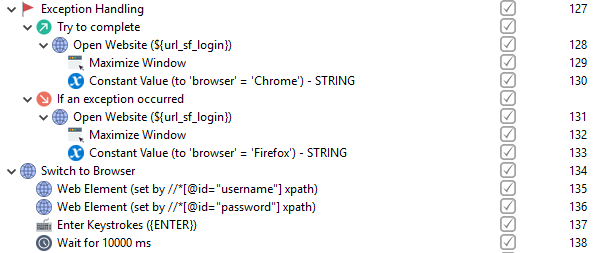
- Log in to Salesforce (reusable). The group of actions (Exception Handling, Open Website, Maximize Window, Constant Value, Switch to Browser, Web Element, Enter Keystrokes, Wait) opens the Salesforce login page mentioned in the
url_sf_loginvariable. Then, bot enters Salesforce credentials that should be set in Secret variables asloginandpassword. The Wait action is added for complete page loading.
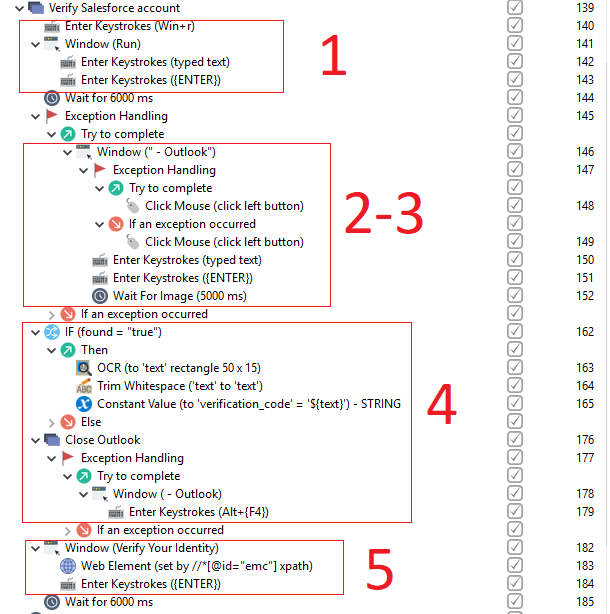
- Verify your Salesforce account (reusable). Salesforce sends a verification code to the email that is set in the Salesforce user account.
- Bot opens the Run dialog with the key combination Win + R (Enter Keystrokes) and calls Outlook.
- In Outlook, it searches for the email with the specific subject "Verify your identity in Salesforce".
- Bot opens the last email with this subject and searches for the verification code using the Wait for Image action.
- When the code is found, bot recognizes and saves it to the
verification_codevariable, and then closes Outlook. - Bot returns to the browser and enters the verification code by XPath.
note
Exception Handling is added to process different Outlook versions. The Wait action is added to give the page time to load all its content.
caution
Bot will find the verification email if the Outlook view is configured as below:
- Reading Pane is on the Right side
- Show as Conversations is unchecked
- There is only one mailbox in the Outlook that should be linked to the Salesforce account.
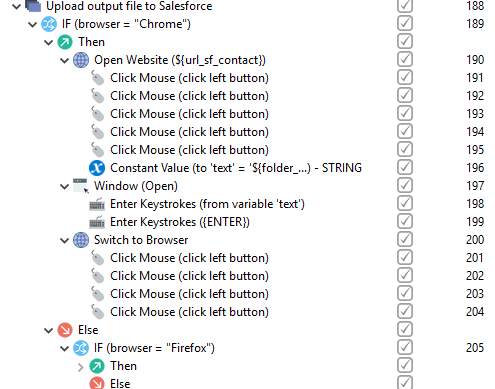
- Upload output file to Salesforce (reusable). On entering the verification code on the Salesforce page, bot opens the Contacts page (Open Website) with the All contacts option, clicks (Click Mouse) on the Import button, and uploads the
out.csvfile fromfolder_path. Then, it confirms the mapped fields and presses the Start import button.