Install and configure
The guide provides instructions on installing and configuring the Tara AI Digital Worker (AI DW).
Check requirements
WorkFusion uses the following options to install and run Tara for Transaction Screening:
- On your premise
- In your Cloud
- In the private Cloud that WorkFusion hosts
Hardware
The requirements are for the on-prem installation type.
The servers must conform to the Enterprise Edition v10.2.6 or 10.2.7 standards. The specifications below allow the system to handle up to 3000 requests or messages per hour for PSS version 2.1+. It also allows scaling additional BEP servers horizontally to handle additional loads.
| Server | Recommended OS | CPU (Cores) | RAM (GB) | HDD (GB) |
|---|---|---|---|---|
| Application | RHEL 8.5 | 8 | 32 | 750 |
| BEP Agent | RHEL 8.5 | 8 | 32 | 150 |
| Analytics | Microsoft Windows Server 2019 | 4 | 16 | 150 |
| MS SQL | Microsoft Windows Server 2019 | 4 | 16 | 500 |
Software
- Intelligent Automation Cloud Enterprise version 10.2.6+
- ODF 2
- Python 3
Performance
The performance metrics are for the on-prem installation type.
The PSS skill leverages BEP servers that can be horizontally scaled for higher volumes.
Below is a sample of the volumes that can be expected when using the provided version and configuration. The system shows stable performance and resource consumption during the whole test, without unexpected spikes and errors, or any critical errors and warnings in logs.
Configuration:
| Skill version | Environment topology | Tested IA Cloud version | Number of RPA Bots | Number of OCR Workers | Machine Learning worker configuration | Control Tower worker configuration |
|---|---|---|---|---|---|---|
| 2.2.5 | 3 / 6 / 20 Agents | 10.2.6, 10.2.7 | 5 | 7 | 1 CPU / 8 GB memory | 0.4 CPU / 2 GB memory |
Results:
| Number of Agents | Number of Payment alerts | Duration | Number of PSS Workers | Hits/hour |
|---|---|---|---|---|
| 3 | 20,000 | 1 hr 51 min | 6 | 36,000 |
| 6 | 20,000 | 1 hr 5 min | 12 | 74,000 |
| 20 | 20,000 | 26 min | 40 | 230,000 |
| 20 (3 BP x 20,000 alerts) | 60,000 | 51 min | 40 | 353,000 |
Here, one payment alert = five hits.
Install
See the Install AI Agents guide.
Configure
You can configure or update the AI DW configuration in one of the following ways:
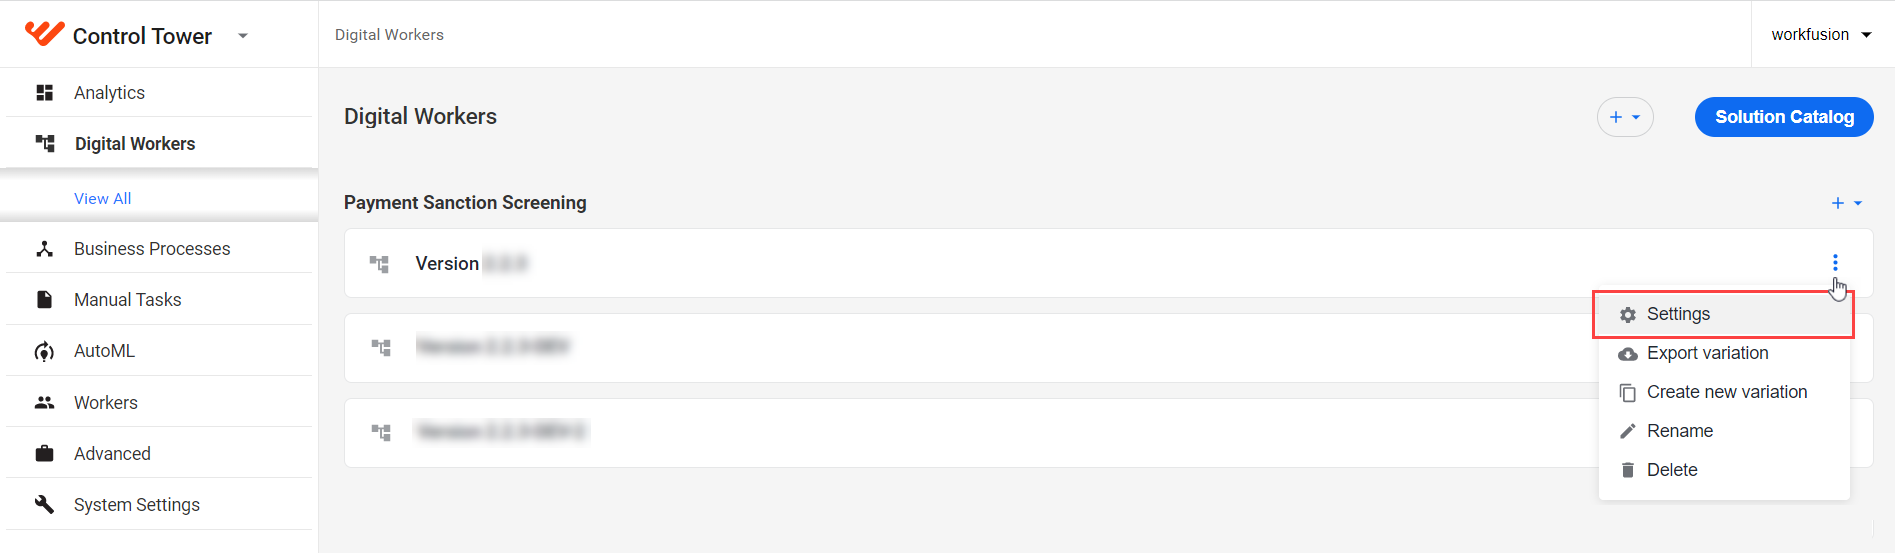
Go to the Digital Workers tab, select your Business Model, click the Actions menu, and select Settings.
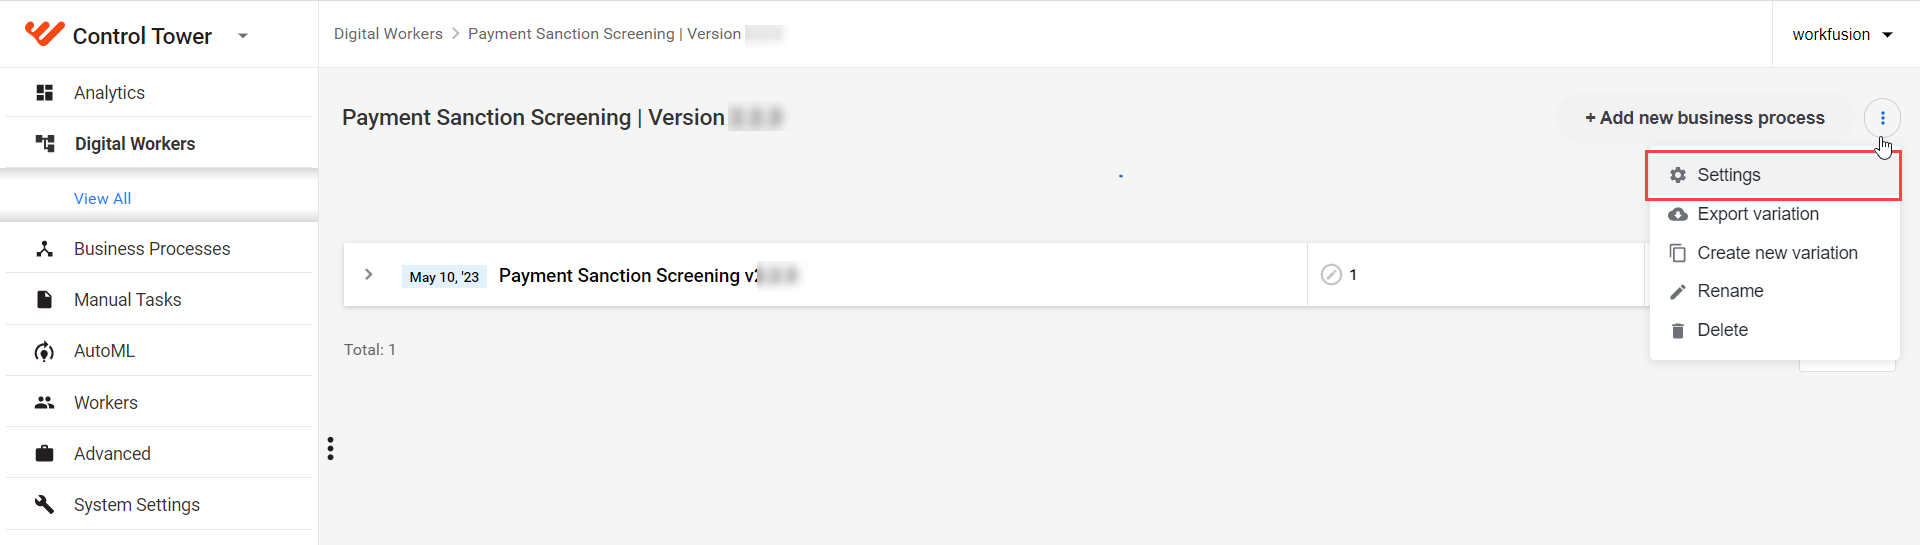
Go to the Digital Workers tab and click your Business Model. On the Business Processes tab, click the Actions menu and select Settings.
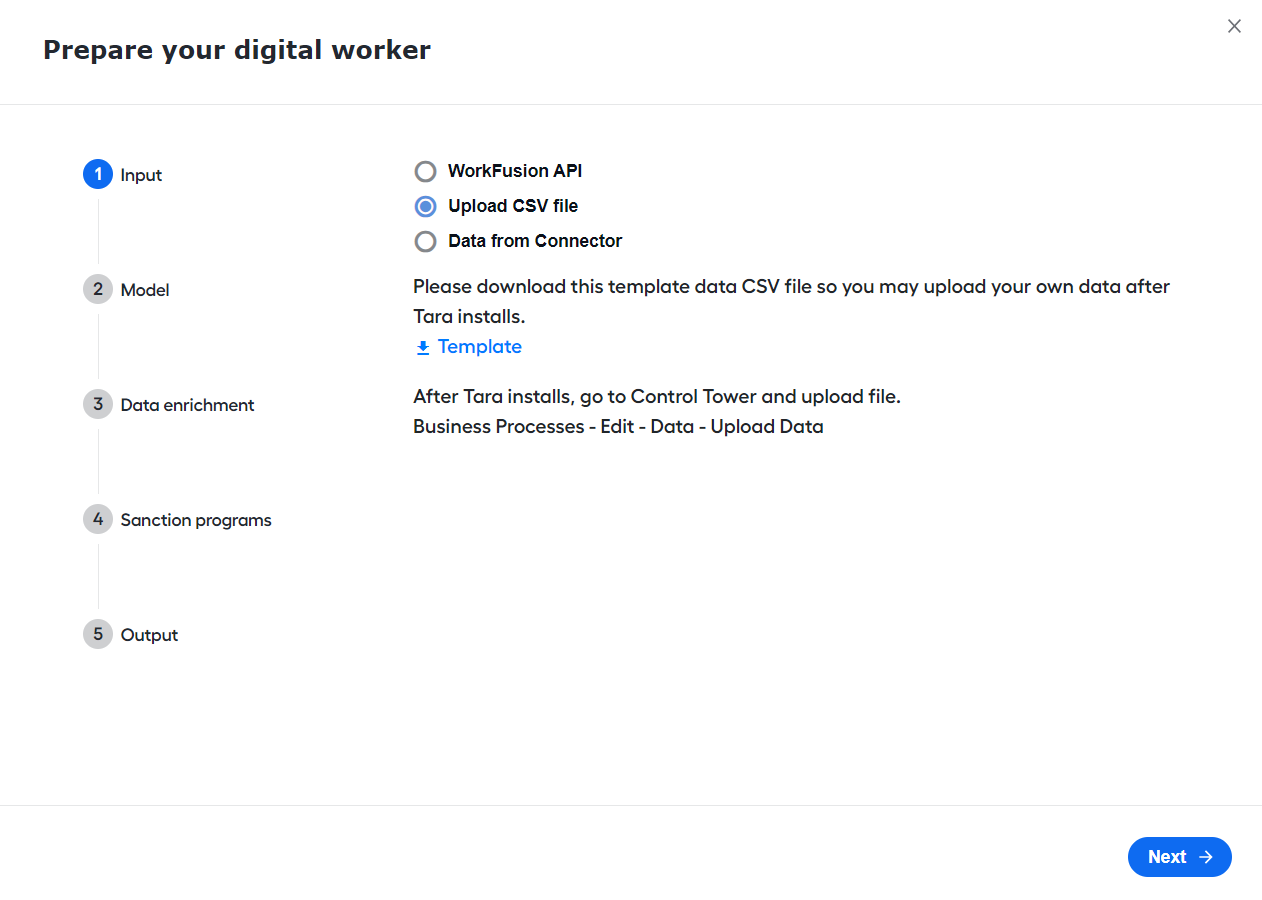
Configure the following settings:
In Input, select the way to supply data to a BP. Choose one of the following options:
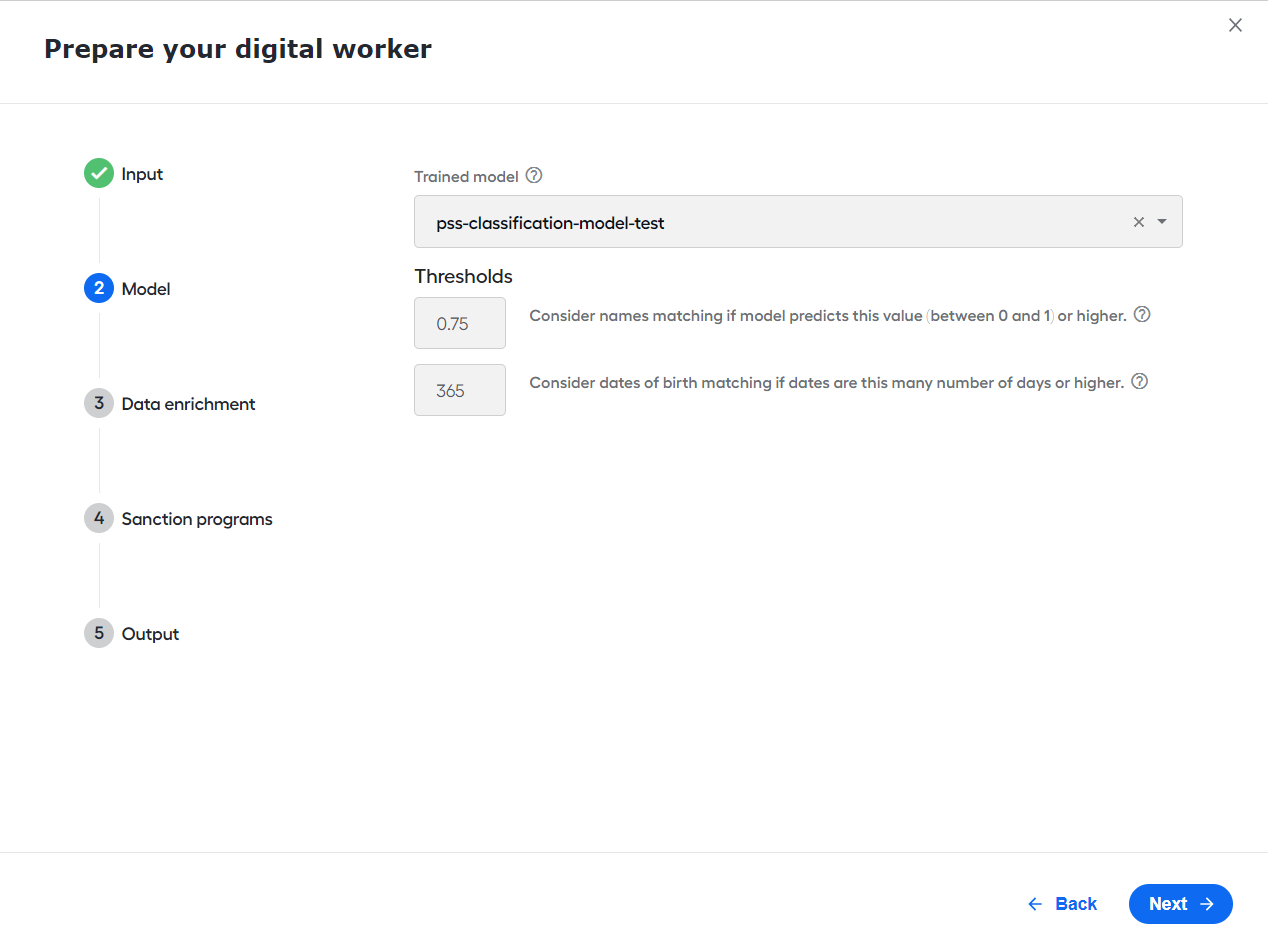
In Model, configure model settings:
Select a compatible model from the list. Otherwise, the default (latest) one is used.
Specify thresholds. Mind that adjusting thresholds can increase the automation rate but can also cause the model to make more errors in its decisions.
Consider names a match if they are on the defined value similar to screened names (between
0and1).Consider dates of birth a match if they are within the specified number of days before or after screened dates (between
0and9999).
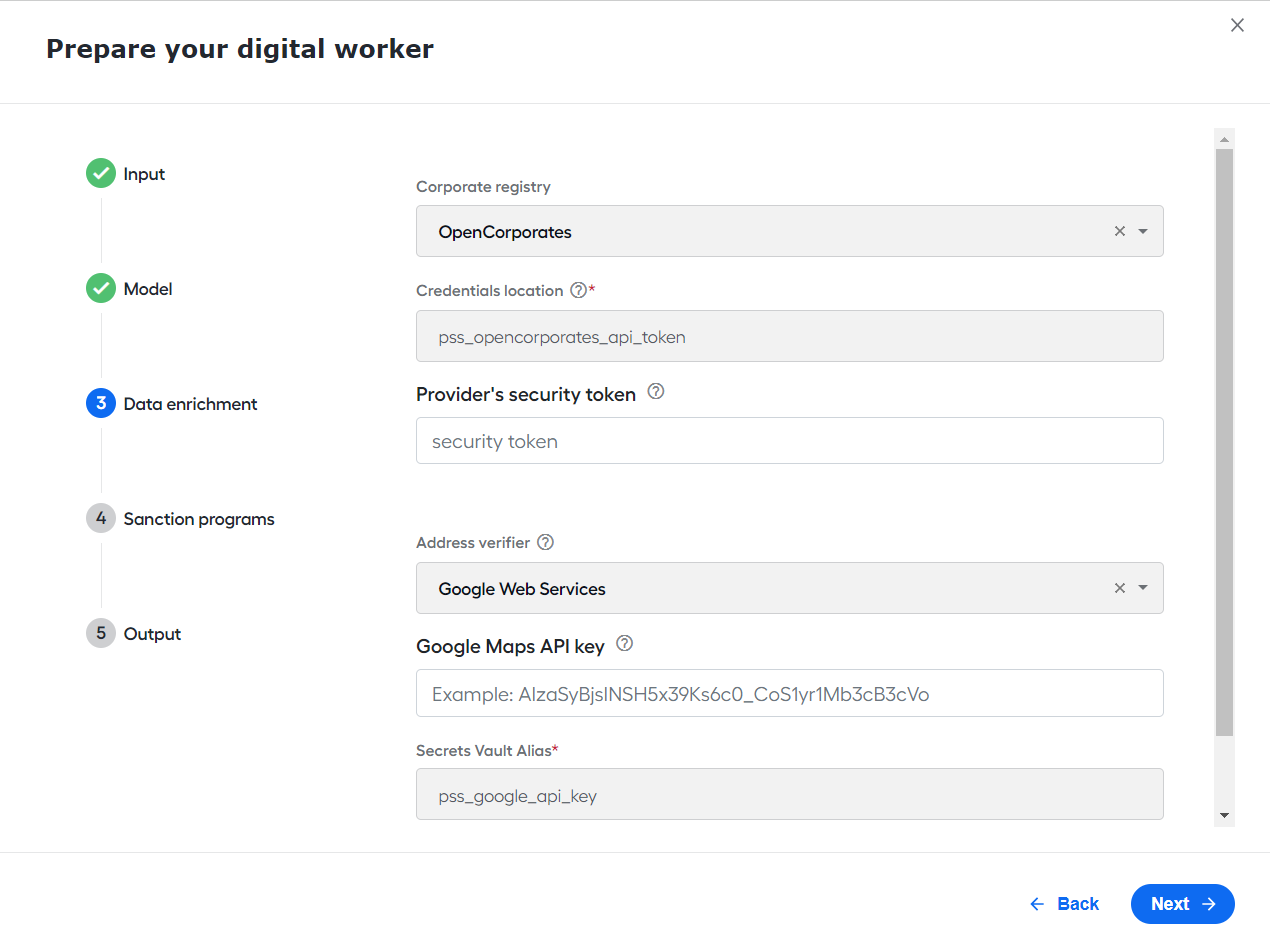
In Data enrichment, specify the sources to get data from:
In the Corporate registry field, select a corporate registry provider to get additional entity information. For more details, refer to the Integrate external services section.
In the Address verifier field, select a service to check screened addresses.
In the Google Maps API Key field, specify your Google Maps API key. Address Validator uses it to access the Google Maps service for address verification. For more details on getting a key for a Google Cloud account, see Using the Google Maps Platform.
In the Secrets Vault Alias field, enter the alias that distinguishes your secure entry.
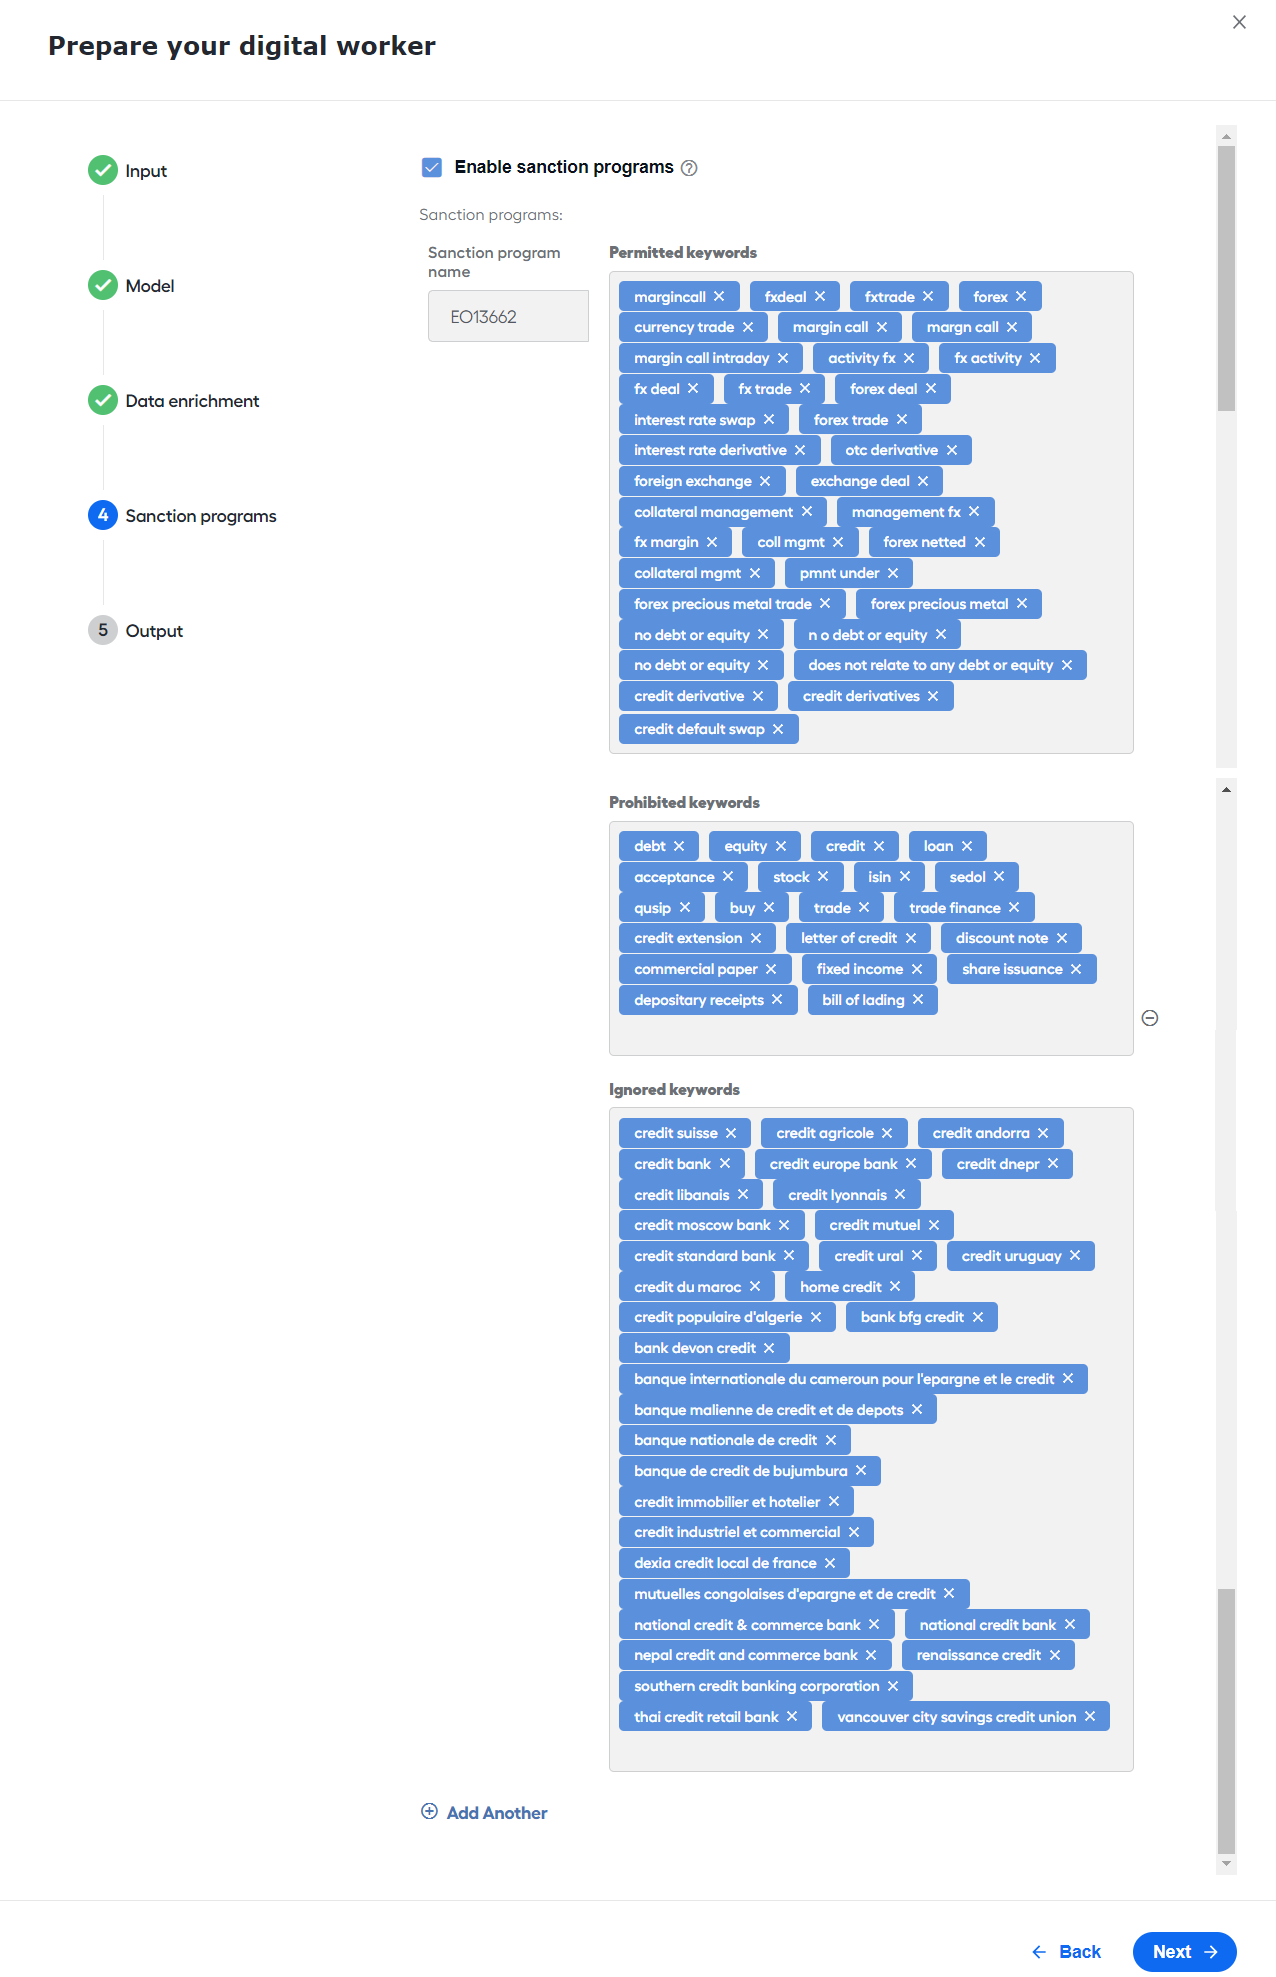
In Sanction programs, select the Enable Sanction Programs checkbox to check alerts for permitted and prohibited keywords.
- Specify the Sanction Program name, for example, EO13662.
- Type in keywords into the Permitted keywords and Prohibited keywords fields. Press Enter to add a keyword.
- If permitted keywords are found and there are no prohibited keywords, the alert is
RESOLVED.
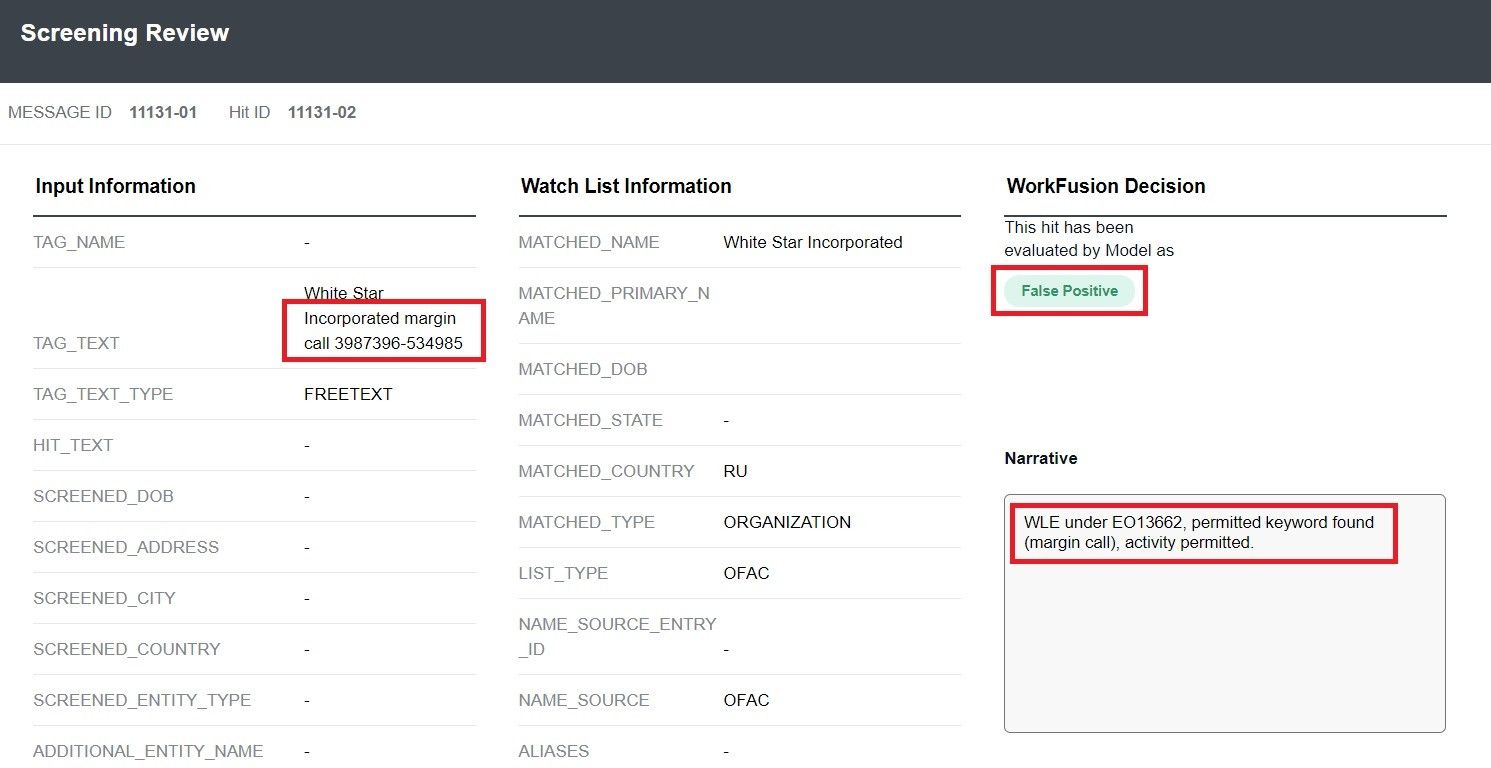
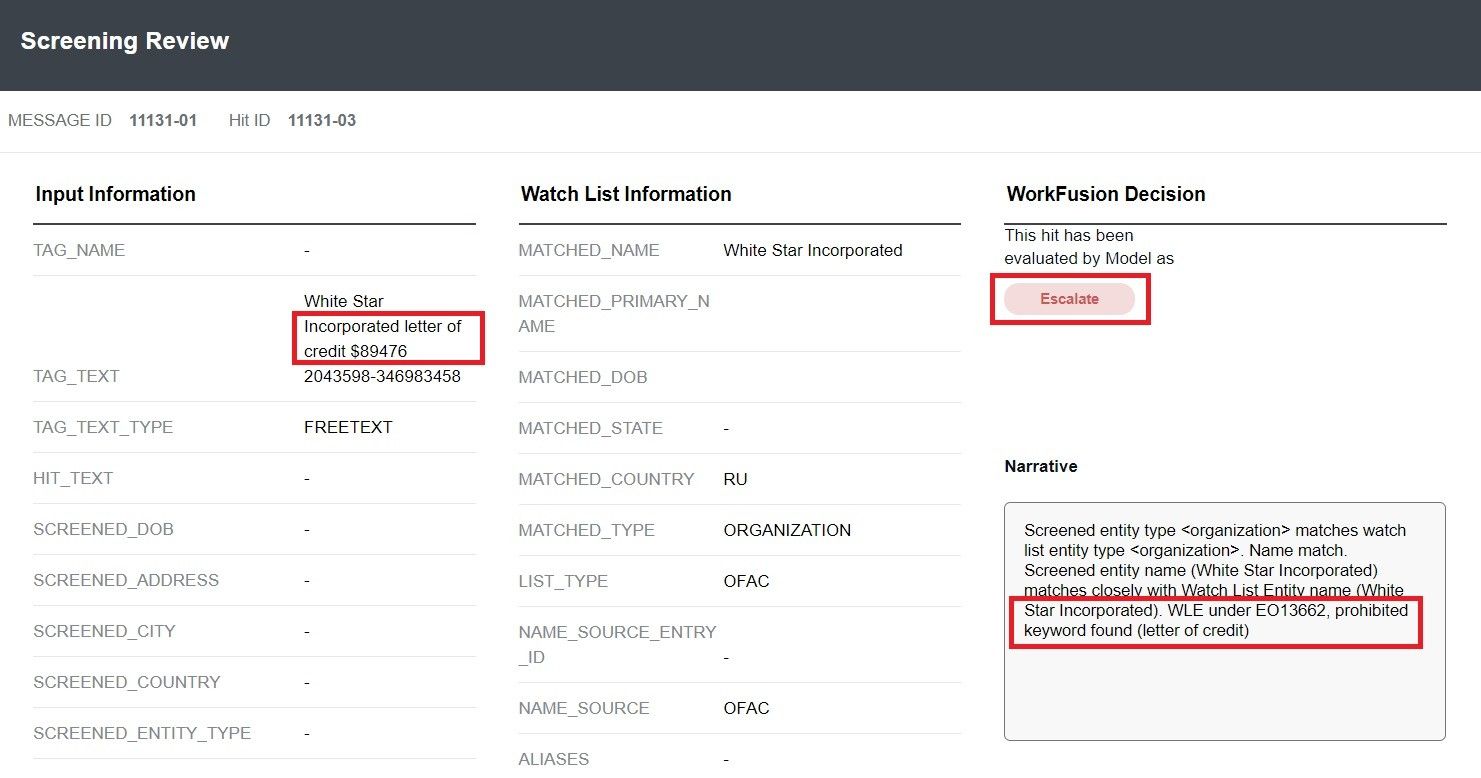
- If prohibited keywords are found, the alert is
NO_DECISION.
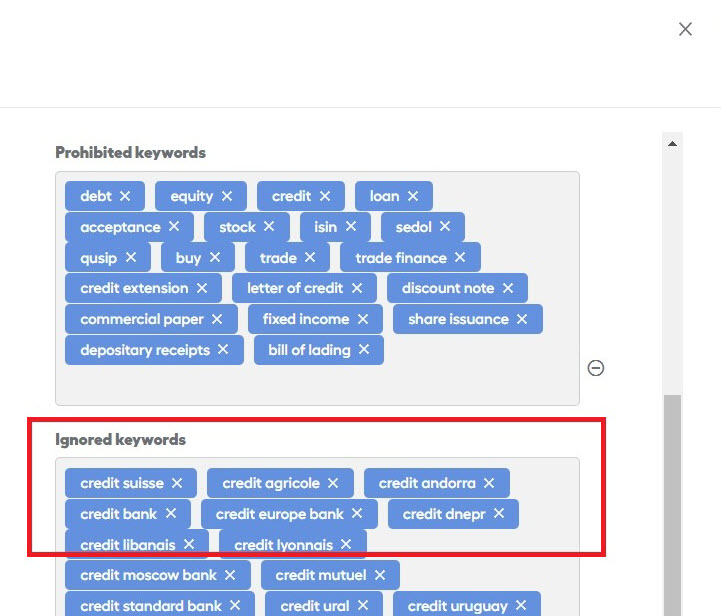
- Add ignored keywords. If you configure Ignored keywords, the "credit" prohibited keyword is permitted if it occurs in the text the same number of times as ignored keywords.
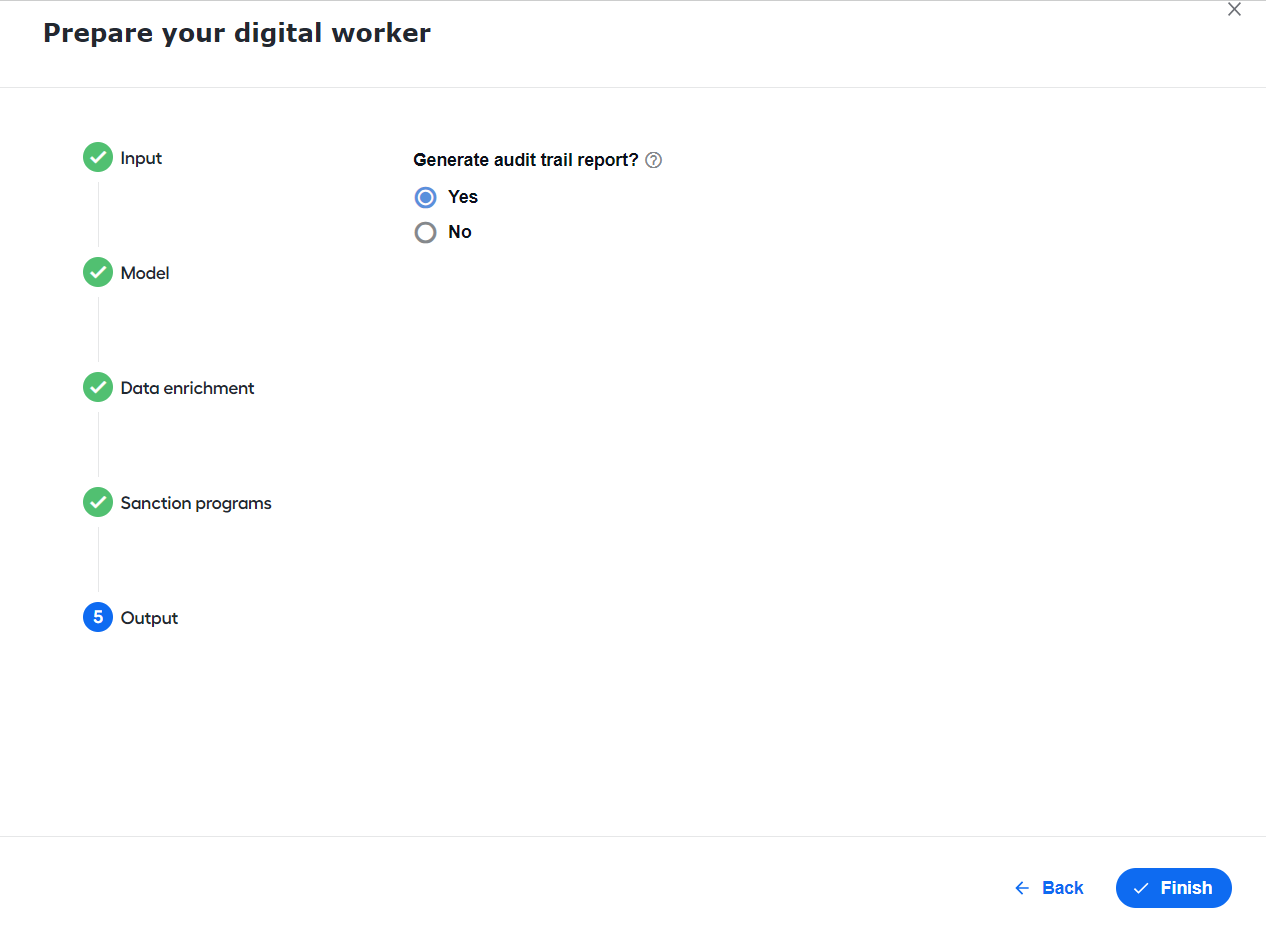
In Output, select Yes to generate an HTML report of BP results after a BP run. For more details on how to find a generated report, see Run screening | View results.
Click Finish.
Integrate external services
To configure integration with an external service for retrieving additional data and improving model decisions, provide a valid access token. Perform the following steps:
In the AI DW configuration menu, go to the Data Enrichment tab and select OpenCorporates.
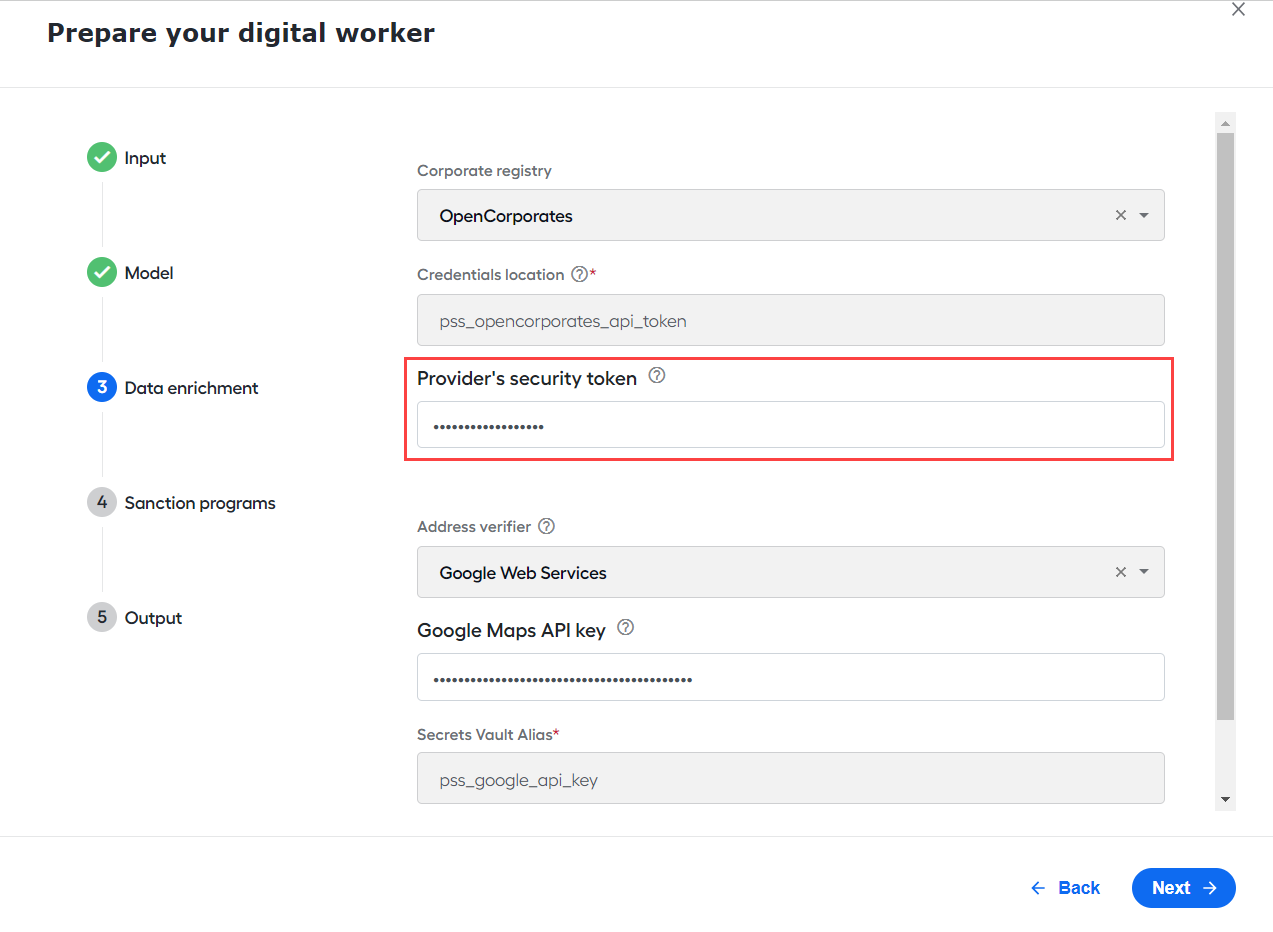
In the Credentials location field, specify the Secrets Vault location of the credentials for the provider's license.
Enter an alias for the token. There are two options to do it:
- Enter the alias in the Provider's security token field.
- Go to System Settings > Secrets Vault and click Add.
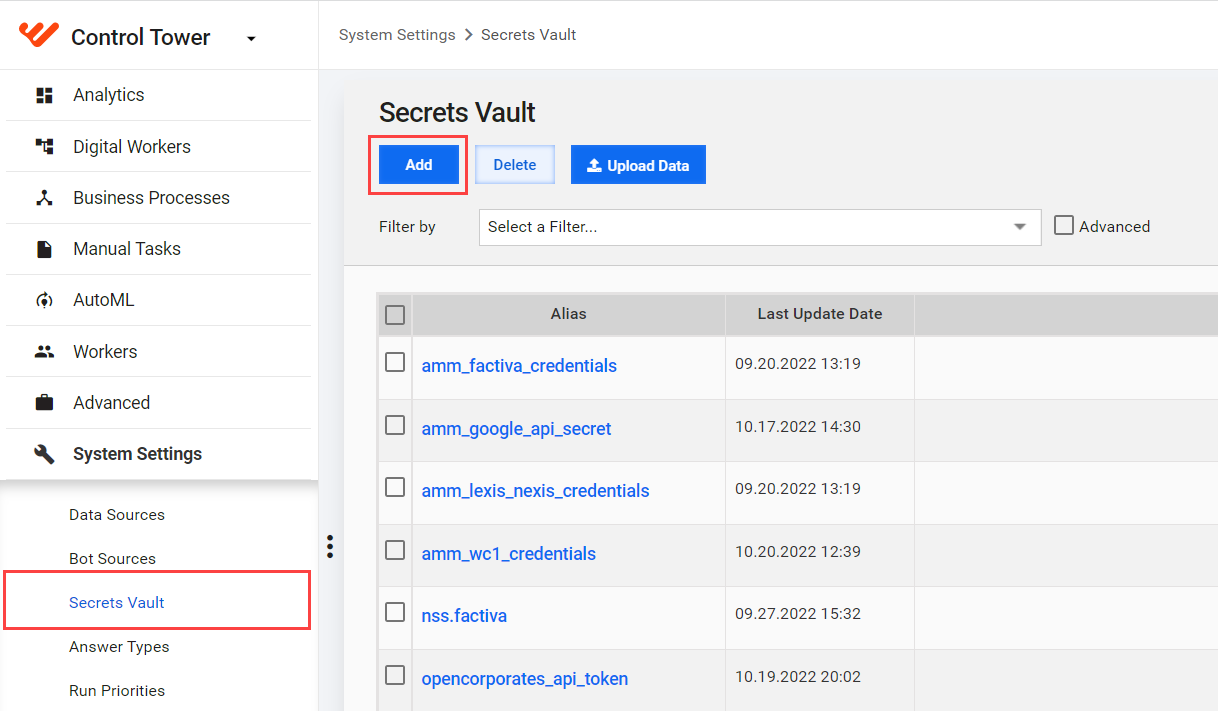
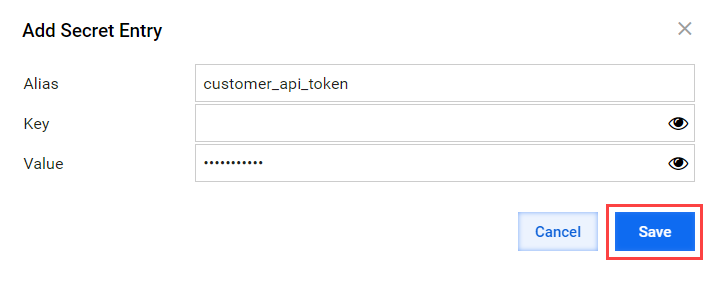
Enter the same alias from the AI DW configuration, specify the token in the Value field, and click Save.
Customize configuration settings
During the AI DW configuration phase, a BP starts with reading settings from the configuration.json file that contains all parameters required to load data and control a data flow.
A sample configuration.json file
{
  "provider": {
    "name": "open_corporates",
    "credentials_alias": "opencorporates_api_token",
    "trigger_codes": "5"
  },
  "input": {
    "source": "file",
    "message_datastore_name": "pss_request_processing_v1",
    "ml_thresholds_datastore_name": "pss_payment_transfer_thresholds_v1",
    "filter_datastore_name": "pss_payment_transfer_filtering_rules_v1",
    "message_batch_size": "500",
    "message_poll_interval_mills": "60000"
  },
  "model": {
    "model_id": "",
    "go_forward_on_failure": "false",
    "default_model_Id": "pss-classification-model-v2.2.3.0"
  },
  "output": {
    "generate_report": false
  },
  "submit": false
}
You can customize the following parameters:
message_datastore_name: name of the Data Store that contains processing data. New messages come to this Data Store. Data gets updated during the BP execution.ml_thresholds_datastore_name: name of the Data Store that contains the mapping of decision codes: definition, confidence threshold, decision.dictionary_datastore_name: name of the Data Store that contains a dictionary of entity attributes and their types in relation to the message type.model_id: name of the ML model used to process input data to determine possible False Positive hits.go_forward_on_failure: variable required to run ML Bridge.message_batch_size: number of messages to process at once.message_poll_interval_millls: message monitoring poll interval in milliseconds. If negative, polling stops when reading all messages.filter_datastore_name: Data Store that contains alerts filtering rules; adjudicate only alerts that match the defined rules. If not defined, all data goes through the model.open_corporates_trigger_codes: for the Company entity type, you can call Open Corporates to find information about it. Makes a call if a model returns specific decision codes. If not defined, no calls to Open Corporates are made. May contain comma-separated values where each value is a decision code returned by the model.provider_name: corporate registry provider for the company validation.provider_credentials_alias: alias registered in Secrets Vault.provider_credentials_value: (optional) access token used if there is none in Secrets Vault.
Customize models
You can customize decision rules, influence ML model outcomes, and thus configure your own rules for specific needs. After completion, a new model appears in the list, and you can choose it during the AI DW configuration.
To update the decision rules, do the following:
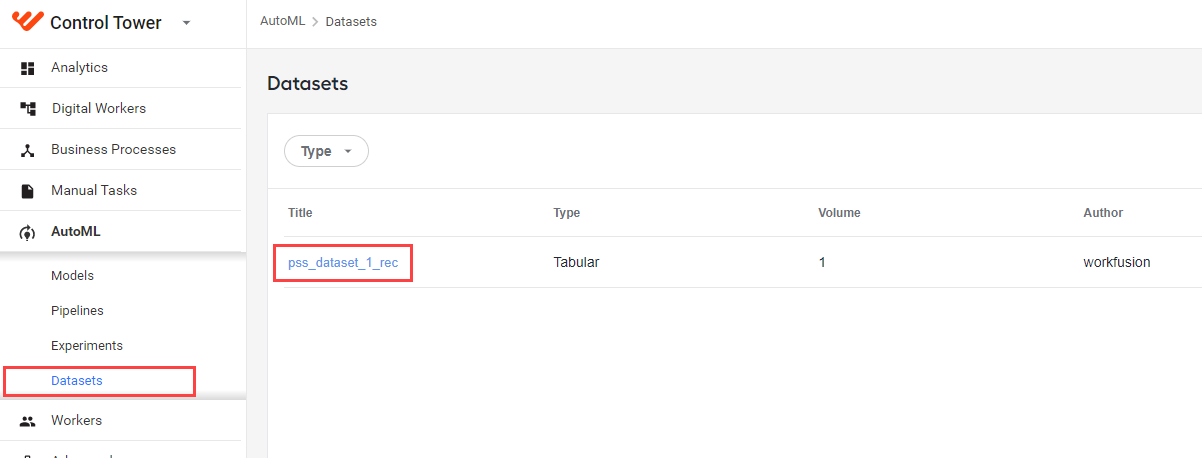
Go to AutoML > Datasets and create a test dataset. Memorize its name, as you need it in further steps. See the sample dataset with one record. For more details, refer to the Manage datasets section.
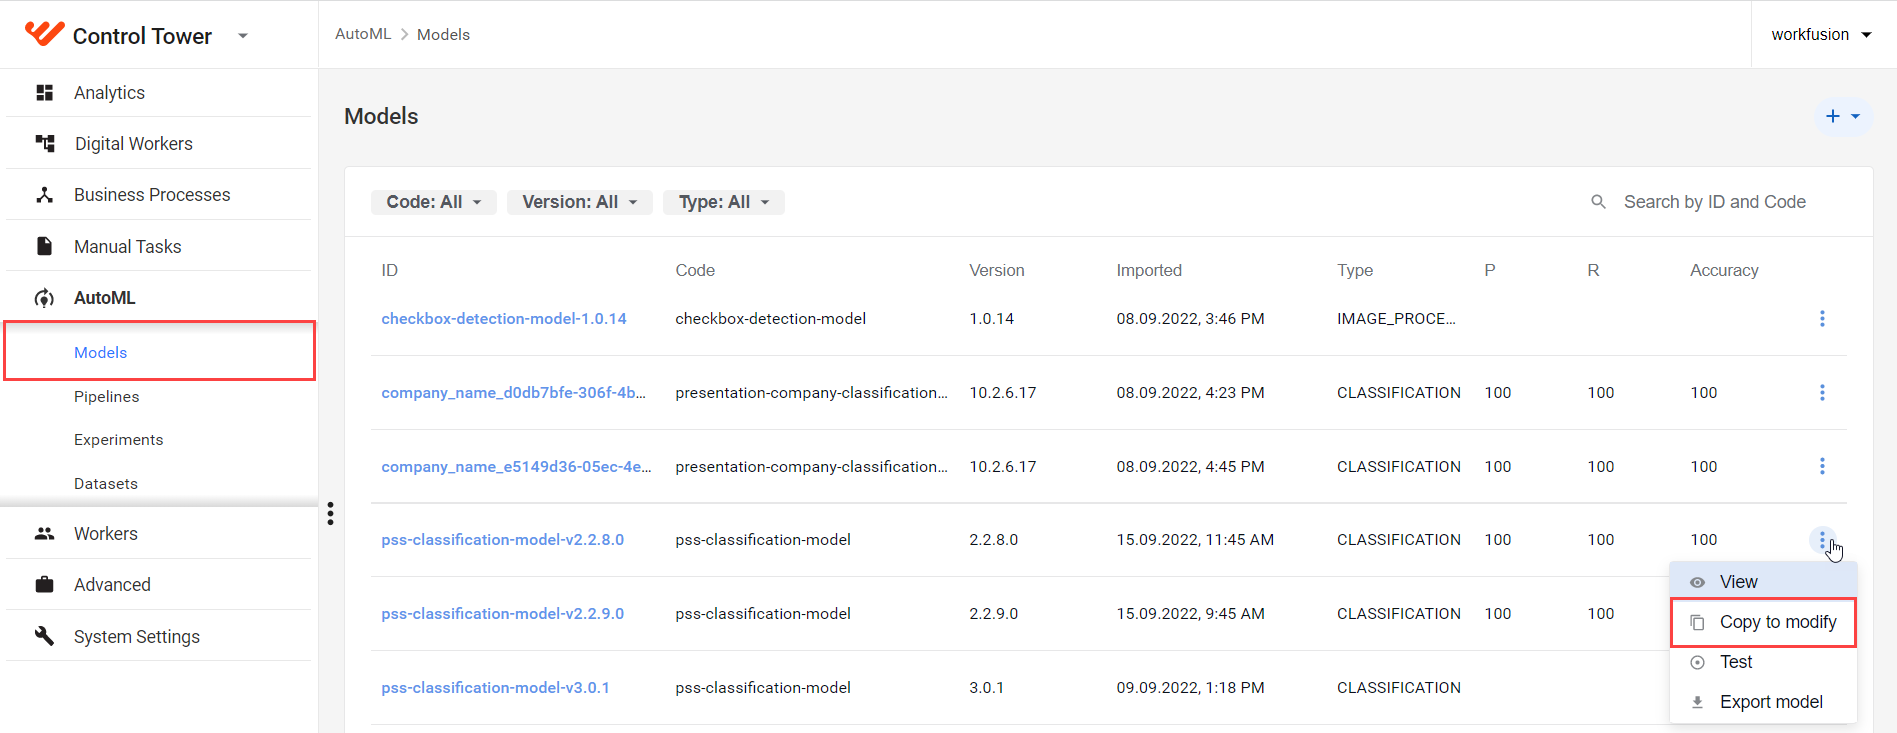
Go to AutoML > Models and find your model in the list.
Click the model's Actions menu and select Copy to modify.
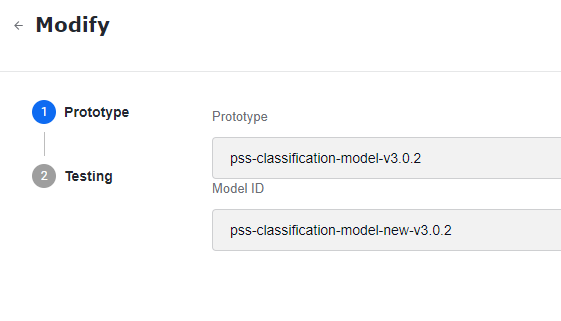
On the Modify window > Prototype > Model ID, specify a new name of the model variant and click Next to continue. Mind that the name must start with pss-classification-model.
On the Modify window > Testing, select the dataset from step 1 and click Next to continue.

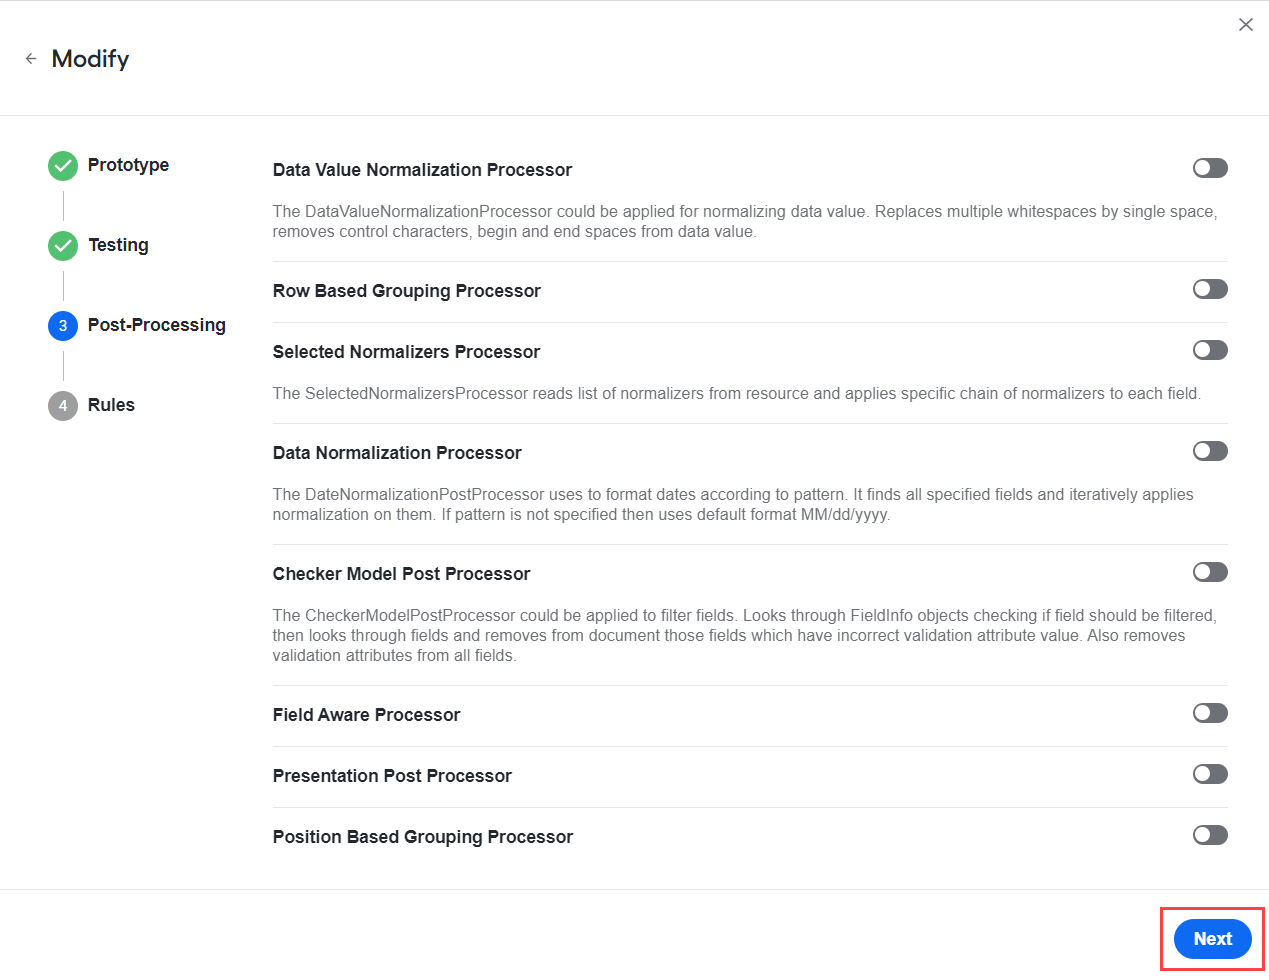
On the Modify window > Post-processing, click Next to continue. Tara does not have any post-processors, so skip this step.
On the Modify window > Rules, set up the model's custom rules.
- Resolve rules
- Escalate rules
- Blacklisted Entities
- Other rules
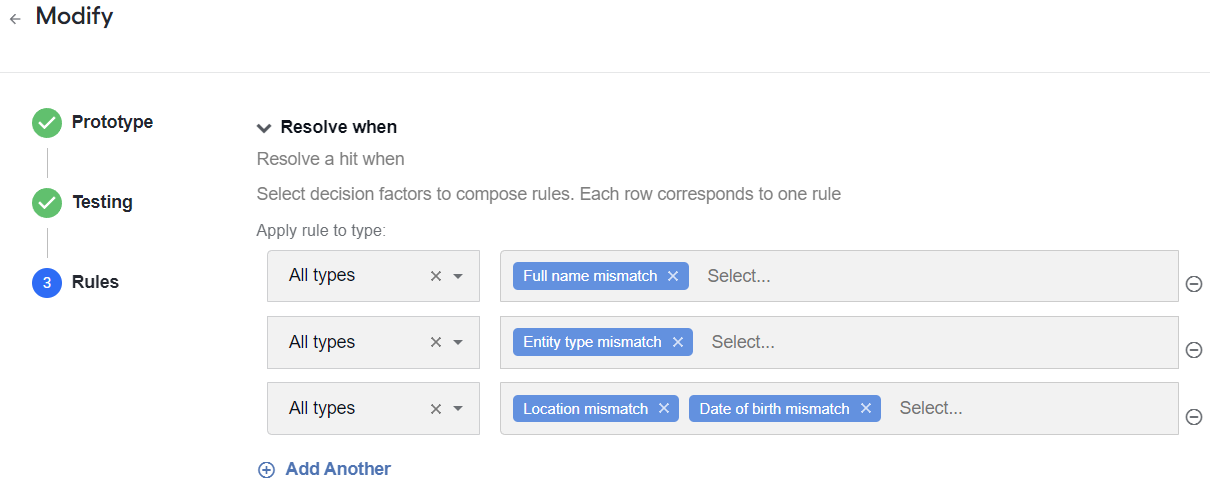
On the Resolve rules tab, configure the rules that define the factors contributing to a false positive (or
RESOLVE) decision. Specify the type in the drop-down menu and select the applicable rule next to it. Each row represents one rule.If any rule is valid, a hit is resolved. For example, you resolve a hit if Name mismatch, Type mismatch, or a combination of Date of birth mismatch and Location mismatch are found in the list of reasons. Mind that Date of birth mismatch or Location mismatch alone is insufficient for a resolution. Also, each rule has an associated type, which is All types by default. You can fine-tune the rules to only impact certain hit types. Supported hit types are:
- Individual
- Organization
- Location
- Vessel
- Aircraft
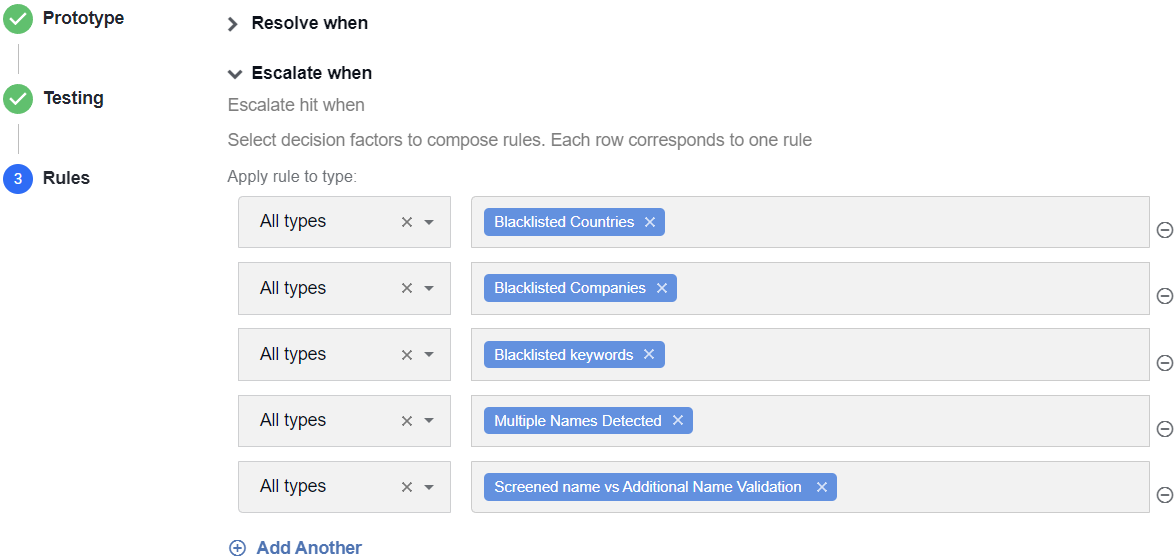
On the Escalate rules tab, set up the rules that define the factors contributing to a true positive (or
NO_DECISION) decision. Specify the type in the drop-down menu and select the applicable rule next to it. Each row represents one rule.If any rule is valid, a hit is not resolved. For example, you do not resolve a hit if Blacklisted Countries, Blacklisted Companies, Blacklisted Tokens, Multiple Names Detected, or Self-Service and Screened Name Validation are found in the list of reasons.
When setting the rules, mind the following aspects:
- Add all blocklisted entries manually on the Blacklisted Entities tab.
- Multiple names detected: escalate if multiple screened names are detected. The rule is used only for Individuals.
- Self-Service and Screened Name Validation: the rules validate additional (self-service) names against screened names to prevent fraud or mistakes.
Rule Types
Suppose you want to impose different sets of rules based on the type of the hit entity. For example, you might need to specify different sets of resolve criteria for Individuals and Organizations. This can be achieved using the Apply rule to type drop-down list associated with every row representing a rule. By default, it is set to All types. The following example shows how to configure different resolve decision rules based on the entity type of the hit in question.
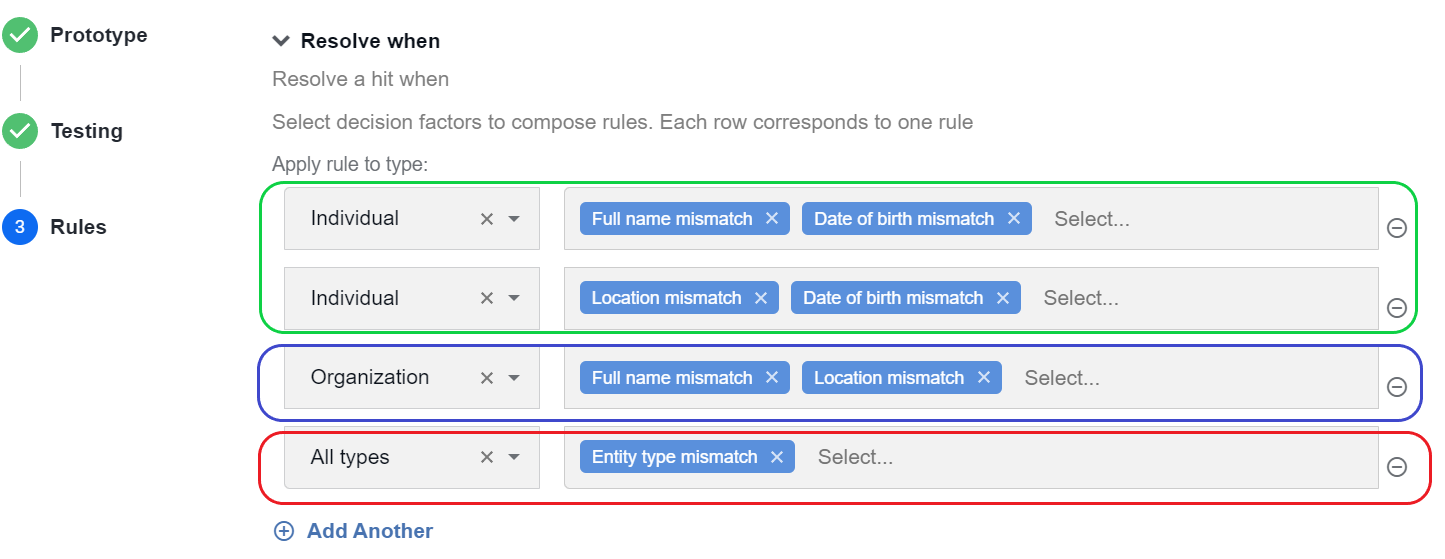
In this example, only rules highlighted in green are used for hits on Individuals. Thus, you would need either Name and Date of Birth mismatches OR Location and Date of Birth to resolve a hit as a false positive. Similarly, only the rule highlighted in blue is used for adjudicating hits on organizations. The rule highlighted in red (all types) is used for all other types not configured yet. So, in this example, there would be aircrafts, vessels, or locations that do not have specific rule sets of their own configured separately.
You may wonder how exactly you determine the "entity type" for a hit. The underlying model usually infers the type from either screened data or additional data information, where the type is explicitly mentioned. If you do not have this information, the model tries to infer the type using the internal NER prediction results on the hit text associated with the hit.
On the Blacklisted Entities tab, enter the blocklisted entities manually. In the screenshot below, you can see the default blacklists.
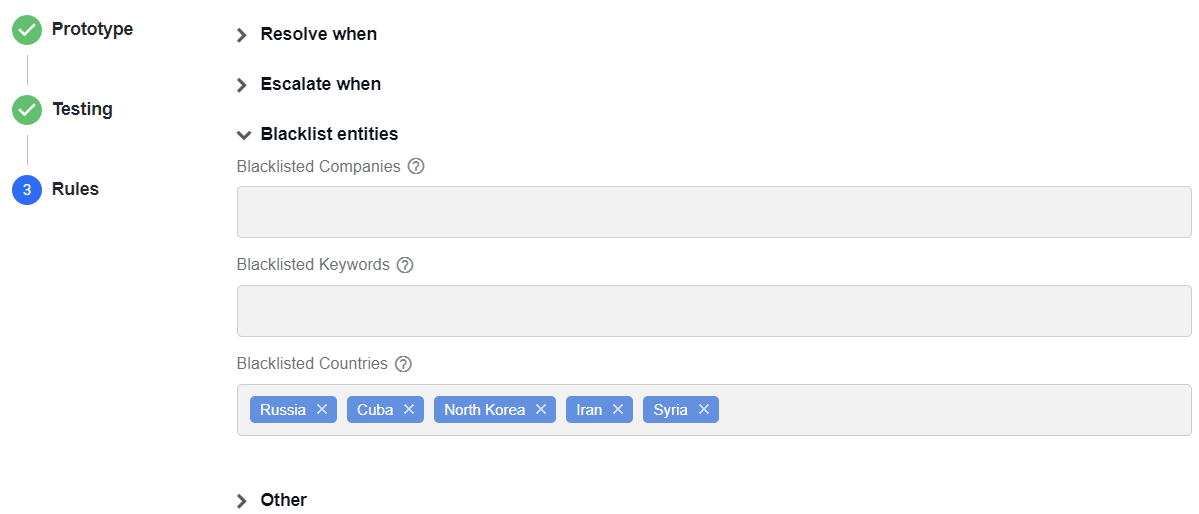
If a screened entity is located in Blacklisted Countries, a model returns
NO_DECISION.Currently, the following countries are configured in the list:
- IRN
- CUB
- SYR
- PRK
- RUS
The fewer entries contain the blacklist, the higher the automation rate is.
On the Other tab, you can also configure the following settings:
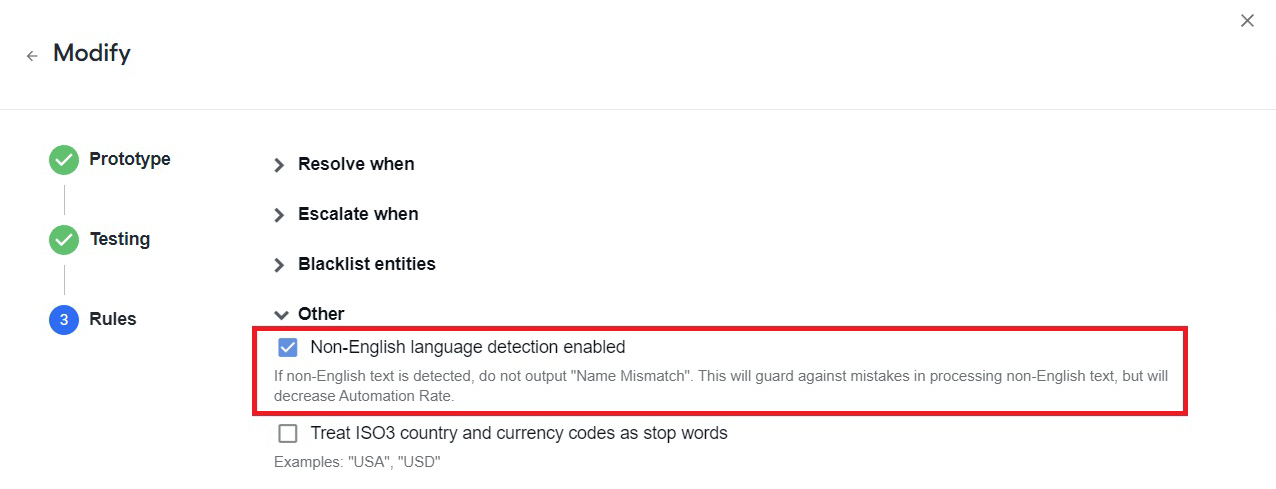
Enable non-English language detection.
Select the Non-English language detection enabled checkbox to ignore the name match when a non-English language is detected.
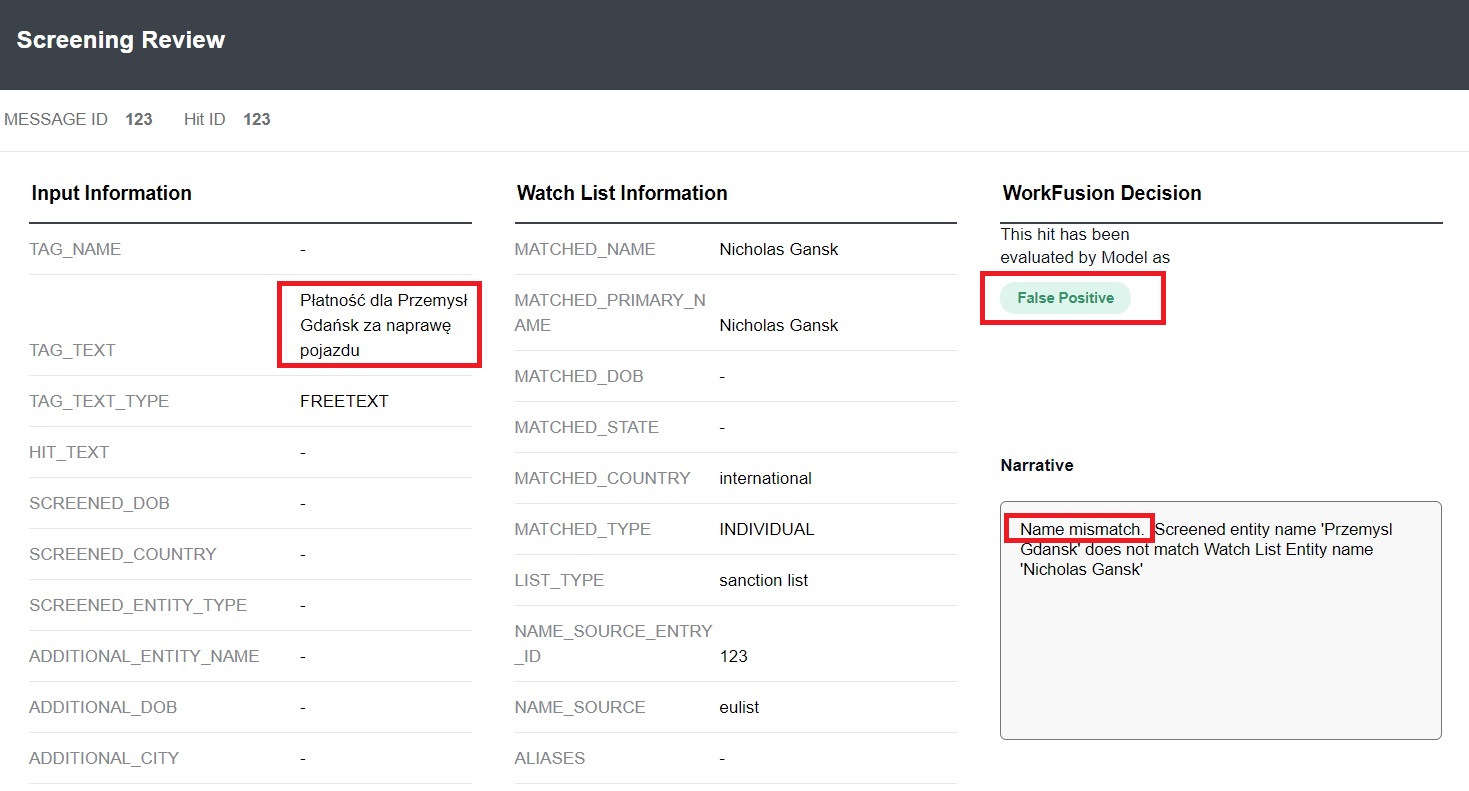
See the example of a screening review report in the case of the enabled non-English language detection:
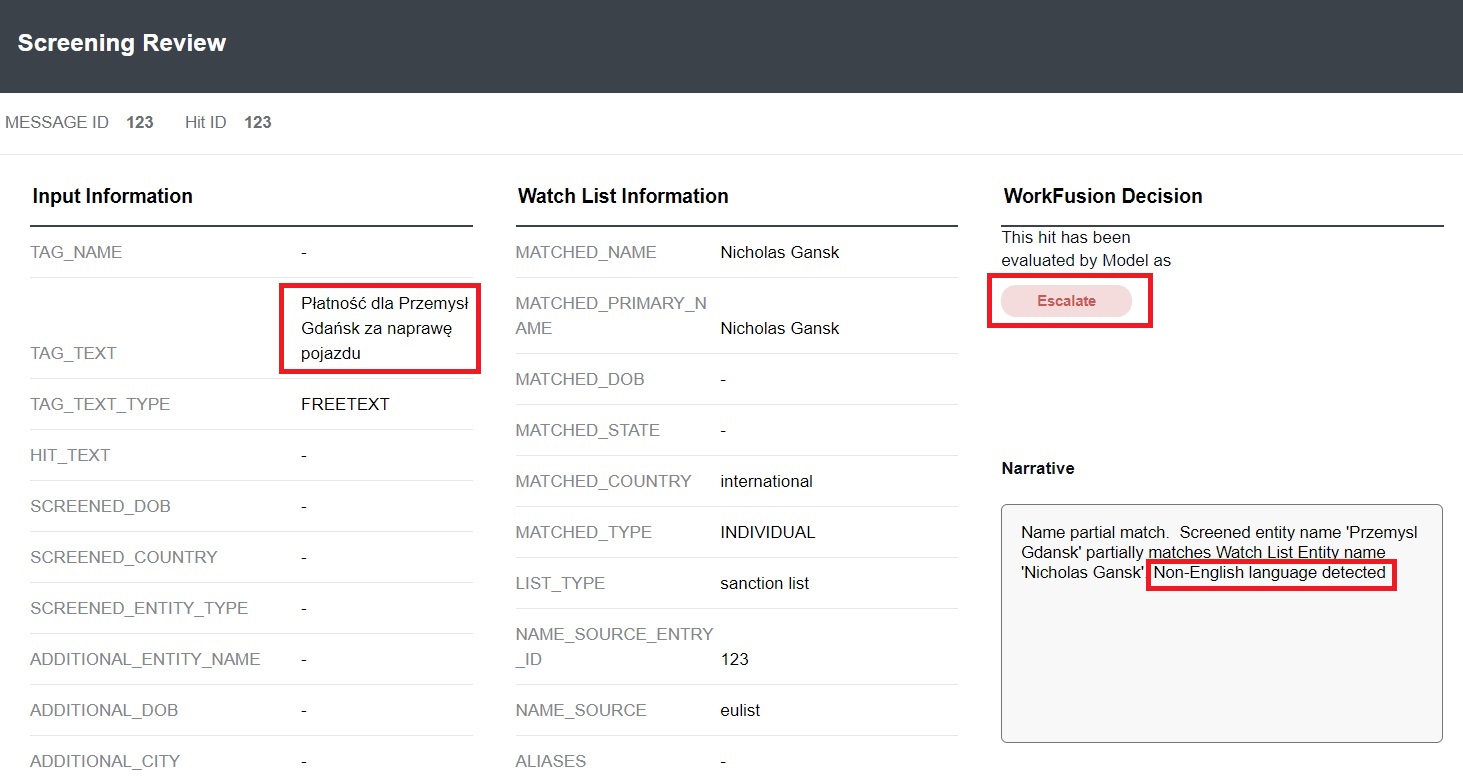
If you disable non-English language detection, the name mismatch is detected. See the example of a screening review report in the case of the disabled non-English language detection:
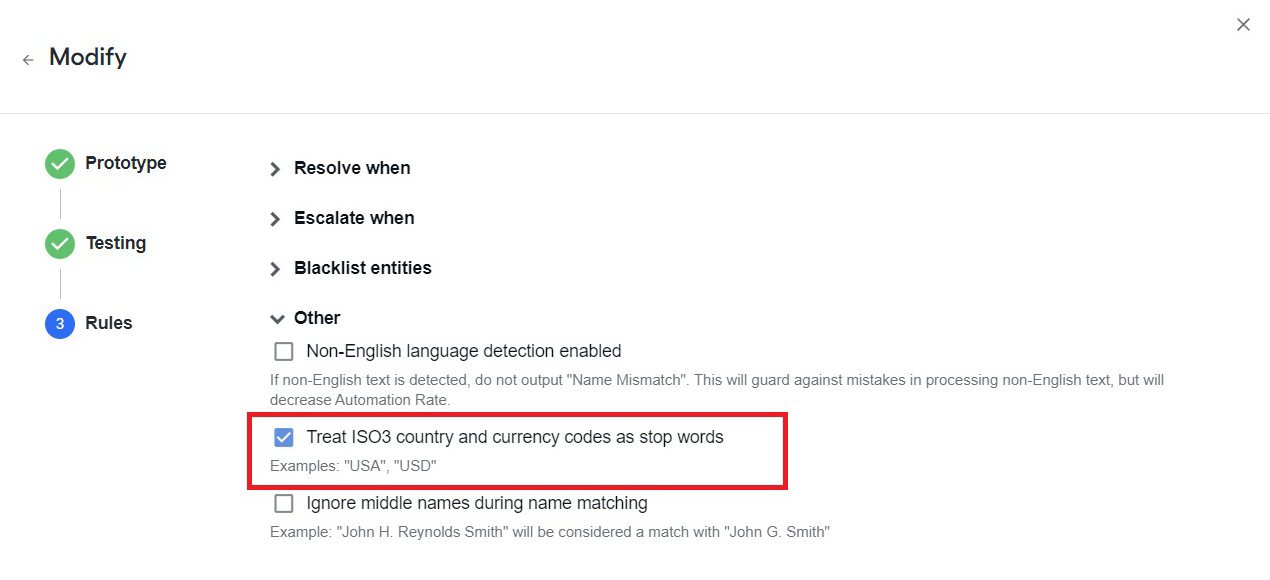
Enable ISO3 country and currency codes.
If you select the Treat ISO3 country and currency codes as stop words checkbox, country and currency codes are not considered as part of Individual or Organization names, for example, "USA" for "United States" and "USD" for "US Dollar".
Ignore middle names.
If you select the Ignore middle names during name matching checkbox, name mismatch is not detected when only the middle names of the screened individual and sanctioned individual are different.
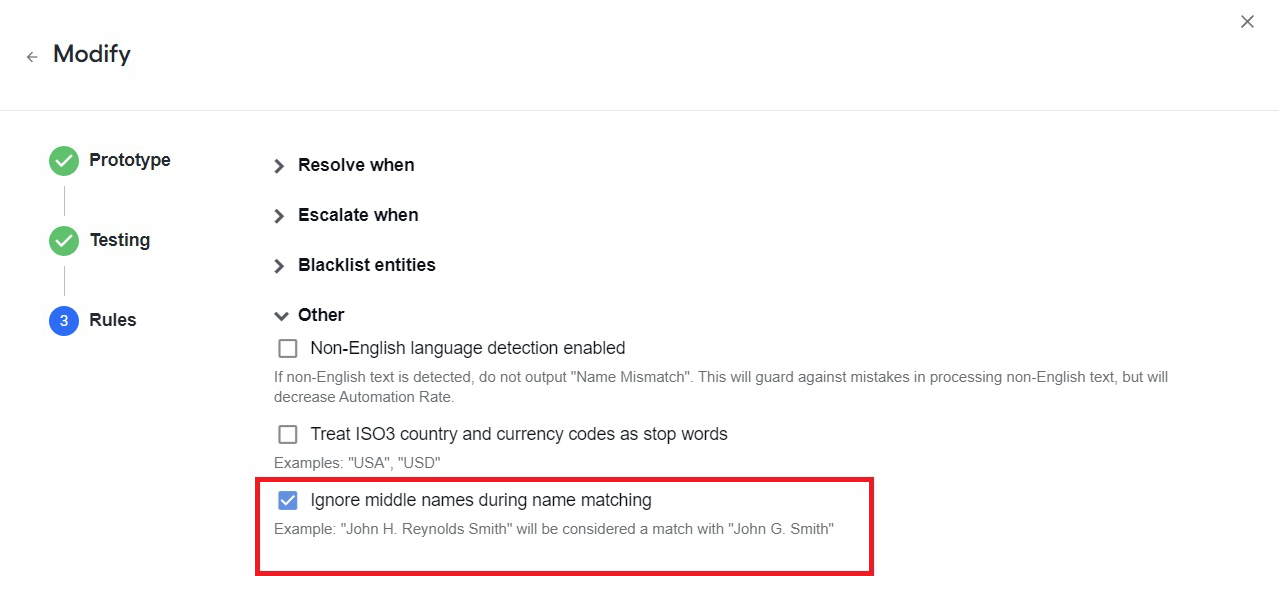
For example, if you enable Ignore middle names during name matching, the names "John H. Reynolds Smith" and "John G. Smith" are considered potentially the same person as they have the same first and last names, and a name match is caused.
If you disable Ignore middle names during name matching, the names "John H. Reynolds Smith" and "John G. Smith" are considered different people as they have different middle names, and a name mismatch is caused.
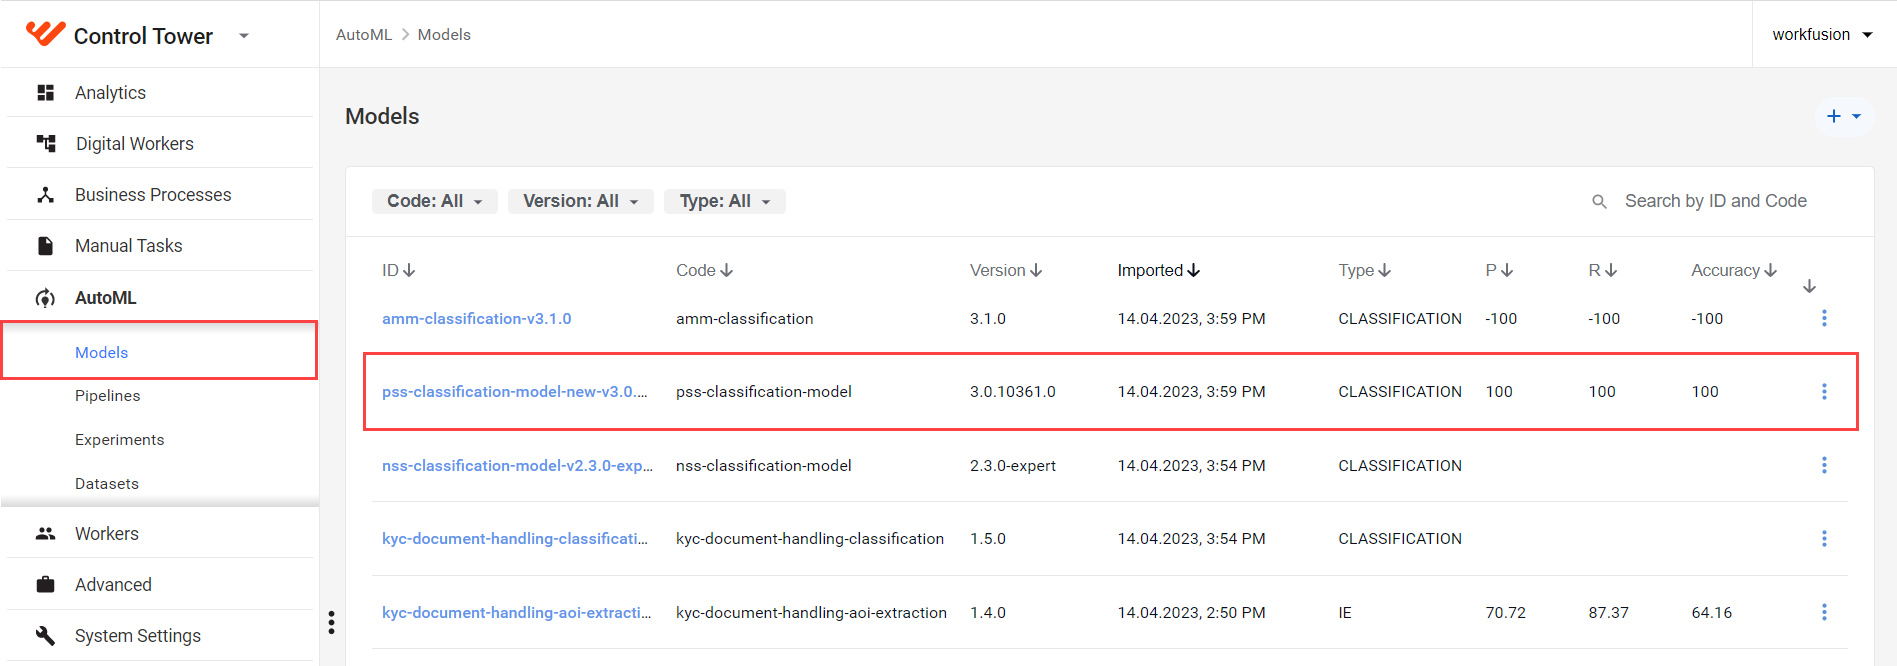
Click Start to build a new model that contains a new decision matrix. When the operation finishes, your new model with the selected name appears in the list of models.
Go to AutoML > Models and select your new model from the list.
- A hit is resolved when any of the conditions apply:
- Each row creates a resolve condition.
- Each condition contains one or more deciding factors.
- When conditions have all factors, that maximizes the automation rate.
- A hit is escalated when any of the conditions apply:
- Each row creates an escalating condition.
- Each condition contains one or more deciding factors.
- When conditions have all factors, that minimizes mistakes.
See an example request
{
  "id": "1",
  "type": "PAYMENT_TRANSFER",
  "hits": [
    {
      "id": "1",
      "tagContent": "Payment to John Doe for service",
      "tagType": "FREETEXT",
      "screenedData": {
        "name": "John Doe",
        "type": INDIVIDUAL,
        "country": "USA"
        "dob":"1978"
      },
      "additionalData": {},
      "sanctionData": {
        "name": "John Doe",
        "primaryName": "John Henry Doe",
        "type": "INDIVIDUAL",
        "dob": "1956",
        "country": "USA",
        "sourceEntryId": "1",
        "source": "OFAC",
        "listType": "WORLD_COMPLIANCE",
        "alsoKnownAs": [
          {
            "name": "John Doe",
            "type": "NOT_AVAILABLE"
          }
        ]
      }
    }
  ]
}
See model examples
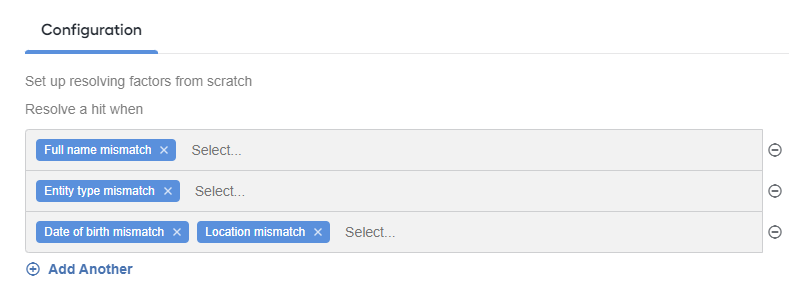
Model 1 (default settings)
Expected decision:
NO_DECISIONThere is Date of birth mismatch, and you can resolve only if Date of birth mismatch + Location mismatch. Date of birth mismatch on the same row means AND Location mismatch.
Model 2
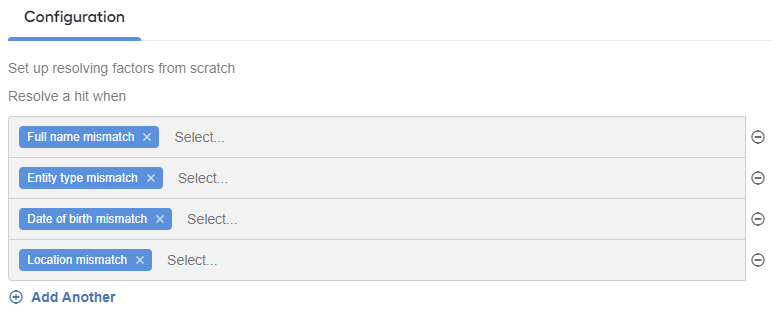
Expected decision:
RESOLVEDate of birth mismatch is a stand-alone reason for a hit dismissal.
Add message type
The procedure works only for messages received in the Fircosoft FUF or SWIFT RAW formats.
To add a message type for processing, do as follows:
In the
data-model-apisources, go to theMessageType.javafile and define a new type. Release any changes to the data model API with the updated version. Use the updated version in the project as a dependency. The existing message types are as follows:public enum MessageType {
GDS,
ACH,
SWF,
FED_WIRE,
PAYMENT_TRANSFER,
}In the dictionary, add details of the entities that belong to the new message type, for example,
sanctions-bcb/wfs-data/datastore/pss_fuf_tags_list.csv. This file defines the entity type for the entity attribute and maps message types to the entity attributes. If the entity type cannot be found, it becomesfreetext.
See sample dictionary entries below.
| msgtype | attrname | entityname | type | description |
|---|---|---|---|---|
| GDS | Colf_Cunry | CollectFrom | Country | Collect from Country Name |
| GDS | Colf_Name | CollectFrom | Name | Collect from Name |
| SWF | SWF_4_30 | Requested Execution Date | Date | date |
| ACH | IAT-ODFIN | Originating | Company | ORIGINATING DFI NAME |
If you add new attribute types to the type dictionary column, update the AttributeType.java file to match values of new attribute types. The existing attribute types are as follows:
public enum AttributeType {
    NAME,
    NAMEADDRESS,
    ADDRESS,
    CITY,
    STATE,
    ZIP,
    POSTALCODE,
    COMPANY,
    COUNTRY,
    COUNTRYCODE,
    CITYCODE,
    NUMBER,
    AMOUNT,
    ID,
    DATE,
    VESSEL,
    FREETEXT
}
Update filtering rules
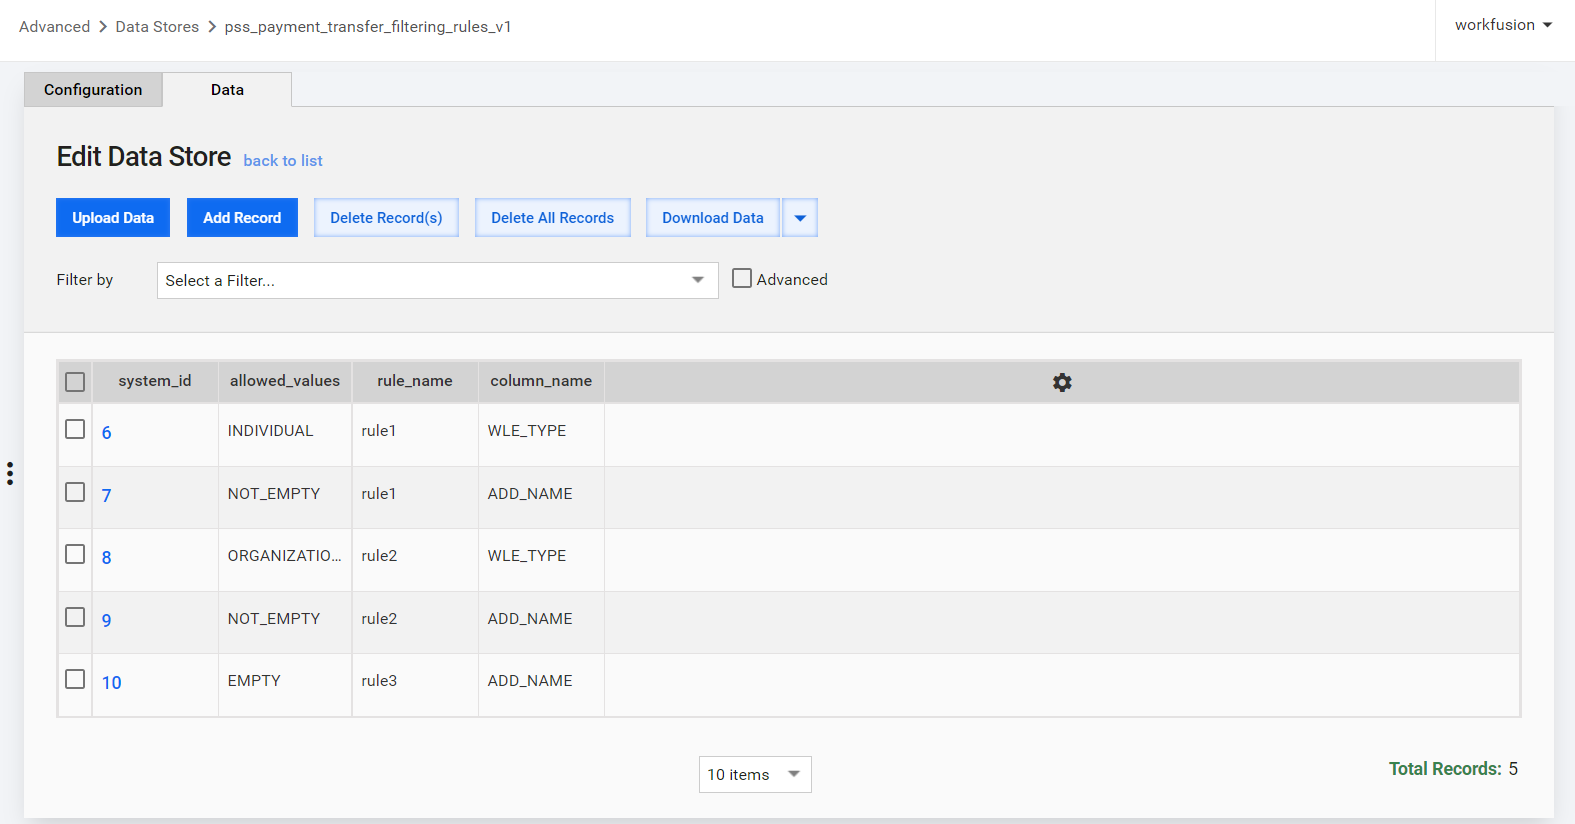
To adjudicate a specific subset of the data, create a filtering Data Store and set the rules. If a record complies with any defined rules, it is processed by the model.
Mind that:
- Filtering rules apply on the hit level.
- Each row must contain at least one condition.
- If a rule has many conditions, add more rows with the same rule name.
- Allowed values have comma-separated values of the field name. The field can also contain predefined values such as
EMPTYandNOT_EMPTY.
To work with filtering rules, do as follows:
Go to Advanced > Data Stores and select the pss_payment_transfer_filtering_rules_v1 Data Store.
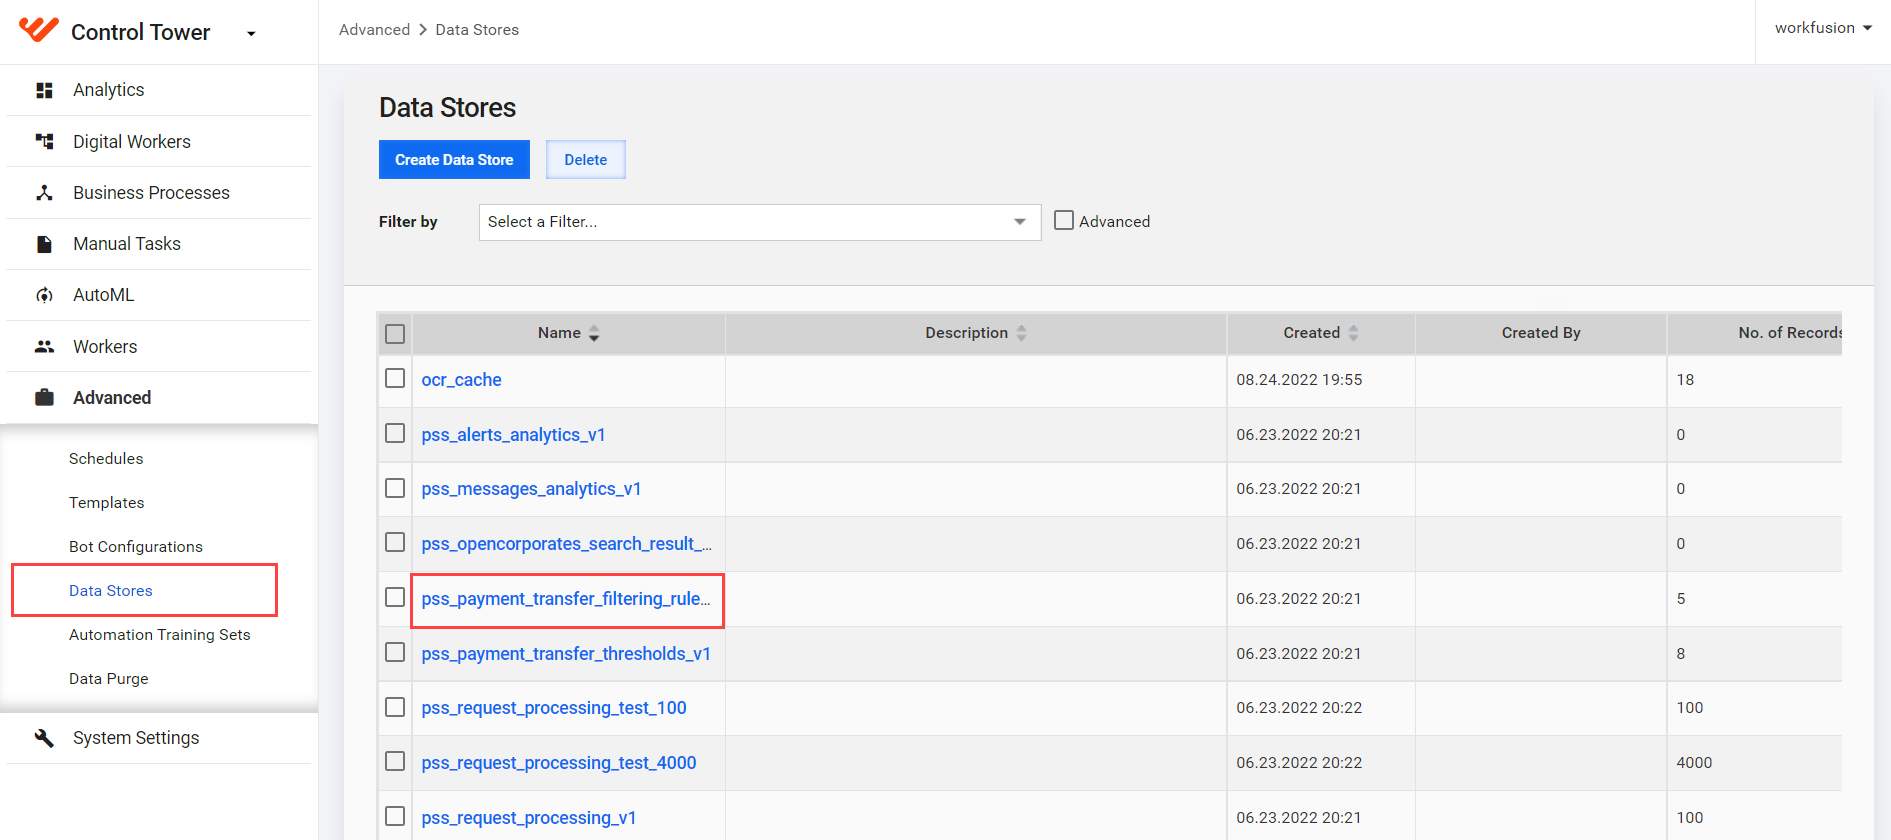
Add, modify, or delete the rules as if you work with rows and columns of any other Data Stores.