Install and configure
The guide provides instructions on installing and configuring the Tara AI Agent.
Check requirements
WorkFusion uses the following options to install and run Tara for Transaction Screening:
- On your premise
- In your Cloud
- In the private Cloud that WorkFusion hosts
Hardware
The requirements are for the on-prem installation type.
The servers must conform to the following standards:
| Server | Recommended OS | CPU (Cores) | RAM (GB) | HDD (GB) |
|---|---|---|---|---|
| Application | RHEL/CentOS 8.10 | 8 | 32 | 750 |
| BEP Agent | RHEL/CentOS 8.10 | 8 | 32 | 150 |
| Superset Analytics | RHEL/CentOS 8.5 | 2 | 4 | 50 |
| MS SQL | Microsoft Windows Server 2019 | 4 | 16 | 500 |
For the architecture deployment, refer to Install AI Agents | View architecture deployment.
Software
- Platform version 10.2.7, 10.2.8, 10.2.9
- ODF 2
- Python 3
Performance
The performance metrics are for the on-prem installation type.
The PSS skill leverages BEP servers that can be horizontally scaled for higher volumes.
Below is a sample of the volumes that can be expected when using the provided version and configuration. The system shows stable performance and resource consumption during the whole test without unexpected spikes and errors or any critical errors and warnings in logs.
Configuration:
| Environment topology | Tested platform version | Number of RPA Bots | Number of OCR Workers | Machine Learning (ML) Worker configuration | Control Tower Worker configuration |
|---|---|---|---|---|---|
| 3 BEP Agents | 10.2.8 | 5 | 7 | 1 CPU / 4 GB memory | 0.4 CPU / 2 GB memory |
Results:
| Number of Agents | Number of alerts | Duration | Number of PSS Workers | Hits/hour |
|---|---|---|---|---|
| 3 | 20,000 | 2 hr 27 min | 5 | 40,000 |
Here, one payment alert = five hits.
Install
See the Install AI Agents guide.
Configure
You can configure or update the AI Agent configuration in one of the following ways:
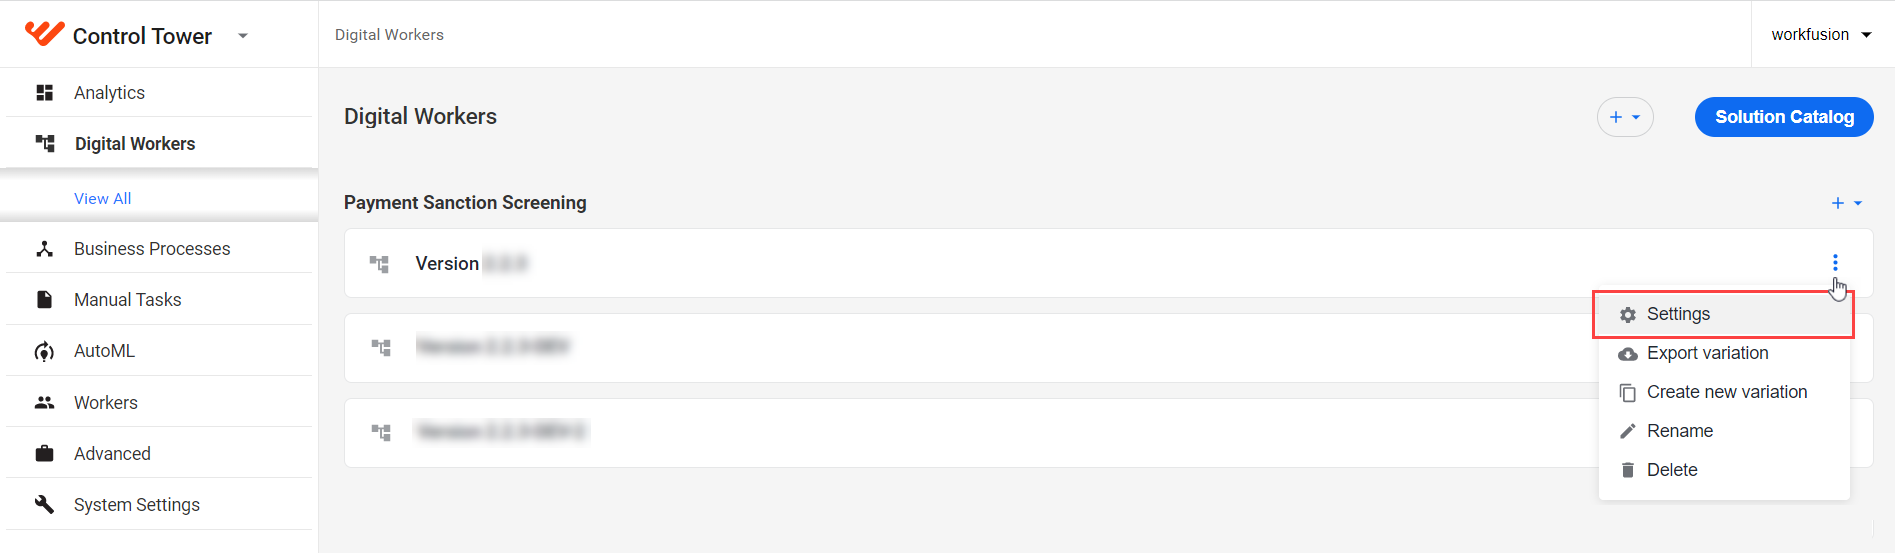
Go to the Digital Workers tab, select your Business Model, click the Actions menu, and select Settings.
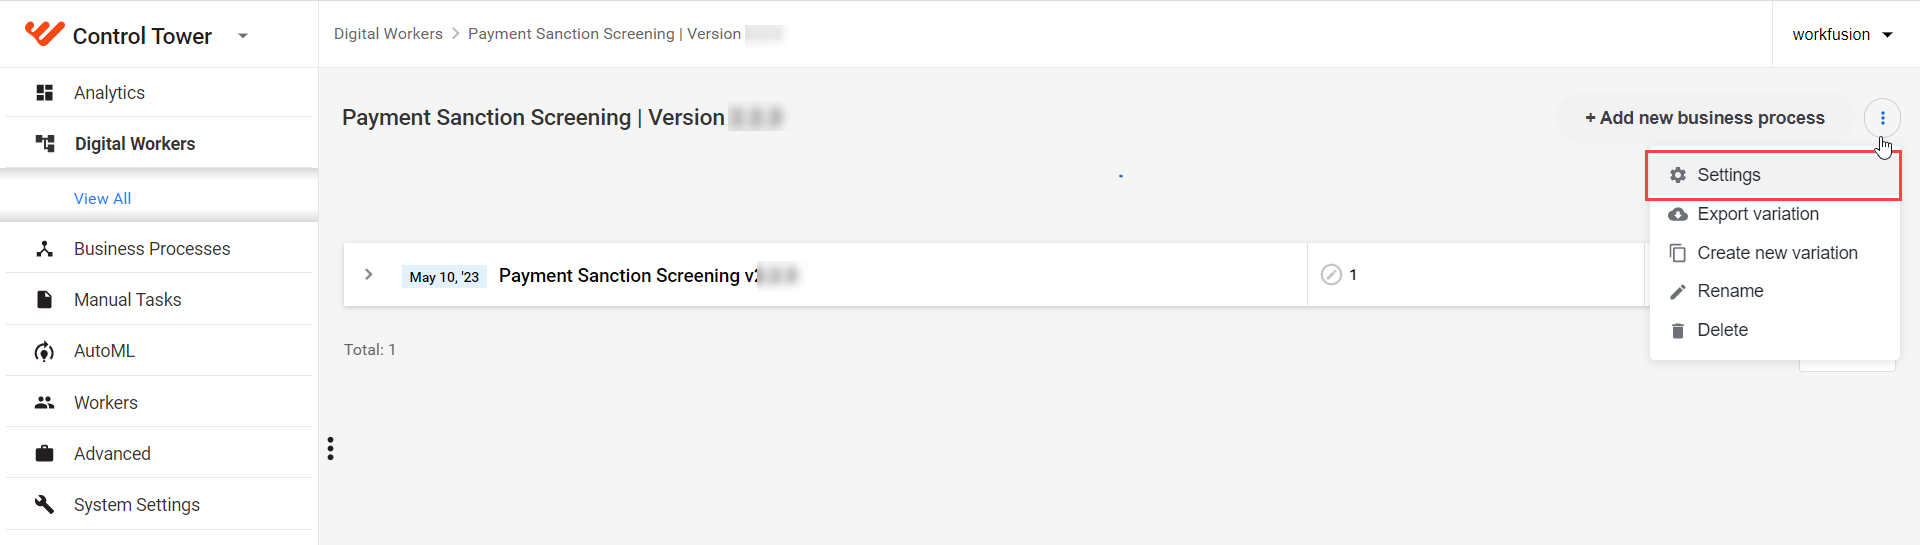
Go to the Digital Workers tab and click your Business Model. On the Business Processes tab, click the Actions menu and select Settings.
Configure the following settings:
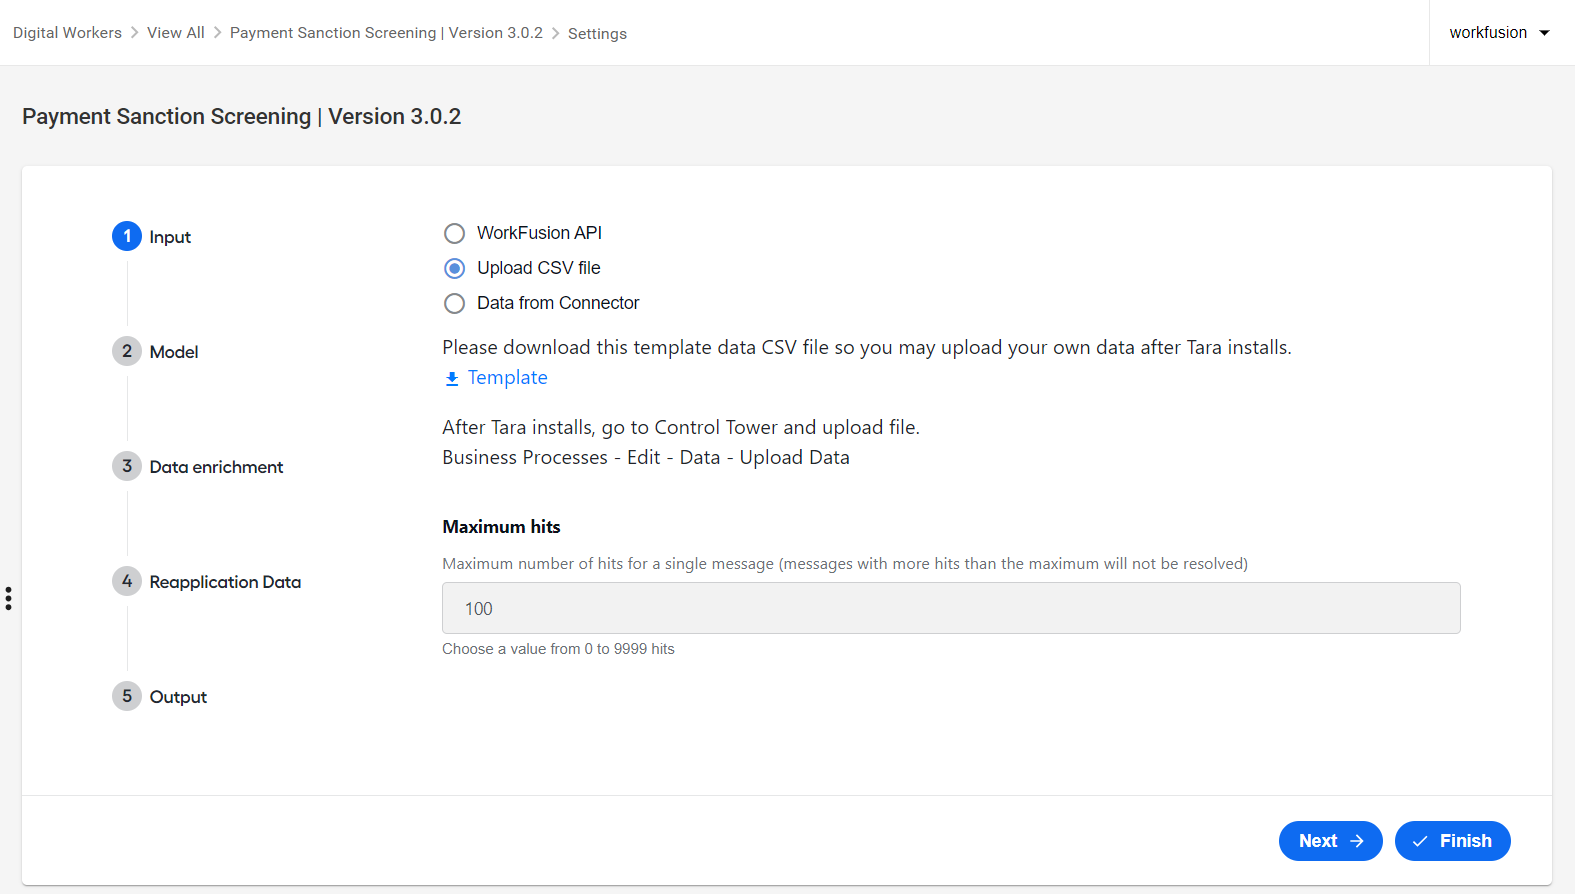
In Input, select the way to supply data to a BP.
Choose one of the following options:
In the Maximum hits field, define the maximum number of hits per alert. If an alert has a larger number of hits than the defined threshold, it is not resolved.
In Model, configure model settings:
In the Decision model drop-down list, select a compatible model. Otherwise, the default (latest) one is used.
In the Trained NER model drop-down list, select a Named Entity Recognition (NER) model. Otherwise, the default (latest) one is used.
In the Matching thresholds section, specify the following thresholds:
- In the Name matching field, enter a value between
0and1.00. Consider names a match if they are similar to a screened entity at least to the defined extent.
The score is closer to
0when names are different and closer to1.00when names are similar. Below the threshold, names are considered different and result in a mismatch. Above the threshold, names are considered similar and referred to as a match.0.75is the default value. Thus, if Tara predicts a name is at least a .75 likely match, it considers the name matching or partially matching.noteIncreasing the threshold value might increase the automation and error rates, meaning fewer names match.
Select the Match if Rare Token Overlap option to decrease the number of errors related to the low name matcher score. In many cases, it can help to resolve issues at the automation rate expense.
- In the Date of birth matching field, enter a value between
0and9999. Consider dates of birth a match if they are within the defined number of days before or after the screened date.
365is the default value. Thus, if Tara identifies birth dates are within 365 days of each other, it considers them a match. When two birth dates are more than the specified number of days apart, they are considered different and result in a mismatch.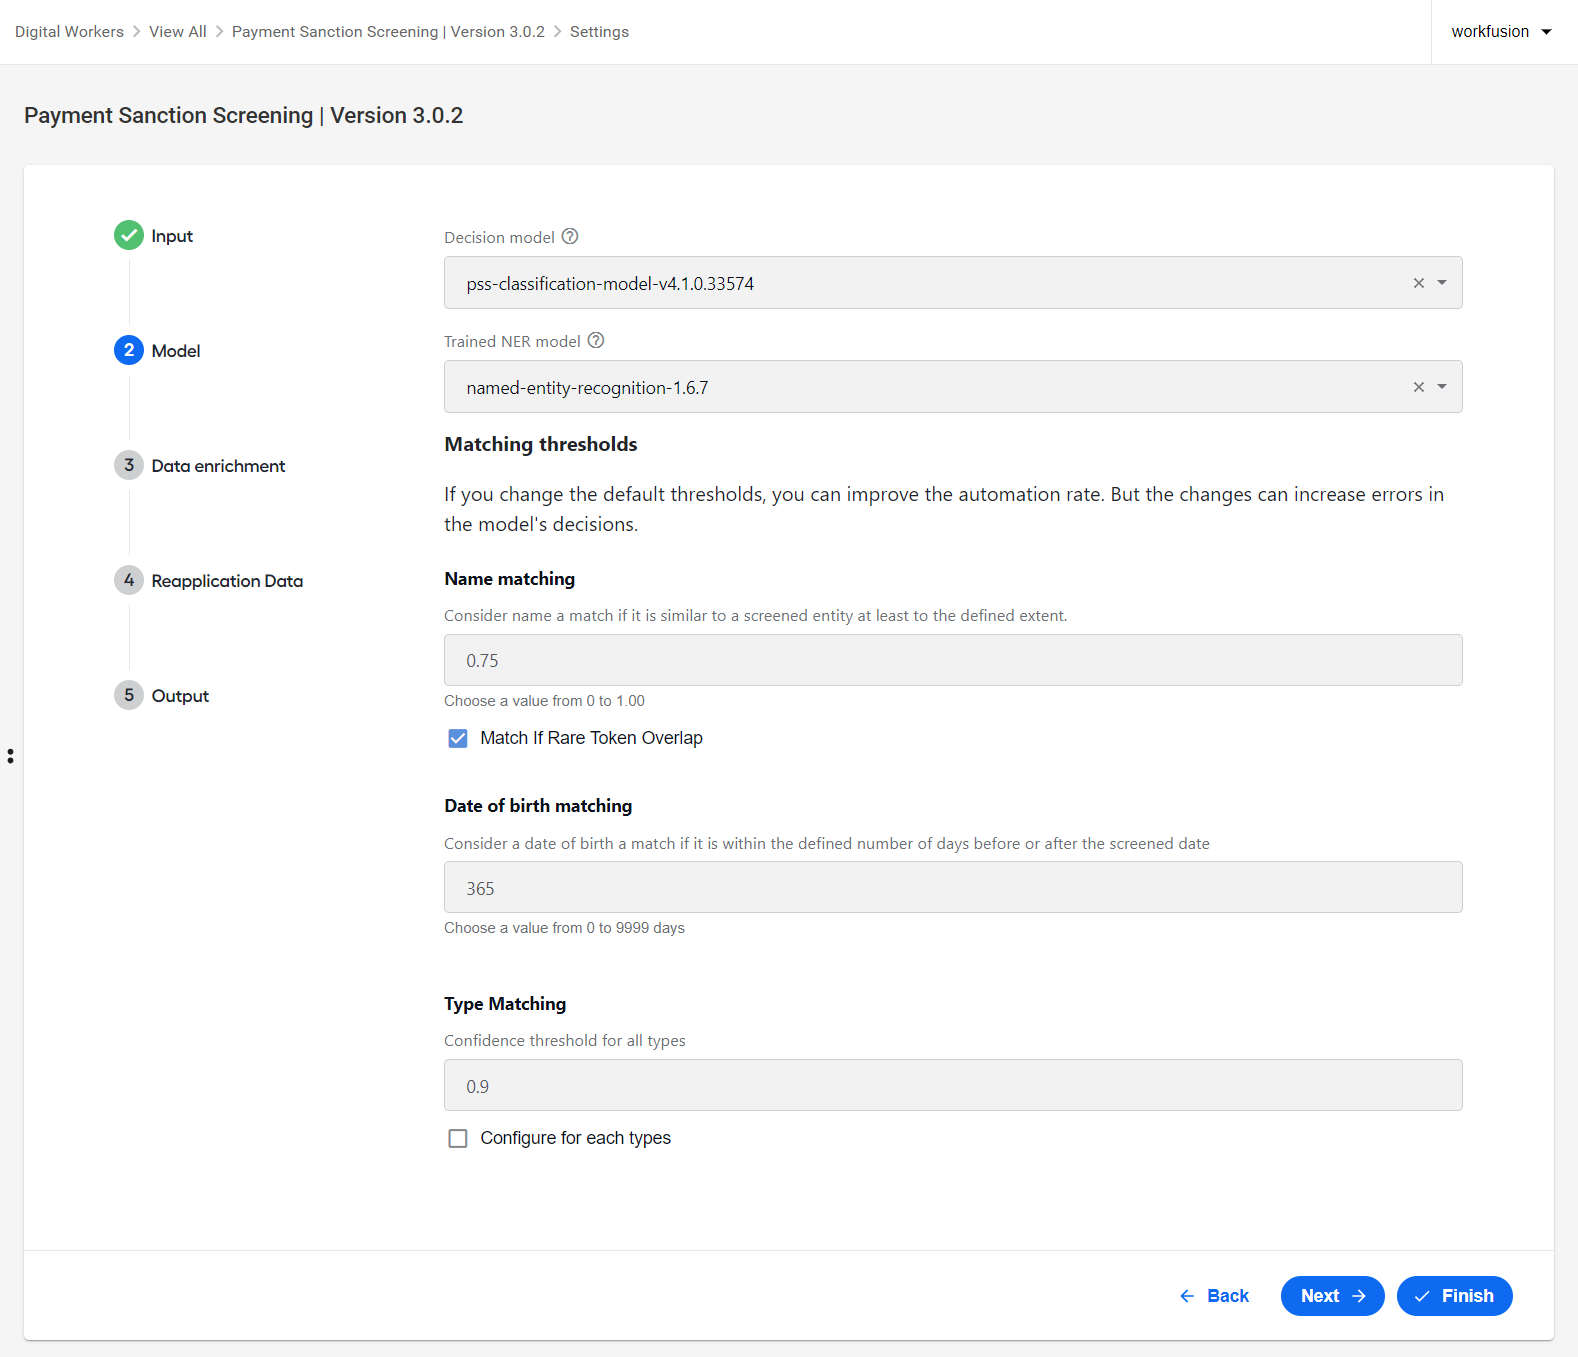
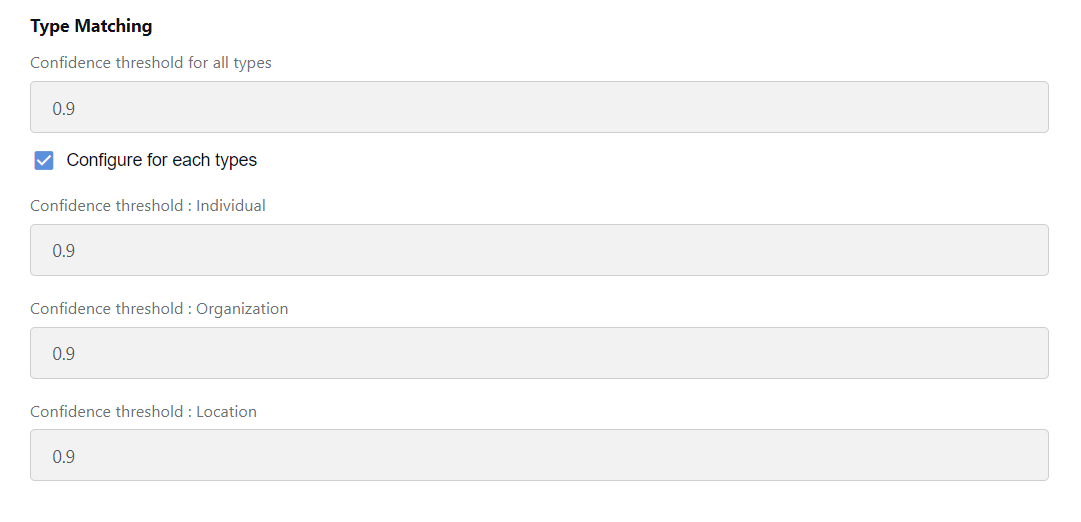
- In the Type Matching field, set a confidence threshold for a NER predicted type. Enter a value between 0 and 1.00.
If the confidence score is below the threshold, the NER type is not trusted and converted to
NON-ENTITYto avoid mistakes. The default value is 0.9.To configure the thresholds per message type, select the Configure for each types option. You can define thresholds for the Individual, Organization, and Location types.
- In the Name matching field, enter a value between
In Data enrichment > Address verifier, specify an external source to retrieve additional data. Currently, Google Web Services is available. To do this, you must provide a valid access token:
- In the Google Maps API Key field, specify your Google Maps API key. Address Validator uses it to access the Google Maps service for address verification. For more details on getting a key for a Google Cloud account, see Using the Google Maps Platform.
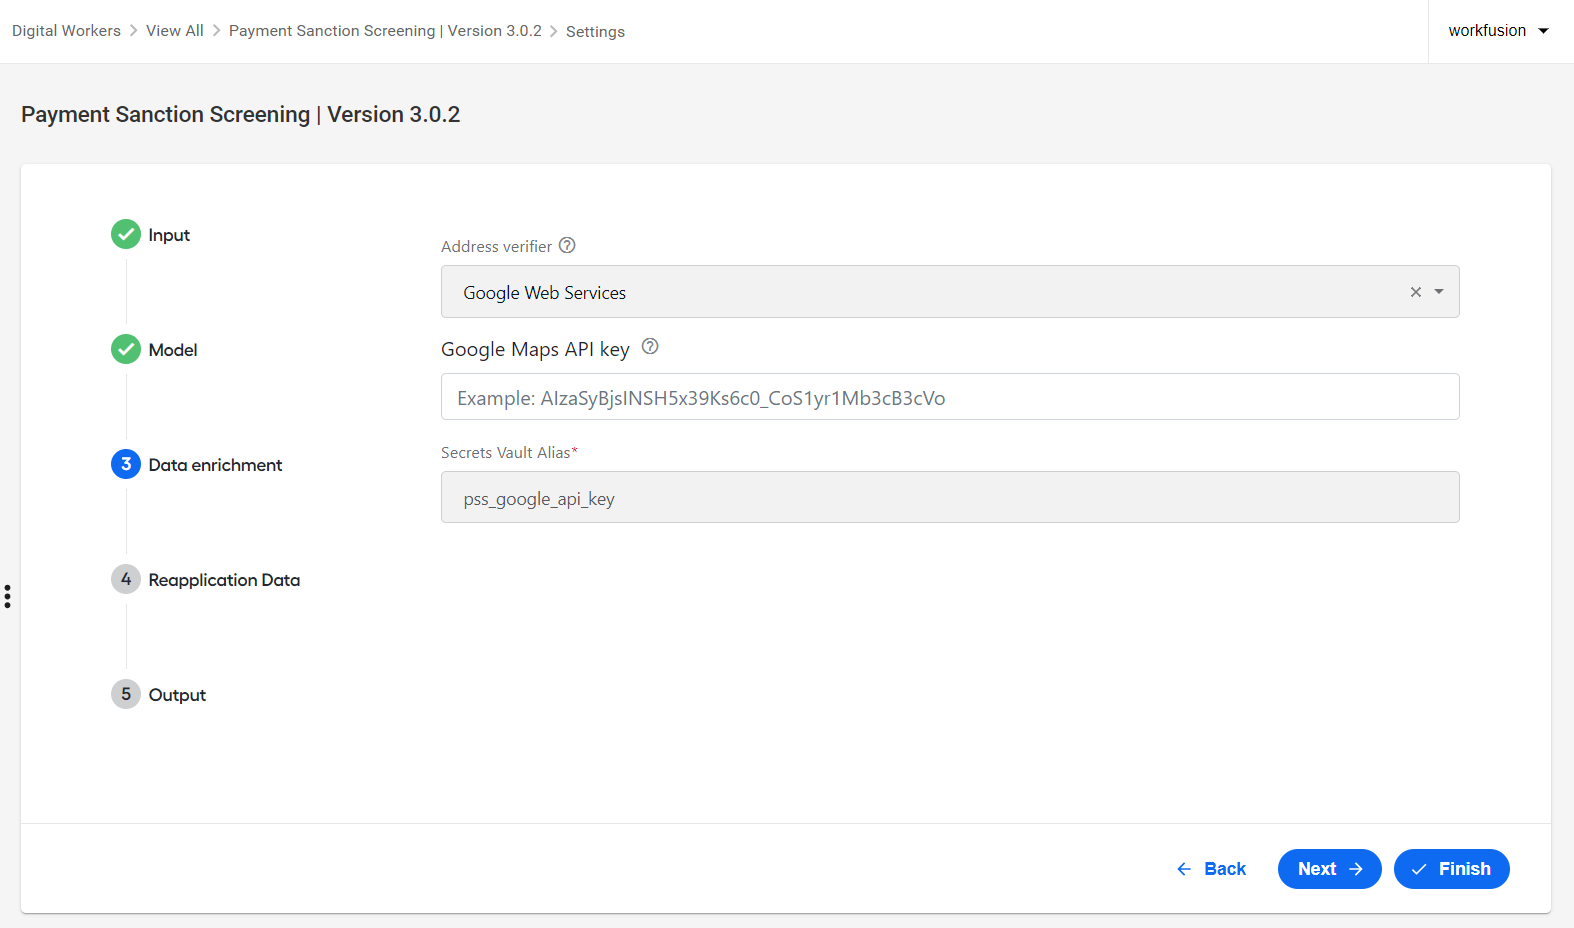
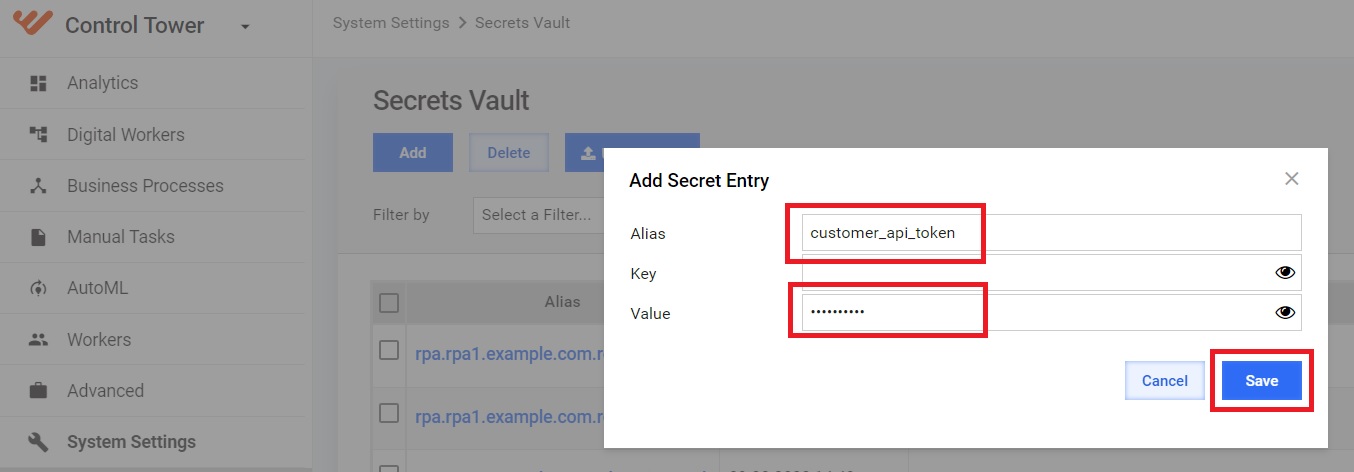
- In the Secrets Vault Alias field, enter the alias that identifies your secure entry.
In Reapplication Data > Enable DR Processing, select yes to enable the Continuous Learning Data Store (CLDS) data flow. By default, the feature is disabled.
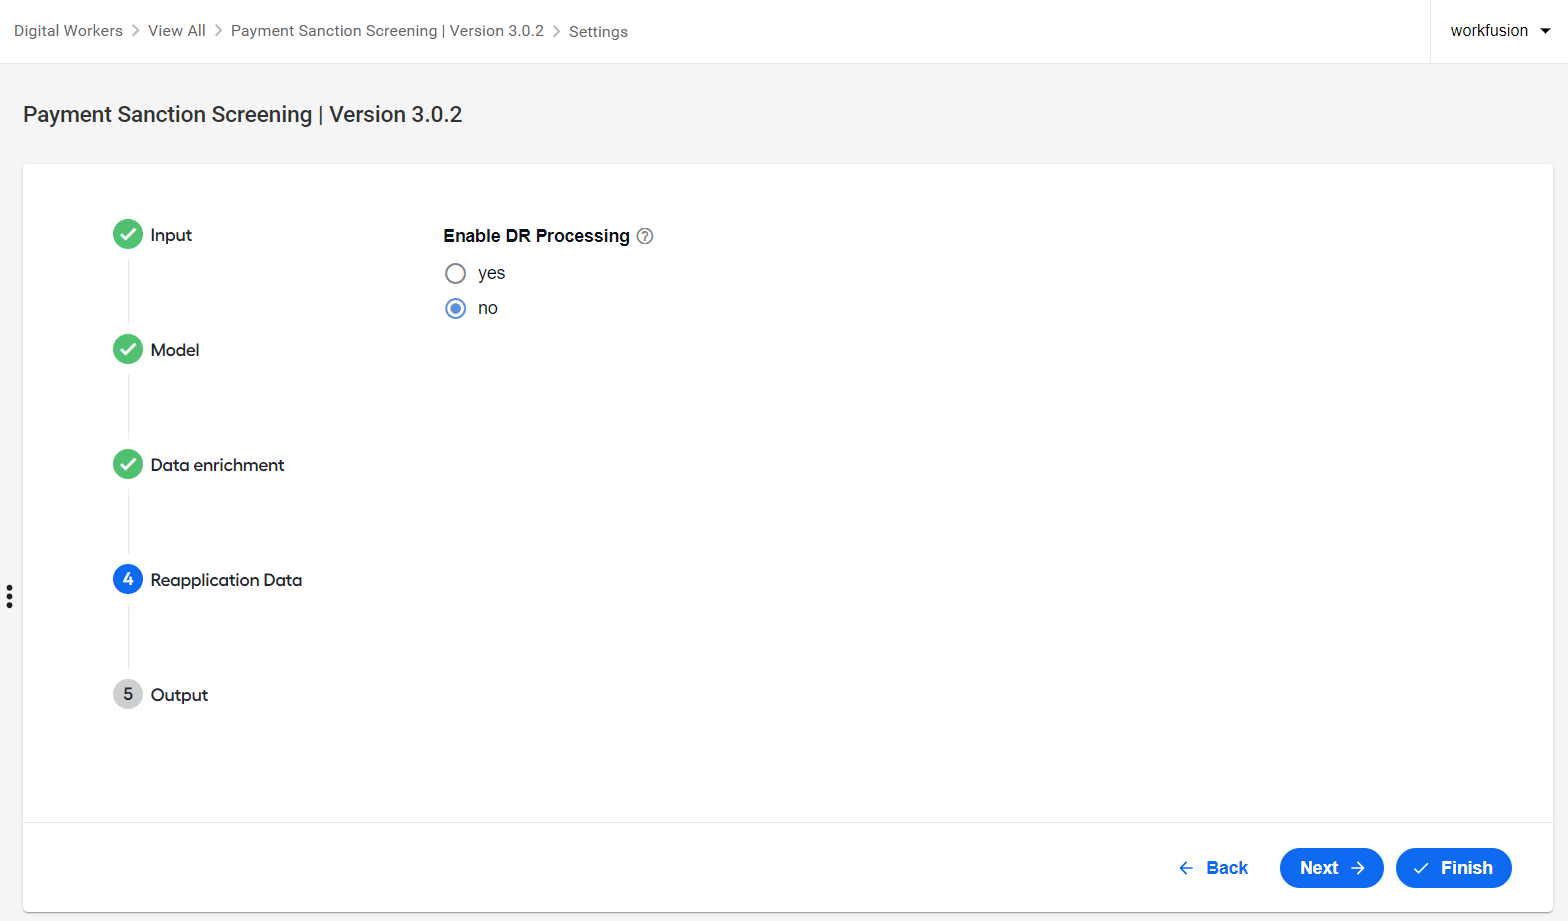
Once you enable the CLDS flow, configure the needed settings:
In the Message Type drop-down list, define the message type to target for continuous learning. The list currently has only a FUF value.
In the Tags to compare field, enter tag names from an alert as comma-separated values, the content of which is used to compare against historical data together with hashed hit content.
infoEnter at least one tag for the CLDS feature to work. For more details, see Apply continuous learning | Compare FUF tags.
In the Search Timeframe (in days) field, specify the maximum number of days in the past to search for historical data.
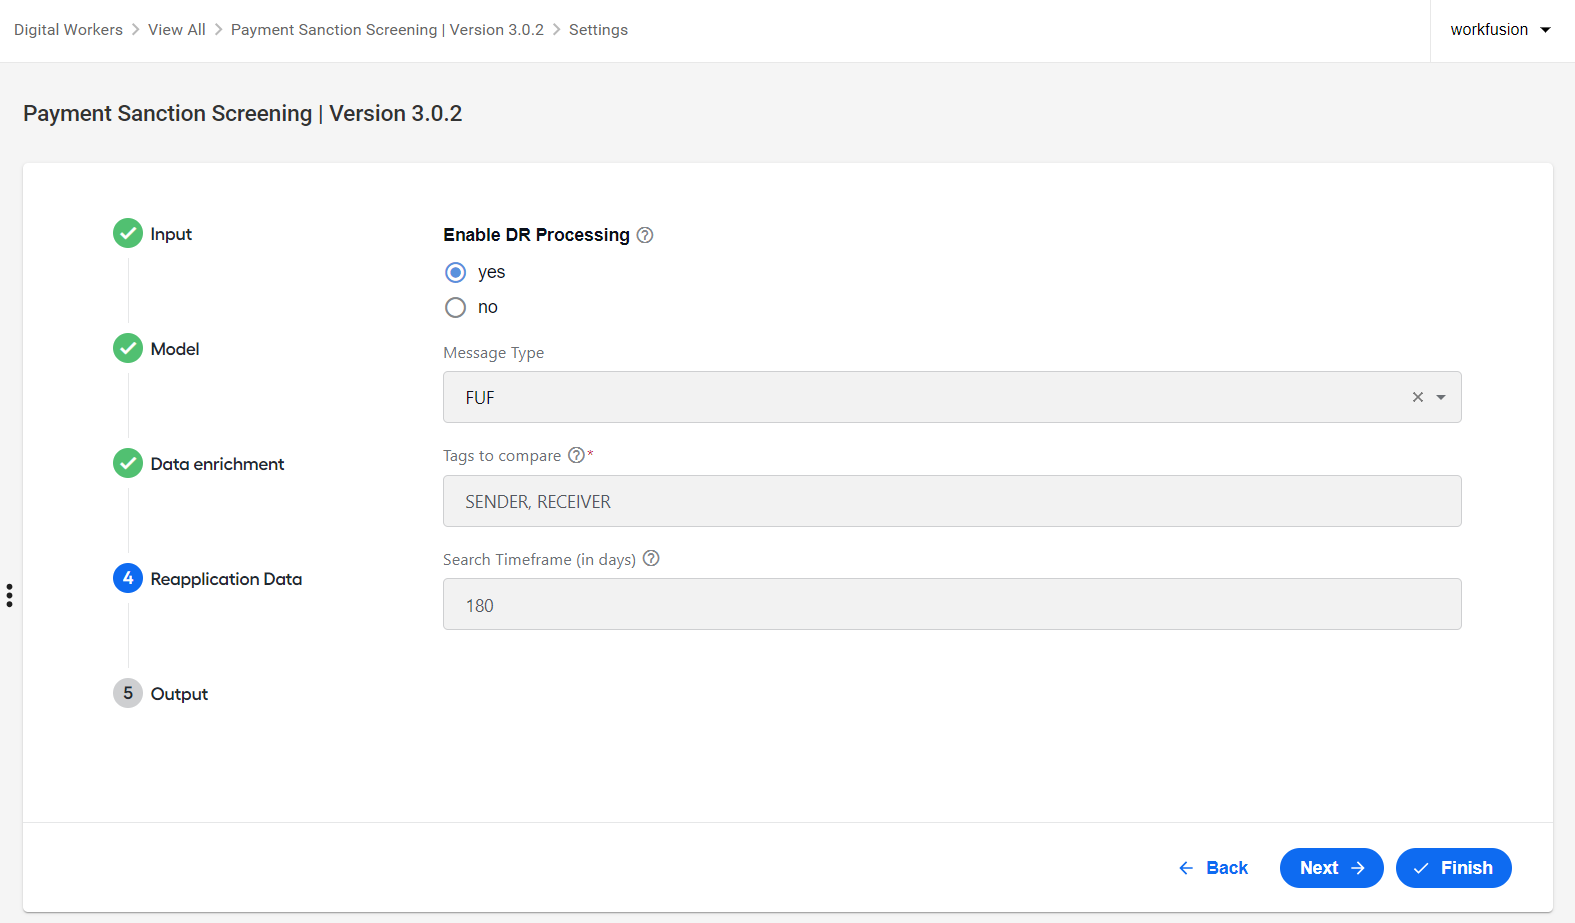
For more details on the feature, see Business Process overview | Ingest Historical Decisions for Reapplication Business Process and Apply continuous learning.
In Output, select Yes to generate an HTML report of BP results after a BP run. For more details on how to find a generated report, see Run screening | View results.
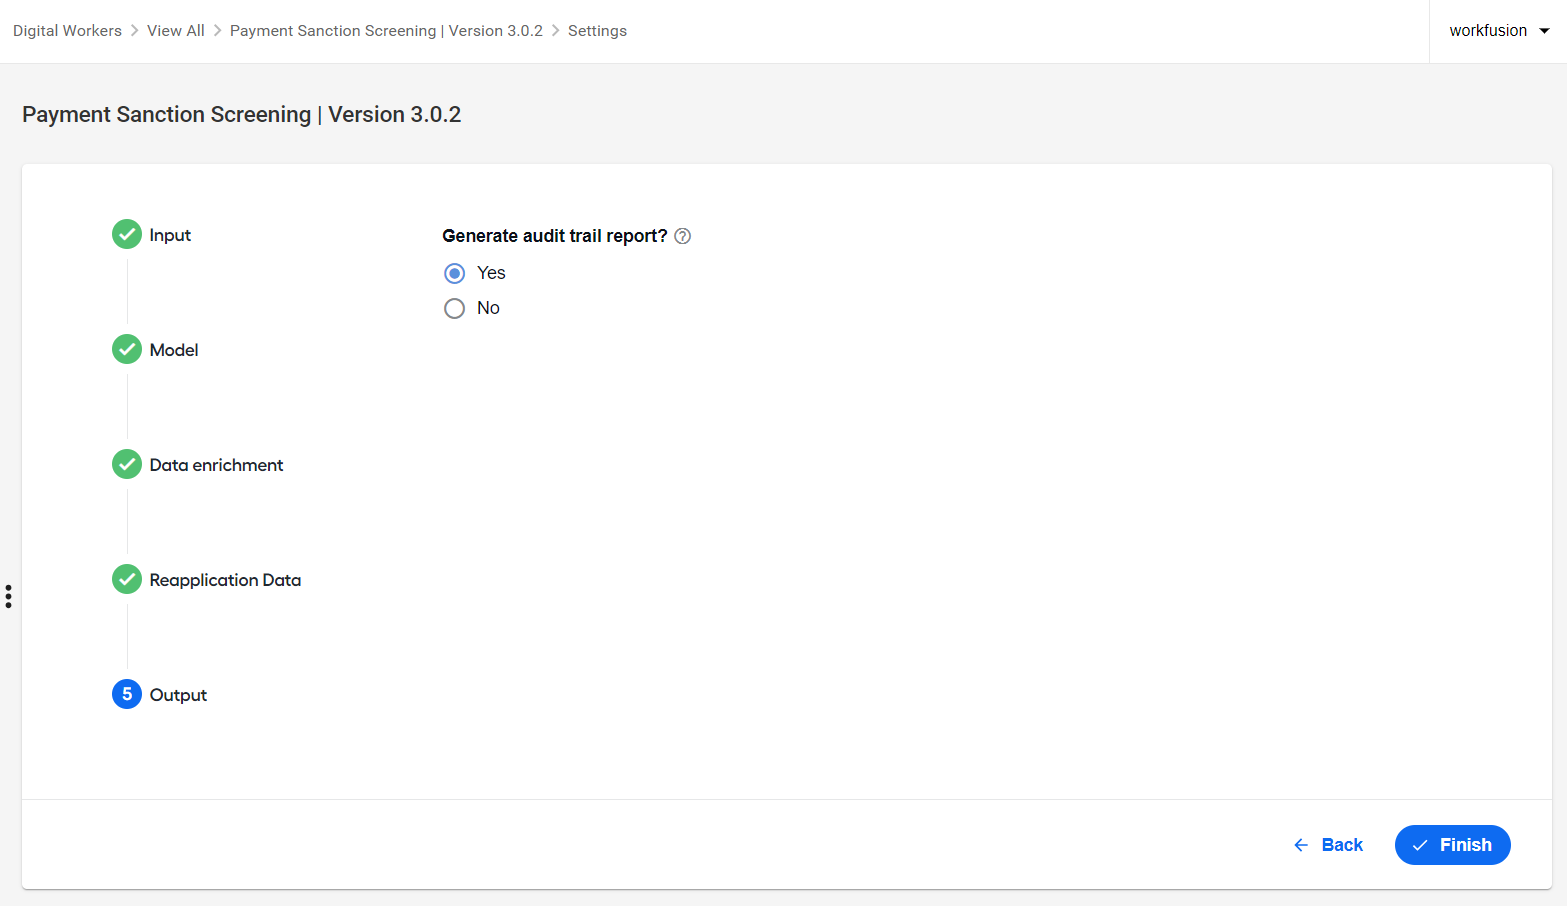
Click Finish.
Customize configuration settings
During the AI Agent configuration phase, a BP starts with reading settings from the configuration.json file that contains all parameters required to load data and control a data flow.
Sample configuration.json
{
  "input": {
    "source": "file",
    "message_datastore_name": "pss_request_processing_v1",
    "ml_thresholds_datastore_name": "pss_payment_transfer_thresholds_v1",
    "filter_datastore_name": "pss_payment_transfer_filtering_rules_v1",
    "fuf_tag_datastore_name": "pss_fuf_tags_list_v1",
    "swift_tag_datastore_name": "pss_swift_tags_list_v1",
    "iso20022_tag_datastore_name": "pss_iso20022_tags_list_v1",
    "maximumHits": 100
  },
  "model": {
    "model_id": "",
    "ner_model_id": "",
    "go_forward_on_failure": "false",
    "default_model_Id": "pss-classification-model-4.0.7",
    "default_ner_model_Id": "named-entity-recognition-1.6.7",
    "nameMatchThreshold": 0.75,
    "dobMatchThreshold": 365,
    "typeConfidenceThreshold": 0.9,
    "individualConfidenceThreshold": 0.9,
    "organizationConfidenceThreshold": 0.9,
    "locationConfidenceThreshold": 0.9,
    "vesselConfidenceThreshold": 0.9,
    "aircraftConfidenceThreshold": 0.9,
    "matchIfRareTokenOverlap": false
  },
  "provider": {
    "name": ""
  },
  "output": {
    "generate_report": false
  },
  "decisionReapplication": {
    "isEnabled": false,
    "messageType": "fuf",
    "tagsToCompare": "",
    "messageTagsNotSensitive": "",
    "numDaysToLookBack": "120"
  },
  "container":{}
}
You can customize some settings, some are hidden from the user interface and cannot be changed.
The default configuration parameters are as follows:
message_datastore_name: name of the Data Store that contains processing data. New messages come to this Data Store. Data gets updated during the BP execution.ml_thresholds_datastore_name: name of the Data Store that contains the mapping of decision codes, such as definition, confidence threshold, decision.fuf_tag_datastore_name: name of the Data Store that contains the FUF dictionary of entity attributes and their types associated with a message type.swift_tag_datastore_name: name of the Data Store that contains the SWIFT dictionary of entity attributes and their types associated with a message type.iso20022_tag_datastore_name: name of the Data Store that contains the ISO20022 dictionary of entity attributes and their types associated with a message type.model_id: name of the ML model used to process input data to determine possible False Positive hits. If not provided, thedefault_model_Idvalue is used.ner_model_id: name of the NER ML model used to process input data to determine possible entity types. If not provided, thedefault_ner_model_Idvalue is used.go_forward_on_failure: variable required to run AutoML Bridge.default_model_Id: model version that comes with the bundle during the release.default_ner_model_Id: model version that comes with the bundle during the release.nameMatchThreshold: threshold that controls the outcome of the name matcher score and name match and mismatch decision.dobMatchThreshold: threshold that controls the outcome of the date of birth (DOB) matcher and DOB match and mismatch decision.filter_datastore_name: Data Store that contains alert filtering rules and adjudicates only alerts that match the defined rules. If not defined, all data goes through the model.generate_report: option used to generate HTML reports and store them on the MinIO server.maximumHits: maximum number of hits per alert. If an alert has a larger number of hits than the defined threshold, it auto-dispositions as no decision.typeConfidenceThreshold: option used to set confidence for a NER-predicted type. NER prediction is trusted when the confidence score exceeds or equals the threshold. The default value is 0.9.matchIfRareTokenOverlap: setting related to the name matcher score calculation. When set totrue, a hit on a rare token increases the score, lowering the error and automation rates.decisionReapplication: settings related to the CLDS flow.isEnabled: set totrueto enable the functionality.messageType: define message types to be included in continuous learning. Currently, only FUF messages are supported.numDaysToLookBack: set the range to search historical data for matching records.
All Data Stores used in the Transaction Screening processes are built during the bundle import stage. Their names cannot be changed.
| Data Store | Description |
|---|---|
| pss_request_processing_v1 | Stores all requests, processing updates, and decisions. |
| pss_payment_transfer_filtering_rules_v1 | Contains filtering rules, if any. Empty by default. |
| pss_alerts_analytics_v1 | Contains per alert analytics. |
| pss_messages_analytics_v1 | Contains per message analytics. |
| pss_fuf_tags_list_v1 | Contains FUF tags versus type data dictionary. Used when parsing FUF messages. |
| pss_iso20022_tags_list_v1 | Contains ISO20022 tags versus type data dictionary. Used when parsing ISO20022 messages. |
| pss_swift_tags_list_v1 | Contains SWIFT tags versus type data dictionary. Used when parsing SWIFT messages. |
| pss_de_analytics_v1 | Contains analytics of data enrichment service calls for Open Corporates and Geocoder. |
| pss_reapplication_data_v1 | Contains historical data for decision reapplication on the alert level. |
| pss_reapplication_hashcodes_v1 | Contains historical data for decision reapplication on the hit level. |
| pss_request_processing_test_4000 and similar test files | Contains synthetic data generated for testing. |
Customize models
In Tara v3.0.3, the model does not make a final decision, and some of the existing settings, such as Resolve when, Escalate when, and Other, do not have an effect. All final decisions are made by the rule engine.
To customize a model, complete the following steps:
Go to AutoML > Datasets and create a test dataset. Memorize its name as you need it in further steps. You can use the sample file with one record to upload to your dataset. For instructions, refer to the Manage datasets topic.
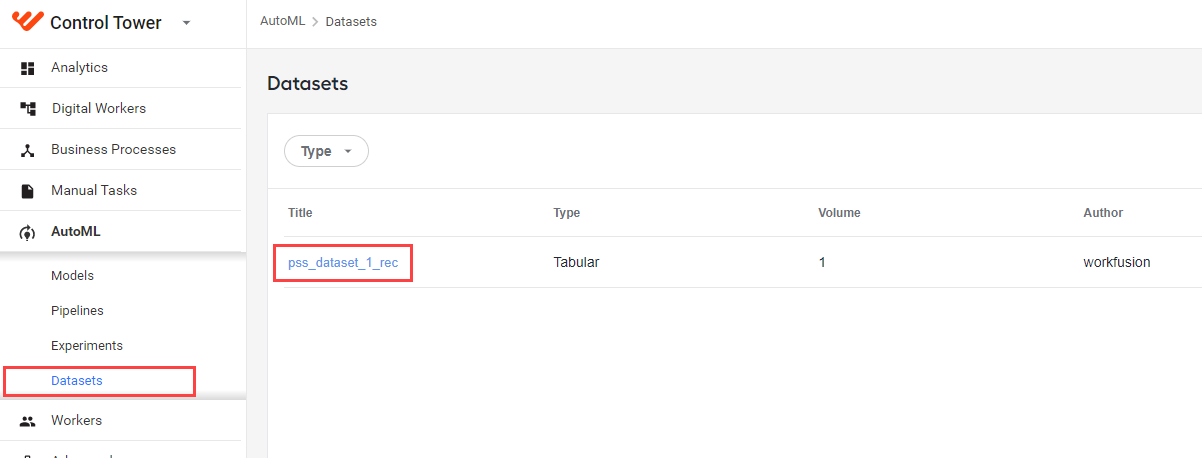
Go to AutoML > Models and find your model in the list.
Click the model's Actions menu and select Copy to modify.
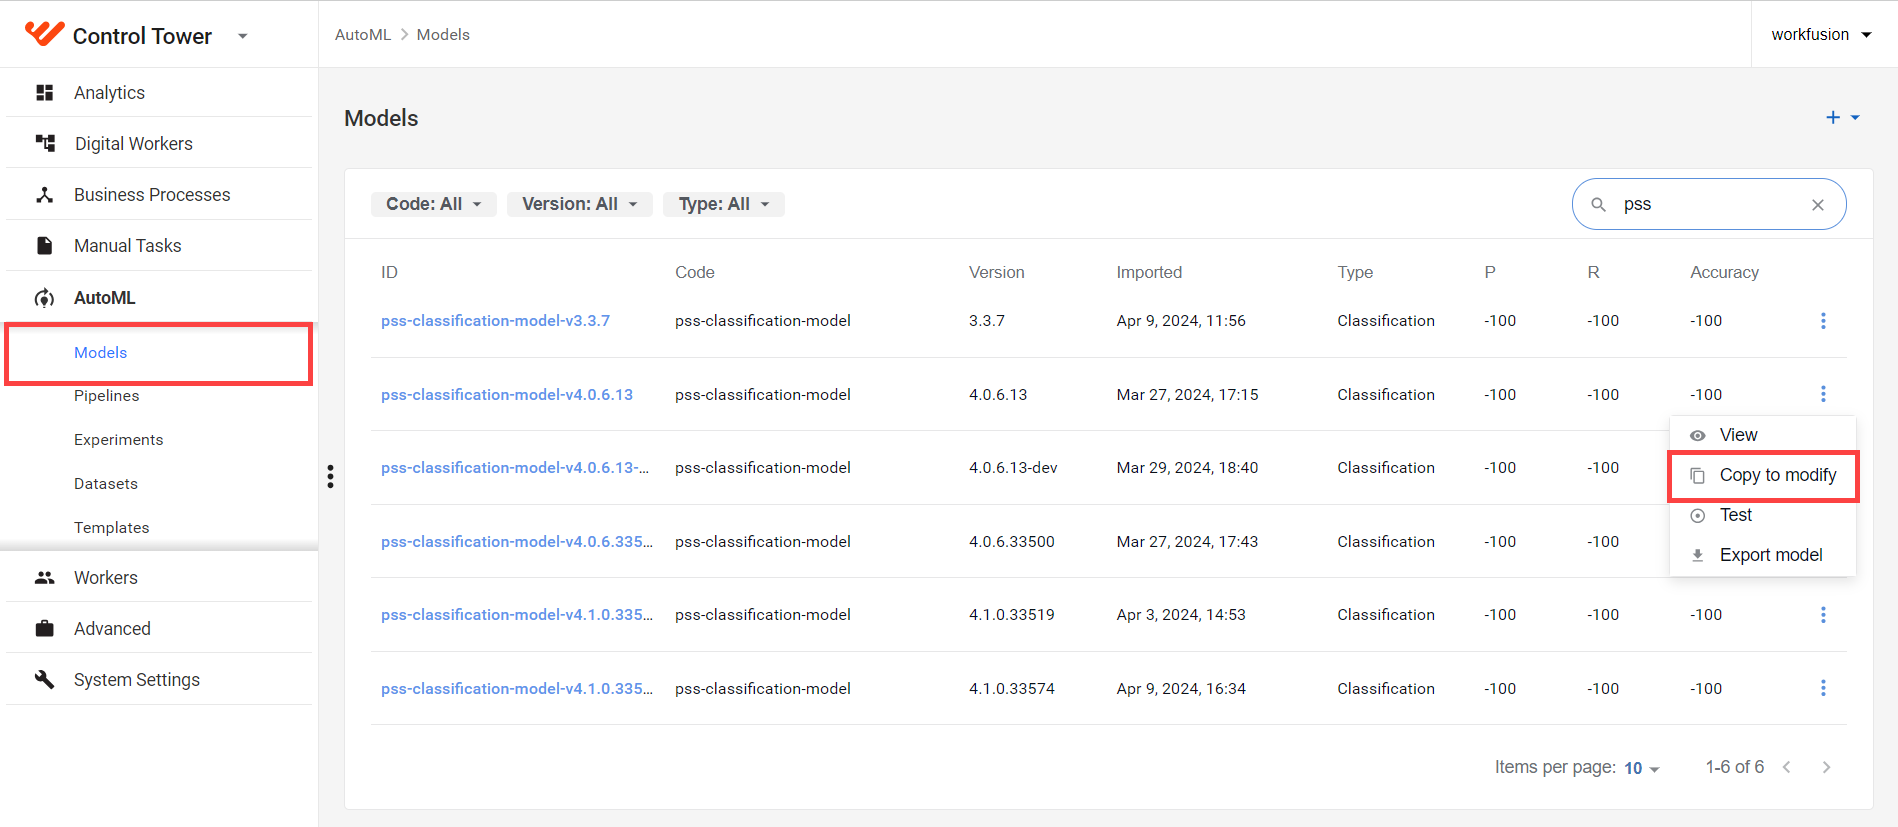
On the Modify window > Prototype > Model ID, specify a new name of the model variant and click Next to continue. Mind that the name must start with pss-classification-model.

On the Testing tab, select the dataset from step 1 and click Next to continue.

On the Rules tab > Blacklist entities, define blacklisted entities.
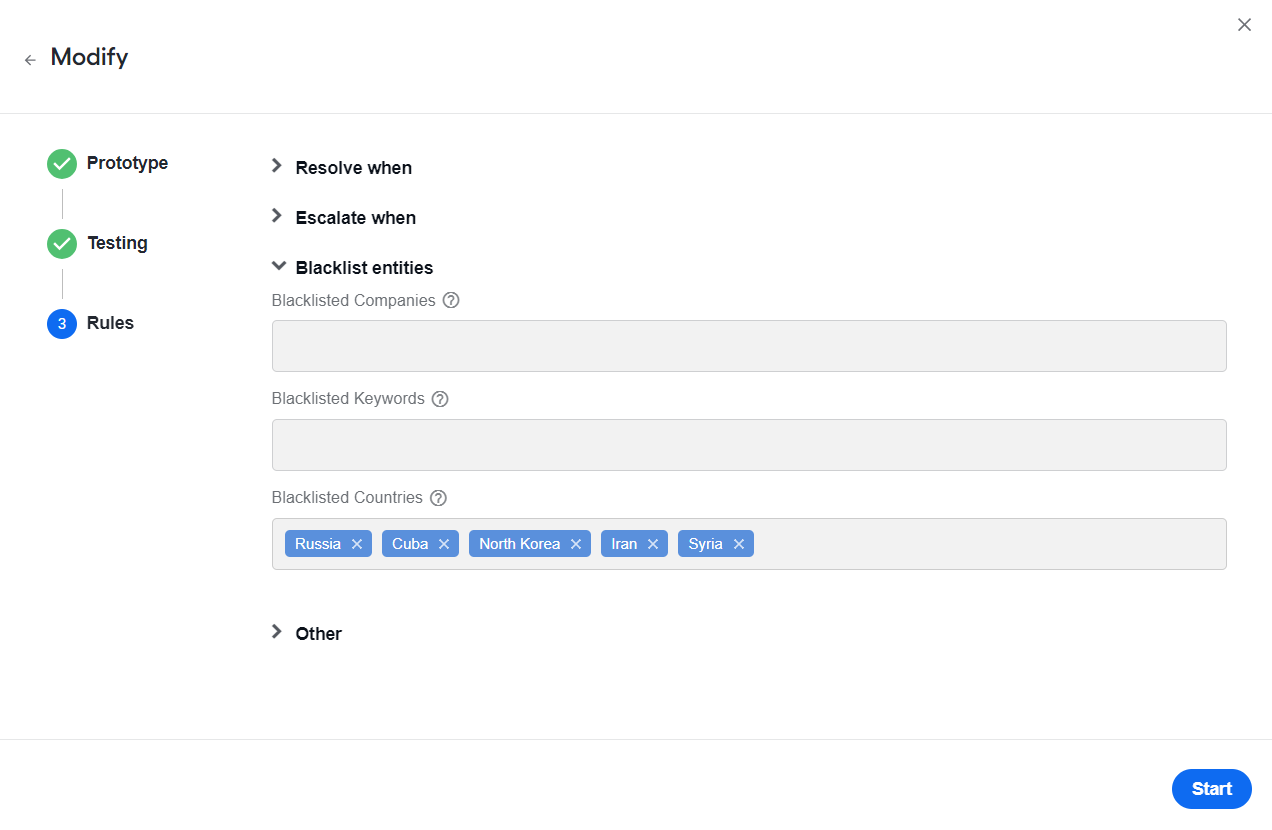
Currently, the following countries are added to the blacklist by default:
- Iran (IRN)
- Cuba (CUB)
- Syria (SYR)
- North Korea (PRK)
- Russia (RUS)
If a screened entity is located in Blacklisted Countries, no decision is returned.
You can add additional blacklisted entities manually. Mind that the fewer entries are blacklisted, the higher the automation rate is.
Click Start to build a new model.
Go to AutoML > Models. The model appears in the list, and you can choose it during the AI Agent configuration.
Add message type
The procedure works only for messages received in the Fircosoft FUF or SWIFT RAW formats.
To add a message type for processing, do as follows:
In the
data-model-apisources, go to theMessageType.javafile and define a new type. Release any changes to the data model API with the updated version. Use the updated version in the project as a dependency. The existing message types are as follows:public enum MessageType {
GDS,
ACH,
SWF,
FED_WIRE,
PAYMENT_TRANSFER,
}In the dictionary, add details of the entities that belong to the new message type, for example,
pss_fuf_tags_list.csv. This file defines the entity type for the entity attribute and maps message types to the entity attributes. If the entity type cannot be found, it becomesFREETEXT.
See sample dictionary entries below.
| Message type (msgtype) | Attribute name (attrname) | Entity name (entityname) | Type (type) | Description (description) |
|---|---|---|---|---|
| GDS | Colf_Cunry | CollectFrom | Country | Collect from Country Name |
| GDS | Colf_Name | CollectFrom | Name | Collect from Name |
| SWF | SWF_4_30 | Requested Execution Date | Date | date |
| ACH | IAT-ODFIN | Originating | Company | ORIGINATING DFI NAME |
If you add new attribute types to the Type dictionary column, update the AttributeType.java file to match the values of new attribute types. The existing attribute types are as follows:
public enum AttributeType {
    NAME,
    INDIVIDUAL,
    NAMEADDRESS,
    ADDRESS,
    CITY,
    STATE,
    ZIP,
    POSTALCODE,
    COMPANY,
    COUNTRY,
    COUNTRYCODE,
    CITYCODE,
    NUMBER,
    AMOUNT,
    ID,
    DATE,
    VESSEL,
    FREETEXT,
    CODE
}
Update filtering rules
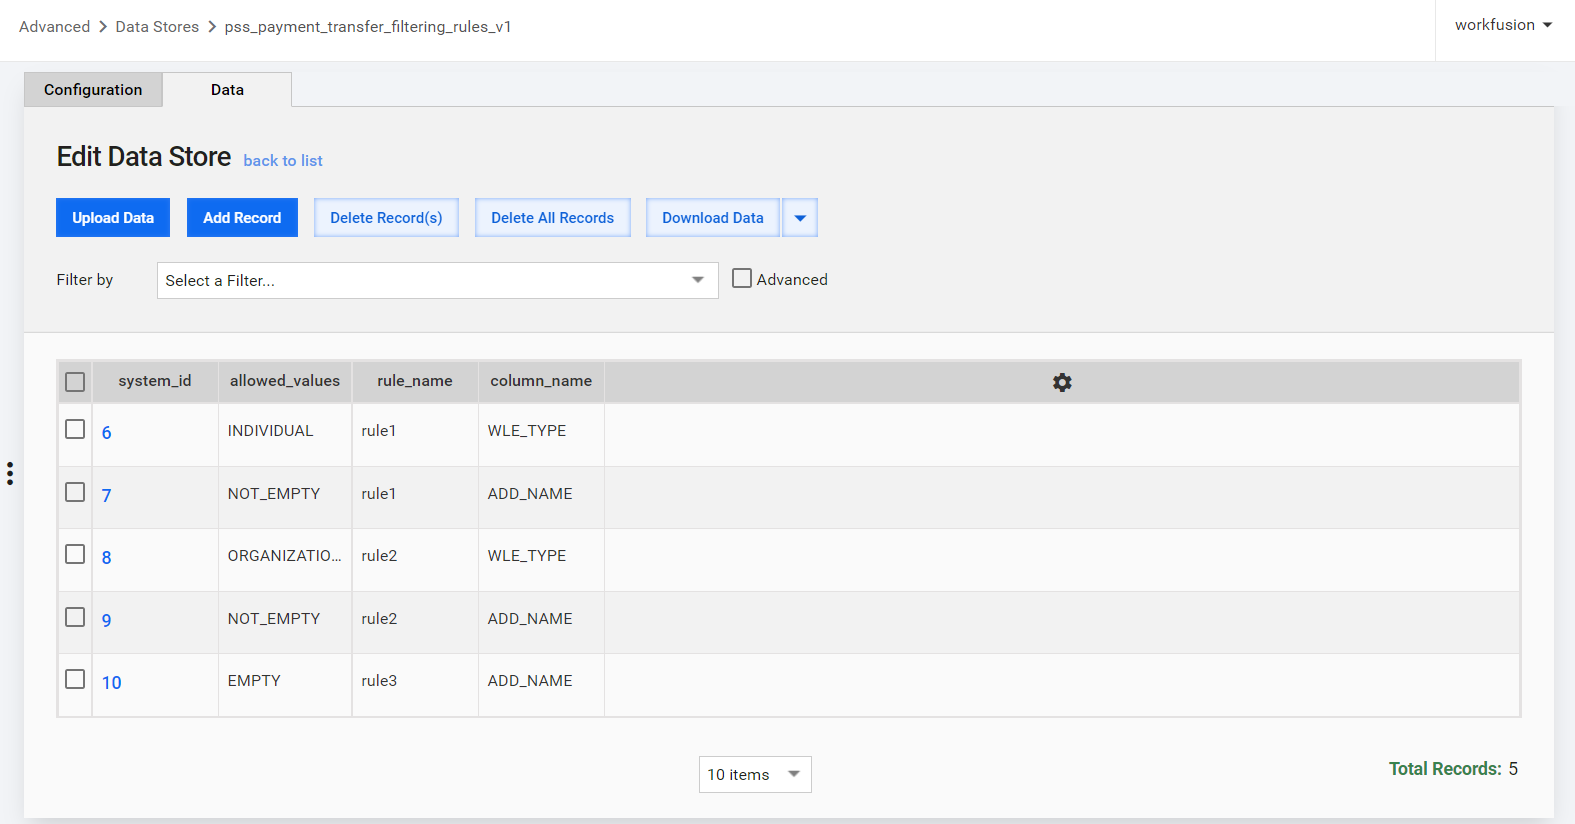
To adjudicate a specific subset of the data, create a filtering Data Store and set the rules. If a record complies with any defined rules, it is processed by the model.
Mind that:
- Filtering rules apply on the hit level.
- Each row must contain at least one condition.
- If a rule has many conditions, add more rows with the same rule name.
- Allowed values have comma-separated values of the field name. The field can also contain predefined values such as
EMPTYandNOT_EMPTY.
To work with filtering rules, do as follows:
Go to Advanced > Data Stores and select the pss_payment_transfer_filtering_rules_v1 Data Store.
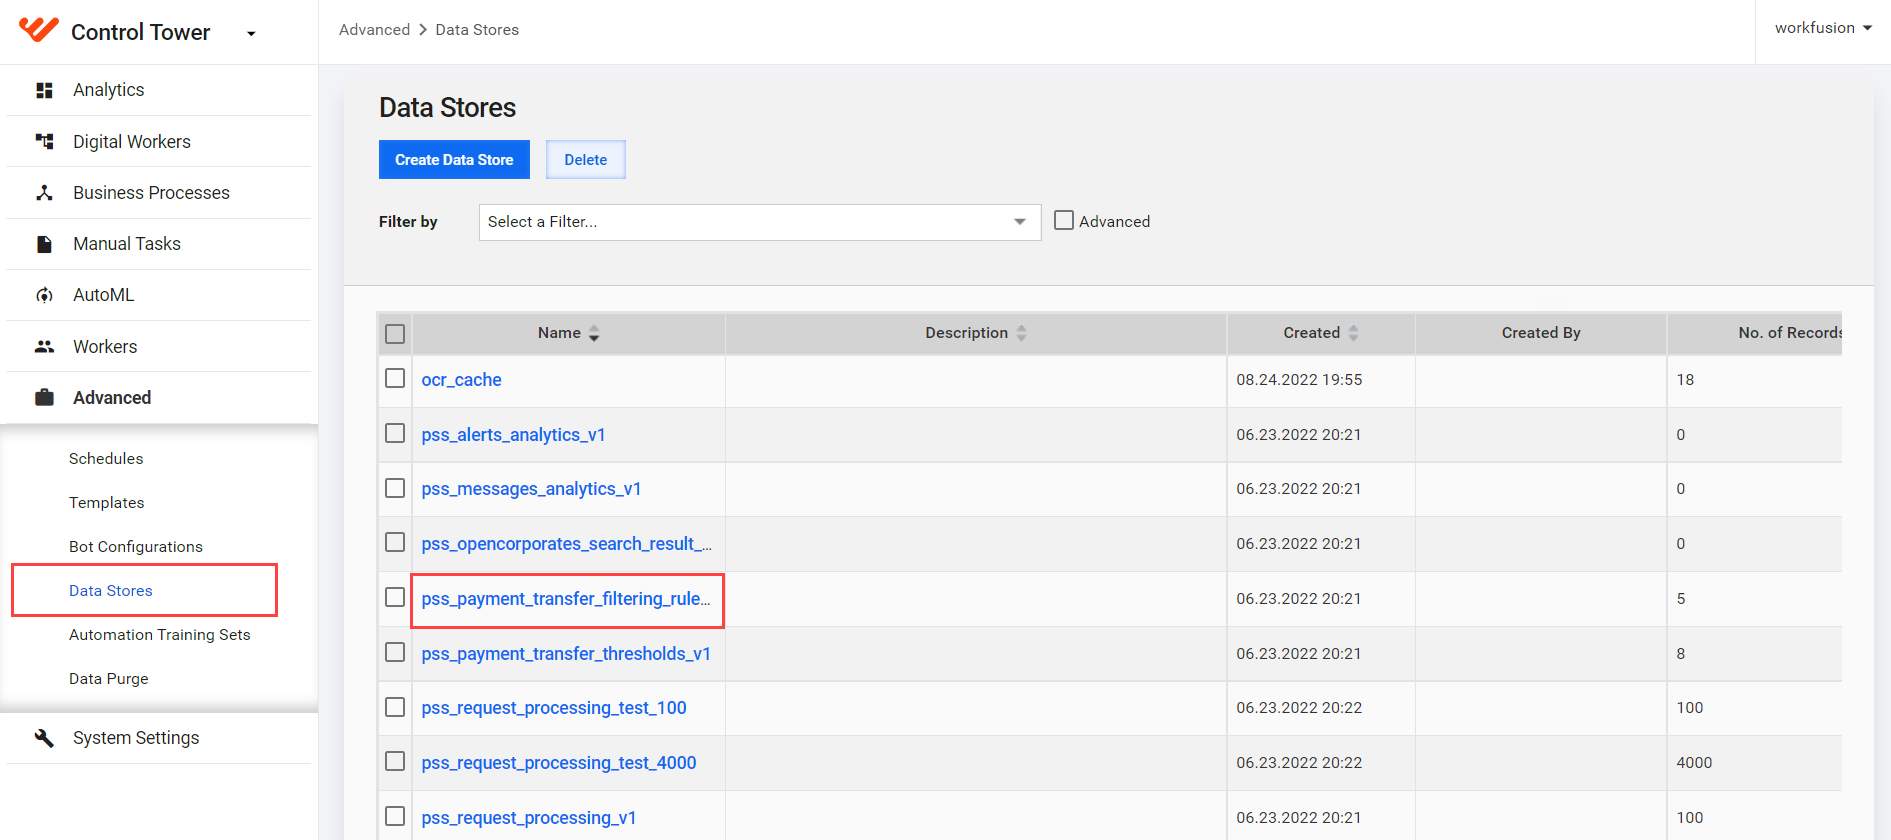
Add, modify, or delete the rules as if you work with rows and columns of any other Data Stores.