Install and configure
The guide provides instructions on installing and configuring the Tara AI Agent.
Check requirements
WorkFusion uses the following options to install and run Tara for transaction screening:
- On your premise
- In your cloud
- In a private cloud hosted by WorkFusion
Hardware
The requirements are for the on-prem installation type.
The servers must conform to the following standards:
| Server | Recommended OS | CPU (Cores) | RAM (GB) | HDD (GB) |
|---|---|---|---|---|
| Master | RHEL/Rocky Linux 8.x | 8 | 48 | 750 |
| BEP Agent | RHEL/Rocky Linux 8.x | 8 | 32 | 150 |
| Superset Analytics | RHEL/Rocky Linux 8.x | 4 | 16 | 50 |
| MS SQL | Microsoft Windows Server 2022, 2019 | 4 | 16 | 500 |
For the architecture deployment, refer to Install AI Agents | View architecture deployment.
Software
- Work.AI v10.3+
- Python 3
- Generic Connector 3.6.0 (
package-generic-connector-3.6.0.zip)
Performance
Performance is measured per hit across the total run to calculate throughput at the specific scaling level.
| Number of BEP Agents | Input | Throughput |
|---|---|---|
| 3 | 20,000 alerts | 66,667 hits per hour |
| 6 | 20,000 alerts | 110,000 hits per hour |
| 20 | 20,000 alerts | 250,000 hits per hour |
Test datasets include between 20,000 and 100,000 alerts, with an average of two hits per alert. The maximum number of hits per alert in these datasets is 1,000.
The performance testing criteria include the following metrics:
Average response time
90th percentile response time
Minimum response time
Maximum response time
Error percentage
Overall model throughput for the duration of the run
The following table shows performance results when using 3 BEP Agents.
| Alerts | Average response | 90% response | Minimum response | Maximum response | Error % | Throughput |
|---|---|---|---|---|---|---|
| 18,216 | 4,757 ms | 5,009 ms | 2,697 ms | 267,888 ms | 0 | 5/sec |
External API Calls
Tara makes outbound calls to third-party services. To enable data enrichment and integration, the following URLs must be accessible:
Google API:
https://maps.googleapis.com/maps/api/geocode/jsonAddress Verification Service:
DEV:
https://address-verification-759422304856.us-central1.run.app/compare-addresses-extendedUAT:
https://address-verification-ppd-1041123399231.us-east1.run.app/compare-addresses-extendedPROD:
https://address-verification-1041123399231.us-east1.run.app/compare-addresses-extended
Orbis connector. Outbound API calls are customer-specific. The API endpoint and credentials must be provided by the client.
Global Legal Entity Identifier Foundation (GLEIF) connector. Outbound calls are made to a publicly available API:
https://api.gleif.org/api/v1/.
Install
See the Install AI Agents guide.
Configure settings
You can configure or update the AI Agent configuration in one of the following ways:
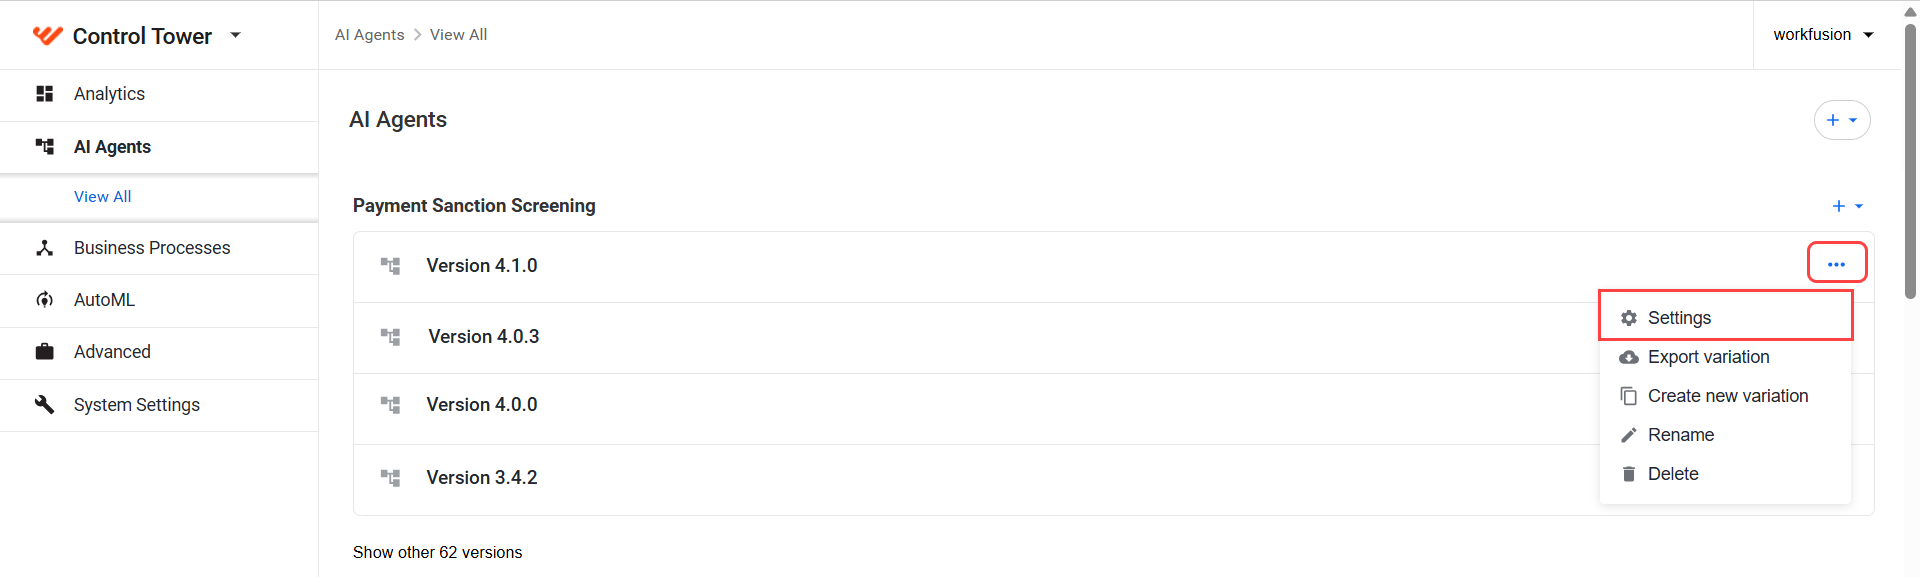
Go to AI Agents > Payment Sanction Screening > Version 4.1.0, click the Actions menu, and select Settings.
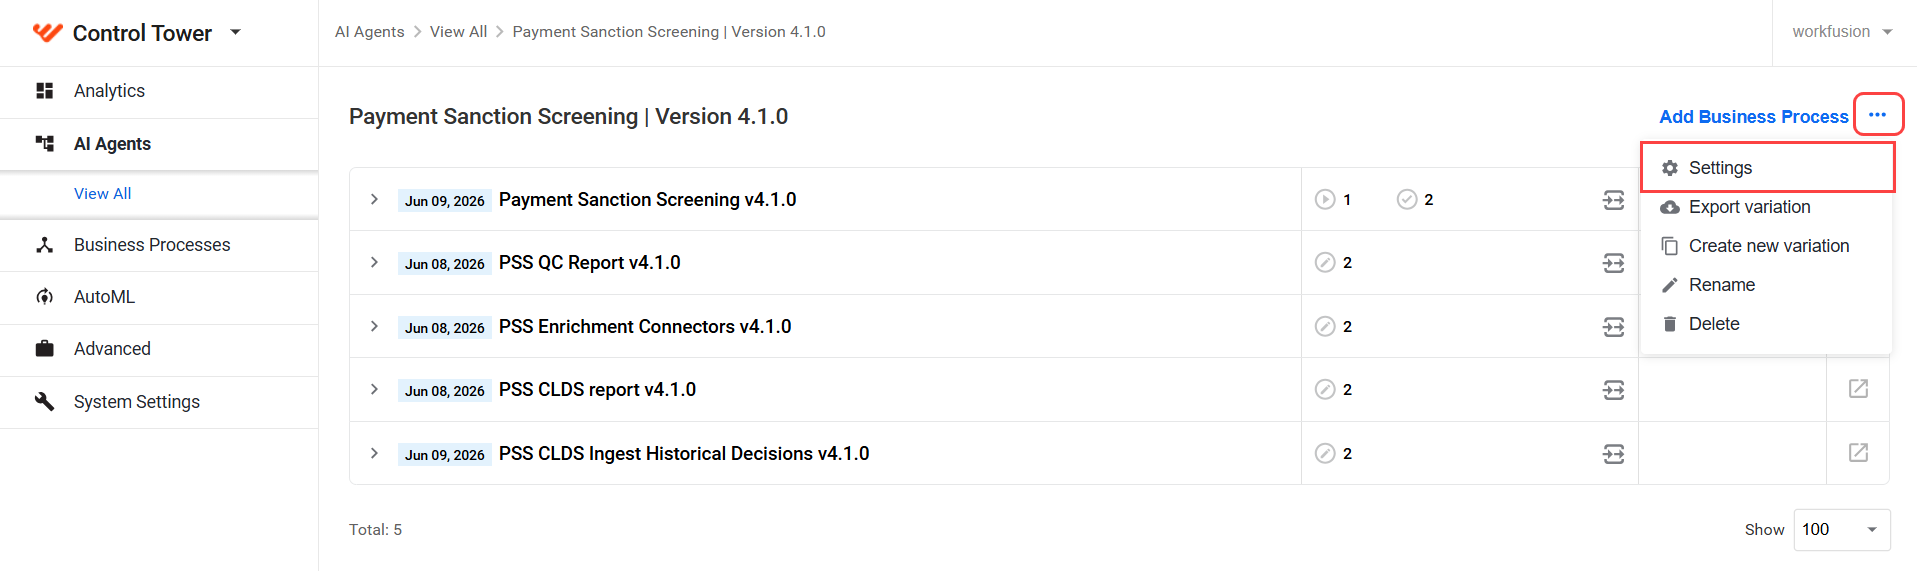
Go to AI Agents > Payment Sanction Screening and select Version 4.1.0. Next to Add Business Process, click the Actions menu and select Settings.
Configure the following settings:
Use the Next or Back buttons to navigate between configuration screens. Click Finish to save the changes.
Input
In the Input section, specify the way to supply data to your BP.
Choose one of the following options:
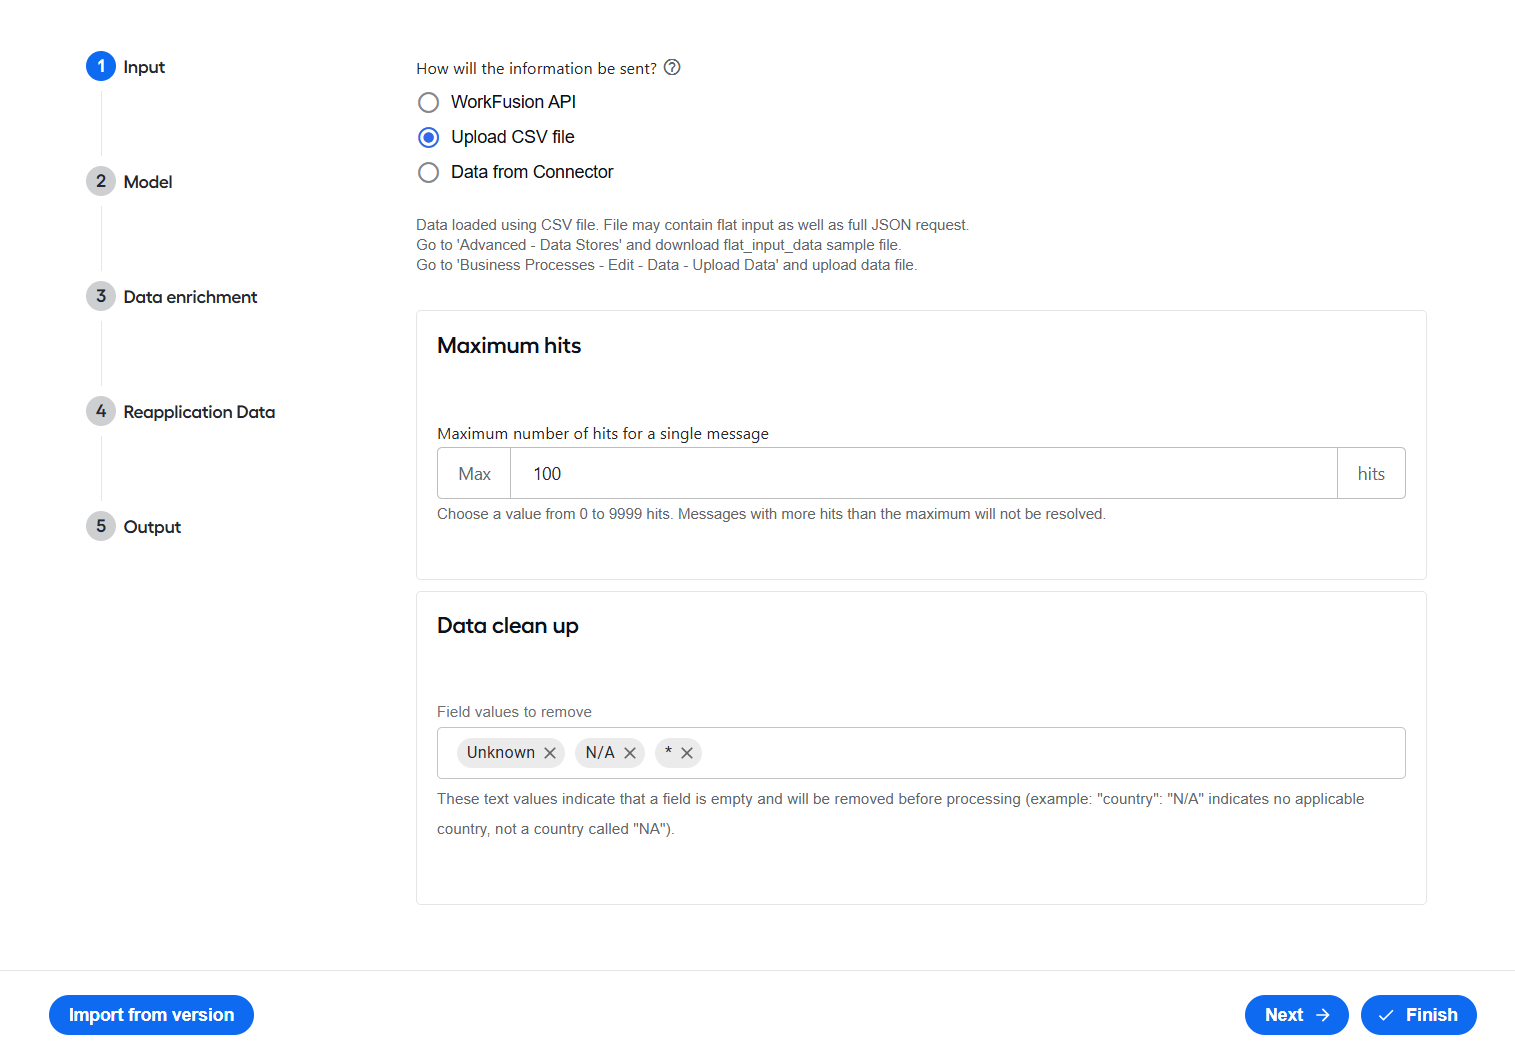
In the Maximum hits field, define the maximum number of hits per alert. Alerts exceeding this threshold will not be resolved.
In Data clean up > Field values to remove, specify the values to remove from the input data before processing. During processing, any matched value is replaced with empty text, for example,
"country": "N/A"becomes"country": "".A multi-character configured value is matched against the entire field value in a case-insensitive manner. For example,
"Unknown"matches input"UNKNOWN"and"unknown"but not"Widgets Unknown LLC".A single-character configured value matches any sequence of that character, including spaces between occurrences. For example,
"*"matches"********"and"* * *"but not"*USA*".
Model
In the Model section, configure the model settings:
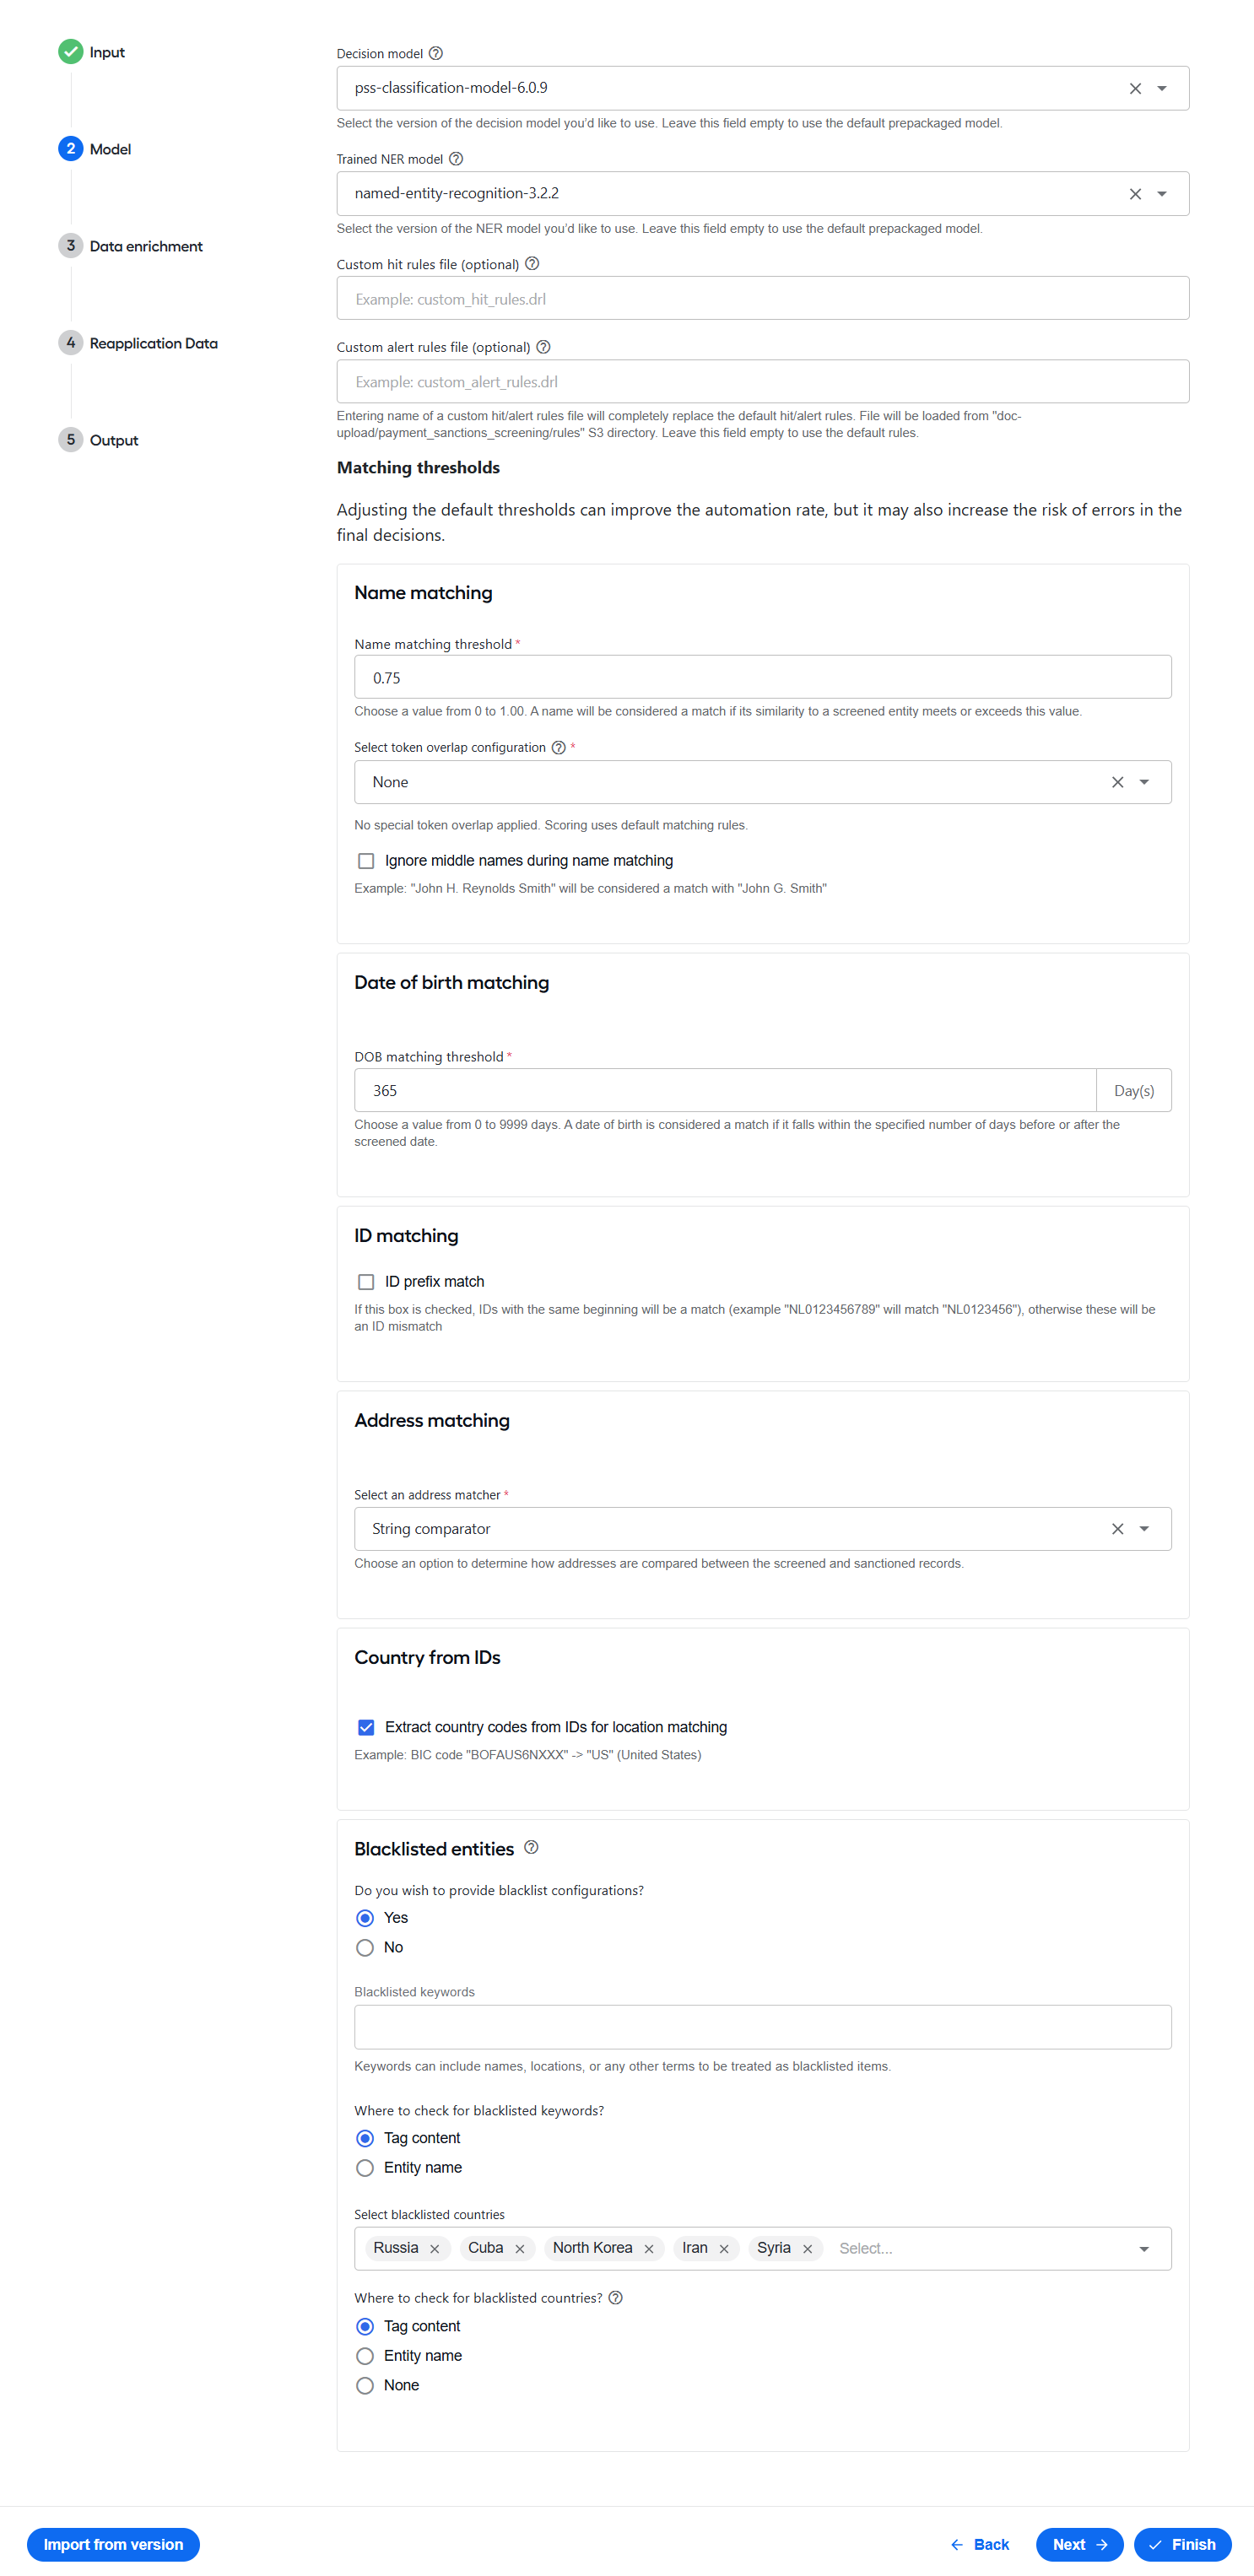
In the Decision model drop-down list, select a compatible model. If none is selected, the default (latest) one is used.
In the Trained NER model drop-down list, select a Named Entity Recognition (NER) model. If none is selected, the default (latest) one is used.
In the Custom hit rules file (optional) field, provide a unique name of the custom hit-level rule file to load from the configured S3 directory.
When the field is configured, the custom rule file completely replaces the default hit-level rules. Leave this field empty to use the default hit-level rules.
Ensure that all hit-level rules in the custom file use the following agenda group:
agenda-group "hit"In the Custom alert rules file (optional) field, provide a unique name of the custom alert-level rule file to load from the configured S3 directory. When the field is configured, the custom rule file completely replaces the default alert-level rules. Leave this field empty to use the default alert-level rules.
Ensure that all alert-level rules in the custom file use the following agenda group:
agenda-group "alert"In the Name matching threshold field, enter a value between
0and1.00. Consider names a match if they are similar to a screened entity at least to the defined extent.Scores closer to
0indicate less similarity, while scores closer to1.00indicate more similarity. Below the threshold, names are considered different, resulting in a mismatch. Above the threshold, names are considered similar and referred to as a match.The default value is
0.75. For example, a name with a predicted match score of0.75or higher is considered matching or partially matching.noteIncreasing the threshold value might reduce name matches, potentially increasing the automation and error rates.
In the Select token overlap configuration drop-down list, select one of the following options:
None (default) does not apply specific token overlap criteria, resulting in the final name score determined by other matching methods or defaults.
Rare boosts the name score for rare or unique token overlaps, favoring matches where unique identifiers are critical. For example,
"SBERBANK ZRT"versus"CORPORATE UNIVERSITY OF SBER BANK"results in a name match if selected.Screened prioritizes matches where the screened name is contained within the watchlist entity (WLE) name. For example,
"Doors LLC"versus"Wood Doors Installation Services LLC"results in a match if selected.Rare and Screened applies rare token and screened token overlap checks from the previous configurations. For example, both examples above result in a name match if selected.
Select Ignore middle names during name matching to prevent middle names (individual names other than the first or last name) from contributing to a name mismatch. Selecting the option can reduce the error rate when names are similar but have different middle names; it can also lower the automation rate by causing more names to match.
In the DOB matching threshold field, enter a value between 0 and 9999. Dates within this range are considered matching.
The default value is
365. Thus, if Tara identifies birth dates that are within 365 days of each other, it considers them a match. When two birth dates are more than the specified number of days apart, they are considered a mismatch.In the ID matching section, select ID prefix match to match IDs with the same prefix. For example,
"NL0123456789"matches"NL0123456".In the Address matching section, select an option to compare addresses:
String Comparator (default) compares two addresses. If all tokens match, the addresses are considered a match. The method is executed first regardless of the chosen option. If two addresses are identical, there is no need to use additional services.
Google geocoder compares all available addresses from the screened and sanctioned data by sending them to the Google geocoder for validation. If an address exists, the geocoder returns a
placeIdvalue. If theplaceIdvalues match, the addresses are considered a match.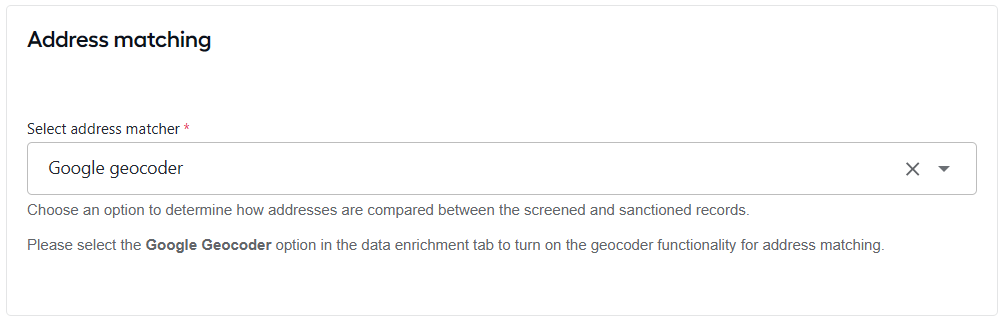
To enable the geocoder functionality for address matching, you must select the Google Web Services option on the Data enrichment tab. In case of failure or if no result is returned from the call, String comparator is used.
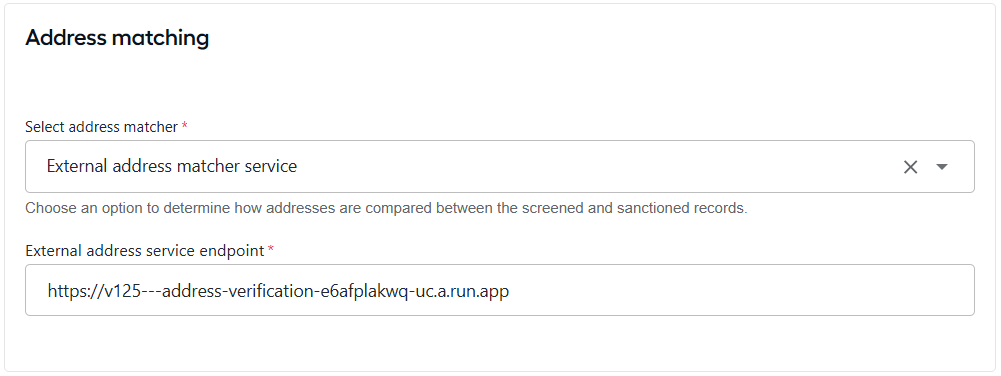
External address matcher service is an in-house product that uses the Nominatim API to compare addresses. The service is installed separately from Tara and must be running to accept calls. It returns a structured response, for example,
{"house_number_match": true,"road_match": true,"city_match": true,"state_match": false,"country_match": true,"postal_code_match": false}. If the house number, road, city, and country all match, the addresses are considered a match.In the External address service endpoint field, set the service endpoint. You can use the following endpoints for testing:
https://v125---address-verification-e6afplakwq-uc.a.run.apporhttps://address-verification-lk-1041123399231.us-east4.run.app. In case of failure or if no result is returned from the call, String comparator is used.
In the Country from IDs section, the Extract country codes from IDs for location matching option is selected by default for Tara to extract country codes from known ID types. For example, in
IT26S0306933090100000003191,ITis extracted for Italy. To disable the feature, deselect the option.In the Blacklisted entities section, configure specific blacklisted entities for Tara to automatically escalate hits if such entities are detected. Otherwise, select No for Do you wish to provide blacklist configurations?.
In the Blacklisted keywords field, enter keywords that should trigger a blacklist-based search.
Select where to search for blacklisted entities to trigger an escalation: Tag content or Entity name.
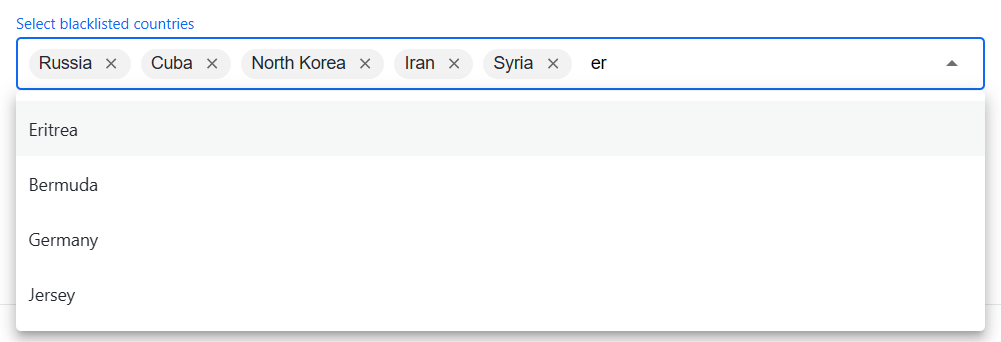
In the Select blacklisted countries field, the listed countries are considered restricted. By default, the following countries are included in the blacklist: Iran, Cuba, Syria, North Korea, and Russia.
You can manually add more blacklisted entities. Start typing a country name and select it from the pre-populated list. Mind that the fewer entries are blacklisted, the higher the automation rate is.
Select where to search for blacklisted country names:
None. Tara always checks the screened country field and NER-detected countries in the tag content.
Tag content. In addition to the default checks, Tara scans the entire tag content for explicitly mentioned blacklisted country names.
Entity name. Tara searches for blacklisted countries in the entity name field.
Tara automatically escalates if a blacklisted country from the provided list appears in a hit.
Data enrichment
In Data enrichment, you can set up external data sources, such as an address verifier or a connector, to retrieve additional data.
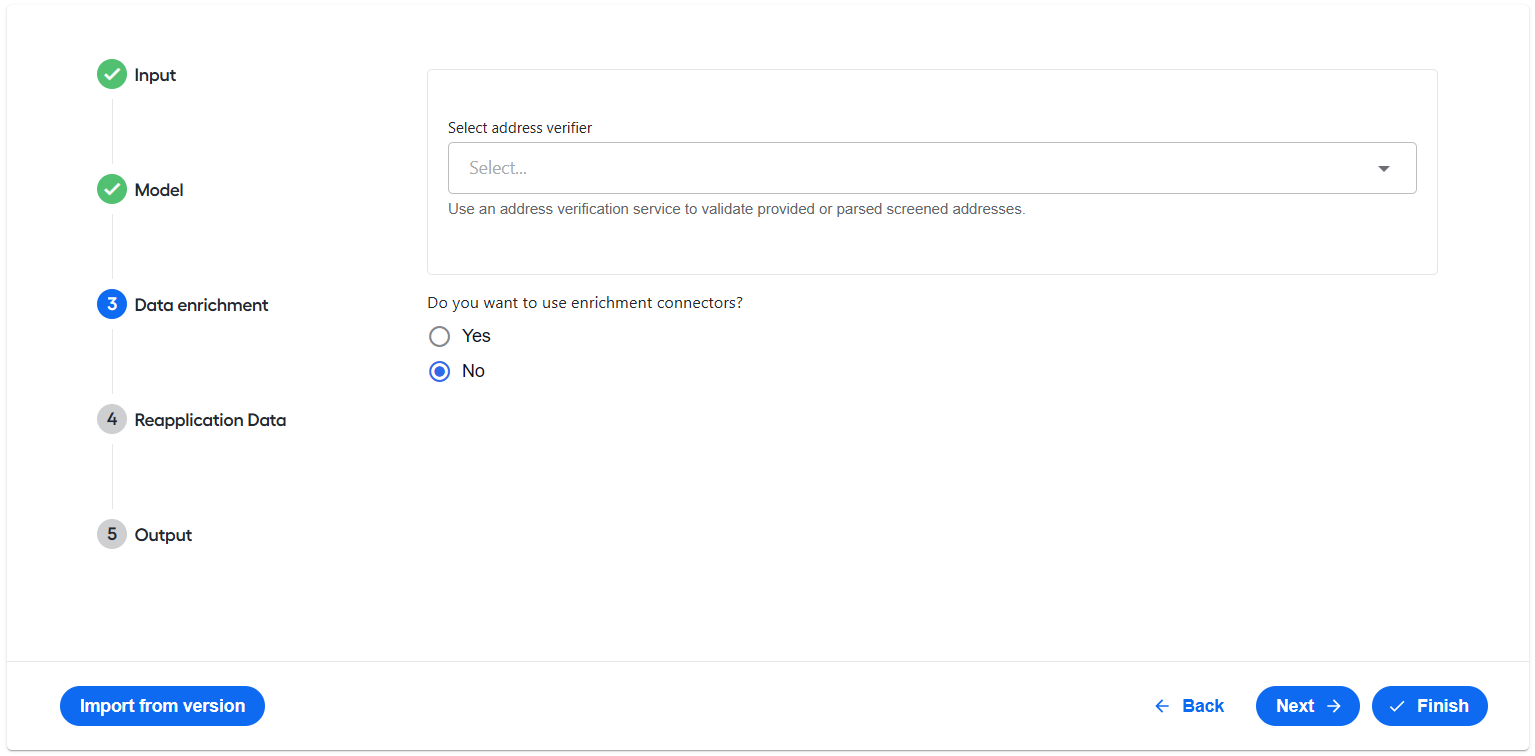
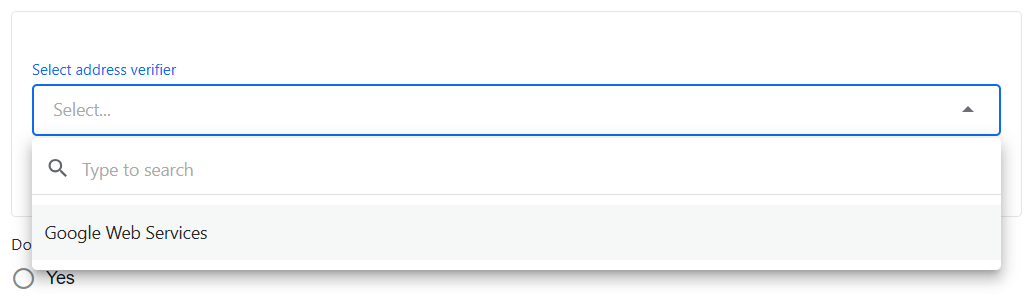
In the Select address verifier field, select Google Web Services.
- For Validate every address (even if Country is already known)?, select Yes to call the geocoder when an address is present. By default, Tara calls the geocoder if the country value is missing from the Country field.
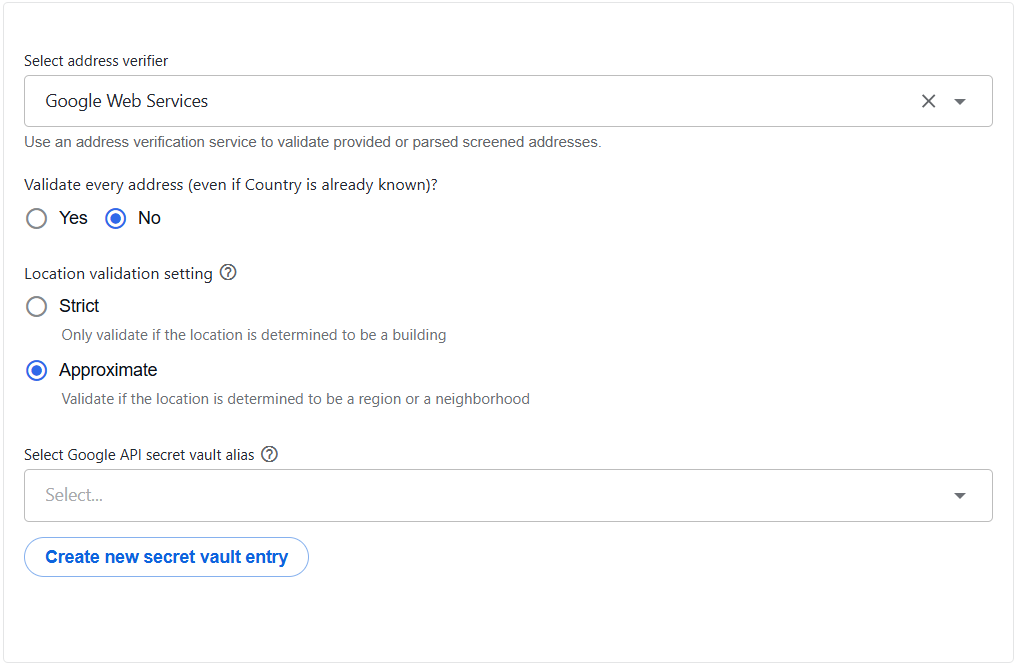
In Location validation setting, select the validation mode:
Strict to validate only addresses that correspond to a building or rooftop found in the Geocoder results.
Approximate to allow less precise validation, such as for an address related to a neighborhood or region.
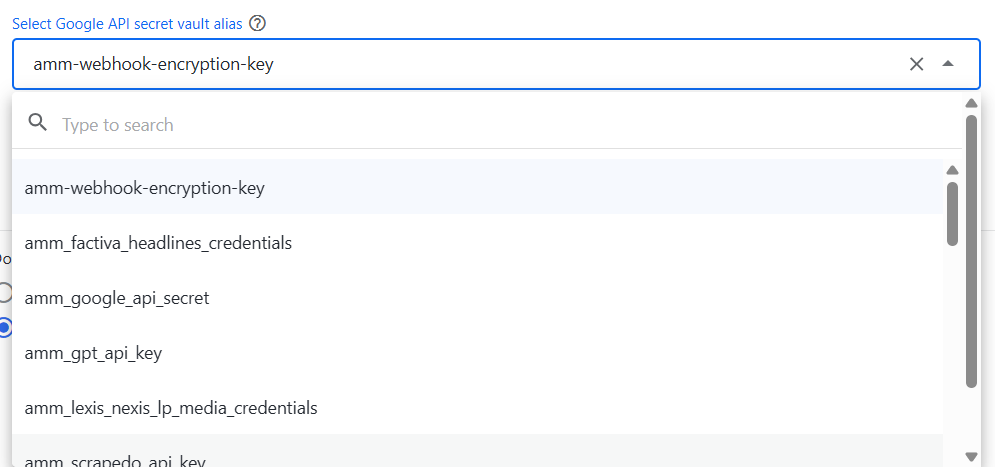
In the Select Google API secret vault alias field, select the alias that identifies your secure entry. For more details on getting a key for a Google Cloud account, see Using the Google Maps Platform and Perform location validation.
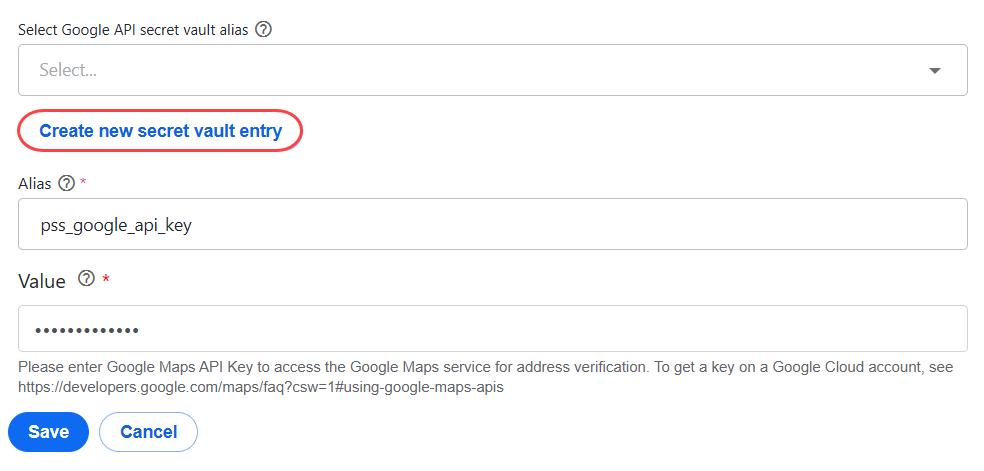
To add a new secure entry, click Create new secret vault entry, specify the alias and value, and then click Save.
For Do you want to use enrichment connectors?, select Yes to use a separate PSS Enrichment Connectors BP. This BP encapsulates all external services that Tara can leverage to look up data derived from security identifier codes. The data returned from these services contains organization details used in the adjudication process to improve decision quality.
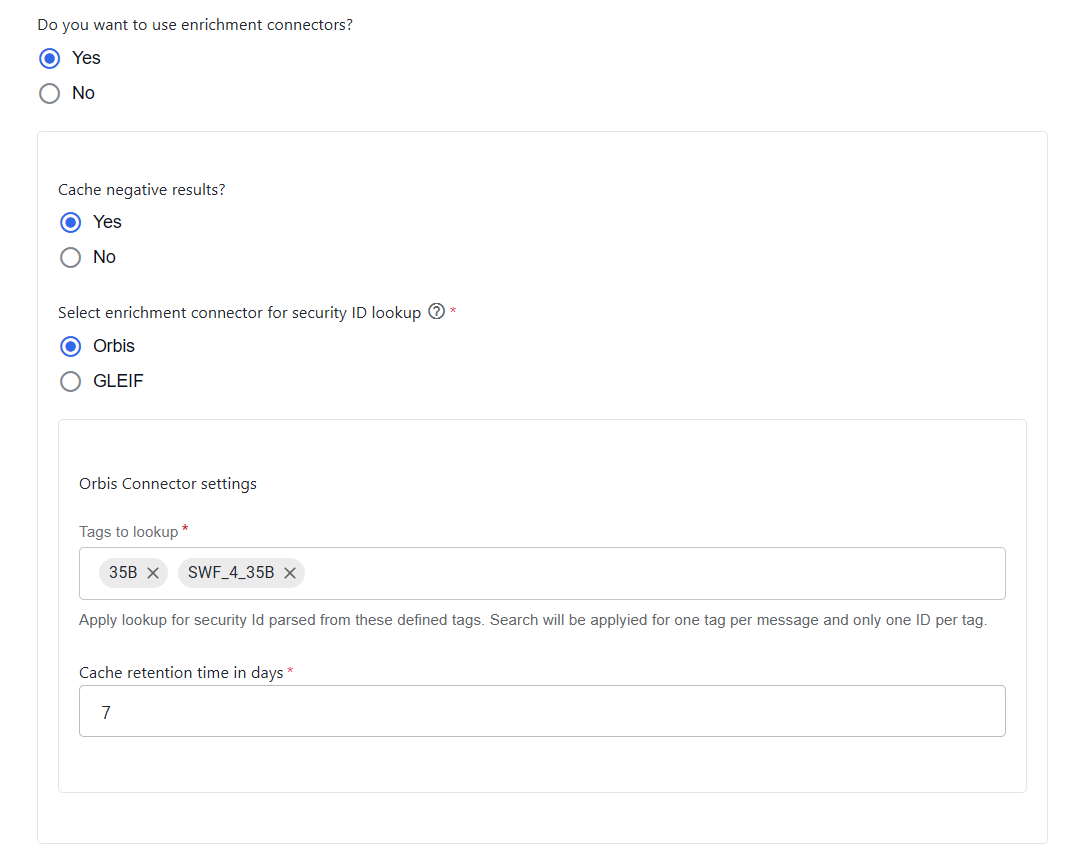
For Cache negative results?, select Yes to allow the BP to cache returned results in a Data Store. When this option is enabled, lookups that return no data are also recorded, preventing repeated calls and reducing unnecessary external API requests.
Select Orbis Connector to enable the Orbis connector within the PSS Enrichment Connectors BP. For configuration details, see Configure enrichment connectors.
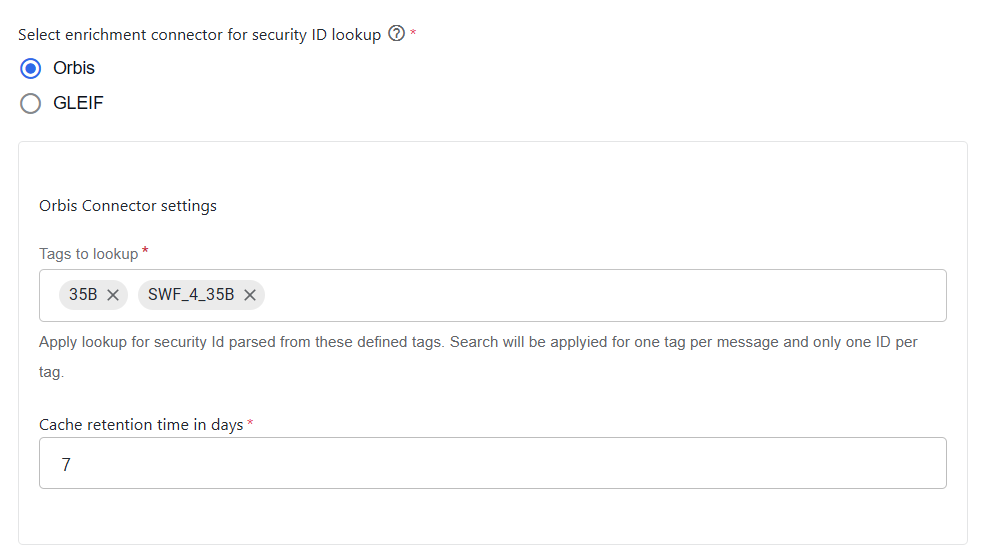
In the Tags to lookup field, specify the tags used to perform lookups for security IDs parsed from these tags. The search is applied to one tag per message and only one ID per tag. You can specify a list of tags from supported content formats (FUF, ISO 20022, or SWIFT) that can contain security ID codes (ISIN, CUSIP, SEDOL, or FIGI). By default, the
35BandSWF_4_35Btags are listed.In the Cache retention time in days field, specify how long cached data should be retained for each security before refreshing it. No data purging is needed; all data remains in the cache. Tara determines when to refresh each decision per record. Records contain timestamps of when they were last updated.
Select GLEIF to enable the GLEIF connector within the PSS Enrichment Connectors BP. The service provides company lookup information based on ISIN, BIC, or LEI identifier codes that can be present in a message request.
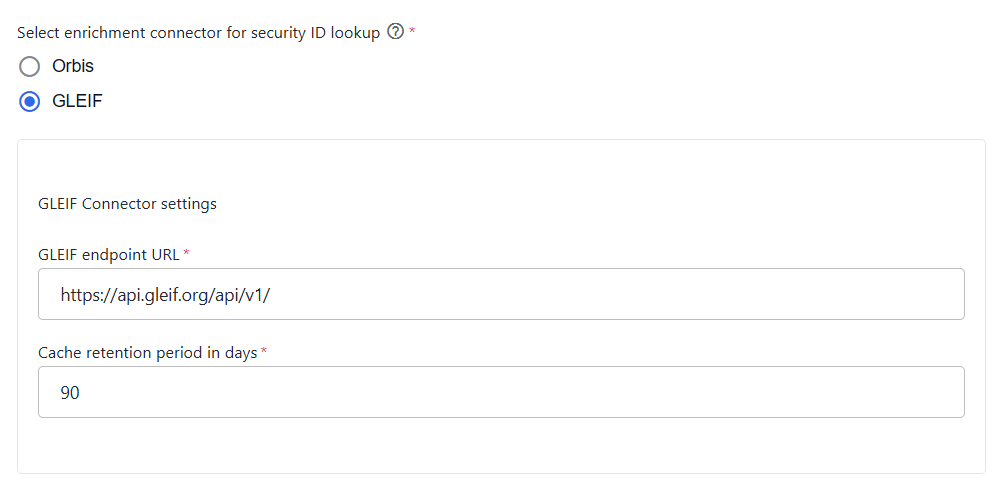
In the GLEIF endpoint URL field, enter the URL used by the GLEIF connector to call the external API service.
In the Cache retention period in days field, specify how long cached data should be retained for each security before refreshing it. No data purging is needed; all data remains in the cache. Tara determines when to refresh each decision per record. Records contain timestamps of when they were last updated.
Reapplication data
In Reapplication Data > Enable decision reapplication (CLDS) processing?, select yes to enable the decision reapplication flow. By default, the feature is disabled.
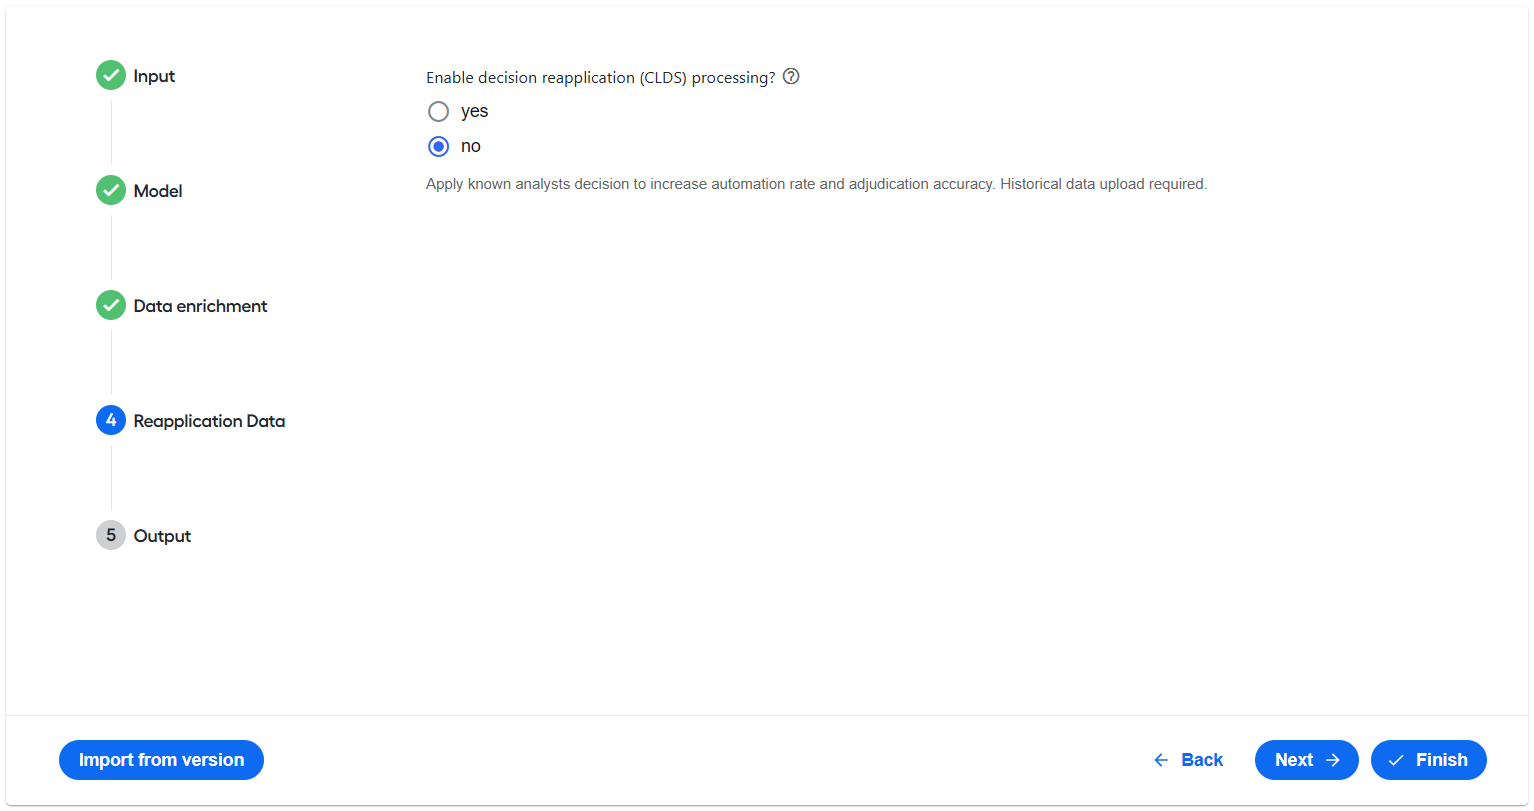
When enabled, configure the following settings:
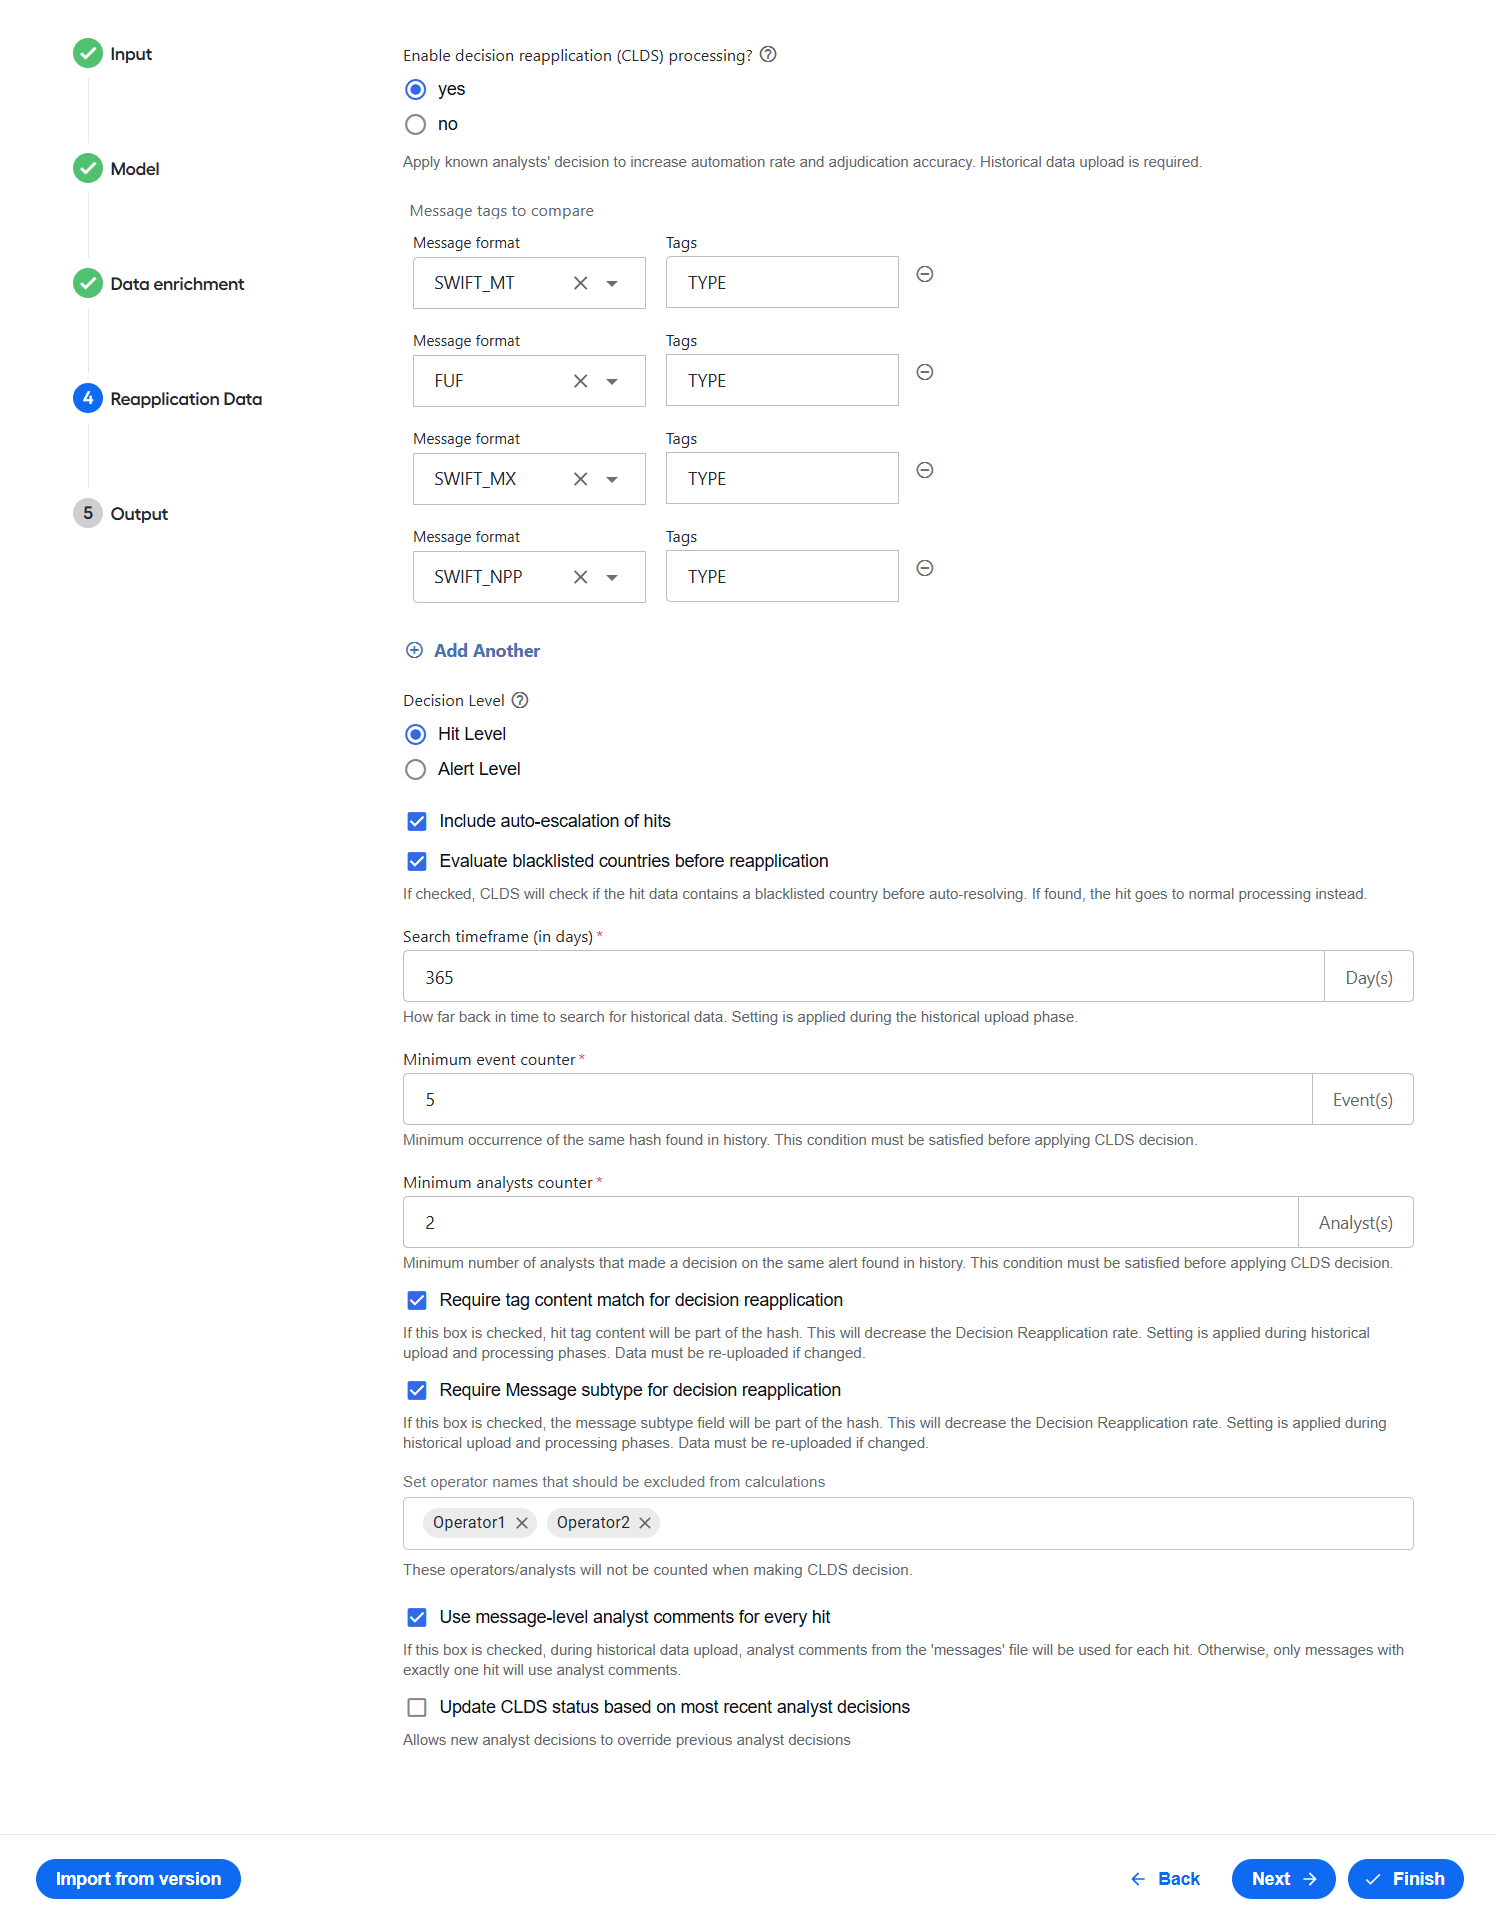
Add message tags.
In the Message format drop-down list, specify the message type to target for decision reapplication. Supported formats include
FUF,SWIFT_MT,ISO20022(SWIFT_MX), andSWIFT_NPP.In the Tags field (optional), enter tag names from an alert as comma-separated values. The tags are compared against historical data along with hashed hit content. Available tags correspond to message tags that are present in the original message content. Some additional tags can be used for most formats, such as
TYPE,SUBTYPE,SENDER, orRECEIVER. UsingTYPEis recommended.
To add additional message types, click Add another.
If message types are added, they are used in decision reapplication. If the configuration changes, you must reload historical alerts for the changes to take effect.
Select the Decision Level option. Specify the level at which the decision reapplication will be applied:
- Hit Level resolves individual hits that match historical decisions.
- Alert Level resolves the entire message if all hits match historical decisions.
Select Include auto-escalation of hits to use decision reapplication to automatically escalate hits on historically escalated or disabled hits. For more details, refer to Apply continuous learning.
In the Search timeframe (in days) field, specify the maximum number of past days to search for historical data. Older decisions will not be considered for reapplication. If the field is left blank, the default value of 365 days is applied. The field is only used during historical uploads.
In the Minimum event counter field, specify the minimum occurence of the same hash found in historical data. The condition must be satisfied before applying a CLDS decision.
In the Minimum analysts counter field, define the minimum number of analysts who made decisions on the same alert found in historical data. The condition must also be met before applying a CLDS decision.
Select Require tag content match for decision reapplication to enforce strict tag content suitable for decision reapplication. Enabling this option reduces reapplication rates.
Select Require Message sub-type for decision reapplication to treat tag content as part of the hash for successful decision reapplication. Enabling this option also reduces reapplication rates. If the configuration changes, you must reload historical alerts for the changes to take effect.
Set historical decision types to be treated as resolved by an analyst. Specify decision codes from historical files to mark alerts as
RESOLVE(released) during historical data uploads. If the value is modified, reload historical alerts for the changes to apply.Set analyst or operator names to be excluded from continuous learning decision calculations. The specified names are excluded from the analyst count when determining whether a hit is suitable for reapplication. If the values change, you do not need to reload historical data. The setting does not affect hashes that are already enabled.
Select the Use message-level analyst comments for every hit option to apply analyst comments from the
messages.csvfile to all hits, not just records with a single hit. If analyst comments are not recorded, the default narrative is used.Select Update CLDS status based on most recent analyst decisions to allow the most recent analyst decisions to override previous analyst decisions when CLDS determines the hit status. When this option is selected, configure the following fields:
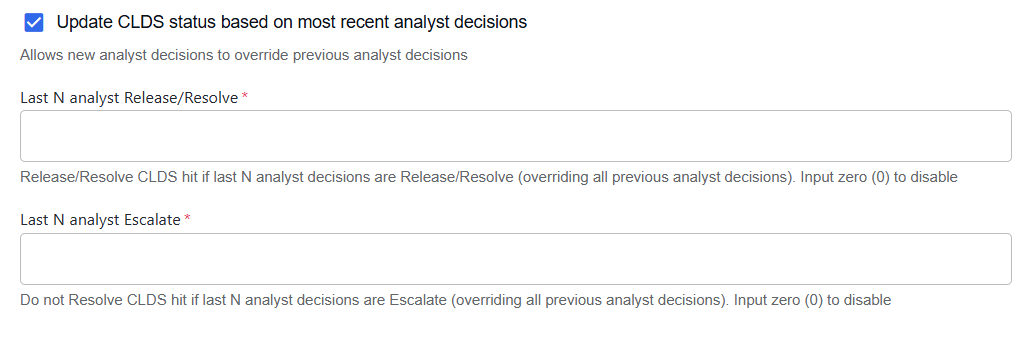
In the Last N analyst Release/Resolve field, specify the number of most recent consecutive analyst Release or Resolve decisions required for CLDS to release or resolve the hit. If the same hit was released or resolved by analysts the specified number of times in a row, CLDS can release or resolve the hit even if previous analyst decisions would otherwise prevent it. To disable the option, enter
0.In the Last N analyst Escalate field, specify the number of most recent consecutive analyst Escalate decisions required to prevent CLDS from releasing or resolving the hit. If the same hit was escalated by analysts the specified number of times in a row, CLDS does not release or resolve the hit, even if previous analyst decisions would otherwise allow it. To disable the option, enter
0.
For more details on the feature, see Business Process overview | Ingest Historical Decisions for Reapplication Business Process and Apply continuous learning.
Output
In the Output section, enable generating HTML, quality control (QC), or CLDS reports after a BP run.
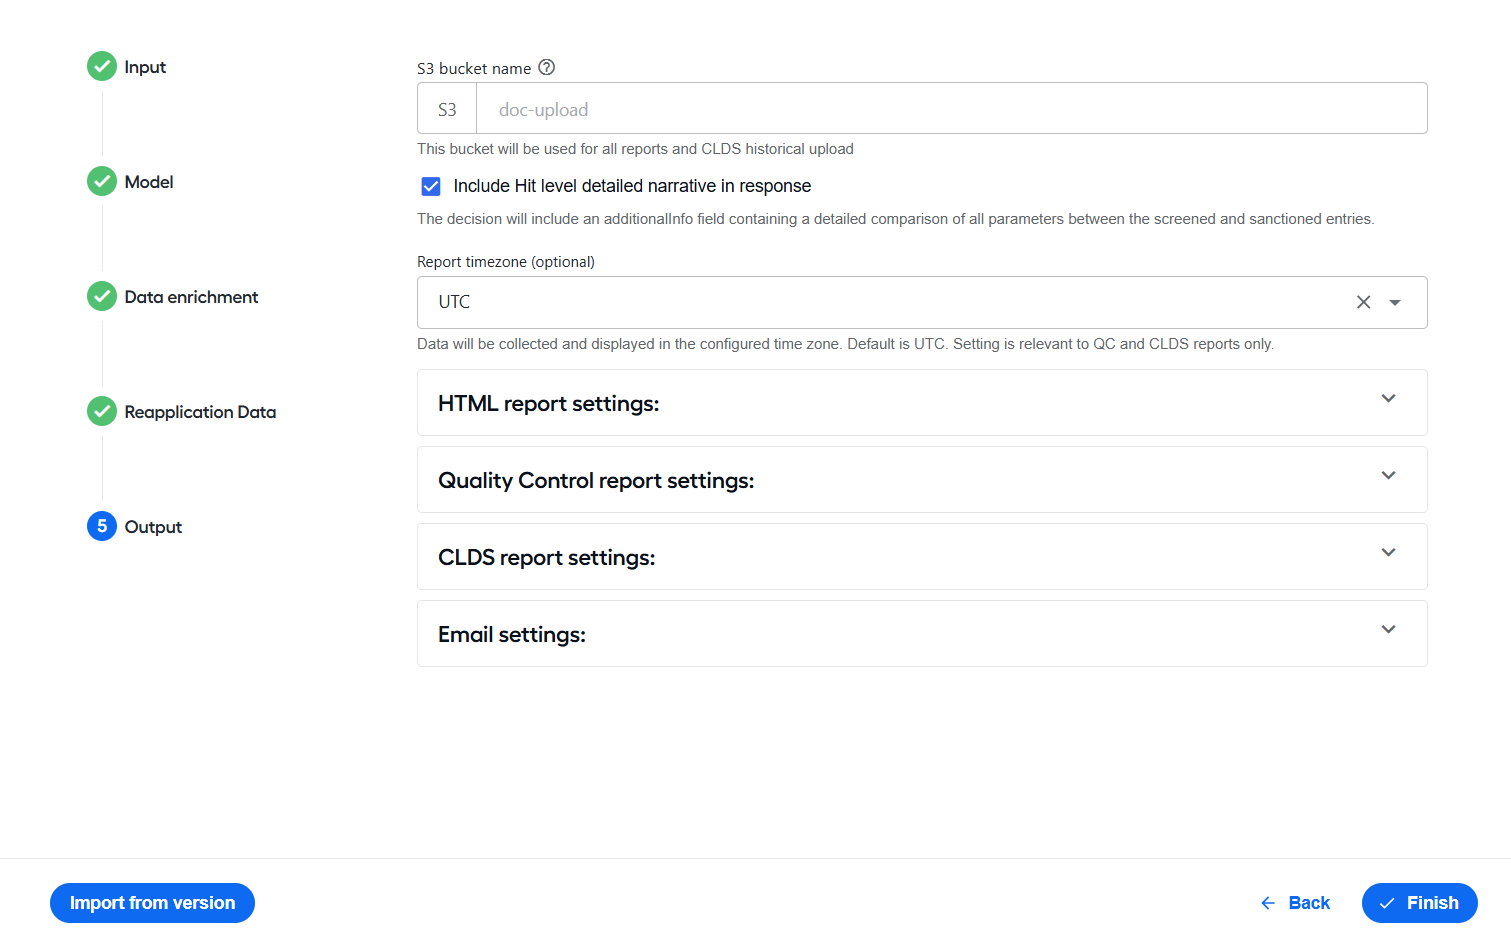
In the S3 bucket name field, specify a custom S3 bucket to securely store reports and historical data. The option also restricts access to the specified bucket.
Select Include detailed narrative in response to generate and add a comprehensive explanation in the response. The HTML report contains this detailed narrative by default.
A sample response with the
additionalInfofield{
"decision": {
"messageId": "1",
"suggestedAction": "RESOLVE",
"comment": "RESOLVE: all hits resolved by [name_country_mismatch_strong]; ",
"hitDecisions": [
{
"reasons": [
{
"score": 0.5593499999999999,
"code": "name_country_mismatch_strong",
"description": "Name and country mismatch. Strong. Screened name (INVESTMENT HOLDINGS INC) does not match sanctioned name (CONSOLIDATED INVESTMENTS LLC) and aliases. Screened location (US) does not match sanctioned location (RU)"
}
],
"hitId": "1",
"additionalInfo": "TYPE MATCH:true; Input type = 'ORGANIZATION' with confidence score = 1.000000; Sanctioned type = 'ORGANIZATION'.\nNAME MATCH:false; Screened input = 'INVESTMENT HOLDINGS INC' Sanctioned input = 'CONSOLIDATED INVESTMENTS LLC' Matching score = 0.559350.\nCOUNTRY MATCH: false; Screened input = '555 EAST STREET, NEW YORK 10500 USA'; Sanctioned input = 'MOSCOW RU'\nID MATCH:null; Screened input = '0000123456' Sanctioned input = ''.\n",
"suggestedAction": "RESOLVE",
"comment": "Name and country mismatch. Strong. Screened name (INVESTMENT HOLDINGS INC) does not match sanctioned name (CONSOLIDATED INVESTMENTS LLC) and aliases. Screened location (US) does not match sanctioned location (RU)"
}
]
},
"requestId": "e7c7b331-853e-4e15-b5f3-de618766d668",
"statusDetails": "",
"status": "COMPLETED"
}In Report timezone (optional), select the timezone for reports. The default timezone is UTC. If a different timezone is selected, the input range is calculated in that timezone. For example, Last 2 days in US/Eastern selects records from midnight to midnight in New York City, and timestamps in the output CSV file are displayed in the same timezone, regardless of where the server is located. The setting applies only to QC and CLDS reports.
HTML reports
For Do you want to generate HTML report?, select Yes to enable generating HTML reports.
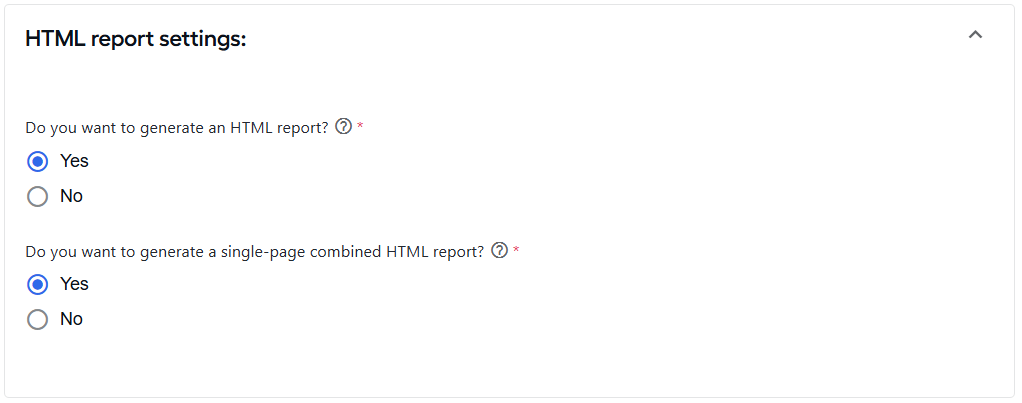
For Do you want to generate a single page combined HTML report?, select Yes to generate a single report file for all sanctioned hits. Otherwise, select No to generate separate files for each sanctions hit.
For details on HTML reports, see Run screening | HTML reports.
QC reports
A QC report provides a snapshot of all the data fields of messages and their corresponding hits in the CSV format. If enabled, you can run the PSS QC report BP manually or on schedule.
For Do you want Quality control report to be generated?, select Yes to enable generating QC reports.
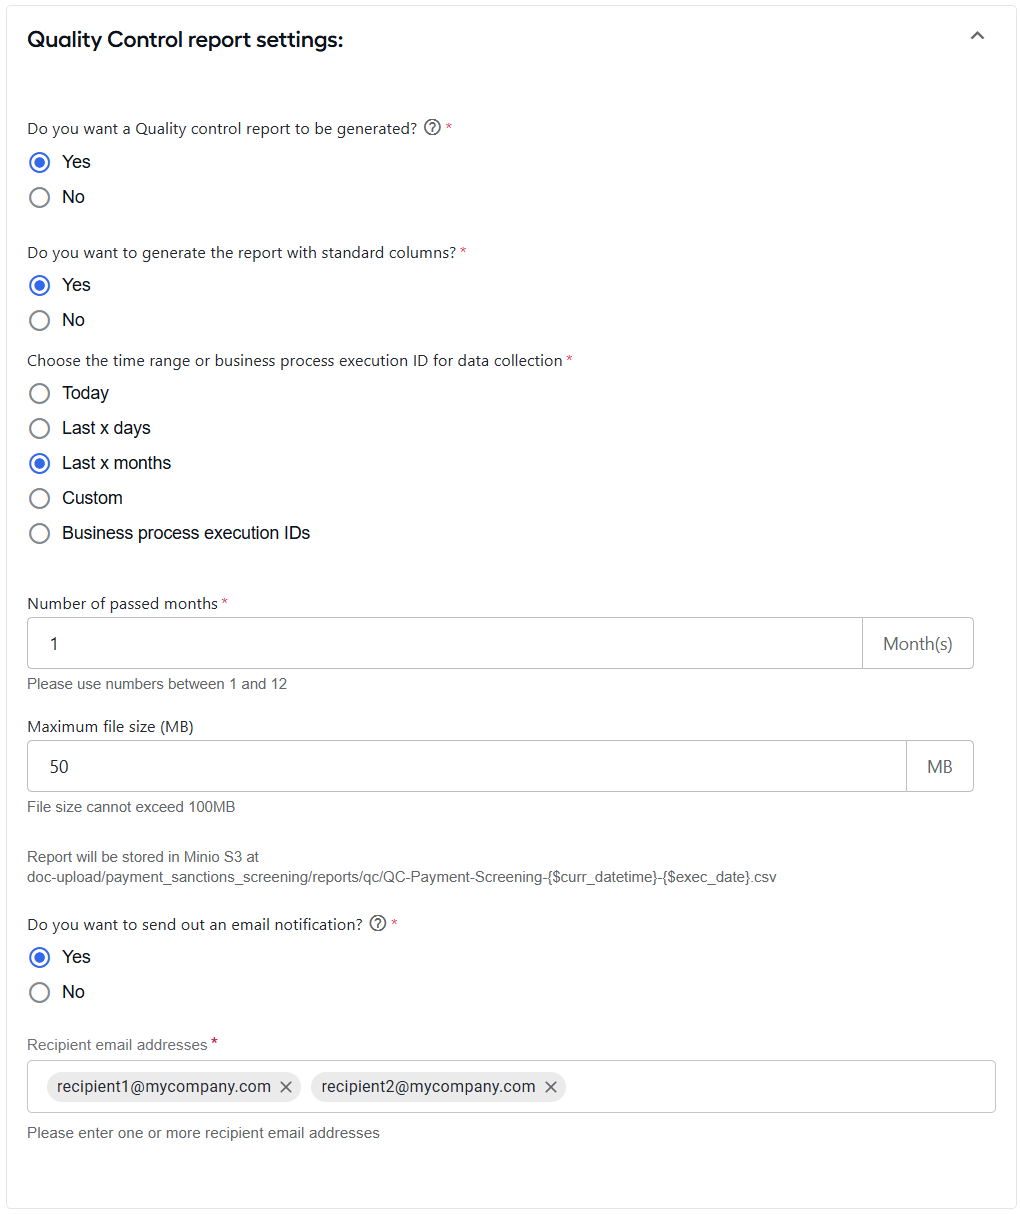
For Do you want to generate the report with standard columns?, select Yes to generate a report using standard columns provided in the file in S3, for example,
doc-upload/payment_sanctions_screening/reports/templates/qc_report_template.csv.If you select No, upload a custom
qc_report_template_custom.csvfile to the same S3 location as above. In the file, you can use a truncated version of the original template file, selecting the columns required for your reporting purposes.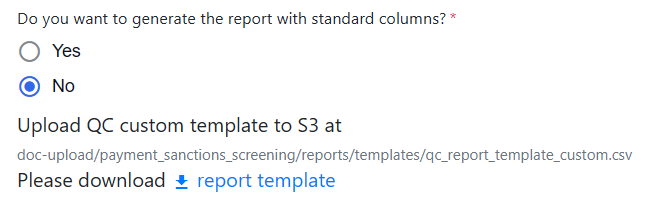
In Choose the time range or business process execution ID for data collection, select one of the following options:
Today. Collect data from 12 AM to the current time.
Last x days. Specify a range that includes the current date. In the Number of passed days field, enter a value between 1 and 31.
Last x months. Specify a range that includes the current date. In the Number of passed months field, enter a value between 1 and 12.
Custom. In the From and To calendar widgets, define a date range and a time range.
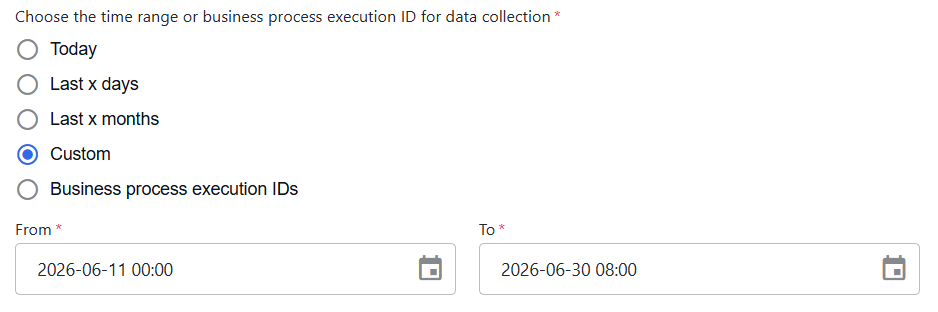
- Business process execution IDs. In the UUIDs field, enter one or more BP run UUIDS to limit results to specific executions.
In the Maximum file size (MB) field, set the maximum file size (up to 100 MB). If exceeded, multiple files are created.
For Do you want to send out an email notification?, select Yes to receive notifications when reports are ready to view or download. To finish setup, also see Email settings.
In the Recipient email addresses field, enter one or more recipient email addresses.
For details on QC reports, refer to Run screening | QC reports.
CLDS reports
For Do you want a CLDS report to be generated?, select Yes to enable generating CLDS reports.
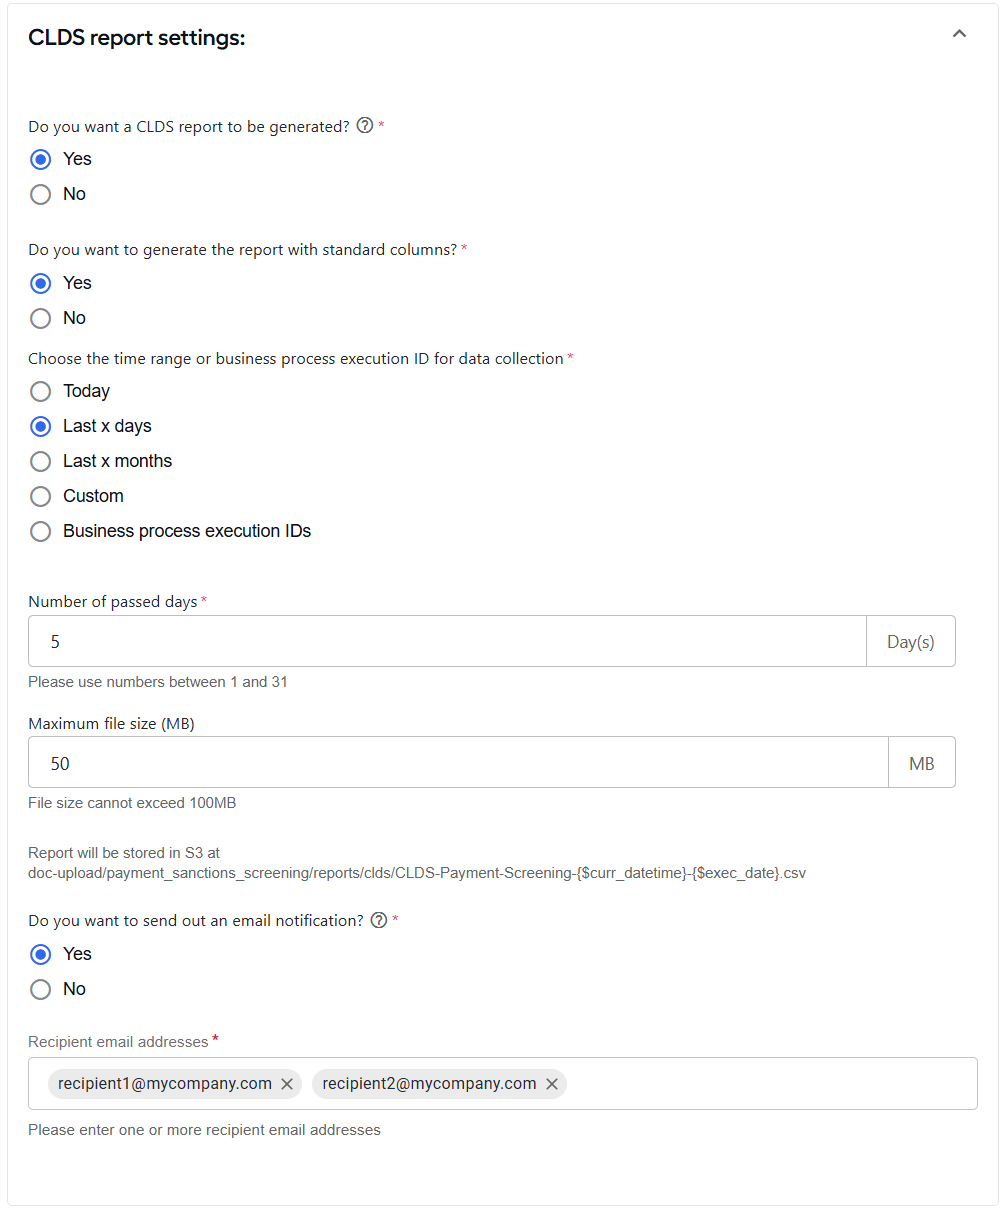
For Do you want to generate the report with standard columns?, select Yes to generate a report using standard columns provided in the file in S3, such as
doc-upload/payment_sanctions_screening/reports/templates/clds_report_template.csv.If you select No, upload a custom
clds_report_template_custom.csvfile to the same S3 location as above. In the file, you can use a truncated version of the original template file, selecting the columns required for your reporting purposes.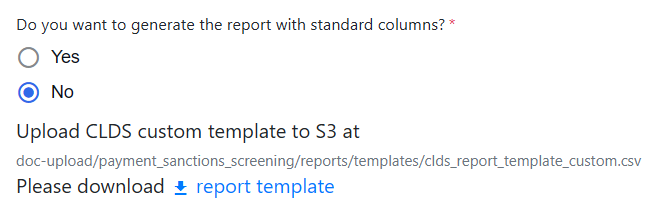
In Choose the time range or business process execution ID for data collection, select one of the following options:
Today. Collect data from 12 AM to the current time.
Last x days. Specify a range that includes the current date. In the Number of passed days field, enter a value between 1 and 31.
Last x months. Specify a range that includes the current date. In the Number of passed months field, enter a value between 1 and 12.
Custom. In the From and To calendar widgets, define a date range and a time range.
- Business process execution IDs. In the UUIDs field, enter one or more BP run UUIDS to limit results to specific executions.
In the Maximum file size (MB) field, set the maximum file size (up to 100 MB). If exceeded, multiple files are created.
For Do you want to send out an email notification?, select Yes to receive notifications when reports are ready to view or download. To finish setup, also see Email settings.
In the Recipient email addresses field, enter one or more recipient email addresses.
For details on CLDS reports, refer to Run screening | CLDS reports.
Email settings
To send email notifications when QC or CLDS reports are ready, verify that the configuration_payload.json file contains the email configuration section. Make sure that the properties are correct:
"email": {
    "smtp-port": "587",
    "smtp-protocol": "SMTP_TLS"
}
Then, complete the required configuration in Email settings:
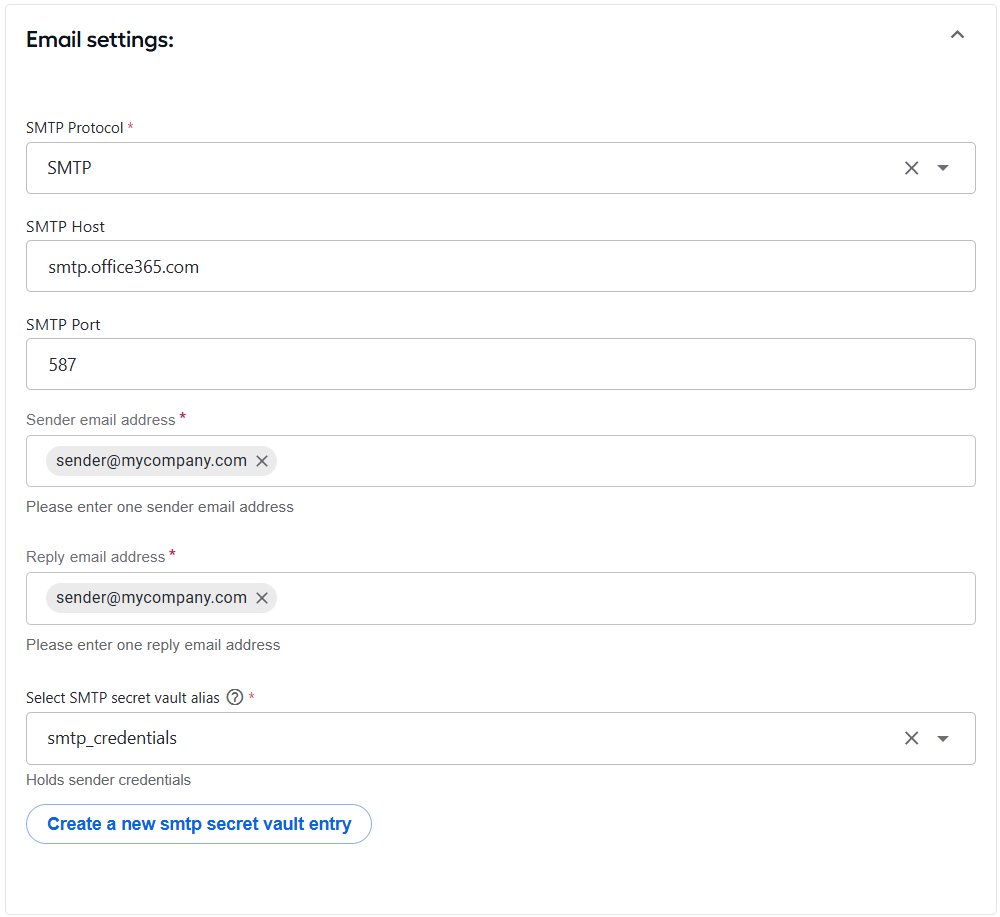
In SMTP Protocol, select the protocol.
In SMTP Host, specify the SMTP host.
In SMTP Port, specify the SMTP port.
In Sender email address, enter the sender email address.
In Reply email address, enter the reply email address.
In Select SMTP secret vault alias, select the secret entry that contains the email server authentication credentials. The BP retrieves the credentials based on the selected alias.
To create a secret entry directly from the Email settings configuration, click Create a new smtp secret vault entry.
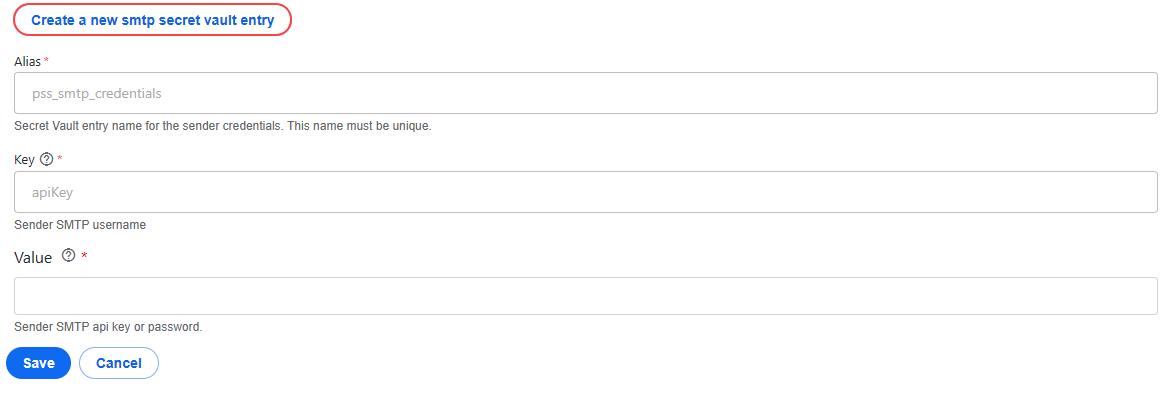
For Exchange servers, use an email address and password.
For SaaS email servers, such as SendGrid, use
apikeyor${api_key_value}.
Configure enrichment connectors
Tara provides the PSS Enrichment Connectors subprocess within the Payment Sanction Screening BP that provides external services to look up data derived from security identifier codes.
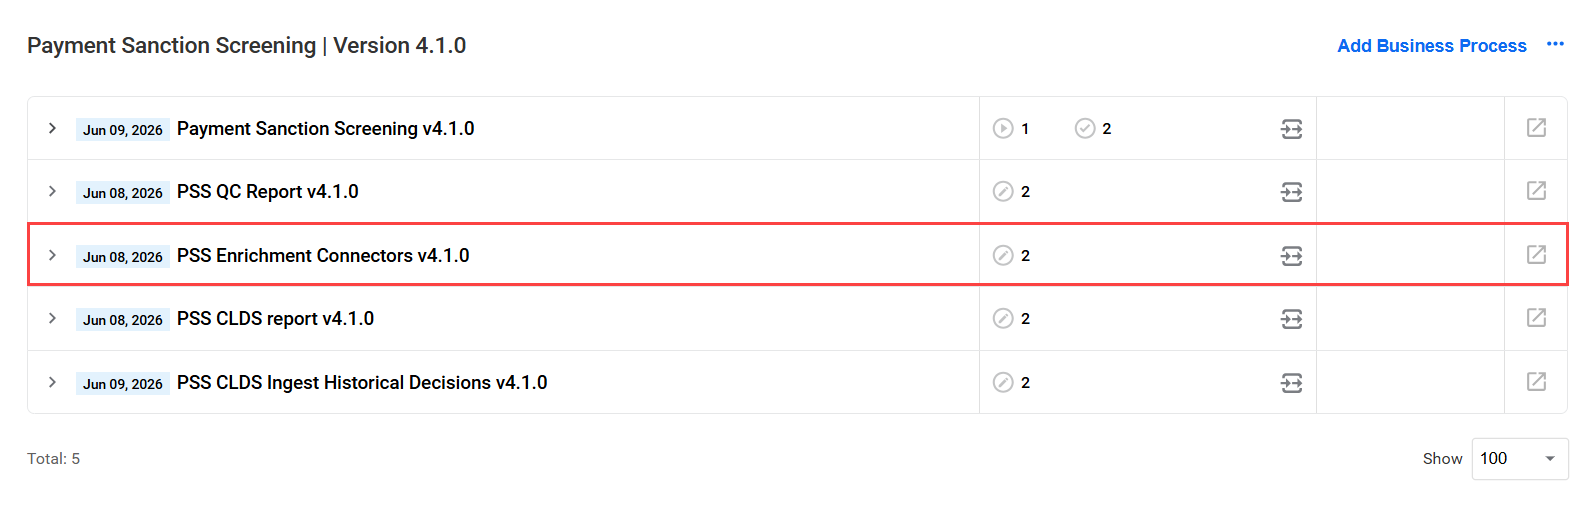
You must start the PSS Enrichment Connectors BP beforehand so that its underlying services are vailable while Tara is running. Make sure the BP is up and running properly.
The available connectors you can enable when configuring Tara are as follows:
- Orbis: a paid service not hosted by WorkFusion. It supports lookups using CUSIP, ISIN, SEDOL, and FIGI identifiers.
- GLEIF: a public service that supports LEI, ISIN, and BIC identifiers.
Configure Orbis
To use the Orbis connector, you must enable it when configuring the data enrichment settings. The connector performs the following steps:
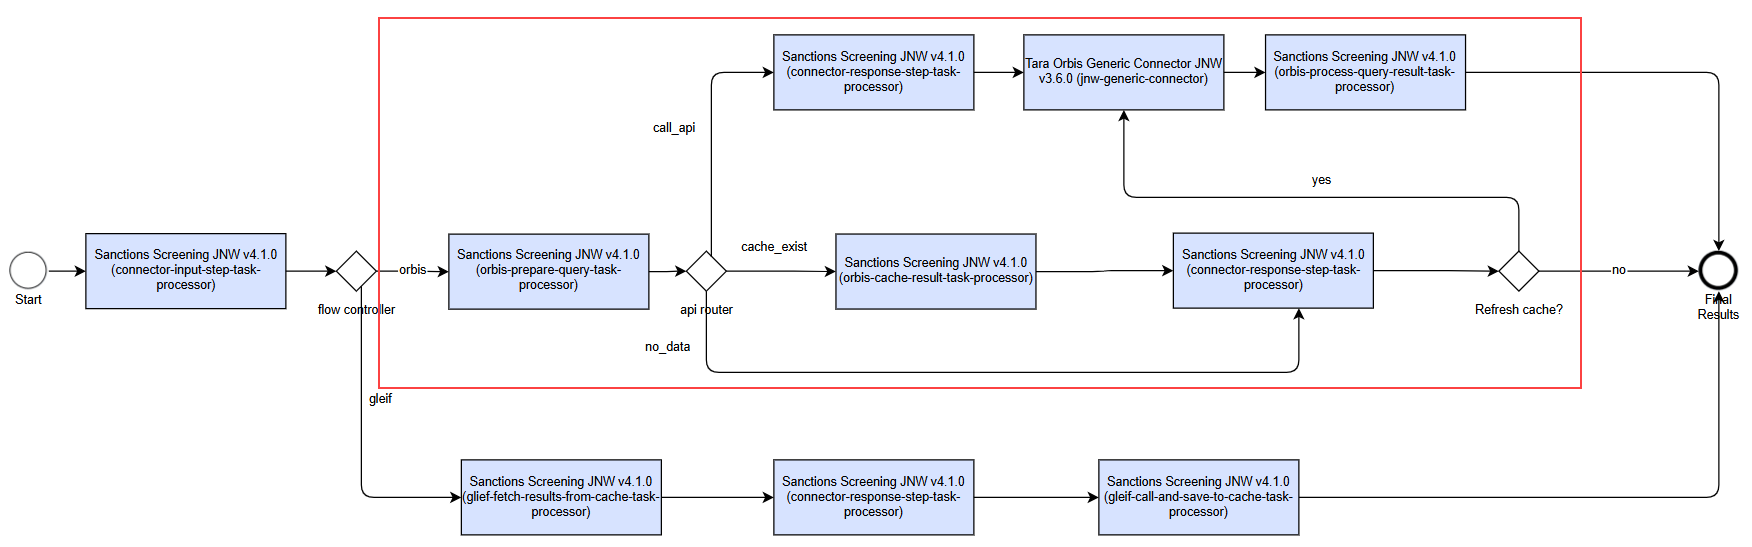
The Orbis logical flow execution is as follows:
Scenario 1
- Start.
- Attempt to fetch cached security data.
- Cache data is not found.
- Return a response.
- Fetch new data and store it in the cache.
- Stop.
Scenario 2
- Start.
- Attempt to fetch cached security data.
- Cached data is found.
- Enrich the message object.
- Return a response.
- No data refresh is performed.
- Stop.
Scenario 3
- Start.
- Attempt to fetch cached security data.
- Cached data is found.
- Enrich the message object.
- Return a response.
- Data requires a refresh.
- Fetch a fresh copy of the data and update the cache.
- Stop.
To configure the Orbis connector, complete the following steps:
Enable the Orbis connector when configuring the data enrichment settings.
If not already installed in Control Tower, install
package-generic-connector-2.8.0.zip.Go to the PSS Enrichment Connectors BP > Workflow, double-click Tara Orbis Generic Connector step, and ensure that the configuration appears as shown below.
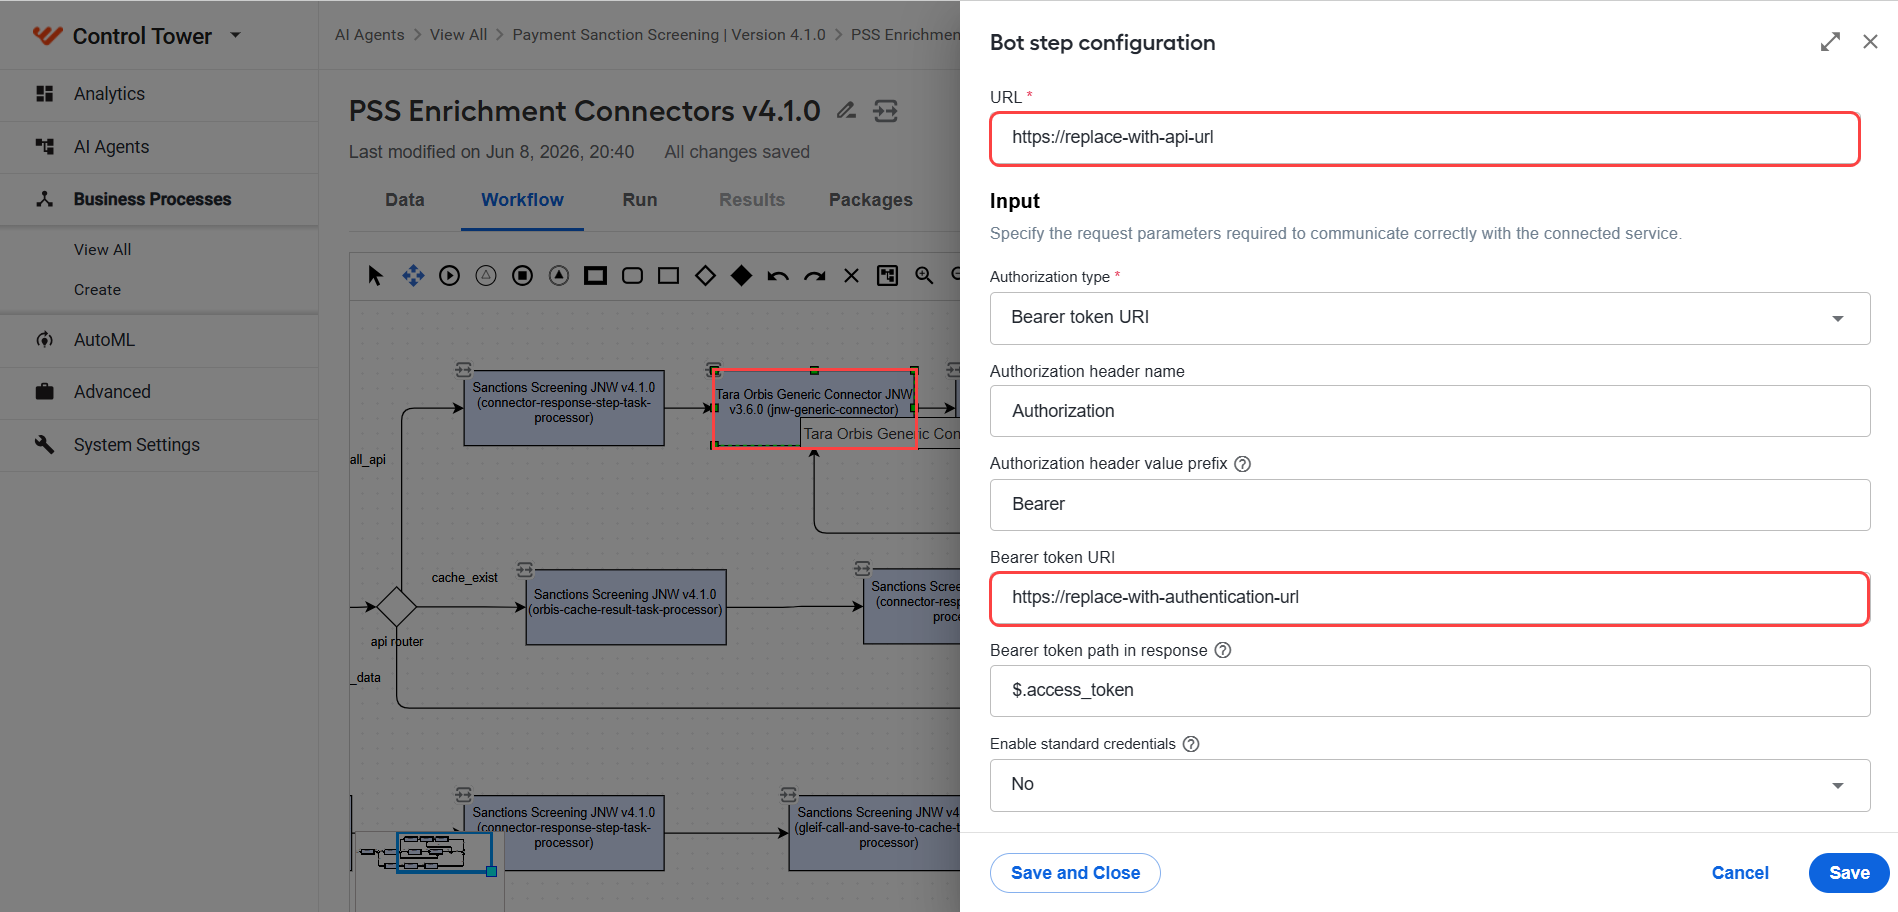
In the URL field, enter the proper external service URL, for example,
https://.../aml-monitoring-platform/v1/entity-reference.In the Bearer token URI field, enter the authentication URL for the client, for example,
https://.../oauth/accesstoken.
infoWorkFusion does not host the Orbis service. You must provide API and credentials.
Select the Input / Output tab. Make sure that the highlighted fields are modified as shown below and then click Save.
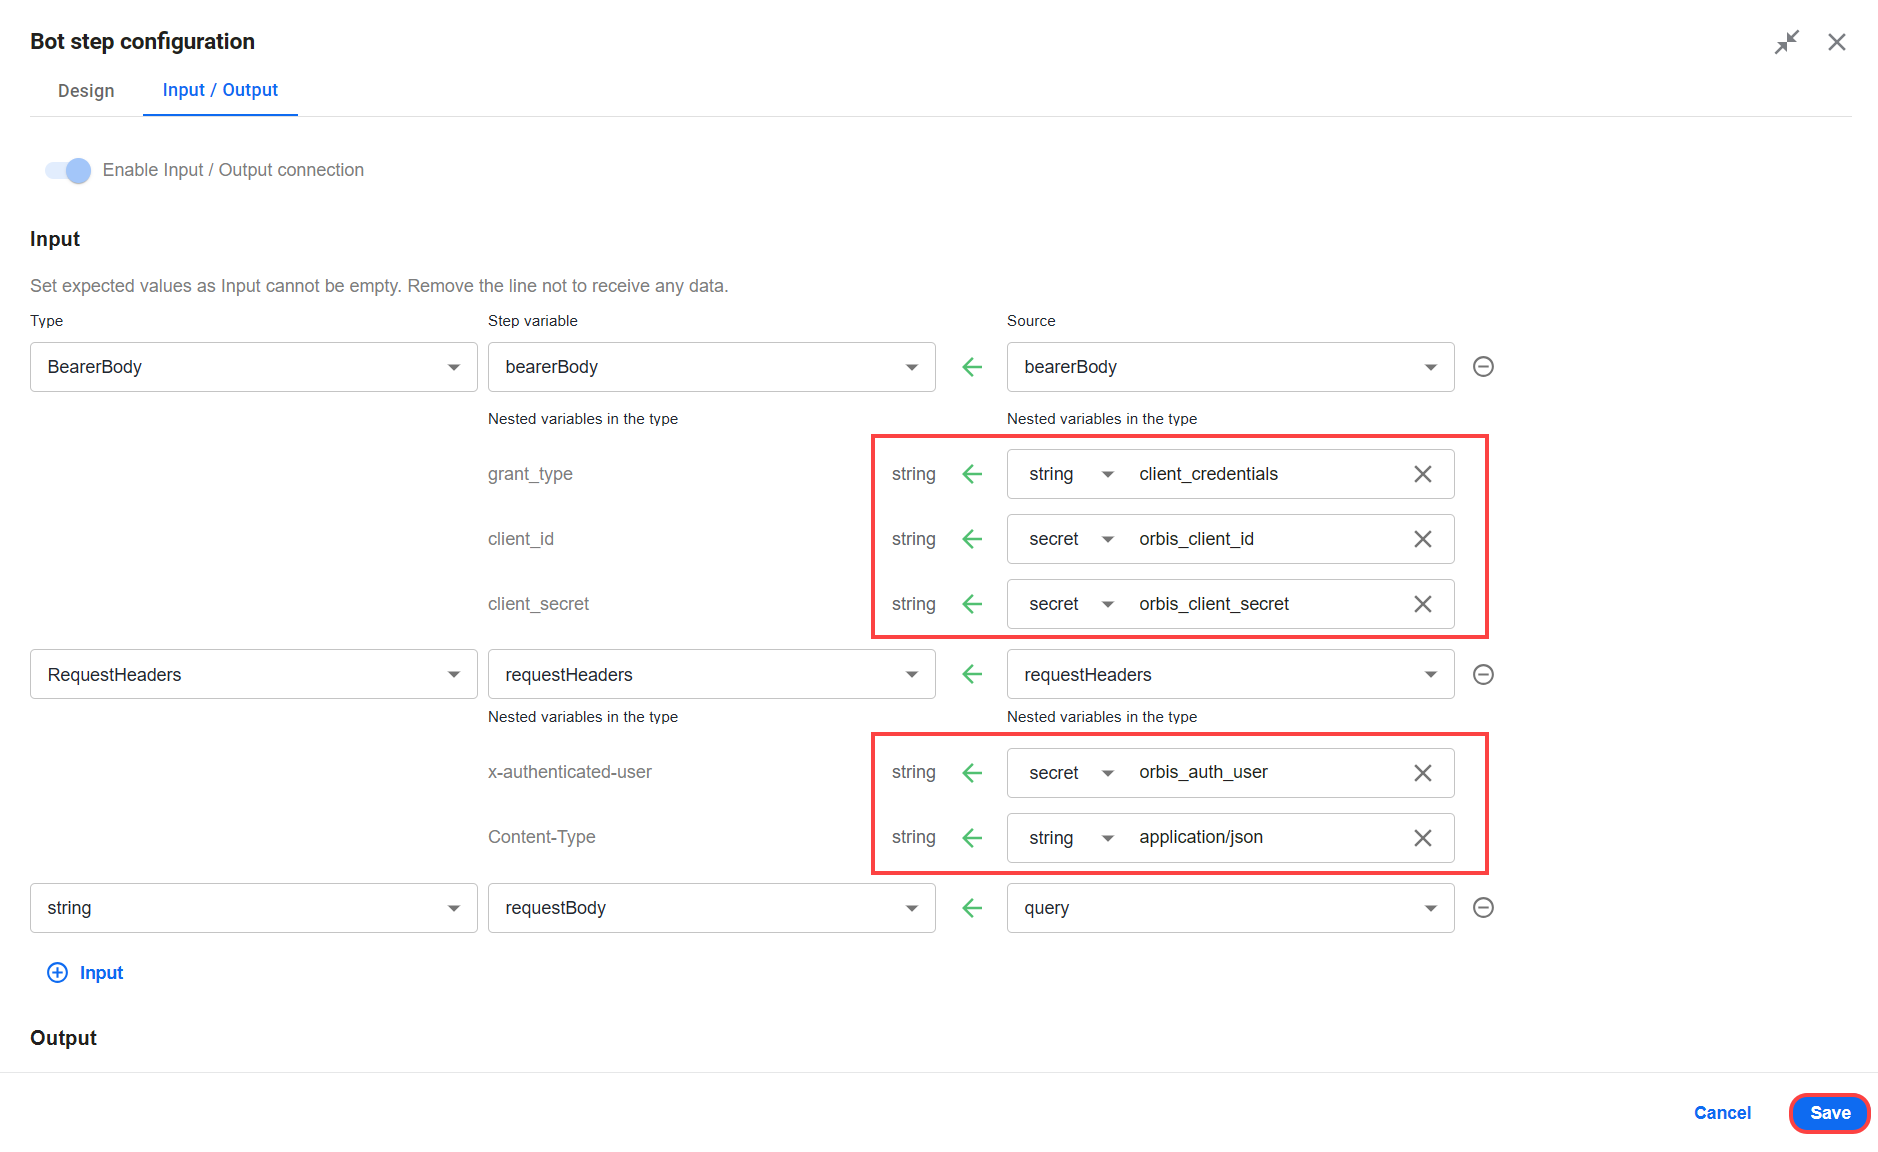
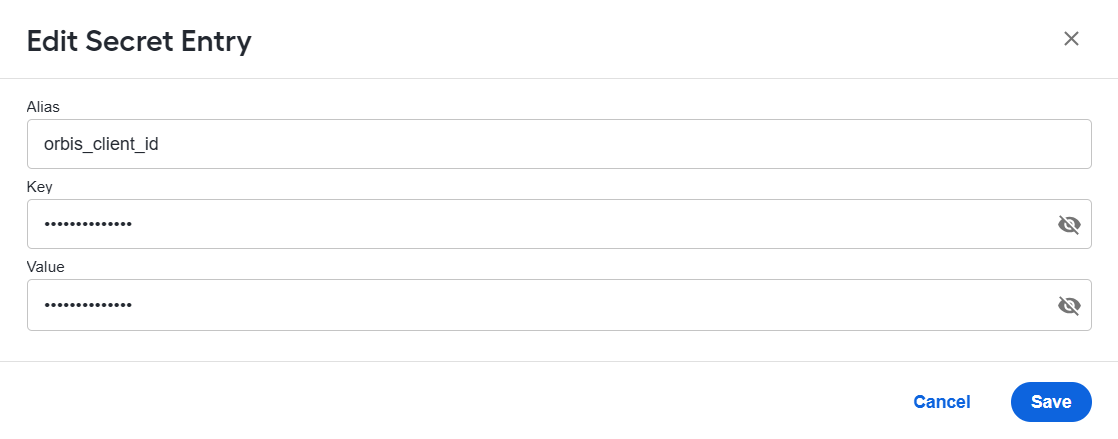
Navigate to System Settings > Secrets Vault and update the following secret entries with the relevant client authentication data:
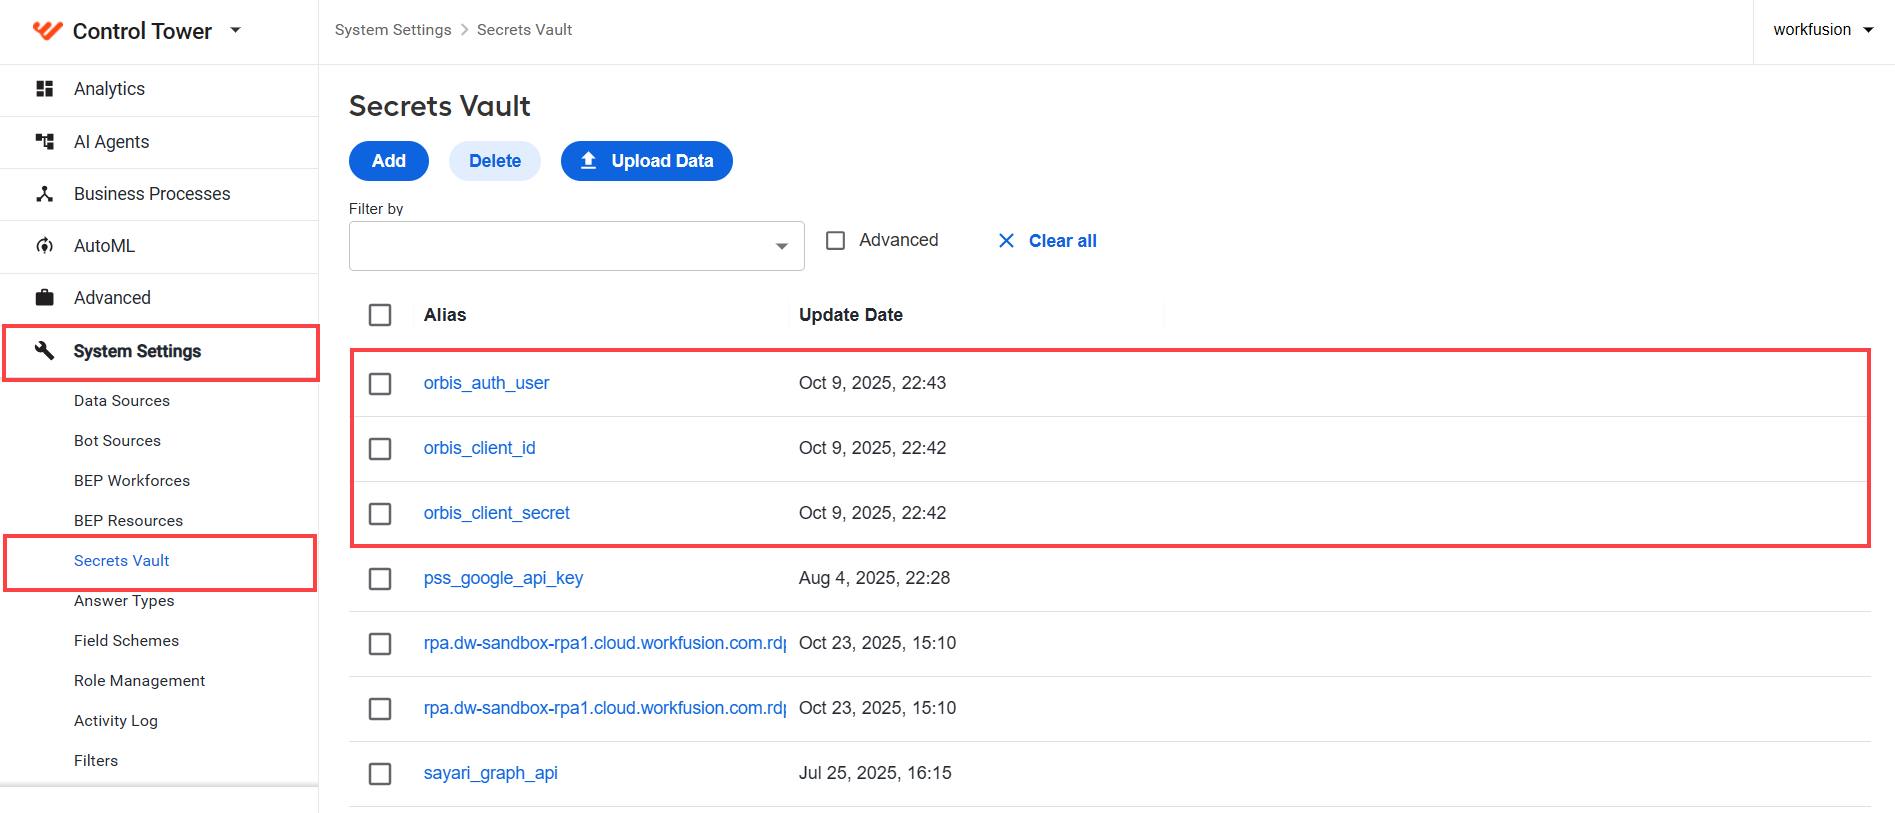
- orbis_auth_user: enter
workfusion. - orbis_client_id and orbis_client_secret: provide yours. Note that the key and value should both be the same.
- orbis_auth_user: enter
Before you deploy the PSS Enrichment Connectors BP, test-run it independently using a CSV file as input. You can do this by:
- Collecting data from a recently run BP that has a hit on the 35B tag
- Deleting all columns from a sample input file except
message_json_objectand using it as input to the PSS Enrichment Connectors BP - Using the sample
message_json_object_35B.csvfile
Cache Data Store
The cache pss_security_cache_v4 Data Store stores enrichment connector responses.
| Field | Description | Example |
|---|---|---|
search_id | ID that was searched in the Orbis database | XS2085608300 |
security_insert_time | Timestamp when the search occurred | 2025-08-14 15:05:17.411 |
security_json_object | Final data object after processing the Orbis response | See a sample below |
See the example of security_json_object
{
    "securityID": "XS2085608300",
    "securityType": "ISIN",
    "bvdID": "US371490331",
    "entityName": "Fidelity National Information Services, Inc.",
    "country": "United States of America",
    "shareHolderHighRiskIndicator": true,
    "highRiskIndicator": true,
    "totalShareholderOwnership": 0.0,
    "timestamp": "2025-08-14"
}
API input and output
See a sample query and response that retrieve risk profile information and shareholder compliance matches for a given security.
Sample query
query TaraQuery {
  getRiskProfilebySecurityID(
    securityId: "KW0EQ0601694",
    securityType: ISIN
  ) {
    id {
      security_id
      security_type
    }
    data {
      bvd_id_number
      name_internat
      country
      same_or_similar_name_in_the_lexisnexis_worldcompliance_database
      shareholder_name
      shareholder_direct
      shareholder_same_or_similar_name_in_the_lexisnexis_worldcompliance_database
      as_of
    }
  }
}
Sample response
{
    "data": {
        "getRiskProfilebySecurityID": {
            "id": {
                "security_id": "KW0EQ0601694",
                "security_type": "ISIN"
            },
            "data": [
                {
                    "bvd_id_number": "KW30113GK",
                    "name_internat": "Humansoft Holding Company K.S.C.P.",
                    "country": "Kuwait",
                    "same_or_similar_name_in_the_lexisnexis_worldcompliance_database": "No",
                    "shareholder_name": "NORTHERN TRUST INVESTMENTS INC",
                    "shareholder_direct": "-",
                    "shareholder_same_or_similar_name_in_the_lexisnexis_worldcompliance_database": "Yes"
                    "as of": "2025-08-23"
                },
                {
                    "bvd_id_number": "KW30113GK",
                    "name_internat": "Humansoft Holding Company K.S.C.P.",
                    "country": "Kuwait",
                    "same_or_similar_name_in_the_lexisnexis_worldcompliance_database": "No",
                    "shareholder_name": "SEI INVESTMENTS MANAGEMENT CORPORATION",
                    "shareholder_direct": "-",
                    "shareholder_same_or_similar_name_in_the_lexisnexis_worldcompliance_database": "Yes"
                    "as of": "2025-08-23"
                },
                {
                    "bvd_id_number": "KW30113GK",
                    "name_internat": "Humansoft Holding Company K.S.C.P.",
                    "country": "Kuwait",
                    "same_or_similar_name_in_the_lexisnexis_worldcompliance_database": "No",
                    "shareholder_name": "FIDELITY MANAGEMENT & RESEARCH COMPANY LLC",
                    "shareholder_direct": "-",
                    "shareholder_same_or_similar_name_in_the_lexisnexis_worldcompliance_database": "Yes"
                    "as of": "2025-08-23"
                },
                {
                    "bvd_id_number": "KW30113GK",
                    "name_internat": "Humansoft Holding Company K.S.C.P.",
                    "country": "Kuwait",
                    "same_or_similar_name_in_the_lexisnexis_worldcompliance_database": "No",
                    "shareholder_name": "CHARLES SCHWAB INVESTMENT MANAGEMENT, INC.",
                    "shareholder_direct": "-",
                    "shareholder_same_or_similar_name_in_the_lexisnexis_worldcompliance_database": "Yes"
                    "as of": "2025-08-23"
                }
            ]
        }
    },
    "extensions": {
        "executionId": "0814220d-488f-7094-18d9-4b3d2aac88a0",
        "traceId": "721f571d-3f29-4471-ac4d-53dcaad50da2",
        "timeStamp": "2025-08-13T14:21:59.631977006"
    }
}
Configure GLEIF
The GLEIF connector is used to fetch company information based on LEI, ISIN, and BIC identifiers. WorkFusion does not host the GLEIF service itself; instead, it utilizes the publicly available external API.
To use the GLEIF connector, you must enable it when configuring the data enrichment settings. The connector performs the following steps:
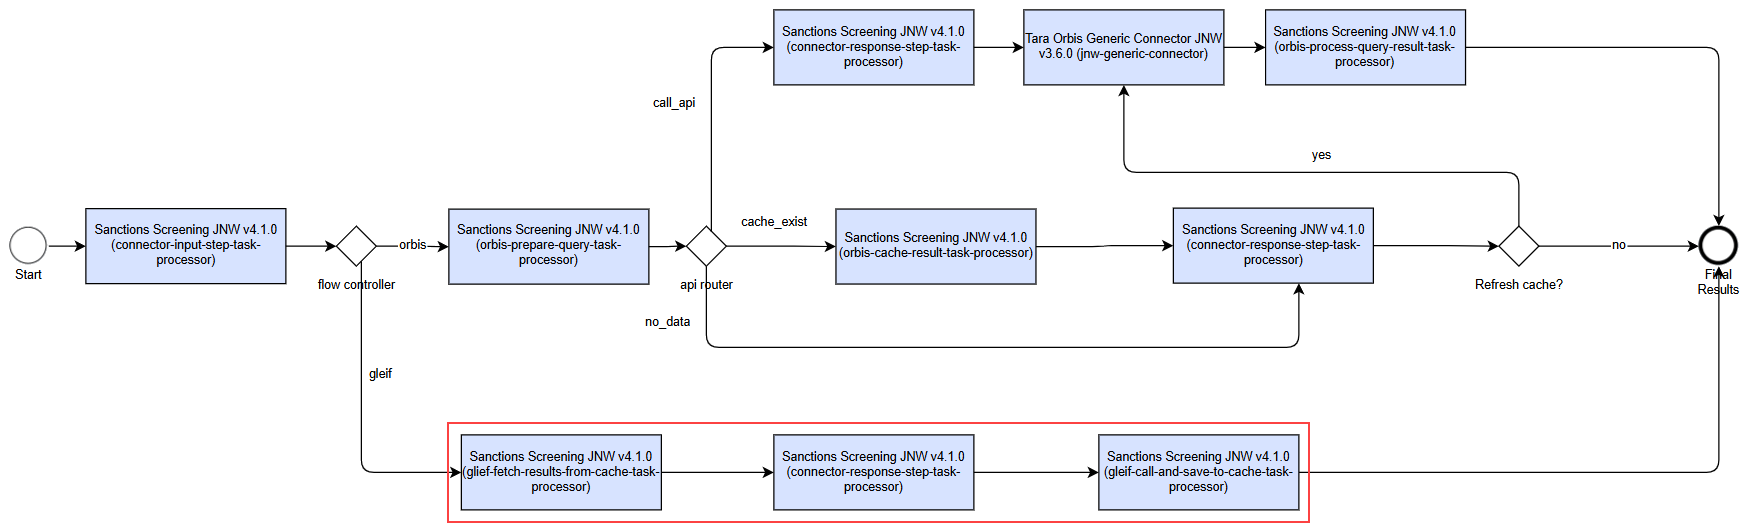
The logical flow execution is as follows:
- Start.
- For each hit, retrieve cached data based on the corresponding IDs.
- Update the hits in the message with the retrieved security data.
- Return a response with the updated message.
- For any cache misses, call the GLEIF service and update the cache.
- Stop.
Cache Data Store
The cache pss_security_cache_v4 Data Store stores enrichment connector responses.
| Field | Description | Example |
|---|---|---|
search_id | ID that was searched in the GLEIF database | US6757466064 |
security_insert_time | Timestamp when the search occurred | 2025-09-19 15:05:17.411 |
security_json_object | Final data object after processing the GLEIF response | See a sample below |
See the example of security_json_object
{
  "sourceType": "GLEIF",
  "securityID": "US6757466064",
  "securityType": "ISIN",
  "bvdID": null,
  "entityName": "OCWEN FINANCIAL CORPORATION",
  "country": "US",
  "city": "Tallahassee",
  "state": null,
  "region": "US-FL",
  "address": "1201 Hays Street",
  "postalCode": "32301",
  "shareHolderHighRiskIndicator": null,
  "highRiskIndicator": null,
  "totalShareholderOwnership": 0.0,
  "timestamp": "2025-09-19"
}
See an example of a GLEIF API response parsed to populate security_json_object in the cached database
{
   ...
    "data": [
        {
            "type": "lei-records",
            "id": "549300DDD1YQ8EIAT278",
            "attributes": {
                "lei": "549300DDD1YQ8EIAT278",
                "entity": {
                    "legalName": {
                        "name": "OCWEN FINANCIAL CORPORATION",
                        "language": "en"
                    },
                    "otherNames": [
                        {
                            "name": "OFC MERGER SUBSIDIARY, INC.",
                            "language": "en",
                            "type": "PREVIOUS_LEGAL_NAME"
                        }
                    ],
                    "transliteratedOtherNames": [],
                    "legalAddress": {
                        "language": "en",
                        "addressLines": [
                            "C/O C T CORPORATION SYSTEM",
                            "1200 SOUTH PINE ISLAND ROAD"
                        ],
                        "addressNumber": null,
                        "addressNumberWithinBuilding": null,
                        "mailRouting": null,
                        "city": "PLANTATION",
                        "region": "US-FL",
                        "country": "US",
                        "postalCode": "33324"
                    },
                    "headquartersAddress": {
                        "language": "en",
                        "addressLines": [
                            "1201 Hays Street"
                        ],
                        "addressNumber": null,
                        "addressNumberWithinBuilding": null,
                        "mailRouting": null,
                        "city": "Tallahassee",
                        "region": "US-FL",
                        "country": "US",
                        "postalCode": "32301"
                    },
                    ...
}
Customize configuration settings
During the AI Agent configuration phase, a BP starts with reading the settings from the configuration.json file that contains all parameters required to load data and control a data flow.
Default configuration.json
{
  "input": {
    "source": "file",
    "maximumHits": 100,
    "valuesToRemove": [
      "Unknown",
      "N/A",
      "*"
    ]
  },
  "model": {
    "model_id": "",
    "ner_model_id": "",
    "go_forward_on_failure": "false",
    "default_model_Id": "pss-classification-model-6.0.9",
    "default_ner_model_Id": "named-entity-recognition-3.2.2",
    "nameMatchThreshold": 0.75,
    "dobMatchThreshold": 365,
    "matchIfRareTokenOverlap": "none",
    "nameMatcherIgnoreMiddleNames": false,
    "idPrefixMatch": false,
    "extractCountryFromId": true,
    "blacklistConfig": "yes",
    "blacklistedKeywords": "",
    "blacklistedKeywordsSource": "tagContent",
    "blacklistedCountries": [
      "RUS",
      "CUB",
      "PRK",
      "IRN",
      "SYR"
    ],
    "additionalBlackListedCountrySource": "tagContent"
  },
  "geocoder": {
    "alwaysRun": false,
    "locationValidationSetting": "approximate"
  },
  "addressMatcher": {
    "matcher": "string"
  },
  "useExternalNameMatchingServiceBabel": false,
  "configureForEachTypes": false,
  "output": {
    "includeNarrative": false
  },
  "htmlReport": {
    "generate_report": false,
    "onePageReport": false
  },
  "qcReport": {
    "StandardColumns": "yes",
    "searchBy": "TODAY",
    "maxVolume": 50,
    "email": {
      "enabled": "no"
    }
  },
  "cldsReport": {
    "StandardColumns": "yes",
    "searchBy": "TODAY",
    "maxVolume": 50,
    "email": {
      "enabled": "no"
    }
  },
  "decisionReapplication": {
    "isEnabled": false,
    "tagsToCompare": "",
    "numDaysToLookBack": "365",
    "level": "hit",
    "matchTagContent": false,
    "matchSubType": false,
    "copyMessageCommentsToHits": true,
    "minimumCounter": 5,
    "minimumAnalysts": 2,
    "resolveType": "Released",
    "setupDataGrid": [
      {
        "drMessageType": "swift_mt",
        "tagsToCompare": "TYPE"
      },
      {
        "drMessageType": "fuf",
        "tagsToCompare": "TYPE"
      },
      {
        "drMessageType": "swift_mx",
        "tagsToCompare": "TYPE"
      },
      {
        "drMessageType": "swift_npp",
        "tagsToCompare": "TYPE"
      }
    ]
  },
  "container": {},
  "connectors": {
    "useEnrichmentConnectors": "no",
    "cacheNegativeResults": "yes",
    "orbis": {
      "tagsToLookup": "35B,SWF_4_35B",
      "cacheRetentionTimePeriod": 7
    },
    "selectEnrichmentConnectors": "NO_CONNECTORS"
  },
  "email": {
    "smtp-port": "587",
    "smtp-protocol": "SMTP_TLS"
  }
}
Default configuration parameters
You can customize some settings, some are hidden from the user interface and cannot be changed. All Data Stores are built during the bundle import stage, and you cannot change their names.
The default configuration parameters are listed below.
Input parameters
message_datastore_namecontains processing data, including new and updated messages during BP execution.ml_thresholds_datastore_namecontains the mapping of decision codes, such as definitions, confidence thresholds, and decisions.fuf_tag_datastore_namecontains the FUF dictionary of entity attributes and their associated types.swift_tag_datastore_namecontains the SWIFT dictionary of entity attributes and their associated types.iso20022_tag_datastore_namecontains the ISO20022 dictionary of entity attributes and their associated types.maximumHitsrefers to the maximum number of hits per alert. Alerts exceeding this limit are auto-dispositioned as no decision.
Model parameters
model_idis the ML model for processing input data to determine possible false positive hits. If not provided, thedefault_model_Idvalue is used.ner_model_idis the NER ML model for processing input data to determine possible entity types. If not provided, thedefault_ner_model_Idvalue is used.go_forward_on_failureis required to run Execute AutoML Model.default_model_Idis the model version that comes with the bundle during the release.default_ner_model_Idis the model version that comes with the bundle during the release.nameMatchThresholdcontrols the outcome of the name matcher score and name match and mismatch decision.dobMatchThresholdcontrols the outcome of the date of birth (DOB) matcher and DOB match and mismatch decision.matchIfRareTokenOverlapinfluences the name matcher score calculation. The default value isnone. When set totrue, a hit on a rare token increases the score, lowering the error and automation rates.nameMatcherIgnoreMiddleNamesinfluences the name matcher score calculation. The default value isfalse.idPrefixMatchinfluences the ID matching logic based on prefix similarity. The default value isnone.extractCountryFromIdextracts country data from IDs for location matching. The default value istrue.addressMatcher.matchercompares addresses. The default is a string. Geocoder and AV Service are available.blacklistConfig,blacklistedKeywords,blacklistedKeywordsSource,blacklistedCountries, andadditionalBlackListedCountrySourceare used to configure countries or entities that need to be escalated if found in the screened data.
Geocoder parameters
alwaysRundetermines whether address validation runs when Geocoder is enabled, even if the country is already present in the address. The default value isfalse.locationValidationSettingspecifies the validation mode:strictorapproximate.strictvalidates only building- or rooftop-level addresses found in the Geocoder results.approximateallows broader matches, such as a neighborhood or region.
HTML report output parameters
generate_reportgenerates HTML reports and stores them in S3. The default value isfalse.onePageReportdetermines whether reports should be single-page or multi-page.
QC report parameters
StandardColumnsuses the default report template. The default value isyes. Otherwise, provide a custom file.searchByspecifies the search scope. The default value isTODAY.splitReportBylimits the report size. The default value isSIZE, with the maximum file size value (maxVolume) of 50 MB.email.enabledenables email notifications of generated reports. The option is disabled by default.
CLDS report parameters
StandardColumnsuses the default report template. The default value isyes. Otherwise, provide a custom file.searchByspecifies the search scope. The default value isTODAY.splitReportBylimits the report size. The default value isSIZE, with the maximum file size value (maxVolume) of 50 MB.email.enabledenables email notifications of generated reports. The option is disabled by default.
CLDS parameters
isEnabledenables the data reapplication functionality, when set totrue.drMessageTypeandtagsToComparetarget specific message types and tags to be included in the CLDS processing. The supported formats areSWIFT_MT,SWIFT_MX,SWIFT_NPP, andFUF.numDaysToLookBackdefines the range to search historical data for matching records. The default values is 365 days.levelspecifies a decision reapplication level. The default value ishit.escalateallows decision reapplication to automatically escalate decisions on historically escalated or disabled hits. The default value isfalse.matchTagContentdetermines if the tag content must match. The default value isfalse.resolveTypesets a historical decision type that should be treated as resolved. The default value isReleased.escalateallows CLDS to automatically escalate decisions on historically escalated or disabled hits. The default value isfalse.
Data Stores
All Data Stores used in the Transaction Screening processes are built during the bundle import stage. Their names cannot be changed.
| Data Store | Description |
|---|---|
| pss_request_processing_v4 | The main Data Store that stores all requests, processing updates, and decisions. |
| pss_payment_transfer_filtering_rules_v4 | Not used; empty. Remains for backward compatibility. |
| pss_alerts_analytics_v4 | Contains per alert analytics. |
| pss_messages_analytics_v4 | Contains per message analytics. |
| pss_de_analytics_v4 | Contains analytics of data enrichment service calls for OpenCorporates and Geocoder. |
| pss_reapplication_hashcodes_v4 | Contains historical data for decision reapplication on the hit level. |
| pss_dr_file_analytics_data_v4 | Contains analytics of loading CLDS historical data. |
| pss_clds_hash_analytics_v4 | Contains summary information about each hit hash of historical data. |
| pss_security_cache_v4 | Stores enrichment connector responses. |
| pss_request_processing_test_v20_4000 and similar test files | Contains synthetic data generated for testing. |
Disable billing
Billing is an out-of-the-box feature in Tara and uses the standard billing service provided by Control Tower.
The billing call happens per alert transaction, regadless of the number of hits per alert. Additional optional skills, such as decision reapplication or external lookups, are not billed separately. The billing request includes the following information:
"base_sku" -               "DGWTRAPSSR0000XXXXCSC"
"transaction_uuid" -       Unique UUID representing the alert
"transaction_status" -     "COMPLETED"
"transaction_count" -      1
"run_uuid" -               runUuid from taskContextHolder representing the BP run
"last_modified_date" -     date/time when alert adjudication is completed
"item_type" -              "Digital Worker"
"dw_name" -                "Tara"
"dw_skill" -               "Payment Sanction Screening"
"variation_name" -         BP variation title from controlTowerBpService
"customer_id" -            Customer ID from taskContextHolder
There is no UI option to disable billing. However, it can be disabled manually if needed.
This option is intentionally hidden to prevent accidental disabling of billing. Changes must be performed by authorized personnel only. Before applying any changes, consult with the business unit on both the client and WorkFusion sides.
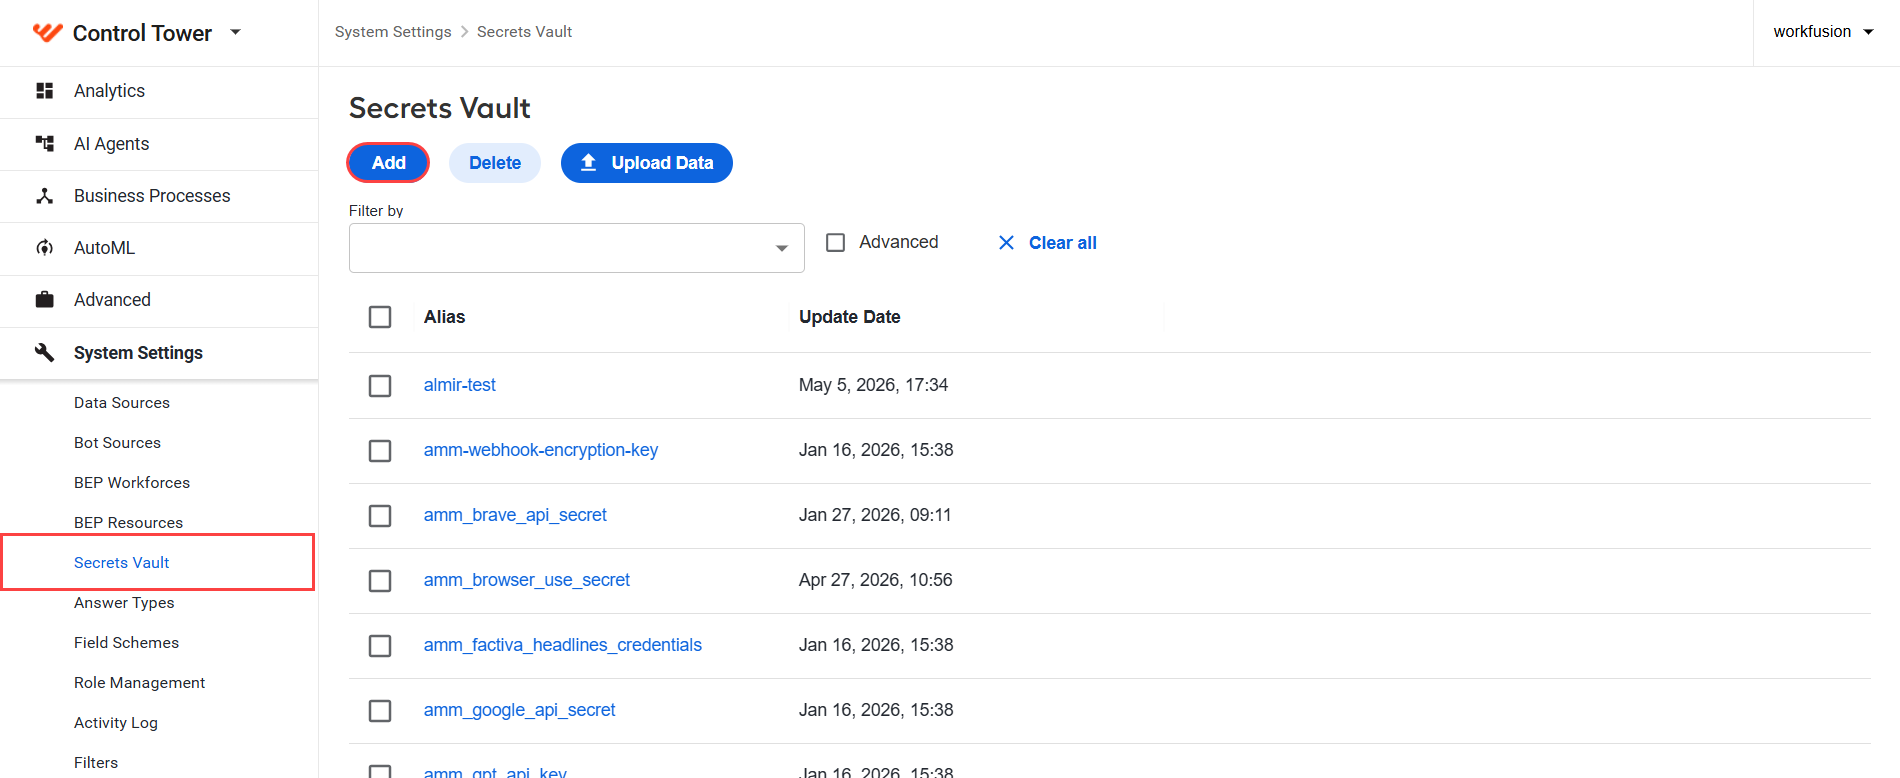
To disable billing in non-production environments where the billing service and queue are not installed, create a dedicated secret entry. This also prevents billing-related errors from cluttering the logs. Complete the following steps:
Go to System Settings > Secrets Vault and click Add.
Create an entry with the pss_disable_billing alias. You can enter any string value in the Key and Value fields. Tara checks only for the presence of this secret entry.
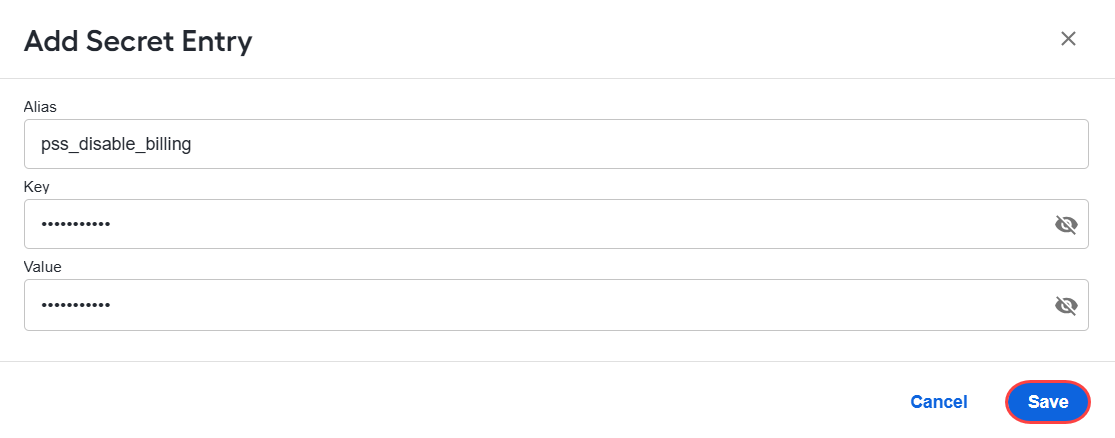
Click Save.