
Configure and run Data Purge
The platform lets users create Data Purge configurations to delete obsolete operational data. Each configuration comprises user-defined data cleanup logic based on a stored procedure or custom SQL. Custom SQLs clean up Data Stores (ds schema), whereas stored procedures purge all other data schemas.
Optionally, Data Purge configurations can also include a cron expression for scheduling and execution info, for example, status, date.
To clean up CT operational and Data Store data, you can run Data Purge in one of the following ways:
note
In this document, execution refers to a single Data Purge run.
Configure Data Purge permissions
To have access to the Data Purge feature, one of the following permissions is required:
- Run Data Purge allows executing Data Purge configurations and viewing their list together with the status and execution information. The permission is available for the Developer and Admin roles.
- Manage Data Purge allows not only viewing and executing but also creating, updating, and deleting Data Purge configurations. The permission is available only for the Admin role.
To grant the permissions to a user, follow the instructions in the Manage Control Tower roles and permissions guide.
note
Make sure to log out and log back in to Control Tower to apply the permission changes.
View configuration list
To view the list of available Data Purge configurations in Control Tower, go to Advanced > Data Purge. On the right, you can see a table containing data on existing Data Purge configurations and action buttons.
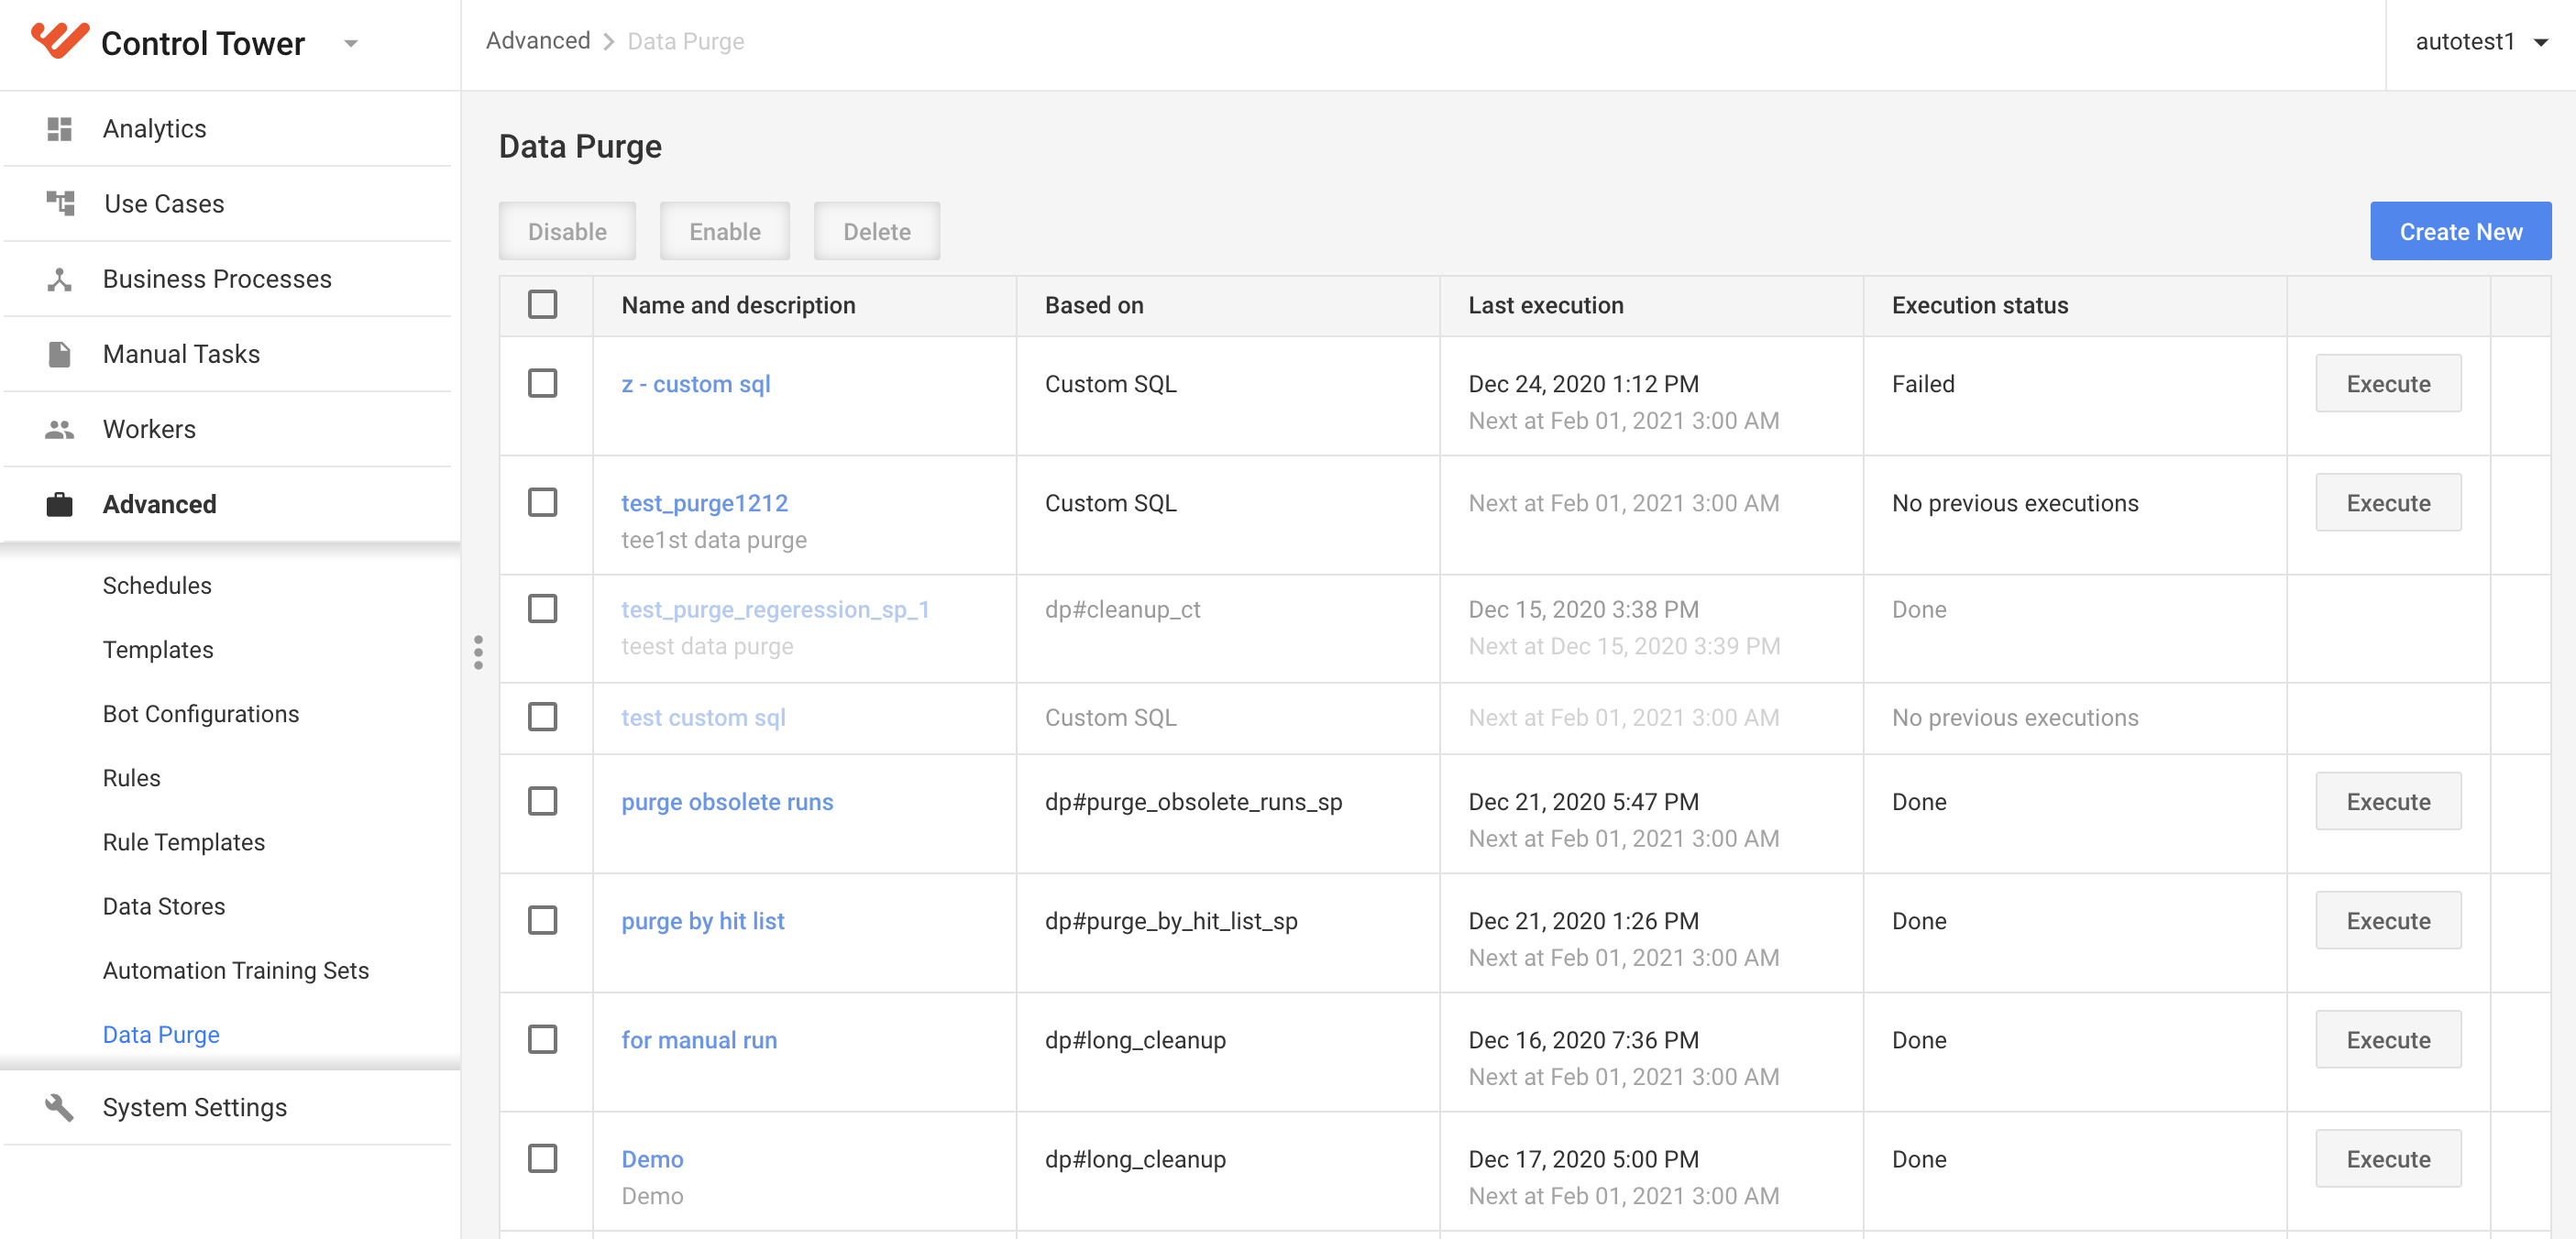
The Data Purge table comprises the following information:
- The Name and description column contains the name and description of the Data Purge configuration.
- Based on indicates whether data purge configuration is based on custom SQL or stored procedure. Custom SQLs clean up Data Stores (ds schema), whereas stored procedures purge all other data schemas.
- The Last execution column comprises the timestamps for the next and the last executions.
- Execution status indicates the state of the latest Data Purge execution related to the given Data Purge configuration. The available statuses are:
- QUEUED: the Data Purge execution is waiting in the queue at the execution engine.
- PROCESSING: the Data Purge execution is in progress.
- FAILED: the Data Purge execution failed at the database side.
- DONE: the Data Purge execution was completed successfully.
- The Execute button lets you submit a Data Purge execution (see Execute Data Purge from list).
- The Enable/Disable buttons activate or deactivate the selected purge. The Data Purge configuration must be enabled to be run as scheduled by cron or executed manually.
- The Delete button removes the selected configuration.
Create configuration
To create a Data Purge configuration, go to Advanced > Data Purge and click the Create New button. The new Data Purge configuration page opens:
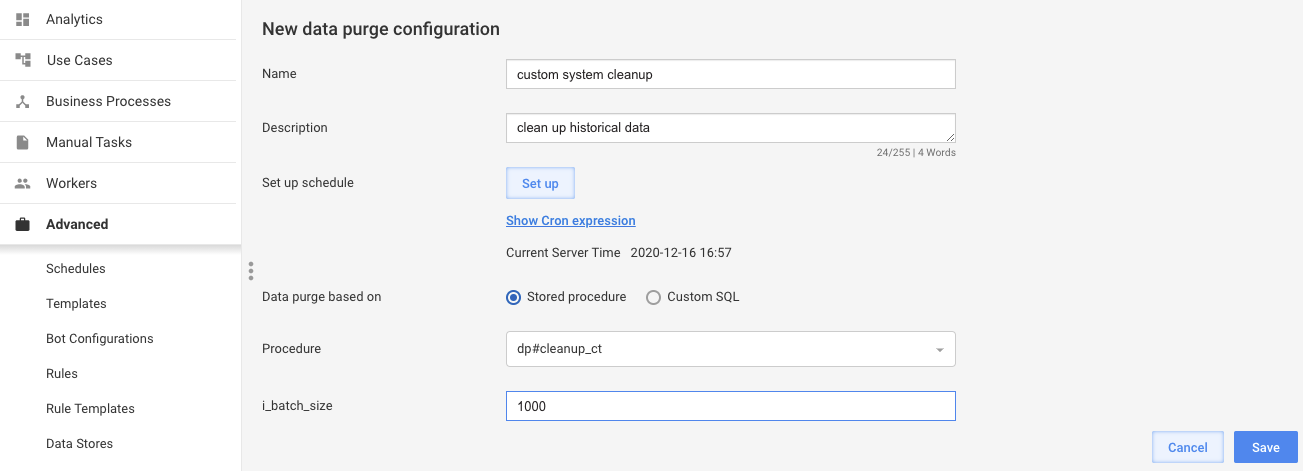
On the page, perform the following actions to configure a Data Purge:
In the required Name field, specify an arbitrary name for the new configuration. This is the name you see in the Name and description column on the Data Purge list page.
The the optional Description field, give more details about the created configuration. After saving the configuration, you can see the details in the Name and description column on the Data Purge list page.
In the Set up a schedule section, click Set up to schedule recurrent executions. For instructions, refer to the Schedule Data Purge with cron section. When no schedule is set, you can only run the configuration manually from the Data Purge list page. For details, refer to the Execute Data Purge from list section.
In Data purge based on, select one of the available options:
Stored procedure, if you apply a stored procedure to perform data cleanup. When the procedure you chose in the Procedure drop-down box has parameters, a list of fields appears below it.
In the figure above, the
dp#cleanup_ctstored procedure has the singlei_batch_sizeparameter.A number of stored procedures are available out of the box. For details, refer to Explore OOTB stored procedures. For instructions to implement custom ones, refer to Develop stored procedures.
Custom SQL, if you need to create a configuration for Data Store cleanup. In the SQL box appearing below, specify custom SQL code.
The custom SQL cannot have any parameters and only works with the Data Store (ds) schema. For details on developing custom SQLs, refer to Develop Data Purge procedures.
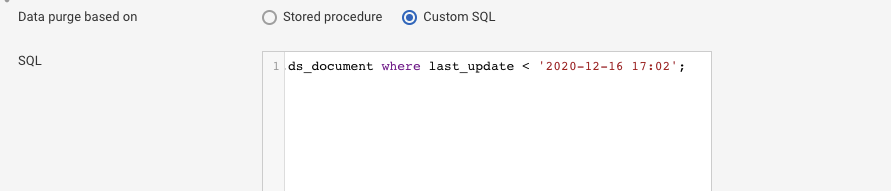
Click Save to save the new Data Purge configuration. You are returned to the Data Purge list page.
warning
When purging the ds schema with Custom SQL, make sure not to delete the ds table itself. For instance, using drop table ds_delete_me is wrong as it would lead to the delete_me Data Store becoming unoperational.
Execute Data Purge from list
You can submit a purge configuration for execution from the Data Purge list page. To do that, perform the following steps:
In Control Tower, go to Advanced > Data Purge and find the configuration to execute.
Ensure that the configuration is active. Active configurations are displayed brightened and contain the Execute button in the last column.
Inactive configurations appear dimmed. To activate a configuration, select the checkbox next to its name and click Enable. The selected row becomes available.
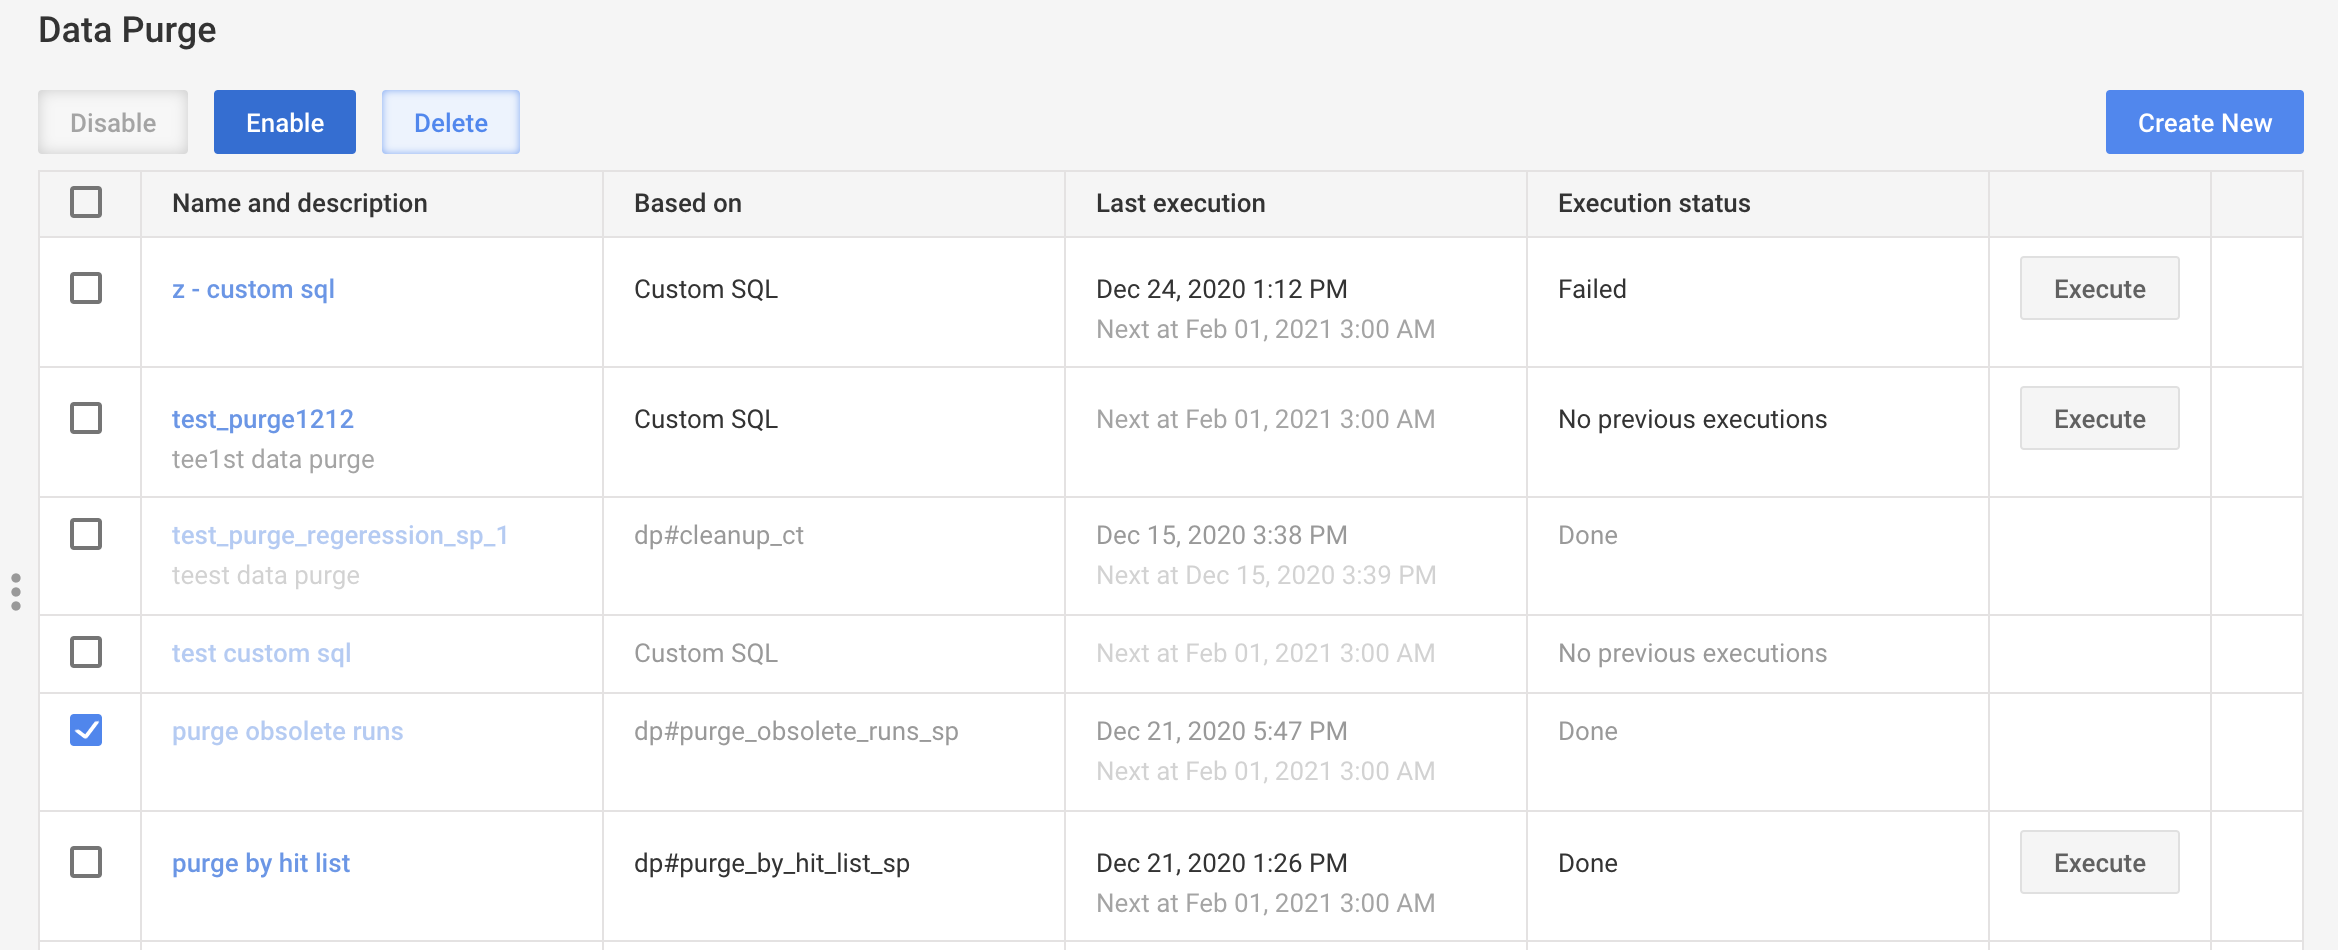
Click Execute.
For stored procedures, a dialog window with parameters appears. Specify the parameters and click Execute. The process is submitted for execution. After that, check the Status column on the list page to see the status of the latest run.
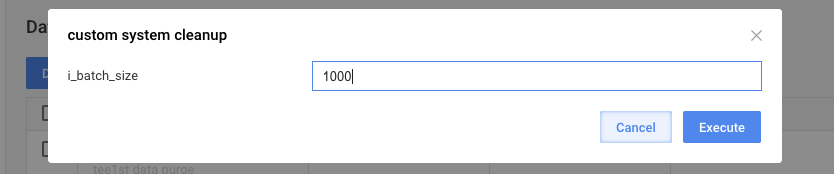
Schedule Data Purge with cron
To schedule a Data Purge with the cron expression, perform the following steps:
Ensure that the configuration you want to schedule contains the cron expression:
- In Control Tower, go to Advanced > Data Purge and find the data purge configuration to schedule.
- On the list page, click the correspondent row to open the configuration for editing.
- Click the Show cron expression link to verify that the expression is populated.
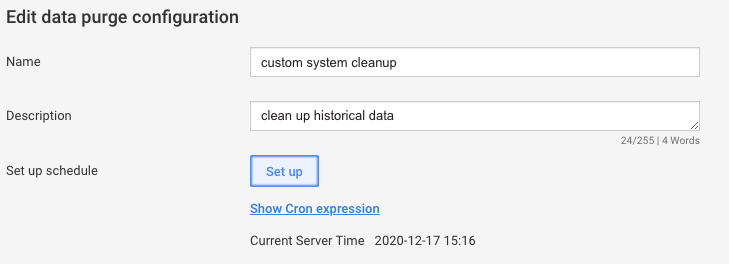
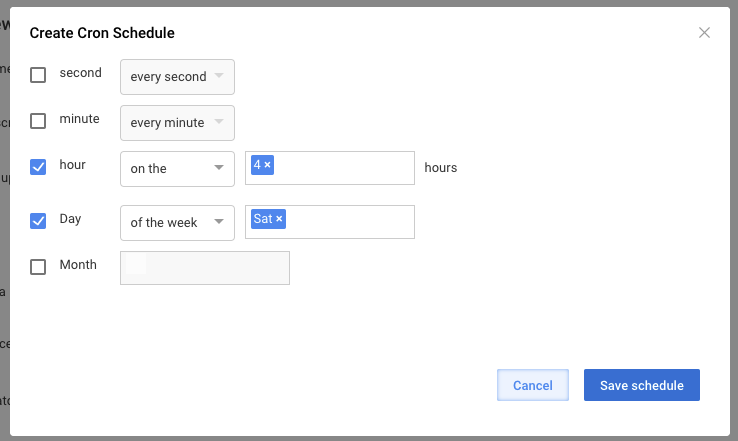
If the expression is empty or incorrect, click Set up, configure the schedule in the dialog window, and click Save schedule.
In the Data Purge window, activate the configuration.
Active configurations are displayed brightened and contain the Execute button in the last column. Inactive configurations appear dimmed. To activate a configuration, select the checkbox next to its name and click Enable. The selected row becomes available.
After you configure the cron expression and activate the configuration, it is executed by the
cronjob. On the Data purge page, you can check the status of the scheduled Data Purge configuration and its last or next execution time.
Deactivate Data Purge
To stop the execution of a given configuration by the cron scheduler and turn off the possibility to run it manually, deactivate the Data Purge instance:
- Go to the Data Purge list page and find the configuration to deactivate.
- In the first column, select the configuration checkbox.
- Click Disable. The deactivated configuration becomes unavailable.
Track configuration changes
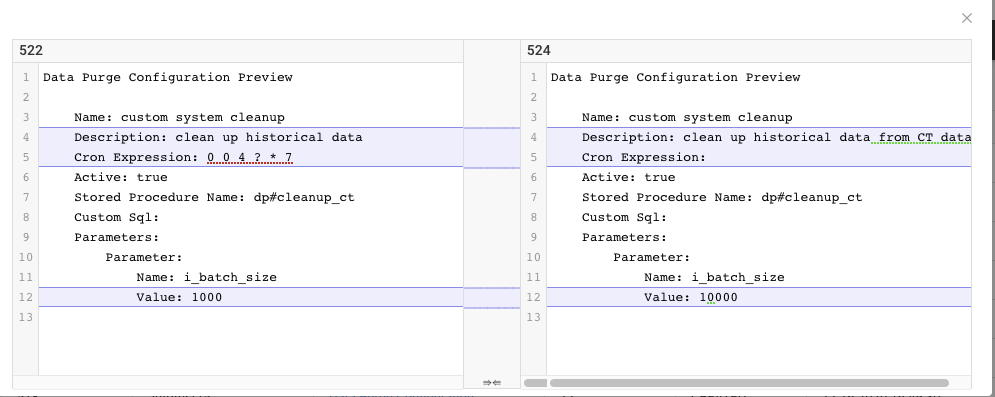
You can track the modifications and updates of Data Purge configurations on the Activity page:
In Control Tower, go to System Settings > Activity Log.
Find the configuration in the list and click it.
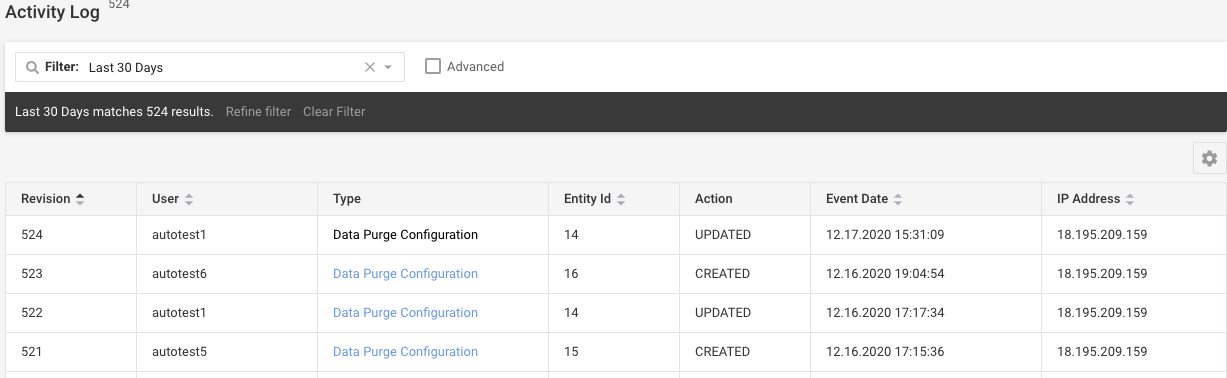
The dialog window with details appears.
Run Data Purge via API
important
Two permissions are essential for working with Data Purge API:
Run Data Purge enables using API methods to submit executions and to get statuses or events. Thus, third-party users can be granted only the Run Data Purge permission to trigger Data Purge without access to sensitive system information.
Manage Data Purge allows utilizing the entire range of Data Purge API methods.
To enable the permissions, follow the instructions in the Role Management guide.
To run Data Purge via API, follow the steps below:
- Acquire the token for the REST client by following the instruction.
- Go to https://editor.swagger.io/ and import the file. See also the API specification.
For detailed API methods description, refer to Data Purge API.
Purge Analytics
warning
Purging Analytics can lead to the increased size of the transaction log file and low disk space.
Prepare for purge
Before starting the Analytics Data Purge, stop all ETL processes:
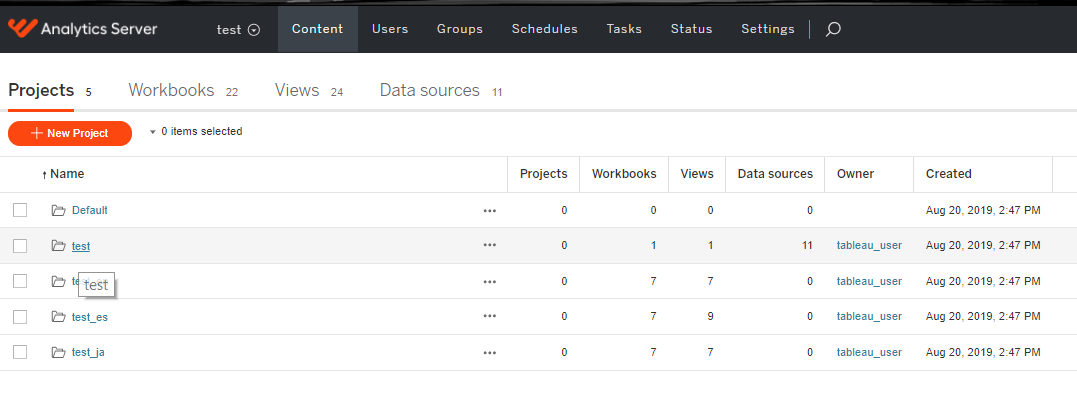
Stop the ETL scheduler:
On the Analytics server, go to the project with the same name as the site (in this example, "test").
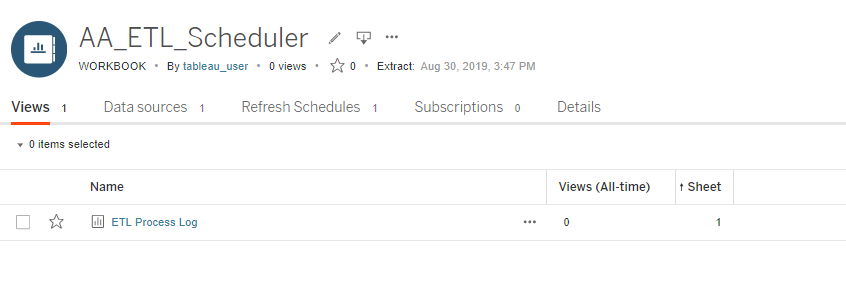
Open the AA_ETL_Scheduler workbook.
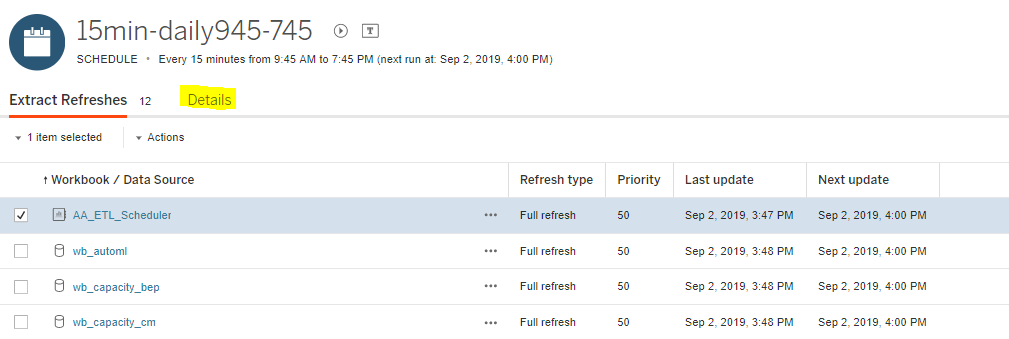
Go to the Refresh Schedules tab. The tab contains the names of all schedules if they exist.
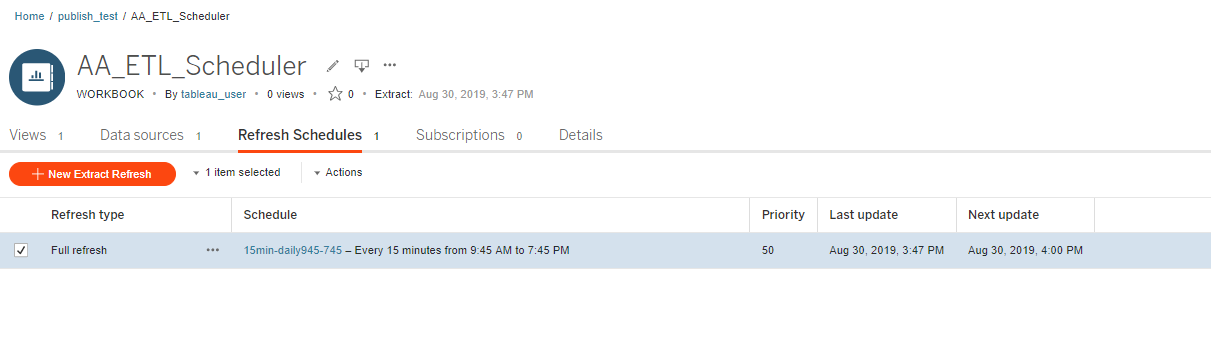
From the list, select AA_ETL_Scheduler, and go to the Details tab.
Set the status to Disabled:
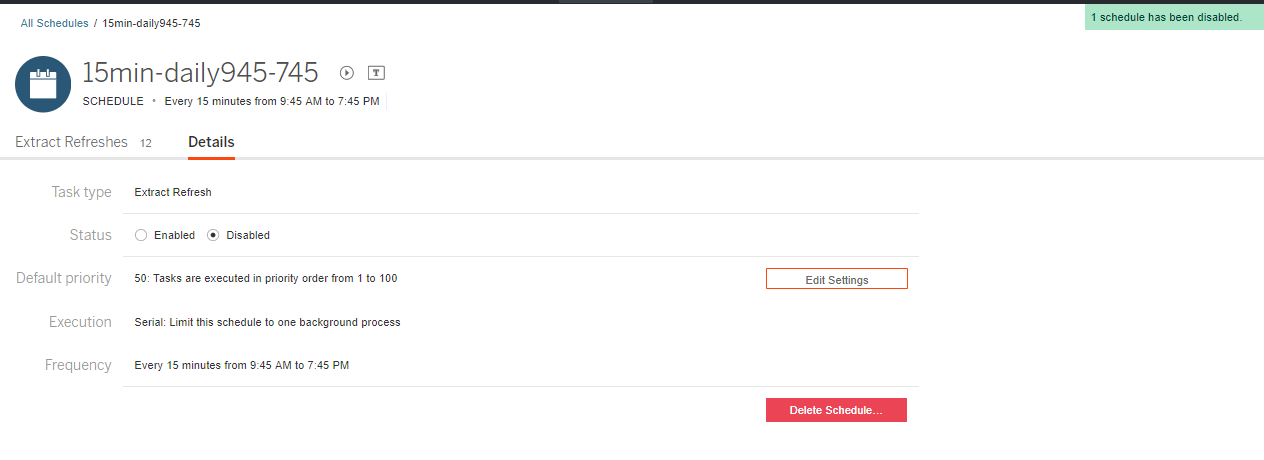
After the Data Purge, remember to enable the schedule for data upgrade.
Run the ETL (extract, transmit, load) process manually using SQL Server Management Studio (SSMS) and ensure it is completed successfully. The script must run without errors.
exec [etl#process_sp]The following script returns 0 rows if there are no errors within the last ETL execution.
select id, duration_sec , source_name, target_name, rows_number, notes
from etl_log
where notes <> 'ok' and
group_date =  (select max(group_date) from etl_log)
Set parameters and run procedure
The stored master purge_data_analytics_sp procedure is the primary one and starts the purge data process. The procedure is to be run manually in SSMS.
The Default parameters are 30 days back from now.
In the procedure, define the following:
- The period for the data to be available in the Analytics DB. You can set up the period type (
day,hour,minute) as well as the period value or count. - The batch size, meaning the count of rows to delete at a time, and the sleep time between batch purges.
--example to run
declare @cnt int

exec @cnt = purge_data_analytics_sp 'day',30
[purge_data_analytics_sp]
create or alter procedure purge_data_analytics_sp
@metric_type nvarchar(10) = 'day' -- day/hour/minute - type of range
, @metric_value int = 30 -- value determining how far to go back to delete rows, pairs with @metric_type
as
/********
SAMPLE:
exec purge_data_analytics_sp 'day',30

CHANGELOG: 10.1-rev
2019-12-12 added [hpath] to order set of tables
2019-08-02 created
********/

begin
set nocount on
; /*parameters that define the execution sql command string*/
declare @sp_name nvarchar(255) -- the name of the stored procedure to purge the table
declare @tb_name nvarchar(255) -- the table name where rows are to be deleted
declare @fl_name nvarchar(255) -- the name of the field (datetime2) used to calculate the range for deleting if needed
declare @id_name nvarchar(255) -- used for deleting in ct_* tables to identify a specific id/table
declare @group nvarchar(8) -- pm,rpa,ct
declare @batch_size int -- the size of the batch to delete (in rows)
declare @sleep_time float -- the sleep time to delay the next step
/*parameters that store information to put into the log table*/
declare @start_date datetime2 -- the start date and time for each deletion operation
declare @end_date datetime2 -- the end date and time of each deletion operation
declare @duration_sec bigint -- the duration in seconds, the difference between @start_date and @end_date
declare @rows_cnt bigint -- the count of deleted rows
declare @status nvarchar(max) -- the resulting 'ok' or error message
declare @purge_run_id int -- the parameter to distinguish different executions of the master SP
/*inner parameters*/
declare @sql nvarchar(max) -- the SQL statement to run the next-level SP to delete rows
declare @date_from datetime2 -- the upper limit for deleting process_execution
declare @temp_table nvarchar(32) --

set @purge_run_id = (select coalesce(max(purge_run_id),0) + 1 from [dp_log]) -- each execution of the master SP is marked
;
if object_id('tempdb..##dp_ct_ids',N'U') is not null drop table ##dp_ct_ids
--table to collect all ids in ct_* tables to delete
create table ##dp_ct_ids
( process_execution_id bigint not null,
[start_date] datetime2(7),
task_id bigint not null,
task_instance_id bigint not null,
task_item_id bigint not null,
task_execution_id bigint null,
task_transaction_id bigint null,
plugin_id bigint null)
;
if object_id('tempdb..##dp_rpa_sessions_ids',N'U') is not null drop table ##dp_rpa_sessions_ids
create table ##dp_rpa_sessions_ids
(bot_session_id bigint not null)
;
if object_id('tempdb..##dp_rpa_status_ids',N'U') is not null drop table ##dp_rpa_status_ids
create table ##dp_rpa_status_ids
(bot_status_id bigint not null)
;
if object_id('tempdb..##dp_ml_stat_ids',N'U') is not null drop table ##dp_ml_stat_ids
create table ##dp_ml_stat_ids
(mls_id bigint not null)
;

-- get the date from which the process execution data is to be stored (or the upper limit for deleting)
set @date_from = case @metric_type when 'day' then dateadd(day,-@metric_value,getdate())
when 'hour' then dateadd(hour,-@metric_value,getdate())
when 'minute' then dateadd(minute,-@metric_value,getdate())
end
; -- collect all ids for ct_*,rpa_*,ml_* tables
exec full_dp_ids_sp @date_from

-- cursor inside which the process runs on the [dp_config] table and purges or deletes data for a specific table with exact parameters - steps
declare cur_purge_sp cursor for
with D_SRC as
(
select id
, isnull(prev_id,0) prev_id
from dp_config
)
, D_TREE( id, prev_id, hpath) as
(
select s.id
, s.prev_id
, cast(s.id as nvarchar(4000)) as hpath
from D_SRC s
where s.prev_id = 0
union all
select s.id
, s.prev_id
, concat( t.hpath, '/', s.id) as hpath
from D_SRC s
inner join D_TREE t on s.prev_id = t.id
)
select
[sp_name]
, [table_name]
, [date_field]
, [id_field]
, case [group_name] when 'ct' then '##dp_ct_ids'
when 'ml' then '##dp_ml_stat_ids'

when 'rpa' then case [id_field] when 'bot_status_id' then '##dp_rpa_status_ids' else '##dp_rpa_sessions_ids' end
else ''
end as temp_table
, [group_name]
, [batch_size]
, [sleep_time]
from [dp_config] dp
join D_TREE dt on dp.id = dt.id
where [is_taken] = 1
order by dt.hpath

open cur_purge_sp

while (1=1) --while the last row is read
begin
fetch next from cur_purge_sp
into @sp_name, @tb_name, @fl_name, @id_name, @temp_table, @group, @batch_size, @sleep_time

if @@fetch_status != 0
break

set @start_date = getdate() --define the start of the step

begin try
begin tran

; -- form sql statement
set @sql = N'exec @row_cnt = ' + @sp_name + ' @tb_name, @fl_name,@id_name, @temp_table, @group, @date_from, @batch_size, @sleep_time '
;
exec sp_executesql @sql, N'@tb_name nvarchar(255), @fl_name nvarchar(255), @id_name nvarchar(255), @temp_table nvarchar(32), @group nvarchar(8), @date_from datetime2, @batch_size int, @sleep_time float, @row_cnt int output',
@tb_name = @tb_name
, @fl_name = @fl_name
, @date_from = @date_from
, @id_name = @id_name
, @temp_table = @temp_table
, @group = @group
, @batch_size = @batch_size
, @sleep_time = @sleep_time
, @row_cnt = @rows_cnt output

commit tran
set @status = 'ok'

end try
begin catch --if error
if @@trancount <> 0
rollback transaction
;
declare @errormessage nvarchar(4000) = error_message()
declare @errorseverity int = error_severity()
declare @errorstate int = error_state()
-- save status
set @status = formatmessage( '[fail] %i: %s', error_number(), @errormessage)
;
raiserror(@errormessage, @errorseverity, @errorstate)
;
end catch

set @end_date = getdate() --define the end of the step
set @duration_sec = datediff(s, @start_date, @end_date)
-- fill in the log table
insert into [dp_log] ([sp_name], [table_name], [date_field], [purge_run_id], [rows_cnt], [duration_sec], [start_date], [end_date], [status])
values (@sp_name, @tb_name, @fl_name, @purge_run_id, @rows_cnt, @duration_sec, @start_date, @end_date,@status)
;
end
-- close cursor
close cur_purge_sp
deallocate cur_purge_sp
-- clean up the temp table with ct_* ids
if object_id('tempdb..##dp_ct_ids',N'U') is not null drop table ##dp_ct_ids
if object_id('tempdb..##dp_rpa_sessions_ids',N'U') is not null drop table ##dp_rpa_sessions_ids
if object_id('tempdb..##dp_rpa_status_ids',N'U') is not null drop table ##dp_rpa_status_ids
if object_id('tempdb..##dp_ml_stat_ids',N'U') is not null drop table ##dp_ml_stat_ids

end