
Package assets into Asset Bundle for deployment
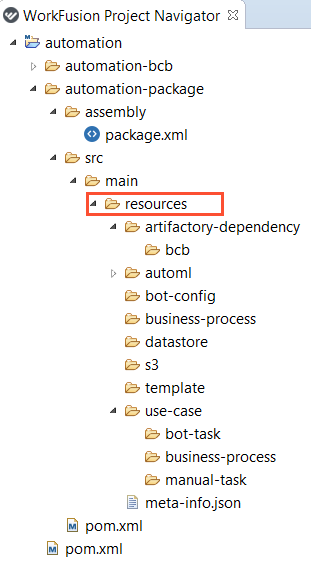
Each project you create from an ODF Archetype includes an [ARTIFACT]-package module. Inside the module, the resources directory contains a pre-configured structure where you can put Use Case assets for further deployment to Control Tower (CT).
Prepare an Asset Bundle for deployment
To prepare an Asset Bundle for deployment, pack the directories into the upper-level resources directory as described below:
/artifactory-dependency
The directory is required if a BCB (Bot Config Bundle) is used. Otherwise, it is optional. The content of the directory maps to zero, one, or multiple BCBs.
In most cases, there is no need to add assets to the /artifactory-dependency directory. After you run mvn clean install, Bot Config Bundle (BCB) files from the [ARTIFACT]-bcb module of the same project are deployed automatically to [ARTIFACT]-package/target/artifactory-dependency.
The deployed BCBs are structured as follows:
artifactory-dependency > bcb >directory1 > directory2 > directory3> bcb-name > bcb-version > bcb-name.jar
The directory structure in bold stands for the BCB's groupId, so it must include at least three directories. Example: a BCB with Group:Artifact:Version being com.workfusion.examples:demo-bcb:0.5 must be represented as follows:
artifactory-dependency > bcb > com > workfusion > examples > demo-bcb > 0.5 > demo-bcb.jar
/automl
The directory maps to zero, one, or multiple AutoML models (trained or not). Each trained model is a sub-directory of the model directory. Each model artifact (not trained yet) is a sub-directory of the artifact directory.
In most cases, there is no need to add assets to the /automl directory. After you run mvn clean install, model artifacts and trained models are deployed from the [ARTIFACT]-ml-sdk module (if any) of the same project to [ARTIFACT]-package/target/automl.
When there is no such directory in an Asset Bundle, it means all Manual Tasks have the No Automation AutoML setting.
For instructions to pack models customized with AutoML SDK, refer to the guide.
/bot-config
The directory contains bot steps (XML) that appear in Control Tower and are essential for designing BPs. It is intended to store the bot steps the BCB module does not include.
Packing this directory is optional unless you have legacy bot configurations that are not in BCBs (for example, those created before the transition to ODF).
note
It is not needed to copy XML data from your BCB to the /bot-config directory. Once BCB import is over, all the necessary bot steps reappear in the Control Tower automatically.
/business-process
Pack the directory with business process packages created as zip files in a local or server Control Tower (CT) in the development environment.
The recommended practice is to leave the directory empty at first Asset Bundle deployment and to proceed as follows:
- Create a Business Process (BP) in a server or local CT in your development environment.
- Export the Business Process from CT.
- Put the exported Business Process into
resources/business-process.
Apply a similar workflow when you need to update a Business Process to incorporate BCB code changes.
note
Be aware that the system automatically creates a BP draft for every imported BP package in Control Tower.
/datastore
The /datastore directory is dedicated for Data Store definition. Data Stores are the most convenient means to share temporary data across bot steps and to persist data for Analytics.
The root of the directory can contain CSV files to be used for creating Data Stores. One CSV file corresponds to one Data Store. The names of CSV files map to the names of Data Stores.
The format of the data in the files must be the same as if you uploaded data to a Data Store via Control Tower. Each file must contain headers and, at least, one record.
Mind that Data Stores created based on the files contain a single data type—NVarchar(max).
note
Data in the CSV files overrides the existing content in Control Tower Data Stores by default. For more information, refer to Asset Bundle migration API | Import strategies.
The /datastore directory includes the /migrations sub-directory storing structured Liquibase XML migrations required to define the Data Stores of your Use Case. In addition to the standard concepts of Liquibase XML changelogs structuring, there are some extra requirements to ensure proper Data Store management.
- For a non-empty
/migrationsdirectory, the migrations.properties file is expected. Its default content is the one line:apply.migrations.in.raw.form=falseVia the property, the platform reflect automatically your migrations to the platform service metadata, which is required for proper functioning of your Data Store as a platform entity. It is not recommended to change the property. - The
install.changelog.xmlfile is at the root level of the directory. - The actual change sets are to reside in the
/versionedsub-directory. There are no limitations on the structure inside it. A typical structure created in your ODF 2 project looks like that:
    ├── datastore.migrations
    │   ├── versioned
    │   │    └── _changelist.xml
    │   │    └── Standard_Tables.xml
    │   │    └── Other_Table1.xml
    │   │    └── Other_Table2.xml
    │   ├── install.changelog.xml
    │   └── migrations.properties
Where:
_changelist.xmlis an index of all changelists of this directory._changelist.xml sample
<?xml version="1.1" encoding="UTF-8"?> <databaseChangeLog xmlns="http://wwww.liquibase.org/xml/ns/dbchangelog" xmlns:xsi="http://www.w3.org/2001/XMLSchema-instance" xsi:schemaLocation="http://wwww.liquibase.org/xml/ns/dbchangelog ../dbchangelog-3.6.xsd"> <include relativeToChangeLogFile = "true" file = "Standard_Tables.xml" /> <include relativeToChangeLogFile = "true" file = "Other_Table1.xml" /> <include relativeToChangeLogFile = "true" file = "Other_Table2.xml" /> </databaseChangeLog>Standard_Tables.xml,Other_Table1.xml, andOther_Table2.xmlcontain actual migrations of Data Stores.install.changelog.xmlis located at the root level and contains all XML files with relative paths from which you read the migrations.install.changelog.xml sample
<?xml version="1.1" encoding="UTF-8"?> <databaseChangeLog xmlns="http://wwww.liquibase.org/xml/ns/dbchangelog" xmlns:xsi="http://www.w3.org/2001/XMLSchema-instance" xsi:schemaLocation="http://wwww.liquibase.org/xml/ns/dbchangelog ../dbchangelog-3.6.xsd http://www.liquibase.org/xml/ns/dbchangelog-ext dbchangelog-ext.xsd"> <include relativeToChangeLogFile = "true" file = "versioned / _changelist.xml" /> </databaseChangeLog>migrations.propertiesis an integral part of the structure located on the root level since the project creation.
important
If you create a project from the ODF 2 Archetype, /datastore.migrations already has the initial structure compatible with the platform requirements. Otherwise, the structure has to be created by a developer.
In addition to the migration structure requirements, some Liquibase changeset types and database Data Types are prohibited.
For more details, refer to Manage Data Model with Liquibase| Using allowed statements and Data Stores with ORMLite | ORMLite limitation.
/s3
Pack the directory with static resources if you need those for your Use Case. Each top-level sub-directory in the /s3 directory corresponds to an s3 bucket. Therefore, the names of these top-level sub-directories in the /s3 directory must map to the names of s3 buckets.
Example: Assume, the /s3 directory in an Asset Bundle has the following structure: s3 > bucket1 > directory1 > directory2 > file.txt. On the target environment, the file.txt file resides in the directory1/directory2 structure inside the bucket1 s3 bucket. If there is no such bucket on a target environment, it is created.
/template
The directory contains zero, one, or multiple XML files, each representing a Template. An XML file name maps to a Template name.
Inside the /template directory, a macro sub-directory can reside, with a structure representing Macro Templates used for advanced Manual Task customizations.
When simple Task Designer manipulations or Answer configurations are not enough to achieve the desired behavior or interface in a Manual Task, Macro Templates are created in CT with custom HTML, CSS, or JavaScript code. Subsequently, the Macro Templates can be re-used in a base Manual Task template via the <include> tag.
Example of a macro sub-directory structure:
Assume that the /template/macro directory has the following structure:
    ├── macro
    │   ├── ie
    │   │    └── js
    │   │    │    └── code.js
    │   │    └── styles.css
    │   └── front.ftl
Then, three Macro Templates named ie/js/code.js, ie/styles.css, front.ftl appear in Control Tower. In case there is a conflict between a template in the /macro sub-directory and the root of the /template directory, the /macro template prevails. UTF-8 encoding is supported only.
To put a macro template into the /template directory, follow the instructions below:
In the
/templatedirectory, create amacrosub-directory.Inside the
macrosub-directory, put the macro template files in required formats. For a clearer structure, create lower-level sub-directories, as shown in the sample above.To verify whether the templates were deployed successfully, go to CT, open Advanced > Templates. On the Templates page, set the search filter to macro and check the resulting list for your templates.
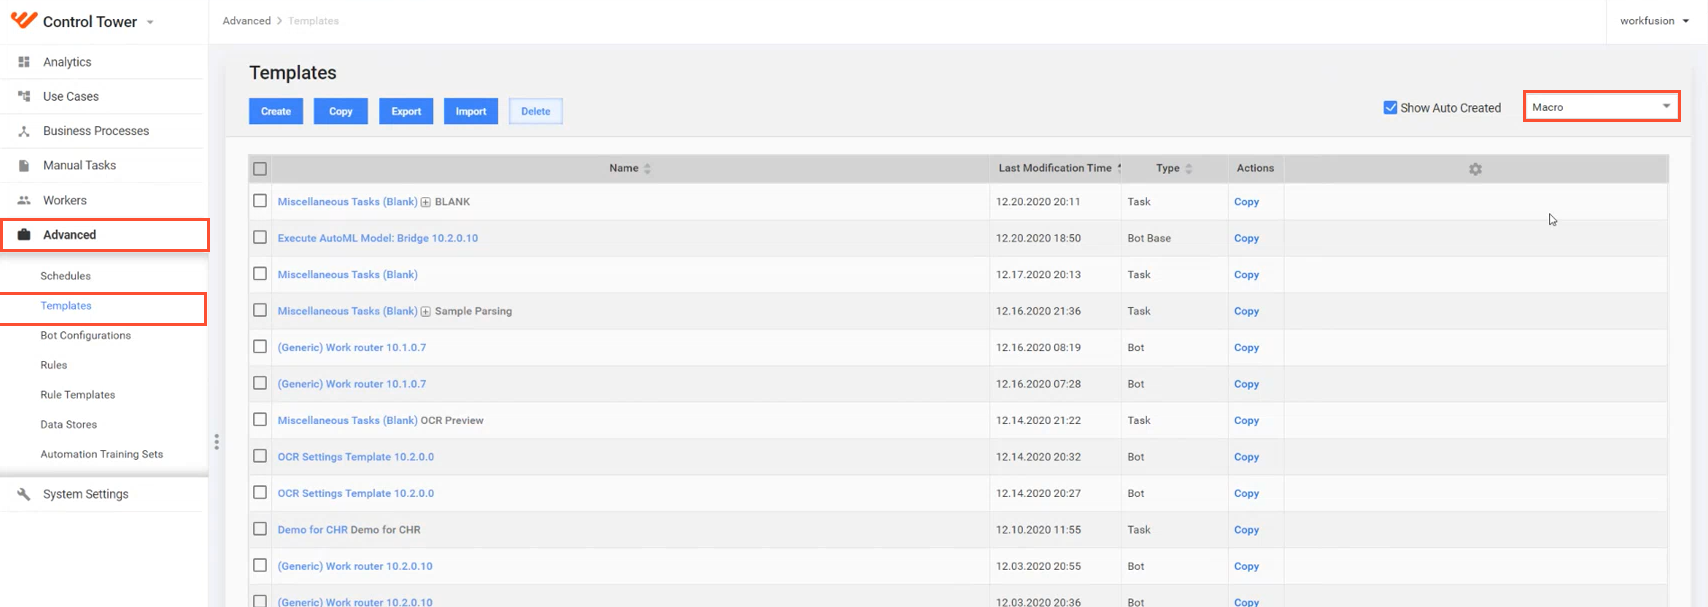
Subsequently, you can re-use the content of the existing templates to create new files in the template/macro directory. For that, go to the Templates page, click any item in the macro-filtered list, and copy its content into a file in your IDE.
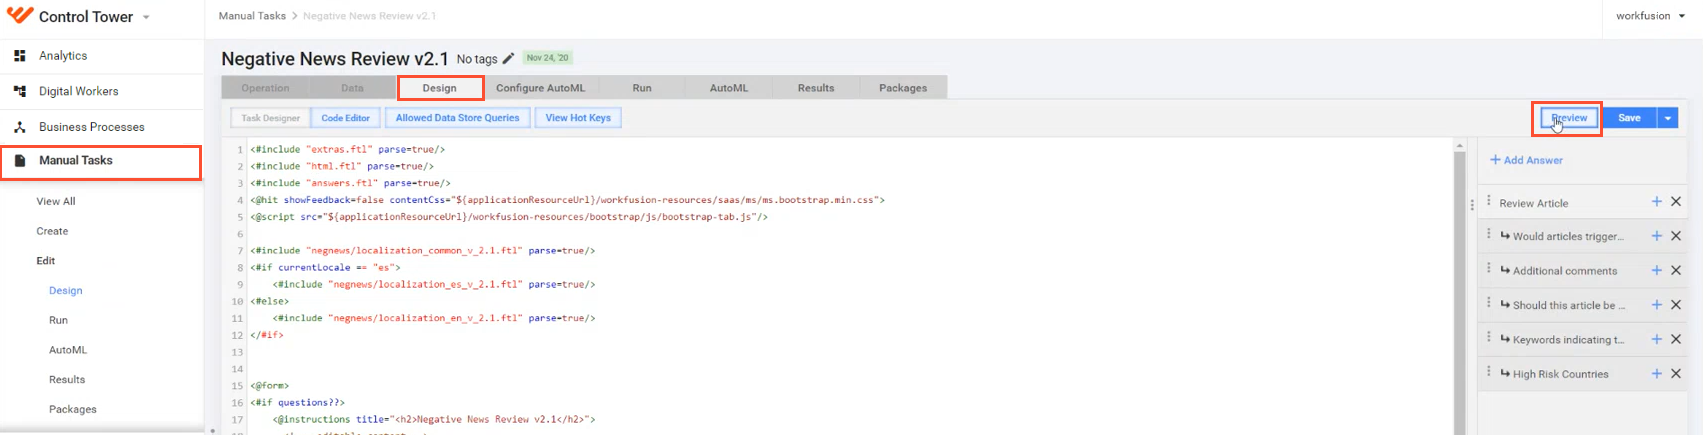
After templates are deployed on CT, you can edit their content right from your IDE and view the changes via Manual Task Preview.
/training-set
Packing the directory is optional. It can contain zero, one, or multiple CSV files, each representing an automation training set. A CSV file name maps to an automation training set name. The file format corresponds to the resulting format of a single automation training set export.
/use-case
If you have a Business Process fully developed, packing the /use-case directory is optional.
You can include XML files representing Operations into the directory if you need them to develop a Business Process. In this case, you put the files into the directory for initial Asset Bundle deployment without a BP package. See the instruction for packing the /business-process directory.
meta-info.json
The file is required and must be a valid JSON file. The NAME and WF_VERSION parameter pairs are required.
The recommended structure is as follows:
    {
        "USE_CASE_CODE": "B-AML-NNRDC",
        "USE_CASE_VERSION": "1.0.0",
        "DATA_MODEL_VERSION": "1",
        "AUTHOR": "user user",
        "DESCRIPTION": "Some specific bundle description",
        "INSTANCE": "example.workfusion.com",
        "NAME": "pack name",
        "PACKAGE_DATE": "2019-06-28 06:24:43",
        "TARGET_VERSION": "10.2.0.4",
        "WF_BRANCH": "bcb-intake-9.2.0.3",
        "WF_REVISION": "bf19d7ff",
        "WF_VERSION": "10.2.0.4"
    }
The USE_CASE_CODE and USE_CASE_VERSION parameters are required for all projects that contain Liquibase XML migrations. It is recommended to also use them for all projects to enable better compatibility with some features of 10.2+ versions. The following restrictions apply to the parameters:
- USE_CASE_CODE can contain letters in upper case, dashes ("-"), underlines ("_"), and digits. For common Use Cases featured on start.workfusion.com, use codes provided on the site.
- USE_CASE_VERSION must contain a semantic version of a Use Case (refer to Semantic Versioning), for example, 1.0.2, 2.3.5-SNAPSHOT, and so on.
If an Asset Bundle is structured correctly, it contains all components needed for Business Processes to run on a target (production) environment. However, any component from the structure above is optional, except for meta-info.json.
tip
You can also create an Asset Bundle containing one or more resources (for example, AutoML models or templates) and import it to a target environment to add those components only.
See sample Asset Bundle
The figure below depicts a sample Asset Bundle with an extended structure.
├── artifactory-dependency
│   ├── bcb
│   │   └── com
│   │       └── workfusion
│   │           ├── intake
│   │           │   └── intake-core
│   │           │       └── 1.0
│   │           │           └── intake-core-1.0.jar
│   │           └── negative-news
│   │               └── 3.0
│   │                   └── negative-news-3.0.jar
│   └── repository-name1
├── automl
│   ├── artifact
│   │   ├── generic-ru-model
│   │   │   ├── 1.0
│   │   │   │   ├── config
│   │   │   │   ├── lib
│   │   │   │   └── model.description.jar
│   │   │   └── 1.1
│   │   │       ├── config
│   │   │       ├── lib
│   │   │       └── model.description.jar
│   │   └── invoice-extraction-model
│   │       └── 2.0
│   │           ├── config
│   │           ├── lib
│   │           └── model.description.jar
│   └── model
│       ├── claim_classification_1_3
│       │   └── output
│       │       ├── hpo-config
│       │       ├── model
│       │       └── model-info.txt
│       └── invoice_xml_4aa8ef30-290c-4a25-8deb-264e27b03068
│           └── output
│               ├── model
│               └── model-info.txt
├── bot-config
│   └── ocr.xml
├── business-process
│   ├── BP+with+BCB+Example+29-3-2019.zip
│   └── Negative+News+AML.zip
├── datastore
│   ├── datastore1.csv
│   └── datastore2.csv
├── meta-info.json
├── s3
│   ├── bucket-name-example
│   └── doc-upload
│       ├── pdf-chrome-printer.jar
│       └── report
│           └── report-template.html
├── template
│   ├── template1.xml
│   ├── template2.xml
│   └── templates-combined.xml
└── use-case
    ├── bot-task
    │   ├── bot-use-case1.xml
    │   ├── bot-use-case2.xml
    │   └── bot-use-cases-combined.xml
    ├── business-process
    │   ├── bp-use-case1.xml
    │   ├── bp-use-case2.xml
    │   └── bp-use-cases-combined.xml
    └── manual-task
        ├── manual-use-case1.xml
        ├── manual-use-case2.xml
        └── manual-use-cases-combined.xml
For a typical Asset Bundle example, download bundle-example.zip.
After you package the Use Case assets into a bundle as described above, your next steps are to build the bundle and deploy it. For detailed instructions, refer to Publish Asset Bundle with Maven.
For instructions to import a pre-built Asset Bundle via CT user interface or REST API, refer to Import Asset Bundle or Asset Bundle migration API, accordingly.