Manage datasets
A dataset is a container for documents and all related meta information as required for model training or testing, such as:
- Labels
- Data schema
- Optical Character Recognition (OCR) settings
- Statistics and so on
Work.AI allows you to create two dataset types:
Document containing TXT, TIFF, PDF, BMP, PNG, JPEG, EML, and MSG files and used for classification and extraction tasks
Tabular, which is a CSV- or Parquet-based dataset intended for classification models
Access datasets
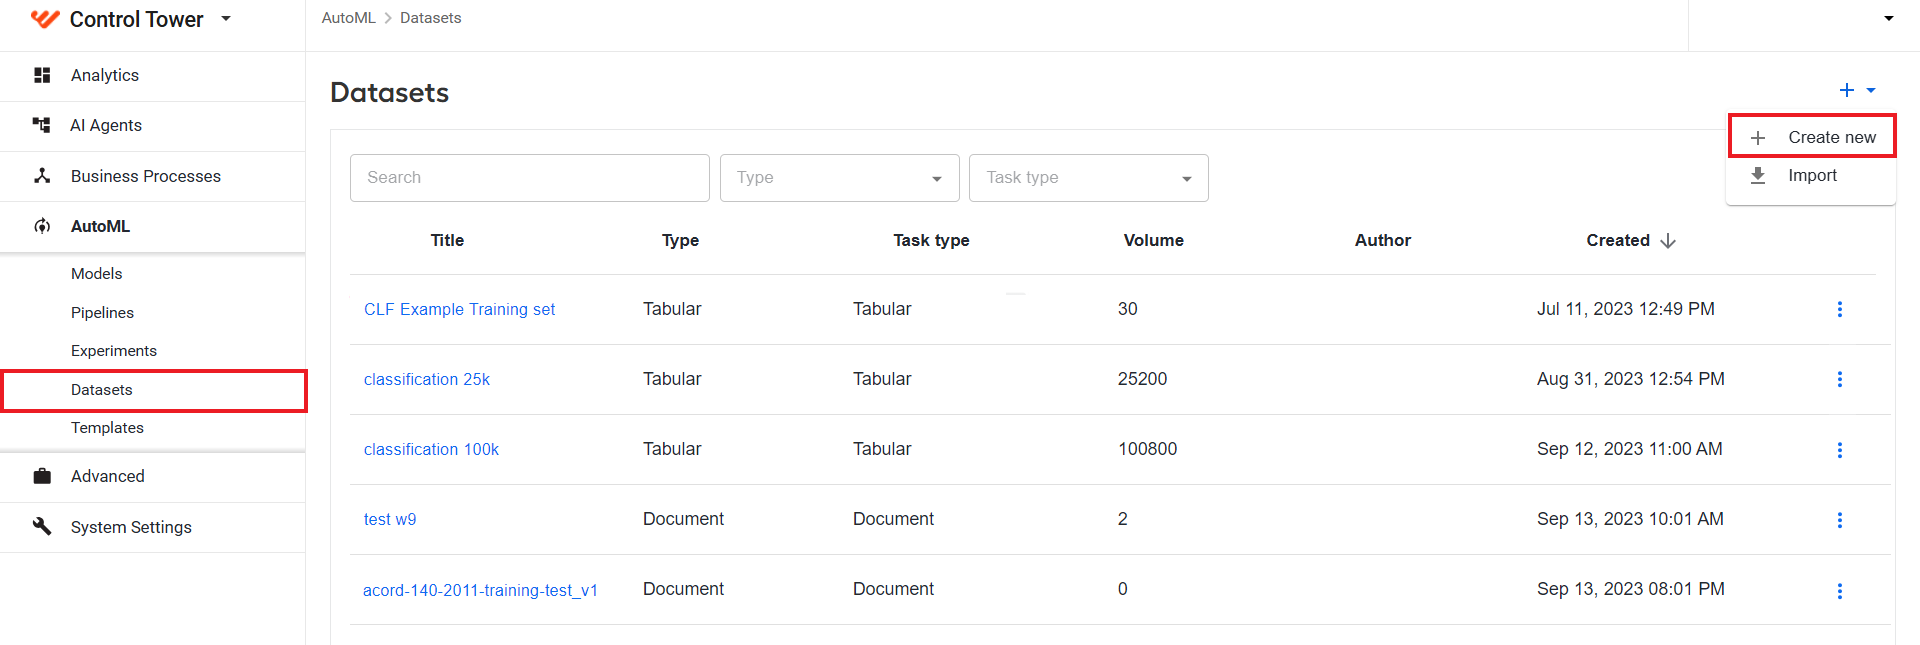
To view, create, label, and otherwise manage datasets, go to AutoML > Datasets. The list is updated every time you create a dataset.
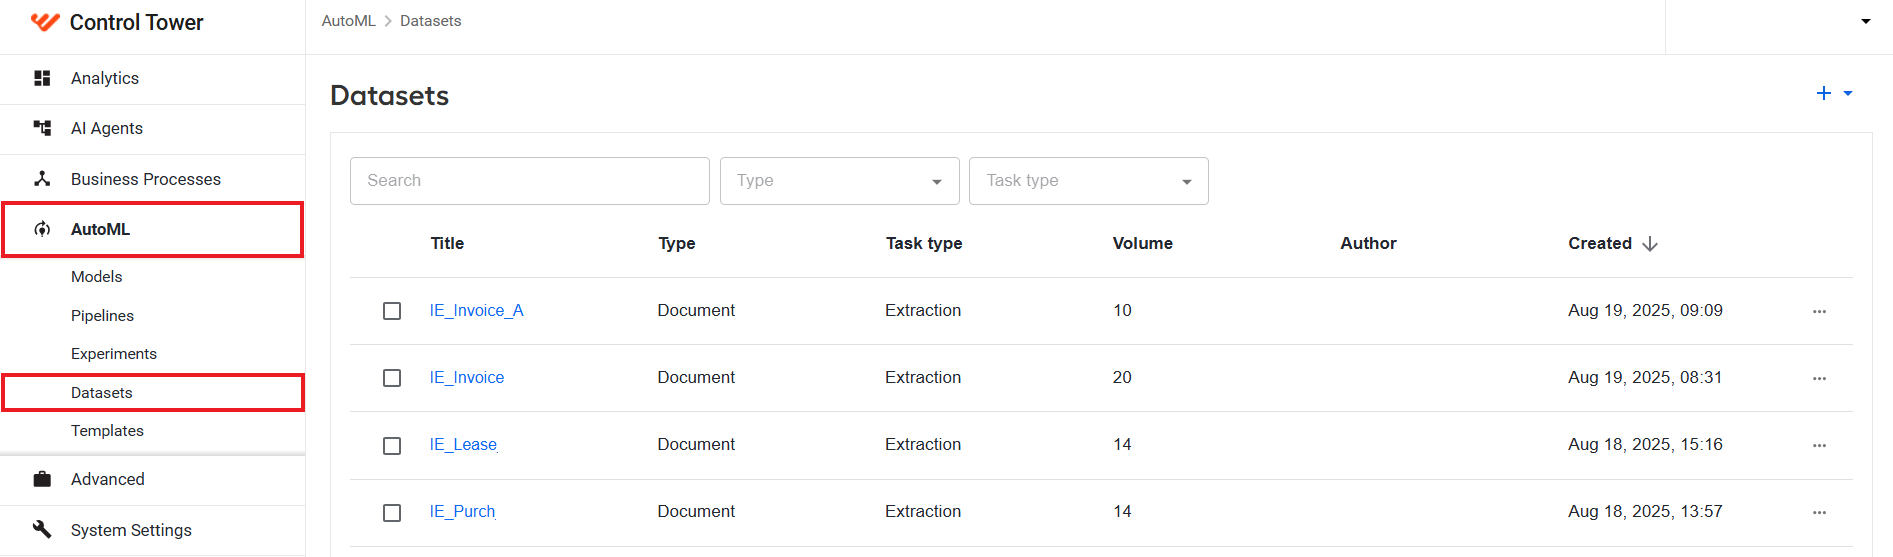
In the Datasets list, you can find the following information about each dataset.
| Parameter | Description |
|---|---|
| Title | Dataset name specified during dataset creation. Each dataset name is a link to the associated dataset page. |
| Type | Dataset type: tabular or document. |
| Task type | Model task type: extraction or classification. |
| Volume | Number of rows for a tabular dataset or number of documents for a document dataset. |
| Author | Name or alias of the dataset author. |
| Created | Date and time (in the dd.mm.yyyy, hh:mm format) when the dataset was created. |
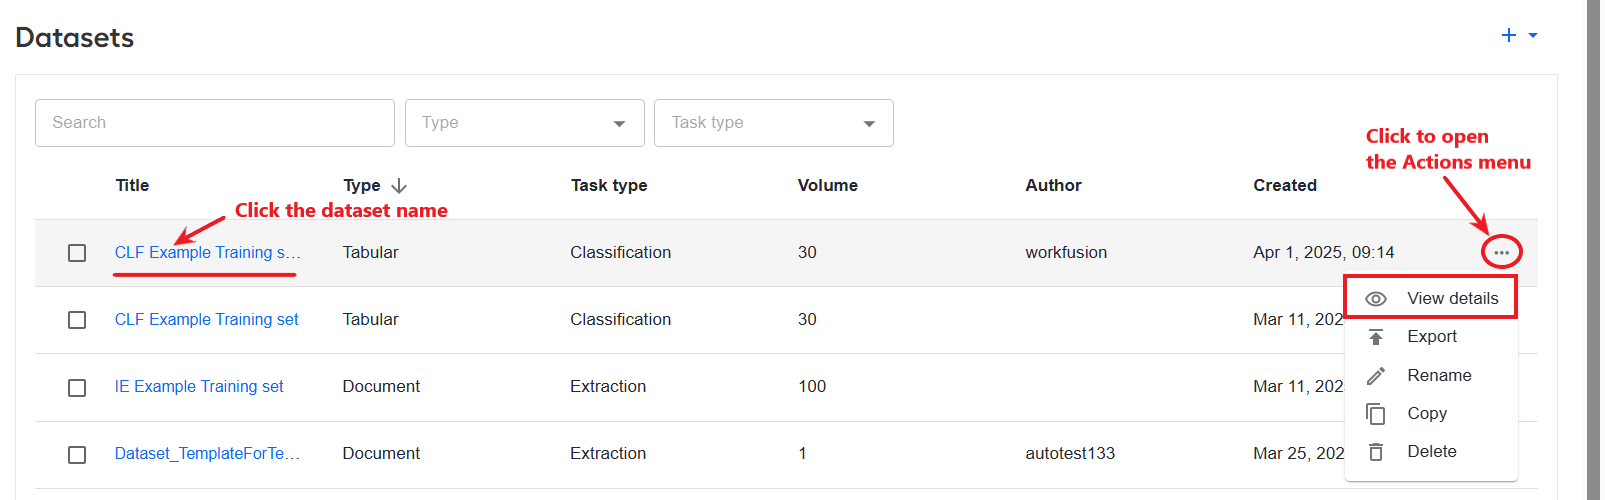
To drill down to a particular dataset, click the dataset name in the list or open its Actions menu and select View details.
Filter and search
You can search datasets in the list on the Datasets page or filter them based on the dataset type or type of task the dataset is intended for.
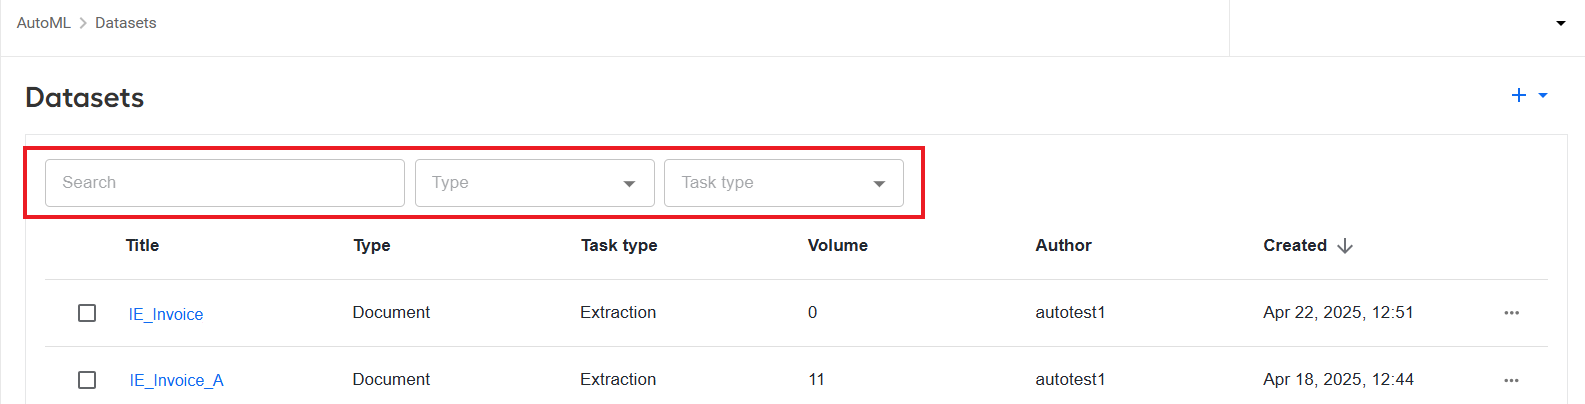
To search for a particular dataset by its title or author, use the Search field in the top-left corner.
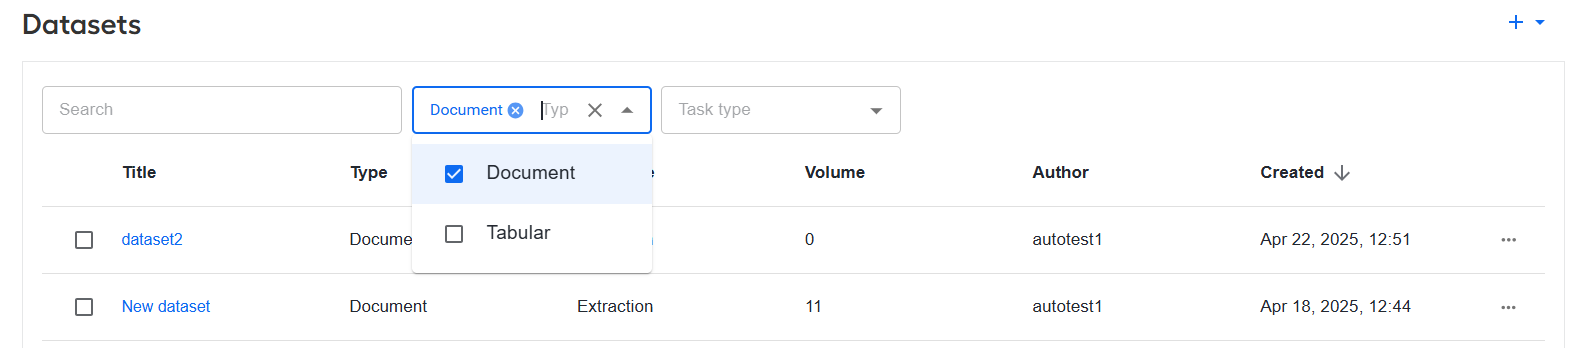
To filter datasets by their type, click the Type drop-down box and select Document, Tabular, or both. The list is filtered accordingly.
To filter datasets by the type of the task they are intended for, click the Task type drop-down box and select Extraction, Classification, or both. The list is filtered accordingly.

To turn off an active filter, click the Close button (cross icon) next to the chosen option.
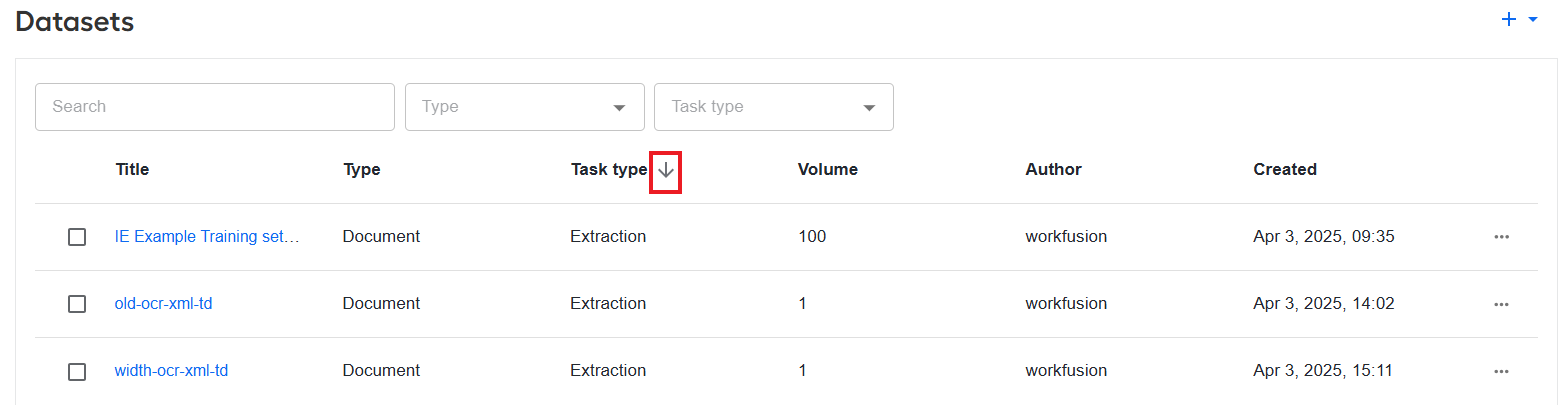
You can sort datasets by their titles, type, task type, author, or the creation date and time by clicking the header of the corresponding column. Sorting by volume is not available.
Create dataset
To create a dataset, click the plus (+) button in the top-right corner of the Datasets page and select Create new.
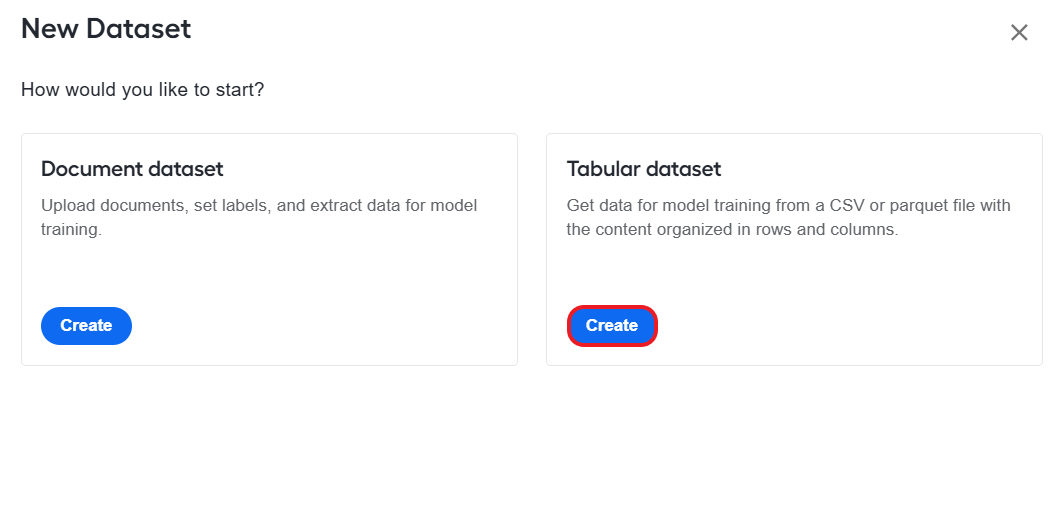
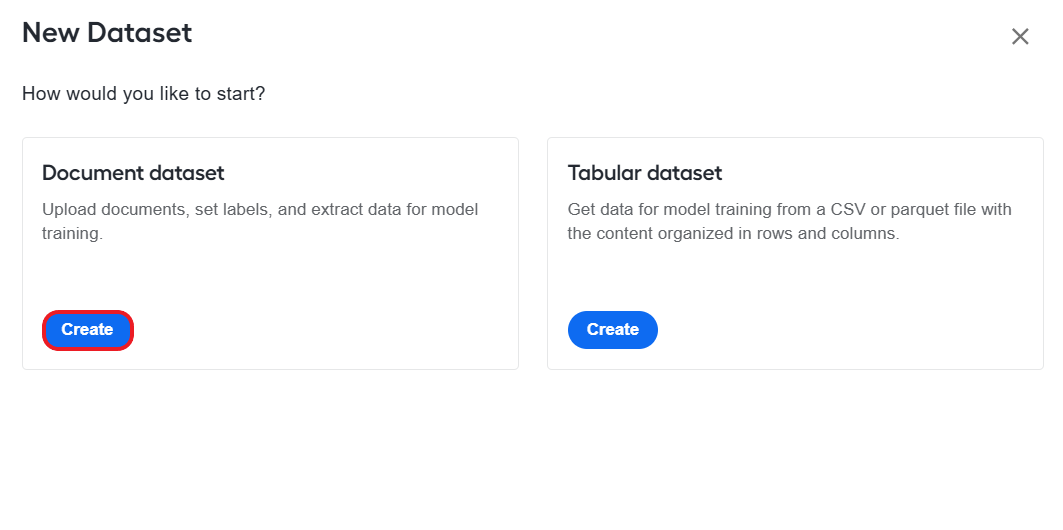
In the New Dataset popup, you can choose to create one of the two dataset types:
Create tabular dataset
The flow below is for creating a tabular dataset from scratch. Alternatively, you can create one by copying an existing tabular dataset or by extracting rows from it.
To create a tabular dataset, follow the steps below:
In the New Dataset popup, click Create in the Tabular dataset section.
In the Dataset display name field, specify a name for the dataset you are creating. Add a description if needed.
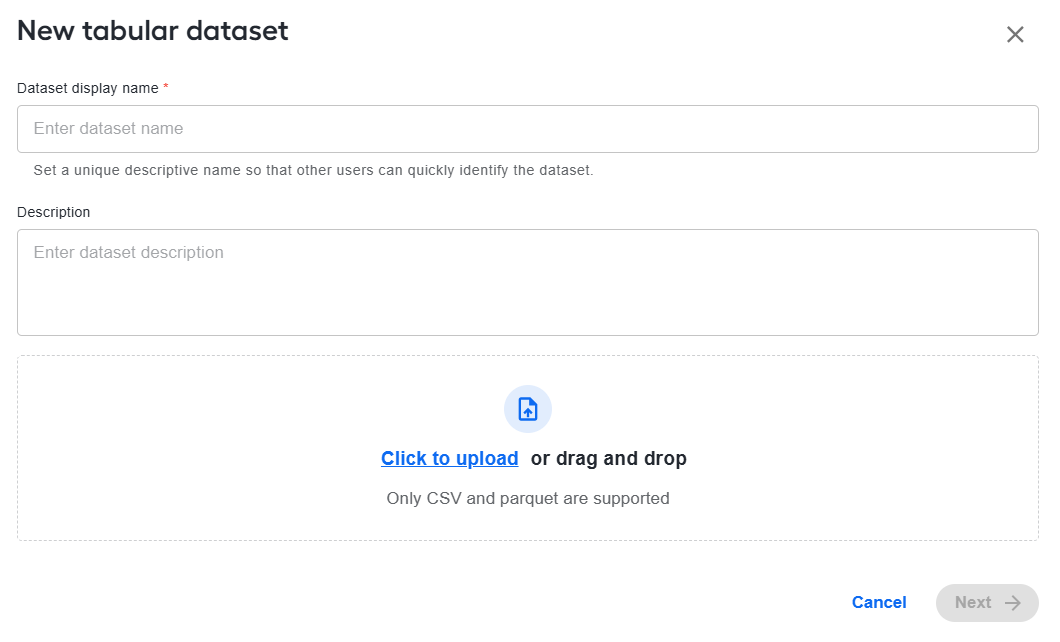
Upload an input document and click Next. For tabular datasets the only supported input formats are CSV and Parquet.
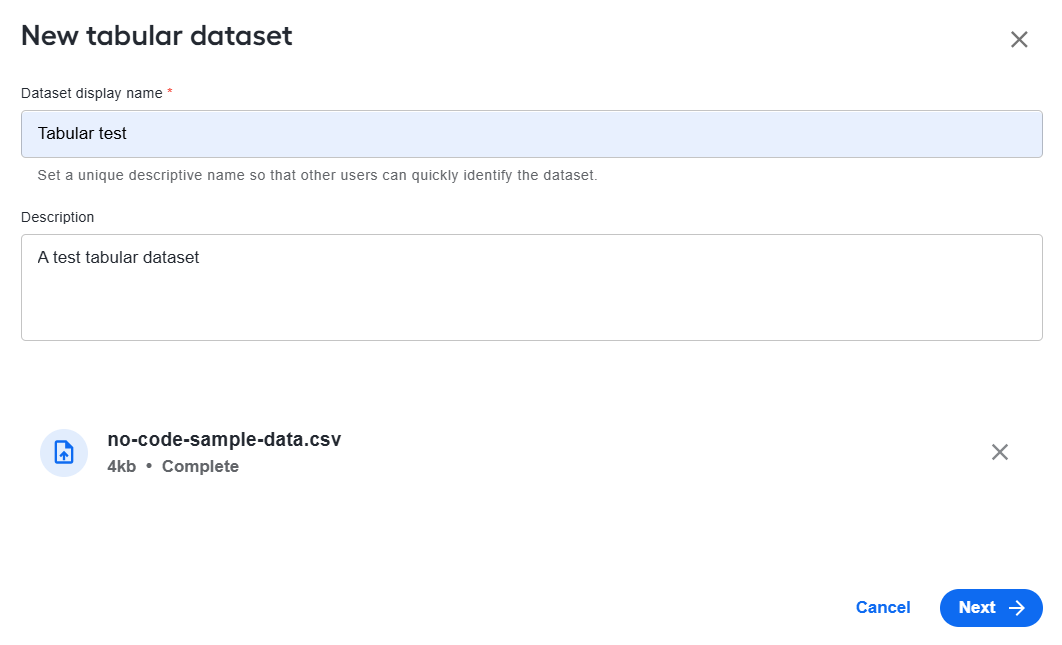
You are redirected to the page of the created tabular dataset from where you can label or apply actions (copy, rename, and so on) to it.
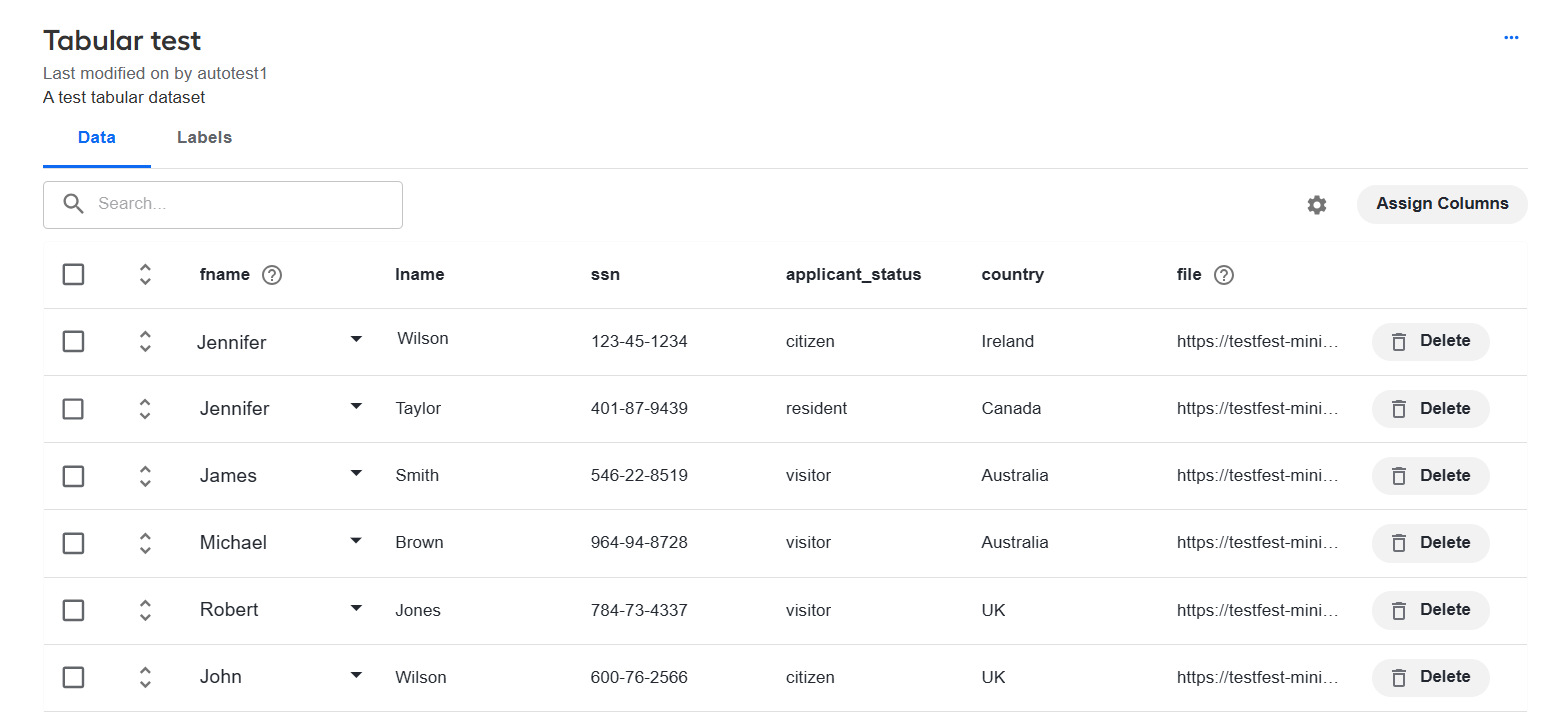
Manage tabular data
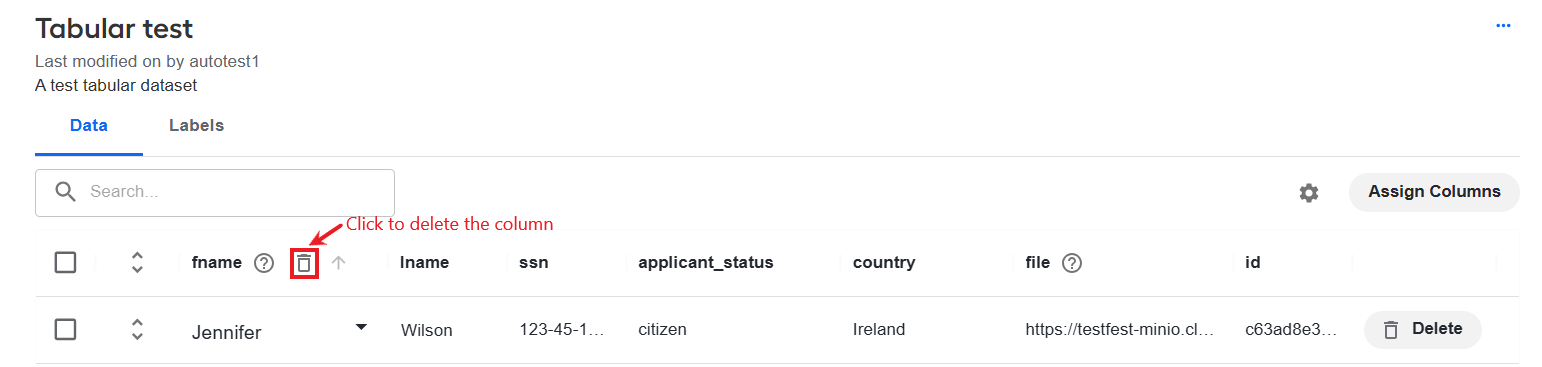
The Data tab displays all the columns and rows from the uploaded CSV or Parquet files. You can adjust the display in the table on the Data tab as described below:
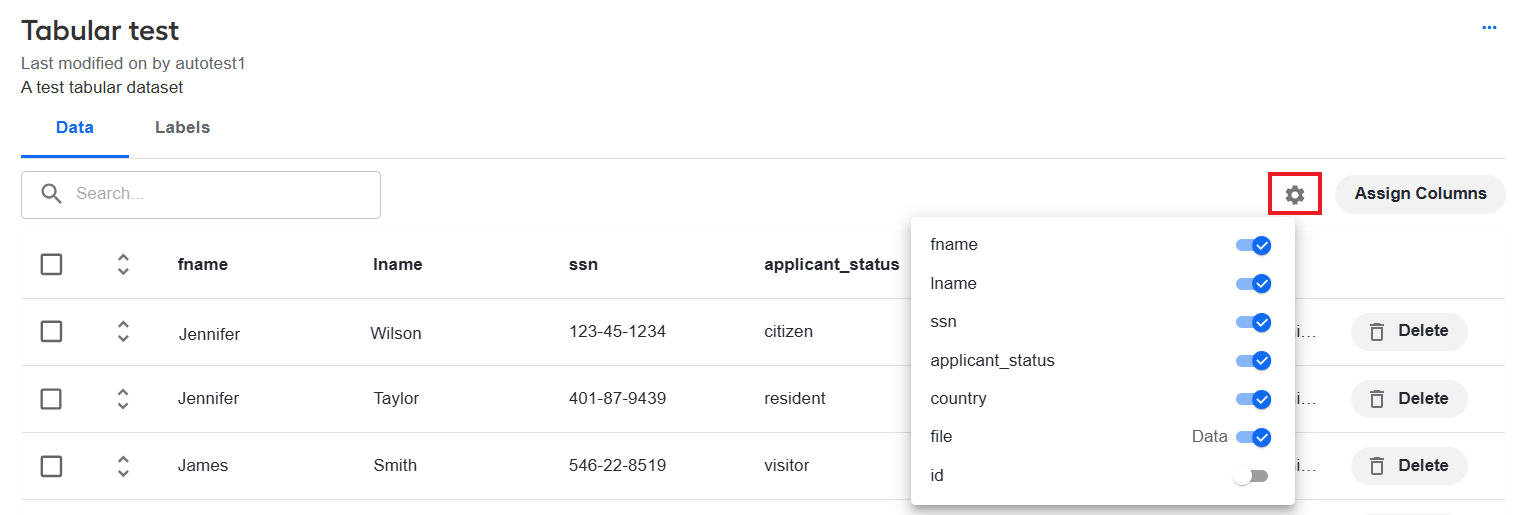
To enable or disable the display of columns, click the cogwheel button and switch the toggle corresponding to a specific column on or off.
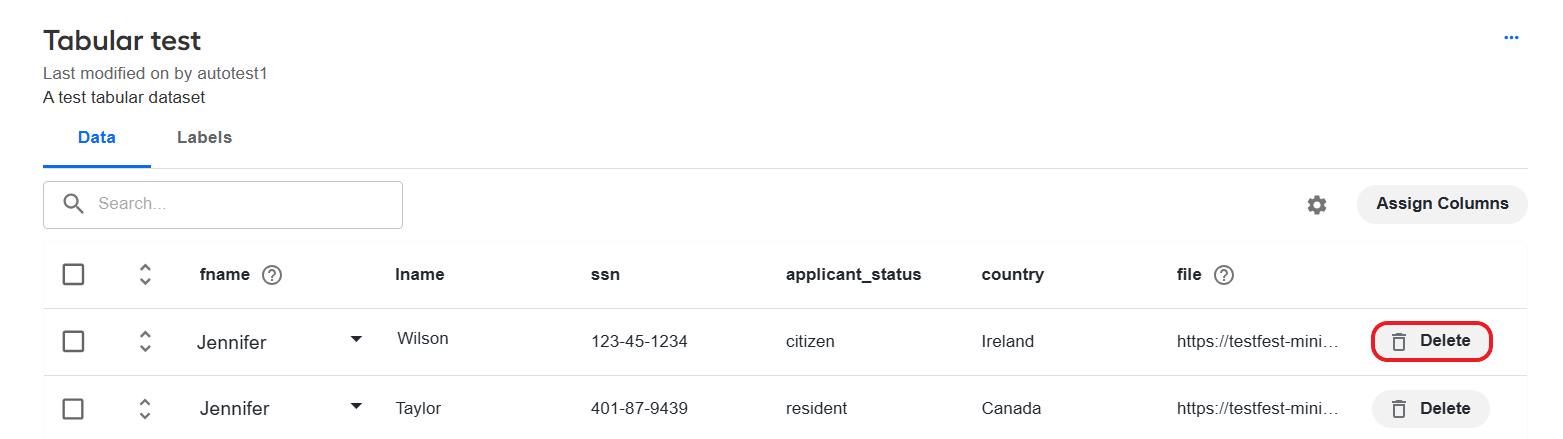
To remove a row from the dataset, click the Delete button corresponding to the row.
To remove a column from the dataset, hover over the column header, click the displayed Delete button, and confirm the deletion.
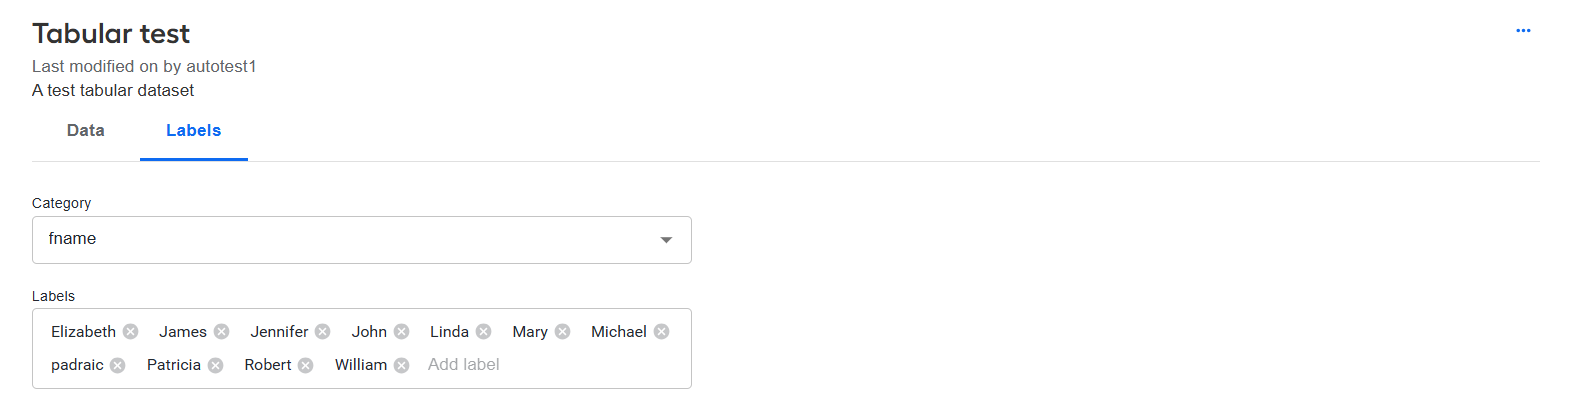
The Labels tab is where you can review or add dataset labels.
Create document dataset
The flow below is for creating a document dataset from scratch. Alternatively, you can create one by copying an existing document dataset or by extracting documents from it.
To create a document dataset, follow the steps below:
In the New Dataset popup, click Create in the Document dataset section.
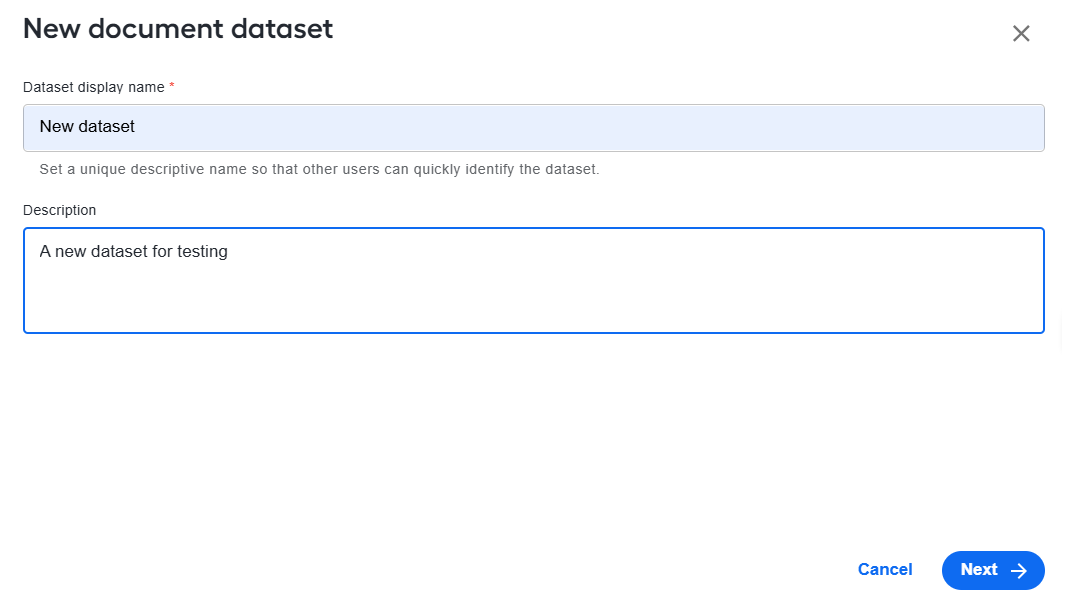
In the Dataset display name field, specify a name for the dataset you are creating. Add a description if needed and click Next. A new dataset is created and added to the Datasets list, while you are redirected to the dataset page from where you can label and apply actions (copy, rename, and so on) to it.
On the dataset page, upload required files. Supported formats include TXT, PDF, TIFF, BMP, PNG, JPEG, EML, and MSG.
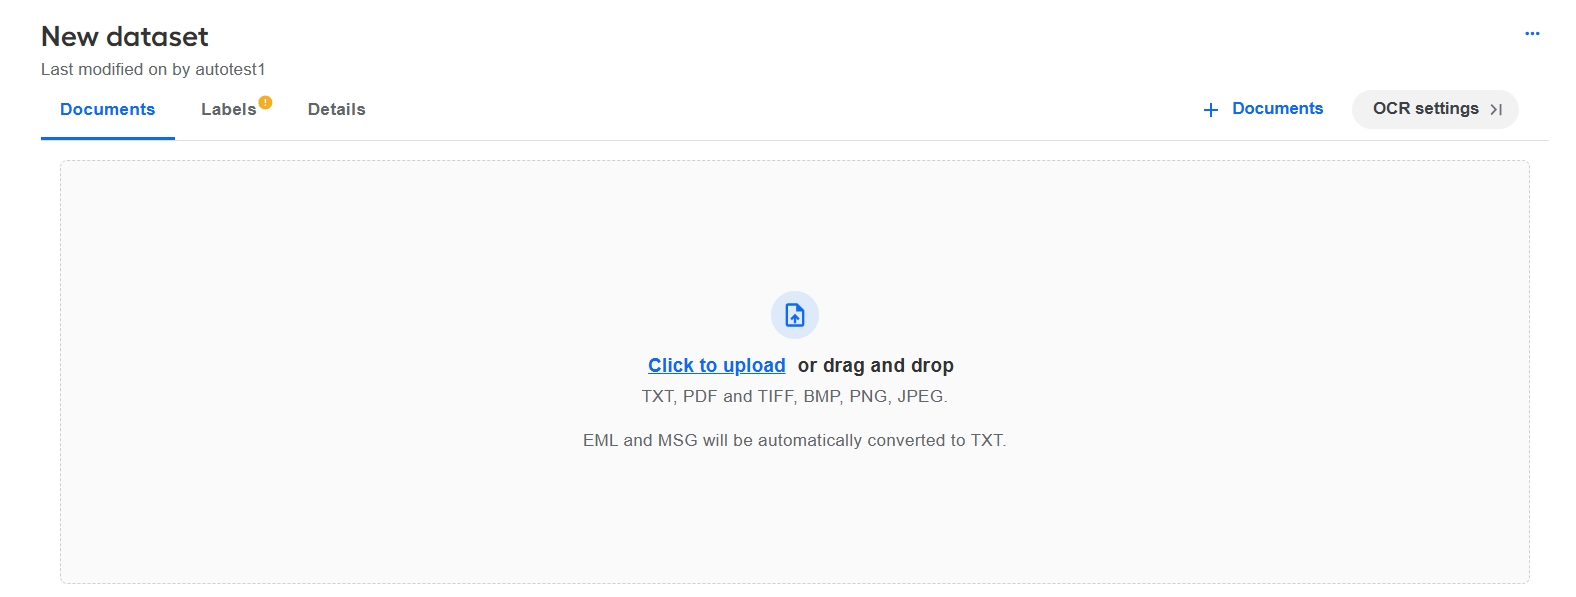
Once your documents are uploaded, you can see them on the Documents tab.
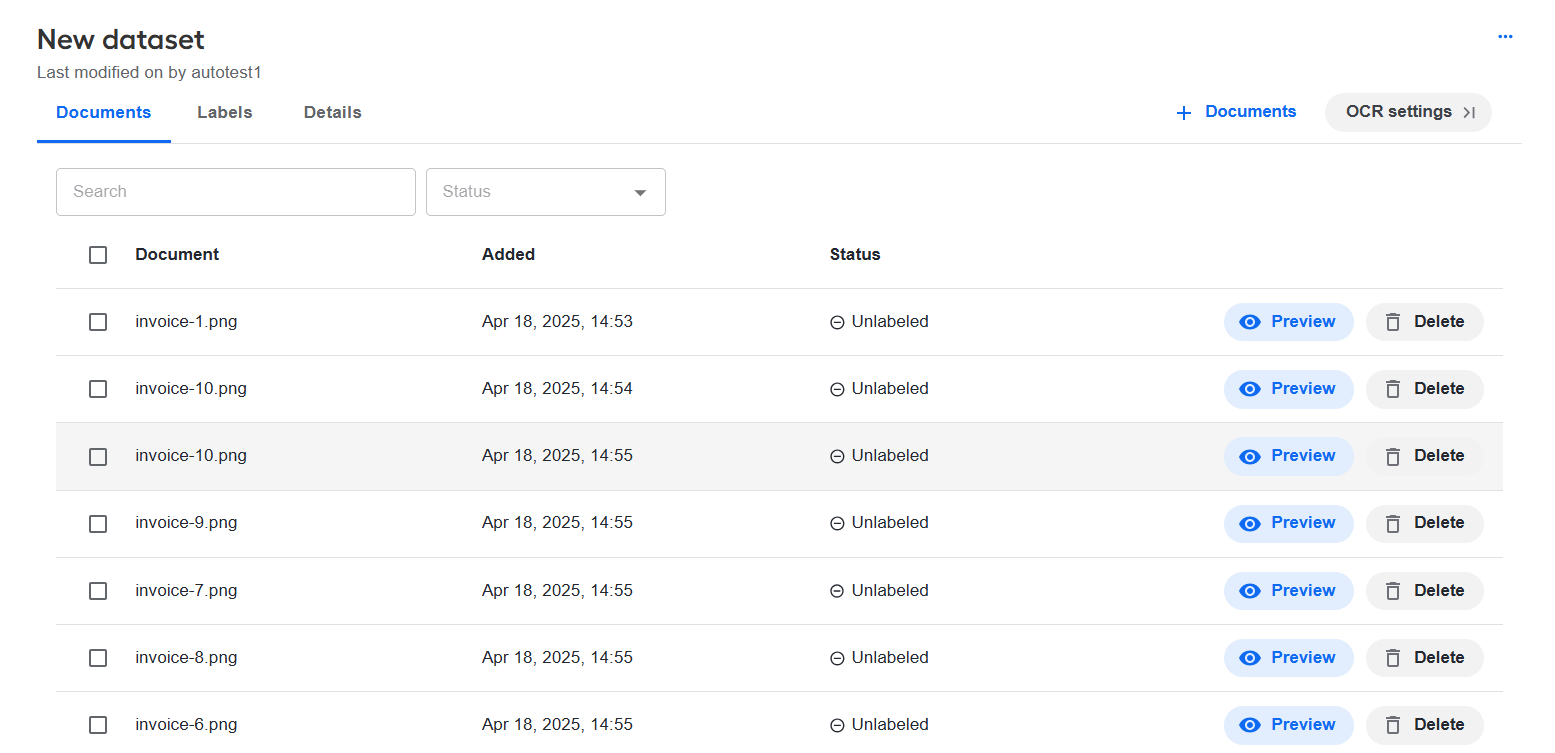
On the Documents tab, you can apply the following actions to the dataset documents:
To remove a document from the list, click the Delete button in the row with the document name.
To add a document to the dataset, click the +Documents button and choose one or more documents.
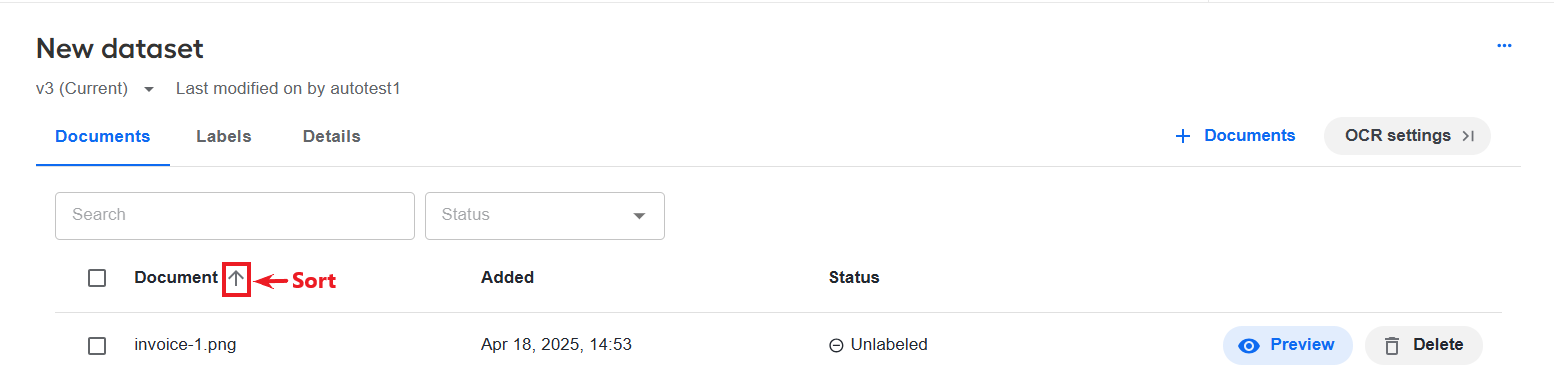
To change the sorting order for the listed documents, click a column header. Sorting is available by the document name, date of adding, and labeling status.
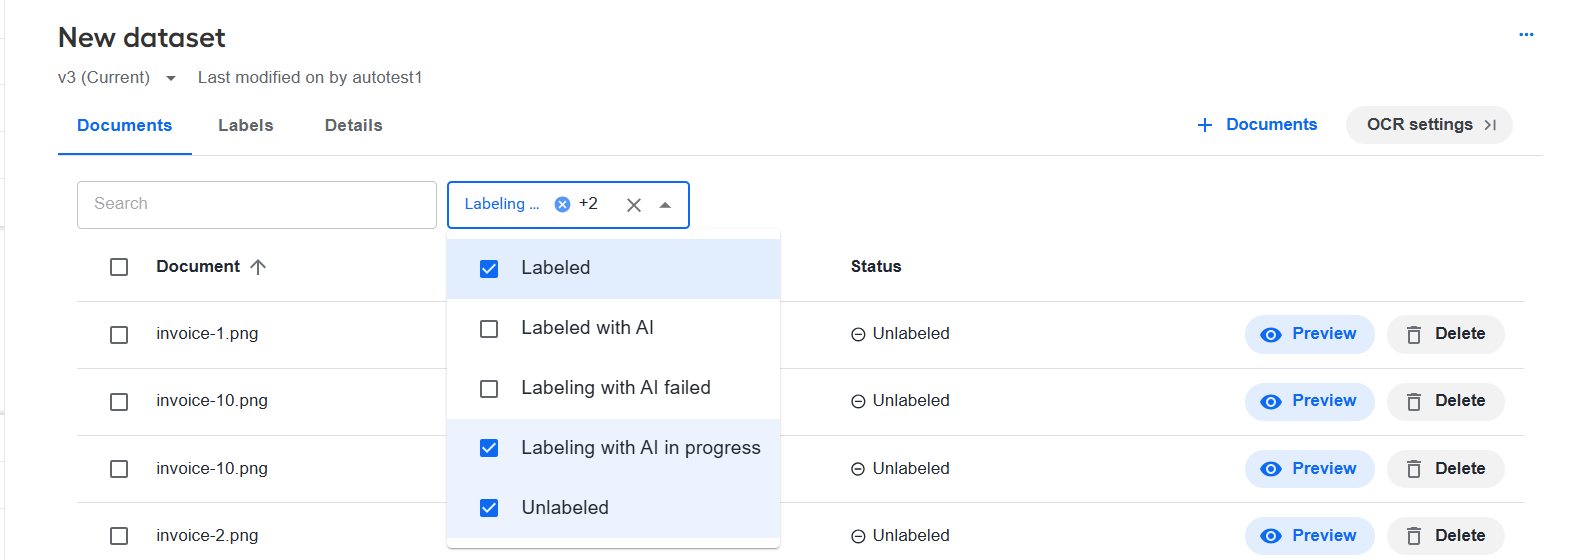
To filter documents by the status, click Status and select one or more option. The documents in the list are filtered accordingly. To turn off an active filter, click Close next to it.
To search the list for a particular document, specify the document name in the Search field. The results are displayed automatically.
Preview dataset documents
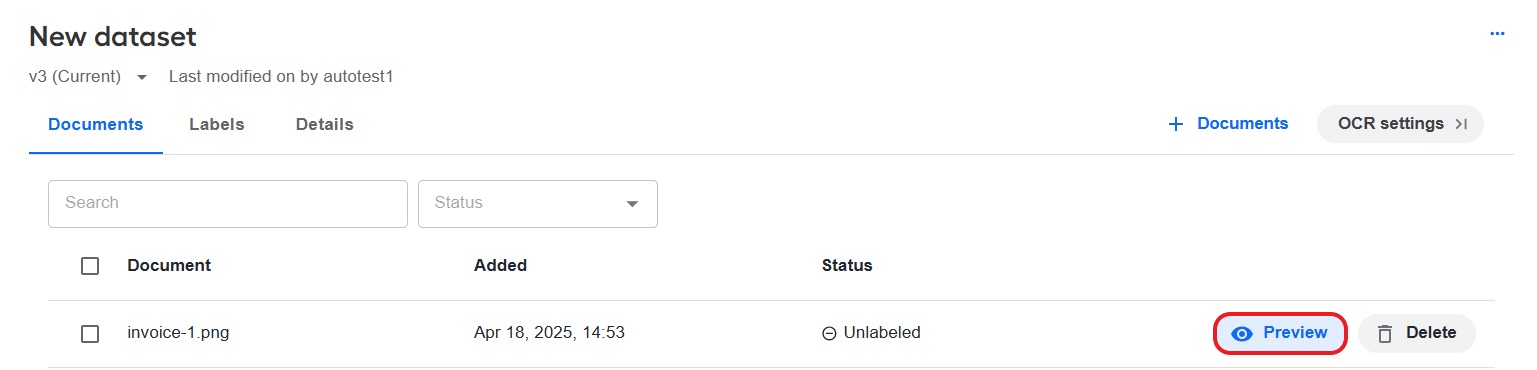
To view a document, go to the Documents tab and click the Preview button in the row with the document name.
On the Preview screen, you have the options as described below:
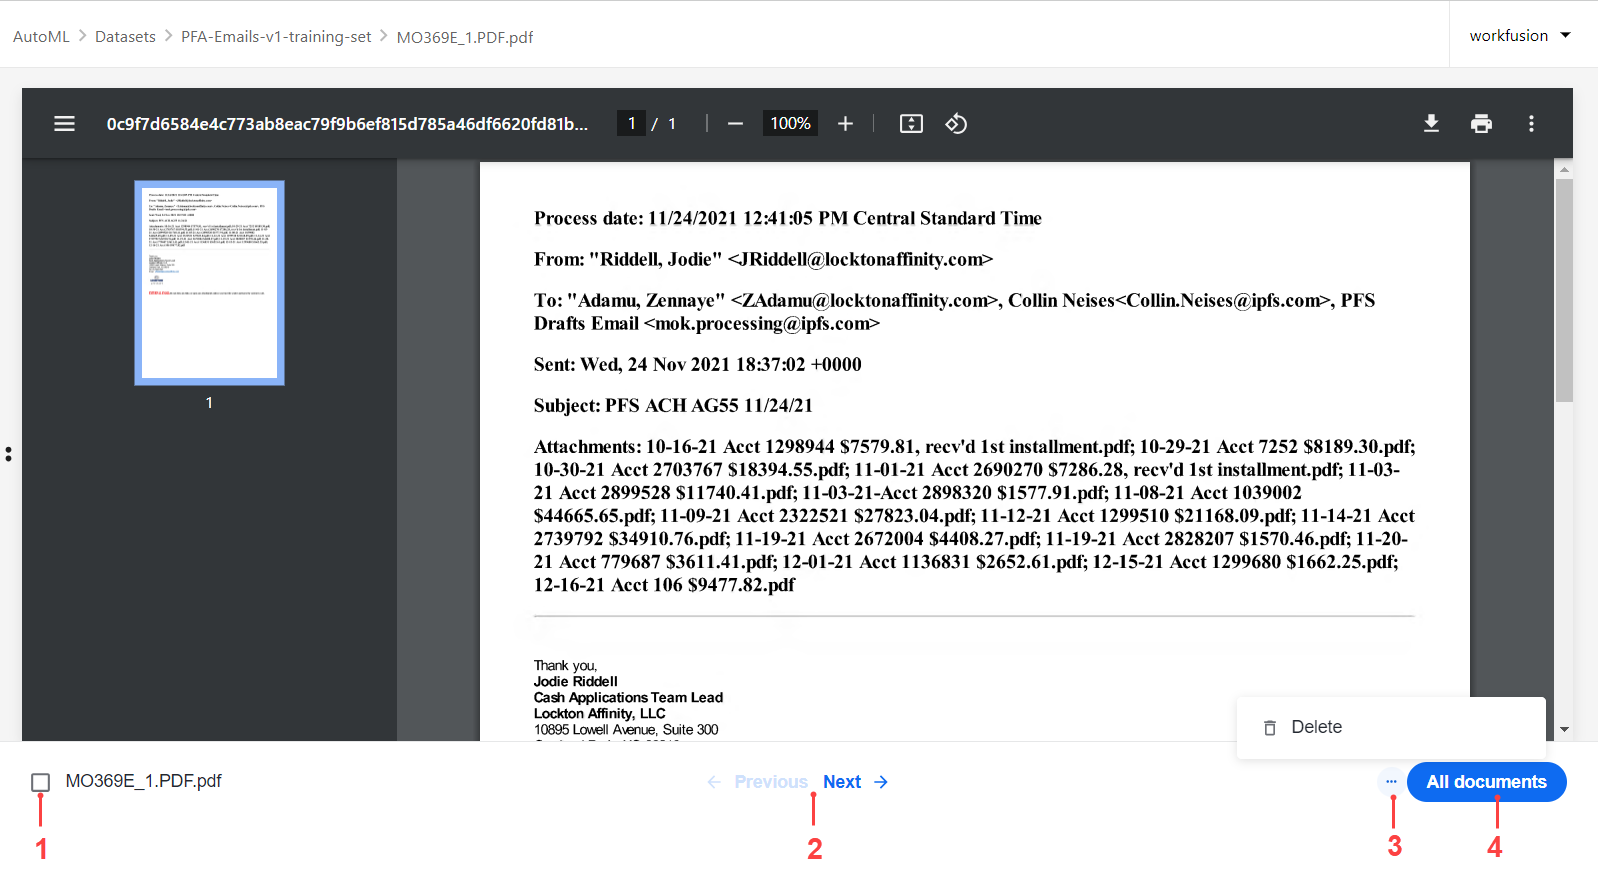
- Select a document for future actions. When you return to the list of documents, the document remains selected.
- Navigate across all dataset documents using the Previous and Next options.
- To delete a document, click the Actions button and select Remove.
- To exit the preview mode and return to the list of documents, click the All documents button.
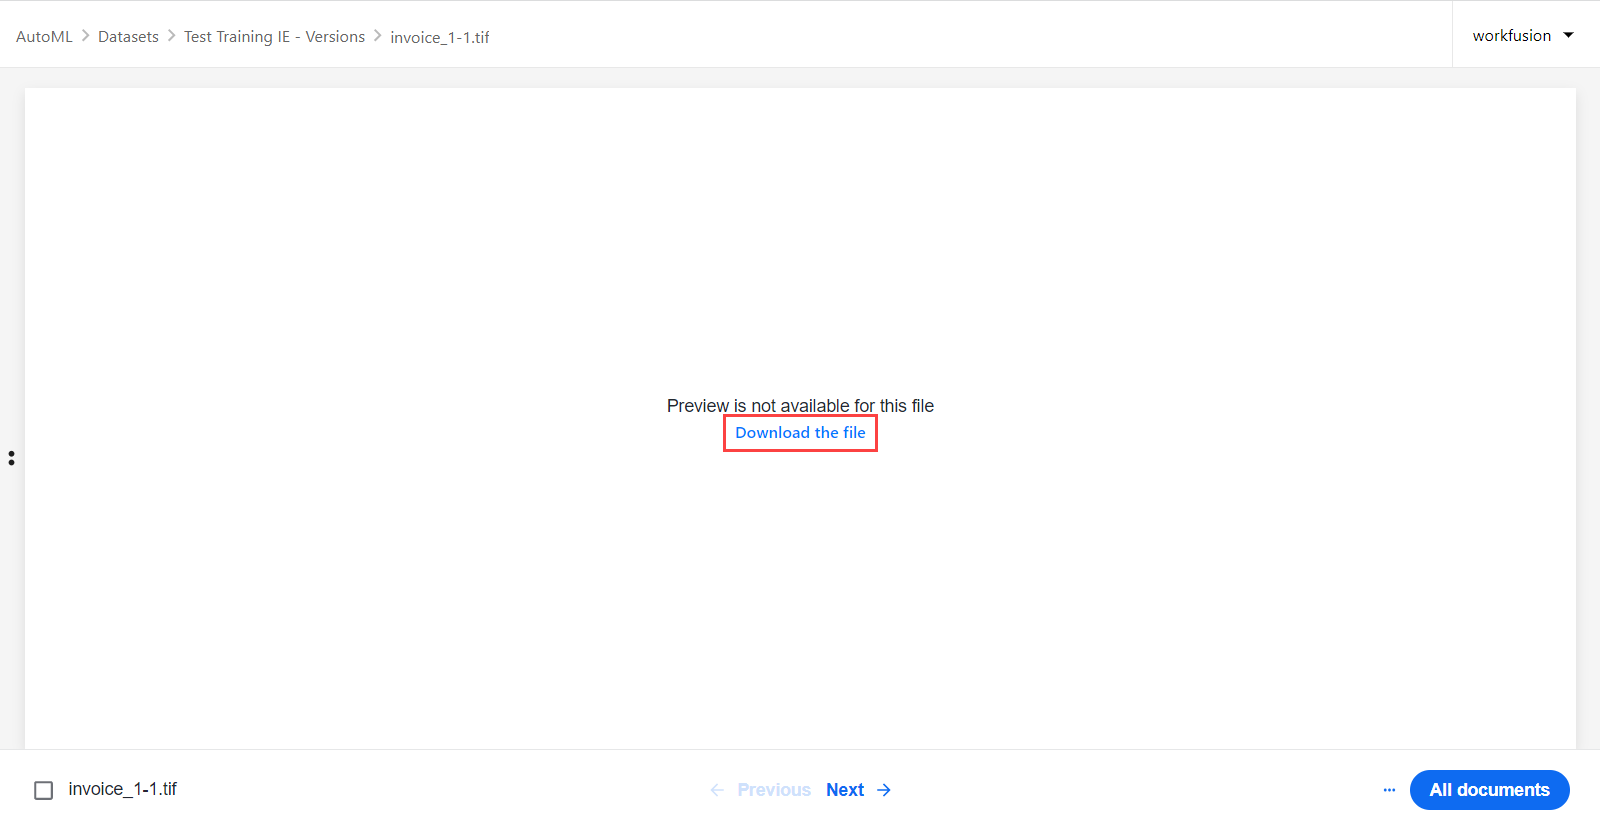
You can preview TXT, PDF, or any image files. If a document is not available for preview, for example, in the case of the GIF and TIFF formats, you can download it by clicking Download the file.
Extract documents to separate dataset
You can create a dataset using documents from an existing dataset:
On the Documents tab, select documents you want to add to a new dataset.
In the bulk actions menu, select the Extract to dataset option.
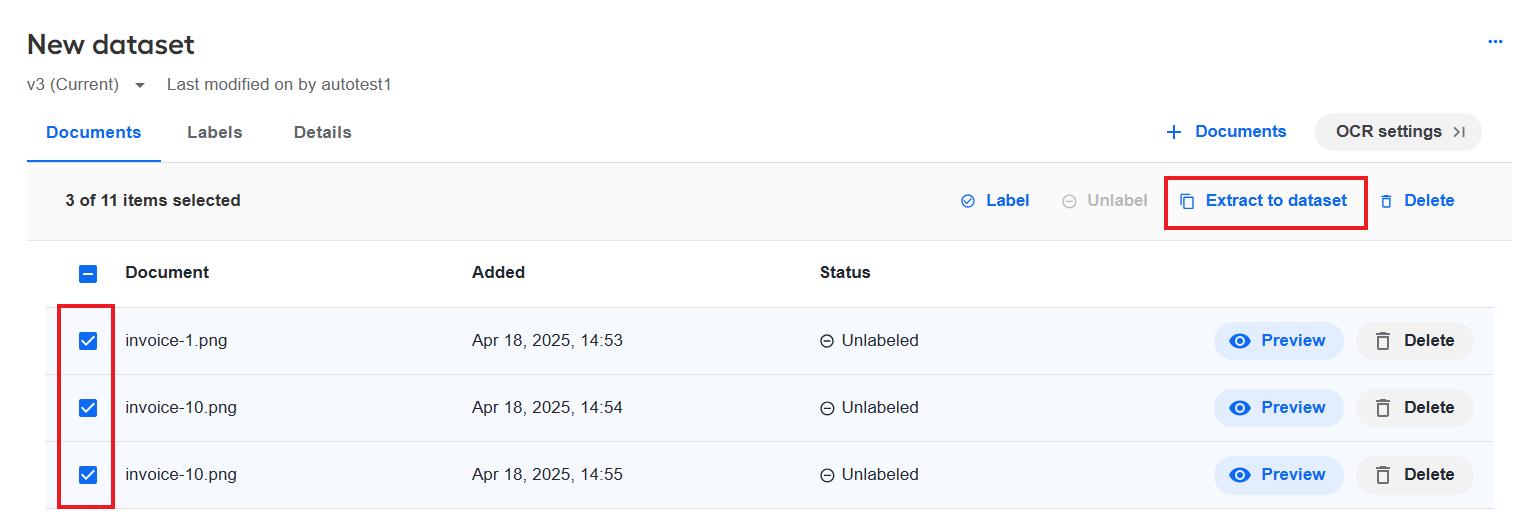
You are automatically redirected to a new dataset with the selected documents added to its Documents tab. A confirmation message appears in the bottom-right corner of the screen.
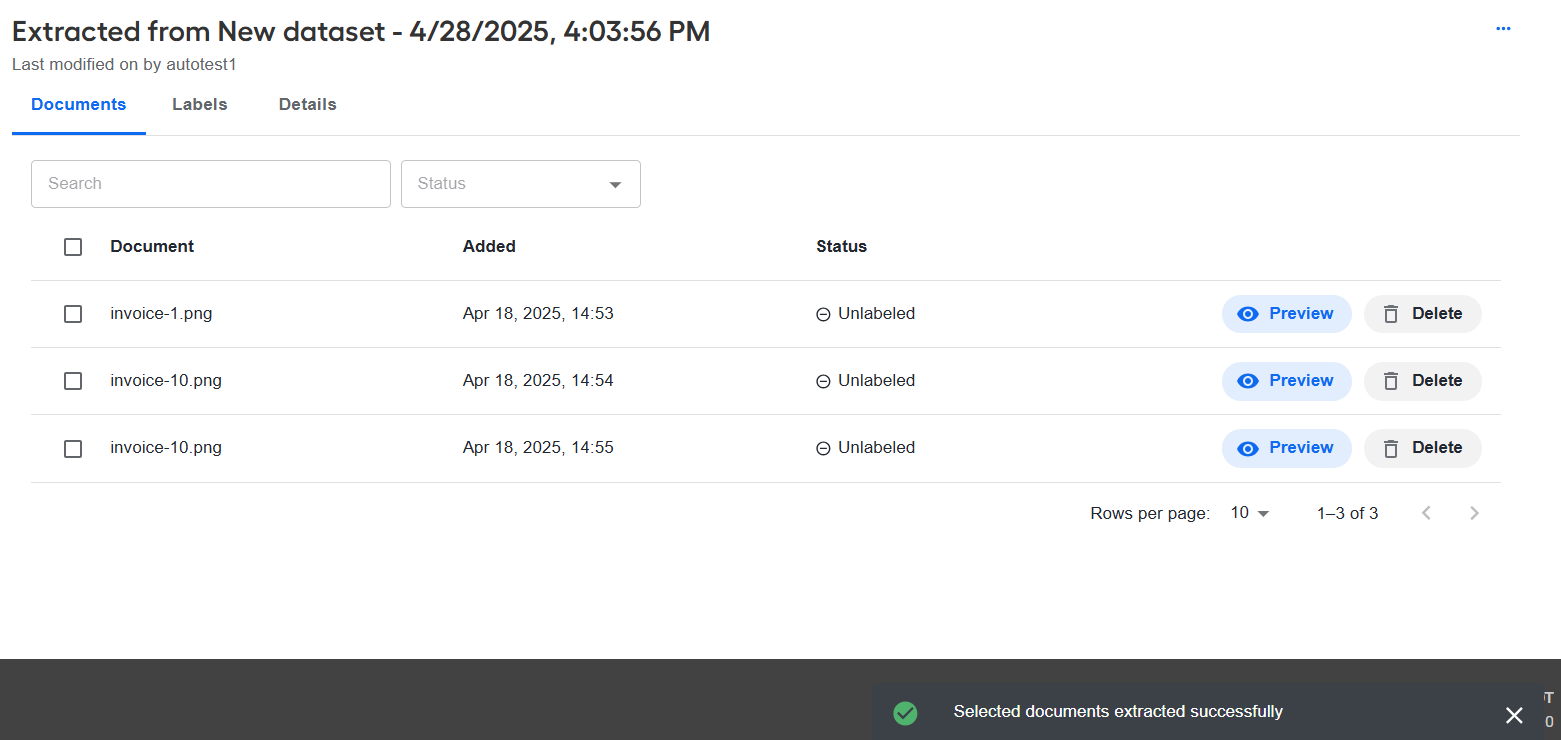
The new dataset is of the same type as the original one and contains the same labels as the one from which it was extracted. All labeled documents are copied as labeled. The dataset name has the following format: Extracted from + original dataset name + creation date and time. You can rename or modify the dataset as you think appropriate.
View document dataset details
On the Details tab, you can find the information about the created document dataset:
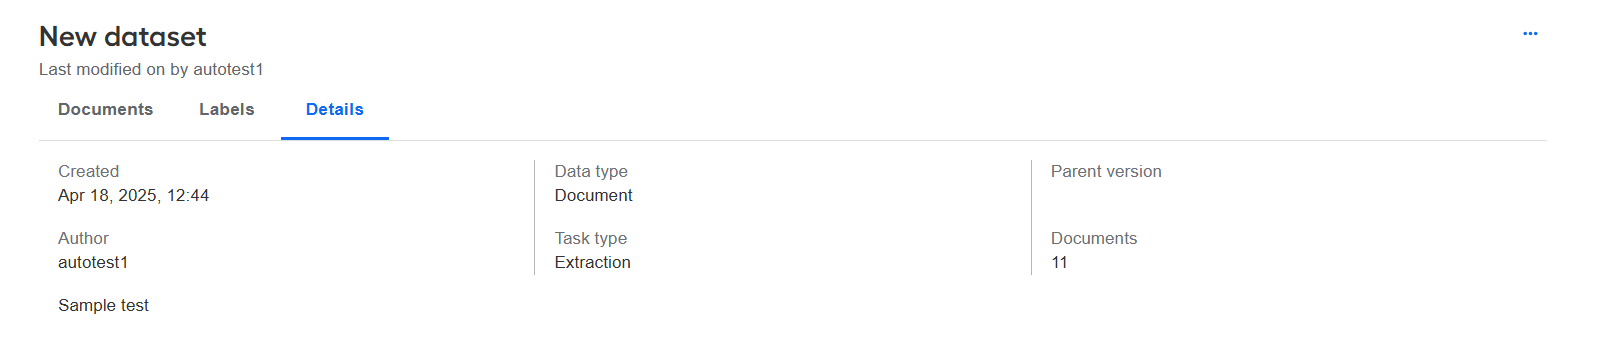
- Created: date and time (dd.mm.yyyy, hh:mm) when the dataset was created
- Author: who created the dataset
- Description: the text you added as a description (if any) when creating the dataset
- Data type: the dataset type
- Task type: the task the dataset is intended for
- Parent version: a clickable link to the dataset version (if any) used to publish the dataset
- Documents: the number of documents in the dataset
Rename dataset
To rename a dataset, follow the steps below:
Initiate the renaming flow in one of the following ways:
From the Datasets list: select a dataset you want to rename, open the Actions menu, and click Rename.
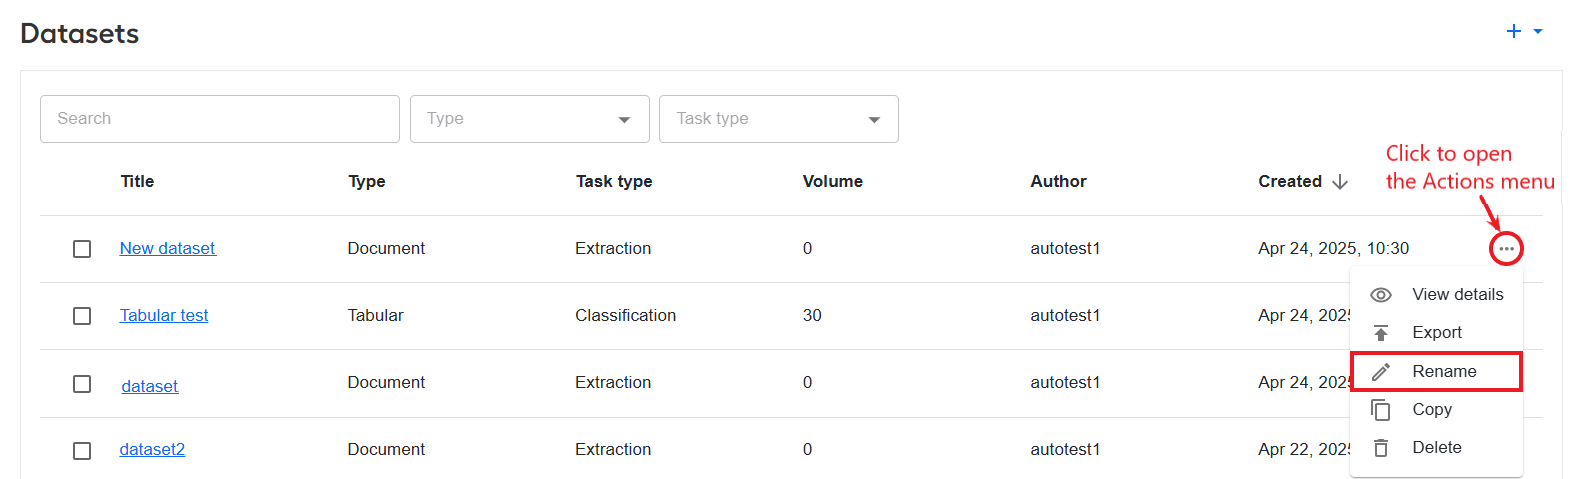
From a specific dataset page: open the Actions menu and select Rename.

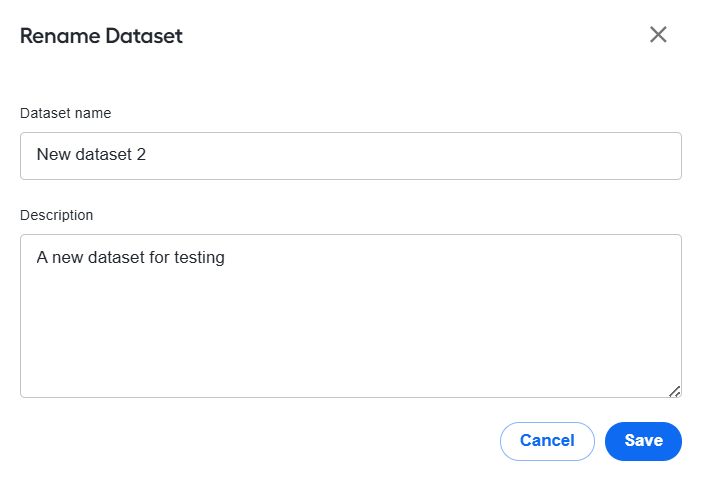
In the displayed popup, change the dataset name or description as required and click Save.
Copy dataset
Instead of creating a dataset from scratch, you can copy an existing one and modify it to your needs. You can copy a dataset in one of the following ways:
From the Datasets list: select the dataset you want to copy, open the Actions menu, and click Copy.
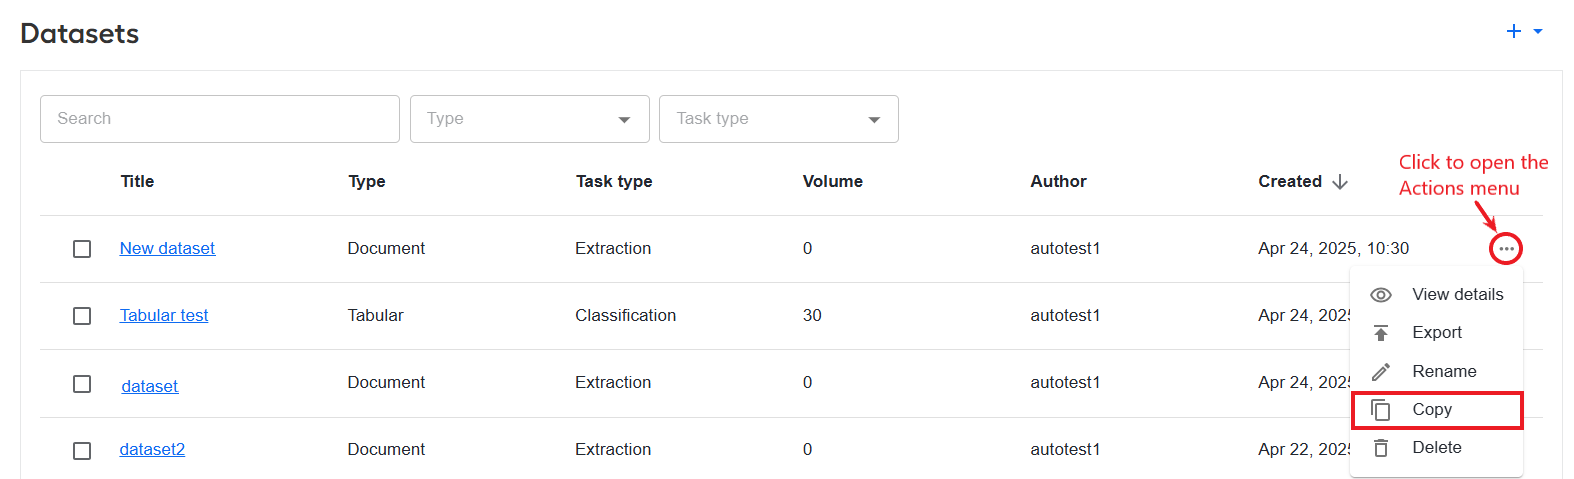
A new dataset appears in the Datasets list. The dataset name has the following format: original dataset name + copy + date and time. You can rename and modify the dataset as you think appropriate.
Also, you can see a confirmation message at the bottom of the screen. To go to a copied dataset, click View on the confirmation message or select it in the list of datasets.

From a specific dataset page: open the Actions menu and select Rename.

A new dataset appears in the Datasets list, and you are automatically redirected to the copied dataset page. The dataset name has the following format: original dataset name + copy + creation date and time. You can rename and modify the dataset as you think appropriate.

Export dataset
You can export a dataset as a bundle (a zip archive) in one of the following ways:
From the Datasets list: select the dataset you want to export, open the Actions menu, and click Export.
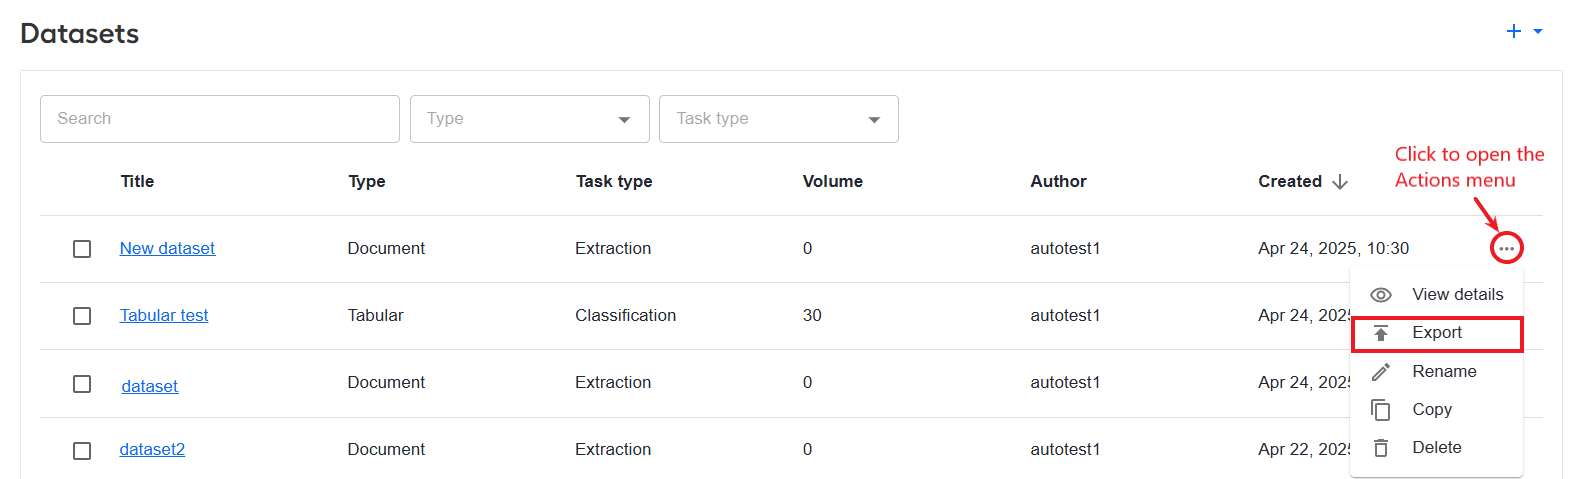
From a specific dataset page: open the Actions menu and select Export.

The resulting zip archive contains the following files:
dataset.jsoncomprises a full dataset representation, including schema, properties, tags, and so on.observations.csvcontains observations or feature values (if any) in the CSV format.meta-info.jsonincludes the technical information associated with the bundle, such as the creation date, author, and the Work.AI platform version.- The
filesfolder (under a specified name) contains documents included in the dataset.
Import dataset
To add a dataset to the list of available datasets, you can import it as a bundle similar to that created with the Export function. Each imported dataset must have a unique ID.
To import a dataset, navigate to the Datasets list, click the plus (+) button, and select Import.
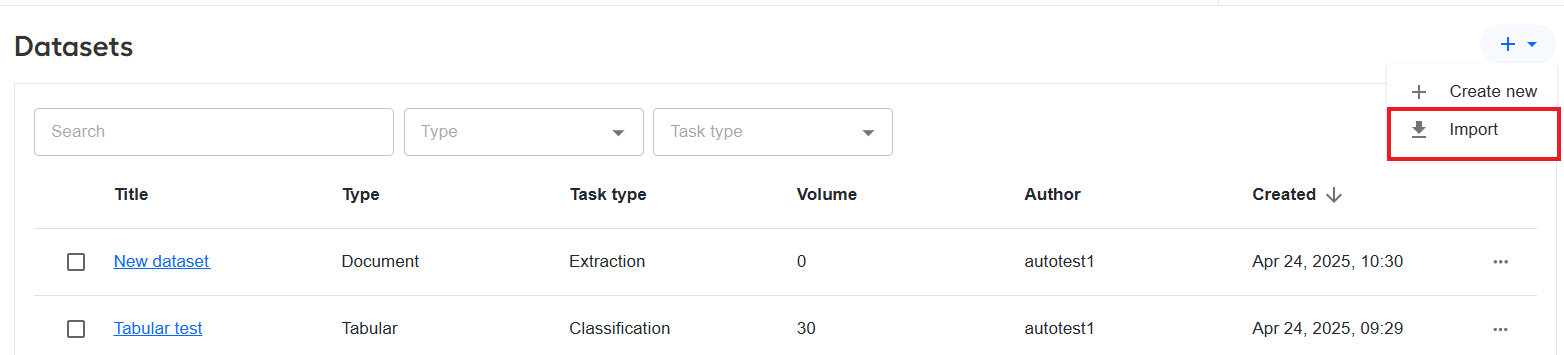
Above the Datasets list, you will see the import progress bar.

The dataset is imported, you see a confirmation message in the bottom-right corner of the screen, and the dataset appears in the list. Otherwise, you get a warning or an error message.
Publish dataset version
You can create dataset versions as immutable snapshots and use them to train and test models or to restore the dataset state at a specific moment.
To publish a new dataset version, navigate to the dataset page, open the Actions menu, and select Publish.
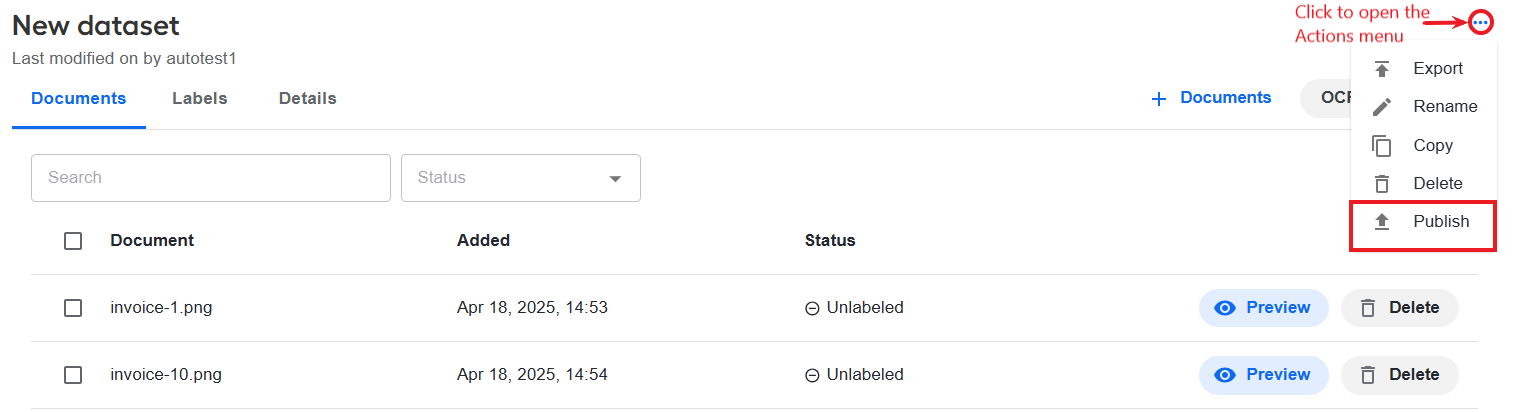
When a new dataset version is published, a version dropdown appears below the dataset name and description, and a confirmation message is shown in the bottom-right corner of the screen. The original dataset is available at the top of the version dropdown with the Current indication.
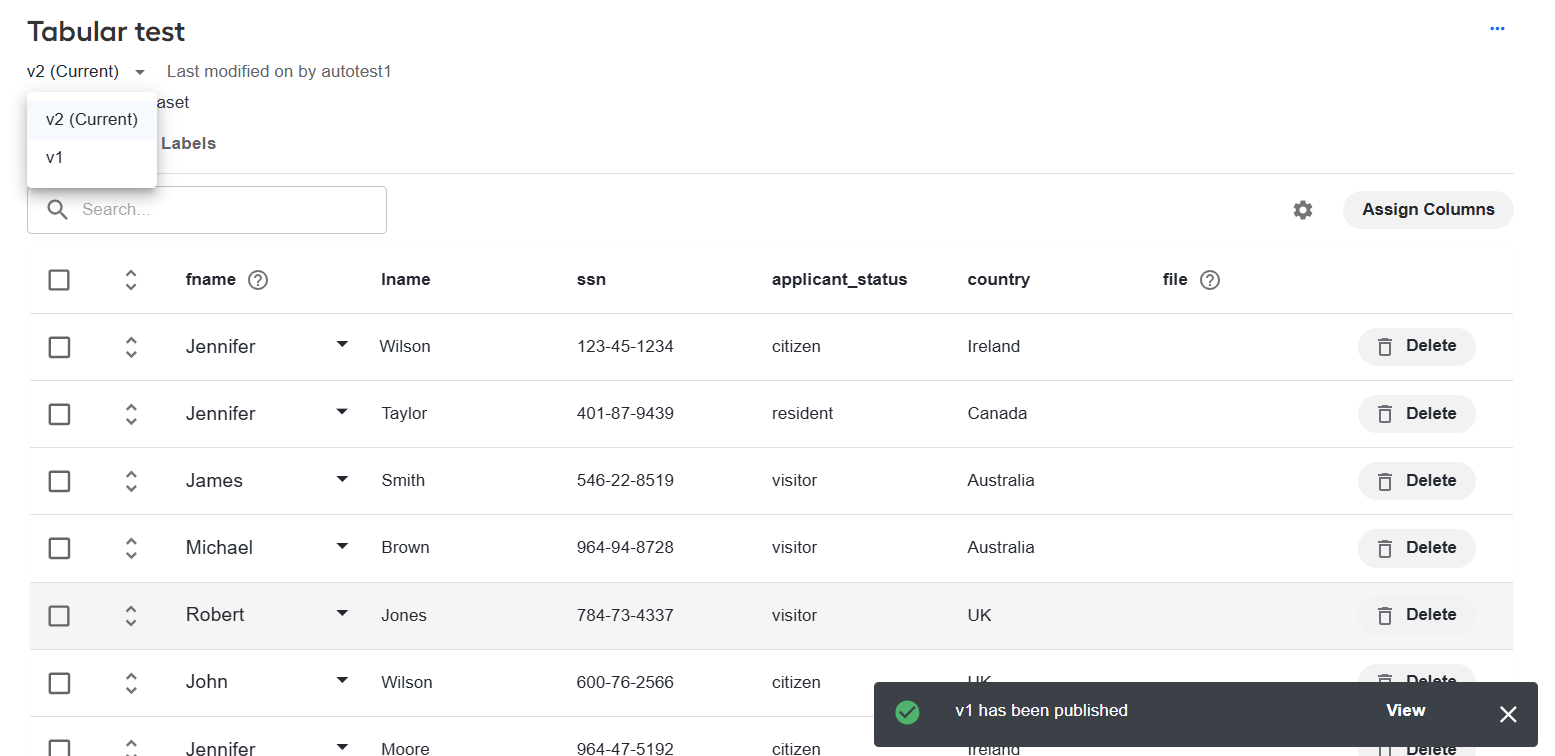
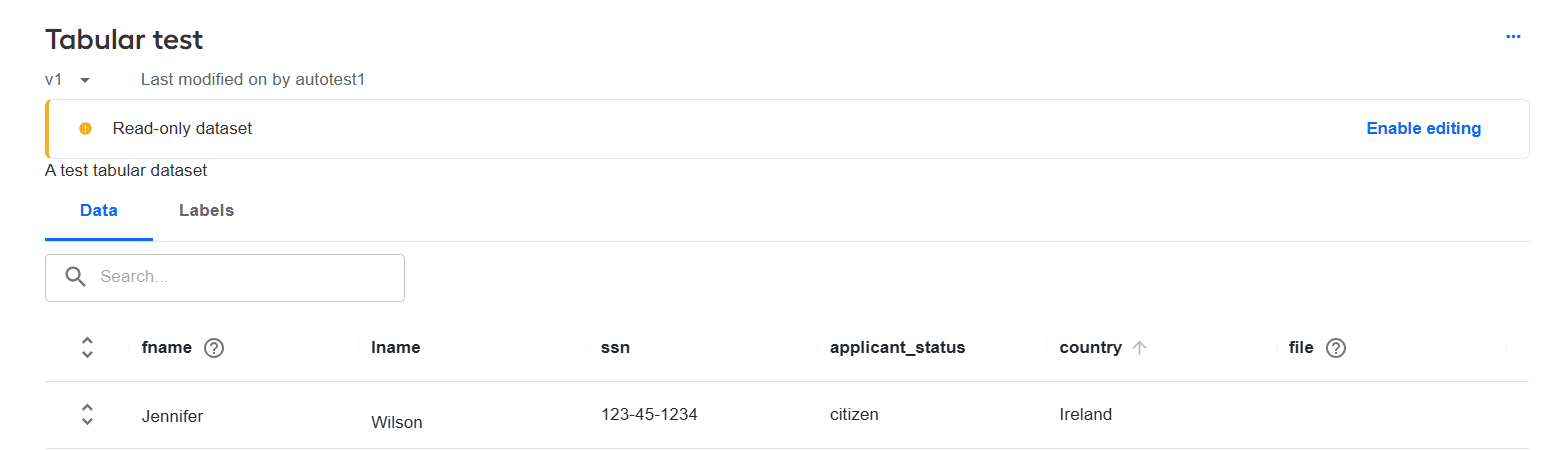
A new version is available in the read-only mode. To modify it, follow the steps below:
Click Enable editing.
Confirm the editing is needed by clicking Enable editing.
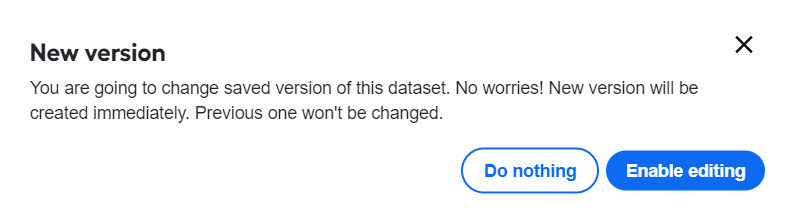
A new dataset version is created immediately, while the previous one remains intact and is available from the version dropdown.
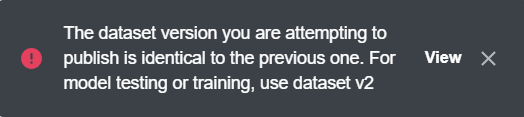
You cannot publish a dataset version until you make changes. If you attempt it, the following warning appears:
Merge datasets
You can combine one or more datasets into a single one. To do that, follow the steps below:
In the Datasets list, select two or more checkboxes corresponding to the datasets you want to merge.
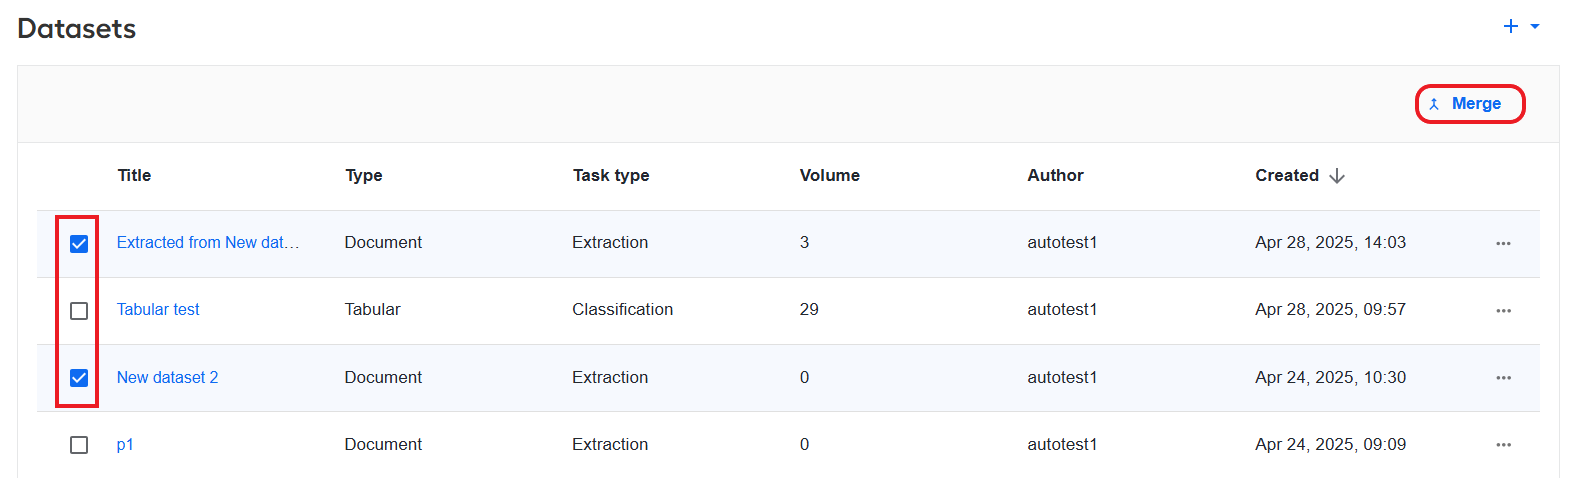
In the top right corner above the list, click Merge.
In the Merge datasets popup, set a name for the new dataset and click the Merge button.

A new dataset is created from the datasets you selected and added to the list. In the right bottom corner, you can also see a message informing about the successul merging.

You can only merge datasets of the same type. If you try to merge a tabular dataset with a document one, you get an error message.
Prepare tabular datasets
To prepare a tabular dataset for usage in model training, do the following:
Assign columns
For a model to classify documents based on a tabular dataset, the dataset needs to have two columns assigned:
Category corresponding to the category based on which the classification is done
Data comprising the classified data
As a dataset is created, the two columns are assigned automatically. On the Data tab, the two columns are displayed with a question mark indication in their headers. As you hover over the question mark, you can see a tooltip with the assignment details.
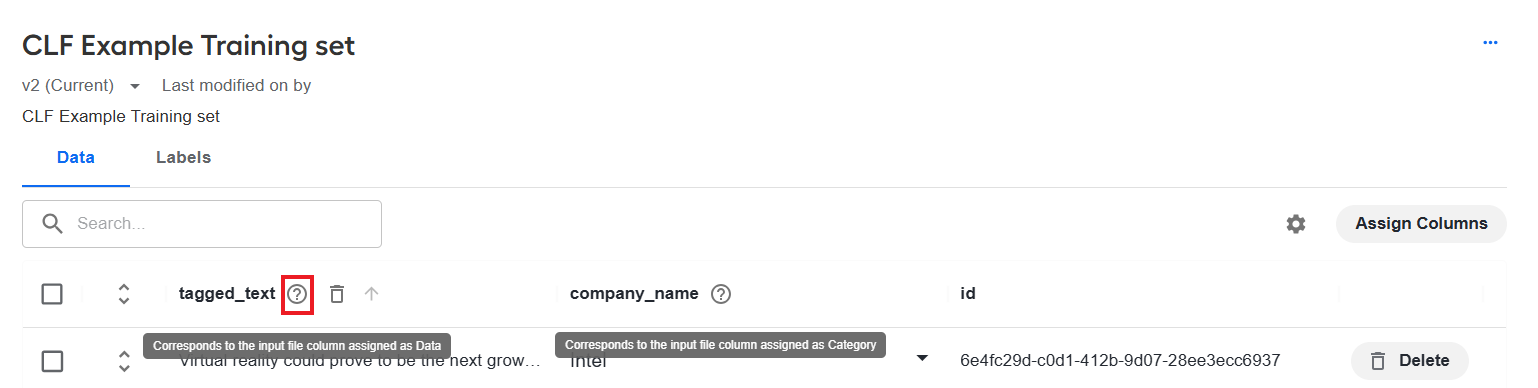
If the automatic assignment is not fit for your task, reassign them as needed in the following way:
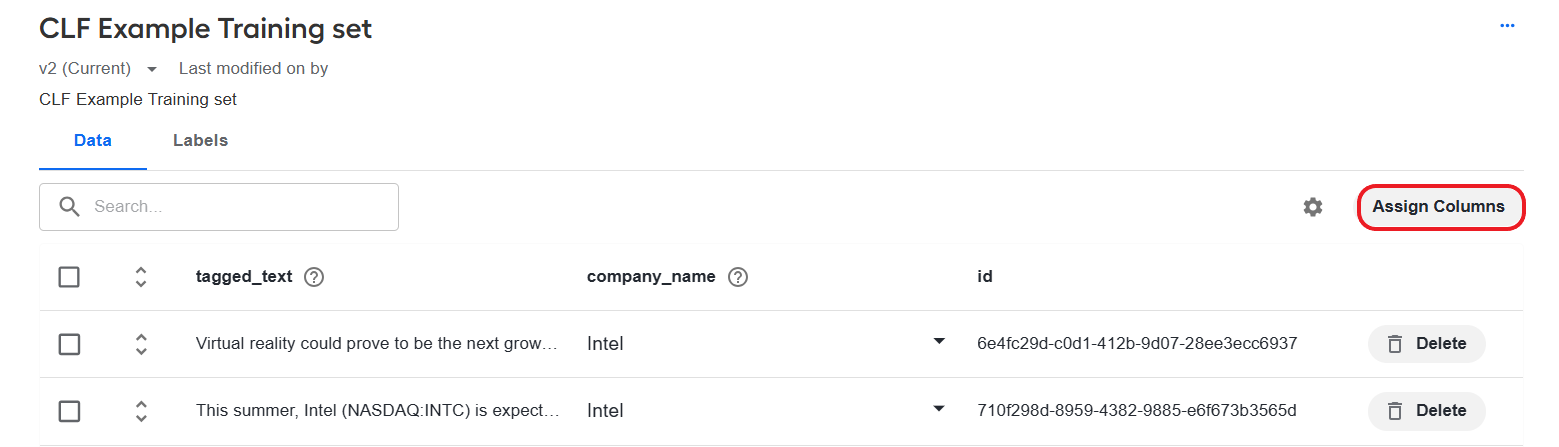
On the Data tab, click the Assign Columns button.
In the Assign columns popup, fill in the Data and Category fields by choosing values from respective drop-down lists.
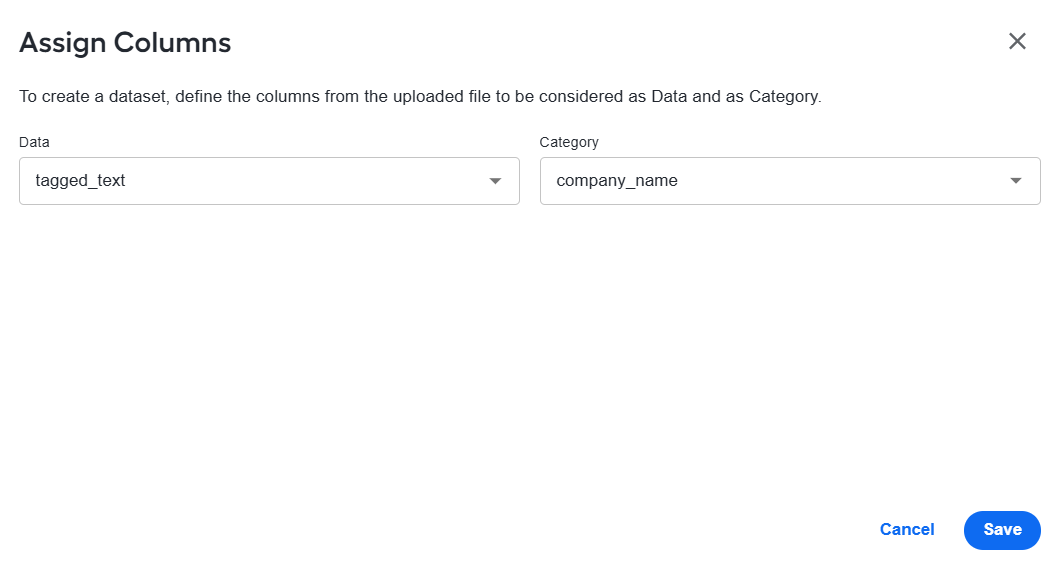
Click Save. On the Data tab, you will see the newly assigned columns with question mark indications.
Review and add labels
In tabular datasets, labels are uploaded automatically from the content of the column assigned as Category. You can see them on the Labels tab as soon as a tabular dataset is created, provided it has Category assigned.
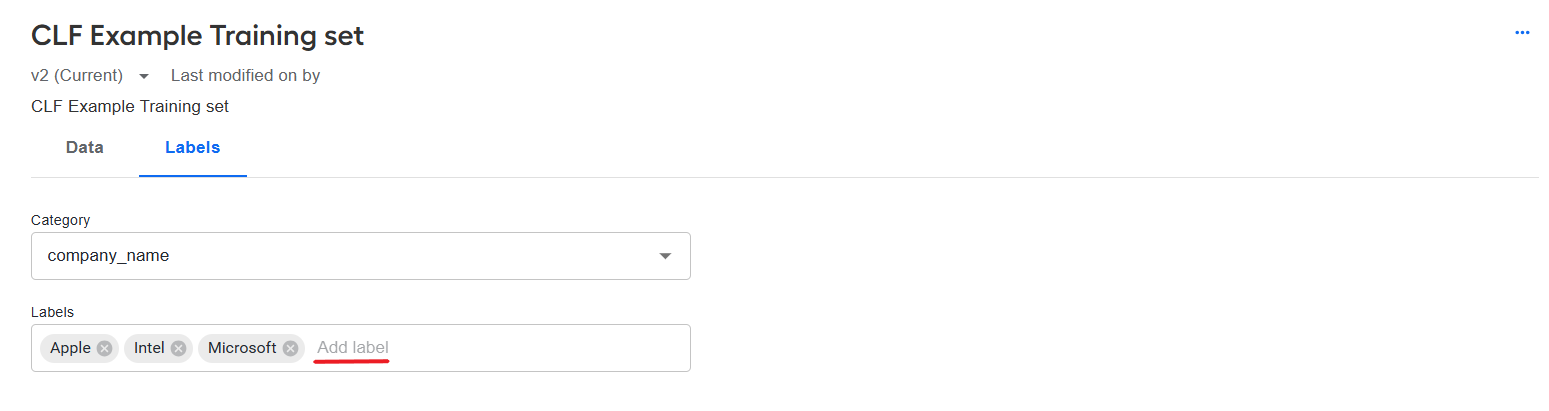
To add a label, type in a new value in the Labels box and press Enter. To delete a label, click the cross button on the label and confirm the deletion.
On the Data tab, once a dataset is created, each value in the column assigned as Data is automatically mapped to a label that you can see in the column assigned as Category. After you add or remove a label, the Data tab displays a notification requesting you to relabel the data displayed on the Data tab.
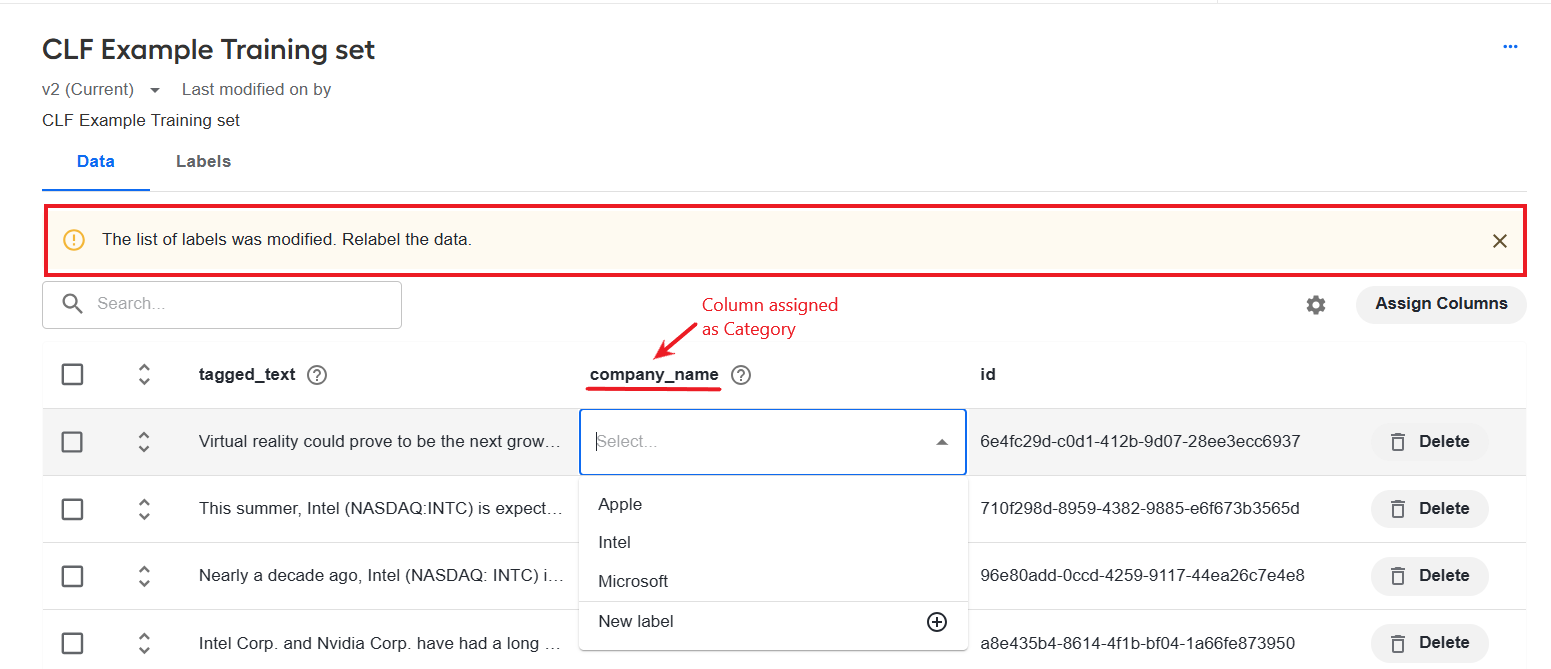
To map or remap the labels on the Data tab, do as follows:
Double-click the value in the corresponding row of the column assigned as Category.
Choose another value from the displayed drop-down list or click New label to set a new value. If you click New label, remove the existing value and type in your custom one.
Apply bulk actions
On the Data tab, you can apply the following bulk actions to the tabular dataset data:
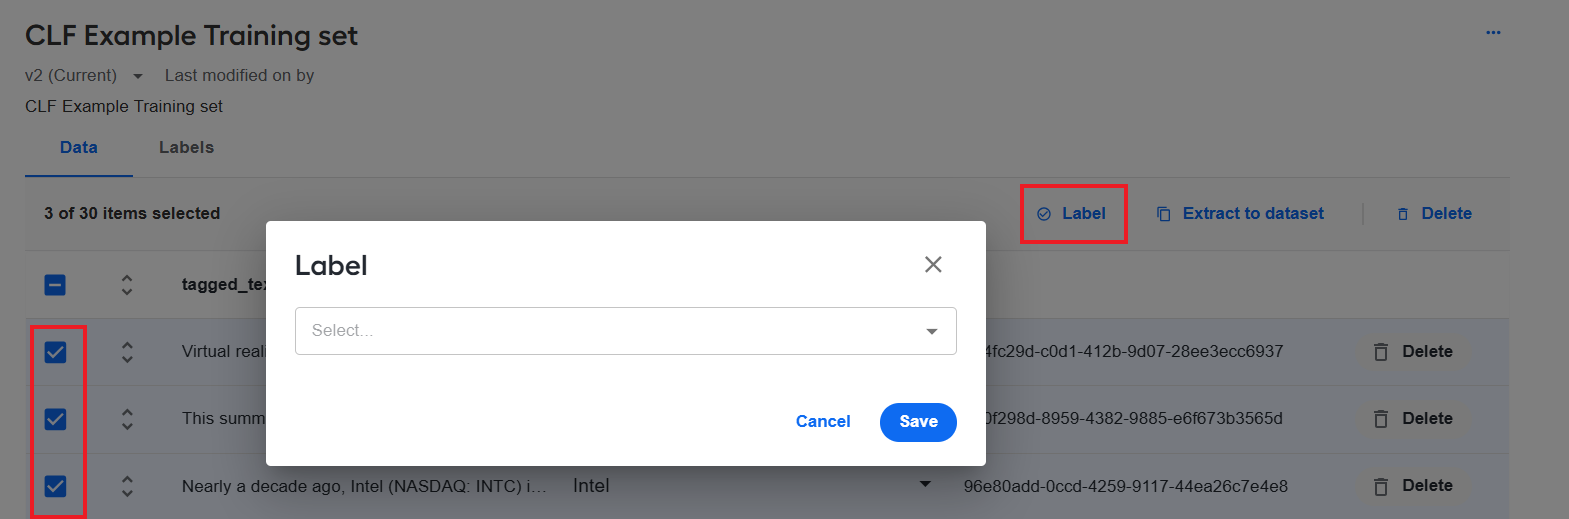
Label multiple rows: select the checkboxes corresponding to the rows you want to map to the same label, click Label, select a label from the drop-down list or create one, and click Save.
Extract specific rows to a separate dataset: select the checkboxes corresponding to the rows you want to extract to a separate dataset and click Extract to dataset. A new dataset is created comprising the selected rows.
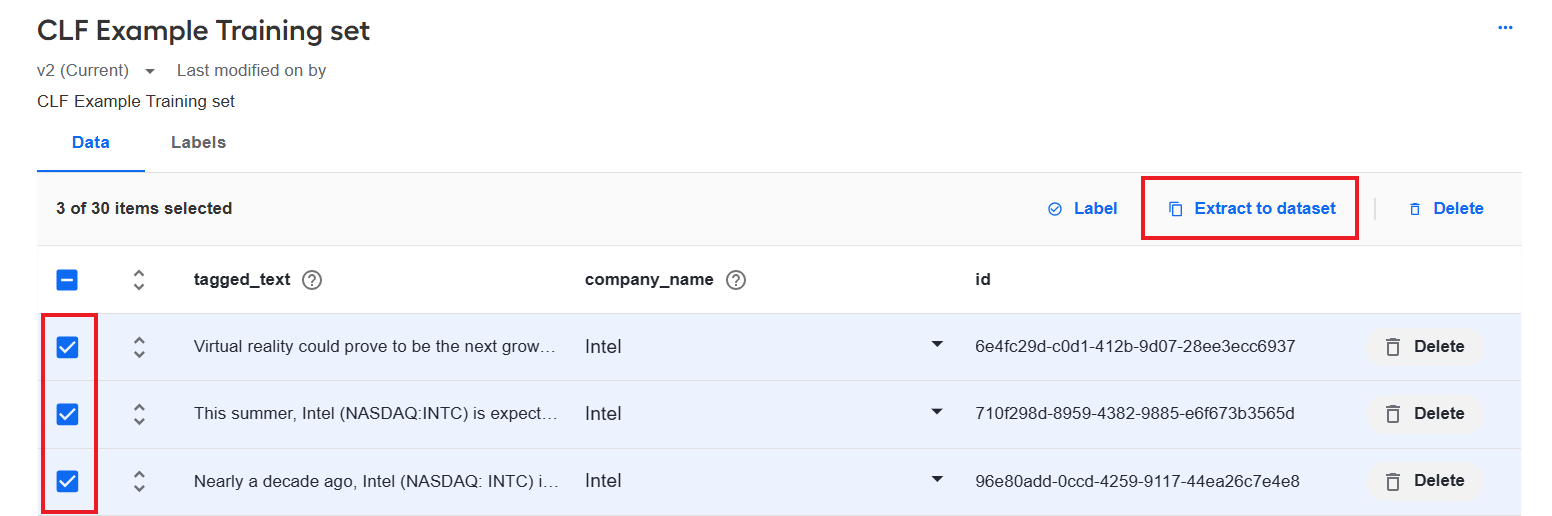
The dataset created as described above is of the same type and contains the same labels as the original one. All labels are copied as well. The dataset name has the following format: Extracted from + original dataset name + creation date and time.
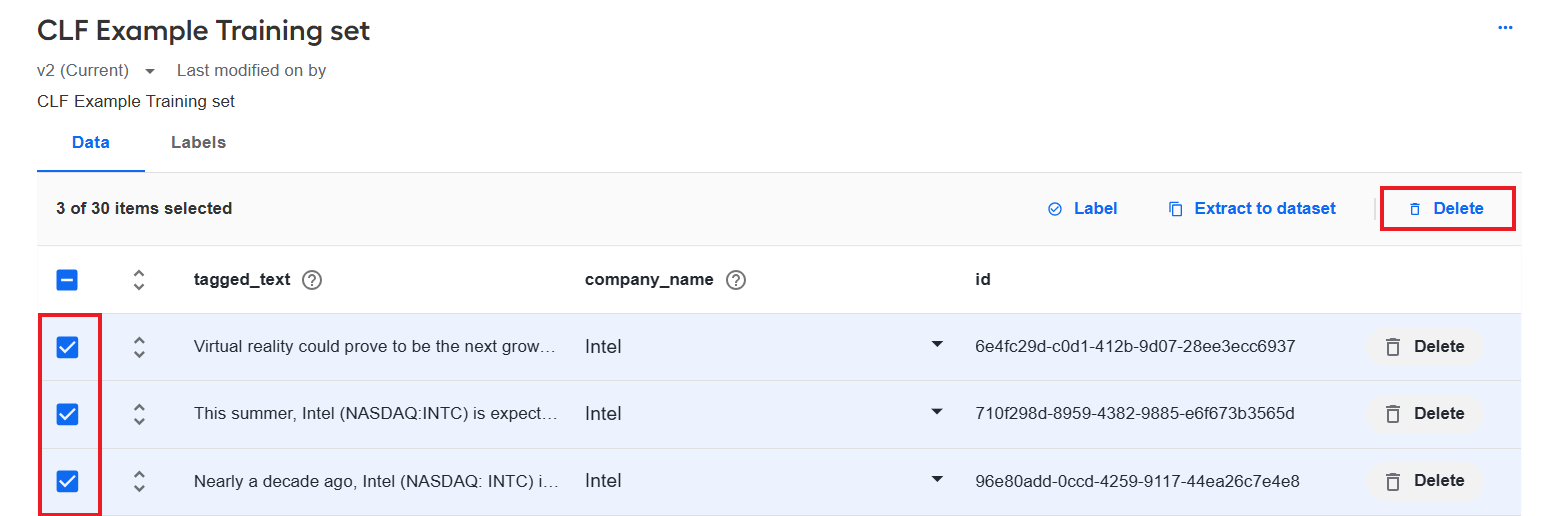
Delete multiple rows: select the checkboxes corresponding to the rows you want to delete and, in the top right menu, click Delete.
Prepare document datasets
To prepare a document dataset for usage in model training, do the following:
Set up labels
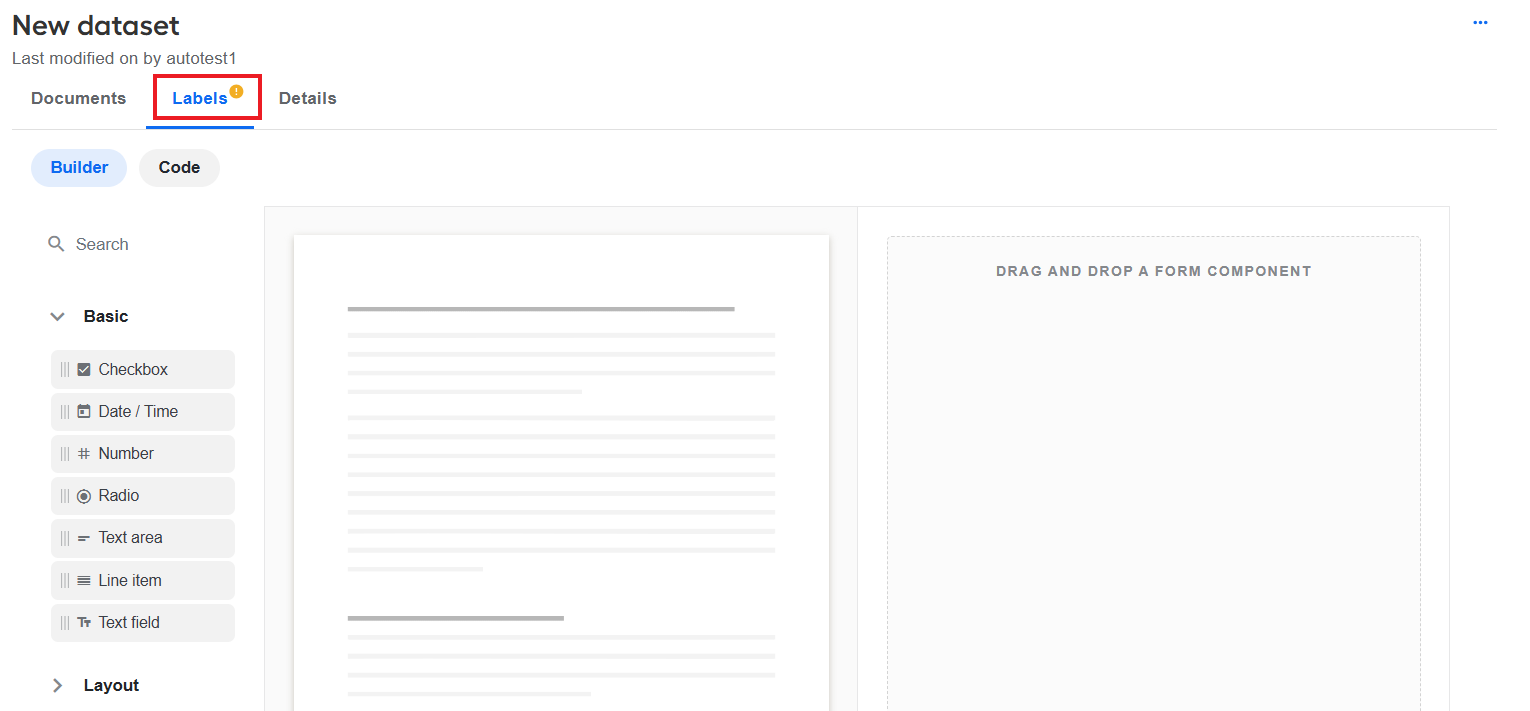
If labels are not configured for your dataset, a yellow icon is displayed next to the Labels tab title. To add labels, go to the Labels tab and set them up in one of the following ways:
- Use Builder.
- Edit the JSON representation.
- Generate labels from a template.
Configure labels in Builder
You can set up labels with Builder components, do as follows:
Make sure the Builder mode is on.
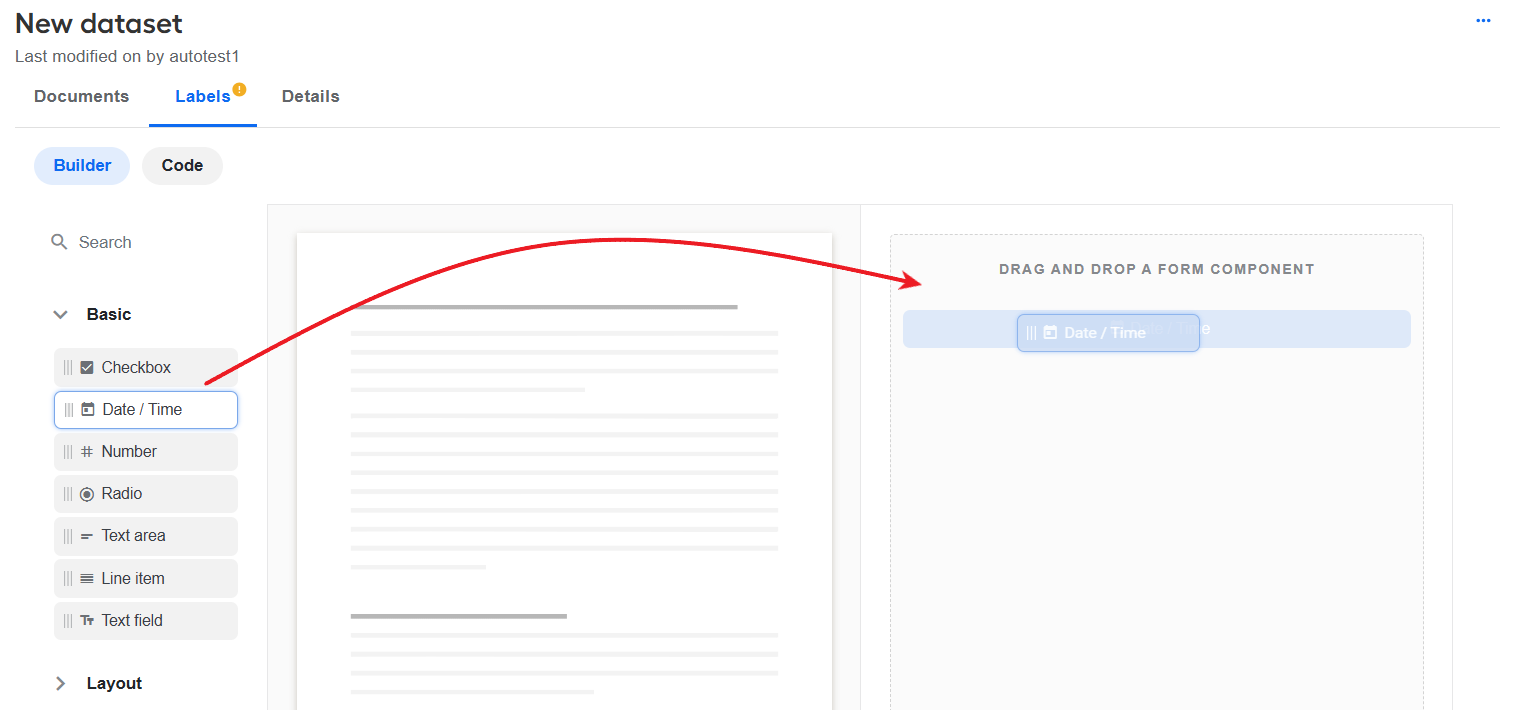
Drag the required labels from the left panel to the right one.
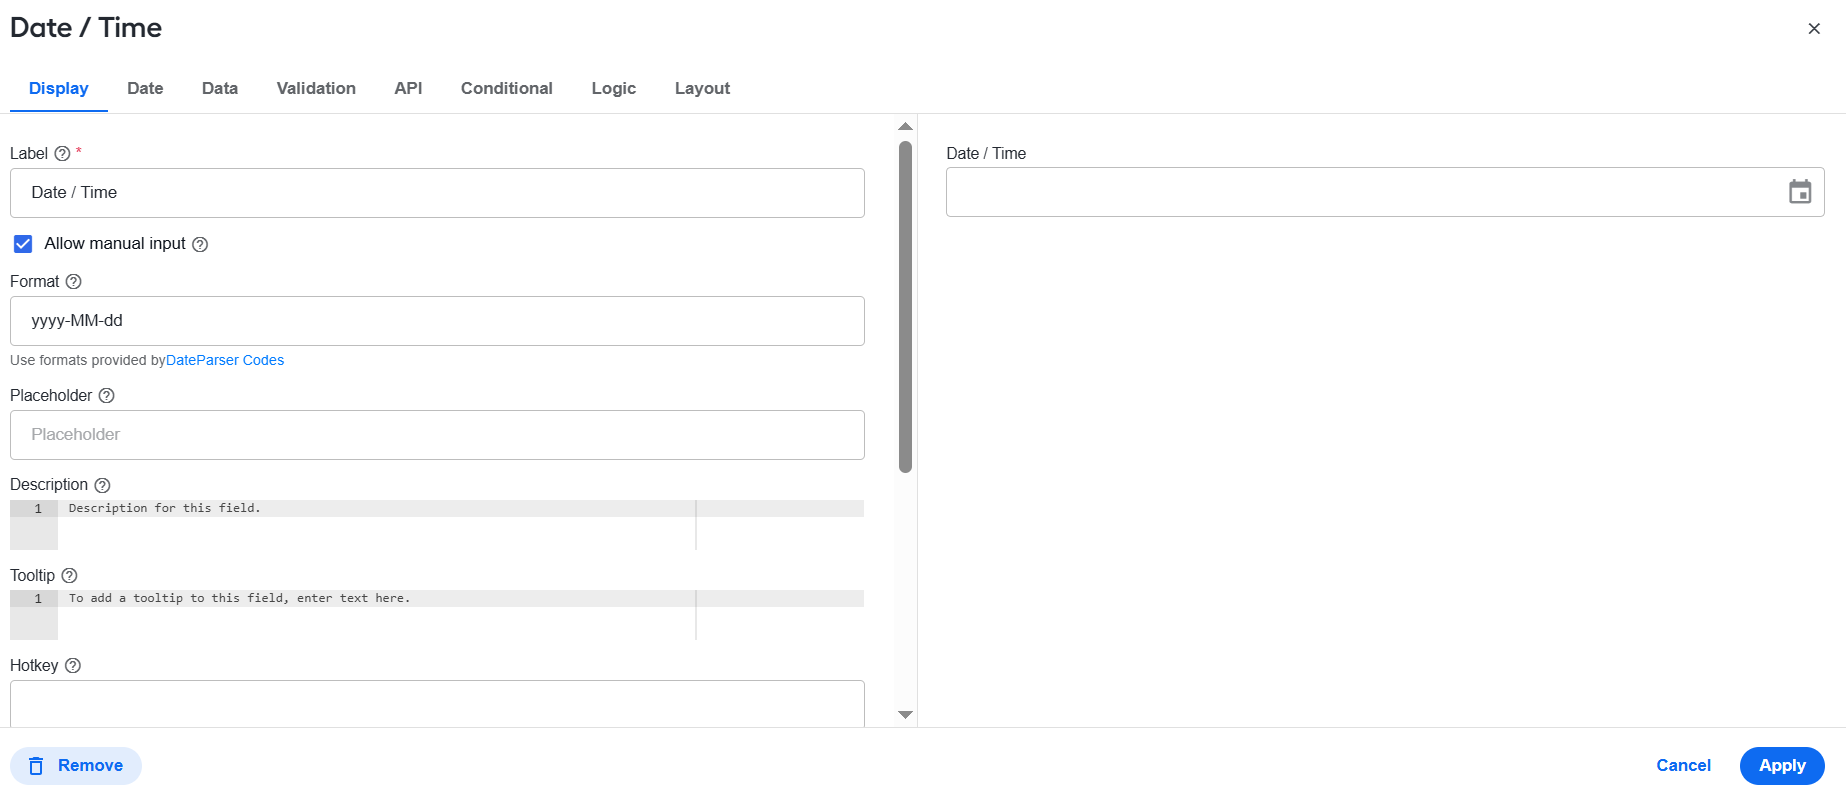
In the component configuration window, change any settings as you need and click the Apply button to save the changes.
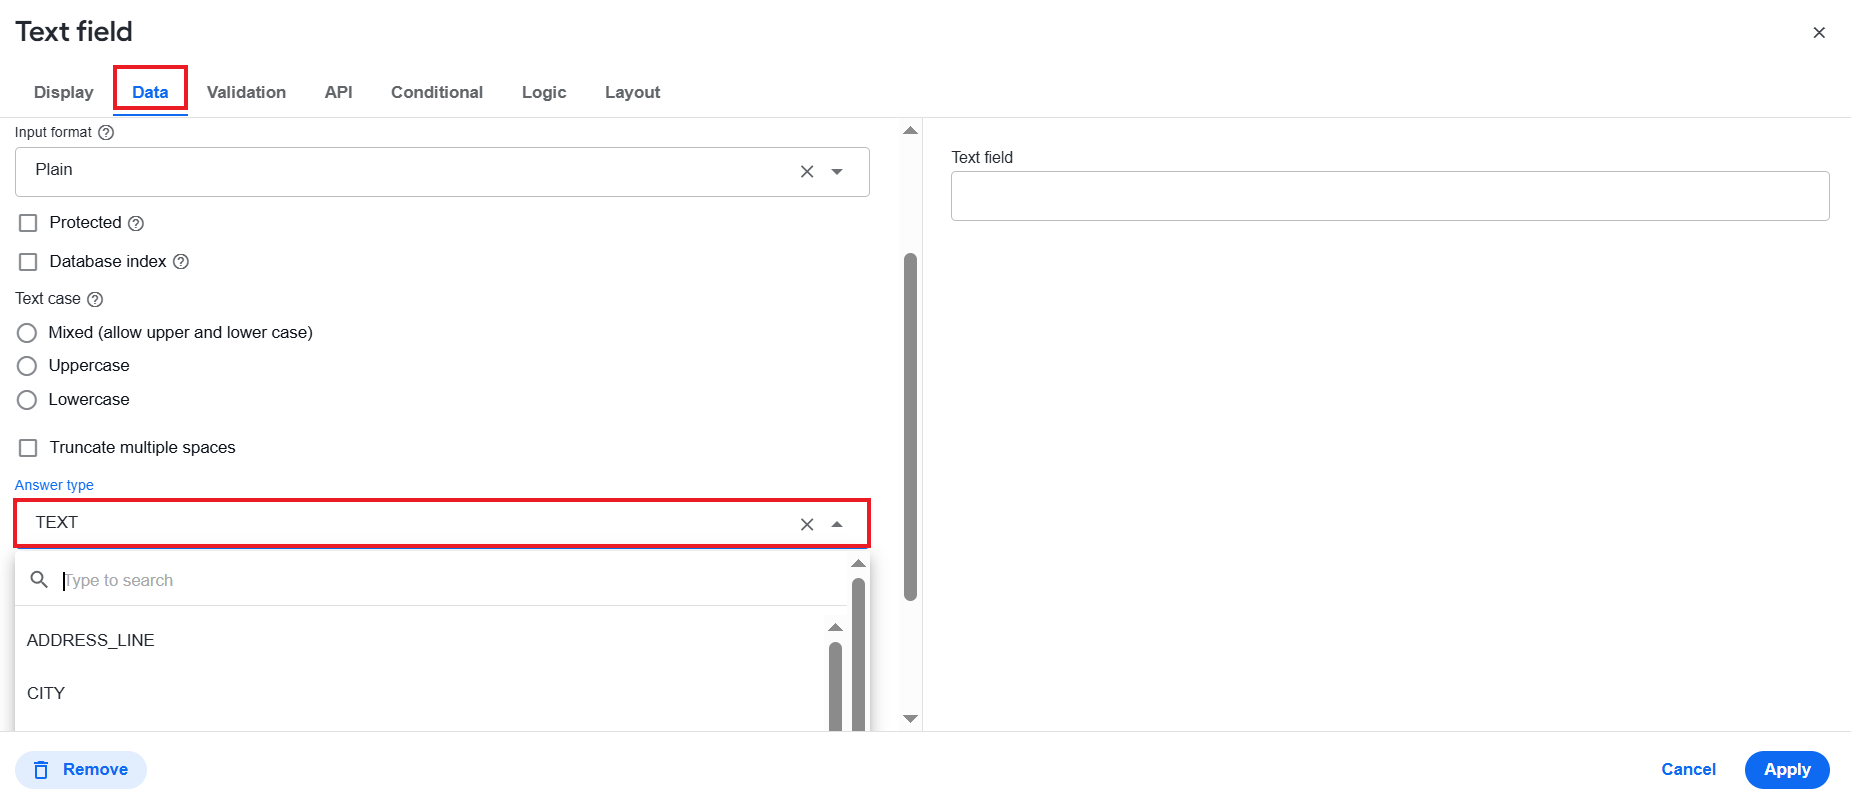
For Text field components, go to the Data tab, open the Answer Type menu, and specify the field type for your model. For other controls, you can leave the default setup.
The labels you add become visible on the right. As you move the pointer over a label, a menu opens, and you can select an action:
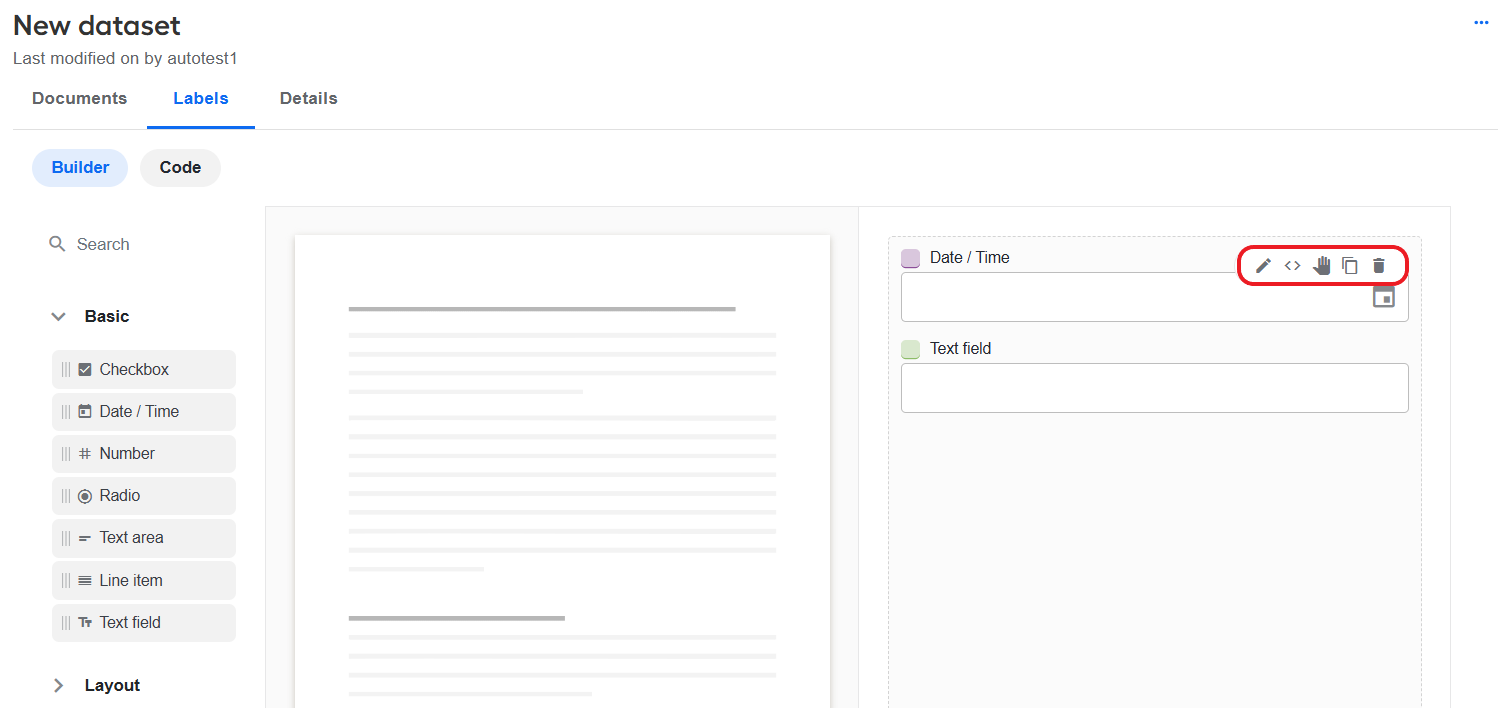
Edit allows editing the form component parameters in Builder.
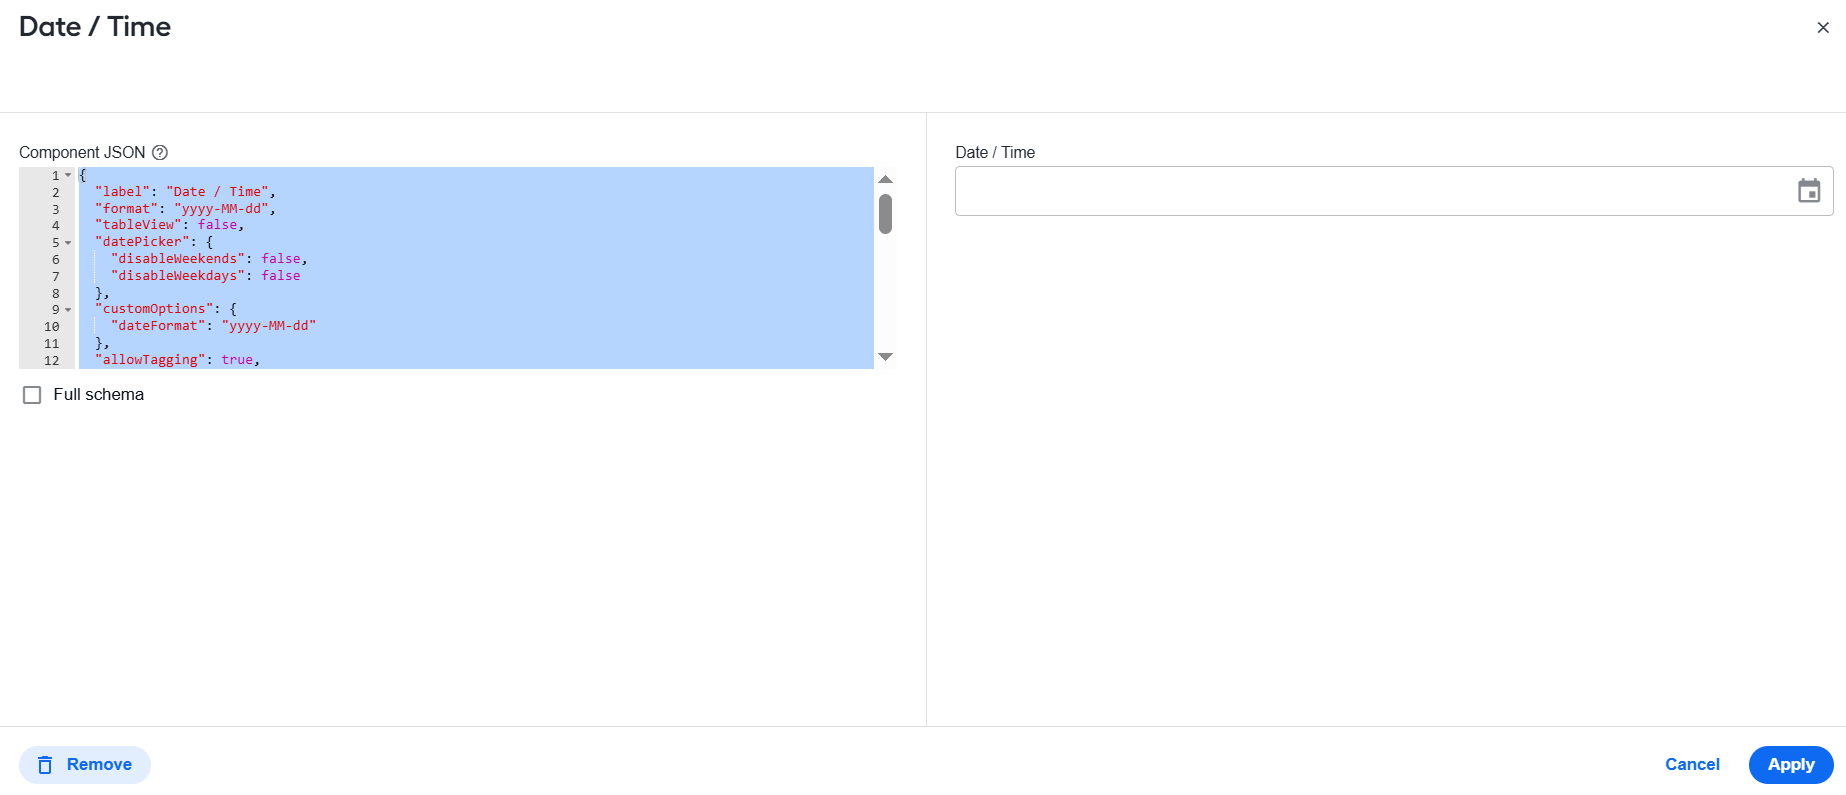
Edit JSON enables editing the form component parameters in the JSON representation. You will see the result in the preview panel on the right.
Move allows you to move the form component within the form.
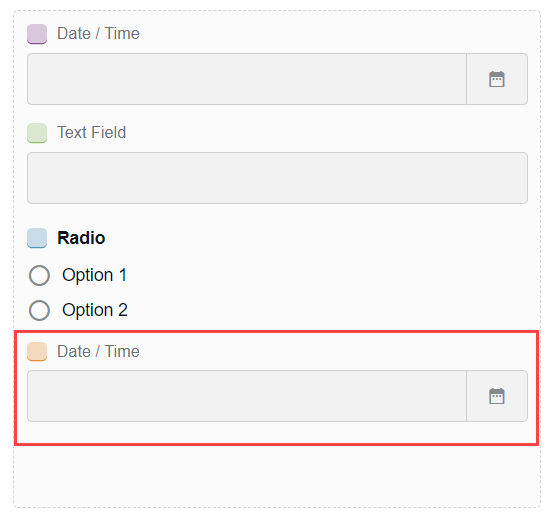
Copy enables copying the form component. Click the Copy button, move the pointer over the form component below which you want to insert the copied one, and click Paste below.
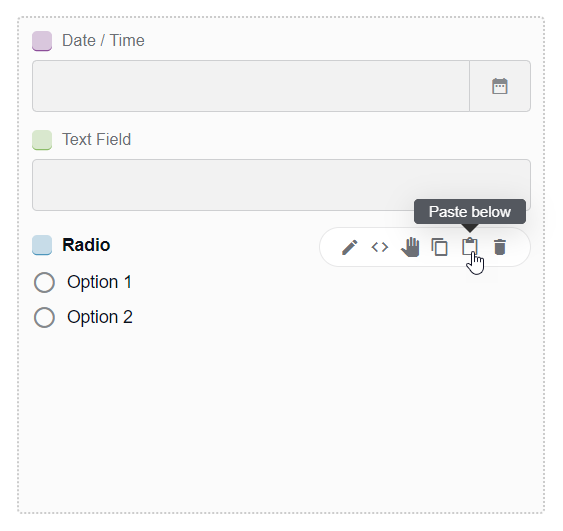
The form component appears in the form. In the example, the Date/Time form component was copied and pasted below the Radio component.
Remove allows deleting the form component from the form.
Changing label names (Edit > Display tab > Label) can result in loss of labeled data as the names are used during the labeling process.
Edit JSON representation
You can configure labels directly in the code:
Make sure the Code mode is on.
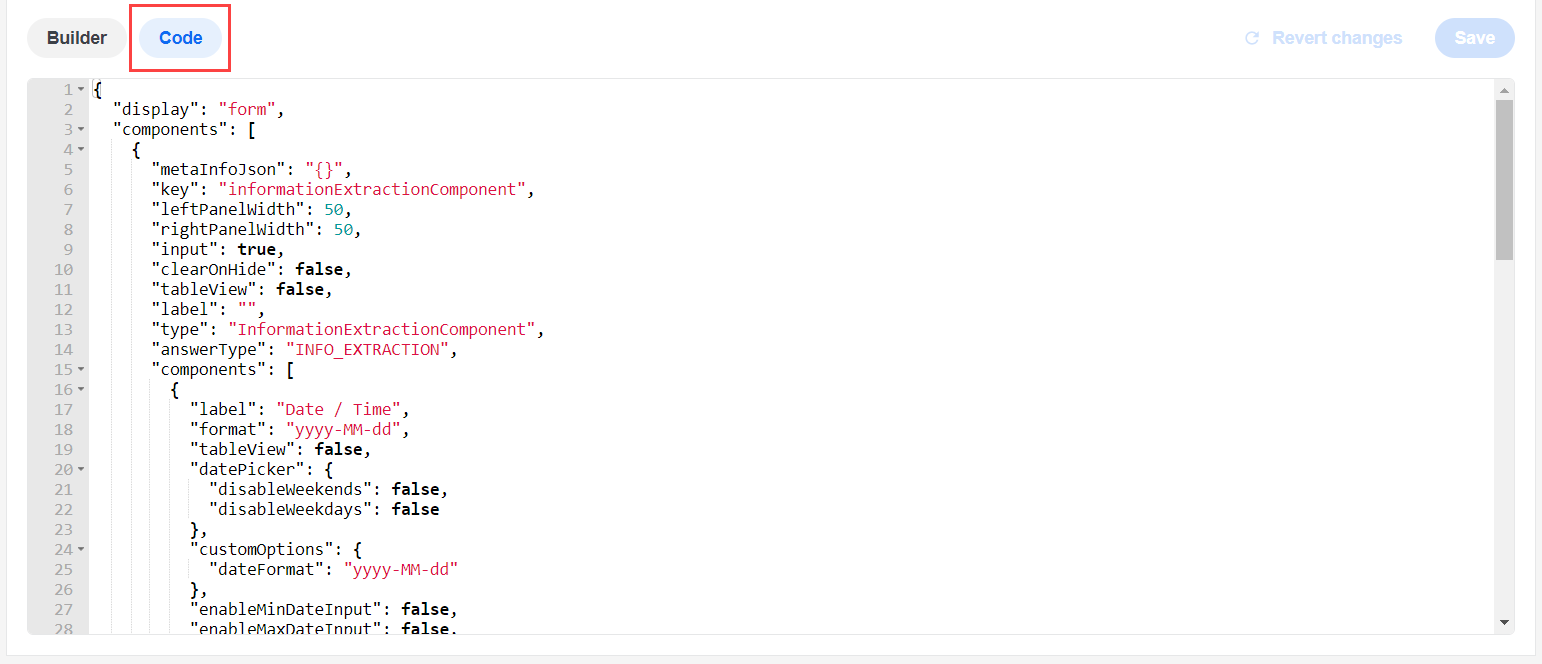
Make changes in the JSON code.
- You can copy and paste the code.
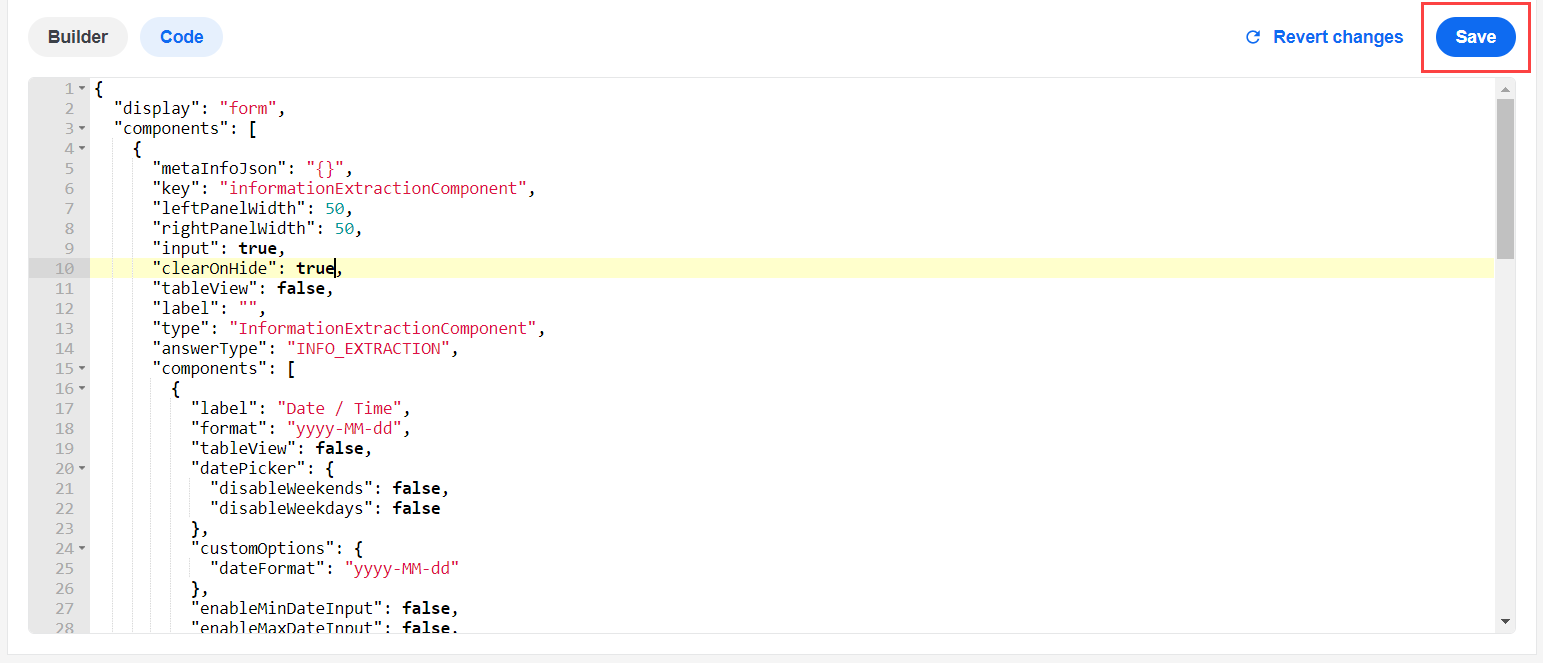
- You can undo the unsaved changes by clicking Revert changes.
Click Save.
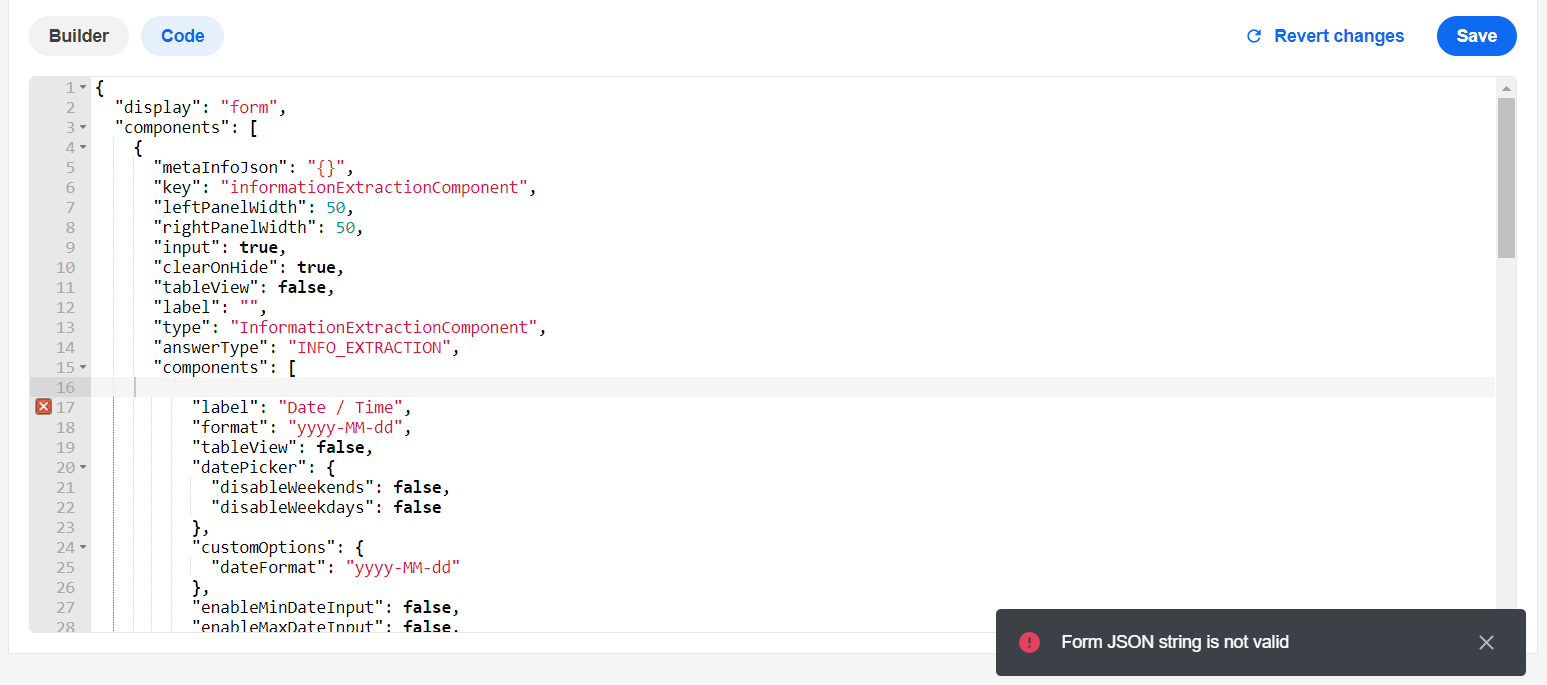
You cannot save invalid JSON. If there are any errors, you see a warning message. Fix the issues and click Save again.
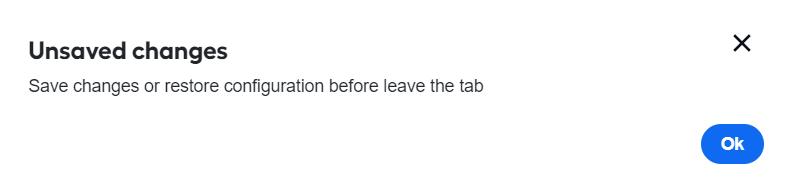
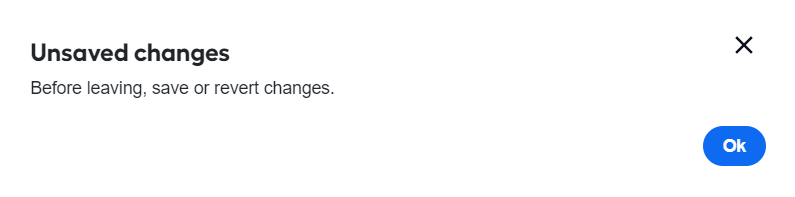
If you try switching to Builder or any other tab with unsaved changes, a warning dialog appears as shown below. Click Ok to close the dialog and make sure to save or revert changes.
Generate labels from template
For detailed instructions on generating labels from a template, read Create and manage templates | Use templates to generate labels in datasets.
Configure OCR settings
The default settings should do fine in most cases. If you need to adjust the settings, make sure to do that before you start labeling.
To configure the OCR settings for processing your documents, navigate to the Documents tab and click OCR settings on the right.
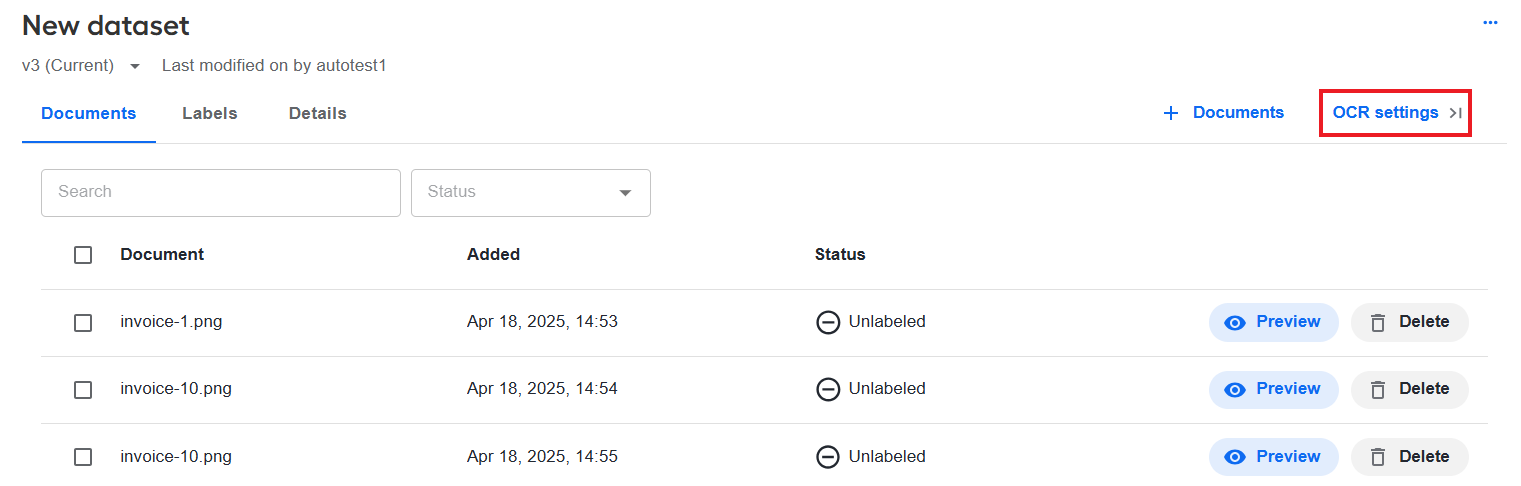
To hide the OCR settings, click the Hide button.
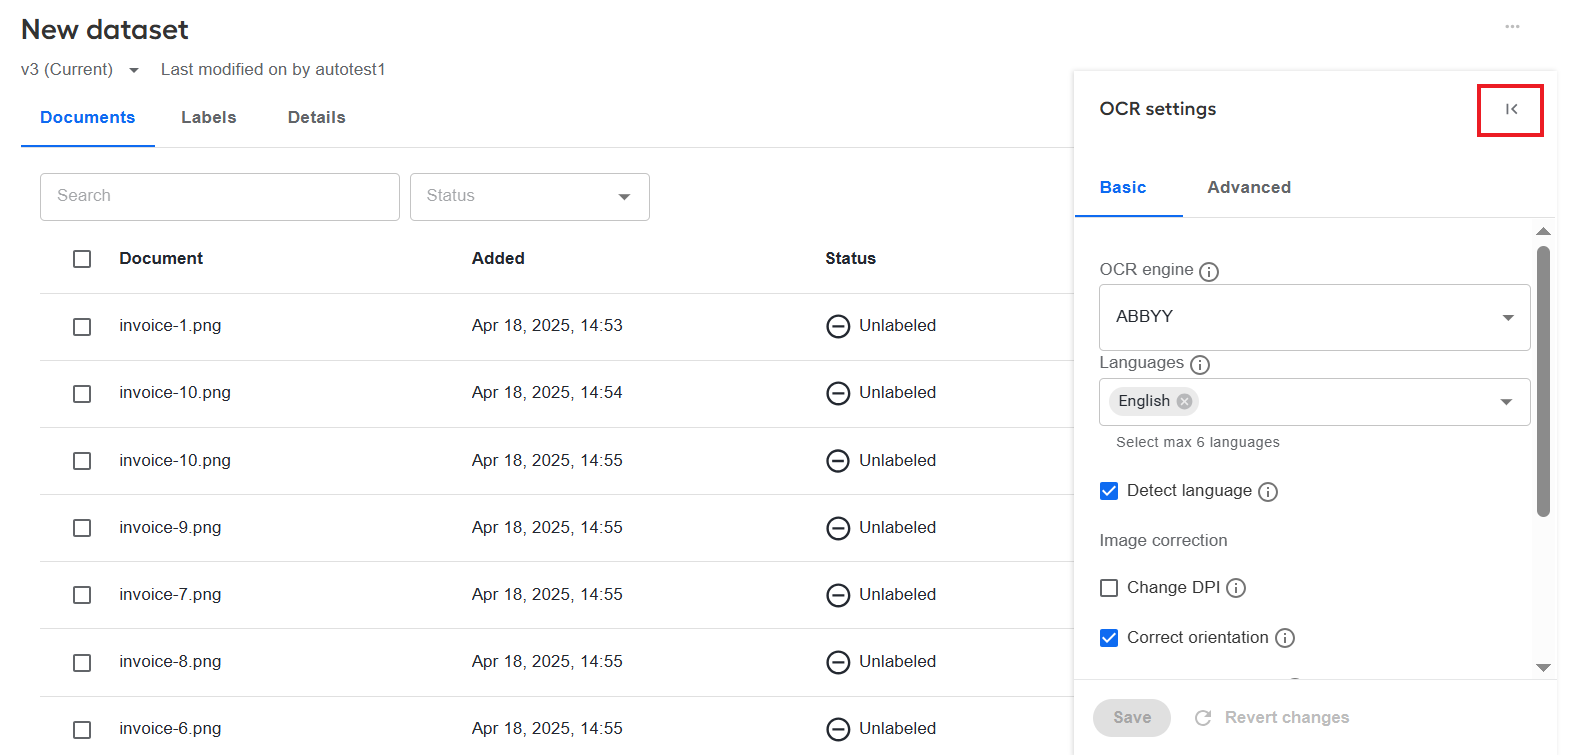
In the OCR engine drop-down list, you can select a tool for recognizing documents in your dataset. There are four OCR providers to choose from:
- ABBY
- Azure
- Paddle
- For ABBYY, you can configure all the settings listed below.
- For Azure and Google, you can adjust only the Convert documents to TIFF setting.
- For Paddle, adjustable settings are Languages, Detect languages, and Table detection.
There are two modes you can choose from when configuring OCR settings:
- Basic
- Advanced
The Basic mode allows you to configure the settings using only user interface controls without coding.
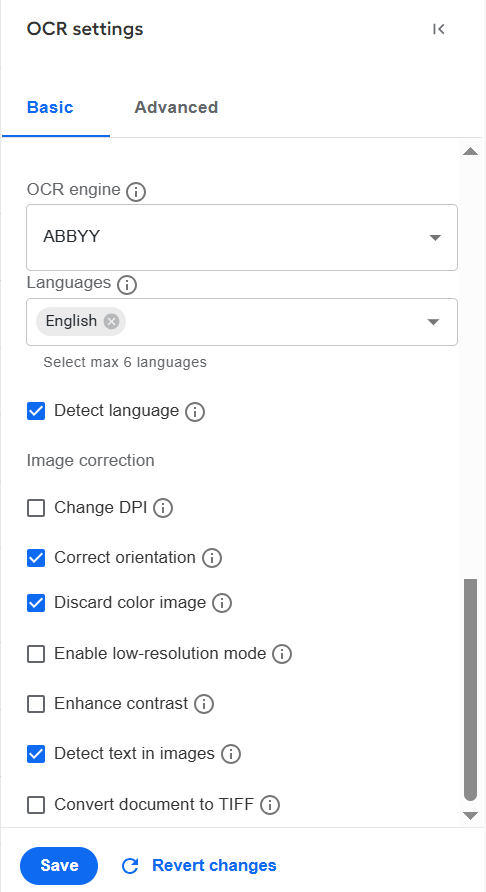
Available OCR settings are as follows:
Languages: add language tags to specify the languages that are likely to be found in your documents. You can add a maximum of six languages. Subsequently, the engine automatically chooses one of them as the most suitable for reading each particular document.
Detect language: select if you want the engine to read texts word by word, applying the most suitable language from the Languages box.
Image correction options:
Change DPI: set the DPI resolution range of the recognition output. The available values are from 50 to 600.
Correct orientation: select if you want the engine to adjust the orientation of the recognized document.
Discard color image: replace any colors of an original document with the shades of grey in the recognition output.
Enable low-resolution mode: select to improve the recognition output from low-quality originals.
Enhance contrast: select to improve the contrast of the recognized document.
Detect text in images: select if you want the engine to recognize any text in images (for example, logos) inside the document.
Convert document to TIFF: convert documents to the TIFF format before recognition.
The Advanced mode allows you to set the same OCR settings you configured in the Basic mode but in the JSON representation.
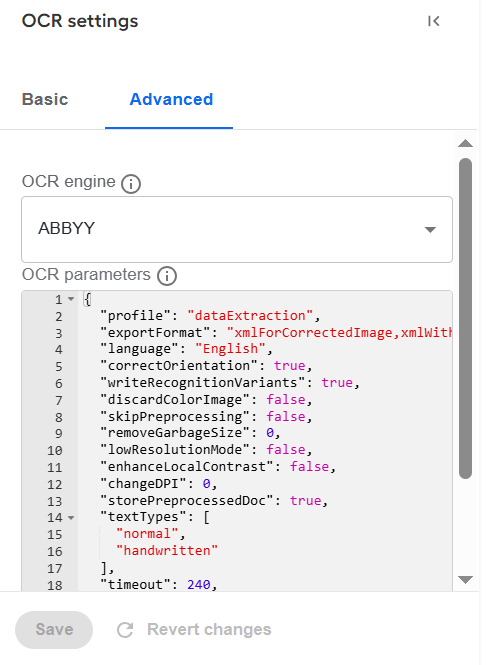
Any changes made in the Basic mode are reflected on the Advanced tab and vice versa.
Click Save to apply the changes. To cancel any changes you made, select Revert changes. If you make any changes and try to leave the page, a warning message about unsaved changes appears.
Label documents
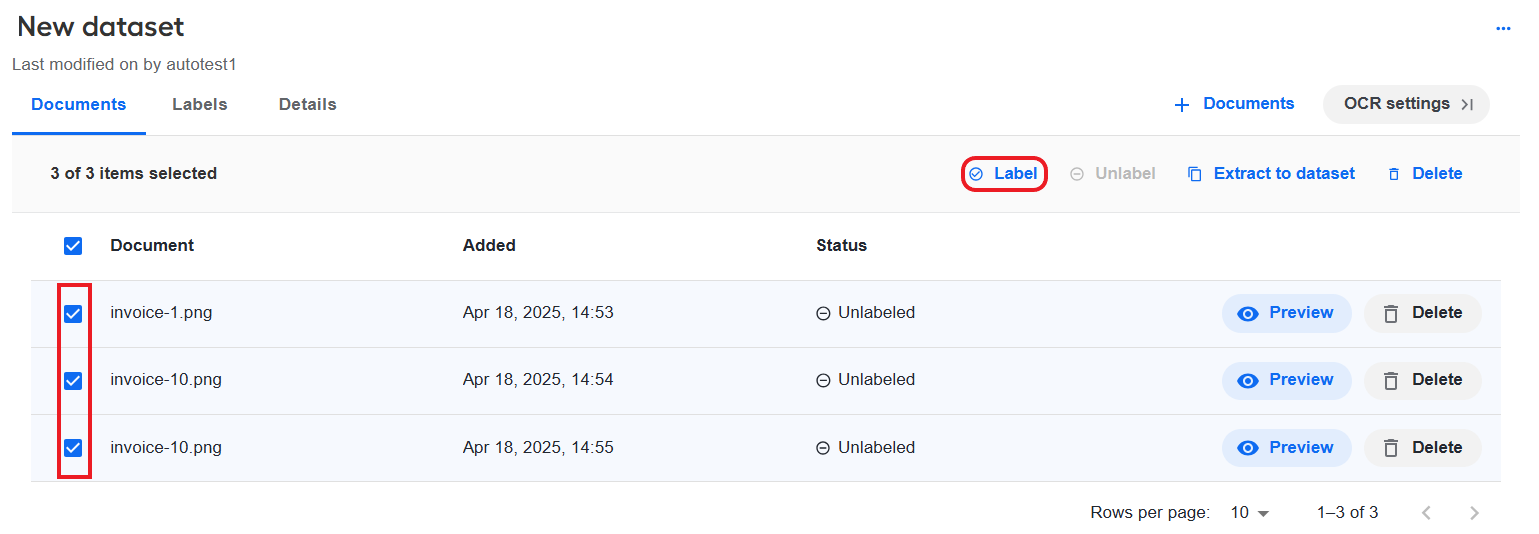
Once you have labels configured, you can start the labeling flow. To do that, follow the steps below:
On the Documents tab for a dataset, choose the documents you want to label by selecting corresponding checkboxes and, in the bulk actions menu, click Label.
 info
infoIf a previously labeled document is passed to labeling, the previously labeled data is restored.
Choose a labeling method and proceed as described in respective instructions:
Label manually if you want to process the documents yourself.
Label with AI if you want a model to label the documents for you automatically.
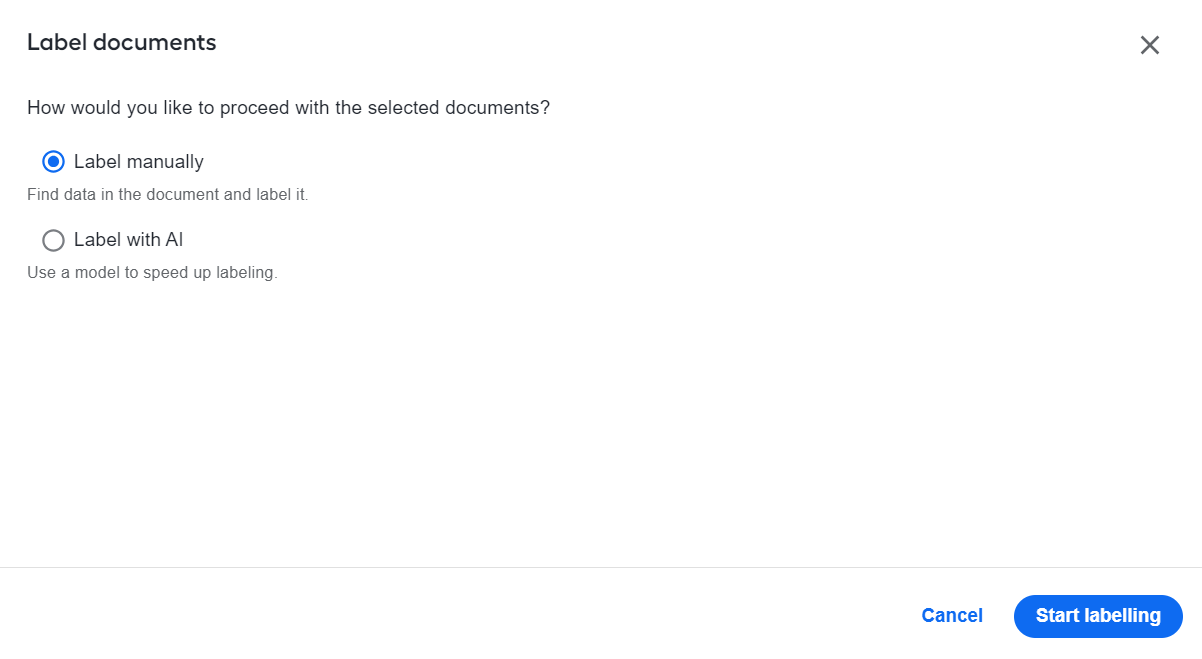
Up to 10 users in parallel can label documents in a dataset using the default memory configuration for dataset management and labeling services.
Manual labeling
After you choose Label manually, click the Start labelling button. The action redirects you to the page with the document you need to label. For labeling instructions, see the guide.
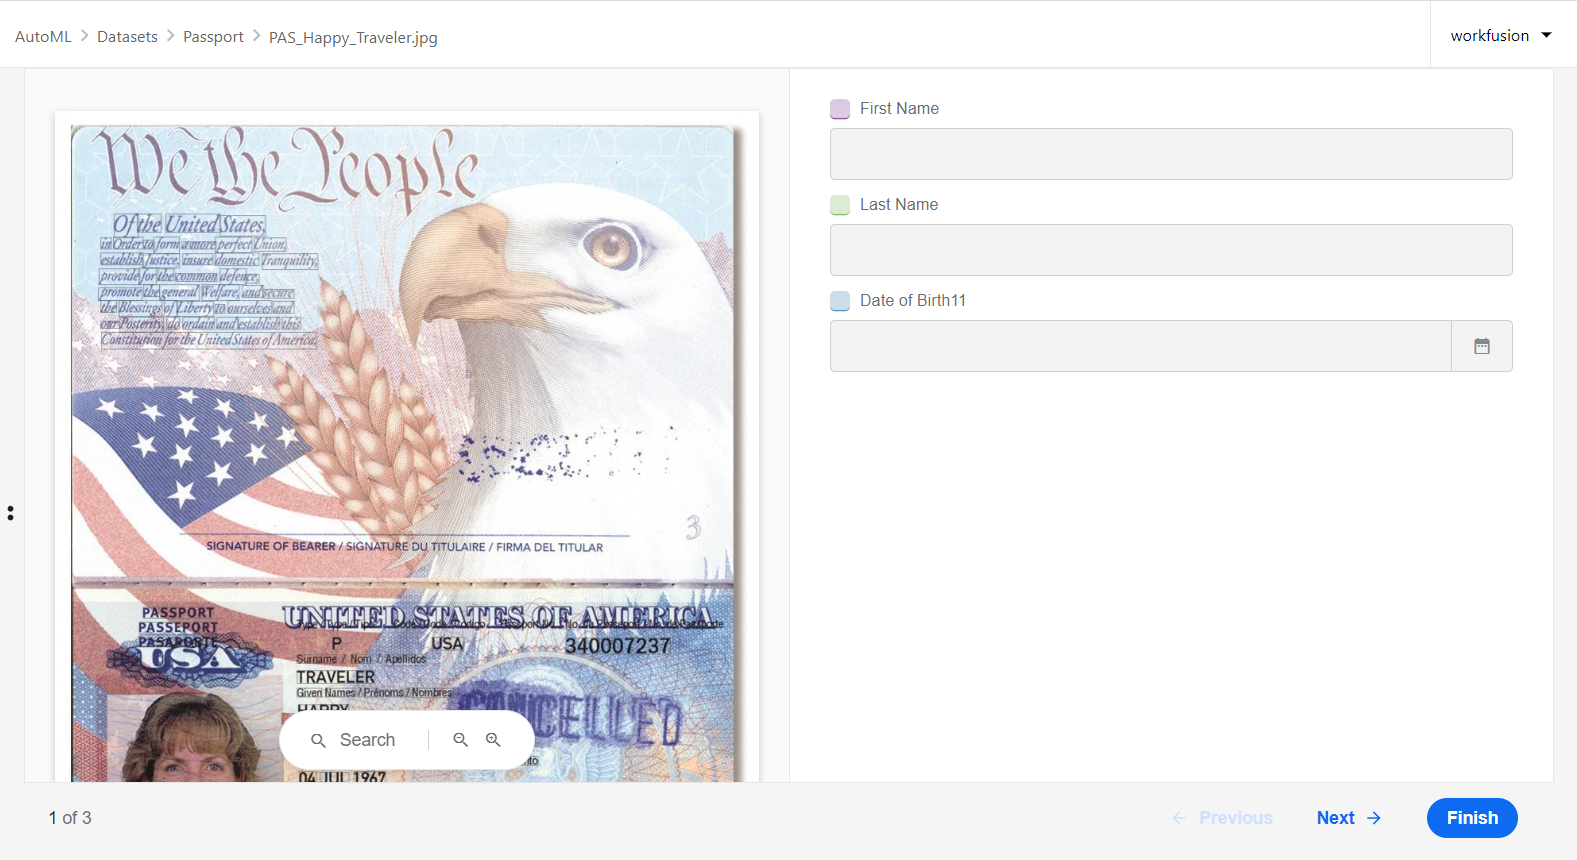
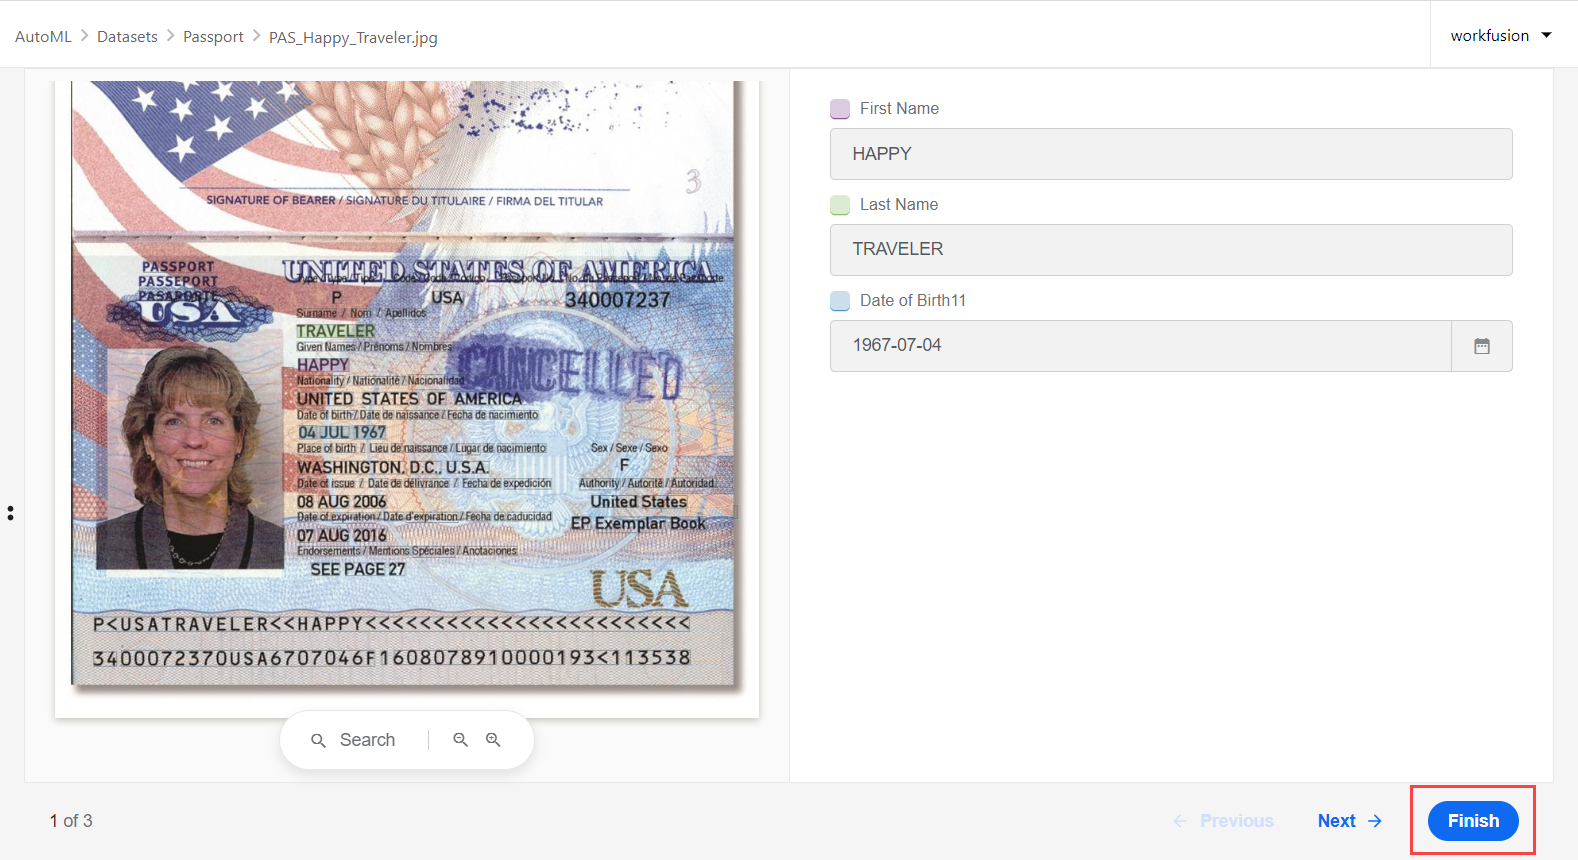
To save your work after you finish labeling, click Finish. If you perform bulk labeling (more than one document), proceed to the next document in the queue by clicking Next.
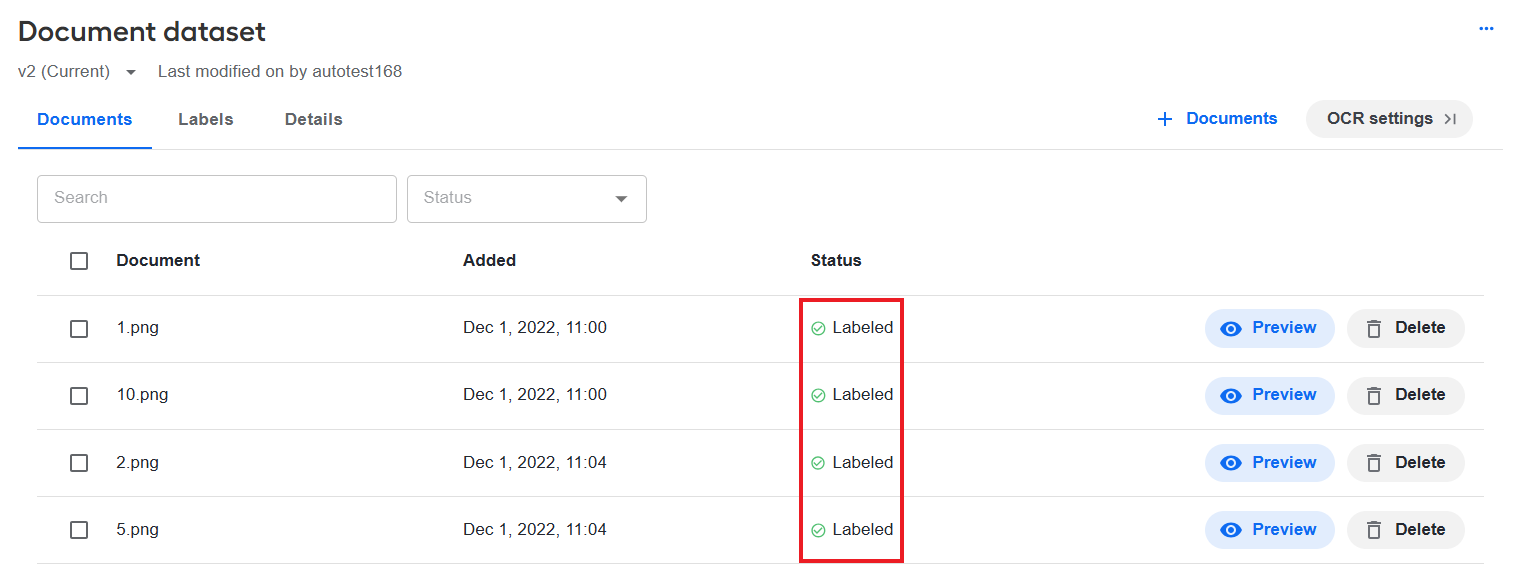
Labeled data is saved to the dataset. On the Documents tab, the Status for the processed documents is changed to Labeled .
Labeling with AI
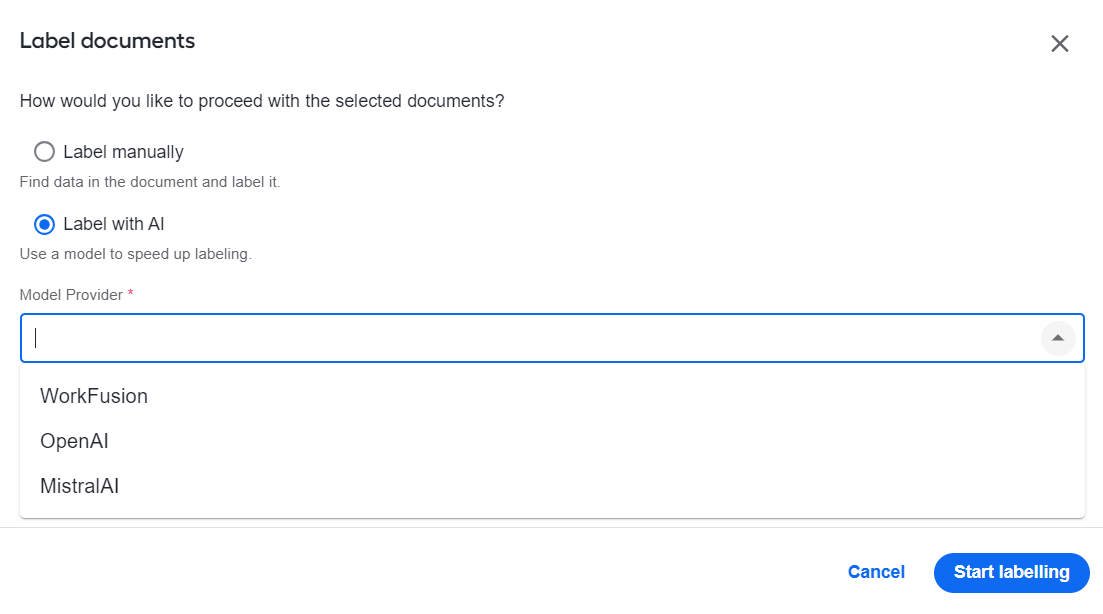
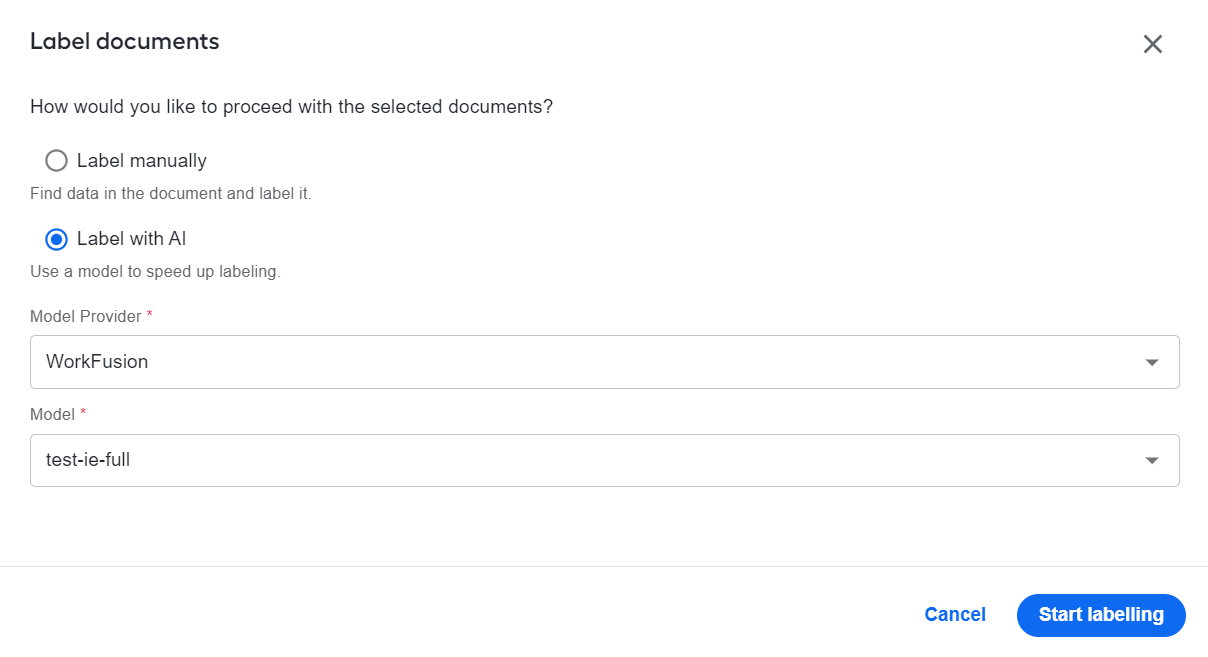
After you choose Label with AI, do as follows:
Select a model provider for automatic labeling.
 caution
Using OpenAI or MistralAI as the model provider is only possible if you enabled the auto-labeling feature. For instructions, see the Enable auto labeling with OpenAI or MistralAI guide.
Depending on the chosen model provider, proceed in one of the following ways:
If you opt for WorkFusion to assist you with labeling, choose a model from the Model drop-down list.
If you choose OpenAI or MistralAI to assist you with labeling, select a model and a document type. To add a custom document type, type it in the Document Type field.
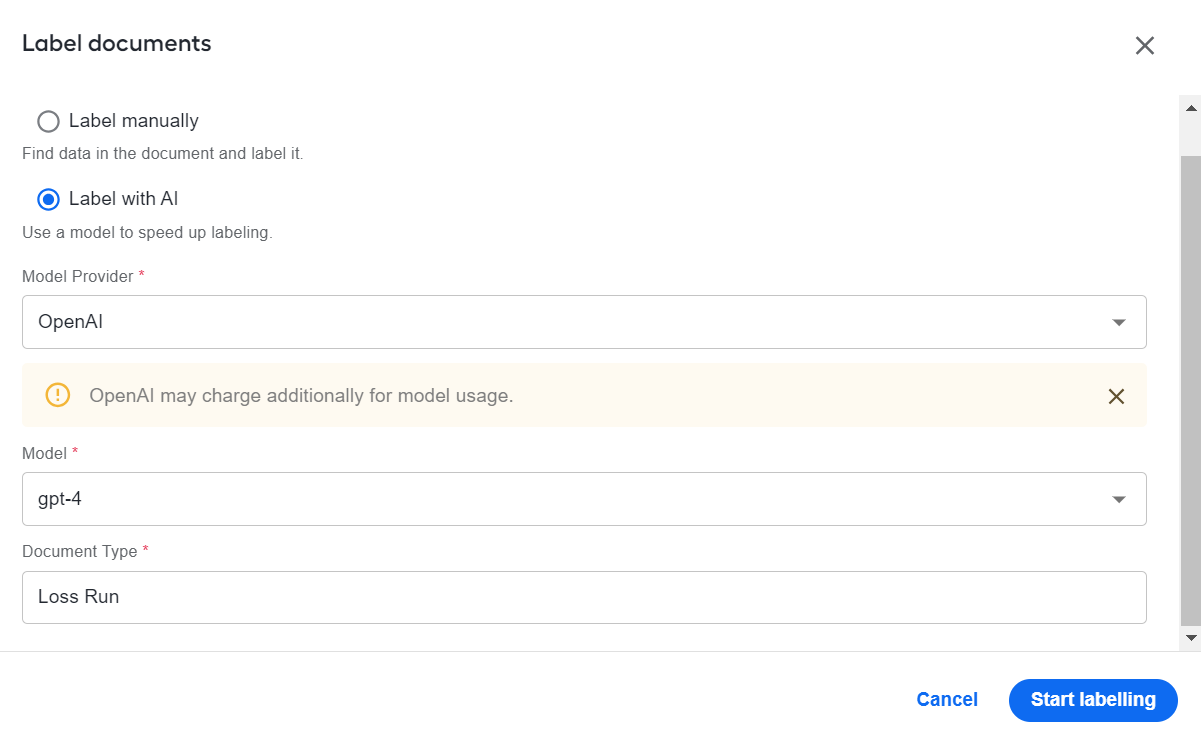
cautionWhen using OpenAI or MistralAI models, you are charged additionally by the mentioned providers according to your pricing plan. No additional charges are applied when you choose a WorkFusion model.
Click Start labelling to launch the auto labeling flow. The model starts labeling the documents for you.
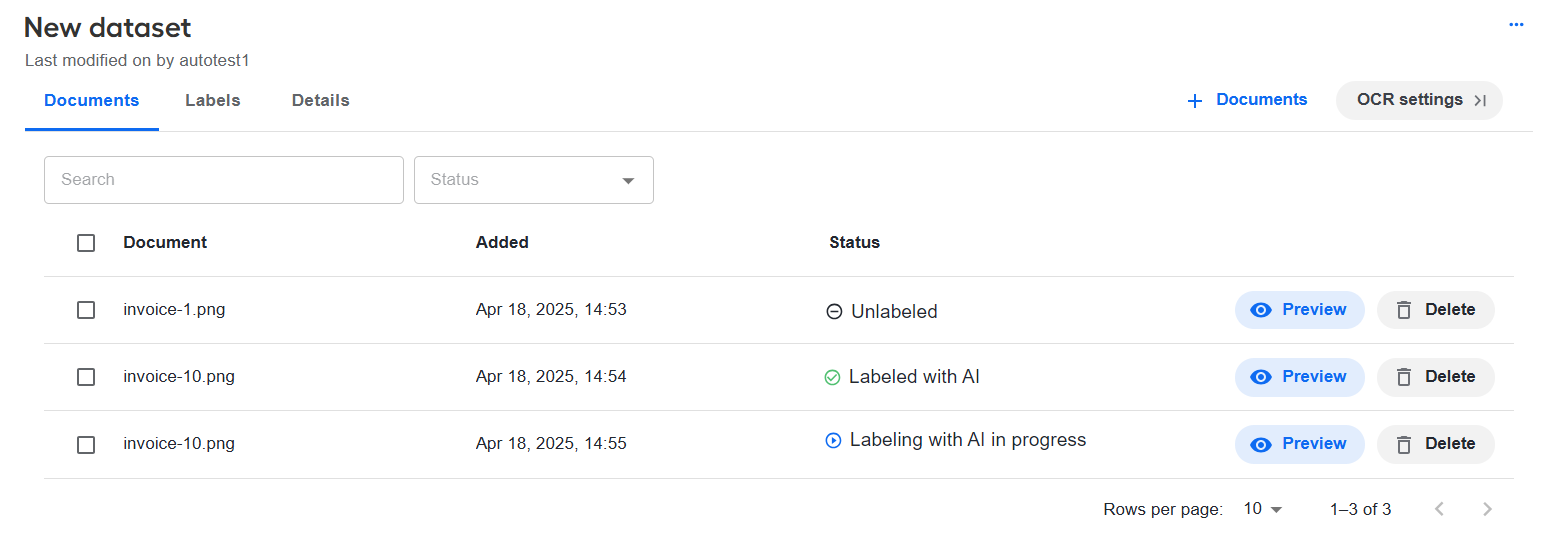
On the Documents tab, all documents that are being processed by the model have the Labeling with AI in progress status. The successfully processed ones have the Labeled with AI status. Labeled data is saved to the dataset.
Once the model finishes labeling all selected documents, a corresponding warning appears in the bottom-right corner.

If you click View results inside the warning, a page opens where you can review the results of the model-assisted labeling and make changes if necessary. Any validation errors are visible in the UI form.
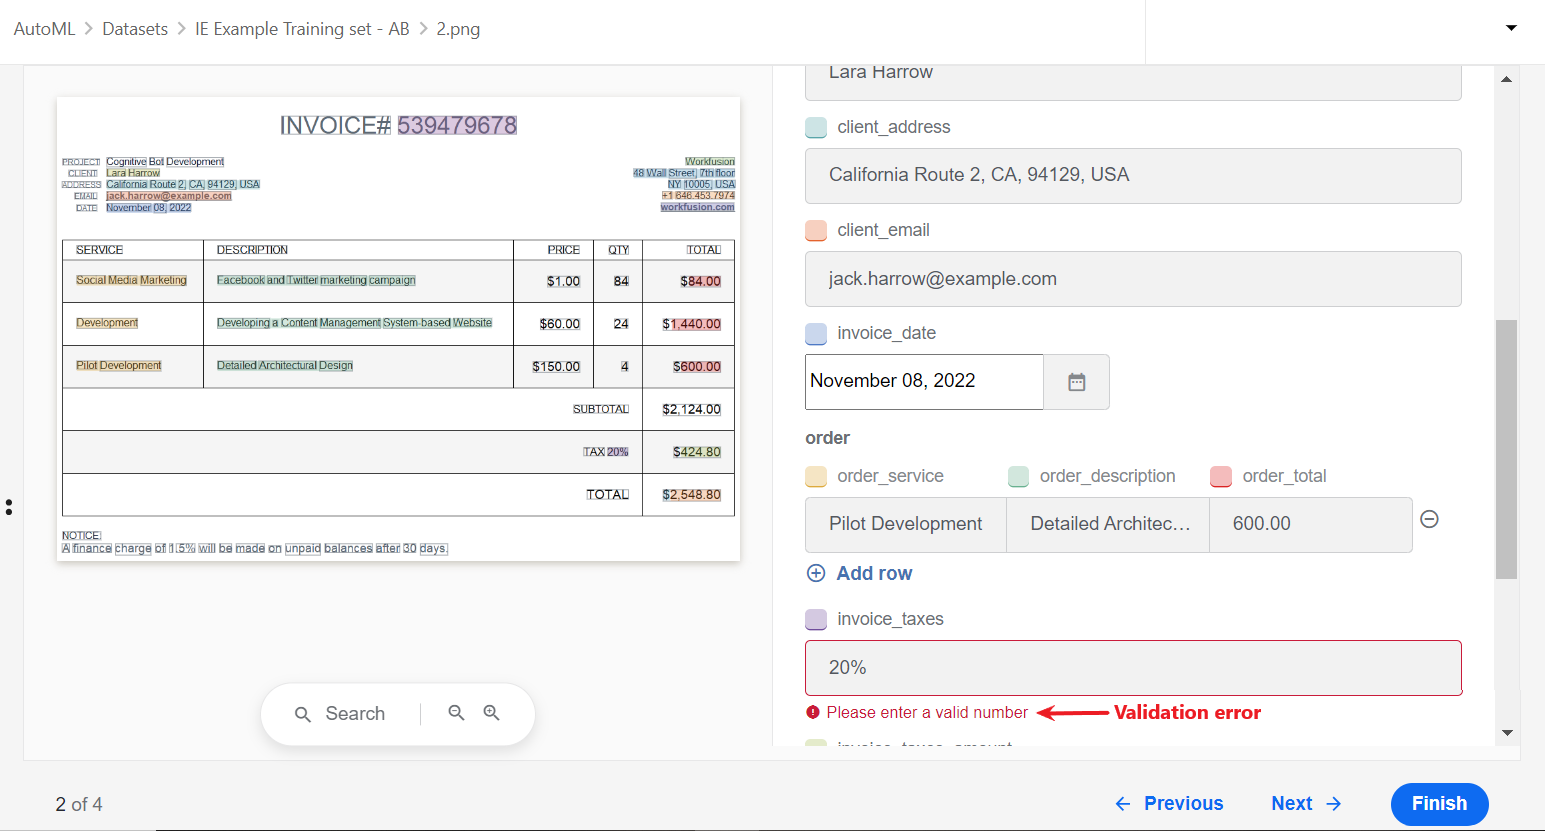
If you perform bulk labeling, proceed to the next document in the queue by clicking Next. To save the labeling results, click Finish.
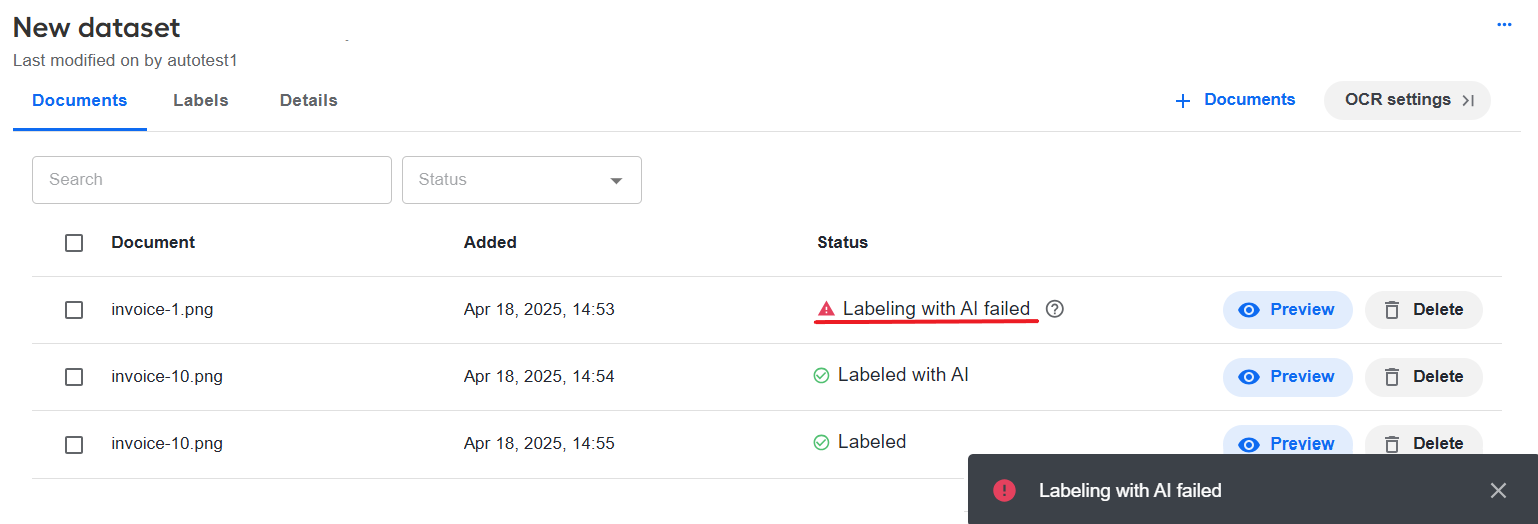
If anything goes wrong during labeling, the corresponding document on the Documents list gets the Labeling with AI failed status. Also, you see an appropriate warning in the top-bottom corner.
Unlabel documents
In case you need to unlabel one or more documents, do as follows:
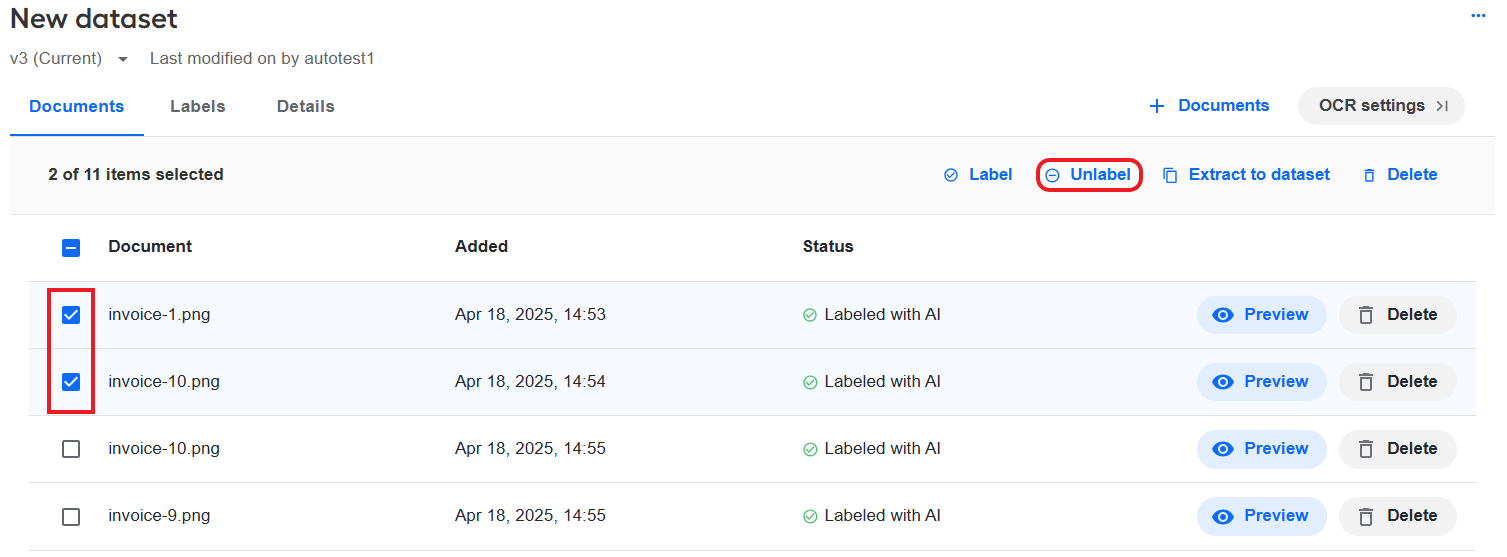
On the Documents tab, click the checkboxes next to the documents you want to unlabel and, in the bulk actions menu, click Unlabel.
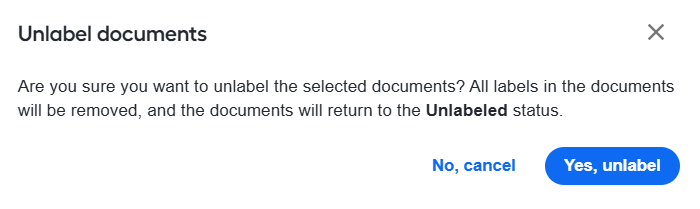
In the confirmation dialog, click Yes, unlabel. The selected one or more documents are unlabeled, and their status returns to Unlabeled.
Delete dataset
To remove a dataset, do as follows:
In the Datasets list, find the dataset you want to delete, open its Actions menu, and click Delete.
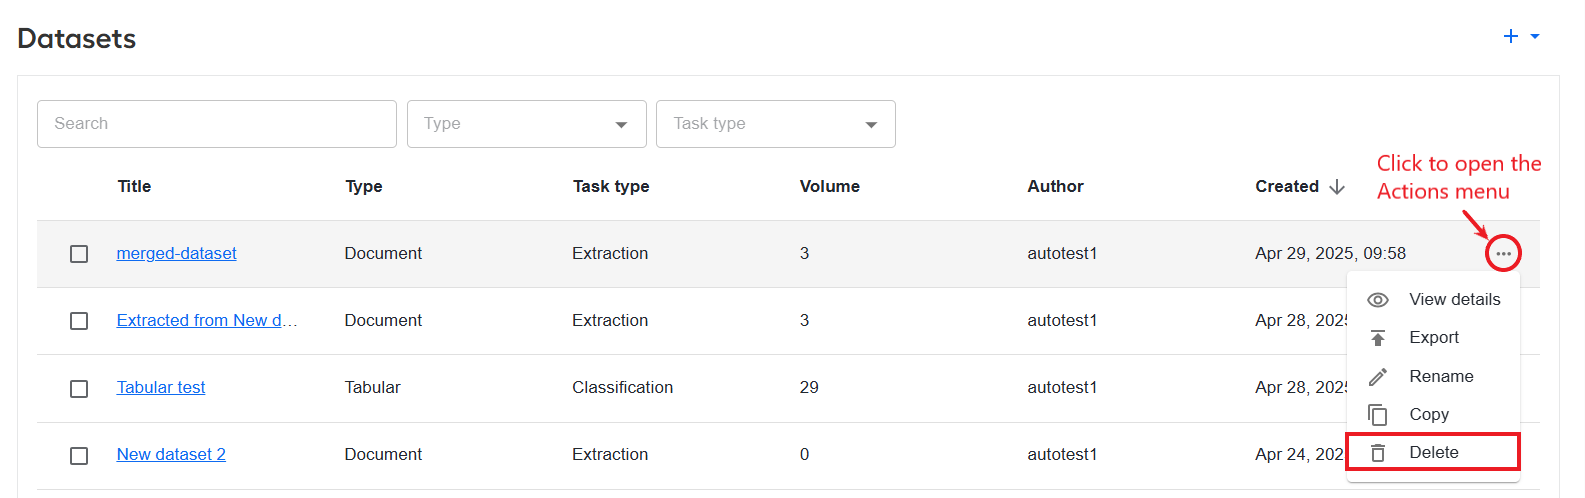
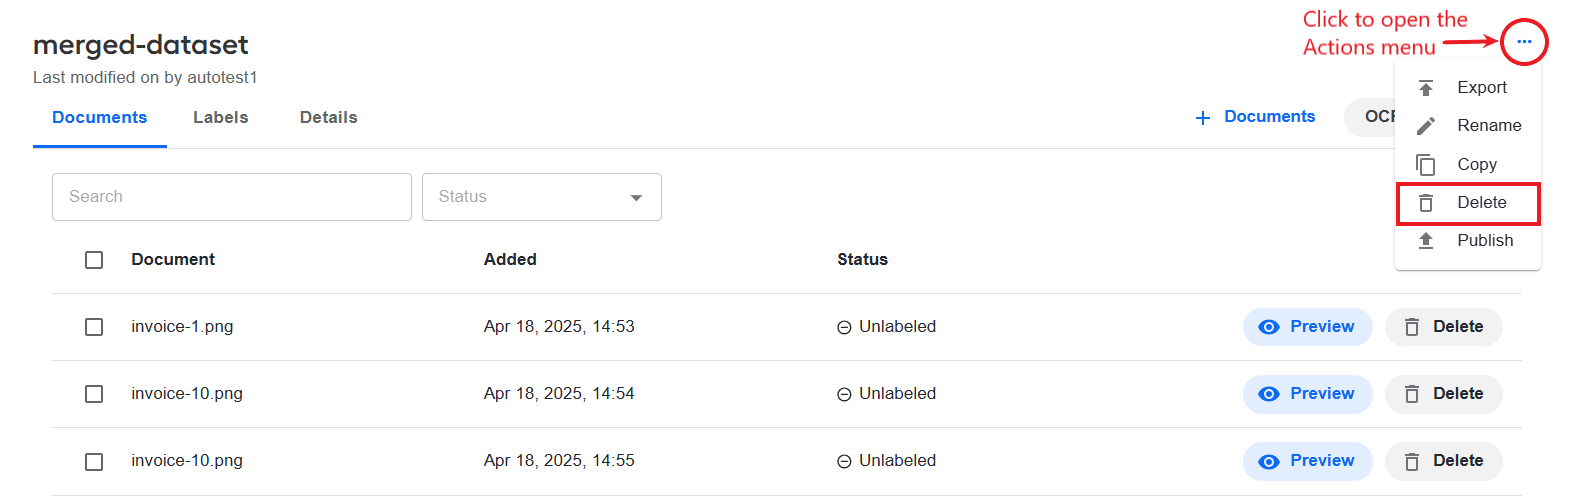
Alternatively, select the Delete option in the Actions menu inside a specific dataset.
In the window that follows, click the Yes, delete button to confirm the deletion.
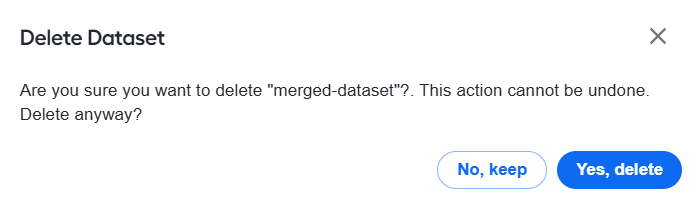
The selected dataset is deleted, and you see a confirmation message in the bottom-right corner of the screen.