Manage models
To access a list of available Machine Learning (ML) models, select AutoML > Models. Control Tower updates the list every time a new model is deployed to your environment or you complete a training run.
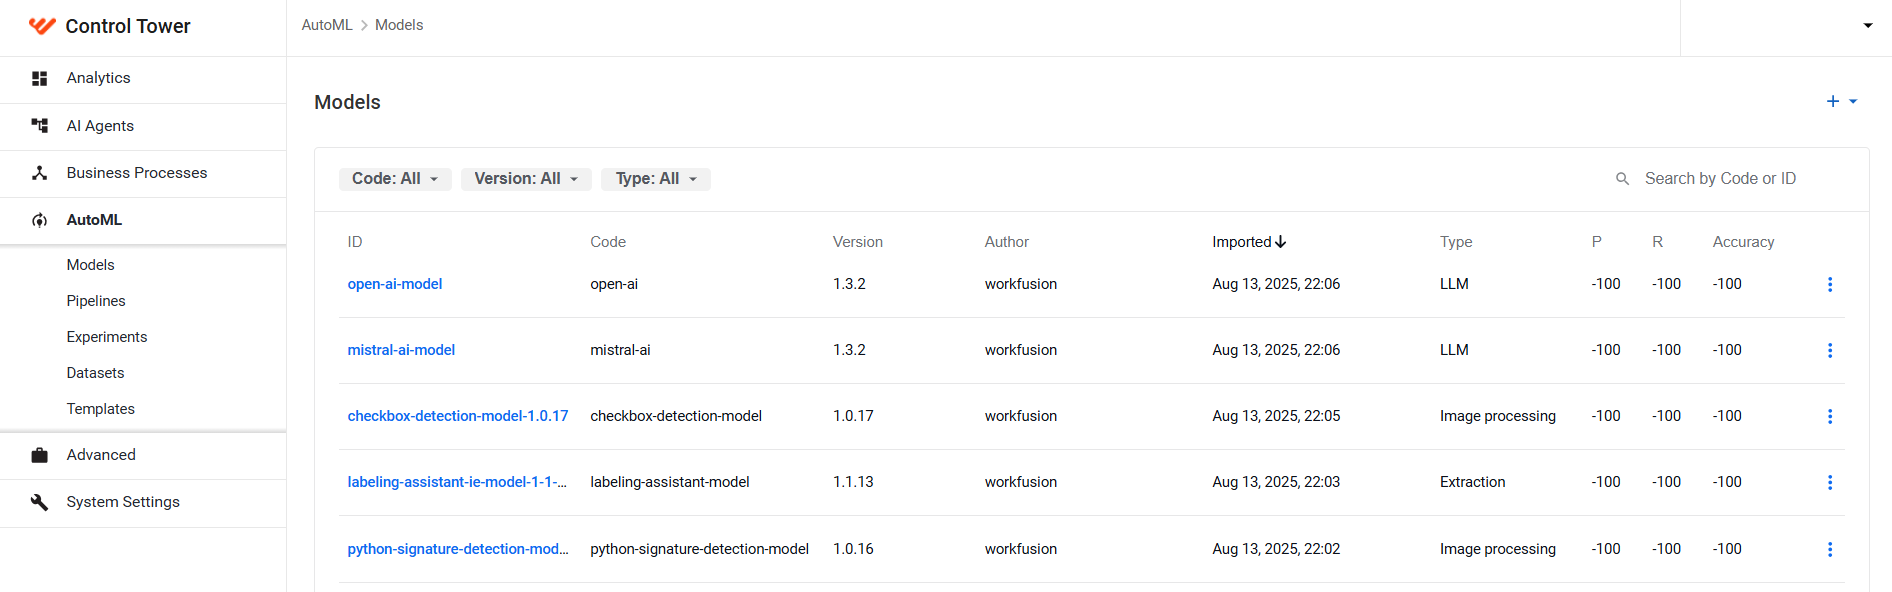
From the list, you can also find out the following information about each available ML model:
| Column | Description |
|---|---|
| ID | Model identifier specified during model training. |
| Code | Pipeline identifier specified in its source code description. |
| Version | Pipeline version specified in its source code description. |
| Author | Name of the user who created or imported the model. |
| Imported | Date and time (in the dd.mm.yyyy, hh:mm format) when the model was added to your environment. New models appear in an environment either via explicit import operations or after training. |
| Type | Model type identifying its working principle (for instance, extraction or classification). |
| P | Precision of the model calculated based on training results. |
| R | Recall of the model calculated based on training results. |
| Accuracy | Accuracy rate for the model calculated based on training results. |
To get information on models available via WorkFusion, see Learn about WorkFusion models.
View model details
To view the detailed data about a particular model, click its ID in the list or open its Actions menu and select View.
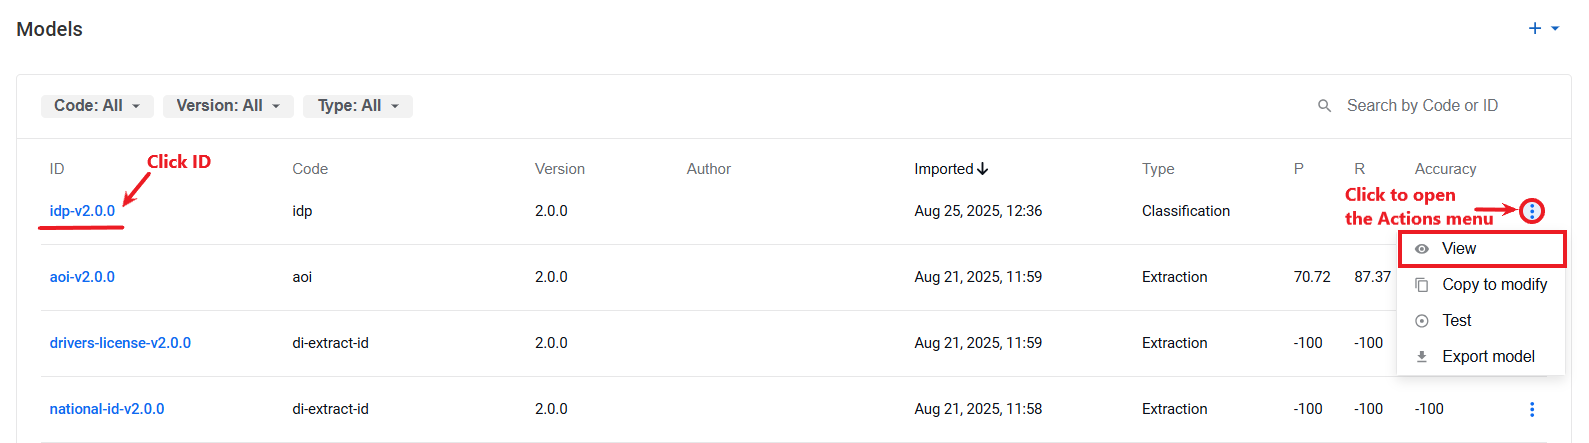
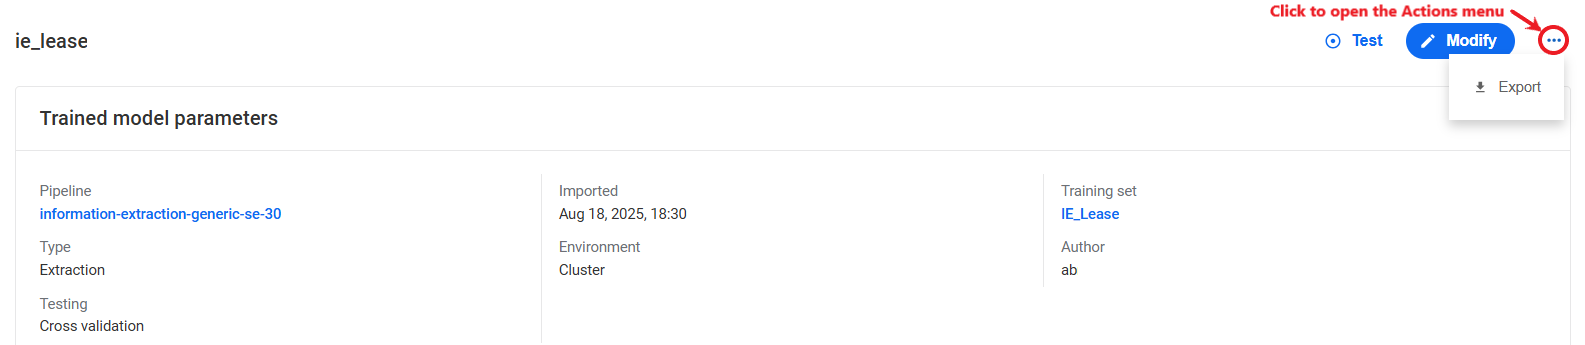
The model details page is displayed:
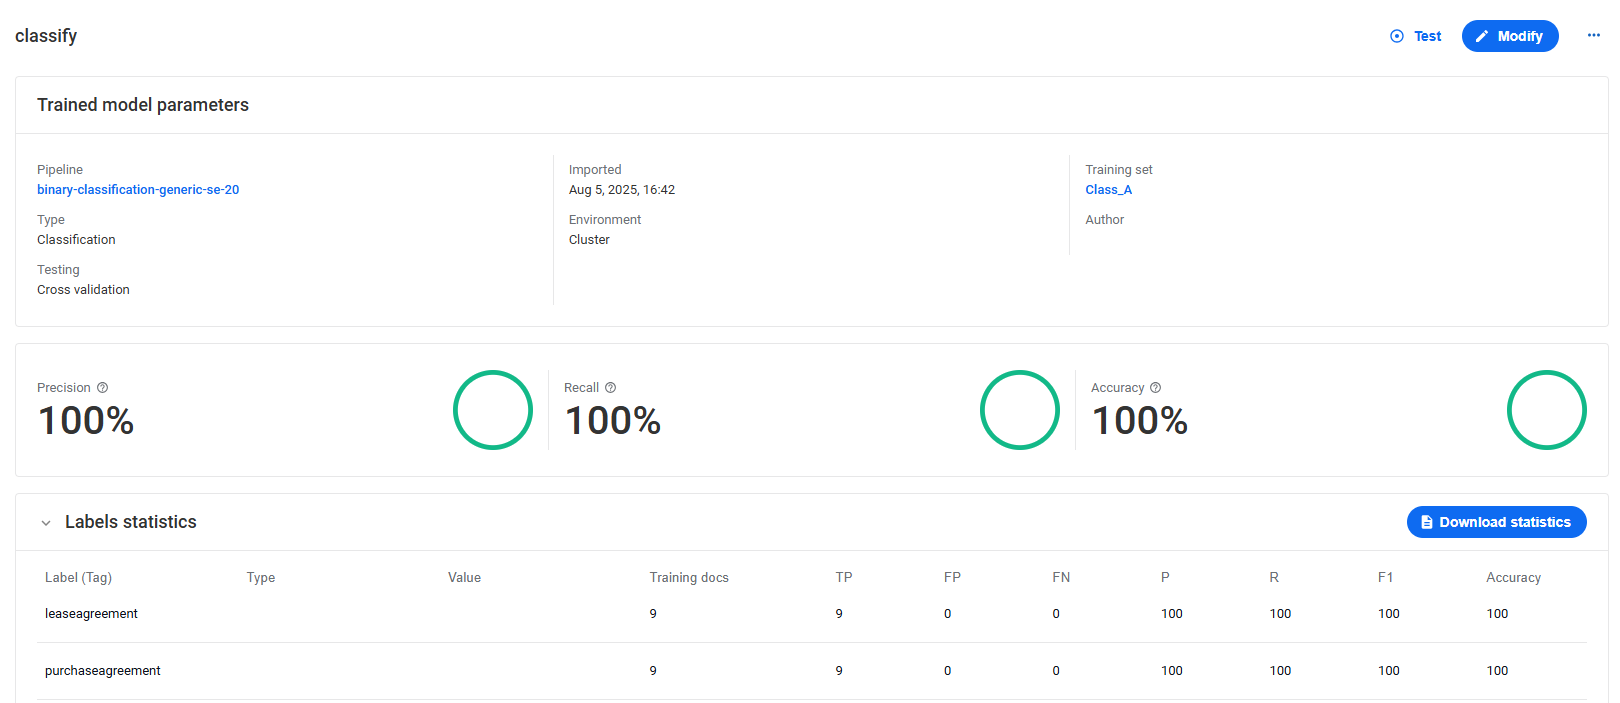
The exact appearance of the page depends on which data is available for a specific model. In particular, it can comprise all or any of the following data items:
| Data item | Description |
|---|---|
| Pipeline | Model's pipeline identifier (Code in the Pipelines list); clicking the link brings you to the page with the pipeline details. |
| Type | Model type identifying its working principle, for instance, extraction. |
| Testing or Test set | Model's test method:
|
| Imported | Timestamp (dd.mm.yyyy, hh:mm) when the model was imported to Control Tower. |
| Environment | Model's environment data. |
| Training set | Name of the dataset used for model training; clicking the link brings you to the page with the dataset details. |
| Overall model statistics | Precision, recall, and accuracy diagrams depicting average metrics for the total of data points (labels) in percent. |
| Label statistics | Various metrics associated with each model data point (label):
|
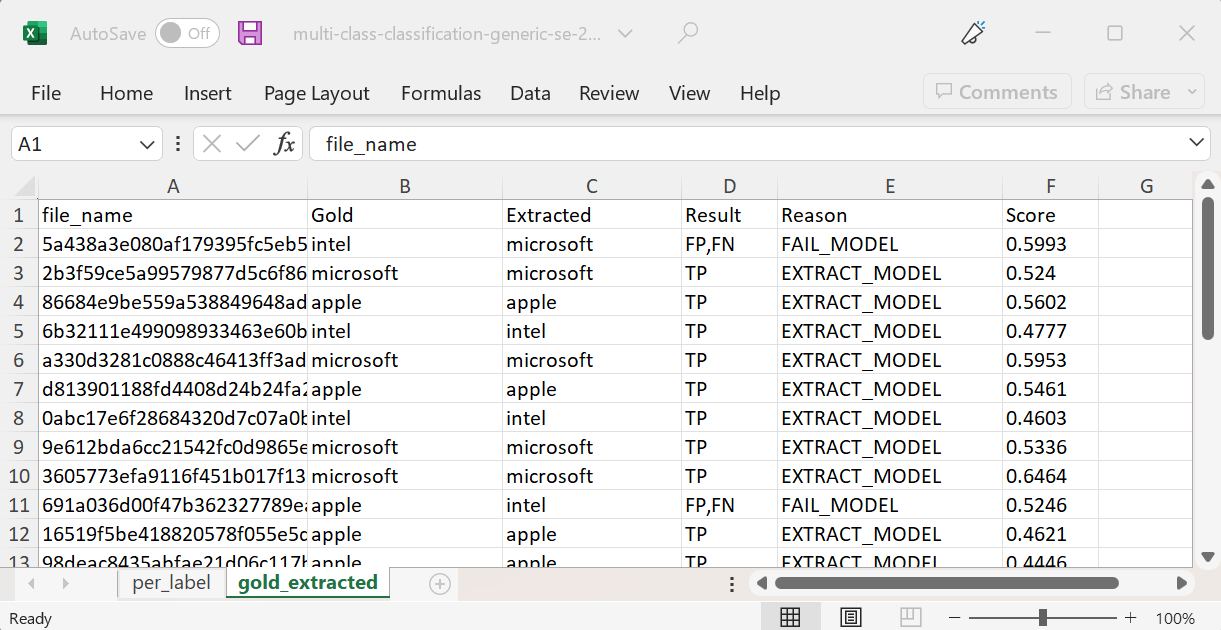
To export the label statistics (if available) as an XLXS file, click Download statistics.

For models developed with AutoML SDK of version 10.2.6 and higher, the XLXS statistics file also includes extended per document statistics.
From the model details page, you can also do the following:
Start the flow to modify the model by clicking the Modify button. For detailed instructions, refer to the Modify model section.
Launch a test for the model by clicking the Test button. For detailed instructions, refer to the Test model section.
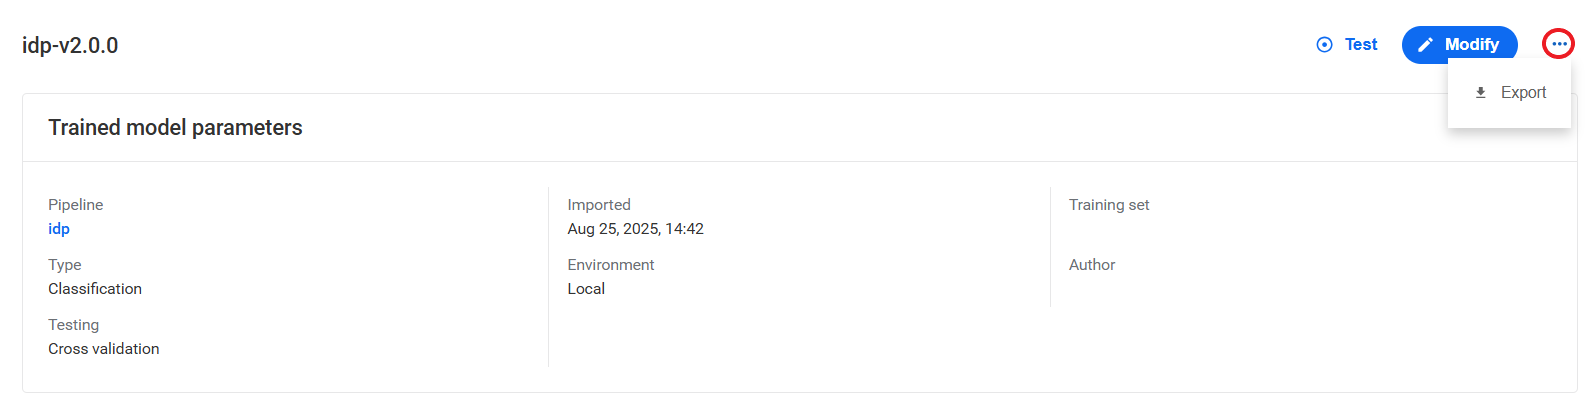
Export the trained model as a zip archive. To start the export flow, open the Actions menu and click Export.
Filter and search
You can filter the list of displayed models based on any or all the three criteria:
- Model's pipeline code
- Pipeline version
- Model type
To apply the criteria, click one or more filter buttons at the top of the model list and select required items or find them using the search box. Filters turn blue as they become active, and the items in the model list change accordingly to show the filtering results.
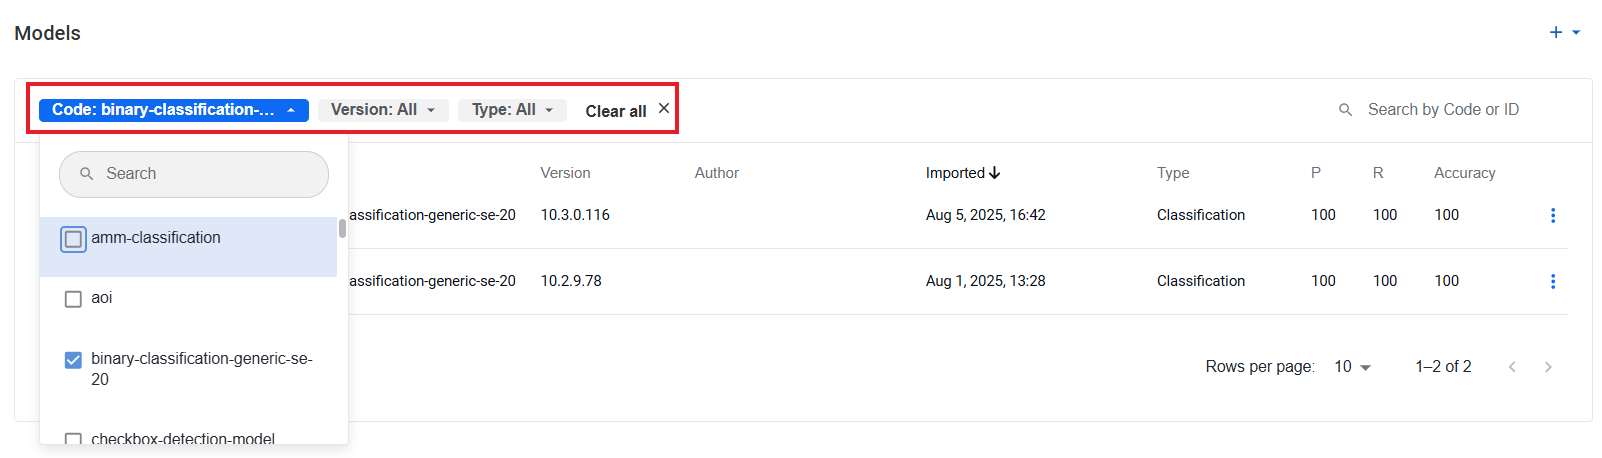
To turn off an active filter, click it again. To reset them all, click Clear all.
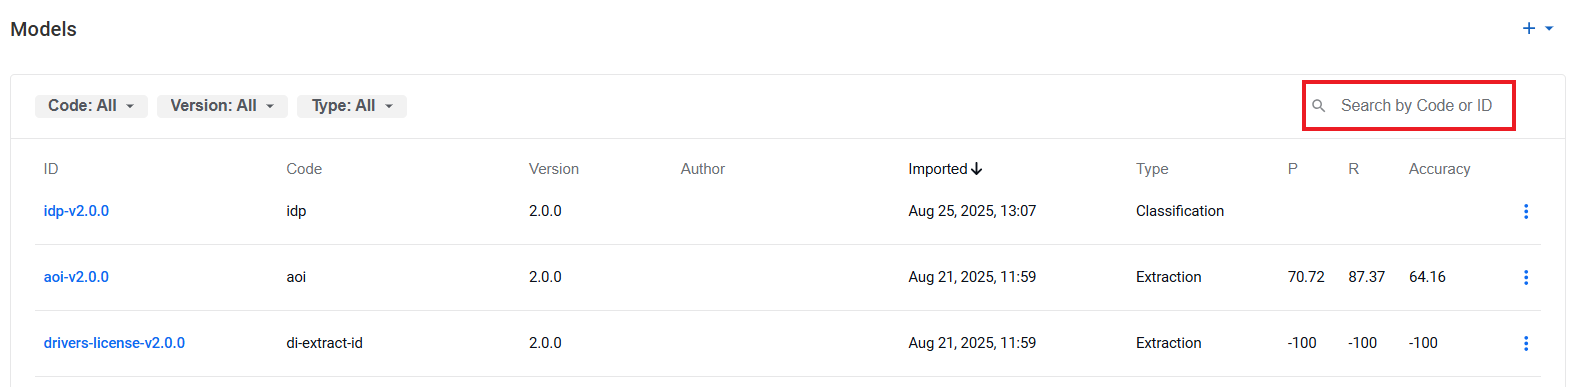
You can also search the list for particular models using the Search by ID and code box in the top-right corner.
Create model in no-code manner
In the AutoML UI in Control Tower, you can create a model in one of the two ways:
Alternatively, you can launch model training as follows:
From the Pipelines list. For details, read Manage pipelines | Train model.
Via Experiments > Trainings. For details, read Run experiments | Start training.
Train new model
To train a new model based on an available pipeline, follow the steps below:
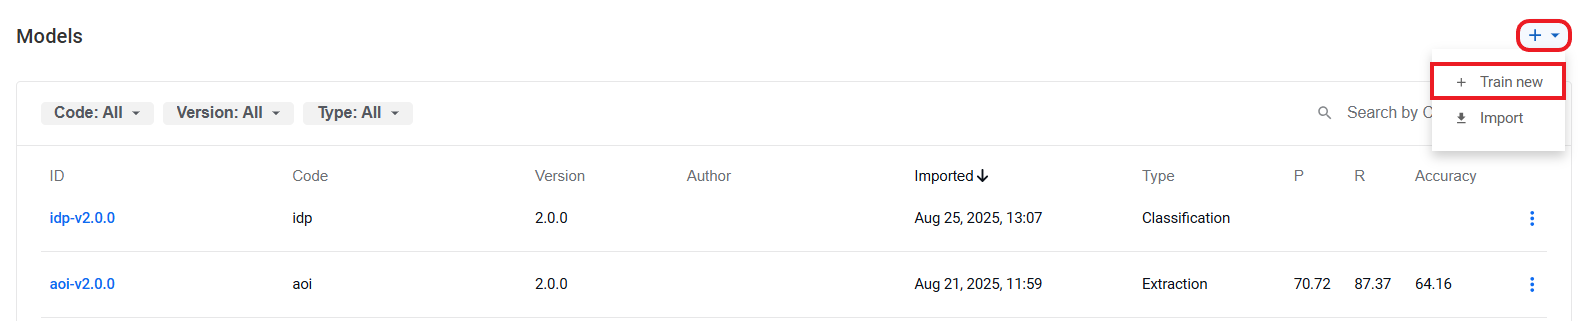
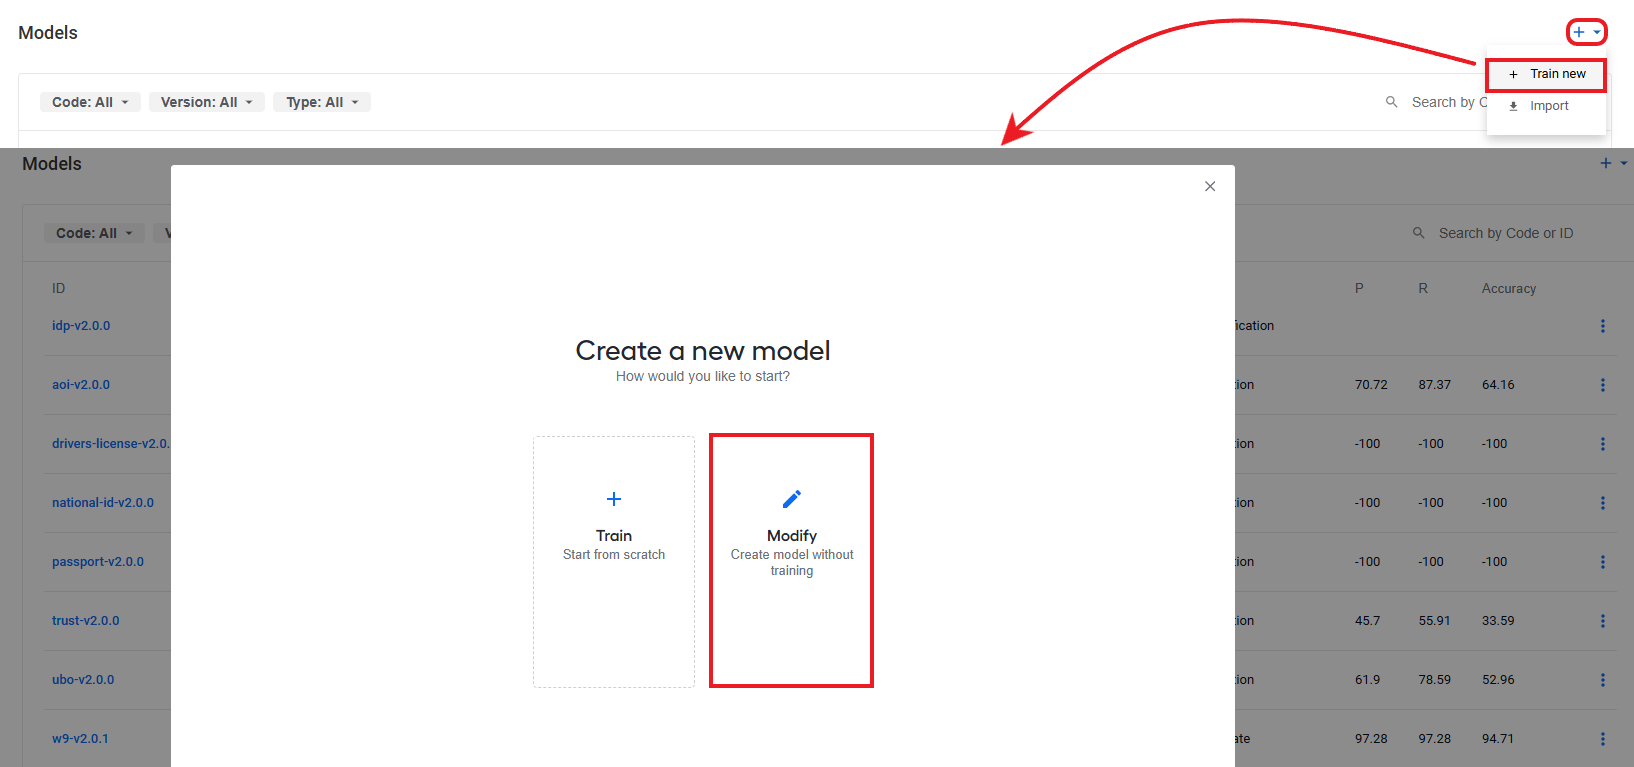
In the top-right corner of the Models page, click the plus (+) button to open the menu and select Train new.
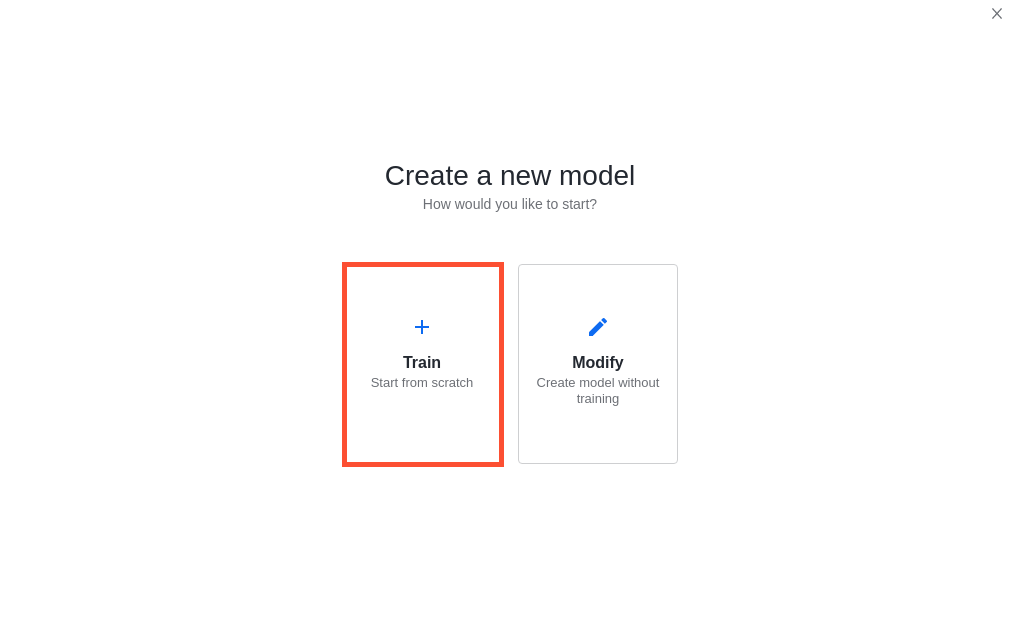
To create a model from scratch, click Train.
To configure a pipeline for the new model, fill in the fields as shown below and click Next.
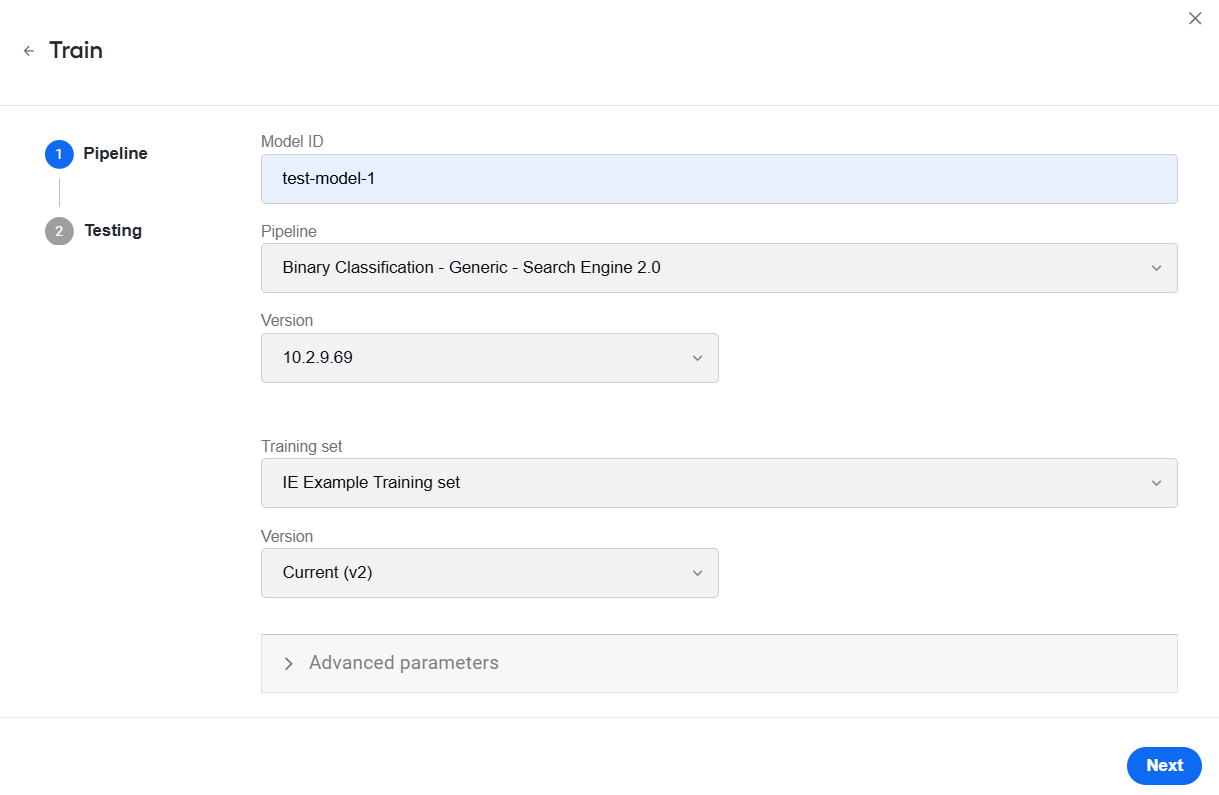
Specify a unique model ID so that you and other users can quickly identify the new model among others.
Choose a pipeline and its version from respective drop-down lists.
In the Training set drop-down list, select a dataset for training the model and choose its version.
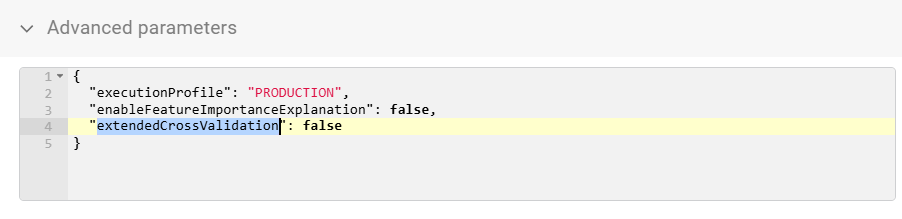
Optionally, set advanced model training and execution parameters. By default, the Advanced parameters JSON editor displays the following parameters:
executionProfiledefines if evaluation results and metadata for them should be preserved (DEBUGmode). Possible values arePRODUCTION(default) andDEBUG.enableFeatureImportanceExplanationprints top N features, each with detailed info and score. Possible values areTRUE(default) andFALSE.extendedCrossValidationis a Boolean flag defining whether to apply extended cross-validation or not. Possible values areTRUE(default) andFALSE.
For a full list of model training and execution parameters you can set in the section, read the Perform advanced model tuning in AutoML UI topic.
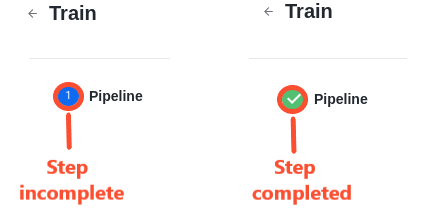
Clicking Next causes the flow of training steps on the left to change, depending on the model configuration contained in the pipeline you specified. The completed step is marked with a green tick as shown below:
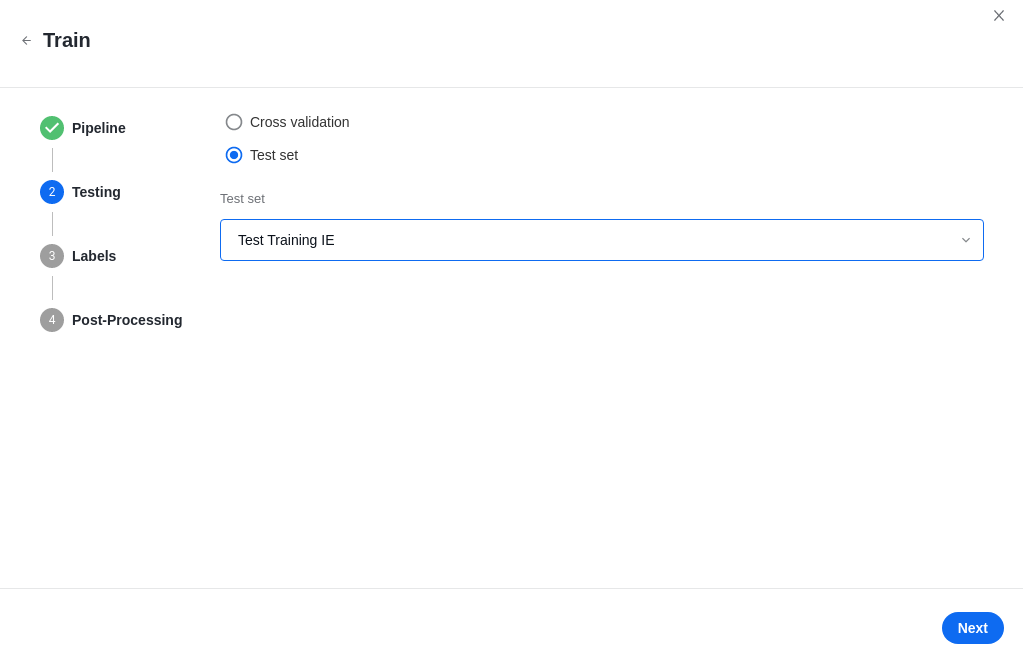
On the Testing step, choose a testing method. If you select Test set, specify one in the appropriate field. As you start typing in the field, available options appear as a drop-down list. To proceed to the next step, click Next.
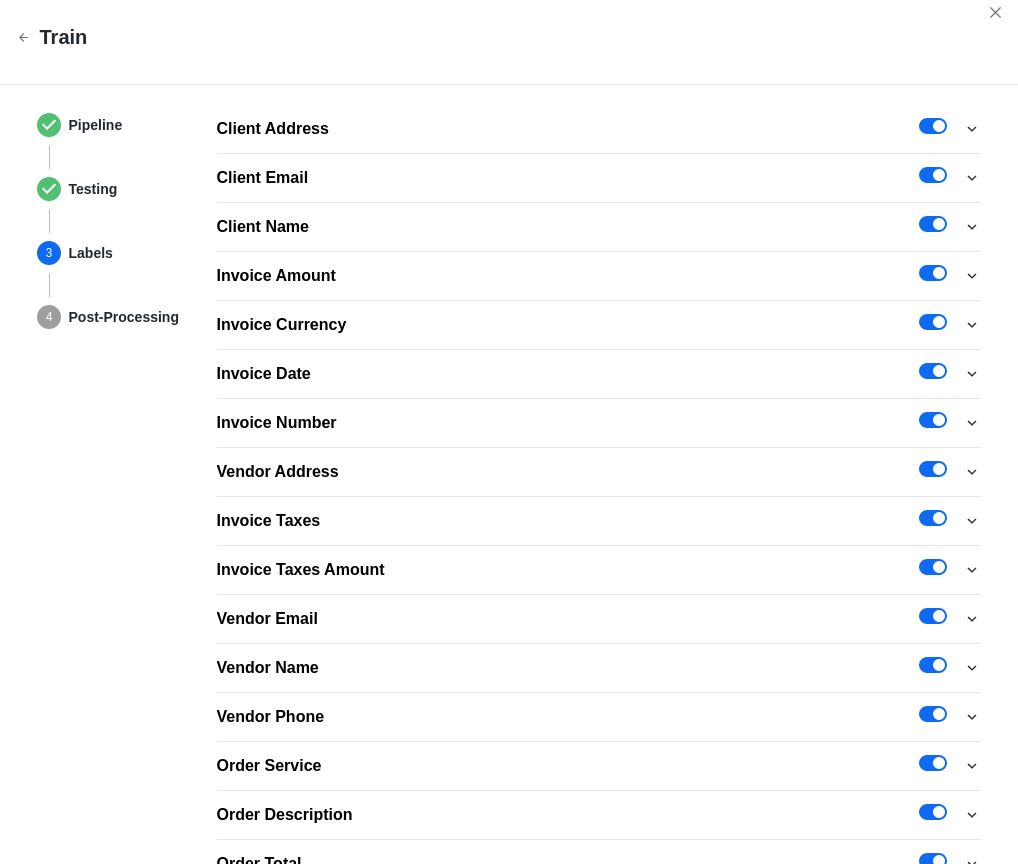
Configure labels by switching toggle buttons on or off. The initial list of labels is fetched from the selected training dataset and the initial configuration—from the model's pipeline.
 info
infoSteps 5 and 6 are not available for classification models.
For each required label, configure normalizers and click Next to continue. To access normalizers, click the arrow button next to a specific label.
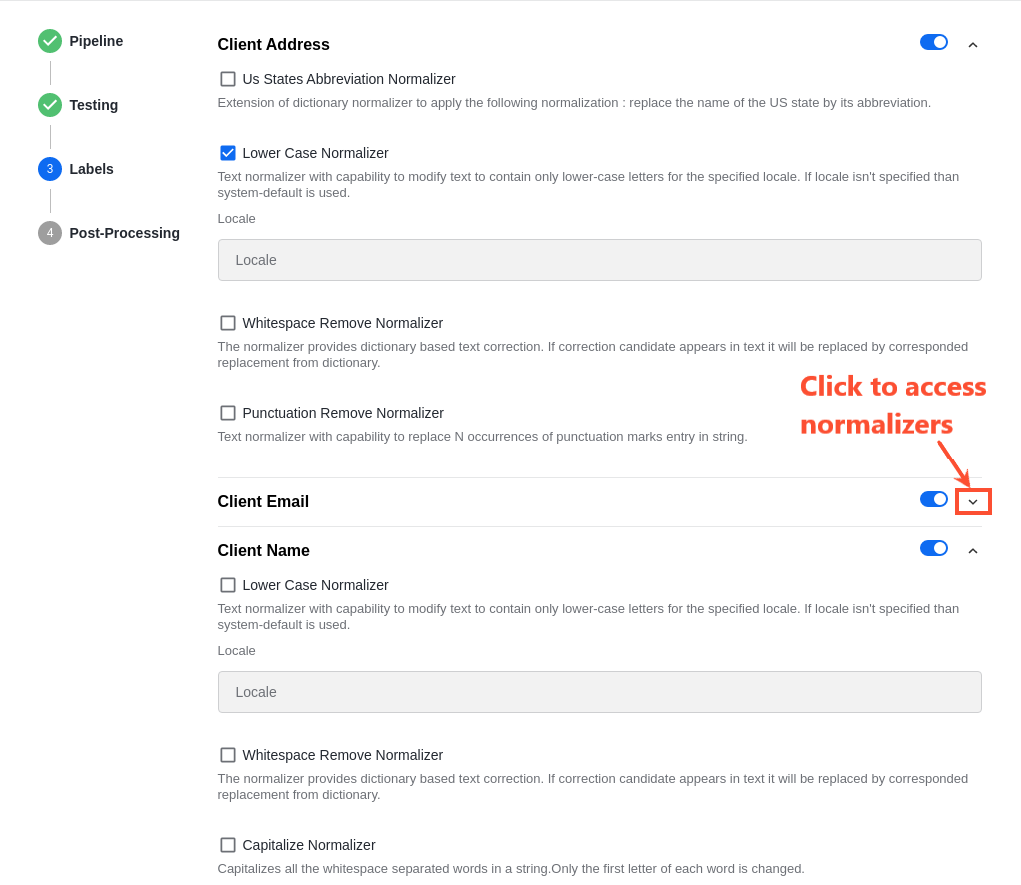
The initial normalizer configuration is fetched from the model's pipeline. For a normalizer setup example, refer to the article.
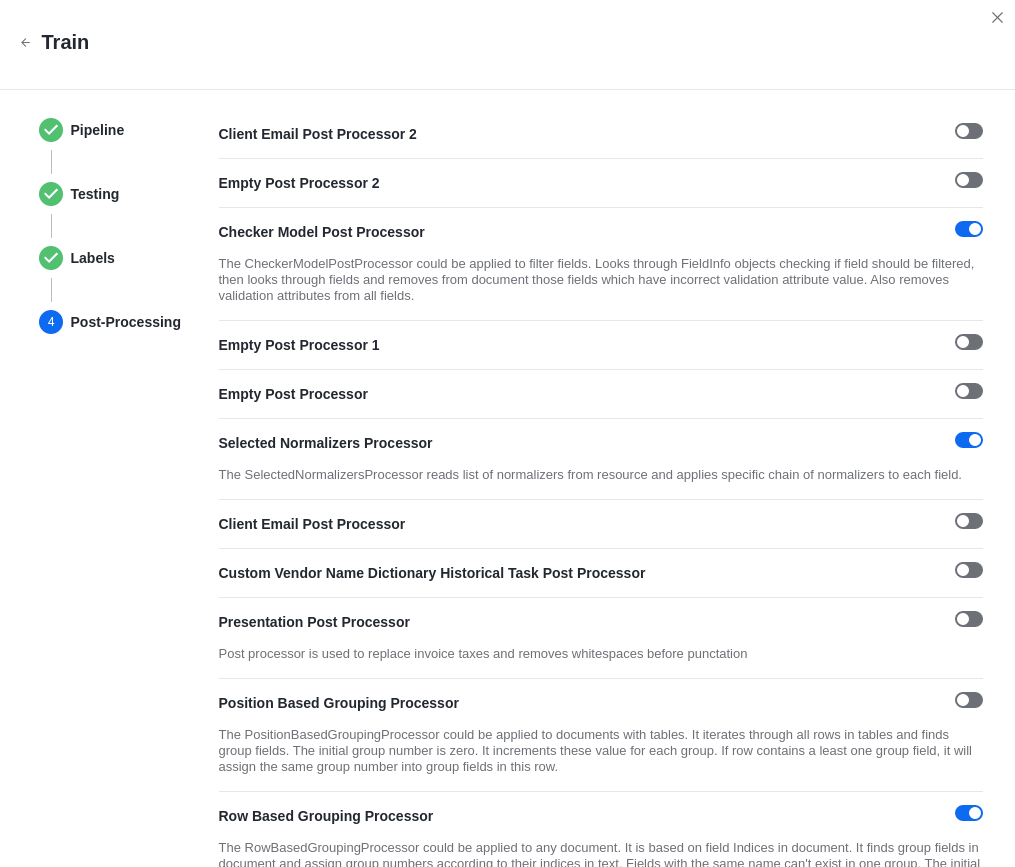
Configure post-processors (if any) by switching toggles on and off and click Next to proceed. The initial post-processor configuration is fetched from the model's pipeline.
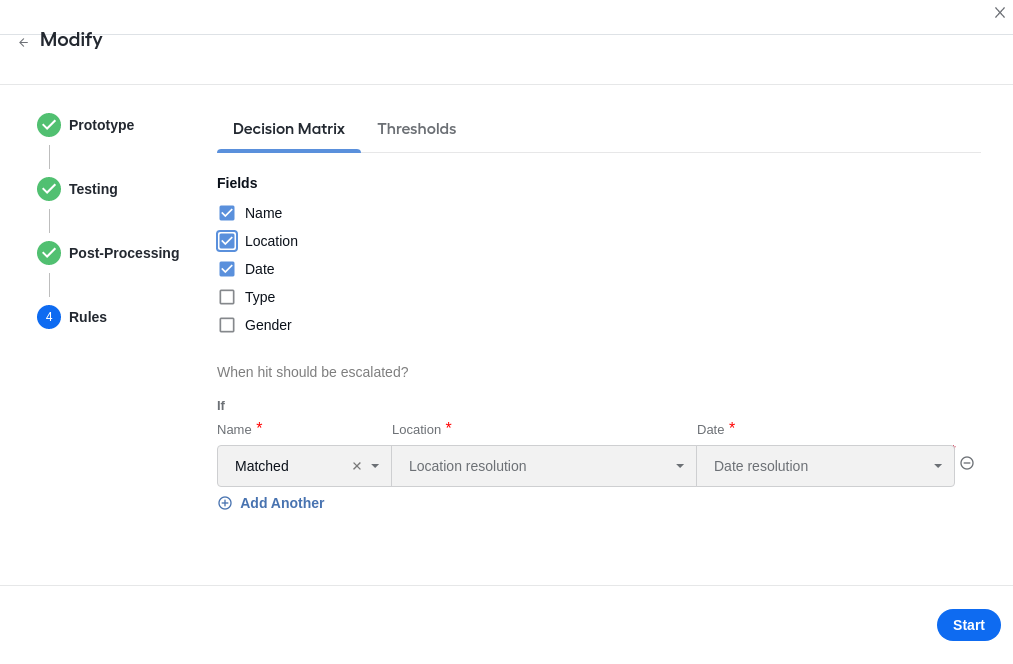
Configure the decision rules (if any) as appropriate for your process. The initial rule configuration is fetched from the model's pipeline.
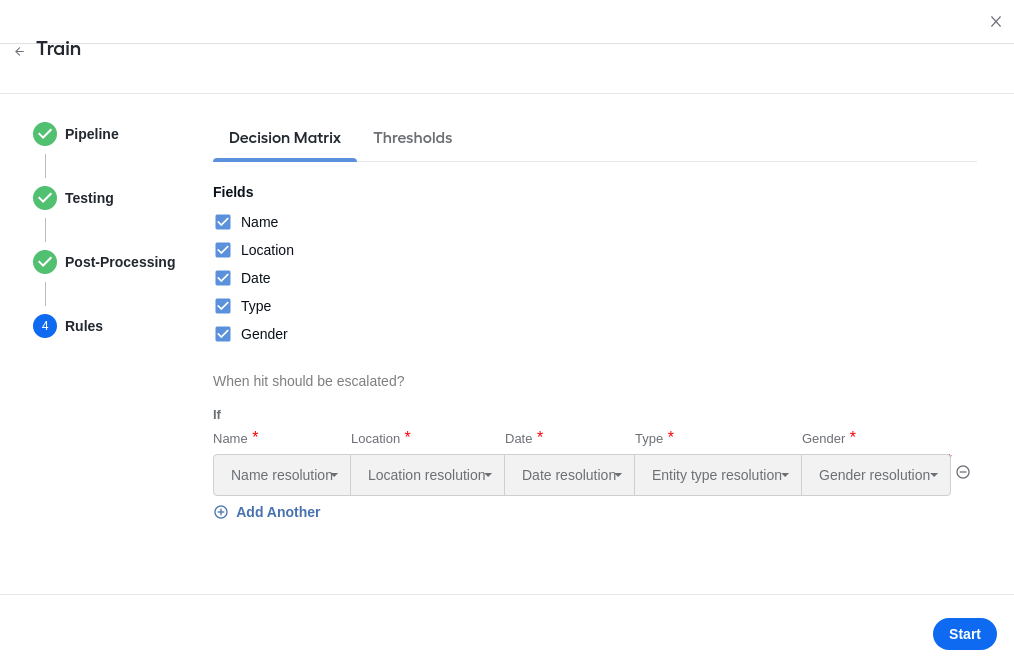
Once you are done with the configuration, click Start to launch the model training.
To check whether the training started successfully, navigate to AutoML > Experiments. On the Trainings tab, find the new model training run: its status should be In progress.
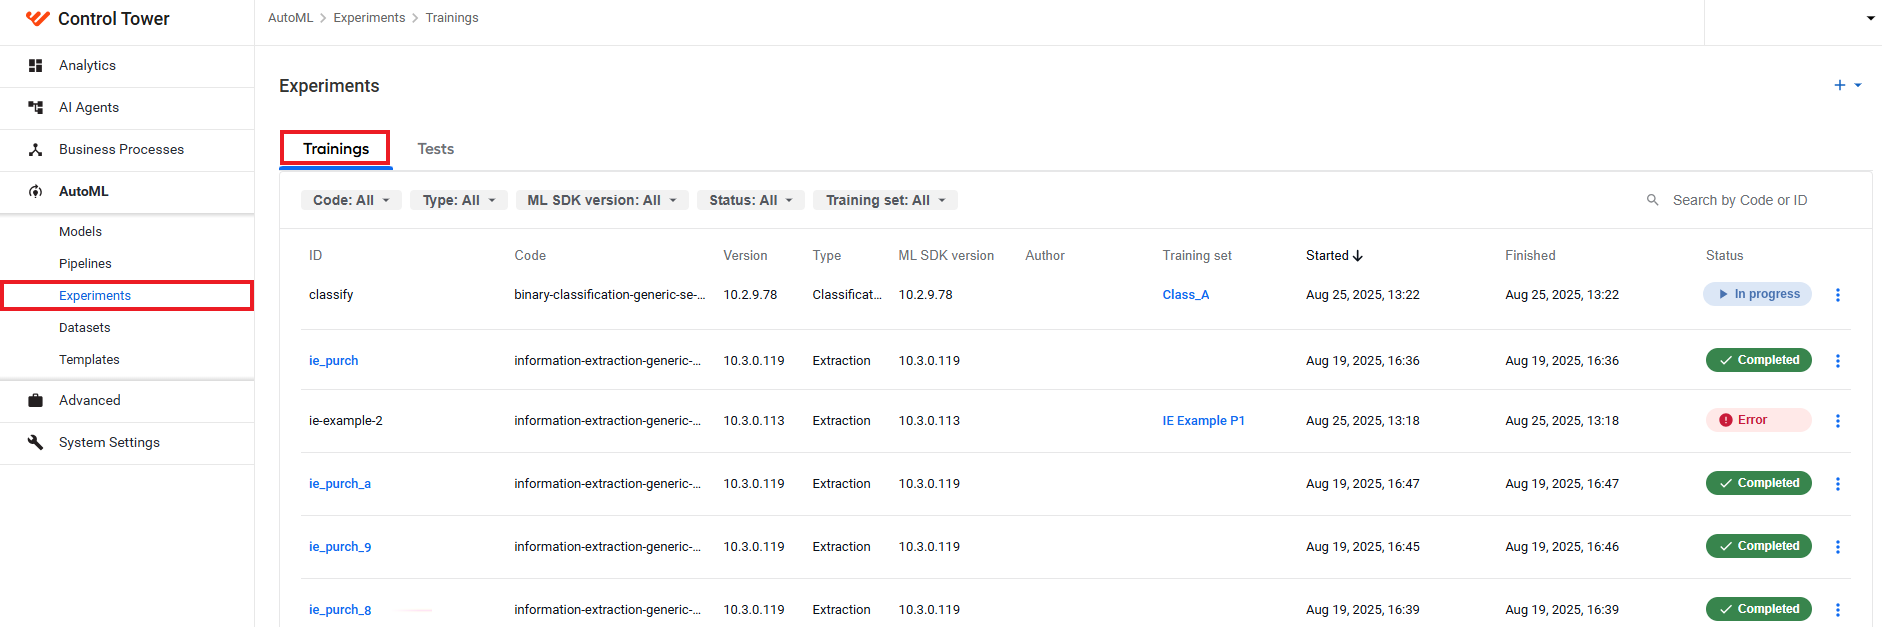
Wait till the status changes to Completed. Now, you can click the training ID and review the resulting model data.
Alternatively, to access the data, act as described in the View model details section above.
Another way to launch the training of a model is via Experiments > Trainings. For details, refer to the guide.
Modify model
The modifying flow lets you update configurations of existing ML models without training them. As a result, you get a new artifact with an updated configuration.
Start flow
There are two methods how you can start the modifying flow:
Via the the Models page menu > Train new > Modify > follow the instructions in Update configuration.
Via the model's Actions menu > Copy to modify > follow the instructions in Update configuration.
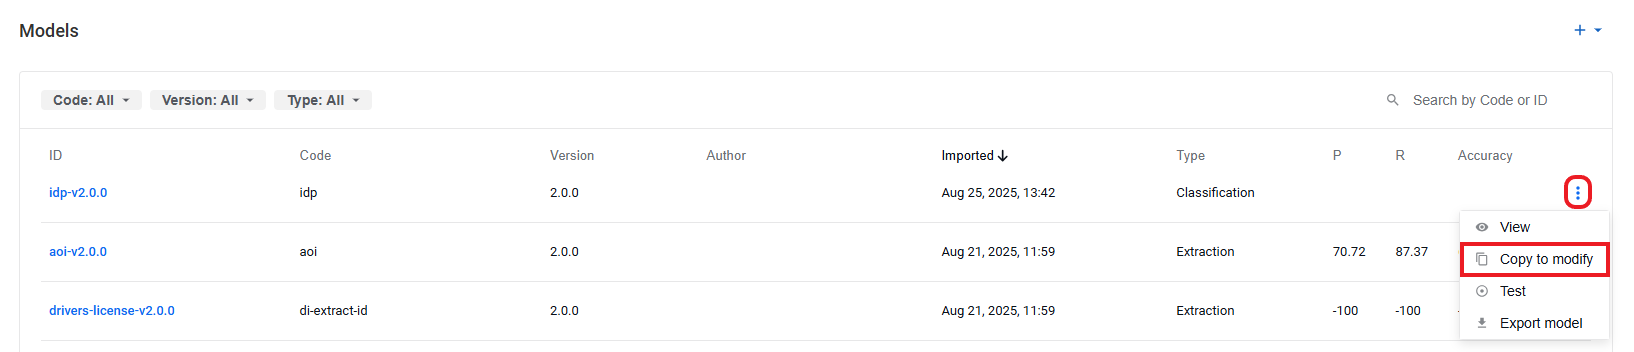
When you start the flow from copying, mind that it comprises two stages:
You select a model to update and make a copy of it.
You launch a test for the copied model.
If the copying stage fails, a model is not created. When the test stage fails, a model artifact is created, but the statics is not available.
Update configuration
In the Modify dialog, follow the steps to create a model:
Select a prototype to modify and specify the new model ID. If you start from Copy to modify, the prototype is already selected for you: it's the model you copied.
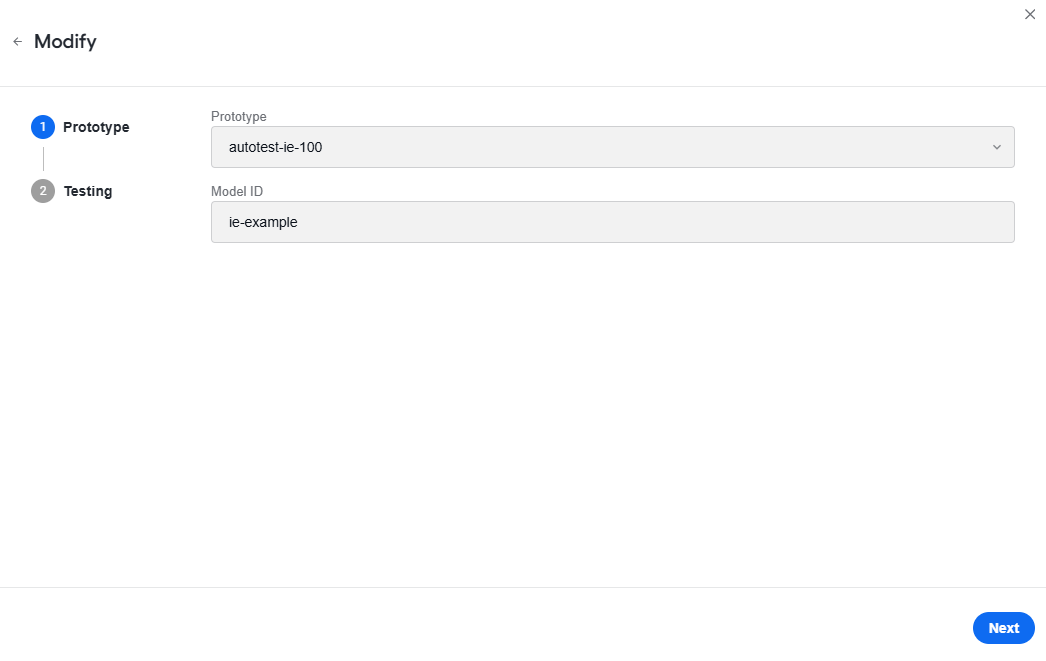
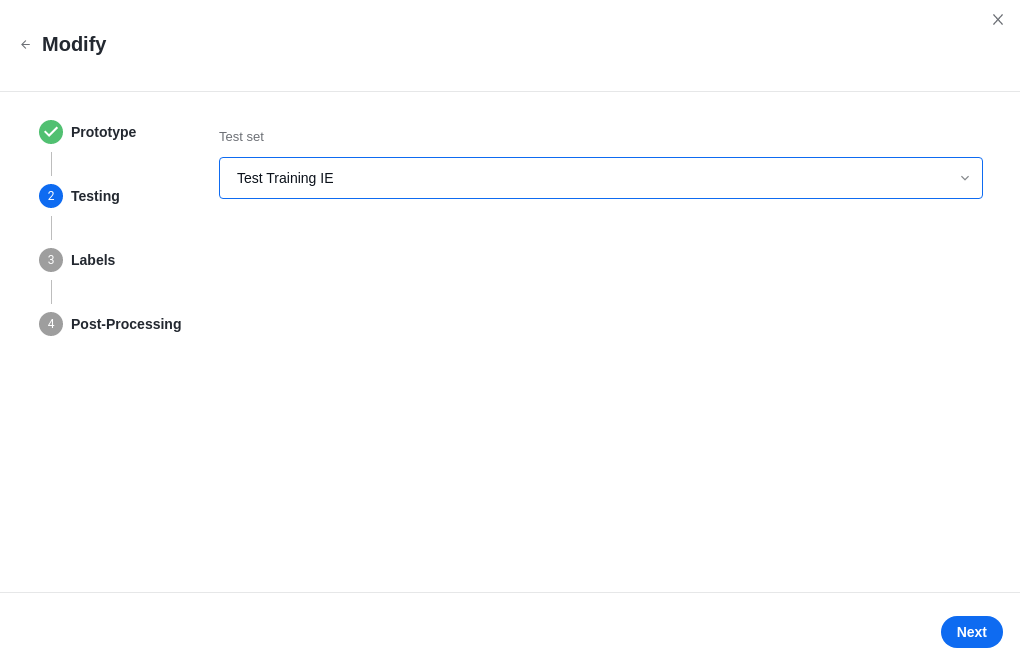
Click Next to proceed. On the right, you can see more steps appearing for the modifying flow. Each completed step is marked with a green tick.
Select a test set and click Next.
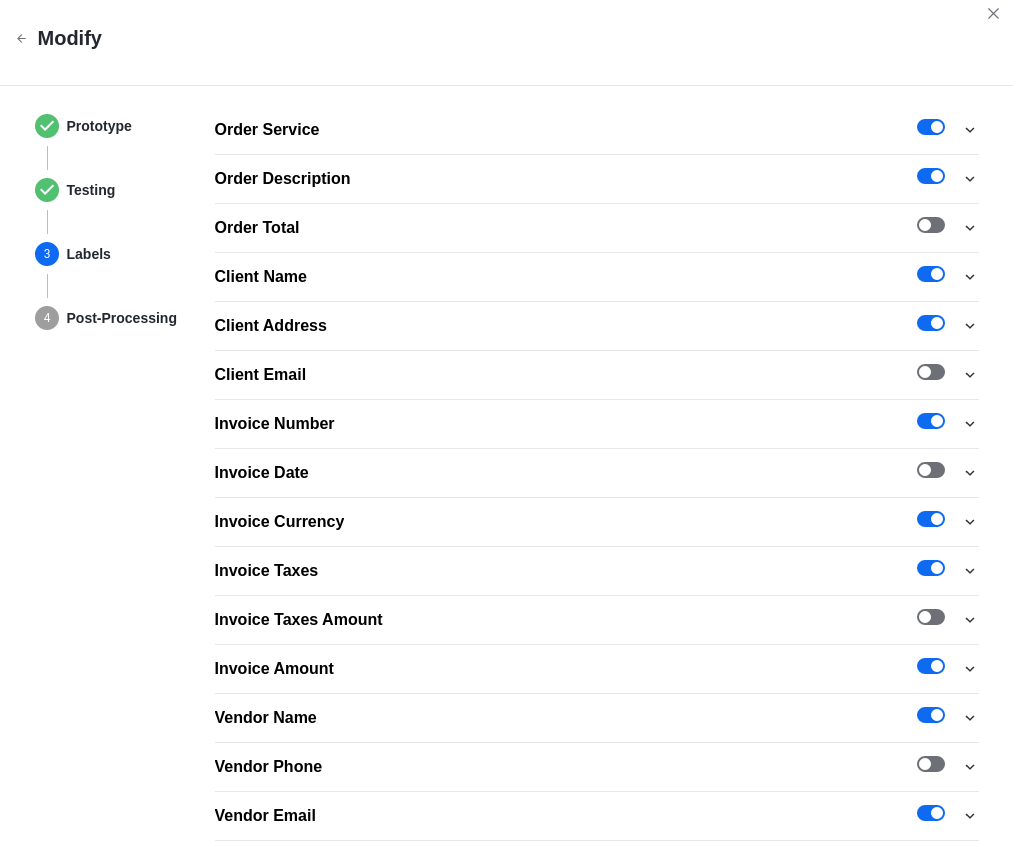
Configure labels by switching the toggles on and off. The initial label configuration (if any) is fetched from the prototype model.
 info
infoSteps 4 and 5 are not available for classification models.
For each required label, configure normalizers and click Next to continue. To access normalizers, click the arrow button next to a specific label.
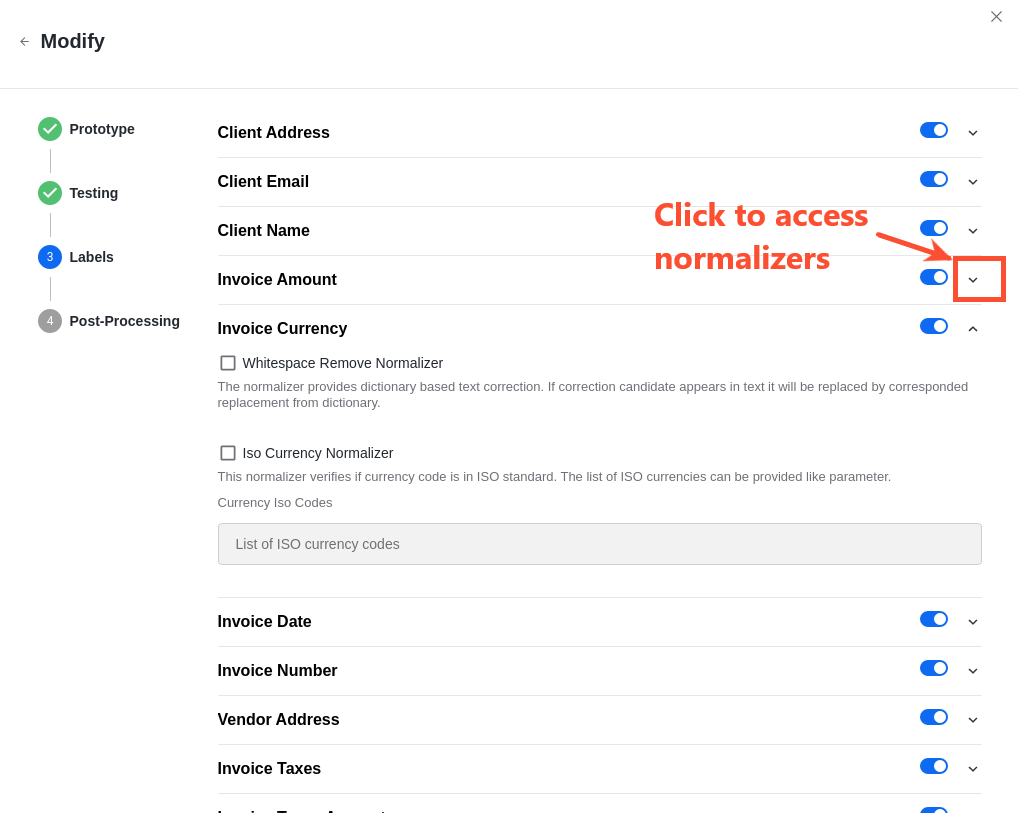
The initial normalizer configuration is fetched from the prototype model. For a normalizer setup example, refer to the article.
Configure post-processors (if any) by switching the toggles on or off. The displayed list of post-processors is fetched from the prototype model.
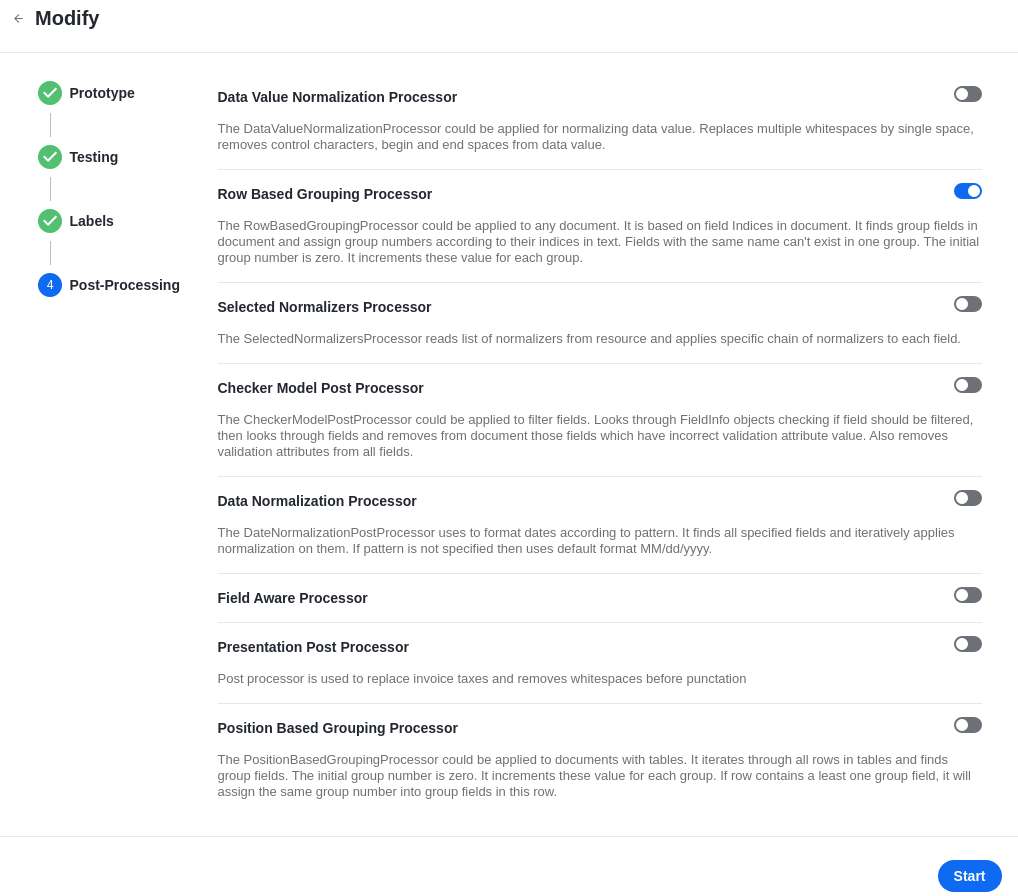
Configure decision rules. They are available if the prototype model contains their definition.
Click Start.
As a result, a new artifact is created, and a test is launched. To find the test, navigate to AutoML > Experiments > Test. Test results are available on the test details page.
Test model
For instructions to set up and run tests and view their results, refer to Run experiments | Tests.
Import model
To import a model as a bundle (a zip archive) to your environment, click the plus (+) button to open the menu in the top-right corner of the Models page and select Import.
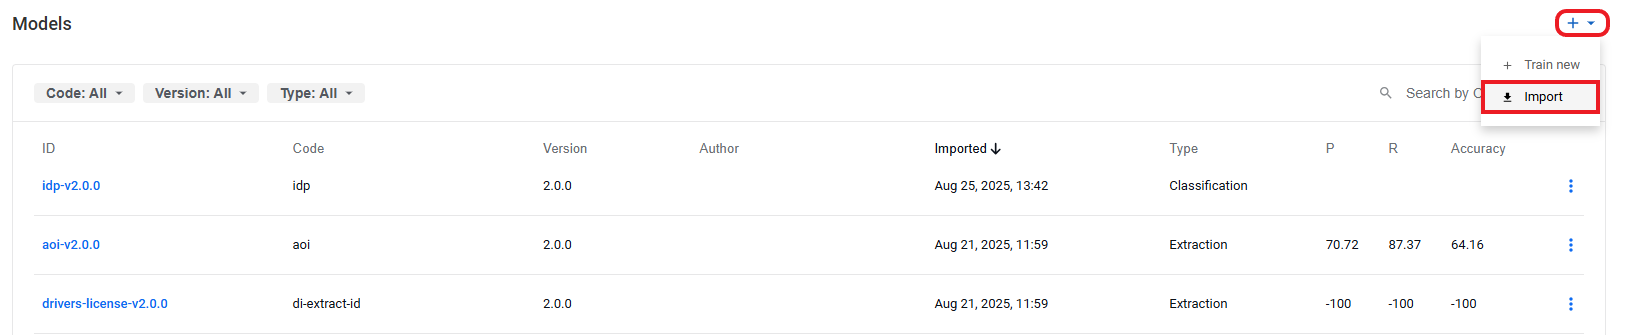
Alternatively, you can import a model bundle via the Pipelines page.
An imported bundle can include only models and pipelines. When the bundle contains any other assets, the import fails.
In case you import models only, associated pipelines must be already deployed to the target environment. Otherwise, the import fails.
The import status is visible above the Models list. The following statuses are possible:
Uploading: the bundle is being uploaded to Control Tower. At the stage, you can stop the procedure by clicking the Stop (cross-shaped) button.

Importing: models and pipelines are being deployed to your environment. At the stage, you can no longer stop the procedure.

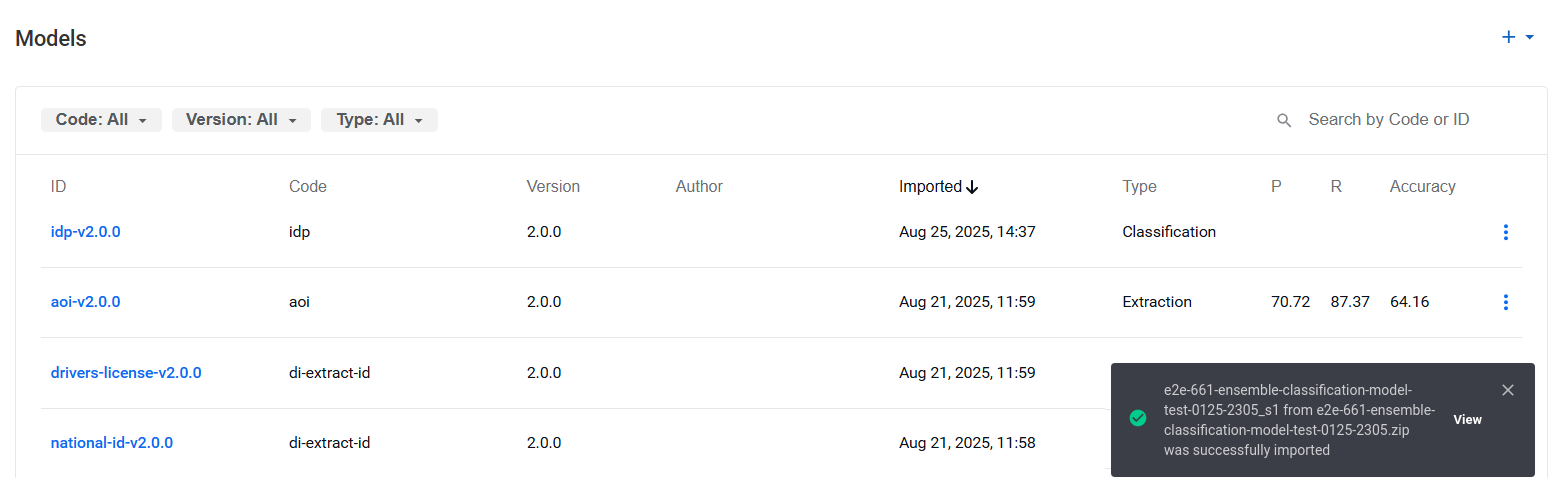
Success: the status appears once the assets from the bundle are moved to the target environment. It disappears automatically after about 15 seconds, or you can click the close (cross) button. To view the bundle details, click View.
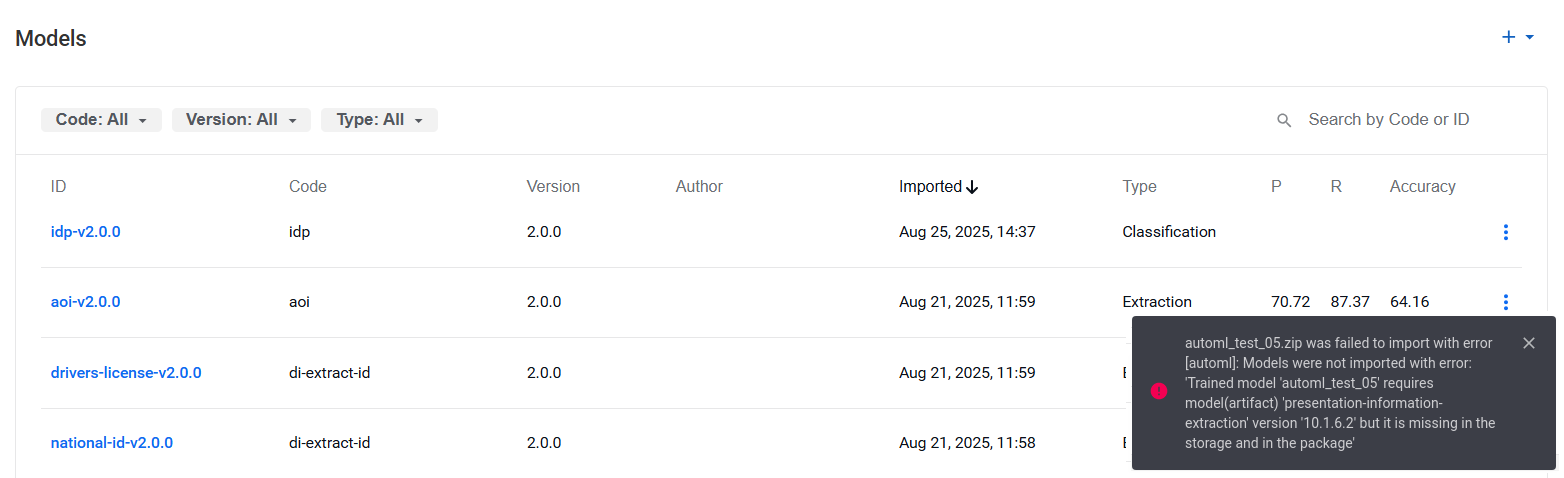
Failed: the status appears for each error. You need to close the messages manually. Those assets that were imported before the error (if any) appear in the Models and Pipelines lists accordingly.
Export model
You can export a model as a bundle (a zip archive) in one of the two ways:
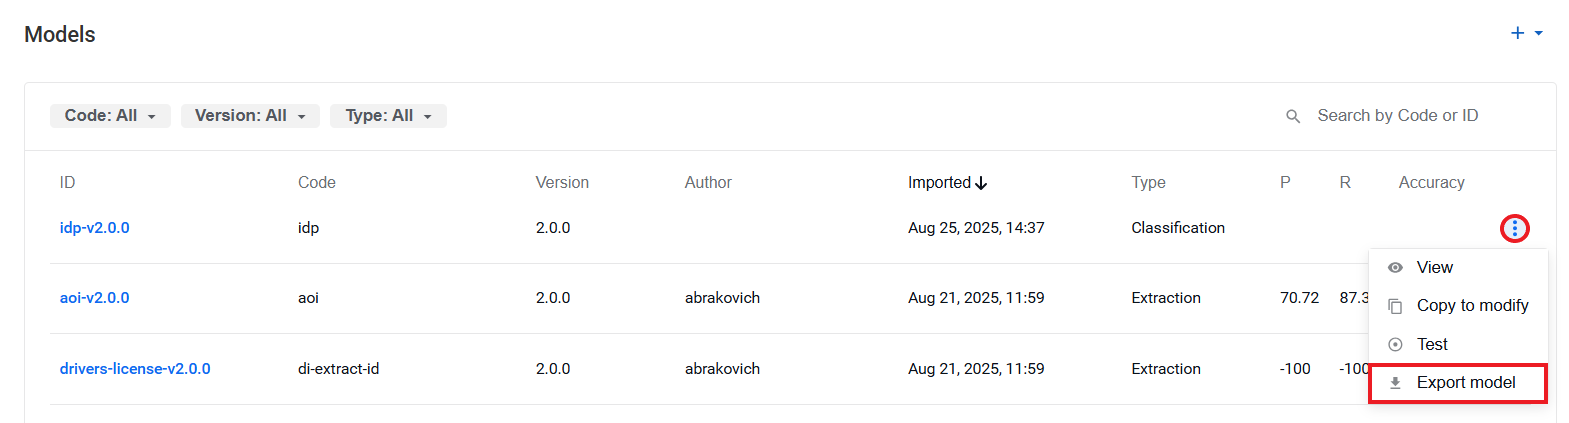
On the Models page, choose a model in the list, open the Actions menu, and select Export model.
On the model details page, open the Actions menu, and click Export.
The resulting zip bundle contains a model (training output) and a pipeline (artifact).