Install and configure
The page provides the instructions for the AMM skill's installation to the v.10.2.7+ instance.
Requirements
Hardware
The AMM skill runs on the standard Intelligent Automation Cloud hardware configuration, as documented in System Requirements.
| Server | Recommended OS | CPU (cores) | RAM (GB) | HDD (GB) |
|---|---|---|---|---|
| Master | RHEL 8.5 | 8 | 32 | 750 |
| BEP Agent | RHEL 8.5 | 4 | 16 | 150 |
| Analytics | Windows Server 2016 | 16 | 32 | 150 |
| MS SQL | Windows Server 2016 | 2/4 | 8/16 | 500 |
- RPA bots are not required for Adverse Media Monitoring.
- High-availability environments require a Proxy server.
Software
Before installing AMM, make sure that your environment meets the requirements:
- You have installed IA Cloud Enterprise v.10.2.7+ and have Control Tower and Analytics components enabled. For IA Cloud 10.1.6+, ODF 2 is installed automatically along with the system.
- You have the bundle with AMM Business Process and ML models.
- You have received the credentials for the required watchlists or licenses for the external screening software to be integrated with AMM.
- You have the Advanced Package Import and Import/Export permissions in Control Tower.
To check that ODF is installed:
Log in to Control Tower, and click Advanced > Data Stores in the menu.
In the list, find the Data Stores with the_odf_transactions and _odf_transactions_status names. ODF is installed on your instance if they are on the list.
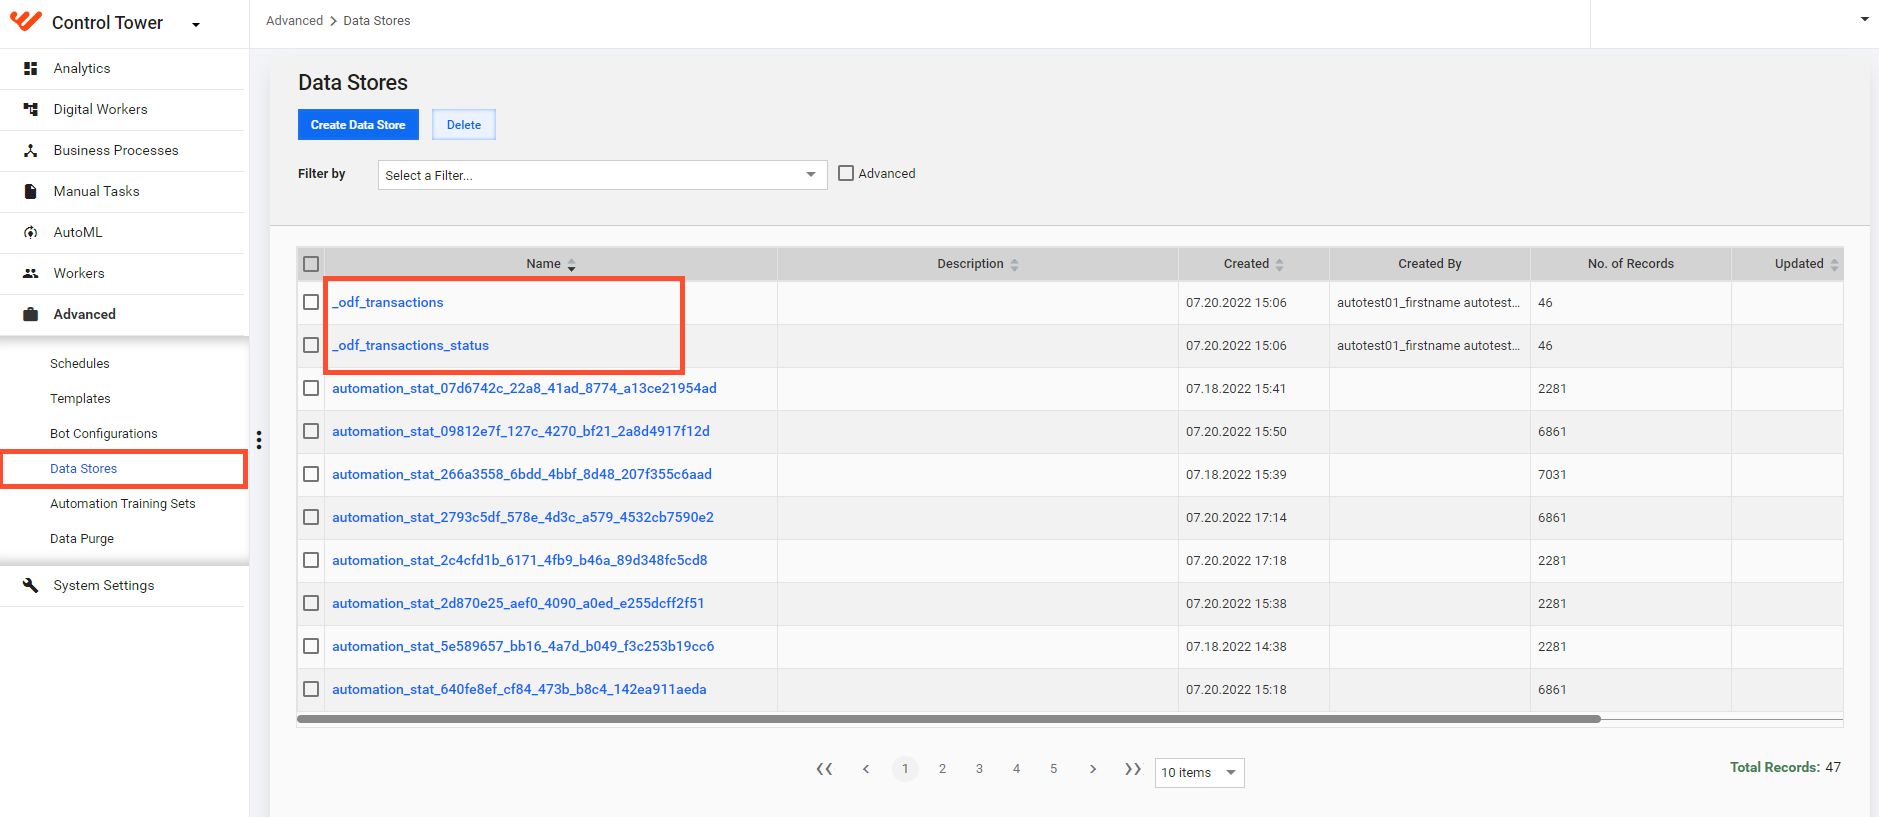
If the Data Stores are missing, download ODF and save odf-install-package-10.1.0.7.zip to your local workstation.
Performance
Adverse Media Monitoring leverages BEP servers that can be horizontally scaled for higher volumes.
Below is a sample of the volumes that can be expected when using the provided version and configuration. The system shows stable performance and resource consumption during the test without unexpected spikes or critical errors and warnings in logs.
The Search provider used is Google API. Note that throughputs can vary slightly based on the provider.
Configuration:
| Skill version | Environment topology | Tested IA Cloud version | AutoML Worker configuration | Control Tower Worker configuration |
|---|---|---|---|---|
| 3.5.0 | standard-6 topology (6/1 BEP Agents) | 10.2.7 | 1 CPU / 8 GB memory | 0.4 CPU / 2 GB memory |
Results:
| Number of Agents | Execution time | Articles/hour |
|---|---|---|
| 1 | 304 min | 1,100 |
| 2 | 119 min | 2,820 |
| 3 | 80 min | 4,200 |
| 5 | 53 min | 6,340 |
Install skill
See the Install AI Agents guide.
Configure skill
Once Adverse Media Monitoring is installed, configure the skill before running it for the first time.
You can configure multiple variations, or sets of parameters, for AMM. For example, a different data provider or a set of keywords per variation.
Credentials
Before setting the news providers, ensure you have obtained the corresponding license with credentials.
The following search providers are supported:
- Google API
- Dow Jones Factiva Headlines
- LexisNexis L&P Media
- World-Check One
- Thomson Reuters CLEAR Adverse Media
You must acquire licenses and credentials for all providers, except for Google API. WorkFusion’s AMM solution includes access to Google API at no additional cost.
If you are using Google API, your first step is to provide credentials. To do that on a GCP-hosted environment, see the instruction under the expand:
Provide new credentials for Google API
You must provide credentials from WorkFusion’s Developer account owned by the Cloud Ops team.
GCP requires unique credentials to be used in each customer environment (for example, pre-production and production).
If you are not using Google Cloud, notify the WorkFusion Engineering and Product teams so that they can perform an audit to ensure there are no gaps for enablement.
To generate new credentials, do the following:
Log in to https://cloud.console.google.com.
Ensure that the Custom Search JSON API is enabled.
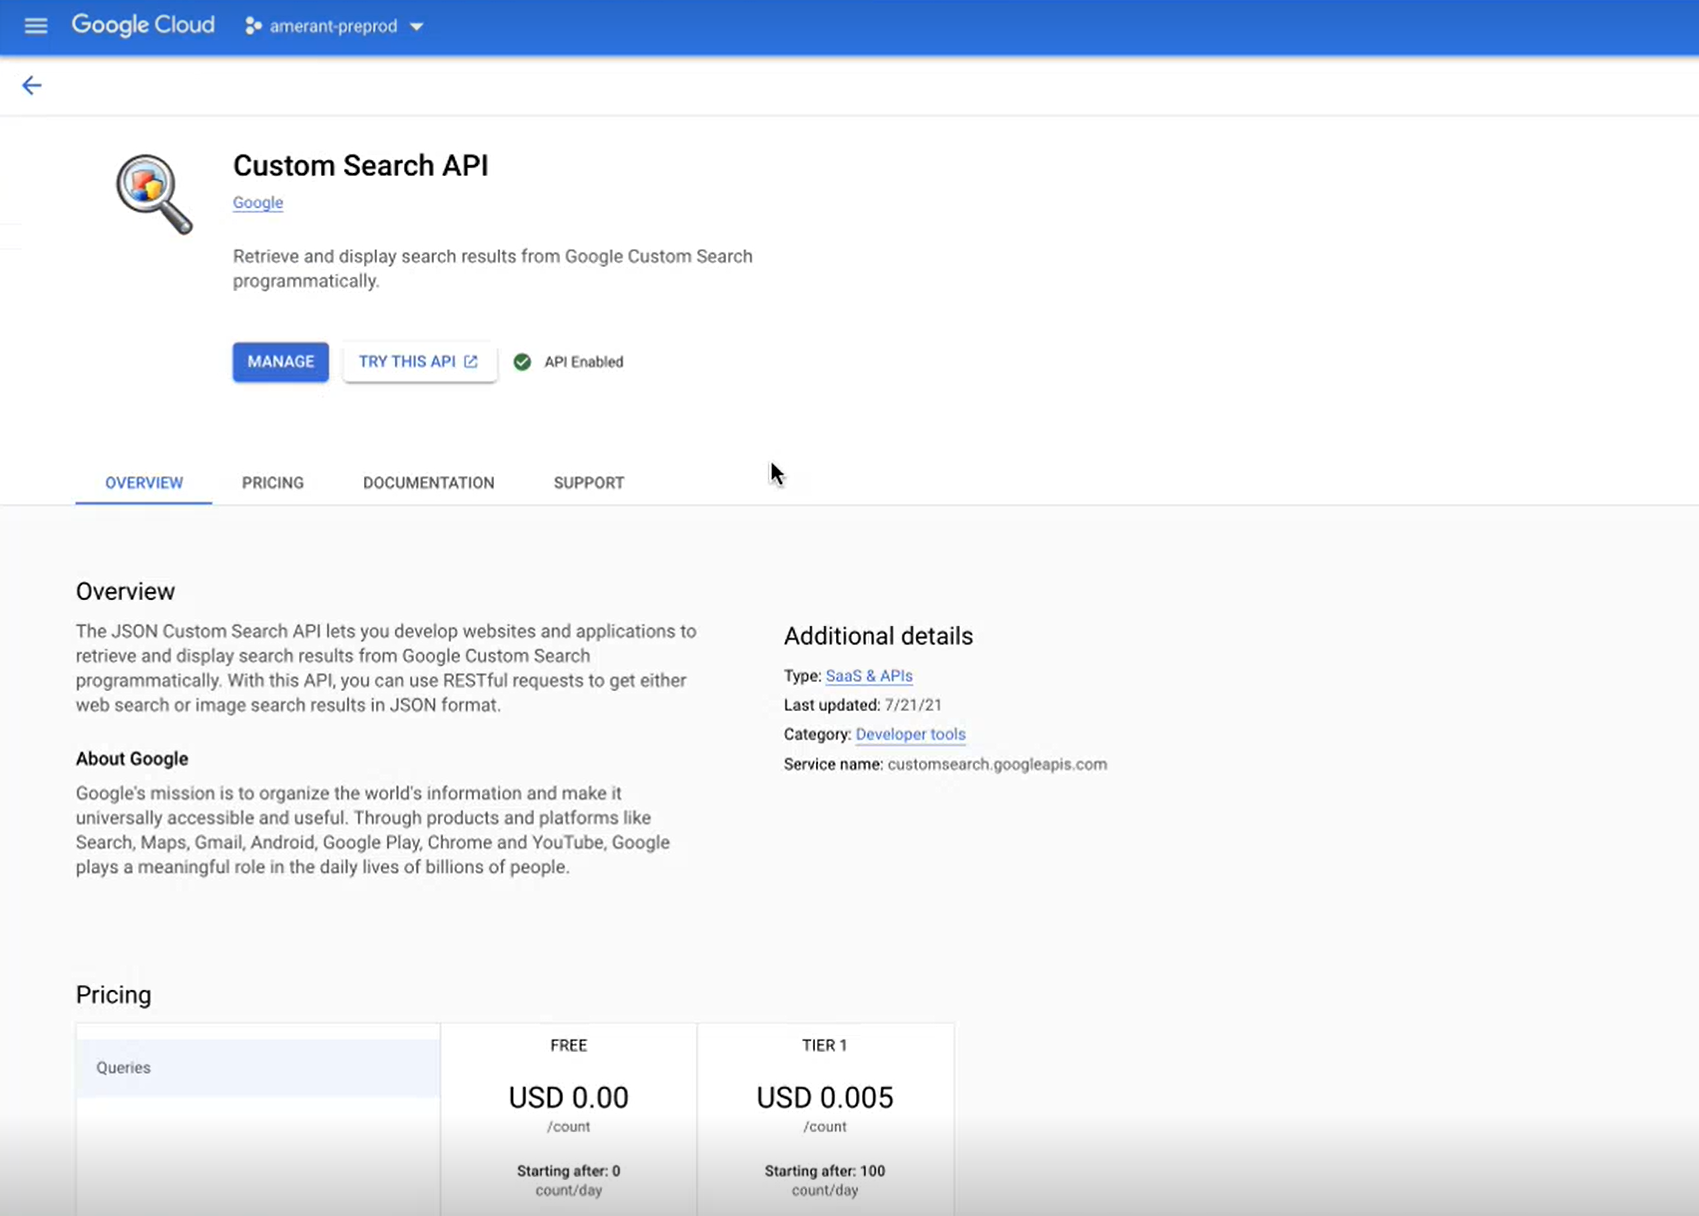
Navigate to the environment where you will use the API, for example, companyname-preprod.
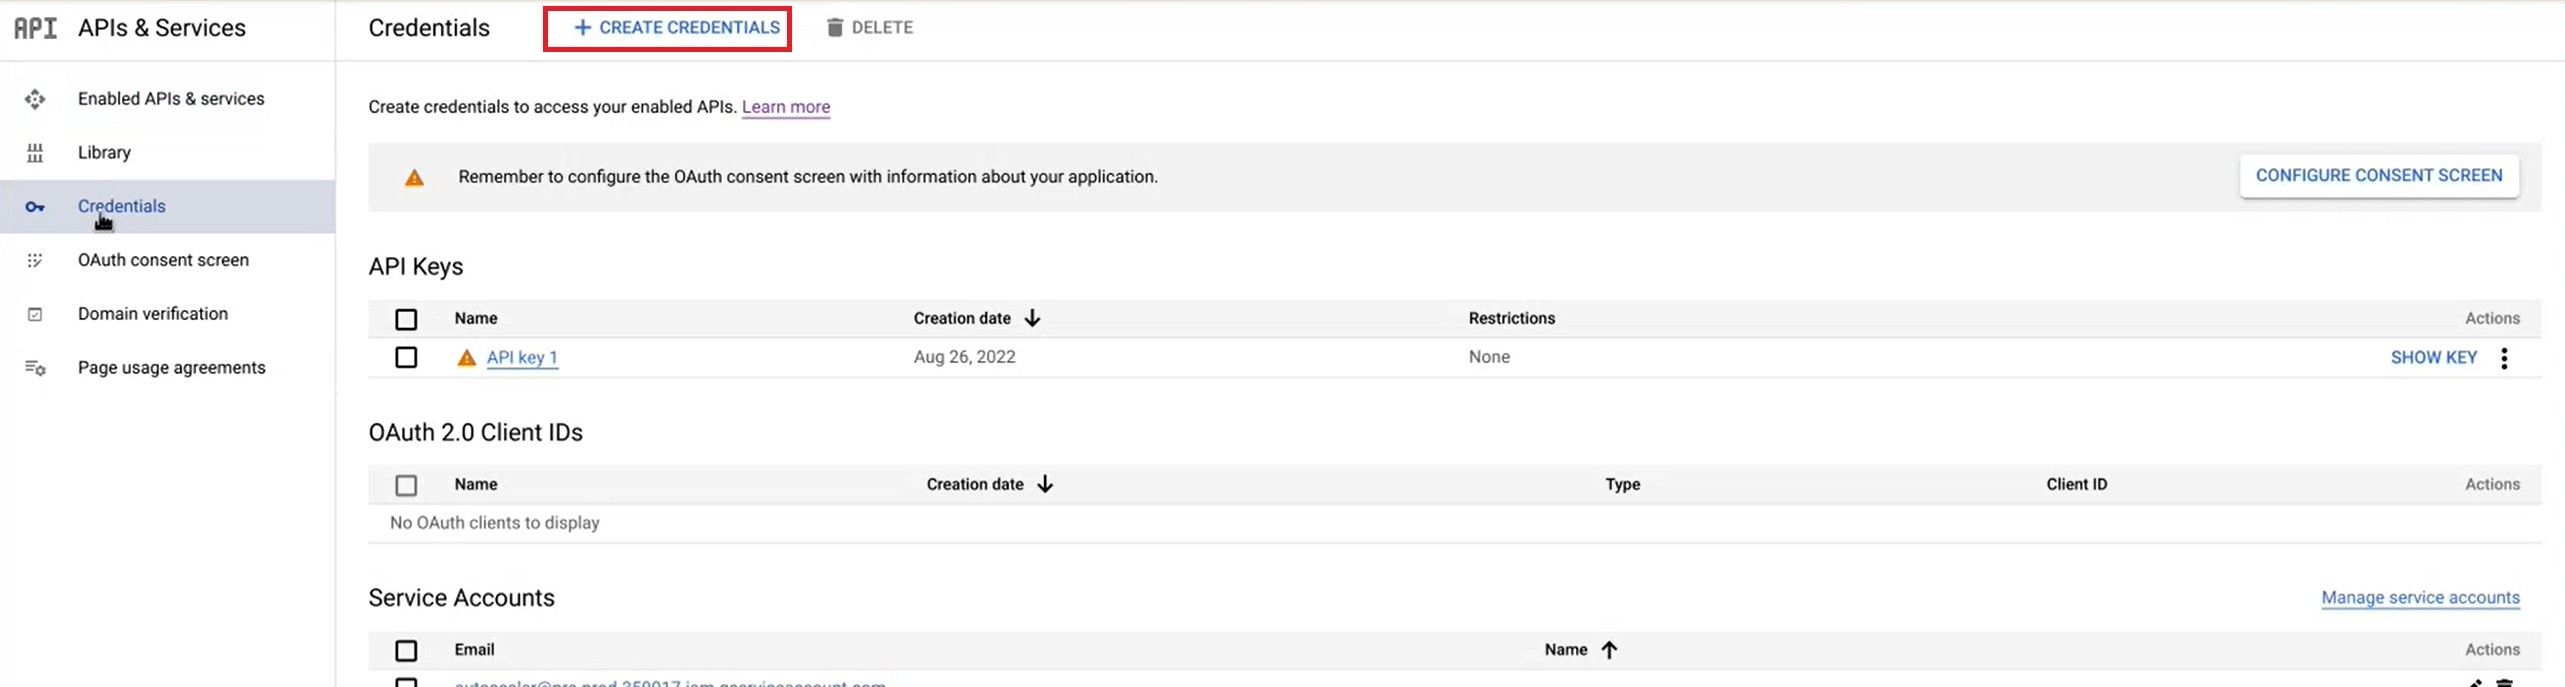
Select Create Credentials.
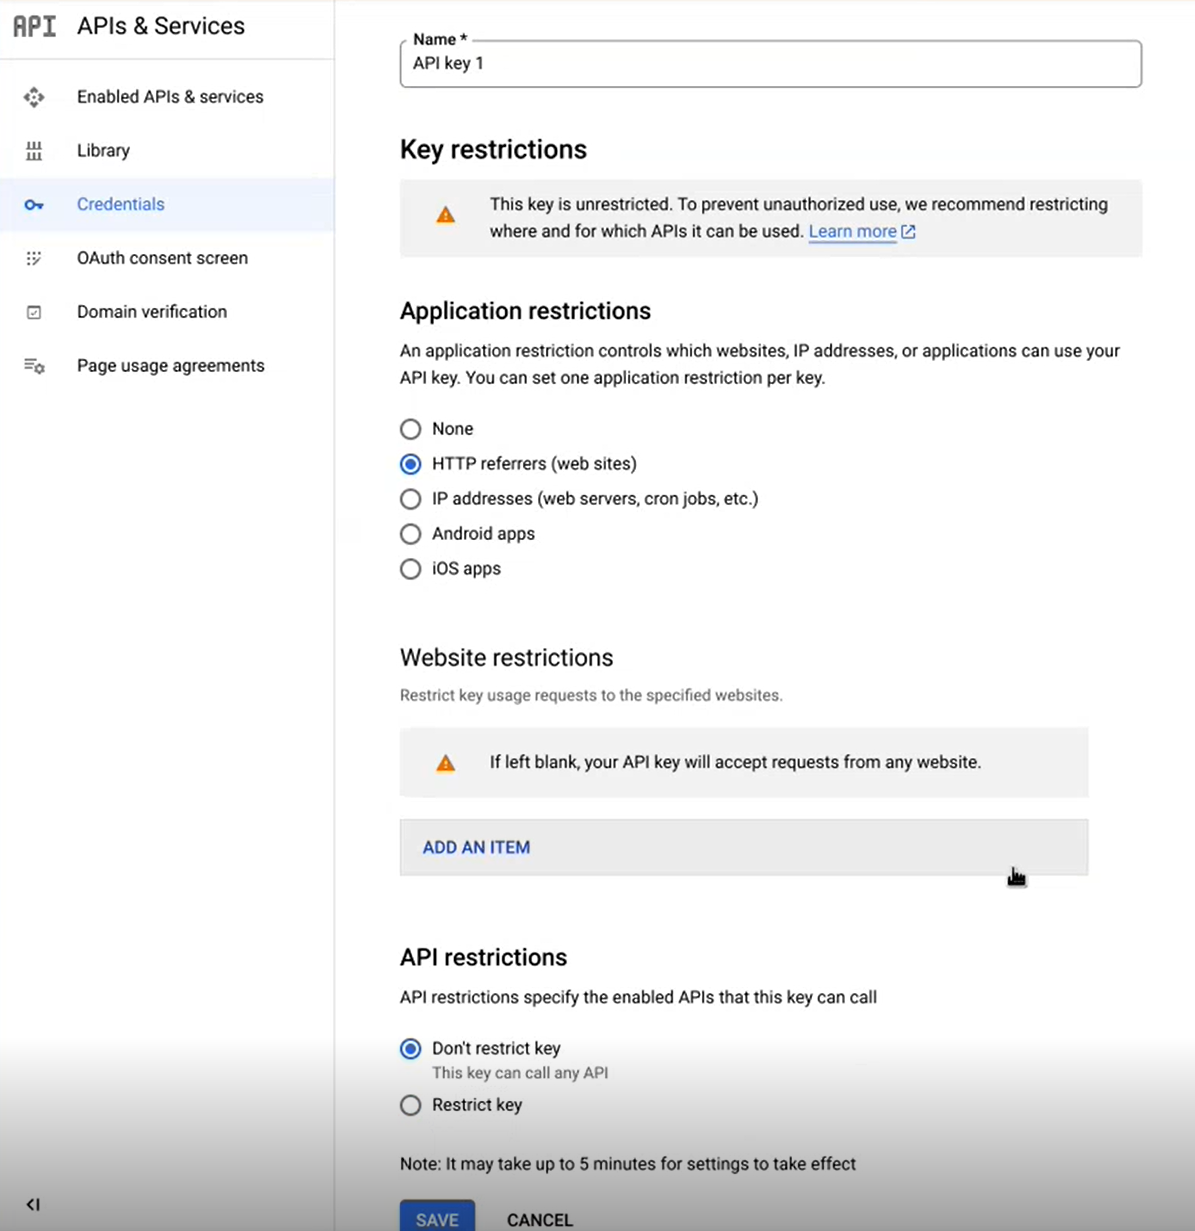
Enter a Name for the API Key, then in the Application restrictions group, select HTTP referrers, and click Save.
Navigate to the OAuth consent screen, in the User Type group, select Internal and click Create.
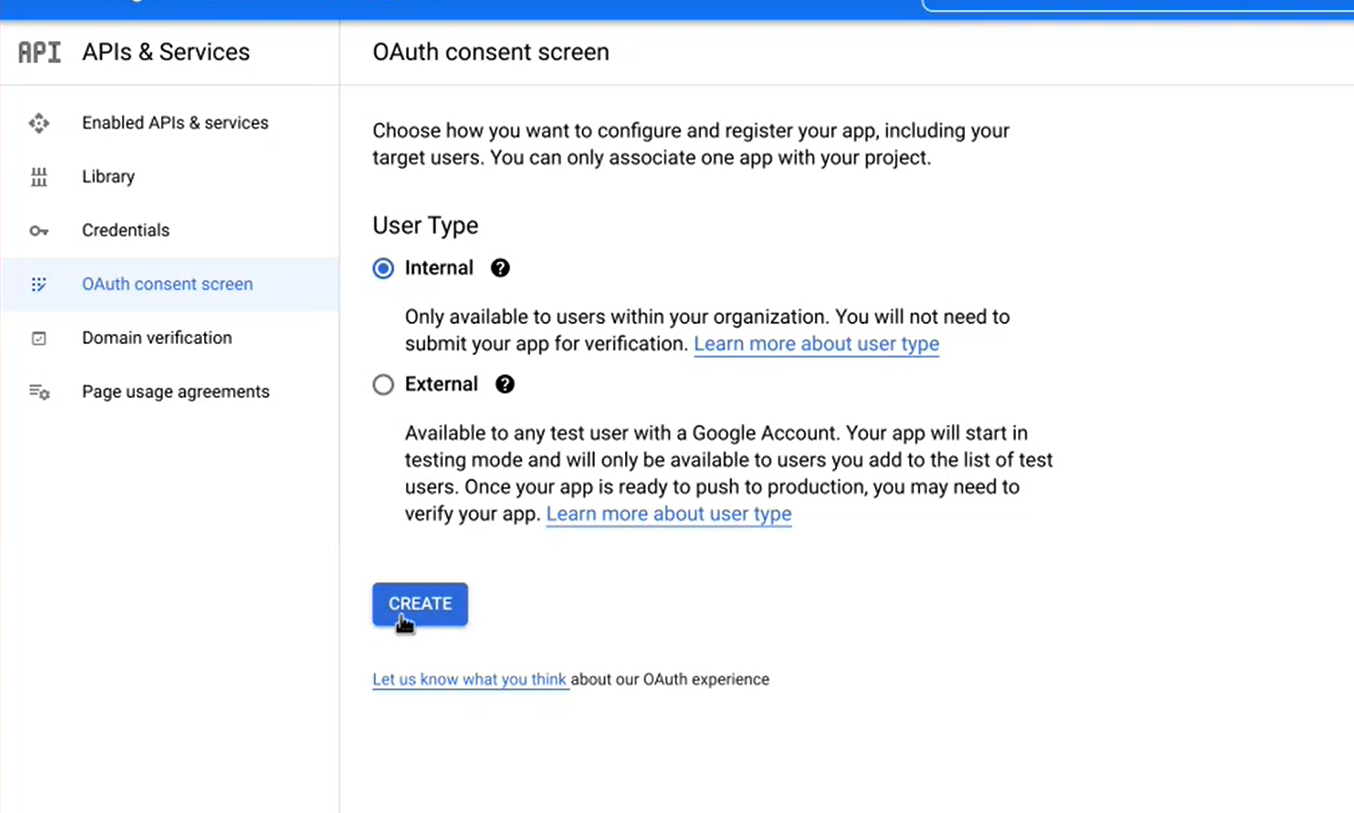
Navigate to Enabled APIs & services to view the key and copy the credentials.
You must add the key value to the Secrets Vault's key field. The Value field is static.
To use providers other than Google API, you must first set up the above credentials in Secrets Vault. For step-by-step instructions, refer to the Set up secret entries in Secrets Vault guide.
Configure SMTP credentials
Adverse Media Monitoring emails analysts when results are ready, and the final report is available. To enable notification, configure the SMTP credentials. You must provide your own SMTP to ensure the respective security protocols are followed.
The sub-sections below describe the steps to configure the credentials and enable email notifications.
Update configuration in Data Store
To update the configuration in the Data Store, do the following:
- Log in to Control Tower.
- On the main menu, navigate to Advanced and select Data Stores.
- Select the
uc_amm_configuration_v1configuration and specify the following:
| Name | Value | Example | Notes |
|---|---|---|---|
smtp.protocol | SMTP_OVER_TLS/SMTP_OVER_SSL/SMTP | SMTP_OVER_TLS | To be confirmed with WorkFusion. |
smtp.host | smtp.office365.com | Set your host. | |
smtp.port | 123 | ||
smtp.replyTo | replyTo@domain.com | Set the email address to be shown as the sender. | |
smtp.authEnabled | true/false | true | Set to true if the SMTP server requires authentication. Otherwise, set to false. |
smtp.credentialsAlias | amm_smtp_credentials | Configure only if smtp.authEnabled is set to true. Specify the name of the SMTP credentials in Secrets Vault. The value must match the alias in Secrets Vault that contains the access credentials to the SMTP server. |
Set up entry for SMTP credentials in Secrets Vault
The step is needed only if smtp.authEnabled is set to true.
The key is the email address, and the value is the password. For detailed instructions, see Set up secret entries in Secrets Vault.
Use a descriptive name, such as amm_smtp_credentials.
Configure proxy
To configure a proxy, do the following:
Log in to Control Tower.
On the main menu, navigate to Advanced and select Data Stores.
Select the
uc_amm_configuration_v1configuration and specify the following:Name Example Notes proxy.hostproxy.customerdomain.comUse your proxy host. proxy.port9473 Use your proxy port. proxy.credentialsAliasamm_proxy_credentialsSpecify the name of the proxy credentials in Secrets Vault. Configure only if the proxy requires authentication. If the proxy requires authentication, set up proxy credentials in Secrets Vault.
The key is the username address, and the value is the password. For detailed instructions, refer to Set up secret entries in Secrets Vault.
Input
To set up your installed AI Digital Worker, do the following:
Log in to Control Tower, navigate to Digital Workers, find your newly installed AMM skill, and click the Prepare button.
The Prepare your digital worker window appears, containing a configuration flow.
In the window, on the Input step, select the input data source:
Data provider: input data is sourced from third-party systems you set up in Step 3.
CSV file: input data for entity screening is imported using a CSV file.
noteIf you choose the CSV file as the data source, you cannot choose any other data providers for data input.
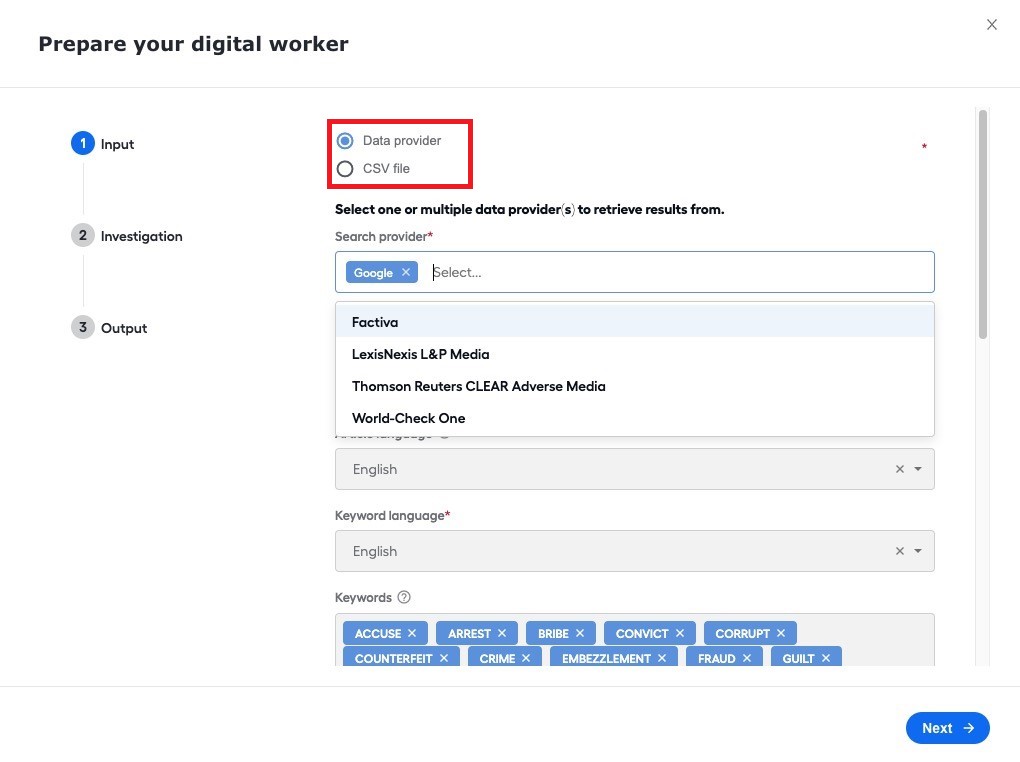
Depending on your choice in Step 2, do as follows:
If you chose CSV file, set up the CSV file location as described in the CSV file section.
If you chose Data provider, select one or more news providers to search the news for an entity or individual. Google API is set by default.
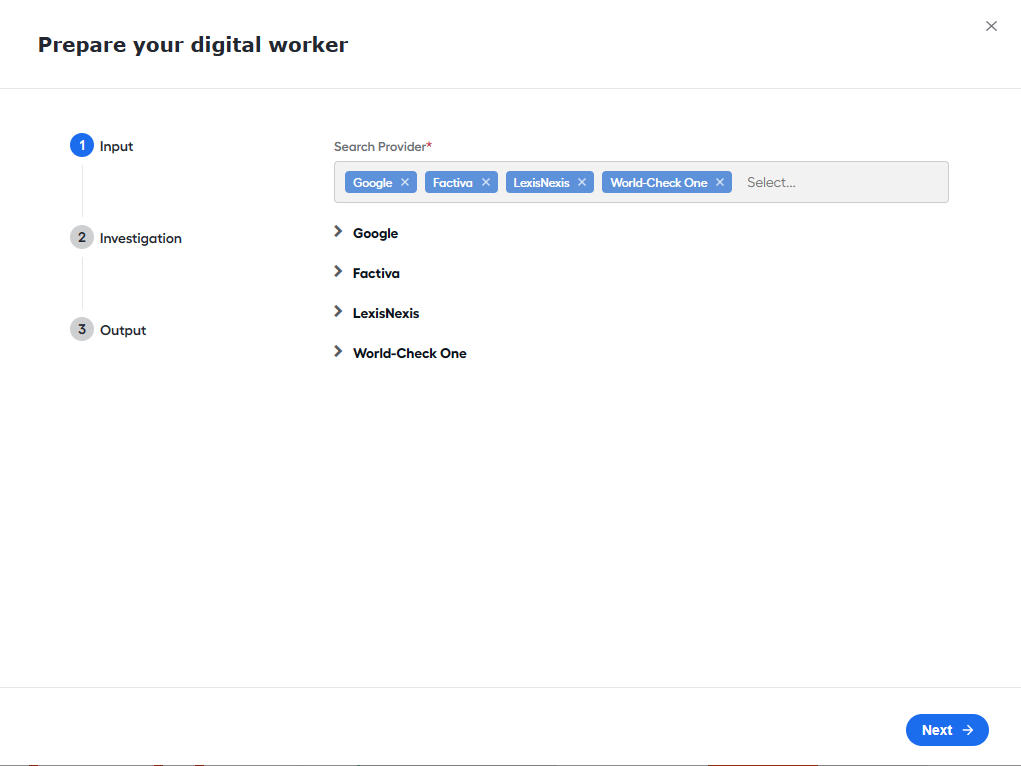
The required configurations may differ based on the selected news provider.
The Adverse Media Monitoring skill supports news retrieval from the following news providers:
- Google API
- Dow Jones Factiva Headlines
- LexisNexis L&P News v1
- World-Check One
- Thomson Reuters CLEAR Adverse Media
The AMM skill can return results from up to four providers at a time. If you select several providers, each appears as a separate collapsible section. Review each section carefully to ensure all required parameters are configured correctly. Available parameters may vary by provider.
See the following sections for a detailed description of each data source settings.
Google API
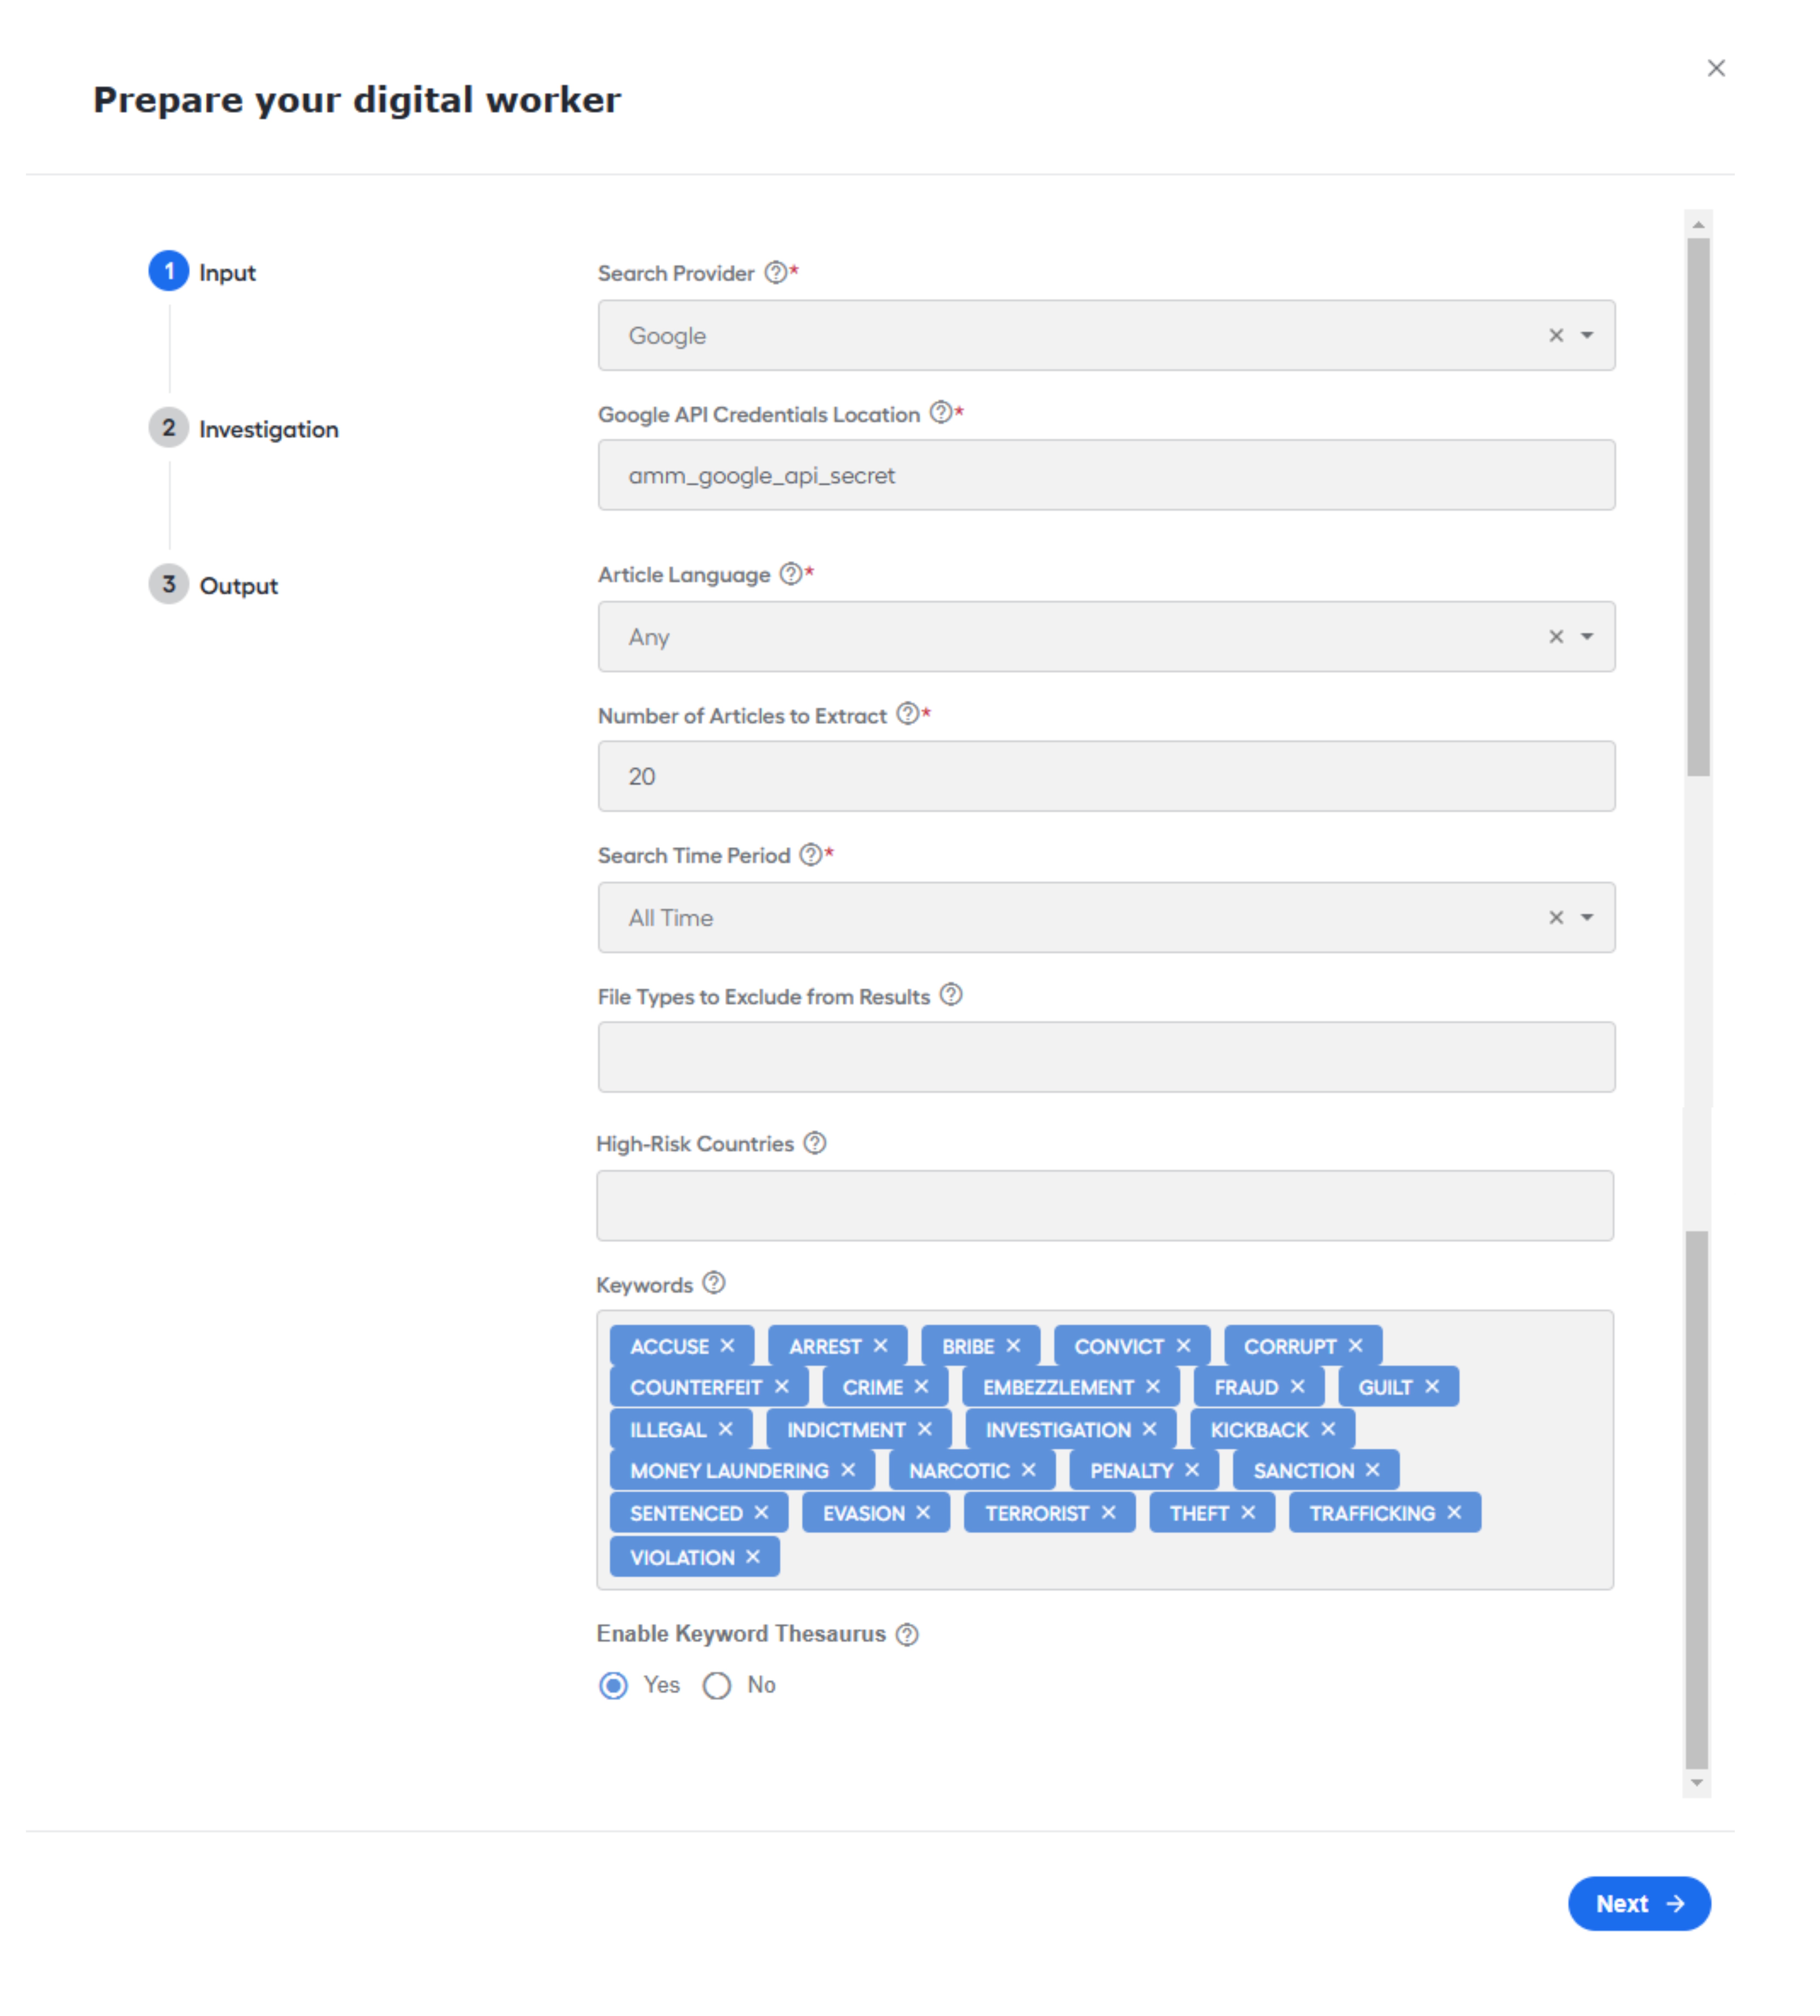
Google API Credentials Location. Specify the corresponding Secrets Vault alias for the Google API system.
Article Language. Select the language of articles to search in. Any language is used by default. You can also choose Keyword Language and its following options:
- Shared creates a single input field for keywords.
- Defined by keyword language.
Number of articles to extract. Specify the maximum number of reports to fetch from 1 to 20. By default, up to 20 articles are retrieved.
Search Time period. Select an option to find information published during a specific time frame. To specify the starting and the ending date for the articles' search, select Custom Range.
Dynamic Location Search. Select to dynamically broaden the search location for an entity if no results are found.
Keywords. Specify keywords to be used for the search. You can add a maximum of 28 words.
The following keywords are added by default based on the article languages you select:
English:
ACCUSE, ARREST, BRIBE, CONVICT, CORRUPT, COUNTERFEIT, CRIME, EMBEZZLEMENT, FRAUD, GUILT, ILLEGAL, INDICTMENT, INVESTIGATION, KICKBACK, MONEY LAUNDERING, NARCOTIC, PENALTY, SANCTION, SENTENCED, EVASION, TERRORIST, THEFT, TRAFFICKING, VIOLATIONSpanish:
ACUSAR, ARRESTAR, SOBORNO, CORRUPTO, FALSIFICACIÓN, CRIMEN, MALVERSACIÓN, FRAUDE, CULPA, ILEGAL, ACUSACIÓN, INVESTIGACIÓN, CONTRAGOLPE, LAVADO DE DINERO, NARCÓTICO, MULTA, SANCIÓN, SENTENCIADO, EVASIÓN, TERRORISTA, ROBO, TRÁFICO, VIOLACIÓN
Enable Keyword Thesaurus. Activate to look not only for exact keywords but also for their synonyms. By default, the feature is turned on. Disable it if your organization requires only exact matches on all keywords.
High-risk countries. Select countries from the dropdown or enter their names in the search field. The high-risk countries configured here are highlighted in articles returned from each investigation.
File types to exclude from results. Select the file types that you want to exclude from Google results:
- HTML is included by default.
- Non-HTML file types do not have the same metadata and tagging. Excluding them reduces the number of articles to review and false hits by 50% without increasing the risk of missing a true hit.
Factiva
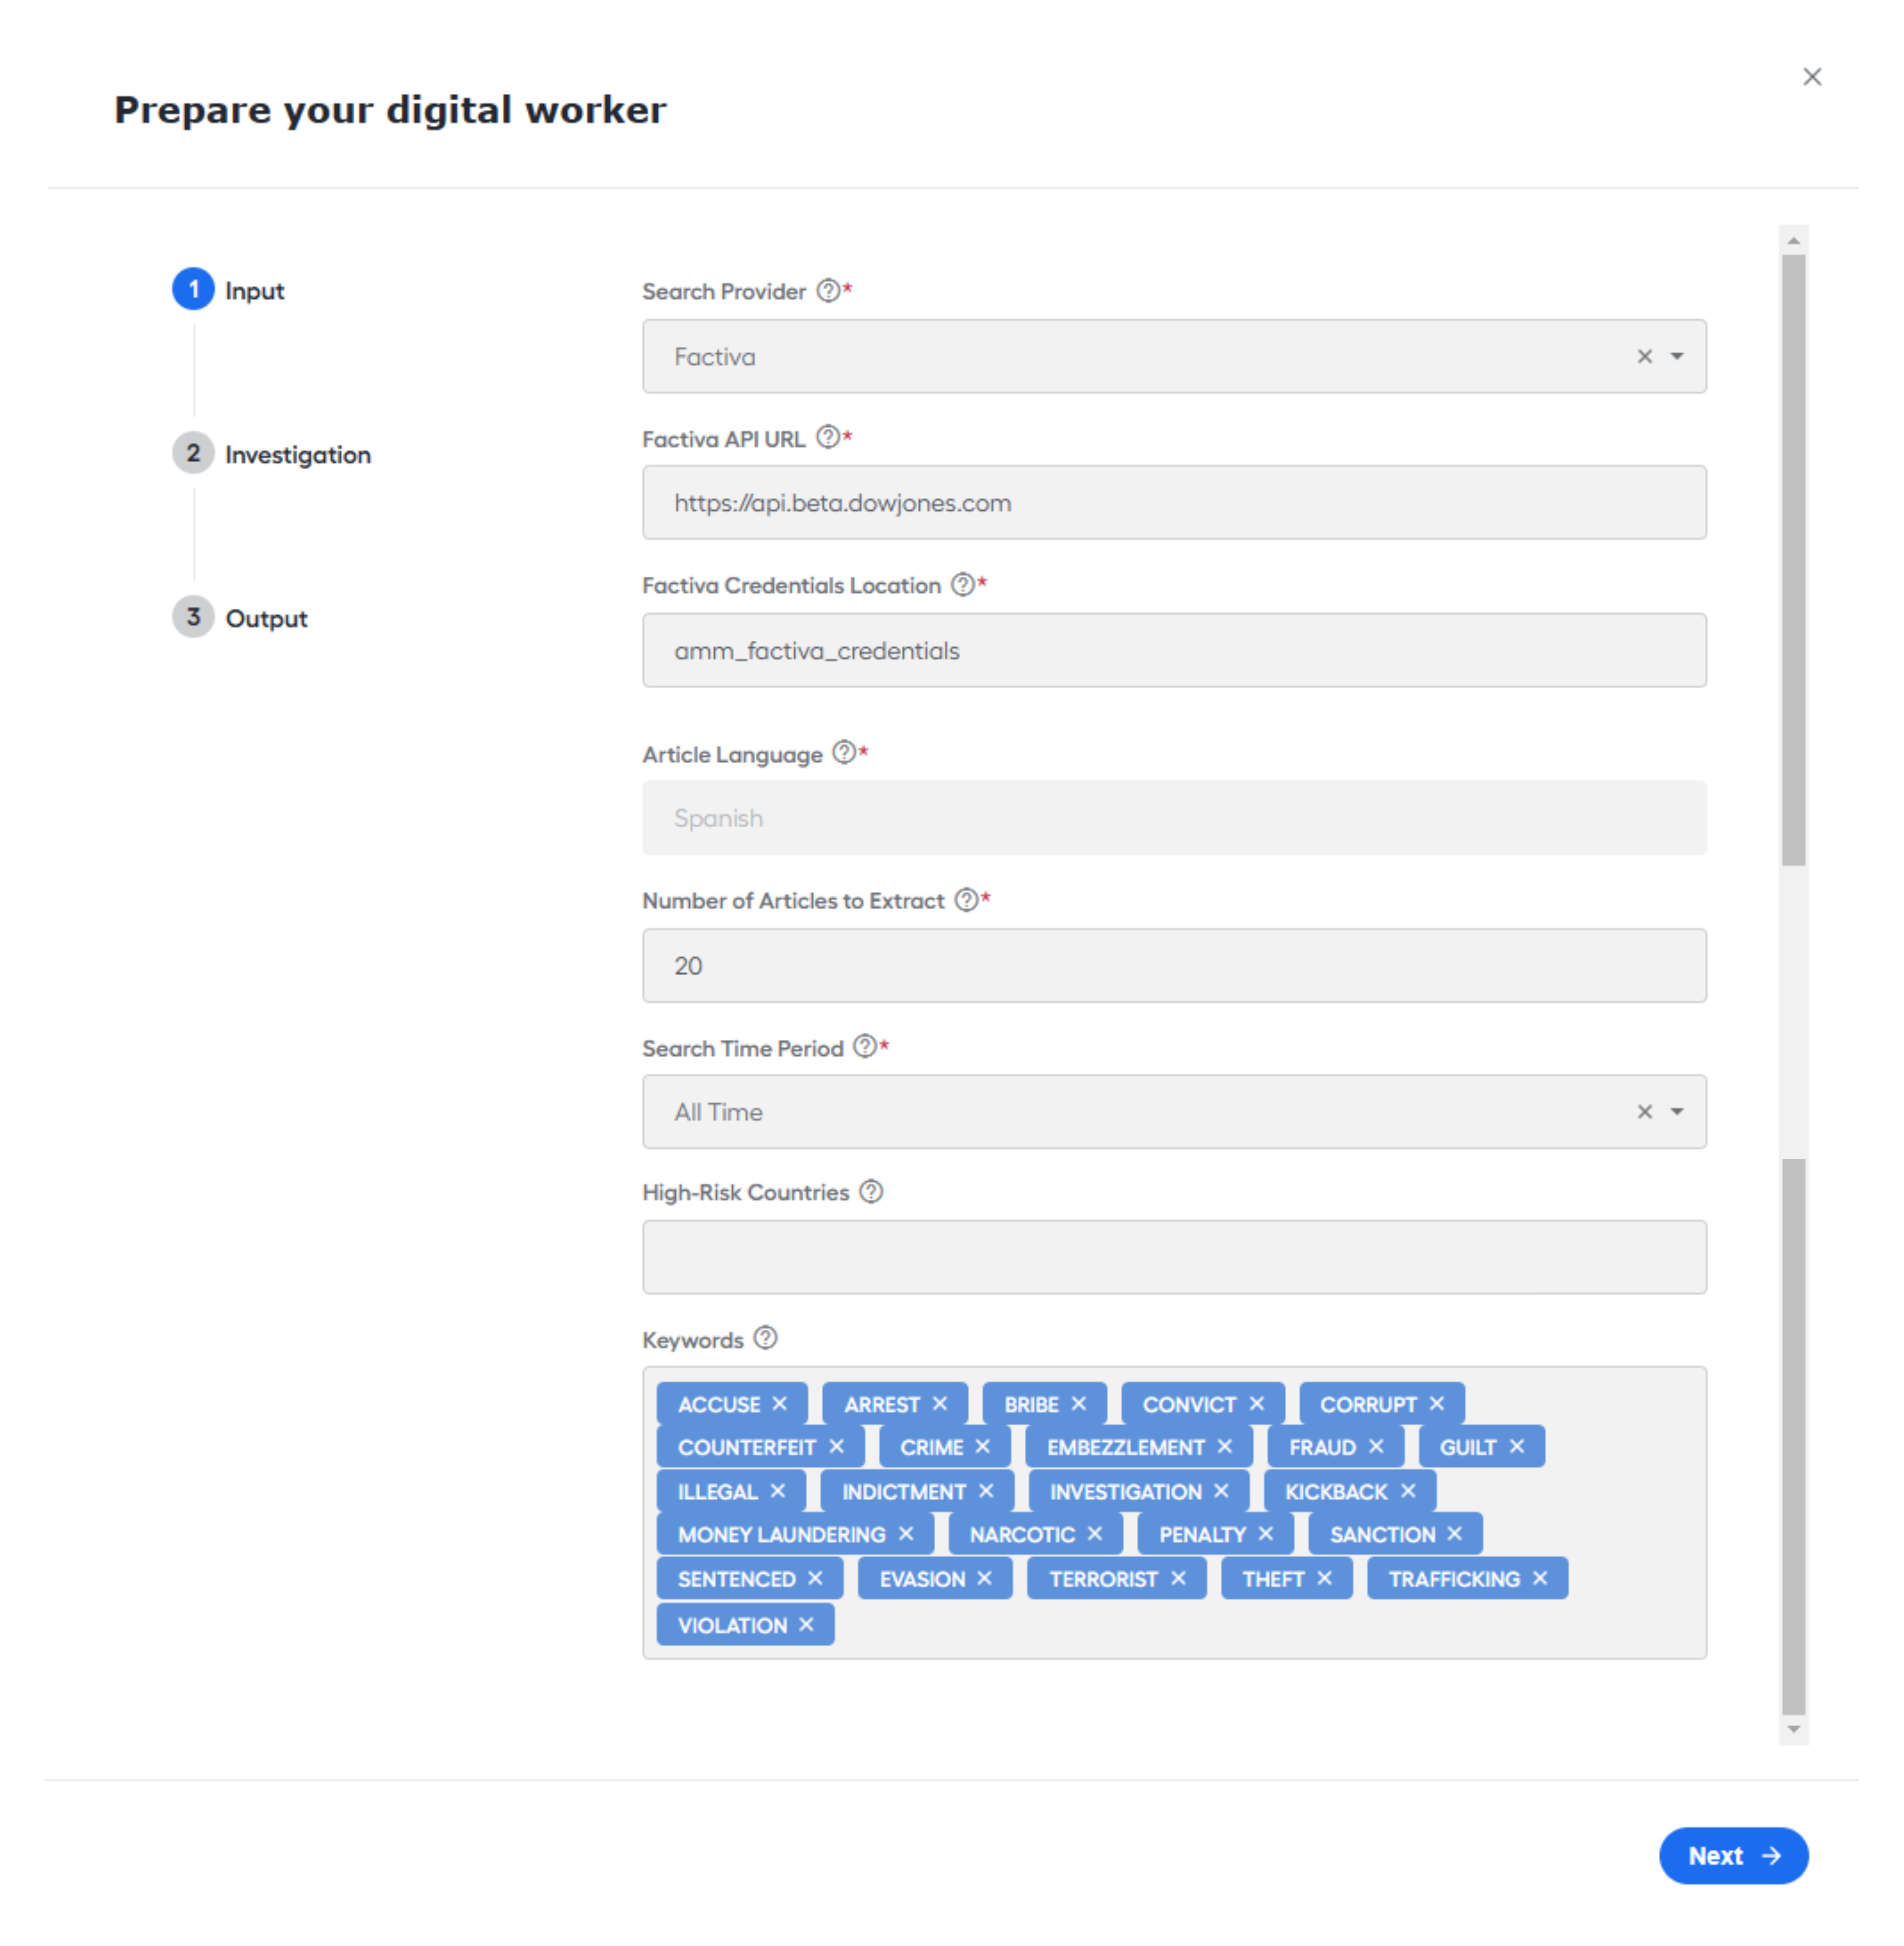
Factiva API URL. Select the address of the Factiva API. Available options:
Factiva Credentials Location. Specify the corresponding Secrets Vault alias for the Factiva system.
Article Language. Select the language of articles to search in. The English language is used by default.
Number of articles to extract. Specify the maximum number of reports to fetch from 1 to 20. By default, up to 20 articles are retrieved.
Search Time period. Select an option to find information published during a specific time frame.
Keywords. Specify keywords to be used for the search. You can add a maximum of 28 words.
The following keywords are added by default based on the article languages you select:
English:
ACCUSE, ARREST, BRIBE, CONVICT, CORRUPT, COUNTERFEIT, CRIME, EMBEZZLEMENT, FRAUD, GUILT, ILLEGAL, INDICTMENT, INVESTIGATION, KICKBACK, MONEY LAUNDERING, NARCOTIC, PENALTY, SANCTION, SENTENCED, EVASION, TERRORIST, THEFT, TRAFFICKING, VIOLATIONSpanish:
ACUSAR, ARRESTAR, SOBORNO, CORRUPTO, FALSIFICACIÓN, CRIMEN, MALVERSACIÓN, FRAUDE, CULPA, ILEGAL, ACUSACIÓN, INVESTIGACIÓN, CONTRAGOLPE, LAVADO DE DINERO, NARCÓTICO, MULTA, SANCIÓN, SENTENCIADO, EVASIÓN, TERRORISTA, ROBO, TRÁFICO, VIOLACIÓN
High-risk countries. Select countries from the dropdown or enter their names in the search field. The high-risk countries configured here are highlighted in articles returned from each investigation.
LexisNexis
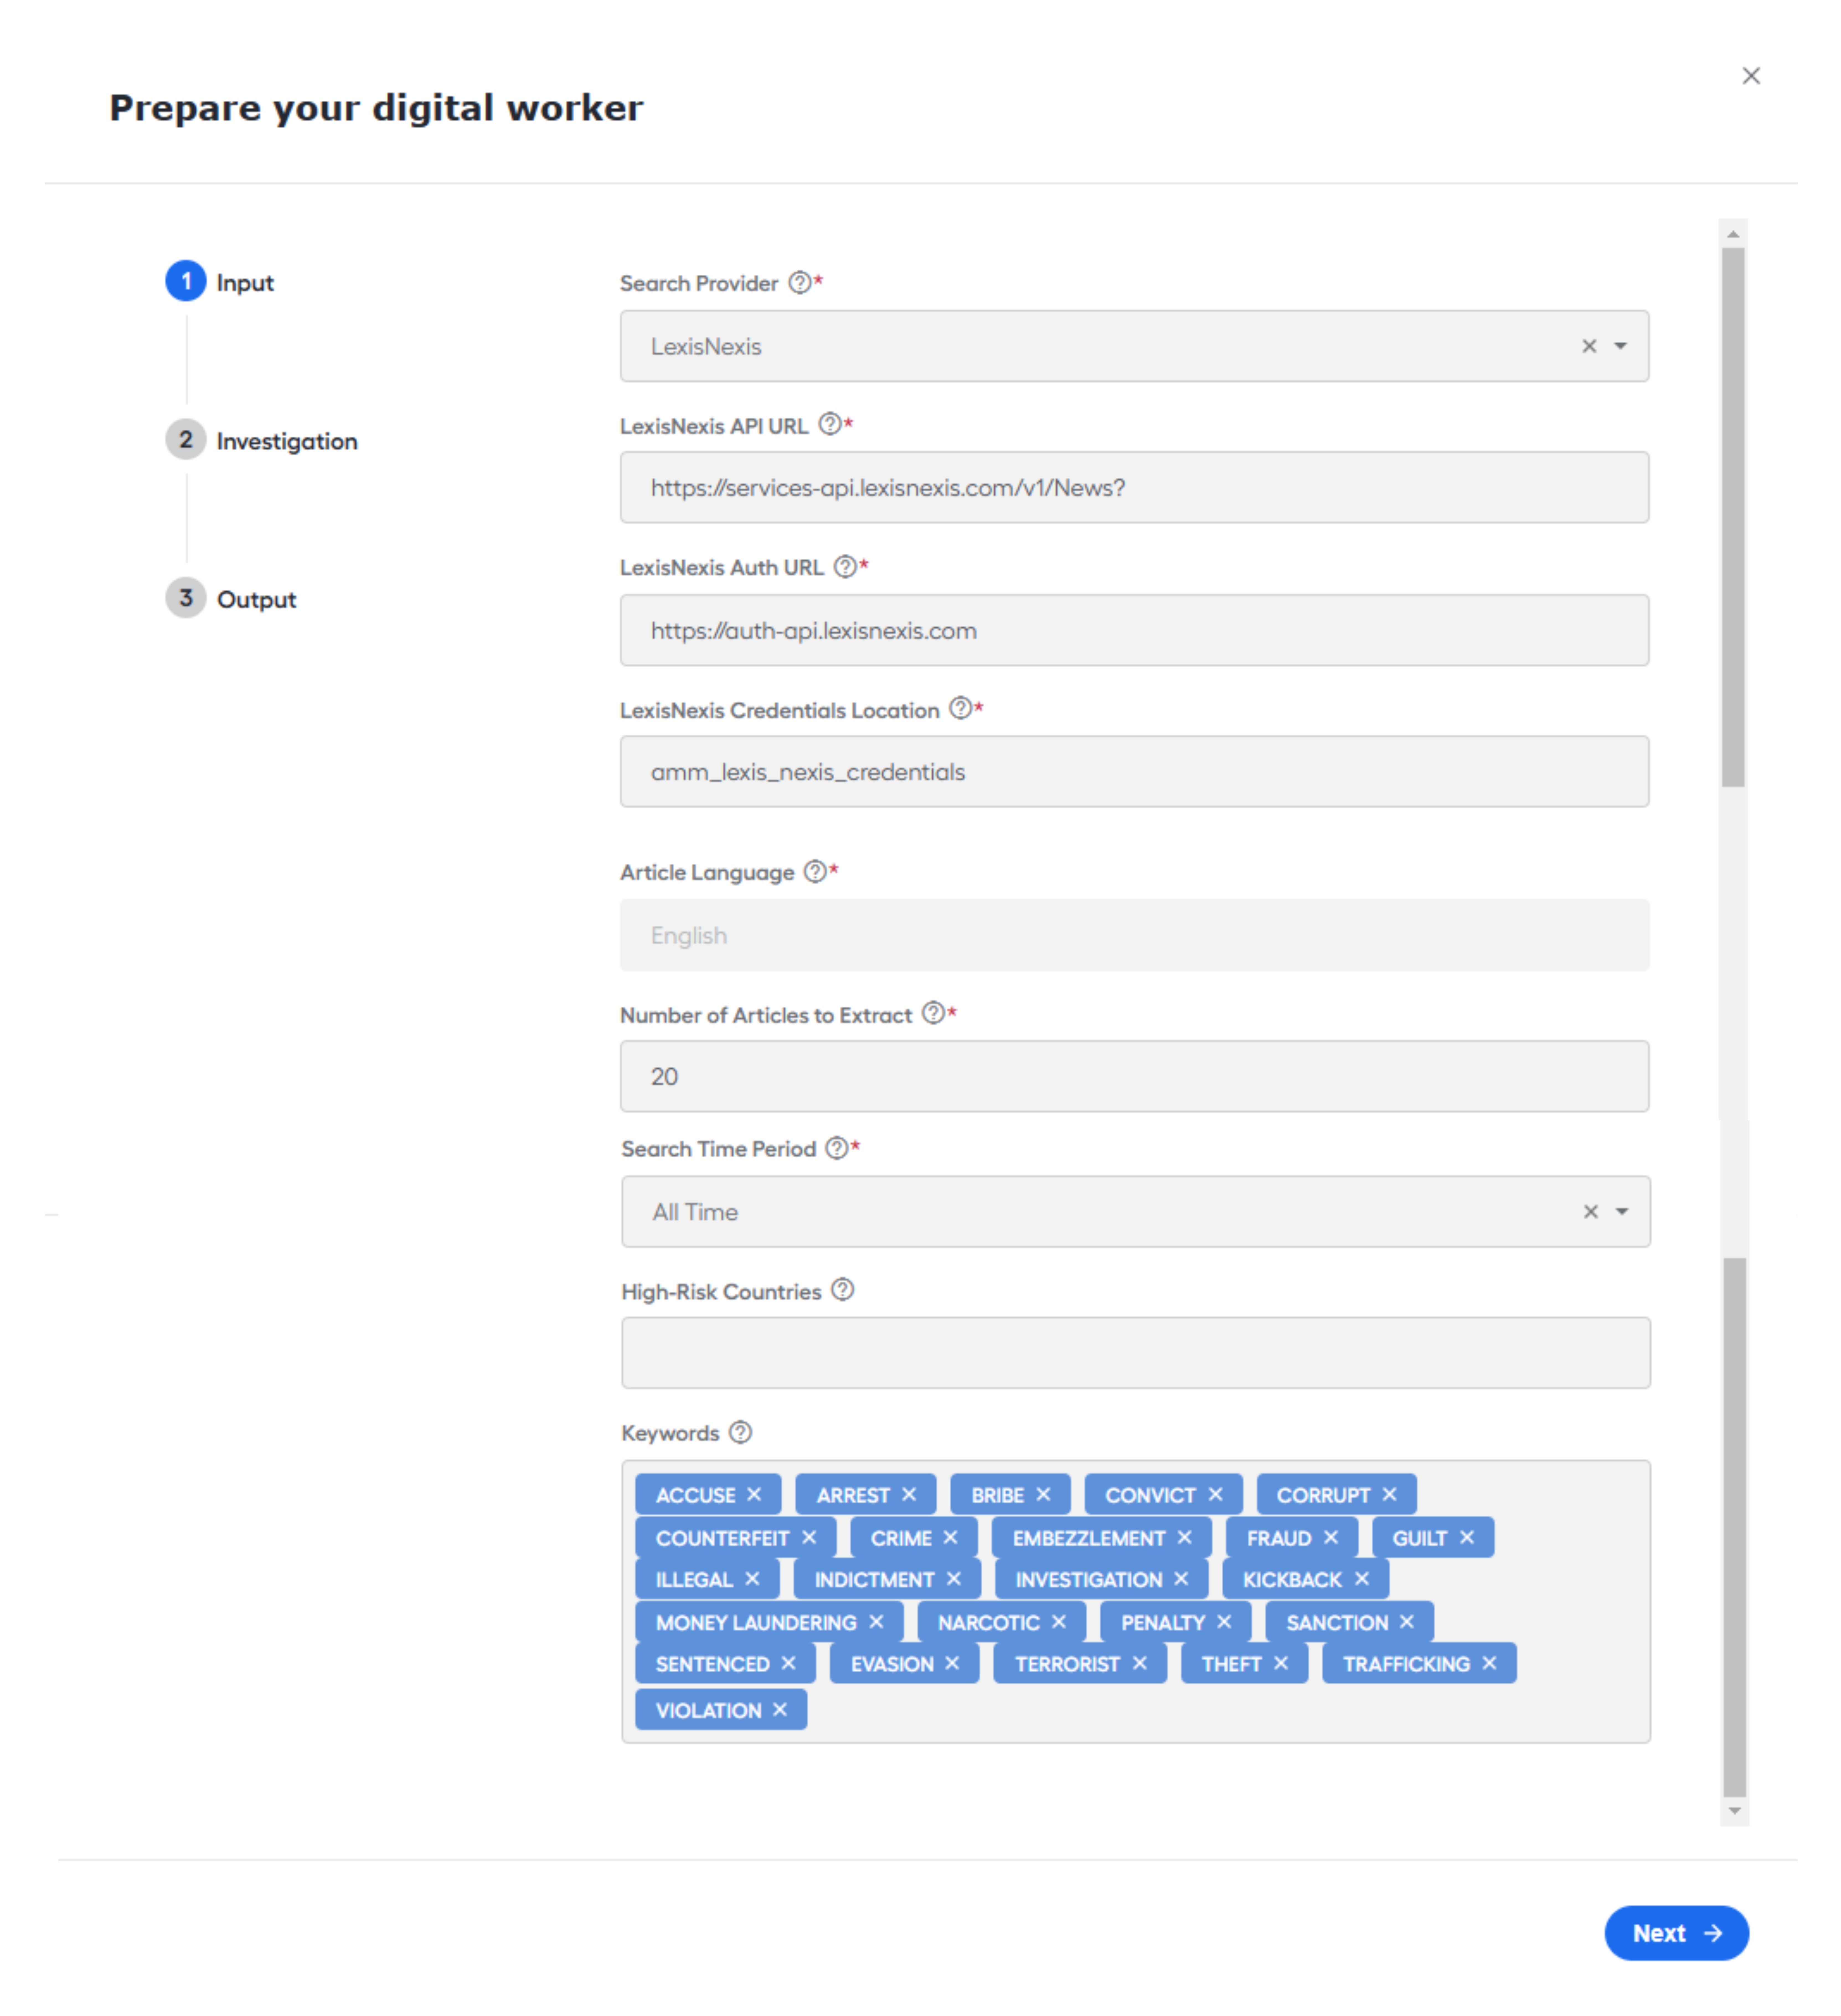
- LexisNexis API URL. Select the address of the LexisNexis API. By default, https://services-api.lexisnexis.com.
- LexisNexis Authentication URL. Specify the Authentication URL for the LexisNexis News. By default, https://auth-api.lexisnexis.com.
- LexisNexis Credentials Location. Specify the corresponding Secrets Vault alias for the LexisNexis News system.
- Article Language. Select the language of articles to search in. The English language is used by default.
- Number of articles to extract. Specify the maximum number of reports to fetch from 1 to 20. By default, up to 20 articles are retrieved.
- Search Time period. Select an option to find information published during a specific time frame.
- High-risk countries. Select countries from the dropdown or enter their names in the search field. The high-risk countries configured here are highlighted in articles returned from each investigation.
- Keywords. Specify keywords to be used for the search. You can add a maximum of 28 words.
World-Check One
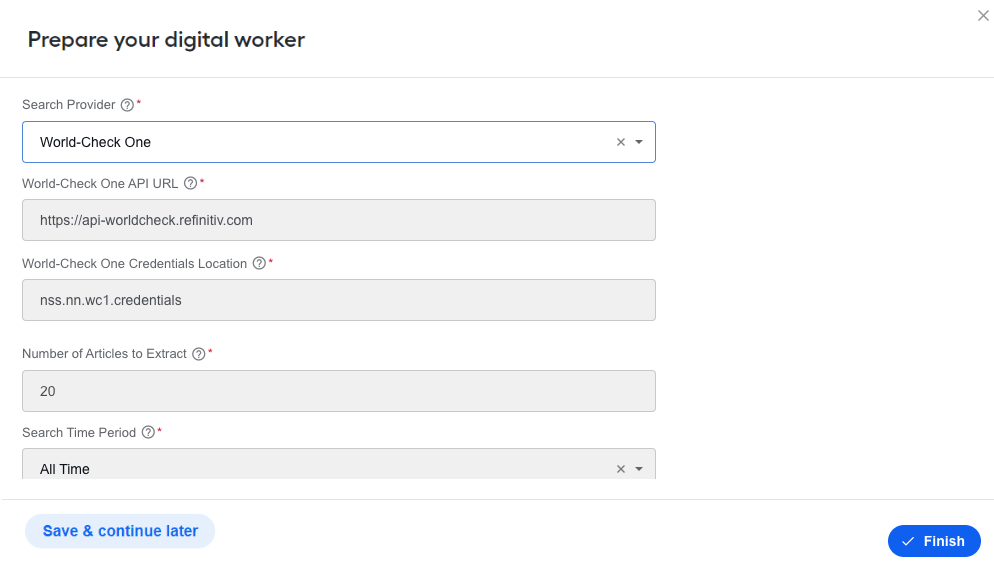
- World-Check One API URL. Select the address of the World-Check One API. The default one is https://api-worldcheck.refinitiv.com.
- World-Check One Group. Specify the Group Id for the World-Check One system.
- World-Check One Credentials Location. Specify the corresponding Secrets Vault alias for the World-Check One system.
- Article Language. Select the language of articles to search in. The English language is used by default.
- Number of articles to extract. Specify the maximum number of reports to fetch from 1 to 20. By default, up to 20 articles are retrieved.
- Search Time period. Select an option to find information published during a specific time frame.
- High-risk countries. Select countries from the dropdown or enter their names in the search field. The high-risk countries configured here are highlighted in articles returned from each investigation.
For the World-Check One provider, the keywords highlight important sections within each article returned by the search, but not for the API call. You must configure keywords to be used in a search at the World-Check One's website.
Thomson Reuters CLEAR Adverse Media
Thomson Reuters CLEAR Adverse Media API URL. Select the address of the Thomson Reuters CLEAR Adverse Media API. By default, it is https://api-worldcheck.refinitiv.com.
Thomson Reuters CLEAR Adverse Media Credentials Location. Specify the corresponding Secrets Vault alias for the Thomson Reuters CLEAR Adverse Media system.
Gramm-Leach-Bliley Act permissible purpose. To comply with the privacy provisions of the Federal Gramm-Leach-Bliley Act and the subsequent regulations adopted by the Federal Trade Commission (GLB), select only a single purpose from the presented list. Misrepresenting your access purpose is a violation of our subscriber agreement and certain federal and state laws. Any use of information maintained by West, a Thomson Reuters business, other than for the selected permissible purpose, is a ground for account termination and can be referred to the appropriate governmental agency.
Driver’s Privacy Protection Act permissible purpose. The Driver's Privacy Protection Act (DPPA) was enacted to prevent any Department of Motor Vehicles (DMV) officer, employee, or contractor from knowingly disclosing or making available to any person or entity the personal information associated or contained within a motor vehicle record. This act does not include or affect accident reports, violations (MVRs), and driver status.
Voter permissible purpose. Due to data privacy restrictions imposed by state laws, users accessing voter registration records are required to acknowledge compliance with the law and to indicate the intended permissible use for the data. Information obtained from each search, including the indicated permissible use, date of search, and search details, are stored for at least five years to comply with states' statutory requirements. Not all permissible uses are applicable to each state.
Number of articles to extract. Specify the maximum number of articles to fetch within the range from 1 to 100. By default, up to 20 articles are retrieved.
Search Time period. Select an option to find information published during a specific time frame.
Minimum risk score. Articles that do not meet the minimum risk score are excluded from the results. The default value is 80.
High-risk countries. Select countries from the drop-down list or type and search. The selected high-risk countries are highlighted in articles returned from each investigation.
To start using Thomson Reuters Clear API, add all public IP addresses of agents to Thomson Reuters Whitelist. For that, contact Thomson Reuters' team.
Additionally, Thomson Reuters keystore should be installed to /opt/workfusion/ssl at the Master node. Once it’s installed, create the tr.clear.api.keystore Secrets Vault entry, where the key is the path to the keystore file, and the value is the certificate password.
CSV file
To make sure your CSV file has the correct format, download a CSV file template by clicking the Template link. Files that do not comply with the format requirements are not ingested.
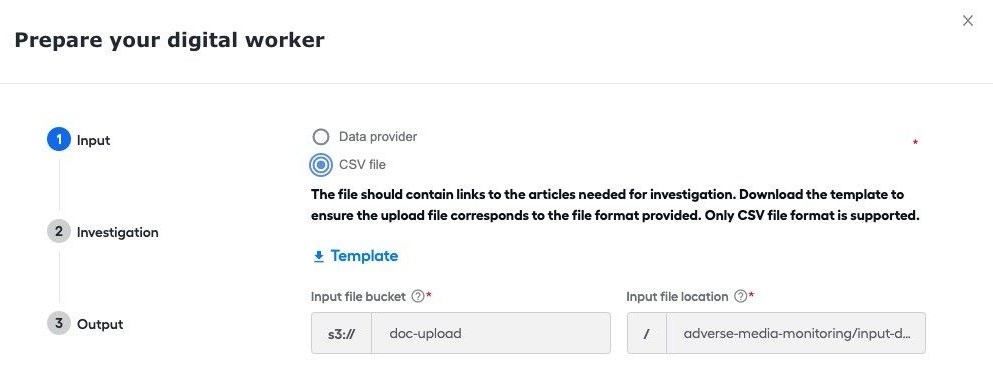
Then, specify the following:
- Input file bucket: the S3 bucket name where you need to upload the CSV file.
- Input file location: the path to the directory where you need to upload the CSV file.
Investigation
After setting the Input parameters, click Next to go to the following step of the wizard.
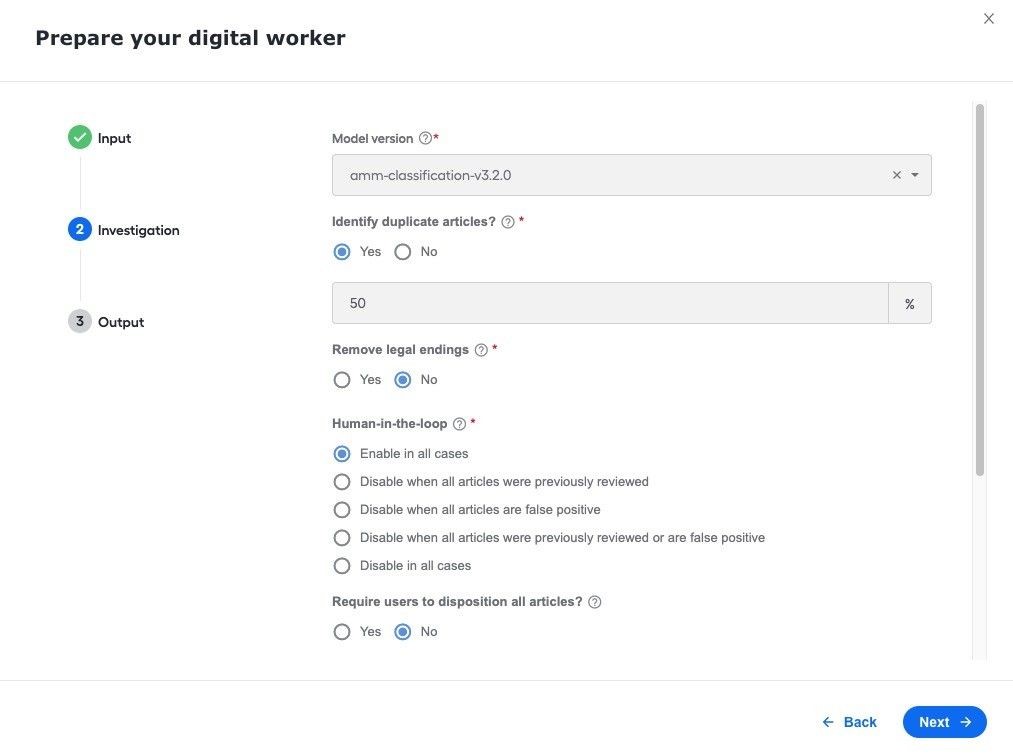
Model version. Select the model version to use. The latest model is selected by default.
Identify duplicate articles. Select Yes to identify and group articles by the configurable similarity threshold. By default, the value is set to 50%.
Remove legal endings. Select Yes to remove legal endings from the company entities. Entities with common names or small businesses (LLCs, S corps) can receive more tailored results when the option is set to No.
Human-in-the-loop. Configure whether and how you want to enable the Manual Review step (also known as Human in the Loop) by selecting one of the following options:
Enable in all cases: the AI Agent creates Manual Review steps for every search run.
Disable when all articles were previously reviewed: the investigation history is used to skip the Manual Review step when all retrieved articles were previously reviewed.
Disable when all articles are false positive: the AI Agent skips the Manual Review step when all retrieved articles are evaluated as False Positive.
Disable when all articles were previously reviewed or are false positive: the AI Agent evaluates both the conditions above and applies whichever is true.
Disable in all cases: the AI Agent skips the Manual Review step in all cases, sticking to model decisions.
Require users to disposition all articles. Configure if users are required to disposition all articles prior to closing an investigation in Workspace.
Automatically route users to the next task. Choose whether you want users to be routed to the next task in the queue. If disabled, users are always taken back to the main queue list after closing or saving an assignment.
Generate report if manual task expires. If set to Yes, when a Manual Task expires, it is considered submitted. The transaction is processed as usual, and a report is generated.
Number of submit investigation tasks. When running the Ad hoc investigation Business Process, specify how many Submit Investigation Tasks you want to create. One task is suggested for two or three analysts.
Output
In the last step, specify the output parameters:
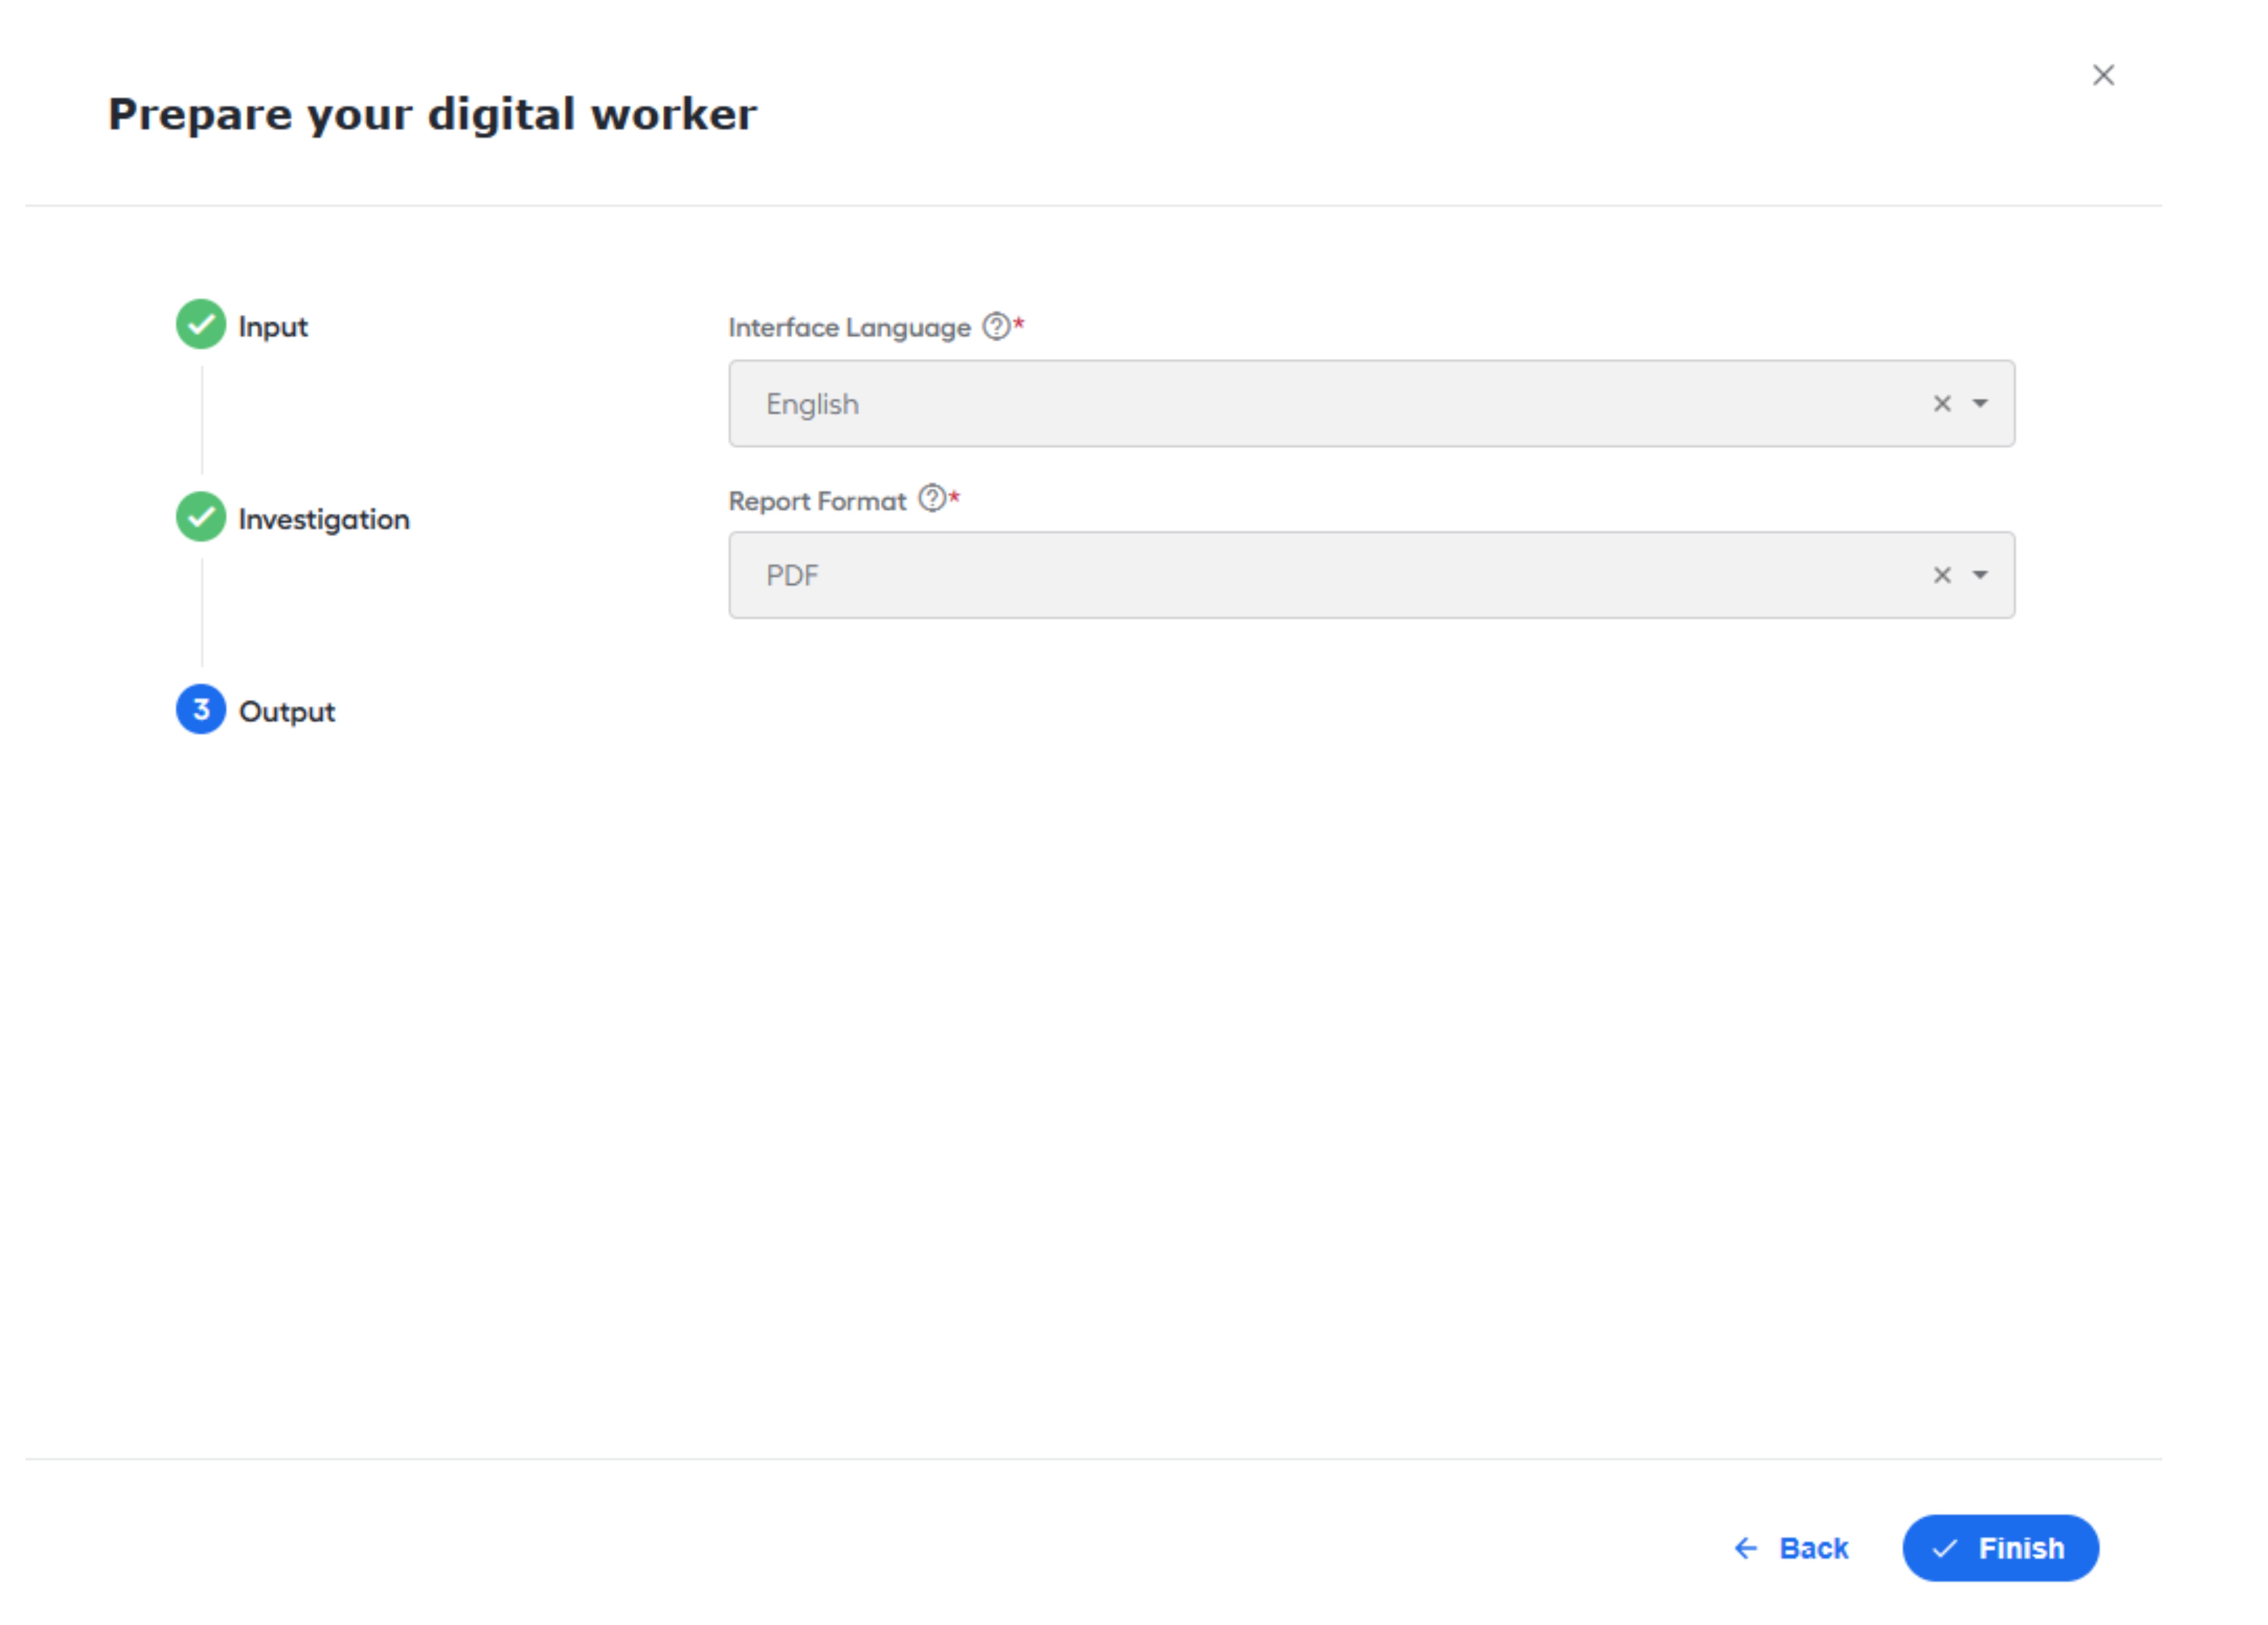
- Interface Language. Select the language of the final report and Manual Tasks.
- Report Format. Select the report file format for generating a screening request: HTML or PDF.
Review
Once you complete the required fields, review the configuration. You can return to any step to change previous settings before finalizing. If everything looks correct, click Finish. You are now ready to use the Adverse Media Monitoring skill.
Advanced settings
Configure Data Purge
The Data Purge Business Process is an additional part of the Adverse Media Monitoring AI Digital Worker that allows for cleaning up old data on the environment.
Configure Data Purge settings
To configure Data Purge settings, do the following:
Log in to Control Tower.
Click the Advanced tab and select Data Stores.
Select
uc_amm_configuration_v1and set the following parameters:Name Value type Example Description dataPurge.storagePeriodInDaysInteger 30Specify how many days should pass after the completion of the transaction to delete the data. dataPurge.deleteReportstrue/falsefalseSet to trueto delete generated reports.dataPurge.deleteAnalyticsDatatrue/falsefalseSet to trueto delete analytics data.dataPurge.deleteArticleHistorytrue/falsefalseSet to trueto delete the previous investigation for the same Entity ID.dataPurge.articleReviewStoragePeriodInDaysInteger 30Specify how many days completed investigations should be stored in the database. The parameter works in combination with dataPurge.deleteArticleHistory.
Configure Data Purge scheduling
You can run the Data Purge BP manually or on a schedule.
To configure the schedule, do the following:
Log in to Control Tower.
Go to the Advanced tab and select Schedules.
Click Create.
In the Create Schedule window, select the following parameters:
- In Task or Process Definition, select Adverse Media Monitoring Data Purge vX.X.X | AMM | X.X.X.
- In Input Data, select Empty.
- Specify Schedule Period to run Data Purge only for some period. Otherwise, leave it empty.
- In Schedule Name, set the operation's name, for example, Adverse Media Monitoring Data Purge.
- In Schedule Frequency, specify days and times when Data Purge must be started. It is recommended to set the time when the environment is least loaded, for example, nightly hours on weekends.
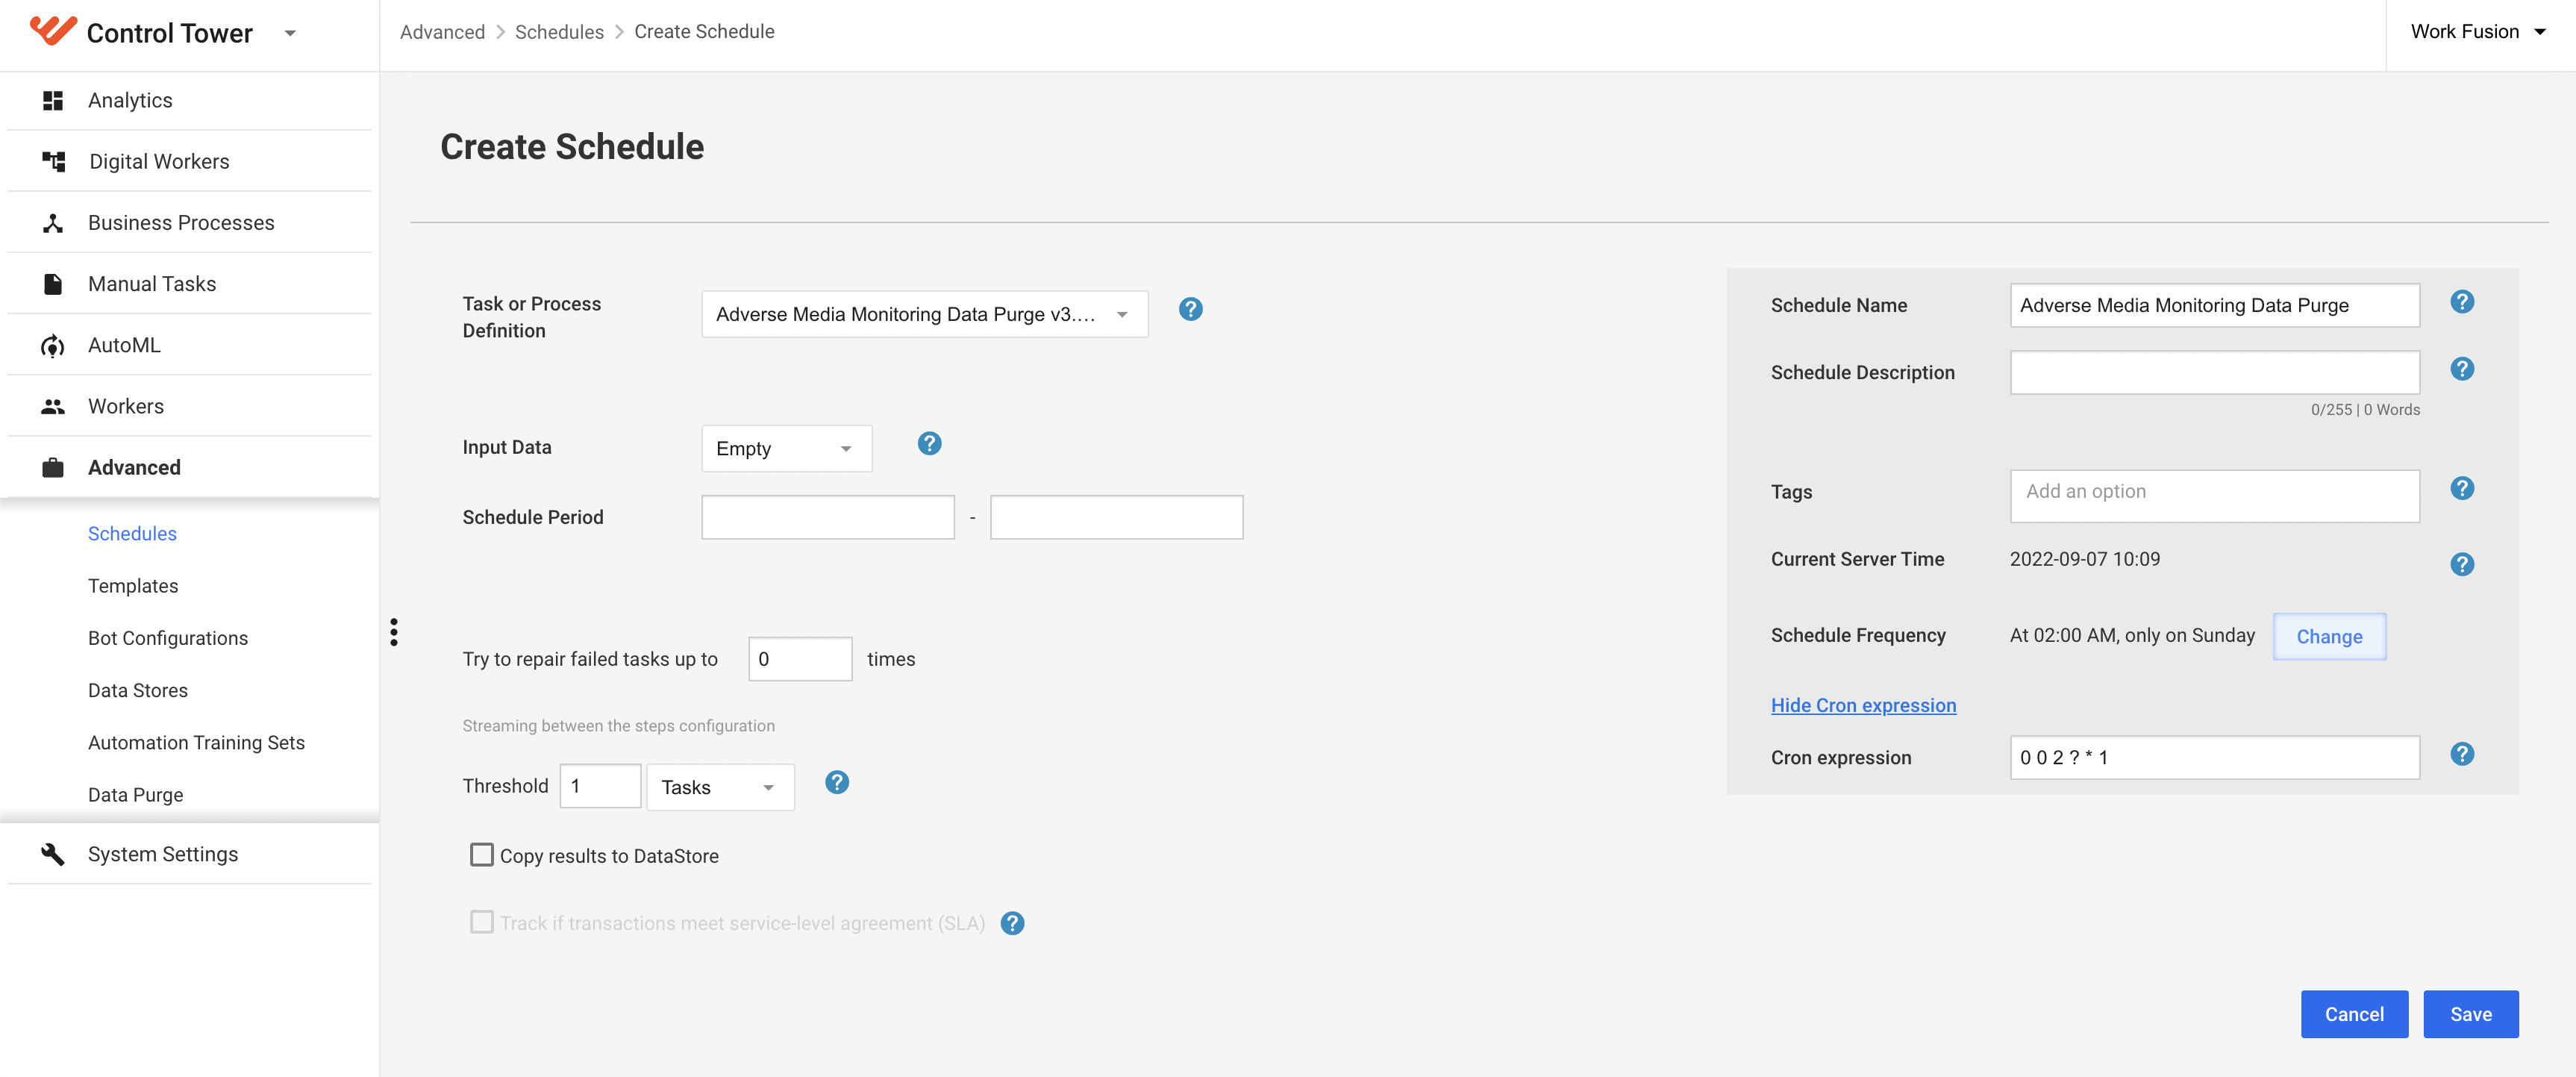
Click Save.
After that, the purge operation runs automatically on a specified day and time.
To learn more about data clearing, see the following sections on Data Purge in the Enterprise Edition documentation:
Configure REST API endpoints
To configure REST endpoints for Adverse Media Monitoring, perform the following steps:
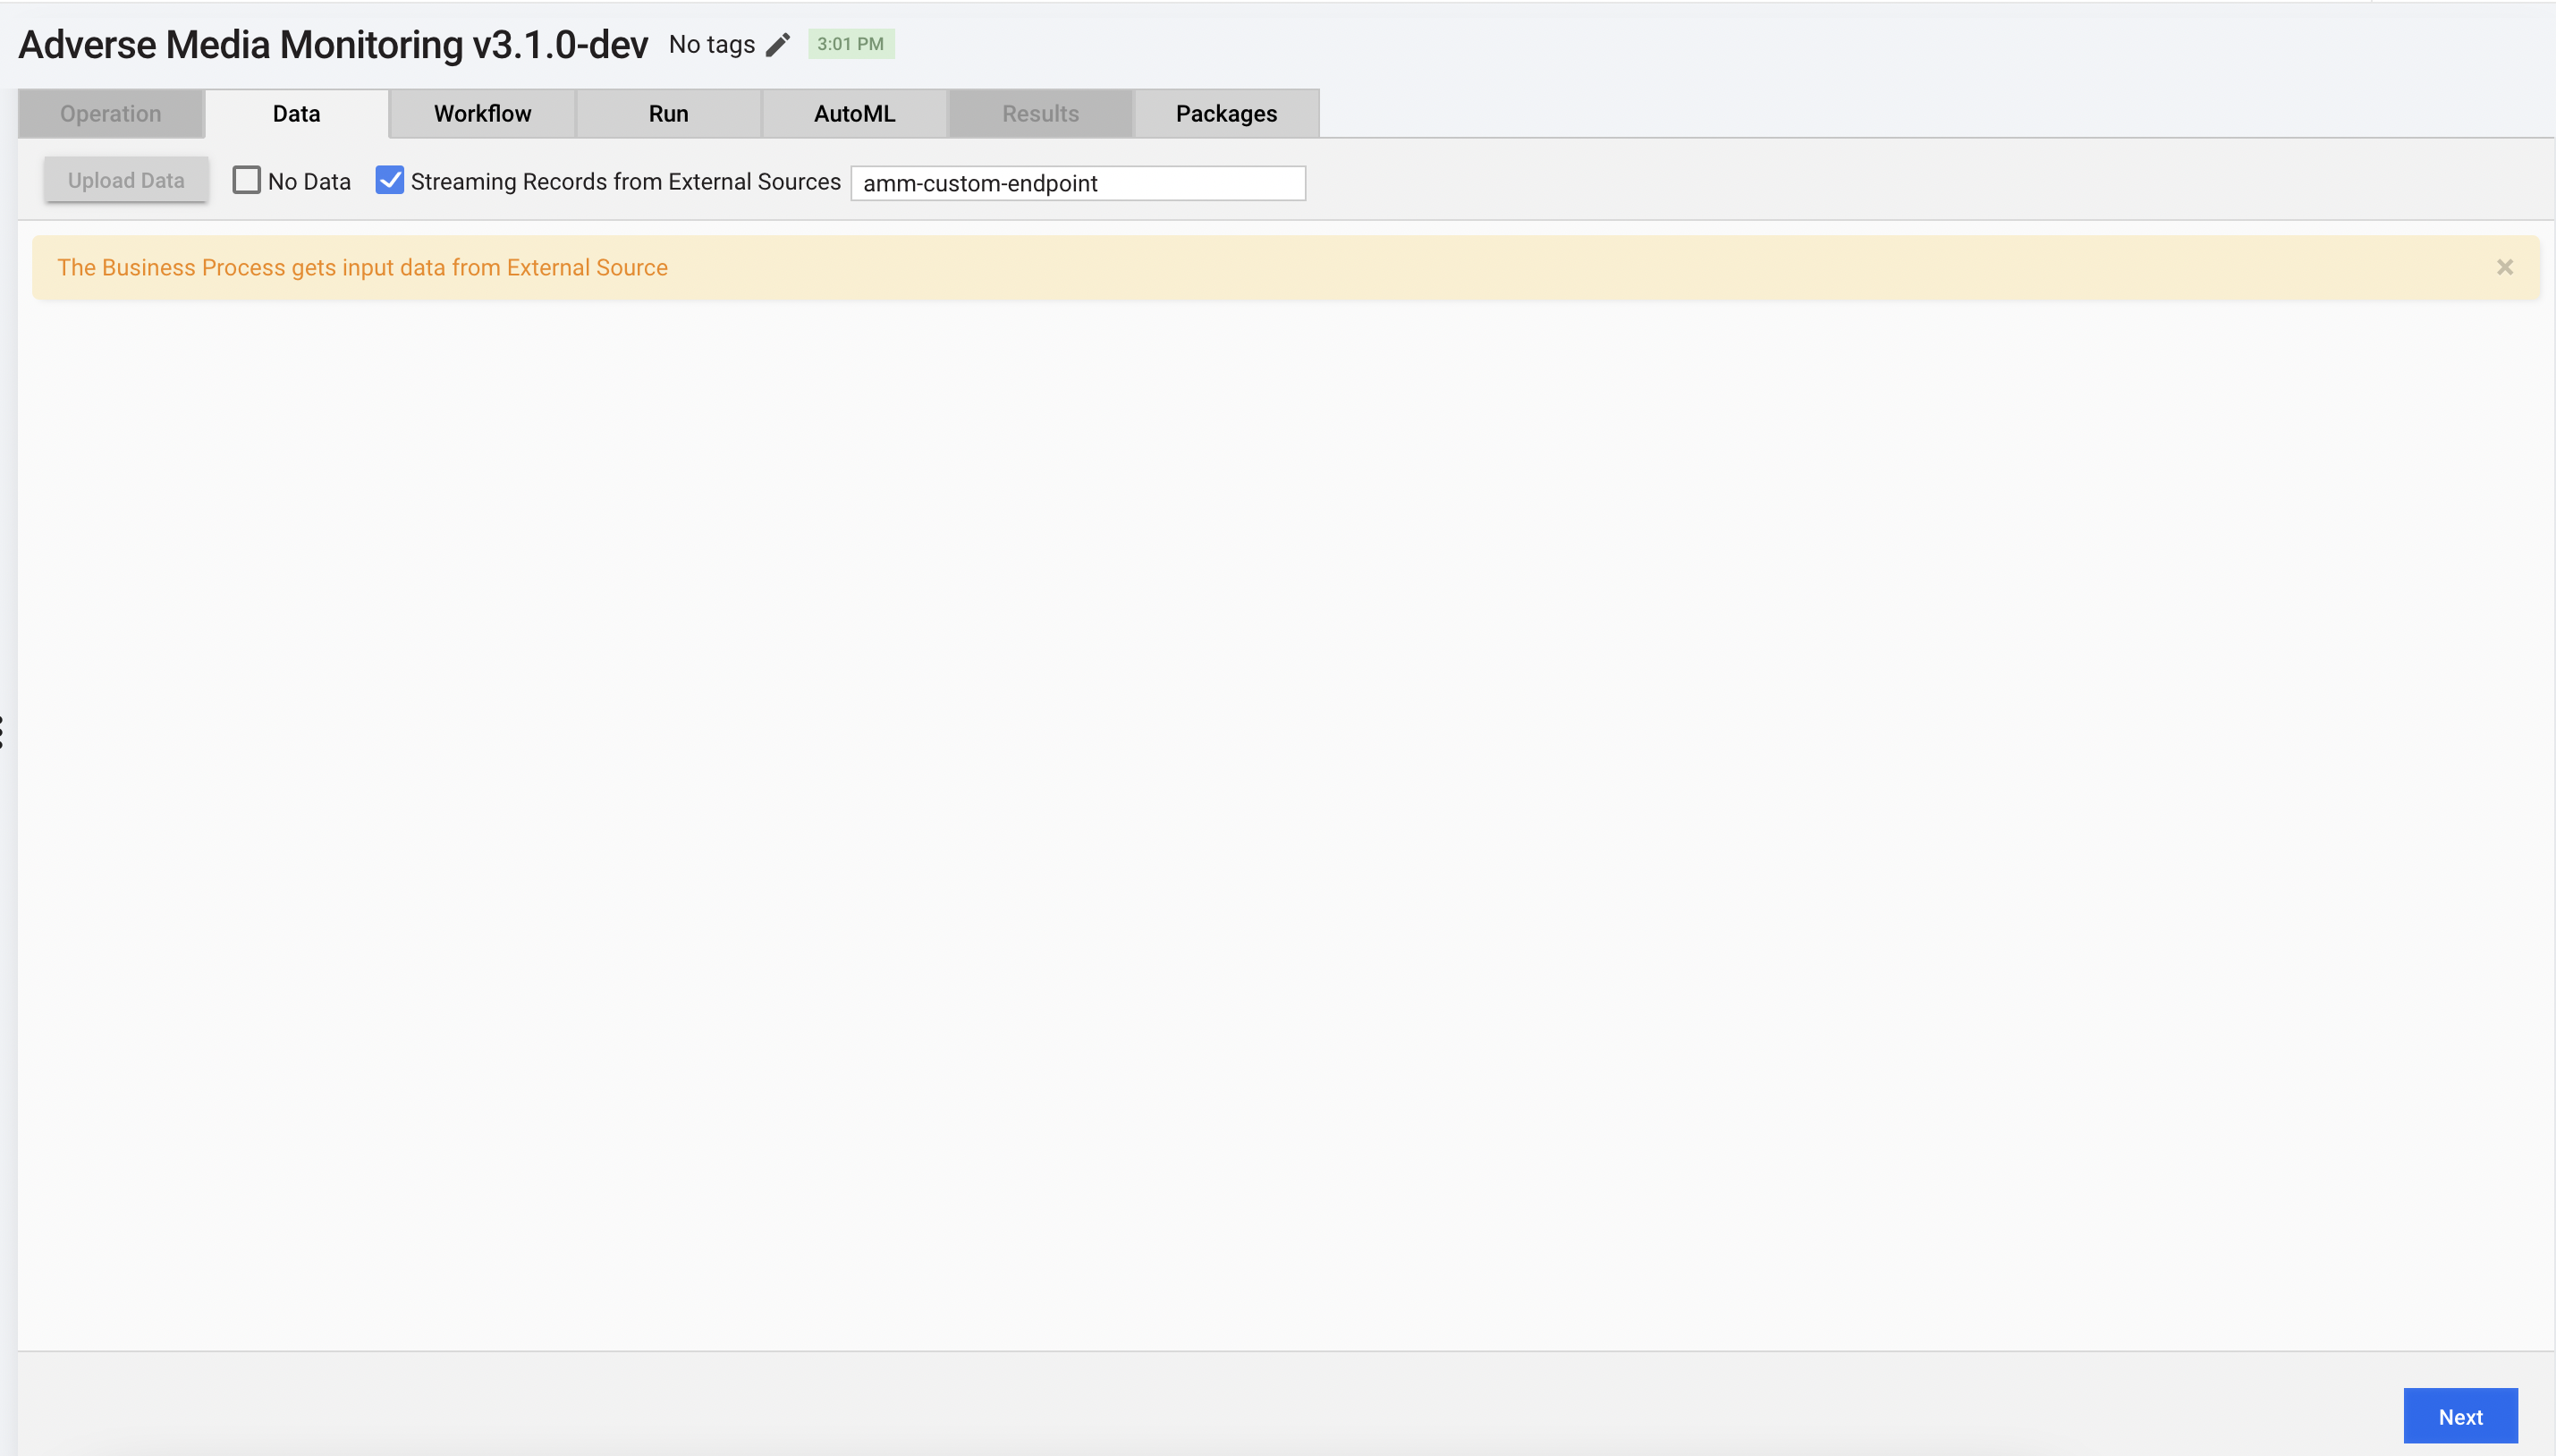
In Control Tower, open the main BP definition Adverse Media Monitoring vX.X.X, and on the Data tab, select Streaming Records from External Sources. Here, also specify a custom signal id:
On the Run tab, click Run This Process.
After the BP starts, return to the Run tab and click Show API to find all available generated endpoints:
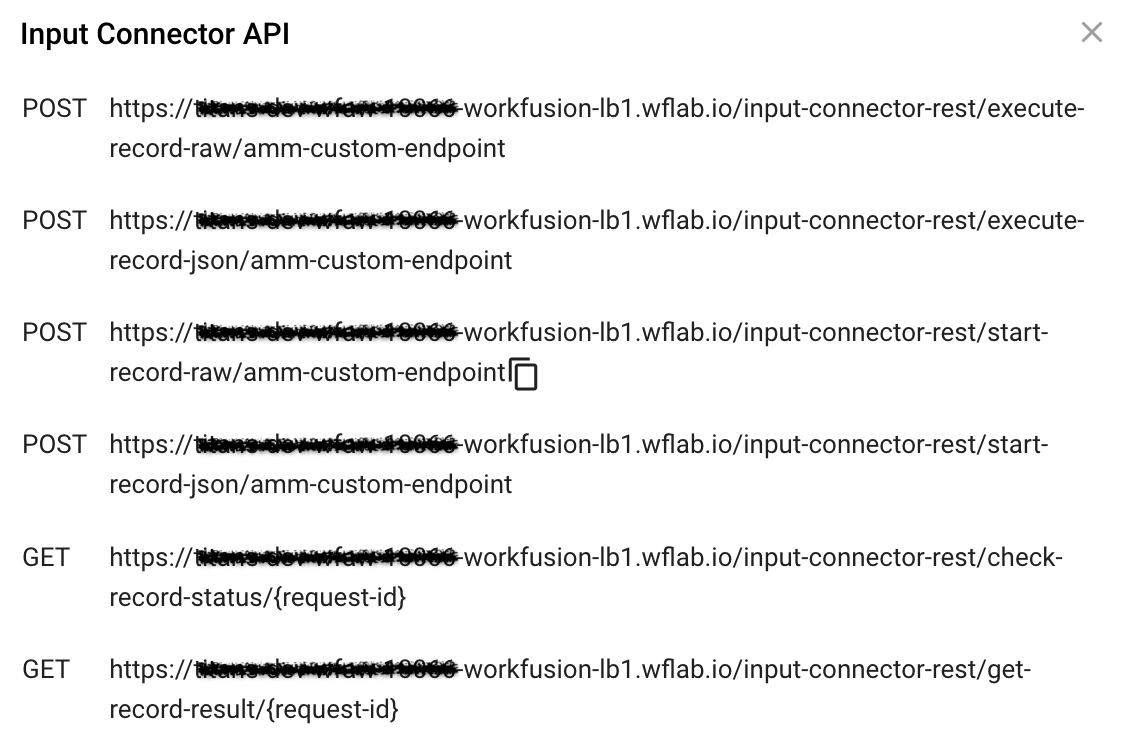
For Adverse Media Monitoring only asynchronous invocation is supported, in particular the following endpoints:
/start-record-raw/to start a BP/check-record-status/to check the status of a running transaction/get-record-result/to get the result data of a finished transaction
For detailed information on invoking transactions and getting access to a token, see Running skills via REST API.
Verify settings
To check that the Business Process is imported correctly, try running an investigation.