Install and configure
The page provides instructions on installing and configuring Evan (formerly Evelyn AMM). For data on the WorkFusion platform compatibility, refer to the release notes.
Meet requirements
Hardware
Evan runs on the standard Work.AI hardware configuration as documented in the Hardware and OS guide. Minimum requirements are as listed below:
| Server | Recommended OS | CPU (cores) | RAM (GB) | HDD (GB) |
|---|---|---|---|---|
| Master | RHEL 8.5 | 8 | 32 | 750 |
| BEP Agent | RHEL 8.5 | 4 | 16 | 150 |
| Analytics | Windows Server 2016 | 16 | 32 | 150 |
| MS SQL | Windows Server 2016 | 4 | 16 | 500 |
- RPA bots are not required for Adverse Media Monitoring.
- High-availability environments require a Proxy server.
For the architecture deployment, refer to Install AI Agents | View architecture deployment.
Software
| AMM version | Environment topology | Platform version | AutoML Worker configuration | Control Tower Worker configuration | Java Native Worker configuration |
|---|---|---|---|---|---|
| 4.7.x | standard-6 topology (6/1 BEP Agents) | 10.3+ | 1 CPU / 8 GB memory | 0.4 CPU / 2 GB memory | 0.4 CPU / 2 GB memory |
Before installing AMM, make sure that your environment meets the following requirements:
- You have installed Work.AI v10.3+ and have the Control Tower and Analytics components enabled. ODF 2 is installed automatically along with the system.
- You have a bundle with the AMM Business Processes and ML models.
- You have received the credentials for the required watchlists or licenses for the external screening software to be integrated with AMM.
- You have the Advanced Package Import and Import/Export permissions in Control Tower.
To check that ODF 2 is installed, do as follows:
Log in to Control Tower and, in the menu, click Advanced > Data Stores.
In the list, find the Data Stores with the_odf_transactions and _odf_transactions_status names. If the Data Stores are on the list, ODF is installed on your instance.
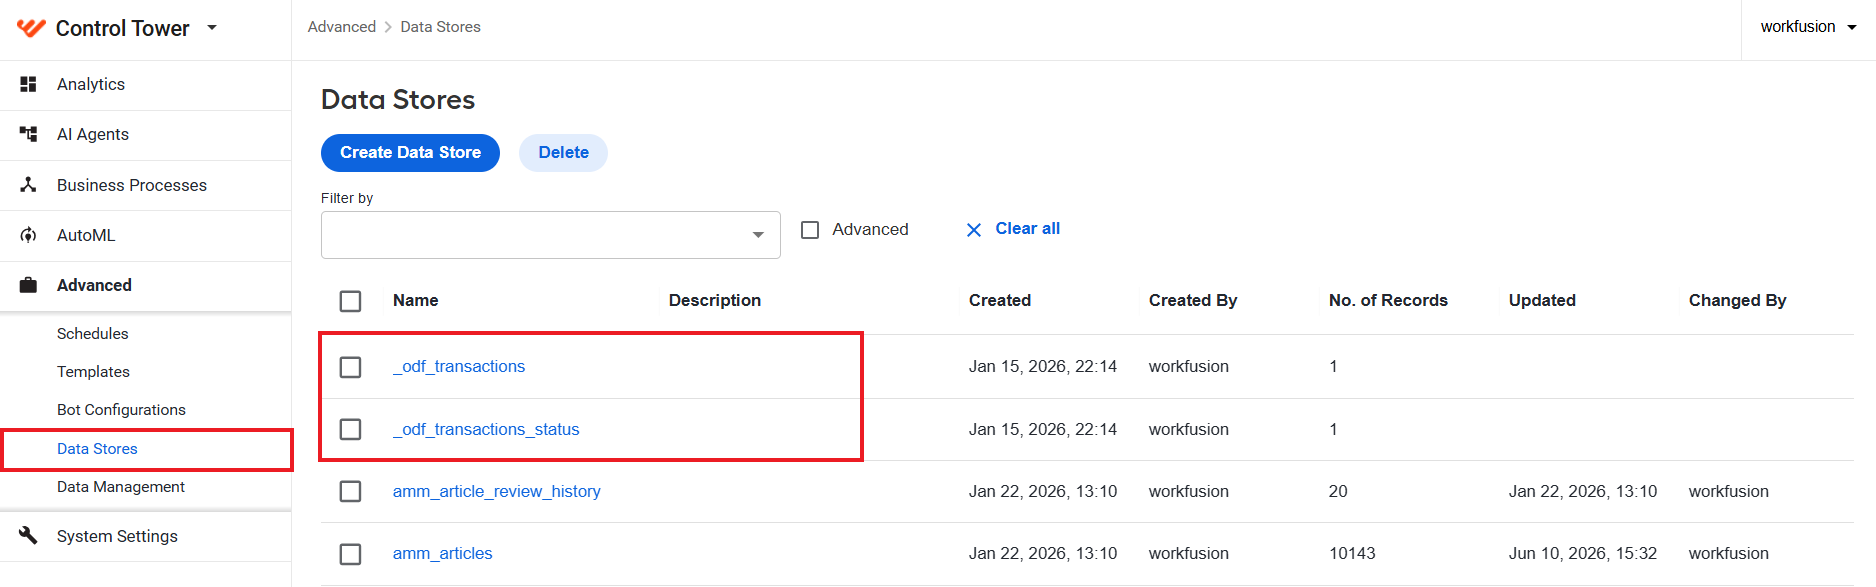
If the Data Stores are missing, download ODF and save odf-install-package-yourversion.zip to your local workstation. To find a proper ODF installation package for your Work.AI version, refer to the Compatibility matrix guide.
Review performance data
Adverse Media Monitoring leverages BEP servers that can be horizontally scaled for higher volumes.
The following table shows the sample volumes expected for the corresponding versions and configurations. These tests were performed with AMM 4.0 using Google API as the search provider. Note that throughputs may vary slightly, depending on the provider.
Test input: 280 entities file, with 1 entity = 20 articles
| Number of BEP Agents | Throughput | Execution time |
|---|---|---|
| 1 | 2,036 articles/hour | 165 min |
| 2 | 6,340 articles/hour | 53 min |
| 3 | 8,000 articles/hour | 42 min |
| 4 | 10,500 articles/hour | 32 min |
| 5 | 10,800 articles/hour | 31 min |
| 6 | 12,923 articles/hour | 26 min |
Performance is measured per article across the total run to calculate throughput at the specific scaling level. Tests are run using the CSV upload method, and the system is monitored to identify long-running processes or performance bottlenecks.
Install Evan
You can install Evan from the Solution Catalog or as a bundle. For details, see the Install AI Agents guide.
Configure Evan
Once Evan is installed, you need to configure it before running for the first time:
Set the API credentials for data providers.
Configure the SMTP credentials.
Set the proxy.
Configure the options on the AMM configuration screen. To open the configuration screen, log in to Control Tower, navigate to AI Agents, find your newly installed AMM variation, and click the Prepare button. The configuration screen includes the following steps:
You can configure multiple variations, or sets of parameters, for Evan. For example, you can set up a different data provider or a set of keywords per variation. For details, refer to Manage AI Agent variations.
API credentials for providers
The following search providers are supported:
- Google Custom Search API (with Serper.dev and SearchApi.io as alternate Google search backends)
- Dow Jones Factiva Headlines
- LexisNexis L&P Media
- World-Check One
- Brave Search
You must acquire licenses and credentials for all providers, except for Google API. WorkFusion’s AMM solution includes access to Google API at no additional cost.
To use providers other than Google API, the first step is to add the credentials to Secrets Vault. For step-by-step instructions, refer to the Manage secret entries in Secrets Vault guide.
If you use Google API, your first step is to provide credentials. To do that, in a GCP-hosted environment, complete the instructions under the expand below.
Provide credentials for Google API
The Google API used for the AMM AI Agent is the Custom Search JSON API. You must provide credentials from the WorkFusion’s Developer account owned by the Cloud Ops team.
GCP requires unique credentials for each customer environment (for example, pre-production and production).
If you are not using Google Cloud, notify the WorkFusion Engineering and Product teams so that they can perform an audit to ensure there are no gaps for enablement.
To generate credentials, do the following:
Log in to https://cloud.console.google.com.
Ensure that the Custom Search JSON API is enabled.
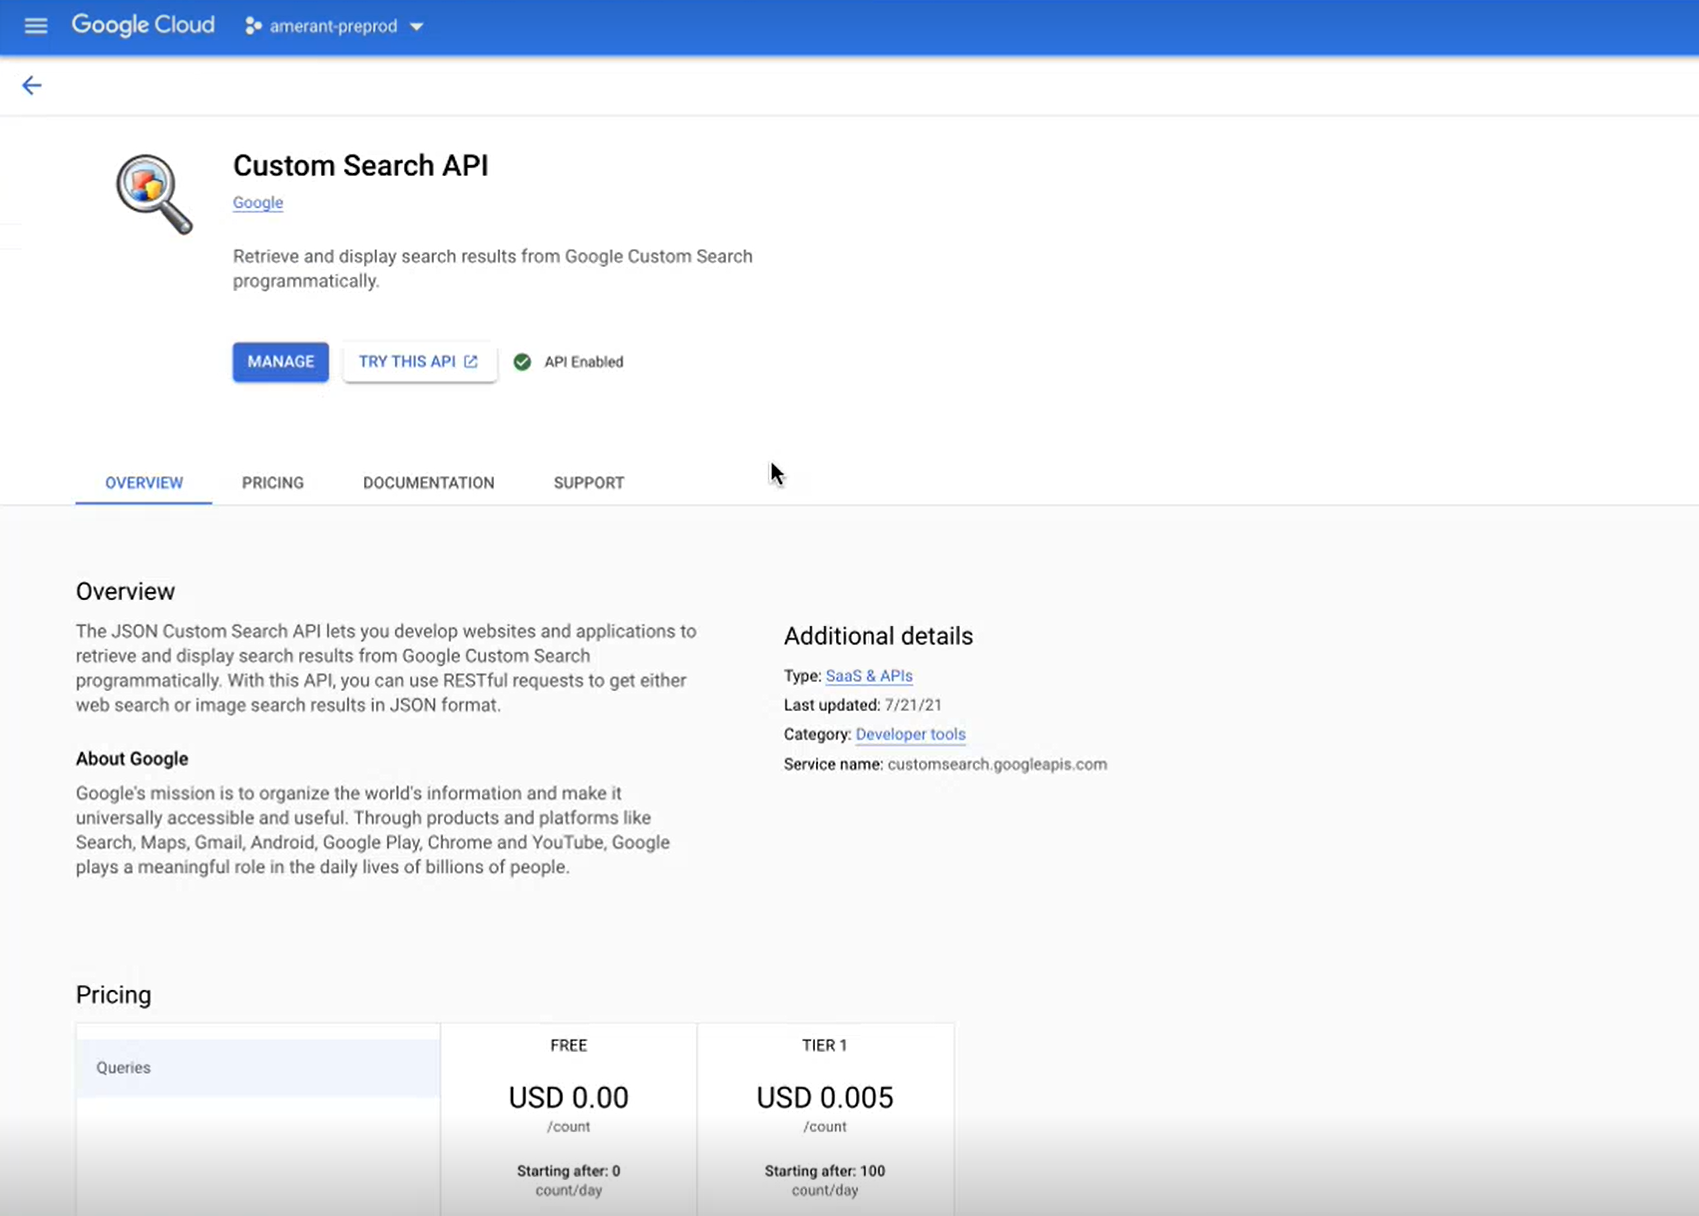
Navigate to the environment where you will use the API, for example, companyname-preprod.
Click Create Credentials.
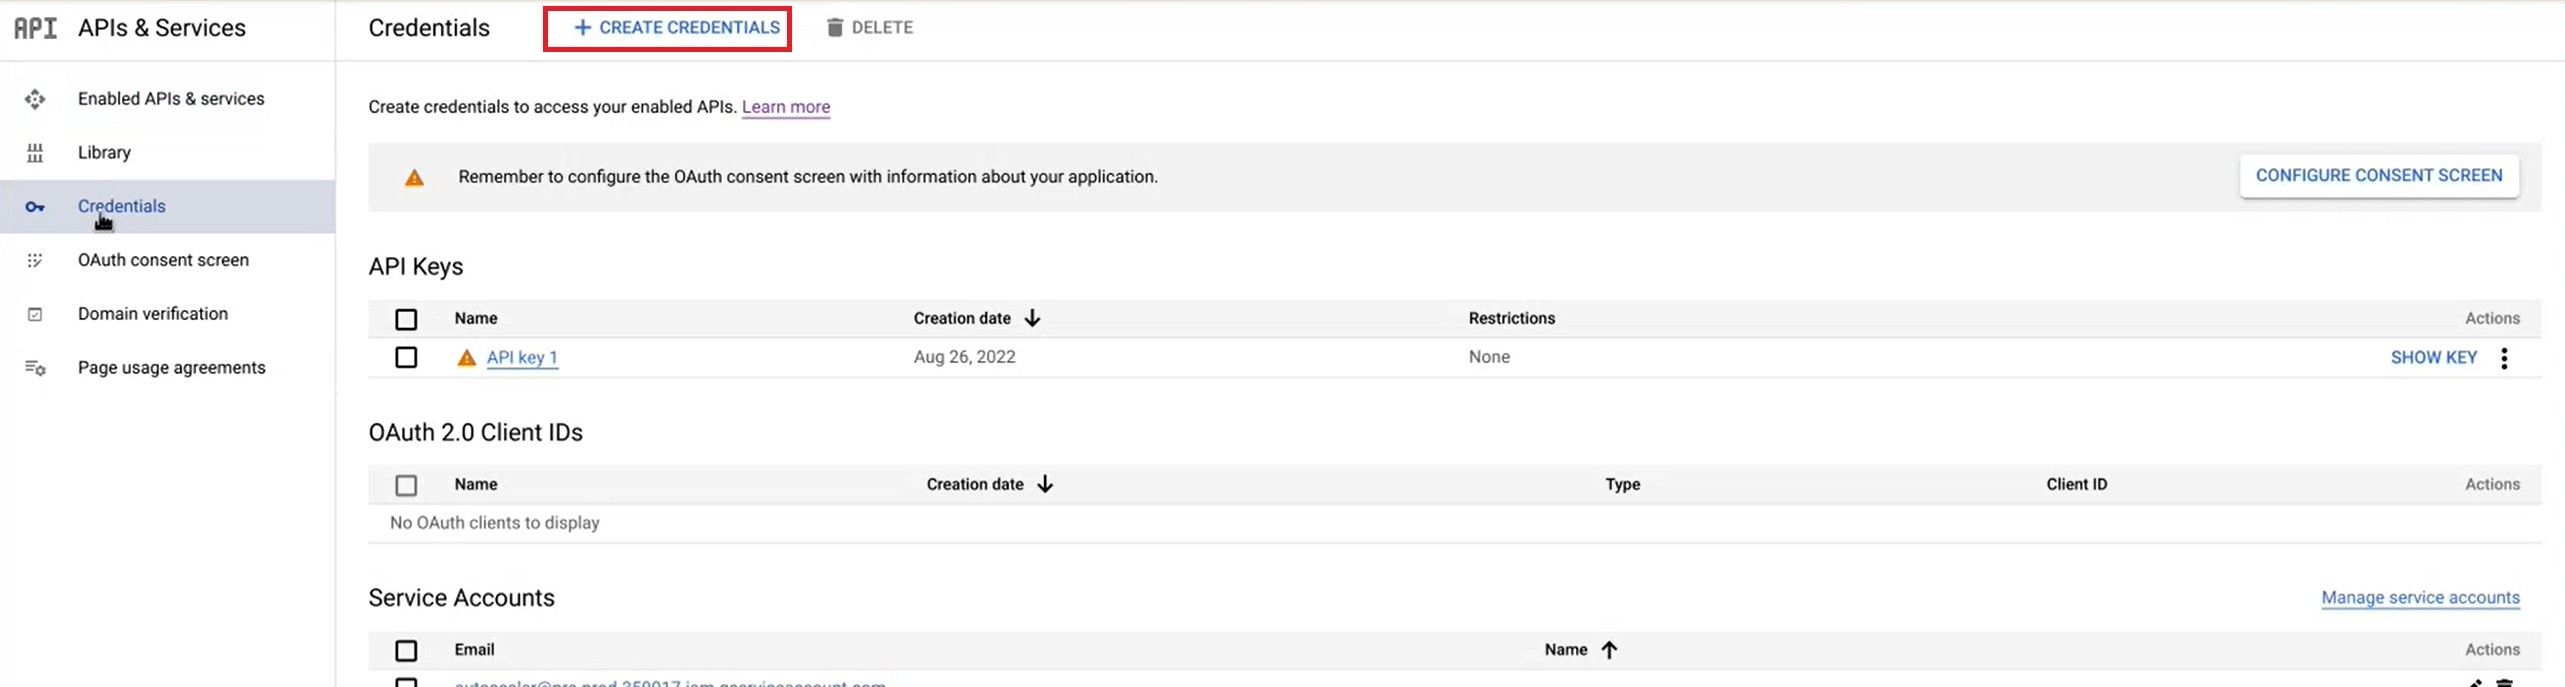
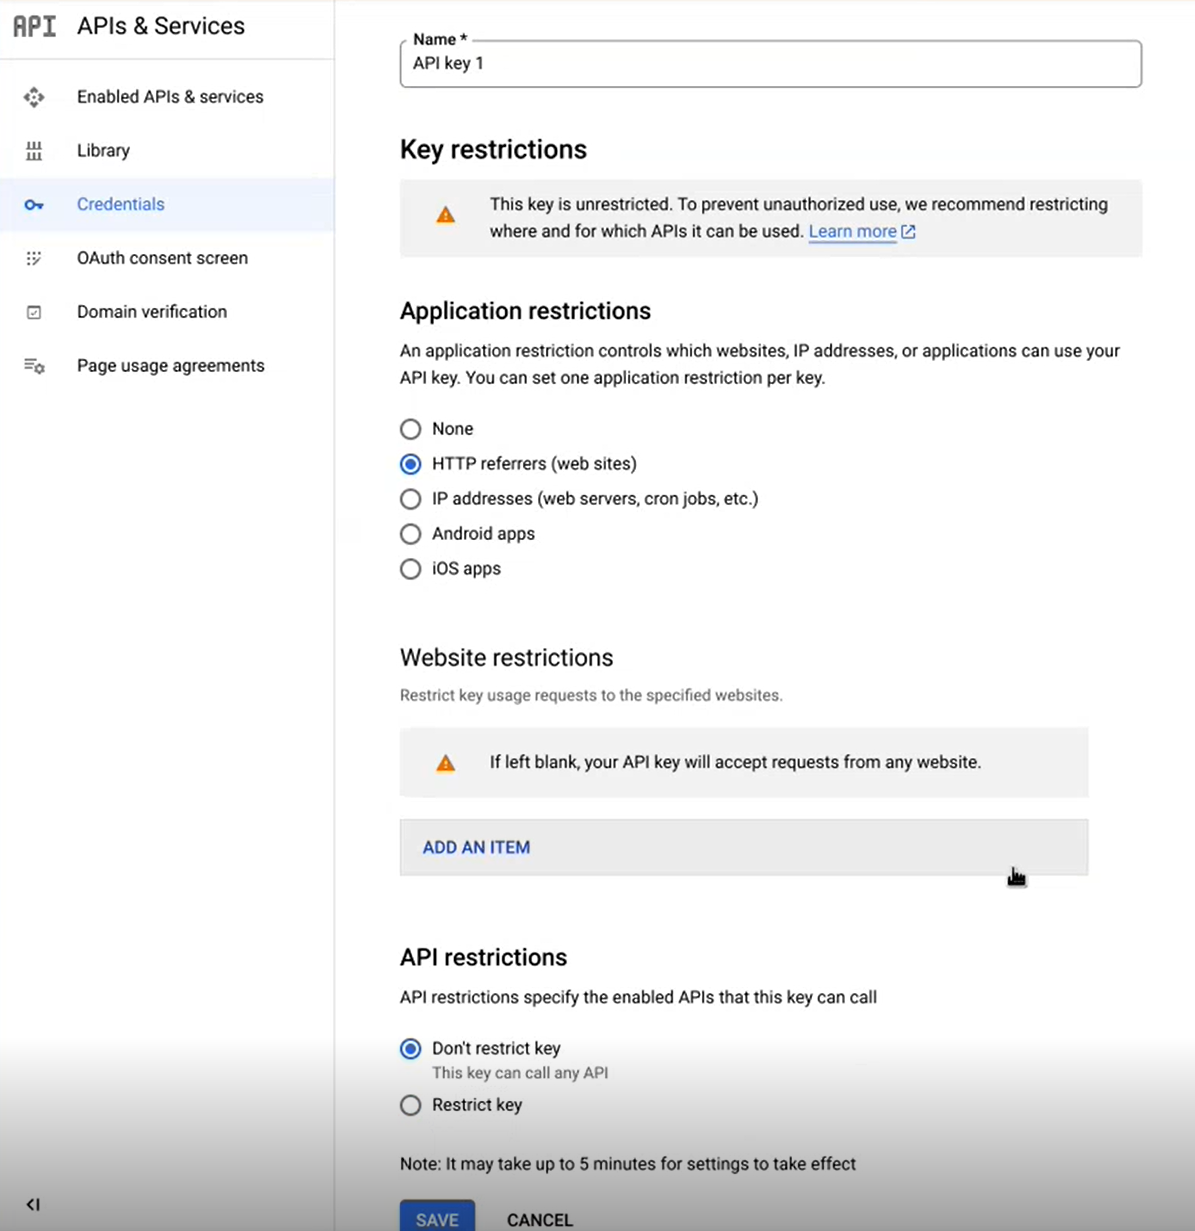
In the Name field, specify a name for the API Key.
In the Application restrictions group, select HTTP referrers and click Save.
Navigate to OAuth consent screen. In the User Type group, select Internal and click Create.
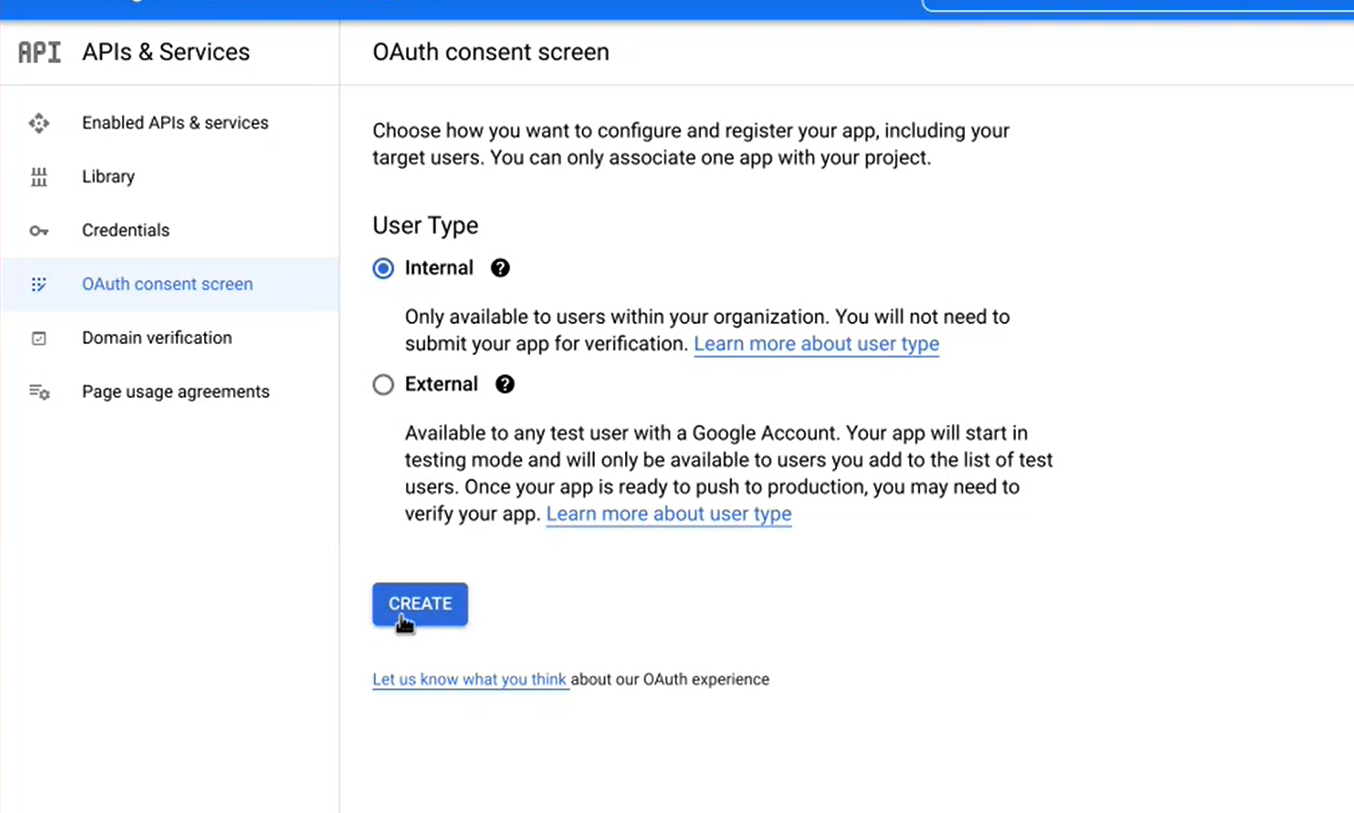
Navigate to Enabled APIs & services to view the key and copy the credentials.
Add the key value in the Key field when setting a Secrets Vault entry as described in Manage secret entries in Secrets Vault. The Value field is static.
If you use Serper.dev as an alternate Google search backend, provide the credentials as described under the expand below.
Provide credentials for Serper.dev
The Serper.dev used for AMM is the Custom Search JSON API. Credentials should be provisioned from WorkFusion’s Developer account owned by the Cloud Ops team.
Serper.dev requires each environment to be provisioned separately. This means that unique credentials must be used in each customer environment (such as pre-production and production).
If you are not using Google Cloud, notify the WorkFusion Engineering and Product teams so that they can perform an audit to ensure there are no gaps for enablement.
To generate new credentials, follow the steps below:
Log in to https://serper.dev/.
Navigate to the API Keys page on the left tab.
Click the copy icon to copy the API Key.

Create a secret entry to store the credentials: specify the value from Step 3 in the Value field. The Key field is static. For detailed instructions, see Manage secret entries in Secrets Vault guide.
If you use SearchApi.io as an alternate Google search backend, provide the credentials as described under the expand below.
Provide credentials for SearchApi.io
The SearchApi.io used for AMM is the Custom Search JSON API. Credentials should be provisioned from WorkFusion’s Developer account owned by the Cloud Ops team.
SearchApi.io requires each environment to be provisioned separately. This means that unique credentials must be used in each customer environment (pre-production and production).
If you are not using Google Cloud, notify the WorkFusion Engineering and Product teams so that they can perform an audit to ensure there are no gaps for enablement.
To generate new credentials, follow the steps below:
Log in to https://www.searchapi.io/.
Navigate to the Dashboard page on the left tab.
Click the Copy button to copy the API Key.
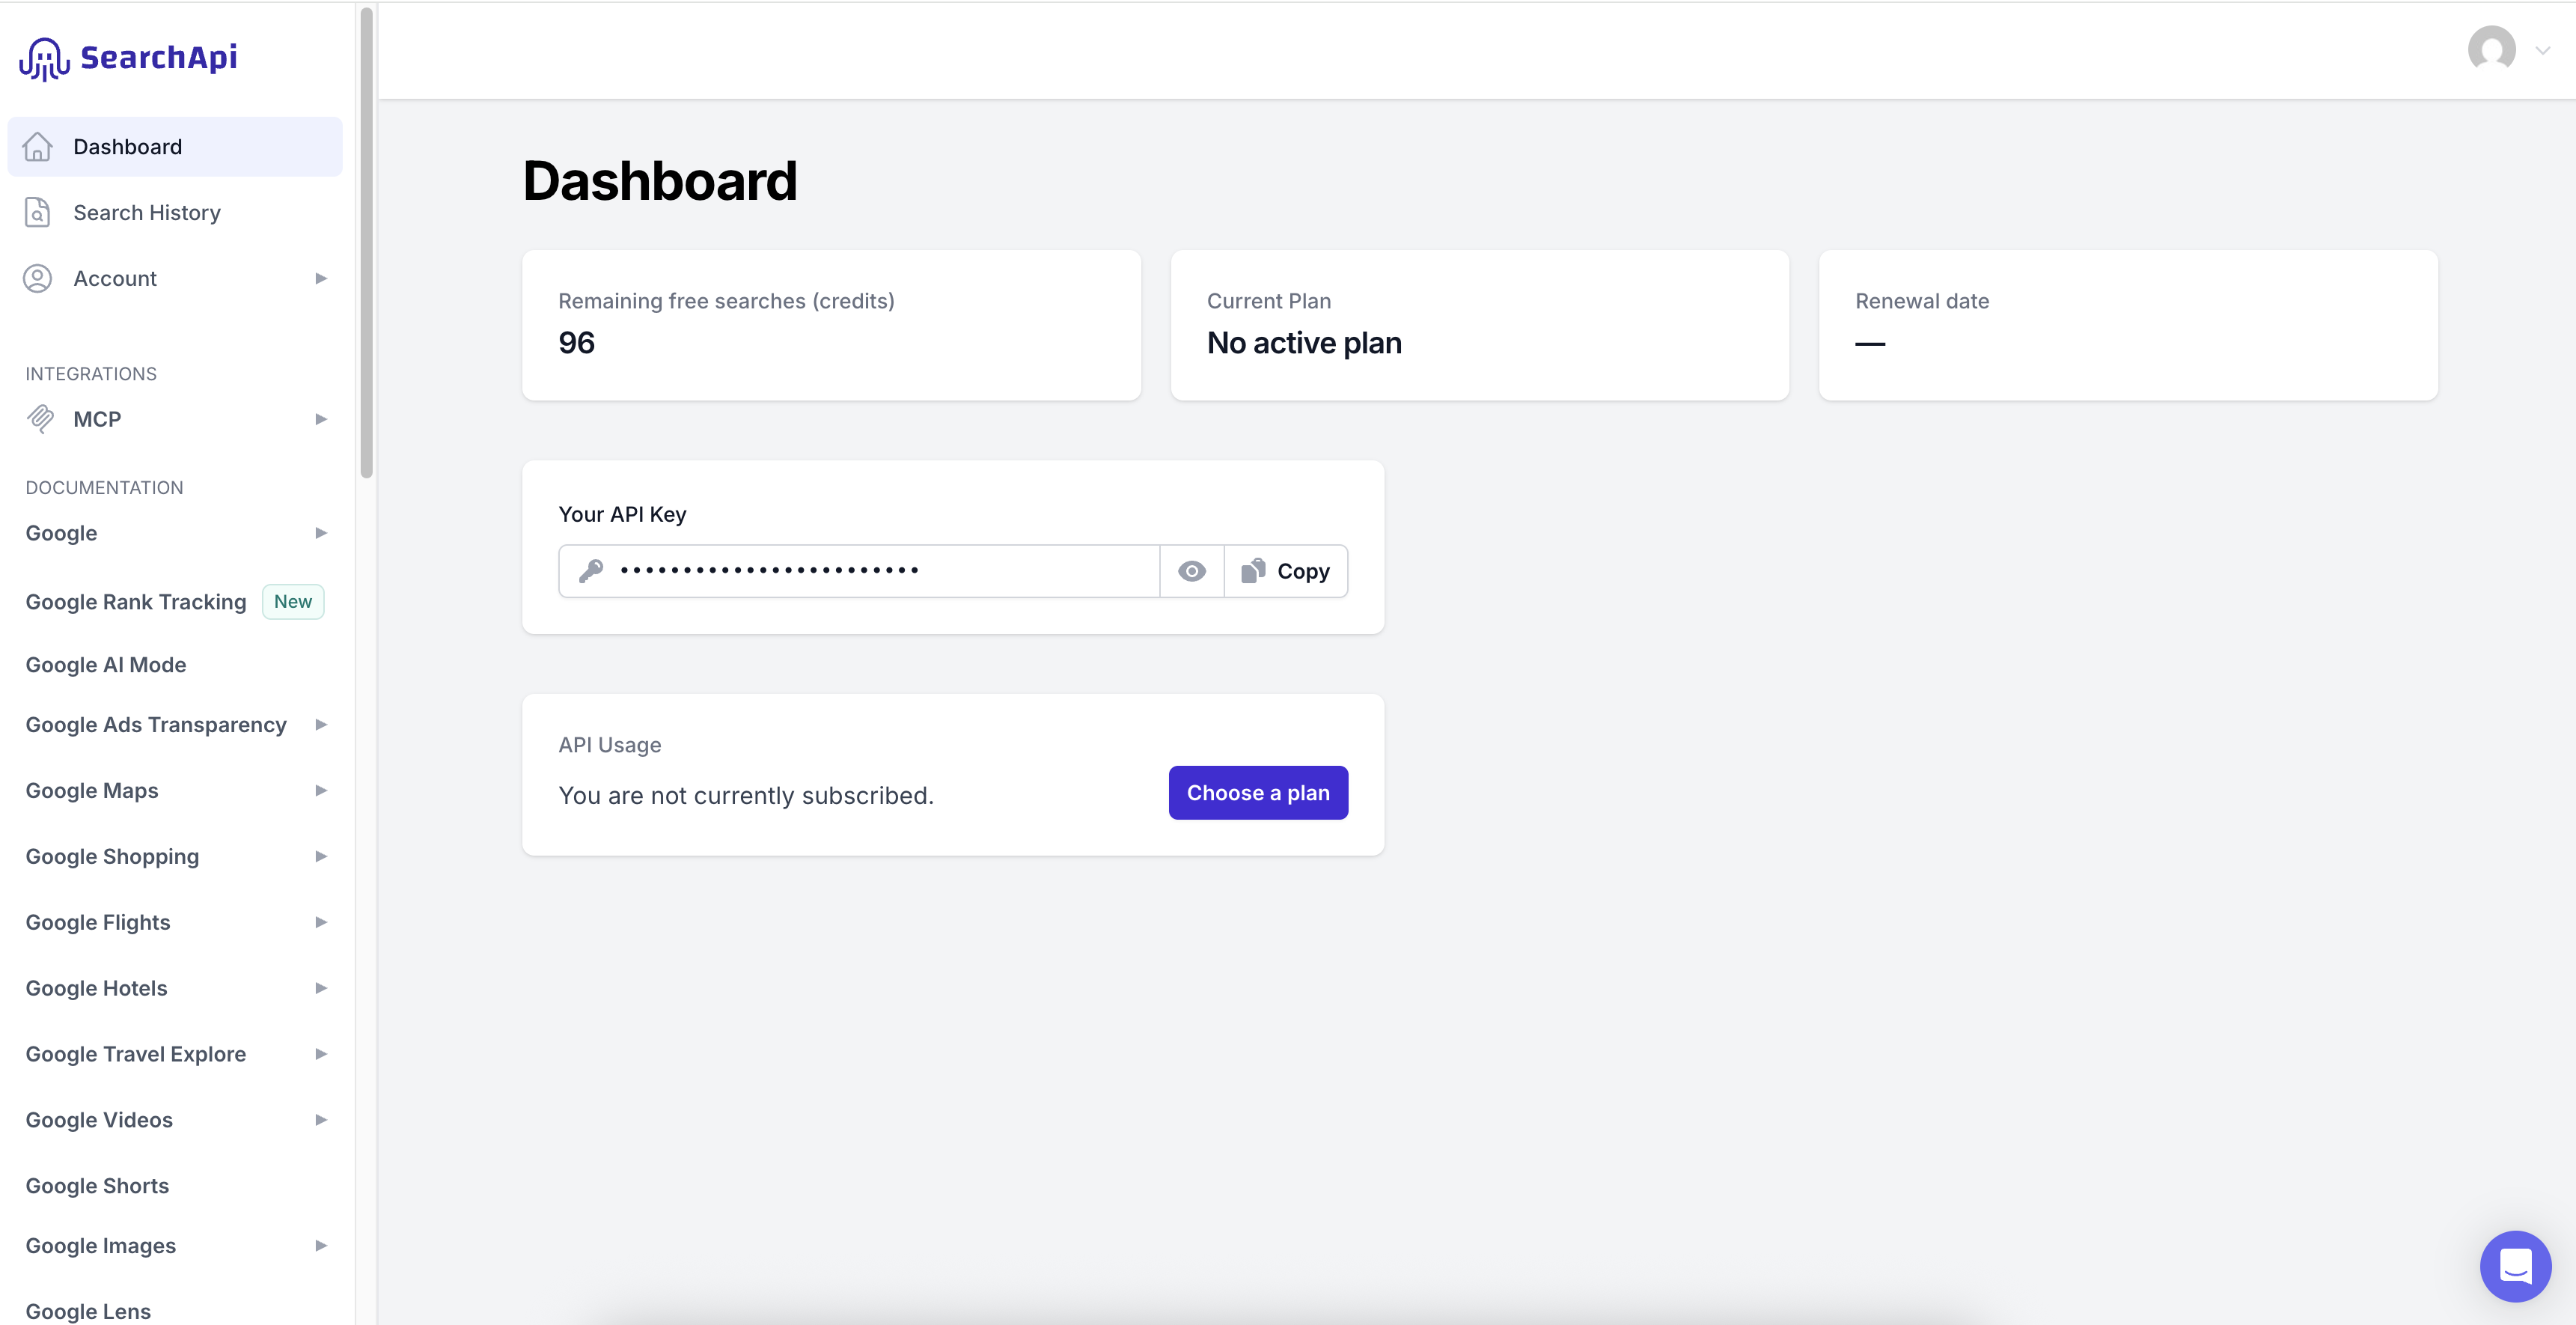
Create a secret entry to store the credentials: specify the value from Step 3 in the Value field. The Key field is static. For detailed instructions, see Manage secret entries in Secrets Vault guide.
SMTP credentials
Evan emails analysts when results are ready and the final report is available. To enable email notifications, configure SMTP credentials. Provide your own SMTP to ensure the respective security protocols are followed.
The sub-sections below describe how to configure the credentials and enable email notifications.
Update configuration in Data Store
To update the configuration in the Data Store, do the following:
- Log in to Control Tower.
- On the main menu, navigate to Advanced and select Data Stores.
- Select amm_configuration and specify the following:
| Name | Value | Example | Notes |
|---|---|---|---|
smtp.protocol | SMTP_OVER_TLS/SMTP_OVER_SSL/SMTP | SMTP_OVER_TLS | To be confirmed with WorkFusion. |
smtp.host | smtp.office365.com | Set your host. | |
smtp.port | 123 | ||
smtp.replyTo | replyTo@domain.com | Set the email address to be shown as the sender. | |
smtp.authEnabled | true/false | true | Set to true if the SMTP server requires authentication. Otherwise, set to false. |
smtp.credentialsAlias | amm_smtp_credentials | Configure only if smtp.authEnabled is set to true. Specify the alias for the Secrets Vault entry that contains the access credentials to the SMTP server. | |
smtp.from | report@workfusion.com | Enter the email address to be shown as the sender. |
Set entry for SMTP credentials in Secrets Vault
The step is needed only if smtp.authEnabled is set to true.
The key is the email address, and the value is the password. For detailed instructions, see Manage secret entries in Secrets Vault.
Use a descriptive name, such as amm_smtp_credentials.
Proxy settings
To configure a proxy, do the following:
Log in to Control Tower.
On the main menu, navigate to Advanced and select Data Stores.
Select amm_configuration and specify the following:
Name Example Notes proxy.hostproxy.customerdomain.comUse your proxy host. proxy.port9473 Use your proxy port. proxy.credentialsAliasamm_proxy_credentialsSpecify the alias for the Secrets Vault entry containing the proxy credentials. Configure only if the proxy requires authentication. If the proxy requires authentication, add the proxy credentials to Secrets Vault.
The key is the username address, and the value is the password. For detailed instructions, see the Manage secret entries in Secrets Vault guide.
Input
To set up the input for the installed AI Agent, do the following:
Indicate whether you want Evan to generate Entity ID automatically if the latter is not provided in the input data.
When you select Yes, Evan looks for an Entity ID in the input data and, if it finds none, generates it automatically based on such details as search request, date of birth, or location. Read also about Automatic Entity ID generation and decision reapplication.
When you select No, you will need to specify the Entity ID manually if it is not contained in the input data.

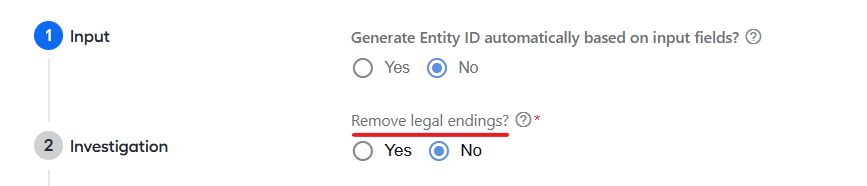
Select whether you want Evan to remove legal endings from entity names to broaden the search results:
Select Yes if you want Evan to remove legal endings from entity names before searching for articles.
When you select No, Evan will not remove legal endings from entity names. Simultaneously, the Search both with and without legal endings? option becomes available in the Google API provider settings. You can use it to tailor the search results for the provider.
Select a news provider for searching news about the entity or individual. You can configure the AI Agent to return search results from up to four providers at a time.
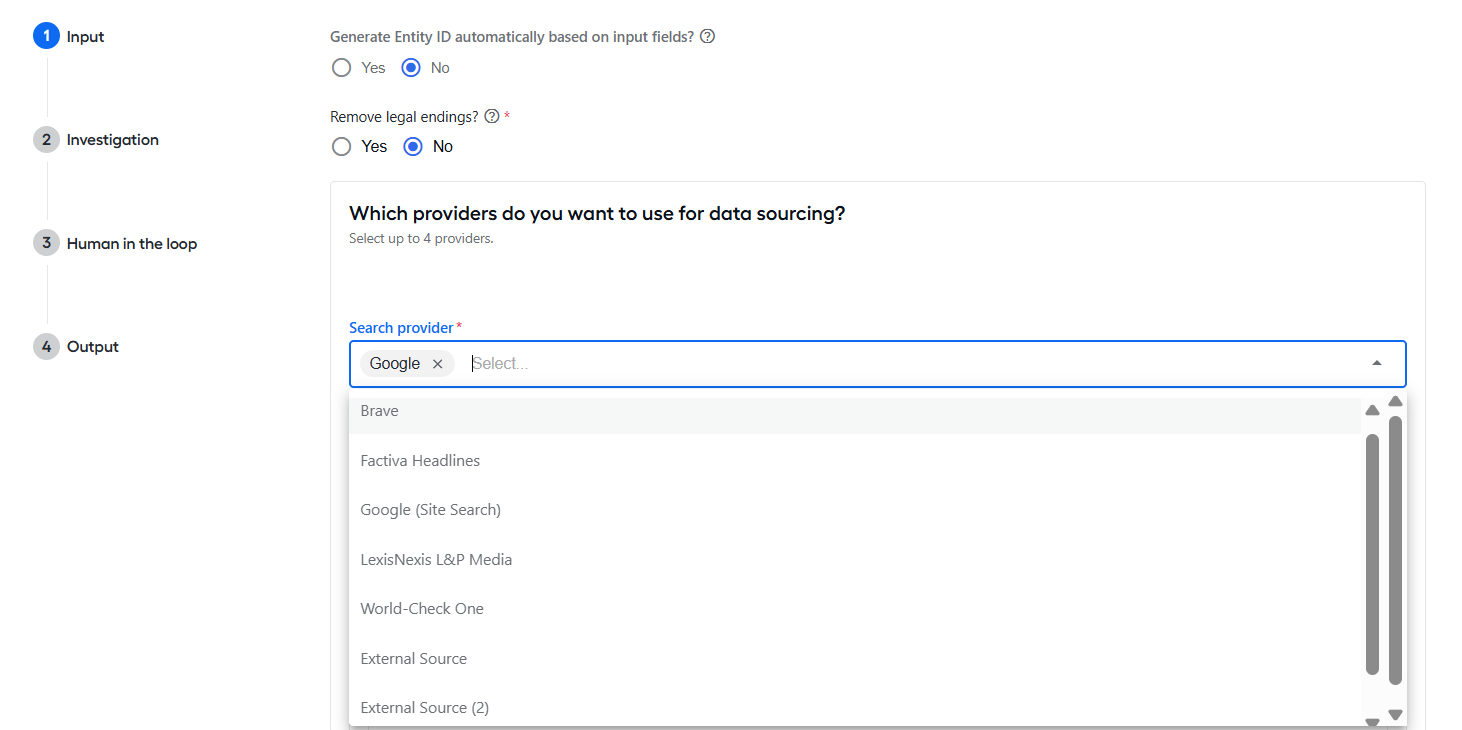
The following providers are supported out of the box:
- Google API
- Google (Site Search)
- Dow Jones Factiva Headlines
- LexisNexis L&P Media v1
- World-Check One
- External Source
- Brave
The settings for each selected provider appear as a separate collapsible section below the Search provider field.
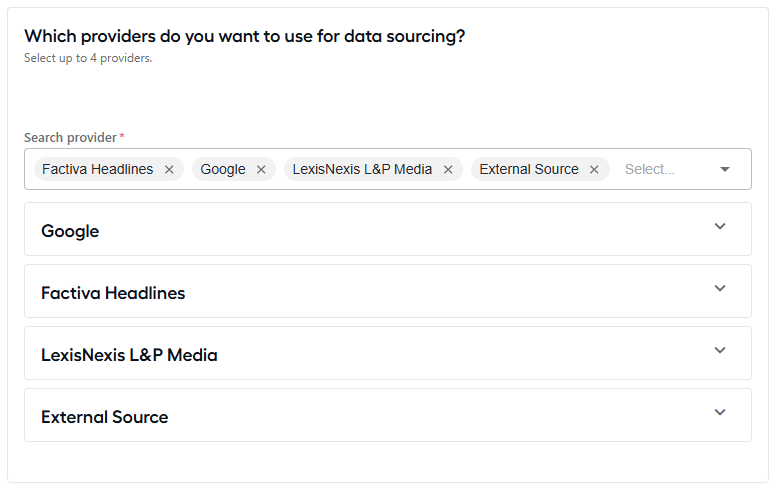
Review each section carefully to ensure all required parameters are configured correctly. Available parameters vary by provider. For detailed instructions, read the sections below.
Google API
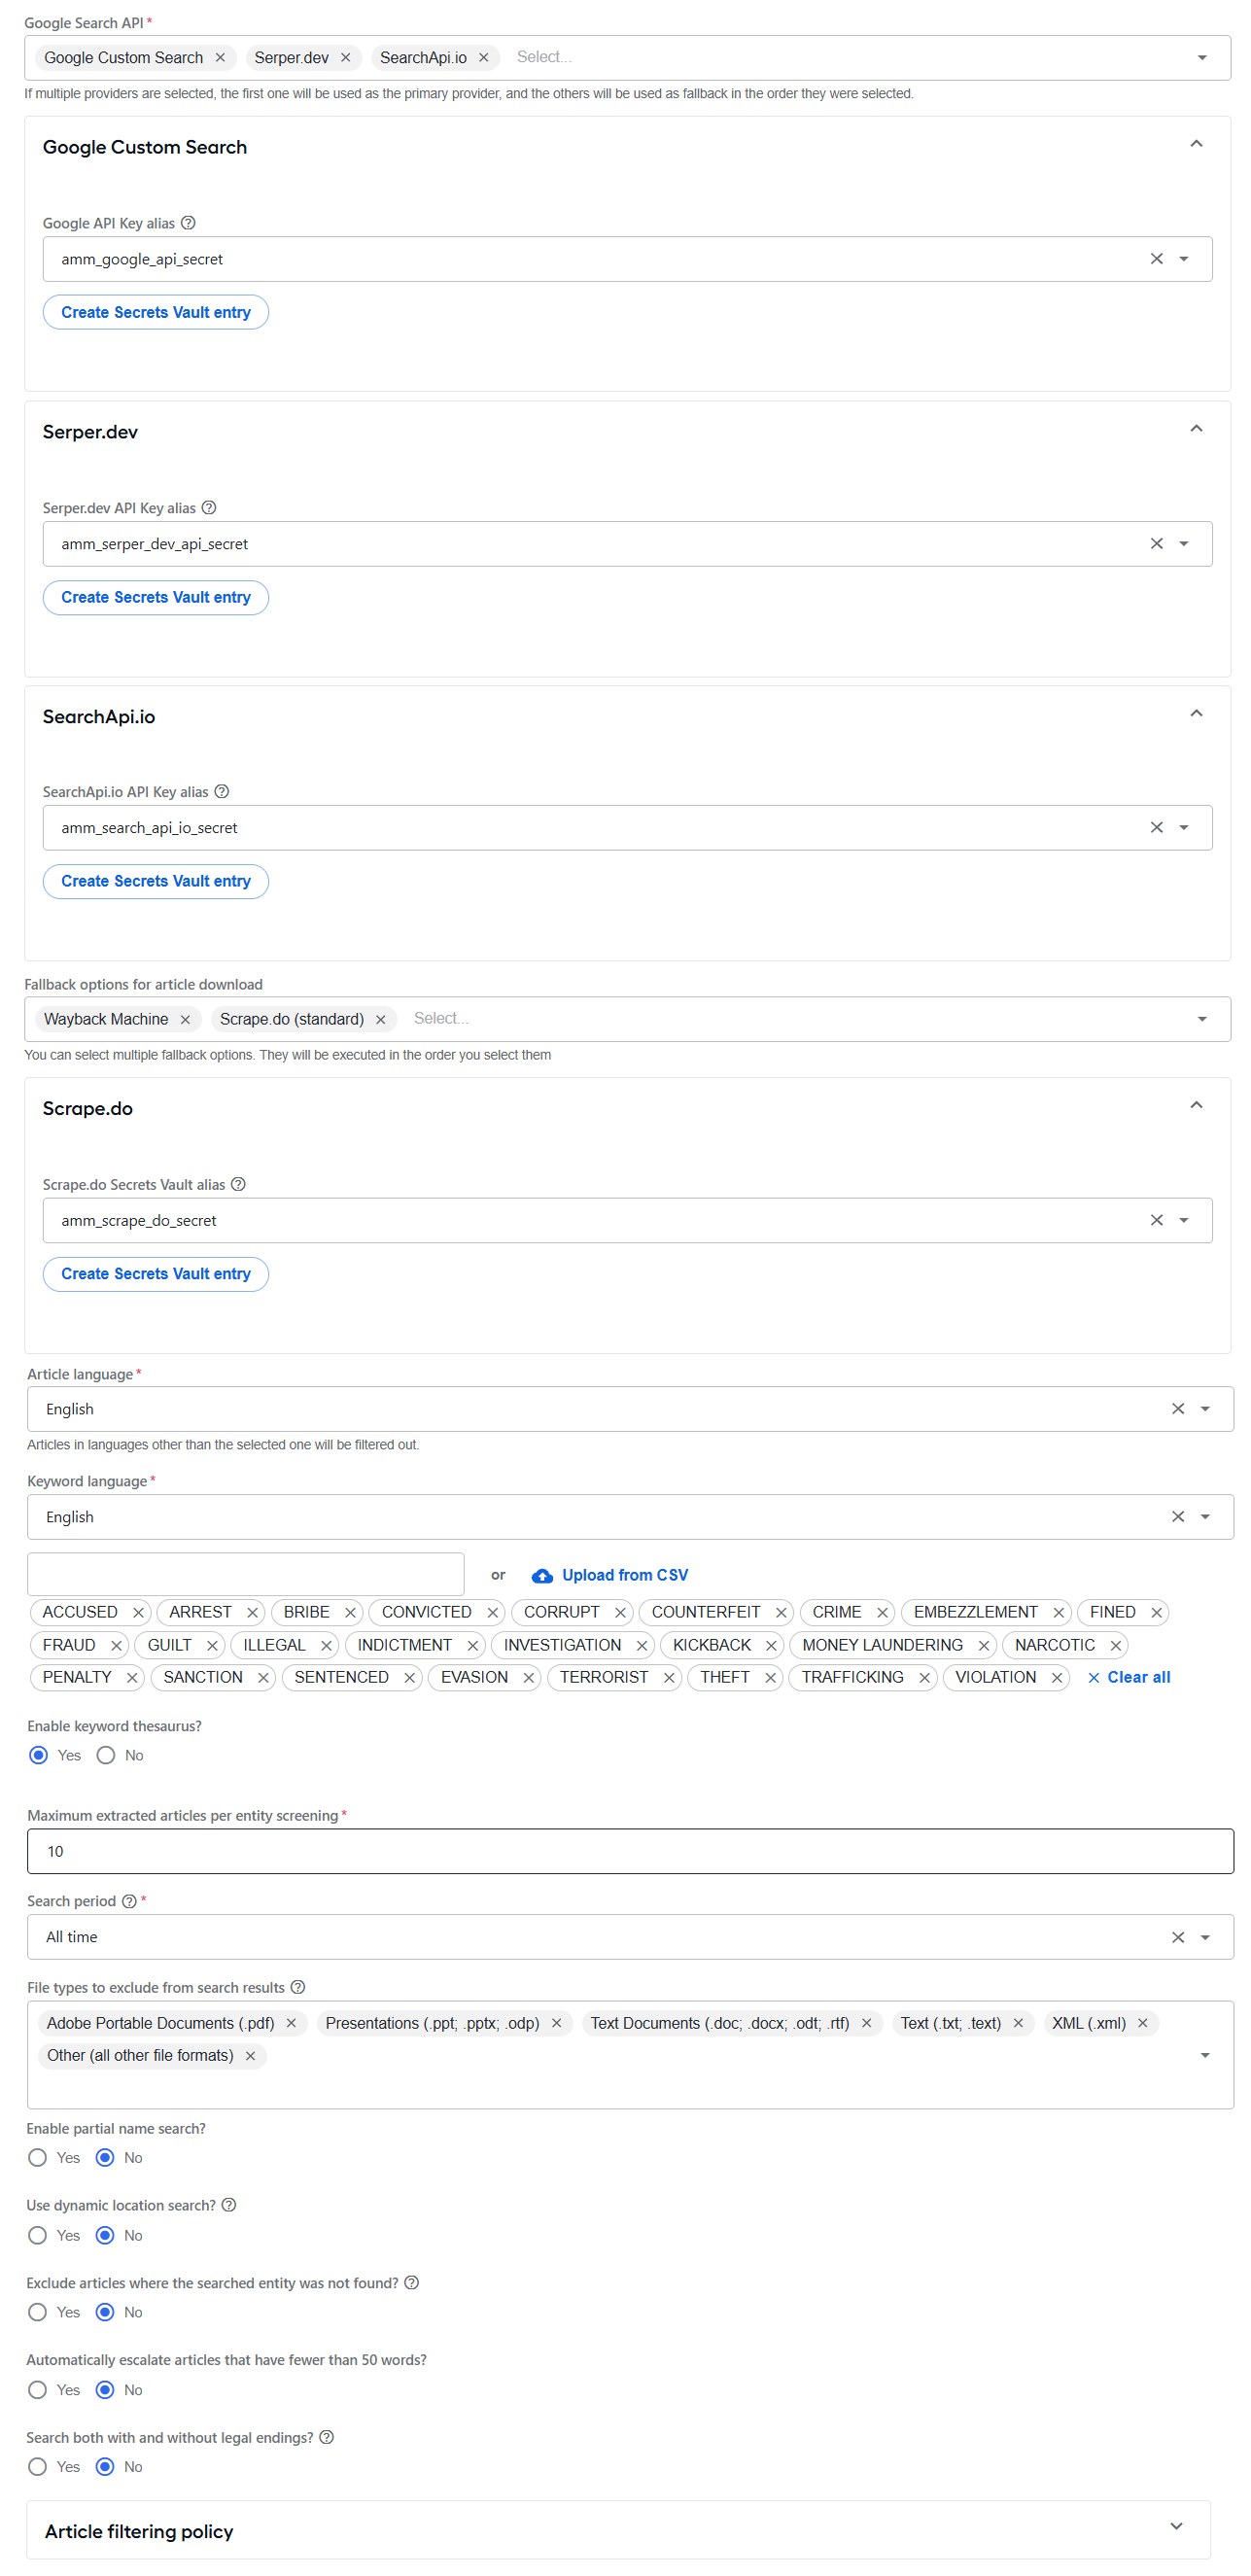
Google Search API: select one or more search API providers to use for Google-based searches. Available options are as follows:
- Google Custom Search (default) uses Google's Custom Search JSON API.
- Serper.dev uses the Serper.dev search API as an alternative or fallback.
- SearchApi.io uses the SearchApi.io search API as an alternative or fallback.
If multiple providers are selected, the first selected provider is used as the primary search source. The remaining providers are used as fallbacks in the order they are selected.
Choose an existing alias or click Create Secrets Vault entry to set up one.
Google Custom Search API Key alias. The field is shown when Google Custom Search is selected. Specify the corresponding Secrets Vault alias for the Google Custom Search API credentials.
Serper.dev API Key alias. The field is shown when Serper.dev is selected. Specify the corresponding Secrets Vault alias for the Serper.dev API key.
SearchApi.io API Key alias. The field is shown when SearchApi.io is selected. Specify the corresponding Secrets Vault alias for the SearchApi.io API key.
Google API Key alias. Specify the corresponding Secrets Vault alias for the Google API system.
Fallback options for article download. Select one or more fallback strategies for downloading articles that could not be retrieved. Options are executed in the order you select them. The Wayback Machine option is selected by default.
Scrape.do (standard) uses Scrape.do with proxy rotation and antibot bypass.
Scrape.do (browser rendering) uses Scrape.do with headless browser rendering for JavaScript-heavy pages.
Wayback Machine retrieves the article from the
web.archive.orgInternet archive.Browser Use utilizes the Browser Use AI agent to download articles.
Scrape.do Secrets Vault alias. The field is shown when any Scrape.do option is selected. Choose a Secrets Vault alias storing the Scrape.do credentials. To create such an entry, click Create Secrets Vault entry.
Browser Use API Key Alias. The field is shown when Browser Use is selected. Choose a Secrets Vault alias storing the Scrape.do credentials. To create such an entry, click Create Secrets Vault entry.
Article language: select the language in which Evan is to search for articles. The Any language setting is applied by default.
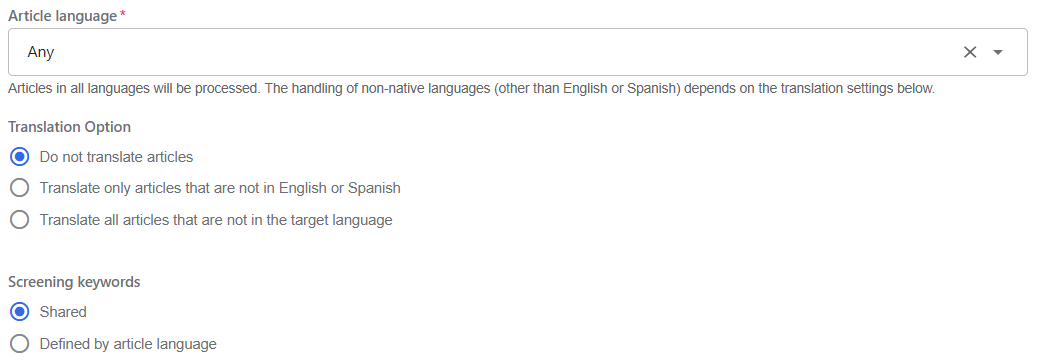
For the default Any option, you can specify the following additional settings:
Translation Option: configure the translation settings as described in the section.
Screening keywords options:
- Shared: the same set of keywords is to be used in articles across all languages.
- Defined by keyword language: depending on the Keyword language setting, each language will have a specific set of keywords.
Keyword language: select the language of the keywords for the search.
Screening keywords: specify keywords for the search or upload a CSV file containing keywords. You can add a maximum of 28 words.
The following keywords are added by default based on the article languages you select:
English:
ACCUSE, ARREST, BRIBE, CONVICT, CORRUPT, COUNTERFEIT, CRIME, EMBEZZLEMENT, FRAUD, GUILT, ILLEGAL, INDICTMENT, INVESTIGATION, KICKBACK, MONEY LAUNDERING, NARCOTIC, PENALTY, SANCTION, SENTENCED, EVASION, TERRORIST, THEFT, TRAFFICKING, VIOLATIONSpanish:
ACUSAR, ARRESTAR, SOBORNO, CORRUPTO, FALSIFICACIÓN, CRIMEN, MALVERSACIÓN, FRAUDE, CULPA, ILEGAL, ACUSACIÓN, INVESTIGACIÓN, CONTRAGOLPE, LAVADO DE DINERO, NARCÓTICO, MULTA, SANCIÓN, SENTENCIADO, EVASIÓN, TERRORISTA, ROBO, TRÁFICO, VIOLACIÓN
Enable keyword thesaurus?: activate to look not only for exact keywords but also for their synonyms. By default, the feature is on. Disable it if your organization requires only exact matches on all keywords.
Maximum extracted articles per entity screening: specify the maximum number of articles to fetch in the range from 1 to 30. By default, up to 20 articles are retrieved.
Search period: select a time frame to specifically search for information published within it.
File types to exclude from results: select the file types that you want to exclude from Google results.
- HTML is included by default.
- Non-HTML file types do not have the same metadata and tagging. Excluding them reduces the number of articles to review and false hits by 50% without increasing the risk of missing a true hit.
Enable partial name search?: select to dynamically substitute names if no results were found for their full variants.
Use dynamic location search?: select to dynamically broaden the search location for an entity if no results are found for the initial location setting.
Exclude articles where the searched entity was not found?: if enabled, articles where Evan failed to detect the entity’s name in the text are excluded.
Automatically escalate articles that have fewer than 50 words?: if the setting is enabled, Evan automatically escalates small articles for manual review by default. A small article is one with fewer than 50 words.
Search both with and without legal endings?: if enabled, the option expands the search to include the results both with and without legal endings (for instance, Apex Ltd. and Apex). This only applies to companies that have a legal ending.
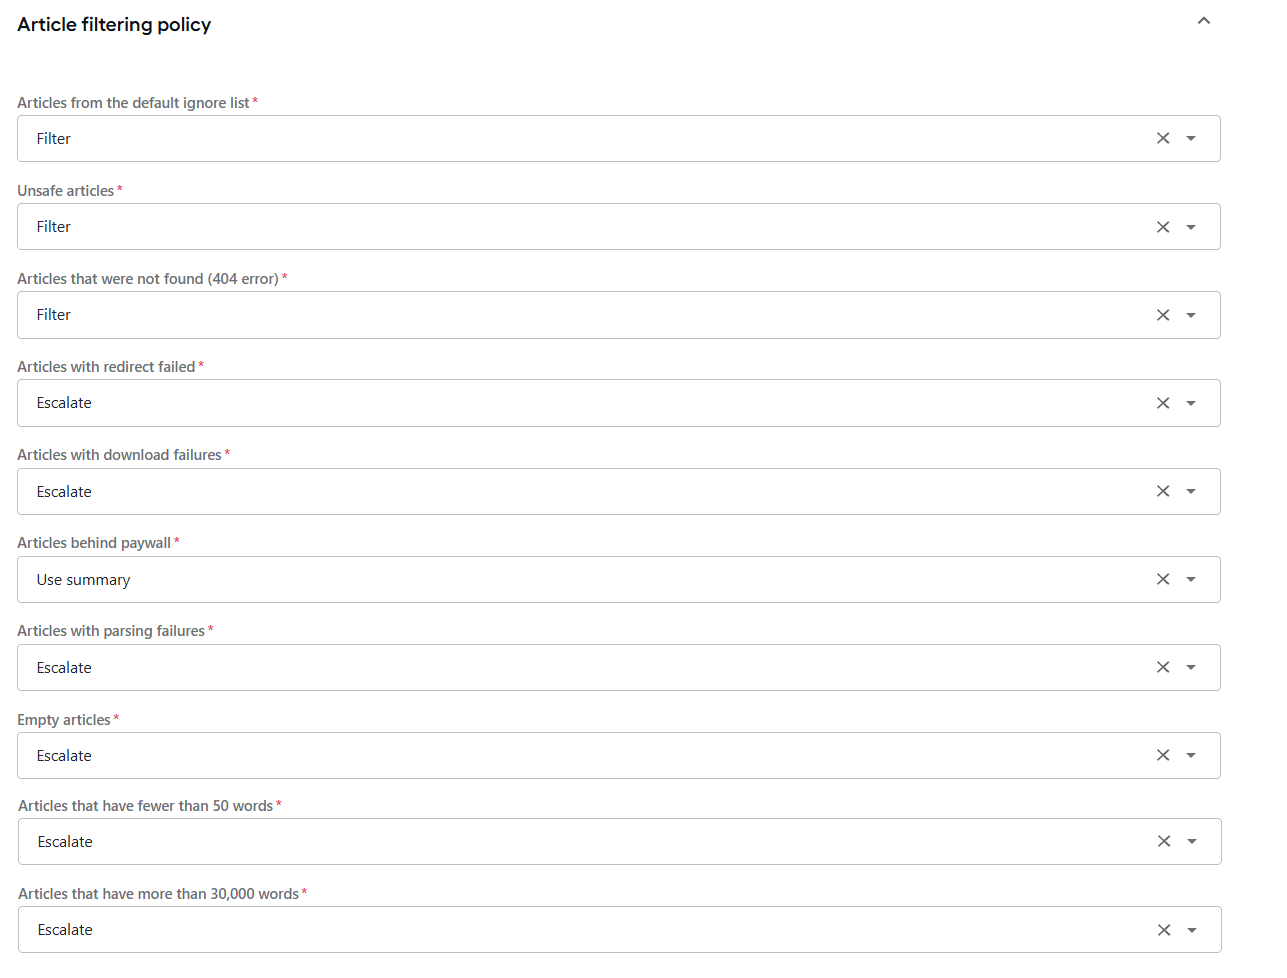
Article filtering policy: in the section, you can fine-tune how Evan should filter out articles from the AMM output when it is configured to source data from Google API.
For the Google API provider, you can filter out the following article categories from the AMM output:
- Articles from the default ignore list.
- Unsafe articles.
- Articles that were not found (404 error).
- Articles with redirect failed.
- Articles with download failures.
- Articles behind paywall.
- Articles with parsing failures.
- Empty articles.
- Articles that have fewer than 50 words. The option is visible only when you set the Automatically escalate articles that have fewer than 50 words? option to Yes.
- Articles that have more than 30,000 words.
To set a filtering policy for each of the categories, select one of the options in respective drop-down menus:
Filter: Evan excludes the articles belonging to the specific category from the processing scope.
Use summary: In case there's an error associated with an article belonging to the specific category, Evan checks whether an article summary, a meta description, or a snippet exists in the ingested metadata payload and makes one of the following decisions:
If a summary exists, the missing or broken article body content is overwritten with the retrieved summary text.
If no summary or fallback text can be found in the metadata, the article is processed as if the Escalate option were chosen.
Escalate: Evan routes articles in the specific category to the triage queue.
Google (Site Search)
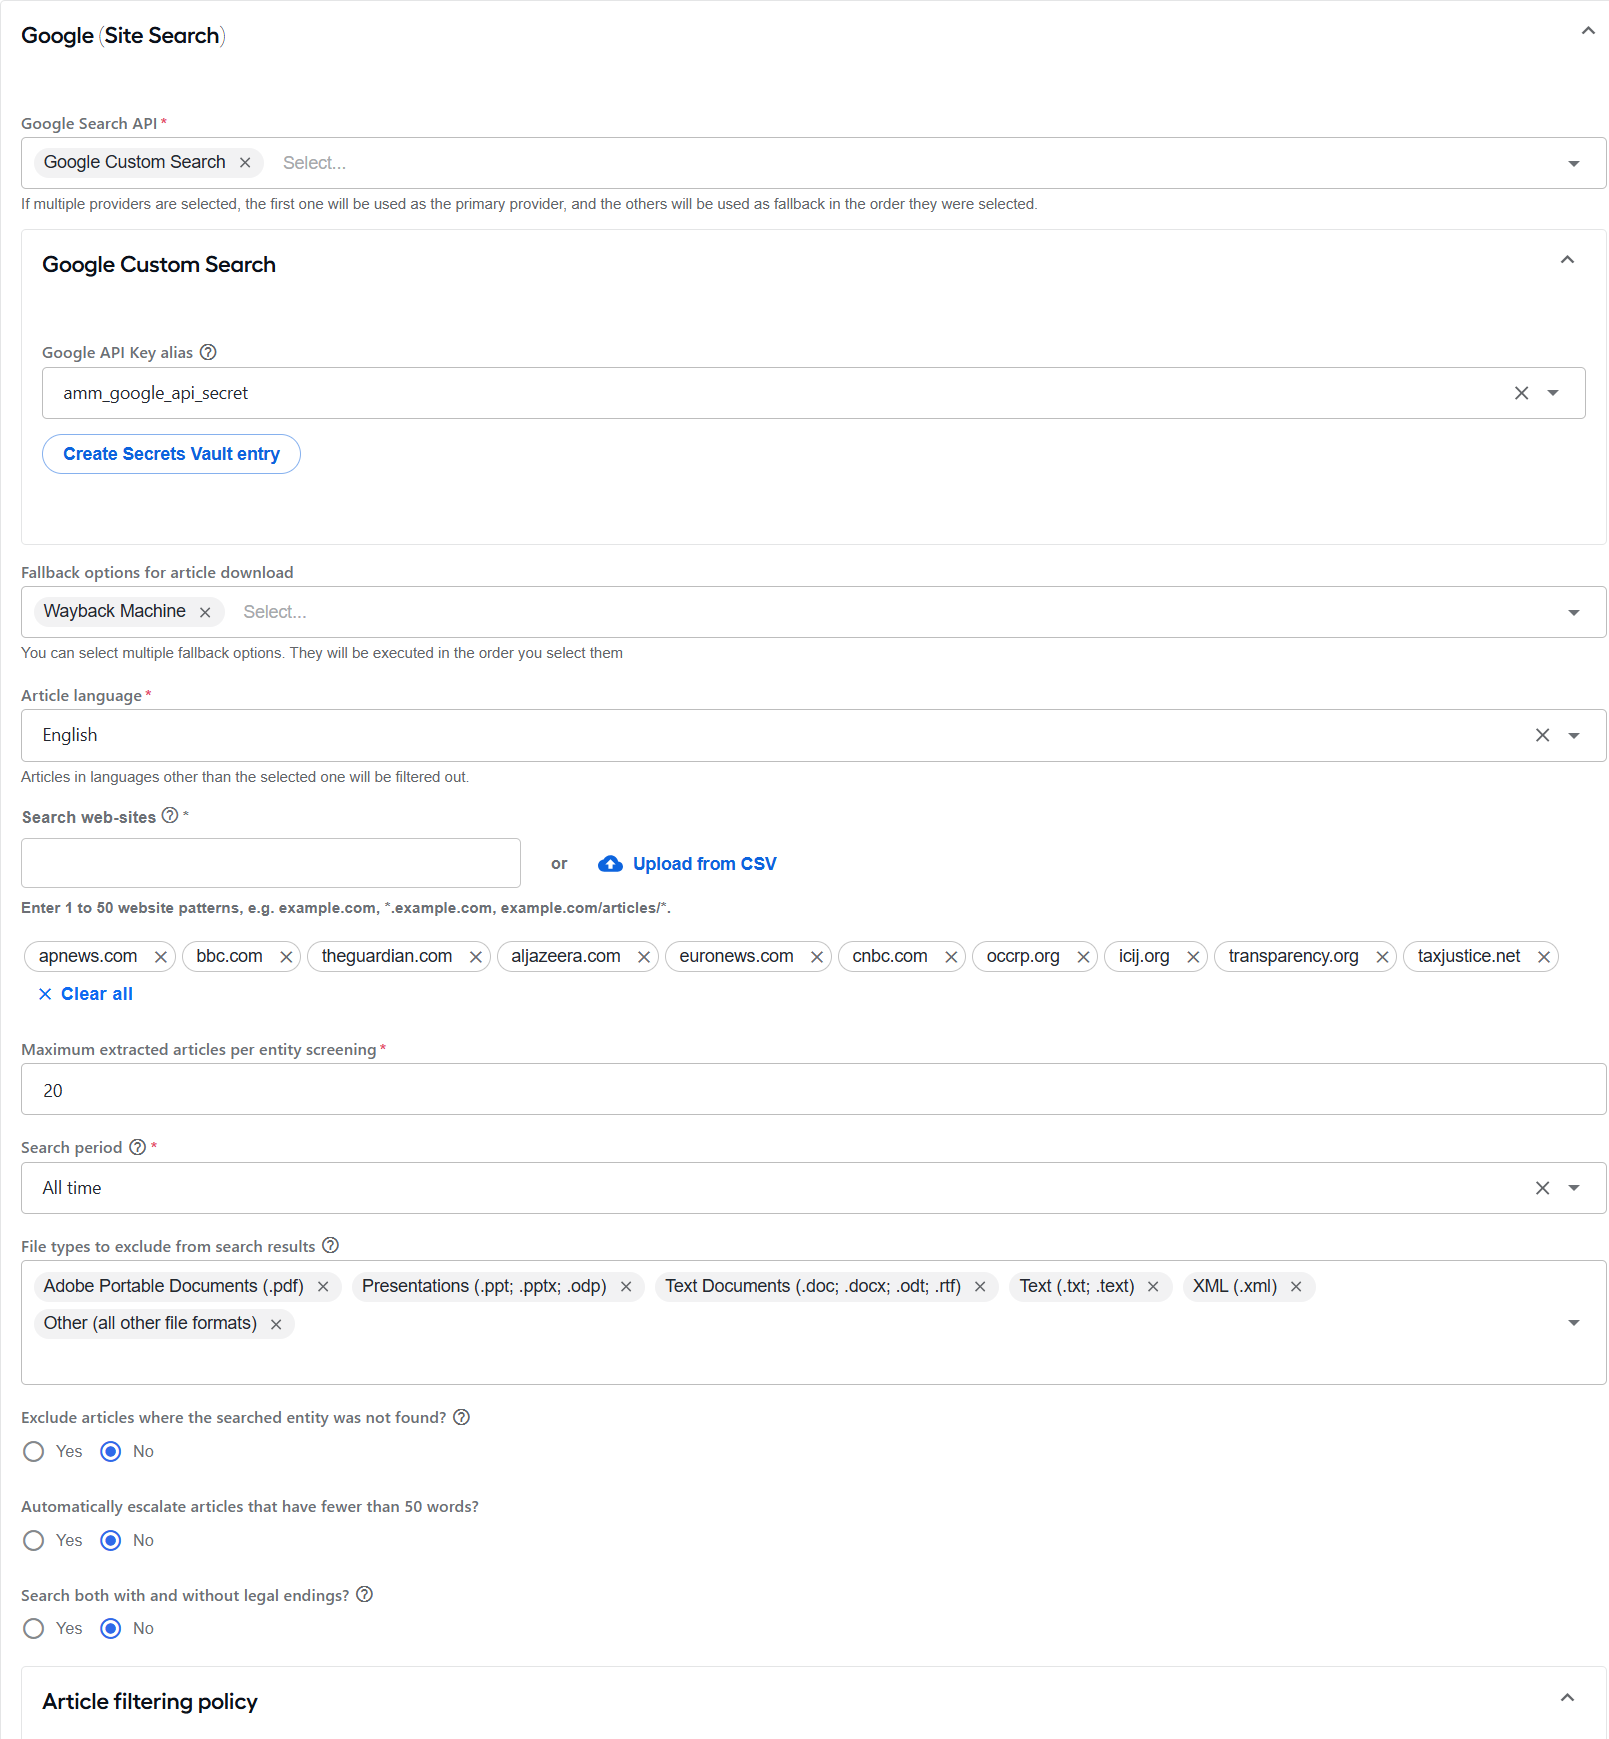
The Google (Site Search) provider is based on the Google API provider and shares most of its settings, but instead of an open web search, it restricts Google's search to a list of websites defined in the Search web-sites field.
To configure the provider, define the following settings:
Google Search API: select one or more search API providers to use for Google-based searches. Available options are as follows:
- Google Custom Search (default) uses Google's Custom Search JSON API.
- Serper.dev uses the Serper.dev search API as an alternative or fallback.
- SearchApi.io uses the SearchApi.io search API as an alternative or fallback.
If multiple providers are selected, the first selected provider is used as the primary search source. The remaining providers are used as fallbacks in the order they are selected.
Choose an existing alias or click Create Secrets Vault entry to set up one.
Google Custom Search API Key alias. The field is shown when Google Custom Search is selected. Specify the corresponding Secrets Vault alias for the Google Custom Search API credentials.
Serper.dev API Key alias. The field is shown when Serper.dev is selected. Specify the corresponding Secrets Vault alias for the Serper.dev API key.
SearchApi.io API Key alias. The field is shown when SearchApi.io is selected. Specify the corresponding Secrets Vault alias for the SearchApi.io API key.
Google API Key alias. Specify the corresponding Secrets Vault alias for the Google API system.
Fallback options for article download. Select one or more fallback strategies for downloading articles that could not be retrieved. Options are executed in the order you select them. The Wayback Machine option is selected by default.
Scrape.do (standard) uses Scrape.do with proxy rotation and antibot bypass.
Scrape.do (browser rendering) uses Scrape.do with headless browser rendering for JavaScript-heavy pages.
Wayback Machine retrieves the article from the
web.archive.orgInternet archive.Browser Use utilizes the Browser Use AI agent to download articles.
Scrape.do Secrets Vault alias. The field is shown when any Scrape.do option is selected. Choose a Secrets Vault alias storing the Scrape.do credentials. To create such an entry, click Create Secrets Vault entry.
Browser Use API Key Alias. The field is shown when Browser Use is selected. Choose a Secrets Vault alias storing the Scrape.do credentials. To create such an entry, click Create Secrets Vault entry.
Article language: select the language in which Evan is to search for articles. The Any language setting is applied by default.
For the Any option, you can specify the Translation Option settings as described in the section.
Search web-sites: specify the websites to search (1–50). Supports wildcards as a leading subdomain (
*.wiki.org) or a trailing path (wiki.org/articles/*).The field is pre-populated with a default set of official law-enforcement, prosecution and regulatory sources that publish the names of wanted, charged and convicted persons, such as most-wanted and fugitive listings, arrest and indictment announcements, sentencing notices, and sanctions designations.
Review the following pre-populated values on the configuration screen and edit or replace them with domains relevant to your needs:
Law enforcement and wanted lists:
fbi.gov,ice.gov,secretservice.gov,usmarshals.gov,nationalcrimeagency.gov.uk,cps.gov.uk,rcmp.ca,afp.gov.au.US enforcement and regulators:
treasury.gov,ftc.gov,cftc.gov,uspis.gov,oig.hhs.gov,fincen.gov,bis.gov,state.gov.International bodies:
interpol.int,eppo.europa.eu,un.org,unodc.org,gov.uk,asic.gov.au,mas.gov.sg.
Maximum extracted articles per entity screening: specify the maximum number of articles to fetch in the range from 1 to 30. By default, up to 20 articles are retrieved.
Search period: select a time frame to specifically search for information published within it.
File types to exclude from results: select the file types that you want to exclude from Google results.
- HTML is included by default.
- Non-HTML file types do not have the same metadata and tagging. Excluding them reduces the number of articles to review and false hits by 50% without increasing the risk of missing a true hit.
Exclude articles where the searched entity was not found?: if enabled, articles where Evan failed to detect the entity’s name in the text are excluded.
Automatically escalate articles that have fewer than 50 words?: if the setting is enabled, Evan automatically escalates small articles for manual review by default. A small article is one with fewer than 50 words.
Search both with and without legal endings?: if enabled, the option expands the search to include the results both with and without legal endings (for instance, Apex Ltd. and Apex). This only applies to companies that have a legal ending.
Article filtering policy: in the section, you can fine-tune how Evan should filter out articles from the AMM output when it is configured to source data from Google API.
For the Google API provider, you can filter out the following article categories from the AMM output:
Articles from the default ignore list.
Unsafe articles.
Articles that were not found (404 error).
Articles with redirect failed.
Articles with download failures.
Articles behind paywall.
Articles with parsing failures.
Empty articles.
Articles that have fewer than 50 words. The option is visible only when you set the Automatically escalate articles that have fewer than 50 words? option to Yes.
Articles that have more than 30,000 words.
To set a filtering policy for each of the categories, select one of the options in respective drop-down menus:
Filter: Evan excludes the articles belonging to the specific category from the processing scope.
Use summary: In case there's an error associated with an article belonging to the specific category, Evan checks whether an article summary, a meta description, or a snippet exists in the ingested metadata payload and makes one of the following decisions:
If a summary exists, the missing or broken article body content is overwritten with the retrieved summary text.
If no summary or fallback text can be found in the metadata, the article is processed as if the Escalate option were chosen.
Escalate: Evan routes articles in the specific category to the triage queue.
Factiva
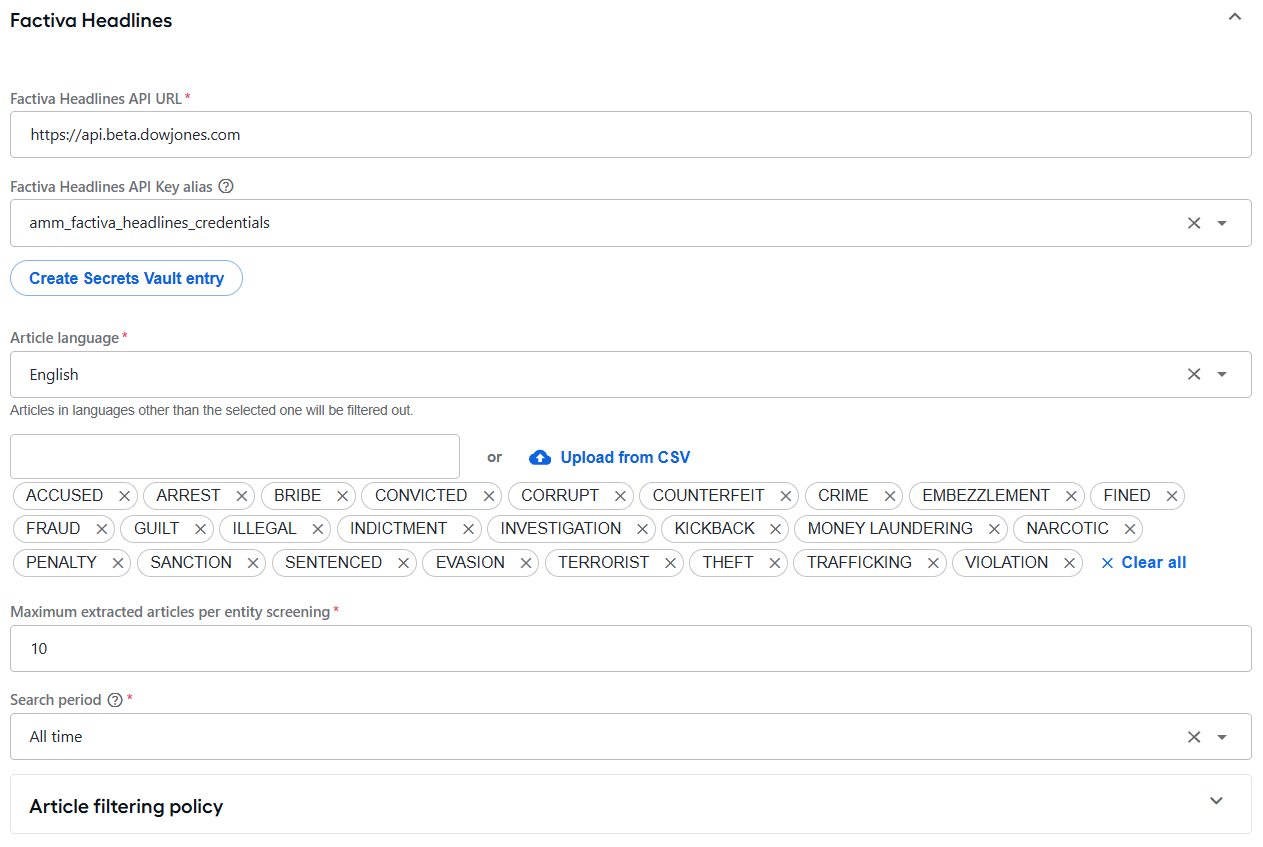
Factiva Headlines API URL: select one of the options below as the Factiva API address.
Factiva Headlines API Key alias: specify the alias for the Secrets Vault entry containing the Factiva credentials. Choose an existing alias or click Create Secrets Vault entry to set up one.
Article language: select the language in which Evan is to search for articles. The English language is the default option.
Screening keywords: specify keywords for the search or upload them as a CSV file. You can add a maximum of 28 words.
The following keywords are added by default based on the article languages you select:
English:
ACCUSE, ARREST, BRIBE, CONVICT, CORRUPT, COUNTERFEIT, CRIME, EMBEZZLEMENT, FRAUD, GUILT, ILLEGAL, INDICTMENT, INVESTIGATION, KICKBACK, MONEY LAUNDERING, NARCOTIC, PENALTY, SANCTION, SENTENCED, EVASION, TERRORIST, THEFT, TRAFFICKING, VIOLATIONSpanish:
ACUSAR, ARRESTAR, SOBORNO, CORRUPTO, FALSIFICACIÓN, CRIMEN, MALVERSACIÓN, FRAUDE, CULPA, ILEGAL, ACUSACIÓN, INVESTIGACIÓN, CONTRAGOLPE, LAVADO DE DINERO, NARCÓTICO, MULTA, SANCIÓN, SENTENCIADO, EVASIÓN, TERRORISTA, ROBO, TRÁFICO, VIOLACIÓN
Maximum extracted articles per entity screening: specify the maximum number of articles to fetch in the range from 1 to 30. By default, up to 20 articles are retrieved.
Search period: select a time frame to specifically search for information published within it.
Article filtering policy: in the section, you can fine-tune how Evan should filter out articles from the AMM output when it is configured to source data from the Factiva provider. For the provider, the only category for which you can set the filtering policy is Articles that have more than 30,000 words.

To set a filtering policy, select one of the options in the drop-down menu:
Filter: Evan excludes the articles belonging to the specific category from the processing scope.
Use summary: In case there's an error associated with an article belonging to the specific category, Evan checks whether an article summary, a meta description, or a snippet exists in the ingested metadata payload and makes one of the following decisions:
If a summary exists, the missing or broken article body content is overwritten with the retrieved summary text.
If no summary or fallback text can be found in the metadata, the article is processed as if the Escalate option were chosen.
Escalate: Evan routes articles in the specific category to the triage queue.
LexisNexis
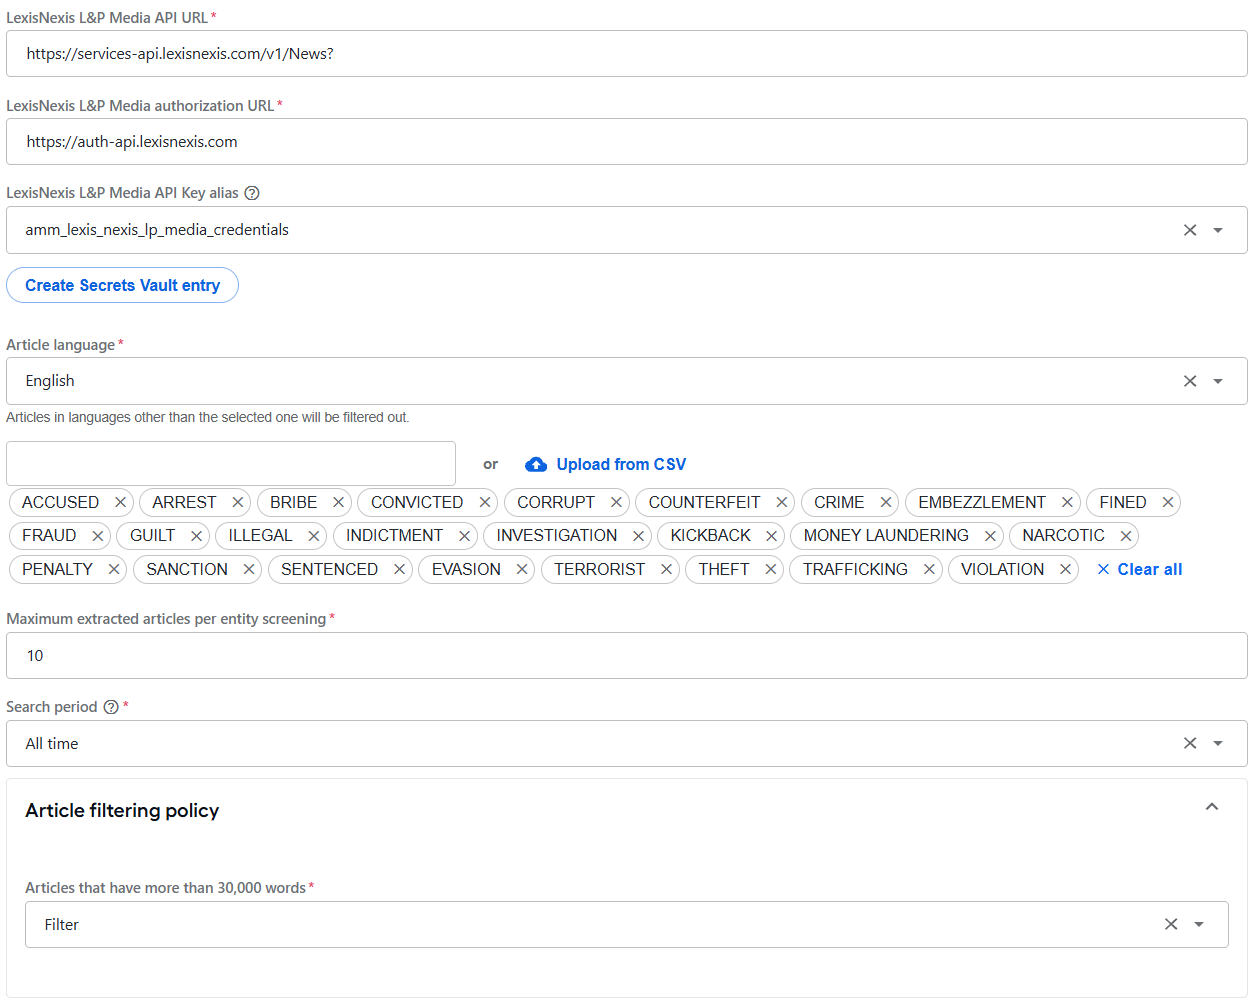
LexisNexis L&P Media API URL: select the address of the LexisNexis API. By default, it is https://services-api.lexisnexis.com.
LexisNexis L&P Media authorization URL: specify the Authentication URL for the LexisNexis News. By default, it is https://auth-api.lexisnexis.com.
LexisNexis L&P Media API Key alias: specify the alias for the Secrets Vault entry containing the credentials for the LexisNexis News system. Choose an existing alias or click Create Secrets Vault entry to set up one.
Article language: select the language in which Evan is to search for articles. The English language is used by default.
Screening keywords: specify keywords for the search or upload them as a CSV file. You can add a maximum of 28 words.
The following keywords are added by default based on the article languages you select:
English:
ACCUSE, ARREST, BRIBE, CONVICT, CORRUPT, COUNTERFEIT, CRIME, EMBEZZLEMENT, FRAUD, GUILT, ILLEGAL, INDICTMENT, INVESTIGATION, KICKBACK, MONEY LAUNDERING, NARCOTIC, PENALTY, SANCTION, SENTENCED, EVASION, TERRORIST, THEFT, TRAFFICKING, VIOLATIONSpanish:
ACUSAR, ARRESTAR, SOBORNO, CORRUPTO, FALSIFICACIÓN, CRIMEN, MALVERSACIÓN, FRAUDE, CULPA, ILEGAL, ACUSACIÓN, INVESTIGACIÓN, CONTRAGOLPE, LAVADO DE DINERO, NARCÓTICO, MULTA, SANCIÓN, SENTENCIADO, EVASIÓN, TERRORISTA, ROBO, TRÁFICO, VIOLACIÓN
Maximum extracted articles per entity screening: specify the maximum number of articles to fetch in the range from 1 to 30. By default, up to 20 articles are retrieved.
Search period: select a time frame to specifically search for information published within it.
Article filtering policy: in the section, you can tune how Evan should filter articles when it is configured to source data from the LexisNexis provider. For the provider, the only category for which you can set the filtering policy is Articles that have more than 30,000 words.
To set a filtering policy, select one of the options in the drop-down menu:
Filter: Evan excludes the articles belonging to the specific category from the processing scope.
Use summary: In case there's an error associated with an article belonging to the specific category, Evan checks whether an article summary, a meta description, or a snippet exists in the ingested metadata payload and makes one of the following decisions:
If a summary exists, the missing or broken article body content is overwritten with the retrieved summary text.
If no summary or fallback text can be found in the metadata, the article is processed as if the Escalate option were chosen.
Escalate: Evan routes articles in the specific category to the triage queue.
World-Check One
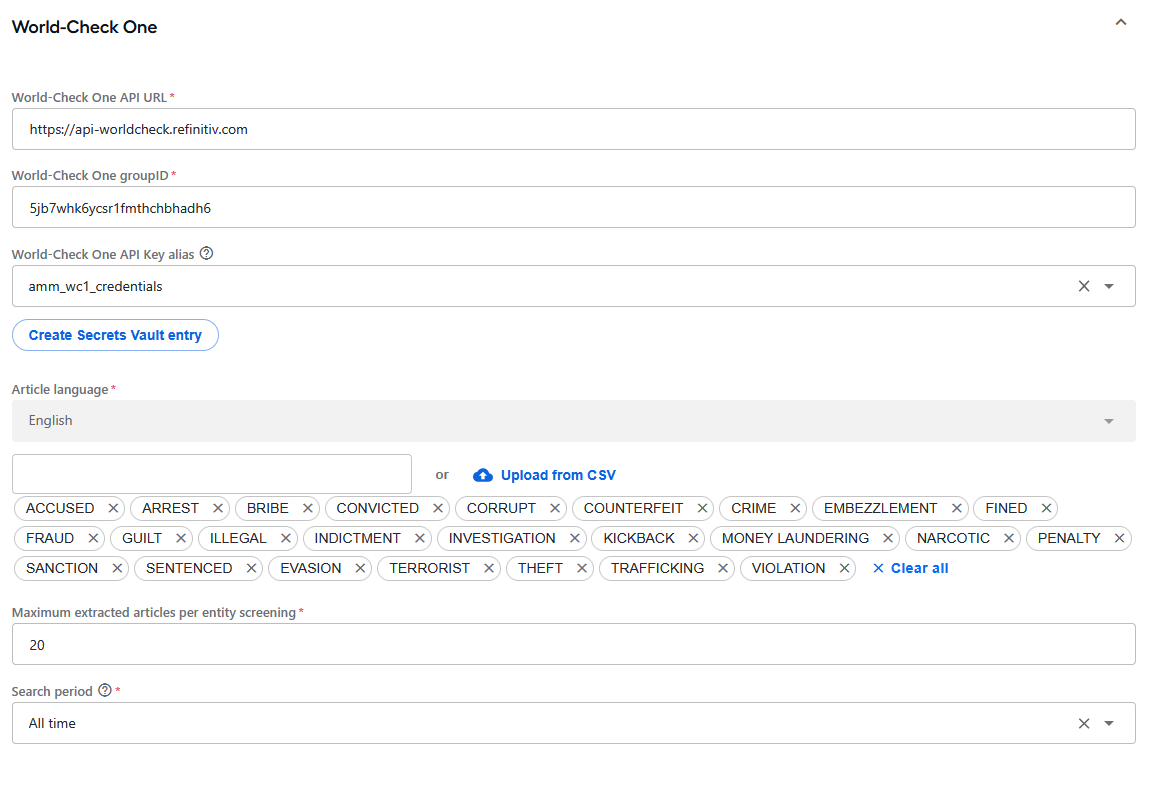
World-Check One API URL: select the address of the World-Check One API. The default one is https://api-worldcheck.refinitiv.com.
World-Check One groupID: specify the Group Id for the World-Check One system.
World-Check One API Key alias: specify the alias for the Secrets Vault entry containing the credentials for the World-Check One system. Choose an existing alias or click Create Secrets Vault entry to set up one.
Article language: select the language in which Evan is to search for articles. The English language is used by default.
Screening keywords: specify keywords for the search or upload them as a CSV file. You can add a maximum of 28 words.
The following keywords are added by default based on the article languages you select:
English:
ACCUSE, ARREST, BRIBE, CONVICT, CORRUPT, COUNTERFEIT, CRIME, EMBEZZLEMENT, FRAUD, GUILT, ILLEGAL, INDICTMENT, INVESTIGATION, KICKBACK, MONEY LAUNDERING, NARCOTIC, PENALTY, SANCTION, SENTENCED, EVASION, TERRORIST, THEFT, TRAFFICKING, VIOLATIONSpanish:
ACUSAR, ARRESTAR, SOBORNO, CORRUPTO, FALSIFICACIÓN, CRIMEN, MALVERSACIÓN, FRAUDE, CULPA, ILEGAL, ACUSACIÓN, INVESTIGACIÓN, CONTRAGOLPE, LAVADO DE DINERO, NARCÓTICO, MULTA, SANCIÓN, SENTENCIADO, EVASIÓN, TERRORISTA, ROBO, TRÁFICO, VIOLACIÓN
Maximum extracted articles per entity screening: specify the maximum number of articles to fetch in the range from 1 to 30. By default, up to 20 articles are retrieved.
Search period: select a time frame to specifically search for information published within it.
For the World-Check One provider, keywords highlight important sections within each article returned by the search, but not for the API call. Configure the keywords for your search on the World-Check One's website.
External Source
AMM supports three External Source options:
External Source
External Source (2)
External Source (3)
Each selected External Source option displays its own settings panel, identical in structure.
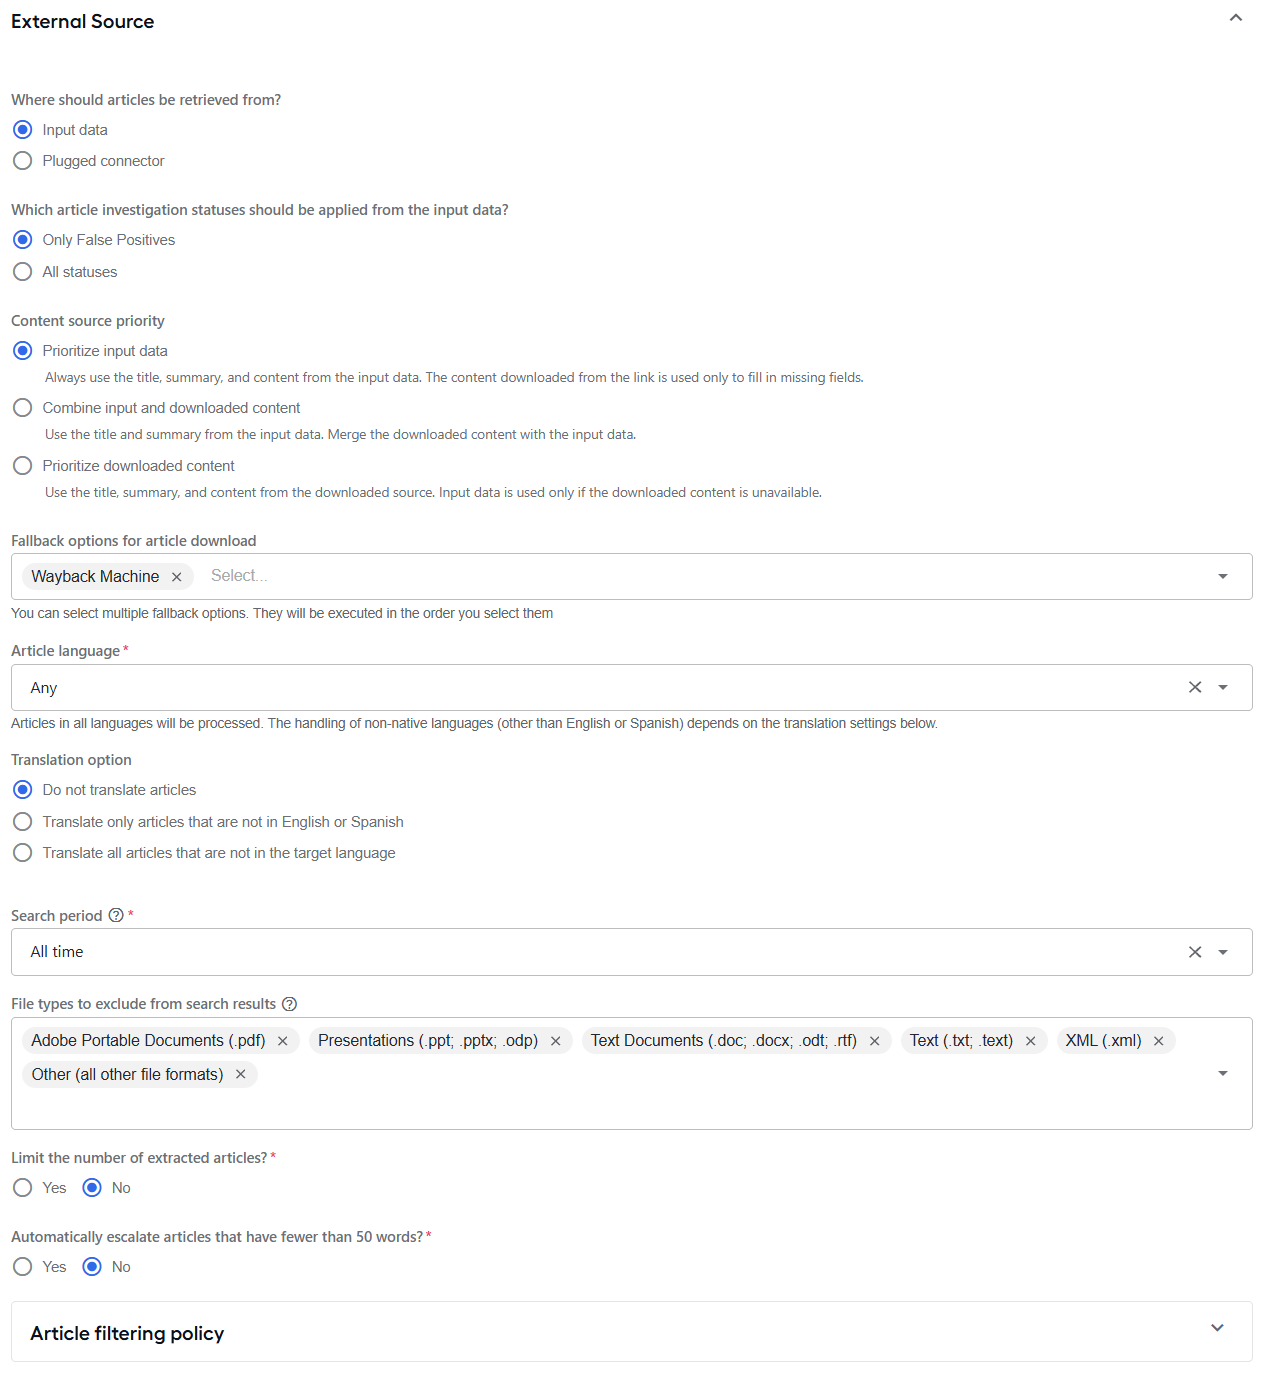
To enable sourcing data from an external source, do as follows:
Choose the article source for the External Source provider by selecting one of the Where should articles be retrieved from? options:
Input data: AMM uses article links provided in the input data CSV file. Only one External Source can use input data at a time.
When choosing the option, make sure your CSV file has the correct format. To do that, open the CSV file monitoring settings section and click the Template link to download a CSV file template. Files that do not comply with the format requirements are not ingested.
Plugged connector: AMM retrieves articles from the configured connector, that is, a third-party data source that is not part of the standard built-in provider set. Examples include the following:
- Moody's: the connector provides structured financial risk and compliance-related news and data.
- Thomson Reuters Clear: the connector delivers news, risk intelligence, and entity-level article data for compliance screening. For details, read the guide.
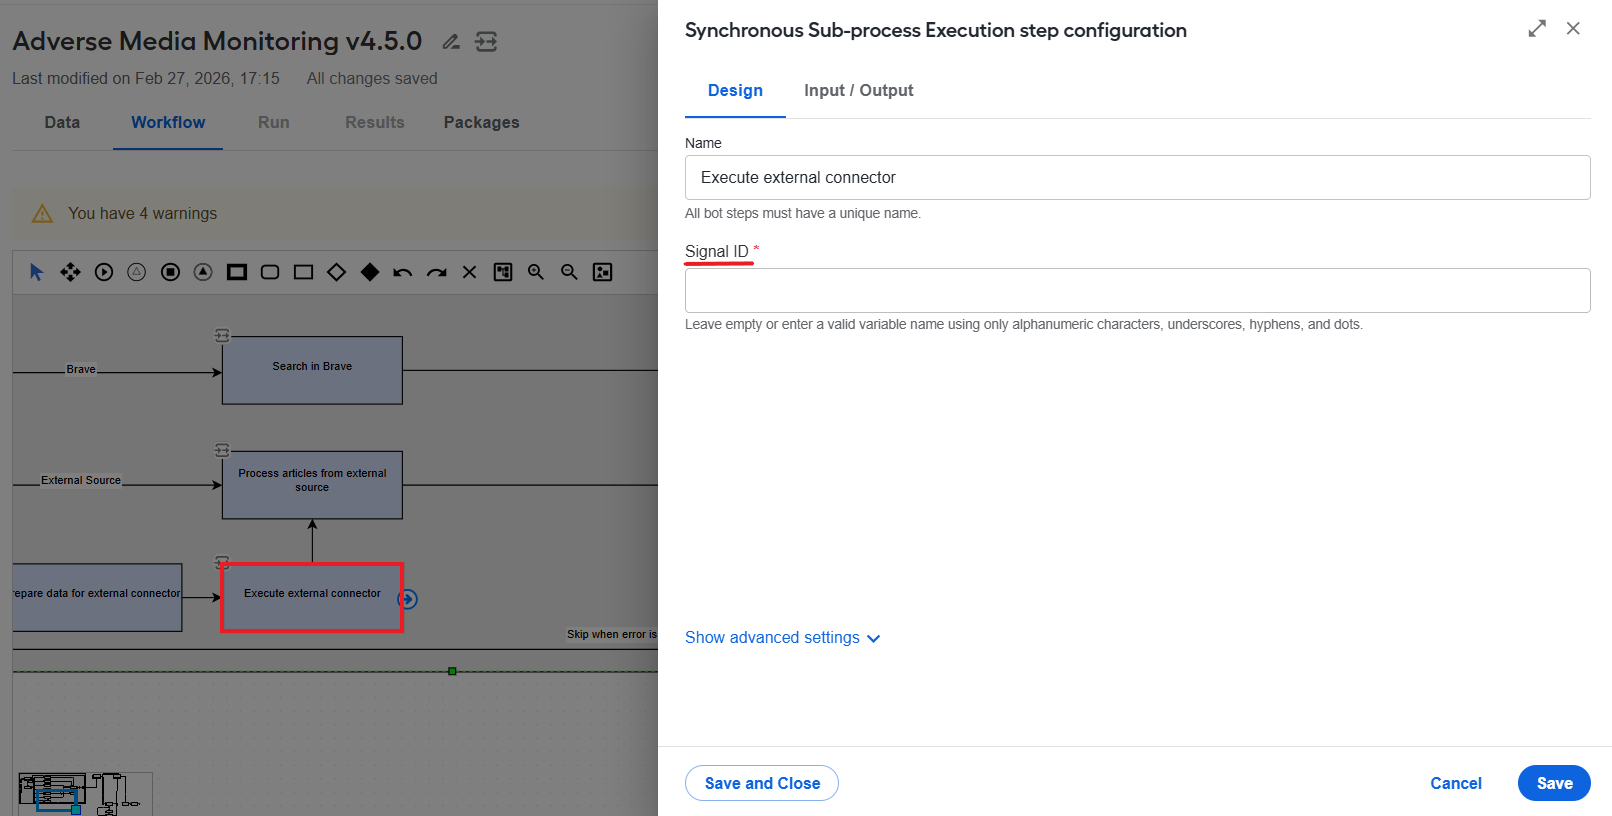
Note: to use a plugged connector, you need to set up Signal ID for the connector Business Process on the Execute external connector sub-process step in the AMM Core Business Process.
Set one of the following parameters, depending on which External Source provider you choose in step 1:
If you selected Input data as the External Source provider in step 1, choose one of the Which article investigation statuses should be applied from the input data? options:
- Only False Positives (default): only articles with a False Positive status in the input data are pre-dispositioned.
- All statuses: all investigation statuses from the input data are applied.
If you selected Plugged connector as the External Source provider in step 1, specify Connector signal ID. If not provided, the signal ID will be taken directly from the Execute external connector sub-process step in the AMM Core Business Process.
In the Content source priority section, define how Evan should prioritize the content fields when both input data and downloaded content (from a link) are available.
In the Fallback options for article download field, select one or more fallback strategies for downloading articles that could not be retrieved. Options are executed in the order you select them.
- Wayback Machine (default) retrieves the article from the
web.archive.orgInternet archive. - Scrape.do (standard) uses Scrape.do with proxy rotation and antibot bypass.
- Scrape.do (browser rendering) uses Scrape.do with headless browser rendering for JavaScript-heavy pages.
- Browser Use uses Browser Use AI agent to download articles.
For the Scrape.do and Browser Use options, you will also need to set up Secrets Vault aliases:
- The Scrape.do Secrets Vault alias field is shown when any Scrape.do option is selected. Specify the Secrets Vault alias for Scrape.do credentials or create one by clicking Create Secrets Vault entry.
- The Browser Use API Key Alias field is shown when Browser Use is selected. Specify the Secrets Vault alias for the Browser Use API key or create one by clicking Create Secrets Vault entry.
- Wayback Machine (default) retrieves the article from the
Specify the following general screening settings:
In the Article language field, select the language of articles to search in. The Any setting is used by default.
Configure the translation settings as described in the section.
Search period: select an option to set Evan to search for information published during a specific timeframe.
File types to exclude from results: select which file types you want to exclude from the AMM results.
HTML is included by default.
Non-HTML file types do not have the same meta data and tagging. Excluding them typically reduces the number of articles to review and false hits by 50% without increasing the risk of missing a true hit.
Limit the number of articles? If enabled, the option limits the number of articles to be retrieved from the external source.
- Maximum extracted articles per entity screening: specify the maximum number of articles to fetch in the range from 1 to 30. By default, up to 20 articles are retrieved.
Automatically escalate articles that have fewer than 50 words?: Evan automatically escalates articles that have fewer than 50 words for human review. If you enable the setting, the Article filtering policy section includes the Articles that have fewer than 50 words filter.
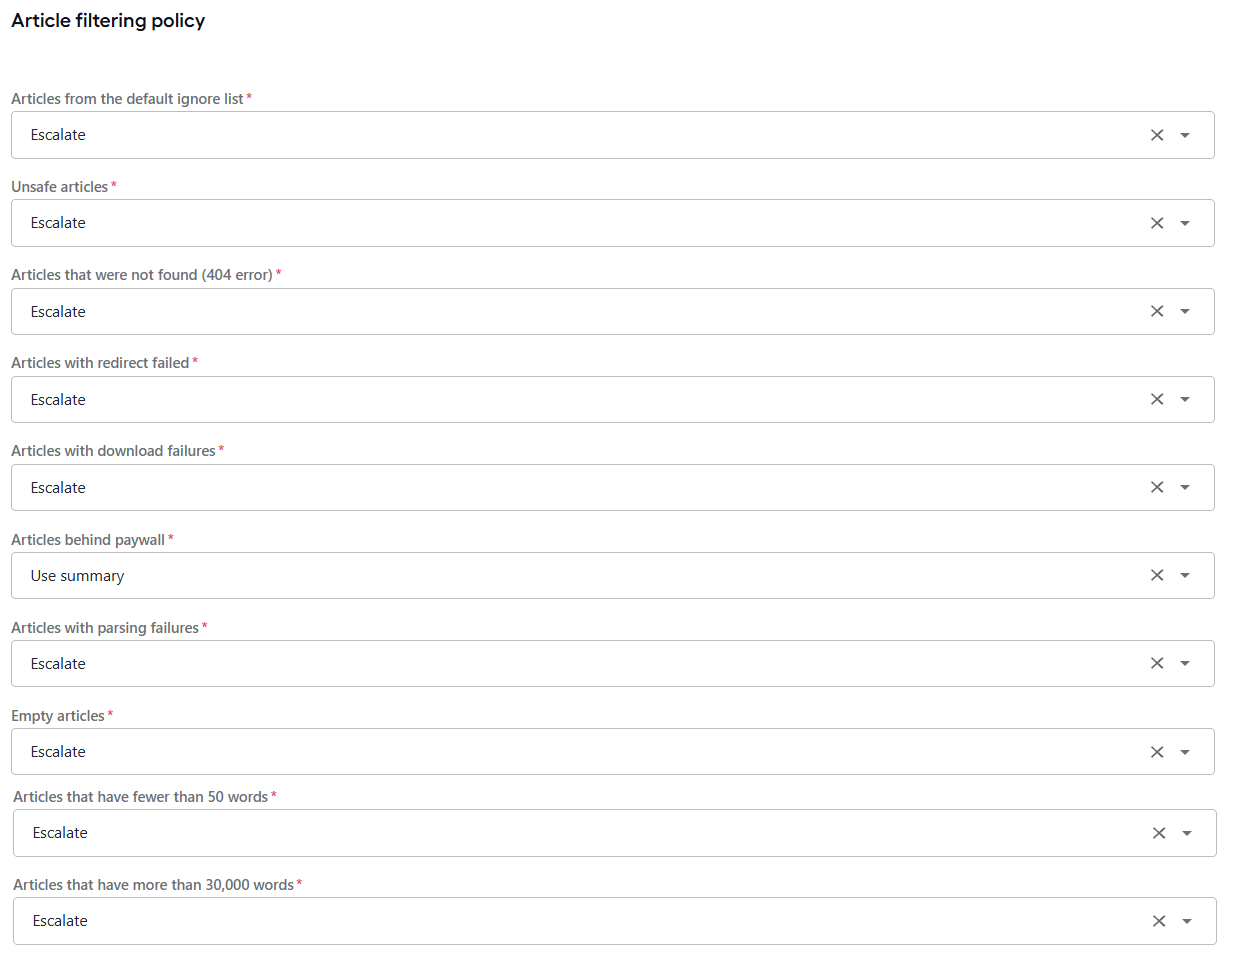
In the Article filtering policy section, fine-tune how Evan should filter out articles from the AMM output when it is configured to source data from the External Source provider.
For the provider, you can filter out the following article categories from the AMM output:
- Articles from the default ignore list.
- Unsafe articles.
- Articles that were not found (404 error).
- Articles wuth redirect failed.
- Articles with download failures.
- Articles behind paywall.
- Articles with parsing failures.
- Empty articles.
- Articles that have fewer than 50 words.
- Articles that have more than 30,000 words.
To set a filtering policy for each of the categories, select one of the options in respective drop-down menus:
Filter: Evan excludes the articles belonging to the specific category from the processing scope.
Use summary: In case there's an error associated with an article belonging to the specific category, Evan checks whether an article summary, a meta description, or a snippet exists in the ingested metadata payload and makes one of the following decisions:
If a summary exists, the missing or broken article body content is overwritten with the retrieved summary text.
If no summary or fallback text can be found in the metadata, the article is processed as if the Escalate option were chosen.
Escalate: Evan routes articles in the specific category to the triage queue.
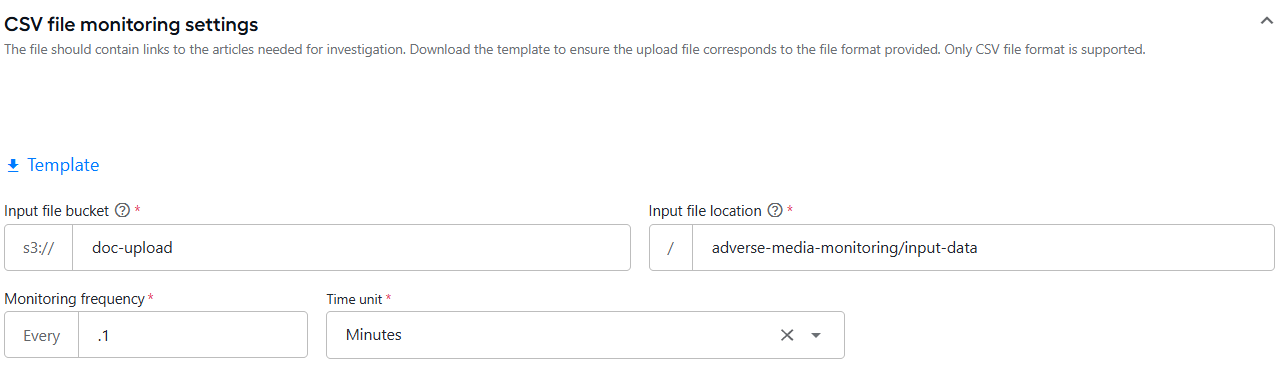
If you plan to use a CSV file as the input source, configure the following settings in the CSV file monitoring settings section:
- Input file bucket: specify the S3 bucket name where you need to upload the CSV file.
- Input file location: specify the path to the directory where you need to upload the CSV file.
- Monitoring frequency and Time unit: configure the interval of monitoring for CSV files.
Brave
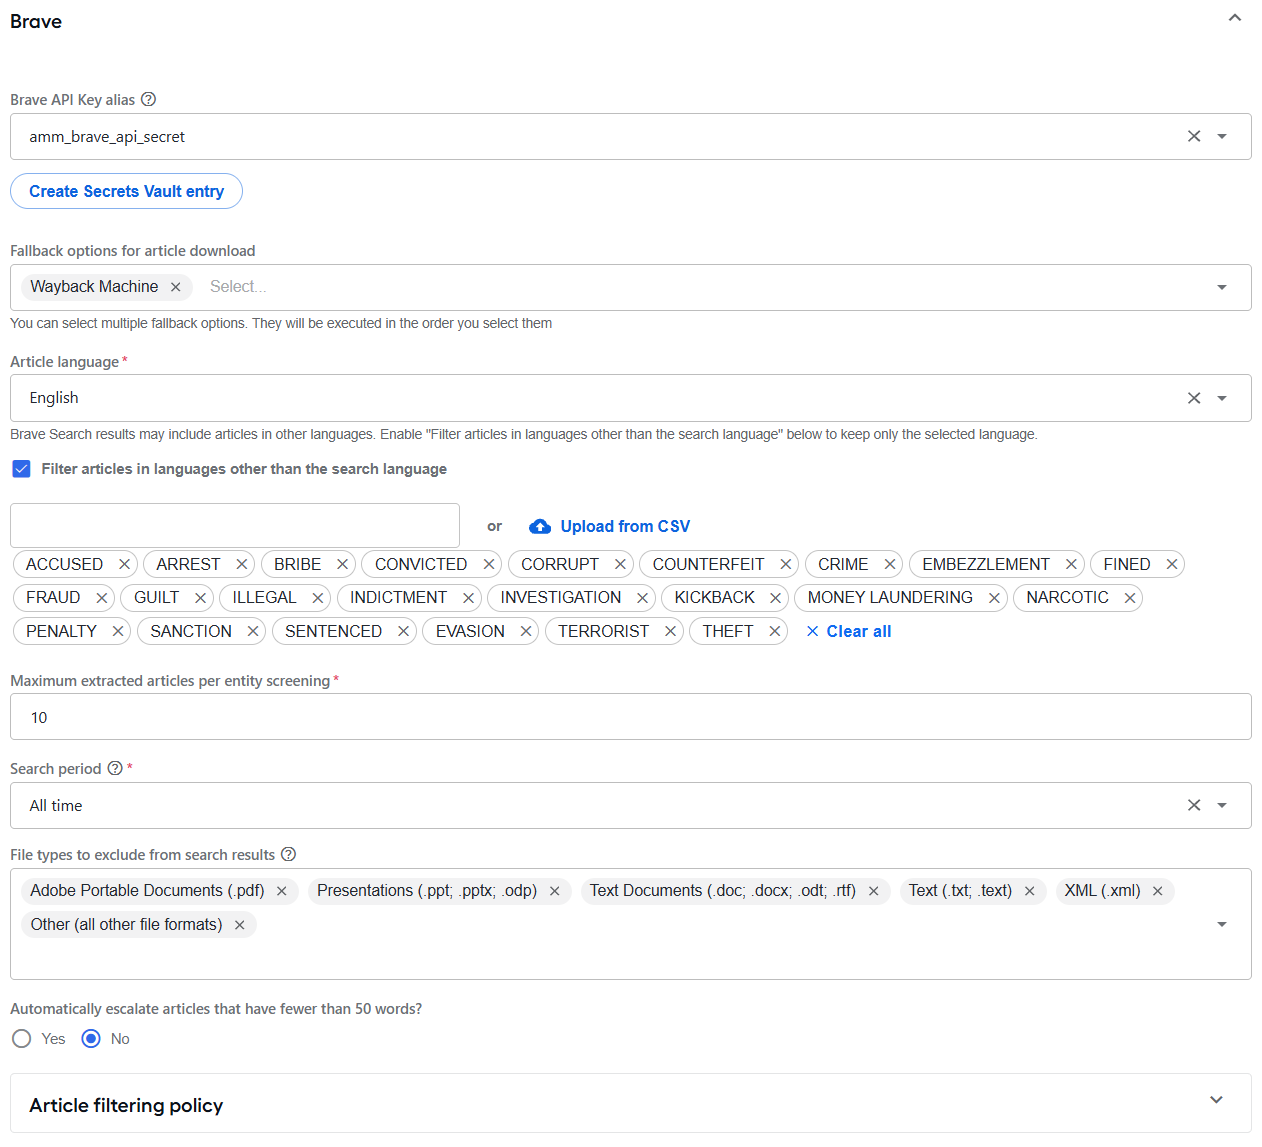
Brave API Key alias: specify the alias for the Secrets Vault entry containing the Brave Search API credentials. Choose an existing alias or click Create Secrets Vault entry to set up one.
In the Fallback options for article download field, select one or more fallback strategies for downloading articles that could not be retrieved. Options are executed in the order you select them.
- Wayback Machine (default) retrieves the article from the
web.archive.orgInternet archive. - Scrape.do (standard) uses Scrape.do with proxy rotation and antibot bypass.
- Scrape.do (browser rendering) uses Scrape.do with headless browser rendering for JavaScript-heavy pages.
- Browser Use uses Browser Use AI agent to download articles.
For the Scrape.do and Browser Use options, you will also need to set up Secrets Vault aliases:
- The Scrape.do Secrets Vault alias field is shown when any Scrape.do option is selected. Specify the Secrets Vault alias for Scrape.do credentials or create one by clicking Create Secrets Vault entry.
- The Browser Use API Key Alias field is shown when Browser Use is selected. Specify the Secrets Vault alias for the Browser Use API key or create one by clicking Create Secrets Vault entry.
- Wayback Machine (default) retrieves the article from the
Article language: select the language in which Evan is to search for articles.
Filter articles in languages other than the search language: if the checkbox is selected, only articles in your search language are shown.
If deselected, you can apply your translation settings to translate the content from other languages. For details on the Translation option settings, see the section.
Screening keywords: specify keywords for the search or upload a CSV file containing keywords. You can add a maximum of 28 words.
The following keywords are added by default based on the article languages you select:
English:
ACCUSE, ARREST, BRIBE, CONVICT, CORRUPT, COUNTERFEIT, CRIME, EMBEZZLEMENT, FRAUD, GUILT, ILLEGAL, INDICTMENT, INVESTIGATION, KICKBACK, MONEY LAUNDERING, NARCOTIC, PENALTY, SANCTION, SENTENCED, EVASION, TERRORIST, THEFT, TRAFFICKING, VIOLATIONSpanish:
ACUSAR, ARRESTAR, SOBORNO, CORRUPTO, FALSIFICACIÓN, CRIMEN, MALVERSACIÓN, FRAUDE, CULPA, ILEGAL, ACUSACIÓN, INVESTIGACIÓN, CONTRAGOLPE, LAVADO DE DINERO, NARCÓTICO, MULTA, SANCIÓN, SENTENCIADO, EVASIÓN, TERRORISTA, ROBO, TRÁFICO, VIOLACIÓN
Maximum extracted articles per entity screening: specify the maximum number of articles to fetch in the range from 1 to 30. By default, up to 20 articles are retrieved.
Search period: select a time frame to specifically search for information published within it.
File types to exclude from results: select the file types that you want to exclude from Google results:
- HTML is included by default.
- Non-HTML file types do not have the same metadata and tagging. Excluding them reduces the number of articles to review and false hits by 50% without increasing the risk of missing a true hit.
Automatically escalate articles that are too small?: Evan automatically escalates small articles for human review. A small article is one that has fewer than 50 words. If you enable the setting, the Article filtering policy section includes the Articles that have fewer than 50 words filter.
In the Article filtering policy section, fine-tune how Evan should filter out articles from the AMM output when it is configured to source data from the Brave provider.
For the provider, you can filter out the following article categories from the AMM output:
- Articles from the default ignore list.
- Unsafe articles.
- Articles that were not found (404 error).
- Articles with redirect failed.
- Articles with download failures.
- Articles behind paywall.
- Articles with parsing failures.
- Empty articles.
- Articles that have fewer than 50 words.
- Articles that have more than 30,000 words.
To set a filtering policy for each of the categories, select one of the options in respective drop-down menus:
Filter: Evan excludes the articles belonging to the specific category from the processing scope.
Use summary: In case there's an error associated with an article belonging to the specific category, Evan checks whether an article summary, a meta description, or a snippet exists in the ingested metadata payload and makes one of the following decisions:
If a summary exists, the missing or broken article body content is overwritten with the retrieved summary text.
If no summary or fallback text can be found in the metadata, the article is processed as if the Escalate option were chosen.
Escalate: Evan routes articles in the specific category to the triage queue.
Validation settings
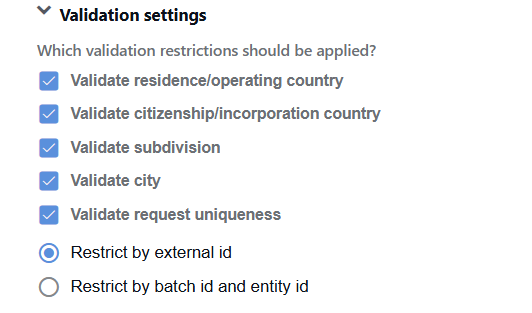
In the section, you can select the options to validate the following input data entities:
Validate country of residence or operating country
Validate country of citizenship or incorporation
Validate subdivision
Validate city
Validate request uniqueness
When the validation is selected, you will see the following options below:
Restrict by external id validates that the external ID has not been used before.
Restrict by batch id and entity id validates that the batch ID and entity ID have not been used before in combination.
All validations, except for Validate request uniqueness, are enabled by default. For details on validation rules, requirements, and errors, see Learn about input and output data | Input data validation.
Translation settings
The feature enables the translation of article content, title, and summary as described below:
AMM detects the language for each article using the title, summary, and parsed content.
AMM applies the configured translation option based on the detected language.
The translated text is used in downstream processing for classification and Workspace review. The same language is also used in the final report.
The translation feature is available only for the following providers:
Mind the following translation feature limitations:
- Translation is done after Evan downloads and parses the article content. Large or media-heavy pages may take longer to process.
- The rate limits or quota constraints on the Google Translation API side can impact throughput. Monitor your usage and adjust quotas as needed.
- For optimal results, ensure the Target translation language setting matches your analysts’ working language and the final report and manual review task language configured in the output settings.
Translation configuration
The general configuration sequence for the translation feature is as outlined below. See also Provider-specific details.
In the Translation Option section, select a rule:
The Do not translate articles rule skips the translation. The Target translation language and Google Translate API Key alias fields are hidden if this option is selected.
The Translate only articles that are not in English or Spanish rule translates articles if their original language is neither English nor Spanish.
The Translate all articles that are not in the target language rule translates articles where the original language is different from the configured target language.
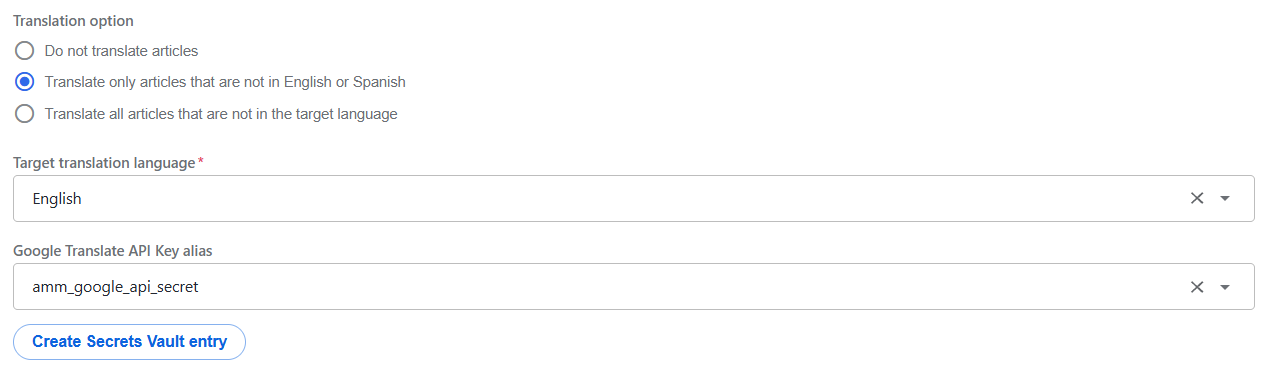
If you select Do not translate articles above, skip this step. Otherwise, proceed to configure the following settings:
Target translation language: select the supported language into which articles should be translated.
Google Translate API Key alias: specify the alias for the Secrets Vault entry containing the Google Translate API credentials.
To create a Secrets Vault entry, if you don't have one, click Create Secrets Vault entry and follow the instructions in the Manage secret entries in Secrets Vault guide.
Provider-specific details
Google
- Translation supports the article fields retrieved from Google: title, snippet or summary, and the content downloaded by Evan.
- To allow searching across all languages, set the provider’s Article language parameter to Any. If a specific language is selected, translation is typically unnecessary.
- The translation engine uses the key provided in the Google Translate API Key alias field.
- If the translation for a particular article fails due to an API error, quota exceeded, or unsupported language, Evan keeps the original text and marks the article with an internal error code. The article still appears in the search results unless excluded by other settings.
Brave
- Translation supports the provider’s returned title, summary, and content downloaded by Evan for the linked articles.
- To enable the Translation option settings, the Filter articles in languages other than the search language option should be deselected.
- The translation feature uses the same Google Translate API Key alias as for the Google provider.
- If translation is not possible, for instance, due to an API error, quota exceeded, or a language unsupported, Evan keeps the original text and continues processing. Articles are not dropped only due to the translation issues.
External Source
- Translation applies to the content downloaded from the provided links, along with any provided titles or summaries in the input file, when available.
- There is no provider-side Article language selector for External Source. Translation is applied purely based on the detected language and the configured Translation option settings.
- The translation feature uses the same Google Translate API Key alias as for the Google provider.
- If a link is dead or the content cannot be retrieved, translation is skipped for that item and Evan's behavior is according to the External Source settings (for instance, the Ignore dead links? option).
Investigation
After setting the Input parameters, click Next to go to the following step of the wizard and complete the setup as described in the sub-sections below.
General investigation settings
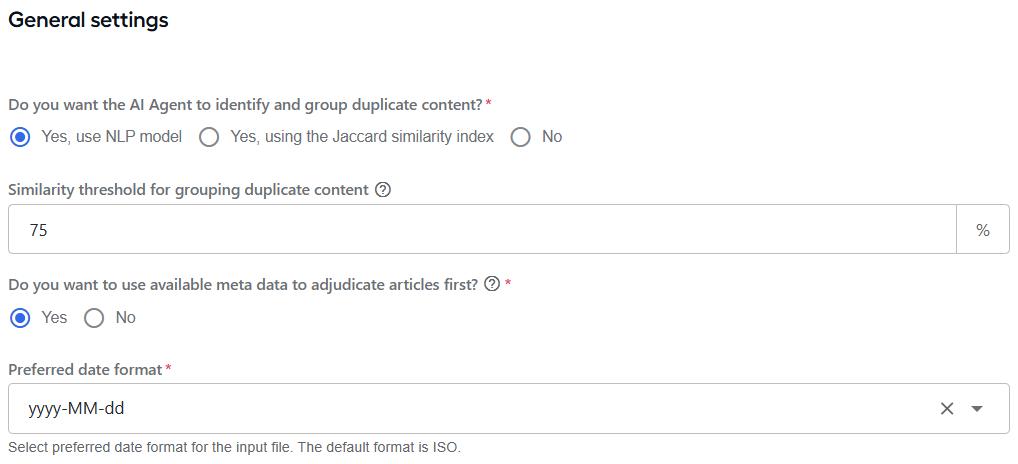
Do you want the AI Agent to identify and group duplicate content?
Set to Yes, use NLP model for AMM to identify and group articles using the NLP model to capture the meaning and context by the similarity threshold that you choose.
Set to Yes, using Jaccard similarity index for AMM to identify and group articles by the similarity threshold that you choose.
If you don't want AMM to identify and group duplicate content, choose No.
Similarity threshold for grouping duplicate content: select the percentage of similarity between articles at which AMM should consider them duplicates. By default, the threshold is set to 50%. However, you can configure it to your needs.
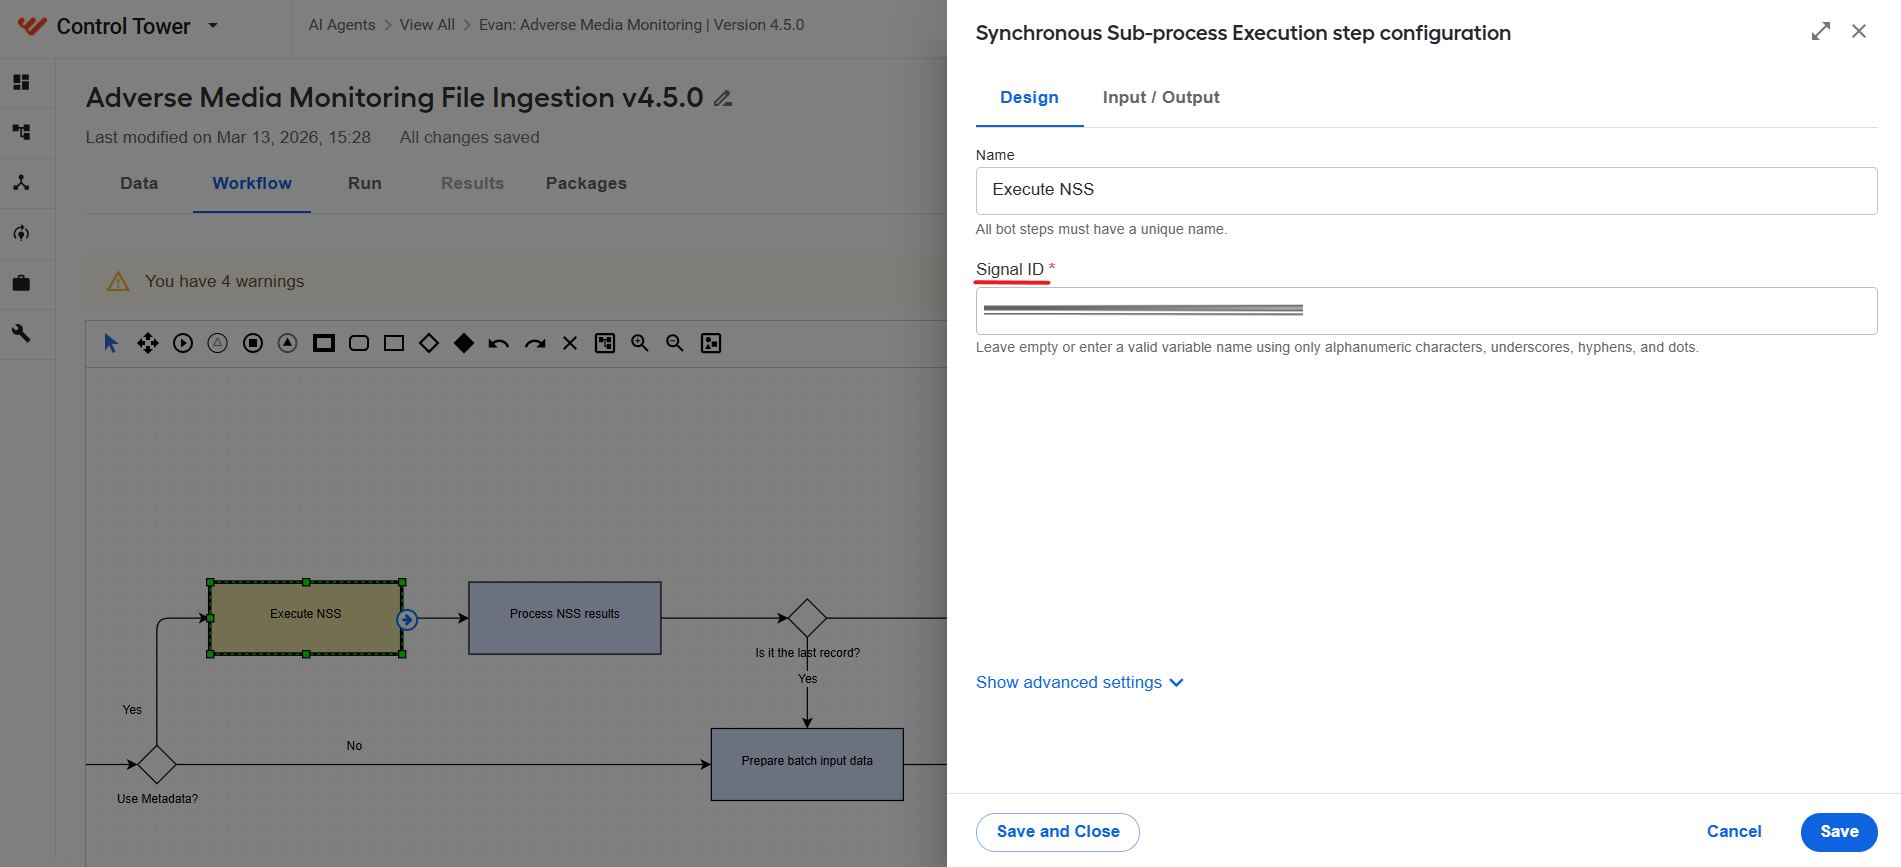
Do you want to use available meta data to adjudicate articles first?: applicable only for the External Source input. Set to Yes for AMM to use the metadata from the input file and process it with the NSS model before running the investigation. To start using it, you also need to configure Signal ID on the Execute NSS step in the Adverse Media Monitoring File Ingestion BP.
Preferred date format: select the date format to use for input and output data.
Decision reapplication settings
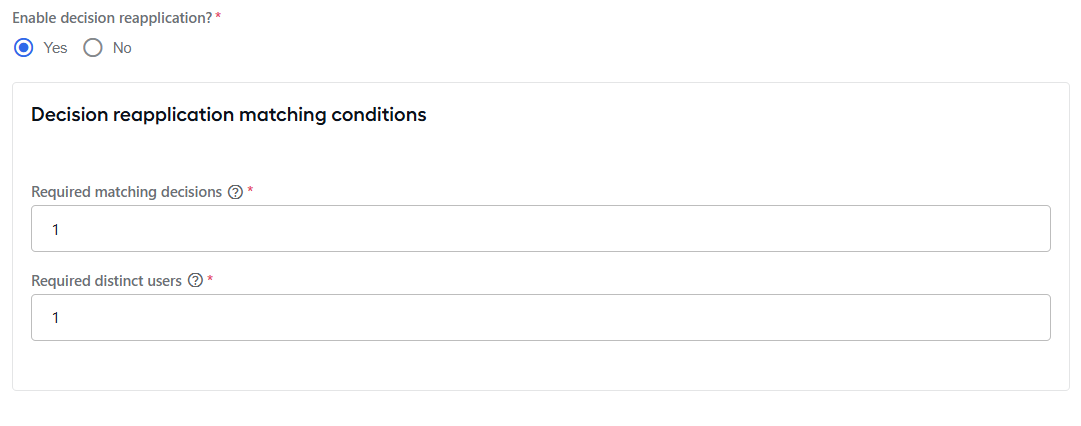
Enable decision reapplication?: choose Yes to enable the decision reapplication feature. If you do not need the feature, select No.
In the Decision reapplication matching conditions section, configure the rules for applying decision reapplication. The section is visible only if decision reapplication is enabled.
- Required matching decisions: set how many times an article has to be reviewed with the same status to reapply a decision.
- Required distinct users: specify how many unique users have to review an article with the same status before reapplying a decision.
Ad-hoc investigation settings
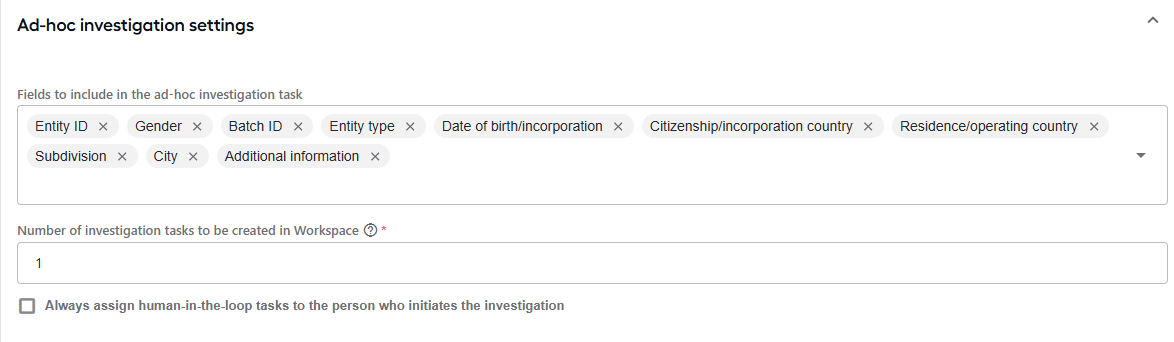
Fields to include in the ad-hoc investigation task: configure what fields should be visible on the Ad Hoc search screen.
Number of investigation tasks to be created in Workspace: configure how many investigation tasks you want to create when running the Ad Hoc investigation BP. The recommended setting is one task per 2-3 analysts.
Always assign human-in-the-loop tasks to the person who initiates the investigation: if selected, all manual review tasks created by the user are automatically assigned to them.
Classification model settings

- Classification model for article processing: select the version of the model you want to use. The latest model is selected by default.
- Use enhanced processing for more precise results: the option is enabled by default. When disabled, Evan skips computationally intensive feature calculations for focal classification, which can improve the processing speed at the cost of a slight decrease in accuracy.
LLM settings
To use an AI-powered Large Language Model (LLM) to assist you with the investigation, set Do you want to use GenAI to assist with the investigation? to Yes and configure the capability as described below.
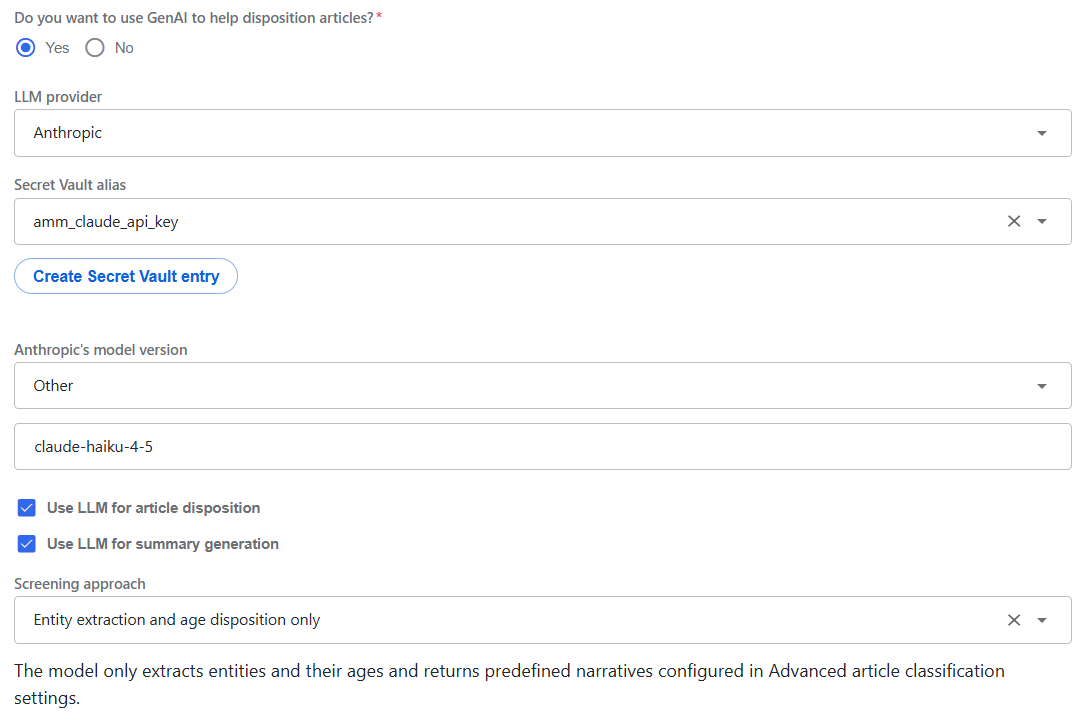
Select an LLM provider. Available options include OpenAI, Google, Anthropic, and xAI.
Set a Secrets Vault alias to store the credentials for the selected LLM provider. The default value is
amm_gpt_api_key.To create a Secrets Vault entry on the go, if you don't have one, click Create Secrets Vault entry and follow the instructions in the Manage secret entries in Secrets Vault guide.
Choose the provider's LLM model and its version.
When you choose the Other option in the model list, a free-text input field is shown for you to type in a custom model name.
Select the Use LLM for article disposition if you want the LLM model to assist with article disposition. The checkbox is selected by default.
When the option is deselected, the Screening approach field is hidden and the dispositioning is handled by the out-of-the-box model.
Select the Use LLM for summary generation checkbox if you want the LLM model to generate article summaries. The checkbox is selected by default.
Choose a screening approach. The available options are as follows:
Entity extraction and age disposition only: the LLM model helps to match the name and age of the screened entity. The AMM OOTB model age-matching functionality is not used.
Entity and crime extraction, age disposition: the LLM model helps to match the name and age of the screened entity. Additionally, it identifies the crime mentioned in articles and generates a decision comment. The AMM OOTB model age-matching and article disposition functionality is not used.
Birthdate and name matching
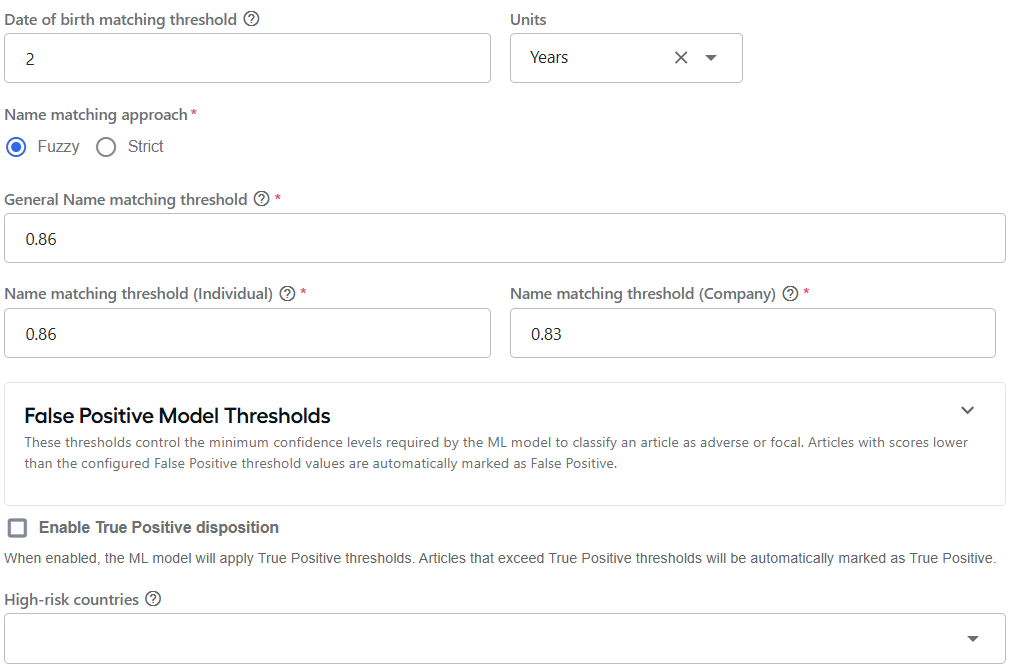
Date of birth matching threshold: articles are marked as False Positive if the difference between the age of the screened entity and the age of the entity in the article is greater than the value configured here. The default setting is 2 years.
Name matching approach: choose which approach you want Evan to use when matching names.
Fuzzy: for Evan to consider a name as a match, the names need to be similar but not perfectly identical. If you enable the approach, you will need to set the following matching thresholds:
General Name matching threshold: the cutoff the matcher uses to decide whether two names are considered a match. The default value is 0.86.
Name matching threshold (Individual): the cutoff the matcher uses to decide whether two individuals' names are considered a match. The default value is 0.86.
Name matching threshold (Company): the cutoff the matcher uses to decide whether two company names are considered a match. The default value is 0.83.
Strict: for Evan to consider a name as a match, the names need to be perfectly identical.
False Positive Model Thresholds
In the False Positive Model Thresholds section, configure the thresholds for the English and Spanish classification models as described below:
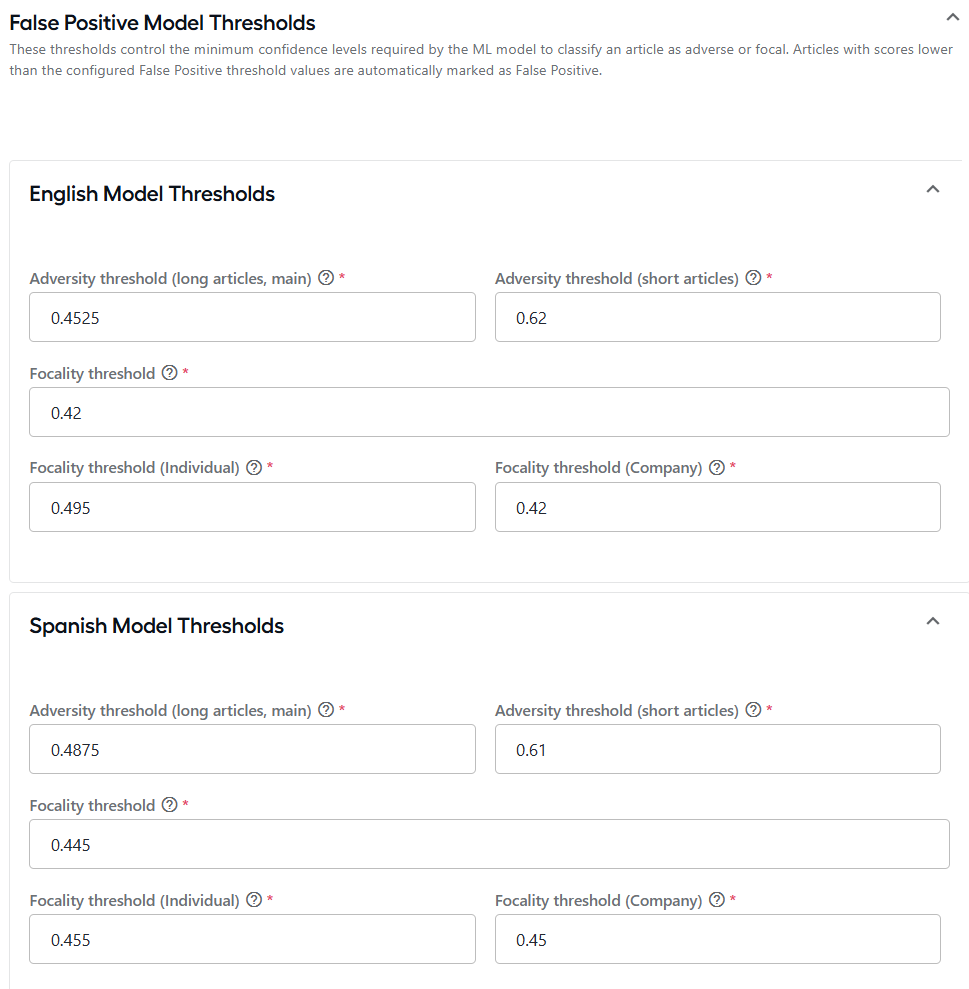
Adversity threshold (long articles, main): the probability cutoff used by the English or Spanish long-text adverse classifier to decide whether content is adverse. The default value is 0.4525 for the English language and 0.4875 for Spanish.
Adversity threshold (short articles): the probability cutoff used by the English or Spanish short-text adverse classifier to decide whether content is adverse. The default value is 0.62 for the English language and 0.61 for Spanish.
Focality threshold: the probability cutoff for the English or Spanish focal classifier to decide whether content is focal. The default value is 0.42 for the English language and 0.445 for Spanish.
Focality threshold (Individual): the probability cutoff for the English or Spanish focal classifier to decide whether content is focal when the subject is an individual. The default value is 0.495 for the English language and 0.455 for Spanish.
Focality threshold (Company): the probability cutoff for the English or Spanish focal classifier to decide whether content is focal when the subject is a company. Default value: 0.42 for the English language and 0.45 for Spanish.
True Positive disposition
Select the Enable True Positive disposition checkbox if you want the ML model to additionally apply True Positive thresholds to classify articles.
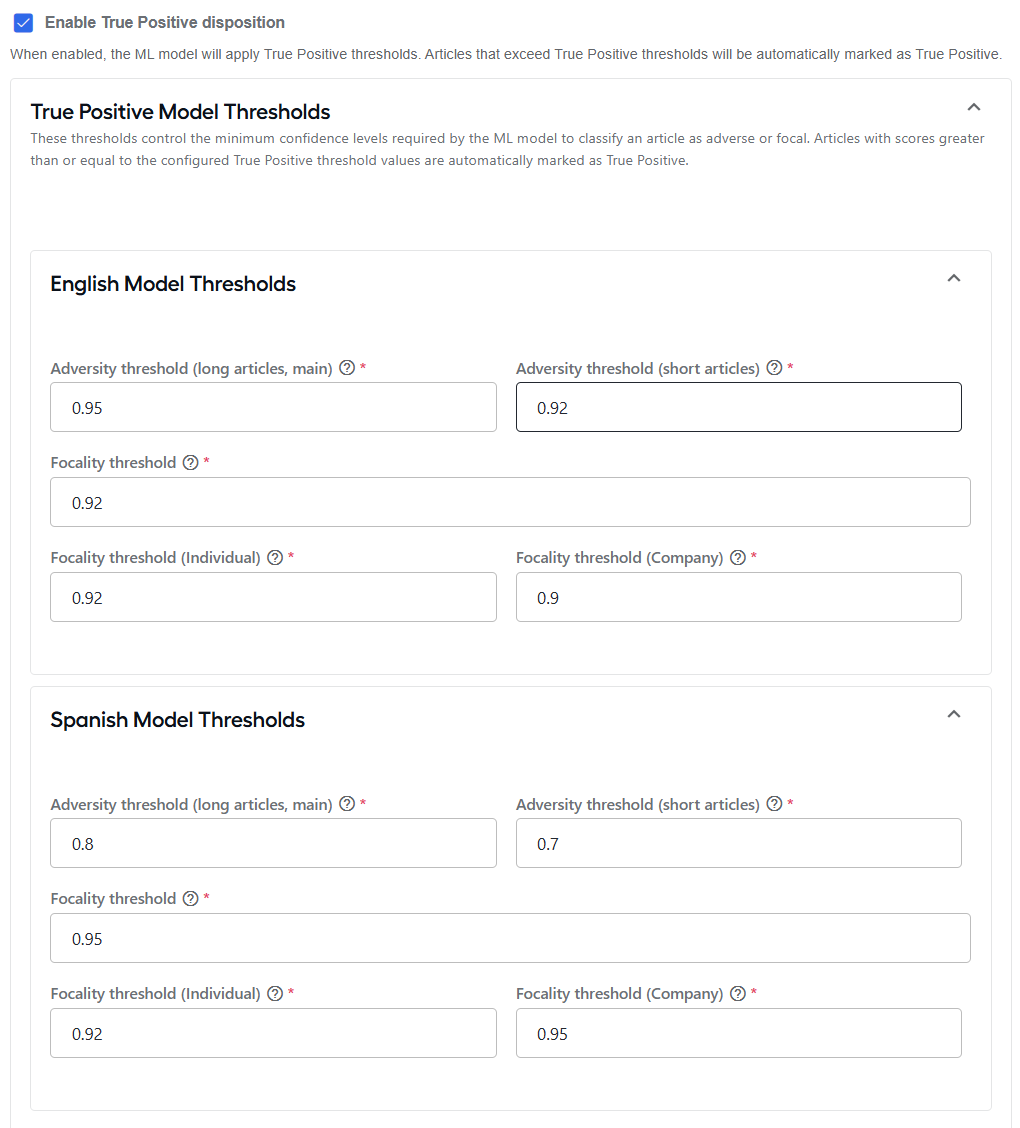
If the True Positive disposition is enabled, the True Positive Model Thresholds section becomes available. In the section, you can specify the minimum confidence levels required by the ML model to classify an article as adverse or focal. Articles with scores greater than or equal to the configured True Positive threshold values are automatically marked as True Positive.
The section contains two subsections for the English and Spanish classification models where you can set the following thresholds:
Adversity threshold (long articles, main): the probability cutoff used by the English or Spanish long-text adverse classifier to decide whether content is True Positive. The threshold must be greater than or equal to the False Positive threshold. The default value is 0.95 for the English language and 0.8 for Spanish.
Adversity threshold (short articles): the probability cutoff used by the English or Spanish short-text adverse classifier to decide whether content is True Positive. The threshold must be greater than or equal to the False Positive threshold. The default value is 0.92 for the English language and 0.7 for Spanish.
Focality threshold: the probability cutoff for the English or Spanish focal classifier to decide whether content is True Positive. The threshold must be greater than or equal to the False Positive threshold. The default value is 0.92 for the English language and 0.95 for Spanish.
Focality threshold (Individual): the probability cutoff for the English or Spanish focal classifier to decide whether content is True Positive when the subject is an individual. The threshold must be greater than or equal to the False Positive threshold. The default value is 0.92 for the English language and 0.92 for Spanish.
Focality threshold (Company): the probability cutoff for the English or Spanish focal classifier to decide whether content is True Positive when the subject is a company. The threshold must be greater than or equal to the False Positive threshold. The default value is 0.9 for the English language and 0.95 for Spanish.
High-risk country settings
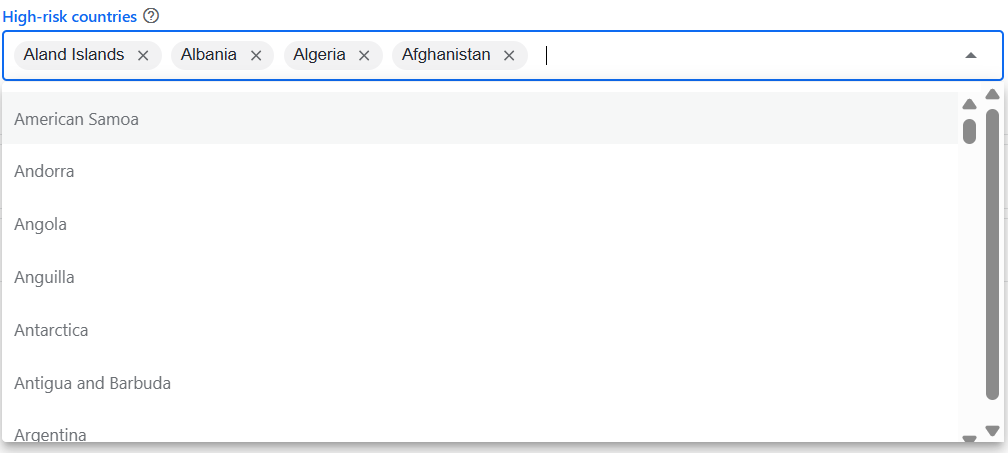
In the High-risk countries box, select or type in the countries you want Evan to flag as high-risk in the search results. The configured high-risk countries are highlighted in articles returned from each investigation.
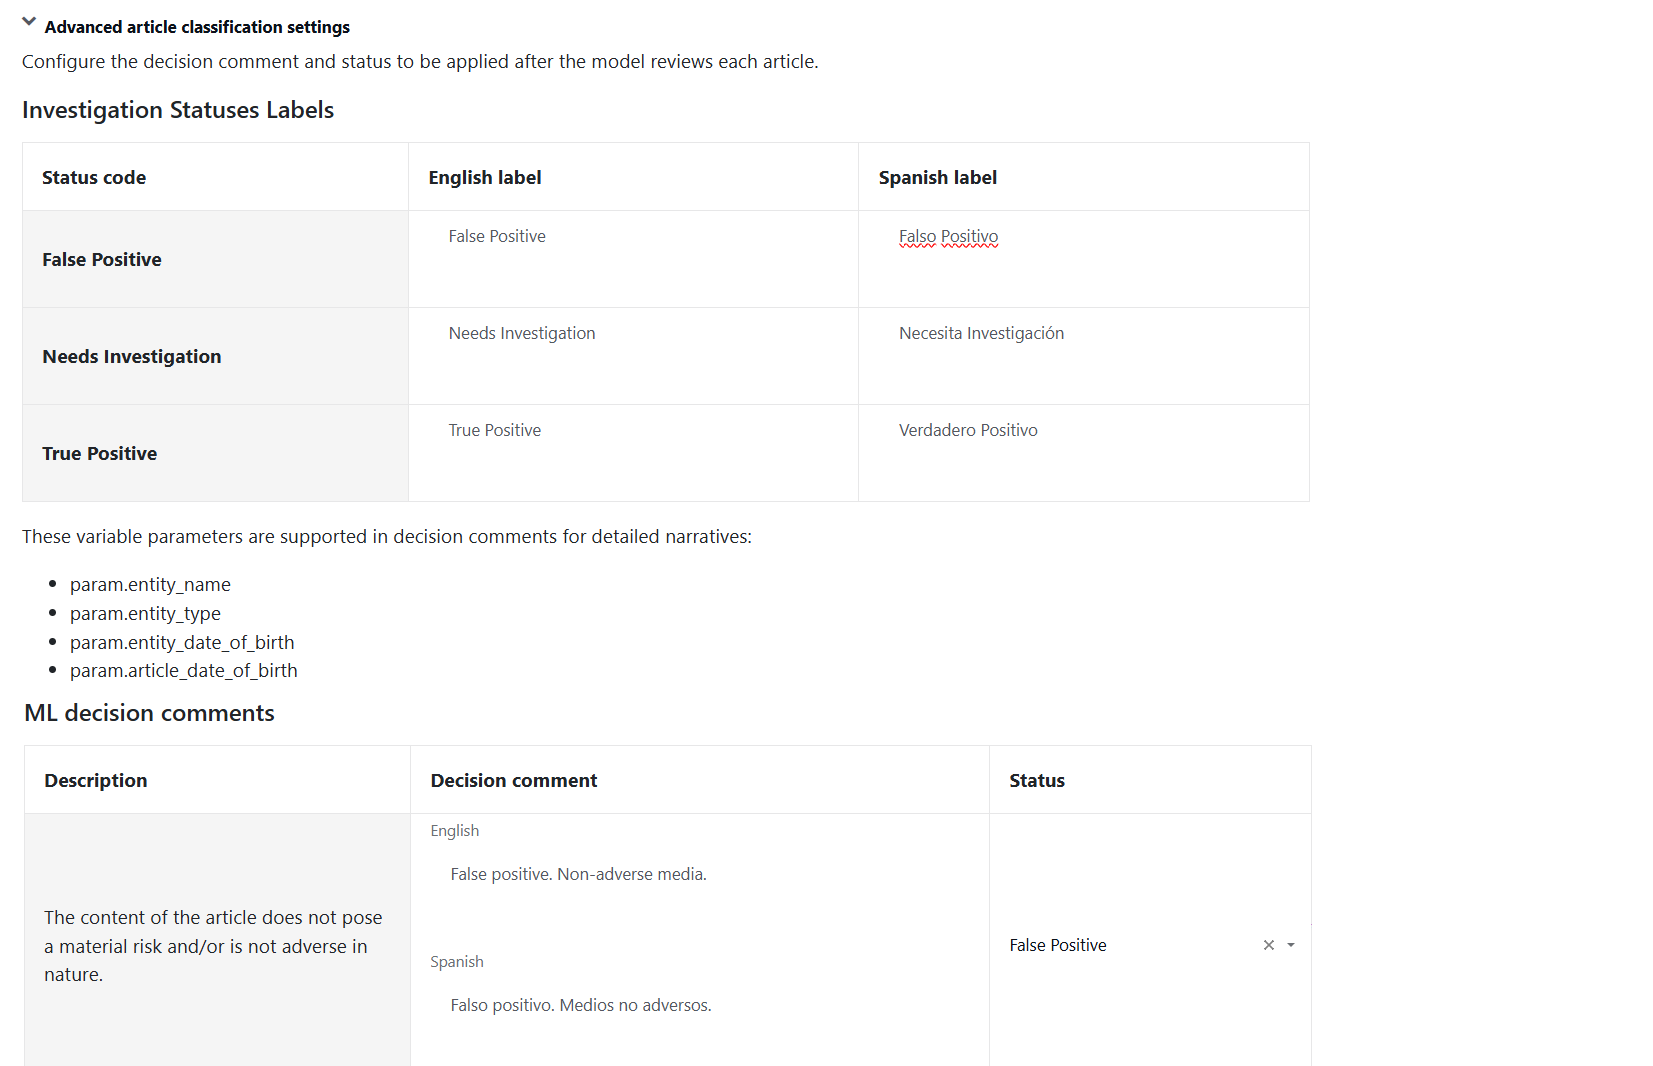
Advanced article classification settings
In the section, configure custom investigation statuses and comments for various ML decisions.
Crime categories
The Crime categories section refines ML-adverse verdicts so that articles tied to crime types you care about remain adverse, while articles with no detected crime category can either be escalated or marked non-adverse.
After the ML model classifies an article as adverse, crime-category filtering checks whether the article matches at least one of the configured crime categories above that category's confidence threshold. This lets you scope adverse media to the crime types that are relevant to your risk policy.
Configuration
To set up the crime detection capability, follow the steps below:
Select the Enable crime category domain gate checkbox.
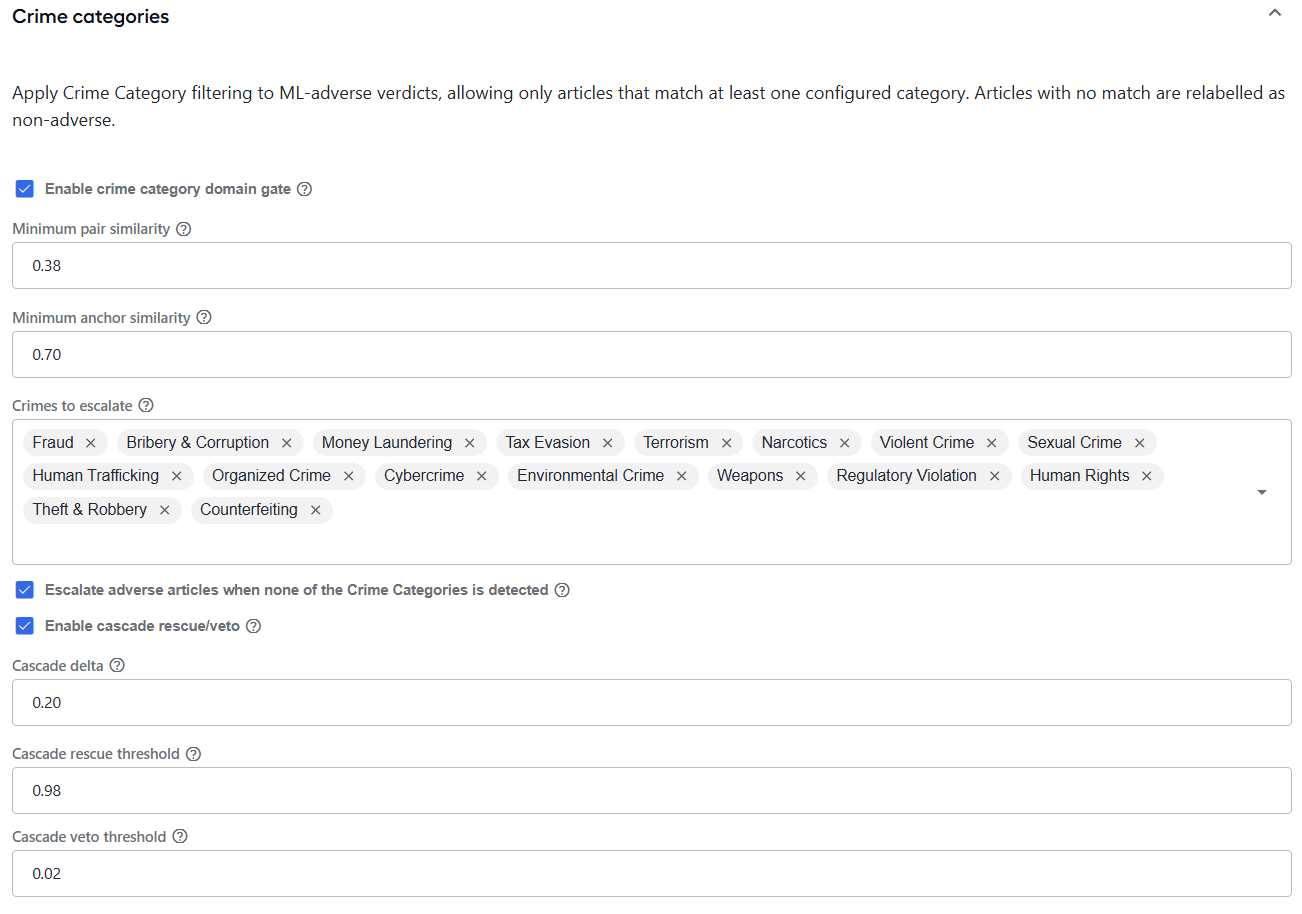
In the Minimum pair similarity field, specify the minimum cosine similarity (0–1) for a keyword-seed pair to count toward a category's score. The default value is 0.38.
In the Minimum anchor similarity field, specify the minimum cosine similarity (0–1) required to anchor a category match without an exact seed hit. The default value is 0.7.
In the Crimes to escalate box select multiple crime categories that can keep an ML-adverse verdict adverse. All categories are selected by default.
The available categories include the following: Fraud, Bribery & Corruption, Money Laundering, Tax Evasion, Terrorism, Narcotics, Violent Crime, Sexual Crime, Human Trafficking, Organized Crime, Cybercrime, Environmental Crime, Weapons, Regulatory Violation, Human Rights, Theft & Robbery, and Counterfeiting.
Select Escalate adverse articles when none of the Crime Categories is detected to assign the Needs Investigation status to the articles the model classified as adverse and that match none of the categories. When the option is deselected, such articles are marked as False Positive. By default, the checkbox is deselected.
Select Enable cascade rescue/veto to turn on an extra check for articles that are a close call for a crime type. The extra check can both catch crime types that the first pass missed and drop the ones that shouldn't have been flagged.
When the option is deselected, the Cascade delta, Cascade rescue threshold, and Cascade veto threshold settings are ignored and hidden. By default, the option is selected.
In the Cascade delta field, specify how close to the borderline a result must be to get the extra check. A larger value leads to more article checks to be more thorough, though slows down the processing. The default value is 0.2.
In the Cascade rescue threshold field, specify how confident the extra check must be before it adds a crime type that the first pass missed. The higher the value in the field, the more sure the check should be about the crime type, hence the fewer of them are actually added. The default value is 0.98.
In the Cascade veto threshold field, specify how doubtful the extra check must be before it removes a crime type the first pass flagged. A lower value removes one only when it's very unsure, so fewer are removed. The default value is 0.02.
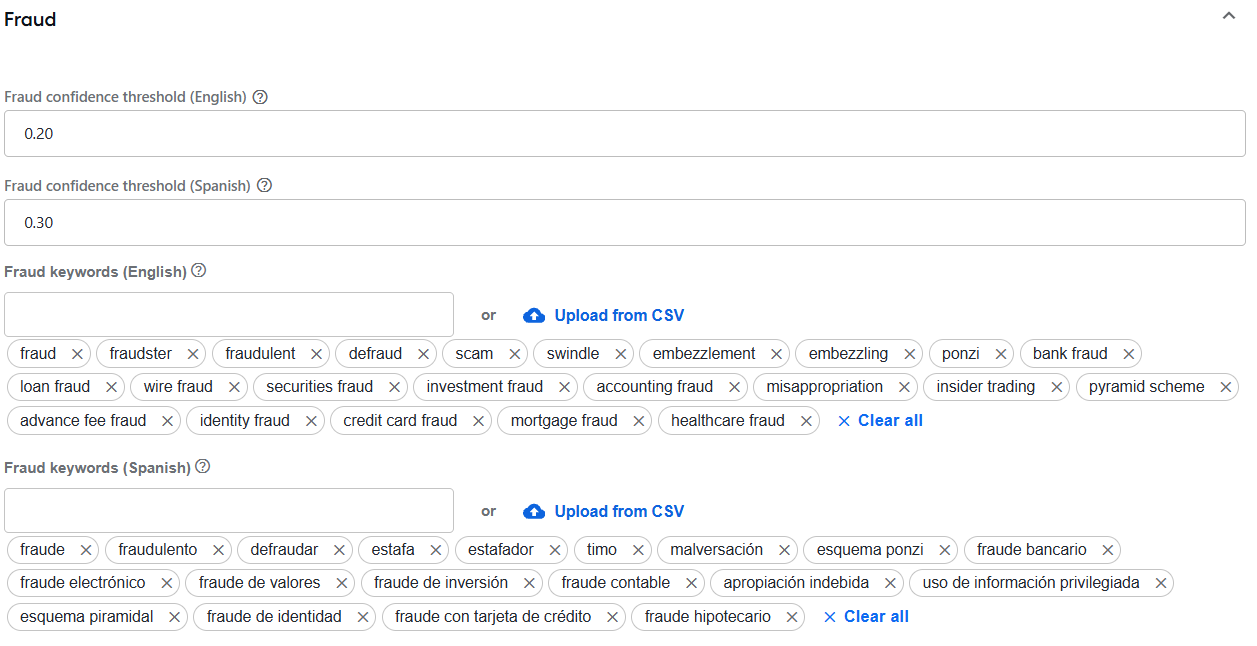
Set confidence threshold in English and in Spanish for each crime category you added to the escalation list.
Each selected category has its own minimum confidence score (0–1) that the category must reach for an article to be considered a match. English and Spanish content are scored against separate, independently tunable thresholds. Per-category defaults are tuned individually as described in the table under the expand below.
See pre-category defaults
Category English score Spanish score Fraud 0.2 0.3 Bribery & Corruption 0.25 0.47 Money Laundering 0.27 0.38 Tax Evasion 0.4 0.55 Terrorism 0.26 0.38 Narcotics 0.2 0.48 Violent Crime 0.26 0.55 Sexual Crime 0.23 0.47 Organized Crime 0.2 0.45 Cybercrime 0.27 0.55 Environmental Crime 0.47 0.5 Weapons 0.3 0.45 Regulatory Violation 0.35 0.58 Human Rights 0.25 0.35 Theft & Robbery 0.39 0.49 Counterfeiting 0.21 0.6 Human Trafficking 0.39 0.6 Set keywords for each crime category you added to the escalation list.
Each category shows two editable keyword lists, one for English content and one for Spanish content, used to match article text for that category, each pre-populated with sensible language-specific defaults. Keywords can be added, removed, or uploaded from a CSV.
When you remove a category from the Crimes to escalate box, the associated confidence threshold and keywords fields in both languages are hidden. When you add the category back, its defaults are restored.
Work principle
When using the feature, mind the following important considerations:
By default, every crime category is selected and articles with no detected category are escalated for review.
An article follows the normal adverse flow if it matches a selected category where the keyword confidence meets or exceeds the category's confidence threshold. Matching combines exact seed hits with cosine-similarity scoring governed by the Minimum pair similarity and Minimum anchor similarity values.
Matching is language-aware: English content is scored against each category's English keywords and English threshold, while Spanish content is scored against its Spanish keywords and Spanish threshold.
An article with no selected category match is escalated or marked False Positive according to the Escalate adverse articles when none of the Crime Categories is detected setting.
When Enable cascade rescue/veto is selected, articles that are a close call for a crime type—those within the Cascade delta of the category's confidence threshold—get a second look:
A crime type the first pass missed is added when the check is at least as confident as the Cascade rescue threshold.
A crime type the first pass flagged is removed when the confidence based on the check drops below the Cascade veto threshold.
Clear matches and clear non-matches are left untouched.
Deselecting a category removes it along with its confidence threshold and keywords from the matching set. If you deselect all categories, no crime category filtering is applied.
Human in the Loop
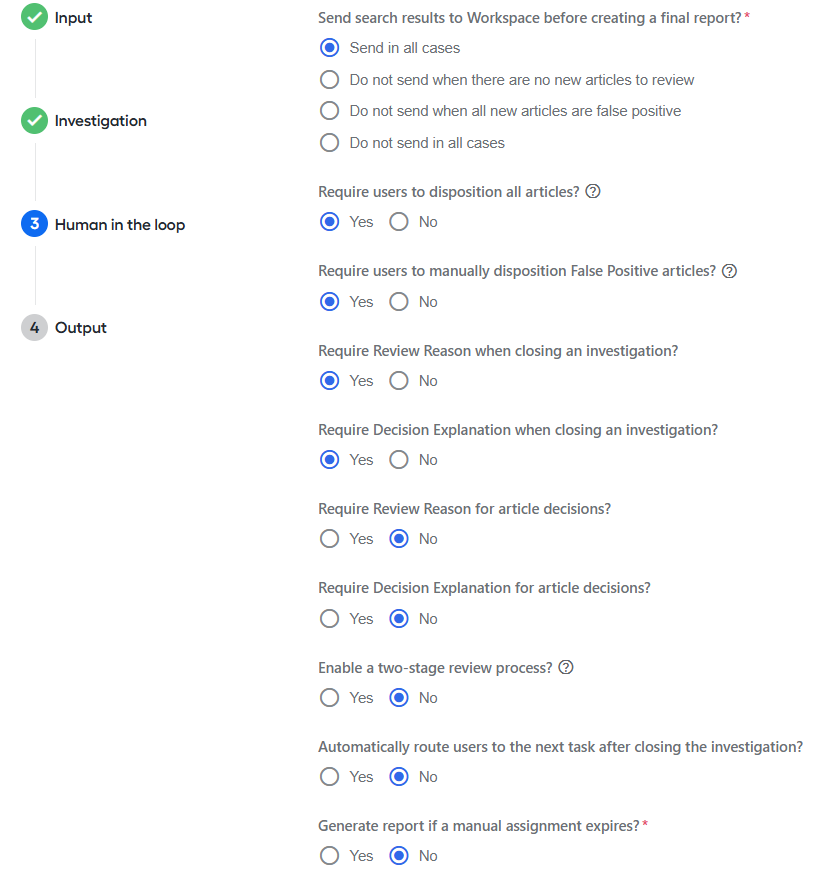
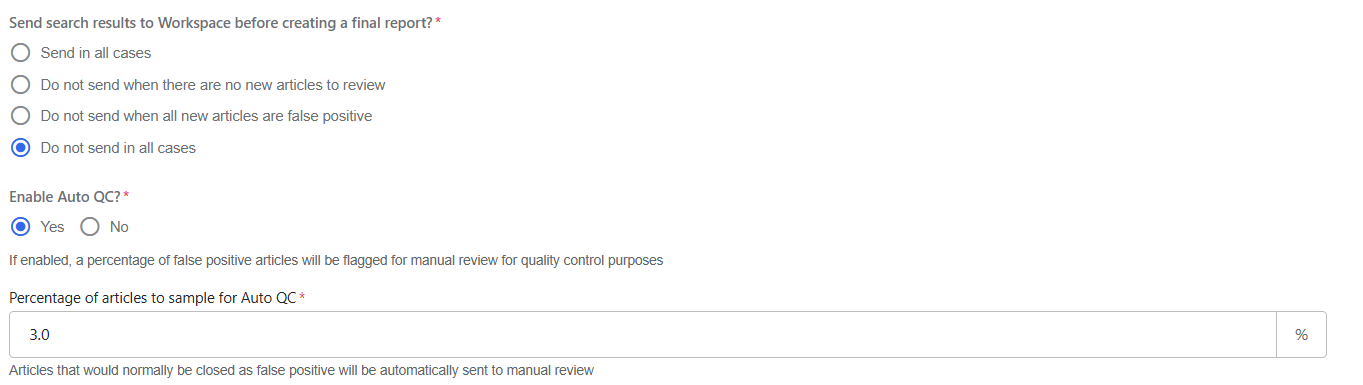
Configure whether and how you want to send the search results to Workspace by selecting one of the following options:
Send in all cases: the AI Agent creates manual review steps for every search run.
Do not send when there are no new articles to review: the AI Agent skips the manual review step when all retrieved articles are evaluated as False Positives or have been previously reviewed1 with the False Positive status.
Do not send when all new articles are false positive: the AI Agent skips the manual review step when all retrieved articles are evaluated as False Positive or have been previously reviewed1 with any status.
Do not send in all cases: the AI Agent skips the manual review step in all cases, sticking to the model's decisions.
Depending on the selected option, configure the settings below:
Review and disposition settings
Enable Auto QC?: if enabled, the specified percentage of false positive articles are flagged for manual review for quality control purposes. Set the percentage in the Percentage of articles to sample for Auto QC field.
The option is available only if you select Do not send in all cases.
Require users to disposition all articles?: set to Yes if you want users to disposition all articles prior to closing an investigation in Workspace.
Require users to manually disposition False Positive articles?: configure if users must manually select an investigation status for False Positive articles and provide a comment.
Require Review Reason when closing an investigation?: if set to Yes, reviewers cannot save or close an overall investigation until all mandatory review comments are provided.
Require Decision Explanation when closing an investigation?: if set to Yes, reviewers cannot save or close an overall investigation until all mandatory review comments are provided.
Require Review Reason for article decisions?: if set to Yes, reviewers cannot save or close a review of an individual article until the review comment is added.
Require Decision Explanation for article decisions?: if set to Yes, reviewers cannot save or close a review of an individual article until the decision explanation is added.
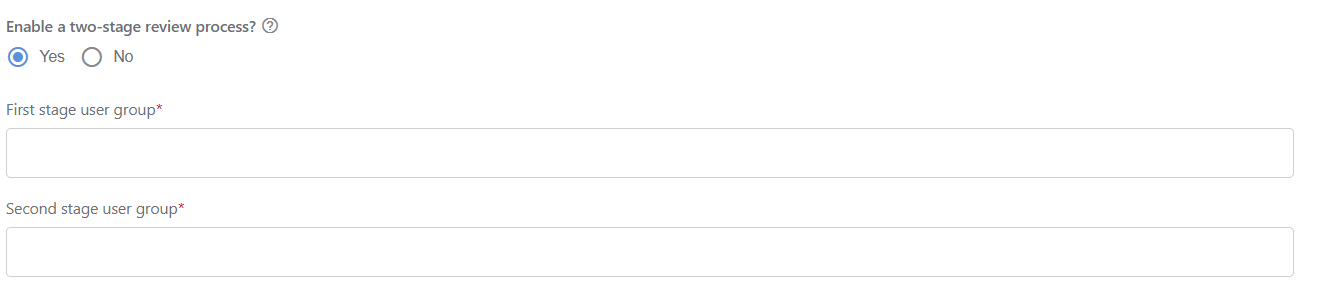
Enable a two-stage review process?: set to Yes if you want to activate a workflow where investigations are reviewed in two steps by different user groups. You will also need to specify the two groups in the fields below:
First stage user group: specify the user group for initial reviews. Users in this group cannot select True Positive for articles but can reassign tasks to the second-stage group.
Second stage user group: select the user group for final reviews. Users in this group have permissions to select True Positive and submit the investigation with the status.
Once the option is enabled, new Manual Tasks are assigned to the first-stage group by default.
Automatically route users to the next task after closing the investigation?: choose whether you want users to be routed to the next task in the queue. If the option is disabled, users are always taken back to the main queue list after closing or saving an assignment.
Generate report if a manual assignment expires?: if the parameter is set to Yes, when a manual review assignment in Workspace expires, it is considered submitted. The transaction is processed as usual, and a report is generated.
Ignore list settings

Set the Allow users to add websites to ignore list? option:
If set to Yes, users are allowed to add websites or articles to the ignore list directly from Evan's manual assignments in Workspace. Associated URLs and metadata are saved to the
content_relevance_feedbackData Store with theenabledparameter set totrue. In future search requests, AMM will automatically ignore these articles and websites, and they will not be displayed in manual review assignments.If set to Yes, with additional approval, added websites or articles will require approval before being ignored. Associated URLs and metadata are saved, but not enabled. The approving person should review the Adverse Media Monitoring Blocked URLs analytics dashboard and enable the required URLs for ignoring.
If set to No, users are not allowed to add websites to the ignore list.
Adding a website to the ignore list will only impact new Manual Tasks submitted after applying the configuration. Any existing Manual Tasks are not updated.
For more information on how the ignore list works, see the guide.
Assignment status and comment customization
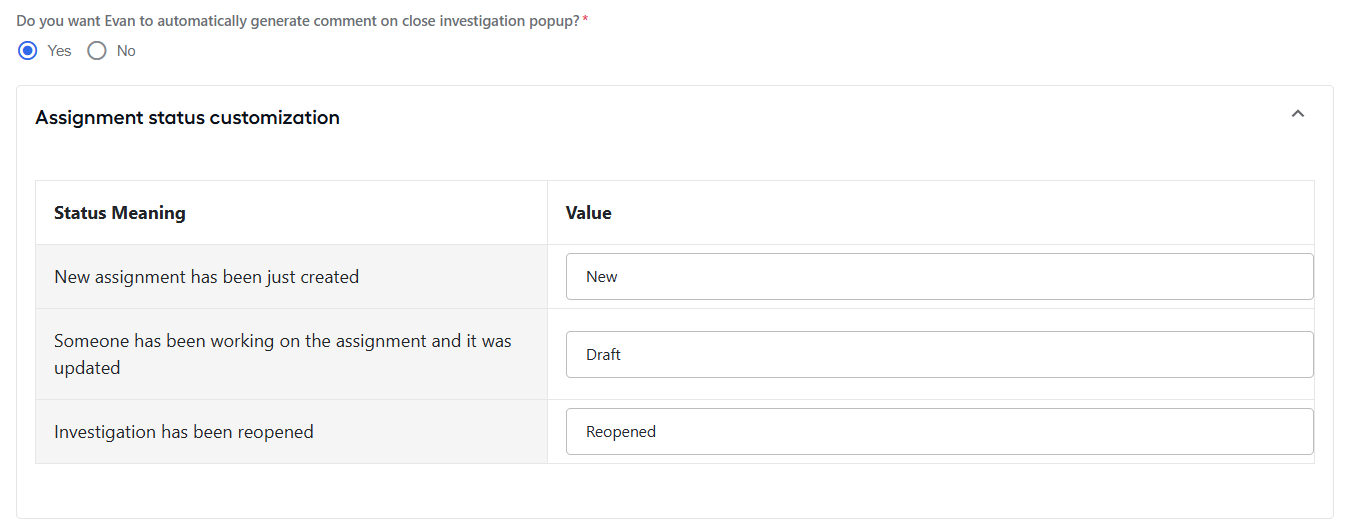
Set Do you want Evan to automatically generate comment on close investigation popup? to Yes if you want Evan to automatically generate a summary comment in the close investigation popup during manual review. Set the setting to No if the comment is not generated and the field is left empty. By default, the setting is set to Yes.
The settings in the Assignment status customization section allow you to view and customize the labels shown for investigation statuses in a Manual Task. The default values are as follows:
- New: the assignment has just been created.
- Draft: someone had been working on the assignment, and it was updated.
- Reopened: the investigation has been reopened.
To add or edit a custom label to indicate an assignment status, enter your preferred label text in the right column next to the corresponding description. The status description is not editable.
Shorthand list of predefined reasons
In the Shorthand list of predefined reasons section, you can specify additional shorthand reasons that can be used by analysts during the manual review.
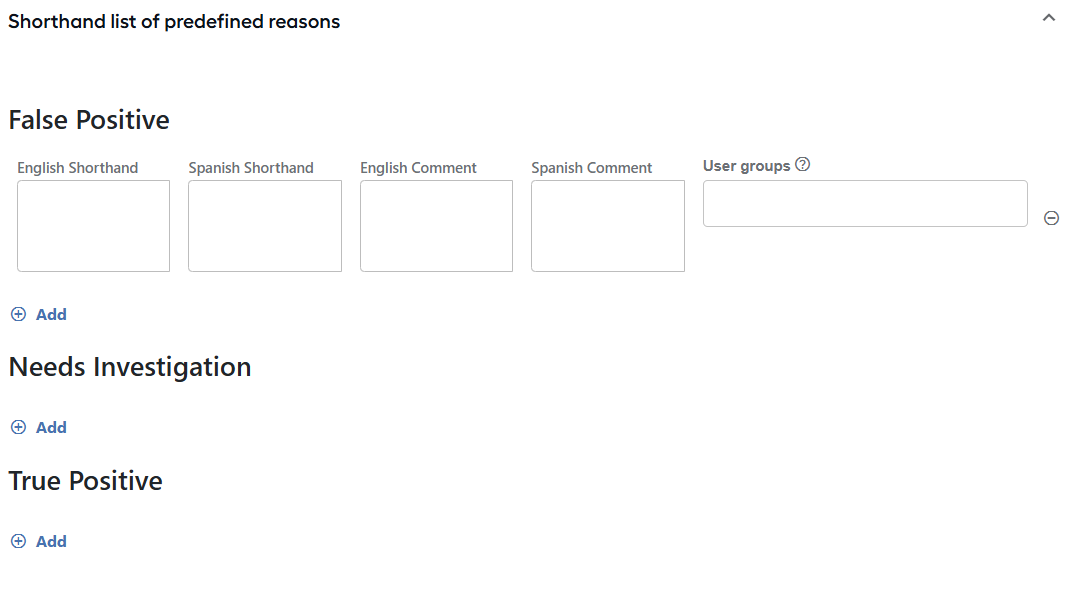
To add a shorthand reason, click the Add button and specify the following:
- English Shorthand: add shorthand reason text in English.
- Spanish Shorthand: add shorthand reason text in Spanish.
- English Comment: add a comment in English associated with the shorthand.
- Spanish Comment: add a comment in Spanish associated with the shorthand.
- User groups: define which user groups can see the created shorthand. You can enter multiple groups. If no groups are specified, the shorthand is visible to all users.
Additional customization options
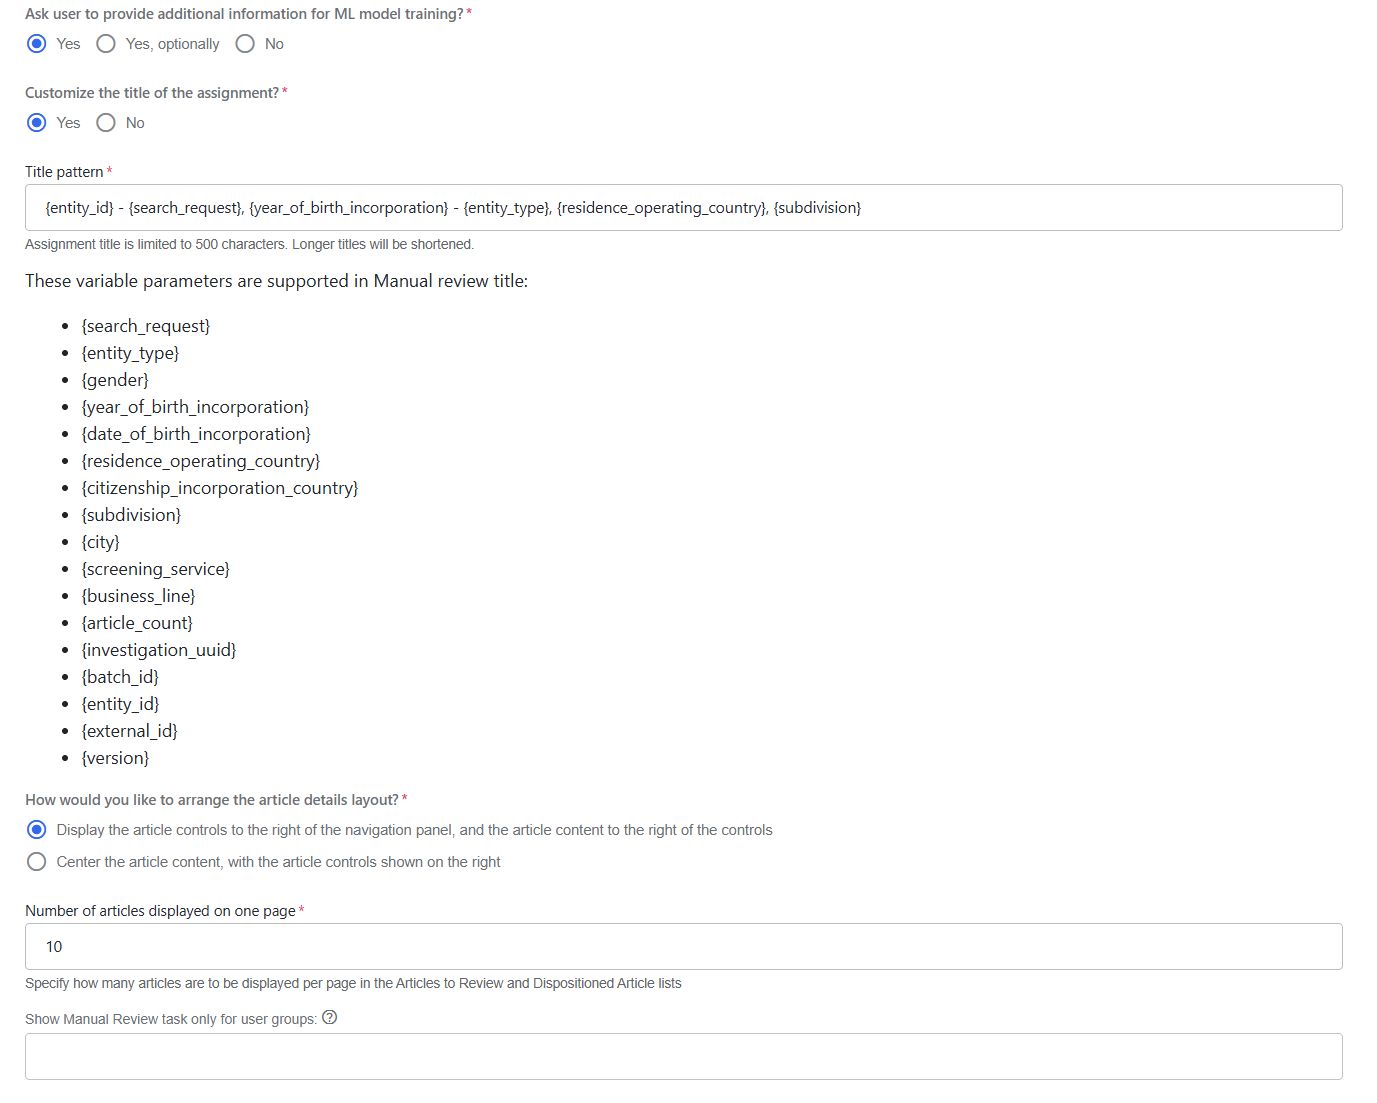
Ask user to provide additional information for ML model training?
Choose Yes if you want Evan to ask users for additional information before submitting an assignment from Workspace.
Choose Yes, optionally, and Evan will show users additional information options without requiring to select them.
Choose No if you want no additional information requested from users.
Customize the title of the assignment?
Choose Yes if you want Evan to ask users to provide a title pattern for assignment submission and display in Workspace.
Choose No if you want the default title to be used with no additional information requested from users.
How would you like to arrange the article details layout?
Choose a layout for displaying manual review assignment components in Workspace:
- Display the article controls to the right of the navigation panel, and the article content to the right of the controls: article controls are moved to the left side, towards the article list, and the article content is moved to the right.
- Center the article content: with the article controls shown on the right, the article content is displayed in the middle.
Number of articles displayed on one page: number of articles displayed per page on the Articles to Review and Dispositioned Articles lists within a manual review assignment page.
Show Manual Review task only for user groups: restricts which users can see the manual review and Ad Hoc investigation tasks in Workspace.
Enter one or more user group names, taking into account the following considerations:
Each name is added as a separate tag as you press Enter, and only members of the specified groups will see the tasks.
Group names might contain spaces.
If no groups are entered, the tasks are visible to everyone.
The combined list is limited to 1024 characters.
The setting applies to every investigation. To restrict it to a single investigation instead, provide the
_sys_user_groupsinput field, which takes precedence over this setting.
Output
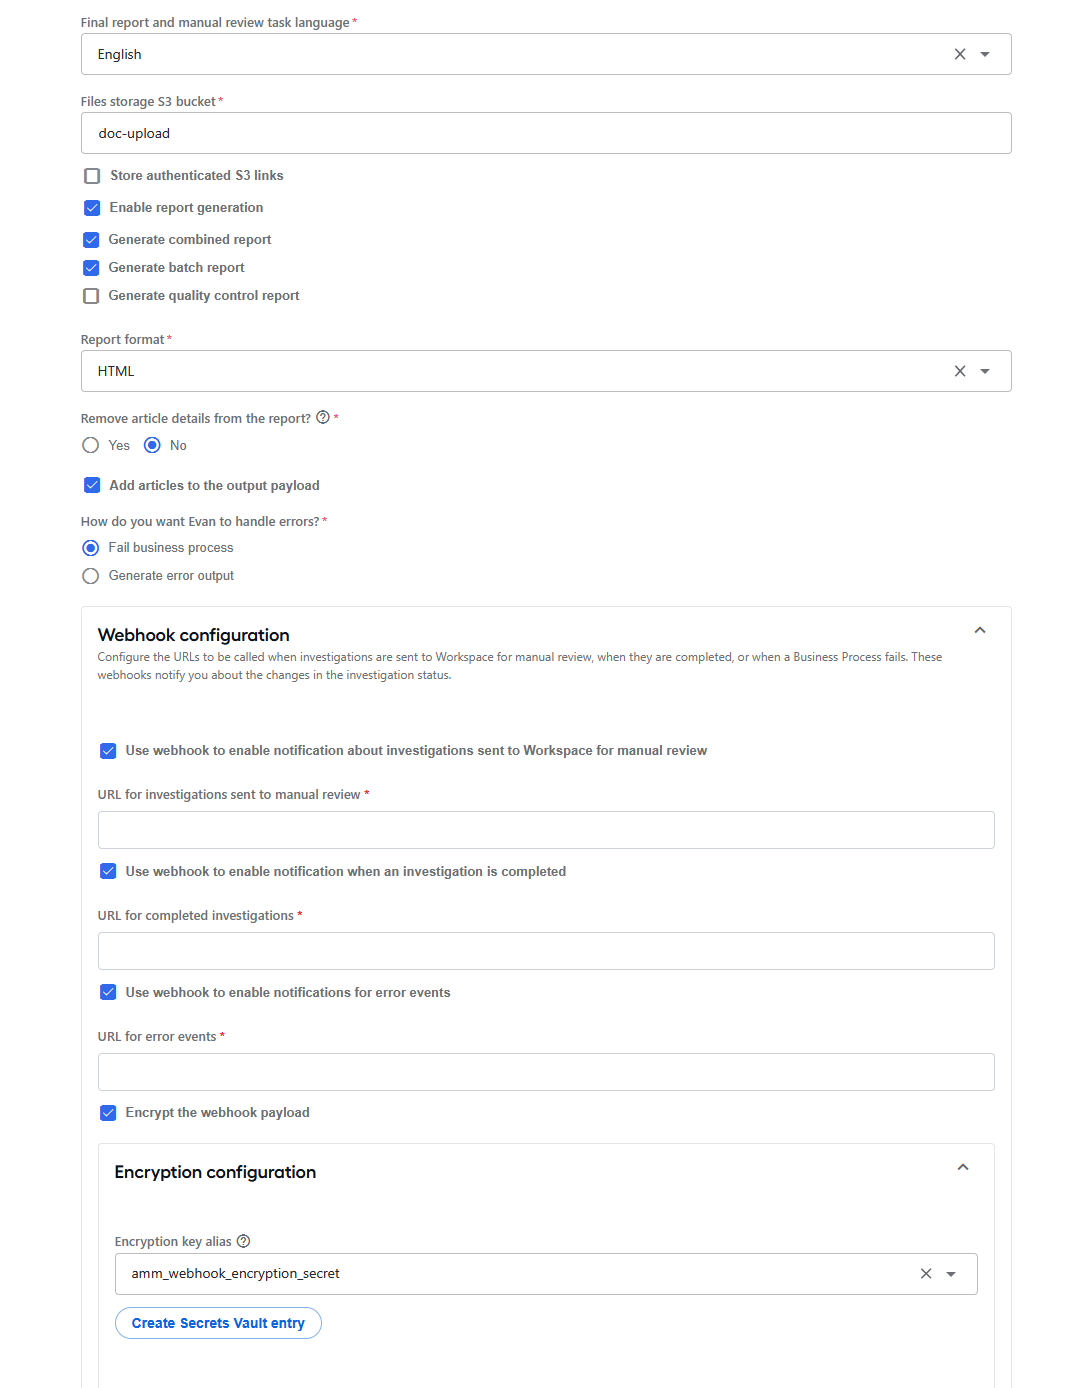
This is the last configuration step where you specify the output parameters as detailed in the sections below.
Reporting and storage preferences
Final report and manual review task language: select the language of the final report and Manual Task.
Files storage S3 bucket: specify the S3 bucket name used to store uploaded files. The field is mandatory and must not be empty. The default value is
doc-upload.Store authenticated S3 links: when the checkbox is selected, Evan saves authenticated (pre-signed) S3 links instead of plain S3 object URLs. The option is deselected by default.
Enable report generation: when this option is deselected, Evan skips the report generation entirely.
Generate combined report: select to generate a combined report. The option is not available for requests through REST API.
Generate batch report: select to generate a batch report. The option is not available for requests through REST API.
Generate quality control report: select to generate a quality control report if you enabled the quality control on the Human in the Loop step. The option is not available for requests through REST API.
Report format: select the format of the report for screening requests. Available options are HTML or PDF.
Remove article details from the report?: if set to Yes, AMM generates only the short version of the report without the full article text.
Send quality control report to: once a batch of records is processed and a quality control report is generated, the latter is sent to the email specified in the field.
Note that the option is available only when the Generate quality control report checkbox is selected. Also, mind that a quality report is not generated when screening starts with REST API.
Add articles to the output payload: if enabled, Evan includes full article details in the output payload. Otherwise, articles are omitted.
Error handling
How do you want Evan to handle errors?
Choose Fail business process if you want Evan to stop the Core AMM Business Process at the failed step.
Select Generate error output if you want Evan to continue processing but generate error output.
Webhook configuration
Use webhook to enable notification about investigations sent to Workspace for manual review: if the checkbox is selected, a webhook callback is sent every time when a manual review task is created.
- URL for investigations sent to manual review: specify a URL to be triggered with the webhook callback. For the webhook payload structure, see the AMM API reference.
Use webhook to enable notification when an investigation is completed: if the checkbox is selected, a webhook callback is sent every time when an investigation is completed.
- URL for completed investigations: specify the URL to be triggered with the webhook callback. For the webhook payload structure, see the AMM API reference.
Use webhook to enable notifications for error events: if the checkbox is selected, a webhook callback is sent every time when an error occurs.
- URL for error events: specify the URL to be triggered with the webhook callback. For the webhook payload structure, see the AMM API reference.
Encrypt the webhook payload: select if you want the webhook payload to be encrypted. For details on how the encryption works and what you need to do, see the Webhook payload encryption section.
- Encryption key alias: specify the name of the alias in Secrets Vault containing the encryption key. If you do not have one, click Create Secrets Vault entry and set one up in accordance with the guide.
Webhook payload encryption
Webhook payload encryption ensures that sensitive investigation results sent from AMM to your external systems are protected in transit. When enabled, Evan does not send the webhook body as plain JSON. Instead, the AI Agent encrypts it using Google Tink’s AEAD encryption with the key provided by you.
Encryption flag: when the Encrypt the webhook payload configuration property is enabled for final results or for manual review alerts, Evan automatically encrypts the webhook payload.
Encryption key alias: Evan fetches the encryption key from the Secrets Vault using the alias defined in Encryption key alias field. The value stored in Secrets Vault must be a valid Tink JSON keyset.
Below is a sample keyset that can be stored in Secrets Vault:
{
  "primaryKeyId": 123456789,
  "key": [{
    "keyData": {
      "typeUrl": "type.googleapis.com/google.crypto.tink.AesGcmKey",
      "value": "EhA1mwq3dU45s3lMquF8H0m7gQ==",
      "keyMaterialType": "SYMMETRIC"
    },
    "status": "ENABLED",
    "keyId": 123456789,
    "outputPrefixType": "TINK"
  }]
}
The encryption sequence is as follows:
Evan serializes the webhook payload into JSON using the provided key from the Secrets Vault to encrypt the payload.
The webhook request is sent with the following Content-Type setting:
application/octet-stream. The request body contains only the encrypted byte array (not JSON).The webhook is decrypted on the customer side. To consume the encrypted payloads, your system must use the same Tink keyset to decrypt the data.
Below is an example in Java:
import com.google.crypto.tink.Aead;
import com.google.crypto.tink.CleartextKeysetHandle;
import com.google.crypto.tink.JsonKeysetReader;
import com.google.crypto.tink.KeysetHandle;

byte[] encryptedPayload = ...; // webhook request body
String keysetJson = ...; // same JSON keyset you uploaded to Secrets Vault

KeysetHandle handle = CleartextKeysetHandle.read(JsonKeysetReader.withString(keysetJson));
Aead aead = handle.getPrimitive(Aead.class);
byte[] decrypted = aead.decrypt(encryptedPayload, new byte[0]);
String payloadJson = new String(decrypted, StandardCharsets.UTF_8);
After the decryption, payloadJson will contain the original AMM webhook JSON.
To enable the webhook encryption, do the following:
Generate an encryption keyset. Use Tink key generation tools or WorkFusion’s guidance to create a JSON keyset. Recommended: AES-256-GCM key type.
Add the generated JSON keyset as a new secret entry to Secrets Vault. Use a descriptive alias, for instance, amm_webhook_encryption_key.
Update the AMM configuration. On the Output step, select the Encrypt the webhook payload checkbox and specify the key alias.
Update your webhook consumer to make sure the system receiving AMM webhooks has access to the same JSON keyset.
Implement a decryption logic similar to the one shown above before processing the payload.
Review configuration
Once you complete the required fields, review the configuration. You can return to any step to change previous settings before finalizing. If everything is correct, click Finish. You are now ready to use AMM to run an investigation.
Configure advanced settings
Data Purge
AMM includes three Data Management procedures that clean up old database records and S3 files. They are imported automatically when the AMM bundle is installed and appear in the Data Management list in Control Tower (go to Advanced → Data Management).
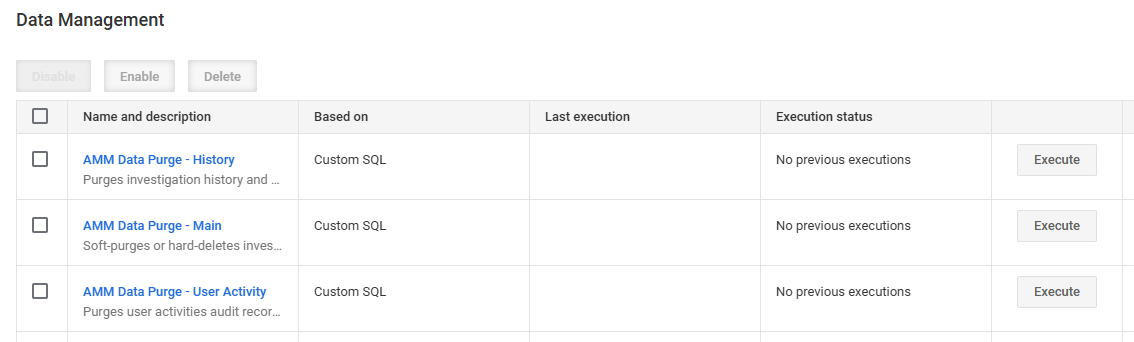
| Procedure | What it does |
|---|---|
| AMM Data Purge - Main | Removes investigation events, input data, and merge records linked to eligible investigations and batches. Depending on dataPurge.deleteAnalyticsData, it either hard-deletes investigation, article, and batch rows or soft-flags them as purged. In addition, the procedure collects and deletes S3 report files and article content files based on the deleteReports and deleteArticleContent flags. |
| AMM Data Purge - History | Removes the investigation history and article review history records (used by decision reapplication) older than the dataPurge.historyStoragePeriodInDays value. Runs only when dataPurge.deleteArticleAndInvestigationHistory is true. |
| AMM Data Purge - User Activity | Removes user activity audit records older than the dataPurge.userActivityStoragePeriodInDays value. Runs only when dataPurge.deleteUserActivity is true. |
An investigation is eligible for purge when is_purged = 0 and its completion time is older than the dataPurge.storagePeriodInDays value. A batch is eligible when is_purged = 0 and its creation date is older than the same period.
Configure Data Purge settings
To configure Data Purge settings, do the following:
Log in to Control Tower.
Click the Advanced tab and select Data Stores.
Select amm_configuration and set the following parameters:
Name Value type Example Description dataPurge.storagePeriodInDaysInteger 30Specify how many days after the completion of a transaction its data should be stored. dataPurge.historyStoragePeriodInDaysInteger 30Specify how many after the completion of a transaction its history data should be stored (used in decision reapplication). dataPurge.userActivityStoragePeriodInDaysInteger 30Specify how many days after the completion of a transaction user activity data should be stored. dataPurge.deleteReportstrue/falsefalseSet to trueto delete generated reports.dataPurge.deleteAnalyticsDatatrue/falsefalseSet to trueto delete analytics data.dataPurge.deleteArticleAndInvestigationHistorytrue/falsefalseSet to trueto delete the historical data for previous investigations (used in decision reapplication).dataPurge.deleteUserActivitytrue/falsefalseSet to trueto delete the user activity data.dataPurge.deleteArticleContenttrue/falsefalseSet to trueif you need to delete the article content.
Run Data Purge manually
In Control Tower, click Advanced and select Data Management.
Select the procedure you want to run (for example, AMM Data Purge - Main).
Click Execute.
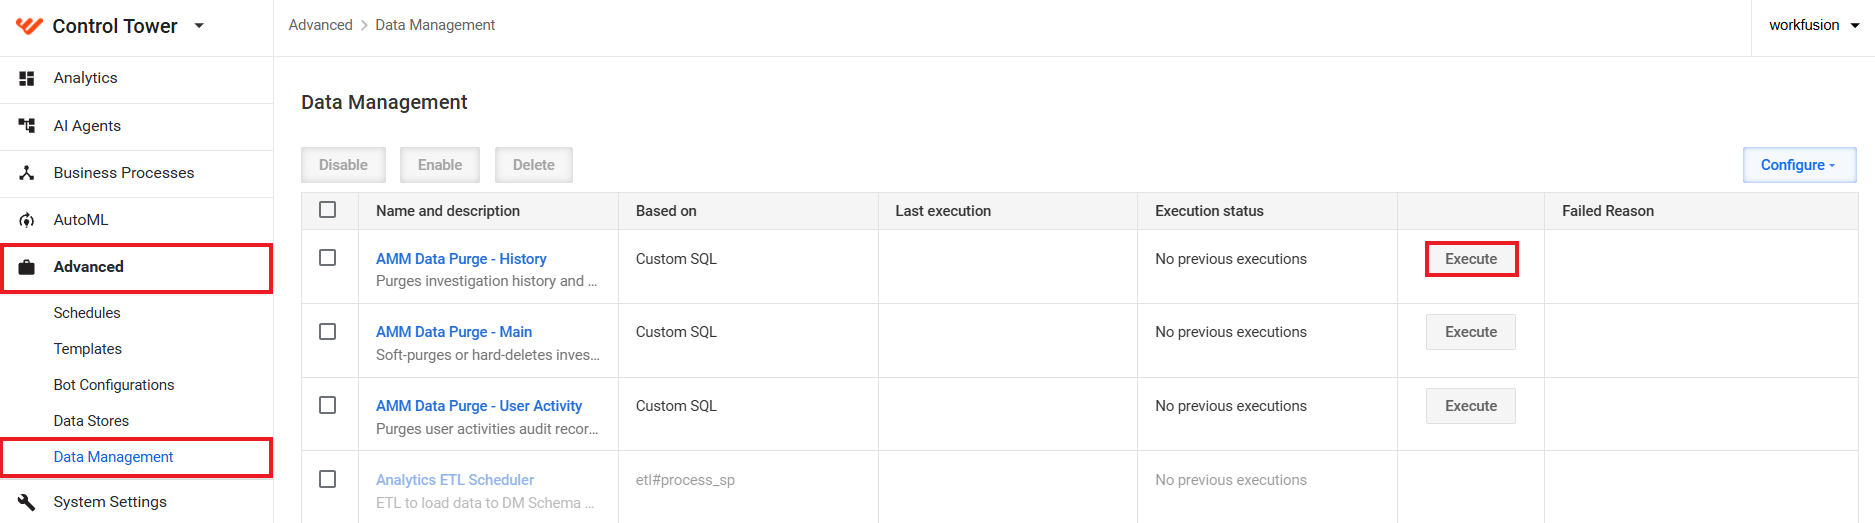
Configure Data Purge scheduling
You can run the Data Purge BP manually or on a schedule. To configure the schedule, do the following:
In Control Tower, click Advanced and select Data Management.
In the list of data management procedures, click the procedure you want to run (for example, AMM Data Purge - Main).
In the procedure configuration window, navigate to the Set up schedule option and click the Set up button.
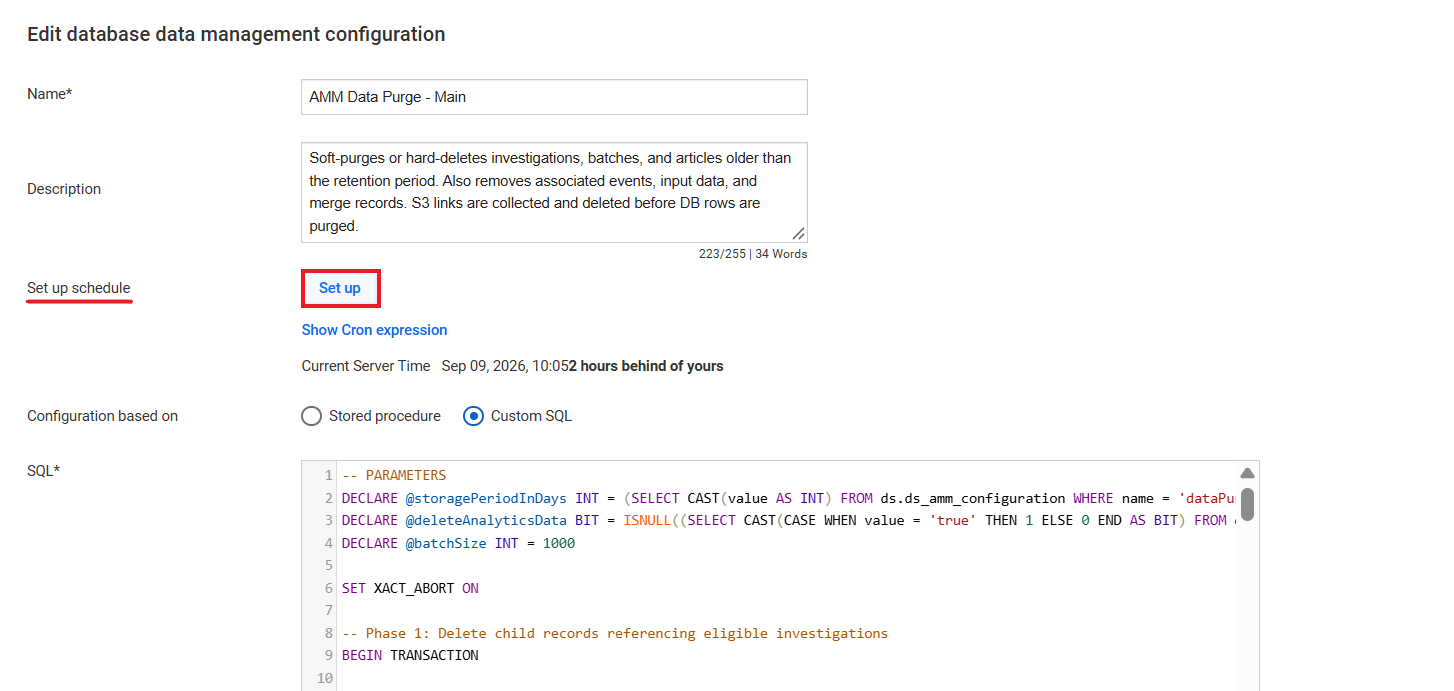
Configure the schedule as needed and click Save schedule.
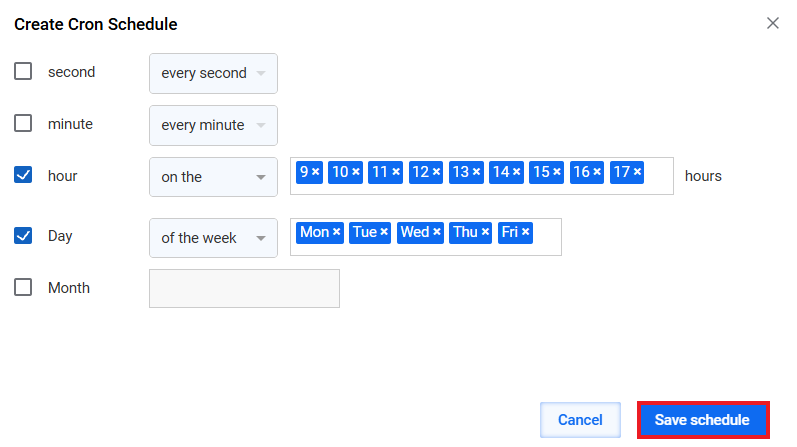
After that, the data management procedure runs automatically on a specified day and time.
To learn more about data purging in Work.AI, see Manage data lifecycle and Manage database and S3 data.
REST API endpoints
Configuring REST API endpoints for AMM investigations
To configure REST endpoints for Adverse Media Monitoring, perform the following steps:
In Control Tower, open the core BP definition Adverse Media Monitoring vX.X.X. On the Data tab, select Streaming Records from External Sources. Here, you can also specify a custom Signal ID if needed:
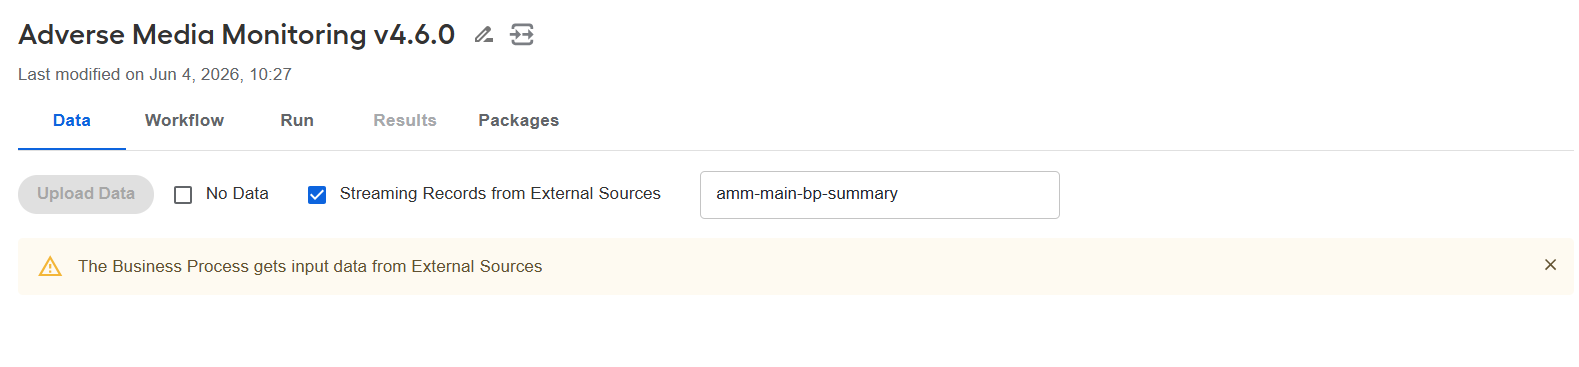
On the Run tab, click Run This Process.
After the BP starts, return to the Run tab and click Show API to find all available generated endpoints:
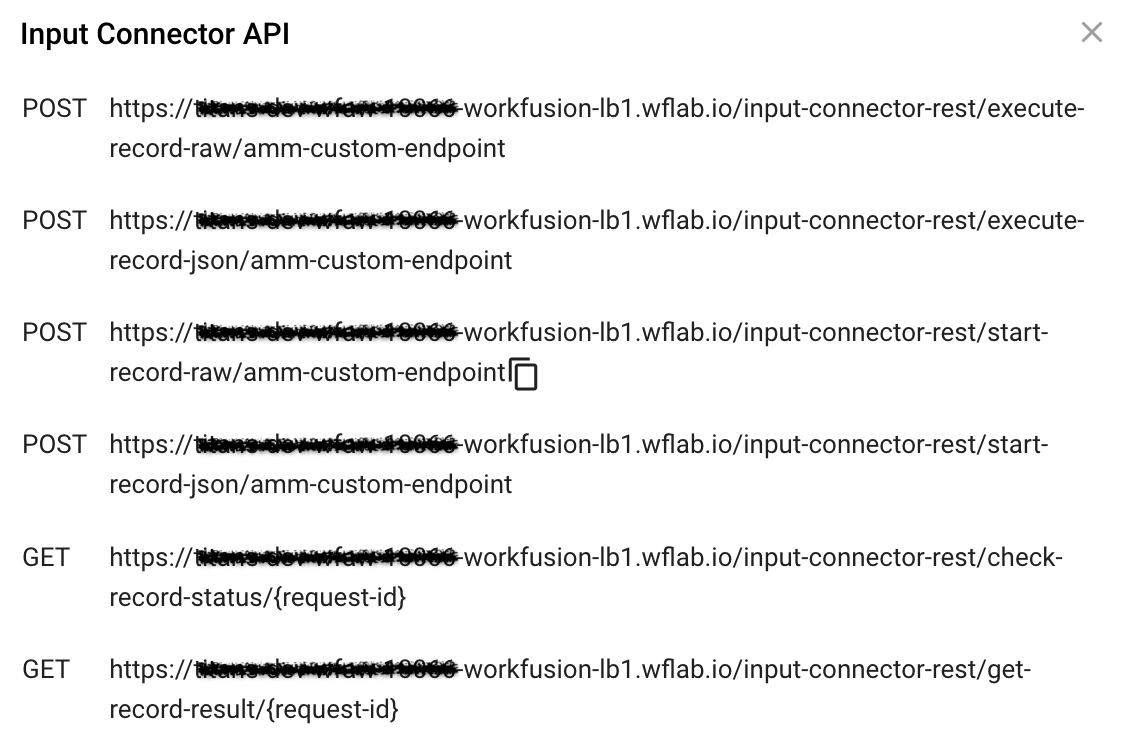
For Adverse Media Monitoring, only asynchronous invocation is supported, in particular, the following endpoints:
/start-record-raw/to start a BP/check-record-status/to check the status of a running transaction/get-record-result/to get the result data of a finished transaction
For detailed information on invoking transactions and getting access to a token, see Running AI Agents via REST API.
Sample JSON request
{
  search_request: String (required),
  entity_type: String (COMPANY),
  year_of_birth_incorporation: Integer,
  citizenship_incorporation_country: String (2 letter ISO Country code),
  subdivision: String (ISO 3166-2 code of the subdivision),
  city: String (Full City name. Used only by Thomson Reuters provider),
  search_period: Integer (search period in days),
  entity_id: String (Used for decision reapplication),
  batch_id: String (Used to group search entities for combined reports generation)
}
Sample JSON response
{
  "transactionUUID": String,
  "runUUID": String,
  "batchId": String,
  "variationUUID": String,
  "entityId": String,
  "externalId": String,
  "timestamp": UTC-date,
  "startTime": UTC-date,
  "searchRequest": String,
  "investigationStatus": String,
  "additionalInformation": String,
  "manualTaskUrl": String,
  "status": String,
  "articles": [
    {
      "articleUUID": String,
      "duplicateArticleUUID": String,
      "title": String,
      "investigationStatus": String (FALSE_POSITIVE/TRUE_POSITIVE/NEEDS_INVESTIGATION/NO_RESULTS_FOUND),
      "adjudicationReason": String,
      "publishingDate": UTC-date,
      "author": String,
      "languages": String,
      "originalLanguages": String,
      "wordCount": Integer,
      "source": String,
      "articleLink": String,
      "originalArticleLink": String,
      "score": Decimal,
      "errorCode": String
    },
        ...
  ]
}
Managing blocked URLs using REST API
The Blocked URL Management task can be invoked via a POST request to the appropriate AMM REST endpoint.
Sample request body
{
  "url_id": 123,
  "action": "ENABLE"
}
Sample success response body
When the operation is successful, the API returns a standard success response, and the task output contains the details.
Task output
{
  "url_id": 123,
  "action": "ENABLE",
  "success": true
}
Sample failure response body
If url_id is not found or the action cannot be completed, the API returns a failure response.
{
  "success": false,
  "error_message": "Failed to enable URL with ID: 456. The URL may not exist."
}
Ad Hoc search
To configure the Ad Hoc search settings, follow the steps below:
Log in to Control Tower.
On the main menu, navigate to Advanced > Data Stores.
In the Data Store list, select amm_configuration and enter the values for the following parameter:
| Name | Value type | Example | Notes |
|---|---|---|---|
adHoc.investigationBatchMaxSize | Integer | 100 | Defines how many entity names can be in one investigation batch. |
- Articles are marked as reviewed if the status or comment was updated manually.↩