Install and configure
The page provides instructions on installing and configuring the Kayla AI Agent for coordinating the perpetual Know-Your-Customer (pKYC) process.
Check requirements
WorkFusion offers the following options to install and run Kayla:
- On your premise
- In your cloud
- In a private cloud hosted by WorkFusion
System requirements
The server requirements for Kayla, the pKYC Coordinator, are the same as for Work.AI (IA Cloud Enterprise) platform. For details, refer to the Hardware and OS article.
Hardware
RPA bots are required if you use a connector or a data provider that uses them.
High-availability environments require PROXY.
Software
IA Cloud Enterprise v10.2.9 or higher
No machine learning (ML) component used
Superset Analytics available but not required
Performance and scaling
- BEP servers can be scaled horizontally for higher volumes.
Install Kayla
To install Kayla, obtain an Asset Bundle (zip archive) with the required release version from the appropriate S3 bucket. Then, upload it manually in the Control Tower interface in accordance with the guide.
Once the installation is complete, you can proceed to configure Kayla's settings.
You can configure multiple variations, or sets of parameters, for a single AI Agent. For example, different departments can set up and manage different requirements or input methods per variation. For details, refer to Manage AI Agent variations.
Configure Kayla
There are two possible ways to start the configuration flow for Kayla:
If you install Kayla without a preset configuration, wait for the installation to complete. Once you are redirected to the AI Agent version details page, open the Actions menu and click Settings.
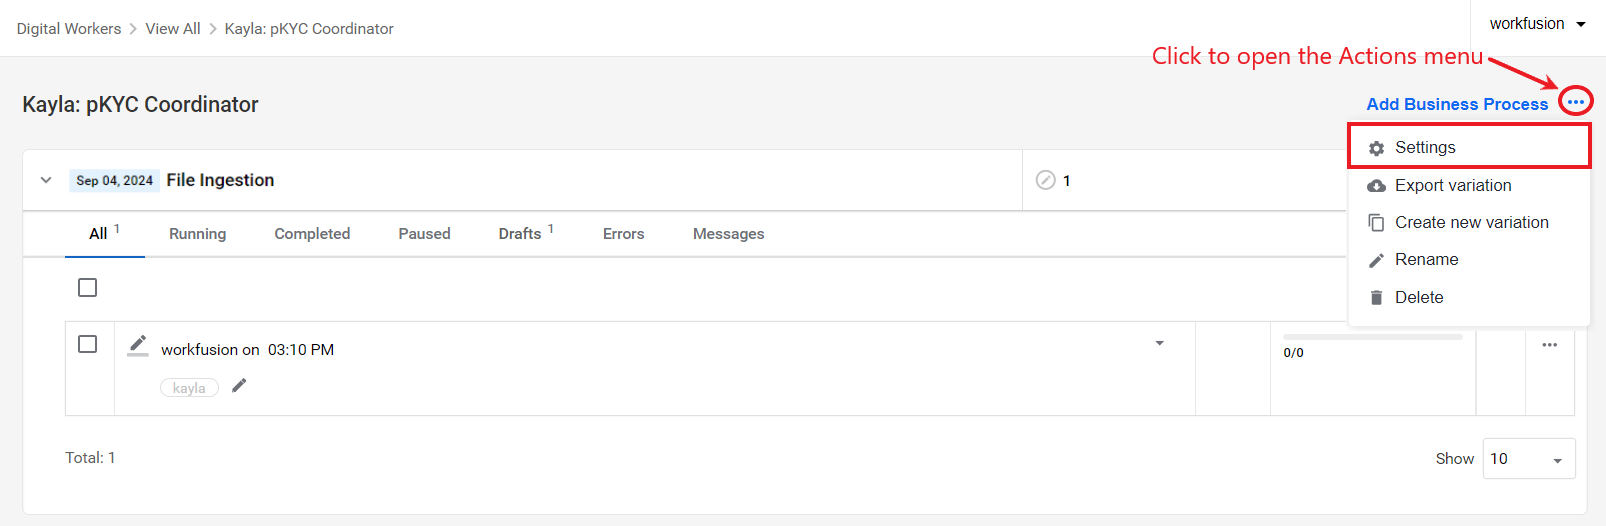
If you install Kayla as an Asset Bundle with a preset configuration, wait for the installation to complete and click Show digital worker. Then, find the installed variation in the Digital Workers list and click Prepare.

After you complete any of the flows described above, proceed to the configuration:
In Advanced > Data Stores, do the following:
Set up a proxy server.
Configure the address service domain.
Install the Chrome driver for RPA sources (if needed).
In the AI Agent configuration wizard, perform the following steps:
Set custom data providers (if needed).
Configure input sources.
Set the review requirements.
Configure a human-in-the-loop step (optional).
Define how Kayla is to deliver and store its output.
- When you configure an AI Agent variation for the first time, you must complete the steps one by one. Once you are in the last step, you can go back and make changes to any previous steps.
- If, for some reason, you cannot finish the configuration, click Save & continue later. This way, the entries you made are saved, and you can go back and complete the process later.
- Starting from Work.AI v10.2.9.2, for a variation that already has configured versions, you can import a configuration from a previous version instead of setting it from scratch. For that, click the Import version button at the bottom of the configuration screen and follow the instructions in the guide.
Proxy server
If the proxy requires authentication, set up an alias containing the proxy credentials in Secrets Vault. The key is the username address, and the value is the password. For detailed instructions, read Set up secret entries in Secrets Vault.
To configure a proxy server, do as follows:
In Control Tower, go to Advanced > Data Stores.
Select the uc_DW_KAYLA_KYC_technical_configuration Data Store.
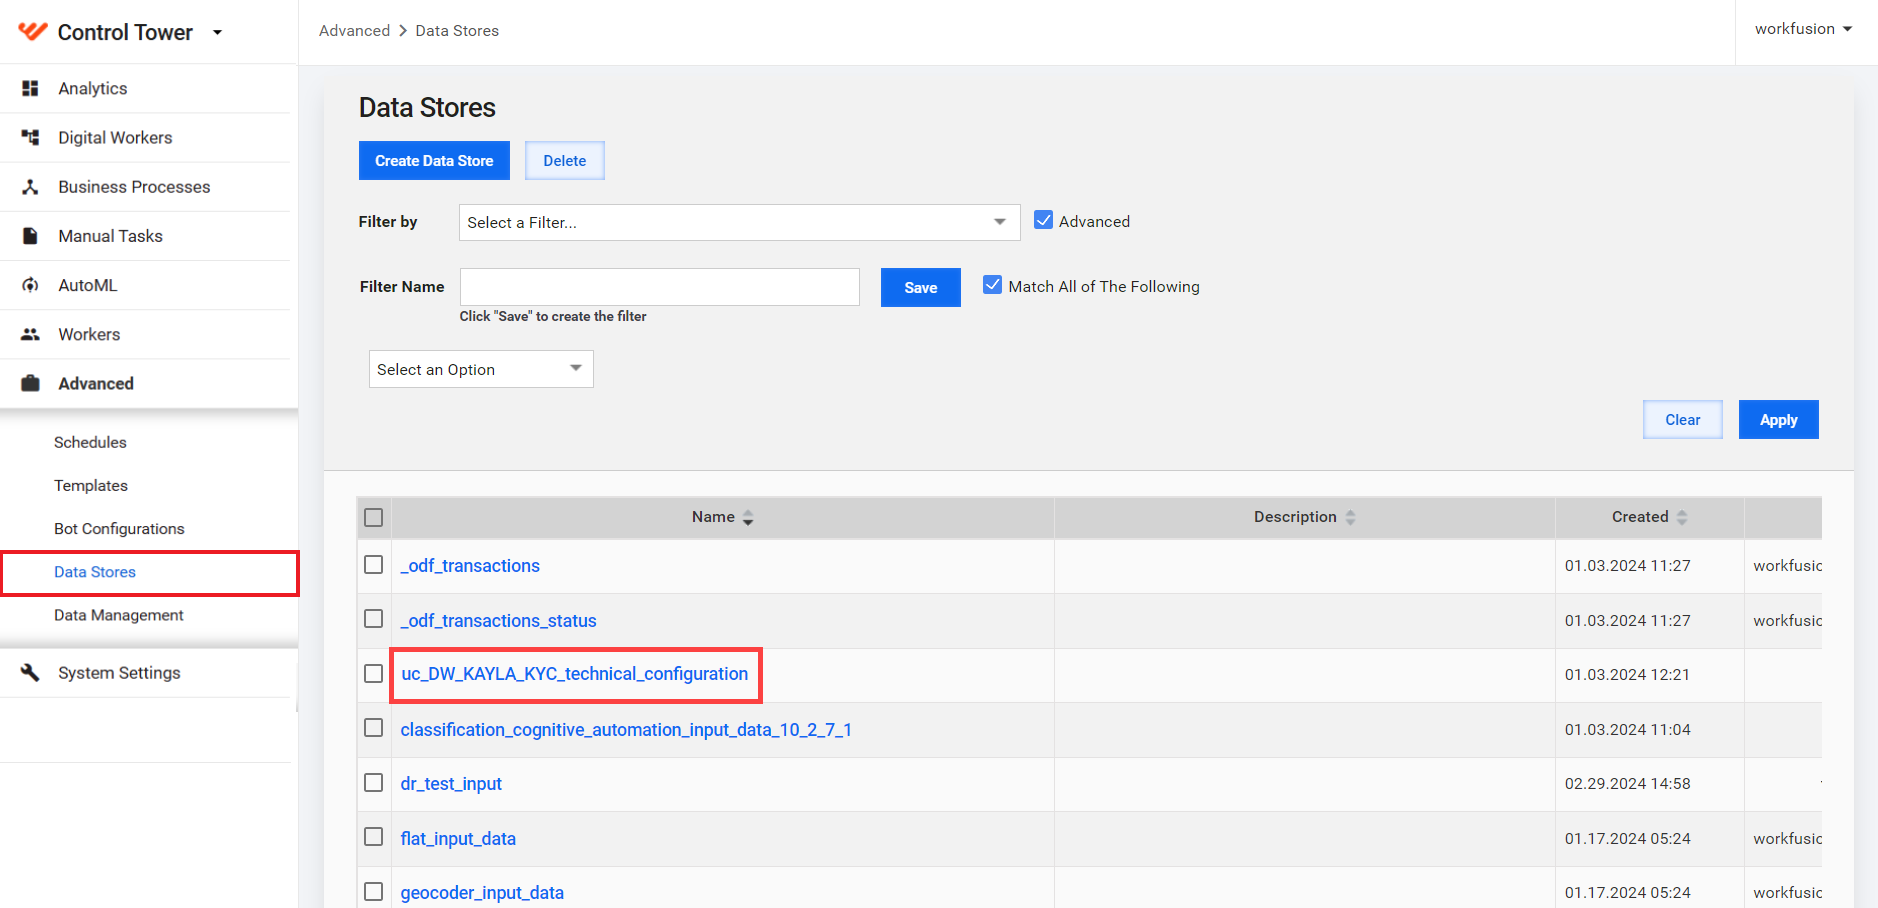
In the Data Store, set up the following fields:
Name Sample value Instruction proxy.hostproxy.customerdomain.comEnter your proxy host. proxy.port1234Enter your proxy port. proxy.credentialsAliaskayla_proxy_credentialsCreate an alias for the proxy credentials in Secrets Vault. Configure only if the proxy server requires authentication. noteIf you use the CSSF, AMF, or SEC Mutual Fund profile connectors, update the ZooKeeper settings to limit the worker pool.
In ZooKeeper, create
/config/worker-management-service/bep.worker.pool.com.workfusion.dw:dw-kayla-kyc-jnw:4.3.4-dev.max-worker-count-pool-limit 1.
Chrome driver for RPA sources
Install the Chrome driver on the auto-scaling agent servers in your environment if the following data providers are used to source input data:
AMF
British Columbia Financial Services Authority - Pension Plan profile
Central Bank of Ireland Register
CSSF
FCA Register - Mutual fund profiles
Financial Services Regulatory Authority of Ontario - Company Profiles
Retraite Quebec - Pension plan profiles
SEC Mutual Fund profiles
Address service domain
The address verification service is required to use the Verify Address ML model method for setting the input processing requirements. To access the address verification service, configure your environment (development, UAT, and production) as described below:
Navigate to Advanced > Data Stores.
Select the uc_DW_KAYLA_KYC_technical_configuration Data Store.
In the Data Store, set up the following field:
Name Sample value Description address_service_environmenthttps://address-service-uat.workfusion.io/Specify the environment name.
Data providers
The Data providers step lists all out-of-the-box (OOTB) data providers (connectors) Kayla works with, already preset for you. The data points (if any) those providers work with are displayed in the Fields column. However, only those providers you choose in the Input step are used to source data based on defined requirements.
For the complete list of supported out-of-the-box data providers, see the F.A.Q topic.
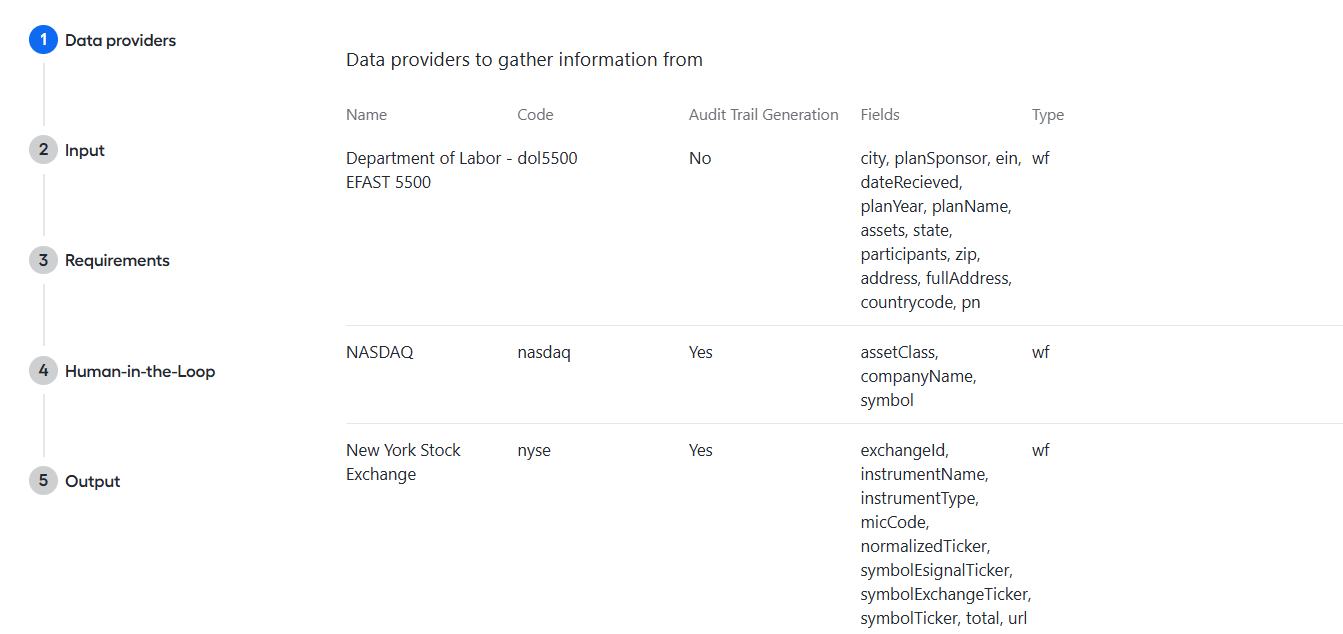
In the Data providers step, you can also set one or more custom connectors to integrate Kayla with a data source other than an OOTB data provider, for instance, your internal system.
Custom data providers
To integrate Kayla with a data source other than an OOTB data provider, for instance, your internal system, follow the instructions below:
In the bottom of the Data providers screen, click Add Another.
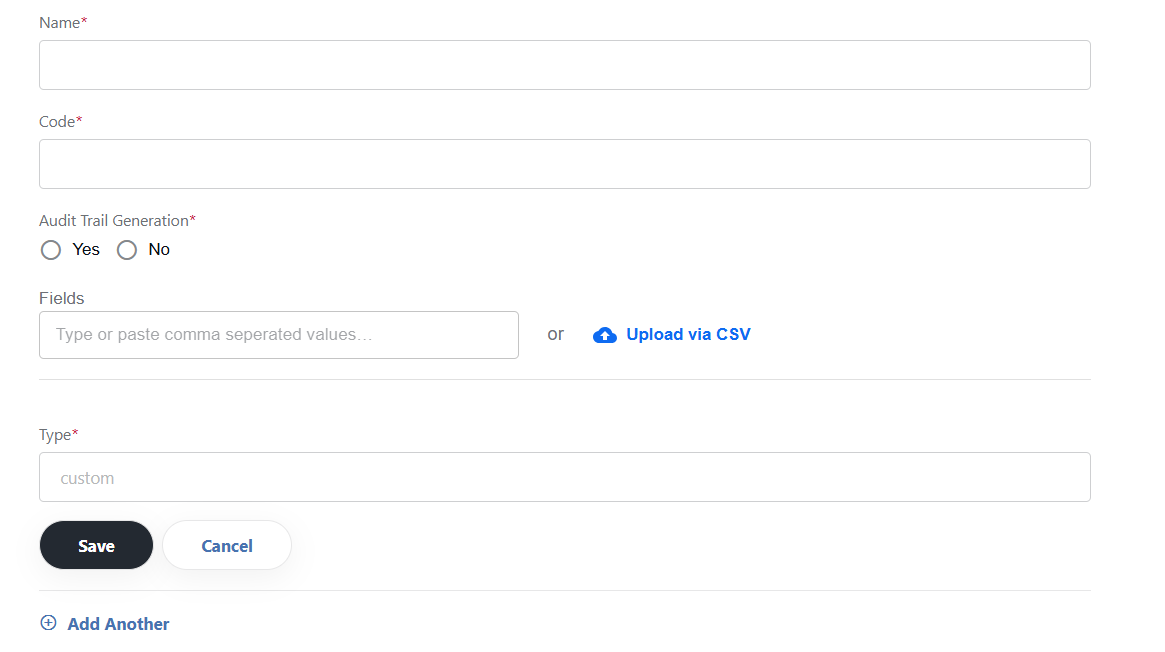
In the Name field, specify a name for the custom connector you want to add.
In the Code field, specify a unique code to identify the connector. You will need it when designing a custom Business Process to work with multiple connectors.
Set Audit Trail generation to Yes if you want Kayla to generate audit trail reports based on connector configurations.
In the Fields box, type in those field names from the custom connector's output to be reviewed with the input. You can also upload a list of such output fields as a CSV file by clicking Upload via CSV.
Click the Save button. The saved custom connector becomes available in the list of data providers in the Input step. You can choose it as an input source just as any other provider.
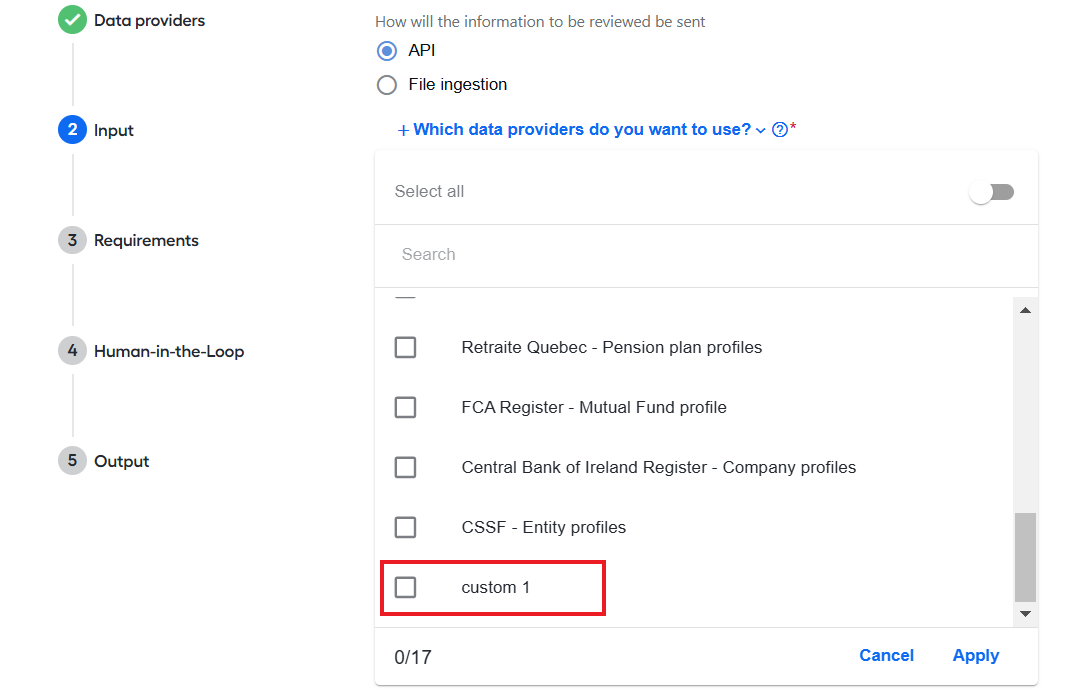
To add more connectors, click Add Another again and repeat steps 2 to 5. You can add as many custom connectors as you need.
For custom data providers, you can use any requirement review method, except for Verify Status.
Input
In the Input step, you choose and configure the following:
Input method Kayla uses to fetch the entity data to be reviewed
Data providers from where Kayla sources enrichment data
Choose input method
As the input method for Kayla, you can choose one of the two alternatives:
API: Kayla fetches data using a dedicated Application Programming Interface.
For detailed API endpoints, see the API specification.
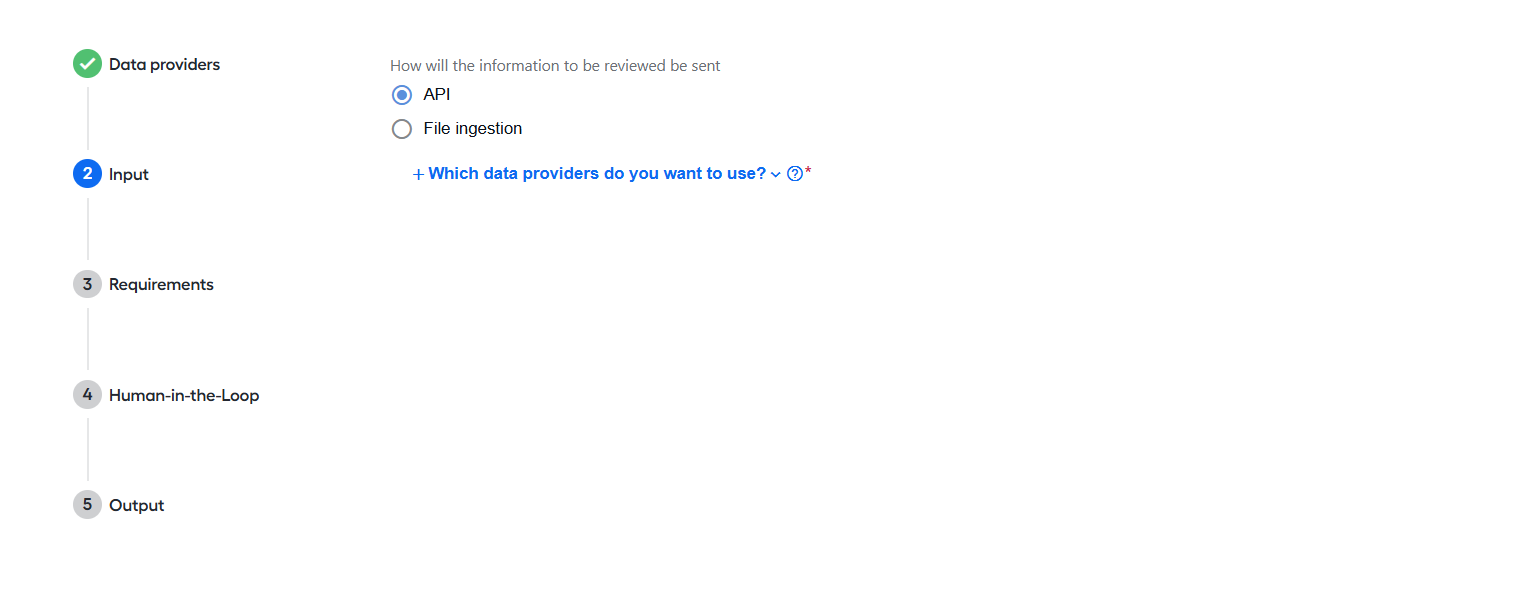
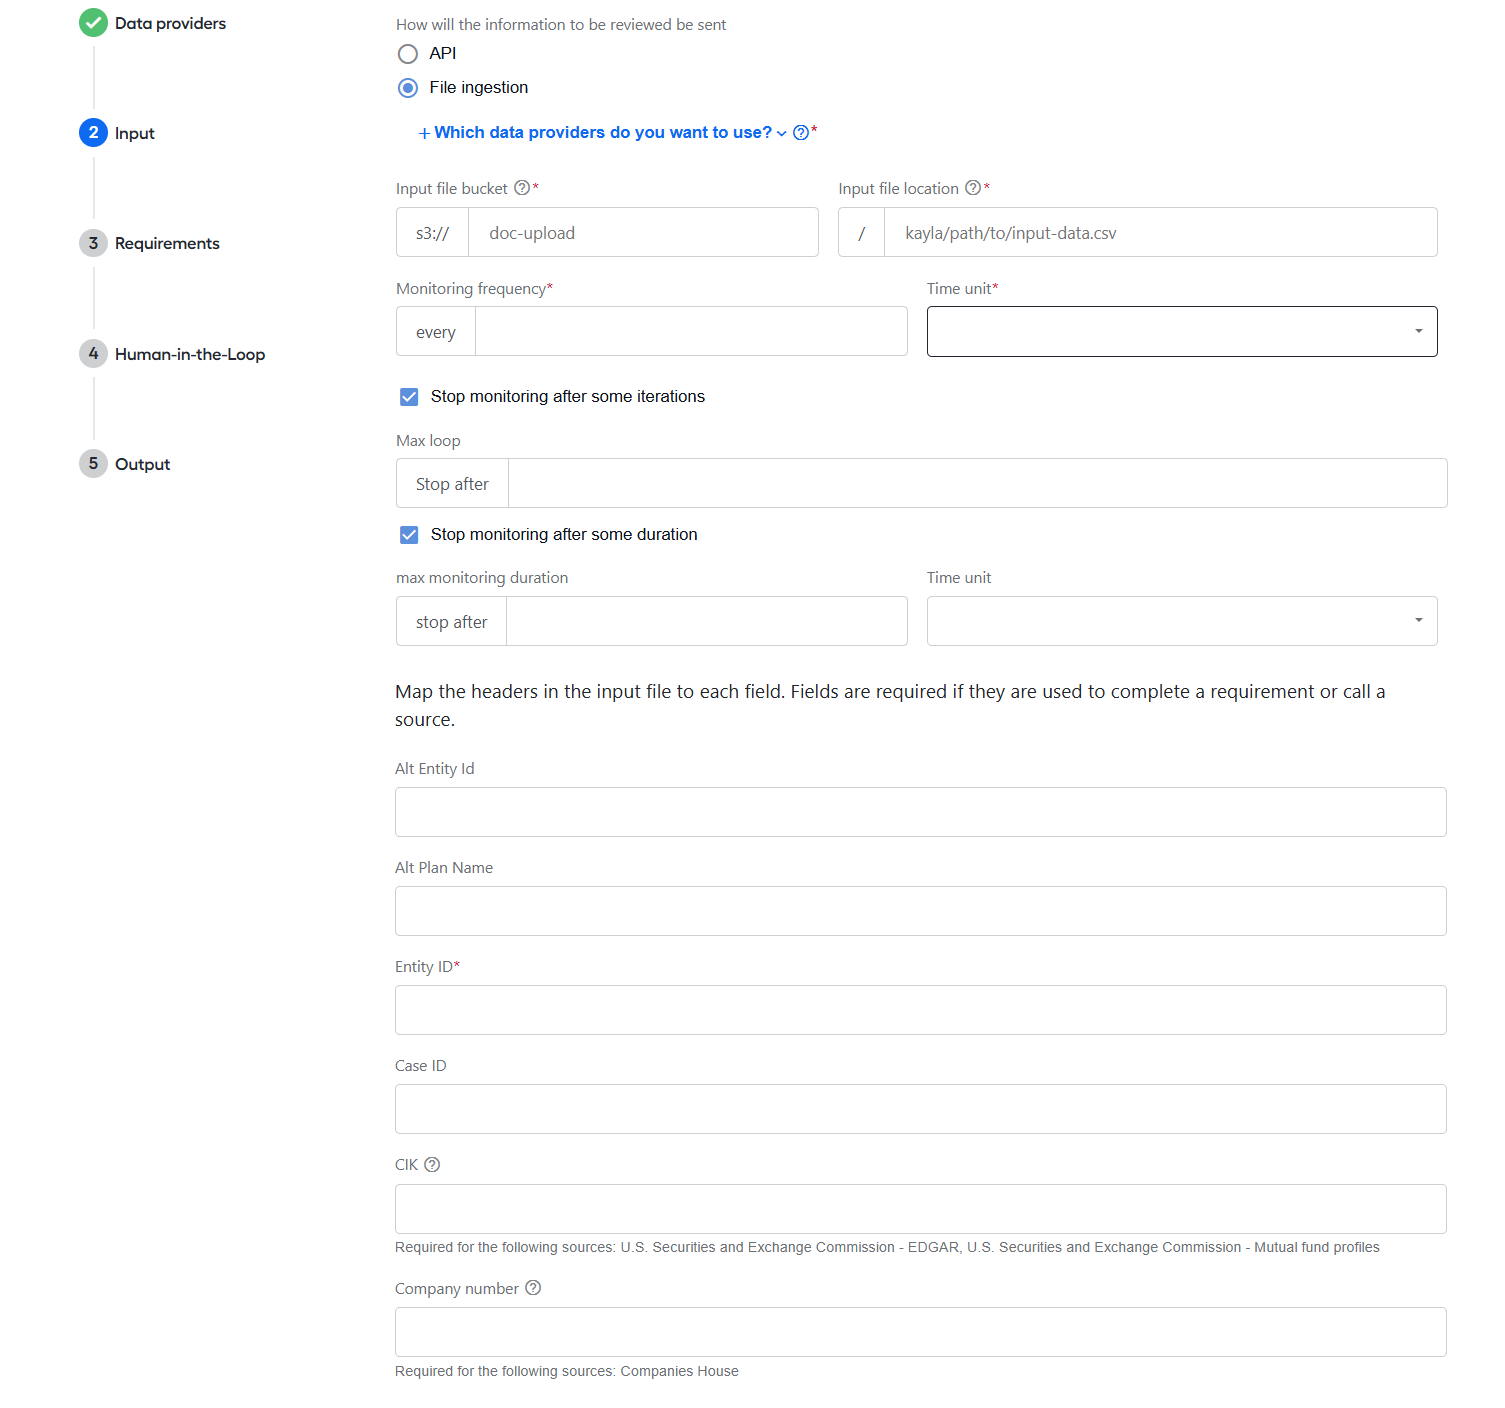
File ingestion: Kayla fetches data from CSV files that correspond to specific requirements and are stored in an S3 (MinIO) location.
To enable Kayla to work with file ingestion, configure the following on the Input screen:
Specify the input file bucket and location in S3 (MinIO) from where Kayla is to retrieve input files.
Define the monitoring settings:
Specify how frequently, in hours or minutes, Kayla should poll the input file location for new files.
If needed, select the Stop monitoring after some iterations checkbox. In the displayed Max loop field, specify the number of iterations.
Optionally, select the Stop monitoring after some duration checkbox. In the displayed Max monitoring duration and Time unit fields, set the period duration.
Map the fields displayed on the Input screen to the respective headers in the input CSV file.
Select data providers
Select one or more data providers to enrich Kayla's input data from third-party sources and click Apply. The list includes all the OOTB providers you can find in the Data providers step and any custom connectors you added.
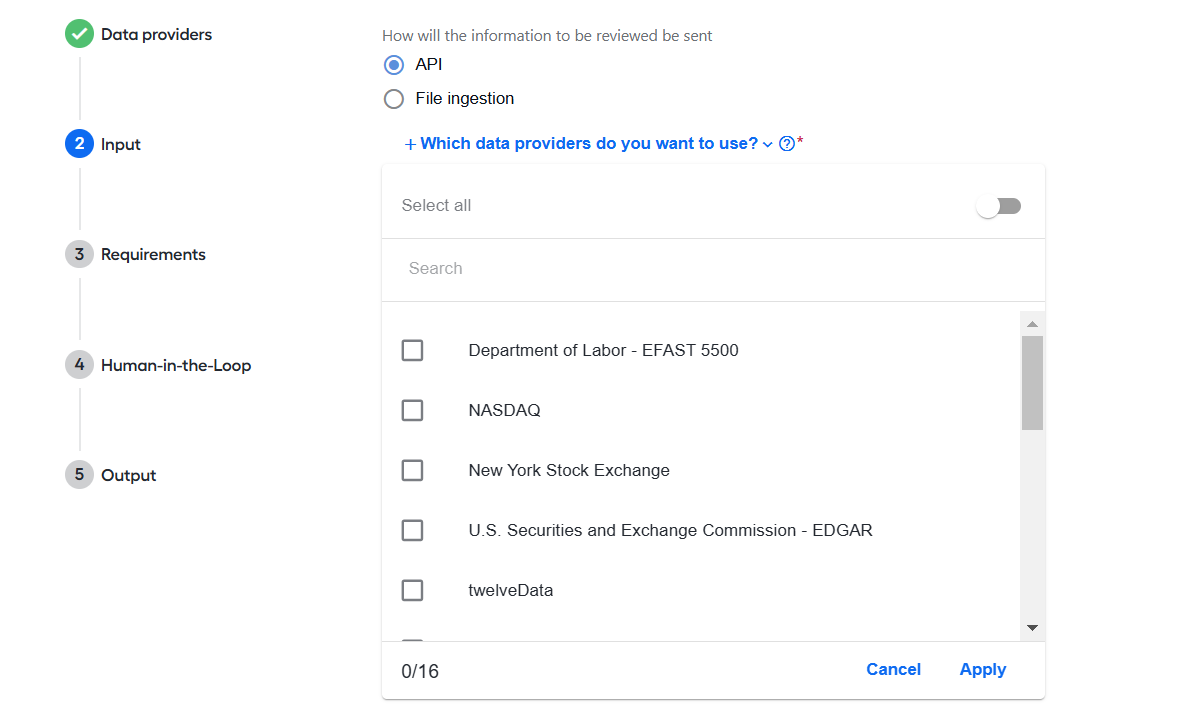
For the complete list of supported out-of-the-box data providers, see the F.A.Q topic.
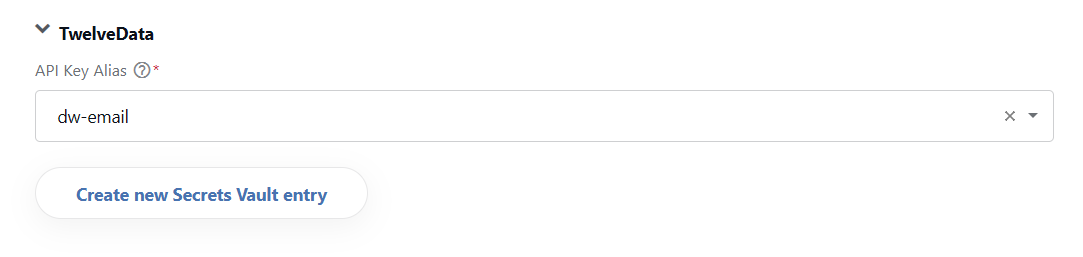
Some providers (such as Sayari, twelveData, and Companies House) require additional configuration. Select an alias from the Secrets Vault containing the credentials to access the data or create one if it is the first time you are setting up the AI Agent in that environment.
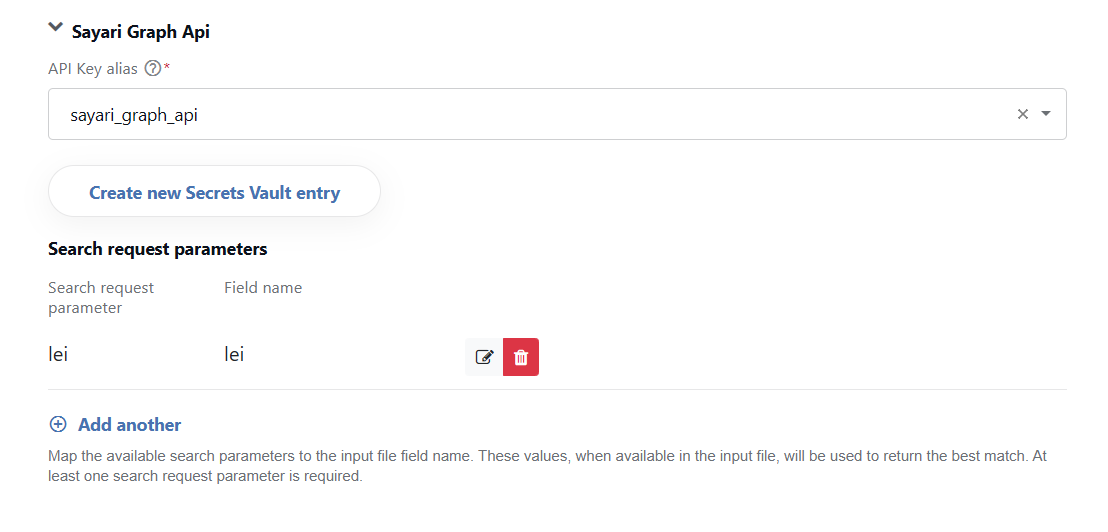
Sayari Graph also requires you to set the parameters for searching and retrieving records.
The following providers can be used for proof of status when, on the Requirements screen, you set the review method to Verify Status:
FCA Register - Mutual fund profiles. The bot goes to the Financial Conduct Authority’s website (Fund search) and searches for mutual funds using the company reference number or exact matches on entity names. Preference is given to the company reference number. Only funds in the active or approved status are considered active.
Central Bank of Ireland - Company profiles. The bot goes to the Central Bank of Ireland’s website (Home page) and runs searches using the regulator ID. If found, the entity is considered active.
Retraite Quebec - Pension plan profiles. The bot goes to the Retraite Quebec register (Retraite Québec - Pension plans) supervised by Retraite Québec and searches for entities using the registration number or an exact match on the entity name. Preference is given to the registration number.
Financial Services Regulatory Authority of Ontario - Company Profiles. The bot goes to the Financial Services Regulatory Authority of Ontario (Pension Plan Information) and searches using the plan number or an exact match on the entity name. Preference is given to the plan number.
British Columbia Financial Services Authority - Pension Plan profile. The bot goes to the British Columbia Financial Services Authority website (Registered Pension Plans | BCFSA) and searches using the registration number or an exact match on the entity name. Preference is given to the registration number.
Requirements
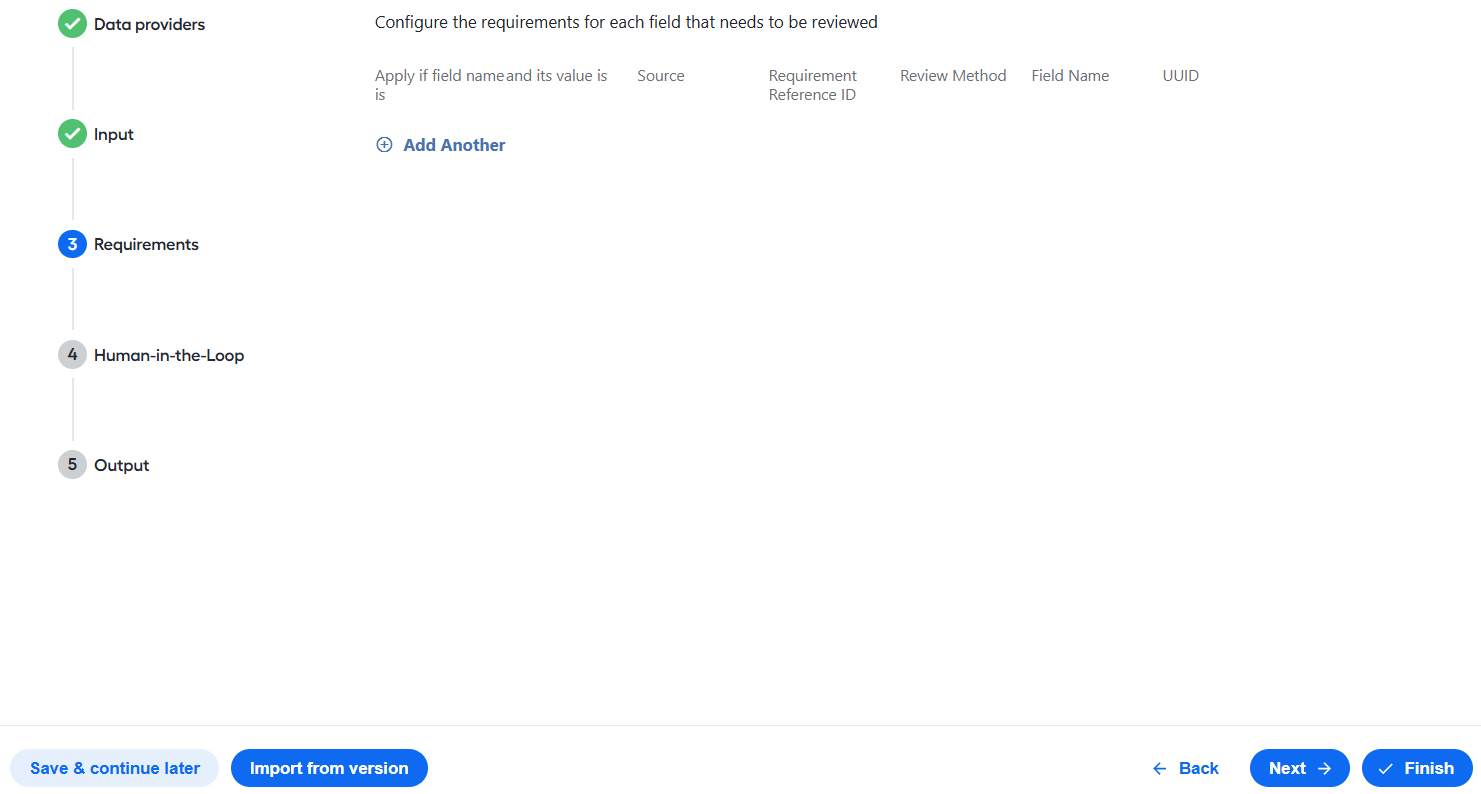
A requirement defines the matching rule, enrichment source, and review method Kayla should apply when processing KYC data for a specific entity. To configure a requirement, follow the steps below:
Click Add Another.
Specify the rules Kayla should follow when reviewing KYC data for an entity. For more details, see the table below.
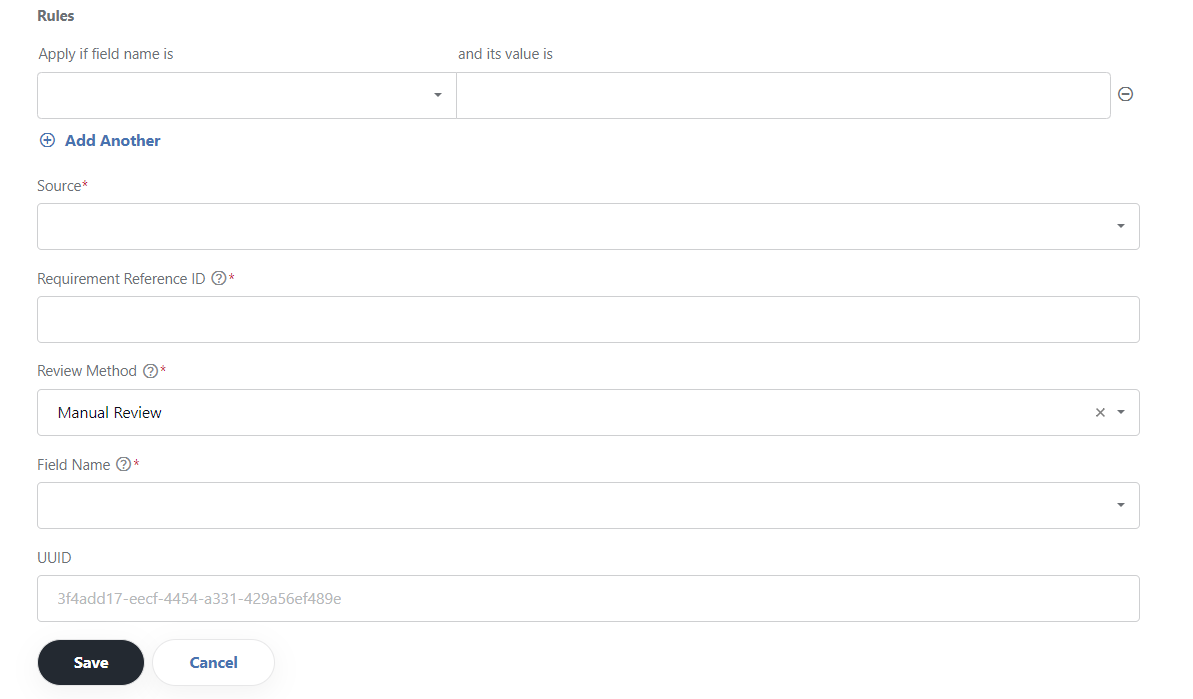
Field Description Values Required Rules The name-value pairs that determine to which entities a specific requirement should be applied Use the name-value pairs from the input file. You can set more than one pair per requirement by clicking the Add Another button. Yes Source The external data provider from where input data is retrieved As configured on the Input step. Yes Requirement Reference ID A key or reference to the KYC requirement matrix Free-text field. Yes Review Method The method used to complete the review - Exact Match: the Field Name value should be a direct match against a value in the response from the configured source.
- Manual Review: the Field Name value is not reviewed. Used if an information extraction model or API is unavailable or a data point requires additional scrutiny.
- Name Match: works similarly to Exact Match, except that it does not consider punctuation, extra spaces, or other special characters that are inadvertently present in a name. This ensures that minor discrepancies (- vs. : or extra spaces) do not get flagged for manual review.
- Validate Geographies: checks specified locations when validating input data against respective requirements. To use the review method, fill in the Geographies field in the input configuration.
- Verify Status: used to verify the Field Name status. For example, whether the entity is regulated and found in a regulator's database and whether the status is a specific value. For the list of providers available for automatic proof of status, see the Select data providers section. The method is not applicable to custom data providers.
- Verify Address ML model: used to verify two addresses. Each address is either normalized (unstructured) or structured. To use the review method, set the address service domain.
Yes Field Name The name from the input file that must be reviewed Depends on the input file. Yes Source Field Name The field from the specified source to be compared to the Field Name from the input file Varies, depending on the source. Yes, if Review Method is set to Exact Match, Name Match, Verify Address ML Model, or Validate geographies. UUID The identifier that is unique for each requirement and used for audit and reporting purposes Automatically generated. - Click Save to save the rules for the entity.
Repeat steps 1 to 3 to add as many rules as you need.
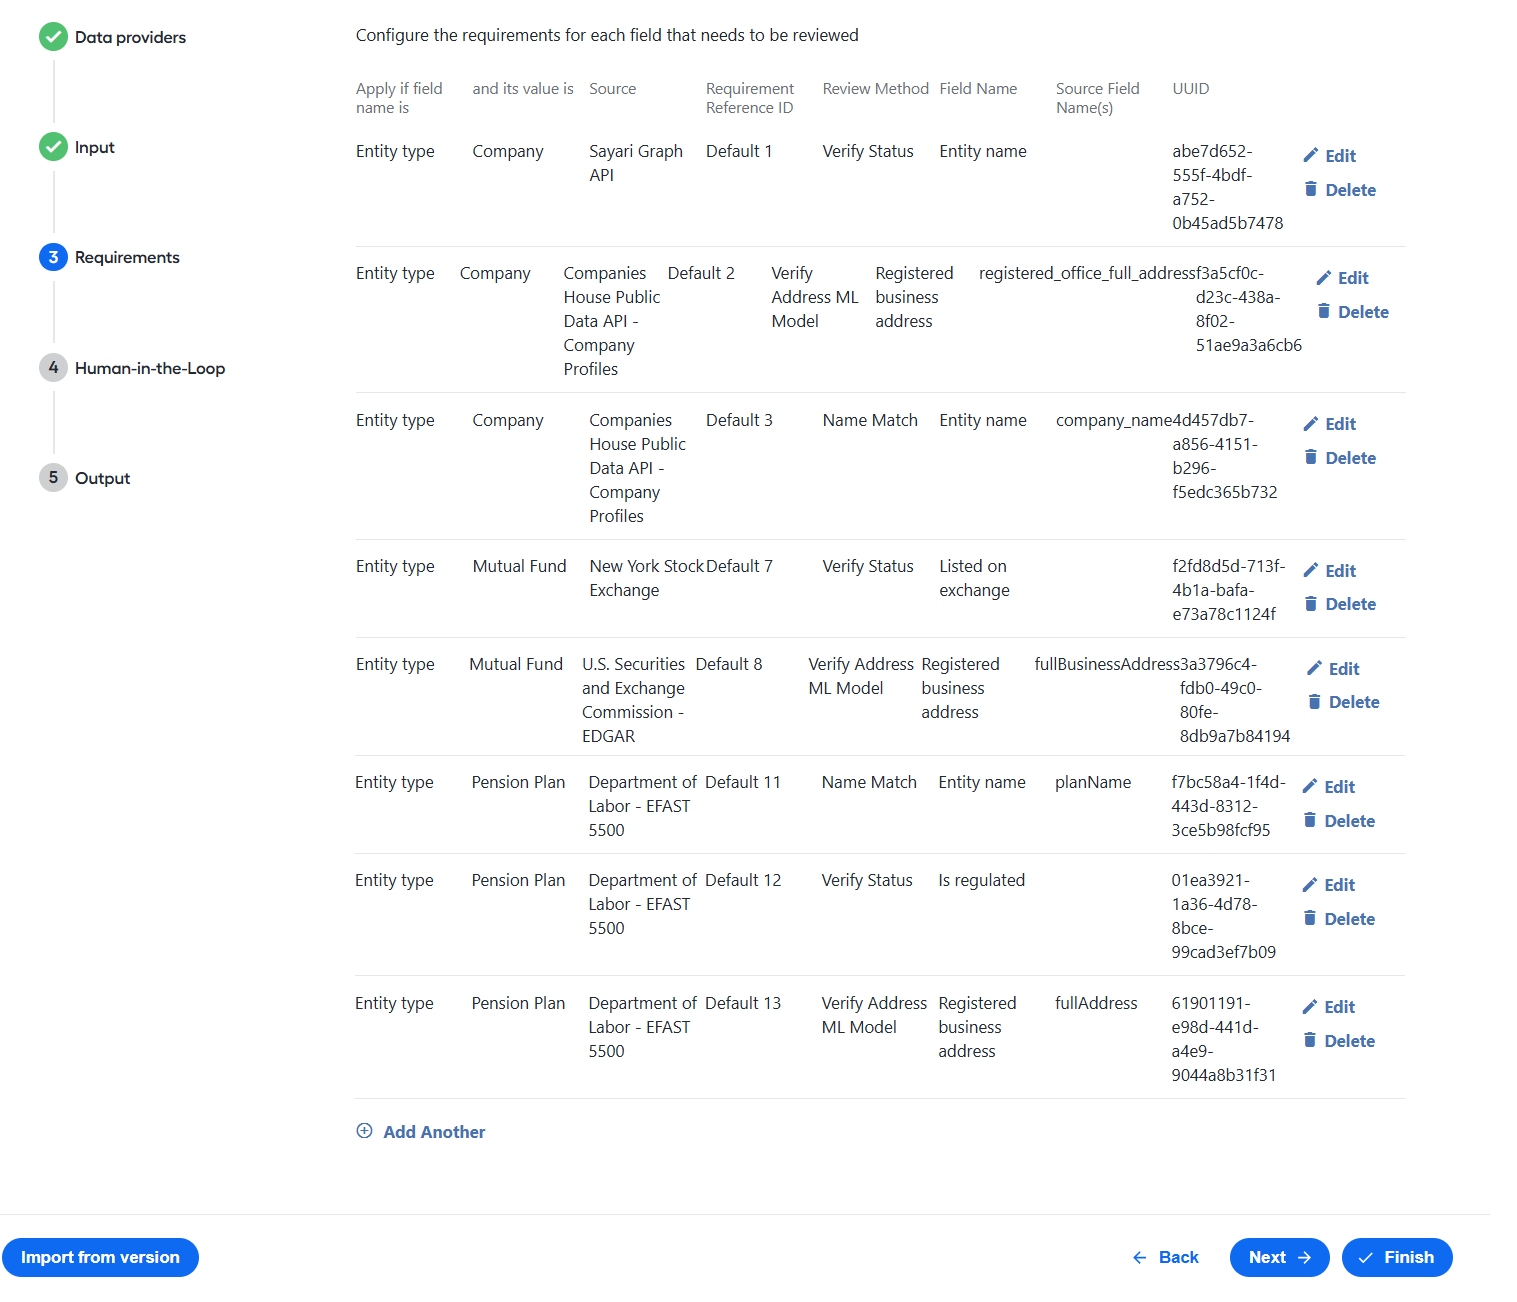
Click Next to move on to the Human-in-the-Loop step.
Human-in-the-Loop
The step is optional. It allows analysts and quality assurance specialists to review Kayla's results in Workspace and address any exceptions prior to the generation of the final periodic review report.
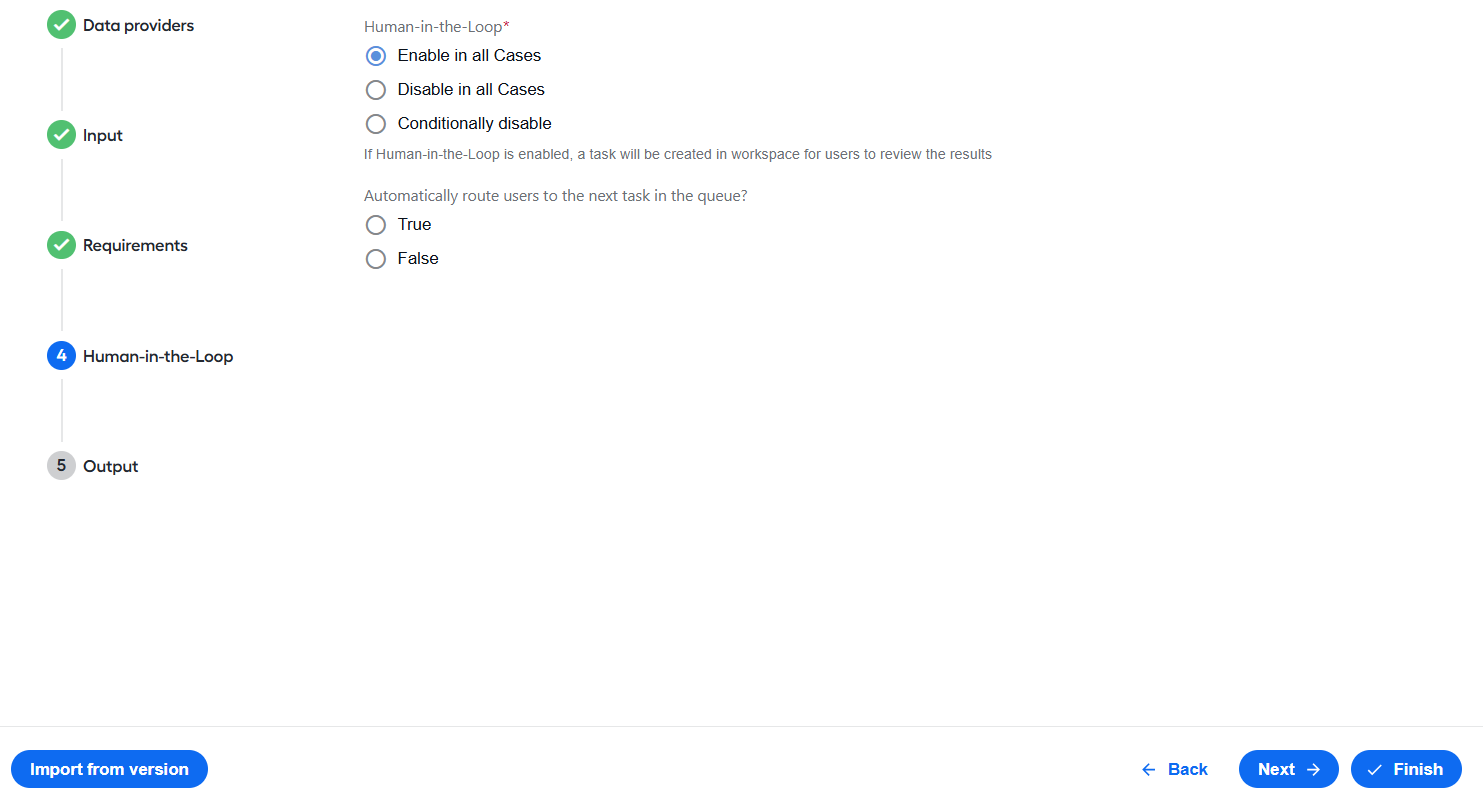
To configure the step, follow the instructions below:
Choose an option to define when manual review should be enabled:
Enable in all Cases creates an assignment in Workspace for every entity, regardless of whether Kayla completed requirements or not.
Disable in all Cases disables manual reviews completely. In this case, the Automatically route users to the next task in the queue? setting is unavailable.
Conditionally disable creates no assignments to review a requirement, provided the preset conditions are satisfied:
All requirements are completed successfully
EvA is not required
If manual review is enabled, specify the task routing mechanism. Select True for Automatically route users to the next task in the queue? to route users to the next task in the queue that is not actively being worked on, regardless of who it is assigned to.
Output
In the Output step, you set how Kayla should deliver its output:
- Entity level reports
- Batch summary reports
- API audit trail report
For details about the reports, see Input and output data.
To configure the output settings for Kayla, do as follows:
Specify the S3 bucket where reports are to be saved.
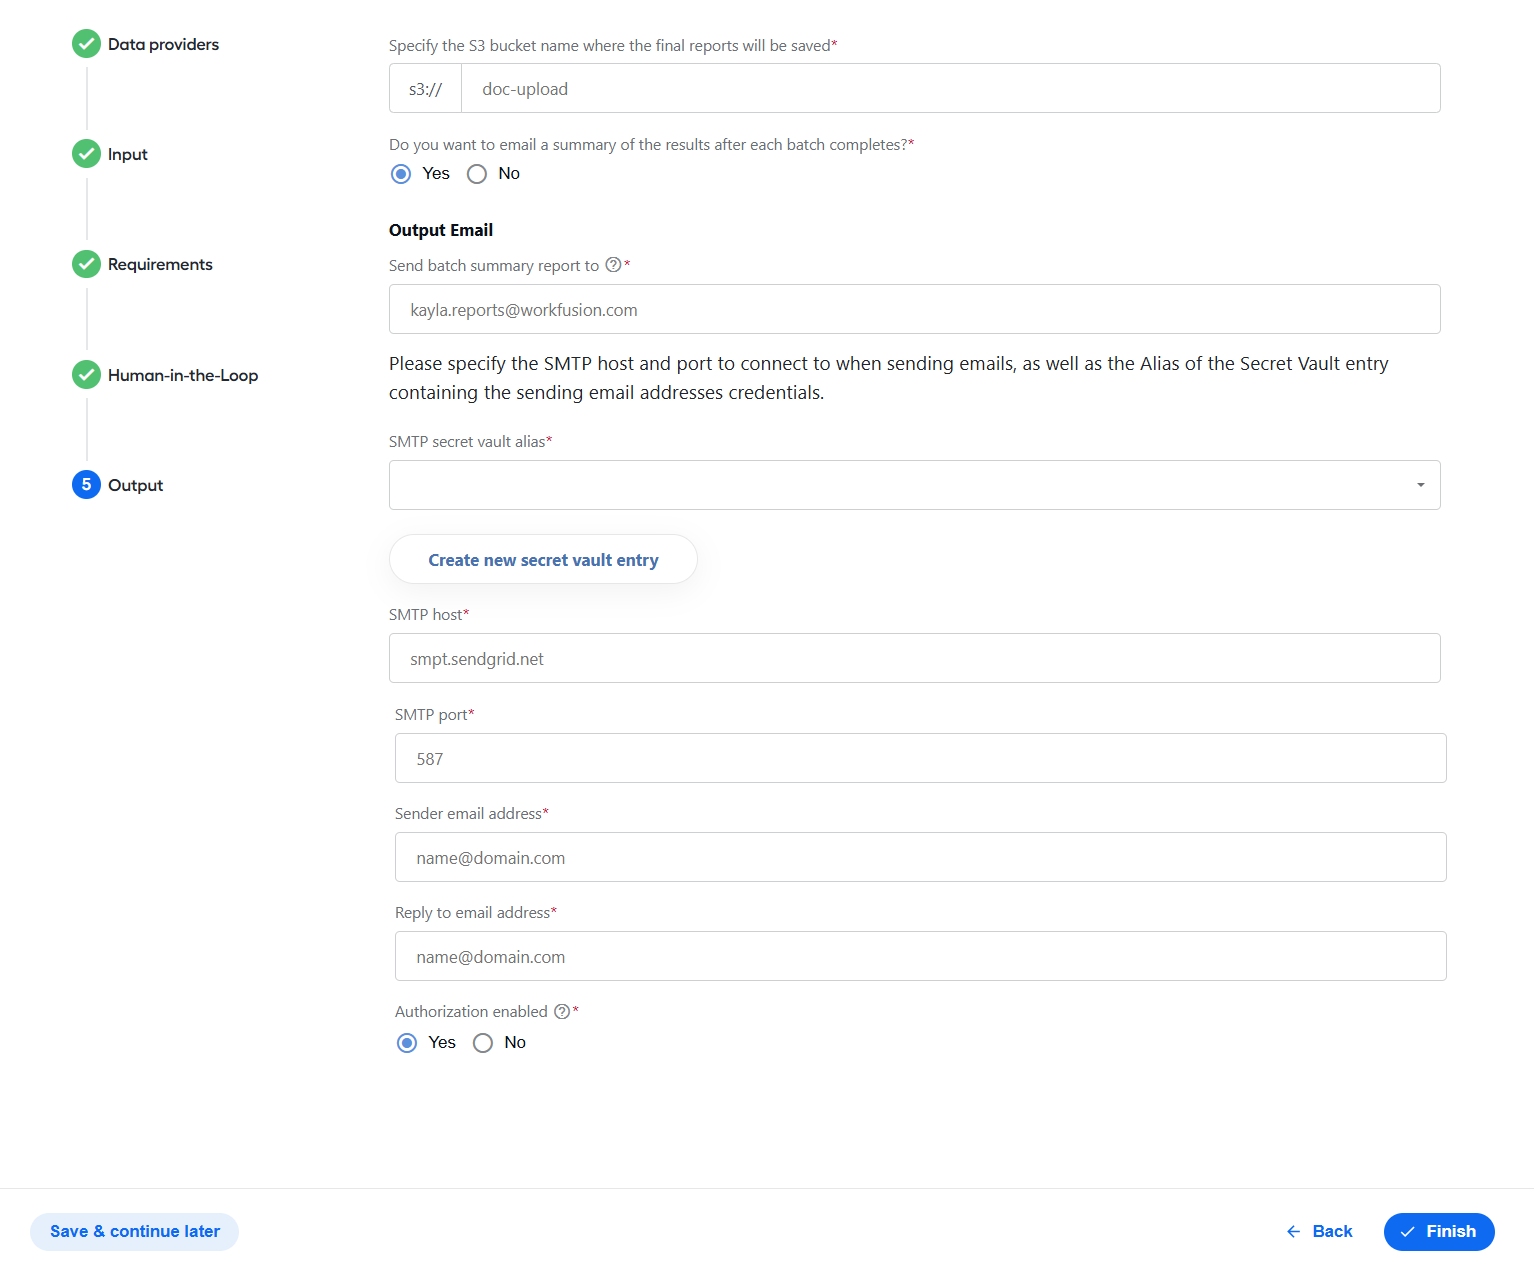
If you selected the File ingestion option when configuring the input method, choose whether you want Kayla to email reports. If you don't want Kayla to email reports, skip the step and go straight to step 3. Otherwise, in the Output Email section, configure the following:
Specify the email address where batch summary reports are to be sent.
Choose a Secrets Vault alias from the drop-down list. If you don't have an alias configured, click the Create new secret vault entry, set the alias up, and save it. For detailed instructions, refer to Set up secret entries in Secrets Vault.
Configure other settings:
SMTP host and port
Required email addresses
Authorization
Click the Finish button to save the configuration.
Update configuration
To update Kayla's configuration, follow the steps below:
Go to the Digital Workers page.
Click the Kayla's version you are working with.
On the version details page, open the Actions menu and select Settings.
On the displayed configuration screen, make changes in each step as required and click Finish to save the updated configuration.