
Integrate ADFS
The document describes the steps of ADFS/SSO integration with WorkFusion services.
note
This document describes the ADFS configuration for IA Cloud versions below 10.2.
For versions 10.2 and above, refer to Integrate ADFS Identity Provider
Prerequisites
IA Cloud Enterprise version 10.1.2 is installed. From version 10.1.4, use the following to configure ADFS:
- Paths to files:
/opt/workfusion/ssl - Filenames:
jks - ADFS address:
fs.WORKFUSION-LB-HOSTNAME - INSTALL_DIR:
/opt/workfusion - PACKAGE_DIR:
/opt/workfusion/wf_installer
WorkSpace
The section helps you to enable SSO in WorkSpace services.
Enable SSO in WorkFusion product
For more information on the SSO integration, see Integrate SSO.
To enable SSO in IA Cloud Enterprise:
Log in to the APP server under a service account. In case of the high-availability environment, log in to all APP servers.
In
/opt/workfusion/workspace/conf/workspace.properties, set the property value toTrue:ws.sso.saml.enable=TrueIn
/opt/workfusion/wf-sec/storage, create or edit thenew.propertiesfile with the following lines:ws.sso.saml.sp.metadata=WORKSPACE-LB-HOSTNAME ws.sso.saml.idp.metadata=https://fs.WORKSPACE-LB-HOSTNAME/federationmetadata/2007-06/federationmetadata.xml ws.sso.saml.idp.file.metadata= ws.sso.saml.username.attribute=http://schemas.xmlsoap.org/ws/2005/05/identity/claims/emailaddressUpload new parameters to Vault WorkSpace:
loader.sh workspace new.propertiesTo check the result, use the following command:
loader.sh workspace review | grep -i ssoTo apply the changes, restart the WorkSpace services:
wfmanager restart workspace
Download WorkSpace metadata
To download the WorkSpace Metadata:
- In your web browser, enter the WorkSpace URL with the appropriate hostname: https://WORKSPACE-LB-HOSTNAME/workspace/saml/metadata. File
spring_saml_metadata.xmldownloads automatically. We recommend renaming it intows_metadata.xml. - Copy
ws_metadata.xmlto your ADFS server.
Configure ADFS
Based on this documentation, the connection between ADFS and WorkFusion is defined using a relying party trust.
Add new relying party trust
To add a new relying party trust:
Log in to the server where ADFS is installed.
Launch the AD FS Management application by clicking Start > Administrative Tools > AD FS Management, and then select the Trust Relationships > the Relying Party Trusts node.
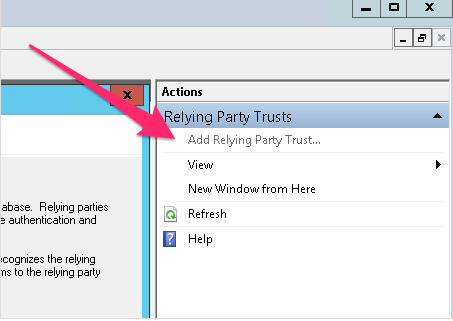
In the Actions sidebar, click Add Relying Party Trust.
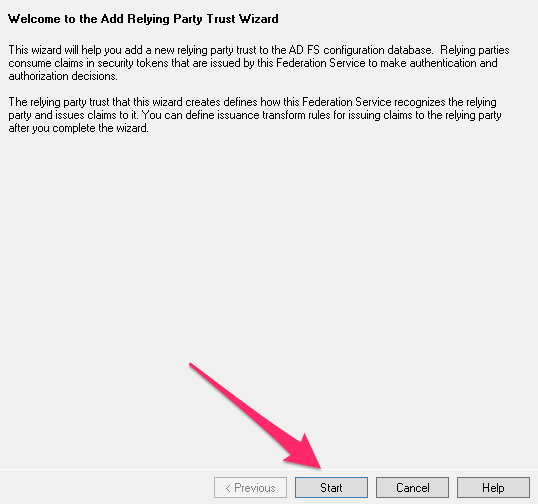
In the Add Relying Party Trust Wizard, click Start.
On the Select Data Source screen, click Import data about the relying party from a file and select the
ws_metadata.xmlfile downloaded on the Download WorkSpace Metadata step, and click Next.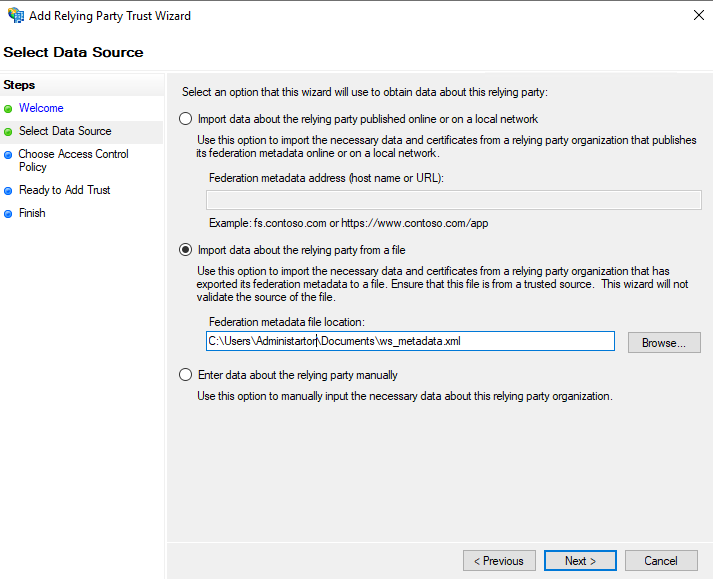
In the Add Relying Party Trust Wizard, provide information for each screen:
- On the Specify Display Name screen, enter a Display name and any notes, select AD FS profile, and click Next.
- Click Next to skip the Choose Access Control Policy screen.
On the Ready to Add Trust screen, review your settings and click Next.
Click Finish.
Create claim rules
After creating the relying party trust, add the claim rules:
If the claim rules editor appears, click Add Rule. Otherwise, in the Relying Party Trusts list, right-click the relying party object you created, click Edit Claims Rules, and then click Add Rule.
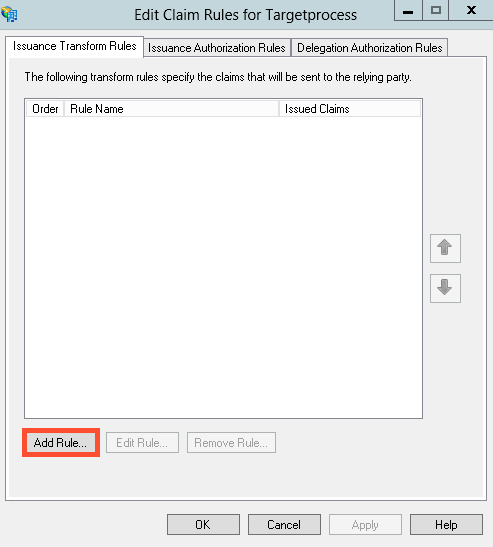
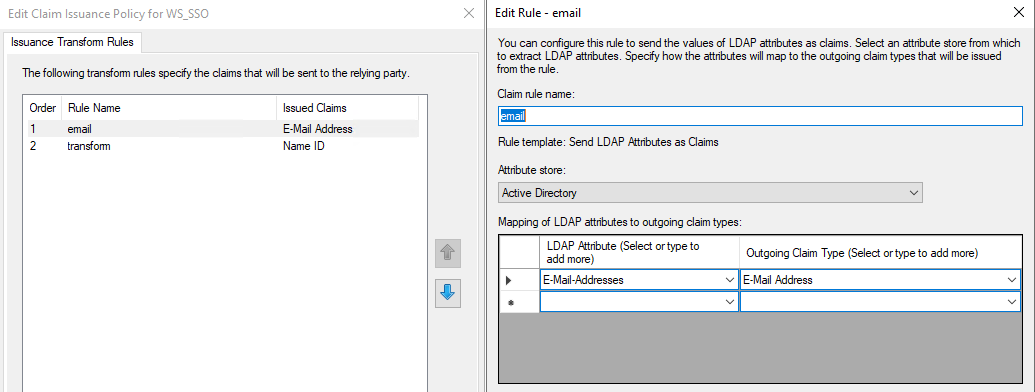
In the Claim Rule Template list, select the Send LDAP Attributes as Claims template and click Next.
Create the following rule:
- Claim rule name: descriptive rule name
- Attribute store: active directory
- Add the following mapping:
- LDAP Attribute: e-Mail addresses
- Outgoing Claim Type: e-Mail Address
Click OK.
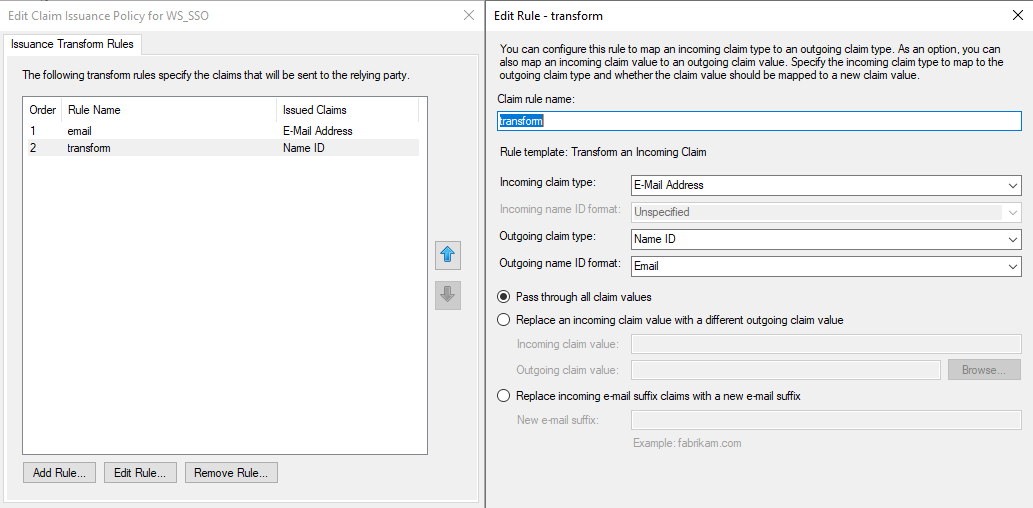
Create another rule by clicking Add Rule and select Transform an Incoming Claim as the template.
On the next screen, create the following rule:
- Claim rule name: descriptive rule name
- Incoming claim type: e-Mail Address
- Outgoing claim type: Name ID
- Outgoing name ID format: e-mail address
- Pass through all claim values: default value
Click OK to create the claim rule, and then click OK again to finish creating rules.
Adjust settings
After creating claim rules, adjust the settings on your relying party trust:
- In the Relying Party Trusts list, double-click the relying party object you created or select Actions > Properties while you have the Relying Party Trust selected.
- On the Advanced tab, change the Secure hash algorithm to
SHA-1.
Configure mapping between ADFS and WorkSpace
note
In case of any issues with metadata URLs, use a static file (steps 1-4).
To configure the mapping between ADFS and WorkSpace:
Download the metadata from ADFS using the following URL: https://fs.WORKSPACE-LB-HOSTNAME/federationmetadata/2007-06/federationmetadata.xml.
Adjust the metadata file. After downloading
federationmetadata.xml, the text is presented in the single line with comments in it. Format it and allow the Tomcat service to read it correctly.- Open XML Pretty Print.
- Upload
federationmetadata.xmland click Turn Pretty. - Copy the output and save it locally. You can also choose to keep it on the APP server in the
/opt/workfusion/workspace/idp_metadata.xmlfile.
You can see a text or description of each parameter. But, you may face an error later that the metadata is incorrect.
See the correct metadata in file
idp_metadata.xml.Copy the file to
/opt/workfusion/workspace/.Extract two certificates from the
idp_metadata.xmlfile and save the output on the APP server incert1.crtandcert2.crtfiles, respectively. Use the following part of the file:encryption:
<KeyDescriptor use="encryption"> <KeyInfo xmlns="http://www.w3.org/2000/09/xmldsig#"> <X509Data> <X509Certificate>MIIC2DCCAcCgAwIBAgIQdsq6bOHfH7lNKM5F44+unTANBgkqhkiG9w0BAQsFADAoMSYwJAYDVQQDEx1BREZTIEVuY3J5cHRpb24gLSBmcy53ZmxhYi5pbzAeFw0xOTExMjIwOTIyMzVaFw0yMDExMjEwOTIyMzVaMCgxJjAkBgNVBAMTHUFERlMgRW5jcnlwdGlvbiAtIGZzLndmbGFiLmlvMIIBIjANBgkqhkiG9w0BAQEFAAOCAQ8AMIIBCgKCAQEA0PTQVAkph+1NU/KEKi4PMHmtkGeB2VzO3NMmIFXGaZqYo9V9dNoOH6/Yg4M/5zMAJ3tQ0qE5NWNsJcdHzv7GBxhQ81HvN2qek72JhosiVB53CV4lQ4BvF9OoiFnMcpnz6GxmqQgHYt6tch+0KDkYuR34SyZyuCthgGMduWrKdlySWE0eH1S46iokL7Bi/ih5P+eulAjVuC0bsao0FH06WBANX13/zcklsutI5hlCaDeG4tgC9LE2UmGqYkk+oPA9VJSTIiKiiGtAW0DjduS6vGV0uDCdcVQsV66Hp2BY1x7SODC2+1LAS0Q+zQpmhf805KCcQ0tIXei8uGvxY8RXmQIDAQABMA0GCSqGSIb3DQEBCwUAA4IBAQAHq9tkdenKVLw+/qQf5GpsxB07WhDHBDpTWijDwKsElr80iUEHD2JmUT13x9nbNmCgvd4pPKfN/d1bnT9pUw7729jon0NpvfXl9h+Q3qcif4tIEtTOYSiNBbC1uJlKDl8R8mHoUjRsvGQLJ3UiFKviy6/+THy3K5+eDds7IHOeokFwgtXUG4tTh+L/+S5vu1yyxOgwUt01UNi7rWvKe2jcLkdM4knPlmmsXYb09g7hIBR2IoQOowm0A/pMR/lT6G51U66oXkhixz/zLYJKTVbAGN60Jo9GqYo/VXIaQKcVI+zr2/QiVE5BfmjSbtZBfzSH5KWGbYmqNVfkjw5vOWoo</X509Certificate> </X509Data> </KeyInfo> </KeyDescriptor>cert1.crt:-----BEGIN CERTIFICATE----- MIIC2DCCAcCgAwIBAgIQdsq6bOHfH7lNKM5F44+unTANBgkqhkiG9w0BAQsFADAo MSYwJAYDVQQDEx1BREZTIEVuY3J5cHRpb24gLSBmcy53ZmxhYi5pbzAeFw0xOTEx MjIwOTIyMzVaFw0yMDExMjEwOTIyMzVaMCgxJjAkBgNVBAMTHUFERlMgRW5jcnlw dGlvbiAtIGZzLndmbGFiLmlvMIIBIjANBgkqhkiG9w0BAQEFAAOCAQ8AMIIBCgKC AQEA0PTQVAkph+1NU/KEKi4PMHmtkGeB2VzO3NMmIFXGaZqYo9V9dNoOH6/Yg4M/ 5zMAJ3tQ0qE5NWNsJcdHzv7GBxhQ81HvN2qek72JhosiVB53CV4lQ4BvF9OoiFnM cpnz6GxmqQgHYt6tch+0KDkYuR34SyZyuCthgGMduWrKdlySWE0eH1S46iokL7Bi /ih5P+eulAjVuC0bsao0FH06WBANX13/zcklsutI5hlCaDeG4tgC9LE2UmGqYkk+ oPA9VJSTIiKiiGtAW0DjduS6vGV0uDCdcVQsV66Hp2BY1x7SODC2+1LAS0Q+zQpm hf805KCcQ0tIXei8uGvxY8RXmQIDAQABMA0GCSqGSIb3DQEBCwUAA4IBAQAHq9tk denKVLw+/qQf5GpsxB07WhDHBDpTWijDwKsElr80iUEHD2JmUT13x9nbNmCgvd4p /d1bnT9pUw7729jon0NpvfXl9h+Q3qcif4tIEtTOYSiNBbC1uJlKDl8R8mHo UjRsvGQLJ3UiFKviy6/+THy3K5+eDds7IHOeokFwgtXUG4tTh+L/+S5vu1yyxOgw Ut01UNi7rWvKe2jcLkdM4knPlmmsXYb09g7hIBR2IoQOowm0A/pMR/lT6G51U66o Xkhixz/zLYJKTVbAGN60Jo9GqYo/VXIaQKcVI+zr2/QiVE5BfmjSbtZBfzSH5KWG bYmqNVfkjw5vOWoo -----END CERTIFICATE-----signing:
<KeyDescriptor use="signing"> <KeyInfo xmlns="http://www.w3.org/2000/09/xmldsig#"> <X509Data> <X509Certificate>MIIC0jCCAbqgAwIBAgIQRfRCOHlLEJBC/rJdnHy0JzANBgkqhkiG9w0BAQsFADAlMSMwIQYDVQQDExpBREZTIFNpZ25pbmcgLSBmcy53ZmxhYi5pbzAeFw0xOTExMjIwOTIyMzRaFw0yMDExMjEwOTIyMzRaMCUxIzAhBgNVBAMTGkFERlMgU2lnbmluZyAtIGZzLndmbGFiLmlvMIIBIjANBgkqhkiG9w0BAQEFAAOCAQ8AMIIBCgKCAQEAv6GOO7ivjAoPhsmtxx8FMoHhnRzbBX/Xne1HRVLy0d9sMCSTeiI03AM/rfKthuNzT7wsPmBbH+7yqTJxhqVjyjcNlf8iDWpQzHb/2zf7/RKVla/5HDBIJLIjjCRKsrIeiwne5xbK89bn9+NWAxDUBAmBX0bnRL/9aNpemNxdNnitR+ak8YX2XCs69NOf1cXOOG5YKRDIHiv8f7OINUbp4Ky+IK5ectZdH+QWGufFx7a3elXipqugrZat8rBN7WsCI3bsq/NcqwgzXvKYyfsLMRAqu4YTfDE+Sxgic6LZKwdsUBh7o65CZo6H/yOeYtFHRTS4pAMEropHVbmSRpv4cQIDAQABMA0GCSqGSIb3DQEBCwUAA4IBAQBDjA6UOnwMMhoHfstm5Sy5oqT/pZOoKmi3hs8OsuqAGzIHGFWmG25sFfh2g5ADCa2T8rSJDcqk9Pyq4K58fQQbWz2fYerfMc95xCCX8GPt4CQmsPx7+Pc2NvqiSSWwUgjubH006+A1OliqHtE/KX98zxztUA3cDsA3Yf+F3POBGWz1ALG8uVMRCc5YYrWeyLU+Q/kKGwWvGm5yzC2opLjWtbokpU4dKEEW8h766UZgILxDIM8hgzRlfcxuC6fjhHMPSP+bzk3uU0yCX0fejcE3Dkj7gDUP5gBWuCtNwjhC0E8TmX6BrsBttS72qwKt8AyrLjTH8leDkhiHlGj/2N3z</X509Certificate> </X509Data> </KeyInfo> </KeyDescriptor>cert2.crt:-----BEGIN CERTIFICATE----- MIIC0jCCAbqgAwIBAgIQRfRCOHlLEJBC/rJdnHy0JzANBgkqhkiG9w0BAQsFADAl MSMwIQYDVQQDExpBREZTIFNpZ25pbmcgLSBmcy53ZmxhYi5pbzAeFw0xOTExMjIw OTIyMzRaFw0yMDExMjEwOTIyMzRaMCUxIzAhBgNVBAMTGkFERlMgU2lnbmluZyAt IGZzLndmbGFiLmlvMIIBIjANBgkqhkiG9w0BAQEFAAOCAQ8AMIIBCgKCAQEAv6GO O7ivjAoPhsmtxx8FMoHhnRzbBX/Xne1HRVLy0d9sMCSTeiI03AM/rfKthuNzT7ws PmBbH+7yqTJxhqVjyjcNlf8iDWpQzHb/2zf7/RKVla/5HDBIJLIjjCRKsrIeiwne 5xbK89bn9+NWAxDUBAmBX0bnRL/9aNpemNxdNnitR+ak8YX2XCs69NOf1cXOOG5Y KRDIHiv8f7OINUbp4Ky+IK5ectZdH+QWGufFx7a3elXipqugrZat8rBN7WsCI3bs q/NcqwgzXvKYyfsLMRAqu4YTfDE+Sxgic6LZKwdsUBh7o65CZo6H/yOeYtFHRTS4 pAMEropHVbmSRpv4cQIDAQABMA0GCSqGSIb3DQEBCwUAA4IBAQBDjA6UOnwMMhoH fstm5Sy5oqT/pZOoKmi3hs8OsuqAGzIHGFWmG25sFfh2g5ADCa2T8rSJDcqk9Pyq 4K58fQQbWz2fYerfMc95xCCX8GPt4CQmsPx7+Pc2NvqiSSWwUgjubH006+A1Oliq HtE/KX98zxztUA3cDsA3Yf+F3POBGWz1ALG8uVMRCc5YYrWeyLU+Q/kKGwWvGm5y zC2opLjWtbokpU4dKEEW8h766UZgILxDIM8hgzRlfcxuC6fjhHMPSP+bzk3uU0yC X0fejcE3Dkj7gDUP5gBWuCtNwjhC0E8TmX6BrsBttS72qwKt8AyrLjTH8leDkhiH lGj/2N3z -----END CERTIFICATE-----
Upload the certificates to Java and SAML Keystore. The
star_wflab_io.crtcertificate is used for ADFS installation and configuration. You can take the password forcacertsfrompackage_dir/config.ymlfrom thejava_cacerts_truststore_passparameter.keytool -keystore /opt/workfusion/java/jre/lib/security/cacerts -import -file star_adfs_certificate.crt -alias sso keytool -keystore /opt/workfusion/java/jre/lib/security/cacerts -import -file cert1.crt -alias adfs_encryption keytool -keystore /opt/workfusion/java/jre/lib/security/cacerts -import -file cert2.crt -alias adfs_signing keytool -keystore /opt/workfusion/workspace/webapps/workspace/WEB-INF/classes/saml/keystore/samlKeystore.jks -import -file star_adfs_certificate.crt -alias sso keytool -keystore /opt/workfusion/workspace/webapps/workspace/WEB-INF/classes/saml/keystore/samlKeystore.jks -import -file cert1.crt -alias adfs_encryption keytool -keystore /opt/workfusion/workspace/webapps/workspace/WEB-INF/classes/saml/keystore/samlKeystore.jks -import -file cert2.crt -alias adfs_signingUpload the value to Vault WorkSpace:
a. In
/opt/workfusion/wf-sec/storage, create or edit thenew.propertiesfile with the following line:ws.sso.saml.idp.file.metadata=/opt/workfusion/workspace/idp_metadata.xmlb. Upload the new value to Vault.
loader.sh workspace new.propertiesTo apply the changes, restart the WorkSpace services:
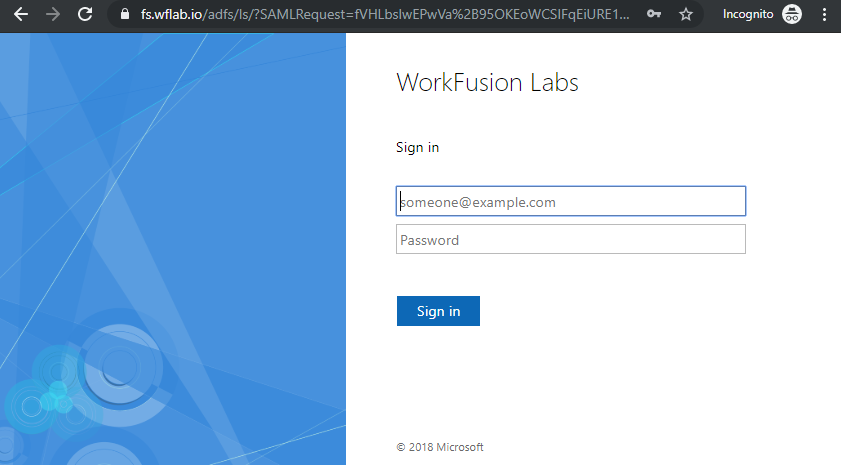
wfmanager restart workspaceLog in to the WorkSpace service with your ADFS/SSO credentials.
Control Tower
The section helps you to enable SSO in Control Tower services.
Enable SSO in WorkFusion product
For more information on the SSO integration, see Integrate SSO.
To enable SSO in the WorkFusion product:
Log in to the APP server under a service account. In case of the high-availability environment, log in to all APP servers.
In
/opt/workfusion/workfusion/conf/workfusion.properties, set the property value toTrue:wf.sso.saml.enable=TrueIn
/opt/workfusion/wf-sec/storage, create or edit thenew.propertiesfile with the following lines:wf.sso.saml.idp.metadata=https://fs.WORKFUSION-LB-HOSTNAME/FederationMetadata/2007-06/FederationMetadata.xml wf.sso.saml.idp.file.metadata= wf.sso.saml.sp.metadata=WORKFUSION-LB-HOSTNAME wf.sso.saml.username.attribute=uidUpload new parameters to Vault:
loader.sh workfusion new.propertiesTo check the result, use the following command:
loader.sh workfusion review | grep -i ssoTo apply the changes, restart the WorkFusion services:
wfmanager restart workfusion
Download WorkFusion metadata
To download the WorkFusion metadata:
In your web browser, enter the WorkFusion URL with the appropriate hostname: https://WORKFUSION-LB-HOSTNAME/workfusion/saml/web/metadata.
Enter the credentials from
config.ymlto Vault for authentication.spring_saml_metadata.xmldownloads automatically. We recommend renaming it intoct_metadata.xml.Copy
ct_metadata.xmlto your ADFS server.
Configure ADFS
Based on this documentation, the connection between ADFS and WorkFusion is defined using a relying party trust.
Add new relying party trust
To add a new relying party trust:
Log in to the server where ADFS is installed.
Launch the AD FS Management application by clicking Start > Administrative Tools > AD FS Management, and then select the Trust Relationships > the Relying Party Trusts node.
In the Actions sidebar, click Add Relying Party Trust.
In the Add Relying Party Trust Wizard, click Start.
On the Select Data Source screen, click Import data about the relying party from a file and select the
ws_metadata.xmlfile downloaded on the Download Control Tower Metadata step, and click Next.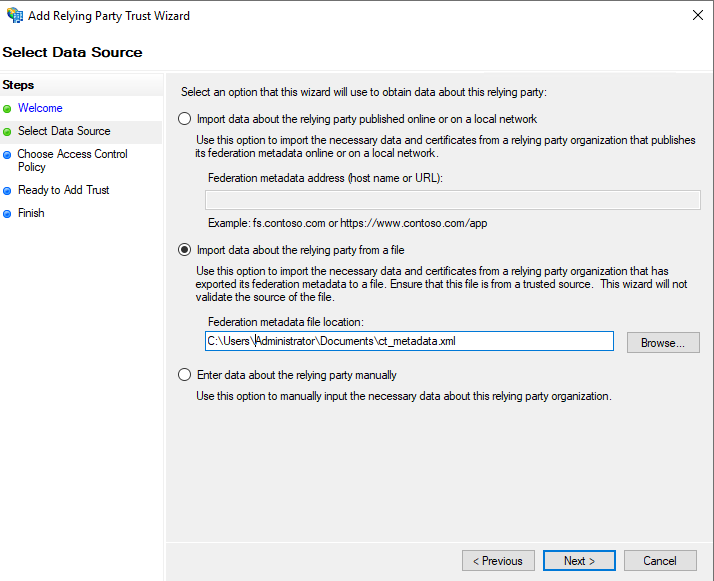
In the Add Relying Party Trust Wizard, provide information for each screen:
- On the Specify Display Name screen, enter a Display name and any notes, select AD FS profile, and then click Next.
- Skip the Choose Access Control Policy screen by clicking Next.
On the Ready to Add Trust screen, review your settings and then click Next.
Click Finish.
Create claim rules
After creating the relying party trust, add the claim rules:
If the claim rules editor appears, click Add Rule. Otherwise, in the Relying Party Trusts list, right-click the relying party object you created, click Edit Claims Rules, and then click Add Rule.
In the Claim rule template list, select the Send LDAP Attributes as Claims template and then click Next.
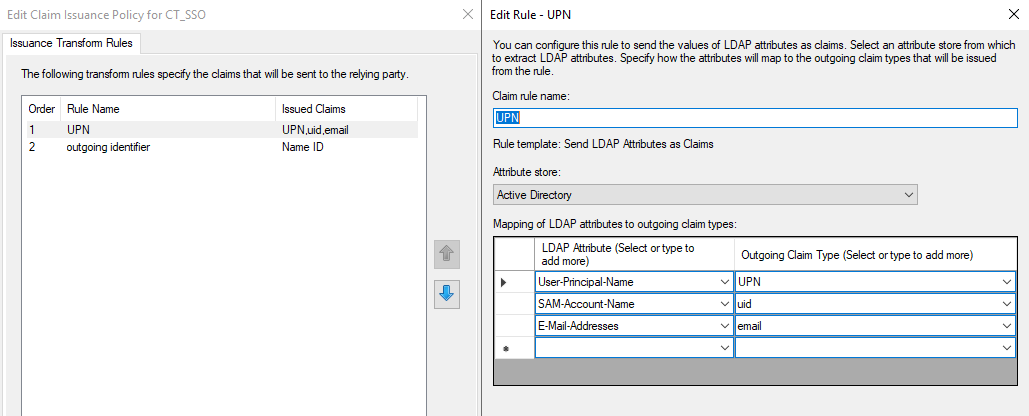
Create the following rule:
- Claim rule name: descriptive rule name
- Attribute store: Active Directory
- Add the following mapping:
- LDAP Attribute: User-Principal-Name, SAM-Account-Name, E-Mail-Addresses
- Outgoing Claim Type: UPN, uid, email
Click OK.
Create another new rule by clicking Add Rule and select Transform an Incoming Claim as the template.
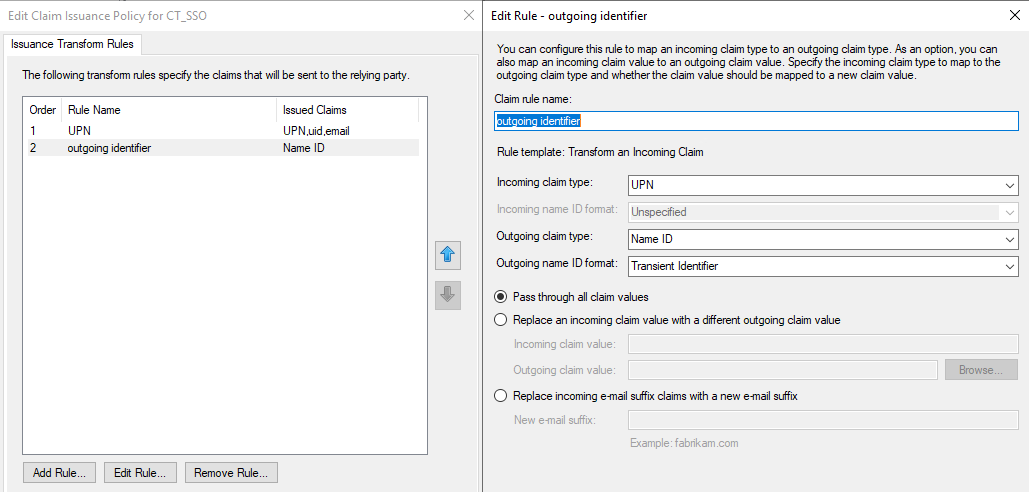
On the next screen, create the following rule:
- Claim rule name: descriptive rule name
- Incoming claim type: UPN
- Outgoing claim type: Name ID
- Outgoing name ID format: Transient Identifier
- Pass through all claim values: default value
Click OK to create the claim rule, and then click OK again to finish creating rules.
Adjust settings
After creating claim rules, adjust the settings on your relying party trust.
- In the Relying Party Trusts list, double-click the relying party object you created or select Actions > Properties while you have the Relying Party Trust selected.
- On the Advanced tab, change the Secure hash algorithm to
SHA-1.
Configure mapping between ADFS and Control Tower
note
In case of any issues with metadata URLs, use a static file (steps 1-4).
To configure the mapping between ADFS and Control Tower:
Download the metadata from ADFS using the following URL: https://fs.WORKFUSION-LB-HOSTNAME/federationmetadata/2007-06/federationmetadata.xml.
Adjust the metadata file. After downloading
federationmetadata.xml, the text is in one line with comments in it. Format it and allow the Tomcat service to read it correctly.- Open XML Pretty Print.
- Upload
federationmetadata.xmland click Turn Pretty. - Copy the output and save it locally. You can also choose to keep it on the APP server in the
/opt/workfusion/workfusion/idp_metadata.xmlfile.
You can see a text or description of each parameter. You may face an error later that the metadata is incorrect.
The correct metadata is
idp_metadata.xml.Copy the file to
/opt/workfusion/workfusion/.Extract two certificates from the
idp_metadata.xmlfile and save the output on the APP server incert1.crtandcert2.crtfiles, respectively. Use the following part of the file:encryption:
<KeyDescriptor use="encryption"> <KeyInfo xmlns="http://www.w3.org/2000/09/xmldsig#"> <X509Data> <X509Certificate>MIIC2DCCAcCgAwIBAgIQdsq6bOHfH7lNKM5F44+unTANBgkqhkiG9w0BAQsFADAoMSYwJAYDVQQDEx1BREZTIEVuY3J5cHRpb24gLSBmcy53ZmxhYi5pbzAeFw0xOTExMjIwOTIyMzVaFw0yMDExMjEwOTIyMzVaMCgxJjAkBgNVBAMTHUFERlMgRW5jcnlwdGlvbiAtIGZzLndmbGFiLmlvMIIBIjANBgkqhkiG9w0BAQEFAAOCAQ8AMIIBCgKCAQEA0PTQVAkph+1NU/KEKi4PMHmtkGeB2VzO3NMmIFXGaZqYo9V9dNoOH6/Yg4M/5zMAJ3tQ0qE5NWNsJcdHzv7GBxhQ81HvN2qek72JhosiVB53CV4lQ4BvF9OoiFnMcpnz6GxmqQgHYt6tch+0KDkYuR34SyZyuCthgGMduWrKdlySWE0eH1S46iokL7Bi/ih5P+eulAjVuC0bsao0FH06WBANX13/zcklsutI5hlCaDeG4tgC9LE2UmGqYkk+oPA9VJSTIiKiiGtAW0DjduS6vGV0uDCdcVQsV66Hp2BY1x7SODC2+1LAS0Q+zQpmhf805KCcQ0tIXei8uGvxY8RXmQIDAQABMA0GCSqGSIb3DQEBCwUAA4IBAQAHq9tkdenKVLw+/qQf5GpsxB07WhDHBDpTWijDwKsElr80iUEHD2JmUT13x9nbNmCgvd4pPKfN/d1bnT9pUw7729jon0NpvfXl9h+Q3qcif4tIEtTOYSiNBbC1uJlKDl8R8mHoUjRsvGQLJ3UiFKviy6/+THy3K5+eDds7IHOeokFwgtXUG4tTh+L/+S5vu1yyxOgwUt01UNi7rWvKe2jcLkdM4knPlmmsXYb09g7hIBR2IoQOowm0A/pMR/lT6G51U66oXkhixz/zLYJKTVbAGN60Jo9GqYo/VXIaQKcVI+zr2/QiVE5BfmjSbtZBfzSH5KWGbYmqNVfkjw5vOWoo</X509Certificate> </X509Data> </KeyInfo> </KeyDescriptor>cert1.crt:-----BEGIN CERTIFICATE----- MIIC2DCCAcCgAwIBAgIQdsq6bOHfH7lNKM5F44+unTANBgkqhkiG9w0BAQsFADAo MSYwJAYDVQQDEx1BREZTIEVuY3J5cHRpb24gLSBmcy53ZmxhYi5pbzAeFw0xOTEx MjIwOTIyMzVaFw0yMDExMjEwOTIyMzVaMCgxJjAkBgNVBAMTHUFERlMgRW5jcnlw dGlvbiAtIGZzLndmbGFiLmlvMIIBIjANBgkqhkiG9w0BAQEFAAOCAQ8AMIIBCgKC AQEA0PTQVAkph+1NU/KEKi4PMHmtkGeB2VzO3NMmIFXGaZqYo9V9dNoOH6/Yg4M/ 5zMAJ3tQ0qE5NWNsJcdHzv7GBxhQ81HvN2qek72JhosiVB53CV4lQ4BvF9OoiFnM cpnz6GxmqQgHYt6tch+0KDkYuR34SyZyuCthgGMduWrKdlySWE0eH1S46iokL7Bi /ih5P+eulAjVuC0bsao0FH06WBANX13/zcklsutI5hlCaDeG4tgC9LE2UmGqYkk+ oPA9VJSTIiKiiGtAW0DjduS6vGV0uDCdcVQsV66Hp2BY1x7SODC2+1LAS0Q+zQpm hf805KCcQ0tIXei8uGvxY8RXmQIDAQABMA0GCSqGSIb3DQEBCwUAA4IBAQAHq9tk denKVLw+/qQf5GpsxB07WhDHBDpTWijDwKsElr80iUEHD2JmUT13x9nbNmCgvd4p PKfN/d1bnT9pUw7729jon0NpvfXl9h+Q3qcif4tIEtTOYSiNBbC1uJlKDl8R8mHo UjRsvGQLJ3UiFKviy6/+THy3K5+eDds7IHOeokFwgtXUG4tTh+L/+S5vu1yyxOgw Ut01UNi7rWvKe2jcLkdM4knPlmmsXYb09g7hIBR2IoQOowm0A/pMR/lT6G51U66o Xkhixz/zLYJKTVbAGN60Jo9GqYo/VXIaQKcVI+zr2/QiVE5BfmjSbtZBfzSH5KWG bYmqNVfkjw5vOWoo -----END CERTIFICATE-----signing:
<KeyDescriptor use="signing"> <KeyInfo xmlns="http://www.w3.org/2000/09/xmldsig#"> <X509Data> <X509Certificate>MIIC0jCCAbqgAwIBAgIQRfRCOHlLEJBC/rJdnHy0JzANBgkqhkiG9w0BAQsFADAlMSMwIQYDVQQDExpBREZTIFNpZ25pbmcgLSBmcy53ZmxhYi5pbzAeFw0xOTExMjIwOTIyMzRaFw0yMDExMjEwOTIyMzRaMCUxIzAhBgNVBAMTGkFERlMgU2lnbmluZyAtIGZzLndmbGFiLmlvMIIBIjANBgkqhkiG9w0BAQEFAAOCAQ8AMIIBCgKCAQEAv6GOO7ivjAoPhsmtxx8FMoHhnRzbBX/Xne1HRVLy0d9sMCSTeiI03AM/rfKthuNzT7wsPmBbH+7yqTJxhqVjyjcNlf8iDWpQzHb/2zf7/RKVla/5HDBIJLIjjCRKsrIeiwne5xbK89bn9+NWAxDUBAmBX0bnRL/9aNpemNxdNnitR+ak8YX2XCs69NOf1cXOOG5YKRDIHiv8f7OINUbp4Ky+IK5ectZdH+QWGufFx7a3elXipqugrZat8rBN7WsCI3bsq/NcqwgzXvKYyfsLMRAqu4YTfDE+Sxgic6LZKwdsUBh7o65CZo6H/yOeYtFHRTS4pAMEropHVbmSRpv4cQIDAQABMA0GCSqGSIb3DQEBCwUAA4IBAQBDjA6UOnwMMhoHfstm5Sy5oqT/pZOoKmi3hs8OsuqAGzIHGFWmG25sFfh2g5ADCa2T8rSJDcqk9Pyq4K58fQQbWz2fYerfMc95xCCX8GPt4CQmsPx7+Pc2NvqiSSWwUgjubH006+A1OliqHtE/KX98zxztUA3cDsA3Yf+F3POBGWz1ALG8uVMRCc5YYrWeyLU+Q/kKGwWvGm5yzC2opLjWtbokpU4dKEEW8h766UZgILxDIM8hgzRlfcxuC6fjhHMPSP+bzk3uU0yCX0fejcE3Dkj7gDUP5gBWuCtNwjhC0E8TmX6BrsBttS72qwKt8AyrLjTH8leDkhiHlGj/2N3z</X509Certificate> </X509Data> </KeyInfo> </KeyDescriptor>cert2.crt:-----BEGIN CERTIFICATE----- MIIC0jCCAbqgAwIBAgIQRfRCOHlLEJBC/rJdnHy0JzANBgkqhkiG9w0BAQsFADAl MSMwIQYDVQQDExpBREZTIFNpZ25pbmcgLSBmcy53ZmxhYi5pbzAeFw0xOTExMjIw OTIyMzRaFw0yMDExMjEwOTIyMzRaMCUxIzAhBgNVBAMTGkFERlMgU2lnbmluZyAt IGZzLndmbGFiLmlvMIIBIjANBgkqhkiG9w0BAQEFAAOCAQ8AMIIBCgKCAQEAv6GO O7ivjAoPhsmtxx8FMoHhnRzbBX/Xne1HRVLy0d9sMCSTeiI03AM/rfKthuNzT7ws PmBbH+7yqTJxhqVjyjcNlf8iDWpQzHb/2zf7/RKVla/5HDBIJLIjjCRKsrIeiwne 5xbK89bn9+NWAxDUBAmBX0bnRL/9aNpemNxdNnitR+ak8YX2XCs69NOf1cXOOG5Y KRDIHiv8f7OINUbp4Ky+IK5ectZdH+QWGufFx7a3elXipqugrZat8rBN7WsCI3bs q/NcqwgzXvKYyfsLMRAqu4YTfDE+Sxgic6LZKwdsUBh7o65CZo6H/yOeYtFHRTS4 pAMEropHVbmSRpv4cQIDAQABMA0GCSqGSIb3DQEBCwUAA4IBAQBDjA6UOnwMMhoH fstm5Sy5oqT/pZOoKmi3hs8OsuqAGzIHGFWmG25sFfh2g5ADCa2T8rSJDcqk9Pyq 4K58fQQbWz2fYerfMc95xCCX8GPt4CQmsPx7+Pc2NvqiSSWwUgjubH006+A1Oliq HtE/KX98zxztUA3cDsA3Yf+F3POBGWz1ALG8uVMRCc5YYrWeyLU+Q/kKGwWvGm5y zC2opLjWtbokpU4dKEEW8h766UZgILxDIM8hgzRlfcxuC6fjhHMPSP+bzk3uU0yC X0fejcE3Dkj7gDUP5gBWuCtNwjhC0E8TmX6BrsBttS72qwKt8AyrLjTH8leDkhiH lGj/2N3z -----END CERTIFICATE-----
Upload the certificates to Java and SAML Keystore if they are not there.
star_wflab_io.crtis the certificate used for ADFS installation and configuration. You can take the password forcacertsfrompackage_dir/config.yml> thejava_cacerts_truststore_passparameter.keytool -keystore /opt/workfusion/java/jre/lib/security/cacerts -import -file star_adfs_certificate.crt -alias sso keytool -keystore /opt/workfusion/java/jre/lib/security/cacerts -import -file cert1.crt -alias adfs_encryption keytool -keystore /opt/workfusion/java/jre/lib/security/cacerts -import -file cert2.crt -alias adfs_signing keytool -keystore /opt/workfusion/workfusion/webapps/workfusion/WEB-INF/classes/saml/keystore/samlKeystore.jks -import -file star_adfs_certificate.crt -alias sso keytool -keystore /opt/workfusion/workfusion/webapps/workfusion/WEB-INF/classes/saml/keystore/samlKeystore.jks -import -file cert1.crt -alias adfs_encryption keytool -keystore /opt/workfusion/workfusion/webapps/workfusion/WEB-INF/classes/saml/keystore/samlKeystore.jks -import -file cert2.crt -alias adfs_signingUpload the value to Vault WorkFusion:
a. In
opt/workfusion/wf-sec/storage, create or edit thenew.propertiesfile with the following line:wf.sso.saml.idp.file.metadata=/opt/workfusion/workfusion/idp_metadata.xmlb. Upload the new value to Vault.
loader.sh workfusion new.propertiesTo apply the changes, restart the WorkFusion services:
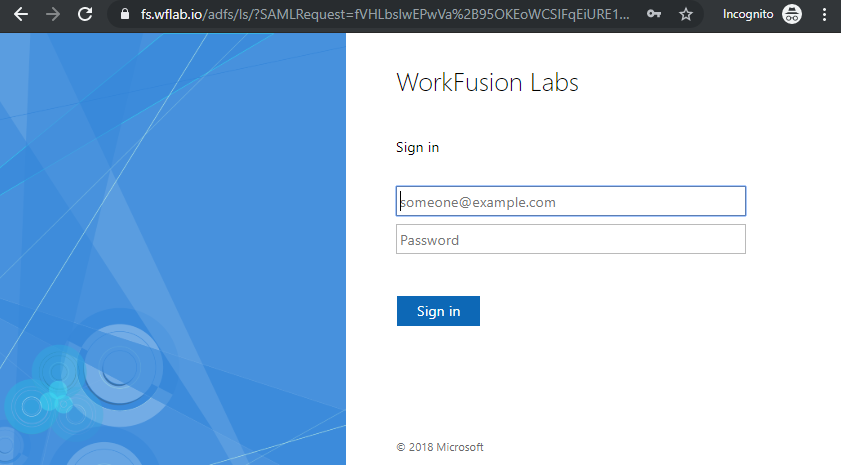
wfmanager restart workfusionLog in to the Control Tower service with your ADFS/SSO credentials.
ELK
The section helps you to enable SSO in the ELK stack.
Integrate WorkFusion ELK stack with SSO
To integrate ELK stack with SSO:
In
kibana.yml, add the following section to configure Kibana for work via proxy:# Work with proxy
xpack.security.public:
protocol: https
hostname: kibana-lb.WORKFUSION-LB-HOSTNAME
port: 443Configure the SAML realm in
kibana.ymlby adding the following parts:# SAML configuration
xpack.security.authc.providers: [saml]
xpack.security.authc.saml.realm: adfs
server.xsrf.whitelist: [/api/security/v1/saml]In
elasticsearch.yml, add the following parameters:# Elasticsearch SAML configuration
xpack.security.authc.token.enabled: true
xpack.security.authc.realms.saml.adfs:
order: 2
idp.metadata.path: "https://fs.WORKFUSION-LB-HOSTNAME/FederationMetadata/2007-06/FederationMetadata.xml"
idp.entity_id: "http://fs.WORKFUSION-LB-HOSTNAME/adfs/services/trust"
sp.entity_id: "https://kibana-lb.WORKFUSION-LB-HOSTNAME/"
sp.acs: "https://kibana-lb.WORKFUSION-LB-HOSTNAME/kibana/api/security/v1/saml"
sp.logout: "https://kibana-lb.WORKFUSION-LB-HOSTNAME/kibana/logout"
attributes.principal: "http://schemas.xmlsoap.org/ws/2005/05/identity/claims/upn"
attributes.groups: "http://schemas.xmlsoap.org/claims/Group"
nameid_format: "urn:oasis:names:tc:SAML:1.1:nameid-format:unspecified"Generate SAML metadata using the command below:
cd /opt/workfusion/elasticsearch
bin/elasticsearch-saml-metadata --realm adfs
Copy the generated
saml-elasticsearch-metadata.xmlfile to the SSO server.Configure Relying Party Trusts with policies on the SSO server:
Follow the steps from Add new relying party trust section.
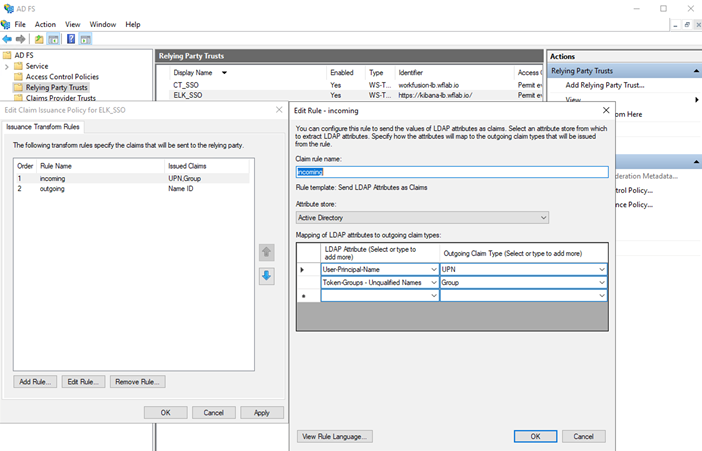
Create Claim Rules as mentioned below:
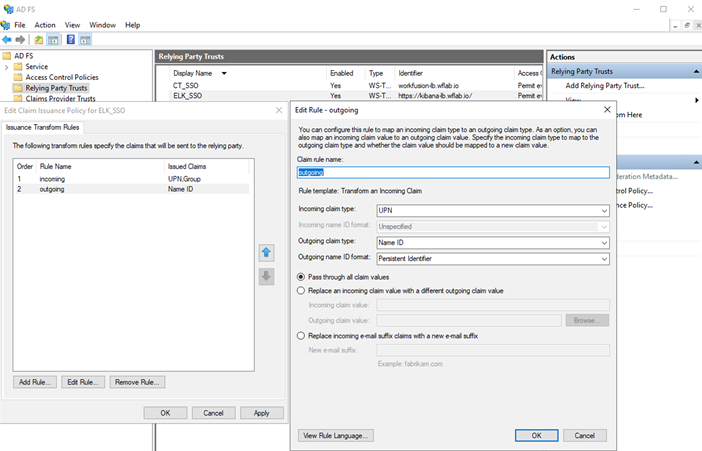
Log in to Kibana as the admin user. Go to Dev Tools and execute the following query:
Only the superuser role gets mapped when you run the query. In case you need other roles, build another request using a similar query.
POST /_security/role_mapping/saml-superuser
{
    "enabled" : true,
    "roles" : [
      "superuser"
    ],
    "rules" : {
      "all" : [
        {
          "field" : {
            "realm.name" : "adfs"
          }
        },
        {
          "field" : {
            "groups" : "WFUsers"
          }
        }
      ]
    },
    "metadata" : { }
  }
Restart the Elasticsearch and Kibana services:
wfmanager restart elasticsearch kibanaLog in to Kibana with your Active Directory credentials.
The high-availability (HA) mode requires the following number of servers:
- Three INT servers—
elasticsearch.ymlchanges - Two APP servers—
kibana.ymlchanges
Steps 1-3 and 8 must be mandatorily performed on all servers mentioned earlier.
To integrate ELK stack with SSO:
In
kibana.yml, add the following section to configure Kibana for work via proxy:# Work with proxy
xpack.security.public:
protocol: https
hostname: kibana-lb.WORKFUSION-LB-HOSTNAME
port: 443Configure the SAML realm in
kibana.ymlby adding the following parts:# SAML configuration
xpack.security.authc.providers: [saml]
xpack.security.authc.saml.realm: adfs
server.xsrf.whitelist: [/api/security/v1/saml]In
elasticsearch.yml, add the following parameters:# Elasticsearch SAML configuration
xpack.security.authc.token.enabled: true
xpack.security.authc.realms.saml.adfs:
order: 2
idp.metadata.path: "https://fs.WORKFUSION-LB-HOSTNAME/FederationMetadata/2007-06/FederationMetadata.xml"
idp.entity_id: "http://fs.WORKFUSION-LB-HOSTNAME/adfs/services/trust"
sp.entity_id: "https://kibana-lb.WORKFUSION-LB-HOSTNAME/"
sp.acs: "https://kibana-lb.WORKFUSION-LB-HOSTNAME/kibana/api/security/v1/saml"
sp.logout: "https://kibana-lb.WORKFUSION-LB-HOSTNAME/kibana/logout"
attributes.principal: "http://schemas.xmlsoap.org/ws/2005/05/identity/claims/upn"
attributes.groups: "http://schemas.xmlsoap.org/claims/Group"
nameid_format: "urn:oasis:names:tc:SAML:1.1:nameid-format:unspecified"Generate SAML metadata using the command below:
cd /opt/workfusion/elasticsearch
bin/elasticsearch-saml-metadata --realm adfs
Copy the generated
saml-elasticsearch-metadata.xmlto the SSO server.Configure the Relying Party Trusts with policies on the SSO server:
Follow the steps from Add new relying party trust section.
Create Claim Rules as mentioned below:
Log in to Kibana as the admin user. Go to Dev Tools and execute the following query:
Only the superuser role gets mapped when you run the query. In case you need other roles, build another request using a similar query.
POST /_security/role_mapping/saml-superuser
{
    "enabled" : true,
    "roles" : [
      "superuser"
    ],
    "rules" : {
      "all" : [
        {
          "field" : {
            "realm.name" : "adfs"
          }
        },
        {
          "field" : {
            "groups" : "WFUsers"
          }
        }
      ]
    },
    "metadata" : { }
  }
Restart the Elasticsearch and Kibana services:
wfmanager restart elasticsearch kibanaLog in to Kibana with your Active Directory credentials.
Troubleshoot
Check ADFS logs
To view the issues that may arise on the ADFS side, check the ADFS logs:
On the ADFS server, navigate to Control Panel > Administrative Tools > Event Viewer.
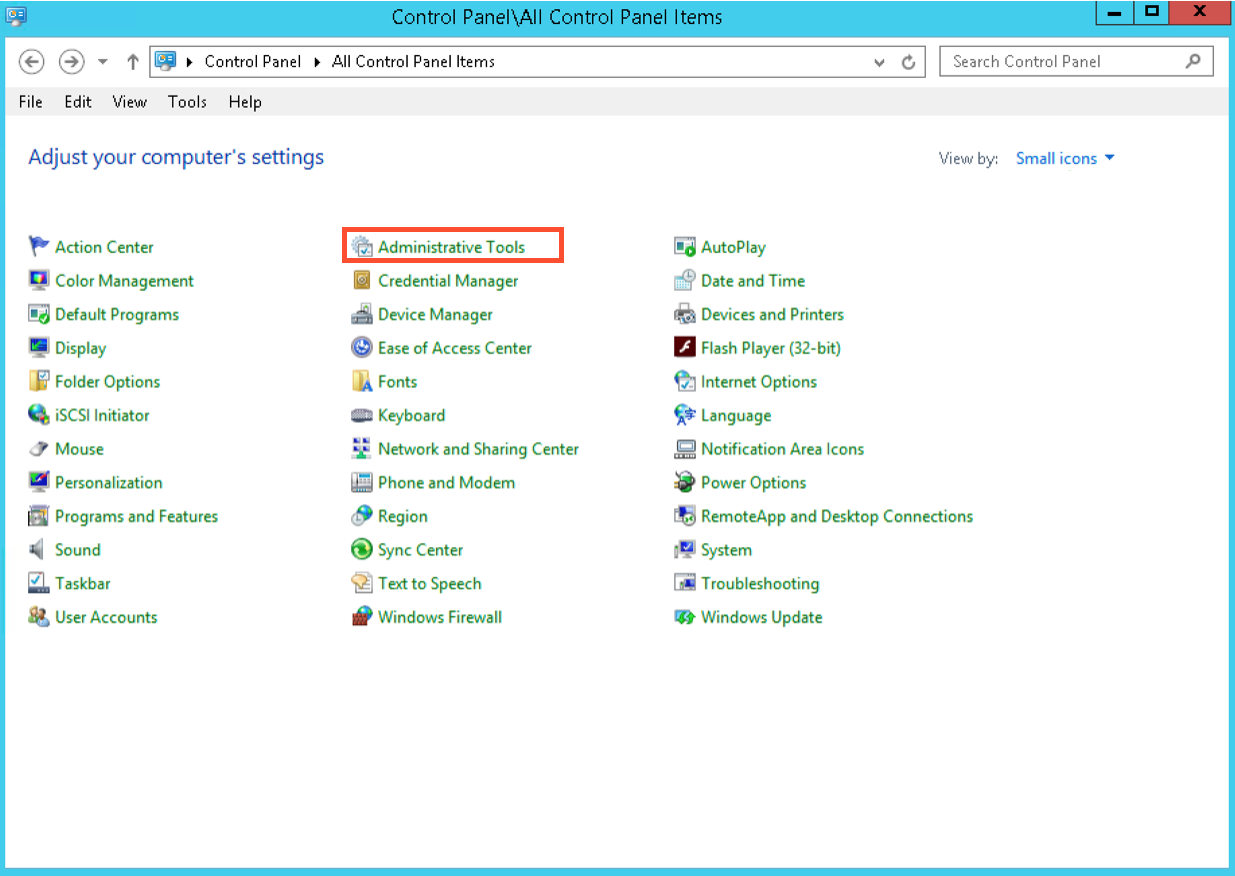
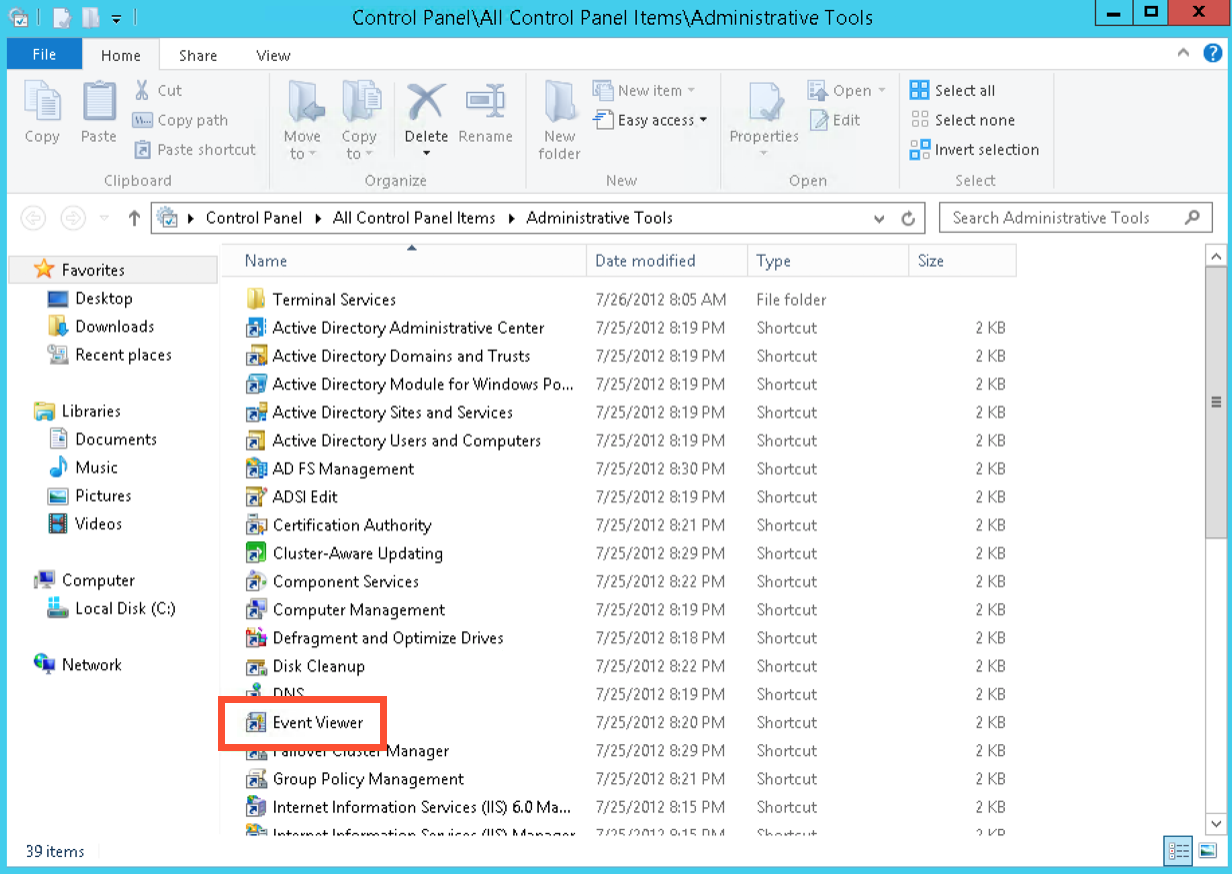
In Event Viewer in the left panel, navigate to Applications and Services Logs > ADFS > Admin and view ADFS logs.
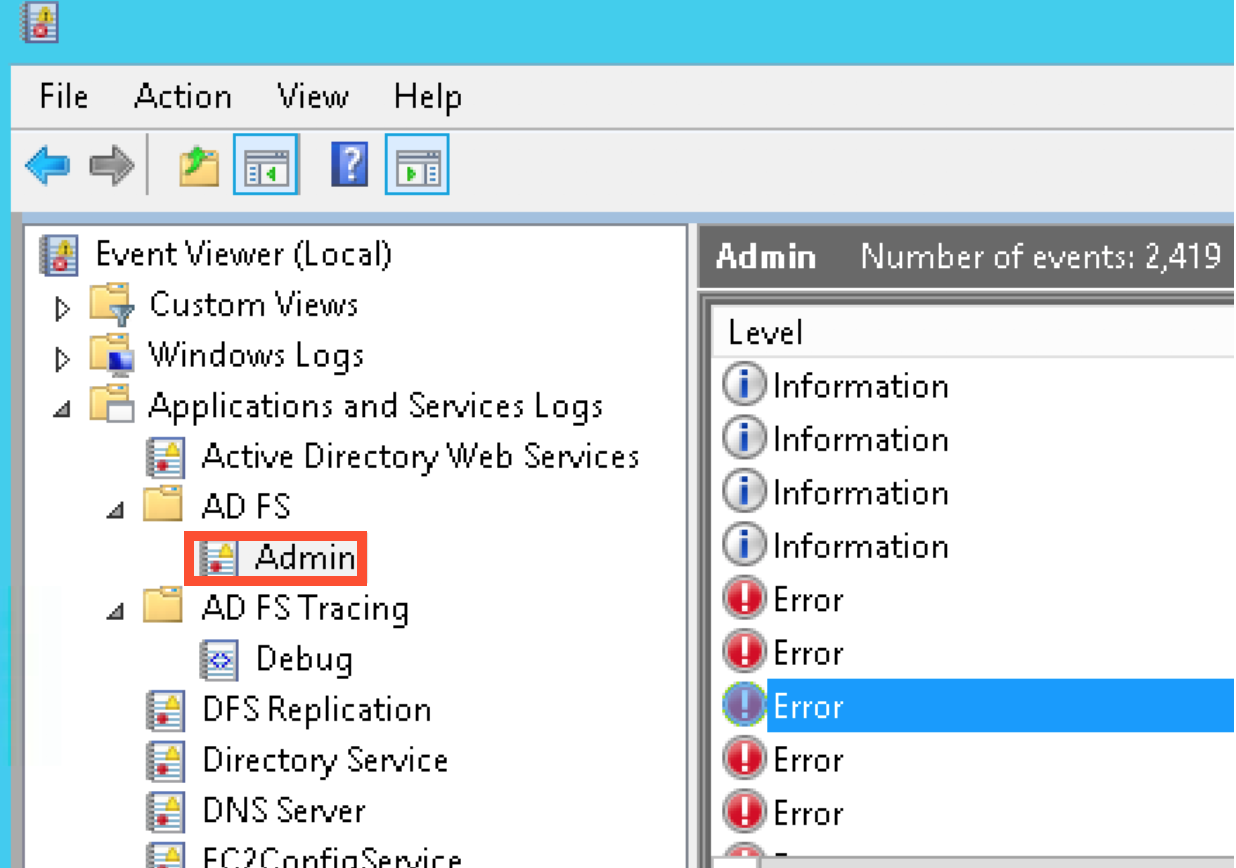
For more details, see How to check ADFS logs for SAML logins.
Troubleshoot through debugging (version 10.2 with Keycloak)
For troubleshooting an issue, enable the debug mode in Keycloak:
Stop the
supervisordservice.systemctl stop supervisordEdit
/opt/workfusion/keycloak/bin/standalone.shand setDEBUG_MODEtotrue.``` DEBUG\_MODE="${DEBUG:-true}" DEBUG\_PORT="${DEBUG\_PORT:-8787}" ```You can also edit
/opt/workfusion/supervisord/apps/keycloak.iniand add--debugto the startup line.``` command = bash -c ' source /opt/workfusion/environment.sh; /opt/workfusion/keycloak/bin/standalone.sh --debug \\ --server-config=standalone-ha.xml \\ --properties=/opt/workfusion/keycloak/keycloak.properties \\ ' ```Start the
supervisordservice again.systemctl start supervisord
After Keycloak starts, you can debug it remotely on a specified port.
Possible errors after debugging
Error type 1
You can face the following error after ADFS sends assertions back to Keycloak after login:
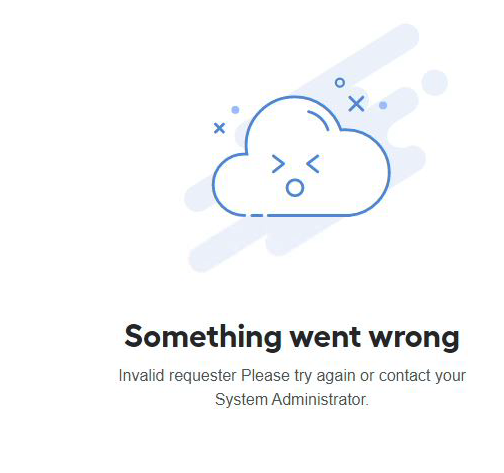
Keycloak logs contain the following error:
{"timestamp":"2021-02-03T14:06:43.462Z","sequence":156,"loggerClassName":"org.jboss.logging.Logger","loggerName":"org.keycloak.broker.saml.SAMLEndpoint","level":"ERROR","message":"no principal in assertion; expected: FRIENDLY_ATTRIBUTE(uid)","threadName":"default task-1","threadId":127,"mdc":{},"ndc":"","hostName":"sso-mish-wfaw-10014-master1.WORKFUSION-LB-HOSTNAME","processName":"jboss-modules.jar","processId":535}
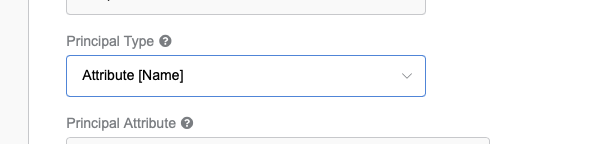
To fix the errors, go to the SAML Config section > Identity Providers and change the Keycloak Principal Type config from Attribute [Friendly Name] to Attribute [Name].
Error type 2
You can also face the following error after ADFS sends assertions back to Keycloak after login:
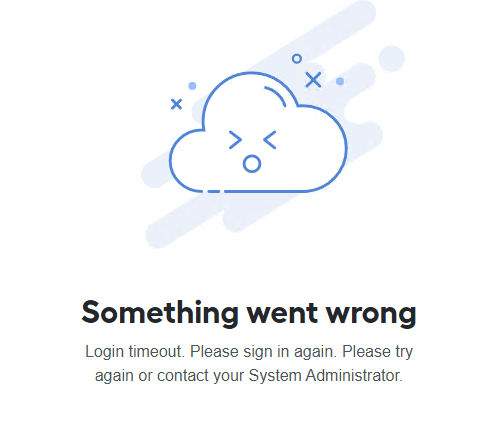
Keycloak logs contain the following error:
{"timestamp":"2021-02-05T11:51:57.483Z","sequence":405,"loggerClassName":"org.jboss.logging.Logger","loggerName":"org.keycloak.events","level":"WARN","message":"type=IDENTITY_PROVIDER_RESPONSE_ERROR, realmId=WorkfusionRealm, clientId=null, userId=null, ipAddress=172.20.243.193, error=invalid_saml_response","threadName":"default task-37","threadId":445,"mdc":{},"ndc":"","hostName":"ip-172-20-51-15.ec2.internal","processName":"jboss-modules.jar","processId":2021}
An invalid relying party trust identifier could cause these errors. Thus, ensure that the identifier does not contain a trailing slash. The identifier should be <keycloak_host>/auth/realms/WorkfusionRealm, (for example, https://sso-mish-wfaw-10014-auth-lb1.WORKFUSION-LB-HOSTNAME/auth/realms/WorkfusionRealm).
Error type 3
You can also face the following issue during the connection to CT/WS using ADFS SSO:
The authentication statement is too old to be used with the value XXXX.
For security reasons, the system limits the time window enabling the processing of SAML messages and assertions. You can customize the time window parameters with the following settings.
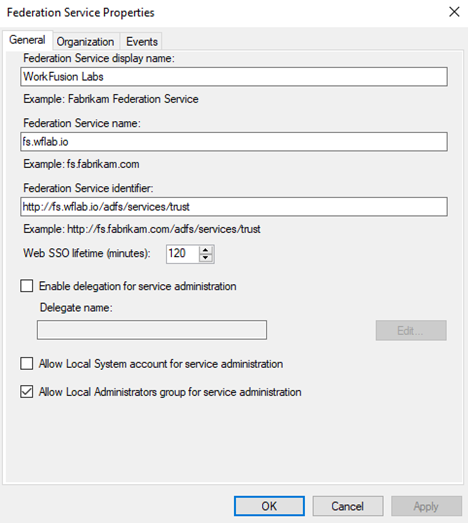
The system allows users to single sign-on for up to 7,200 seconds (120 minutes) since their initial authentication with the IDP, based on the AuthInstance value of the Authentication statement. Some IDPs allow users to stay authenticated for longer periods than this, and you might need to change the default value by setting maxAuthenticationAge of the WebSSOProfileConsumerImpl bean.
Based on the default parameters from Advanced configuration, search by maxAuthenticationAge.
To fix the issue, use one of the solutions below:
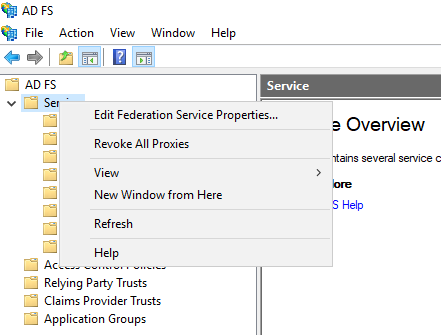
Change the Web SSO lifetime(minutes) option from 480 to 120 on the ADFS server.
Add the parameter to the
/opt/workfusion/workfusion/webapps/workfusion/WEB-INF/classes/spring/saml-security.xmlfile with the value of 28,800 seconds (480 minutes—the same as we have on ADFS by default).before:
<bean id="webSSOprofileConsumer" class="org.springframework.security.saml.websso.WebSSOProfileConsumerImpl"> <property name="responseSkew" value="#{samlProperties.responseSkew}"/> </bean>after:
<bean id="webSSOprofileConsumer" class="org.springframework.security.saml.websso.WebSSOProfileConsumerImpl">
    <property name="responseSkew" value="#{samlProperties.responseSkew}"/>
    <property name="maxAuthenticationAge" value="28800"/>
</bean>
Restart the WorkFusion service.
wfmanager restart workfusion