
Use File Storage as transactions source
Download sample project
Download project tutorial-filestorage_10.1.0.4.zip
Learn how to input to application from S3 file
note
To make it easier to understand the important classes and interfaces, we recommend to download and import this example project into your WorkFusion Studio and refer to it as you read this guide.
The downloaded project must have the file structure below.
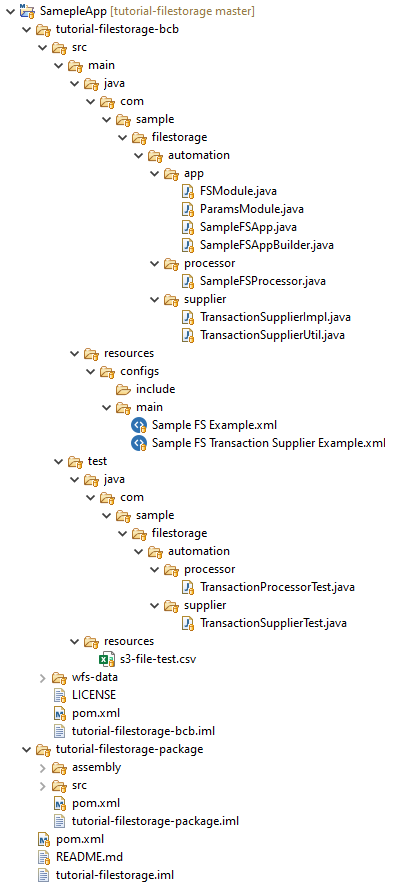
As soon as you have downloaded the project, perform the following actions.
- Run
mvn clean installon parent pom.xml. - Make sure you set all the needed data about Control Tower and Nexus users.
The user specified is settings.xml under server ID bcb-repository exists in Nexus.
The Nexus user should have a deployment privilege on the wf-machine-config-bundle repository.
In parent pom.xml, you have set the specified Nexus repository where your JARs will be installed. Make sure to point it to your Nexus, for example:
<workfusion.nexus.host.url>http://localhost:8081/</workfusion.nexus.host.url>Add the following code with the Control Tower user credentials to the settings.xml file:
<servers>
    <server>
      <id>control-tower</id>
      <username>CT_username</username>
      <password>CT_password</password>
    </server>
</servers>
In parent pom.xml, you have set the Control Tower host where your bundle will be published.
<workfusion.controltower.url>https://yourinstance.workfusion.com/</workfusion.controltower.url>
Now, you can deploy your bots to Nexus or publish a bundle with BP to Control Tower.
Deploy to Nexus
- Run
mvn deployon parent pom.xml. This deployment depends on your Nexus repository configuration. - Once the build is reflected in Nexus, upload the bots into the local Control Tower. Go to Bot Configurations > Import from repository. You can build your business process by selecting a bot task from the list.
Publish to Control Tower
- Run
mvn bundle:importon tutorial-filestorage-package/pom.xml. This command calls the import plugin. - Open your Control Tower and find BP named "tutorial datastore v0.0.7".
important
You must make some changes for the samples to work properly:
- Upload the .csv file to the S3 bucket (the instance must have access to this bucket), the file can be found in the following path: tutorial-filestorage-bcb/src/test/resources/s3-file-test.csv
- Set the bucket name in the File Storage module: com.sample.filestorage.automation.app.FSModule
- Change the file link in the TransactionSupplier connector: com.sample.filestorage.automation.supplier.TransactionSupplierImpl
Learn TransactionSupplier
In this case, TransactionSupplier is TransactionSupplierImpl.java.
Navigate to the following files:
src > main > java > com > sample > filestorage > automation > supplier > TransactionSupplierImpl.javasrc > main > resources > configs> main > Sample FS Transaction Supplier Example.xml
This is the bot task that triggers the execution of the TransactionSupplier class mentioned in [1].
The following code in the bot task initializes the task of creating transactions.
def app = SampleFSApp.init(binding).get();
def transactions = app.loadTransactions(TransactionSupplierImpl.class);
Transactions are created for each row present in the .csv file in the "fs-odf-demo" S3 bucket. In order to read the file, the S3Manager class is used. S3Manager is a utility in ODF to perform file-based operations in S3 and interact with your local file system.
Execution flow inside Collection<Transaction> get() method
The following steps describe the execution flow inside the Collection<Transaction> get() method. Refer to the code for TransactionSupplierImpl.java.
- Using the
s3Manager.getFile(url)method, the uploaded file in the S3 bucket is read andInputStreamof the file is returned. - The
BufferedReaderobject is created usingInputStream. - Each line of the file is read using the
readLine()method ofBufferedReaderwhile loop. - An ODF transaction is created for each line in the .csv file except for the header line ("first_name", "last_name", "email").
- The line is split by the delimiter "," and the values for the column names are extracted.
- The extracted values are inserted into transaction attributes using the
transaction.putAttribute()method.
Work with File Storage
S3PluginAdapter
Since S3Manager is deprecated, one should start working with S3PluginAdapter for higher versions. It provides similar utility functions as S3Manager.
To implement this class in ODF projects, create a module that provides two resources:
Method with the return type as String which provides the name of the S3 bucket (similar to S3Manager)
Singleton instance of the
S3PluginAdapterclass, e.g.:@Provides @Singleton public S3PluginAdapter s3PluginAdapter(PluginAdapterFactory pluginAdapterFactory) { return(S3PluginAdapter) pluginAdapterFactory.getPluginAdapter(PluginAdapterFactory.PluginsEnum.S3); }
Sometimes in client environments, you may need to define s3EndpointUrl while interacting with s3PluginAdapter. You can perform this action in the constructor of your class as follows:
public MyClass {

    private SystemUtilities systemUtilities;

    @Inject
    public MyClass (SystemUtilities systemUtilties) {
        this.systemUtilities = systemUtilities;
        this.systemUtilities.defineVariable("s3EndpointUrl", "client_env_specific_s3_endpoint_url");
    }

}
Methods you can use with S3PluginAdapter are as follows.
| Method | Result | Parameters | Description |
|---|---|---|---|
getCommonS3Attributes |
Map<String, String> |
|
Returns basic attributes for the S3Adapter. |
| get | byte[] | String url | Downloads a file from the S3 bucket that you set in CommonS3Attributes. |
listEntries |
List<String> |
String prefix |
Returns a list with entries from S3: can return all the entries from a folder or filter the entries. If you want to use the prefix only, set null for the |
| delete | void | String url | Deletes a file by URL |
put |
S3ResultItem |
byte[] data, String s3key, CannedAccessControlList acl, String contentType, String contentDisposition, Long expiresInSeconds |
Uploads a file to the S3 bucket
|
| copy | void | String from, String to, CannedAccessControlList acl | Copies files inside the S3 bucket |