
Data Stores with ORMLite
ORMLite is a framework that provides lightweight Object Relational Mapping between Java classes and SQL databases. There are certainly more mature ORMs that provide this functionality, including Hibernate and iBatis. However, ORMLite is a simple yet powerful wrapper around the JDBC functions.
ODF 2 comes with ORMLite as the default ORM framework used primarily to access Data Stores data.
tip
For more details on the framework specifics, follow the ORMLite official documentation.
Set up repository
In terms of the ODF 2 framework, ORMLite enables mapping between Java classes and corresponding Data Stores. To describe how it works, let's start with a simple example of including a simple Email entity into the following structure:
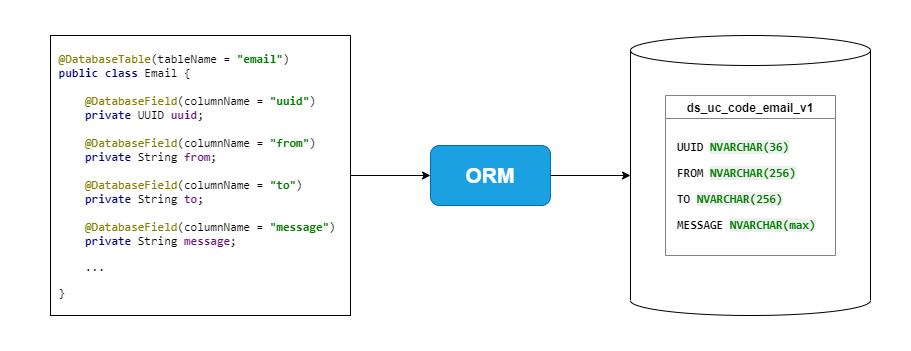
The steps are as follows:
To create an entity class with a structure corresponding to that of the Data Store, add the following ORMLite annotations to the Java class:
@DatabaseTable(tableName = "email")
public class Email {

    @DatabaseField(columnName = "uuid", dataType = DataType.UUID, generatedId = true)
    private UUID uuid;

    @DatabaseField(columnName = "from")
    private String from;

    @DatabaseField(columnName = "to")
    private String to;

    @DatabaseField(columnName = "message")
    private String message;

    // getters and setters are omitted

}
The
@DatabaseTableannotation configures theEmailclass persisting to theds_uc_<use_case_code>_email_v<version>Data Store. For details on the name conversion, refer to Entity to Data Store conversion.The
@DatabaseFieldannotations map theEmailfields to the Data Store columns with identical names.
Ensure that your class has a no-argument constructor with at least package visibility. When an object is returned from a query, ORMLite constructs the object using a Java reflection, and a constructor needs to be called.
tip
For more details about the ORMLite annotations, refer to Adding annotations.
When you have the entity class and the mapping, create a repository class for operations with
Email. ODF 2 provides theOrmLiteRepositoryclass that already covers all basic create, read, update, and delete (CRUD) operations. To create a custom repository fromOrmLiteRepository, extend the class and specify the entity type as a generic parameter, for example,Email:public class EmailRepository extends OrmLiteRepository<Email> { public EmailRepository(ConnectionSource connectionSource) throws SQLException { super(connectionSource, Email.class); } }The required
ConnectionSourceobject is already configured by the ODF 2 framework. Like any other predefined object, it is available from the Feather context. In most cases, you don't have to create it manually. Instead, use the injection when creating a repository instance:public class ClientOdfModule implements OdfModule { @Provides @Singleton public EmailRepository emailRepository(ConnectionSource connectionSource) throws SQLException { return new EmailRepository(connectionSource); } }tip
For the custom
ConnectionSourceexample, refer to the ORMLite documentation | Connection Sources.
When the entity class is prepared and the corresponding repository is created, add them to a Bot Task:
Add the
@Requires(ClientOdfModule.class)annotation so that your Bot Task can get access to the repository instance.Inject
EmailRepositoryusing the constructor injection:@BotTask @Requires(ClientOdfModule.class) public class EmailExampleTask implements AdHocTask { private final EmailRepository emailRepository; @Inject public EmailExampleTask(EmailRepository emailRepository) { this.emailRepository = emailRepository; } @Override public TaskRunnerOutput run(TaskInput taskInput) { // Create new Email entity with test data Email email = new Email(); email.setFrom("example@mail.com"); email.setMessage("Test message"); // Store the entity in the Data Store by using the repository email = emailRepository.create(email); // Assert that ID was generated by the Data Store automatically assert email.getUuid() != null; // Assert the Data Store contains the created Email Optional<Email> emailFromRepository = emailRepository.findById(email.getUuid()); assert emailFromRepository.isPresent(); return taskInput.asResult(); } }Where you perform the following actions:
- Create a new
Emailentity using test data. - In the corresponding Data Store, create a new record by calling the
createmethod forEmailRepository. Mind that the Data Store generates an ID in theEmailentity automatically. - To check that the Data Store actually contains the created
Emailentity, call thefindByIdmethod forEmailRepositorythat returns a newEmailinstance using data from the Data Store.
- Create a new
OrmLiteRepository provides basic CRUD operations, not only the create and find methods. Since you extend your EmailRepository from OrmLiteRepository, the following basic methods are available out of the box:
Email create(Email email)creates a newEmailentity.Collection<Email> createAll(Collection<Email> emails)creates a collection of newEmailentities.Optional<Email> findById(UUID id)reads theEmailentity by its ID.boolean existsById(UUID id)checks whether theEmailentity exists using its ID.List<Email> findAll()returns all storedEmailentities.long count()returns a specified number of storedEmailentities.Email update(Email email)updates theEmailentity.void deleteById(UUID id)deletes theEmailentity by its ID.void delete(Email email)deletes theEmailentity.void deleteAll(Collection<Email> emails)deletes a collection of theEmailentities.Dao<Email, UUID> getDao()returns the underlying data access object (DAO).
Besides the basic CRUD operations, ORMLite provides a more sophisticated mechanism to interact with a Data Store. For example, it can use query builders or raw SQL queries. Each OrmLiteRepository has an underlying DAO that you can access by calling the getDao method for a repository class.
// Query builder usage example
public List<Email> findEmailsByMessageText(String text) throws SQLException {
    return this.getDao().queryBuilder()
            .where()
            .like("message", text)
            .query();
}
// Raw query usage example
public List<String> selectAllMessages() throws SQLException {
    String sqlQuery = String.format("select MESSAGE from %s", this.getDao().getTableName());
    GenericRawResults<String[]> rawResults = this.getDao().queryRaw(sqlQuery);

    List<String> messages = new ArrayList<>();
    for (String[] result : rawResults) {
        messages.add(result[0]);
    }

    return messages;
}
tip
Explore the DAO capabilities in the following articles:
You can also create a DAO class manually without using OrmLiteRepository. Each DAO has two generic parameters: the class you persist with the DAO and the class of the ID column to identify a specific Data Store row. If your class does not have an ID field, put Object or Void as the second argument. For example, in the above Email class, the uuid field is the ID column. Therefore, the ID class is UUID.
The simplest way to create a custom DAO is to use the createDao static method for the com.j256.ormlite.dao.DaoManager class:
Dao<Email, UUID> dao = DaoManager.createDao(connectionSource, Email.class);
tip
For more details on creating DAO classes, refer to Setting Up the DAOs.
Convert entity to Data Store
The ODF 2 framework uses a certain conversion between a table name you set with the @DatabaseTable annotation and the actual one in the SQL Server database, for example:
@DatabaseTable(tableName = "email")
public class Email {...}
If you set up your entity as @DatabaseTable(tableName = "email"), the actual table name in the SQL Server database is automictically converted by ORMLite using the following pattern: ds_uc_<use_case_code>_email_v<version_number>
Where:
ds_is a standard Data Store prefix. All table names representing Data Stores start with this prefix.uc_defines reference and linkage that the current Data Store uses for a specific Digital Worker.<use_case_code>is the Digital Worker code set for the current project upon its creation.emailis the actual entity name that comes from the@DatabaseTableannotation._vdefines that the current Data Store is versioned.<version_number>is the actual Data Model version of the current project.
note
The naming conversion is crucial for seamless integration with the analytics flow and defining conformity to a specific Digital Worker and version.
When you work with the ORMLite repository, the framework uses the pattern described above to translate an entity name for each SQL query:
// considering <use_case_code> = 'code' and <version> = '1' the actual SQL query can look like this:
emailRepository.findById("id") -> SELECT * FROM 'ds_uc_code_email_v1' WHERE uuid='id';
Access Data Stores outside of project
When you need to access a Data Store maintained outside of the project—meaning not connected to any Digital Worker, you can still benefit from using the ORMLite repositories. Utilize the com.workfusion.odf2.core.orm.model.Datastore annotation defining how exactly OrmLite should work with a specific Data Store.
For example, see how to get data from the System Currency Data Store using a repository. First, define an entity class:
@DatabaseTable(tableName = "System_Currency")
@Datastore(type = DatastoreType.GLOBAL)
public class SystemCurrency {

    @DatabaseField(columnName = "id")
    private String id;

    @DatabaseField(columnName = "name")
    private String name;

    // getter and setter are omitted
}
As you can see, this is a regular ORMLite entity, except for the @Datastore(type = DatastoreType.GLOBAL) annotation. The annotation defines that the SystemCurrency entity and the related Data Store are global, not connected to any Digital Worker, and are to be treated accordingly.
There are three Data Store types:
DatastoreType.VERSIONED: the Digital Worker code, entity name, and version are used for the table name conversion, for example,ds_uc_code_entity_name_v1.DatastoreType.NON_VERSIONED: the Digital Worker code and entity name are used for the table name conversion, for example,ds_uc_code_entity_name.DatastoreType.GLOBAL: the entity name is used for the table name conversion only, for example,ds_entity_name.
If not specified, DatastoreType.VERSIONED is used as the default type.
The rest of the code looks completely the same as for any other Data Store.
Create a repository for the entity:
public class SystemCurrencyRepository {

    private final Dao<SystemCurrency, String> dao;

    public SystemCurrencyRepository(ConnectionSource connectionSource) throws SQLException {
        dao = DaoManager.createDao(connectionSource, SystemCurrency.class);
    }

    public List<SystemCurrency> getAll() throws SQLException {
        return dao.queryForAll();
    }

}
Use it in your Bot Task:
@BotTask
public class SystemCurrencyTask implements AdHocTask {

    private final SystemCurrencyRepository repository;
    private final Logger logger;

    @Inject
    public SystemCurrencyTask(SystemCurrencyRepository repository, Logger logger) {
        this.repository = repository;
        this.logger = logger;
    }

    @Override
    public TaskRunnerOutput run(TaskInput taskInput) {
        repository.getAll().forEach(currency ->
                logger.info("Currency: ID '{}', name '{}'", currency.getId(), currency.getName()));
        return taskInput.asResult();
    }

}
Access Data Stores with dynamic names
When you access a lot of differently named Data Stores with identical structures, it can be impractical to create an entity and a repository for each of them. Instead, you can have a single entity with the required structure and use the com.workfusion.odf2.core.orm.util.DynamicDaoSupport class to create a DAO bound to a Data Store with an arbitrary name.
Unlike name specified in @DatabaseTable annotation, this name will be used as SQL Server table name exactly as it is, without adding Digital Worker name and version, or any other modifications.
Using the previous example, you can write a Bot Task like this:
@BotTask
public class SystemCurrencyTask implements AdHocTask {

    private final DynamicDaoSupport dynamicDaoSupport;
    private final Logger logger;

    @Inject
    public SystemCurrencyTask(DynamicDaoSupport dynamicDaoSupport, Logger logger) {
        this.dynamicDaoSupport = dynamicDaoSupport;
        this.logger = logger;
    }

    @Override
    public TaskRunnerOutput run(TaskInput taskInput) {
        final Dao<SystemCurrency, String> dao = dynamicDaoSupport.createDao("any_table_name_you_like", SystemCurrency.class);
        try {
            dao.queryForAll().forEach(currency -> logger.info("Currency: ID '{}', name '{}'", currency.getId(), currency.getName()));
            return taskInput.asResult();
        } catch (SQLException e) {
            throw new RuntimeException(e);
        }
    }
}
In this way, you can create multiple DAOs for different Data Stores using the same entity to access them. If working directly with DAO is inconvenient, you can wrap it with com.workfusion.odf2.core.orm.OrmLiteRepository that offers methods for all typical database operations.
@BotTask
public class SystemCurrencyTask implements AdHocTask {

    private final DynamicDaoSupport dynamicDaoSupport;
    private final Logger logger;

    @Inject
    public SystemCurrencyTask(DynamicDaoSupport dynamicDaoSupport, Logger logger) {
        this.dynamicDaoSupport = dynamicDaoSupport;
        this.logger = logger;
    }

    @Override
    public TaskRunnerOutput run(TaskInput taskInput) {
        final OrmLiteRepository<SystemCurrency> repository = new OrmLiteRepository(dynamicDaoSupport.createDao("any_table_name_you_like", SystemCurrency.class));
        repository.findAll().forEach(currency -> logger.info("Currency: ID '{}', name '{}'", currency.getId(), currency.getName()));
        return taskInput.asResult();
    }
}
One of the common cases for dynamic DAOs is accessing dictionary Data Stores used in Manual Tasks. Such Data Stores share the same structure (the id and name fields). For convenience, ODF 2 offers an entity called com.workfusion.odf2.core.orm.util.ManualTaskDictionaryEntity that has this structure out of the box.
View ORMLite limitation
When creating and mapping an entity using the ORMLite framework, mind that columns of the Data Stores created in Control Tower can have one of the four data types:
- TEXT:
nvarchar - DATE:
date - TIMESTAMP:
datetime2 - INTEGER:
int
If a Data Store is maintained using Liquibase migrations, which is by default true for all tables of the standard extendable Data Model, you can use any text, numeric, and date types, but you cannot use UUID, Time, Boolean, and some other data types.
For example, see how to address the Boolean type not supported by Data Stores by default:
@DatabaseTable(tableName = "email")
public class Email {

    @DatabaseField(columnName = "is_read", dataType = DataType.BOOLEAN_INTEGER)
    private boolean isRead;

    // getter and setter are omitted

}
Specifying the dataType parameter in @DatabaseField, you can control how exactly ORMLite handles the corresponding field data. In the example, it persists the boolean Java primitive as an integer in the Data Store. By using this conversion, you can keep the boolean type in your code, while the integer type is stored in the corresponding field of the Data Store.
tip
To read more about the supported data type in ORMLite, go to Persisted Data Types.