Core
Engine
The ODF Engine instance is created in each Bot Task. This work is done by abstract com.workfusion.intake.core.App class, which provides two main public
methods and a constructor.
/**
 * Initializes ODF Engine.
 *
 * @param context Bot Task Context.
 * @param additionalModules Additional modules to be included as dependency providers.
 * @param overrideModules modules which override default Intake Module and additional modules.
 * @param injectContext Object in which all dependency are injected. Mostly is used for testing.
 */
protected App(Binding context, List<Module> additionalModules, List<Module> overrideModules, Object injectContext) { ... }

/**
 * Loads transactions using requested connector and saves them into data storage.
 *
 * @param connectorClass target connector class to be initialized
 * @return list of loaded transactions
 */
public final Collection<Transaction> loadTransactions(Class<? extends TransactionSupplier> connectorClass) {...}

/**
 * Processes transaction using requested processor and saves it.
 *
 * @param processorClass target processor class to be initialized
 * @param transactionId if of the transaction to be processed
 * @return instance processed transaction
 */
public final Transaction processTransaction(Class<? extends TransactionProcessor> processorClass, String transactionId) {...}
Let's see what parameters the App class accepts in the constructor.
| Parameter | Description | Required |
|---|---|---|
| Binding context | WebHarvest context object | Yes |
List<Module> additionalModules | Additional modules to be included as dependency providers. A module contains provider methods to be used to inject dependencies where a particular class is required. The list of modules will be combined with the default list of modules that the App class provides. Can be null. | No |
List<Module> overrideModules | List of modules that will override additional modules and App default. Mostly used in testing. Can be null. | No |
Object injectContext | Object in which all dependencies will be injected. Mostly used for testing. Can be null. | No |
In your application, you need to create your own Application Engine and extend it from com.workfusion.intake.core.App. The simplest example is given below.
public class SimpleAppExample extends App {
    public SimpleAppExample(Binding context) {
        super(context, null, null, null);
    }
}
The example of the SimpleAppExample usage from Bot Task to call transaction processing is as follows.
<config xmlns="http://web-harvest.sourceforge.net/schema/1.0/config" scriptlang="groovy">
    <script><![CDATA[
        import com.workfusion.intake.core.SimpleAppExample
        import com.workfusion.intake.impl.processor.ExcelToHtmlProcessor;

        String transactionId = _sys_transaction_id.toString();
        def app = new SimpleAppExample(binding).get();
        app.processTransaction(ExcelToHtmlProcessor.class, transactionId);
        ]]></script>
    <export include-original-data="true">
    </export>
</config>
Data flow
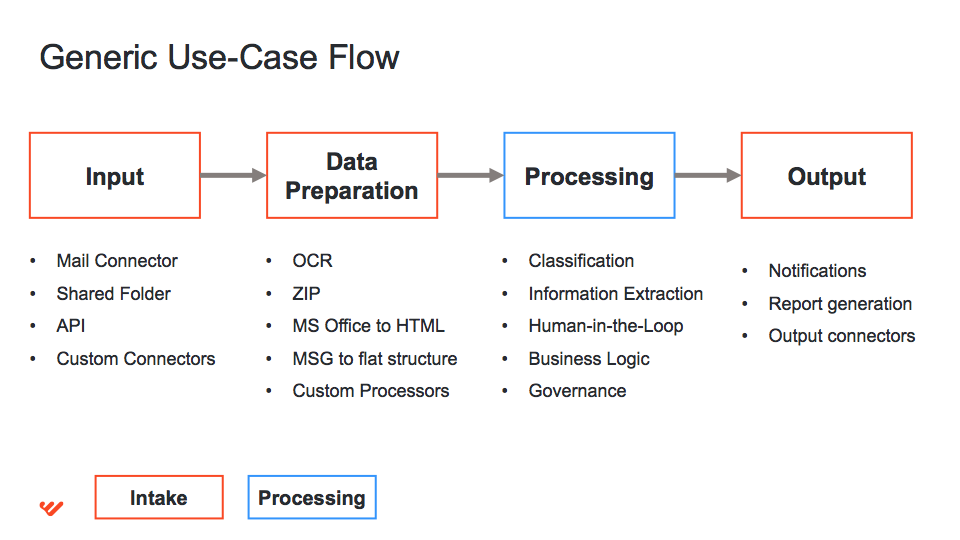
The majority of use-cases consist of three main swim lanes as below.
- Input+Data Preparation: Connecting to the target application or service and downloading data like documents. In most cases, some pre-processing is required for documents like OCR, extraction of .msg file attachments, etc.
- Processing: This is where all the processing logic happens. It can be information extraction or classification, manual tasks, validation, etc.
- Output: Preparing and submitting the processing results to some system. Can involve report generation, sending email, interacting with legacy systems.
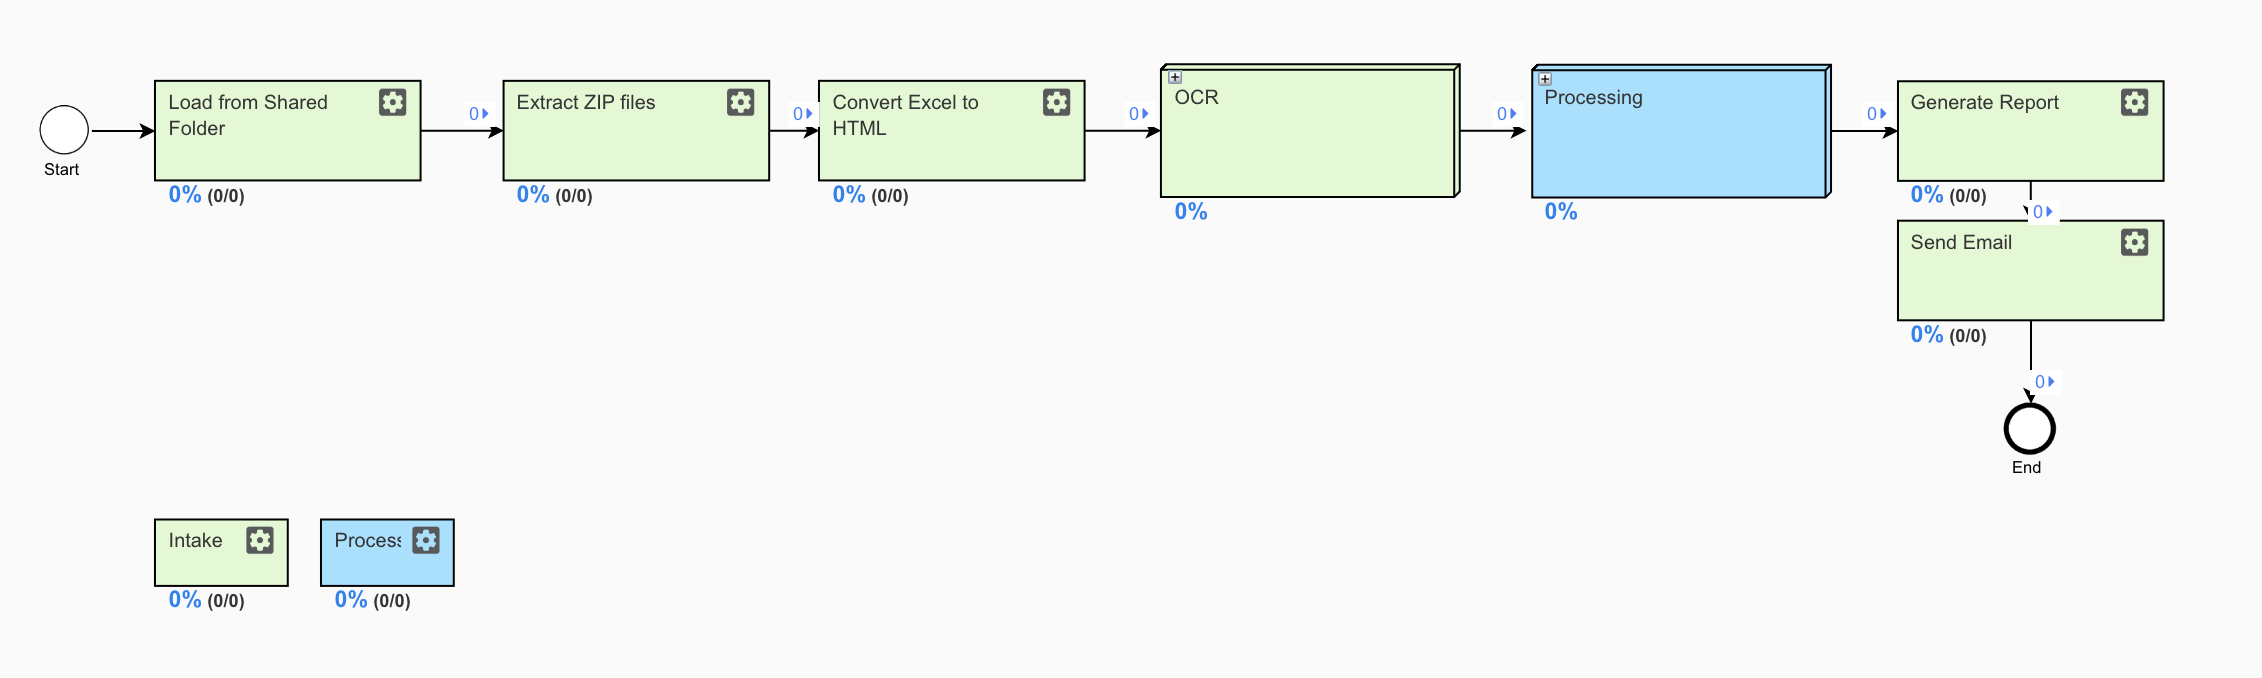
In WorkFusion, this can be mapped to the standard business process like illustrated below. Green boxes represent Input, Preparation, and Output, while the Blue box encapsulates Processing logic.
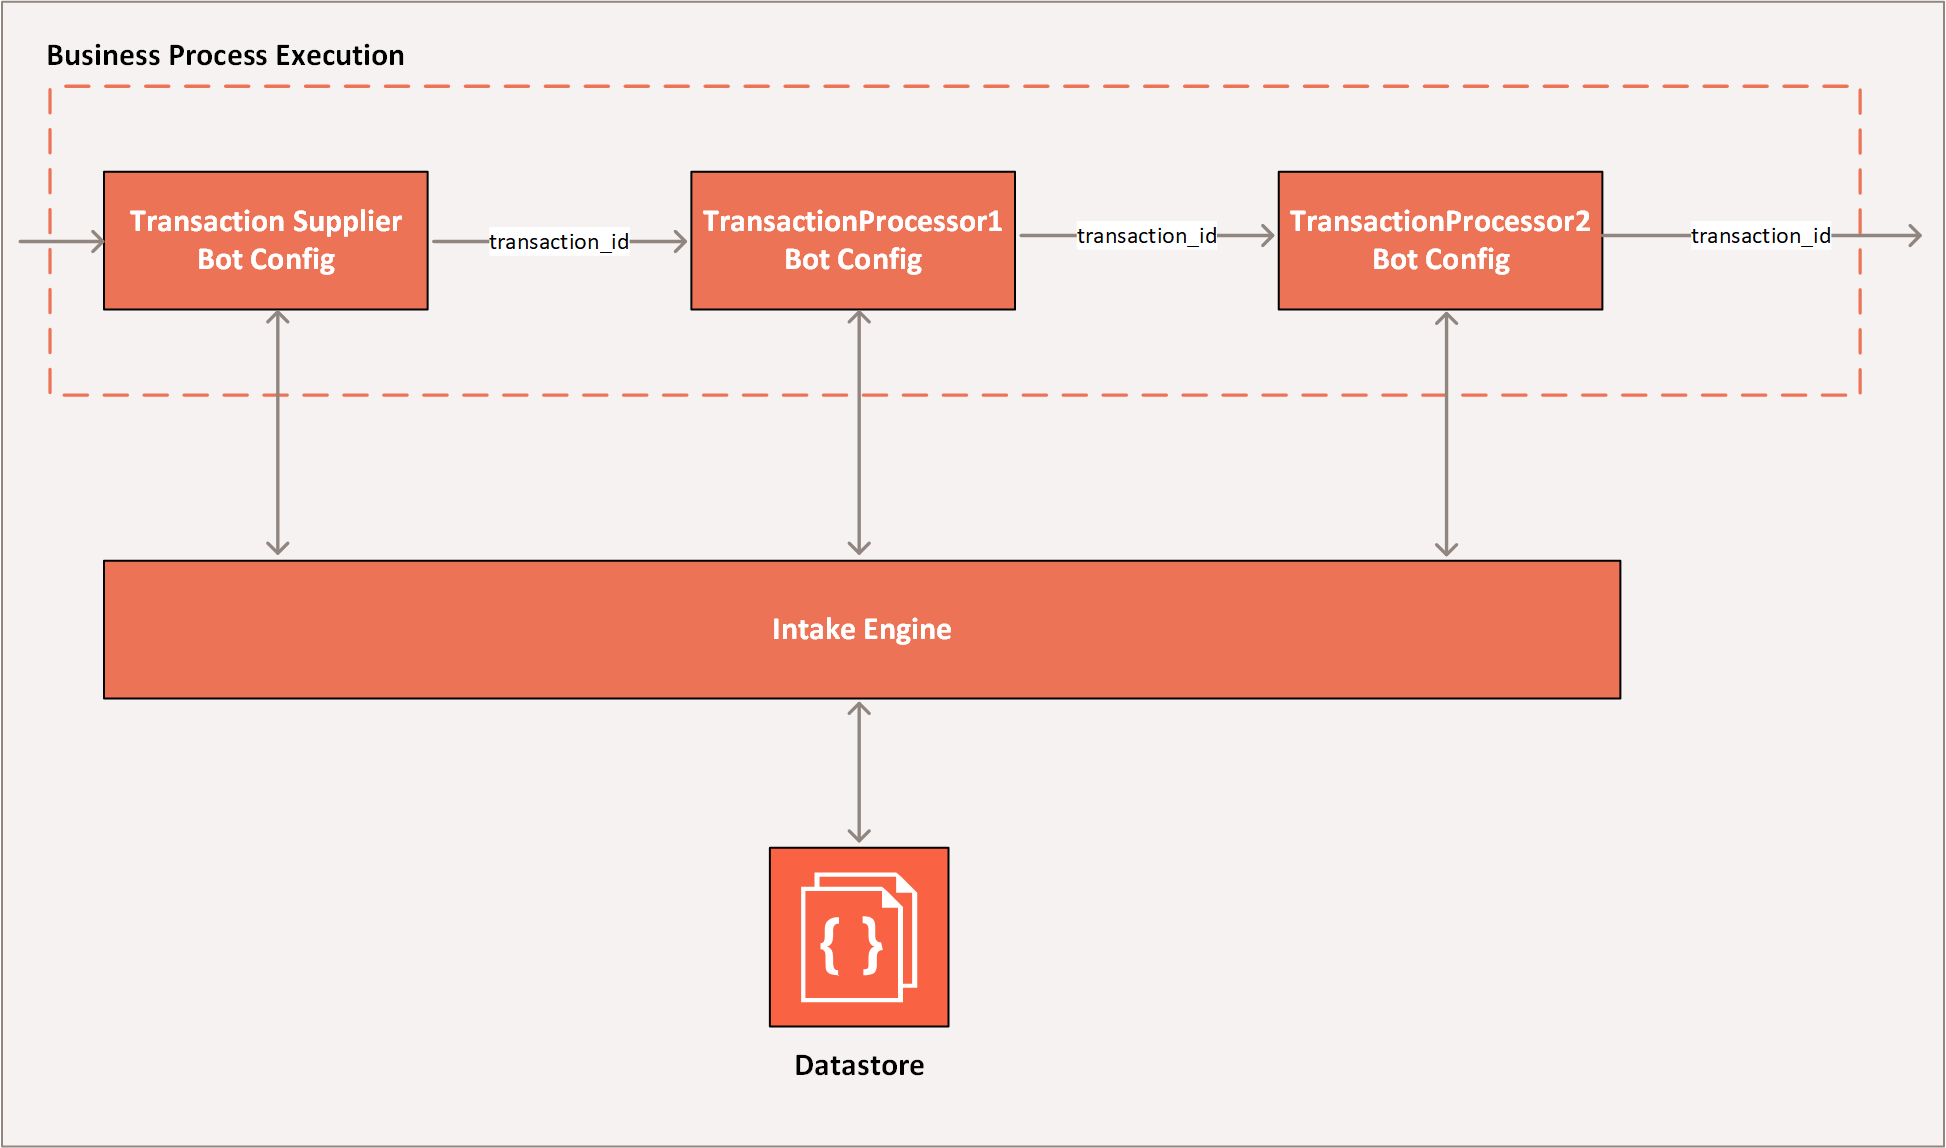
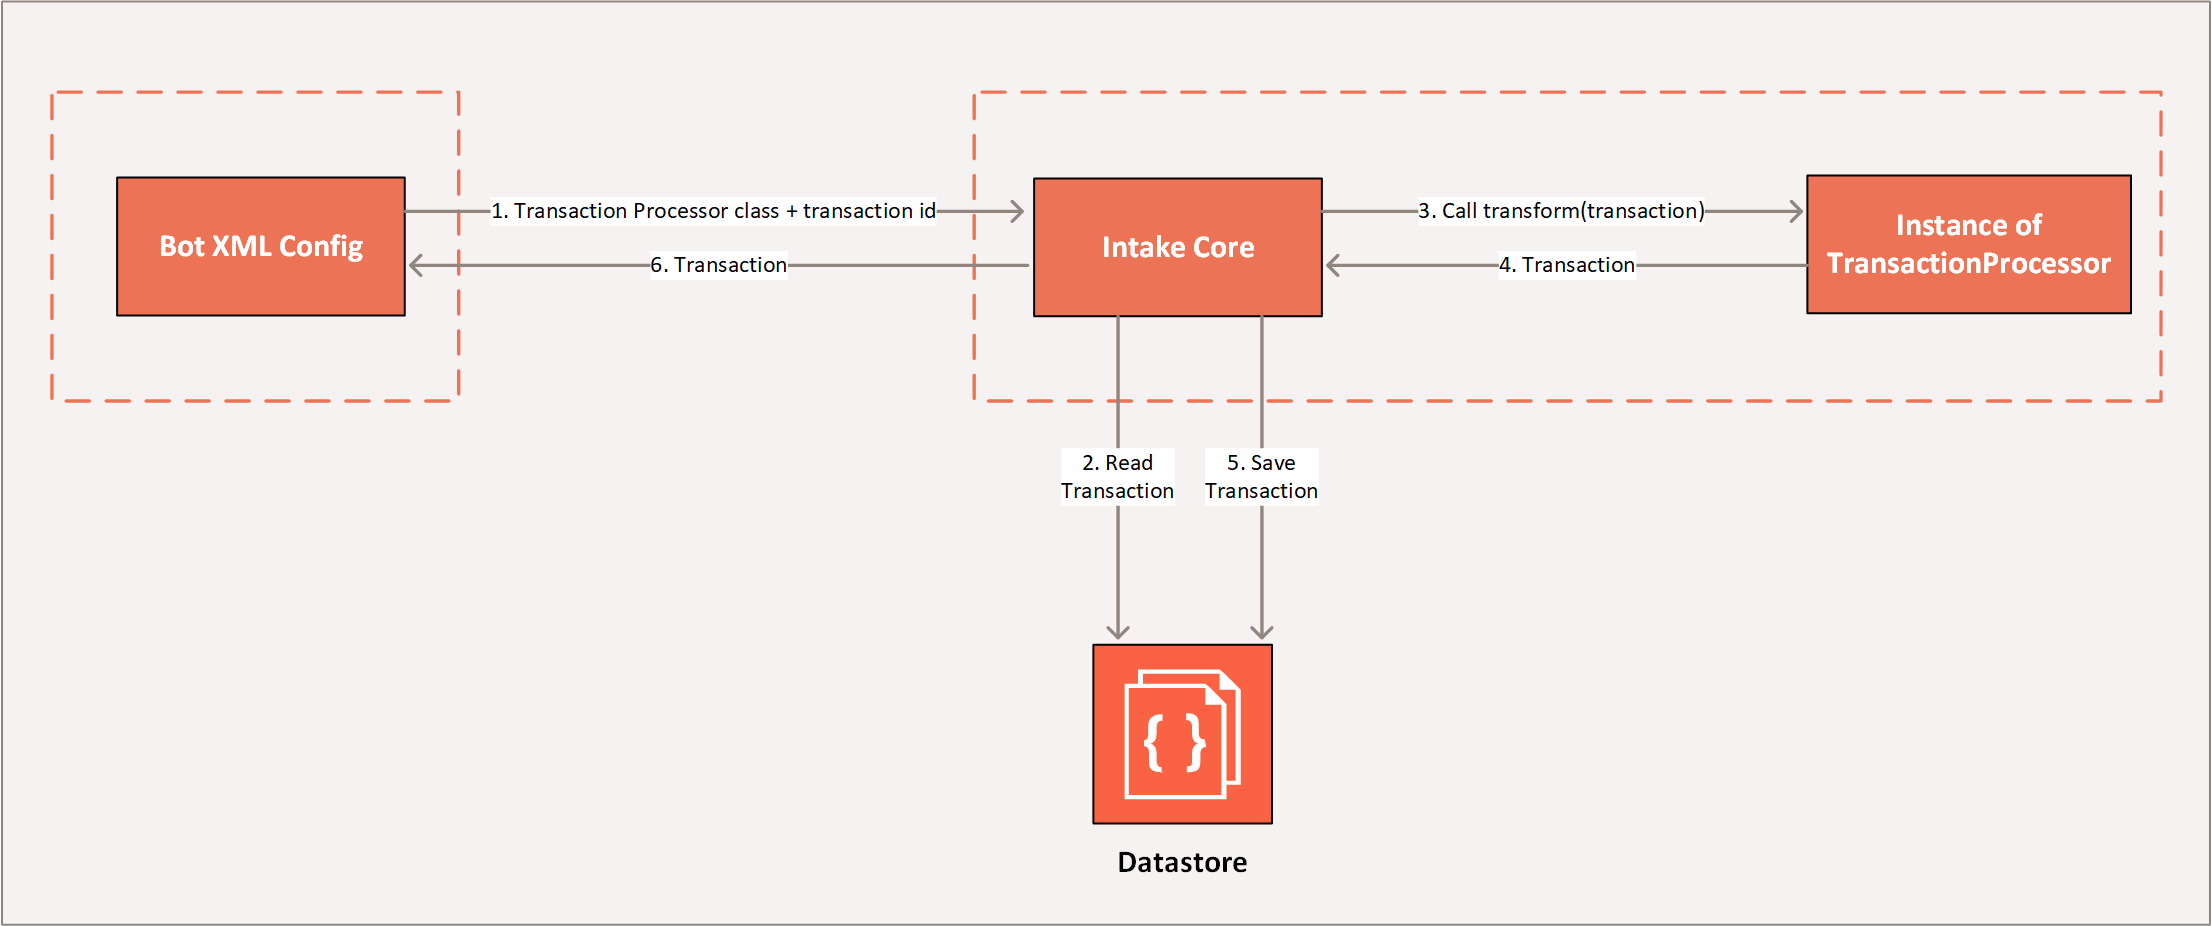
Now, let's see how to pass data between steps. Comparing to the pure Webharvest XML approach, where data is exported from the step and then injected into the next step, data is stored inside the Transaction object in ODF. As shown on the diagram below, only transaction_id needs to be passed between steps. By using that ID, the ODF Engine will restore the Transaction object from the Data Store and call TransactionProcessor passing the Transaction instance as parameter.
Transaction in ODF and Control Tower context is also called 'record' or 'task' and:
- represents single execution unit
- typically contains number of variables or data properties
- in most of cases contains number of documents as links to files stored in file storage
- originates either:
- from single row of input data
- from split data export of bot task
- goes from step to step according to Business Process design schema
- differs from traditional database "transaction" with regards to the roll-back feature - it is not possible to roll back ODF Transactions
Dependency Injection
We strongly recommend you to spend enough time reading and understanding Feather Dependency Injection Framework used as the base wiring library in ODF. Make sure you get its concepts from https://github.com/zsoltherpai/feather.
Dependency injection is a programming technique that makes a class independent from its dependencies. It achieves that by decoupling the usage of an object from its creation.
ODF provides it as a core capability, and it is based on the super lightweight Feather library that takes almost zero time to instantiate the objects. ODF provides some dependencies by default, modules are not overridden. As you can see below, transactionService, dbTransactionService logger, and binding are available by default.
final class CoreModule implements Module {
    private final Binding context;

    public CoreModule(Binding context) {
        this.context = context;
    }

    @Provides
    public TransactionService transactionService(DatastoreTransactionService service) {
        return service;
    }

    @Provides
    @Singleton
    public DBTransactionService dbTransactionService(DBTransactionServiceImpl service) {
        return service;
    }

    @Provides
    public Logger logger() {
        return (Logger)context.getVariable("log");
    }

    @Provides
    public Binding binding() {
        return context;
    }
}
To add custom dependencies, you need to create your own module or a set of modules and pass them as a parameter to the App constructor. Let's see an example of the custom module that provides the list of countries to the context:
import org.codejargon.feather.Provides;

import javax.inject.Named;
import java.util.Arrays;
import java.util.List;

public class SimpleModule implements Module {
    @Provides
    @Named("countries")
    public List<String> availableCountries() {
        return Arrays.asList("Canada, Italy");
    }
}
In SimpleAppExample below, the SimpleModule instance is passed as an App class constructor parameter, so it will be used as the instance provider to the injection target.
import groovy.lang.Binding;

import java.util.Arrays;

public class SimpleAppExample extends App {
    public SimpleAppExample(Binding context) {
        super(context, Arrays.asList(new SimpleModule()), null, null);
    }
}
In the example below, SimpleTransactionProcessor requests the list of countries to be injected.
import com.workfusion.intake.api.domain.Transaction;
import com.workfusion.intake.processor.TransactionProcessor;

import javax.inject.Inject;
import javax.inject.Named;
import java.util.List;

public class SimpleTransactionProcessor implements TransactionProcessor {

    private List<String> countries;

    @Inject
    public SimpleTransactionProcessor(@Named("countries") List<String> countries) {
        this.countries = countries;
    }

    @Override
    public Transaction transform(Transaction transaction) {
        // ...
    }
}
Refer to the Feather library native documentation for specific details usage.
Core flow interfaces
Core flow basics
The Open Development Framework introduces two principal entities around which all execution happens.
Transaction: logical representation of indivisible data or a set ofDocumentsrequired to be processed together. For example, invoice and its supporting documents like Certificate or Original, Bill of Lading represent a single transaction with multiple documents. Another example is when Robot needs to read all the incoming requests from some system like Mail Box or SAP. Each request will be a separate transaction with all the needed information stored inside.Document: a single data unit or a file that needs to be processed with meta information.DocumentandTransactionrelationship is shown below.

Transaction elements
Properties/methods:
id: Transaction unique idList<Document>: List of related documents- attributes: Transaction meta information in
Map<String, String>format asJson(): Returns a serialized transaction in the JSON String format
Document elements
| Property/method | Description |
|---|---|
id | Document unique ID. |
name | User friendly document name. Usually can be shown on UI to users. |
type | Defines document type. Could be filled upfront if known or left for classification. Can be null or empty. |
textLink | Contains the link or content for the TXT, HTML, XML based document suitable for processing. Can be empty if the document is in other format, like PDF, XLX, and so on. In that case, doc_original_link must be filled. |
taggedTextLink | Contains the link or content for the tagged document after processing (ML, Rules, Manual). Goes within doc_text. |
originalDocumentLink | Provides the link for the document original version. Usually, it is downloaded from Excel and PDF. If the document was taken from a zip archive or other bundle like MSG, the link should point to the document itself, not to a bundle. Normally, it is what user would want to see as origin. |
origin | Document link from where the current instance was created from. Can be empty if this is an original document. Example: If PDF is OCRed, then the XML version should have the PDF object as origin. |
List<Document> | List of related documents. |
attributes | Transaction meta information in the Map<String, String> format. |
createChildDocument() | Creates a clone of the current document for further processing. Usually, the Clone version has the origin link to its parent. |
Transaction Supplier interface
The TransactionSupplier interface represents components that will produce transactions. It could be, for example, a connector to an external system or in-memory operations. Eventually, this component creates transactions for processing.
public interface TransactionSupplier {
    Collection<Transaction> get();
}
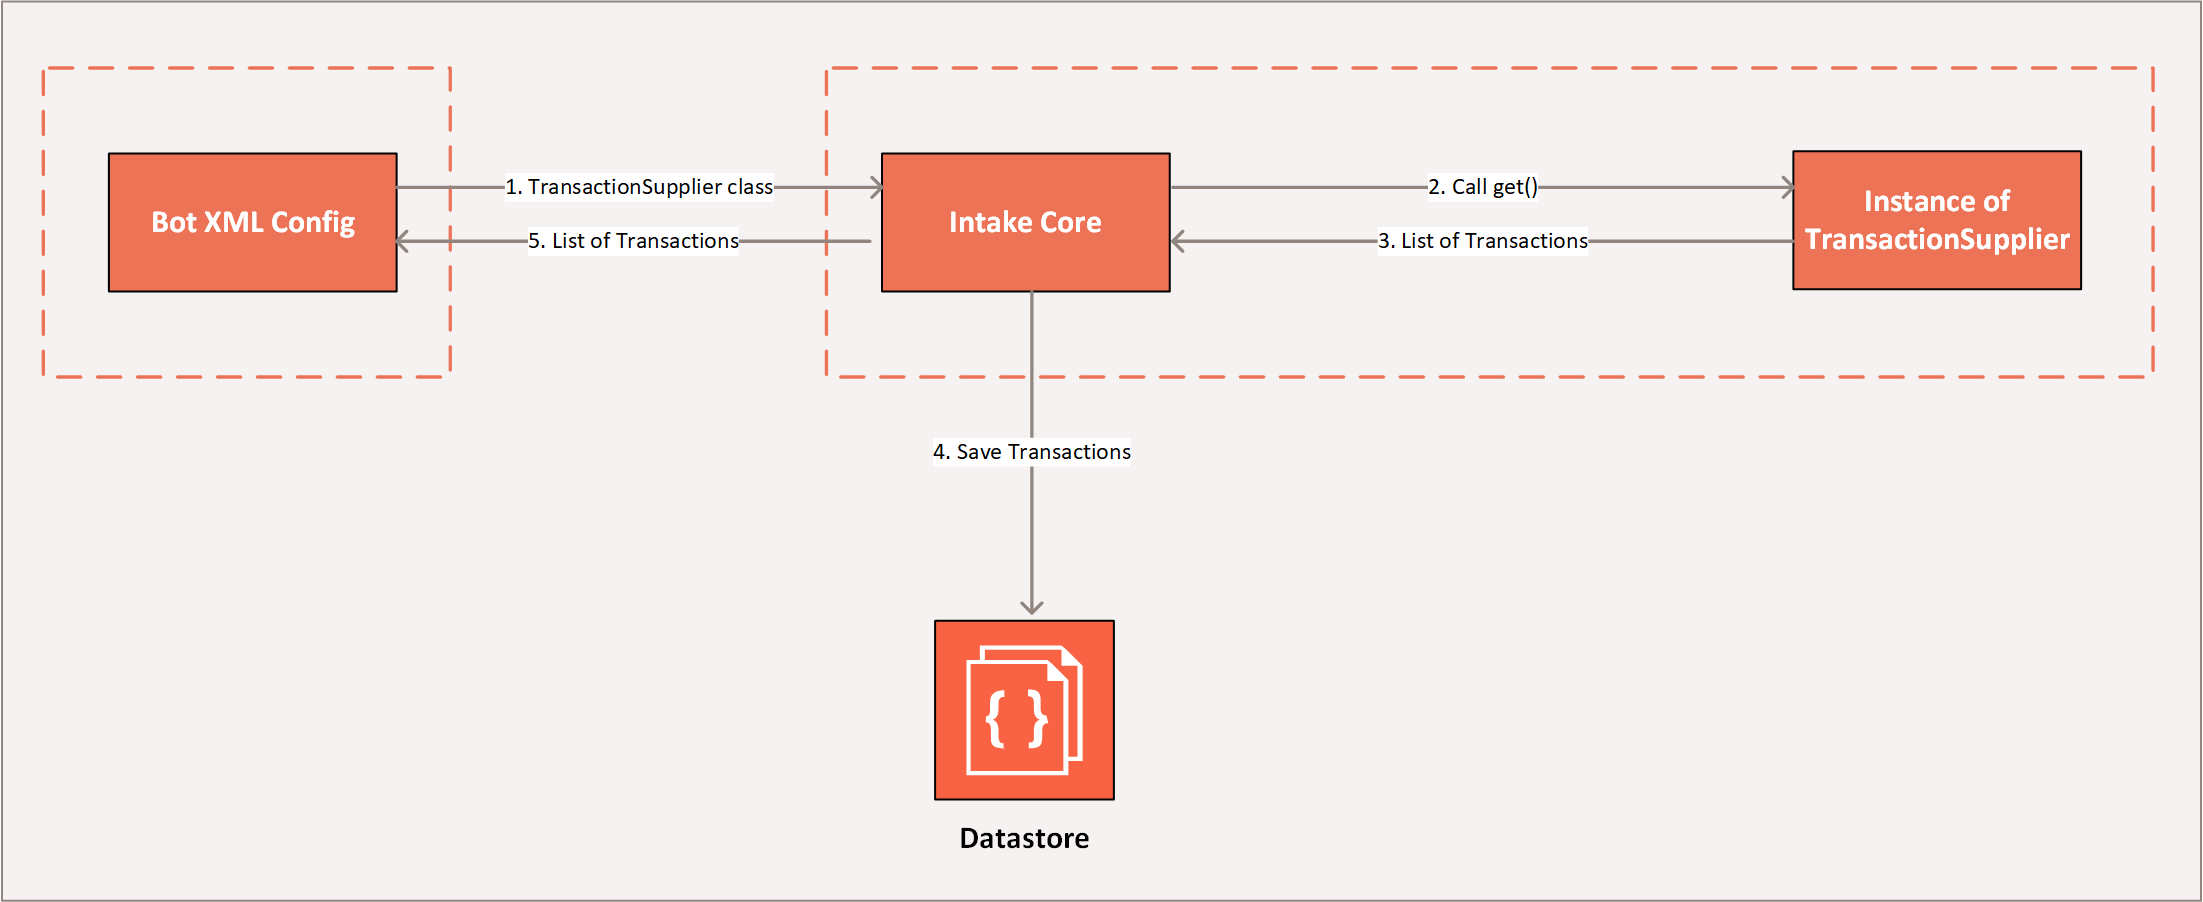
Internally, ODF creates an instance of the TransactionSupplier interface passed from Bot Task and calls Collection<Transaction> get(). The returned transactions are saved into the internal Data Store and then passed back to the Bot Task.
Transaction Supplier example
First, let's start with some very simple Transaction Supplier example. The logic is very straightforward: it generates 5 transactions where each transaction has one document. The document itself has a content uploaded to S3. The S3Manager instance is injected by Intake Framework right to the object constructor annotated with @Inject.
public class TransactionSupplierExample implements TransactionSupplier {
    private S3Manager s3Manager;
    @Inject
    public TransactionSupplierExample(S3Manager s3Manager) {
        this.s3Manager = s3Manager;
    }

    @Override
    public Collection<Transaction> get() {
        Collection<Transaction> transactions = new ArrayList<>();
        for (int i = 0; i < 5; i++) {
            Transaction transaction = new Transaction();
            transaction.setId(uuid());
            transaction.setDocs(Arrays.asList(createDocument()));
            transactions.add(transaction);
        }
        return transactions;
    }

    private Document createDocument() {
        Document document = new Document();
        document.setId(uuid());
        document.setName("Example Document");
        document.setTextLink(generateAndUploadDocument());
        return document;
    }

    private String generateAndUploadDocument() {
        return s3Manager.putFile(uuid() + ".txt", new ByteArrayInputStream("Some very important text".getBytes()), MediaType.TEXT_PLAIN_VALUE);
    }

    private String uuid() {
        return UUID.randomUUID().toString();
    }
}
Now, let's see how we can use our class in Bot Config. At first, Instance of AppExample is initialized, this is Intake Application Context that is responsible for overall execution. Then, we call app.loadTransactions() with the TransactionSupplierExample class reference as parameter.
Intake creates the instance of TransactionSupplierExample with all dependencies, calls Collection<Transaction> get() , saves transactions to the internal storage, and returns saved transactions back to the machine config context. The final steps export created transaction IDs to the Bot output.
<config xmlns="http://web-harvest.sourceforge.net/schema/1.0/config" scriptlang="groovy">
    <script><![CDATA[
        import com.workfusion.intake.core.AppExample
        import com.workfusion.intake.supplier.TransactionSupplierExample

        def app = AppExample.init(binding).get();
        def transactions = app.loadTransactions(TransactionSupplierExample.class);

        // Exporting only transaction ids to the next steps.
        result = [];
        transactions.each {
            result << ['transaction_id': it.id];
        }
    ]]></script>

    <export include-original-data="false">
        <multi-column list="${result}" split-results="true">
            <put-to-column-getter name="_sys_transaction_id" property="transaction_id"/>
        </multi-column>
    </export>
</config>
Transaction Processor interface
public interface TransactionProcessor {
    Transaction transform(Transaction transaction);
}
Internally, ODF creates an instance of the TransactionProcessor interface passed from Bot Task, reads the transaction from the Data Store by ID and then calls Transaction transform(transaction) passing it as a parameter. The returned transaction is updated in the internal Data Store and then is passed back to the Bot Task.
Transaction Processor example
Now, let's take a look at the Transaction Processor example that will encode all documents for the given transaction. TransactionEncryptionProcessor needs more dependencies than TransactionSupplierExample but all of them are injected in the same way.
For each document for a given transaction, TransactionEncryptionProcessor downloads text content, encodes with the injected Cipher instance, and uploads back to S3.
public class TransactionEncryptionProcessor implements TransactionProcessor {
    private S3Manager s3Manager;
    private Logger logger;
    private Cipher cipher;

    @Inject
    public TransactionEncryptionProcessor(S3Manager s3Manager, Cipher cipher,  Logger logger) {
        this.s3Manager = s3Manager;
        this.logger = logger;
        this.cipher = cipher;
    }

    @Override
    public Transaction transform(Transaction transaction) {
        List<Document> encodedDocuments = transaction
                .getDocs()
                .stream()
                .map(this::encryptDocumentContent)
                .collect(Collectors.toList());

        transaction.setDocs(encodedDocuments);
        logger.debug("Documents were successfully encrypted");
        return transaction;
    }

    private Document encryptDocumentContent(final Document document) {
        if (StringUtils.isNotEmpty(document.getTextLink())) {
            byte[] content = s3Manager.getContent(document.getTextLink());
            byte[] encryptedContent = cipher.encode(content);
            String link = s3Manager.putFile(
                    document.getId() + "_encoded",
                    new ByteArrayInputStream(encryptedContent),
                    S3Manager.AUTO_DETECT_CONTENT_TYPE
            );
            Document encryptedDocument = document.createChildDocument();
            encryptedDocument.setTextLink(link);
            return encryptedDocument;
        }

        return document;
    }
}
Below, you can see the Bot Config example on how to use TransactionEncryptionProcessor. Again, as the first step, the AppExample instance is initialized. After that, app.processTransaction() is called with the TransactionEncryptionProcessor class reference and the transactionId parameter, which is the context variable received from the previous step.
Intake creates the instance of TransactionEncryptionProcessor with all dependencies, calls Transaction transform(Transaction transaction), saves the updated transaction to the internal storage and returns it back to the machine config context. In that case, there is no need to export anything, we will just pass _sys_transaction_id further.
<config xmlns="http://web-harvest.sourceforge.net/schema/1.0/config" scriptlang="groovy">
    <script><![CDATA[
        import com.workfusion.intake.core.AppExample
        import com.workfusion.intake.processors.TransactionEncryptionProcessor

        // Expecting only '_sys_transaction_id' from previous step.
        String transactionId = _sys_transaction_id.toString();
        def app = AppExample.init(binding).get();

        def processedTransaction = app.processTransaction(TransactionEncryptionProcessor.class, transactionId);
        ]]></script>

    <!-- Nothing additional required to export. All data was saved inside Transaction. -->
    <export include-original-data="true">
    </export>
</config>
Multiple Transaction Processor
MultipleTransactionProcessor is the interface to be implemented by processors that process multiple transactions at once.
Multiple Transaction Processor example
Now, let's take a look at the MultipleTransactionProcessor example that encodes all documents for the given transactions by using injected Cipher and uploads the documents back to S3.
public class MultipleTransactionEncryptionProcessor implements MultipleTransactionProcessor {
    private S3Manager s3Manager;
    private Logger logger;
    private Cipher cipher;

    @Inject
    public MultipleTransactionEncryptionProcessor(final S3Manager s3Manager, final Cipher cipher,  final Logger logger) {
        this.s3Manager = s3Manager;
        this.logger = logger;
        this.cipher = cipher;
    }

    @Override
    public List<Transaction> process(List<Transaction> transactions) {
        for (Transaction transaction : transactions) {
            List<Document> encodedDocuments = transaction
                .getDocs()
                .stream()
                .map(this::encryptDocumentContent)
                .collect(Collectors.toList());

            transaction.setDocs(encodedDocuments);
            logger.debug("Transaction '{}' documents were successfully encrypted", transaction.getId());
        }
    }

    private Document encryptDocumentContent(final Document document) {
        if (StringUtils.isNotEmpty(document.getTextLink())) {
            byte[] content = s3Manager.getContent(document.getTextLink());
            byte[] encryptedContent = cipher.encode(content);
            String link = s3Manager.putFile(
                    document.getId() + "_encoded",
                    new ByteArrayInputStream(encryptedContent),
                    S3Manager.AUTO_DETECT_CONTENT_TYPE
            );
            Document encryptedDocument = document.createChildDocument();
            encryptedDocument.setTextLink(link);
            return encryptedDocument;
        }

        return document;
    }
}
Below, you can see the Bot Config example of how to use MultipleTransactionEncryptionProcessor. As the first step, the AppExample instance is initialized. After that, app.processTransactions() is called with the MultipleTransactionEncryptionProcessor class reference and the transactionIds parameter. Intake creates the MultipleTransactionEncryptionProcessor instance with all dependencies, calls void process(String transactionIds), saves updated transaction to the internal storage, and returns it back to the machine config context. In that case, there is no need to export anything extra, we will just pass through _sys_transaction_ids.
<config xmlns="http://web-harvest.sourceforge.net/schema/1.0/config" scriptlang="groovy">
    <script><![CDATA[
        import com.workfusion.intake.core.AppExample;
        import com.workfusion.intake.processors.MultipleTransactionEncryptionProcessor;

        // Expecting only '_sys_transaction_ids' from previous step
        String transactionIds = _sys_transaction_ids.toString();
        def app = AppExample.init(binding).get();

        app.processTransactions(MultipleTransactionEncryptionProcessor.class, transactionIds);
    ]]></script>

    <export include-original-data="true">
    </export>
</config>
Note that on the previous bot task it is expected that the _sys_transaction_ids variable will be set with list of transaction IDs.
<?xml version="1.0" encoding="UTF-8"?>
<config xmlns="http://web-harvest.sourceforge.net/schema/1.0/config" scriptlang="groovy">
    <!--
     Transaction wait component.

     Input parameters:
       _sys_transaction_id - ID of the transaction created in previous step.
     -->

    <script><![CDATA[
        poolKey = ['INTAKE_WAIT_ALL_POOL_KEY'];
    ]]></script>

    <pool key="intake_wait" convert-to-map="false">
        <list>
            <script return="poolKey"/>
        </list>
        <body>
            <script><![CDATA[
                import com.workfusion.odf.core.Intake;
                import com.workfusion.odf.service.TransactionWaitService;

                Intake intake = Intake.init(binding).get();
                TransactionWaitService transactionWaitService = intake.getInstance(TransactionWaitService.class);
                result = transactionWaitService.registerTransactionCompletion(_sys_transaction_id.toString());
            ]]></script>
        </body>
    </pool>

    <export include-original-data="false">
        <single-column name="_sys_transaction_ids" value="${result}"/>
    </export>
</config>
Document Processor interface
public interface DocumentProcessor {
    Document processDocument(Document document);
}
Each Transaction can be split into a number of records in flow. This number can be driven by the number of Documents in each Transaction. It means that there will be duplicated transaction IDs for those originated from single Transaction. Such split can be achieved using pre-packaged ODF component (Bot Task) Split Documents.