Install and configure
The guide details how to install and configure Evelyn.
Prerequisites
Before installing the Name Sanctions Screening (NSS) AI Agent, make sure your environment meets the following requirements.
Hardware
The server requirements for the AI Agent are the same as for the Work.AI Platform. To run screening, you don't need the RPA server.
| Server | Recommended OS | CPU (cores) | RAM (GB) | HDD (GB) |
|---|---|---|---|---|
| Master | RHEL/CentOS 8.x | 8 | 32 | 750 |
| Agent | RHEL/CentOS 8.x | 8 | 32 | 150 |
| Superset Analytics | RHEL/CentOS 8.x | 2 | 4 | 50 |
| MS SQL | Microsoft Windows Server 2022, 2019 | 4 | 16 | 500 |
For the architecture deployment diagram, refer to Install AI Agents | View architecture deployment.
Software
- You have installed Work.AI v10.2.9 and have Control Tower (CT) and Analytics components enabled. See the installation guide.
- You have obtained the bundles with the NSS Business Processes and machine learning (ML) models from your Account Managers.
- You have received the credentials for the required watchlists or licenses for the external screening software to be integrated with the AI Agent.
- You have enabled the Advanced Package Import and Import/Export permissions in CT. For detailed instructions, read Manage Control Tower roles and permissions.
Performance
Performance is measured per hit across the total run to calculate throughput at the specific scaling level. Test datasets include 20,000 hits.
| Number of BEP Agents | Input | Throughput |
|---|---|---|
| 3 | 20,000k hits | 75,800 hits per hour |
| 6 | 20,000 hits | 140,000 hits per hour |
| 20 | 20,000 hits | 205,000 hits per hour |
Install
For instructions, see the Install AI Agents guide.
Evelyn provides two versions of an AI Agent package:
- Standard Asset Bundle:
names-screening-package-3.x.zip - Asset Bundle without Thomson Reuters ongoing monitoring:
names-screening-package-3.x-no-tr.zip
Configure
Once Evelyn is installed, configure the AI Agent before running it for the first time:
- Set up Secrets Vault entries to be used in external data providers and Manual Tasks.
- Select an input source.
- Configure the selected input source.
- Configure the model.
- Configure data enrichment.
- Configure manual review.
- Set up output options.
You can configure multiple variations or sets of parameters for NSS, for example, a different media provider or a set of keywords per variation. For more information, see the Manage AI Agent Variations.
A secret entry is not a part of the AI Agent package. You must configure it manually after installing Evelyn.
Set up API credentials in Secrets Vault
To use external data providers, set up credentials in Secrets Vault. For instructions, see the guide.
The following external data providers are supported:
- Dow Jones Factiva REST API v1.0
- World-Check One v2.2.0
- Firco Trust Case Manager API v5.4.22
- Thomson Reuters CLEAR
Before setting the above data providers, make sure you have obtained required licenses with credentials.
Set up Workspace URL in Secrets Vault
To use Manual Tasks in the Work.AI v10.2.8 environment, set up a secret entry for the Workspace URL in Secrets Vault. Add a new secret entry and specify the following settings:
Alias:
workspace_urlKey: URL to Workspace, for example,
https://my-company-ws.cloud.workfusion.com/workspaceValue: any value
Select input source
To select a screening provider, do as follows:
In the Control Tower menu, go to Digital Workers, find your newly installed AI Agent, and click the Prepare button.
In the configuration window, on the Input step, select from where to source input data for the configured AI Agent.
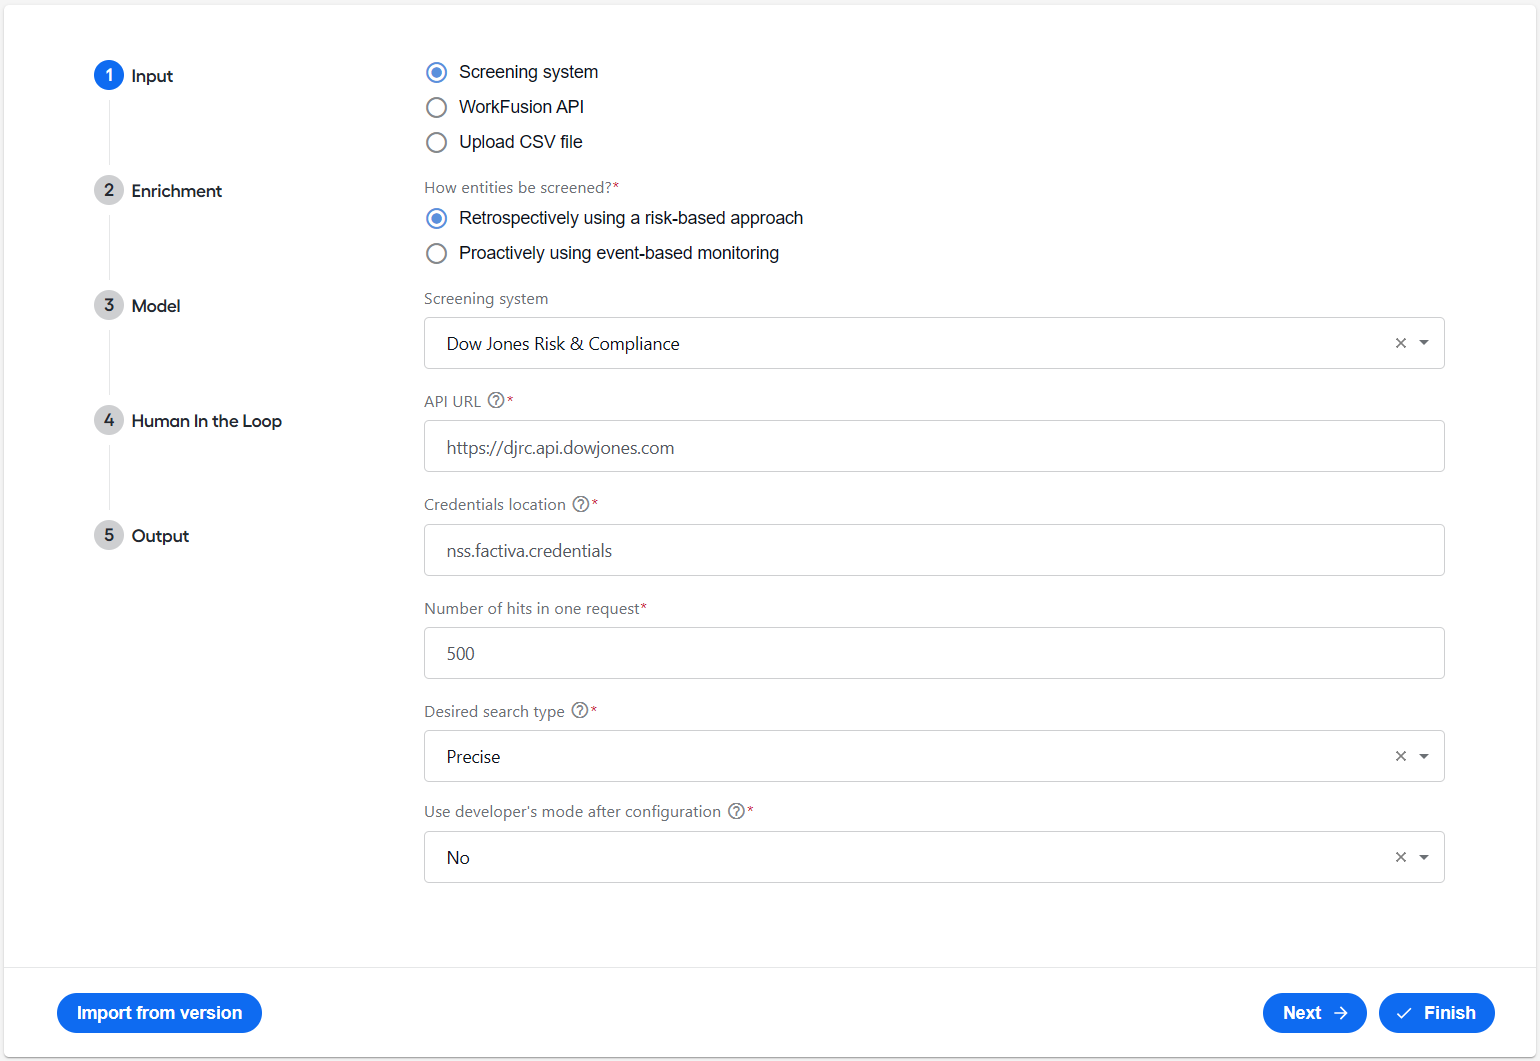
Configure the selected input source.
Configure input
To configure the selected input source, specify relevant parameters. For detailed setup instructions, see the sections below:
Screening system
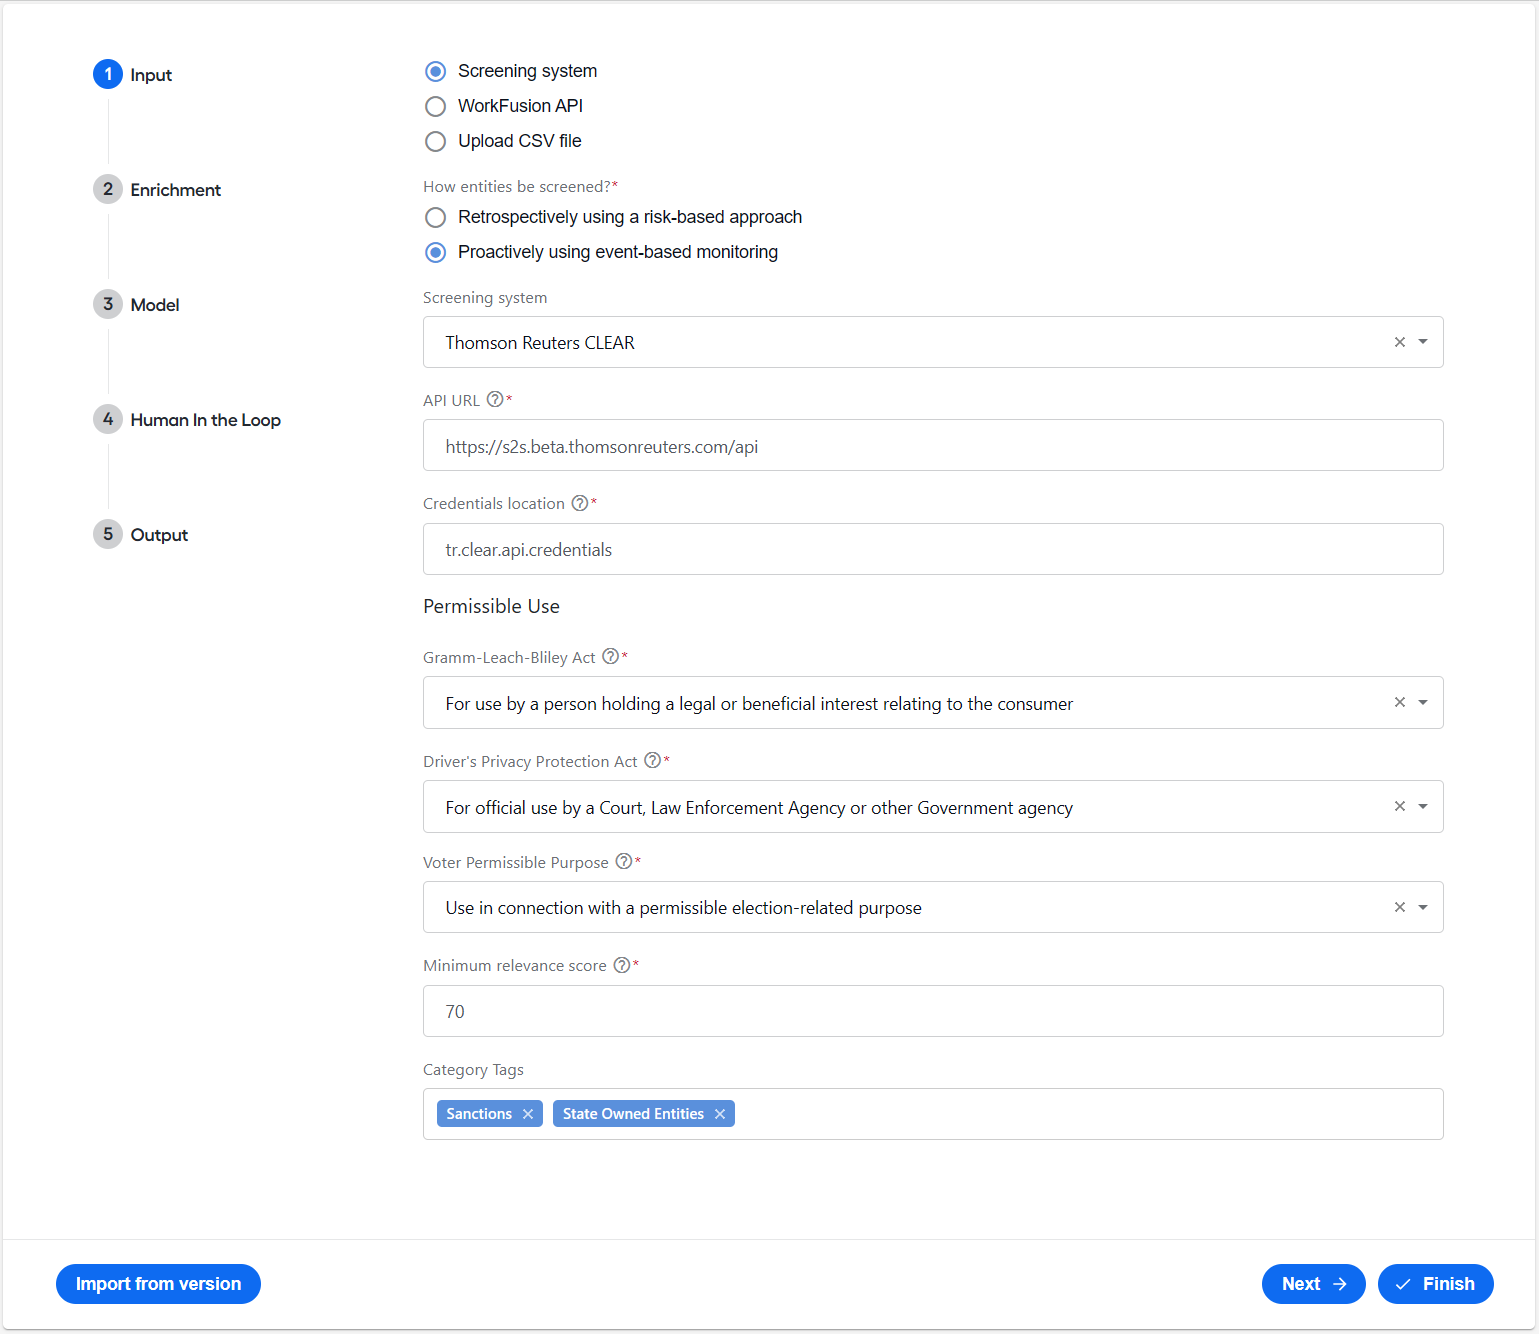
If you select Screening system as the input source, Evelyn will search for records about an entity or individual in the system you choose in the appropriate drop-down list.
To configure the screening system to work with Evelyn, follow the steps below:
Choose how you want entities or individuals to be screened:

The following options are available:
Retrospectively using a risk-based approach if you want the screening to be executed upon request.
Proactively using event-based monitoring if you want screening to be automatically executed based on monitored events.
Choose a screening system. Depending on the screening method you choose in Step 1, Evelyn supports the systems listed in the table below. Dow Jones Risk & Compliance is the default choice for the retrospective screening and Thomson Reuters CLEAR for the proactive screening.
Screening method Supported screening systems Retrospectively using a risk-based approach Proactively using event-based monitoring To configure a screening system integration, follow the instructions below.
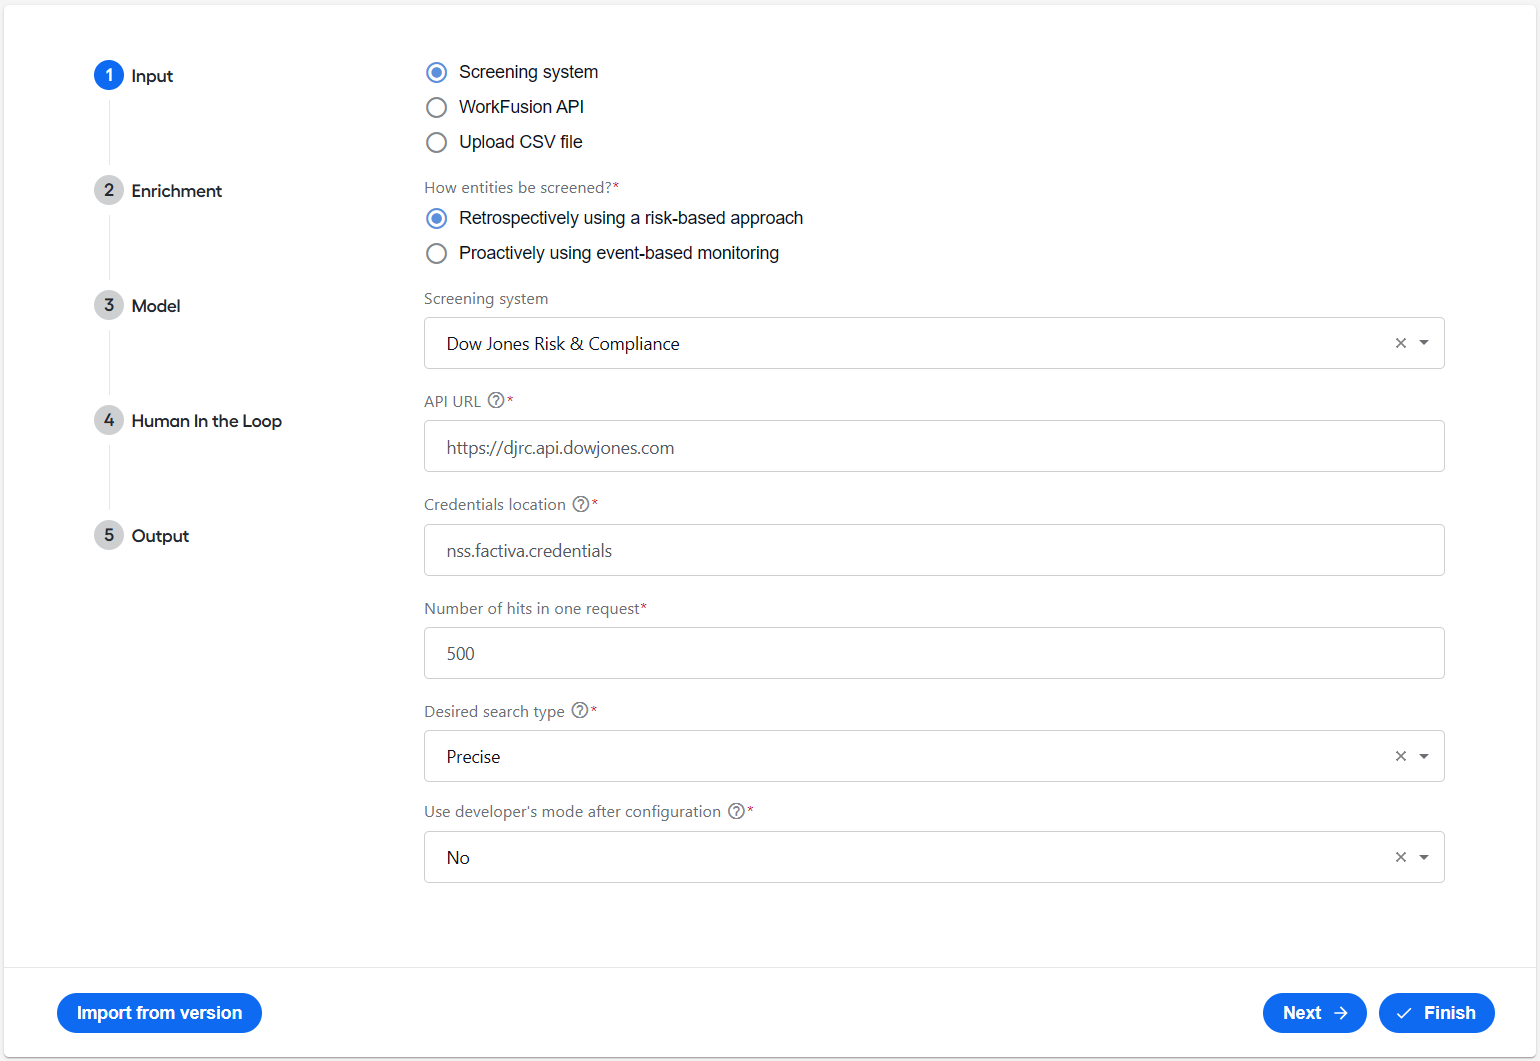
Dow Jones Risk & Compliance
API URL. Select the address of the Dow Jones Risk & Compliance API. Available options are as follows:
https://api.beta.dowjones.comhttps://djrc.api.dowjones.com
Credentials location. Specify the Secrets Vault alias storing the credentials for the Dow Jones Risk & Compliance system.
Number of hits in one request. Specify the number of hits to be processed per request for a particular entity from Dow Jones Risk & Compliance API. This parameter impacts how many requests are sent to Dow Jones Risk & Compliance API. The default value is 500.
Desired search type. Set the desired tolerance for the search in the Dow Jones Risk & Compliance system. By default, it is Precise. Available options are as follows:
Precise: the mode requires an exact match between the search input and the data in the database. It is highly specific, meaning that the names, dates, or other identifying information must be identical or very close to the input.
The mode is best suited for situations where you have complete and accurate information about the search entity. It minimizes false positives but might miss matches if there are minor discrepancies in the data (for instance, slight variations in spelling).
Near: the mode allows for minor variations in the search input. It is less strict than the precise search, accommodating small differences, such as typos, abbreviations, and slight spelling variations.
It is most useful when the information might not be entirely accurate or complete. It balances the need to catch more potential matches while still reducing the number of false positives as compared to the Broad search.
Broad: the mode is the least restrictive, allowing for significant variations and partial matches between the search input and the database entries. It casts a wide net to catch as many potential matches as possible.
The mode is perfect when the information is highly uncertain or incomplete. It increases the number of potential matches identified but generates more false positives, requiring additional manual review to filter out irrelevant results.
Use developer's mode after configuration. Select Yes to enable the Developer mode for a Business Process. The Developer mode caches requests and responses from the Dow Jones Risk & Compliance API to avoid a ban from Dow Jones due to a massive number of queries.
For the production configuration, set the value to No.
More about cache
The cache is meant to reduce the number of requests to screening systems. It is implemented as a separate Data Store.
After you install Evelyn, the cache Data Store is empty by default. The hit data is received in responses when a bot sends a name request to an external screening system. The received data is then saved to the cache.
Most screening systems send one response that contains all necessary hit data. But in some cases, there can be two requests:
- The first one obtains brief information on all hits. The data is saved to the search cache.
- The second one with the hit ID obtains detailed information on the specific hit. The received data is saved to the hit cache.
Evelyn supports caching both for searches and for hits.
Search cache
Activate the search cache (with the Developer mode) in development environments only. If enabled in the production environment, Evelyn operates with obsolete data.
The search cache implies that hits for particular names are used from the cache instead of the real-time API. In such a situation, the stored data will soon become outdated. This is why the search cache is intended for the Developer mode only.
The operation flow with the enabled search cache is the following:
- The AI Agent sends a search request to the API.
- All data received from the API is stored in the search_cache Data Store.
- Next time, when input contains the same name for the search, Evelyn will obtain all hits for this particular name from the cache instead of DJ API.
Hit cache
The hit cache is always enabled to reduce requests to the Dow Jones API and improve BP performance.
The operation flow of the hit cache is the following:
- Evelyn sends a search request to the API and receives a list of hits with short data for this name.
- Evelyn performs the second request with a specific
hit_idto get the hit's detailed info. - The hit details are saved to the hits_cache Data Store. It also stores the date when the hit was updated last time in the database.
- Next time, when the AI Agent requests hit details, the system checks whether the hit cache contains up-to-date hit details.
- If the hit details in the hit cache are outdated, Evelyn sends a new request for the hit details and updates the cache for this particular hit.
World-Check One
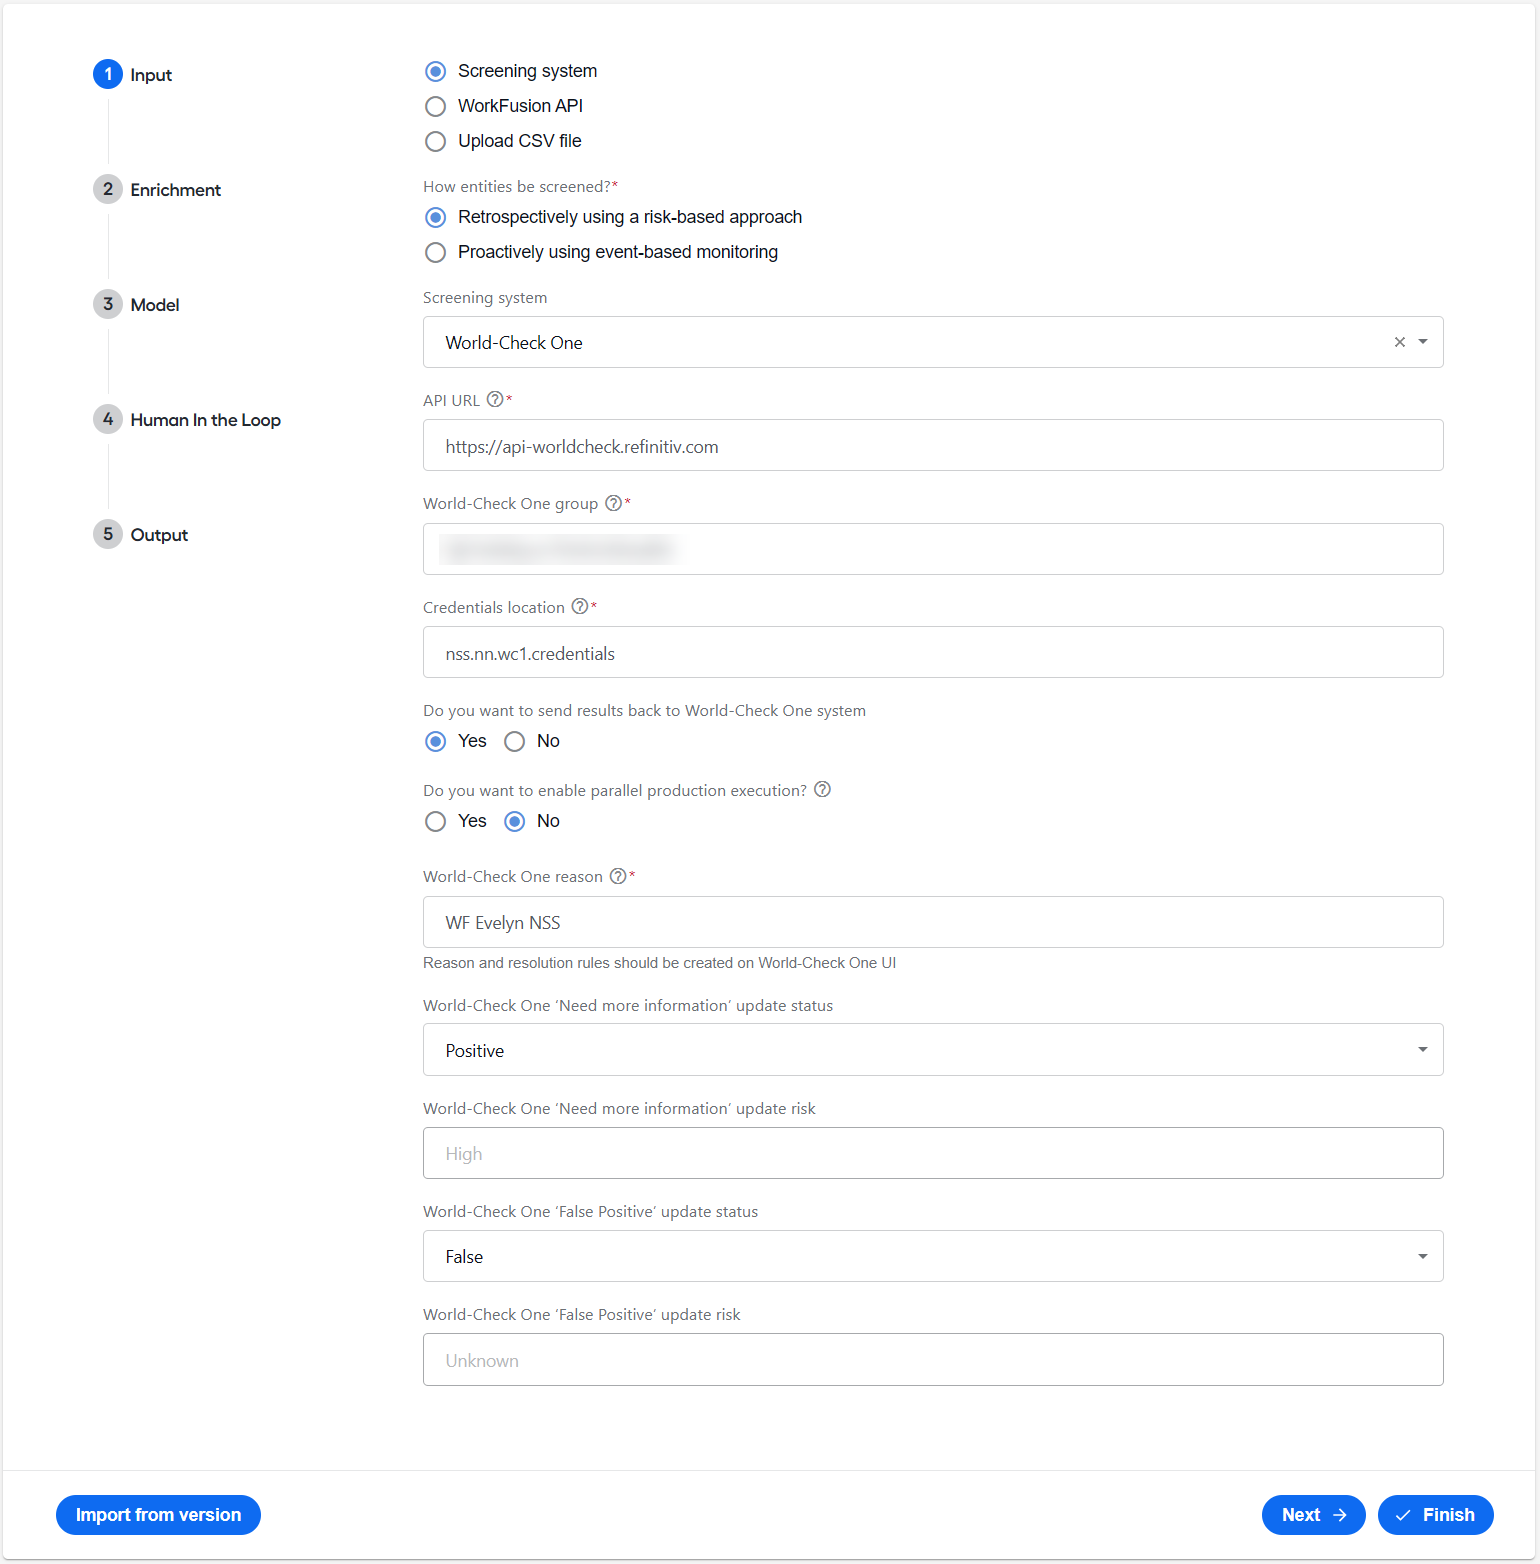
API URL. Select the World-Check One API address. By default,
https://api-worldcheck.refinitiv.comis used.World-Check One group. Enter the World-Check One group ID associated with your license.
Credentials location. Specify the Secrets Vault alias that stores the credentials for the World-Check One system.
Do you want to enable parallel production execution? Select Yes to enable the parallel production execution mode. Then, all alerts will be updated in the World-Check One system with the status set to Unknown and the risk set to Unspecified.
World-Check One reason. Enter the name of the reason for updating the alert status in the World-Check One system. Ensure this reason is pre-configured in the Resolution Toolkit within the World-Check One system.
World-Check One 'Need more information' update risk. The field contains the risk level to be assigned when selecting Need More Information.
World-Check One 'False Positive' update status. Choose the status: Positive, Possible, False, or Unspecified.
World-Check One 'False Positive' update risk. The field contains the risk level to be assigned when marking an alert as a false positive.
More about Resolution Toolkit
The Resolution Toolkit configuration provides a default set of resolution states, risks, and reasons used to resolve potential matches generated during the screening process. You can view or modify the Resolution Toolkit in the World-Check One UI or via APIs.
The following example of the Resolution Toolkit illustrates all possible statuses, risks, reasons, and resolution rules that define valid combinations of these elements. Any attempt to resolve a case must comply with the defined resolution rules.
{
  "groupId" : "t3jgv1fffqdudk8ascrep",
  "providerType" : "WATCHLIST",
  "resolutionFields" : {
    "statuses" : [ {
      "id" : "cy8c94bb9z83pndydvdvu",
      "label" : "POSITIVE",
      "type" : "POSITIVE"
    }, {
      "id" : "lhq5ceb5v2387lx65i2v0",
      "label" : "POSSIBLE",
      "type" : "POSSIBLE"
    }, {
      "id" : "iq6p13p73xc0d1ax86rwx",
      "label" : "FALSE",
      "type" : "FALSE"
    }, {
      "id" : "baik1o4jre1extosbozyp",
      "label" : "UNSPECIFIED",
      "type" : "UNSPECIFIED"
    } ],
    "risks" : [ {
      "id" : "k1ld4dgzmgl7p5nt3117l",
      "label" : "HIGH",
      "type" : null
    }, {
      "id" : "9bbysus4odx0z8xl17mur",
      "label" : "MEDIUM",
      "type" : null
    }, {
      "id" : "14t2l2o2v5csz3vhn22by",
      "label" : "LOW",
      "type" : null
    }, {
      "id" : "gbul1lc02506bybw02cvg",
      "label" : "UNKNOWN",
      "type" : null
    } ],
    "reasons" : [ {
      "id" : "d5rj12qz49ih1o7z90fo7",
      "label" : "WF Evelyn NSS",
      "type" : null
    }, {
      "id" : "emyqfbfyiqn1f2u8qtzom",
      "label" : "No Match",
      "type" : null
    }, {
      "id" : "l23ovbpbjzry3kt2v40hz",
      "label" : "Full Match",
      "type" : null
    }, {
      "id" : "16aueejqjnwbrss910zsp",
      "label" : "Partial Match",
      "type" : null
    }, {
      "id" : "ok70toq0yf19kvvb4yk5f",
      "label" : "Unknown",
      "type" : null
    }, {
      "id" : "DEFAULT_REASON_AUTO_RESOLVED",
      "label" : "Auto-Resolved",
      "type" : null
    } ]
  },
  "resolutionRules" : {
    "iq6p13p73xc0d1ax86rwx" : {
      "reasons" : [ "d5rj12qz49ih1o7z90fo7", "emyqfbfyiqn1f2u8qtzom" ],
      "remarkRequired" : false,
      "reasonRequired" : true,
      "risks" : [ "gbul1lc02506bybw02cvg" ]
    },
    "baik1o4jre1extosbozyp" : {
      "reasons" : [ "ok70toq0yf19kvvb4yk5f", "d5rj12qz49ih1o7z90fo7" ],
      "remarkRequired" : false,
      "reasonRequired" : true,
      "risks" : [ "gbul1lc02506bybw02cvg" ]
    },
    "cy8c94bb9z83pndydvdvu" : {
      "reasons" : [ "d5rj12qz49ih1o7z90fo7", "l23ovbpbjzry3kt2v40hz" ],
      "remarkRequired" : false,
      "reasonRequired" : true,
      "risks" : [ "k1ld4dgzmgl7p5nt3117l", "9bbysus4odx0z8xl17mur", "14t2l2o2v5csz3vhn22by" ]
    },
    "lhq5ceb5v2387lx65i2v0" : {
      "reasons" : [ "d5rj12qz49ih1o7z90fo7", "16aueejqjnwbrss910zsp" ],
      "remarkRequired" : false,
      "reasonRequired" : true,
      "risks" : [ "k1ld4dgzmgl7p5nt3117l", "9bbysus4odx0z8xl17mur", "14t2l2o2v5csz3vhn22by", "gbul1lc02506bybw02cvg" ]
    }
  }
}
Evelyn processes the input data provided by the user and watchlist entity (WLE) data from World-Check One using the NSS classification model. Based on the results, a similar response is sent to World-Check One to resolve the case:
{
  "resultIds" : [ "5jb698vlinz01jgl74ymzgtdn", "5jb698vlinz01jgl74ymzgtdp", "5jb698vlinz01jgl74ymzgtdr", "5jb698vlinz01jgl74ymzgtdt" ],
  "statusId" : "lhq5ceb5v2387lx65i2v0",
  "riskId" : "9bbysus4odx0z8xl17mur",
  "reasonId" : "d5rj12qz49ih1o7z90fo7",
  "resolutionRemark" : "Hit is False Positive."
}
Resolution criteria are as follows:
- Updating results must be enabled in the UI.
- At least one WLE must be associated with the input data.
- World-Check One must return
caseSystemIdin the response. - Resolution rules in the Resolution Toolkit must allow the configured reason to be used in combination with all possible risks and statuses.
- If parallel production is enabled, the status will be Unspecified and the risk will be Unknown.
- If an alert is selected for automatic quality check, the status will be Unspecified and the risk will be Unknown.
Firco Trust
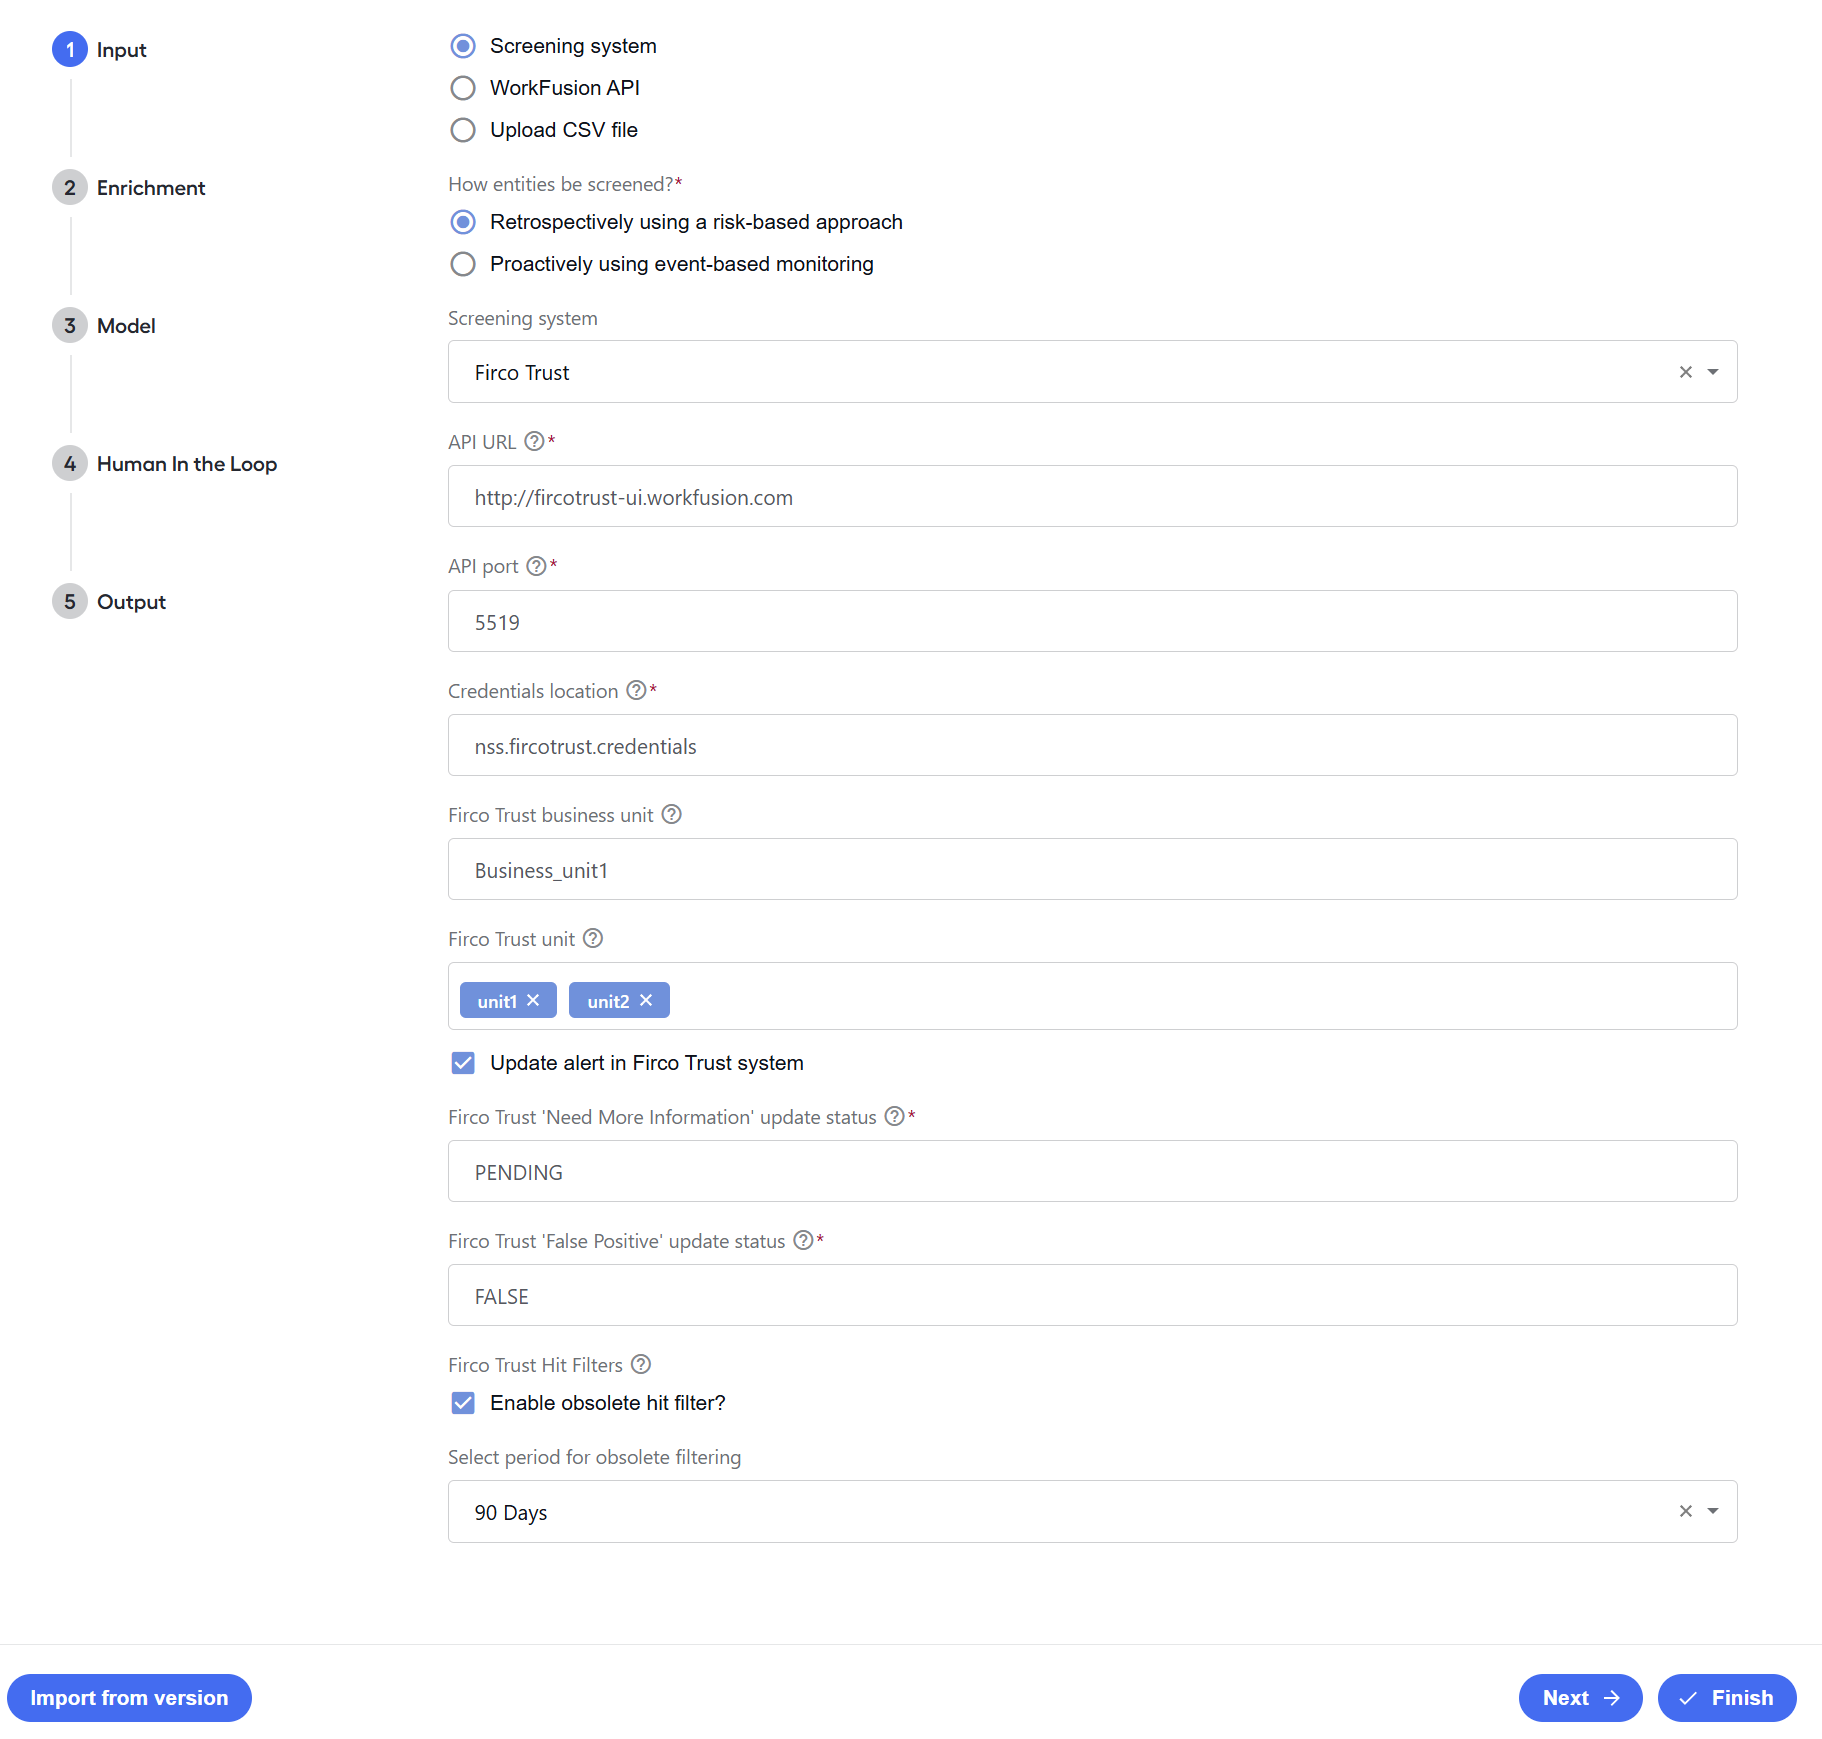
API URL. Select the address of the Firco Trust Case Manager API.
API port. Select the port of the Firco Trust Case Manager API Receive Message Service. You can find the value in the Trust Case Manager API configuration file.
Credentials location. Specify the Secrets Vault alias storing the credentials for the Firco Trust system.
Firco Trust business unit. Specify the business unit that will get messages from the Firco Trust system.
Firco Trust unit. Specify the underlying unit(s) or feed associated with the Firco Trust business unit on which screening should occur.
Update alert in Firco Trust system. Select if Evelyn's Business Process must update the alert in the Firco Trust UI with model decisions.
Firco Trust 'Need More Information' update status. Specify the alert status to be set if the model's decision is Need More Information.
Firco Trust 'False Positive' update status. Specify the alert status to be set if the model's decision is False Positive.
Enable obsolete hit filter? Select to filter out obsolete hits.
Select period for obsolete filtering. Specify how old a hit should be to be valid for filtering. Works in combination with the Enable obsolete hit filter? option.
For details on parsing data with Firco Trust, refer to Understand NSS data flow.
Thomson Reuters CLEAR
API URL. Select the address of the Thomson Reuters CLEAR API.
Credentials location. Specify the Secrets Vault alias storing the credentials for the Thomson Reuters CLEAR system.
Permissible Use:
Gramm-Leach-Bliley Act. To maintain compliance with the privacy provisions of the federal Gramm-Leach-Bliley Act and the subsequent regulations adopted by the Federal Trade Commission (GLB), select only a single purpose from the presented list.
Misrepresenting your access purpose violates your subscriber agreement and certain federal and state laws. Any use of information maintained by West, a Thomson Reuters business, other than for the selected permissible purpose, is grounds for account termination and might be referred to the appropriate governmental agency.
Driver's Privacy Protection Act. The Driver's Privacy Protection Act (DPPA) was enacted to prevent any Department of Motor Vehicles (DMV) officer, employee, or contractor from knowingly disclosing or making available to any person or entity the personal information associated with or contained within a motor vehicle record. The act does not include or affect accident reports, violations (MVRs), and driver status.
Voter Permissible Purpose. Due to data privacy restrictions imposed by state laws, users accessing voter registration records are required to acknowledge compliance with the law and to indicate the intended permissible use of the data.
Information obtained from each search, including the indicated permissible use, date of search, and search details, is stored for at least five years to comply with state statutory requirements. Not all permissible uses are applicable to each state.
Minimum relevance score. Specify the minimum relevance score to ensure that only the results that meet or exceed the threshold are returned for each data source.
Category Tags. The option is only available if you set Thomson Reuters CLEAR API as the input screening system for proactive monitoring. To do that, choose or type in tags to categorize the input to the connector that monitors the data provider. Available options are as follows: Sanctions, State owned entities, or Politically exposed persons.
WorkFusion API
Select WorkFusion API for full alert screening via REST API.
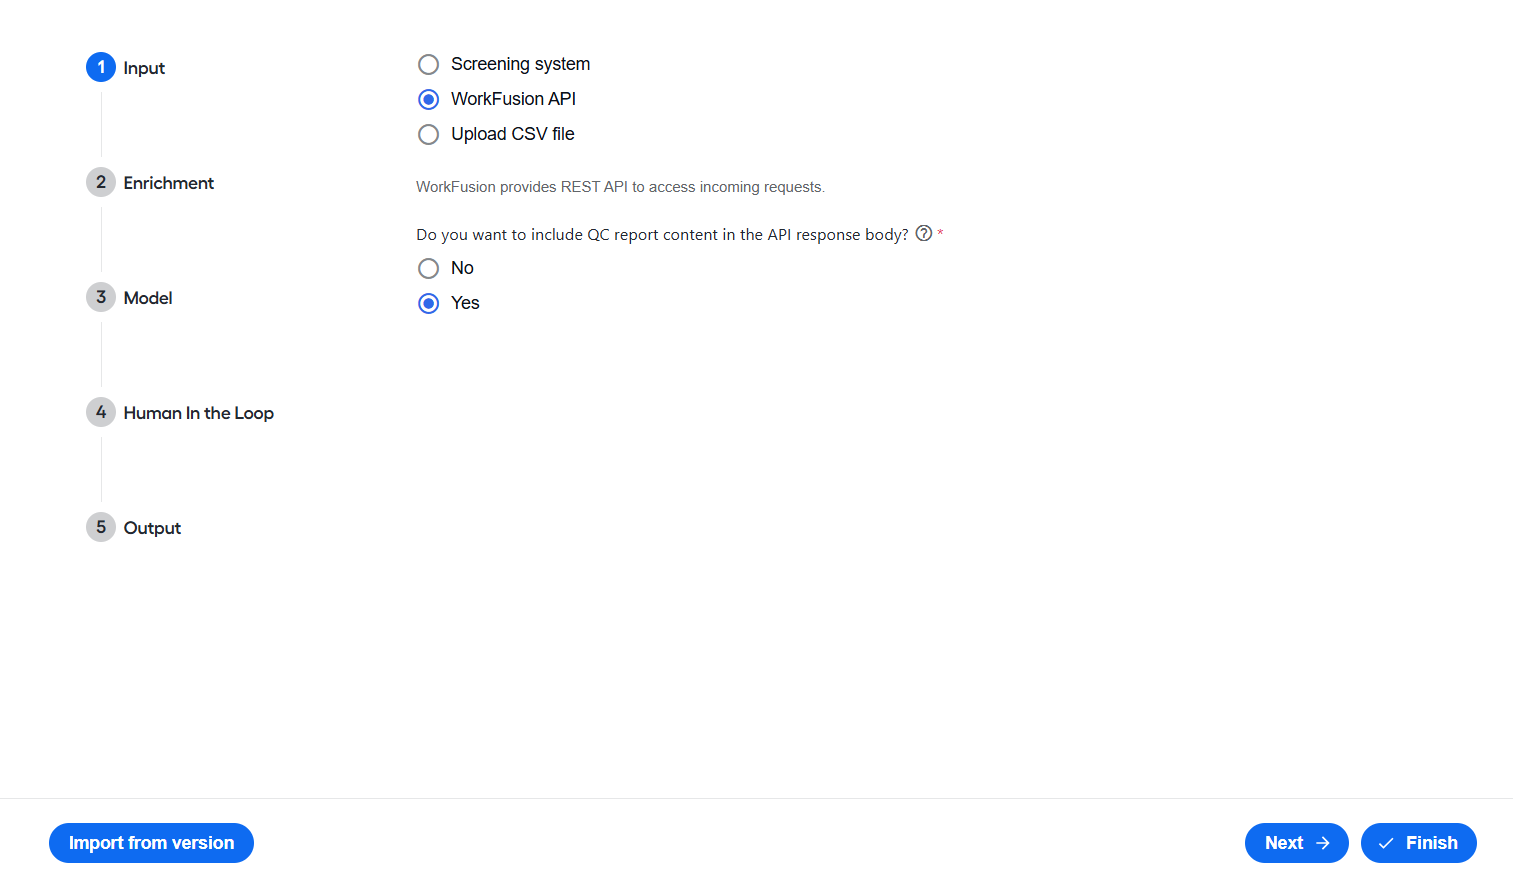
Select Yes for Do you want to include QC report content in the API response body? to return the full quality check (QC) report content directly in the REST API response instead of a link to the report stored in S3. If the QC report is missing or corrupted, the response returns an error message instead. The default value is No.
For more details on data transfer via API, refer to Run screening | Call NSS REST API.
Upload CSV file
Select Upload CSV file for historical data evaluation. The uploaded CSV file should contain historical data and WLE data.
Click Download format file to get a CSV file template and ensure the uploaded file corresponds to the provided format. Keep in mind that only the CSV format is supported.
To complete the configuration, do as follows:
In the Format file location field, specify the S3 path where the format file is stored. Click download format file to get a CSV template and ensure your uploaded file matches the required format. Only CSV files are supported.
In the Input data file location field, specify the the S3 folder or file path where the historical data is located. Ensure the input file contains
input_id(a unique identifier) to minimize unintended volume usage. Click download input file to get a CSV template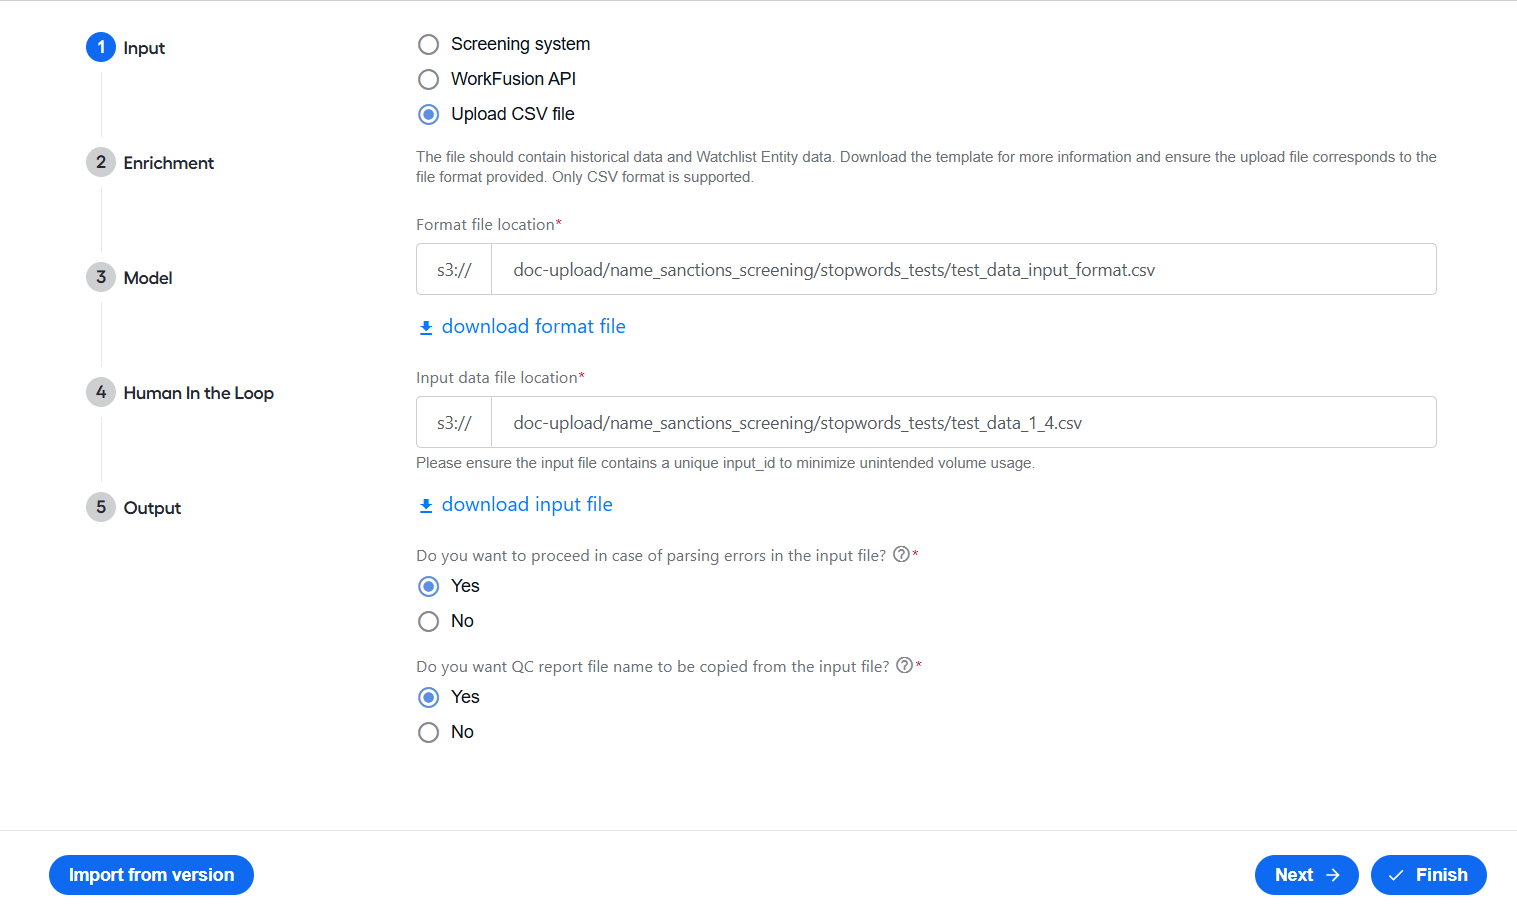
For more information on the historical data evaluation flow, see the guide.
In Do you want to proceed in case of parsing errors in the input file?, choose how Evelyn handles parsing errors in the input file:
Set to Yes (default) for the Business Process to process all valid records from the input CSV file, even if some records contain errors.
Set to No for Evelyn to use a strict all-or-nothing approach. If any error is detected, the entire Business Process is stopped. See possible scenarios depending on your choice:
Proceed on parsing errors
Scenario 1: no errors in input data
The CSV File Ingestion Business Process successfully parses all records.
All parsed data is sent to the core Names Screening Business Process for processing.
Result: the Business Process completes as normal.
Scenario 2: mix of valid and invalid data
The CSV File Ingestion Business Process scans the file and identifies both valid and invalid records.
A log message is generated indicating the total number of records and how many will be processed (the valid ones).
Error logs are generated.
Only the valid records are sent to the core Names Screening Business Process.
Result: the Business Process processes valid data and logs errors for invalid records.
Scenario 3: all records contain errors
The CSV File Ingestion Business Process scans the file and determines that all records are invalid.
A log message is generated stating that no records can be processed.
Detailed error logs are created.
The Business Process stops gracefully without sending any data to the core Names Screening Business Process.
Result: the Business Process stops, preventing the core Business Process from running with faulty data.
Stop on parsing errors
Scenario 1: no errors in input data
The CSV File Ingestion Business Process successfully parses all records.
All parsed data is sent to the core Names Screening Business Process for processing.
Result: the behavior is the same as when the feature is enabled.
Scenario 2: mix of valid and invalid data
The CSV File Ingestion Business Process scans the file for errors.
A log message is generated indicating that errors were found.
Detailed error logs are created, specifying the column, defined header name, and line number(s) of the error(s).
The Business Process stops gracefully, and no data is sent to the core Names Screening Business Process.
Result: the entire transaction is aborted to ensure data integrity.
Scenario 3: all records contain errors
The behavior is identical to Scenario 2. The CSV File Ingestion Business Process stops on the first error and logs the issue.
Result: the entire Business Process is stopped.
- For Do you want QC report file name to be copied from the input file?, select Yes if you want Evelyn to generate the QC report file name from the input file name. Subsequently, the QC report is stored under the name and enriched as per QC configuration.
If the same input file is rerun several times, all generated QC reports will have the same name, so later reports will overwrite the previous ones. For multiple runs, it is recommended to update the final QC report location on the Output tab.
Configure enrichment
On the Enrichment tab, you can configure name and location enrichment.
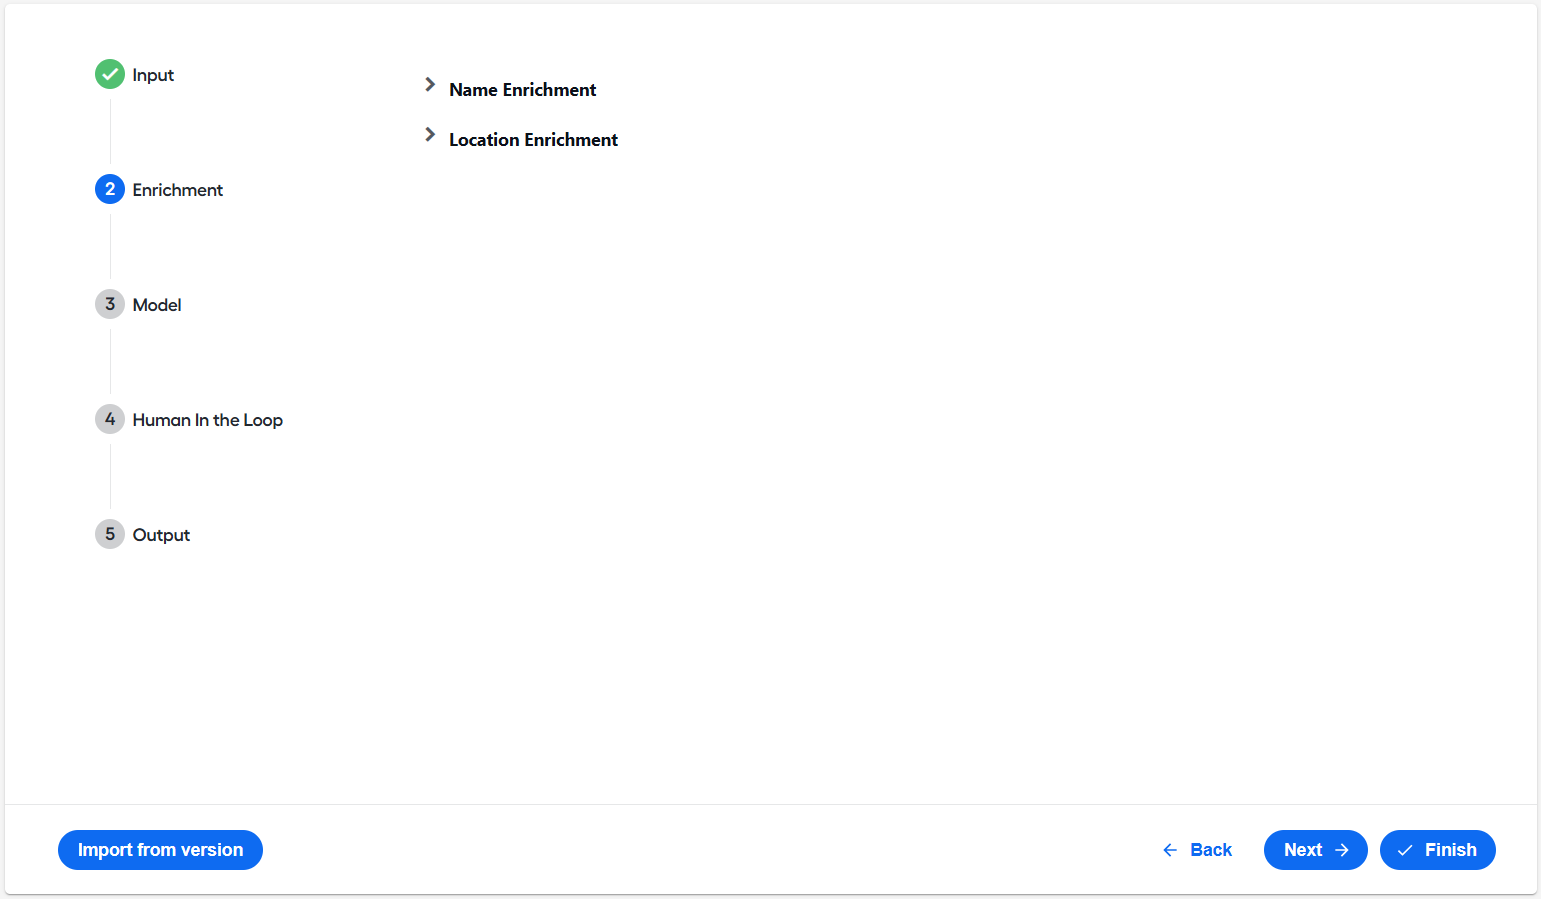
In the Name enrichment section, enable or disable name enrichment. The feature is enabled by default.
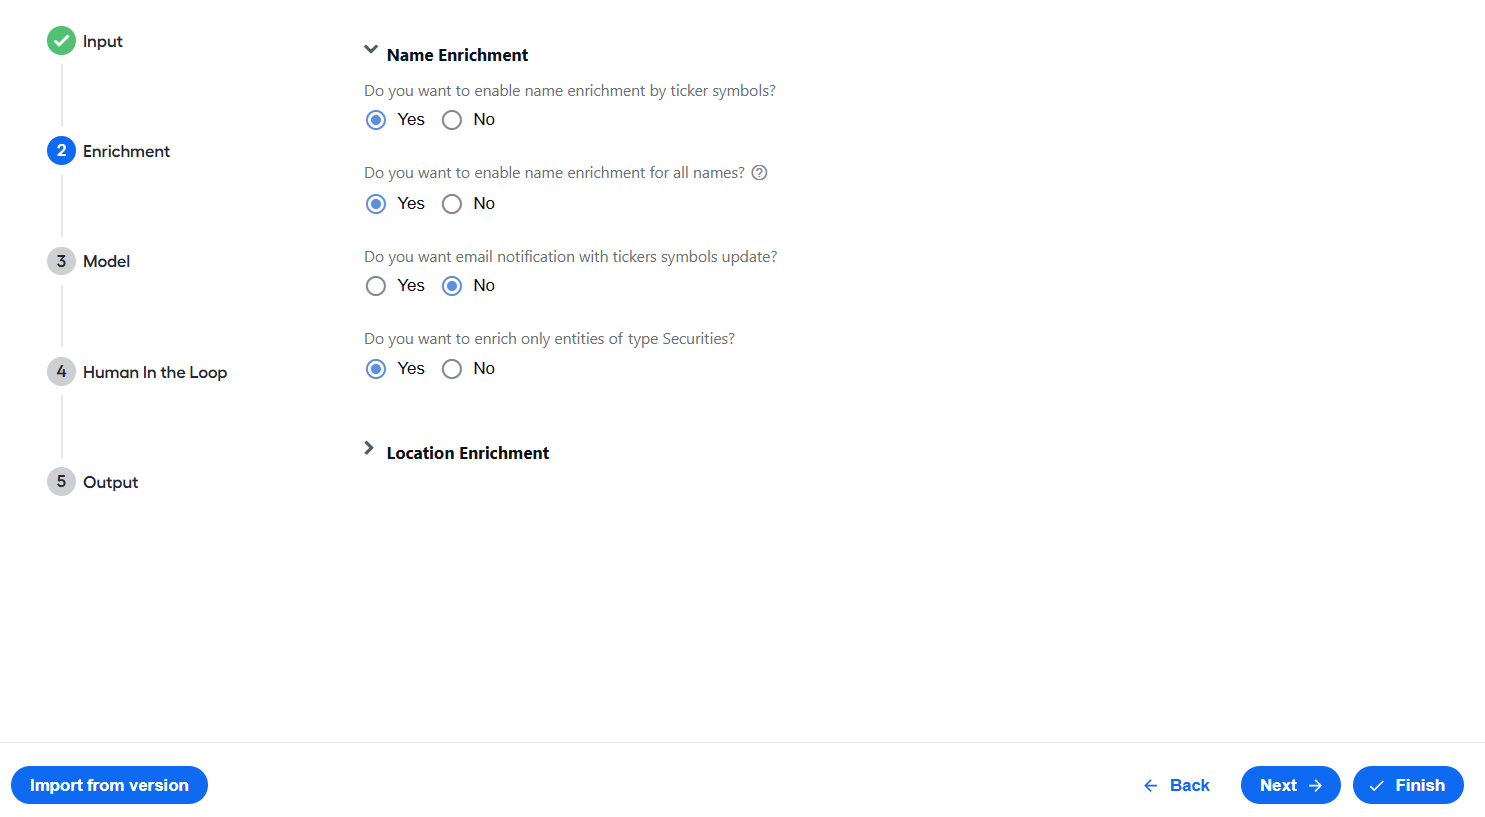
Select Yes for Do you want to enable name enrichment for all names? to enrich all name fields. If No (default) is selected, Evelyn enriches only the primary name field (
input_full_name).To enable enrichment only for the security type entities, set Do you want to enrich only entities of the type Security? to Yes.
Select Yes for Do you want email notification with tickers symbols update? to enable email notifications for Ticker Lookup Business Process runs. The feature is disabled by default.
- In the Email addresses to notify field, enter the email addresses where notifications should be sent.
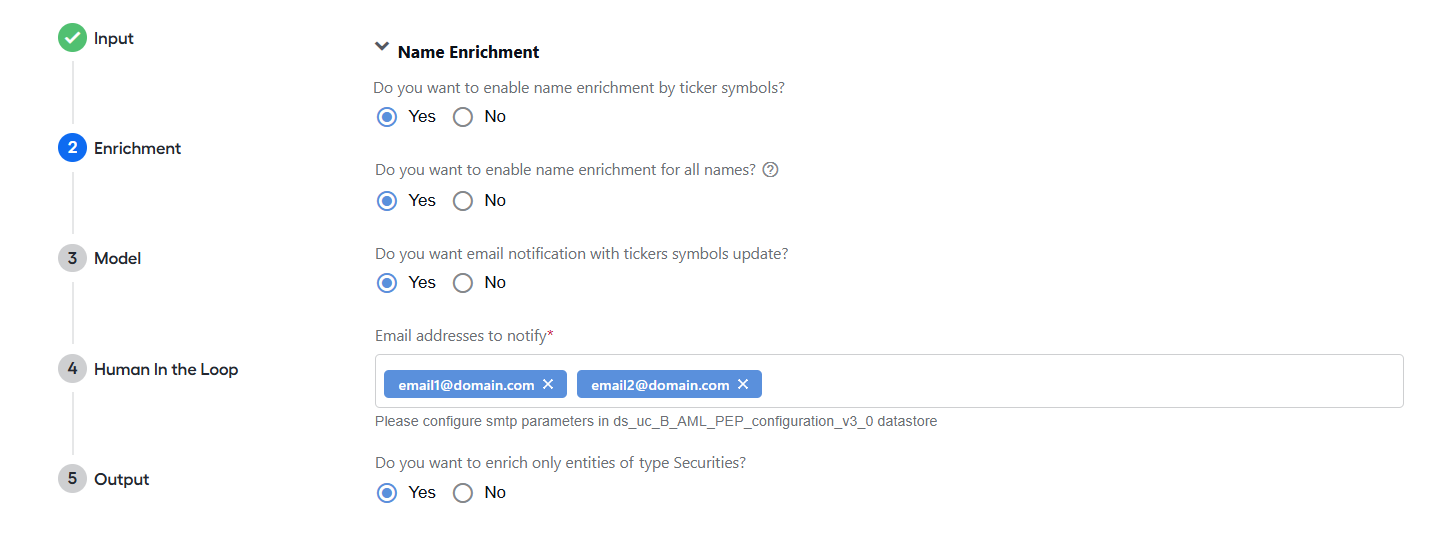
In the ds_uc_B_AML_PEP_configuration_v3_0 Data Store, configure SMTP parameters. For details, see Ticker enrichment configuration table.
Add a Secrets Vault entry with authentication credentials. Use the alias stored in
smtp.credentialsAliasin the configuration Data Store.
For more details, see Perform data enrichment | Name enrichment.
In the Location Enrichment section, leave Location lookup empty to skip address enrichment.
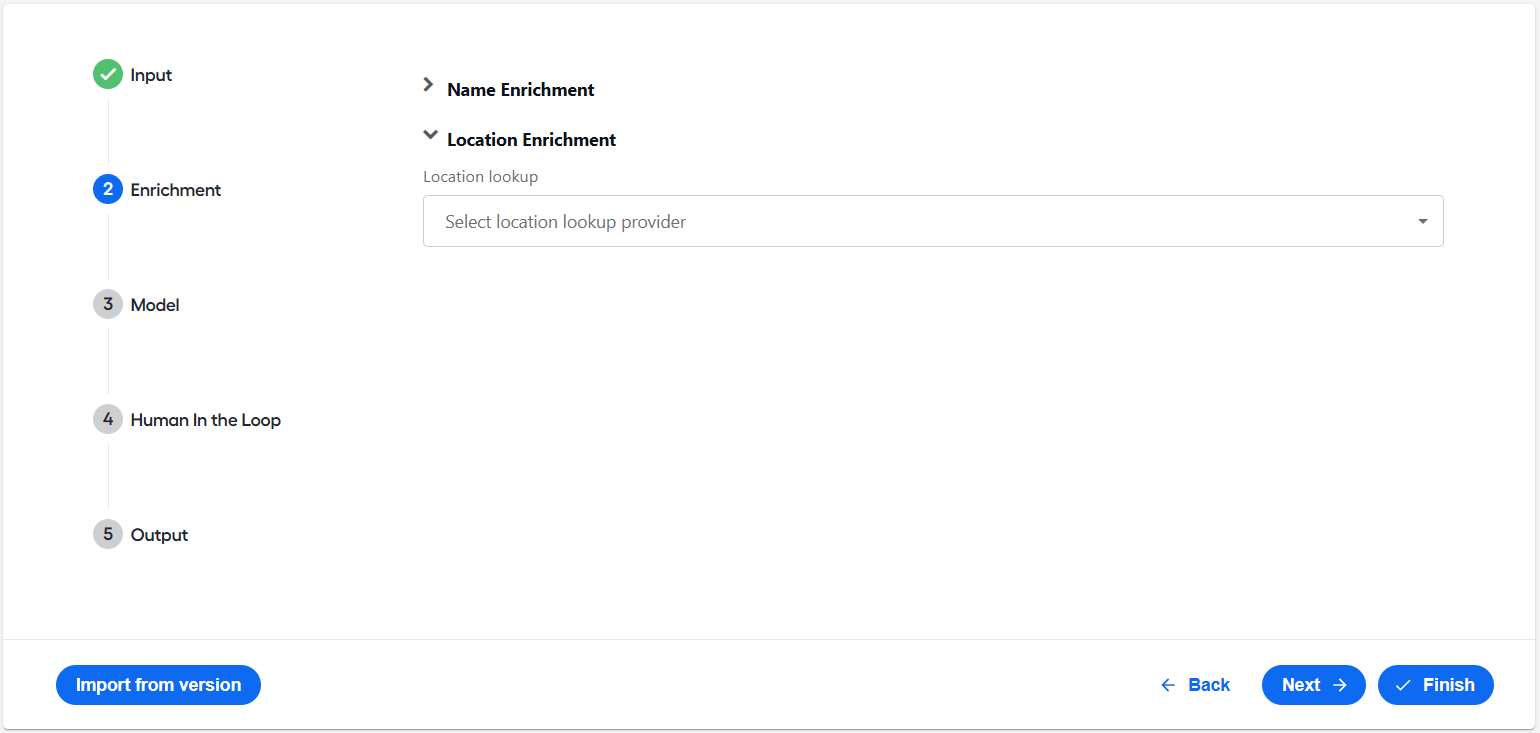
To enable address enrichment, complete the following steps:
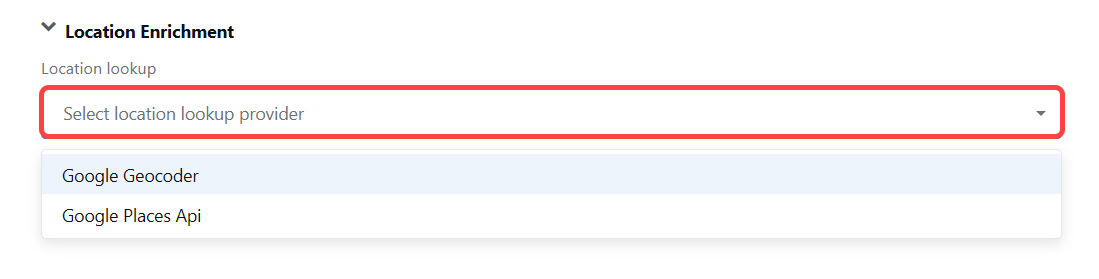
In the Location lookup dropdown, select a provider. The AI Agent retrieves detailed information about the location from the selected provider and enriches
ScreenedDataandWleData. Available providers are as follows:Google Geocoder. One request is made per address, returning relevant geolocation data.
Google Places Api. First, NSS calls
https://maps.googleapis.com/maps/api/place/autocomplete/jsonto retrieve a list of predicted addresses. Then, it callshttps://maps.googleapis.com/maps/api/place/details/jsonto get detailed address information for each prediction.
In the API key field, enter the key used to retrieve geolocation data from the selected provider.
In the Lookup settings section, specify when to perform an address lookup. If enrichment is needed for both the input entity and WLE, select both checkboxes:
Lookup on input entity applies address enrichment to input data only.
Lookup on watch list entity applies address enrichment to hit data.
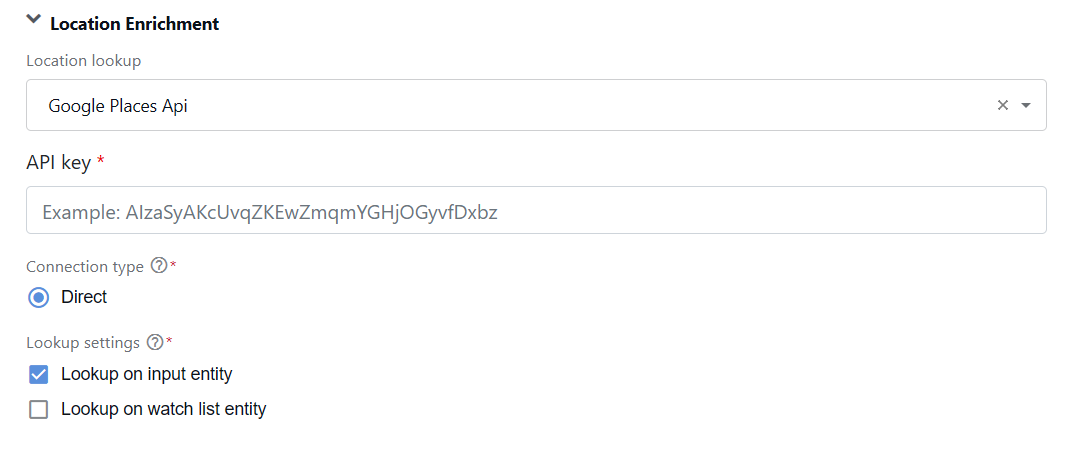
In Connection type, the method used to connect to the selected geolocation provider is set to Direct by default, which enables direct calls to the provider.
For more details, see Perform data enrichment | Location enrichment.
Configure model
On the Model step, you can modify the following model-related settings:
Leave Use latest model version selected (default) to apply the default prepackaged model.
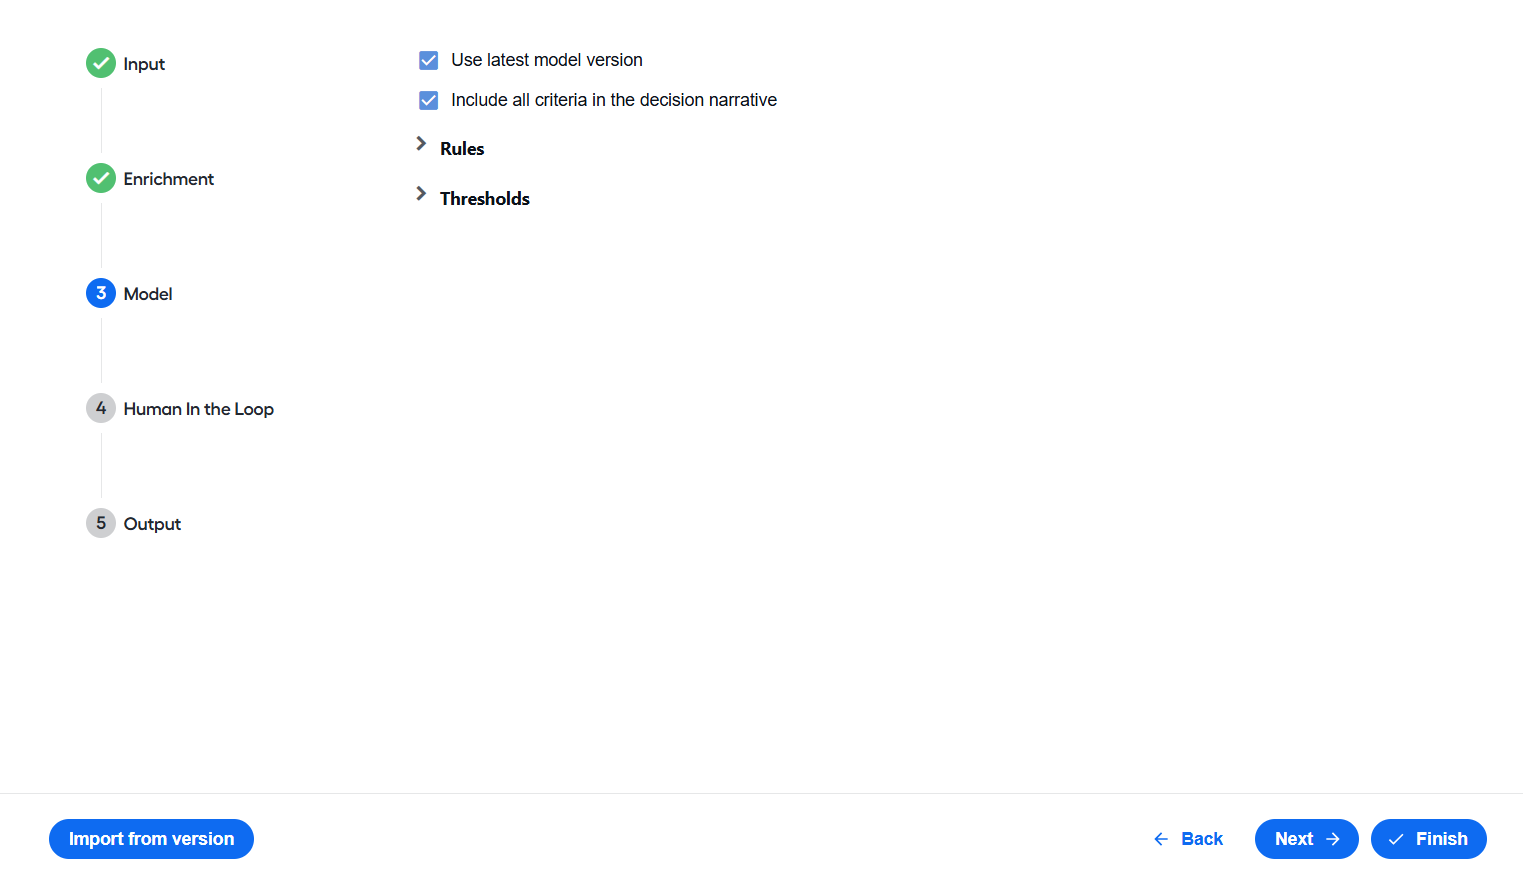
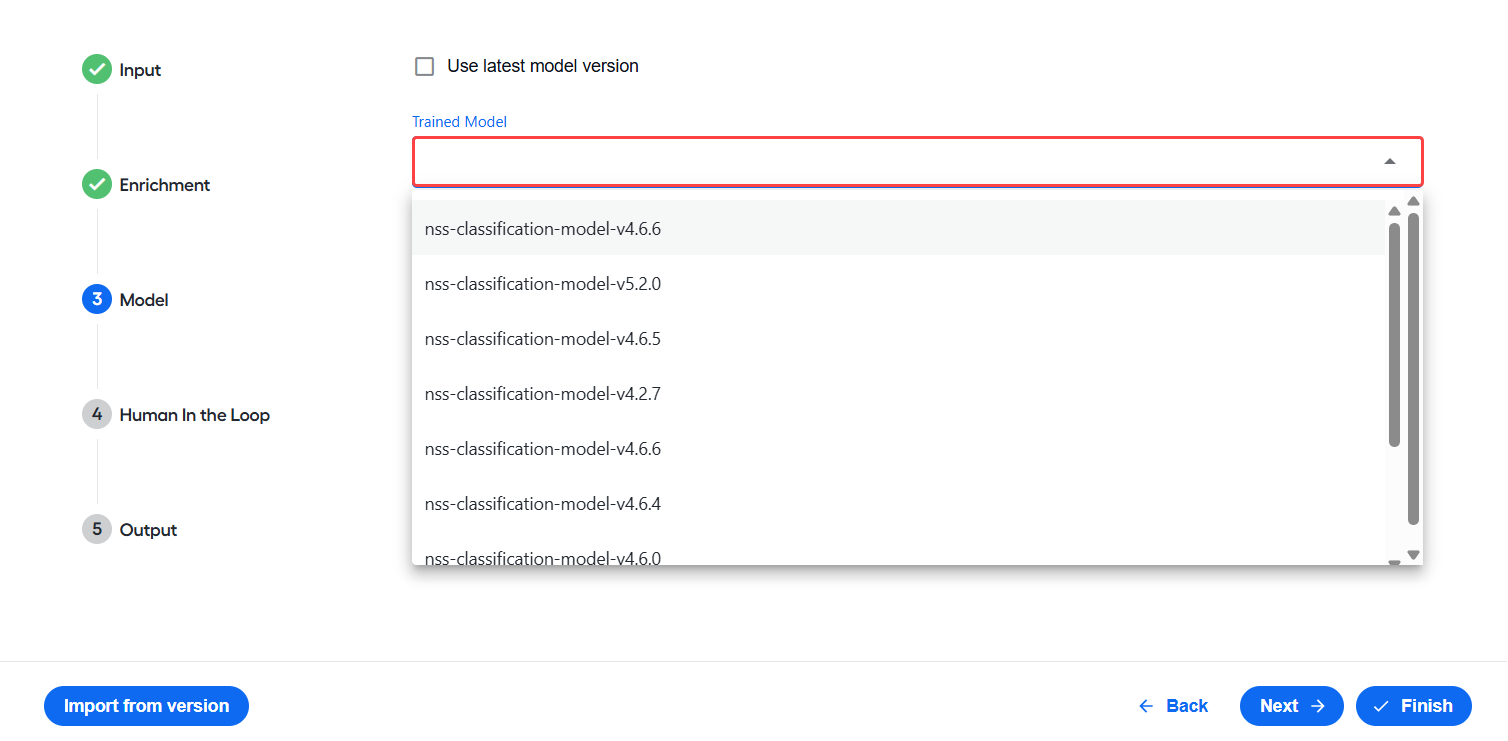
To change the model version, clear the option and select the required version in the Trained Model drop-down list. For the list of compatible models, see Supported models.
Select Include all criteria in the decision narrative to include available factors in the narrative.
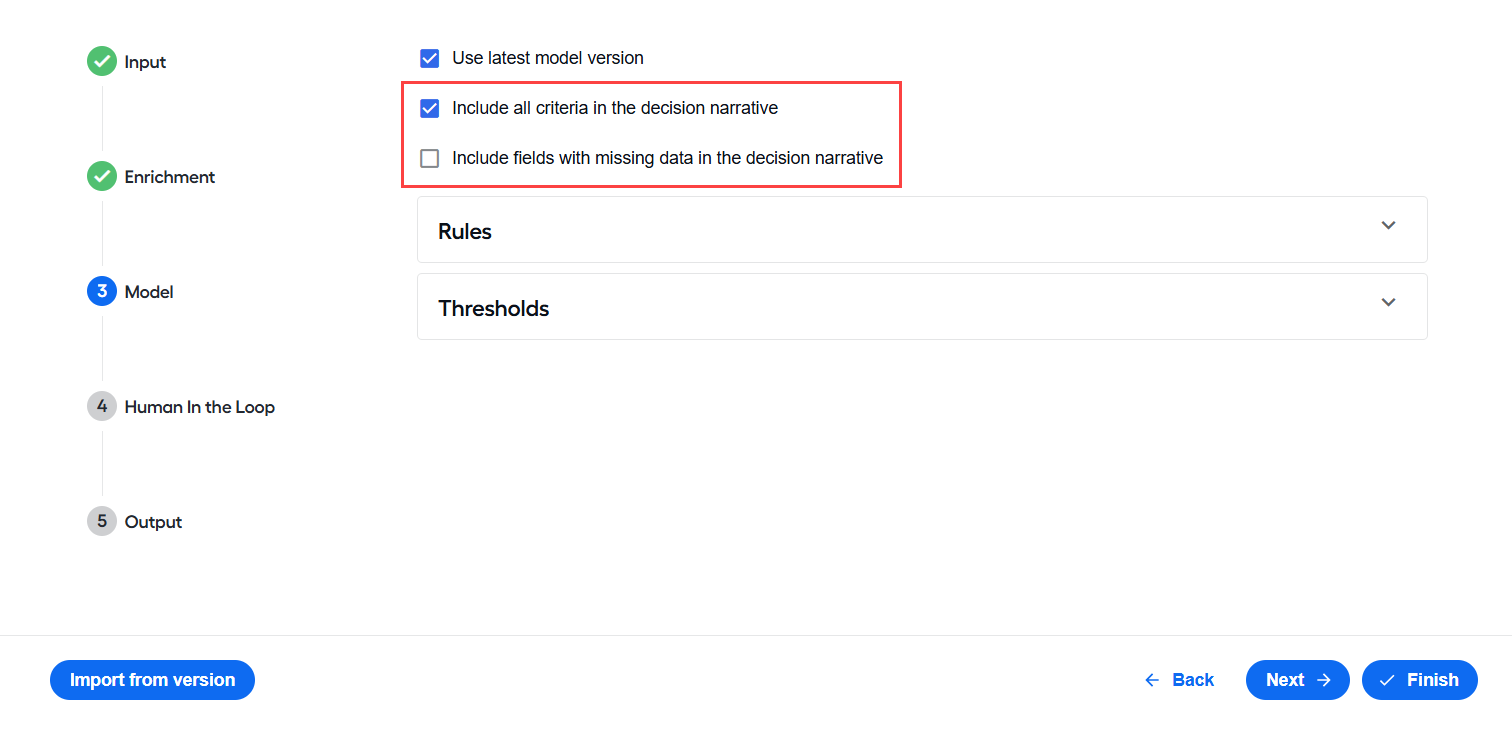
Leave Include all criteria in the decision narrative deselected to show only the most significant factors in the decision narrative for a strong match and weak mismatch (if available).
Open the Rules section and complete the following steps:
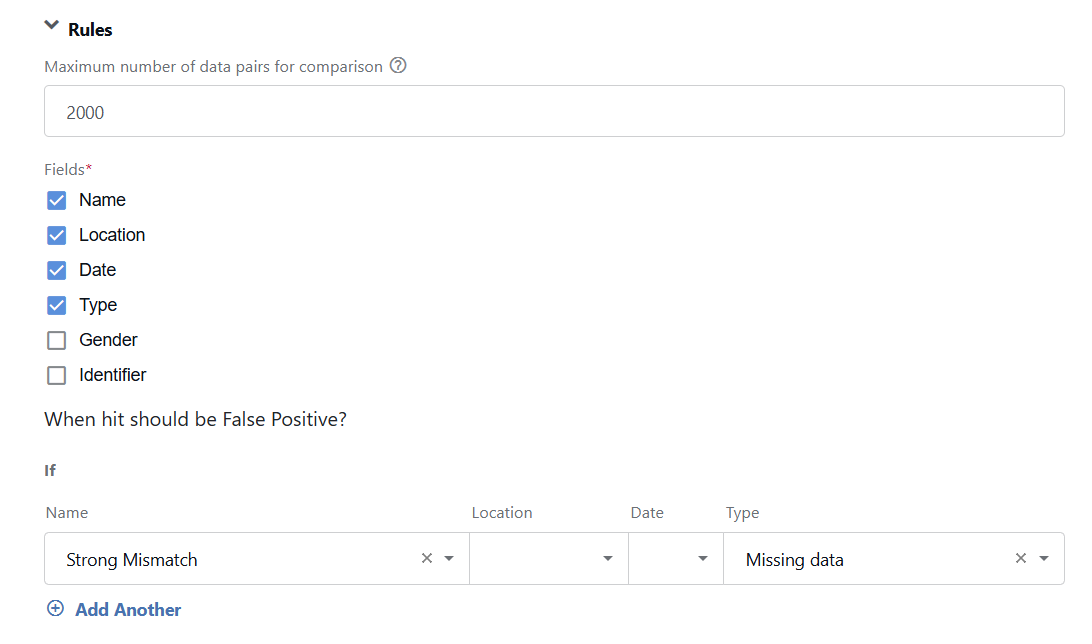
- In the Maximum number of data pairs for comparison field, specify how many field comparisons, or data pairs, are evaluated per alert across its watchlist entries. The default value is
2000. The allowed range is0–100,000and includes only whole numbers.
If the total number exceeds the limit, the alert is flagged and routed for automatic escalation. The ML model is not invoked for these alerts.
noteSetting to
0processes all alerts regardless of size. This may affect performance in environments with large alert volumes.- Specify the factors the model uses to identify a hit as a false positive. To define rules, select the Name, Location, Date, Type, Gender, or Identifier checkboxes and set the values in the rules matrix. For instructions, refer to Configure classification model | Rules.
- In the Maximum number of data pairs for comparison field, specify how many field comparisons, or data pairs, are evaluated per alert across its watchlist entries. The default value is
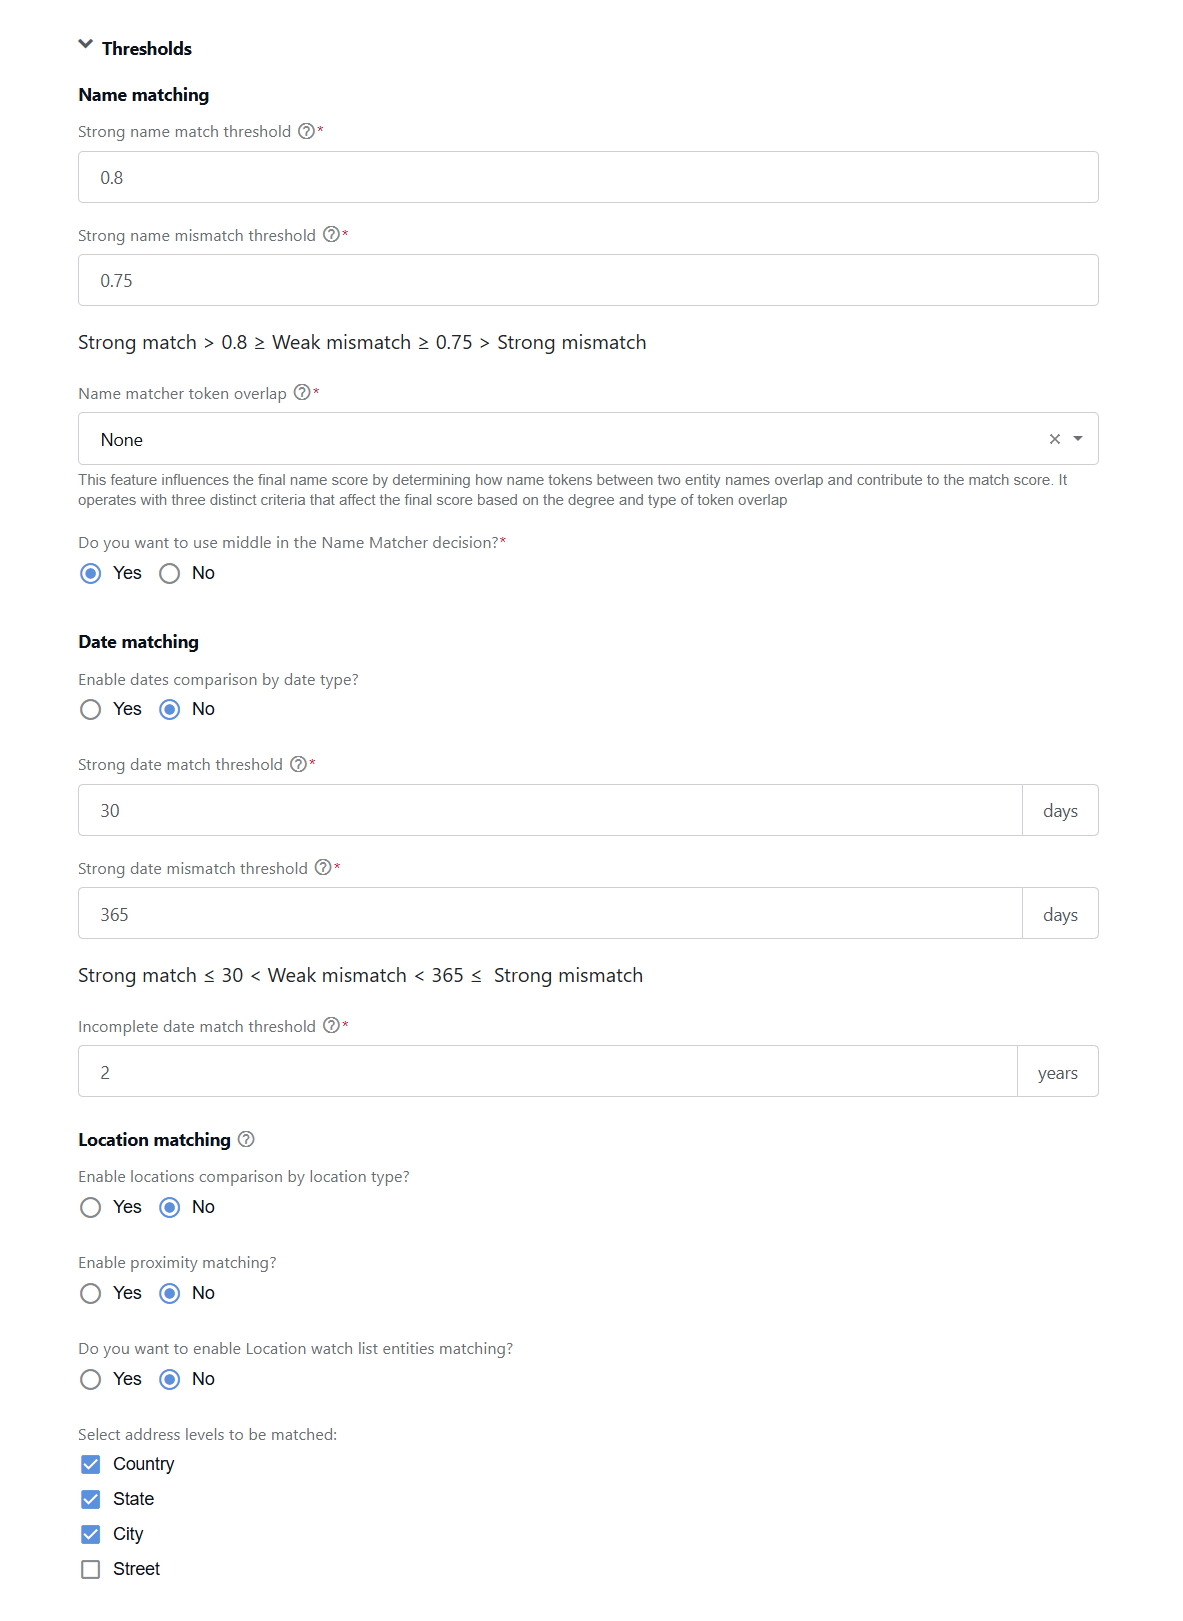
Open the Thresholds section and set similarity thresholds for comparing names, dates, and locations. For more details, see Configure classification model | Thresholds.
Configure manual review
The Human in the Loop step allows you to verify or modify the decisions of the NSS classification model by providing all available information that might be too complex for the model to process. Alerts chosen for manual review remain available in Workspace till manually submitted.
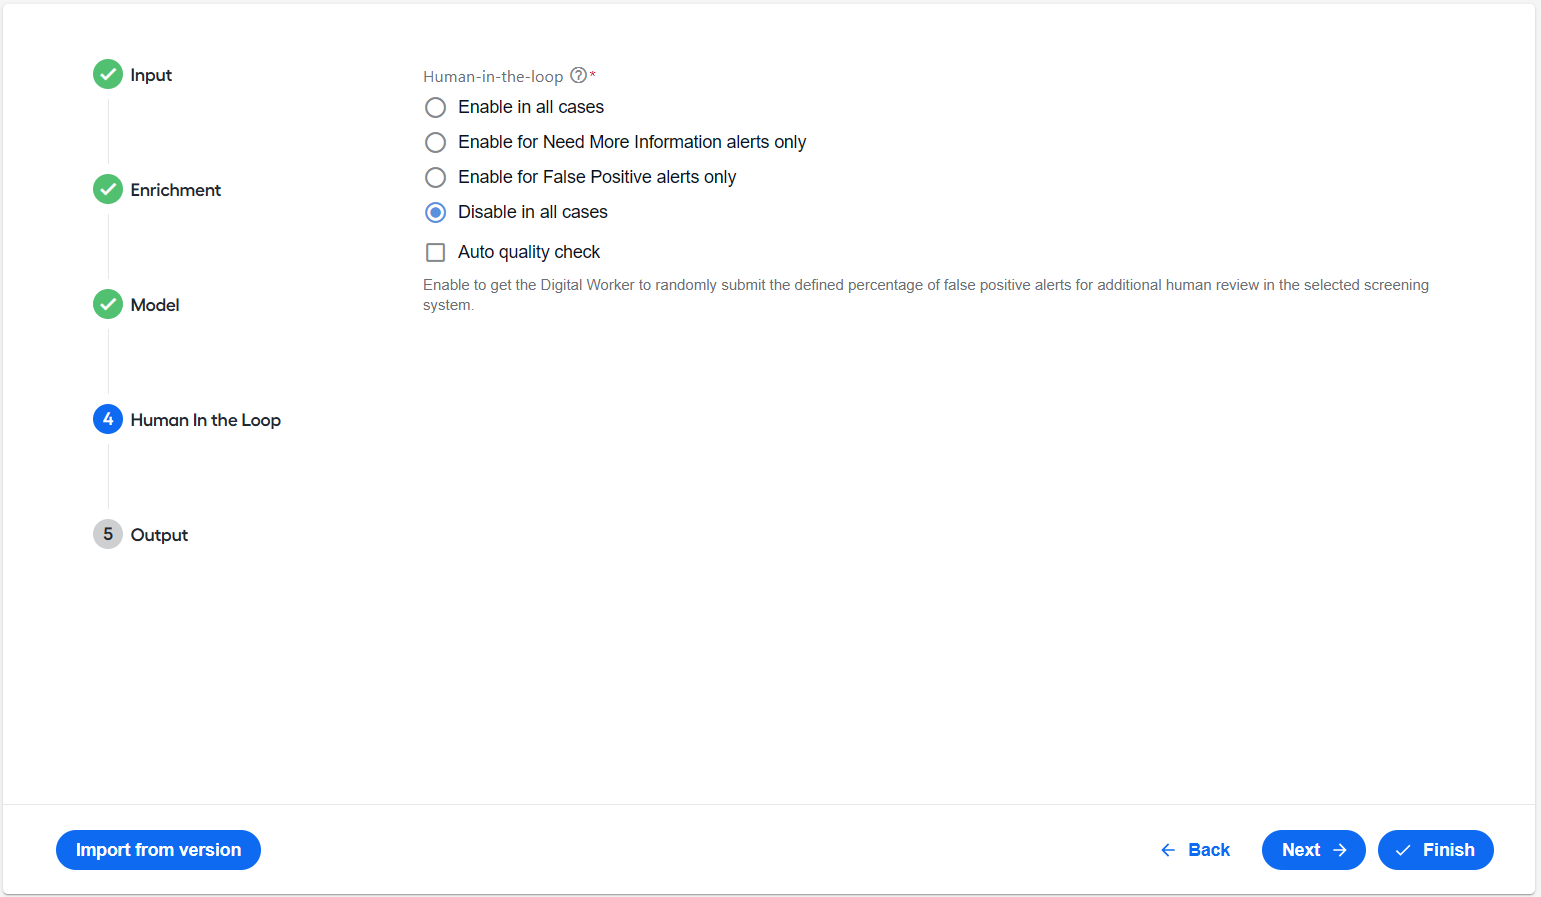
To set the Human in the Loop step, follow the steps below:
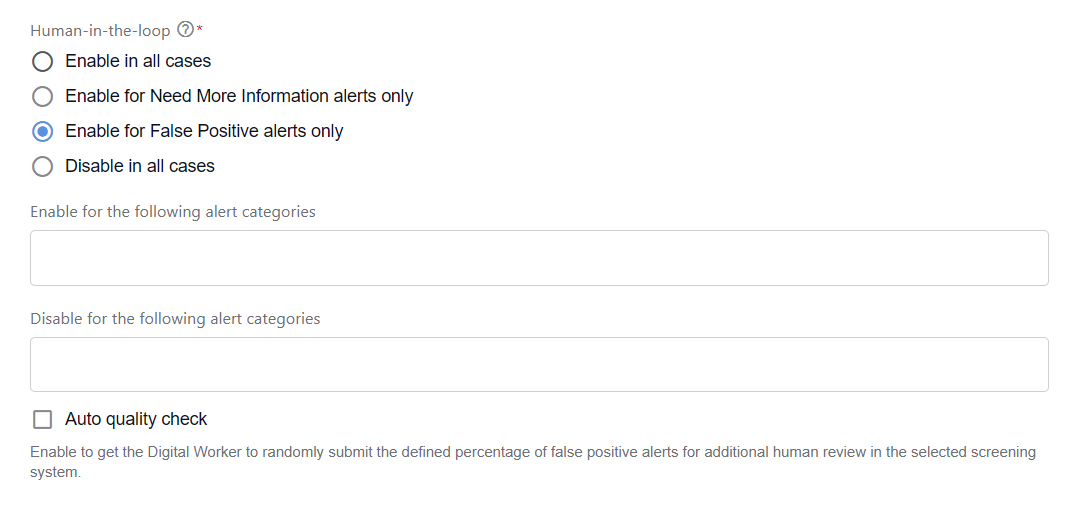
Select whether and how you want to check the AI Agent's output manually in Workspace:
Enable in all cases: Evelyn sends all alerts with hits to manual review.
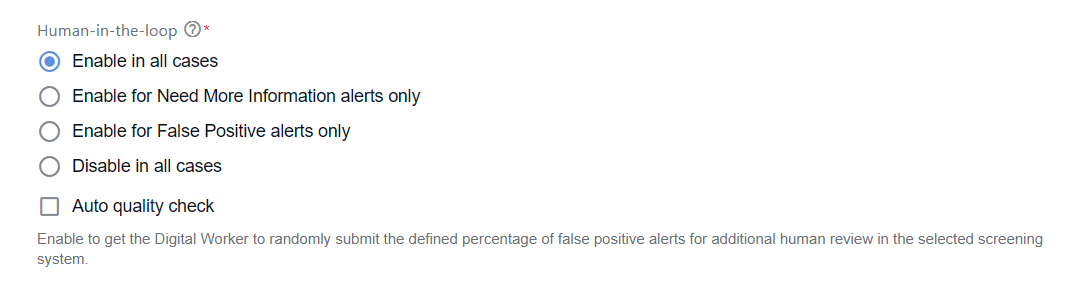
Enable for Need More Information alerts only: Evelyn creates manual review assignments for alerts where the model decision was Need more information.
Enable for False Positive alerts only: Evelyn creates manual review assignments for alerts evaluated as False Positive.
Disable in all cases: Evelyn skips the manual review step in all cases, sticking to the model decisions.
Additionally, for the Enable for Need More Information alerts only and Enable for False Positive alerts only options, type in the exact alert categories that should be forced (Enable for the following alert categories) or skipped (Disable for the following alert categories).
 info
infoThe above configuration can be overridden by using the
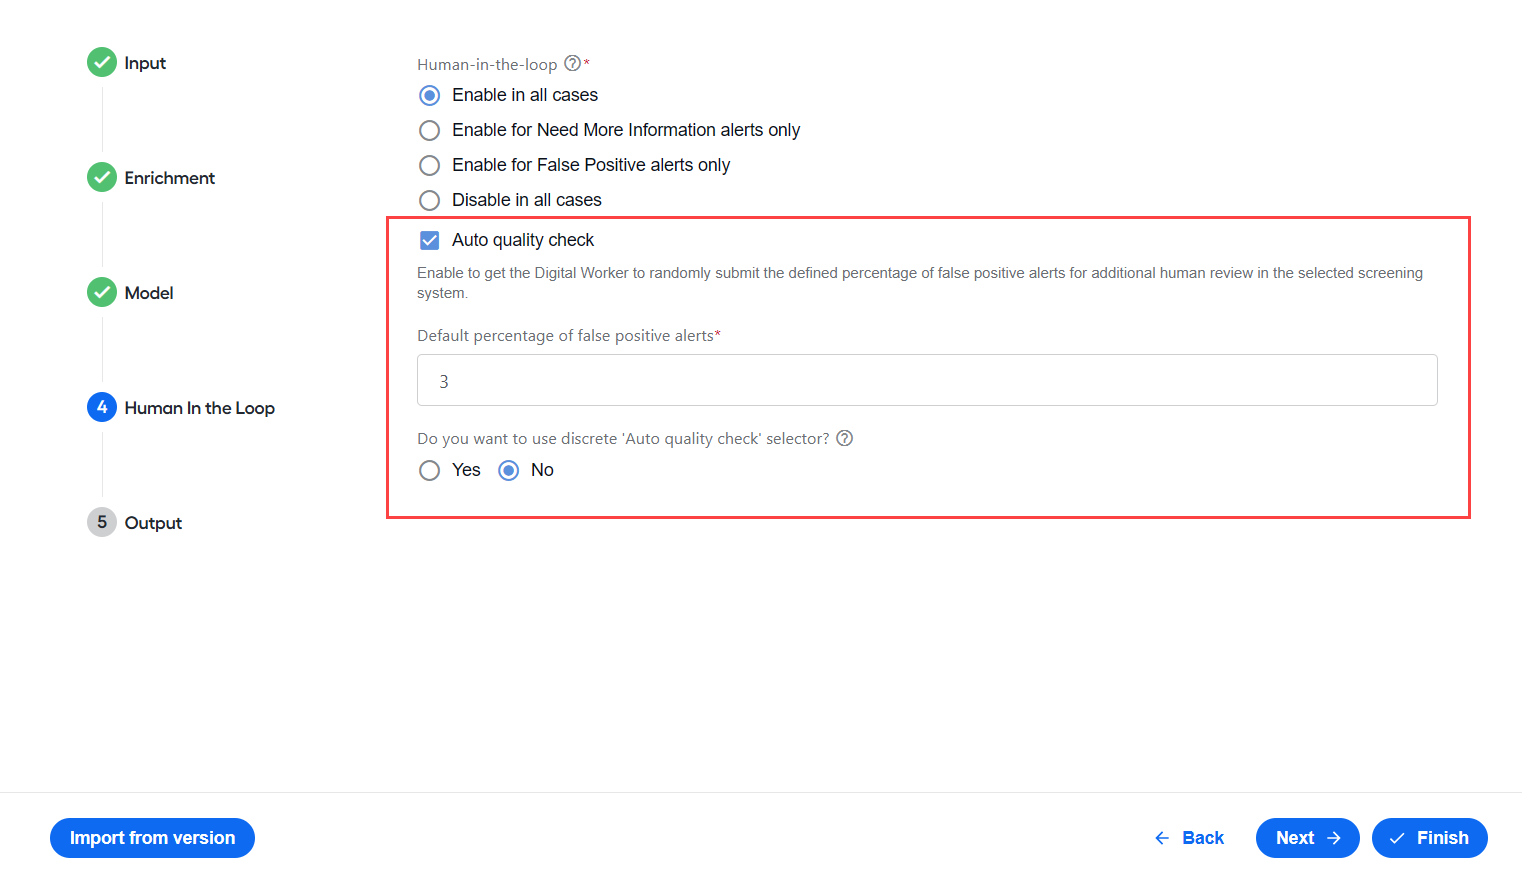
mt_forceparameter. For details, read Run screening | REST API configuration map.Select Auto quality check to allow Evelyn to randomly submit a percentage of false positive alerts for additional manual review in your screening system.
How it works
Auto quality check applies only to alerts that Evelyn resolves as False Positive (ALL_FP), meaning all hits in the alert are resolved as False Positives. From these eligible alerts, Evelyn randomly selects the configured percentage and flags them for manual review. Alerts that are not selected follow the normal workflow.
An alert is included in auto quality control only when:
The alert resolution is
ALL_FP, andThe alert is randomly selected based on your configured sampling rate.
Quality control records gold outcomes used as ground truth for evaluation:
input_gold_resolution(alert level):0= False Positive (all hits are non-matches; the alert can be auto-resolved)1= Need More Information (at least one hit requires manual review)
If any hit has
hit_gold_resolution=1, theninput_gold_resolution=1.hit_gold_resolution(hit level):0= False Positive (the hit is a clear non-match and can be auto-resolved)1= Need More Information (the hit requires manual review)
These outcomes are used to calculate quality metrics such as automation rate (correct auto-resolutions) and error rate (incorrect auto-resolutions).
For more details, see the API documentation.
In Default percentage of false positive alerts, specify the sampling rate (1–100%). The default is 3%. The associated screening system is updated to indicate that the AI Agent flagged the alert for automatic quality check.
Set Do you want to use discrete 'Auto quality check' selector? to Yes to configure different sampling percentages based on risk category and score. Then complete the following settings:
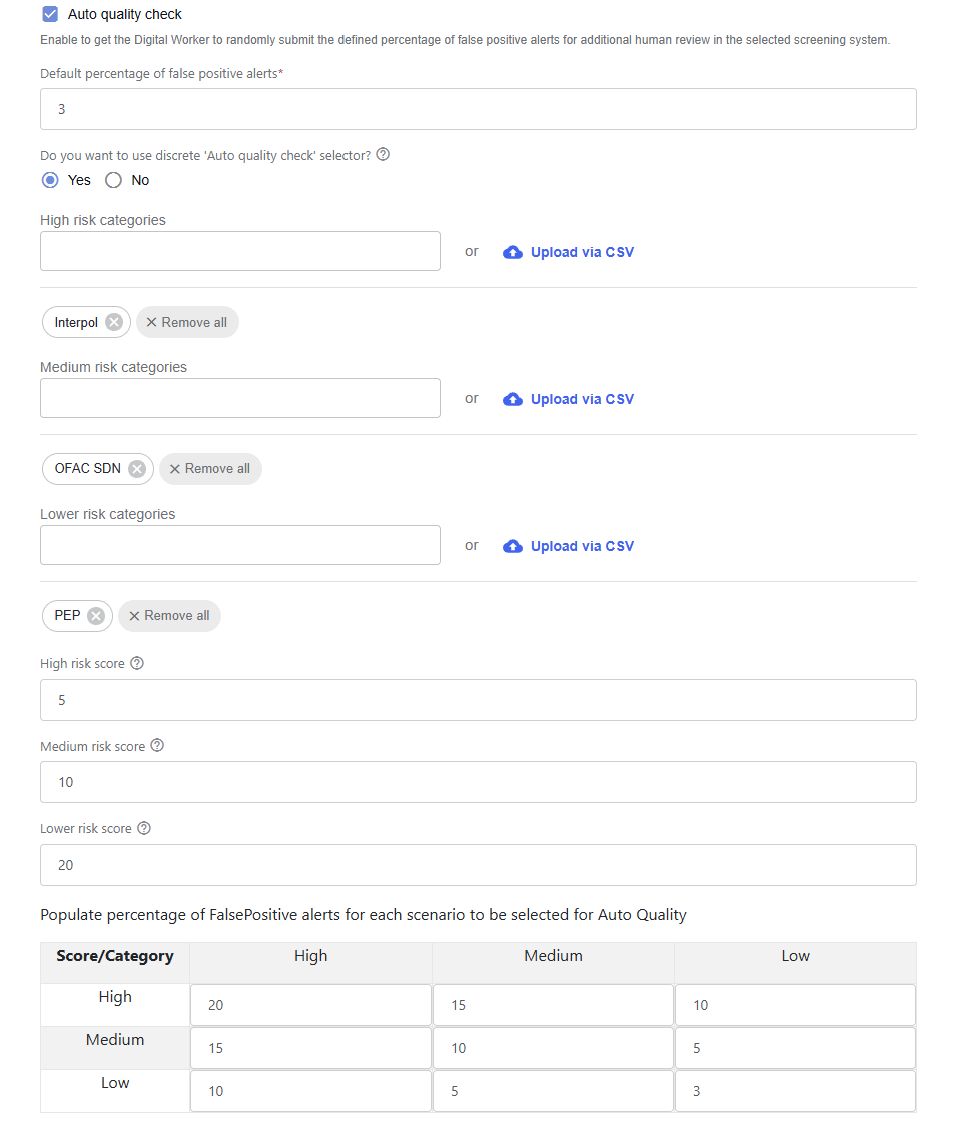
High risk categories. Specify which alert categories are considered high risk
Medium risk categories. Specify which alert categories are considered medium risk.
Lower risk categories. Specify which alert categories are considered lower risk.
High risk score. Specify the percentage range below the threshold to treat as high risk.
Medium risk score. Specify the percentage range below the threshold to treat as medium risk.
Lower risk score. Specify the percentage range below the threshold to treat as lower risk.
The threshold used for the calculation is the
StrongNameMatchthreshold. The final alert score is calculated as follows:(1 - max(DecisionScore of all WLE of an alert)).The table is populated with percentages for each intersection of risk categories and risk scores. Any false positive alerts that do not fall into the configured risk categories or score ranges use the percentage specified in the Default percentage of false positive alerts field.
See examples
See examples based on the screenshot above:
20% of false positive alerts from the Interpol category with a final score between
StrongNameMismatchand(StrongNameMismatch-5%)15% of false positive alerts from the Interpol category with a final score between
(StrongNameMismatch-5%)and(StrongNameMismatch-10%)and from the OFAC SDN category with a final score betweenStrongNameMismatchand(StrongNameMismatch-5%)10% of false positive alerts from the Interpol category with a final score between
(StrongNameMismatch-10%)and(StrongNameMismatch-20%), from the OFAC SDN category with a final score between(StrongNameMismatch-5%)and(StrongNameMismatch-10%), and from the PEP category with a final score betweenStrongNameMismatchand(StrongNameMismatch-5%)5% of false positive alerts from the OFAC SDN category with a final score between
(StrongNameMismatch-10%)and(StrongNameMismatch-20%)and from the PEP category with a final score between(StrongNameMismatch-5%)and(StrongNameMismatch-10%)3% of false positive alerts from the PEP category with a final score between
(StrongNameMismatch-10%)and(StrongNameMismatch-20%)3% of false positive alerts that do not belong to any of the categories above and have a final score below
(StrongNameMismatch-20%)
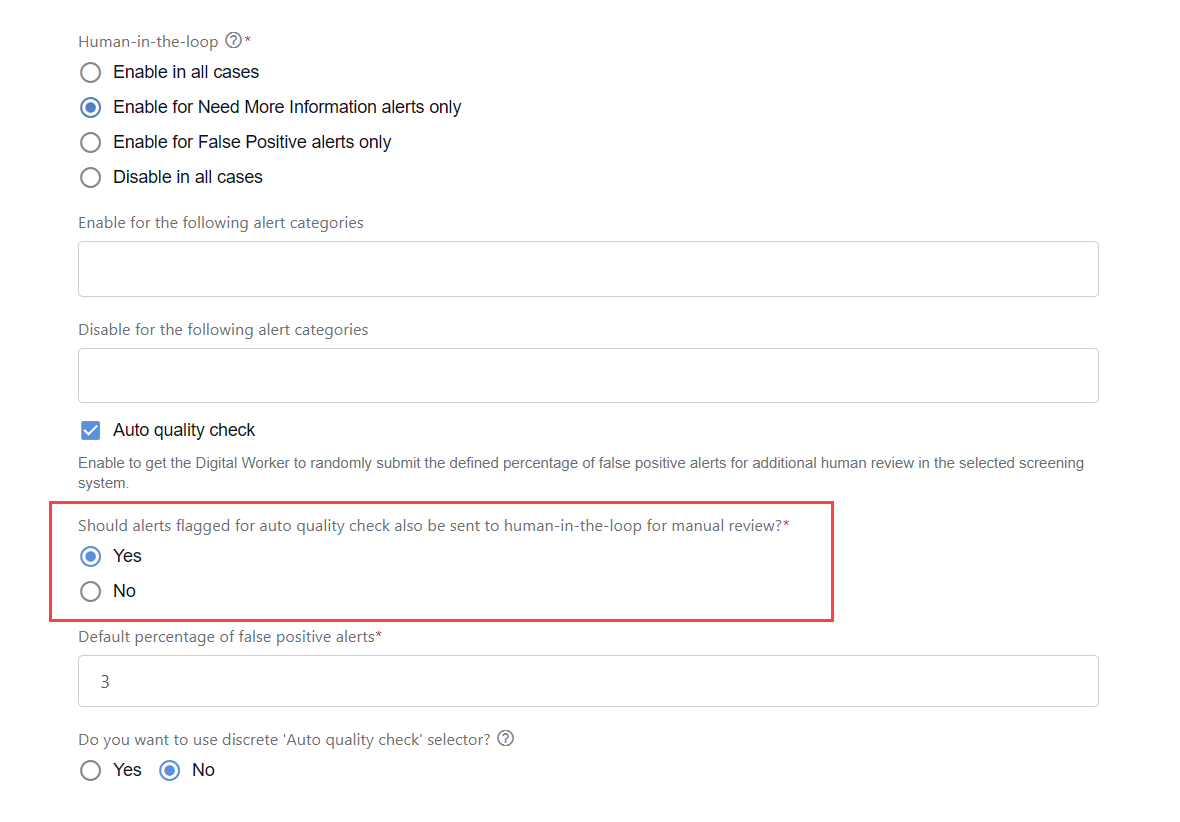
If you selected Enable for Need More Information alerts only or Enable for False Positive alerts only in step 1, specify whether alerts flagged for automatic quality check should be sent for manual review. To do that, select Yes for Should alerts flagged for auto quality check also be sent to human-in-the-loop for manual review?.
Configure output
On the Output step, choose which reports to generate after the Business Process runs and where to store them.
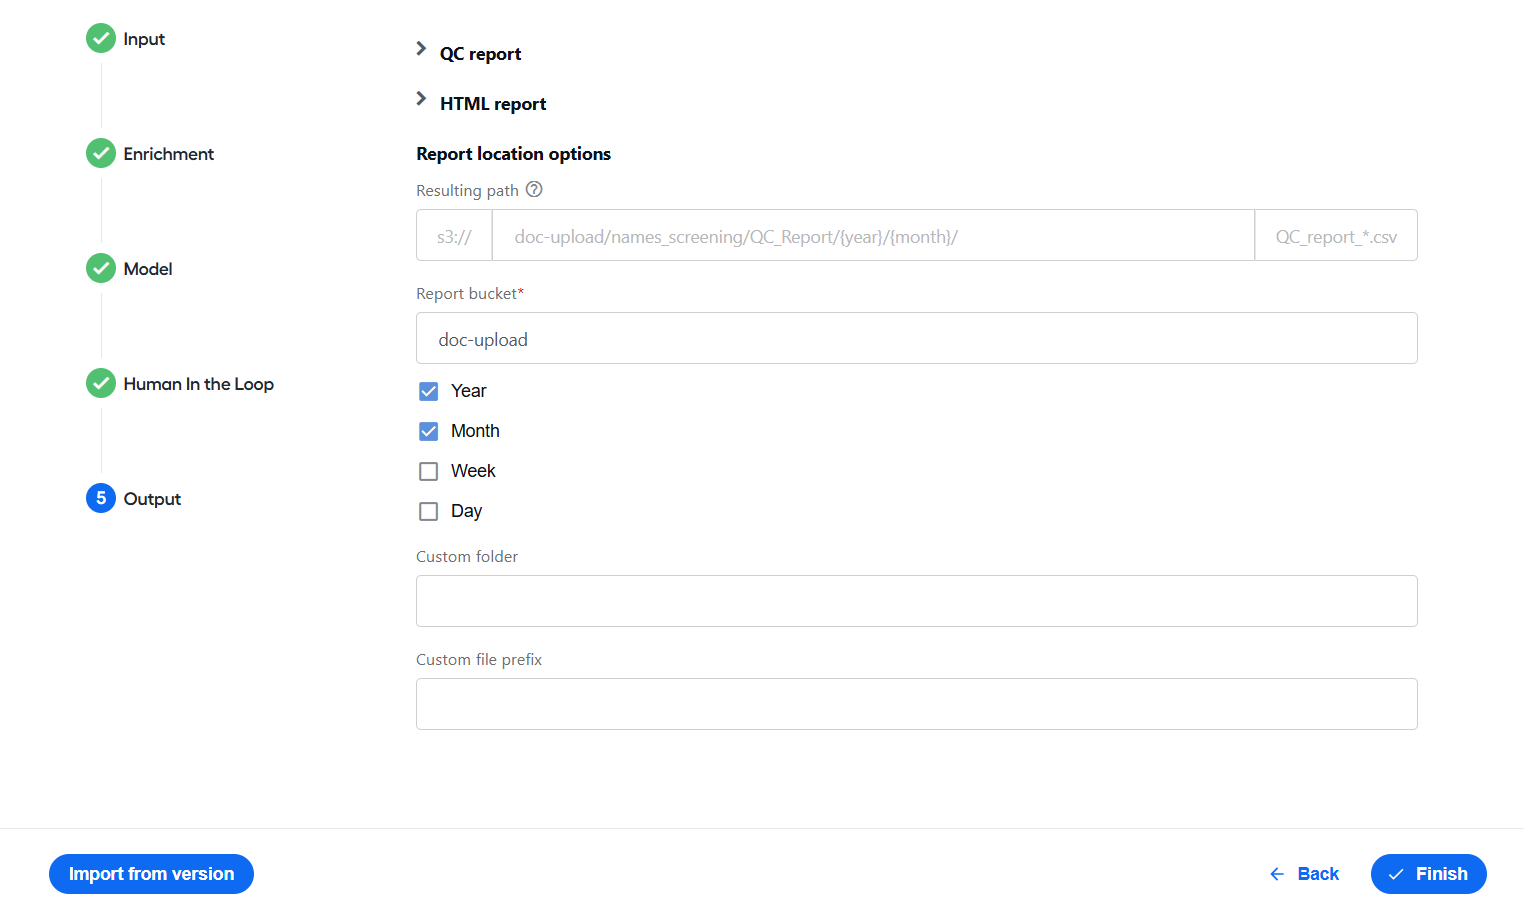
The step includes the following settings:
Report location options that apply to both report types
QC report settings
To configure QC report settings, use the options in the QC report section:
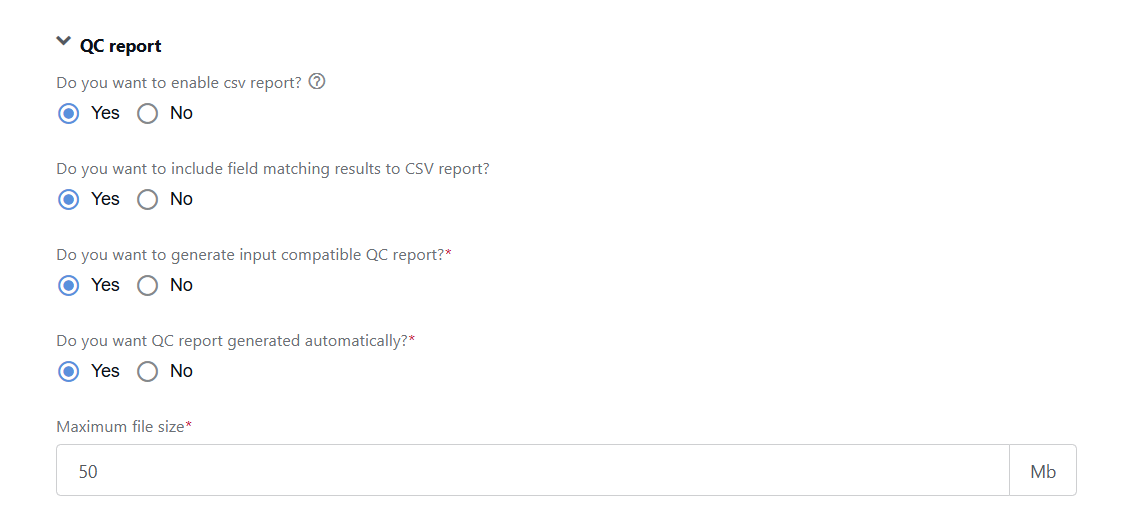
Set Do you want to enable csv report? to Yes to generate a QC report (CSV) with detailed information about completed transactions.
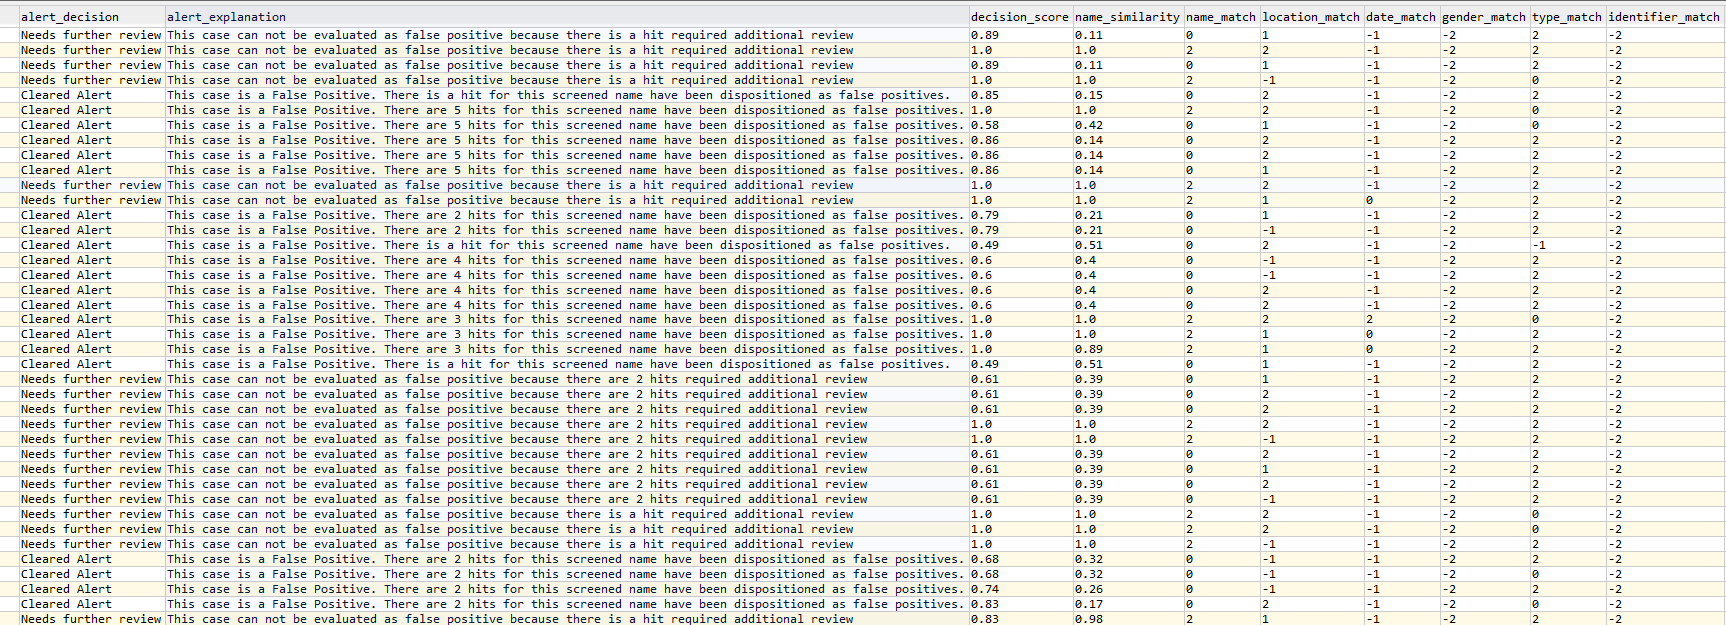
Set Do you want to include field matching results to CSV report? to Yes to include field-matching data. The QC report then contains the following columns:
Set Do you want to generate input compatible QC report? to Yes to generate input-compatible QC reports. When you run the Names Screening QC Report Business Process, the QC report and format files are generated and saved to the configured S3 directory.
infoOnce the QC report and the corresponding format file are generated, you can use them to rerun the Business Process. As both files are saved in the same directory, make sure you can clearly distinguish the QC report file(s) from the format file.
Set Do you want QC report generated automatically? to control how QC reports are produced:
Select Yes for the Names Screening QC Report Business Process to run as part of the core Names Screening Business Process and generate a QC report for all transactions created by the core Business Process.
Select No for the Names Screening QC Report Business Process to run manually and generate a QC report. In this case, configure the parameters below:
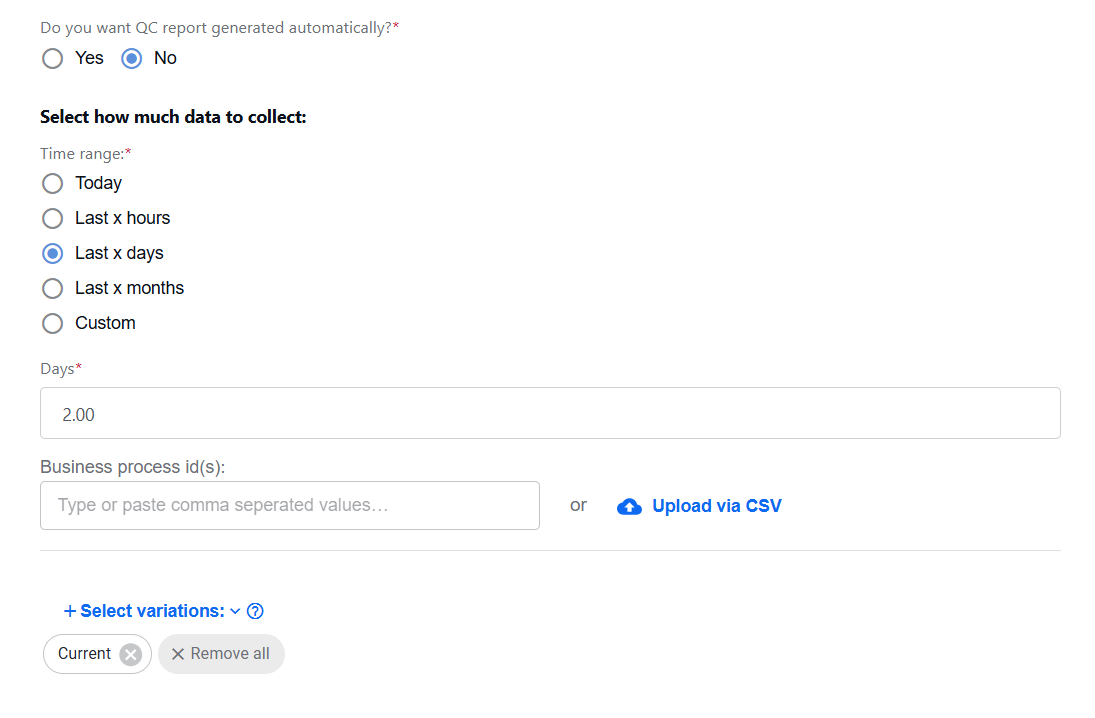
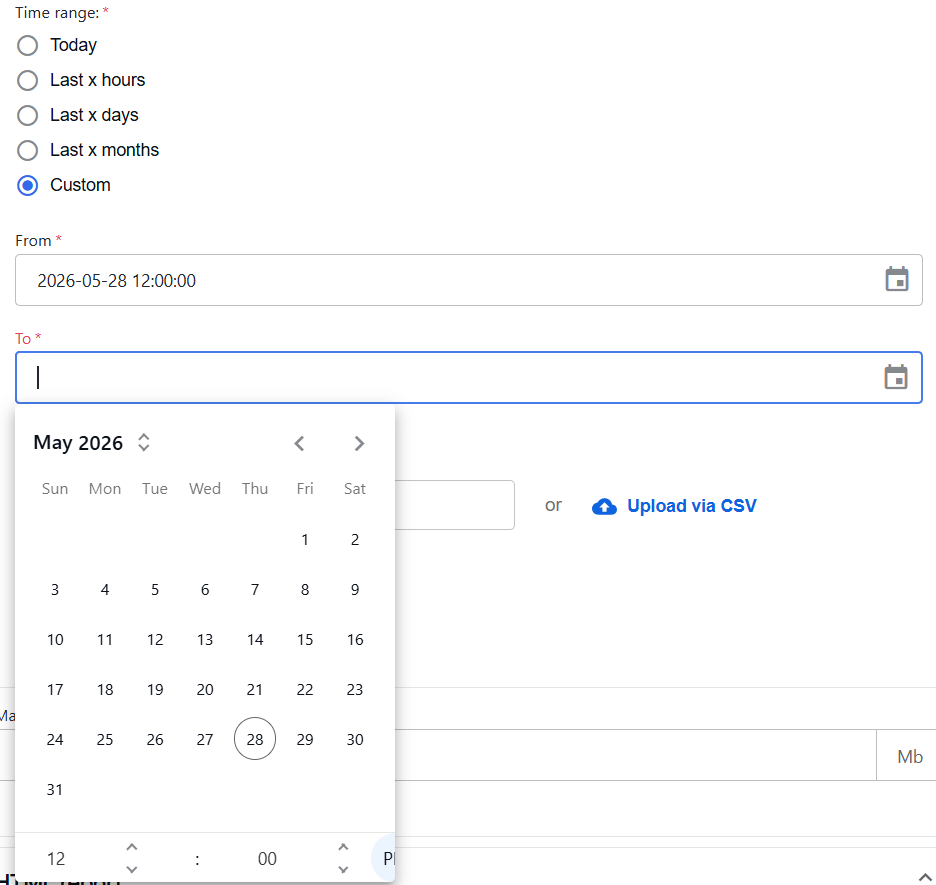
Select how much data to collect (time range):
Today includes transactions from the current day.
Last X hours includes transactions from the past X hours. If
0is provided, the range starts at the beginning of the current hour.Last X days includes transactions from the past X days. If
0is provided, the range starts at the beginning of the current day.Last X months includes transactions from the past X months. If
0is provided, the range starts at the beginning of the current month.Custom includes transactions within the specified From and To timestamps.
In the Business process id(s) field, enter the UUIDs of the Business Processes to include their transactions in the QC report. Paste comma-separated values or upload a CSV file using the Upload via CSV option.
In Select variations, choose which Business Process variations to include. You can select all variations or search for specific ones. By default, the current variation is selected, meaning the report is generated for the current variation only.
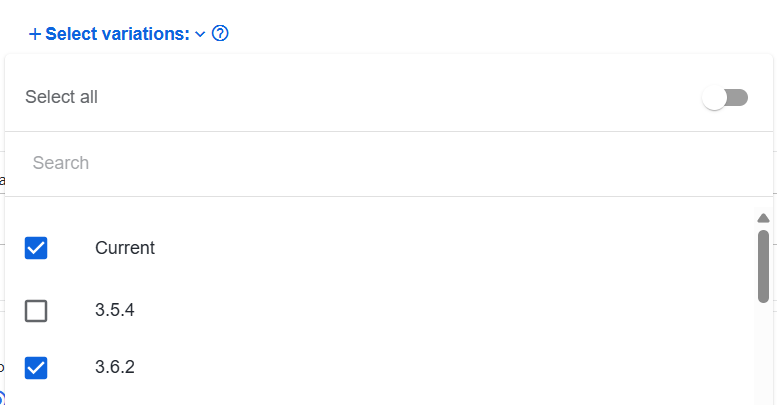
If you specify both Business Process UUIDs and variations, the Business Process UUIDs take priority.
HTML report settings
To configure HTML report settings, complete the following steps:
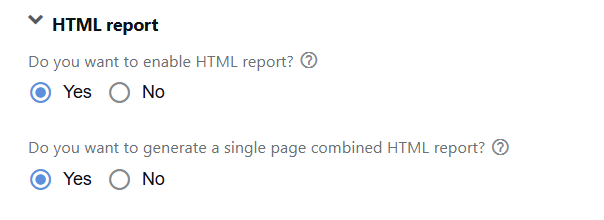
Set Do you want to enable HTML report? to Yes to generate an HTML report for each transaction.
Set Do you want to generate a single page combined HTML report? to Yes to generate a single-page combined HTML report.
Report location settings
These settings apply to both QC (CSV) and HTML reports:
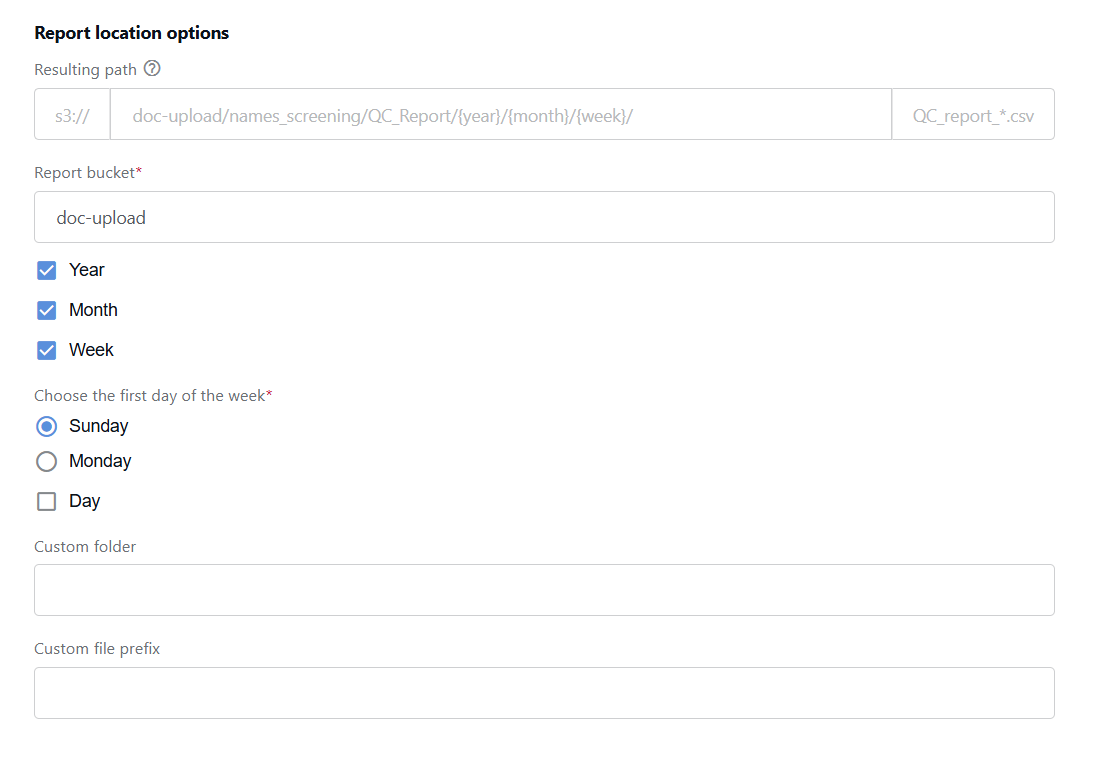
In Resulting path, define where reports will be saved. The field shows a sample path format:
s3://doc-upload/names_screening/QC-Report/{year}/{month}/{week}/QC_report_*.csvA similar folder structure is used for HTML reports.In the Report bucket field, specify the MinIO S3 bucket where the reports will be saved. The default is
doc-upload.Select which date-based folders to include in the resulting path:
Year includes the year, for example,
2025or2026.Month includes the month, for example,
JulyorAugust.Week includes the week of the month, for example,
week1orweek2. Choose the first day of the week: Sunday or Monday.Day includes the day of the month, for example,
01or22.
In the Custom folder field, add an additional folder name to further organize reports, for example, to separate outputs by variation. Depending on your configuration, this folder can appear before or after the date-based folders.
In the Custom file prefix field, add a prefix to generated report filenames to support file sorting or easier identification.
The Custom folder and Custom file prefix fields accept only letters, numbers, underscores (_), and hyphens (-). Each value can be up to 25 characters long.