
Prepare for installation
Create RPA users
Before installation, the Bot Master and Bot Unit users must be created on each server that you plan to deploy and specified later in hosts.yml, in the rpa_hostnames list (see the Configure installation step). The users must meet the following requirements:
A Bot Master user must have the same username and password on all RPA servers.
A Bot Master user must be a member of the Administrators and Remote Desktop Users groups on all RPA servers.
All Bot Unit users must have the same username and password on all RPA servers.
A Bot Unit user must be a member of the Remote Desktop Users group on all RPA servers.
The number of created Bot Unit users must be specified in config.yml in the
rpa_bots_per_serverparameter, on the Configure installation) step.All Bot Unit users must have common basename and different index numbers in the end of the basename. For more information, see config.yml, section RPA.
*For example, if, in config.yml, you set
rpa\_bots\_per\_server: 2, andbot\_unit\_base\_name: BotUnit, then the following users must be present on each RPA server: BotUnit1, BotUnit2,...
To create an RPA user on the Windows server:
Connect to the remote Windows server via Remote Desktop, or any other software, as a user with the Administrator's privileges.
Run PowerShell as Administrator.
In PowerShell, run the following commands to create a Bot Master user and add it to groups:
net user BotMaster <bot-master-pass> /add
net localgroup "Administrators" BotMaster /add
net localgroup "Remote Desktop Users" BotMaster /add
Here,
<bot-master-pass>is the password for the Bot Master user.In PowerShell, run the following commands to create the Bot Unit users and add them to groups:
net user BotUnit1 <bot-unit-pass> /add
net localgroup "Remote Desktop Users" BotUnit1 /add
Here,
<bot-unit-pass>is the password for the Windows Bot Unit user.
Prepare the MS SQL Server
For Workfusion Intelligent Automation Cloud installation you need to have an existing activated instance of the MS SQL server. The server must be up and running during the Workfusion Intelligent Automation Cloud installation.
MS SQL Server must run in SQL Server and Windows Authentication mode:
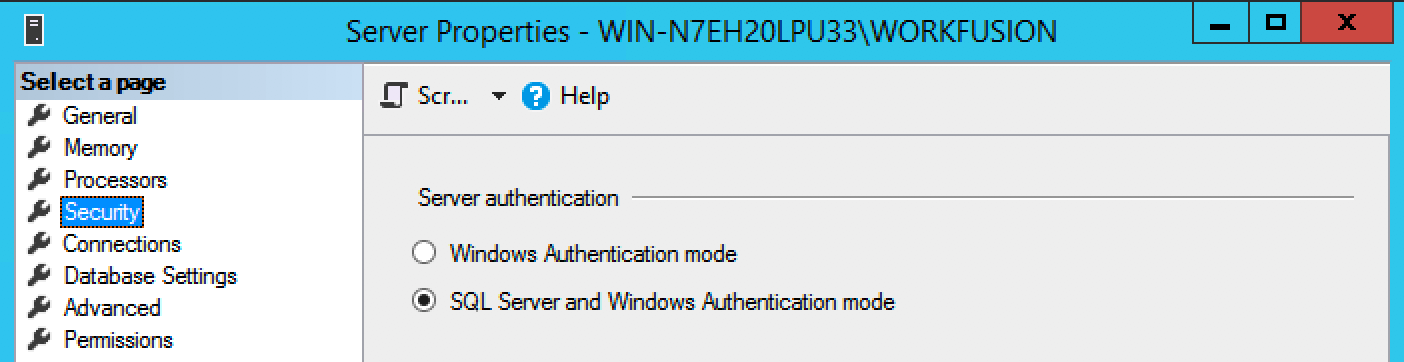
To prepare a MS SQL server:
Create the <mssql_db_name> database, and specify the database name. For other options you may use the default values.
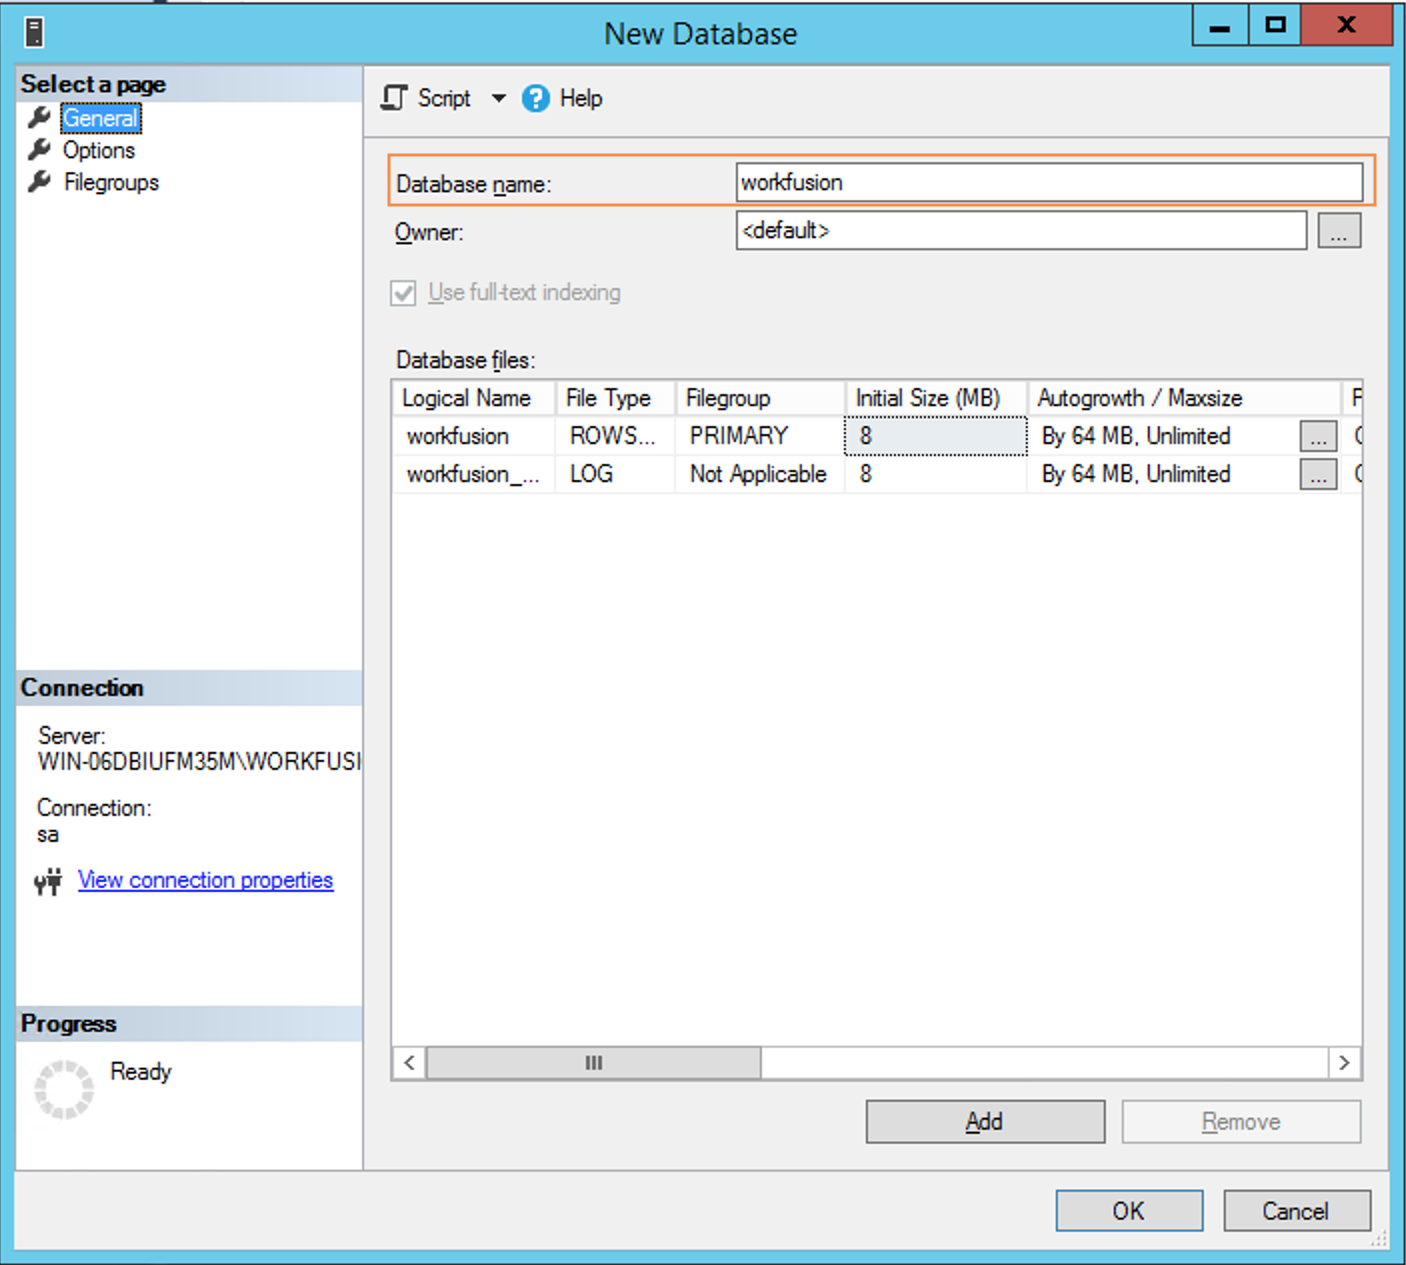
Create the <mssql_dba_user> owner with the full-access permissions for the <mssql_db_name> database. This user must be later specified in config.yml.
Note: for all logins, the following password policies are applied:
- Allowed special symbols for db password for monitoring tools: @#^*():,.}<>/
- Allowed special symbols for db password for the Analytics component: @#^*():,.;}[]/
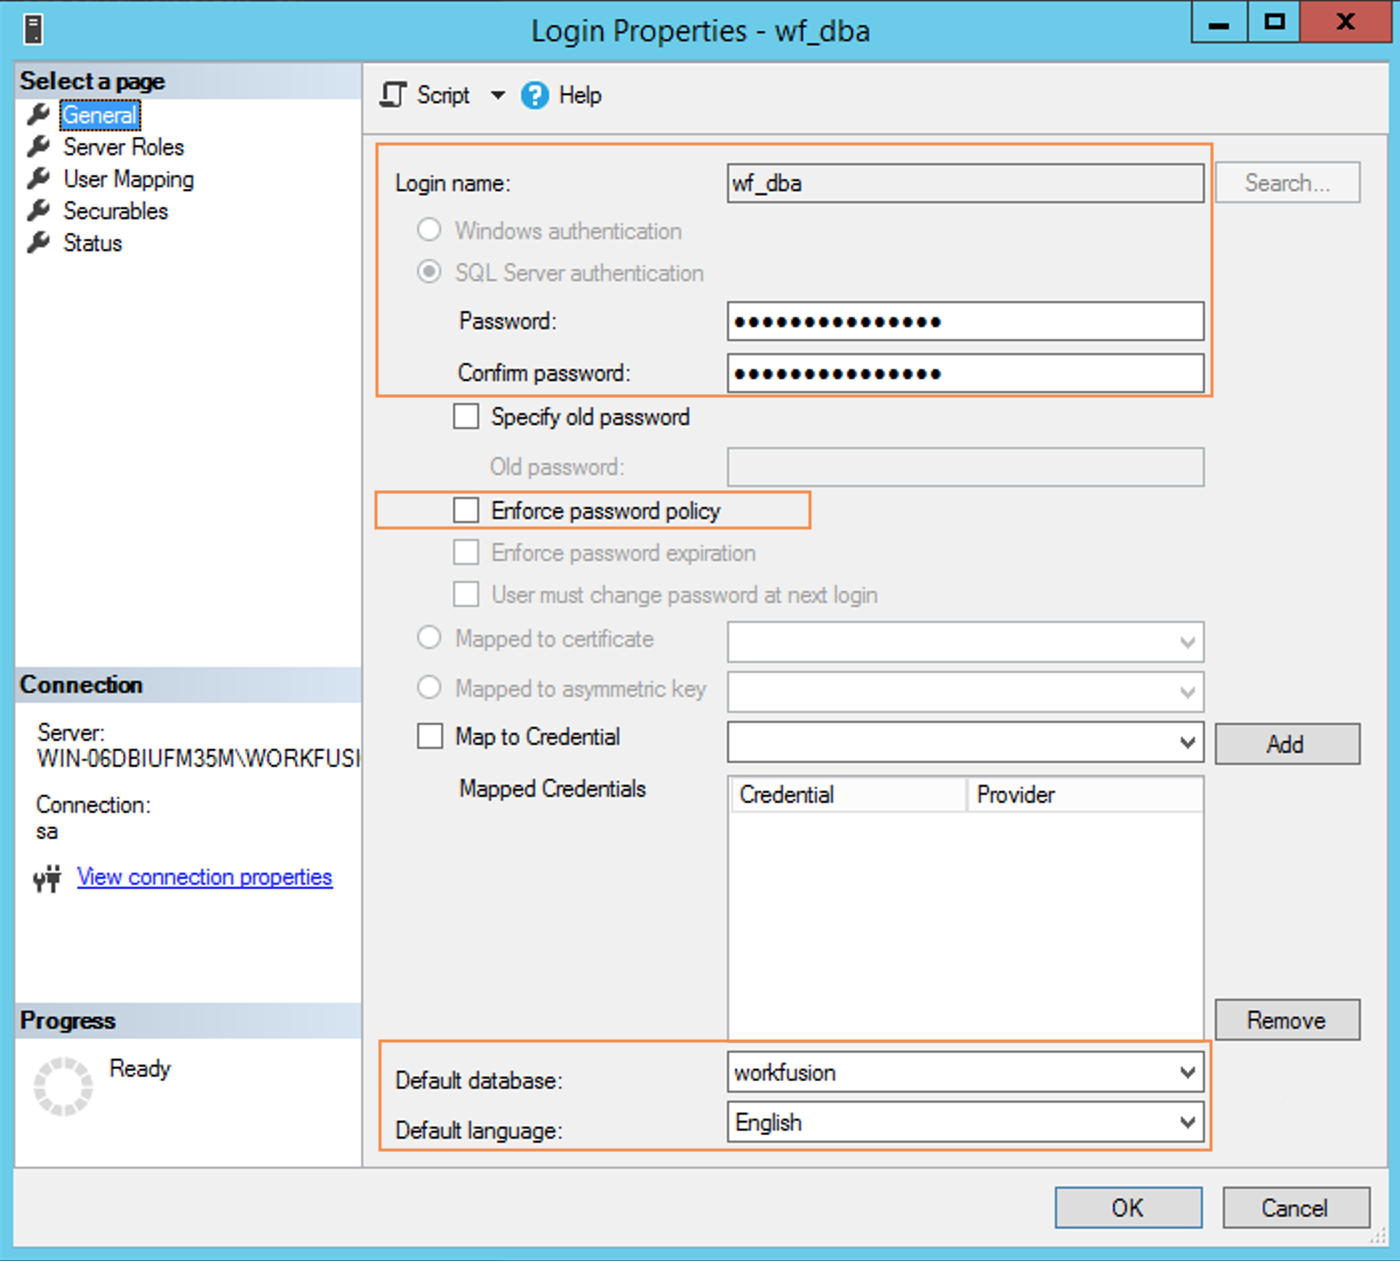
To create <mssql_dba_user>:
On a MS SQL server, create the mssql login, specify the login name, and then make sure that the Enforce password policy check box is not selected.
In the Default database box, specify the <mssql_db_name> database, and then choose English as Default language.
In the Select a page group, click User mapping, and then select the <mssql_dba_user> check box to map the user to the <mssql_db_name> database. Leave all other options unchanged.
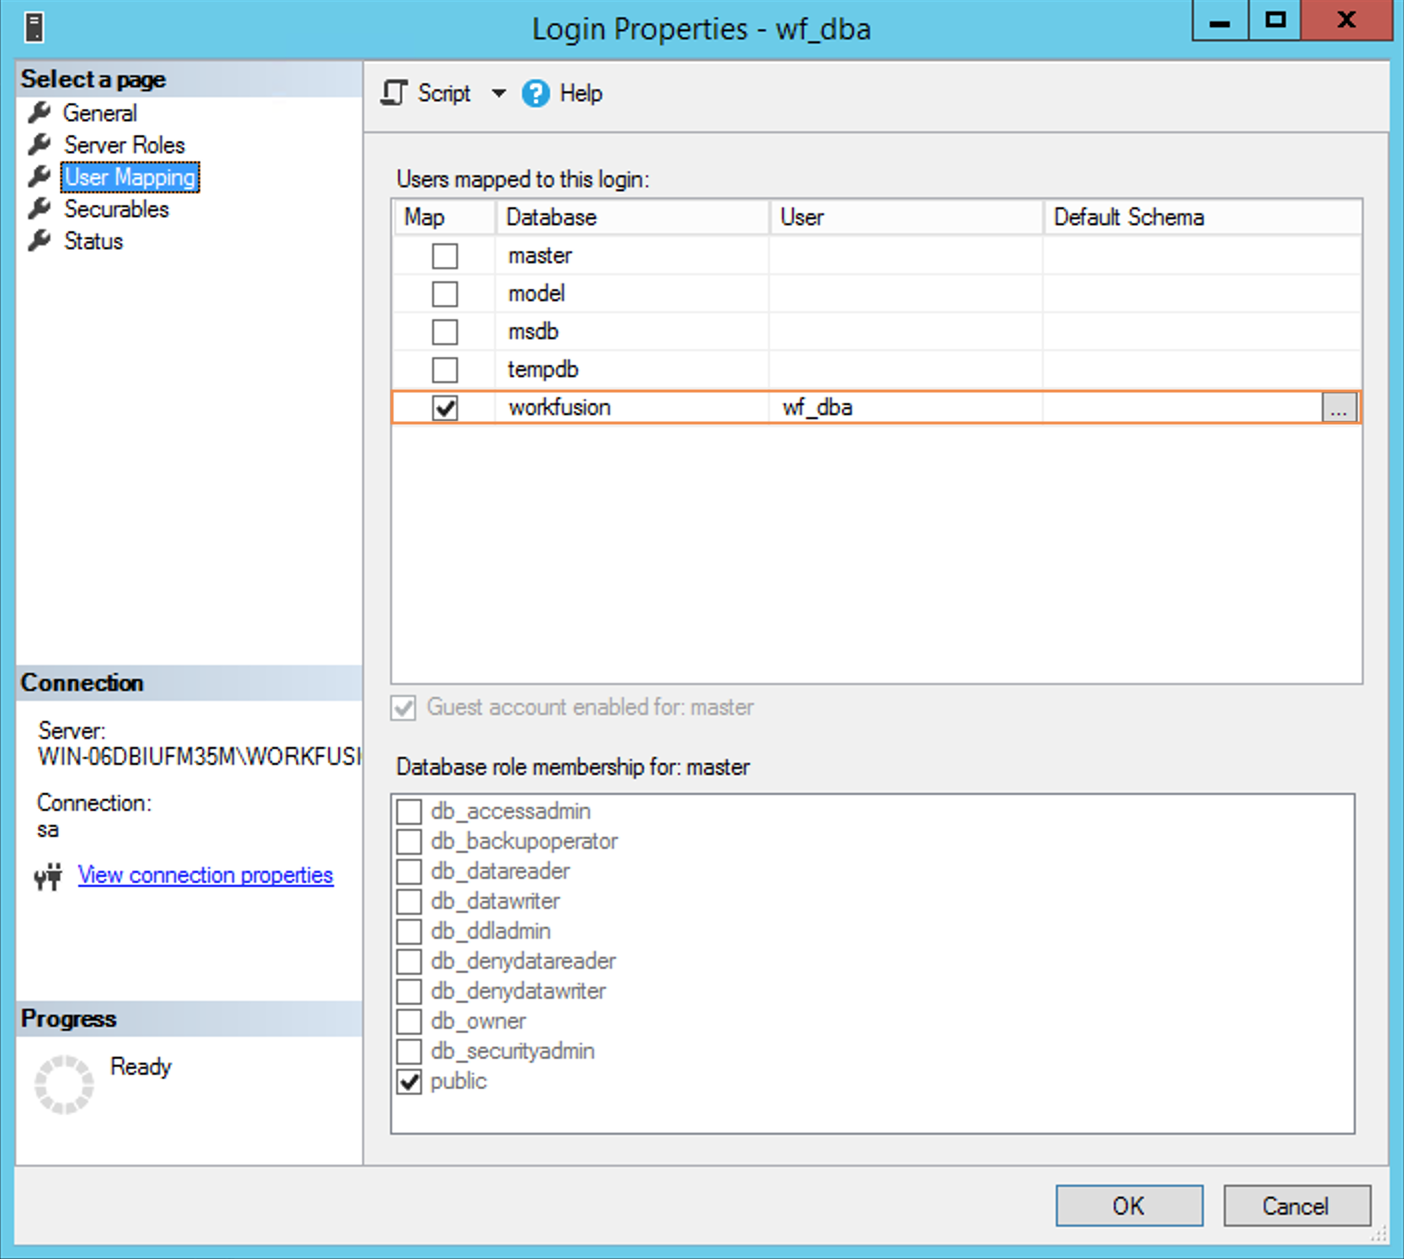
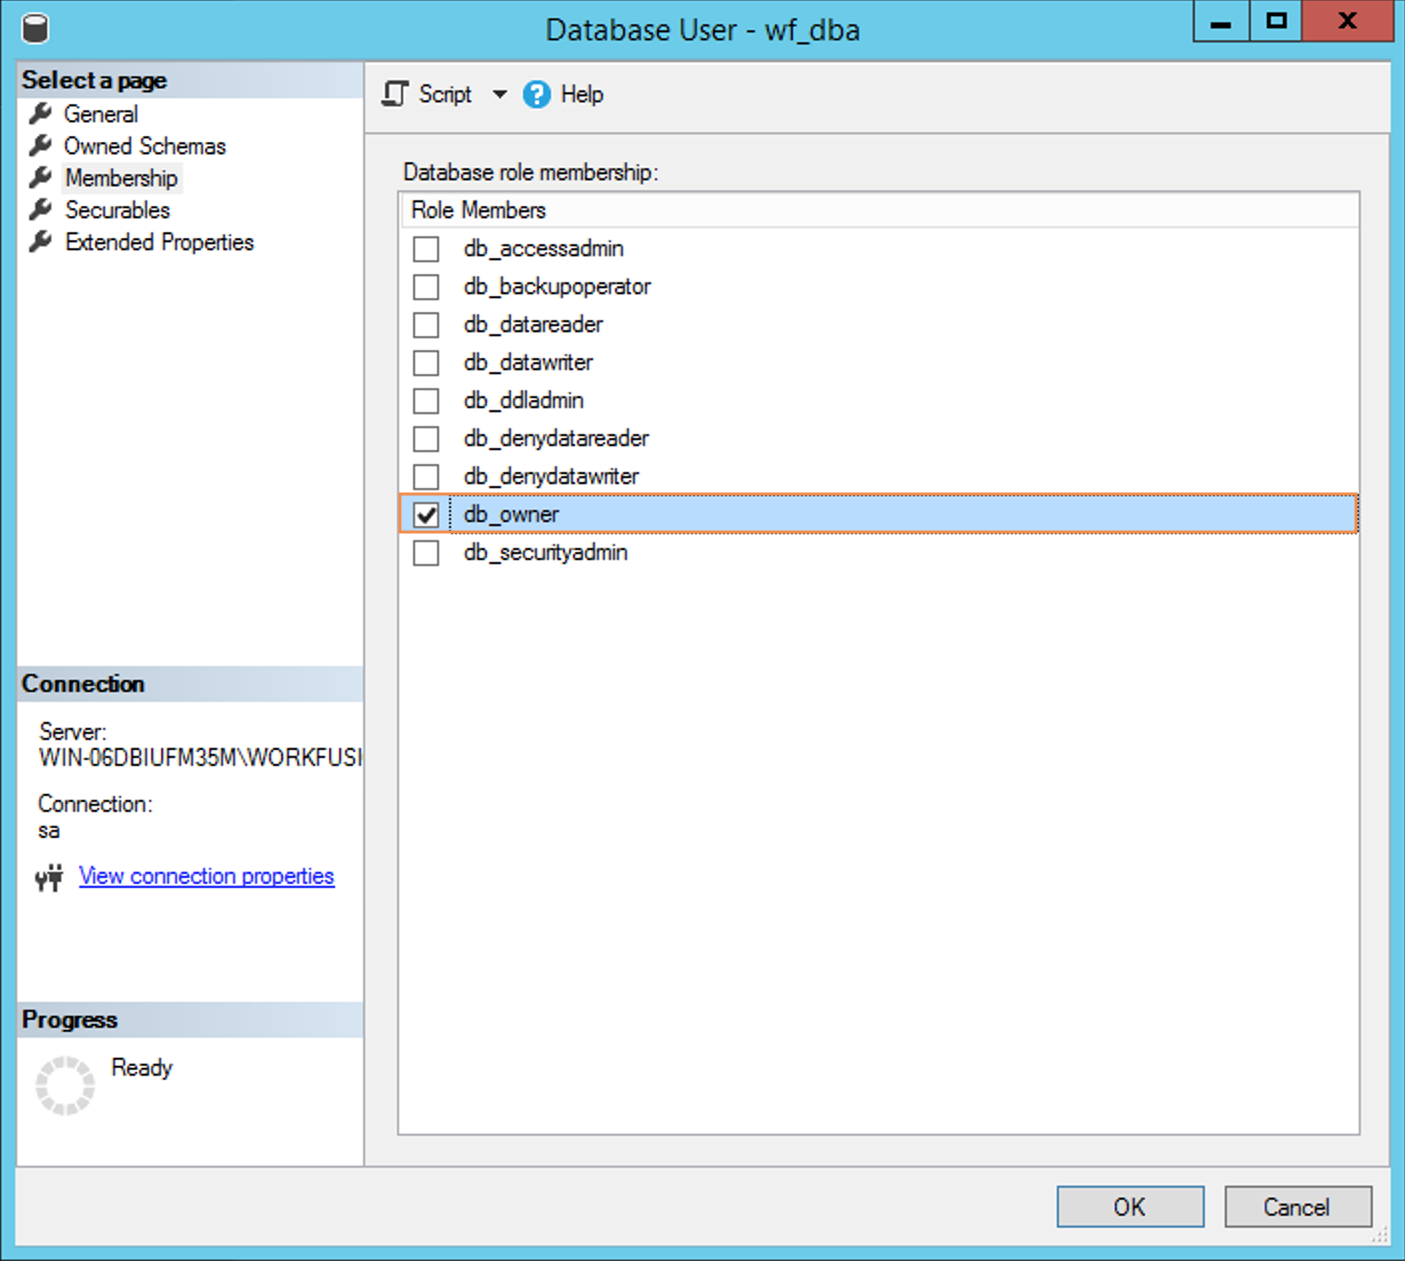
In the <mssql_db_name> database Users, select the db_owner check box to assign <mssql_dba_user> to the db_owner role.
Create the following MS SQL login names and passwords for the Workfusion components:
- mssql_dba_user
- mssql_ct_user
- mssql_ws_user
- mssql_sqc_user
- mssql_ds_user
- mssql_rpa_user
- mssql_pm_user
- mssql_dm_user
- mssql_rapi_user
- mssql_ocr_user
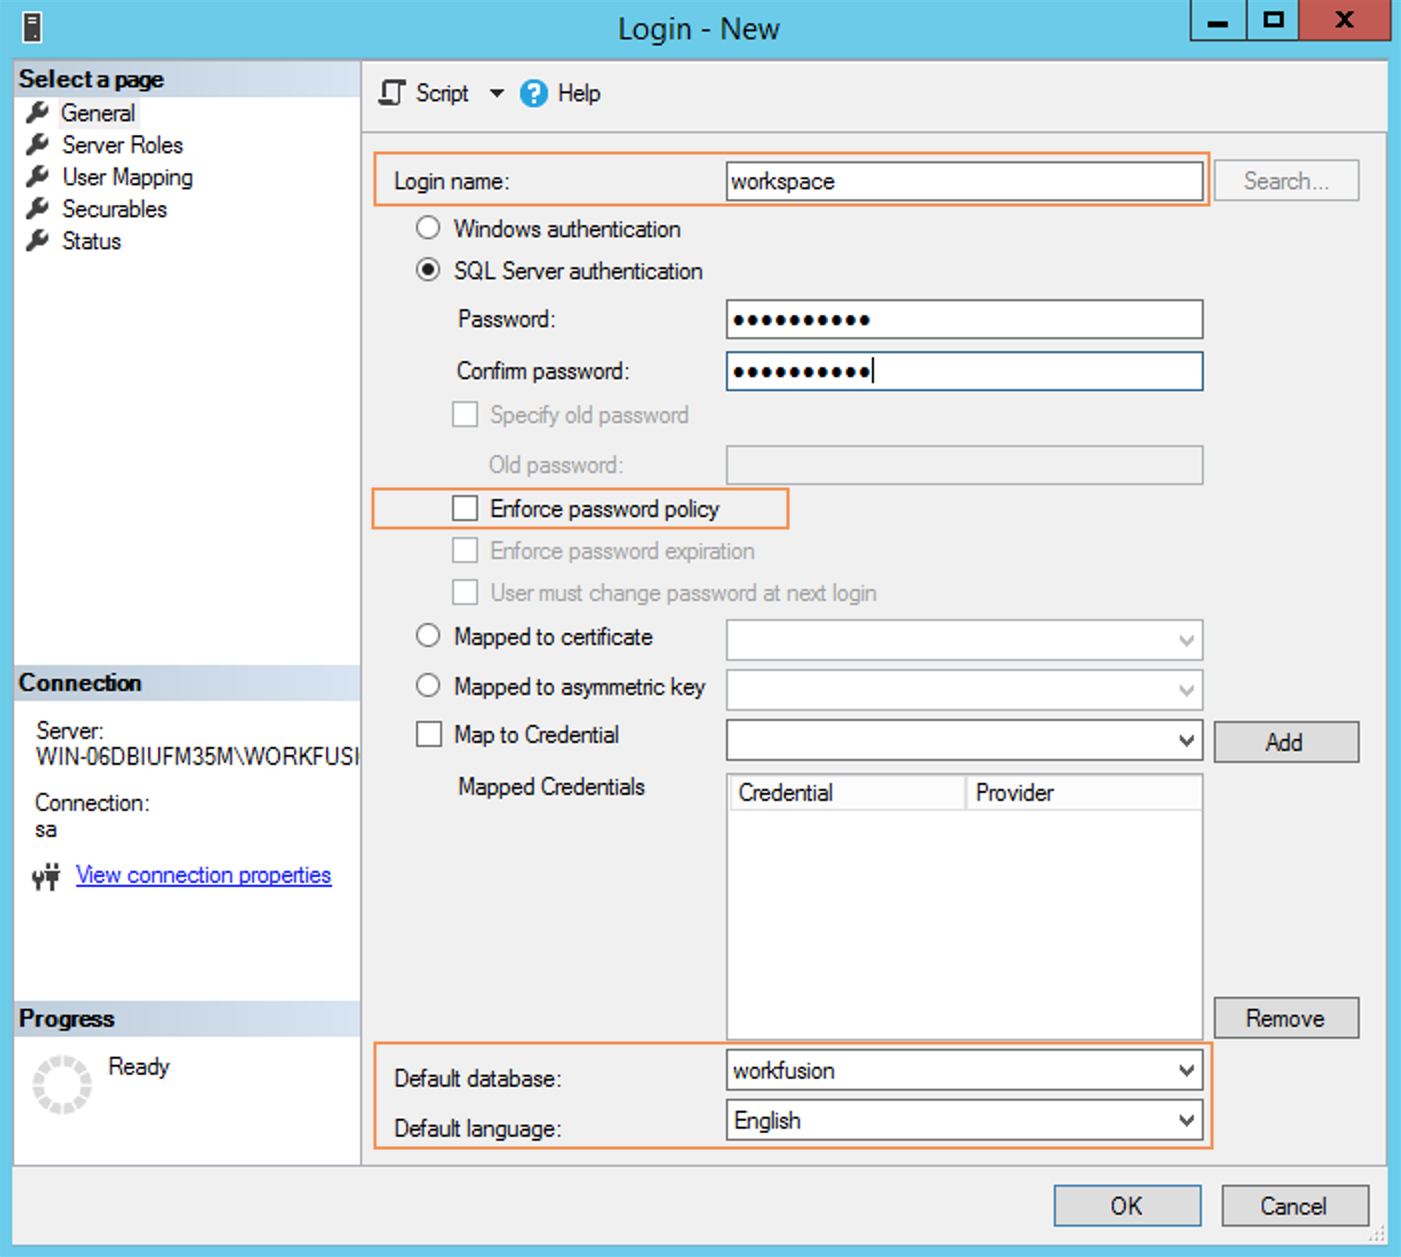
For each login, specify the following parameters:
If you use the SQL Server authentication,
- Specify the login name.
- Make sure that the Enforce password policy check box is not selected.
- In the Default database box, specify the <mssql_db_name> database.
- Choose English as Default language.
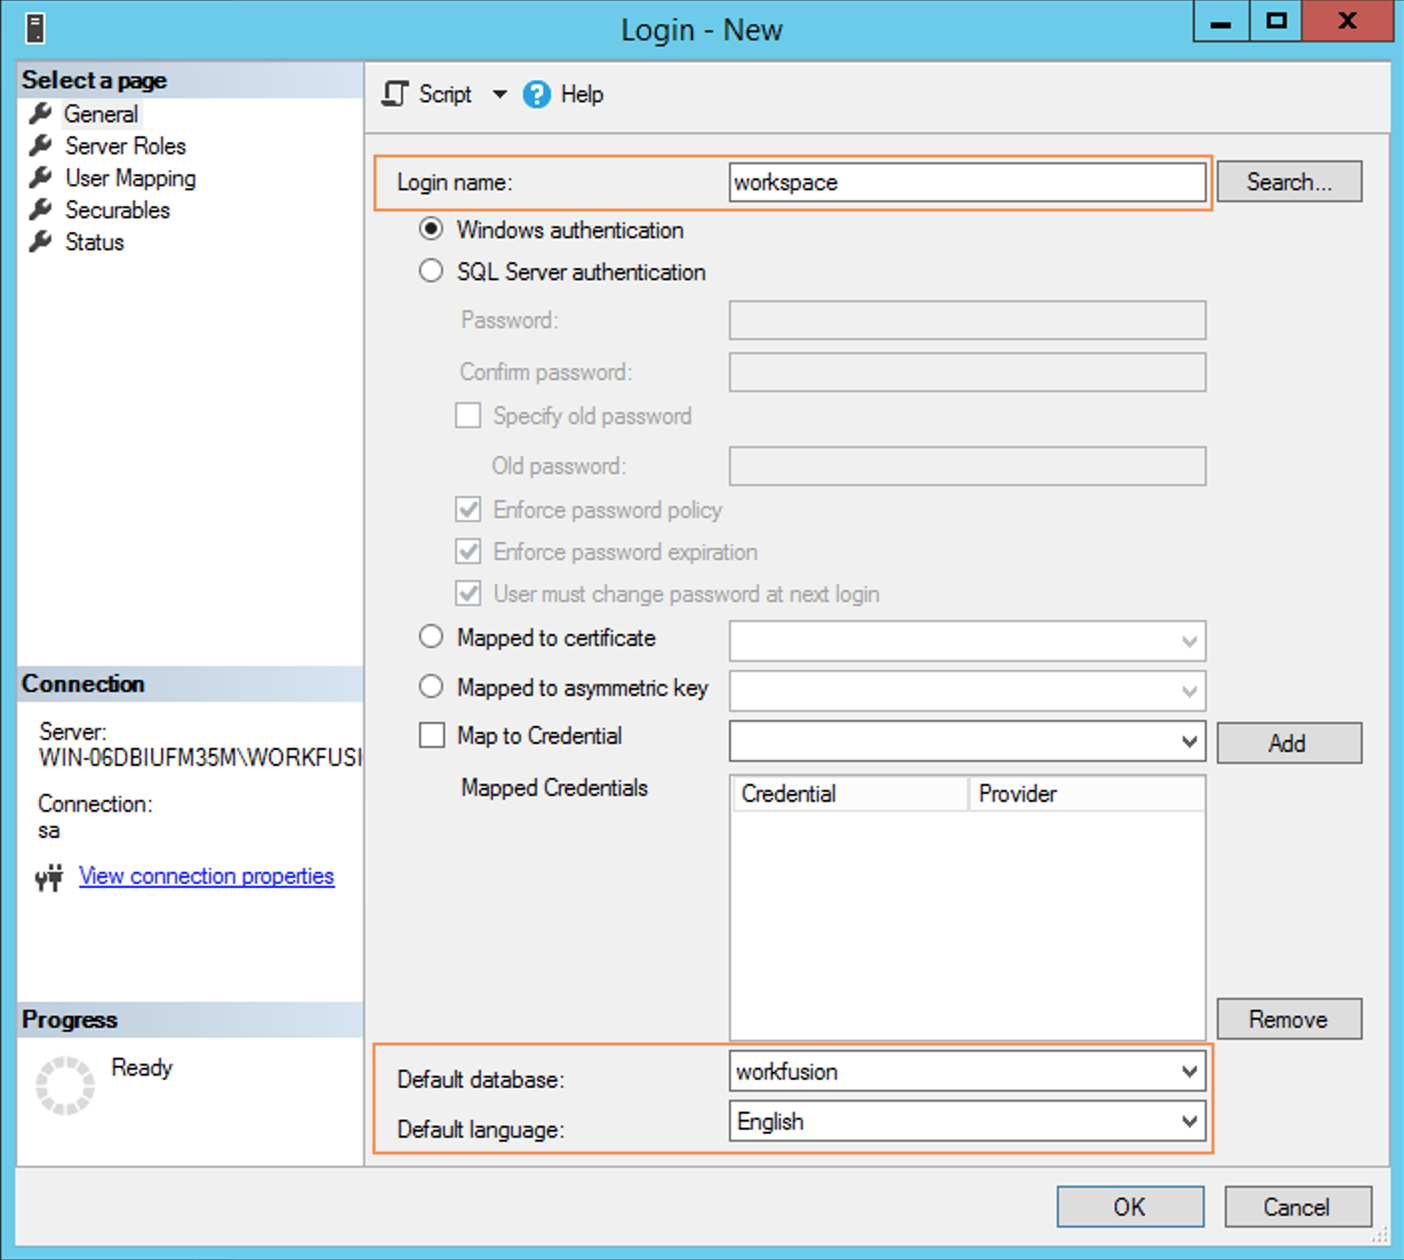
If you use Windows authentication,
- Select a corresponding login name.
- In the Default database box, specify the <mssql_db_name> database.
- Choose English as Default language.
- For other options leave the default values.
When configuring the Integration server, on the INT server, in the config.yml file, in the
#MSSQLsection, remember to specify the corresponding login names and passwords, that you have created on the previous step.
Prepare the INT Server
All further steps must be performed on the Integration server.
Extract installation packages
To extract installation packages:
Log in to the INT server as a user with the root privileges, by using Linux Terminal, Windows PuTTY, or any other SSH client:
Example: Linux Terminal
$ ssh -i <path-to-private-key.pem> <username>@<hostname.example.com>
$ sudo su - root
In the
INSTALL_DIRdirectory, create a directory for the WorkFusion installation package, for example, /opt/workfusion/wf_installer. Grant the read access for this directory to all users:$ mkdir -p /opt/workfusion/wf_installer $ chmod 0755 /opt/workfusion/wf_installerExtract the downloaded package to the
PACKAGE_DIRdirectory:$ tar -xzvf /opt/workfusion/workfusion-full-package-<version>.tar.gz --strip 1 -C /opt/workfusion/wf_installer
Configure installation
To configure installation:
On your INT Server, in the
PACKAGE_DIRdirectory, edit the hosts.yml configuration file. The vi text editor is used in the example below:$ vi hosts.ymlRefer to the hosts.yml options section for more details on each option.
On your INT Server, in the
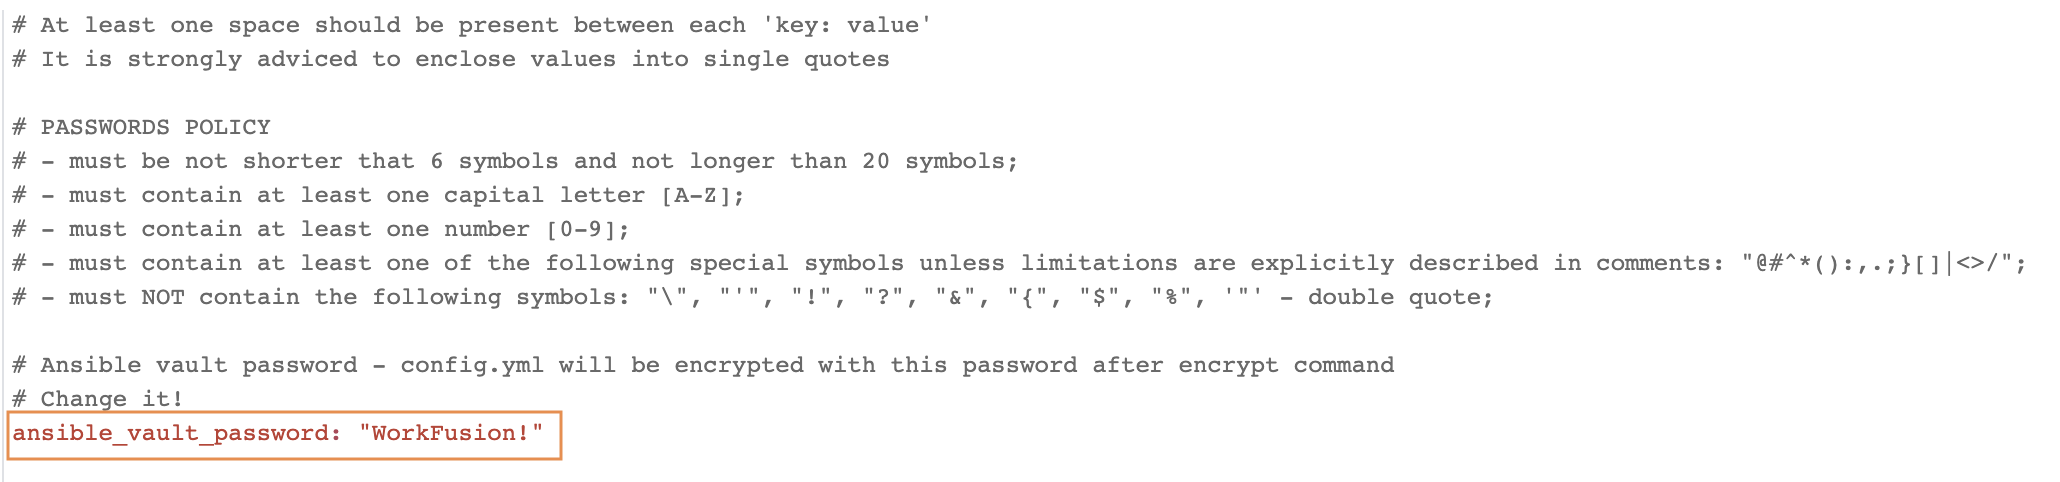
PACKAGE_DIRdirectory, open config.yml, and in theansible_vault_passwordparameter, change the password.$ vi config.ymlThe password is used for encrypting the config.yml at the following step and will be asked several times during the installation of the components. We strongly recommend to secure and memorize it. When creating passwords, make sure they are strong enough and meet the following requirements:
If needed, change the other secrets and parameters as well. After that, save the changes and close the file.
Optionally, on the INT server, run the following command to automatically generate passwords for the WorkFusion internal services according to product policies. We strongly recommend to change them manually for security reasons. Note that the command doesn't generate end-user password.
$ ./install.sh passwords generateAs a result, in config.yml, the passwords for most services, except for the following end-user ones, are created:
"wf_password"
"ldap_bind_password"
"mail_pass"
"tableau_dashboard_pass"
"tableau_automation_pass"
"windows_installation_pass"
"elk_admin_pass"
"ansible_vault_password”
"bot_relay_user_pass"
"bot_user_pass"
If you prefer to set the passwords manually, remember to use only Latin letters and allowed symbols. If needed, change other secrets and parameters, as well. After that, save and close the file.
Remember to specify the corresponding MS SQL login names and passwords, that you have created earlier, in the
#MSSQLsection.Encrypt config.yml.
$ ./install.sh encrypt configNow config.yml is encrypted via ansible-vault with the password that you have provided earlier.
If needed, you can edit the encrypted file with the following command:
$ ./install.sh edit_config intEnter
ansible_vault_password, when asked.Prepare the TLS certificates, as described in Prepare TLS certificates for installation.
Distribute the PACKAGE_DIR/certificates folder, along with config.yml files across all other Linux servers:
Create the wf_configs.tar.gz archive with these files:
$ tar czvf wf_configs.tar.gz certificates config.yml hosts.ymlCopy wf_configs.tar.gz to all other servers.
For that a python SimpleHTTPServer can be used. Start the HTTP server on any INT Server's port, which is accessible by other servers:
Example: SimpleHTTPServer is on port 9999
python -m SimpleHTTPServer 9999After running this command in a specific directory, the content of the directory can be downloaded via HTTP.
Prepare other Linux servers
The following steps must be performed on each other Linux server.
To prepare another Linux server:
Log in to a targer server, as a root user, and download wf_configs.tar.gz from the INT server:
$ cd /opt/workfusion/wf_installer

# install wget if not installed
$ yum -y install wget
$ wget http://int_hostname:9999/wf_configs.tar.gz -O wf_configs.tar.gz
Unpack configuration files and certificates:
$ tar xzvf wf_configs.tar.gz -C /opt/workfusion/wf_installer/
Install the WorkFusion license
The following step must be performed on APP Server.
To install the license, copy the provided license.properties file to the PACKAGE_DIR directory, for example, /opt/workfusion/wf_installer/license.properties.