
Install RPA Windows server
RPA deployment diagram
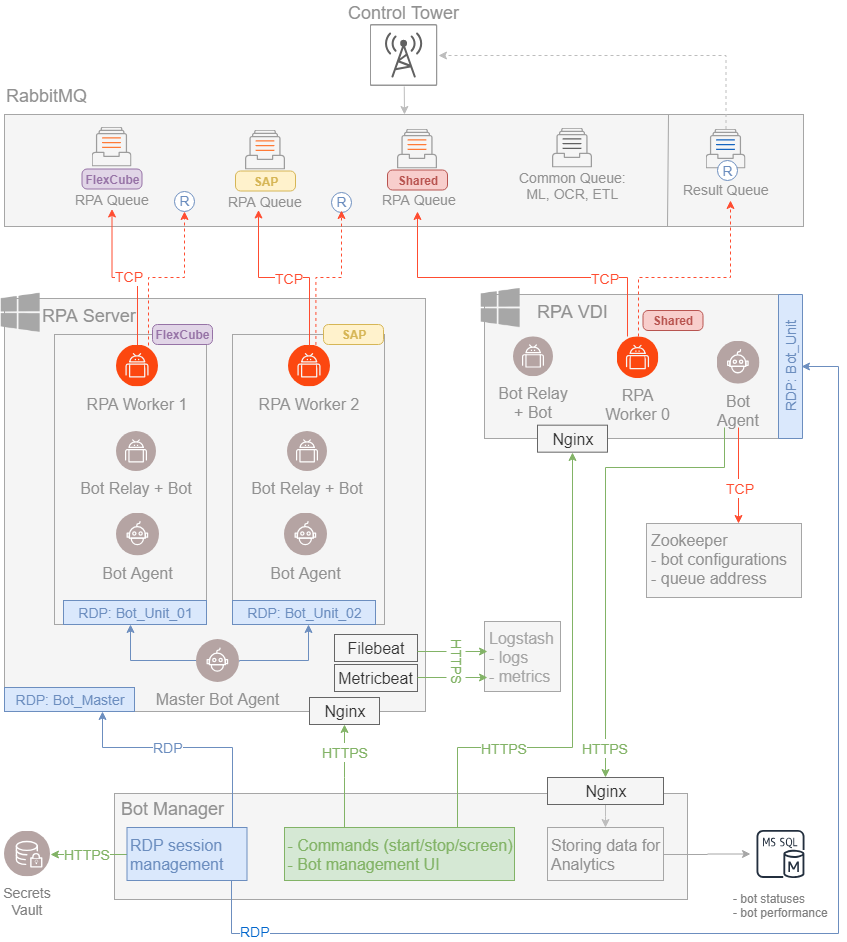
To learn more about deployment, see Deploy RPA.
RPA folder structure
As soon as you have downloaded the installer file, extract all the files from RPAInstaller-{version}.zip to any directory on your PC.
The packages inside the directory are as follows:
| Package name | Package usage |
|---|---|
| autoit | Executes AutoIT scripts. |
| bot-agent | Contains Bot Agent together with its configuration and logs. |
| filebeat | Contains Filebeat configuration and logs. |
| java | Executes Java processes for 64-bit Windows. |
| java_x86 | Executes Java processes for 32-bit Windows. |
| libs | Contains DLL files used for native work of the system. |
| logs | Contains logs of Bot Relays, Bots, and Workers. |
| metricbeat | Contains Metricbeat together with its configuration and logs. |
| nginx | Contains Nginx configuration and logs. |
| registry | Contains registry files used while installation. |
| installer | Runs machine_settings and user_settings. |
| rpa-grid | Performs configuration and runs Bot Relay and Bot files. |
| scripts | Collects logs from the package, contains scripts for logs and configuration. |
| worker | Contains executable code. |
Prerequisites
- Internet Explorer 11.
- The CA certificate is imported into Trusted Root Certificates Authorities of Local Machine's Certificate TrustStore. For more information, see Import Root or Intermediate CA to Store.
- Before configuring users, make sure your Internet Explorer browser is turned off, and no Java processes are running.
- The MS SQL, Integration, and Application Servers are installed.
- RPA Windows users are created in advance and logged in at least once.
Install RPA package
Install RPA as the Administrator user on a Windows machine.
To install the RPA package:
Download the installer file and extract all files from
RPAInstaller-{version}.zipto any folder on your PC.Launch
RPAInstaller.exeand follow the RPA Setup Wizard steps. Allow the installer to make changes to your computer.Accept the License Agreement and proceed.
Set the Destination Folder for the RPA installation and wait until the installation process is finished.
By default, the destination directory for RPA installation is
C:/RPAthat will be further referred to asINSTALL_DIR.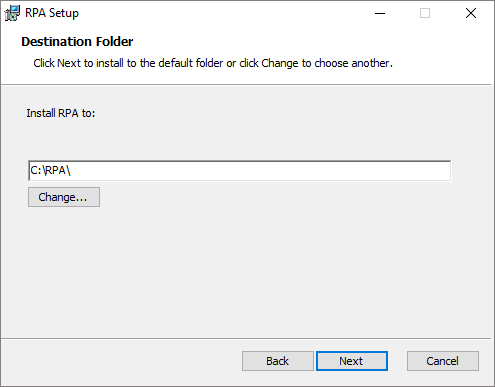
Configure users
Before the RPA Windows server installation, users must already be created and have local profiles on the RPA machine.
Run the following commands on a Windows machine, in PowerShell, as Bot Master. Bot Master is the user that triggers RPA Units.
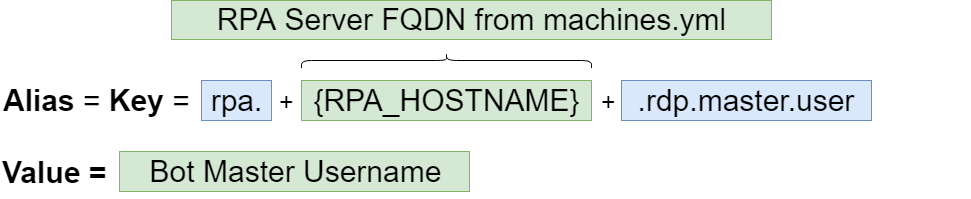
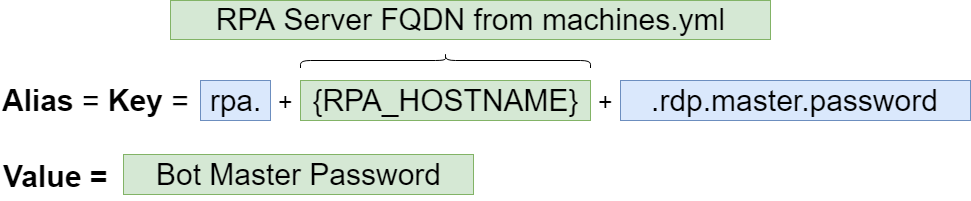
In Control Tower, register Bot Master in Secrets Vault. Add two secret entries with Alias for Bot Master user and Alias for Bot Master password. The Key box must be the same as Alias, while Value stands for either username or password. Use the following format to proceed:
- Bot Master User secret entry:
- Bot Master Password secret entry:
Grant RPA with full folder permissions to all created users–Bot Master, RPA Unit X. The RPA folder is the folder where your RPA is installed.
Make sure that Bot Master is a member of the Administrator group. For more information on configuring groups and permissions in Windows, see Configuring permissions and groups.
Enable RDS to use multiple bots on one server
Multiple RDP sessions are configured on the RPA Windows server.
To enable RDS to use multiple bots:
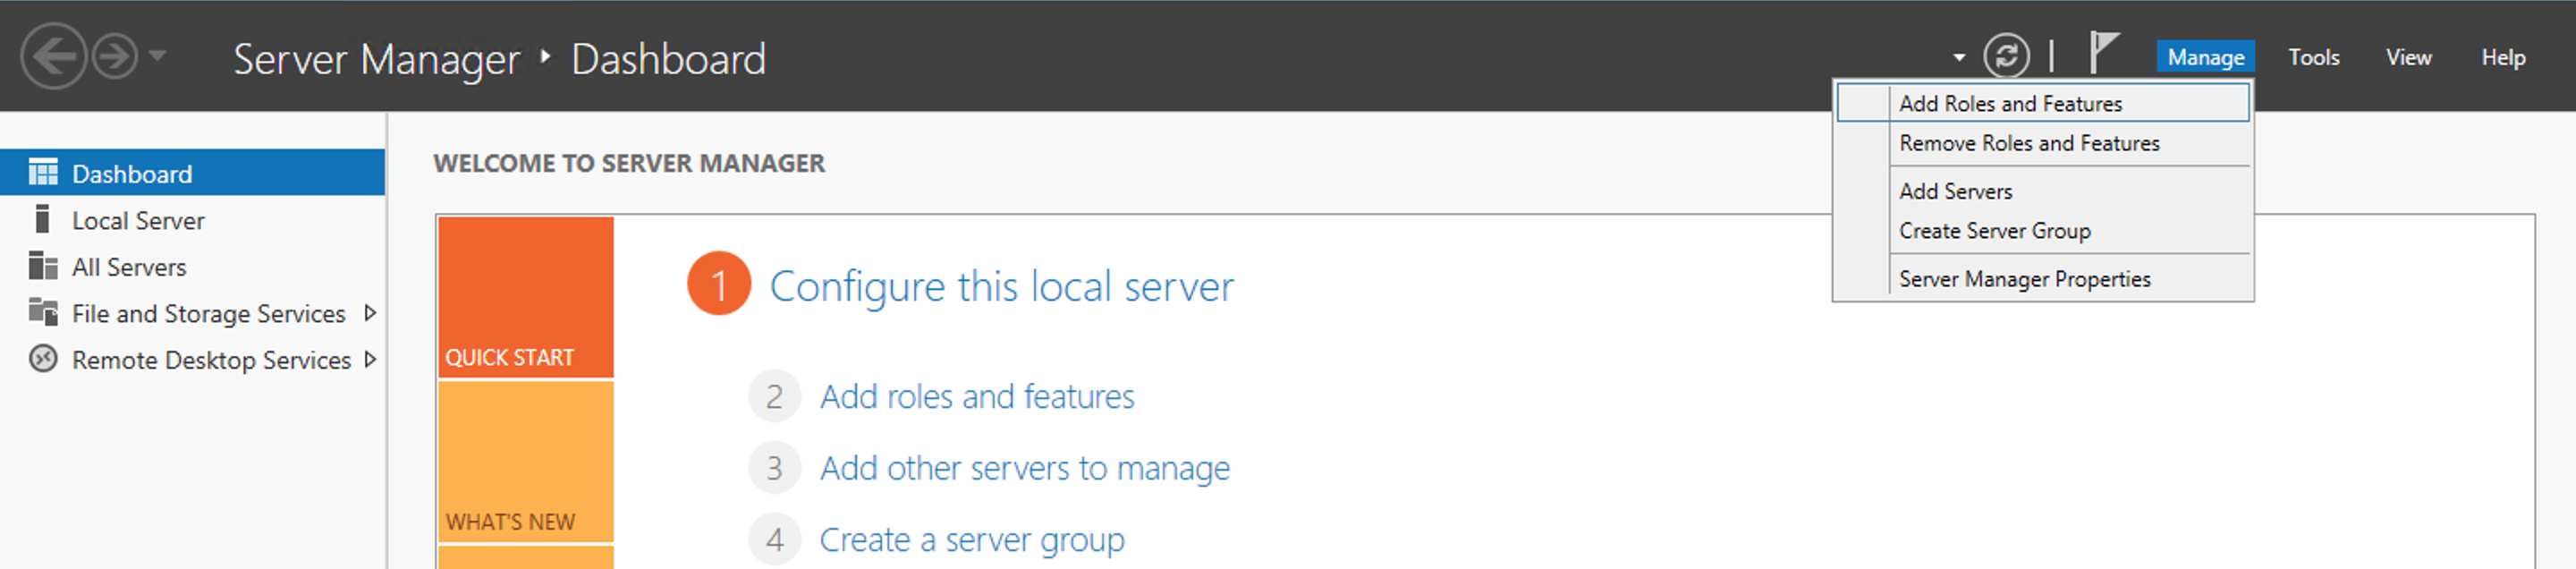
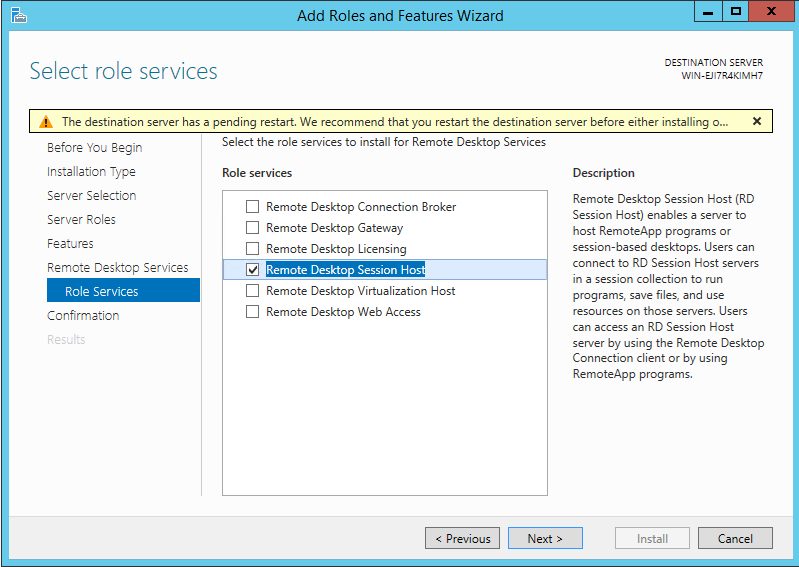
Go to Server Manager > Manage > Add Roles and Features.
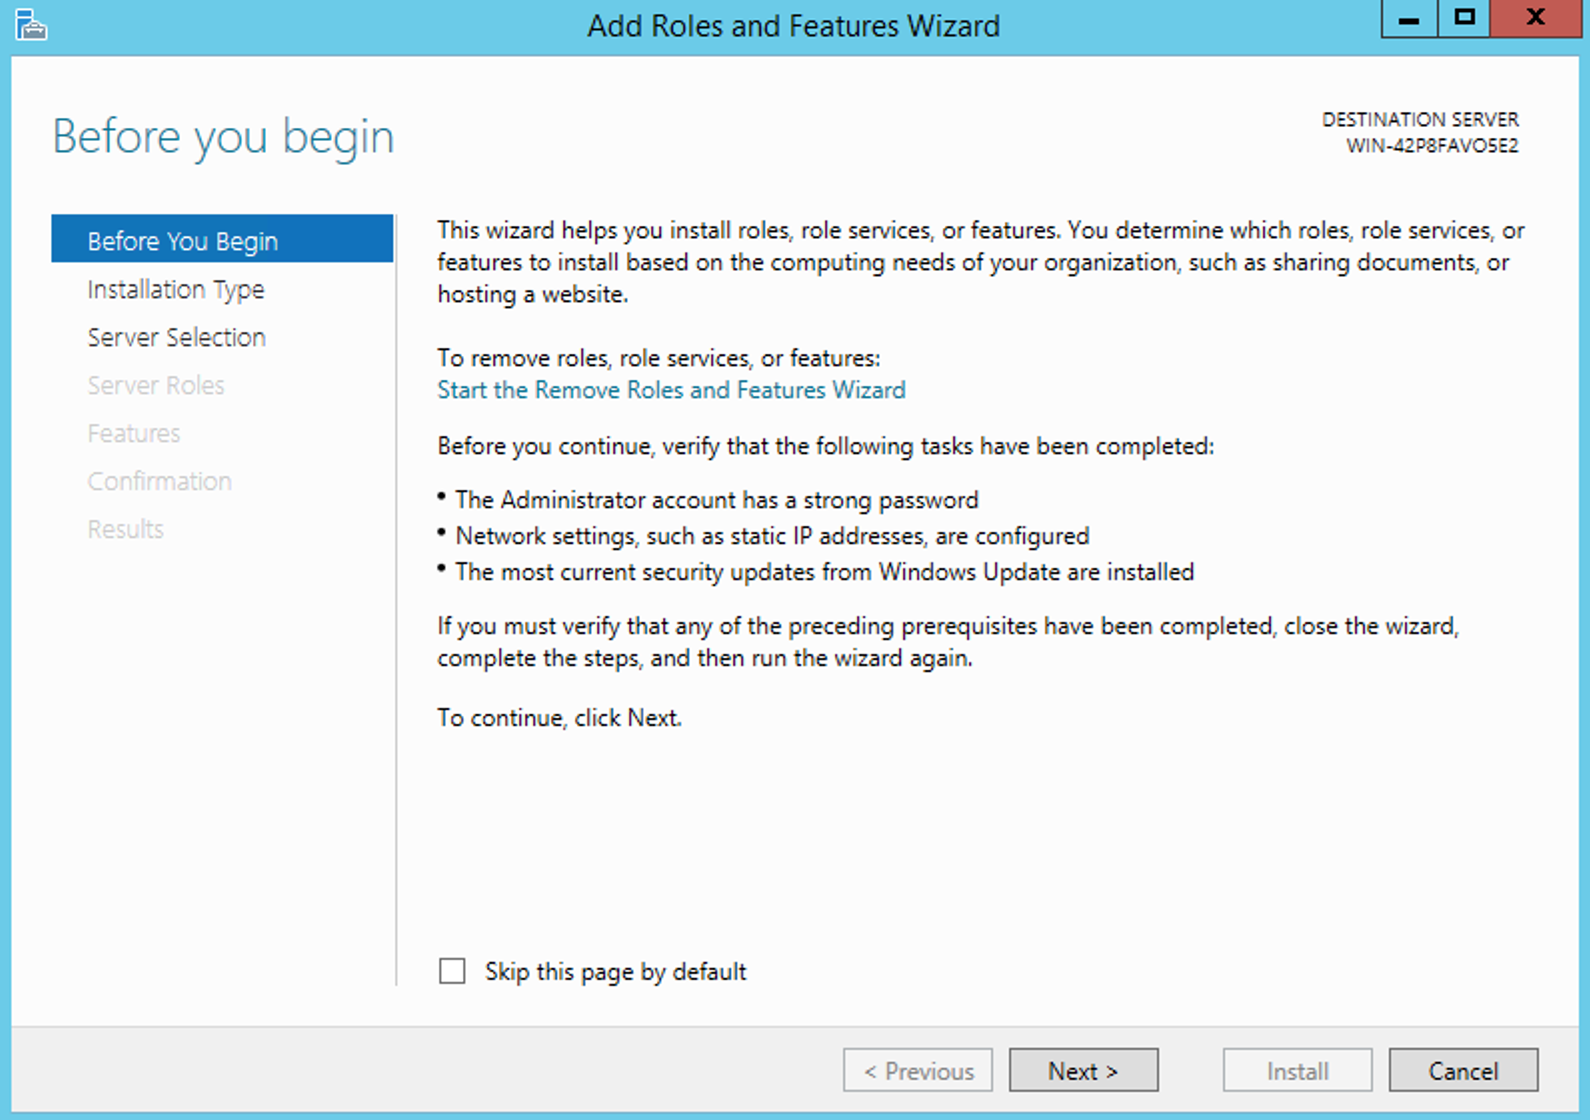
The Add Roles and Features Wizard opens.
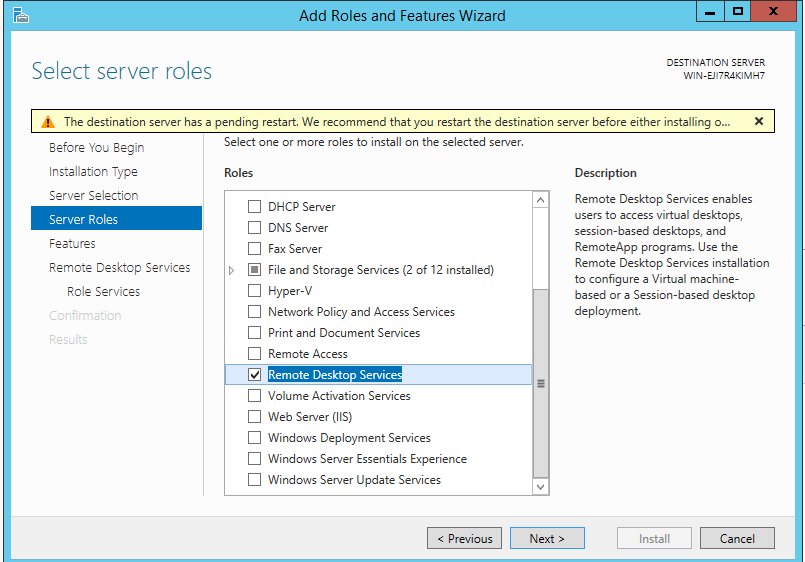
Go to Server Selection > Server Roles > Remote Desktop Services > Next.
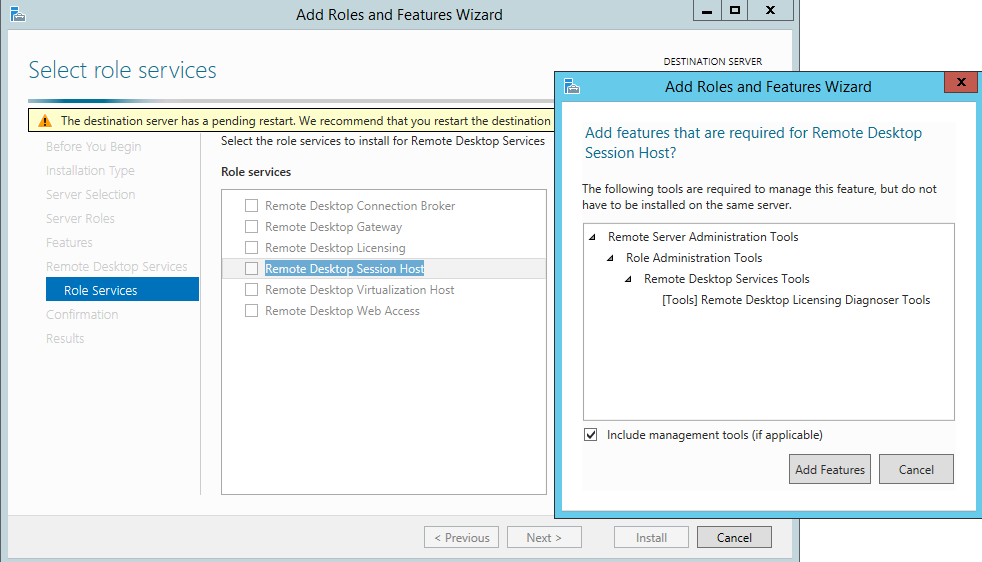
Select Remote Desktop Session Host > Next > Add Features.
Restart your machine.
Verify Internet Explorer settings (optional)
Verification is required in case Internet Explorer is used. The settings are verified for each added user. For more details, see Configuring Internet Explorer for RPA.
Configure firewall for Nginx
Nginx configuration is required to provide secure communication among RPA machines.
To provide access to Nginx, configure Windows Firewall to define a port for connection:
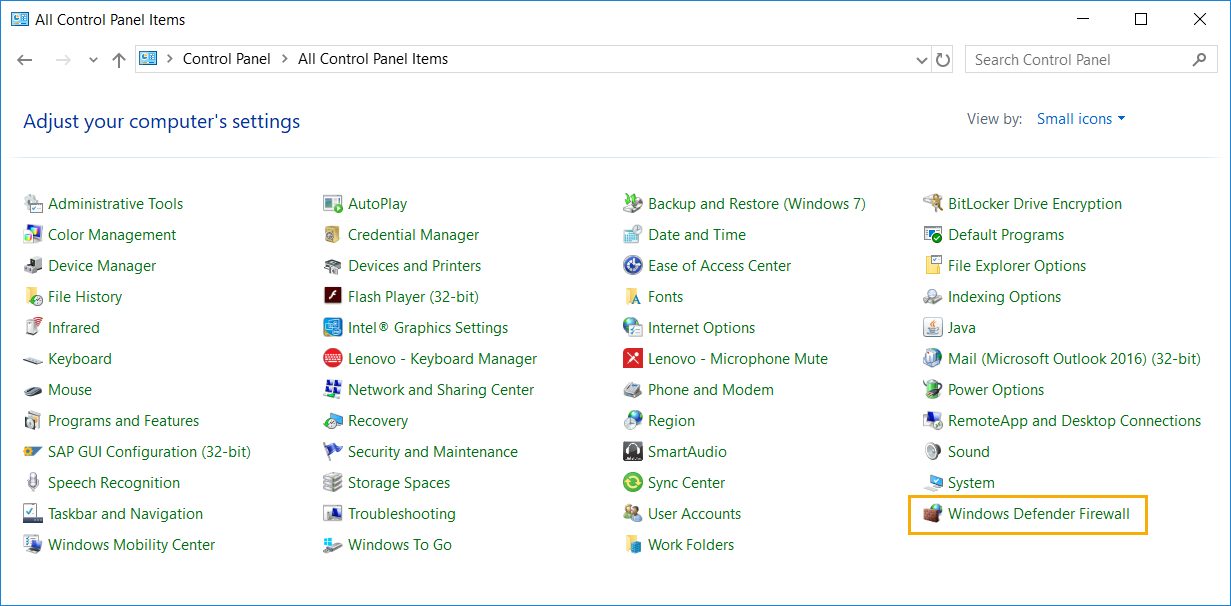
Go to Control Panel > Windows Defender Firewall.
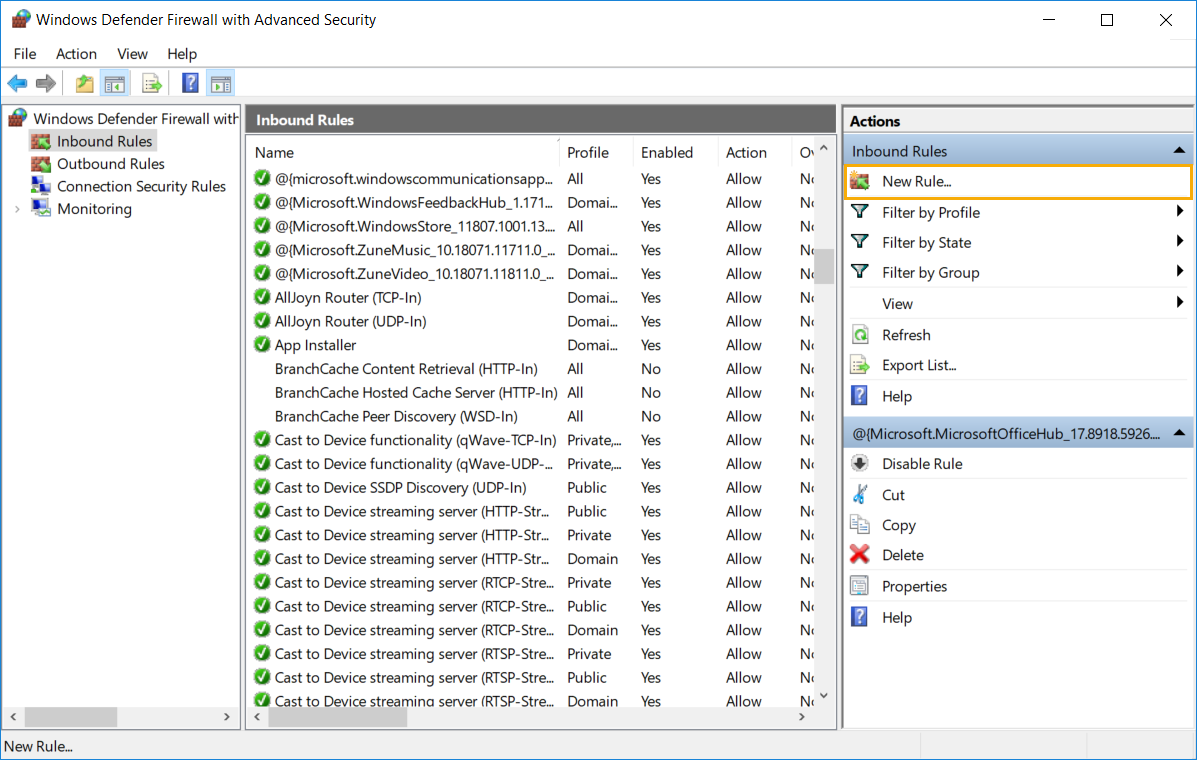
Select Advanced settings > Inbound Rules and click New rule to allow secure inbound communication for applications to use the SSL connection.
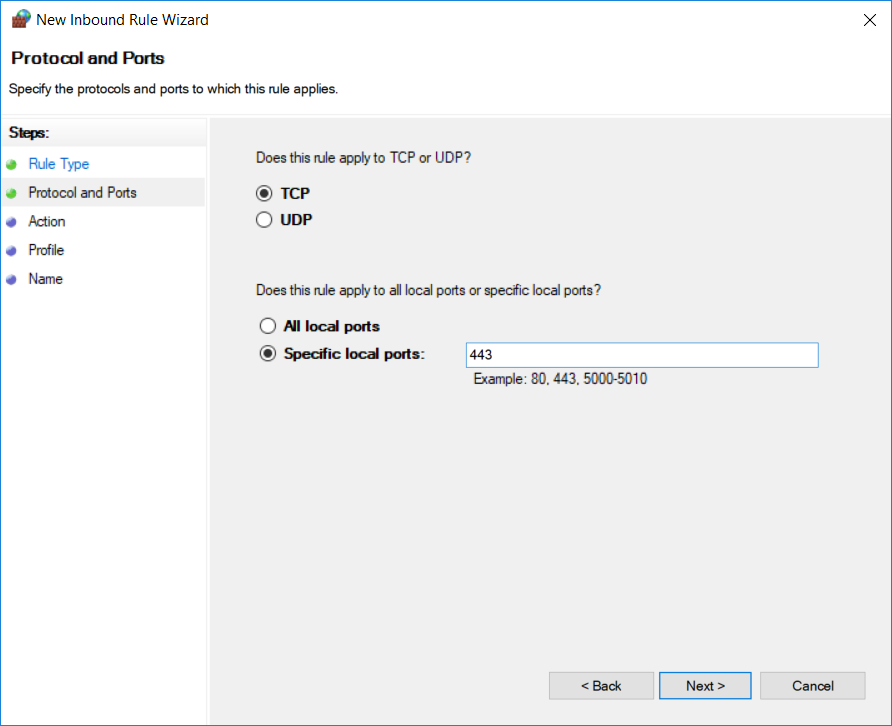
Select TCP and define the local port 443 to allow the connection.
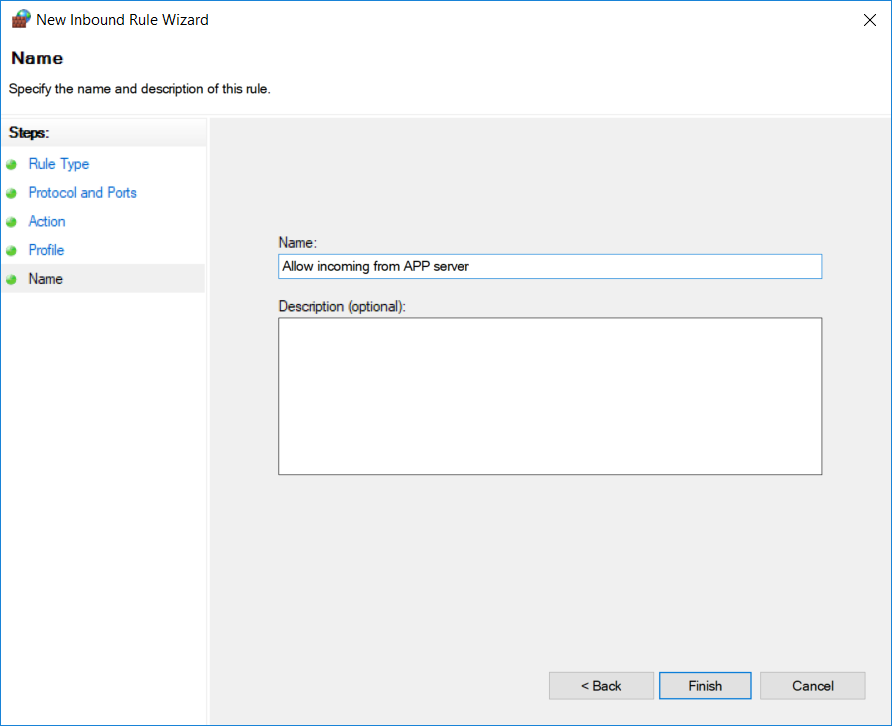
Specify the connection name and click Finish.
Generate configuration files for RPA Windows Server
The RPA Windows server configuration files are generated on the Integration server.
Log in to the Integration Server via SSH.
Change to the default user:
wfuser.su - wfuser cd /opt/workfusion/wf_installer/Mind that your default username can differ. When installing IA Cloud Enterprise, you can set up the username in the
config.ymlfile. The default value iswfuser.In the
hosts.ymlfile, specify the actual hostnames forrpa_hostnames. If there is more than one hostname, use a comma to separate them.Make sure that certificates are generated and located in
<package_dir\>/certificates.In case of multiple bots, specify the
rpa_bots_per_serverparameter and define the number of RPA Units../install.sh edit_config intRun a configuration generation command:
./install.sh generate_conf rpaConfiguration files are placed to
INSTALL_DIR/distr/win/_confs/rpa/_configs.
For more information, see Prepare RPA, OCRWIN and BI configurations.
Apply generated configuration files
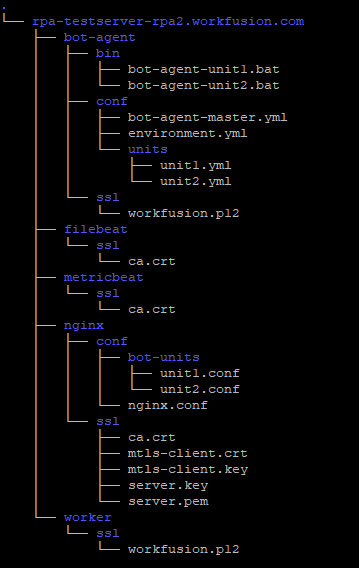
All the generated configuration files are formed in the corresponding RPA folder structure for each RPA server separately.
To apply configuration files:
Archive all the configuration files for each RPA server:
zip -r rpa-testserver-rpa2.workfusion.com.zip ./rpa-testserver-rpa2.workfusion.comCopy all the generated files from the Integration server to a required RPA server. Use the following path to the files:
INSTALL_DIR/distr/win/_confs/rpa/_configs.Unarchive and put all the generated configuration files to the RPA package home directory or
INSTALL_DIRwhile preserving the directory structure.
Schedule Bot Agent startup on logon
You can schedule tasks using the task scheduler or advanced group policies. Bot Agent startup is scheduled to autostart an RDP session (Bot Master, RPA Unit X) by Bot Manager.
To schedule Bot Agent's startup:
For one RPA Unit per server:
Open the Windows console and enter the following commands:
SchTasks /Create /SC onlogon /TN "bot-agent-BotMaster" /TR "INSTALL_DIR\bot-agent\bin\bot-agent-nordp.bat" /RU BotMaster /IT /FFor several RPA Units per server:
Configure tasks for the Bot Master user and for each RPA Unit. To do that, run the following commands:
SchTasks /Create /SC onlogon /TN "bot-agent-BotMaster" /TR "INSTALL_DIR\bot-agent\bin\bot-agent-master.bat" /RU BotMaster /IT /F
SchTasks /Create /SC onlogon /TN "bot-agent-BotUnit1" /TR "INSTALL_DIR\bot-agent\bin\bot-agent-unit1.bat" /RU BotUnit1 /IT /F
SchTasks /Create /SC onlogon /TN "bot-agent-BotUnitX" /TR "INSTALL_DIR\bot-agent\bin\bot-agent-unitX.bat" /RU BotUnitX /IT /F
Configure Bot Master autostart
Bot Master autostart is set up to run RDP sessions. To allow autostart, provide correct RPA Windows server hosts.
To configure Bot Master autostart:
On the Application server, go to the
INSTALL_DIR/bot-manager/configdirectory.In
machines.yml, provide correct RPA Windows server hosts:machines.hosts: - test1.workfusion.com - test2.workfusion.com - test3.workfusion.comRestart Bot Manager:
wfmanager restart bot-manager
Start RPA Units
Before starting RPA Units, make sure you made necessary changes. There are several ways to run RPA Units–either with Bot Manager (automatic start from the Application Linux server call) or by using Bot Agent.
It is recommended to avoid a manual start. Use the automatic start from the Application Linux server call instead.
To start RPA Units manually
Before starting the services, select Deployment architecture.
For one RPA Unit per server (VDI setup):
Run
INSTALL_DIR/bot-agent/bin/bot-agent-nordp.batto start Nginx, Bot Master, and RPA Unit. Your user session must be active to guarantee correct work.For multiple RPA Units per server (RDP-in-RDP):
- Run
INSTALL_DIR/bot-agent/bin/bot-agent-master.batto start Nginx, Unit RDP sessions in a separate RDP session.
Make sure to change the Master-Agent configuration that depends on your session's Unit count and create additional configs for RPA Units. For correct work, RPA Unit sessions must be active internally in the Master session, but the Master session can have the disconnected status.
- Run Unit agents in each Unit RDP session:
INSTALL_DIR/bot-agent/bin/bot-agent-unit{Unit_ID}.bat.
- Run
Check RPA installation
There are several ways to check the RPA Windows server installation.
To check the installation:
Make sure RPA Units are available and WebDrivers exist on the connected bots. Open the following link as any user on the RPA machine:
http://localhost:1500{unit_id}/grid/consoleOn evoking the command, view the list of available RPA Units in your browser.
To check RPA Worker, open the following link in your browser under any user on the RPA machine: http://localhost:1520{unit_id}/health.
You receive the following response:
[
  {
    "status": "UP",
    "details": {
      "rabbit": {
        "status": "UP",
        "details": {
          "version": "3.7.14"
        }
      },
      "diskSpace": {
        "status": "UP",
        "details": {
          "total": 53317988352,
          "free": 25653489664,
          "threshold": 10485760
        }
      },
      "refreshScope": {
        "status": "UP"
      },
      "zookeeper": {
        "status": "UP",
        "details": {
          "connectionString": "hostname.workfusion.com:port",
          "state": "STARTED"
        }
      }
    }
  }
]
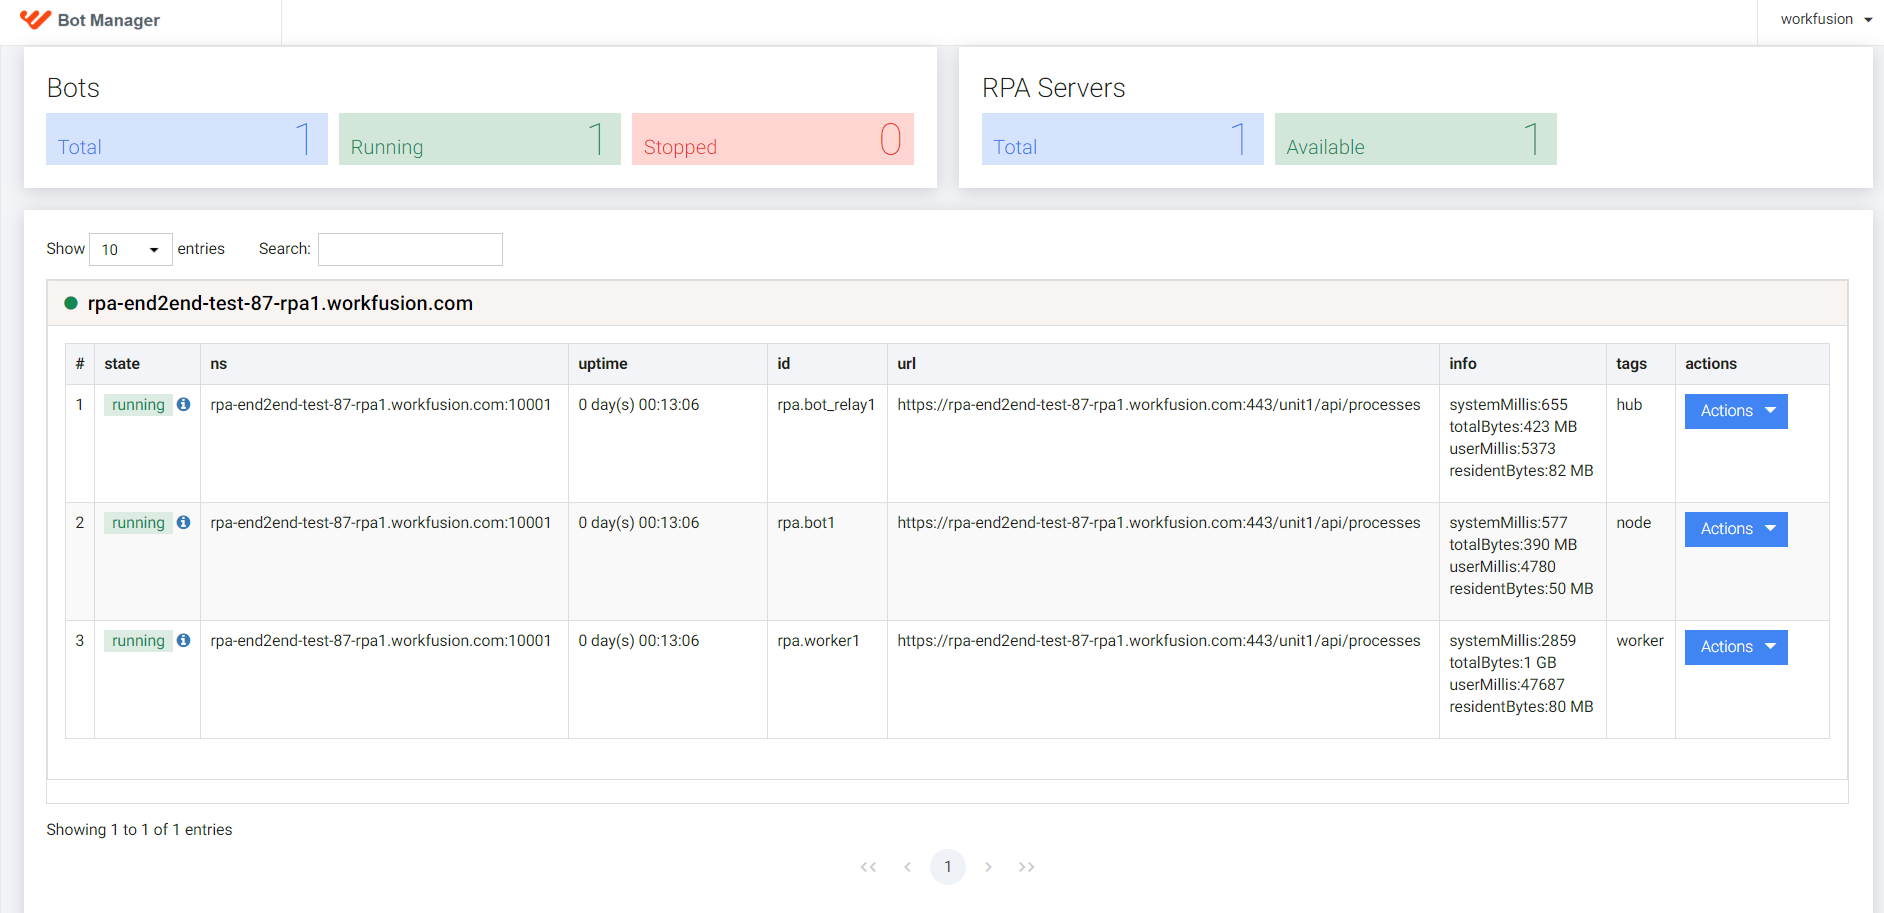
Open Bot Manager and make sure that your RPA Windows server hostname is available, and that you are able to send commands to RPA Unit components.
Run any RPA task and view logs in Kibana.